

Guides and Hosts
Add the guides and hosts who lead your trips once, then show their photo, bio, languages and certifications on any trip page, in the layout and order you choose.
Introduction
Guides and Hosts lets you show the people who lead and look after your travelers on your trip pages. Travelers see a short intro on the trip page and can open a full profile with a bio, languages, certifications, and photos before they book.
This guide covers adding guides, choosing how they look, and assigning them to trips.
Key Features & Benefits
| Feature | Benefit |
|---|---|
| One directory, many trips | Add each guide once and reuse them on any trip. Update a bio or photo in one place and every trip page shows the change. |
| Profiles that build trust | Show experience, languages, specialities, certifications, and photos so travelers know who will lead them before they book. |
| Control over who appears and in what order | Pick the guides for each trip and drag them into the order you want travelers to see. |
| Four card layouts | Match the look to your site and your team, from a single lead guide to a full crew. |
| Per-trip headings | Change the heading and description on one trip without touching the rest of your site. |
| Pause a guide without losing work | Hide a guide on all trips while they are away. Their trips stay assigned, so you can bring them back later. |
| Private contact details | Keep emails, phone numbers and emergency contacts in one place for your team. Travelers never see them. |
Prerequisites
- You have WP Travel Engine installed and activated on your WordPress site (Version 6.8.5 or more).
- You have updated WP Travel Engine to its latest version.
- You have WordPress 5.9 or more and PHP 7.4 or more on your site.
- You have installed and activated the Guides and Hosts add-on.
How to Install
See how to activate a Pro add-on license key for the full installation and activation walkthrough.
Verification
To confirm the add-on is active and working:
- Go to your WordPress Dashboard.
- Click WP Travel Engine in the left menu.
- Confirm that Guides and Hosts appears in the submenu.
- Go to WP Travel Engine > Settings > Extensions and confirm that a Guides and Hosts tab appears.
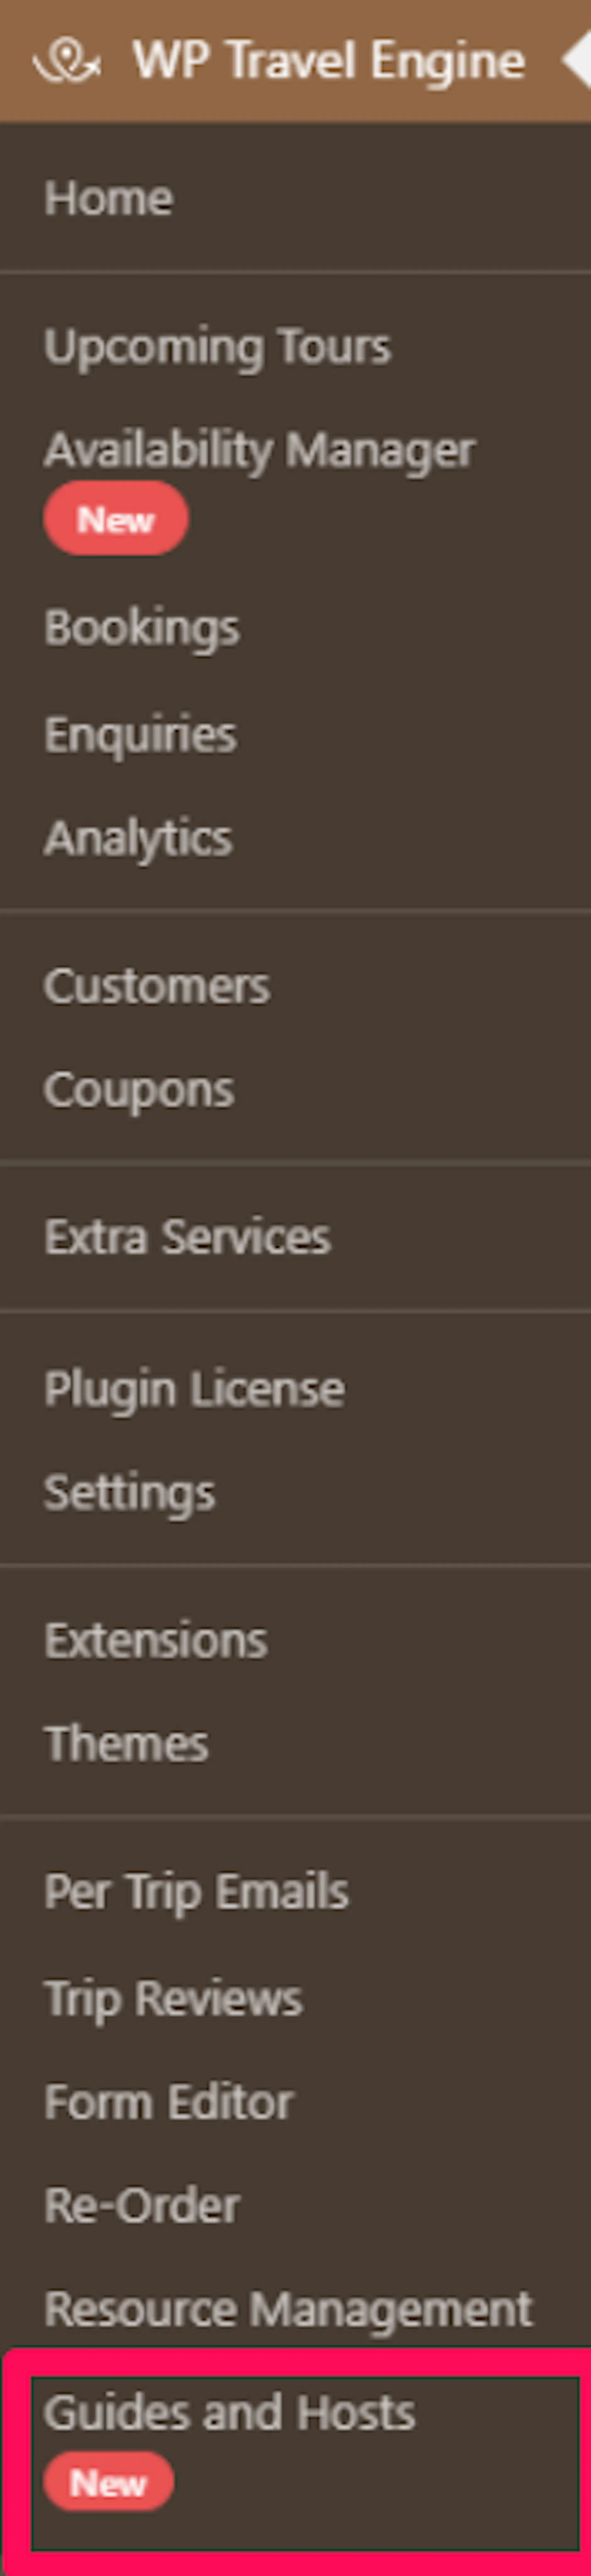
If Guides and Hosts doesn't appear, deactivate and reactivate the add-on from the Plugins screen.
Note: Depending on your WP Travel Engine version, a small New badge shows next to the menu item. It goes away in later WP Travel Engine versions.
Adding Your Guides and Hosts
Add each person once on the Guides and Hosts page. You can then show them on as many trips as you like.
Opening the Guides and Hosts Page
- Go to WP Travel Engine > Guides and Hosts.
- The page opens with the heading Trip Guides.
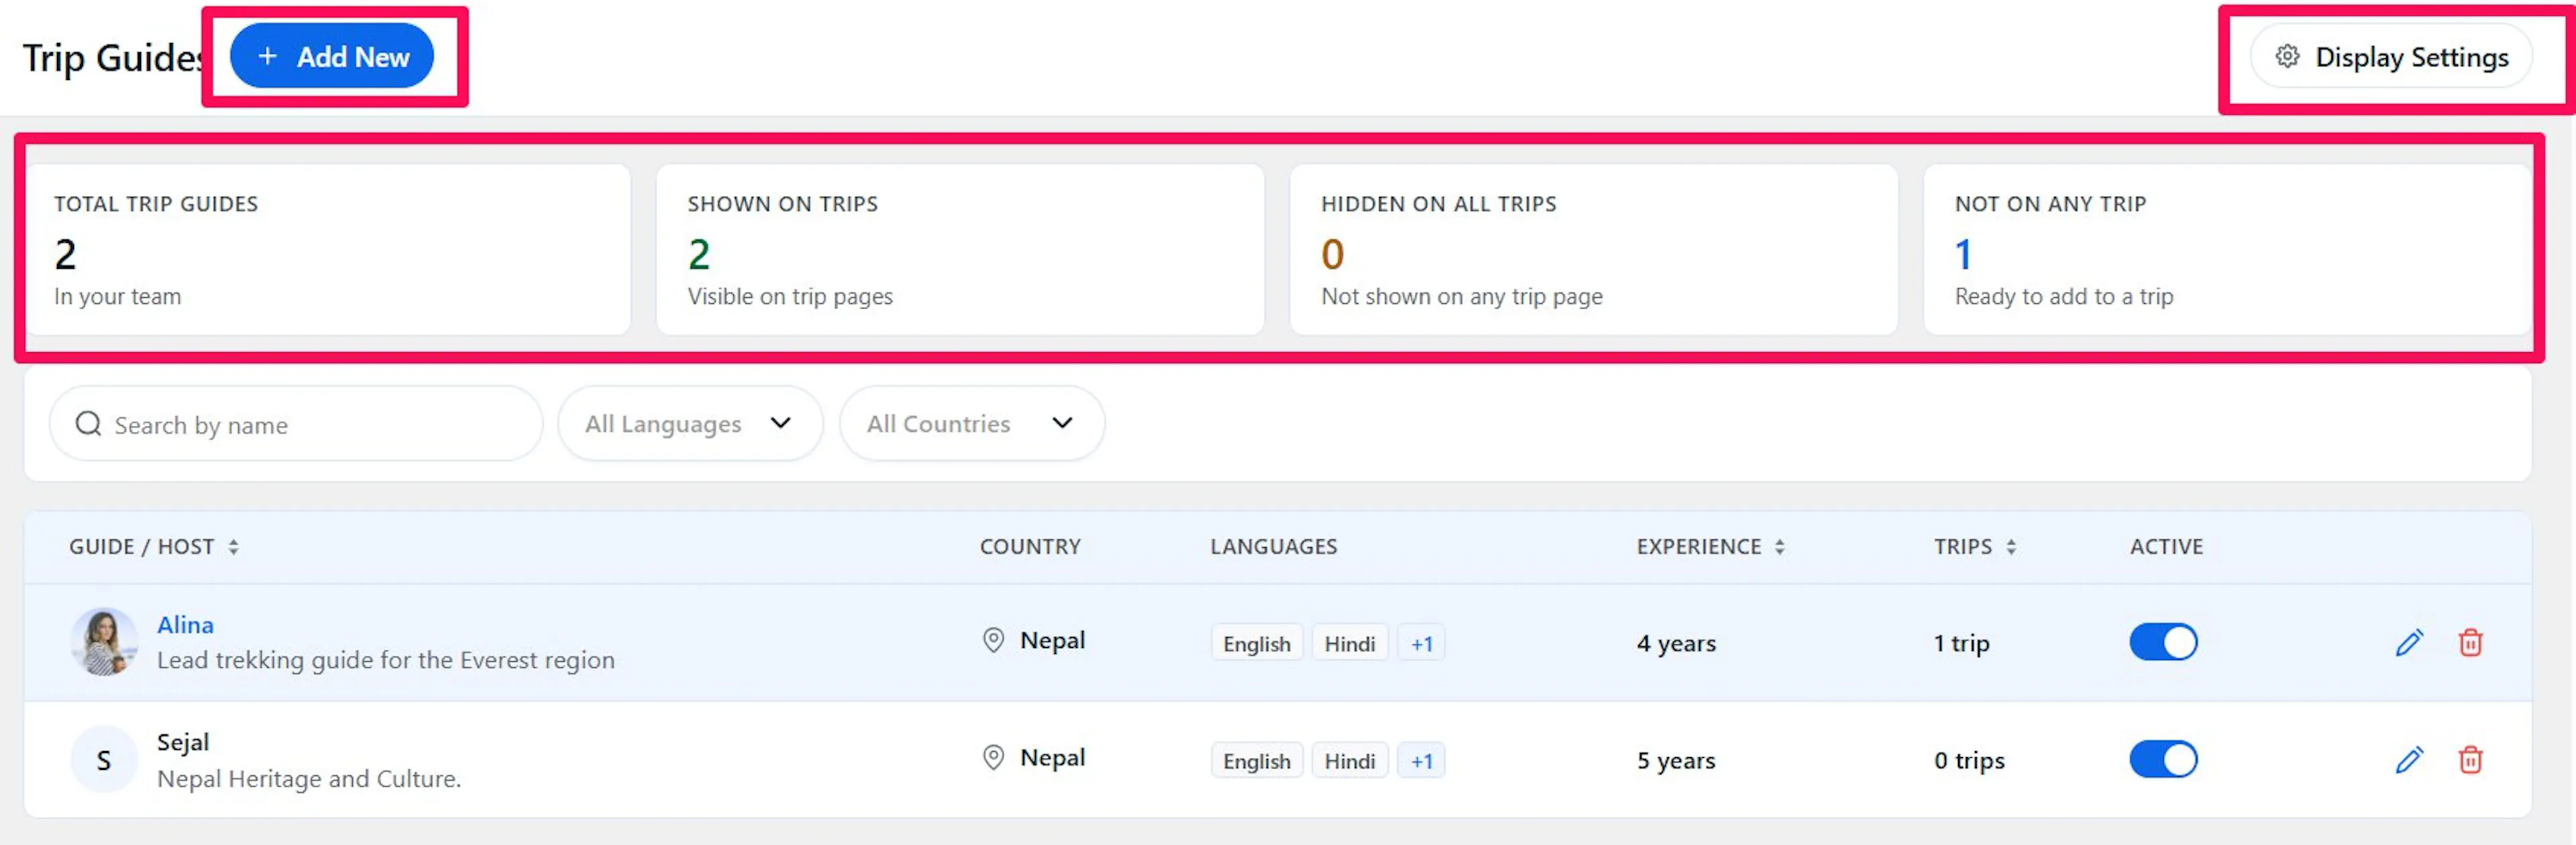
Four summary boxes at the top give you a quick count of your team:
- Total trip guides shows everyone in your directory.
- Shown on trips shows guides who are visible on trip pages.
- Hidden on all trips shows guides you have switched off.
- Not on any trip shows guides who are ready but not yet added to a trip.
If you haven't added anyone yet, the page shows No trip guides yet with an Add New button.
Finding and Managing Guides
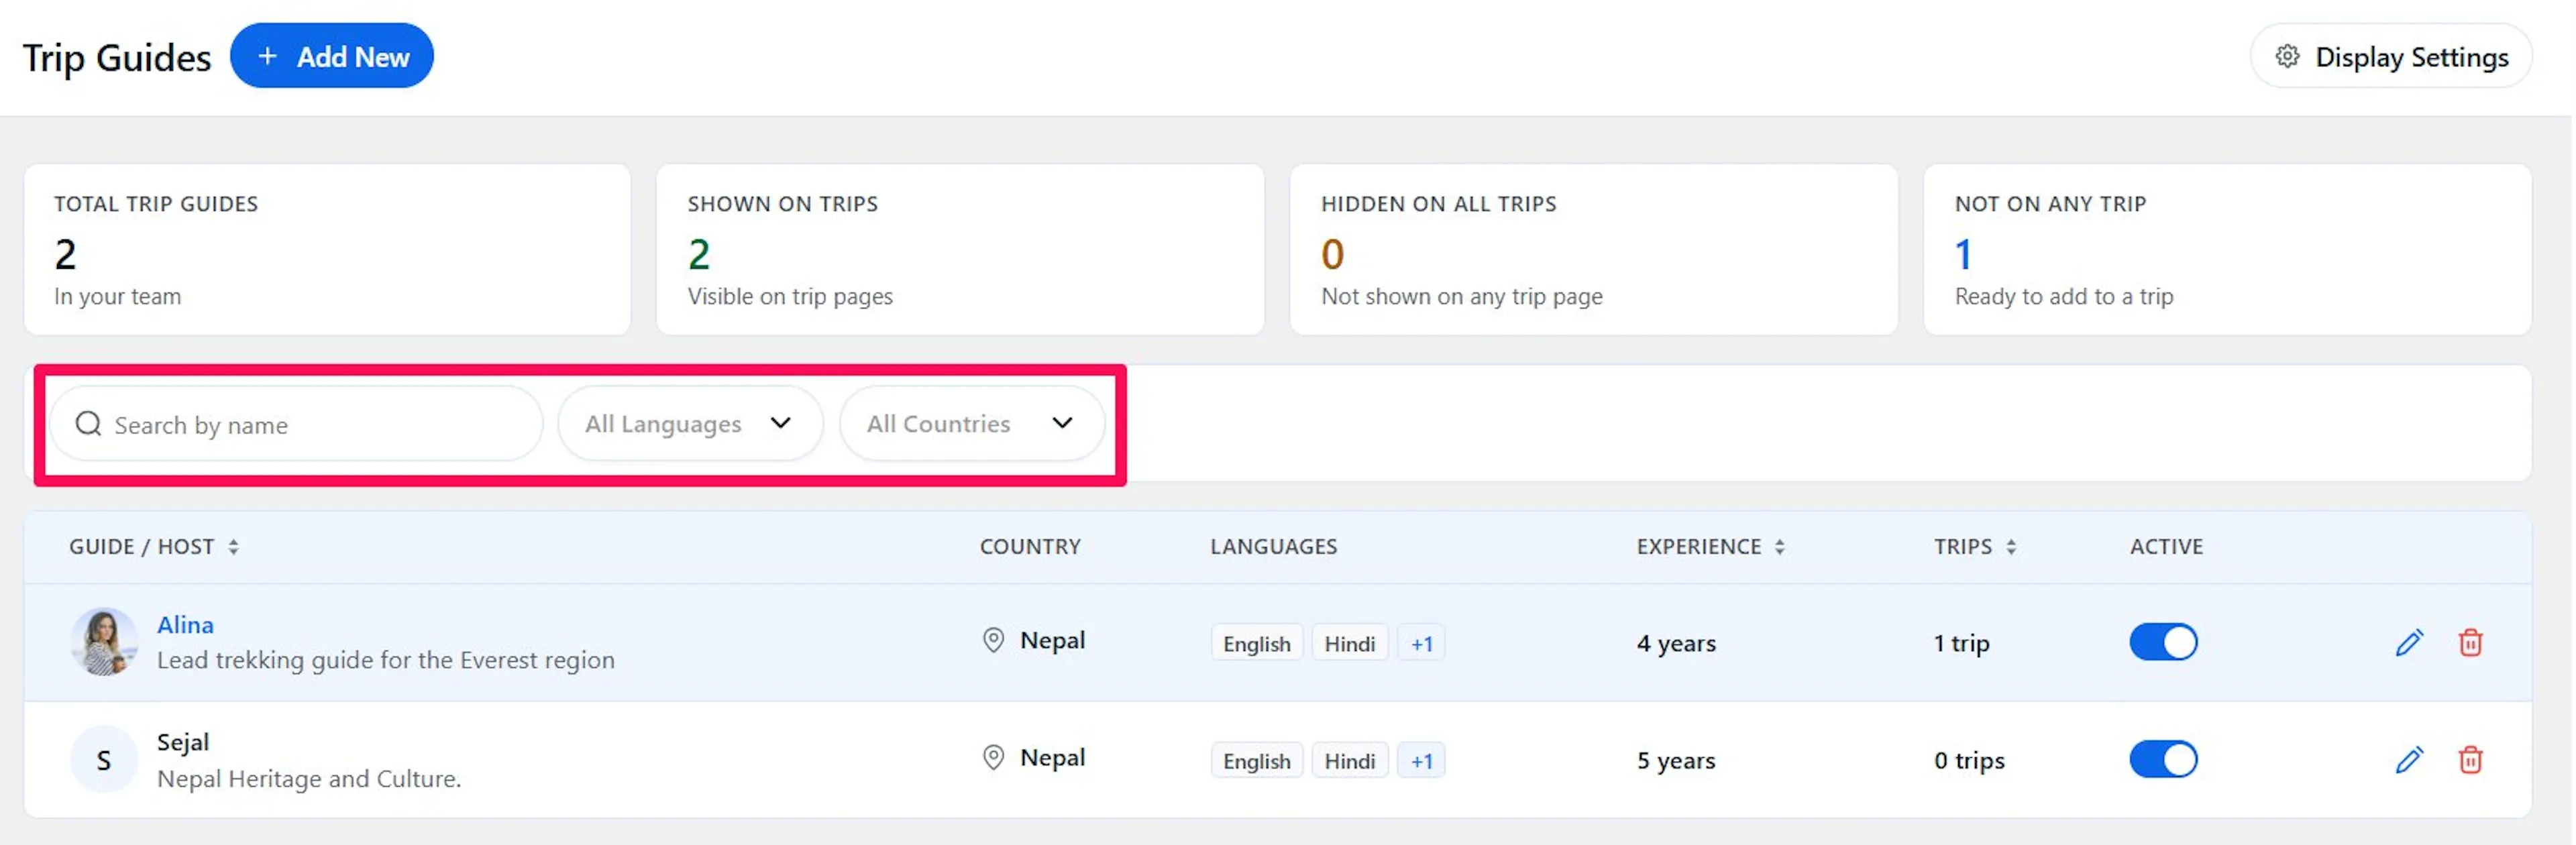
Each row in the table shows the guide's photo, name and tagline, along with their Country, Languages, Experience and Trips.
- Enter a name in Search by name to find a guide.
- Select a language from All Languages or a country from All Countries to narrow the list. Both dropdowns are searchable, and you can use them together with the search box.
- Click Clear to reset the search and filters.
- Click the Guide / Host, Experience or Trips column heading to sort the list. Click it again to reverse the order. New guides appear first until you sort.
- Use the pagination controls at the bottom to move between pages. The list shows 10 guides per page, and the bottom of the page shows the total number of items.
If a search or filter finds nobody, the page shows No results found. Change your search or click Clear.
The Trips column counts published trips only. A guide assigned to a draft trip shows 0 trips until that trip is published.
Other things you can do from the table:
- Click a row, or the pencil icon at the end of the row, to edit a guide.
- Click the trash icon to delete a guide. See Deleting a Guide.
- Toggle the switch in the Active column to hide or show a guide on all trips. See Hiding a Guide Without Deleting Them.
- Hover over the +2 style label in the Languages column to see the rest of a guide's languages. The table shows the first two only.
A message appears at the top of the page after a change, for example 1 change saved.
Adding a New Guide
- On the Guides and Hosts page, click Add New.
- Fill in the sections described below. Full name is the only required field.
- Click Save.
A Guide added. message confirms the guide is saved.
The editor has a few controls that help you along the way:
- The Guides and Hosts link at the top left takes you back to the list.
- A Sections menu lets you jump to any section, and shows whether each section is Complete or Not complete.
- Unsaved changes appear at the top while you have edits you haven't saved.
- When you edit an existing guide, the page shows an Active or Inactive label next to the name. The Save Changes button turns on once you change something.
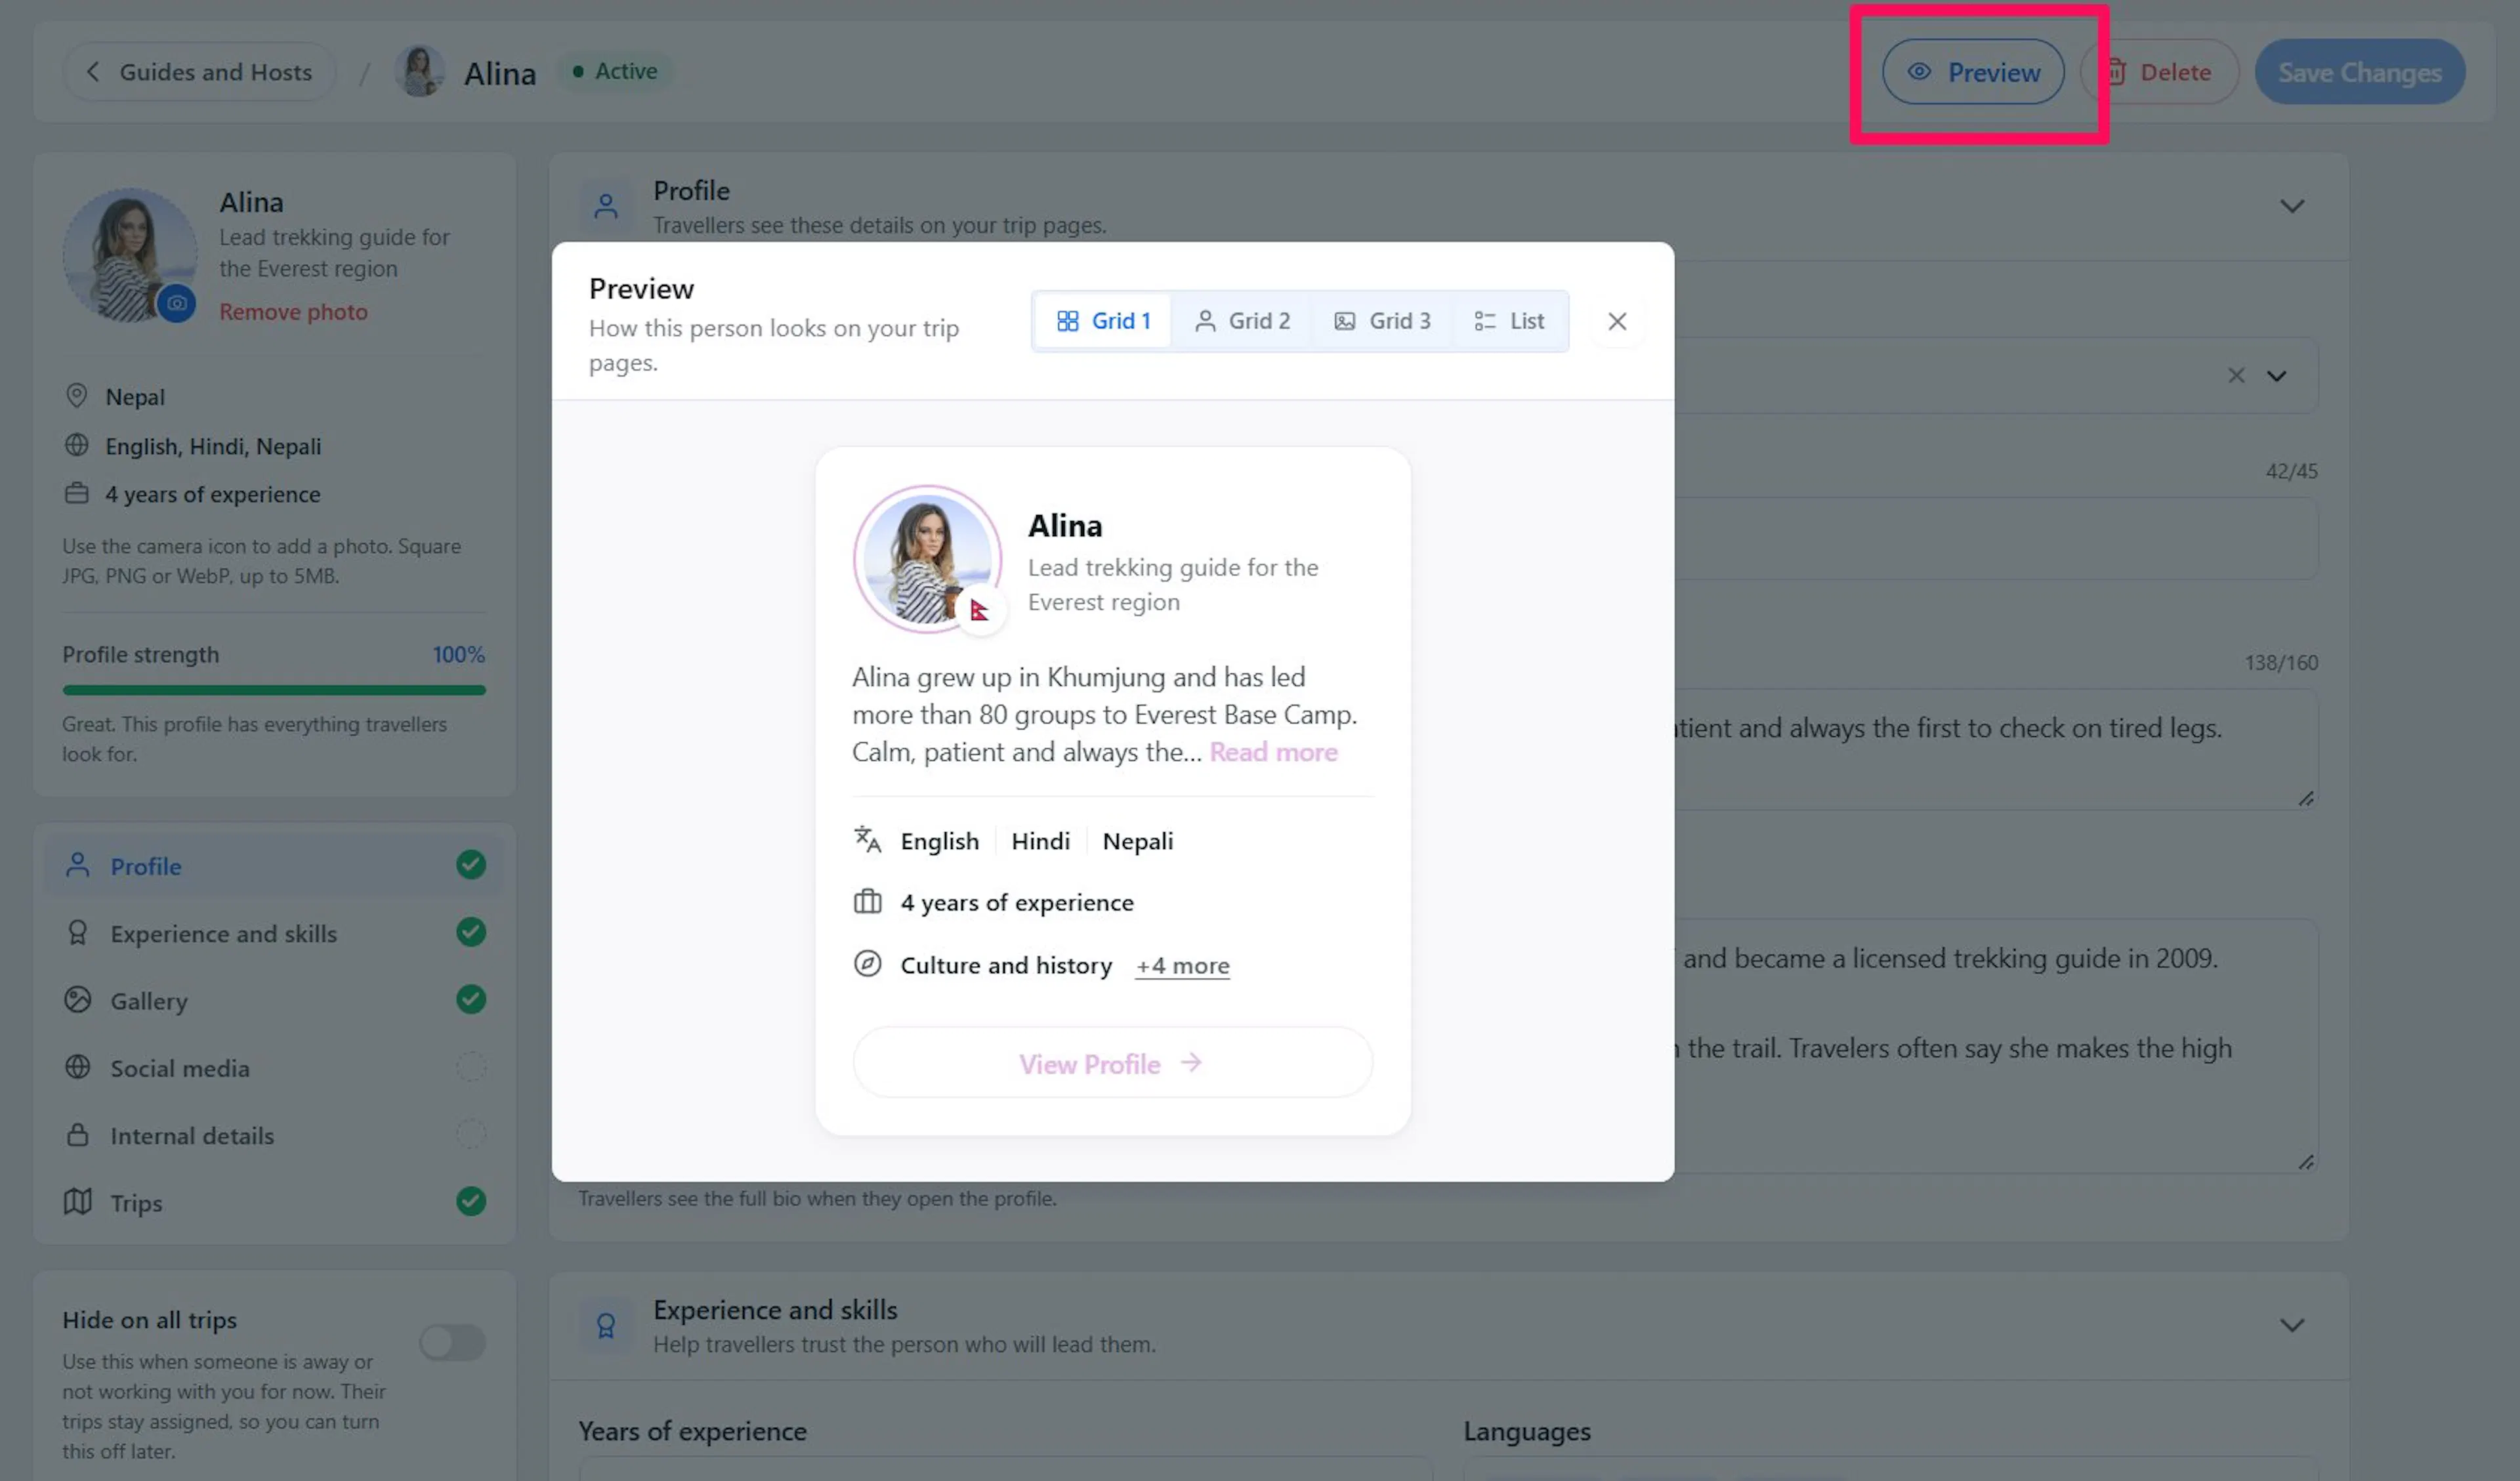
- Preview shows how the guide looks on a trip page. See Previewing a Guide.
Profile
The Profile section holds what travelers see first on the trip page.
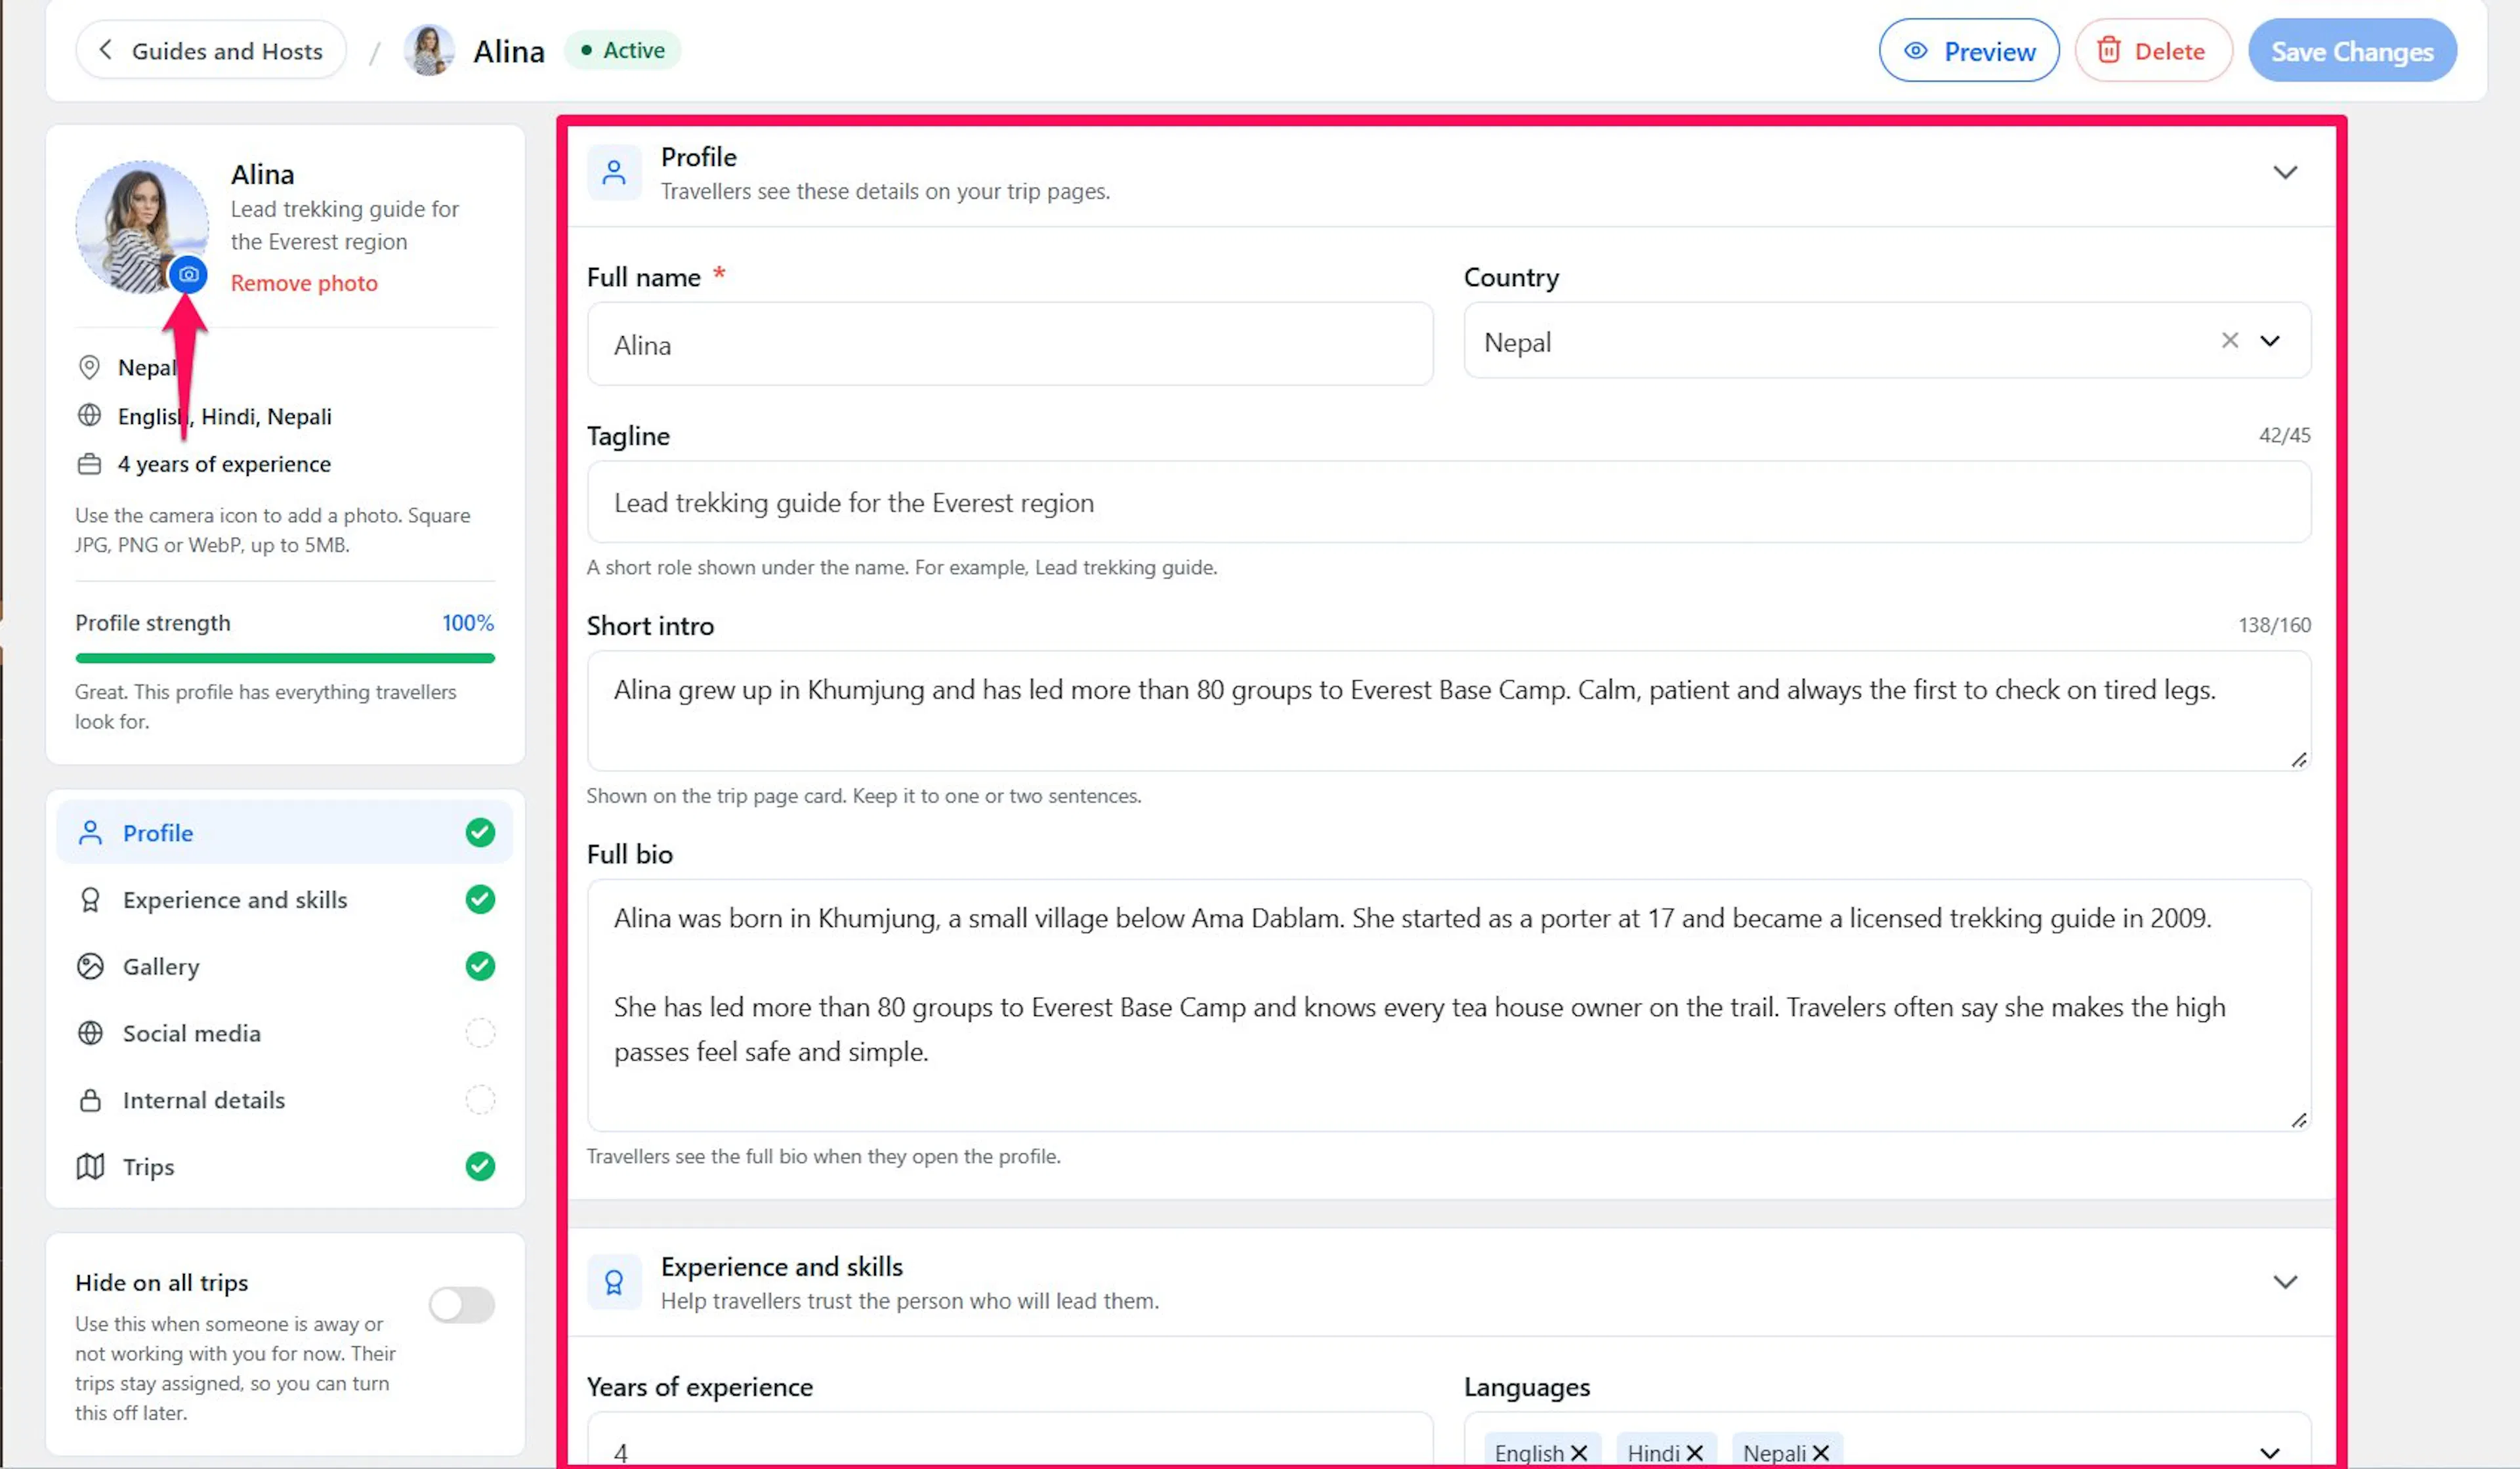
- Click the camera icon to add a photo (Upload photo). To change it later, use Replace photo or Remove photo. Use a square JPG, PNG or WebP image up to 5MB. You can choose from your WordPress Media Library.
- Enter the person's name in Full name.
- Select a country from Select a country.
- Enter a short role in Tagline. It appears under the guide's name. A counter shows how many of the 45 allowed characters you have used.
- Enter one or two sentences in Short intro. It appears on the guide's card on the trip page. The limit is 160 characters, and the counter stops you at the limit.
- Enter the guide's story, experience and what they love about guiding in Full bio. Travelers read this when they open the full profile.
Write the short intro as a hook, then save the details for the full bio. If you leave Full bio empty, travelers see the short intro in the profile instead.
A guide without a photo still appears on the trip page. WP Travel Engine shows a circle with the guide's initials in place of the photo.
Experience and Skills
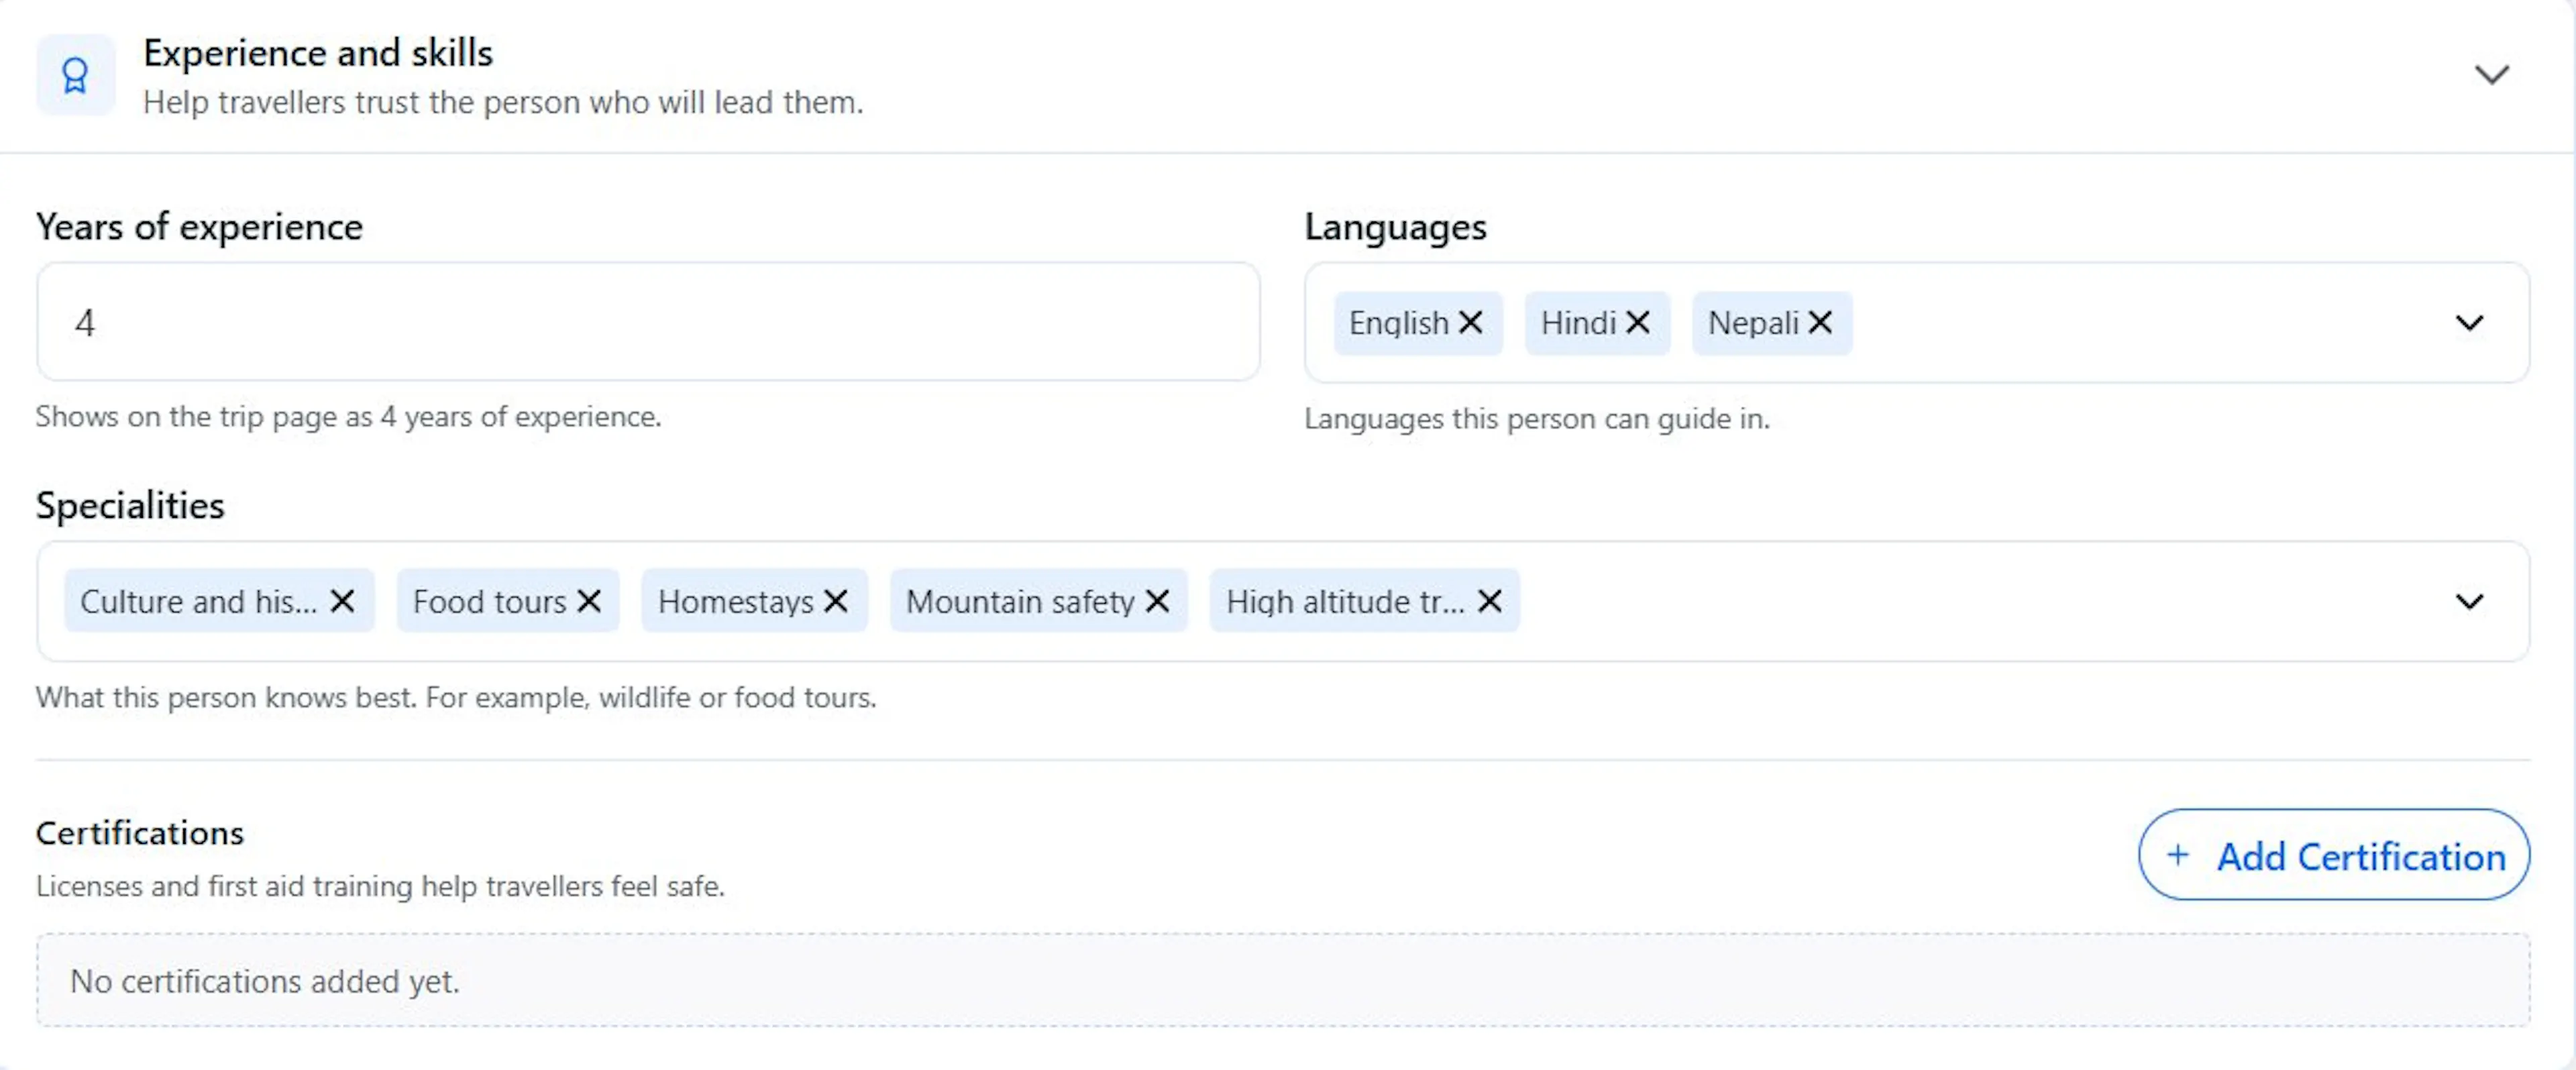
- Enter a whole number from 1 to 80 in Years of experience. It shows on the trip page as, for example, "17 years of experience". Leave it empty to hide the line.
- Click Add languages and choose the languages this person can guide in. Pick from the suggestions or type your own and select it to add it. The suggestions are English, Spanish, French, German, Italian, Portuguese, Dutch, Russian, Arabic, Hindi, Bengali, Nepali, Sherpa, Tibetan, Chinese, Japanese, Korean and Thai.
- Click Add specialities and choose what this person knows best. Pick from the suggestions or type your own. The suggestions are High altitude trekking, Mountain safety, Culture and history, Food tours, Photography, Wildlife, Bird watching, Homestays, Village walks, Cycling, Rafting, and Yoga and wellness.
- Click Add Certification to add a license or training. Enter the name in Certificate name (for example, Wilderness First Aid) and the organization in Issued by (for example, Red Cross). Click Add Certification again for each additional entry, and use the remove icon to delete one.
A certification needs a Certificate name to appear on the trip page. Entries with only an Issued by value are not shown.
Gallery
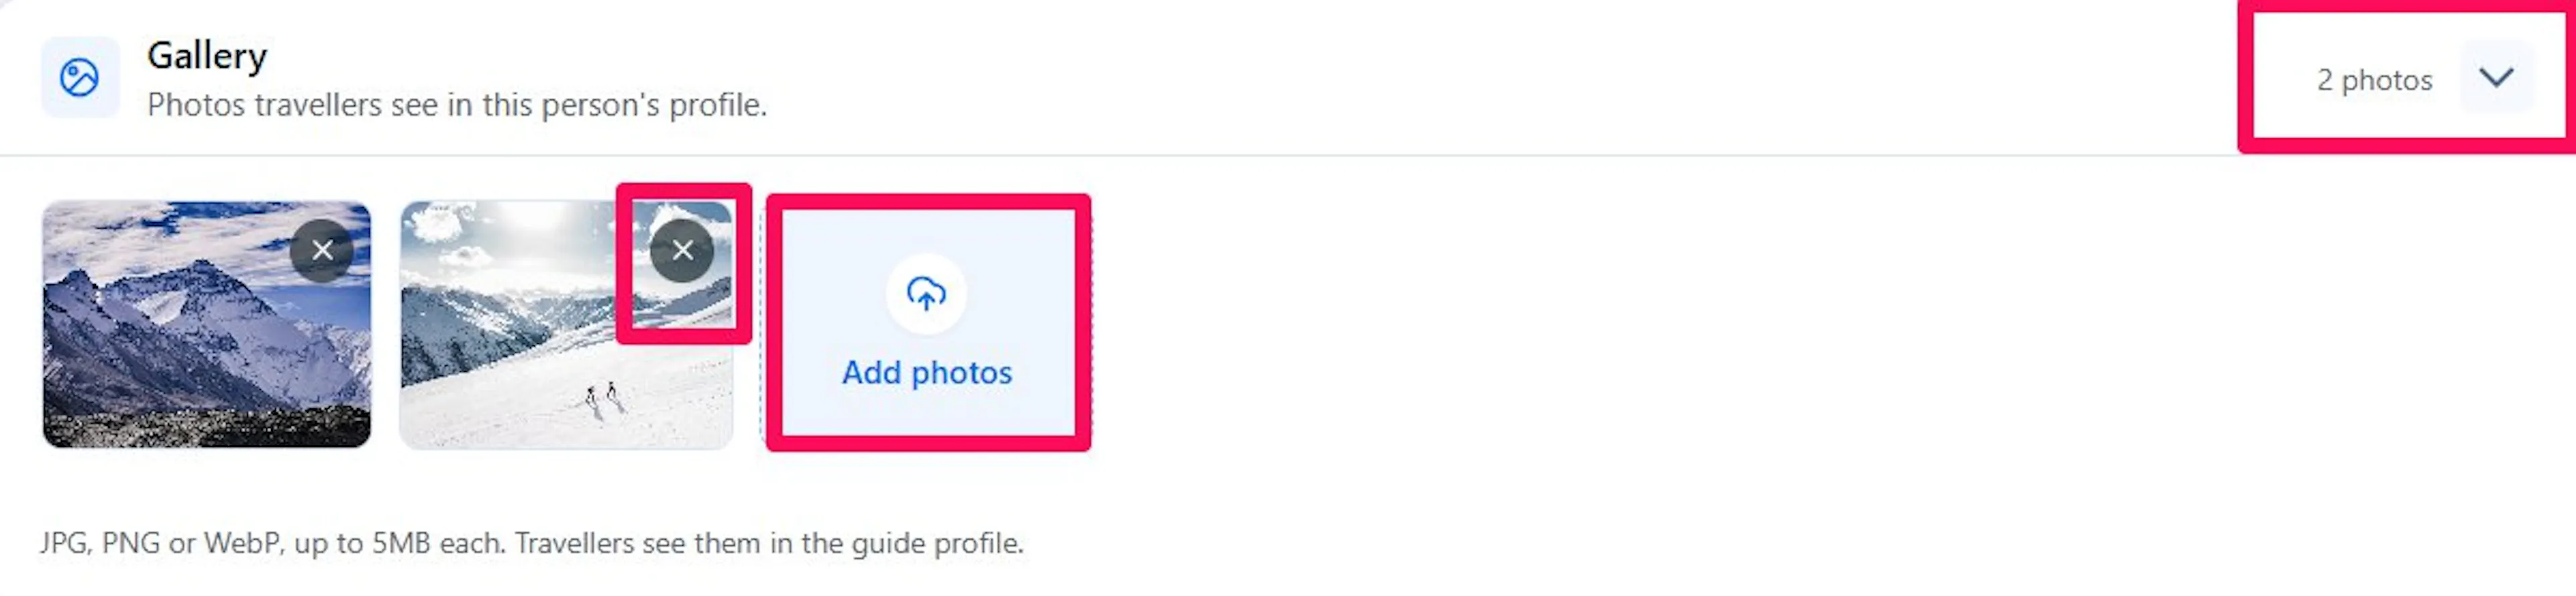
- Click Add photos and choose images from your Media Library or upload new ones. Each image can be a JPG, PNG or WebP file up to 5MB.
- Check the photo count shown at the top of the section. Remove a photo with its remove icon (Remove photo).
Travelers see these photos in the Gallery tab of the guide's profile. They also appear in the photo slider on the Grid 3 layout.
Add at least one gallery photo for every guide if you use the Grid 3 layout. Guides without gallery photos show a placeholder cover.
Social Media
- Click Add Link.
- Select a platform from Select a platform. The options are Facebook, Instagram, WhatsApp, LinkedIn, X, TikTok, YouTube and Website.
- Paste the full address in Link. It must start with
https://,http://ormailto:. - Click Add Link again for each extra link, and use the remove icon to delete one.
Travelers see the matching icons next to the guide's name, and they open in a new tab.

A row without a valid link is dropped when you save.
Internal Details
Use this section for details only your team needs.
- Enter the guide's email address in Email. WP Travel Engine checks that it is a valid address.
- Enter their number in Phone. Use digits and the characters
+ - ( ) . /only. - Under Emergency contact, enter a name in Contact name and a number in Contact phone. The same character rules apply.
Note: Email, phone and emergency contact details never appear on the trip page or in any public view of your site. Only people who can sign in to your dashboard see them.
Trips
Use this section to pick the trips a guide appears on from the guide's own page. You can also assign guides from the trip itself. See Assigning Guides to a Trip.
- Click Select trips.
- Enter a trip name in Search trips if your list is long.
- Select every trip this person should appear on.
- Click Save Changes.
If no trip matches your search, the list shows No trips match your search.

This section stays locked on a new guide, with a message asking you to save the person first. Click Save, then come back and choose the trips.
Hiding a Guide Without Deleting Them
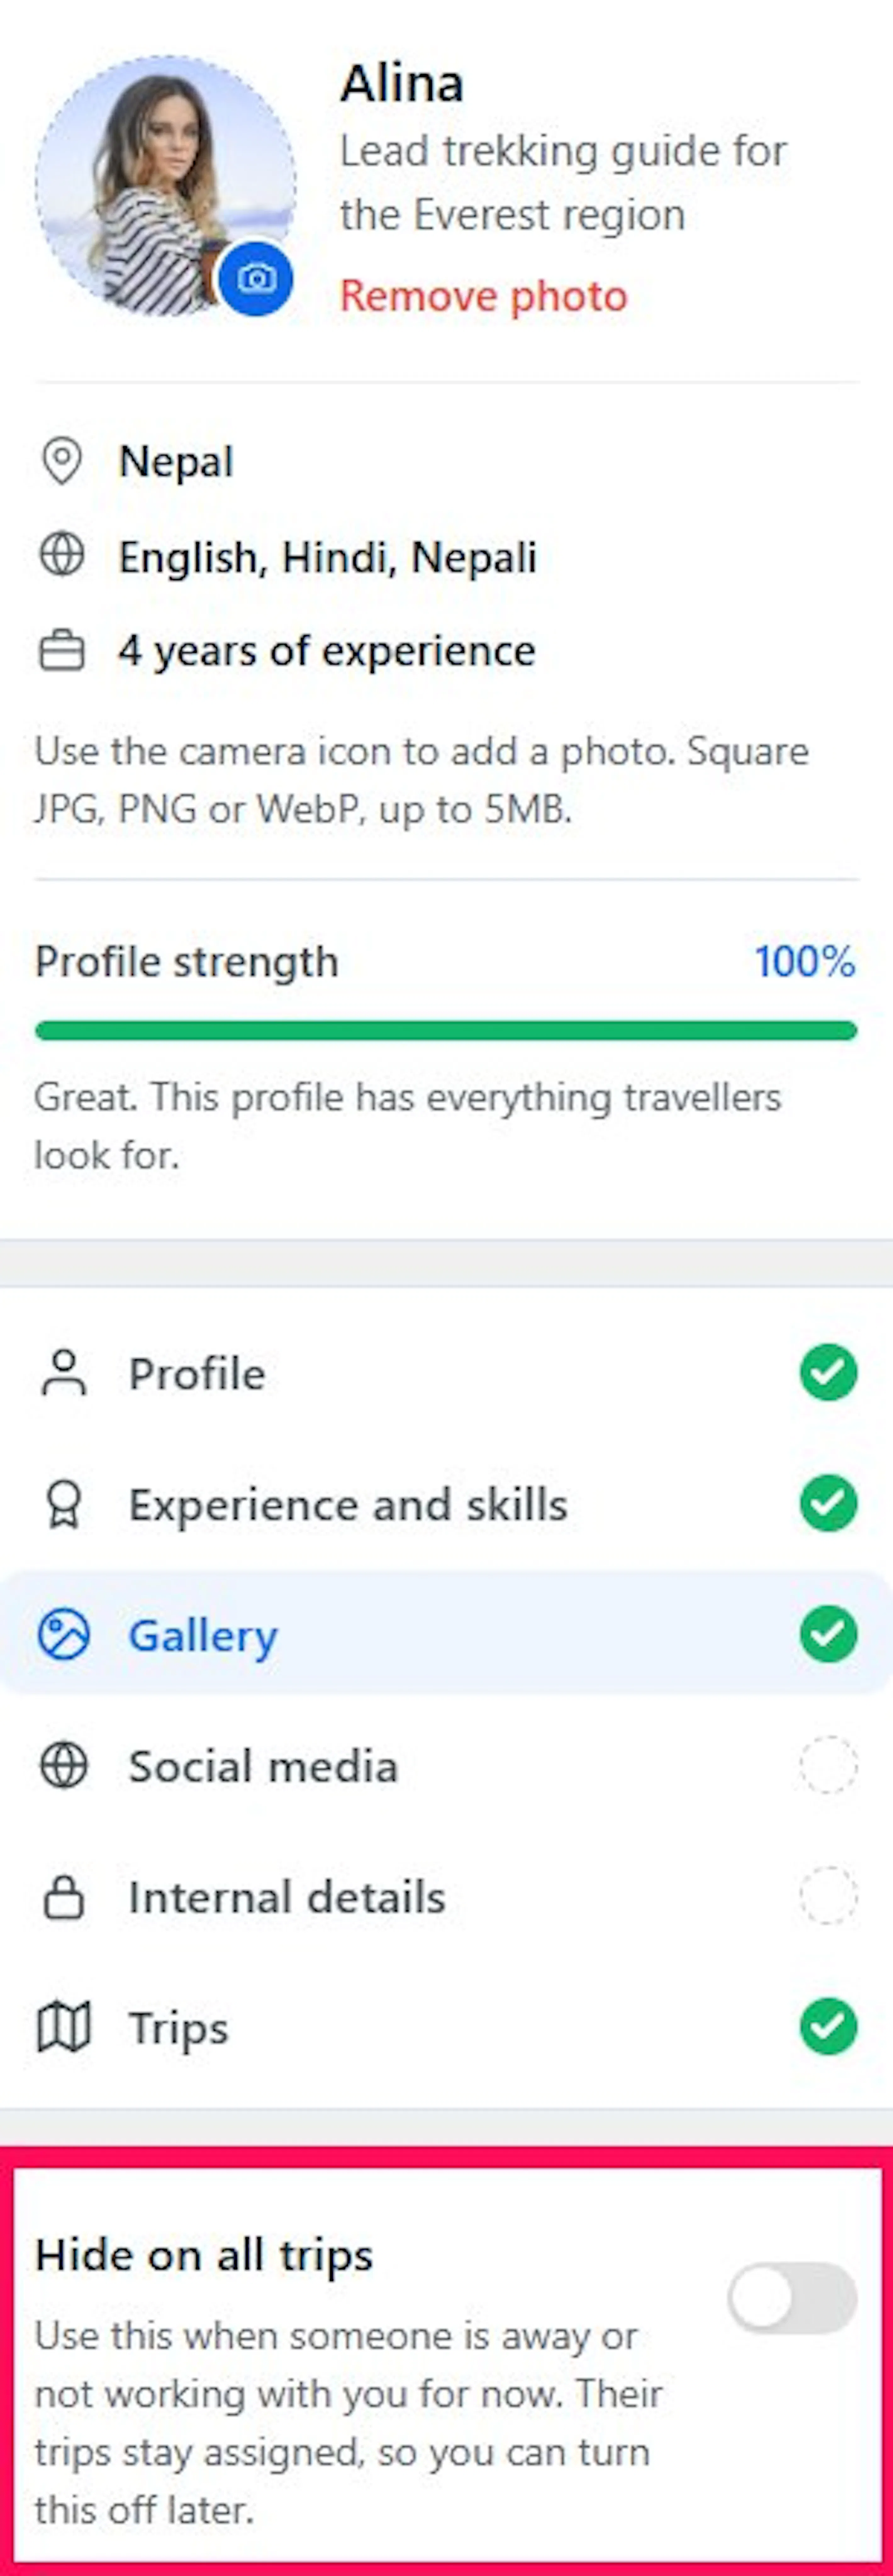
Hide a guide when someone is away or not working with you for now. They disappear from every trip page, but their profile and trip assignments stay in place.
- Open the guide from the Guides and Hosts page.
- Turn on Hide on all trips.
- Click Save Changes.
You can also use the switch in the Active column on the guide list. It saves as soon as you change it.
A hidden guide shows Inactive next to their name. Turn the setting off to bring them back on every trip they were assigned to.
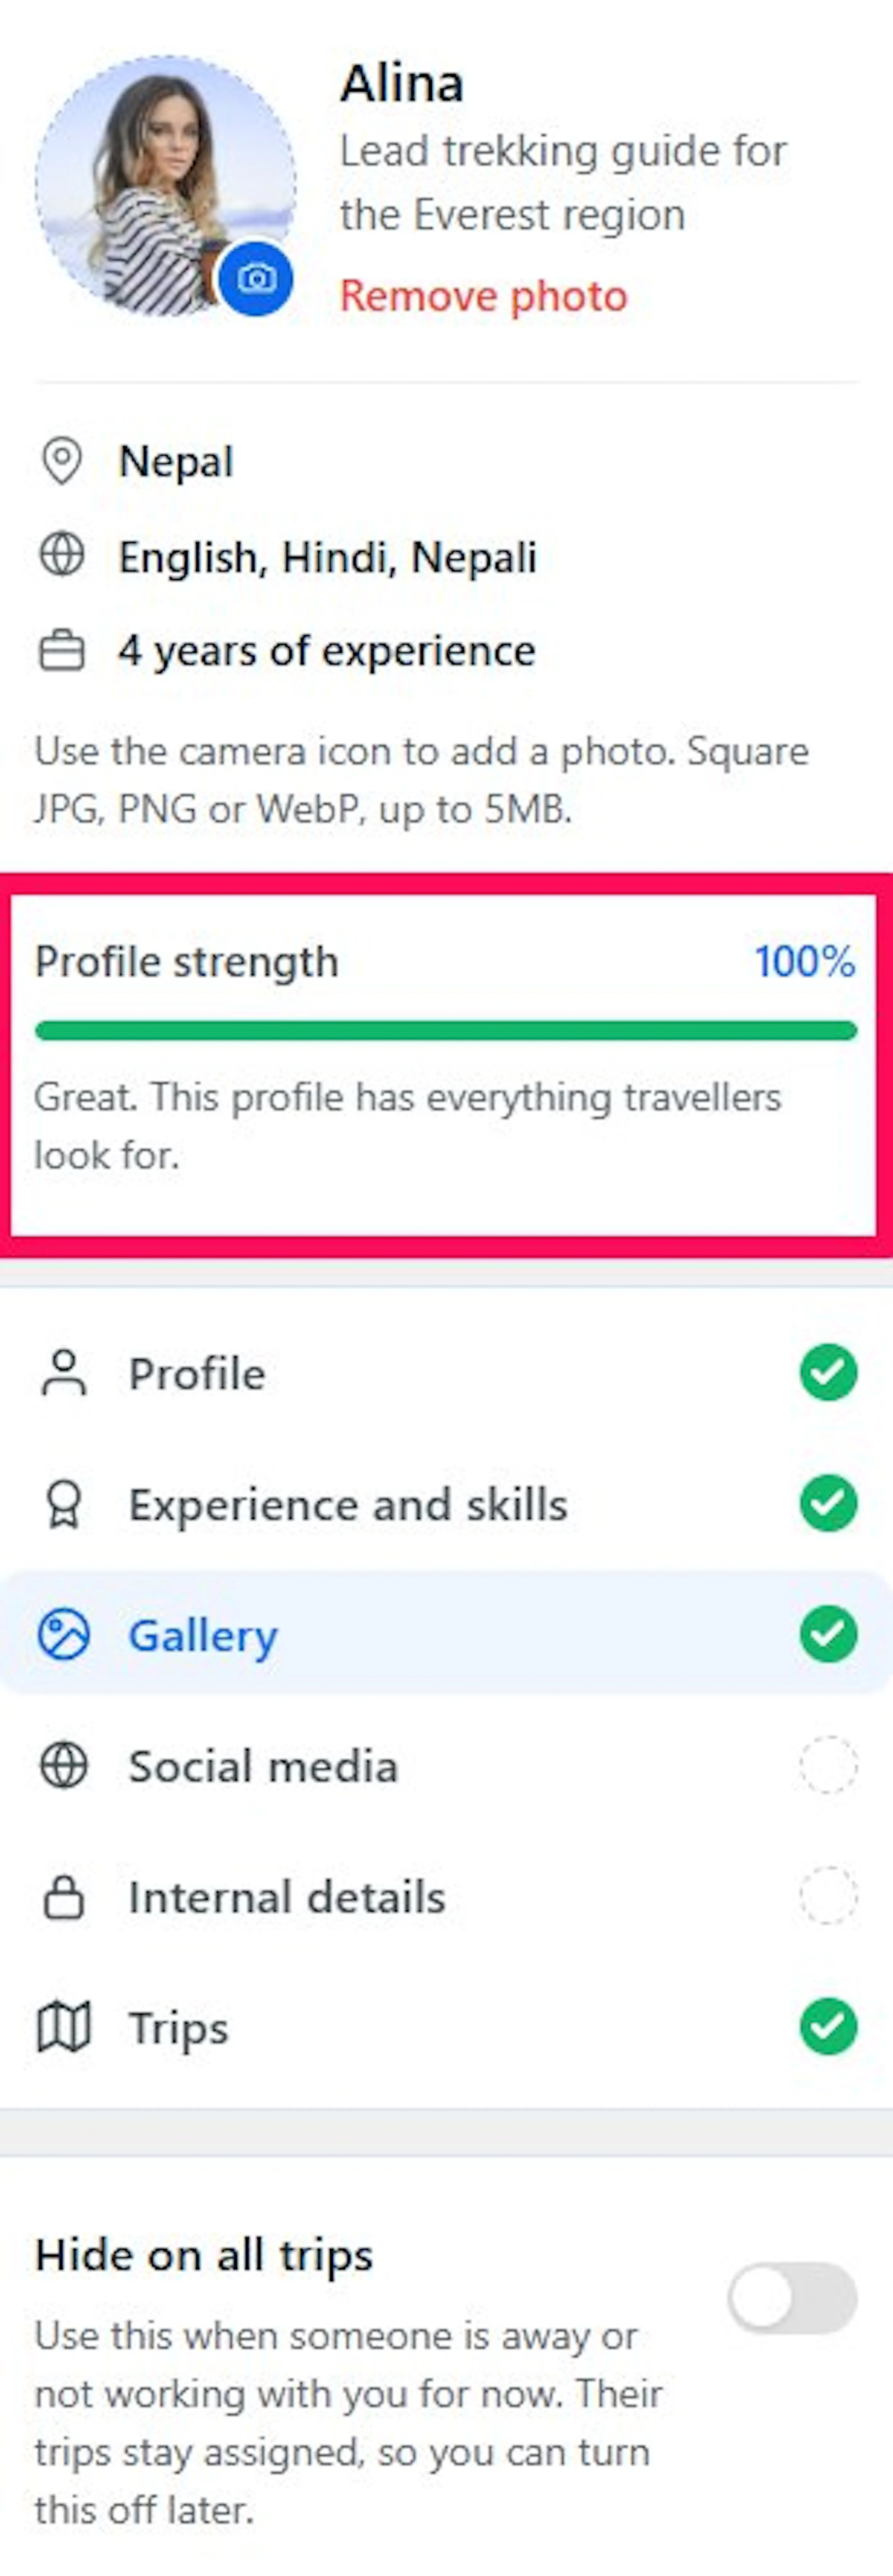
Checking Profile Strength
The editor shows a Profile strength score as a percentage. It goes up as you fill in the details travelers look for:
- Photo
- Tagline
- Country
- Short intro
- Full bio
- Years of experience
- Languages
- Specialities
- Gallery
The card names what is still missing, so you know what to add next. When everything is complete, the card shows a confirmation message.
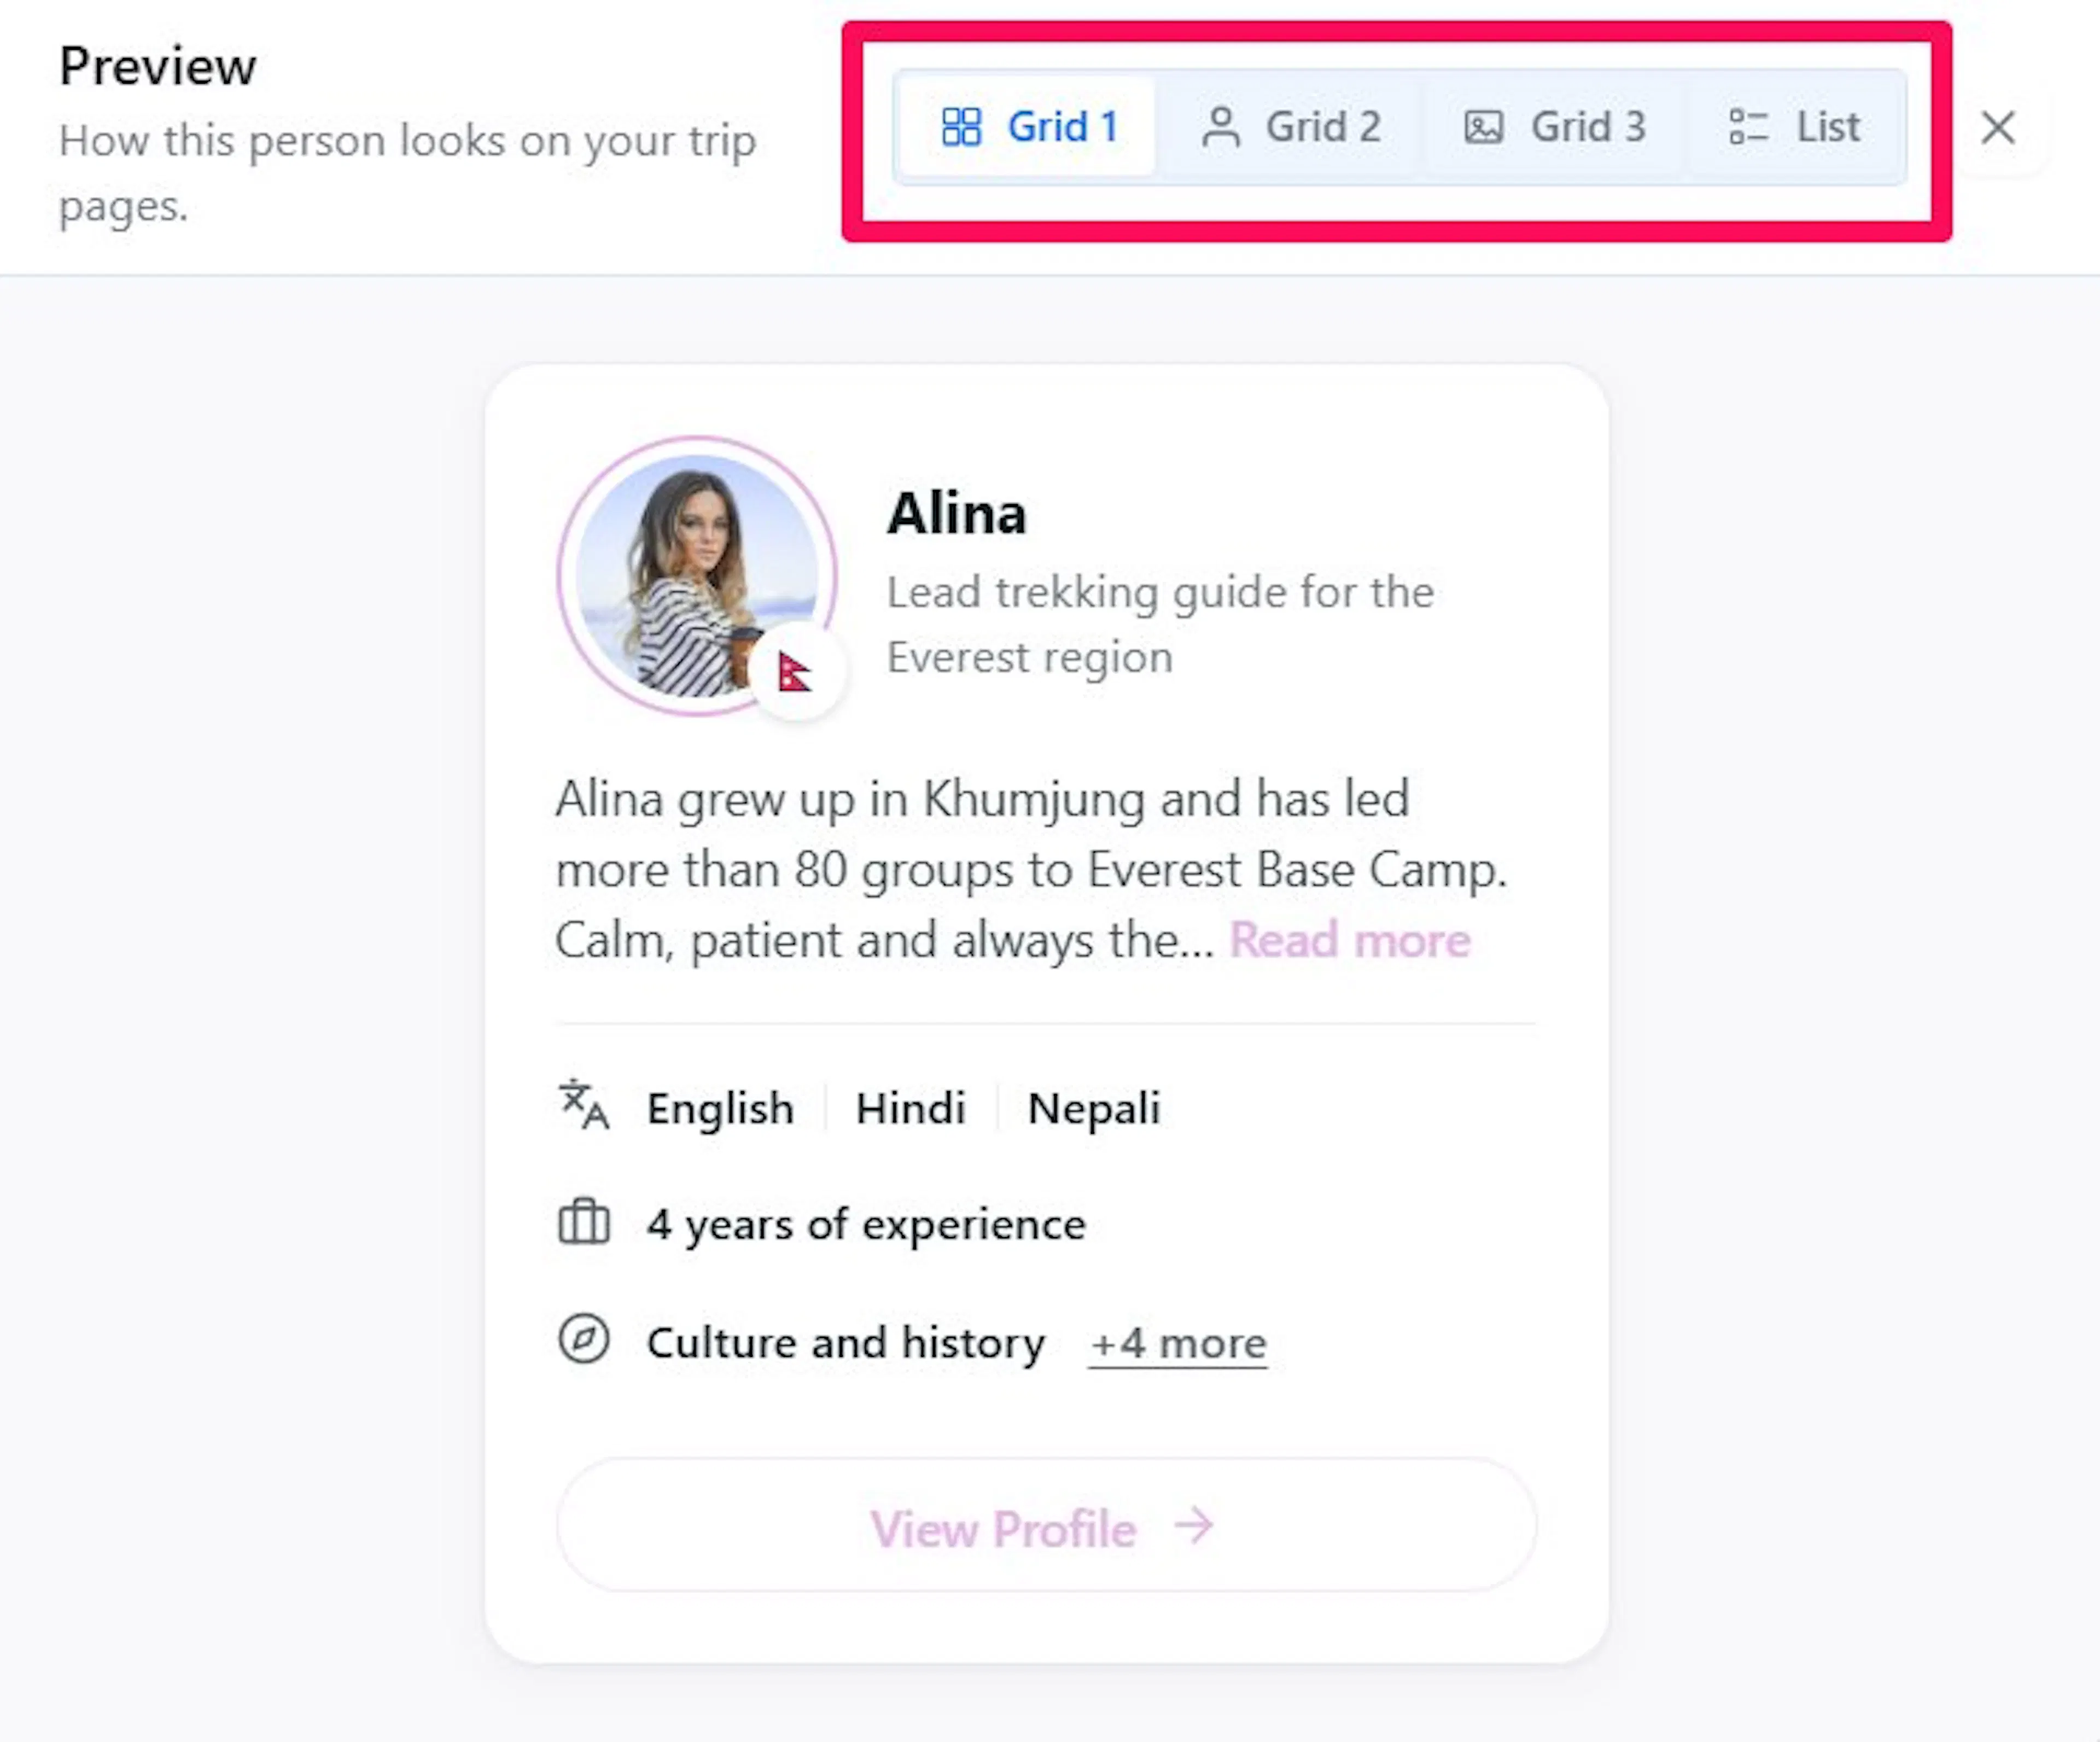
Previewing a Guide
- Open the guide and click Preview.
- Choose Grid 1, Grid 2, Grid 3 or List to see how the guide looks in each layout. The preview uses your site's brand color, so it matches your trip page.
- Click Close when you are done.
If the preview doesn't load, it shows The preview could not be loaded. Close it and try again.
Deleting a Guide
- Open the guide and click Delete, or click the trash icon in the guide list.
- Read the confirmation window. It lists the trips where the guide currently appears.
- Click Delete to confirm, or Cancel to keep the guide.
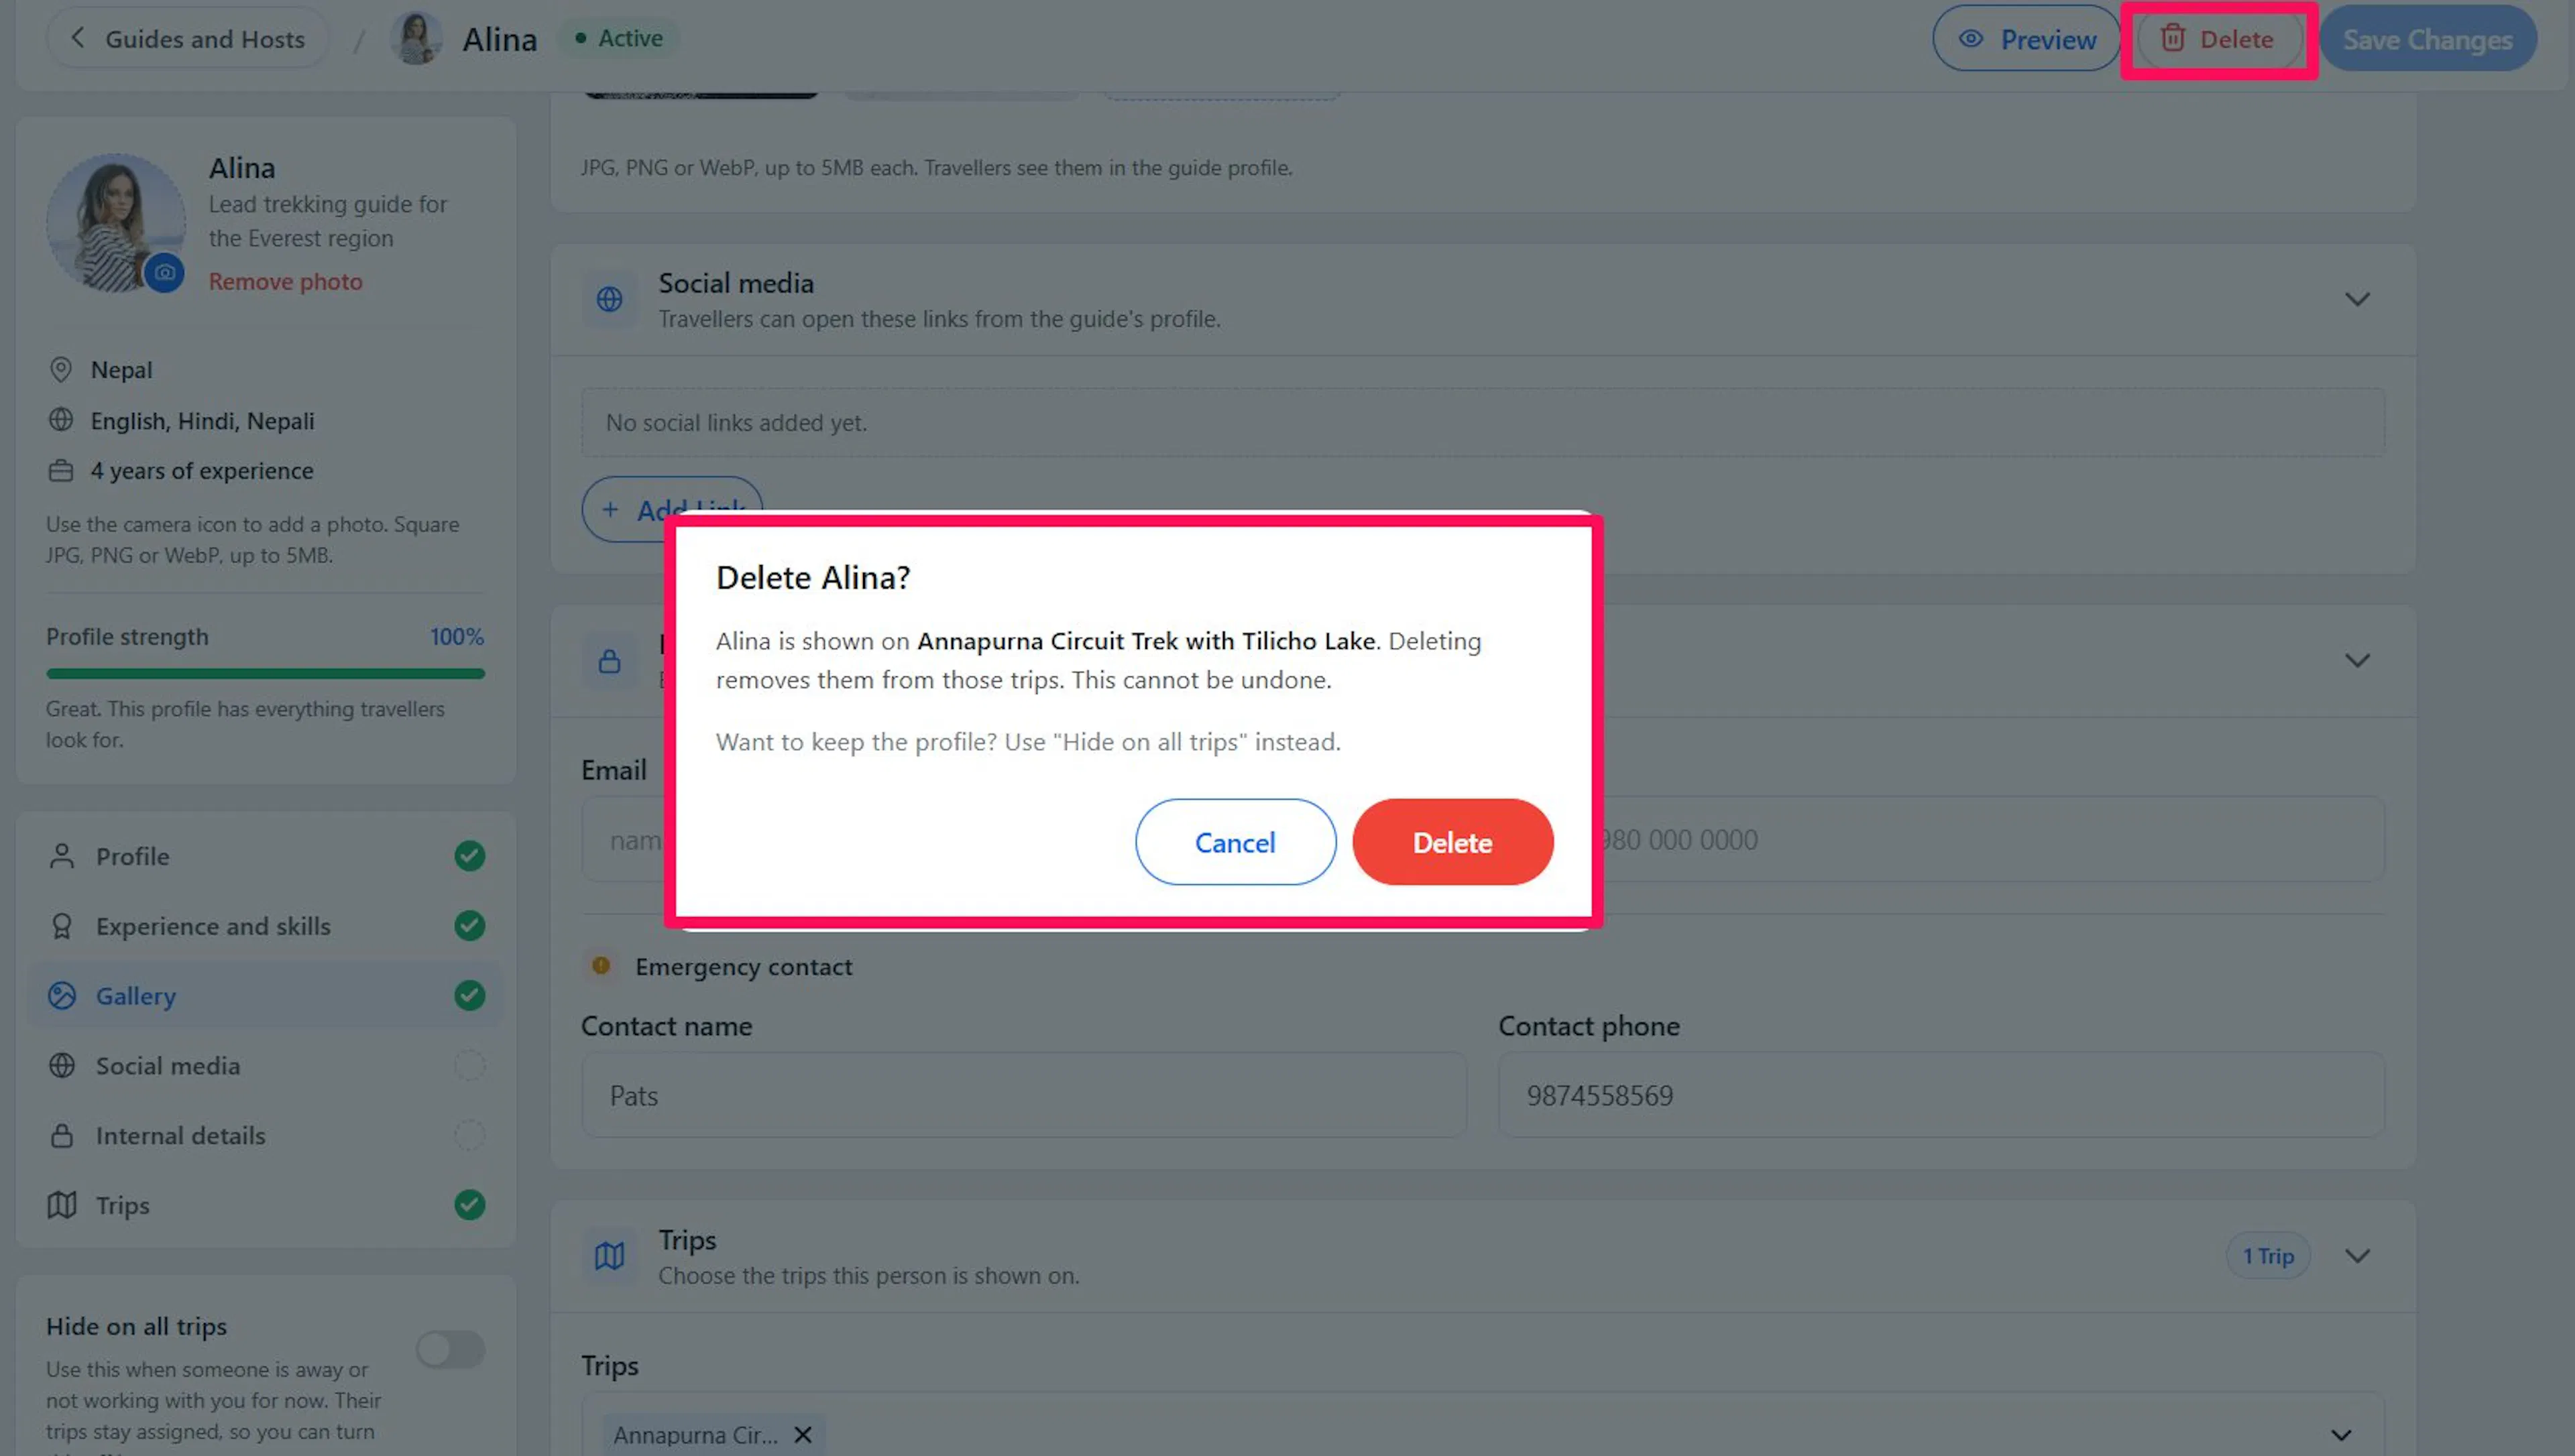
Deleting a guide removes the profile for good and removes them from every trip. You can't undo it. To keep the profile, use Hide on all trips instead.
Choosing How Guides Look on Trip Pages
The display settings control the layout and heading for all trips.
- Go to WP Travel Engine > Settings > Extensions > Guides and Hosts. You can also click Display Settings at the top of the Guides and Hosts page.
- Select a Layout.
- Enter a heading in Section Title. A trip can override this in its own settings.
- Enter an optional line in Section Description. It appears under the title. Leave it empty to show no description.
- Click Save Settings.
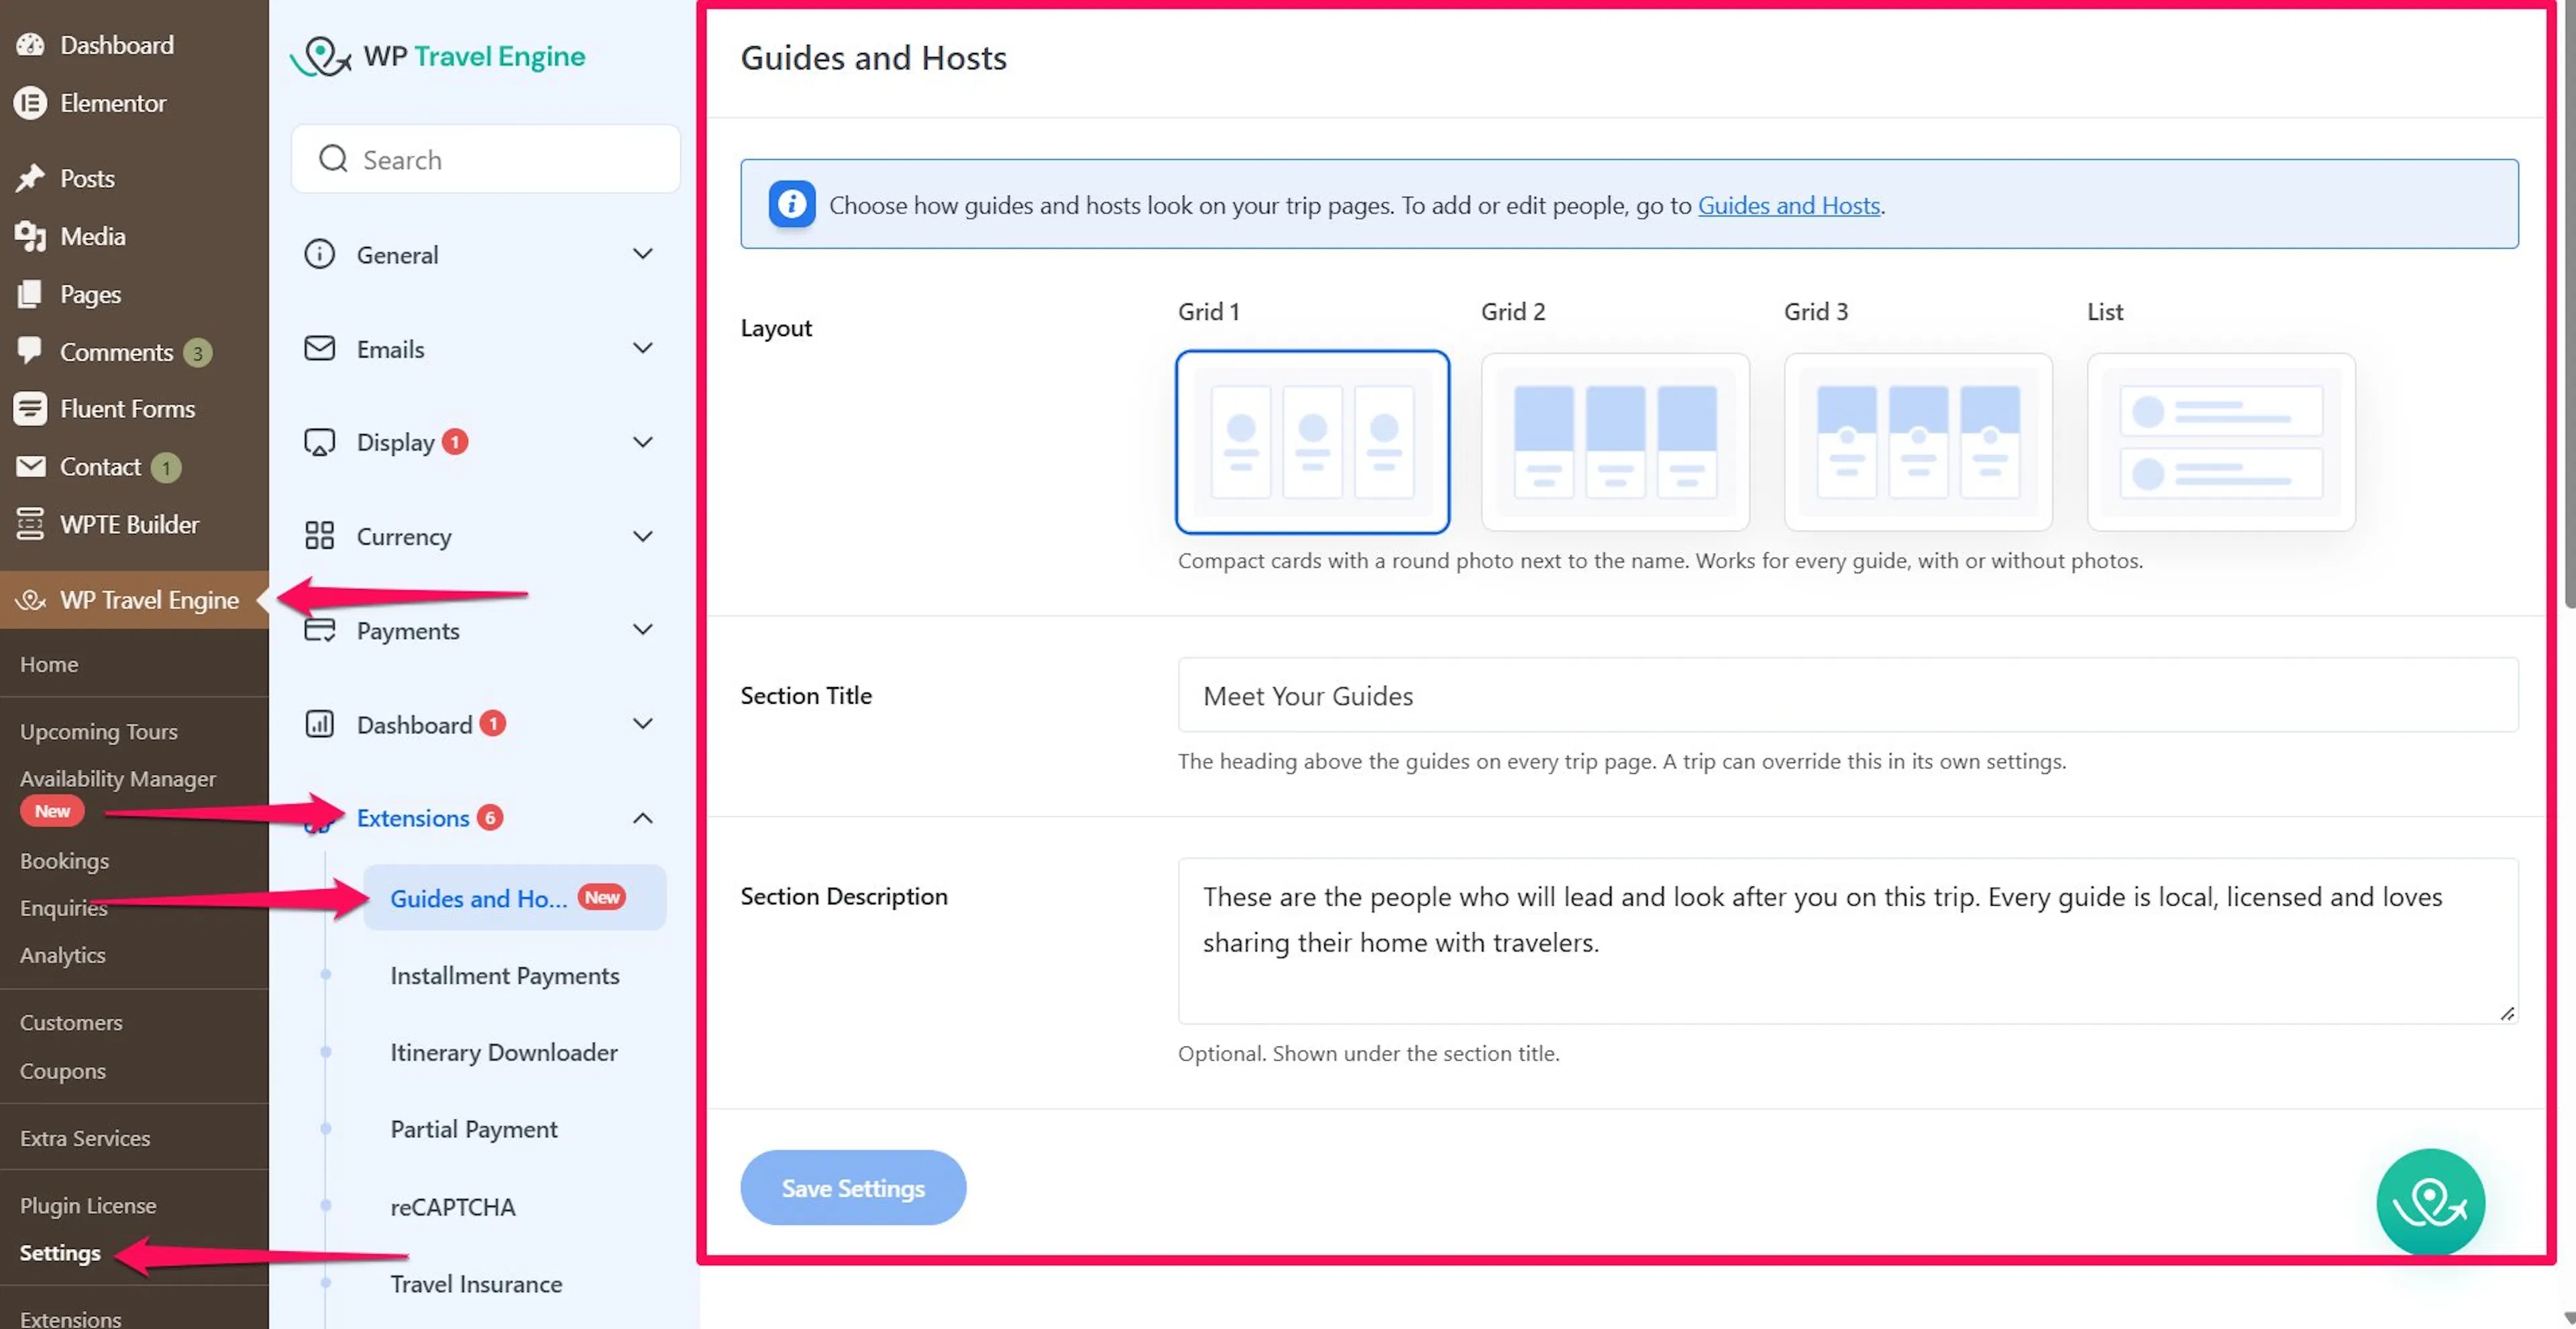
The four layouts suit different teams:
| Layout | What it looks like | Best for |
|---|---|---|
| Grid 1 | Compact cards with a round photo next to the name. | Everyone. It works with or without photos. |
| Grid 2 | Cards with the guide's profile photo as a large image on top. | Teams where every guide has a good profile photo. |
| Grid 3 | Cards with a slider on top that shows each guide's gallery photos. | Teams where every guide has gallery photos. |
| List | One person per row. | One or two guides per trip. |
Note: If you leave Section Title empty, the add-on uses its built-in heading. The title and description you set here apply to every trip unless the trip has its own.
Assigning Guides to a Trip
- Go to Trips and open the trip you want to edit.
- Open the Advanced Settings tab, then click Guides and Hosts.
- Click Select guides and hosts under Assign Guides and Hosts. Search by name or country, then tick each guide you want on this trip.
- Drag the guides in the list below into the order you want. The order here is the order travelers see on the trip page. You can also reorder with the arrow keys.
- (Optional) Enter a Section Heading and a description for this trip only. Leave them empty to use the Section Title and Section Description from the display settings.
- Save the trip the way you normally do.
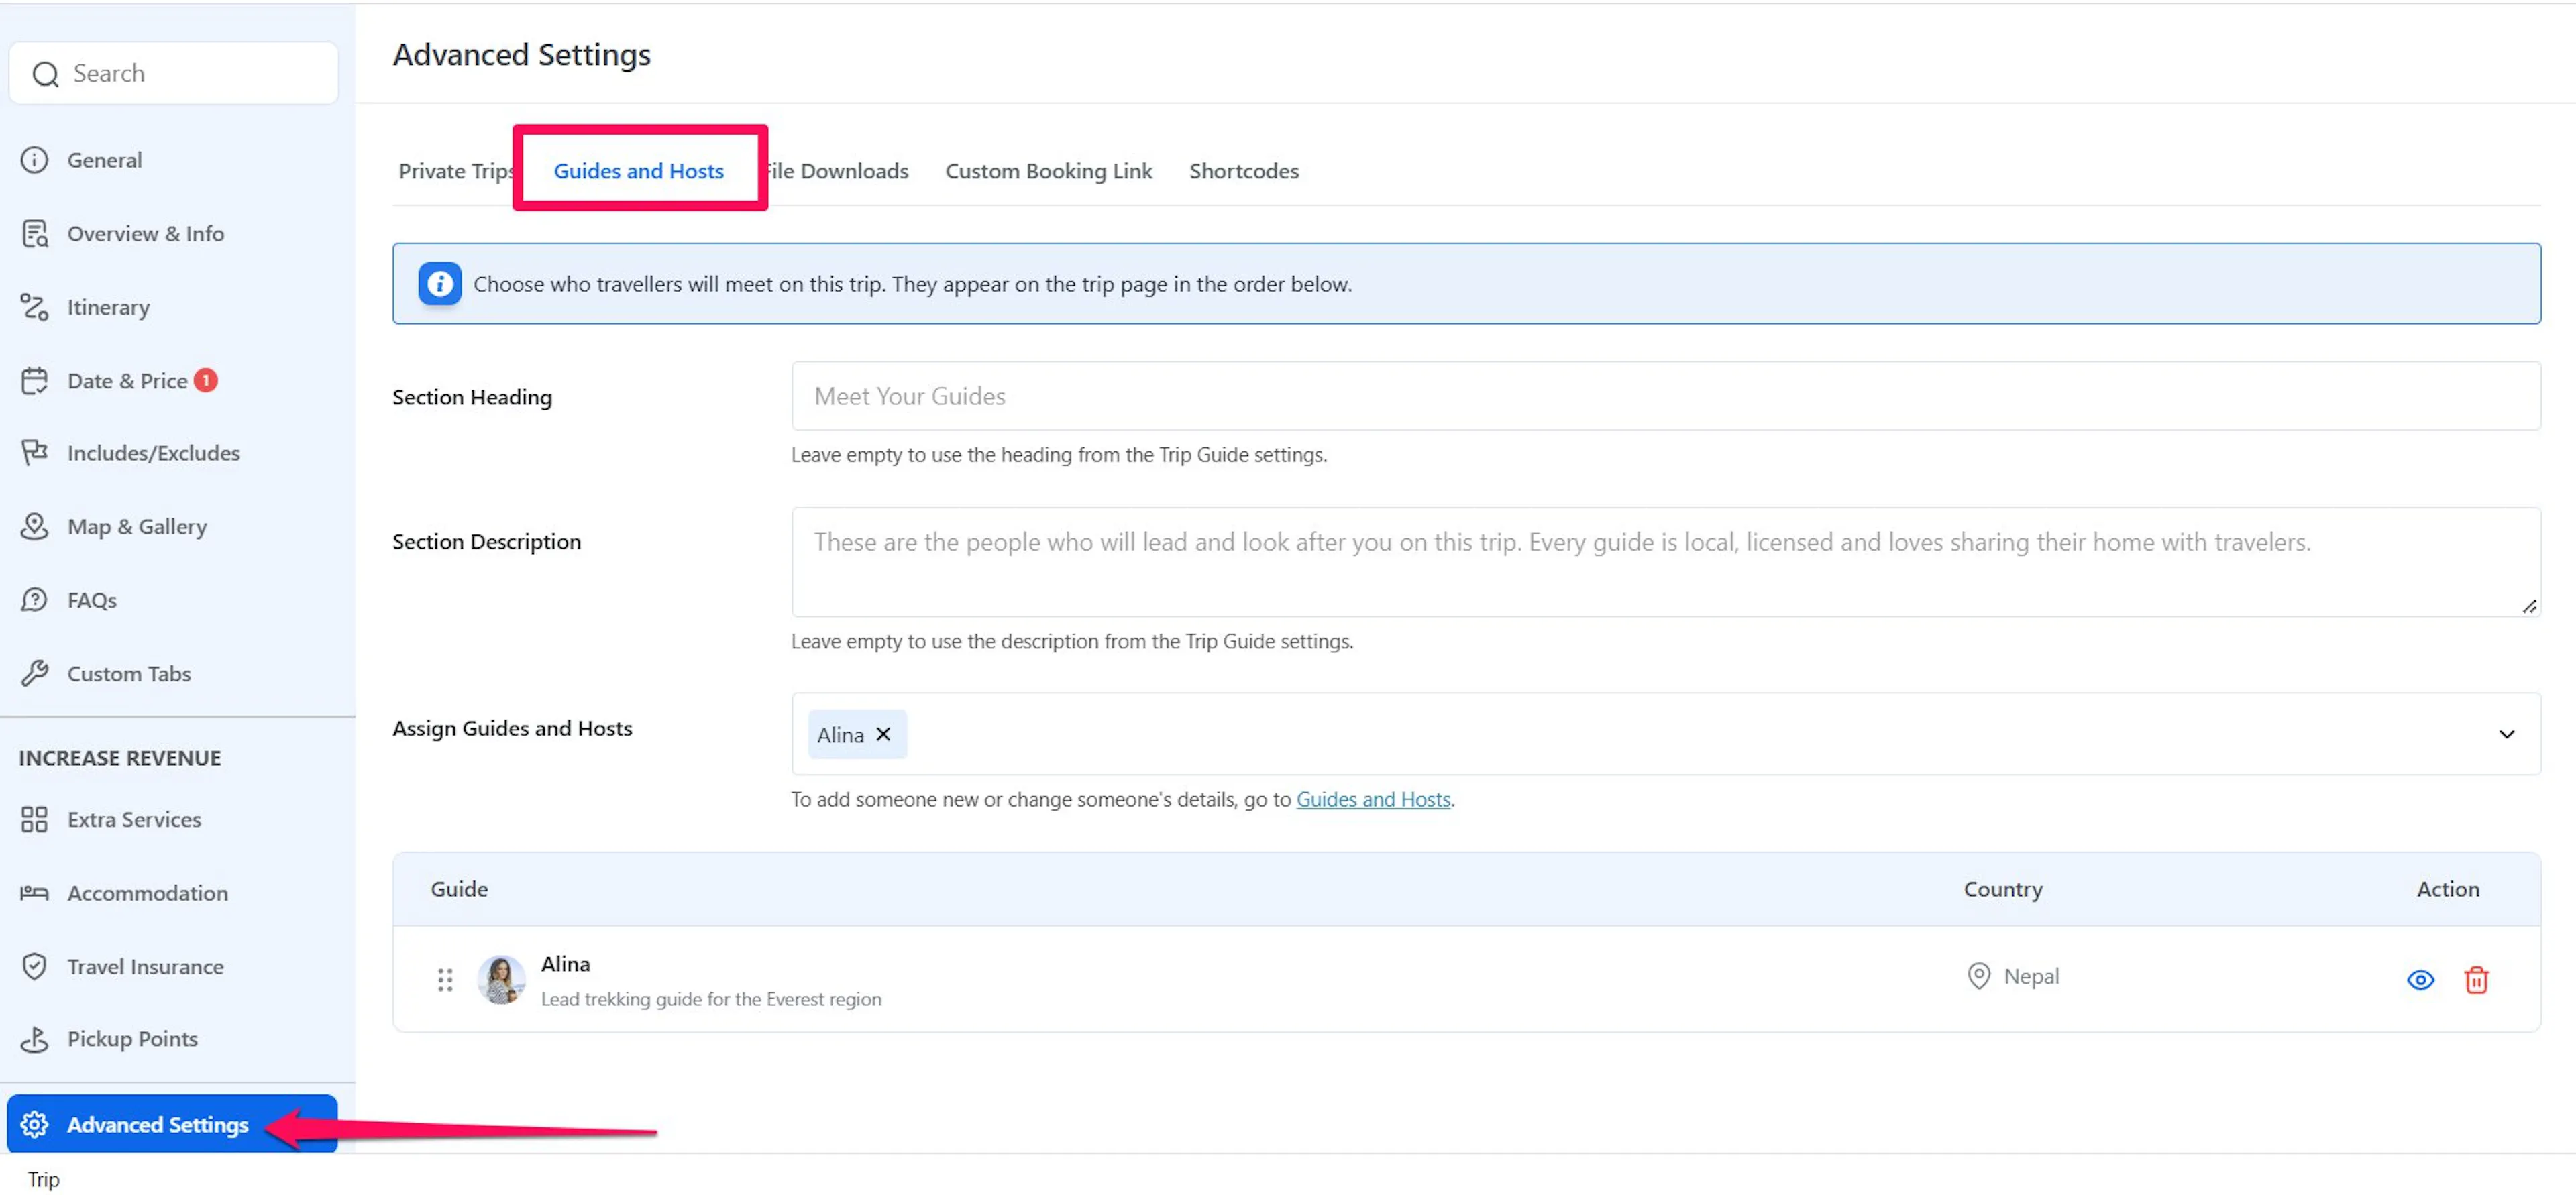
Each assigned guide appears as a row with their Country and two actions:
- Click the eye icon (Preview details) to open a side panel with the guide's profile and internal details. Click Edit this guide in the panel to open their full editor in a new tab.
- Click the trash icon (Remove from this trip) to take the guide off this trip. This does not delete the guide.
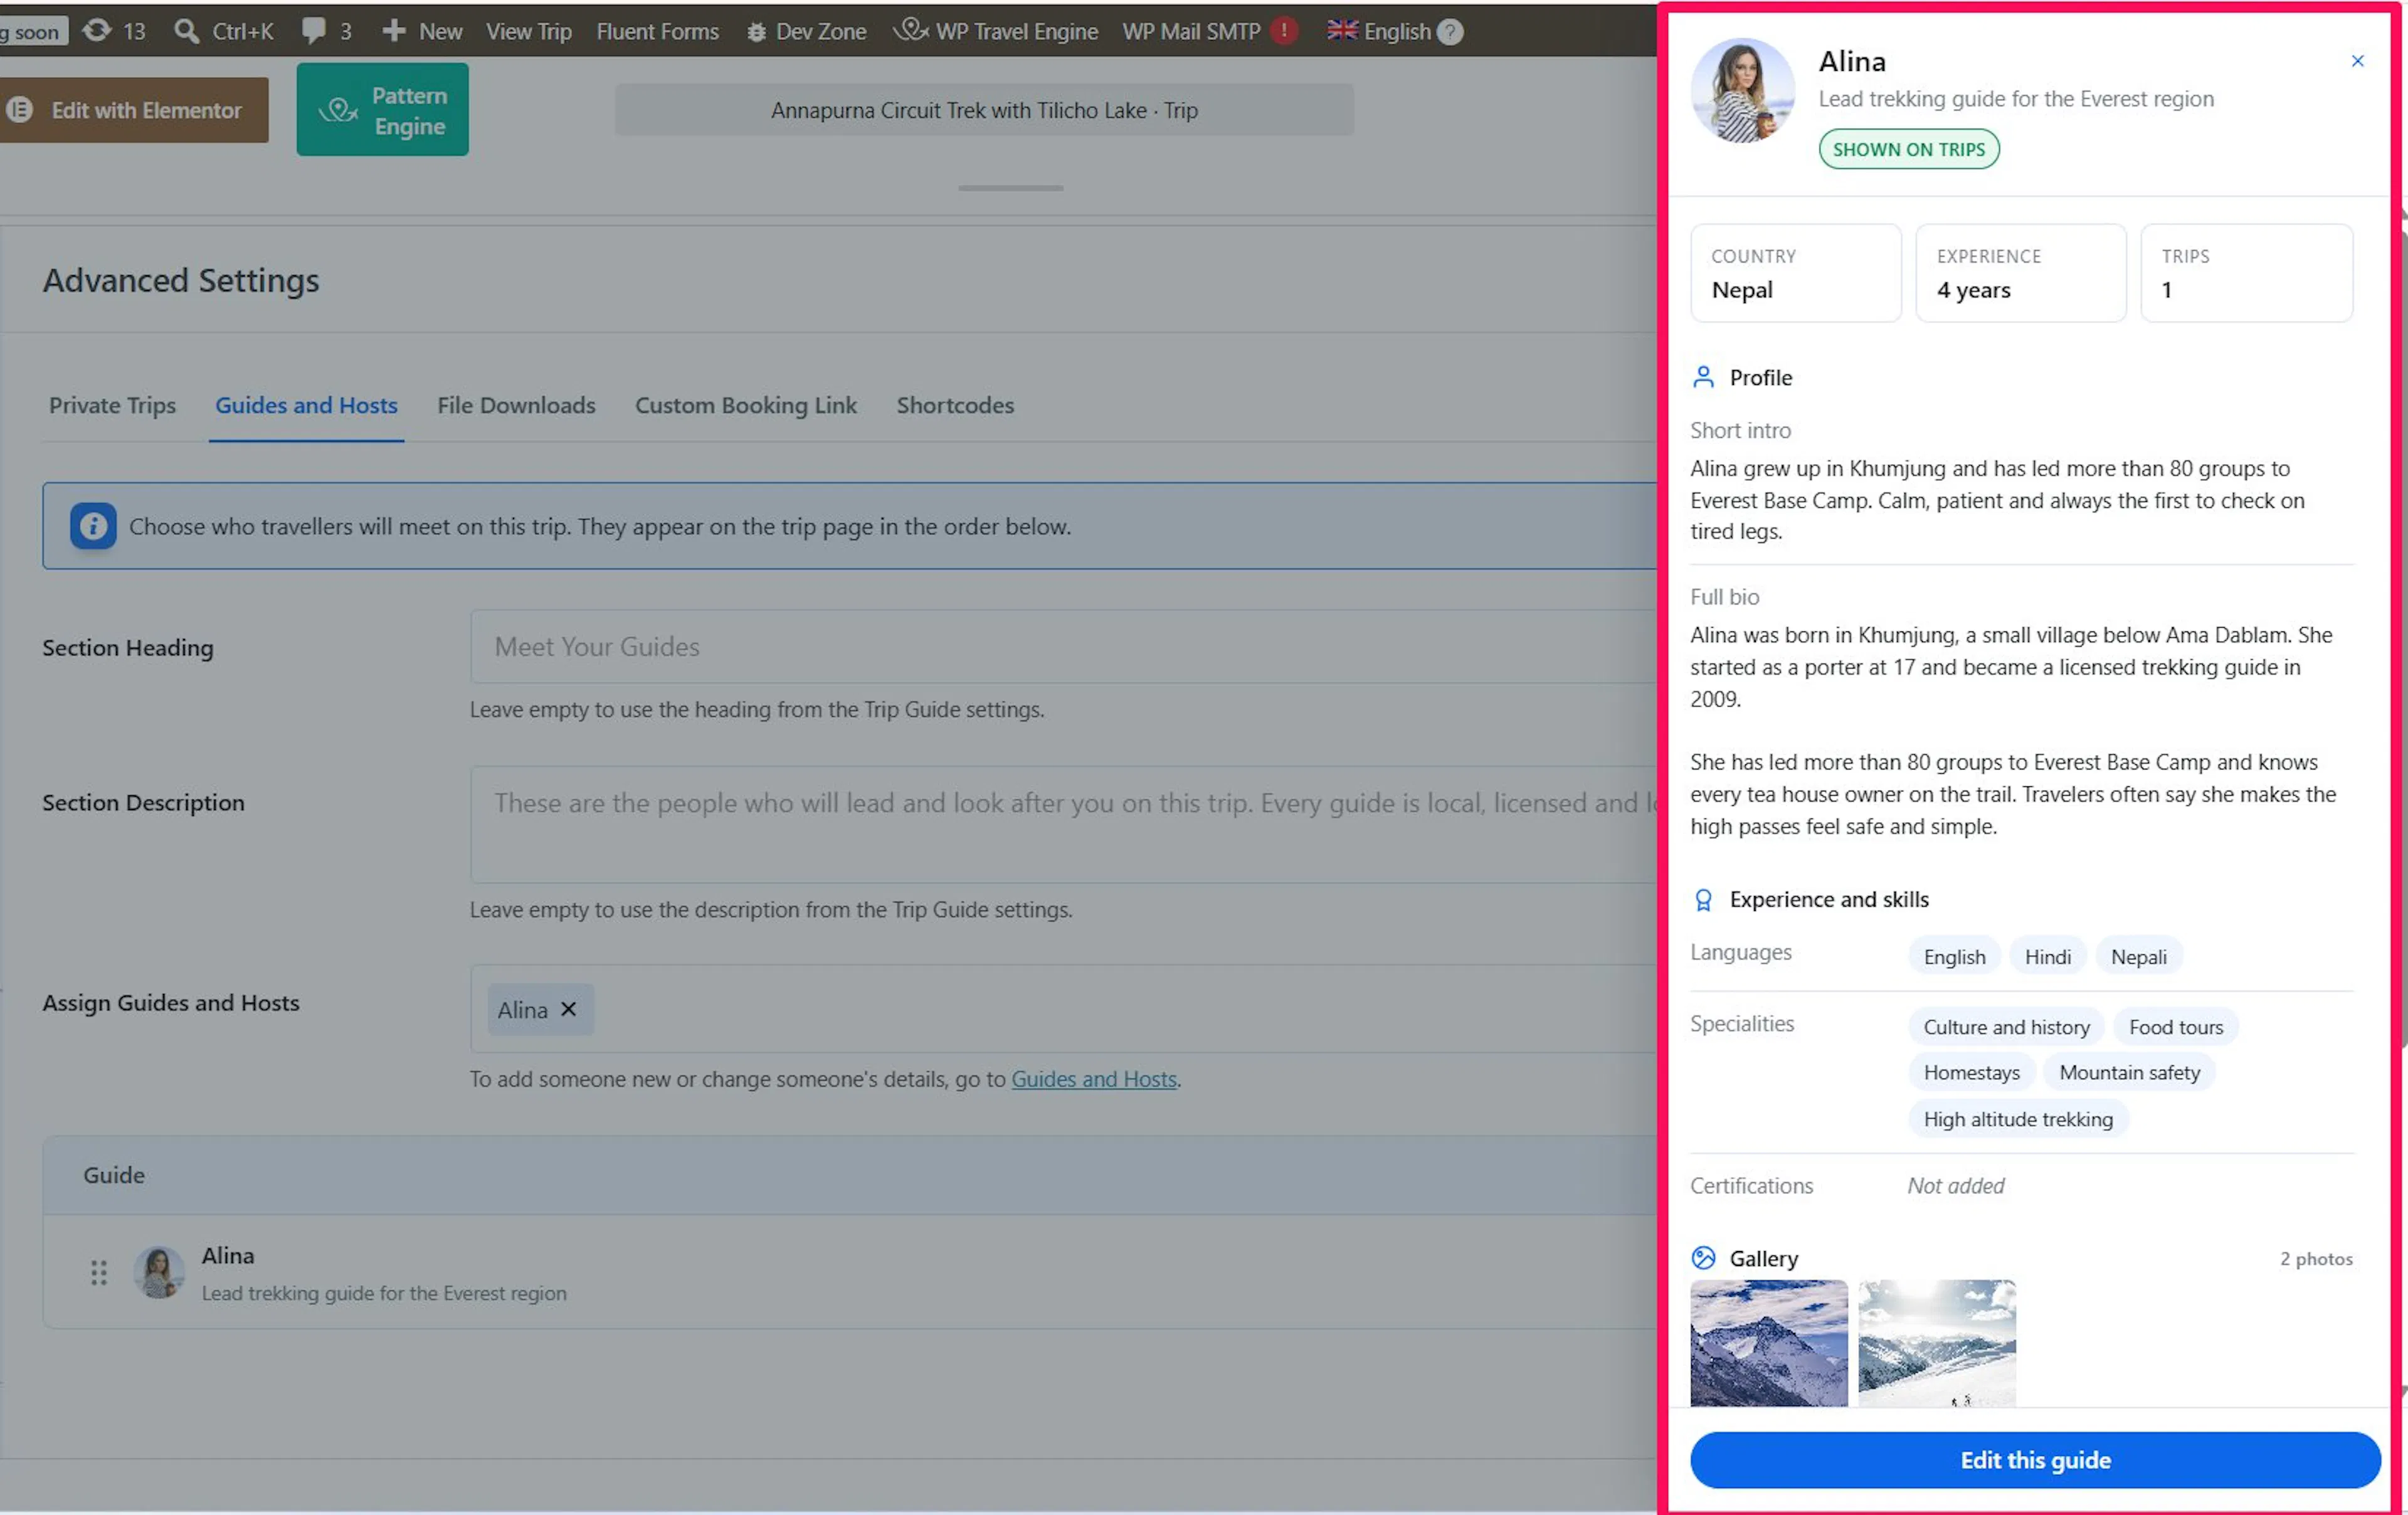
Messages you may see on this screen:
- No one added yet. The Guides and Hosts section stays hidden on the trip page until you add someone.
- A warning that a guide has no gallery photos. This appears when you use Grid 3, and those guides show a placeholder cover.
- A warning that an assigned guide is hidden on all trips. That guide doesn't appear on this trip page until you turn off Hide on all trips.
- A message that you haven't added any guides yet, with a pointer to WP Travel Engine > Guides and Hosts.
Showing or Hiding the Tab on Your Trip Pages
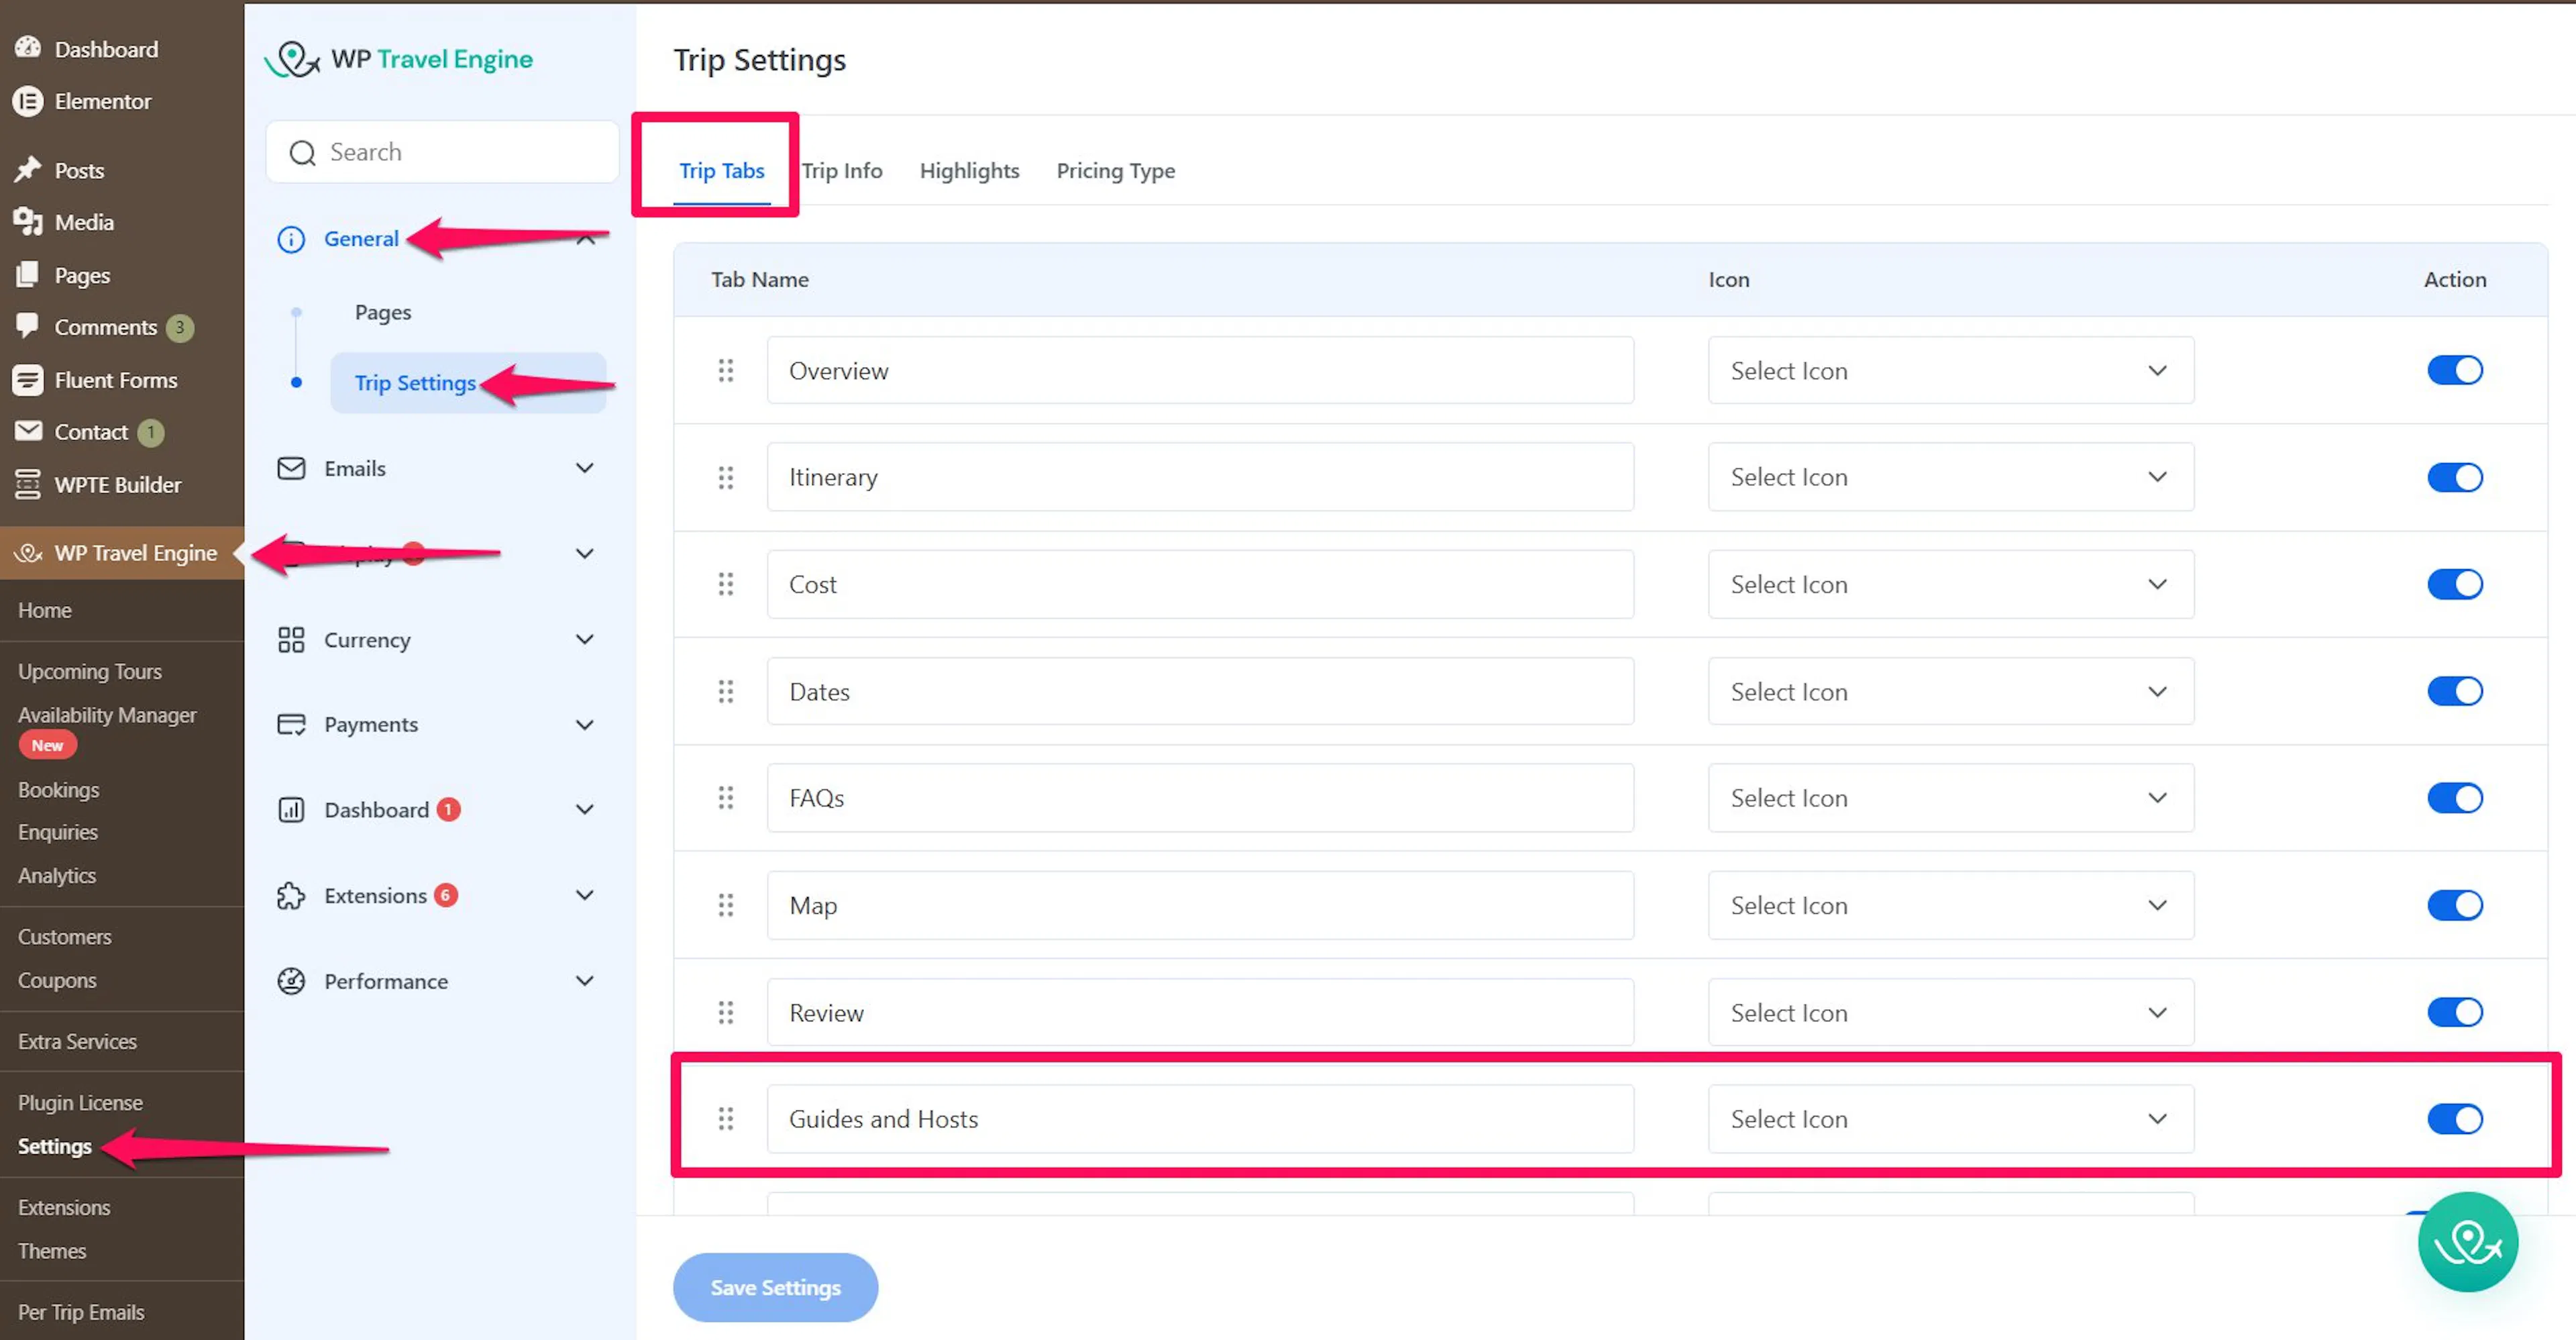
The add-on adds a Guides and Hosts tab to your trip tabs when you activate it. You can rename, reorder or turn it off in WP Travel Engine > Settings > General > Trip Settings > Trip Tabs. If you turn the tab off, the add-on doesn't turn it back on.
What Travelers See on the Trip Page
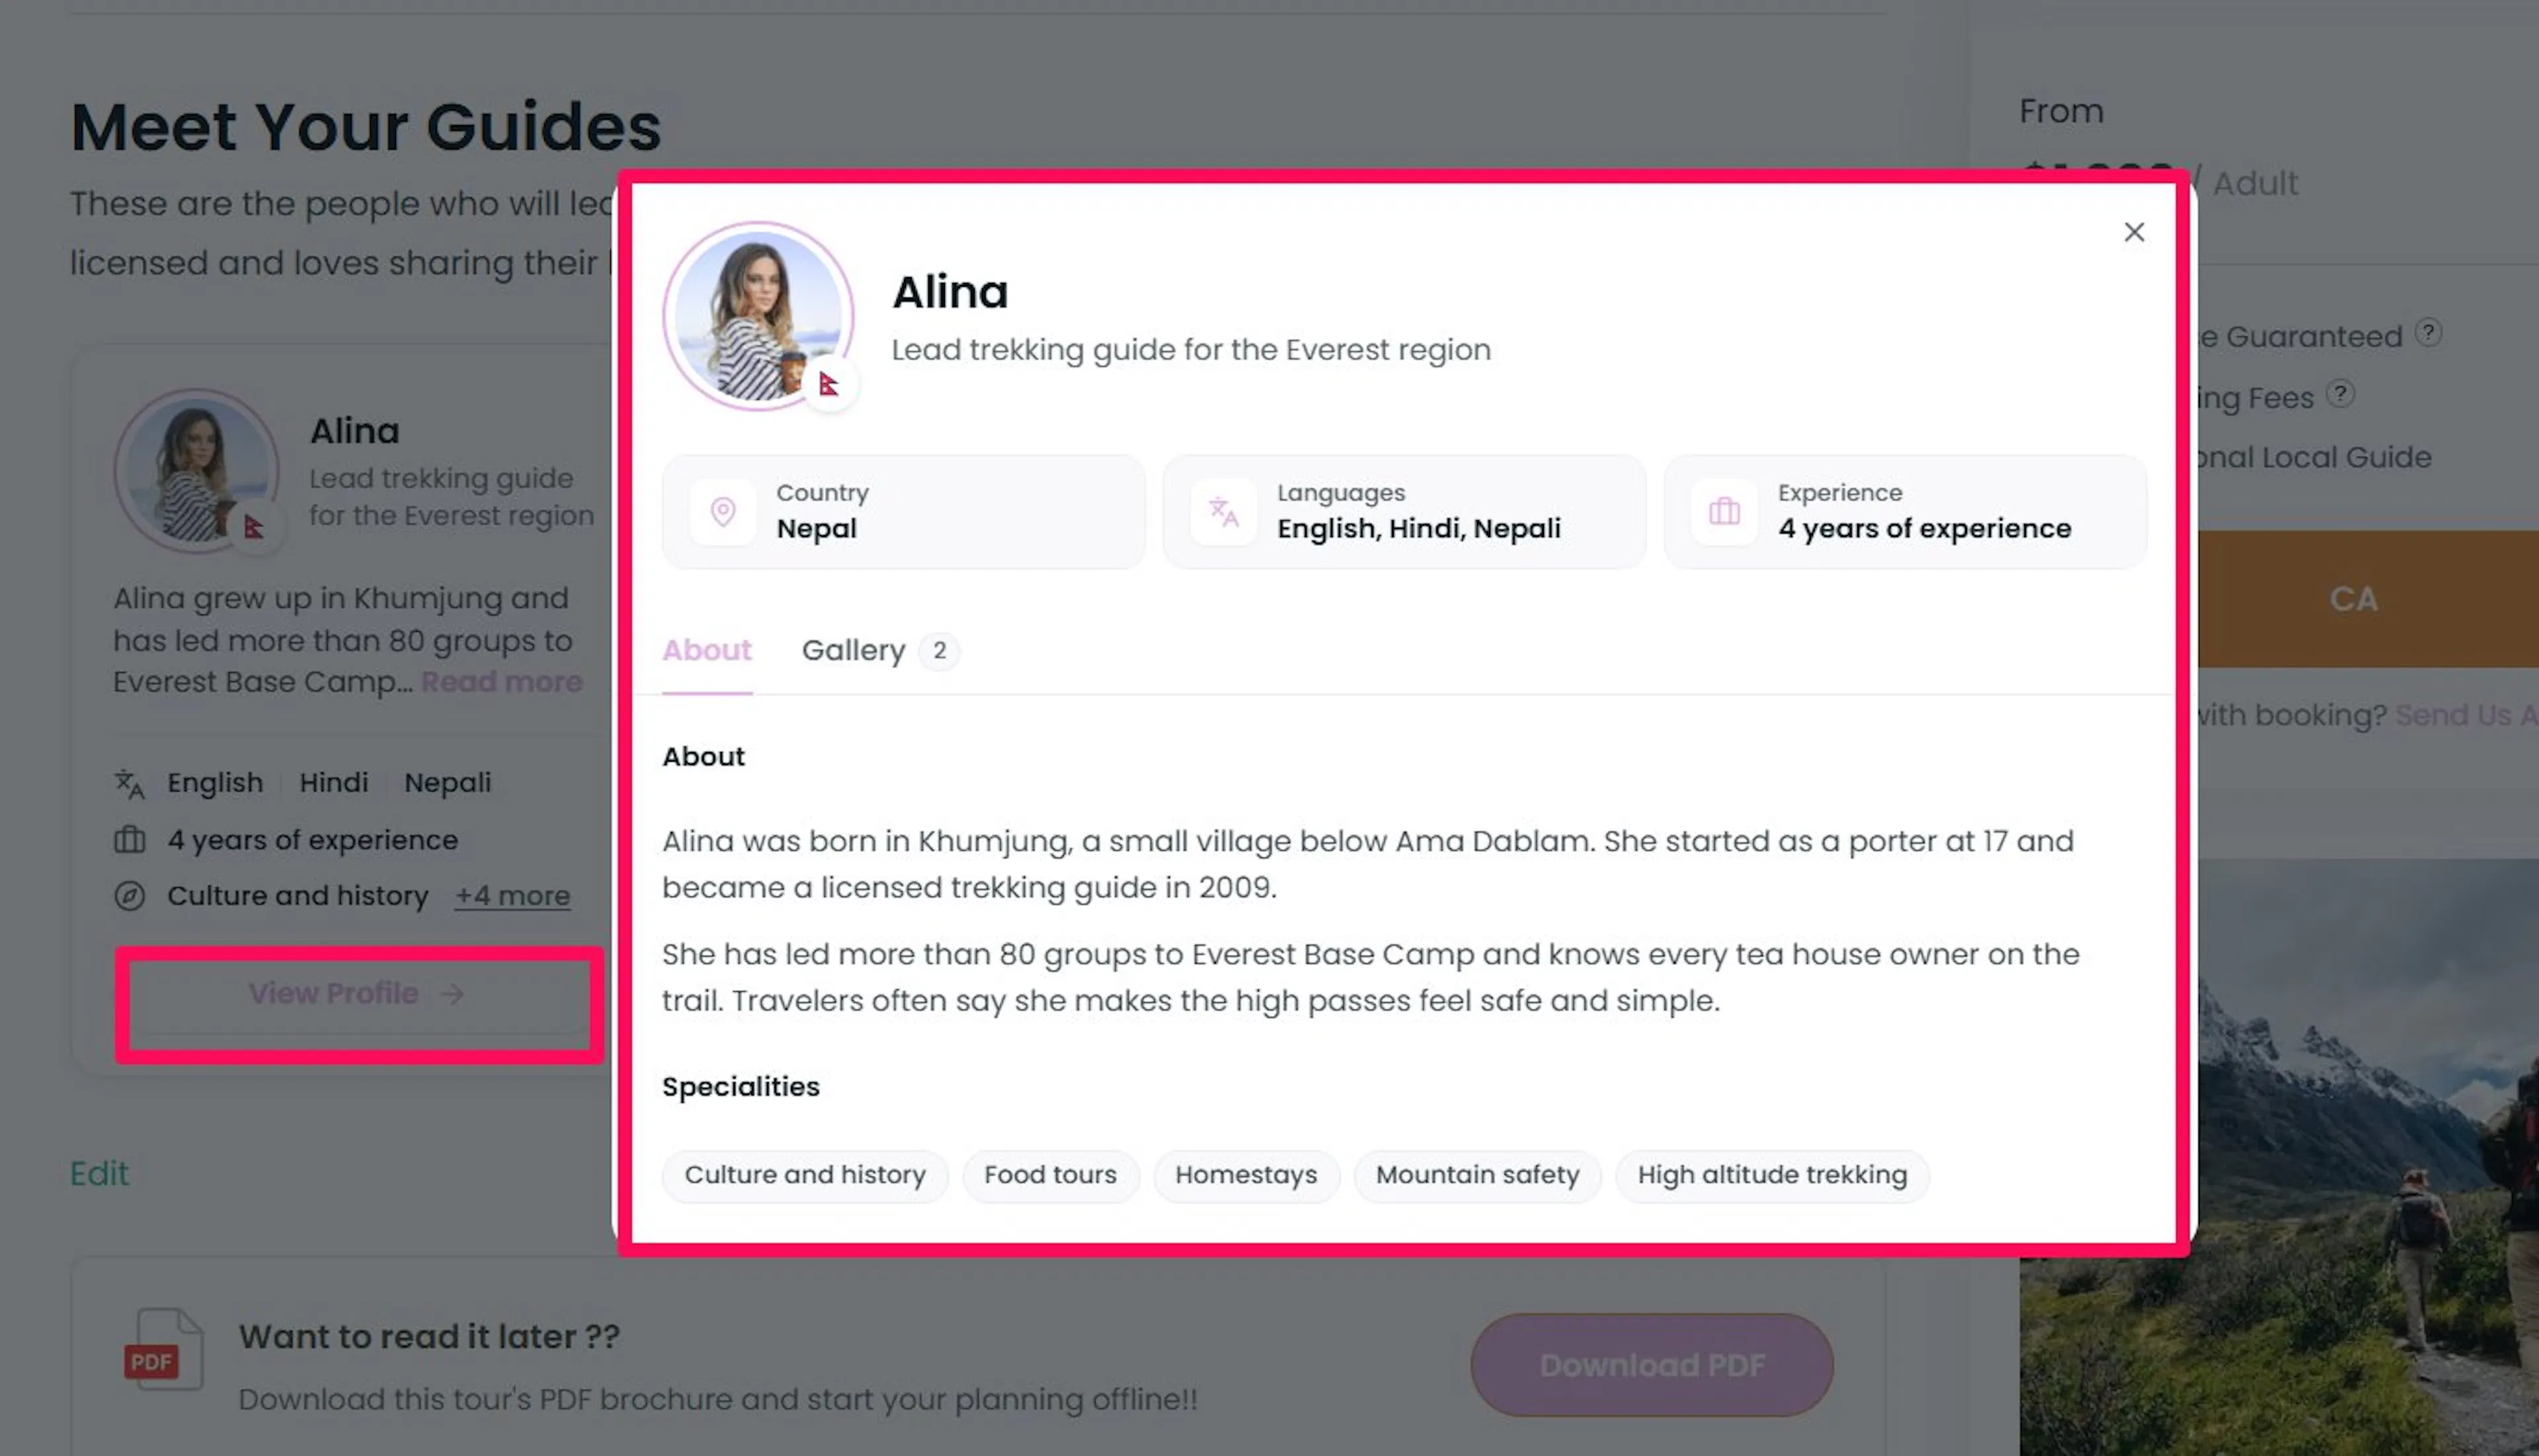
Travelers see a Guides and Hosts tab on the trip page. It shows your section heading, the description if you added one, and a card for each guide in the order you set.
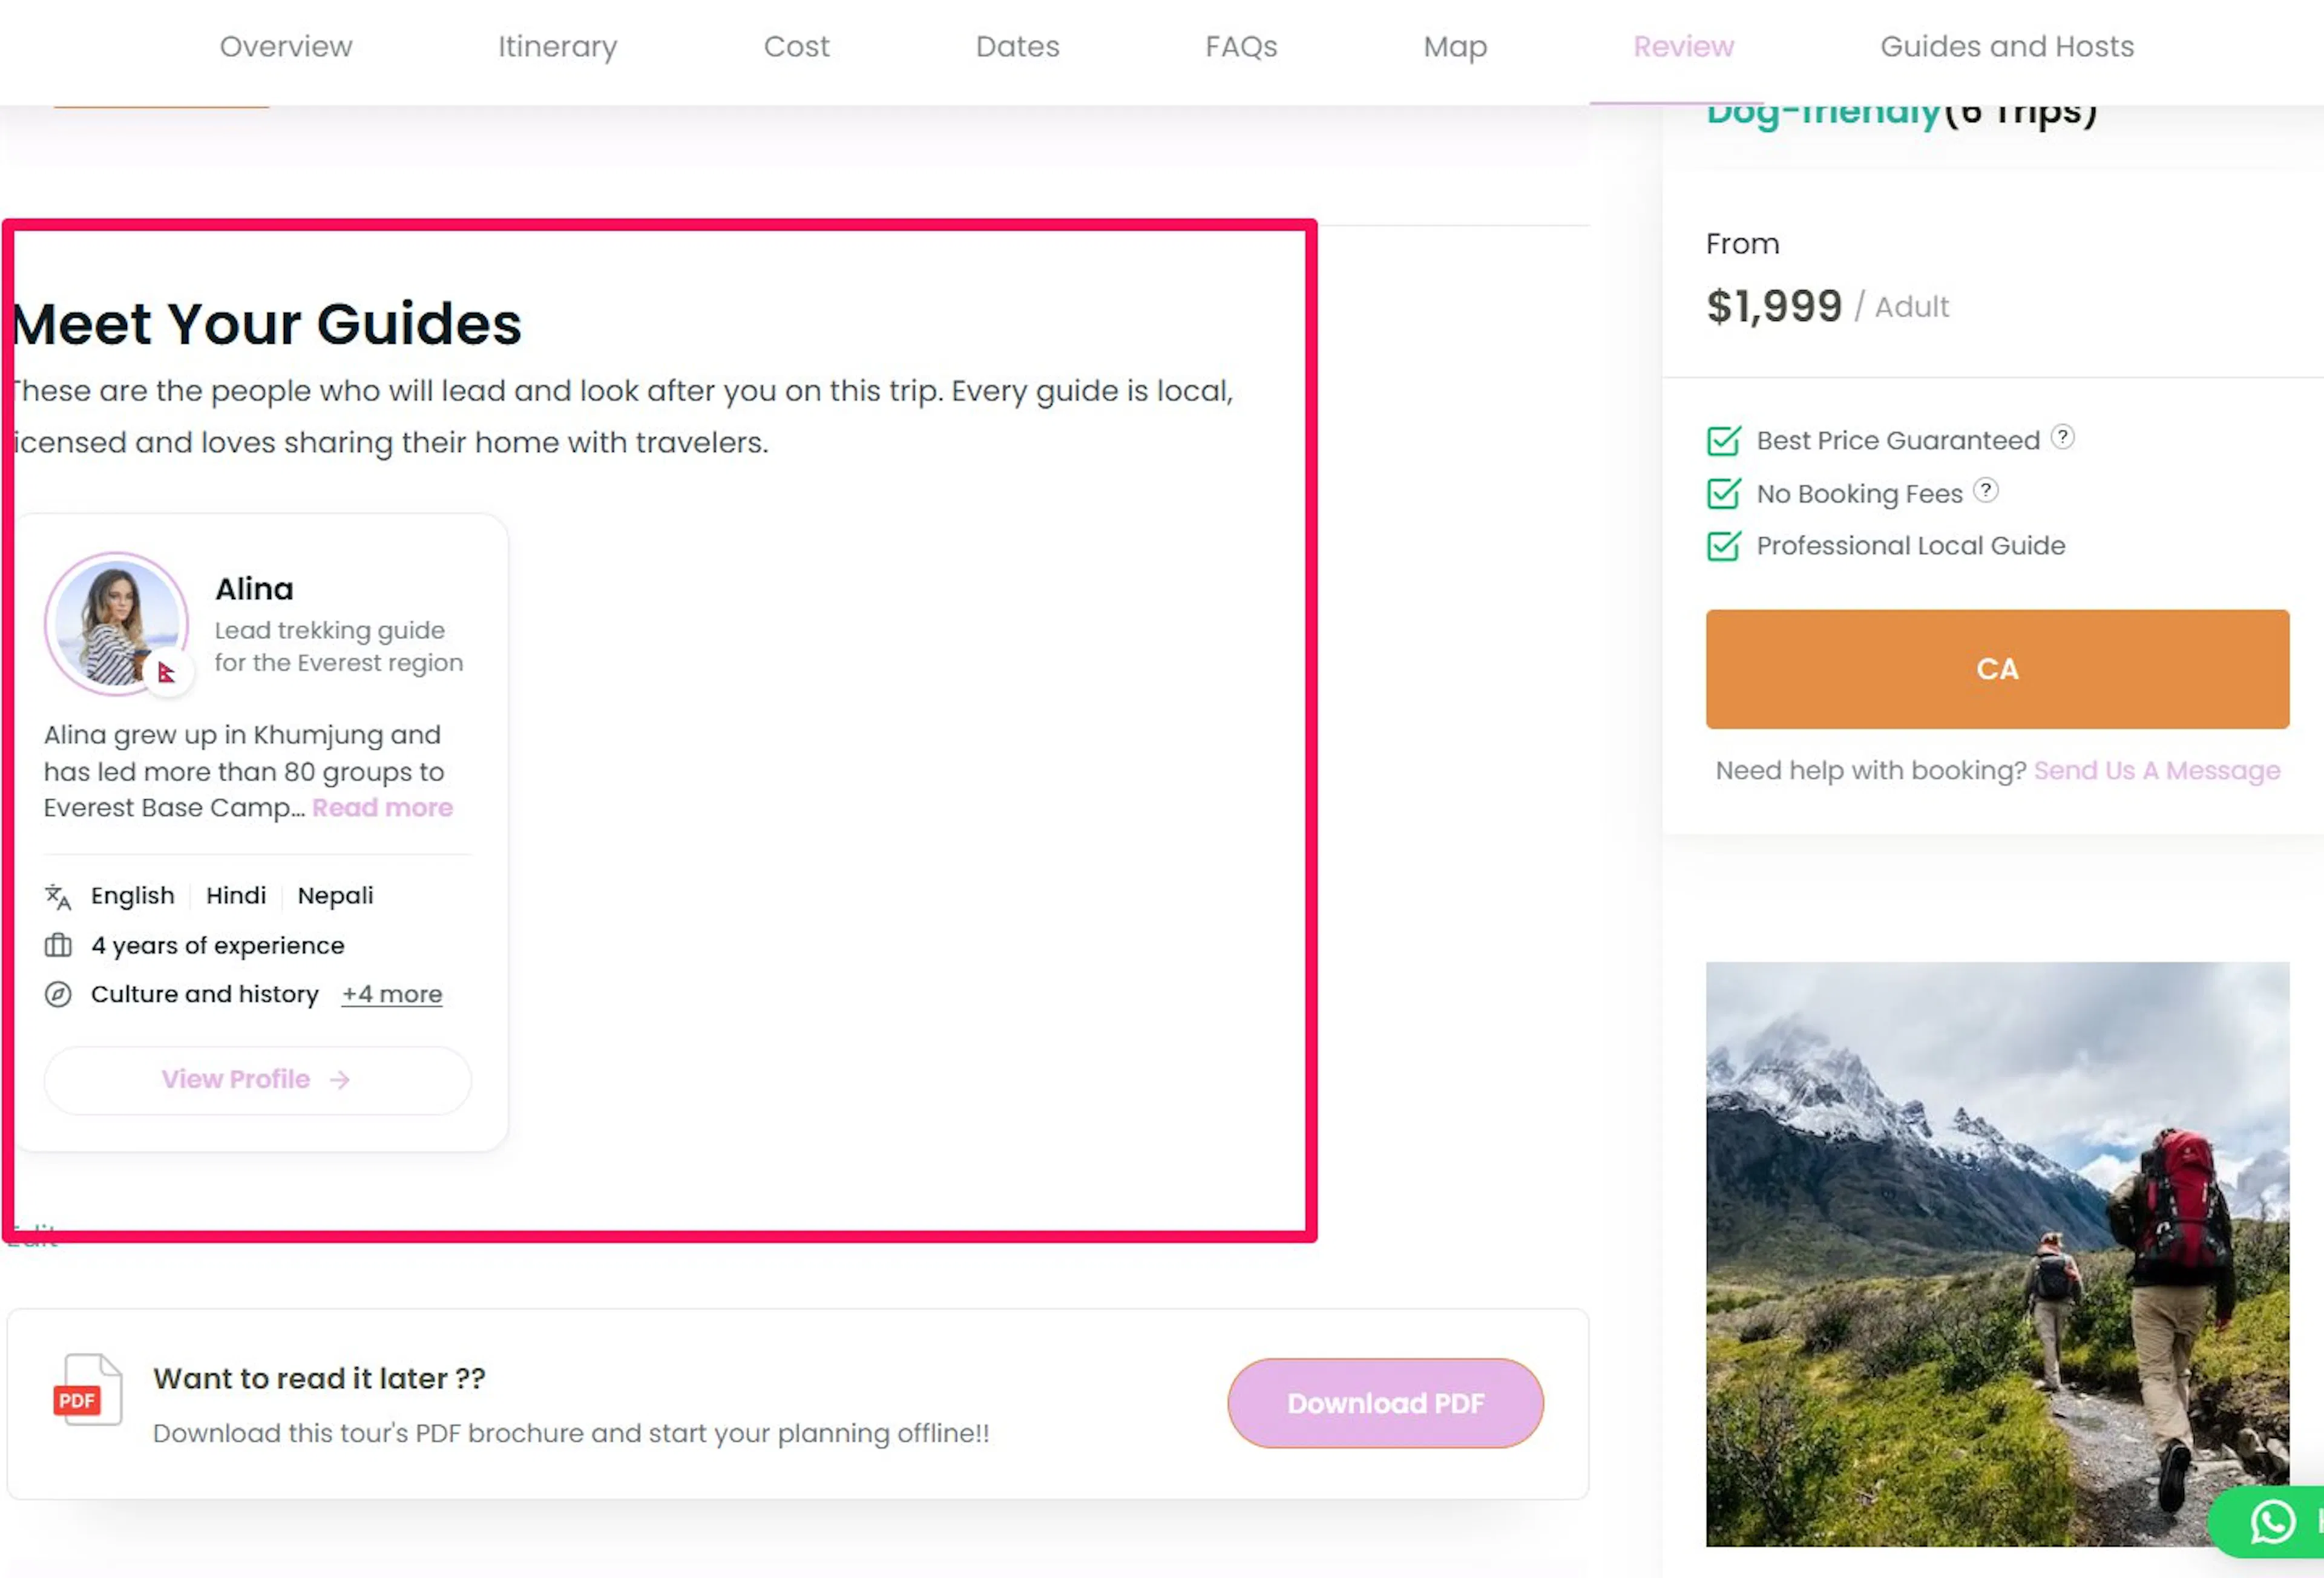
A card can include:
- The guide's photo, or their initials if there is no photo, with a country flag when one is available.
- The guide's name, tagline and social media icons.
- The short intro, cut to three lines with a Read more link when it is longer. The List layout shows the full intro.
- A country line (when no flag is available), languages, years of experience, a count of certifications, and specialities. If the specialities don't fit, a Show 3 more specialities style link opens the full list, and Show less closes it.
- A View Profile button.
Travelers click View Profile to open the full profile in a window without leaving the trip page. The window shows:
- The guide's photo, name, tagline and social media icons.
- Tiles for Country, Languages and Experience.
- An About tab with the full bio, Specialities and Certifications, including who issued each one.
- A Gallery tab with the guide's photos, when the guide has any. Clicking a photo opens it larger. The tab shows the number of photos.
On the Grid 3 layout, travelers can swipe through each guide's gallery photos on the card. Clicking a photo opens that guide's profile on the Gallery tab. A guide with no gallery photos shows their profile photo instead.
Note: Hidden guides never show on the trip page. If a trip has no visible guides, the tab and the section don't appear at all.
Keeping Contact Details Private
Email, phone and emergency contact details are for your team only. They never appear on the trip page and never show in public responses from your site. Only people who sign in to your dashboard can see them.
WordPress privacy tools also work with guide records. When you export or erase personal data for a person through Tools > Export Personal Data or Tools > Erase Personal Data, the add-on matches guides by email address:
- An export includes the guide's name, email, phone, emergency contact name, emergency contact phone and biography.
- An erase clears the email, phone and emergency contact details. The rest of the profile stays.
Who Can Manage Guides
Any user who can edit posts on your site can add and edit guides on the Guides and Hosts page. To assign guides to a trip, the user also needs permission to edit that trip.
Deactivating or Removing the Add-on
- Deactivating the add-on removes the Guides and Hosts tab from your trips. WP Travel Engine doesn't delete any guides or assignments, and everything comes back when you activate the add-on again.
- Uninstalling the add-on also keeps your data.
- Deleting a photo from the Media Library removes it from any guide profile or gallery that used it.
- Deleting a trip removes its guide assignments and updates each guide's trip count.
FAQs
What does this add-on need to run?
WP Travel Engine 6.8.5 or newer. If WP Travel Engine is missing or older, the dashboard shows a notice that Guides and Hosts needs WP Travel Engine 6.8.5 or newer (or needs WP Travel Engine to be installed and activated), and the add-on stays off until you fix it.
Where do I add guides?
Go to WP Travel Engine > Guides and Hosts. Add a guide once and you can show them on any number of trips.
How do I put guides on a trip?
Edit the trip, open the Guides and Hosts tab, pick the guides and drag them into order. See Assigning Guides to a Trip.
How do I change the way guides look?
Go to WP Travel Engine > Settings > Extensions > Guides and Hosts. Pick a layout and set the heading and description. See Choosing How Guides Look on Trip Pages.
Are the contact details public?
No. Email, phone and the emergency contact are for your team only. See Keeping Contact Details Private.
Can I change the templates?
Yes, but this is a job for your developer. They copy any file from the add-on's templates folder into yourtheme/wp-travel-engine/guides-and-hosts/ and edit the copy.
What happens to my guides if I deactivate the add-on?
Nothing is deleted. The Guides and Hosts tab disappears from your trips, and everything returns when you activate the add-on again. Uninstalling keeps your data too.
Can I translate the section heading and description?
Yes. The heading and description, both the global ones and the ones set on a single trip, work with WPML for translation. Guide profiles themselves are one set of records shared across your site.
Why doesn't the Guides and Hosts tab show on my trip page?
Check these in order:
- The trip has at least one guide assigned. See Assigning Guides to a Trip.
- The guide isn't hidden. A guide marked Inactive doesn't appear on any trip.
- You saved the trip after assigning the guides.
- The tab is turned on in your trip tabs settings.
Why doesn't a guide show on a trip I assigned them to?
The guide is most likely set to Hide on all trips. Turn the setting off on the guide's page, or switch them to active in the Active column.
Why does a guide show 0 trips?
The Trips column counts published trips only. The count updates when a trip is published.
Why can't I upload a photo?
Photos must be JPG, PNG or WebP files up to 5MB. Resize larger images and try again.
Why won't a guide save?
Check that Full name has a value and that Email is a valid address. If you see That guide could not be saved., try again. A permission message such as You are not allowed to manage trip guides. means your user role can't edit guides. Ask a site administrator for help.
The cards look empty or uneven with Grid 2 or Grid 3. What should I do?
Grid 2 works best when every guide has a good profile photo, and Grid 3 works best when every guide has gallery photos. Add the missing photos, or switch to Grid 1, which works with or without photos.
If you're still stuck or have a question we didn't cover, our support team is happy to help. Reach out at our support page and we'll get you sorted.