

Travel Muni Pro Theme: Complete Setup Guide
Install the Travel Muni Pro theme, import demo content, activate your license, set up your homepage, and customize every section of your tour website.
Getting started with Travel Muni Pro
Travel Muni Pro is a WordPress theme made for tour and travel businesses. A WordPress theme controls your website's colors, layout, fonts, and page structure.
This page takes you through installation and setup. You will also find links to every settings area that Travel Muni Pro adds. Work through the steps in order the first time. Later, use the section cards to return to a specific area.
To search this page, press Ctrl+F on your keyboard. Your browser will show a search box. Type a word such as license or homepage.
What you'll need before you start
Travel Muni Pro needs WordPress version 4.5 or newer. WordPress is the software that runs your website. A newer version gives you the latest features and security fixes.
You can download the latest version from the WordPress repository.
Before you begin, make sure you have:
- Checked your WordPress version and updated it if needed.
- Installed and activated the Travel Muni Pro theme.
- Installed the recommended plugins. Some theme features need these plugins to work.
Check and update your WordPress version
Updating WordPress first helps prevent compatibility and security problems while you install the theme.
What you'll need before you start: access to your WordPress dashboard.
Open the WordPress updates page
On the left sidebar of your WordPress dashboard, click Dashboard, then click Updates. This page shows your current WordPress version and any available updates.
Install an available update
If WordPress shows an update, click the update button and wait for the process to finish. Keep the dashboard open until WordPress confirms that the update is complete.
Your WordPress installation is ready when the Updates page shows that you are using the latest available version. You can now check the image sizes that work best with the theme.
Recommended image sizes
Using the right image size helps your photos look clear and correctly proportioned. Images that are too large or too small can look stretched or blurry.
| Element | Recommended size |
|---|---|
| Banner Slider Image | 1920 × 600 px |
| Header Image | 960 × 650 px |
| Header Background Image | 1920 × 350 px |
| Site Logo | 600 × 60 px |
| Trip Taxonomy Image | 600 × 600 px |
| Post Thumbnail Image | 610 × 343 px |
| Mega Menu Image | 594 × 373 px |
| Single Trip Page Banner | 1920 × 500 px |
Say you are adding a photo of your trekking group on a mountain trail. For the banner at the top of a trip page, aim for 1920 × 500 pixels. Photos that are close to these dimensions should look fine.
With your WordPress version and images ready, you can import sample content to create the starting layout for your site.
Import the demo content
Demo content is a set of sample pages, images, and settings that makes your website look like the theme preview. Think of it like importing a sample itinerary. You get a planned starting point, then replace the sample trips and photos with your own.
What you'll need before you start: an active Travel Muni Pro installation and access to the left sidebar of your WordPress dashboard.
Install the demo import plugin
The importer gives you a way to bring the sample pages and settings into your site. Install and activate the One Click Demo Import plugin.
Open the demo importer
On the left sidebar of your WordPress dashboard, click Appearance, then click Import Demo Data. This opens the page where you can start the sample content import.
Run the import
Click Import Demo Data. Keep the page open while WordPress adds the sample pages, images, and settings.
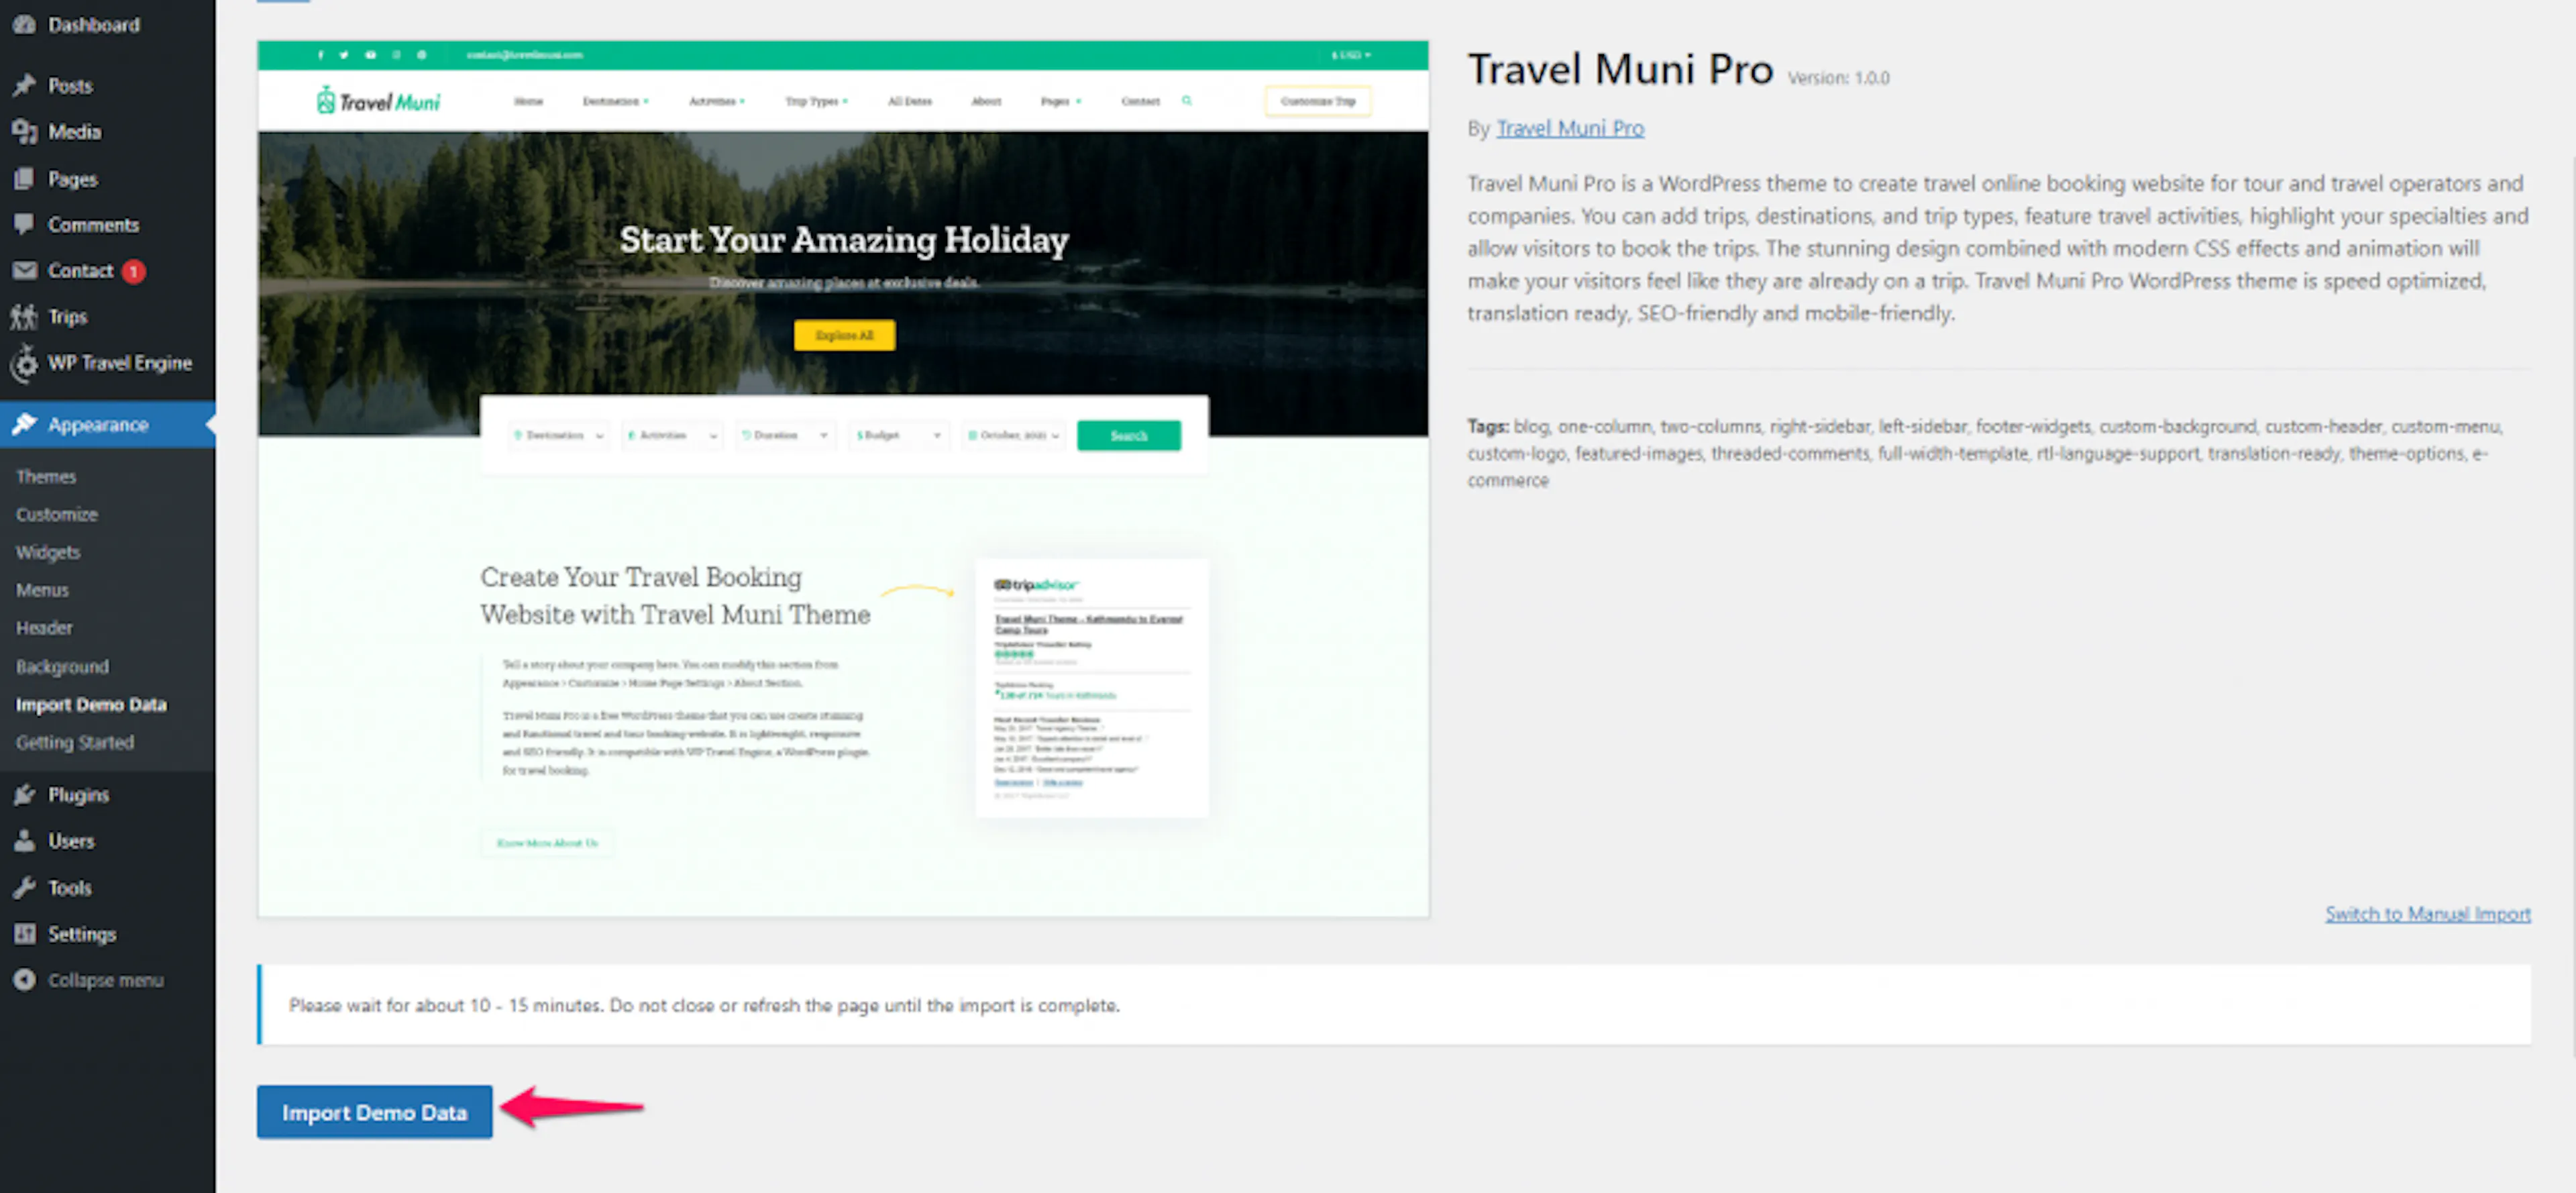
A success message appears when the import finishes. You can then replace the sample content with your tour details.
Your site now has a starting layout based on the theme preview. Next, install and activate the theme itself if you have not done that already.
Install and activate the theme
If you use Safari on a Mac, downloaded .zip files sometimes unzip automatically. Check that your theme file is still in .zip format before you upload it. Follow these instructions to stop Safari from auto-unzipping files.
What you'll need before you start: the downloaded travel-muni-pro.zip file saved somewhere on your computer.
Save the theme file
Keep the downloaded travel-muni-pro.zip file somewhere you can find it. WordPress needs this file to install Travel Muni Pro.
Open the theme uploader
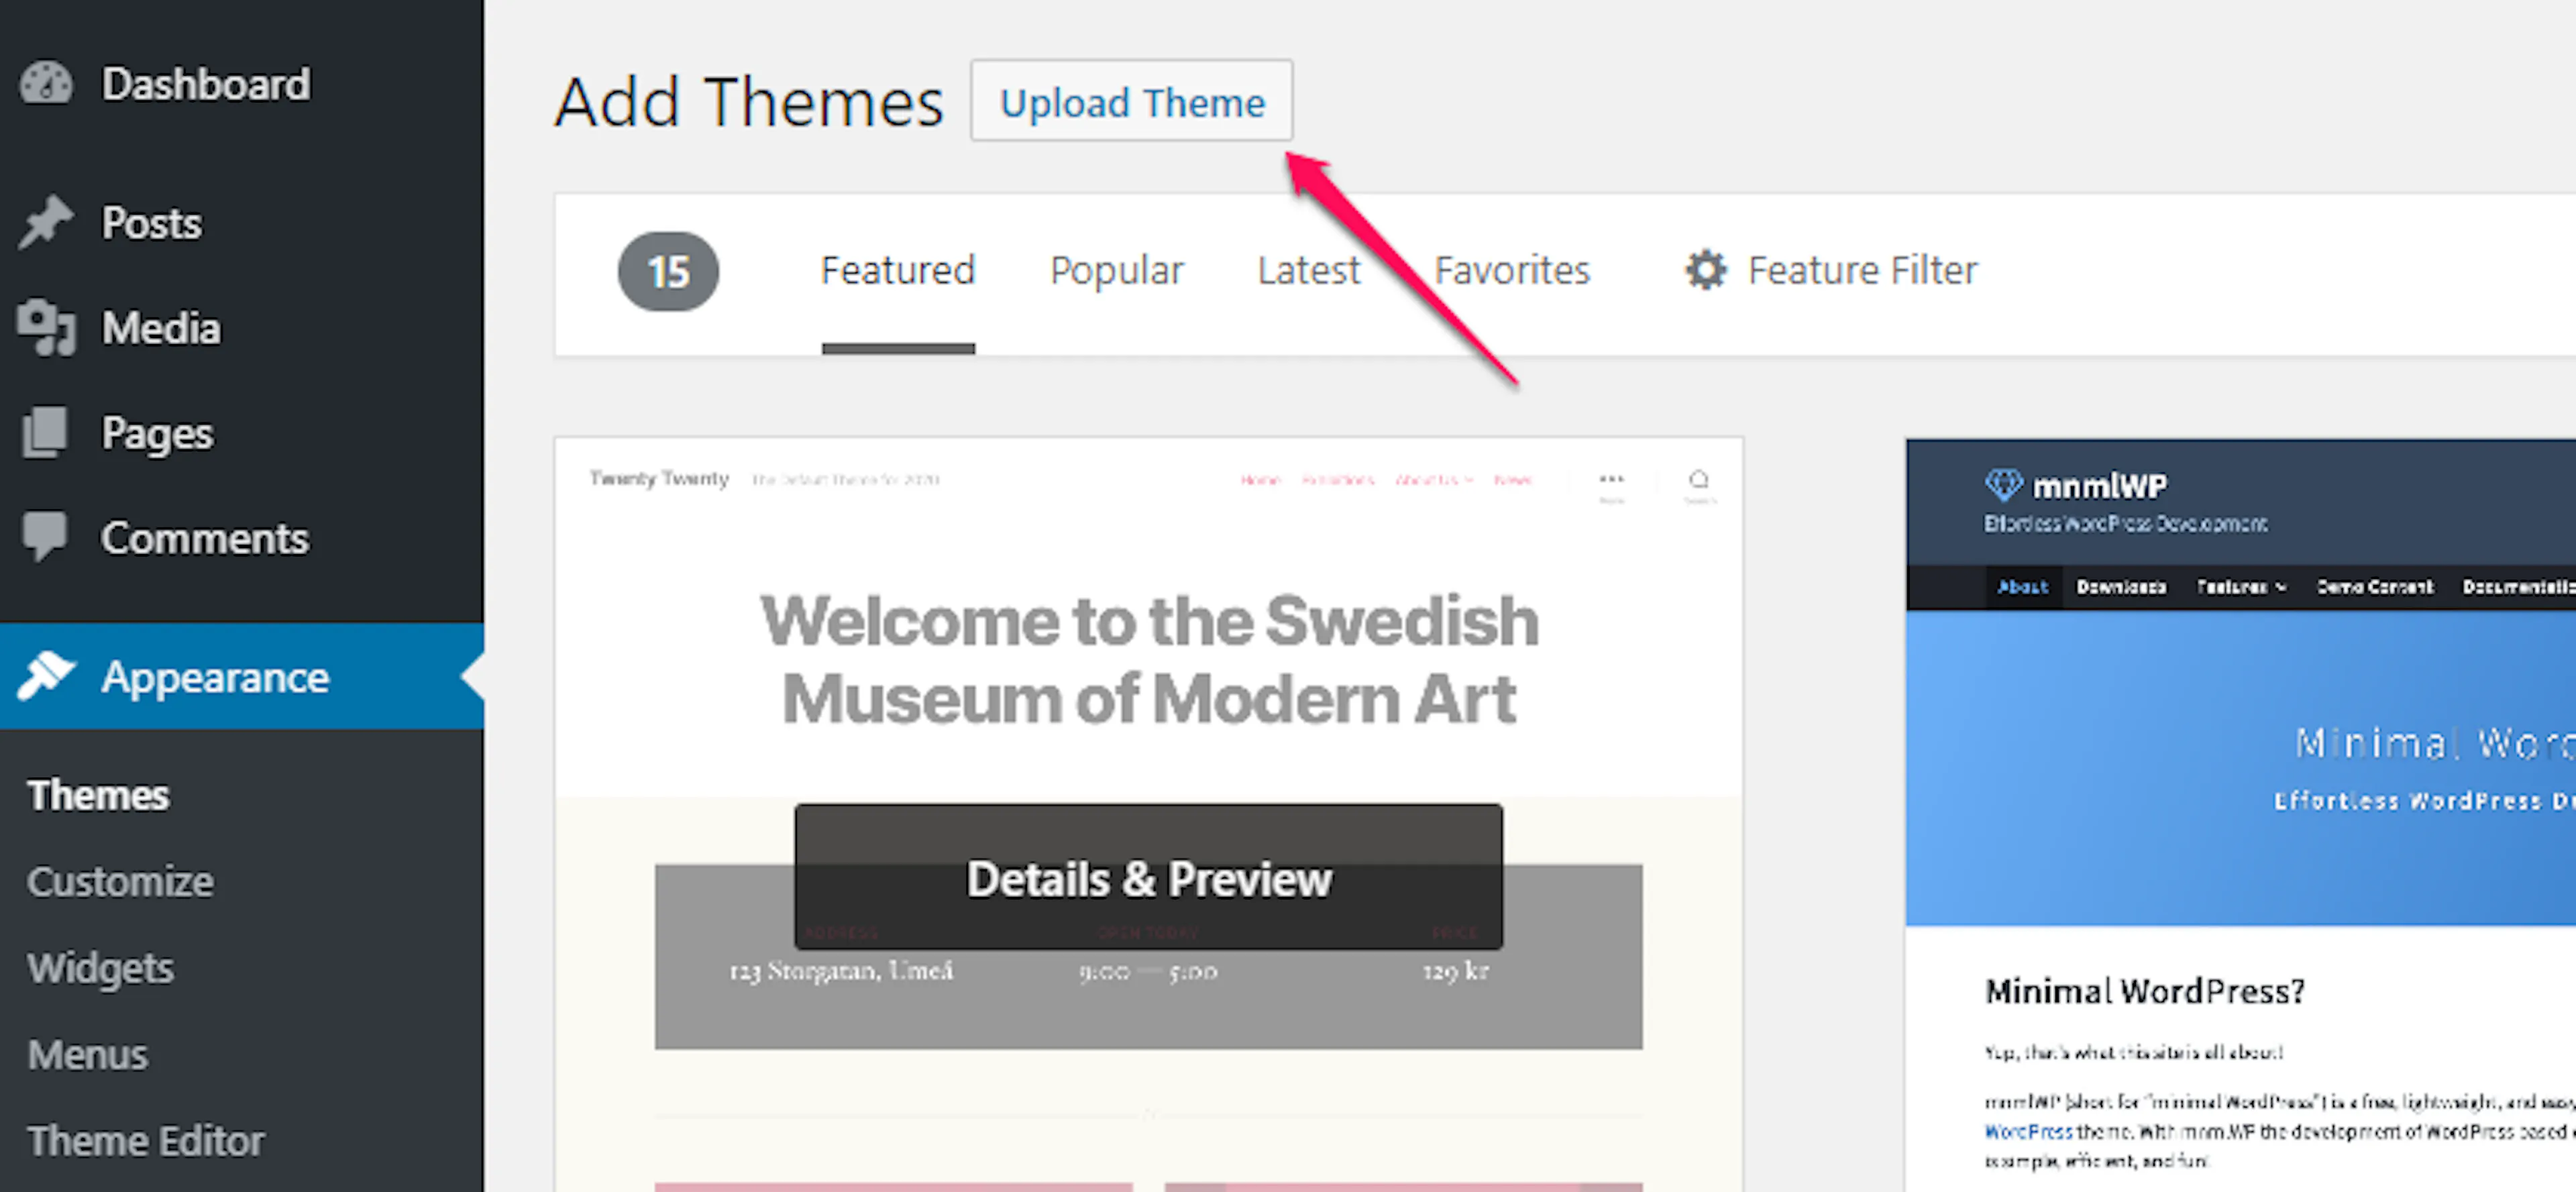
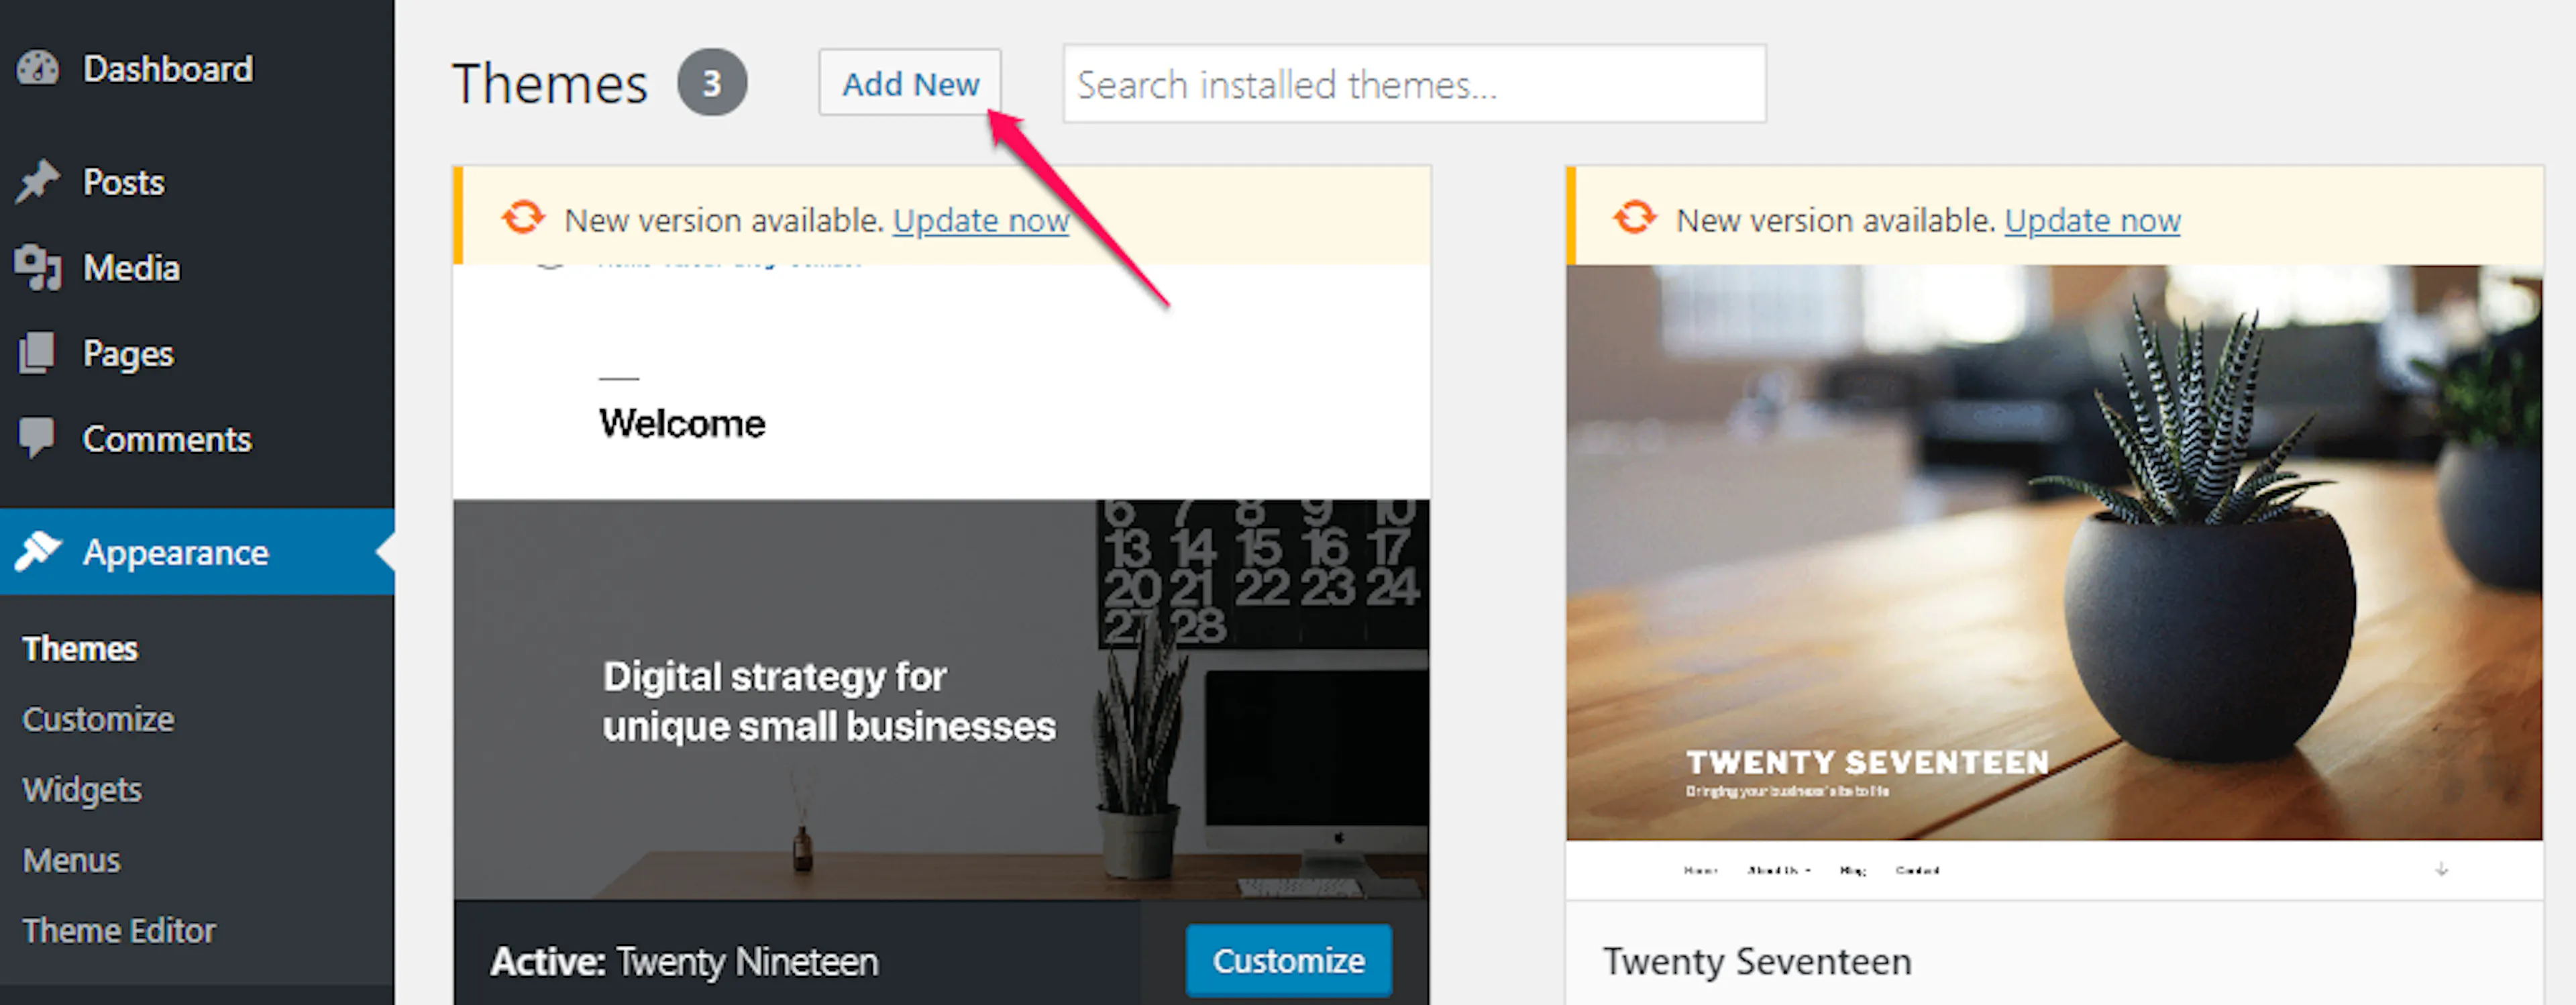
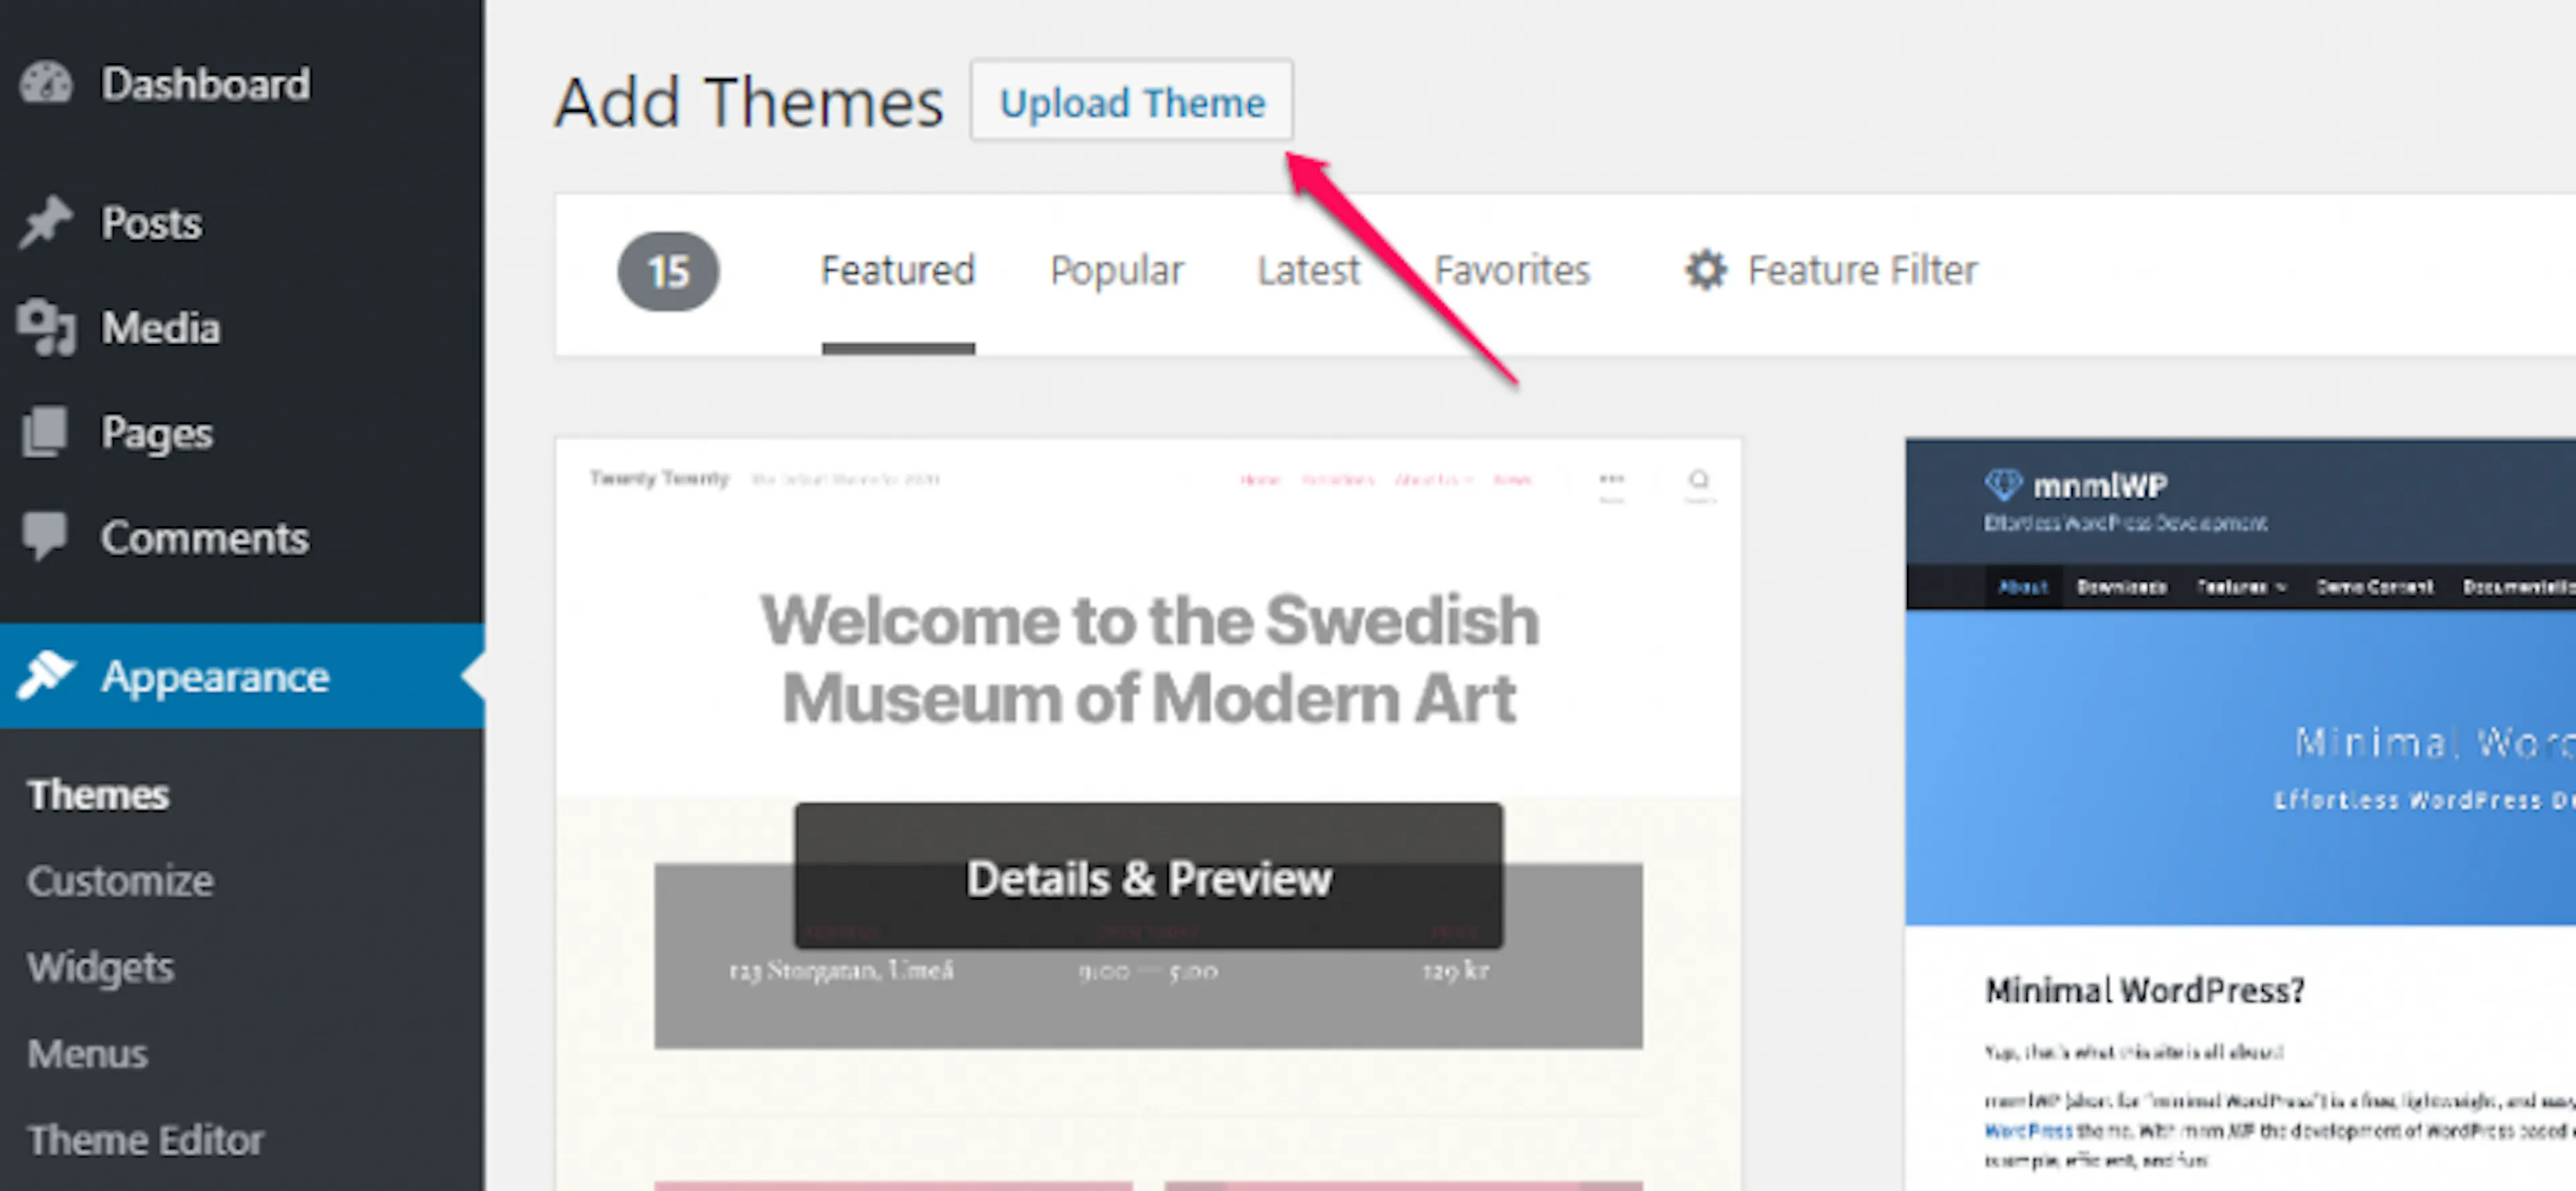
On the left sidebar of your WordPress dashboard, click Appearance, then click Themes. Click Add New, then click Upload Theme.
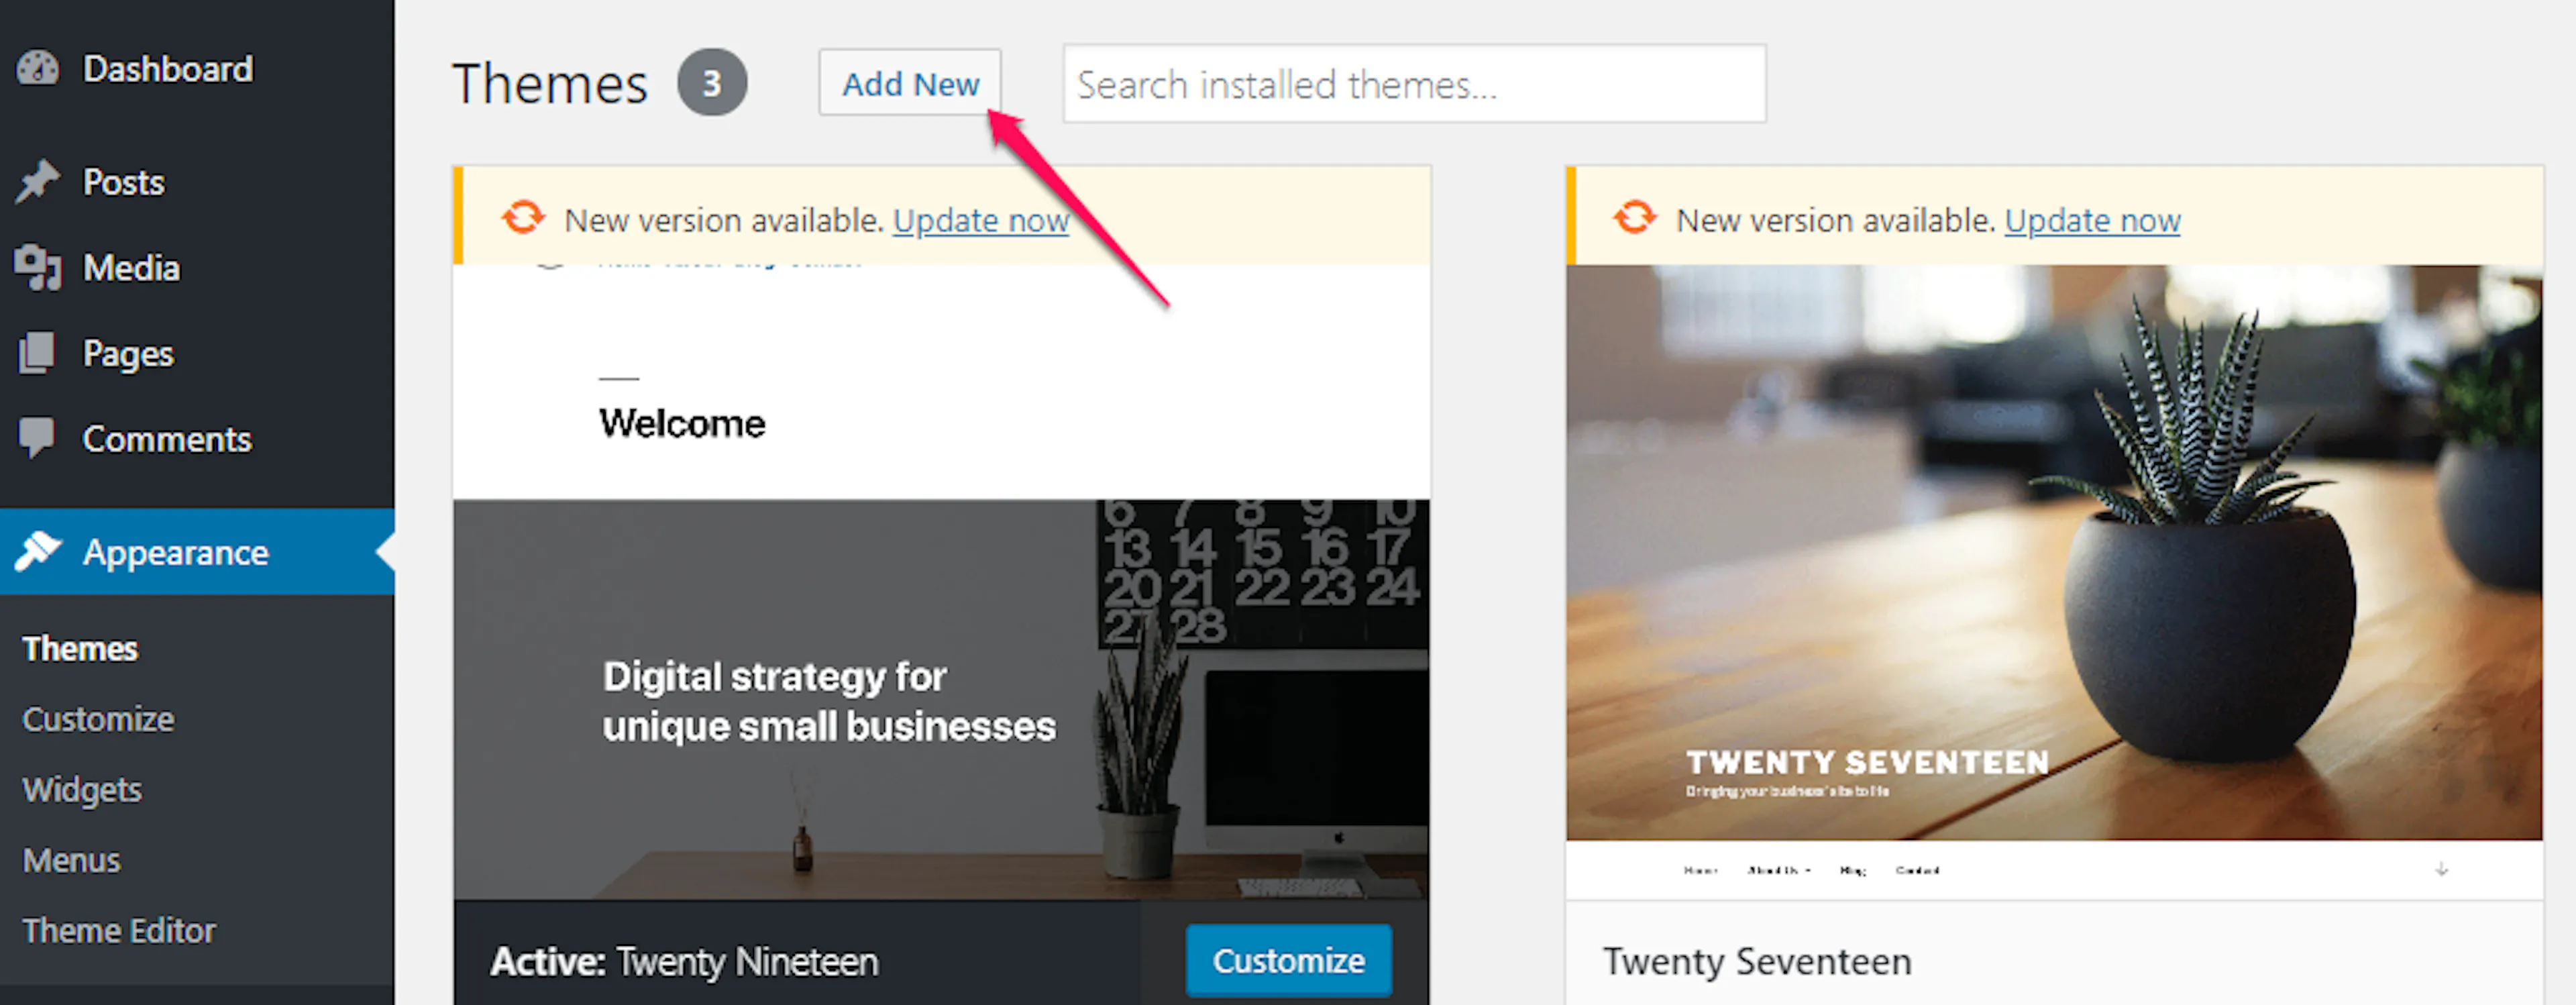
Upload the theme
Click Choose File and select travel-muni-pro.zip from your computer. Click Open, then start the upload.
Activate the theme
When installation finishes, click Activate. Your website will now use the Travel Muni Pro design.
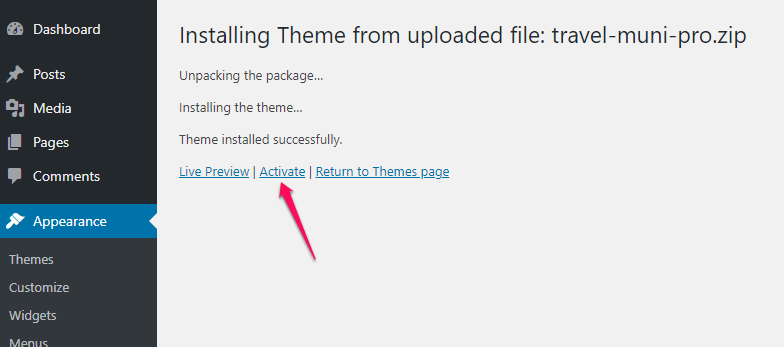
When Travel Muni Pro is active, install the recommended plugins so your trip pages, contact forms, and images work as expected.
Install recommended plugins
A plugin is a small app that adds a specific feature to your WordPress site. Travel Muni Pro works with the following plugins to add trip management, contact forms, and image support.
| Plugin | What it does |
|---|---|
| WP Travel Engine | Helps you create and manage trips, destinations, itineraries, prices, and other travel information. |
| Contact Form 7 | Helps you create contact forms so travelers can send questions through your website. |
| Regenerate Thumbnails | Creates new image sizes for existing media when you move older images into the theme. |
What you'll need before you start: an active Travel Muni Pro theme and access to your WordPress dashboard.
Open the plugin installer
On the left sidebar of your WordPress dashboard, click Appearance, then click Install Plugins. This page lists the plugins recommended for the theme.
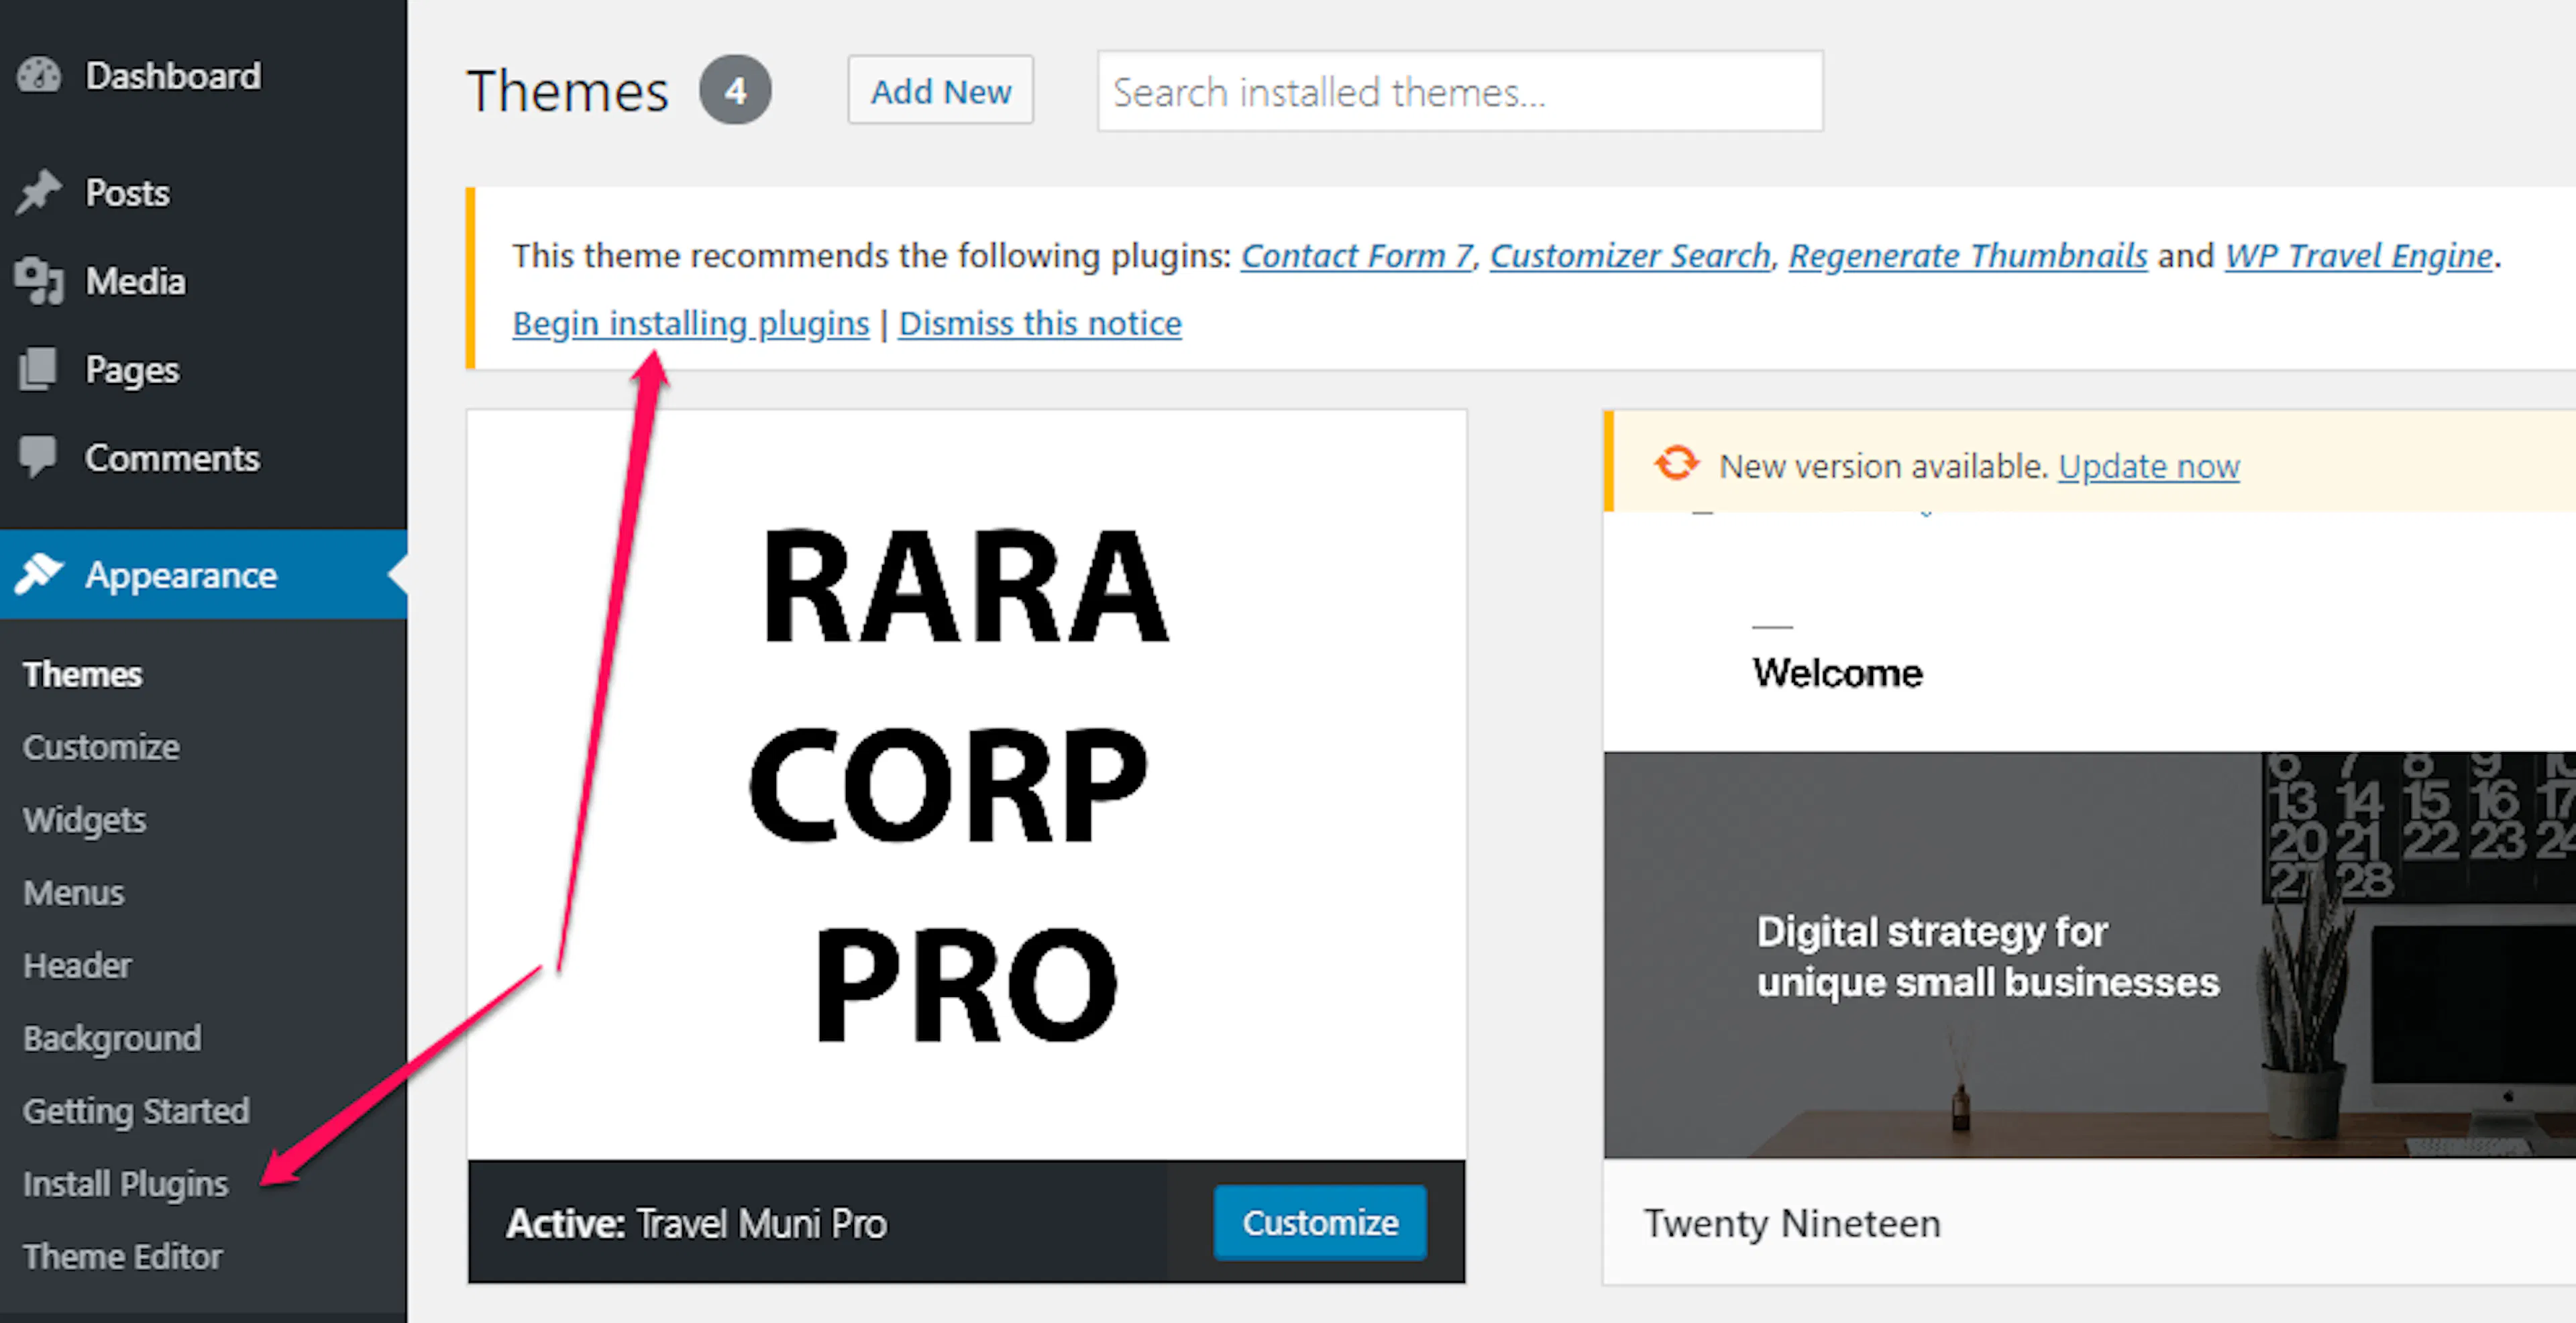
Install each plugin
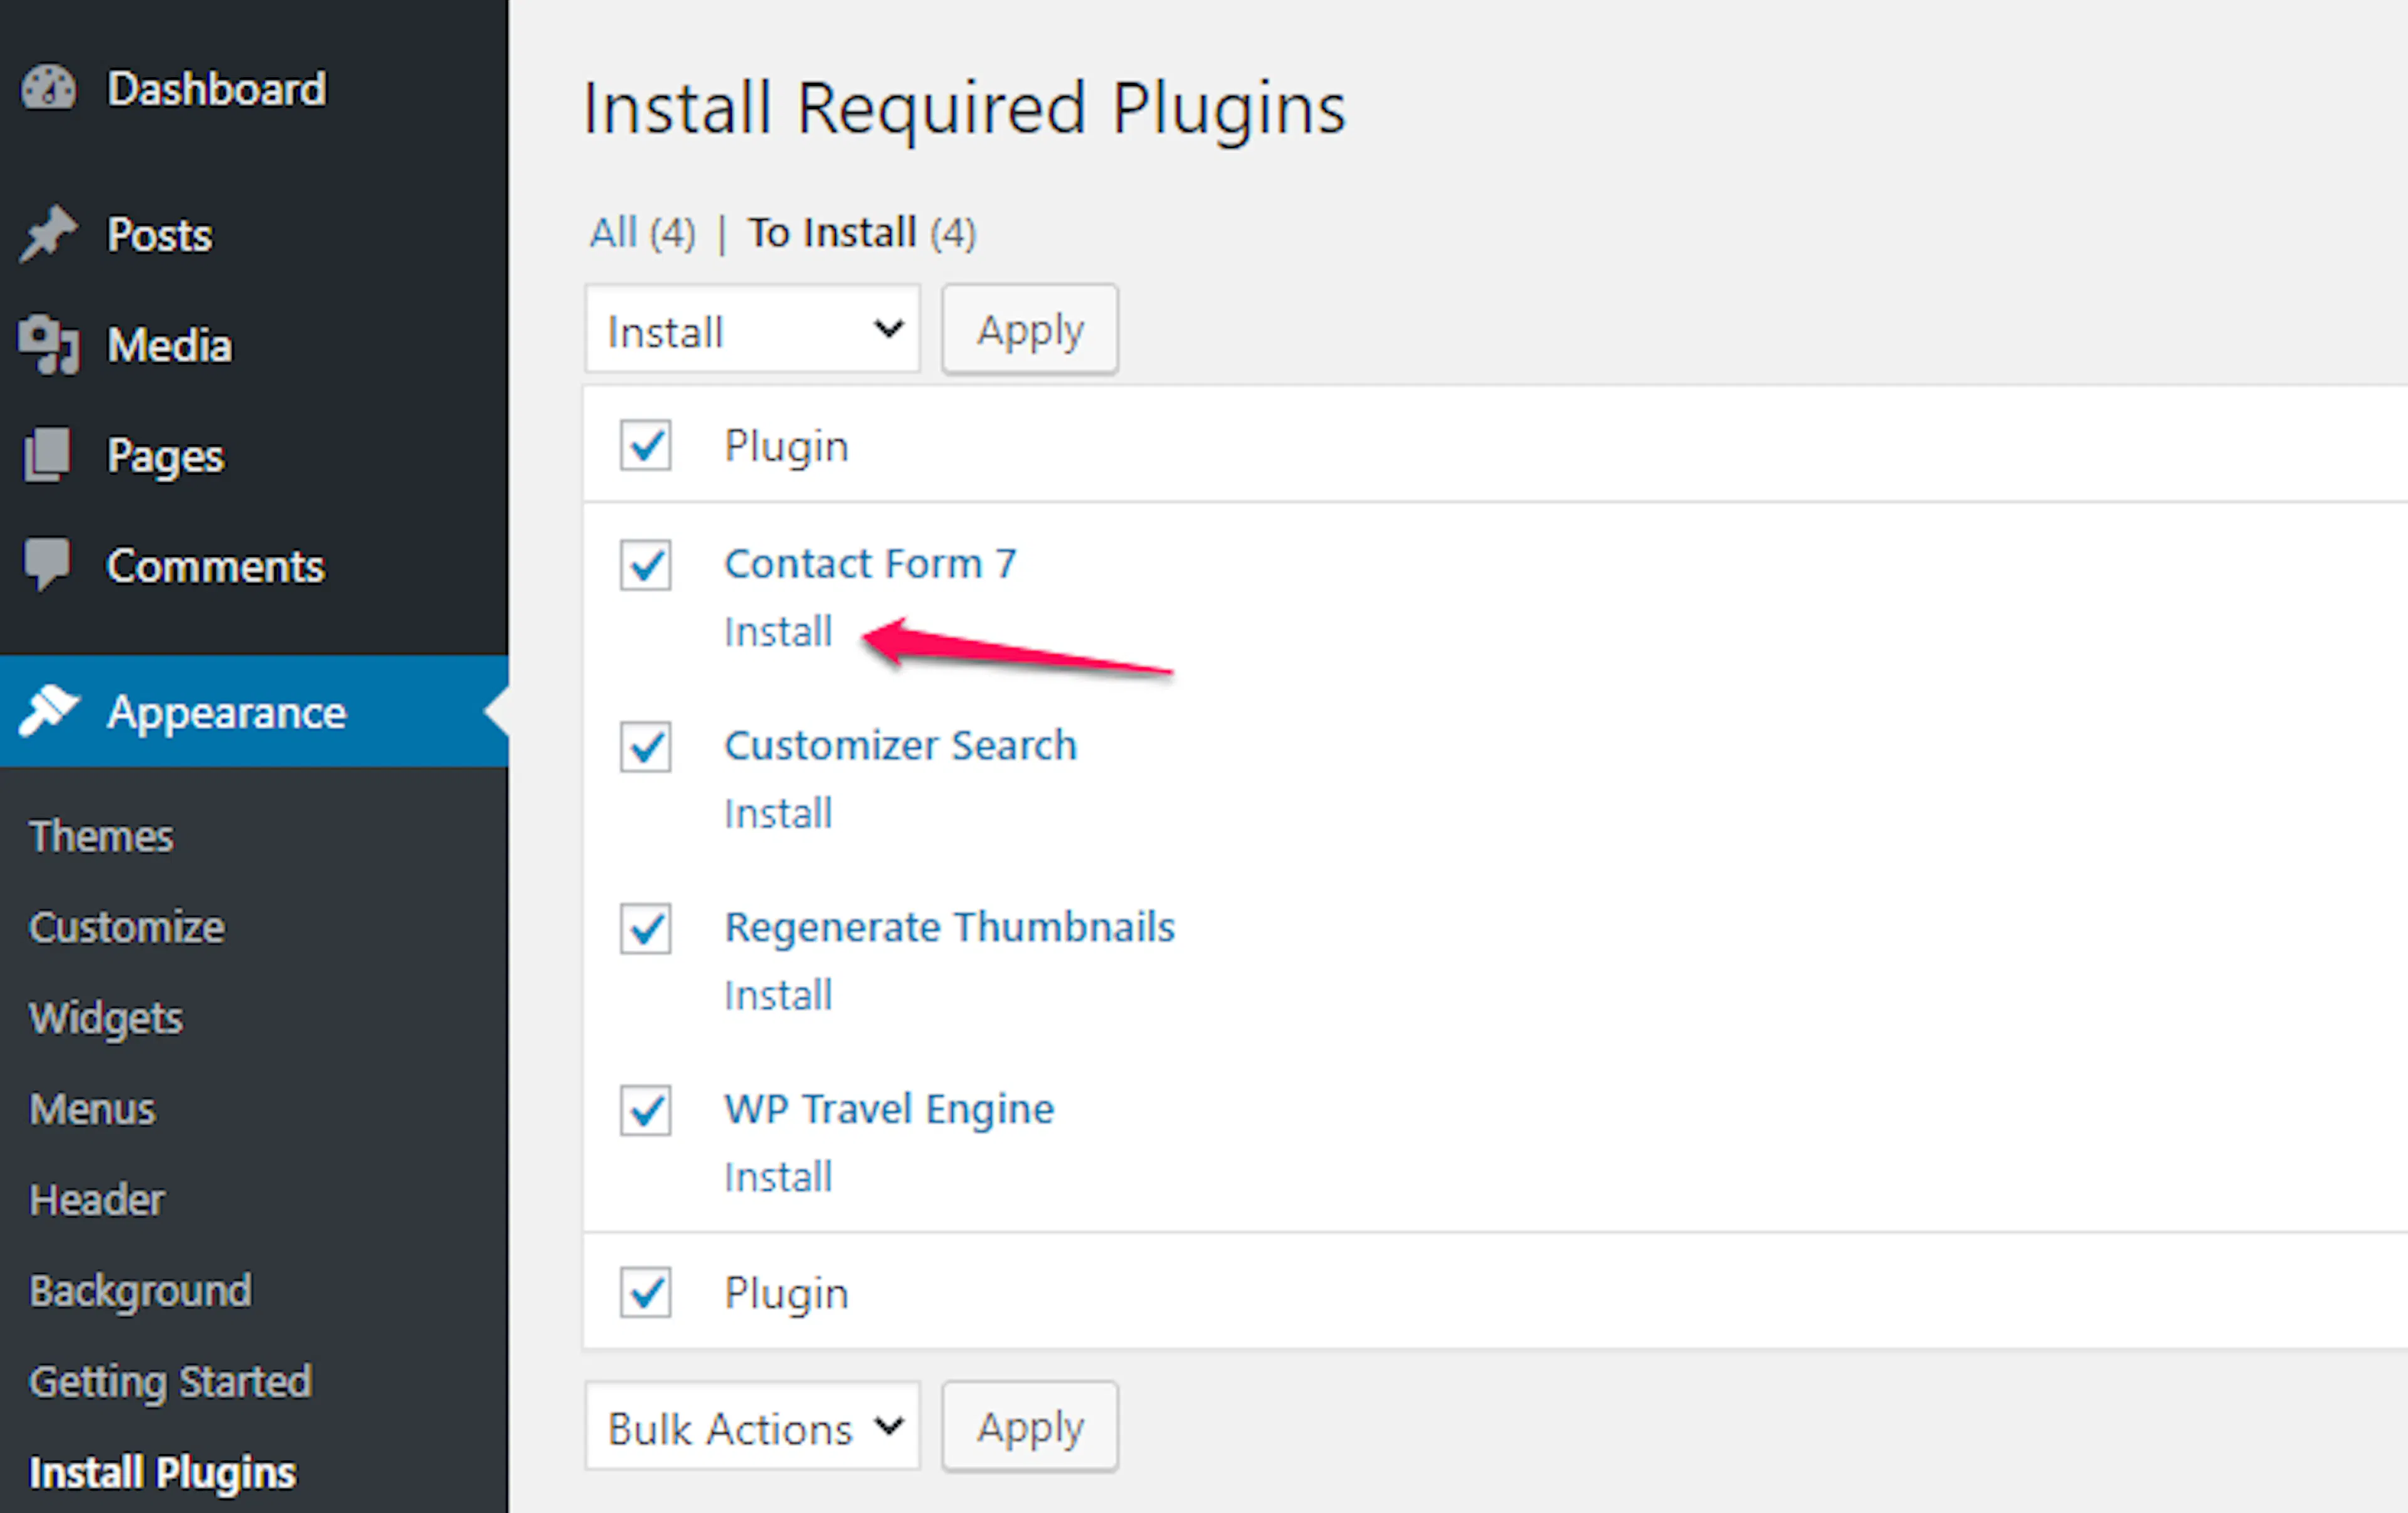
Click Install next to each recommended plugin. Installation adds the feature to your website, but the feature is not available until you activate the plugin.
Activate each plugin
Click Activate next to each plugin after it finishes installing. Complete this for all three recommended plugins.
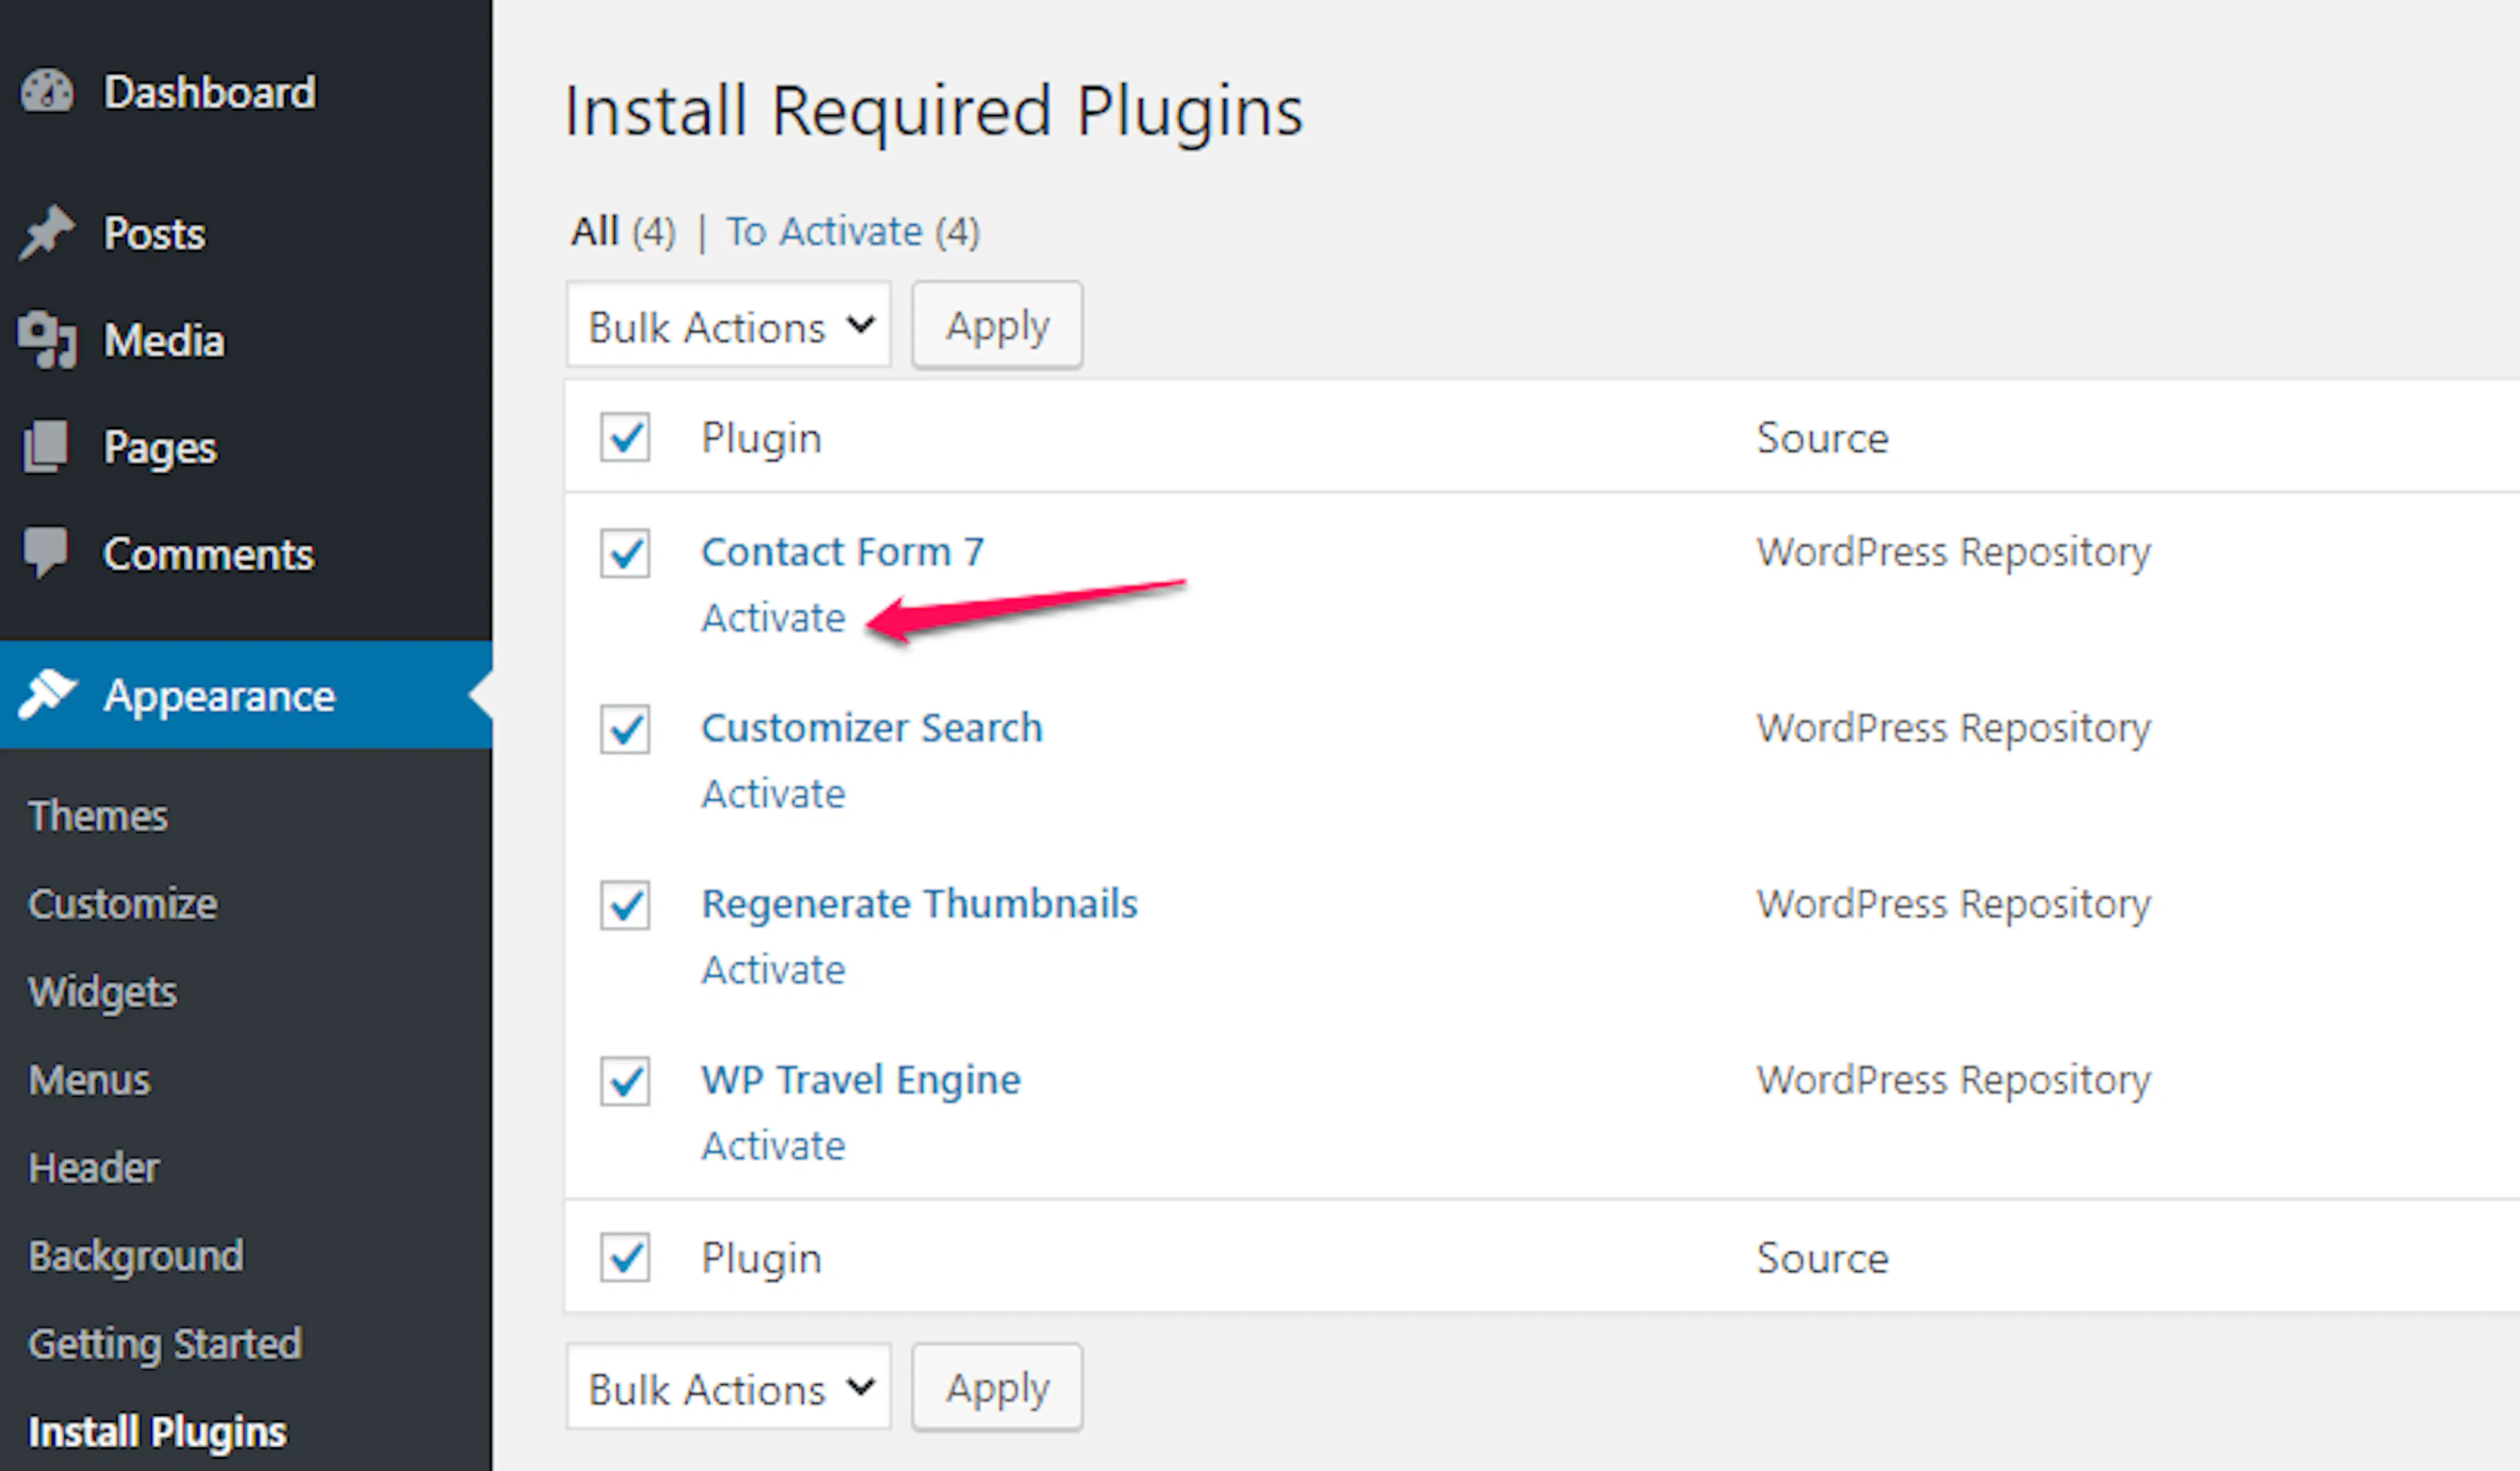
For example, WP Travel Engine lets you create trips such as an Annapurna trek. Contact Form 7 lets travelers send questions before booking. Regenerate Thumbnails helps older photos fit the theme's image areas.
Your main theme features are now in place. The next step is to activate your license so you receive updates and support.
Activate your license key
Activating your license keeps the Travel Muni Pro theme updated and gives you access to support. Updates fix compatibility problems, patch bugs, improve security, and add new features.
What you'll need before you start: your license key. Find it in your purchase receipt email or under your WP Travel Engine account profile.
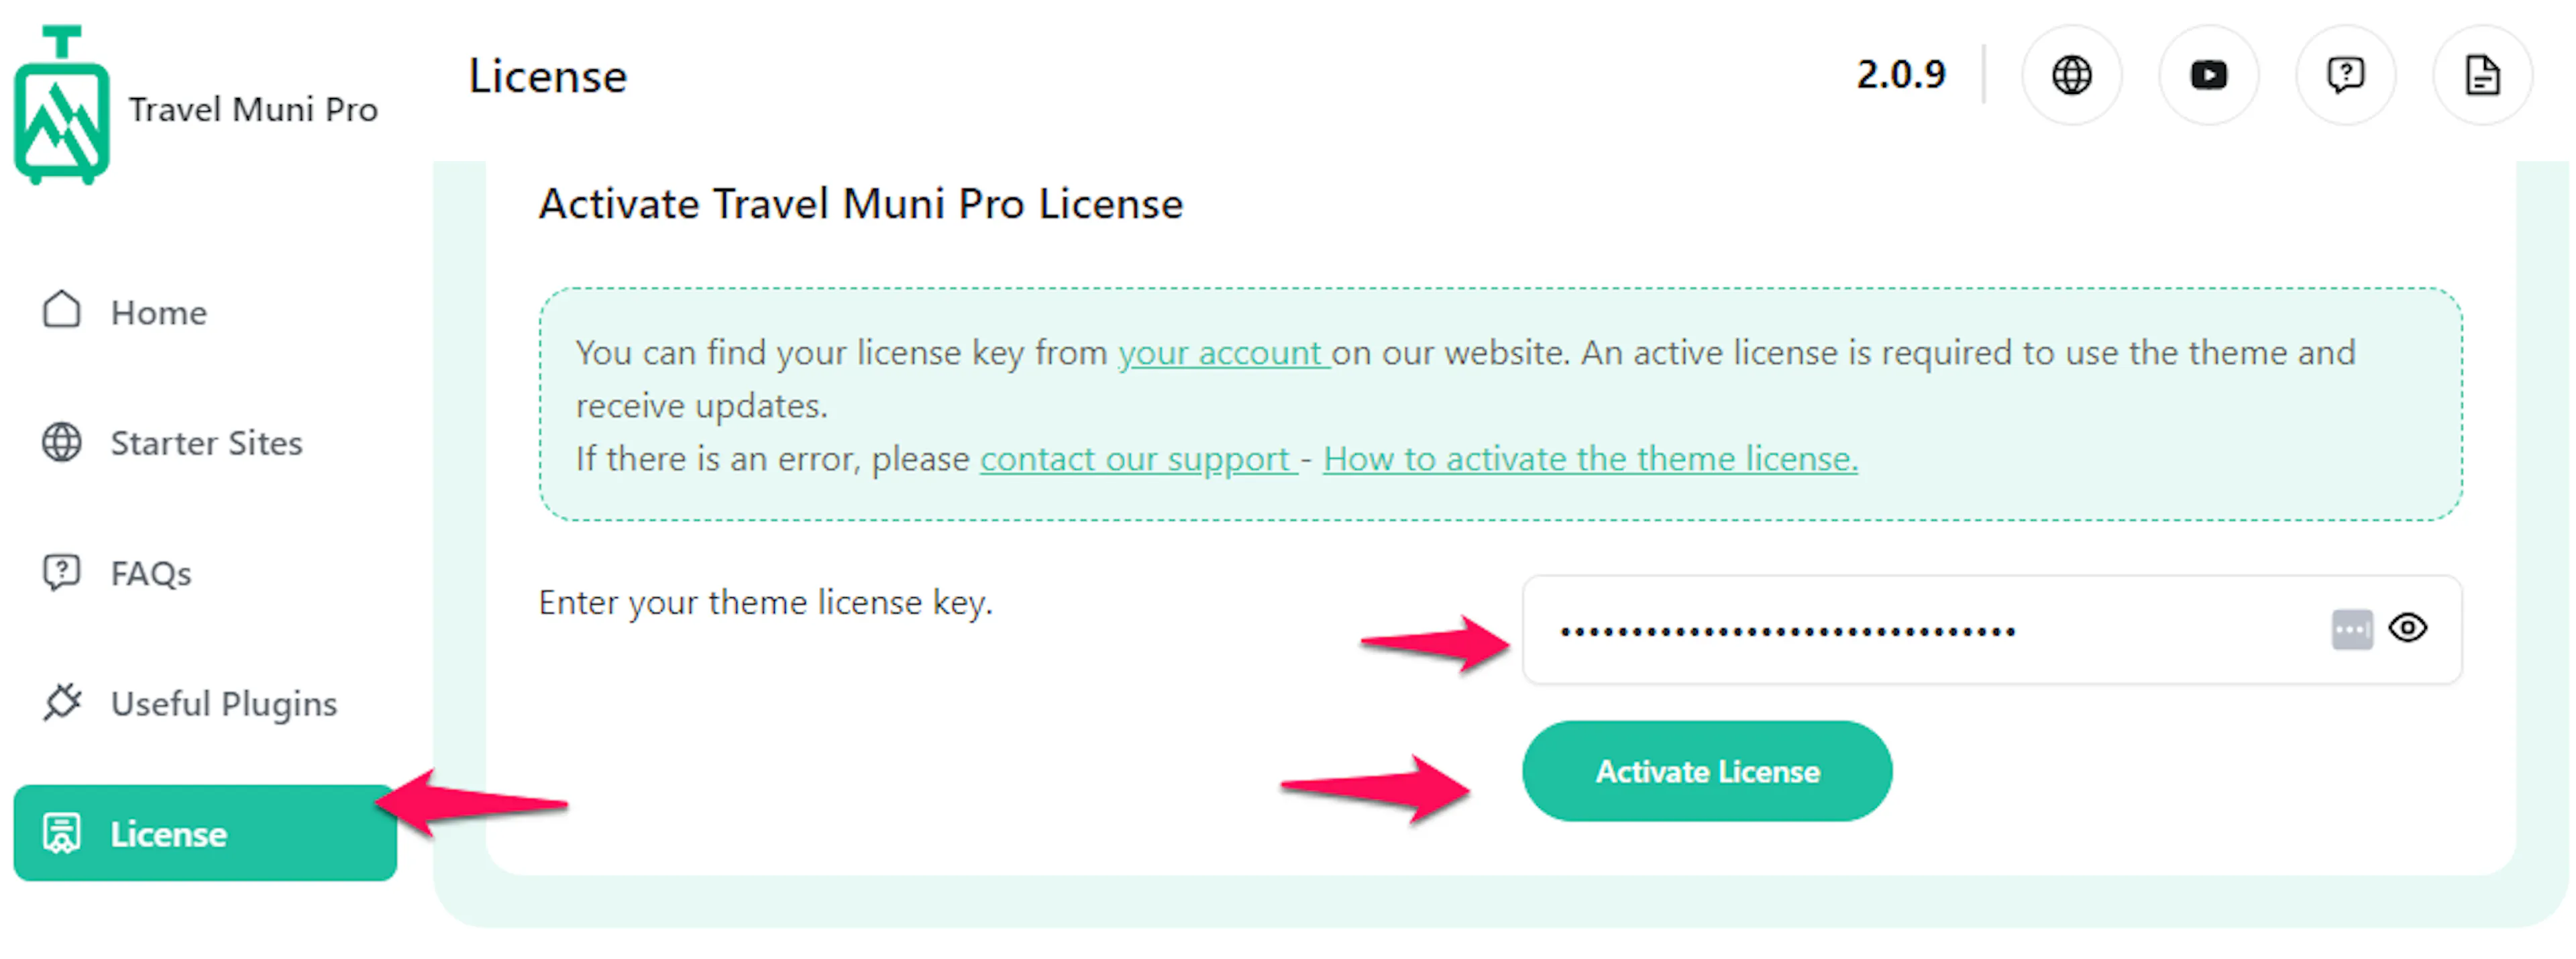
Open the theme's License tab
On the left sidebar of your WordPress dashboard, open Appearance. Click the Travel Muni Pro theme settings link, then open License.
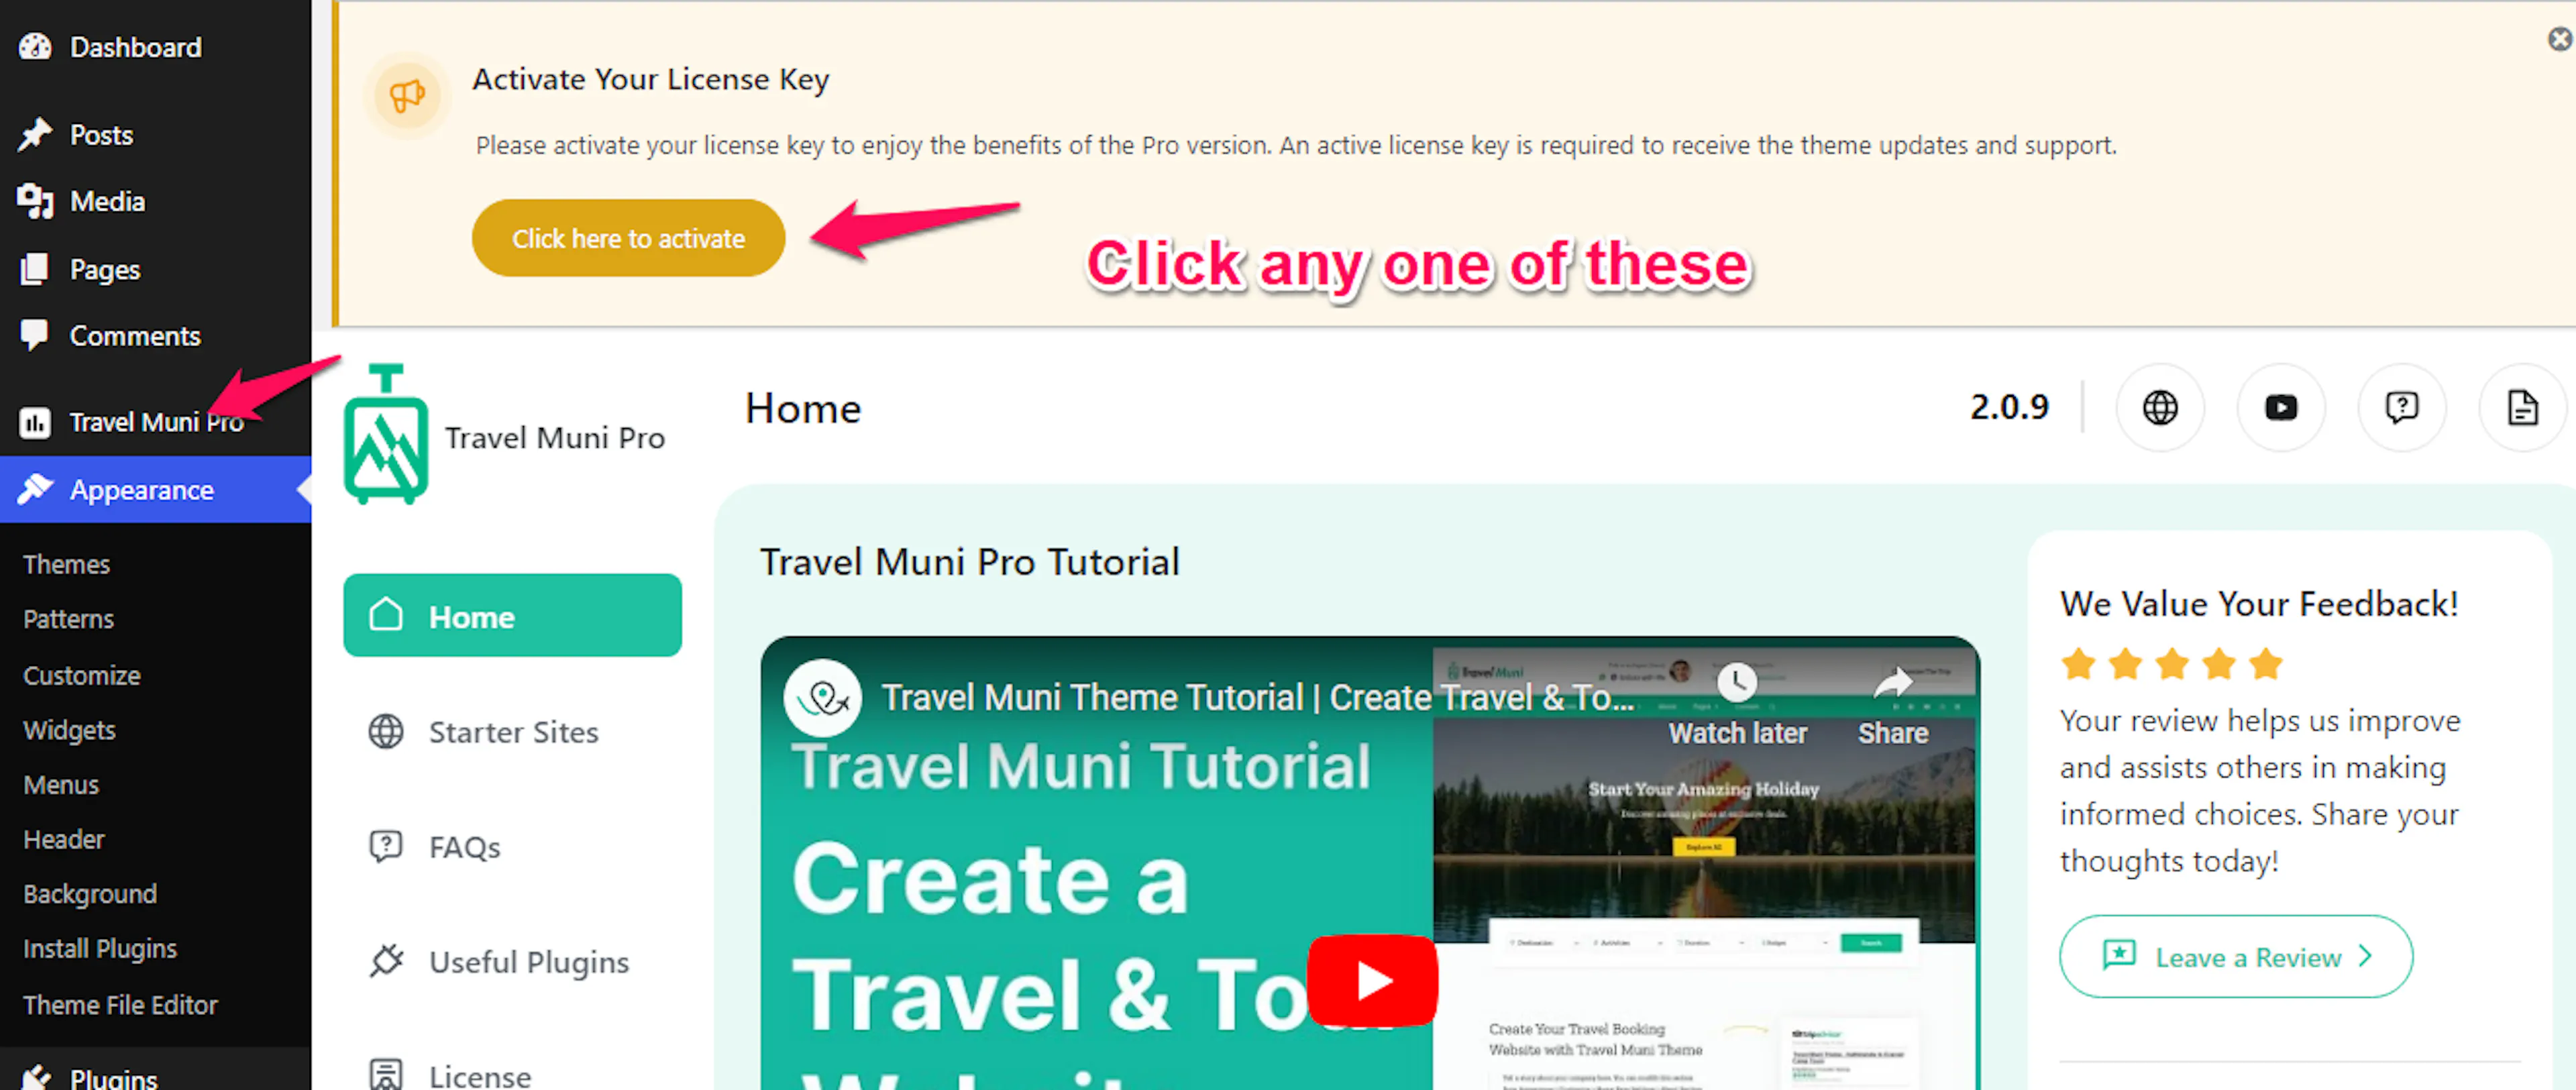
Enter your license key
Enter your license key in the license field. Click Save Changes to save it.
Activate the license
Click Activate License. Wait for the confirmation that the license is active.
A firewall protects the WP Travel Engine license server from bots. It blocks IP addresses that have been reported on abuseipdb.com.
If activation fails, check your site's IP address with a tool such as NSLookup.io. Your site may be blocked. If activation still does not work, contact support and include your purchase email and website URL.
When you see that the license is active, your theme can receive updates and you can request support. Next, choose what travelers see when they visit your website.
Set up your homepage and blog page
WordPress can show your latest blog posts on the homepage, or it can show a specific page as your front page. Most tour businesses use a static front page so travelers see trips, services, and a welcome message first.
For example, a trekking company can use the homepage for featured trips and a welcome message. The blog page can hold an article about what to pack for the Everest Base Camp trek.
The Customizer is WordPress's built-in settings panel for changing design options. Find it under Appearance on the left sidebar of your dashboard.
What you'll need before you start: at least two pages. Use one page for your homepage and another page for your blog posts.
Open Homepage Settings
On the left sidebar of your WordPress dashboard, click Appearance, then Customize. Open Homepage Settings to choose what visitors see first.

Select a static homepage
Under Your homepage displays, choose A Static Page. This lets you select a dedicated page for your homepage instead of showing your latest blog posts there.
Assign your pages for an existing site
If you have a fresh WordPress installation, skip this step. If your site already has content, choose the page you want to use as Front Page. Then choose the page you want to use as the Posts Page.
Publish your changes
Click Publish in the Customizer. Your homepage and blog page assignments are now saved.
Your visitors will now see the page you selected as the front page. You can continue by setting up the theme sections that show your trips, contact details, and business information.
Getting started with Travel Muni Pro
Travel Muni Pro is a WordPress theme made for tour and travel businesses. It controls your website's colors, layout, fonts, and page structure.
This page takes you from installation to a finished tour website. Work through the setup sections in order the first time. Return to any later section when you need to change a specific part of your site.
To search this page, press Ctrl+F on your keyboard. Type a word such as license, homepage, or trip.
What you'll need before you start
Travel Muni Pro needs WordPress version 4.5 or newer. Download the latest WordPress version from the WordPress repository.
Before you begin, make sure you have:
- Checked your WordPress version and updated it if needed.
- Downloaded the
travel-muni-pro.ziptheme file. - Installed and activated the Travel Muni Pro theme.
- Installed the recommended plugins.
- Access to the left sidebar of your WordPress dashboard.
Checklist for Getting Started
- Check WordPress Version and Update it
- Install and Activate Travel Muni Pro theme
- Install Necessary Plugins. Some functionality of the theme might not work if you do not install the recommended plugins.
Recommended image sizes
Using the right image size helps your photos look clear and correctly proportioned. Images that are too large or too small can look stretched or blurry.
| Element | Recommended size |
|---|---|
| Banner slider image | 1920 × 600 px |
| Header image | 960 × 650 px |
| Header background image | 1920 × 350 px |
| Site logo | 600 × 60 px |
| Trip taxonomy image | 600 × 600 px |
| Post thumbnail image | 610 × 343 px |
| Mega menu image | 594 × 373 px |
| Single trip page banner | 1920 × 500 px |
A taxonomy is a way to group things together. For example, you can group trips by destination or trip type.
For a banner at the top of a trip page, use an image close to 1920 × 500 pixels. A photo of a trekking group on a mountain trail will work well in this space.
Demo Import (Instantly Make Website Like Demo)
You can easily make your website exactly like the live preview (demo) of the Travel Muni Pro theme by importing the demo content. Importing demo content is a great way of getting started with your website. You can get a guideline on how to set up this theme if you import the demo content.
To import the demo with a click, you need to install One Click Demo Import plugin and follow the below steps:
- Go to Appearance > Import Demo Data
- Click on the Import Demo Data button.
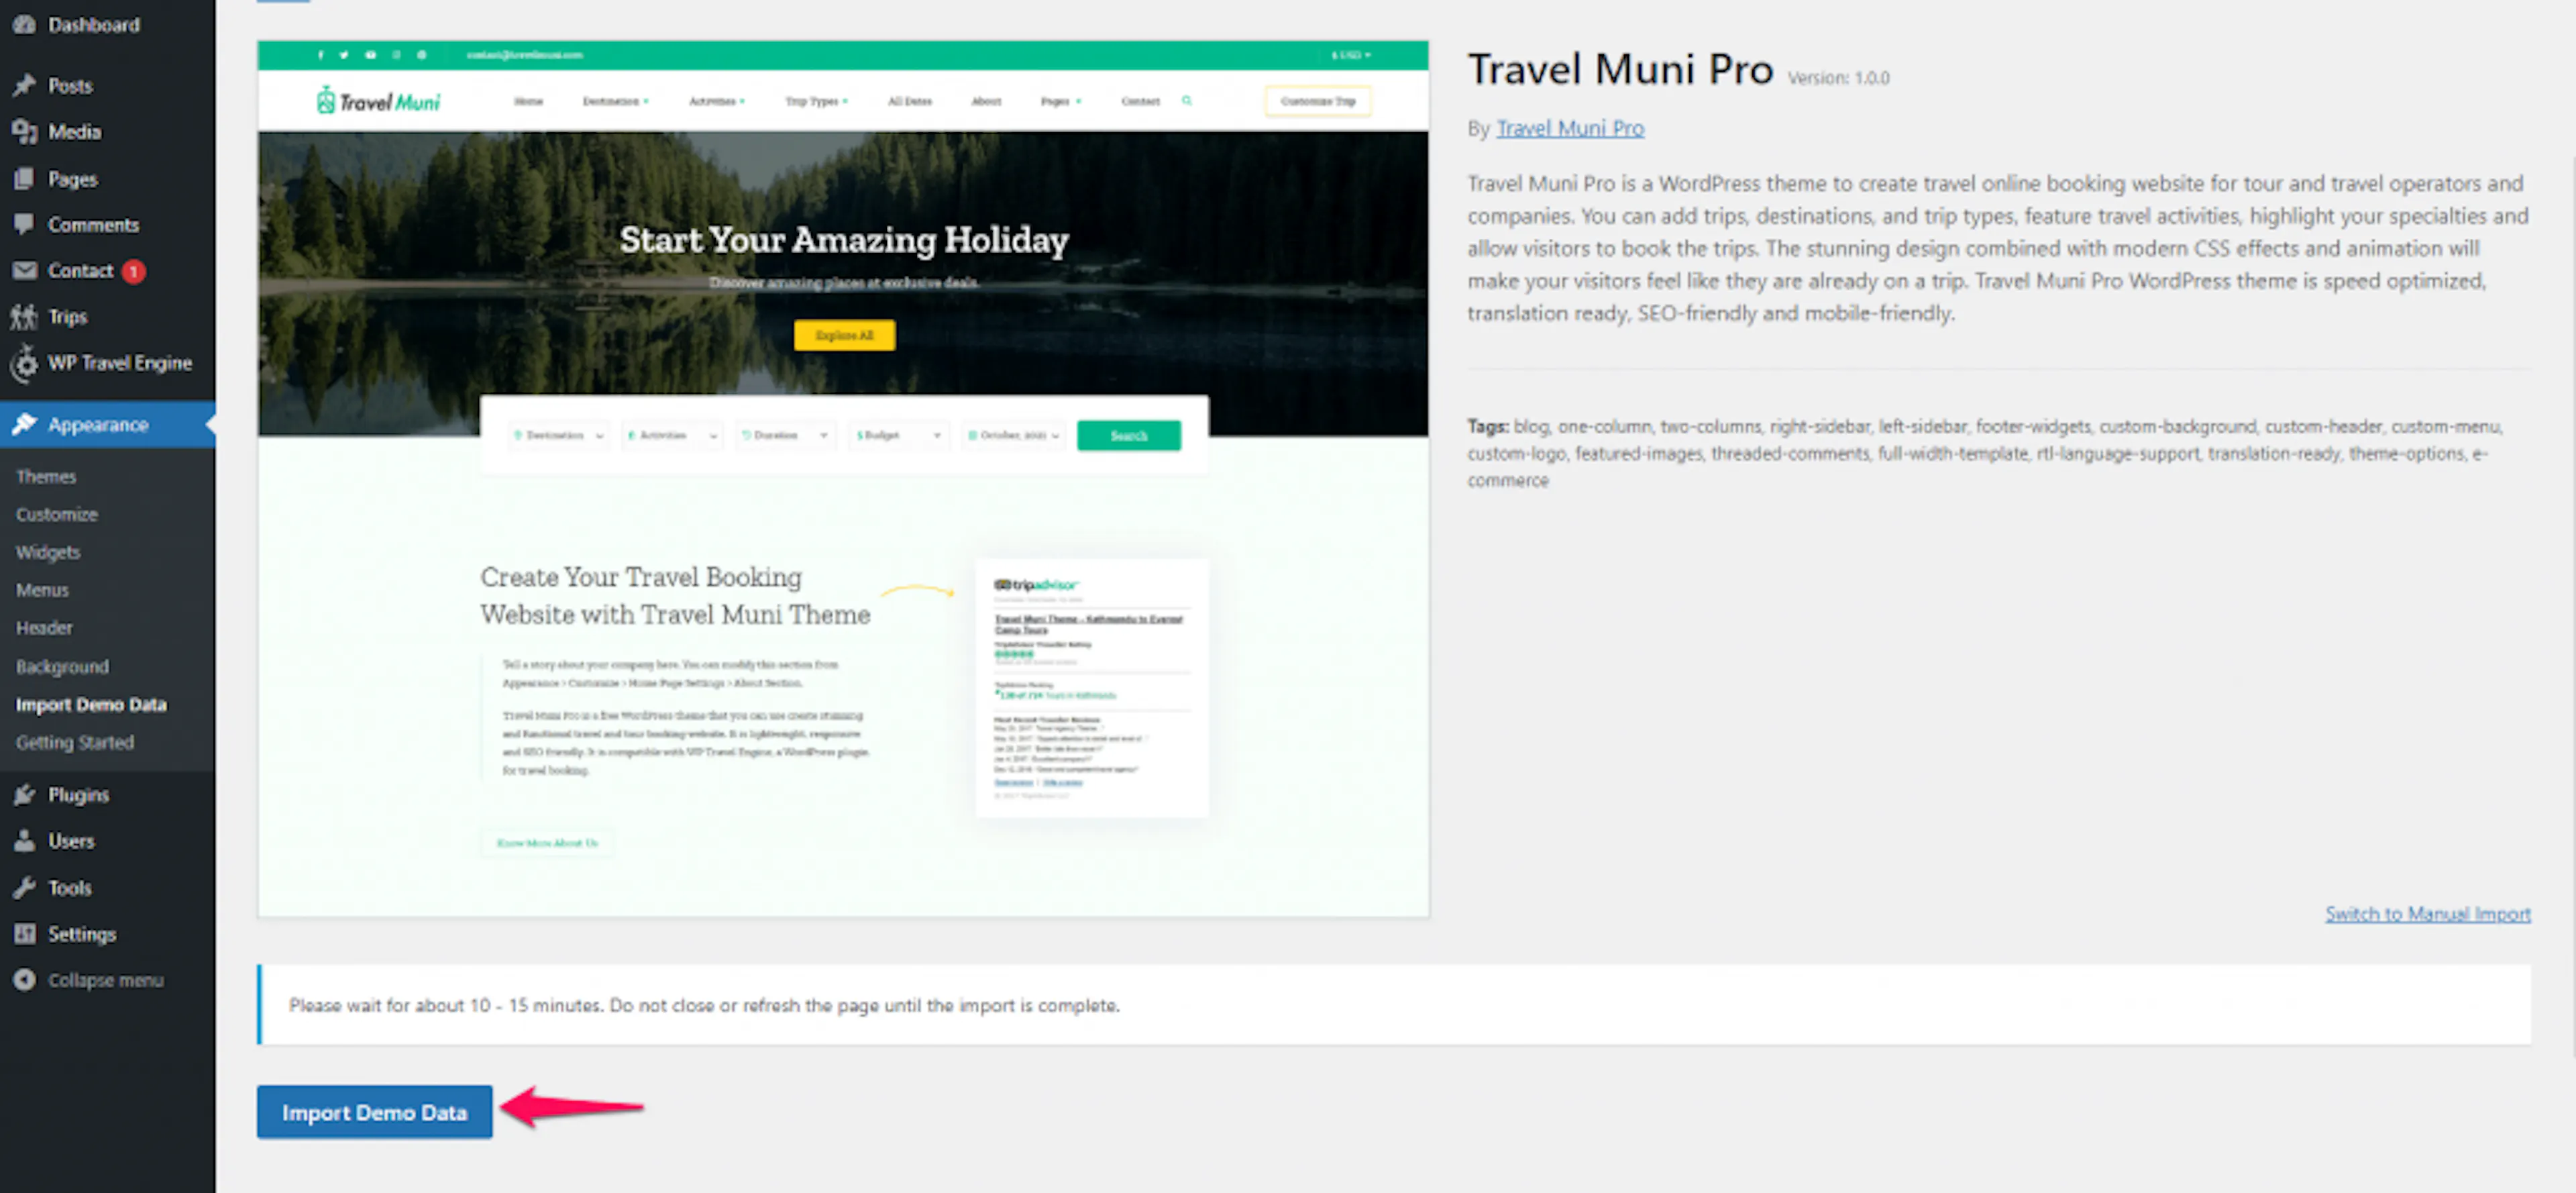
Once the demo import is successful, you will get a demo import successful message.
How to Check and Update WordPress Version:
Open the WordPress updates page
On the left sidebar of your WordPress dashboard, click Dashboard, then click Updates. This page shows your current WordPress version and available updates.
Install an available update
If WordPress shows an update, click the update button and wait for the process to finish. Keep the dashboard open until WordPress confirms that the update is complete.
Install and activate the theme
The theme file must stay in .zip format when you upload it to WordPress.
If you use Safari on a Mac, downloaded .zip files sometimes unzip automatically. Check that your theme file is still in .zip format before you upload it. Follow these instructions to stop Safari from auto-unzipping files.
What you'll need before you start: the downloaded travel-muni-pro.zip file saved somewhere on your computer.
Save the theme file
Keep travel-muni-pro.zip somewhere you can find it. WordPress needs this file to install Travel Muni Pro.
Open the theme uploader
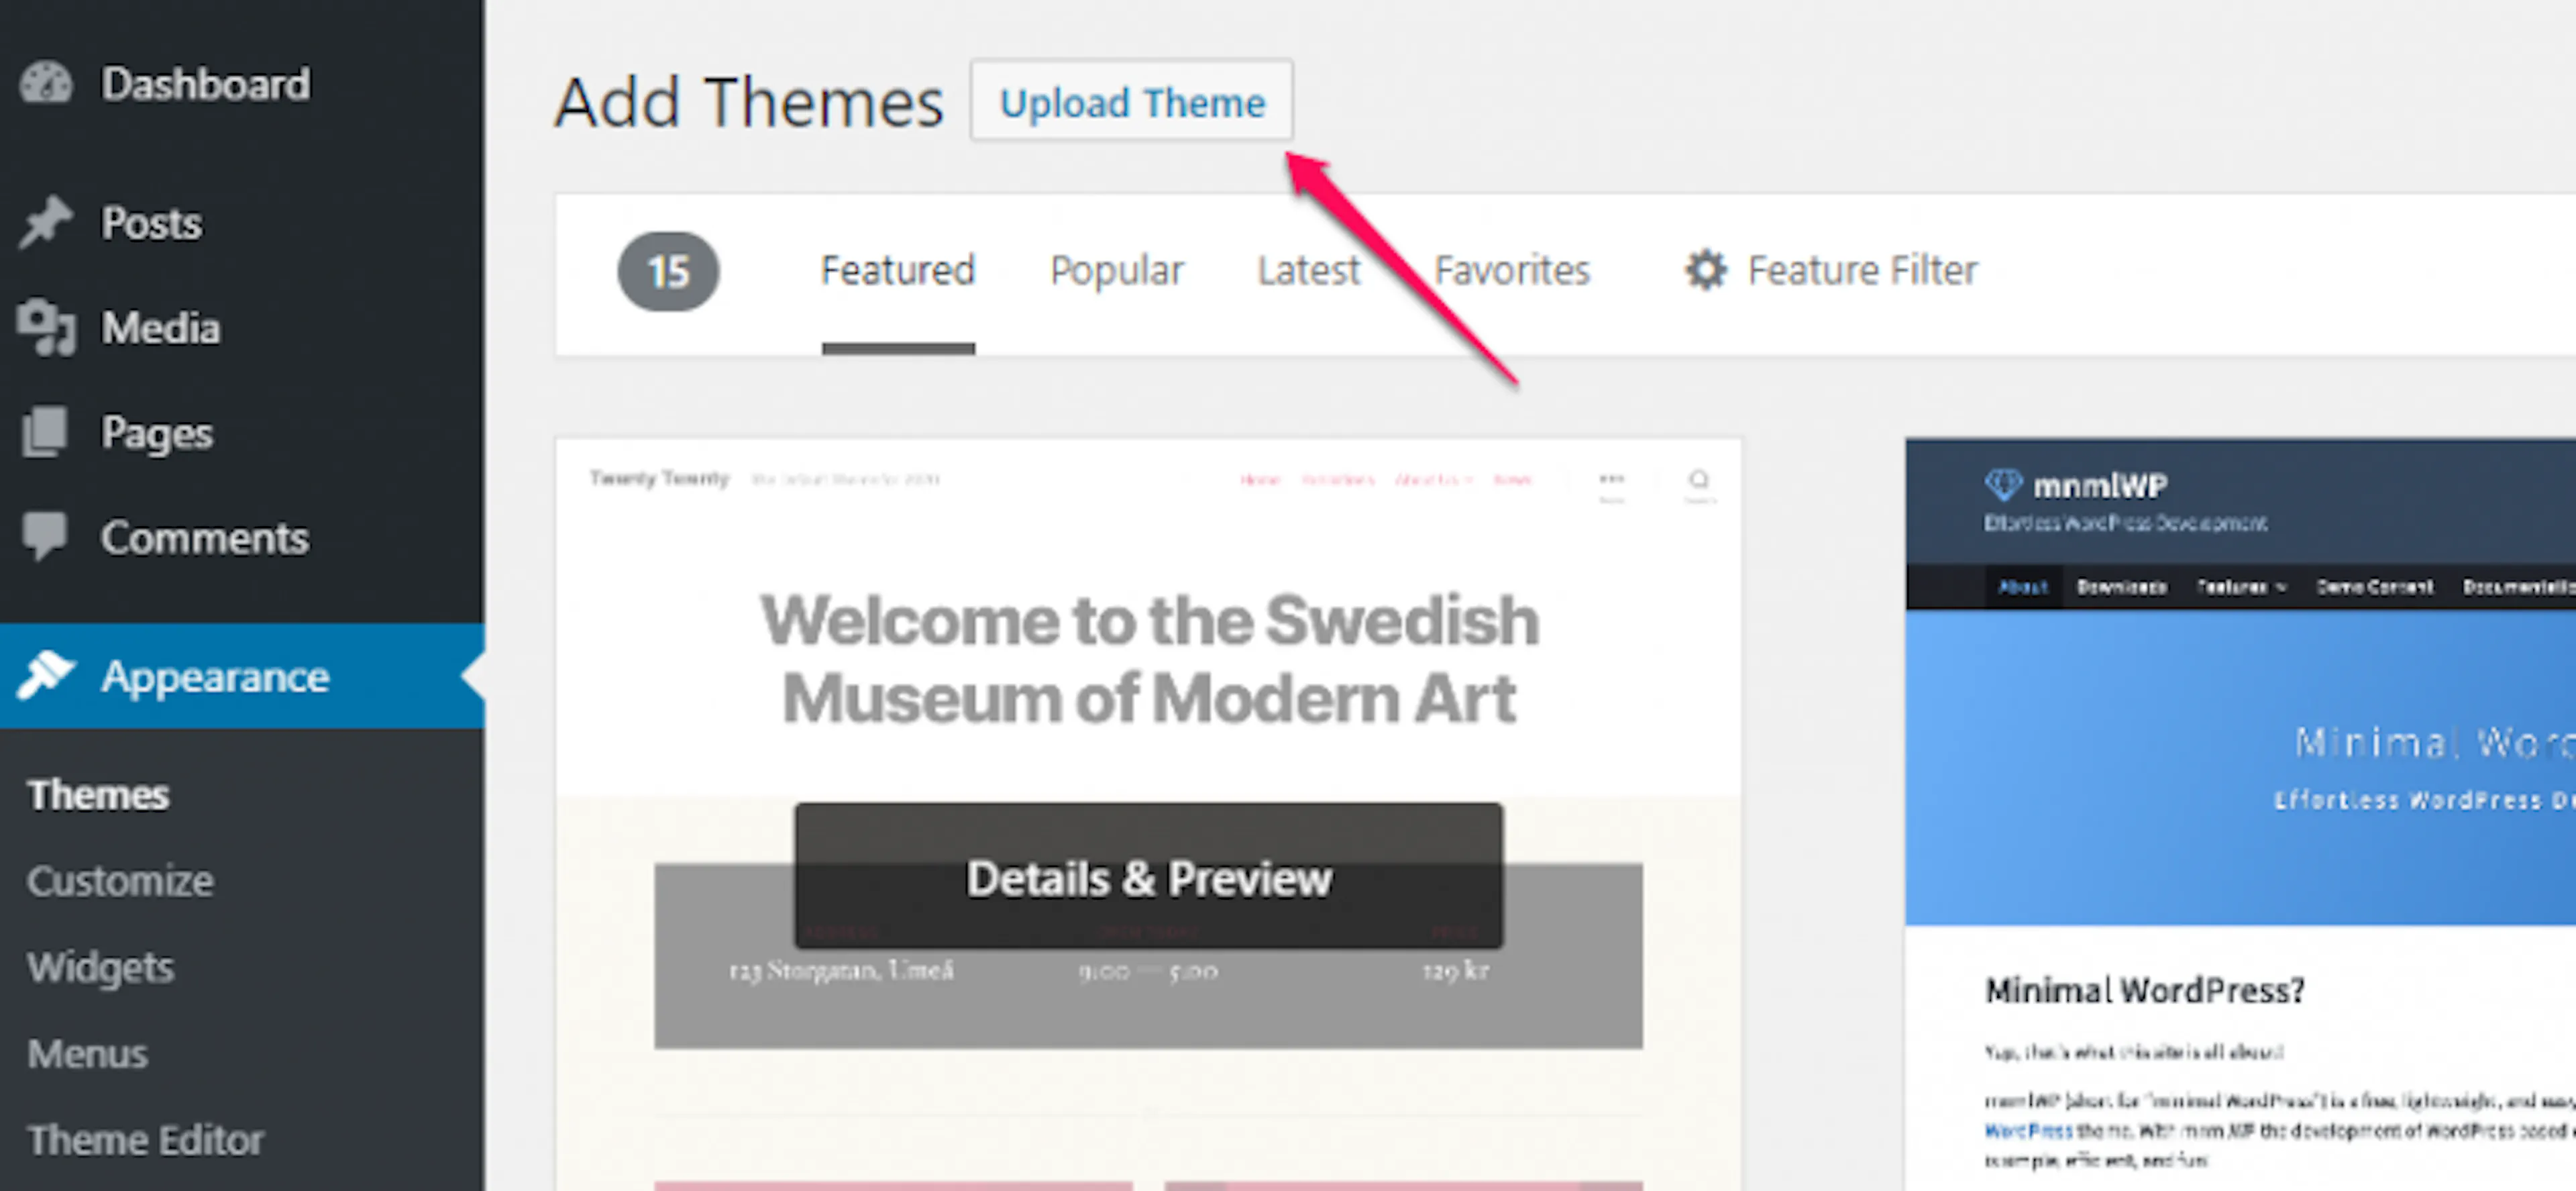
On the left sidebar of your WordPress dashboard, click Appearance, then Themes. Click Add New, then click Upload Theme.
Upload the theme
Click Choose File and select travel-muni-pro.zip from your computer. Click Open, then start the upload.
Activate the theme
When installation finishes, click Activate. Your website now uses the Travel Muni Pro design.
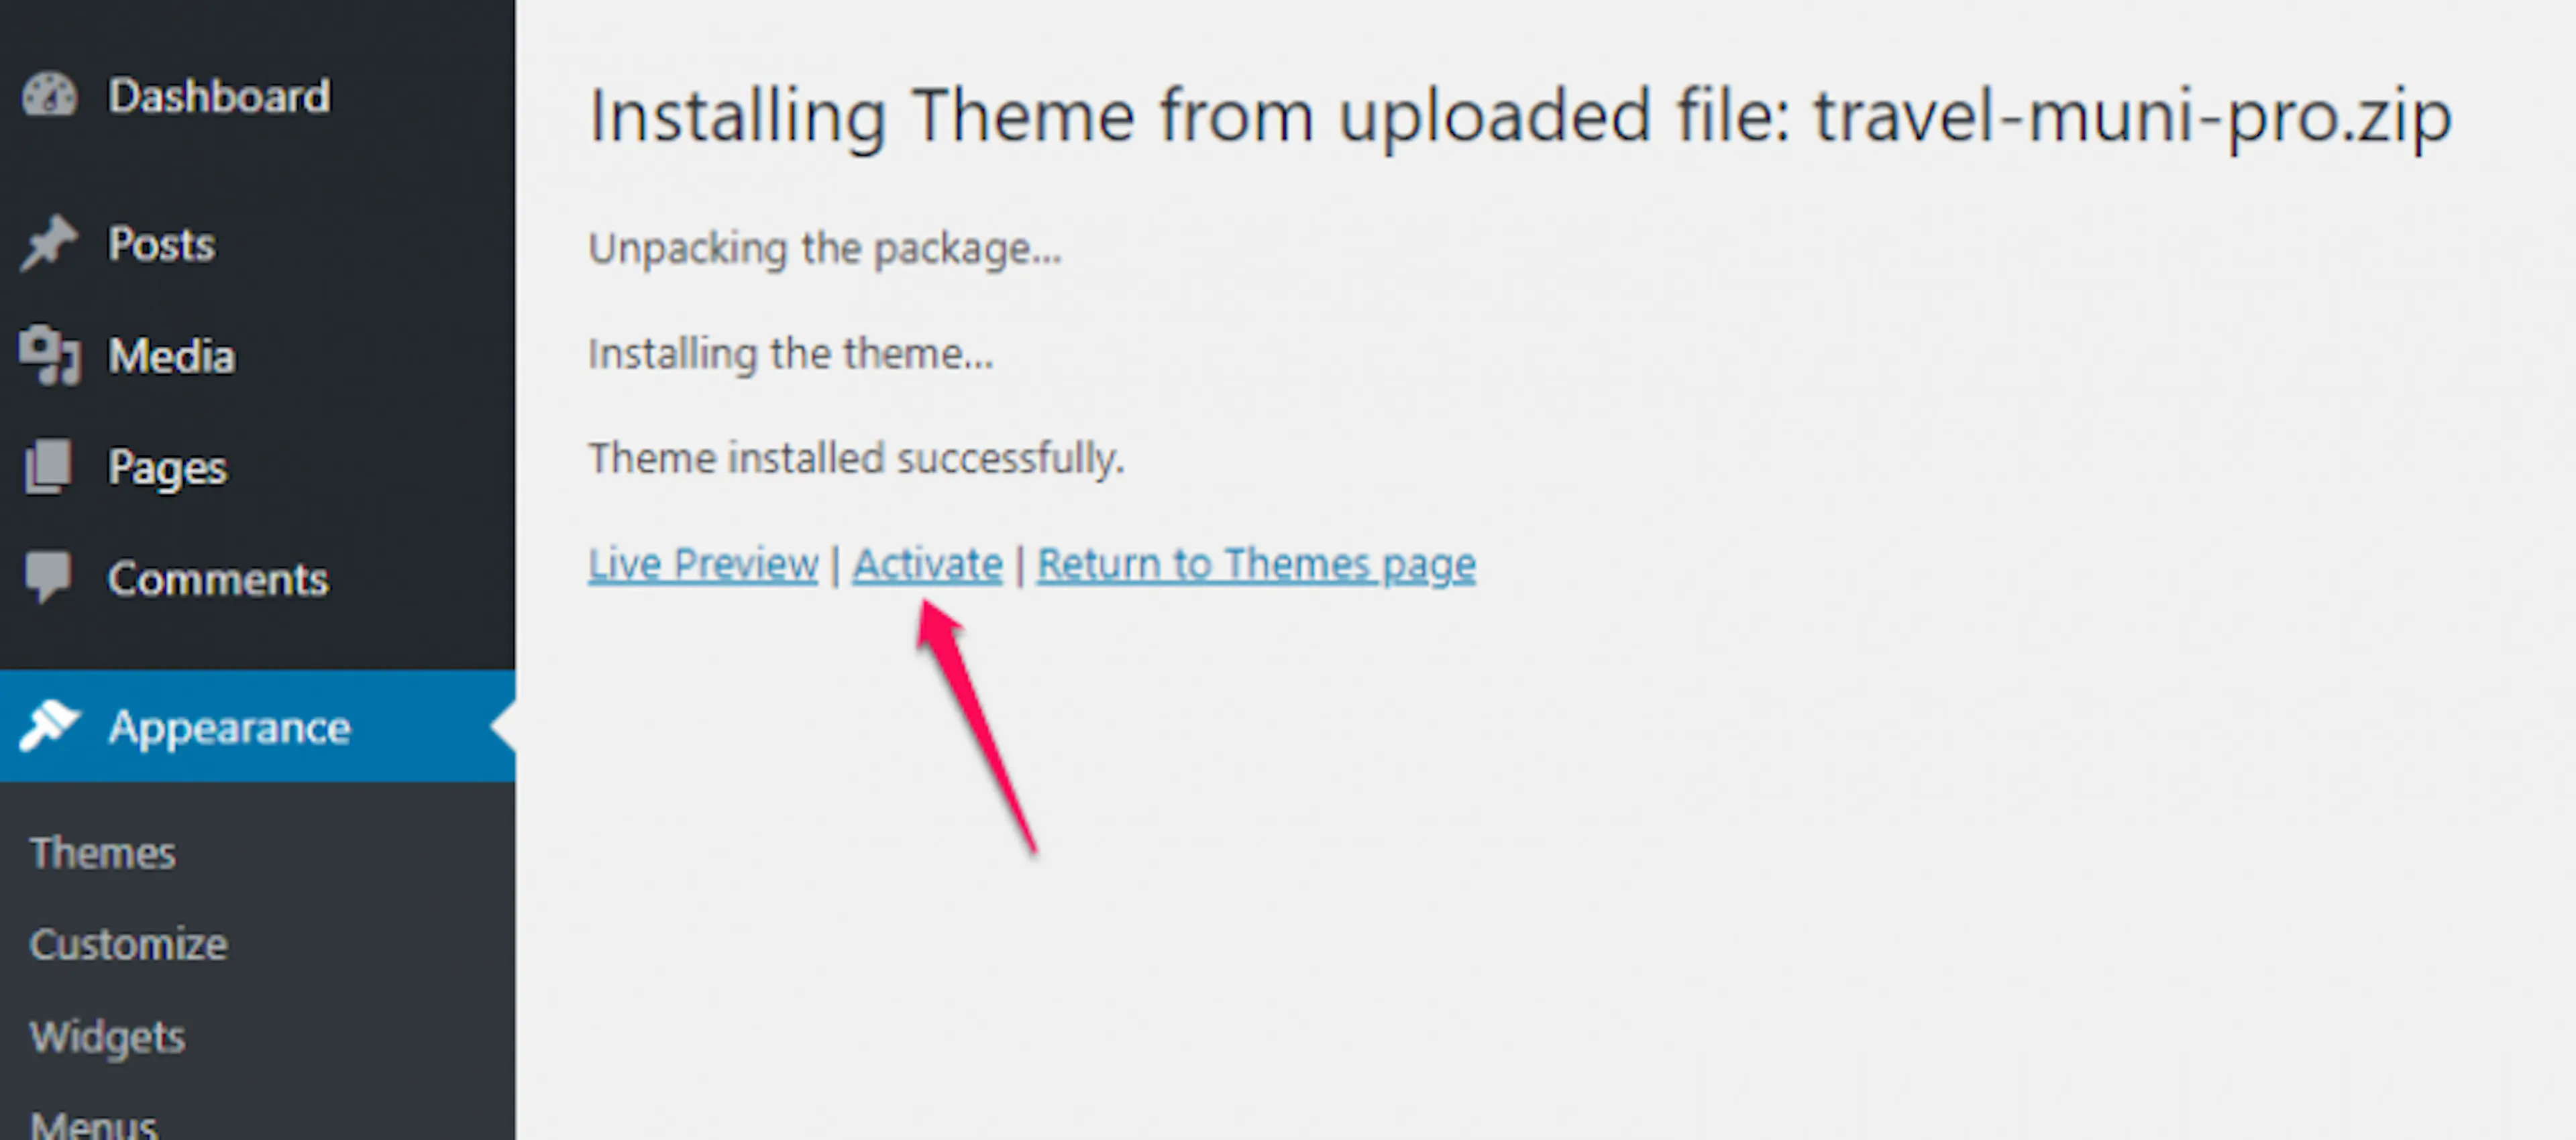
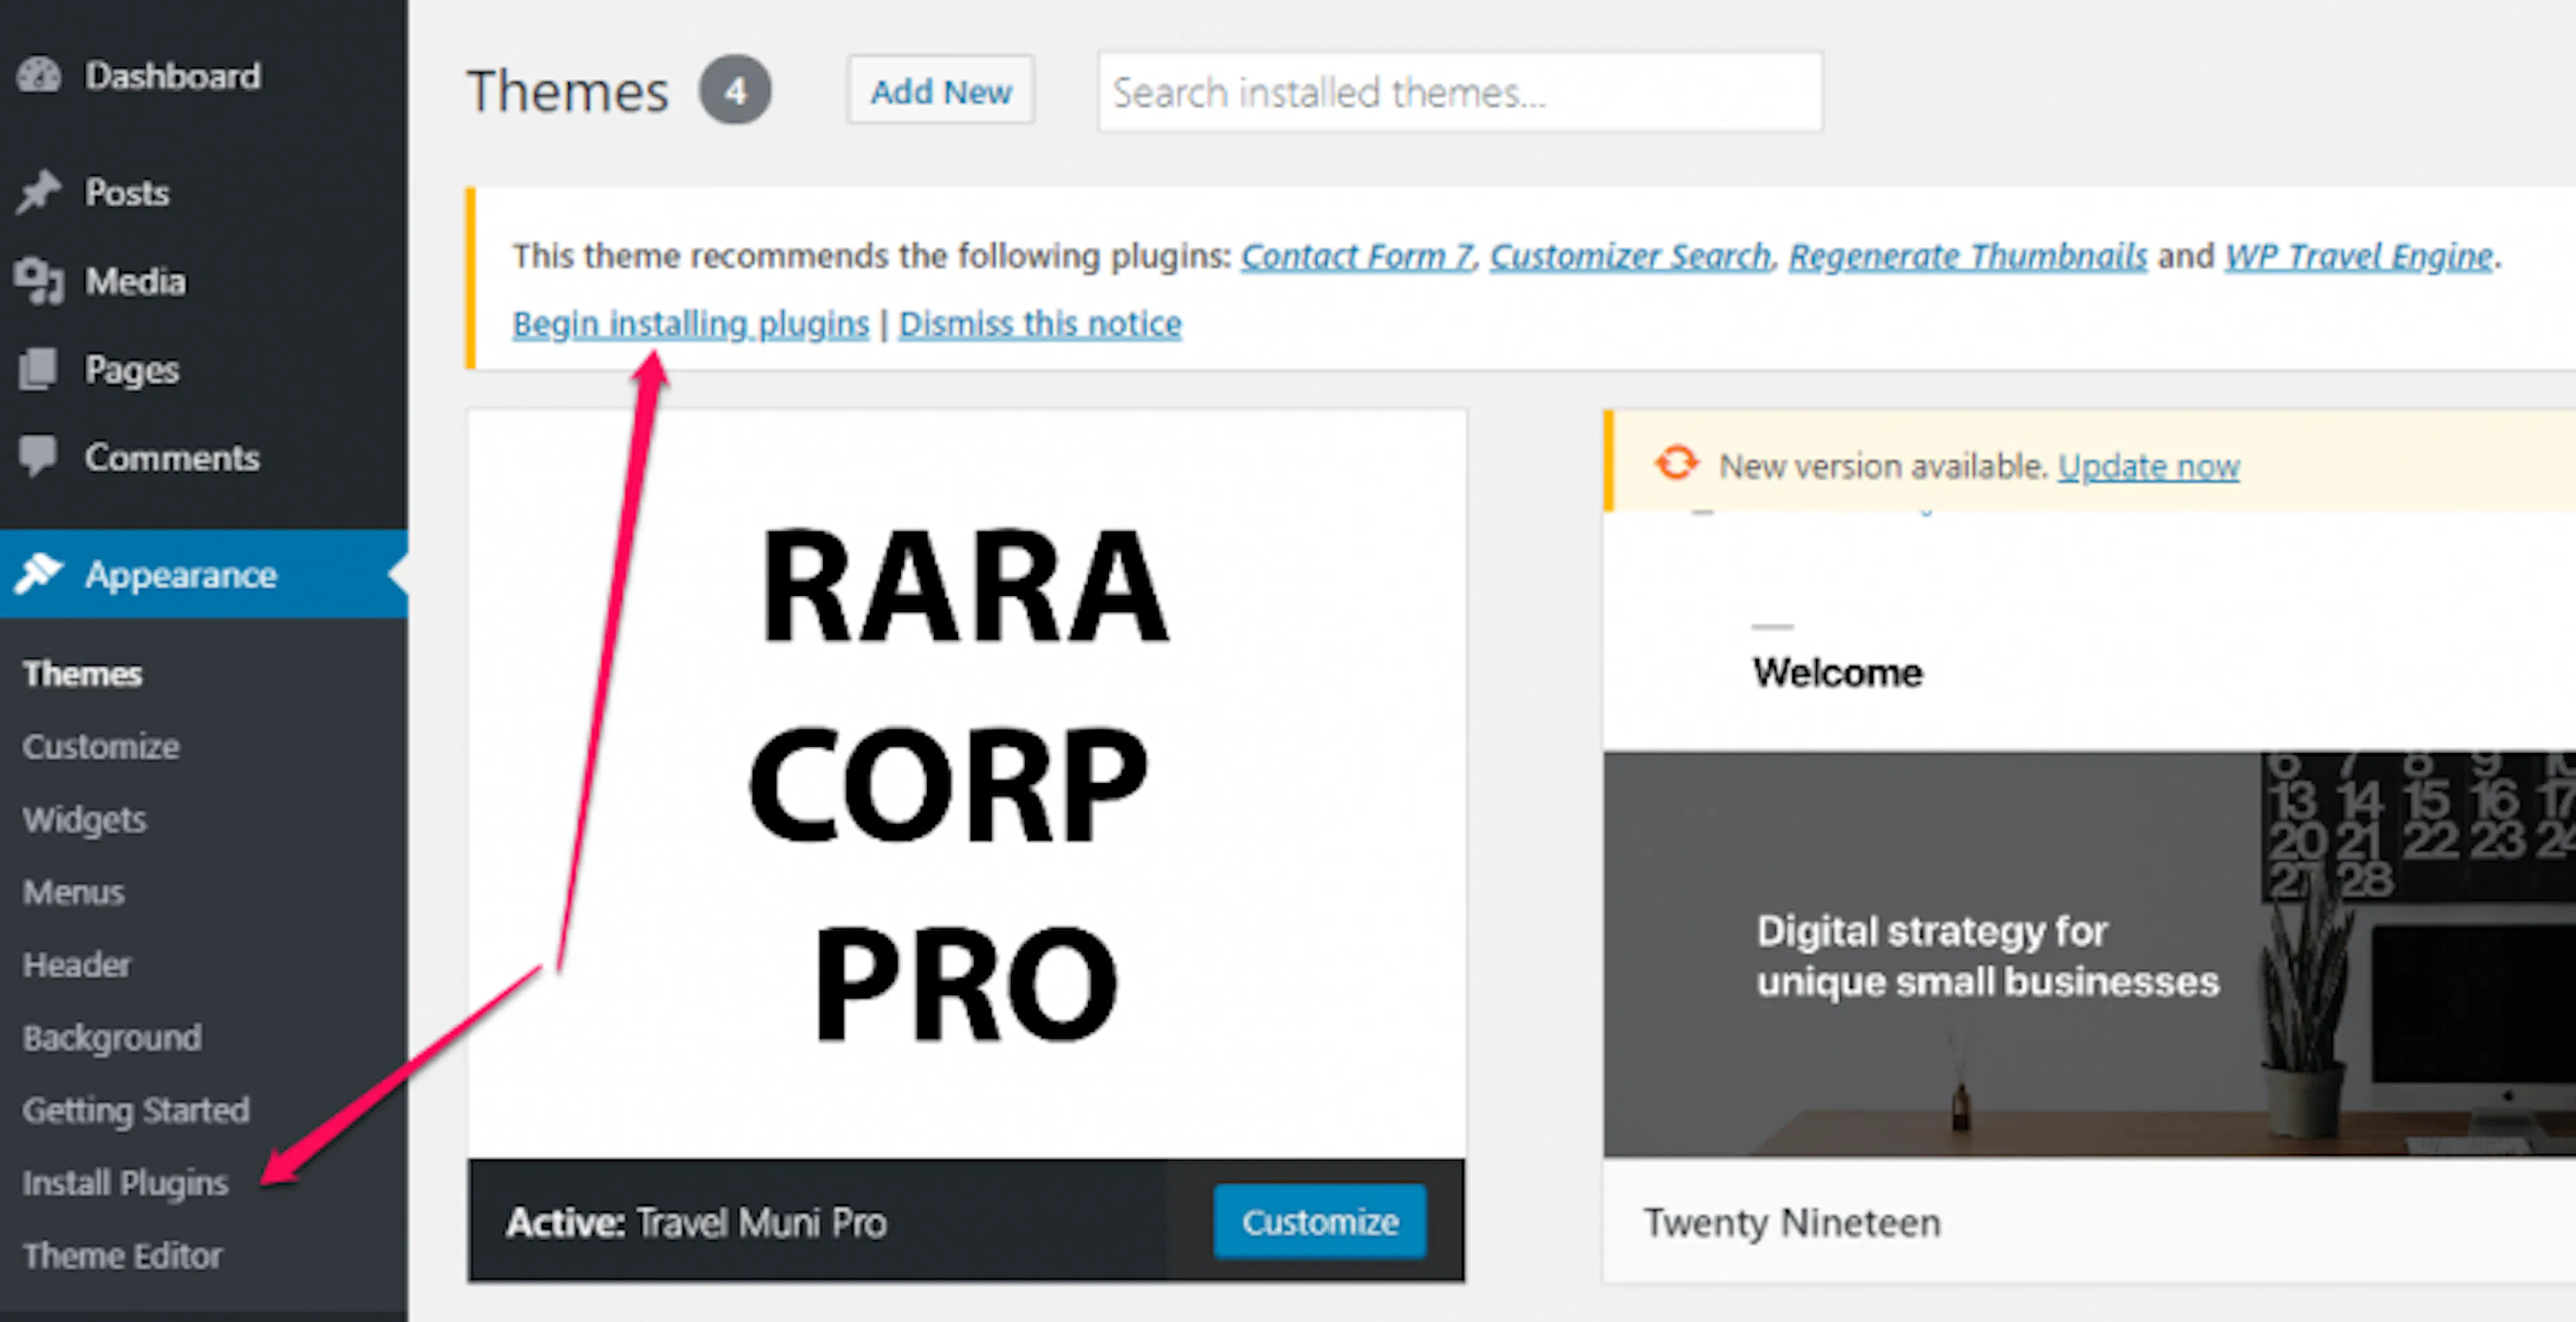
Travel Muni Pro is ready when it appears as your active theme. Install the recommended plugins before you create trips and contact forms.
Install recommended plugins
Plugins are small apps that add features to WordPress. Travel Muni Pro works with these plugins for trip management, contact forms, and image support.
| Plugin | What it does |
|---|---|
| WP Travel Engine | Creates and manages trips, destinations, itineraries, prices, and other travel information. |
| Contact Form 7 | Creates contact forms so travelers can send questions through your website. |
| Regenerate Thumbnails | Creates new image sizes for existing media when you move older images into the theme. |
What you'll need before you start: an active Travel Muni Pro theme and access to your WordPress dashboard.
Open the plugin installer
On the left sidebar of your WordPress dashboard, click Appearance, then Install Plugins. This page lists the plugins recommended for the theme.
Install each plugin
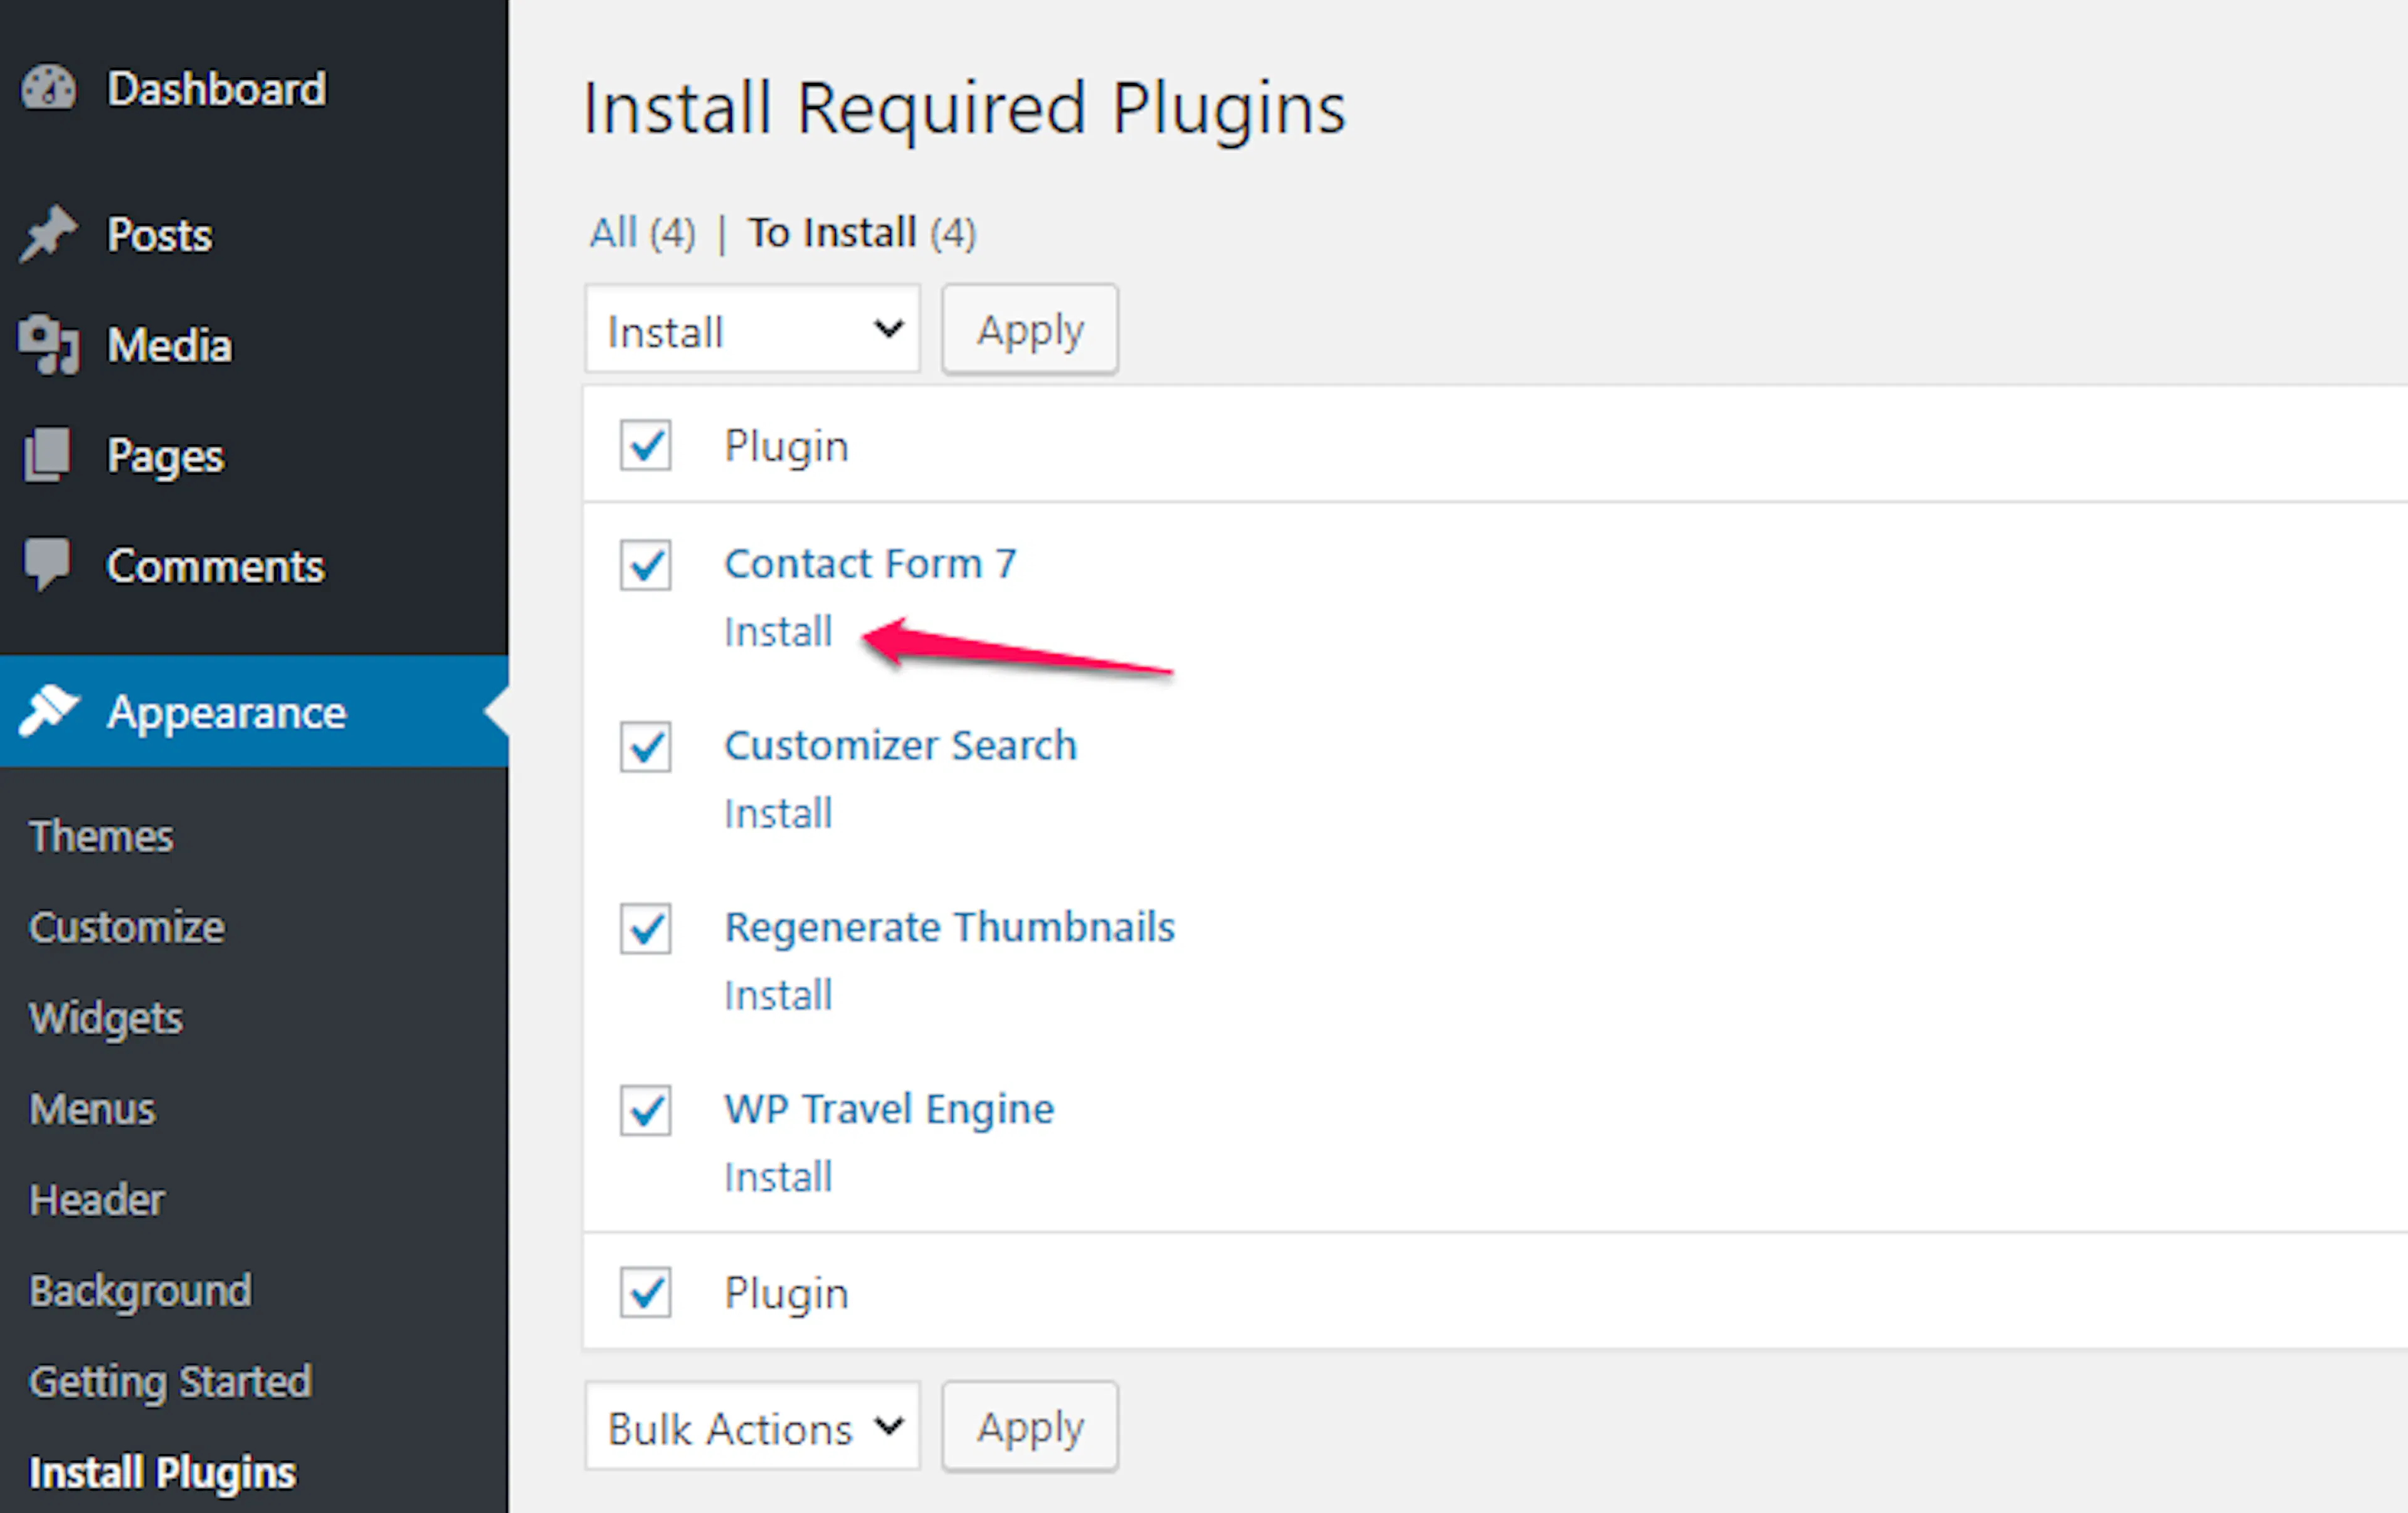
Click Install next to each recommended plugin. Installation adds the feature, but the feature is not available until you activate the plugin.
Activate each plugin
Click Activate next to each plugin after it finishes installing. Complete this for all three recommended plugins.
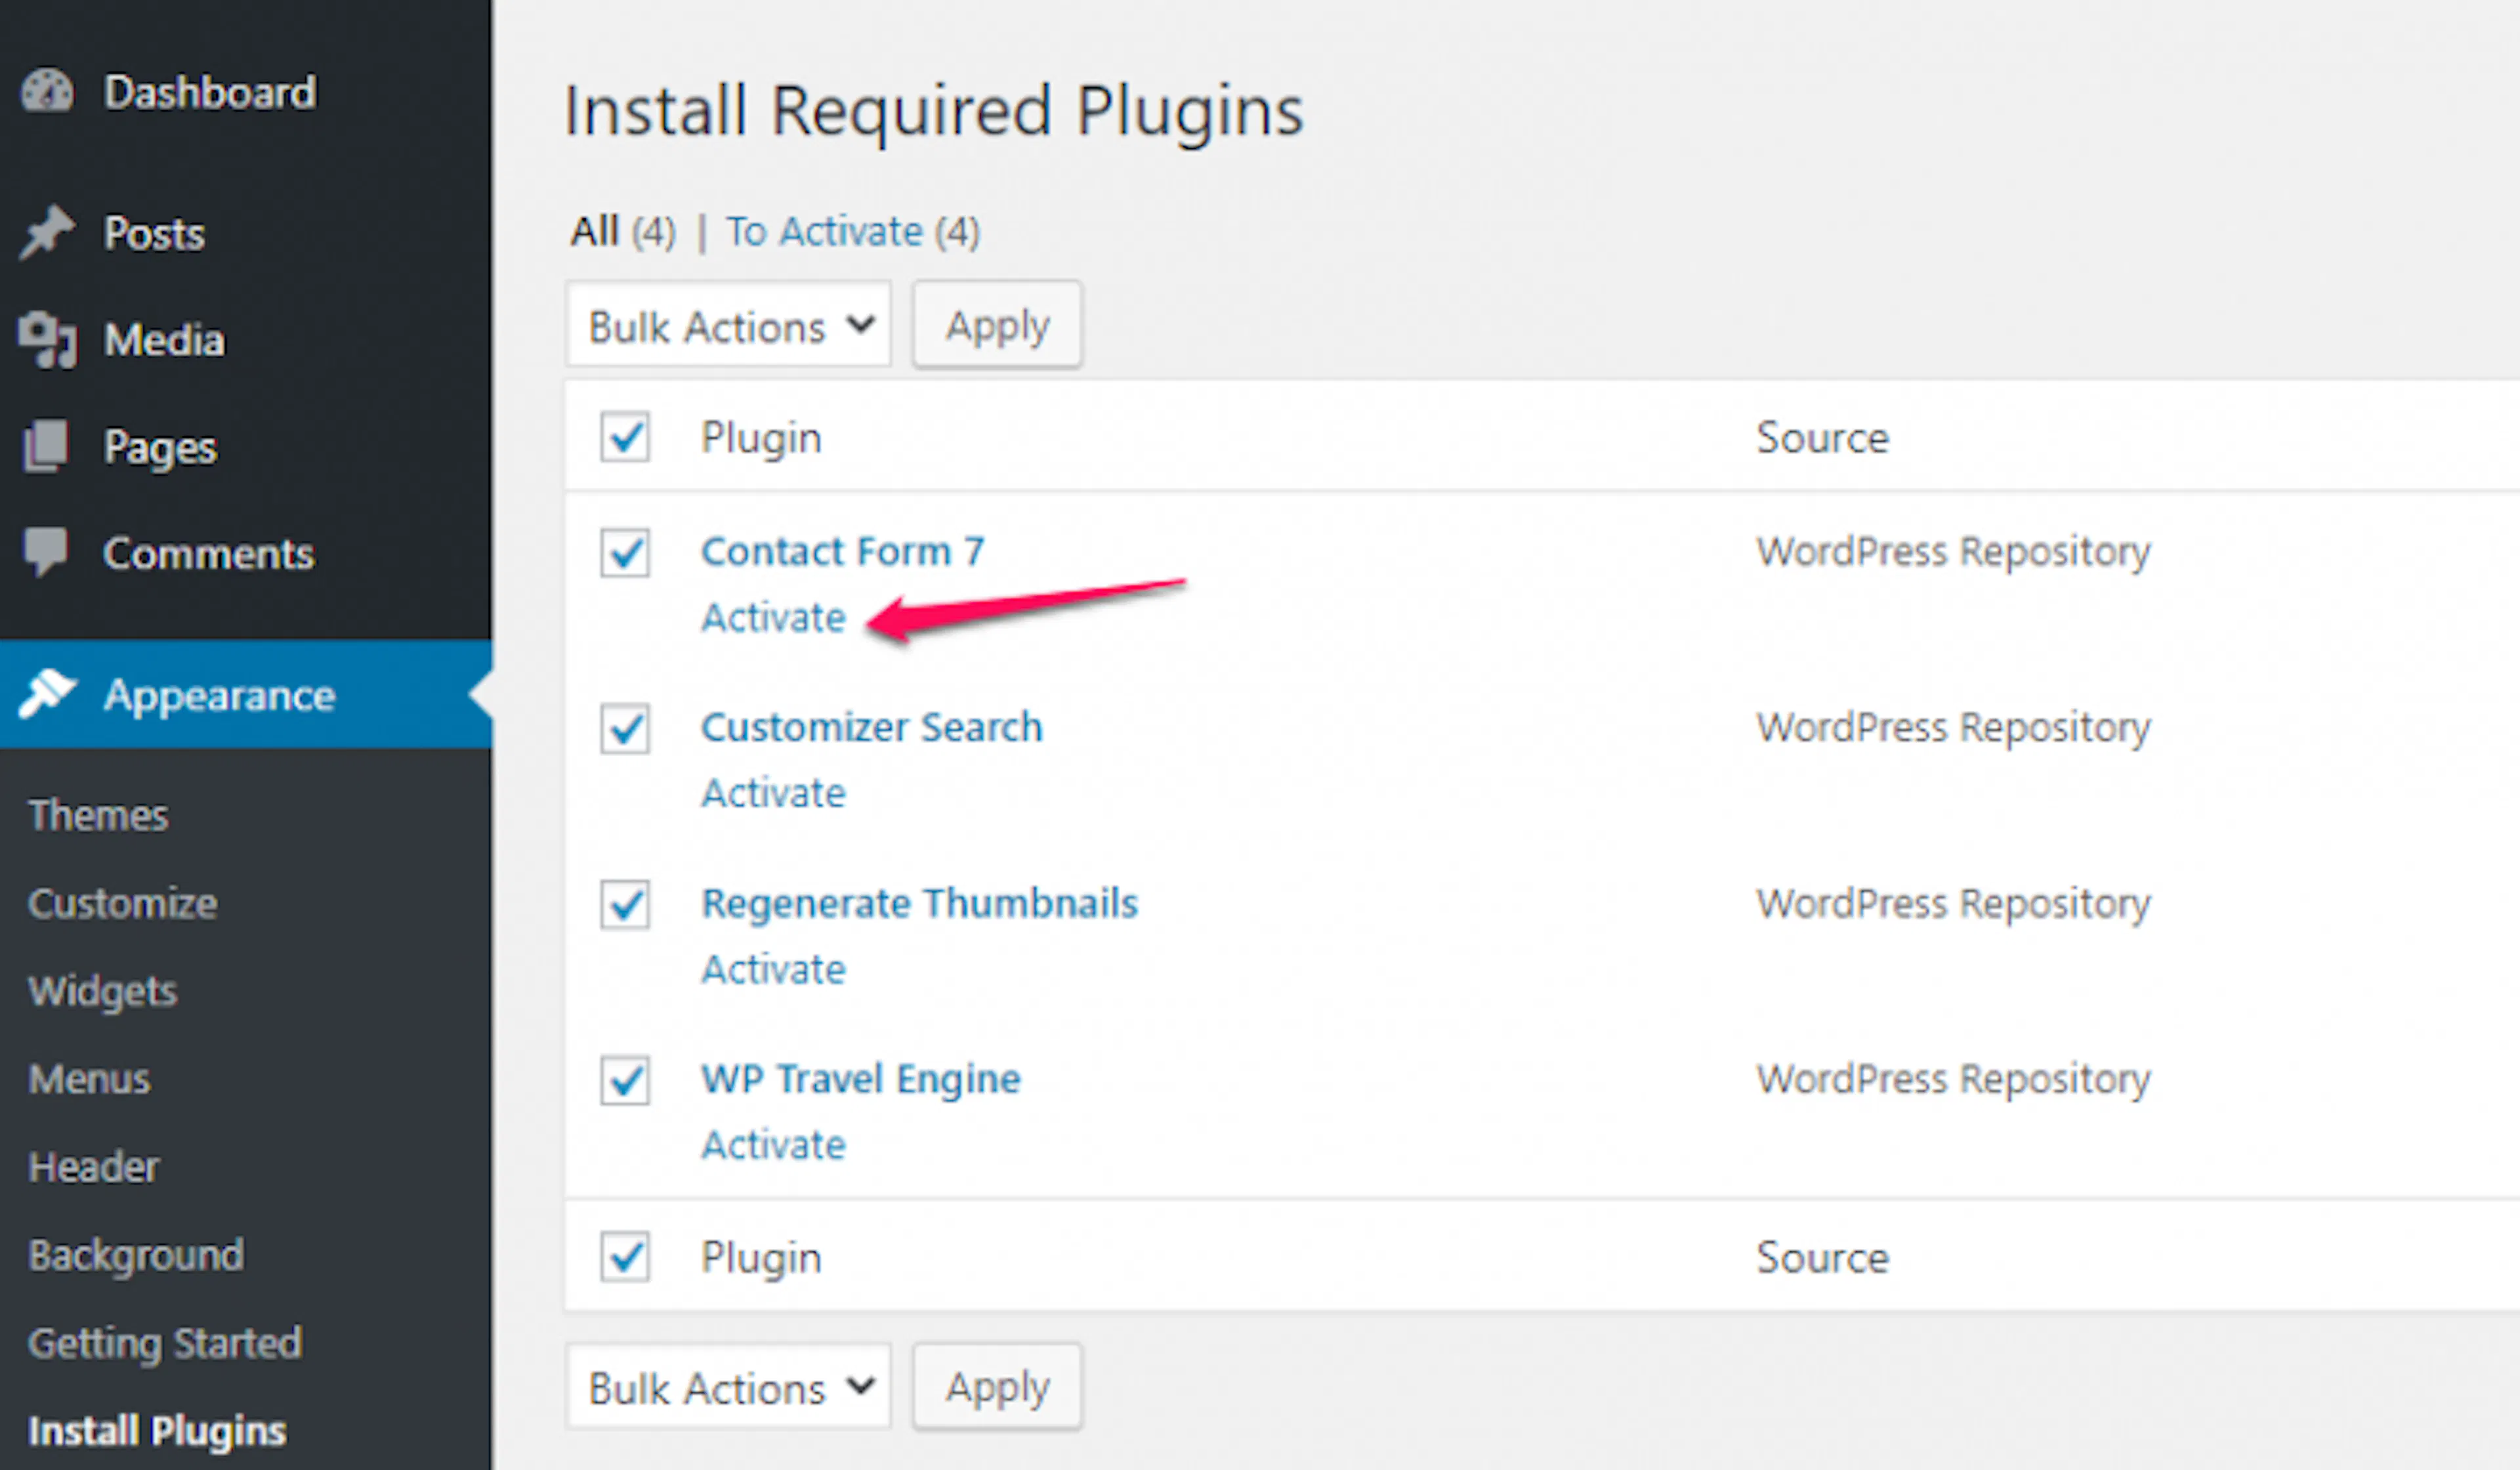
WP Travel Engine lets you create trips such as a three-day Annapurna trek. Contact Form 7 lets travelers ask questions before booking. Regenerate Thumbnails helps older photos fit the theme's image areas.
The Trip Search section needs the WP Travel Engine Trip Search plugin. The Testimonial sections work with the WP Travel Engine Trip Reviews addon. Contact sections that display a form work with Contact Form 7.
Your main theme features are now in place. Activate your license next so the theme can receive updates and support.
Activate your license key
Your license key comes in your purchase receipt email. You can also find it in your WP Travel Engine account.
Open the theme's License tab
On the left sidebar of your WordPress dashboard, open Appearance. Click the Travel Muni Pro theme settings link, then open License.
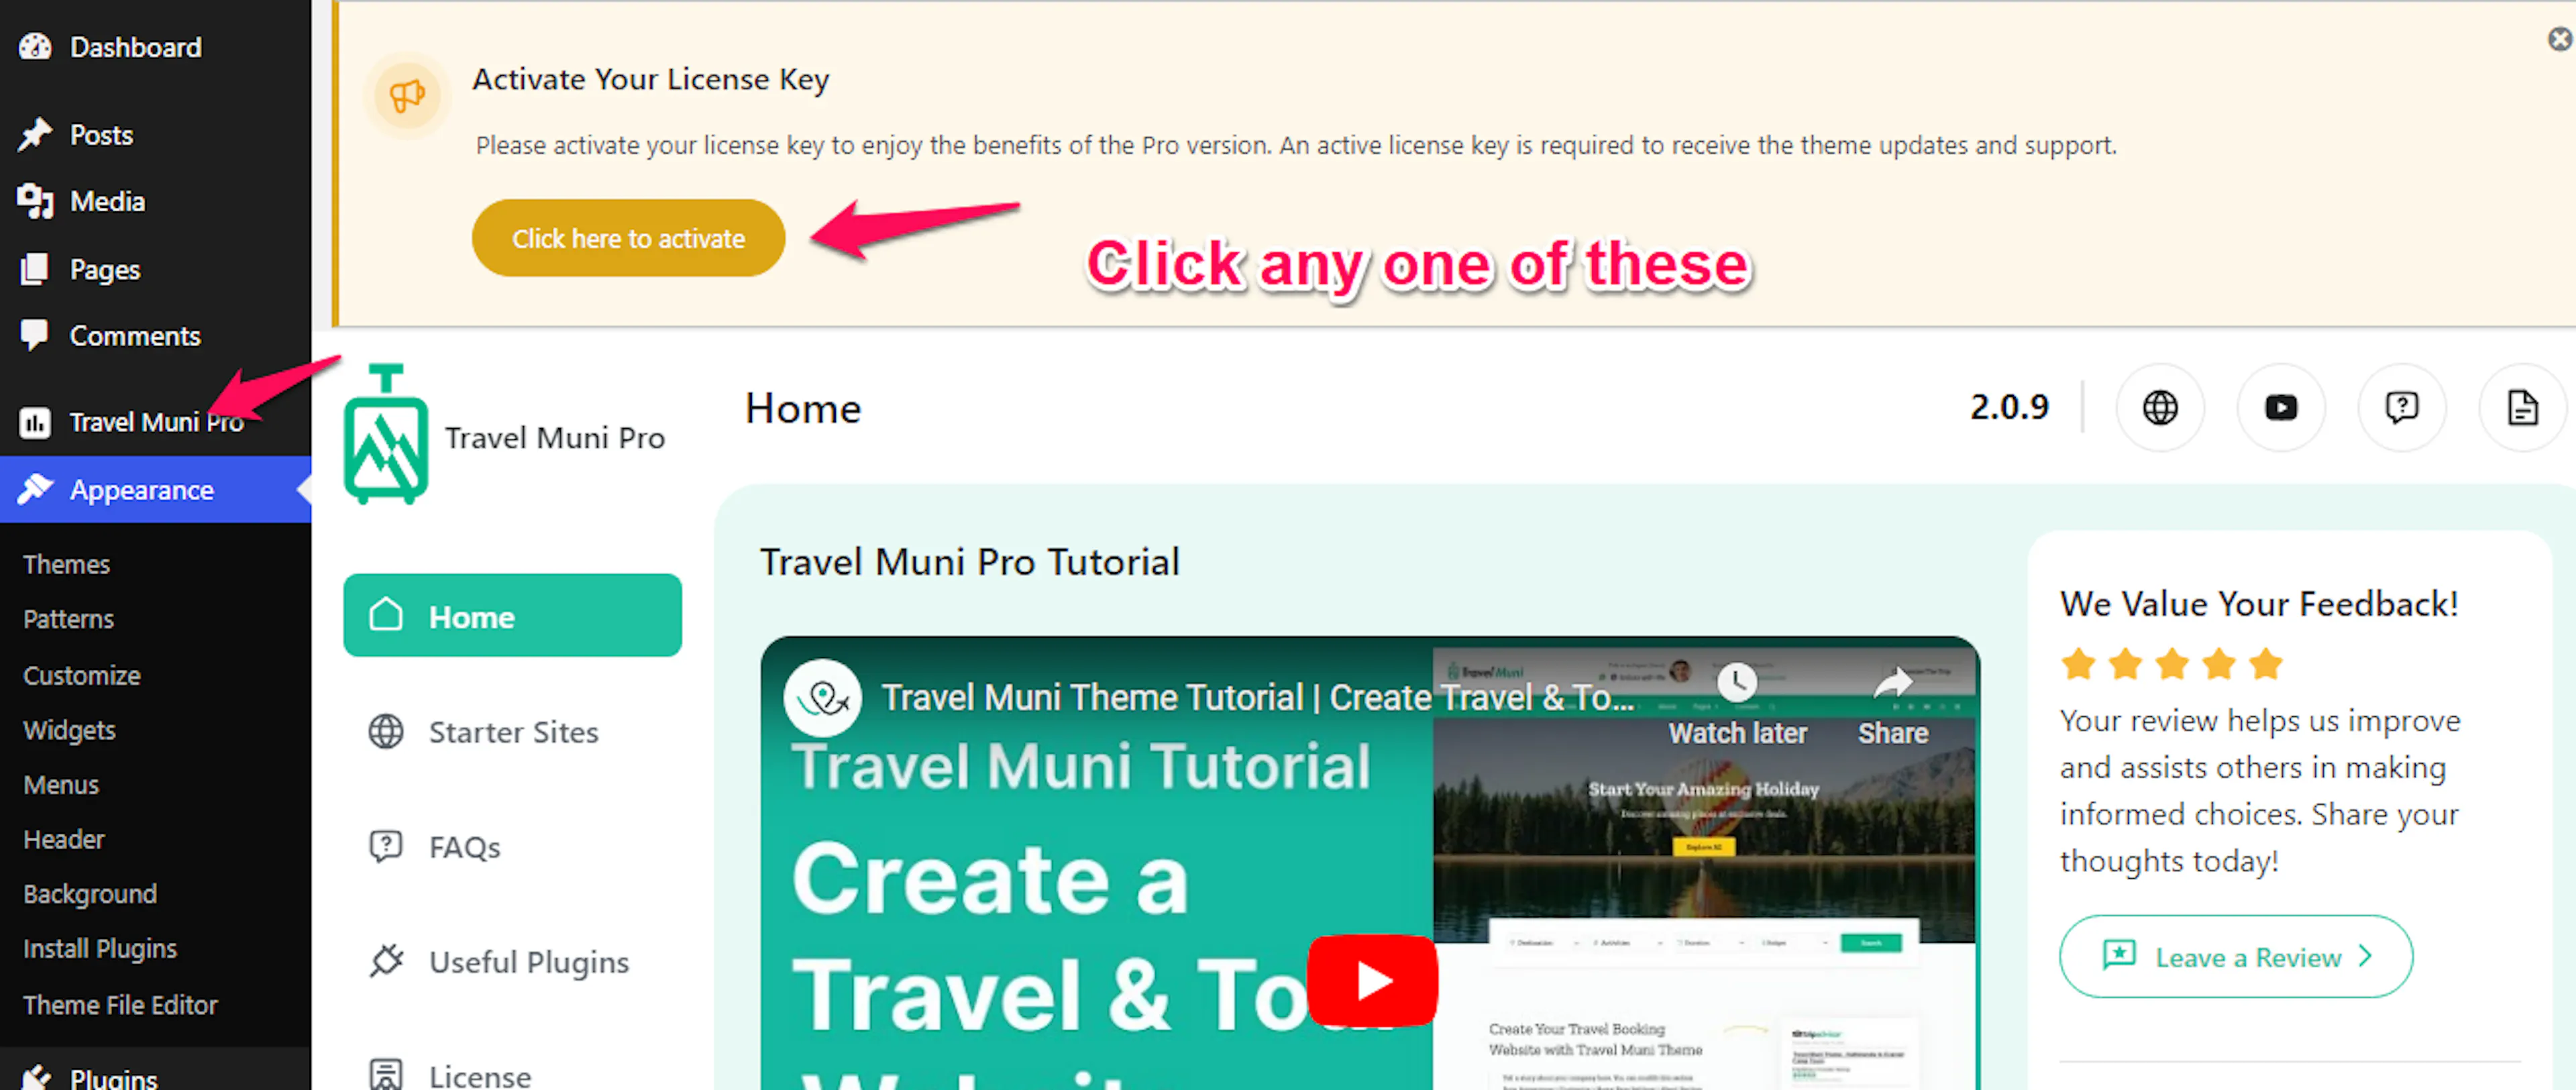
Enter your license key
Enter your license key in the license field. Click Save Changes to save it.
Activate the license
Click Activate License. Wait for the confirmation that the license is active.
The license server blocks IP addresses reported on abuseipdb.com. If activation fails, check your site's IP address with NSLookup.io. If activation still does not work, contact support with your purchase email and website URL.
When the license shows as active, the theme can receive updates and you can request support.
Set up your homepage and blog page
A static homepage lets you show trips and business information first. Your blog page can hold travel articles, packing advice, and other updates.
What you'll need before you start: two pages in WordPress. Use one for the homepage and another for blog posts.
Open Homepage Settings
On the left sidebar of your WordPress dashboard, click Appearance, then Customize. Open Homepage Settings.
Select a static homepage
Under Your homepage displays, choose A Static Page.
Assign your pages for an existing site
If you have a fresh WordPress installation, skip this step. If your site already has content, choose your homepage under Front Page. Choose your blog page under Posts Page.
Publish your changes
Click Publish. WordPress now uses your selected pages for the homepage and blog.
Your homepage is ready. The Customizer is WordPress's built-in settings panel for changing your site's design and content. You will find it under Appearance on the left sidebar.
Logo and header settings
These settings control the identity and contact information visitors see across your website.
Site identity
Add your logo, business name, tagline, and browser icon from Site Identity.
What you'll need before you start: a logo file and a square image for your site icon.
Open Site Identity
From the left sidebar, open Appearance, then Customize. Open Site Identity.
Add your logo and business details
Click Select Logo and upload your logo. Enter your Site Title and Tagline. Enable Display Site Title and Tagline if you want both to appear beside the logo.
Add your site icon and publish
Set a suitable logo width. Click Select Image under Site Icon and upload your browser icon. Choose the font, font size, and site title color, then click Publish.
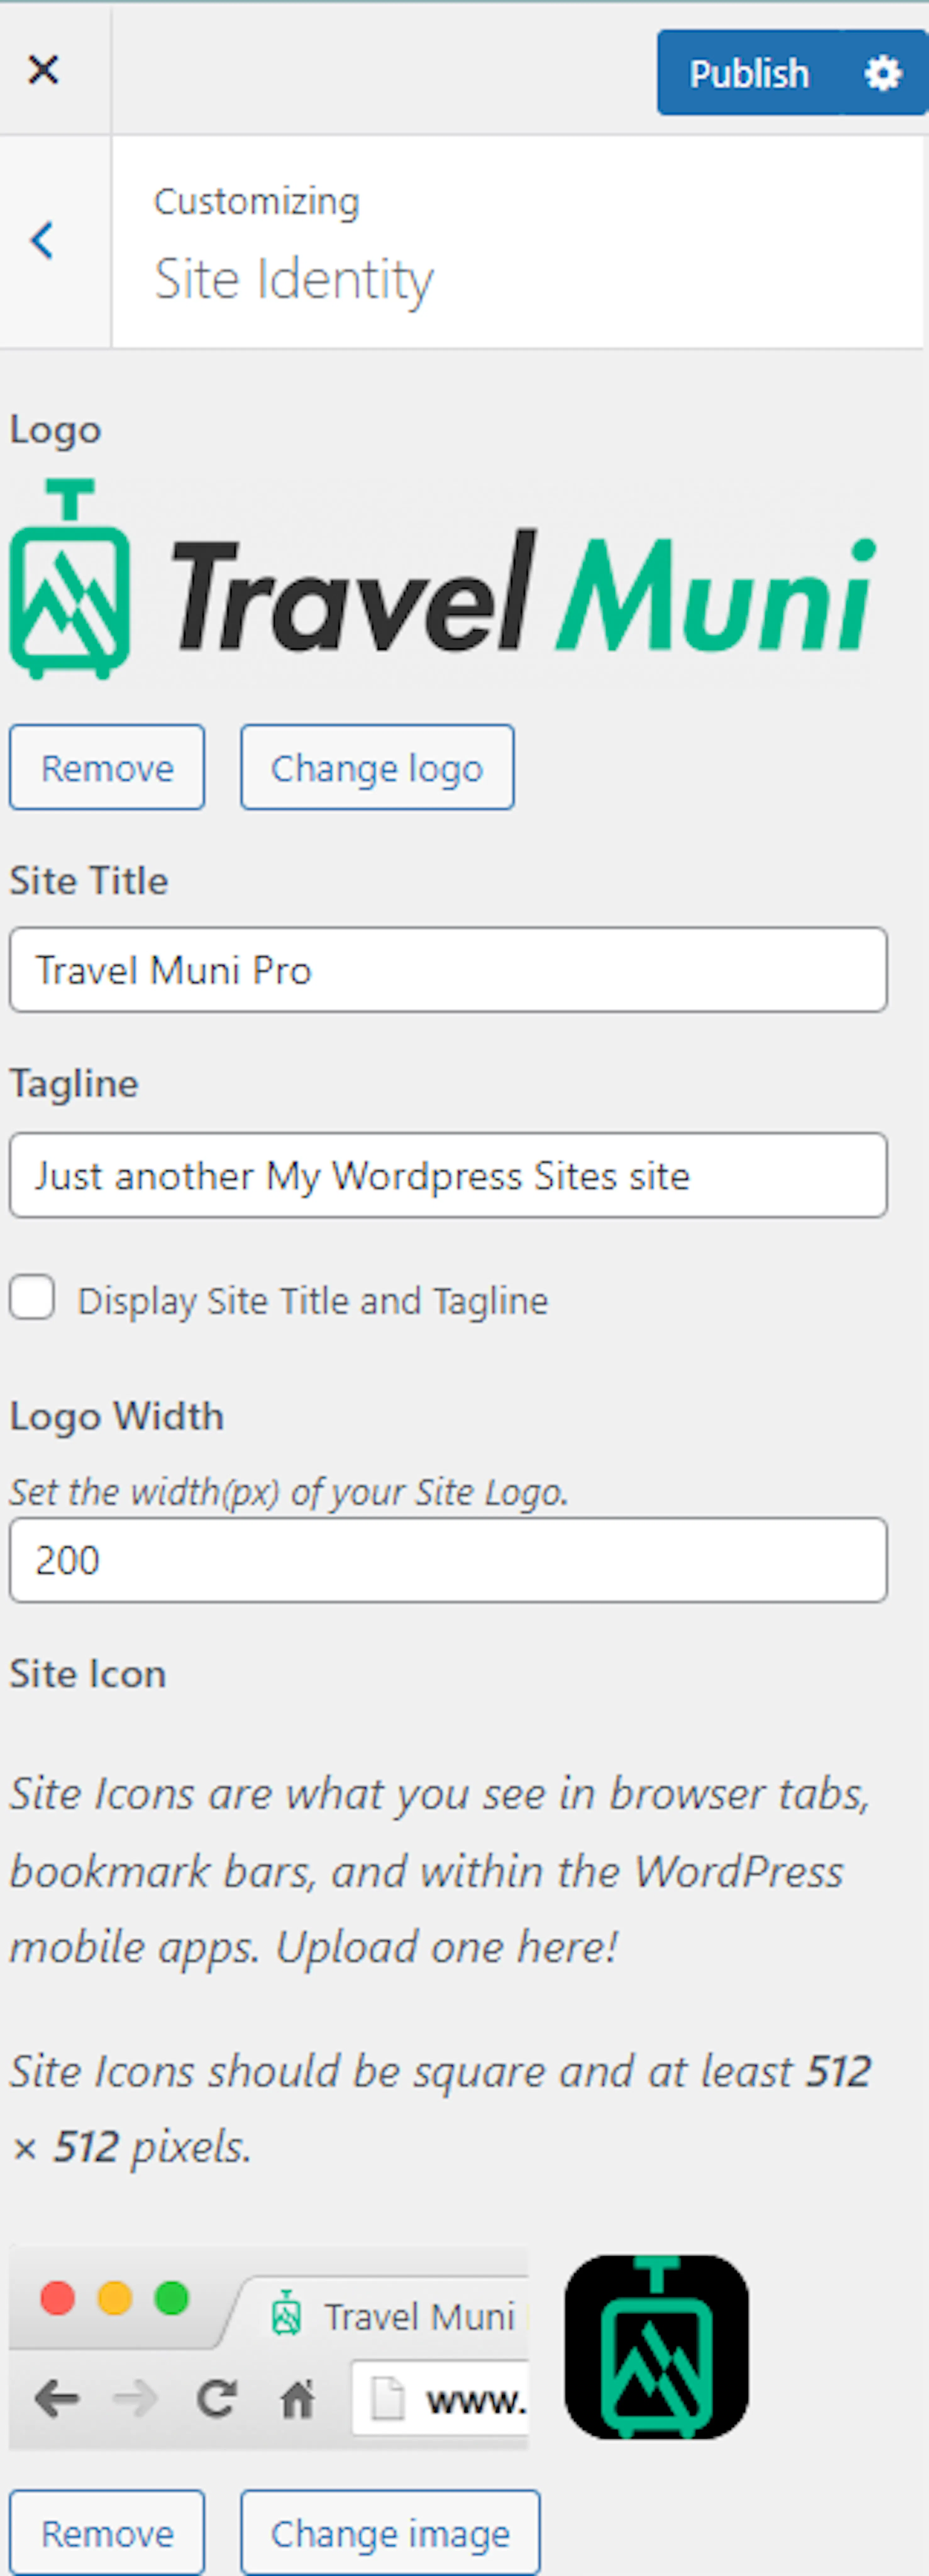
Your business name and logo now appear consistently across the site.
Header settings
Header settings help visitors find your phone number, email address, search button, and booking link.
What you'll need before you start: your contact details, a contact person image if you want to use one, and the URL for your trip or booking page.
Open Header Settings
From Appearance, open Customize, then General Settings, then Header Settings.
Configure the header
Enable Sticky Header if you want the header to stay at the top while visitors scroll. Enable Header Search to show the search button. Enter your phone number and email address.
Add the contact person and button
Upload a contact person image in Upload Vip Image. Enter the button text in Customize The Trip Label and the destination URL in Customizer The Trip URL.
Configure the top header
Enable or disable the top header. If you use it, enter the Top Header Title, button label, and button URL. Upload a Header Image for archive and other site pages, then click Publish.
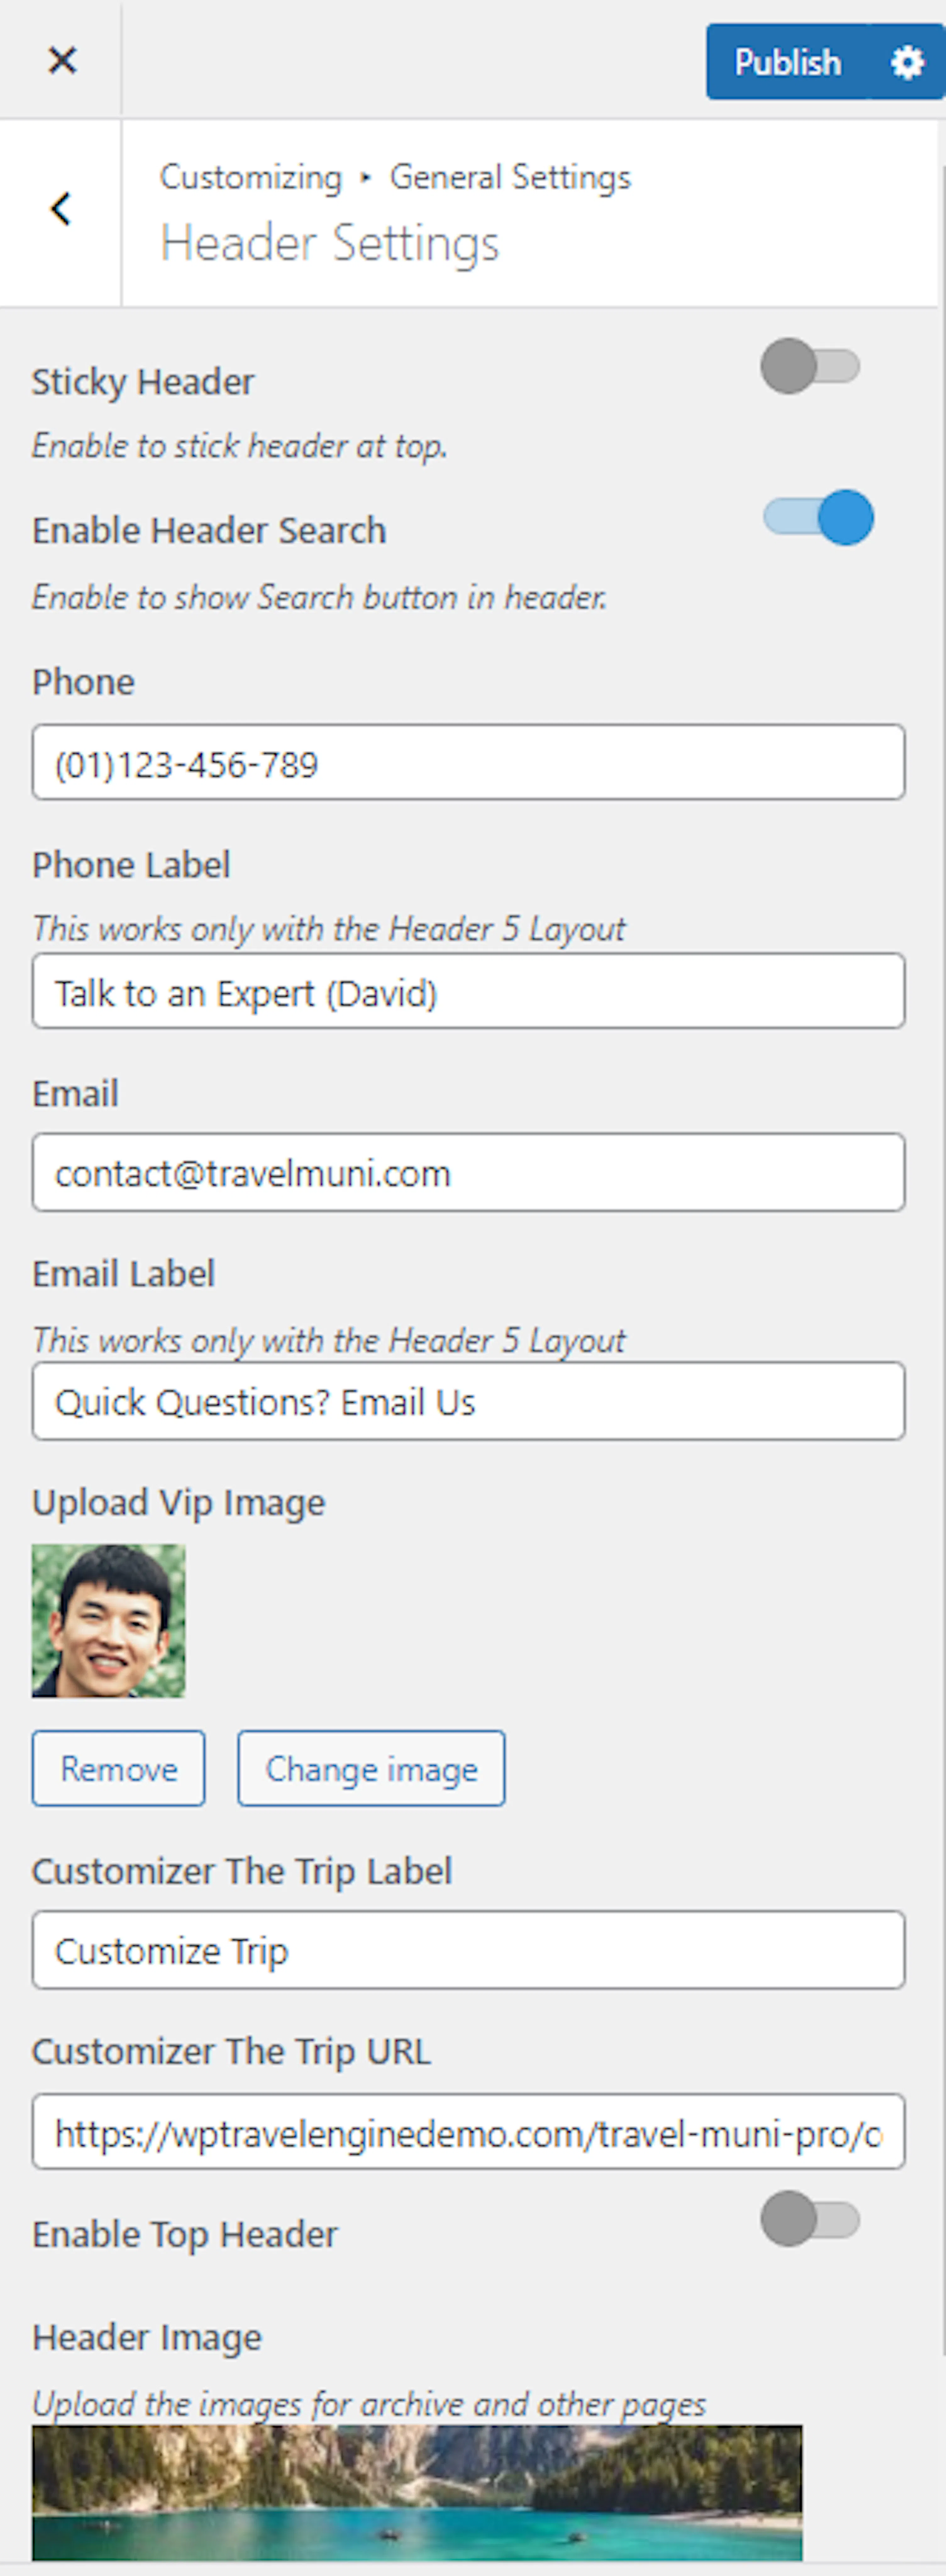
Visitors can now see the contact options you chose. Next, set the colors and background that support your brand.
Appearance settings
Appearance settings control the colors and background used throughout your site.
Color scheme
Choose colors that match your logo and printed tour materials.
Open the color settings
From Appearance, open Customize, then Appearance Settings, then Colors.
Choose your colors
Select a Primary Color, Background Color, and Secondary Color. Click Publish.
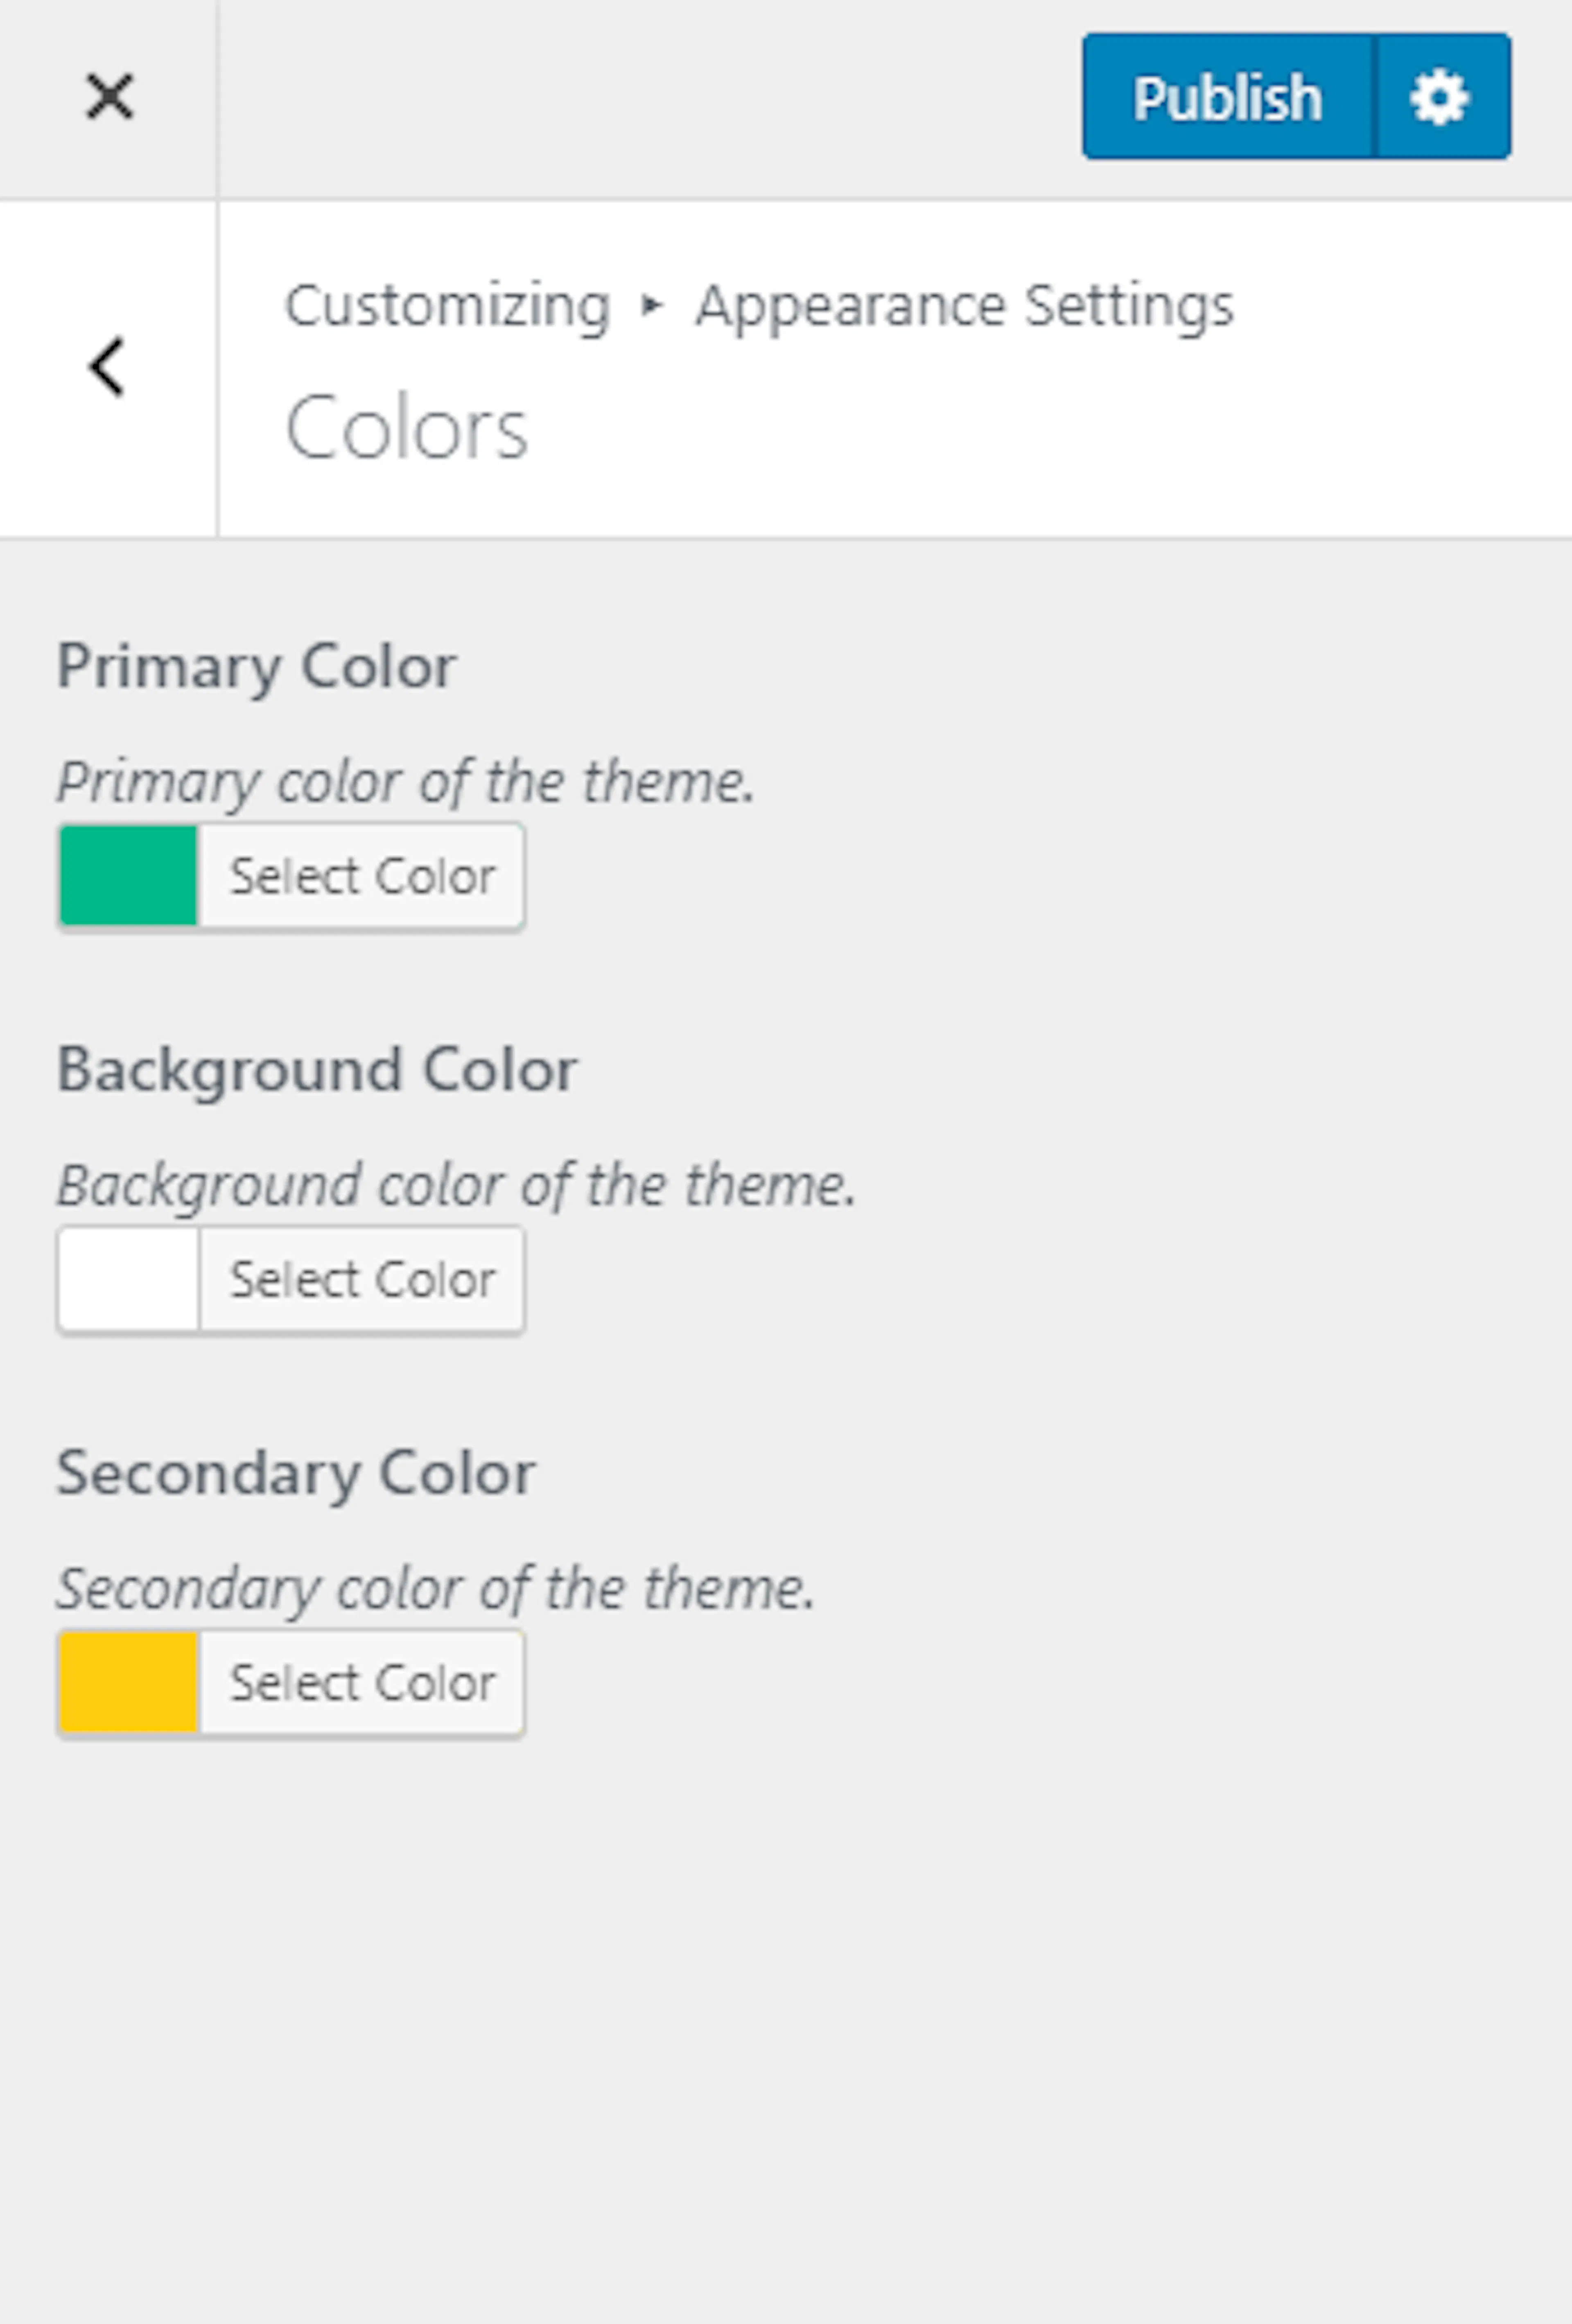
Your site now uses the colors you selected.
Background settings
A background image can add a visual texture behind your pages.
Open Background settings
From Appearance, open Customize, then Appearance Settings, then Background.
Add or change the background image
Open the Image tab and click Select Image. Upload or choose an image. Click Change Image to replace it or Remove to delete it. Click Publish.
The background image is now saved.
Background pattern
A pattern gives the background a repeated design instead of using a large image.
Choose a background pattern
From Appearance, open Customize, then Appearance Settings, then Background. Open the Pattern tab and select a pattern.
Save or remove the pattern
Choose No bg pattern to remove the pattern. Click Publish to save your choice.
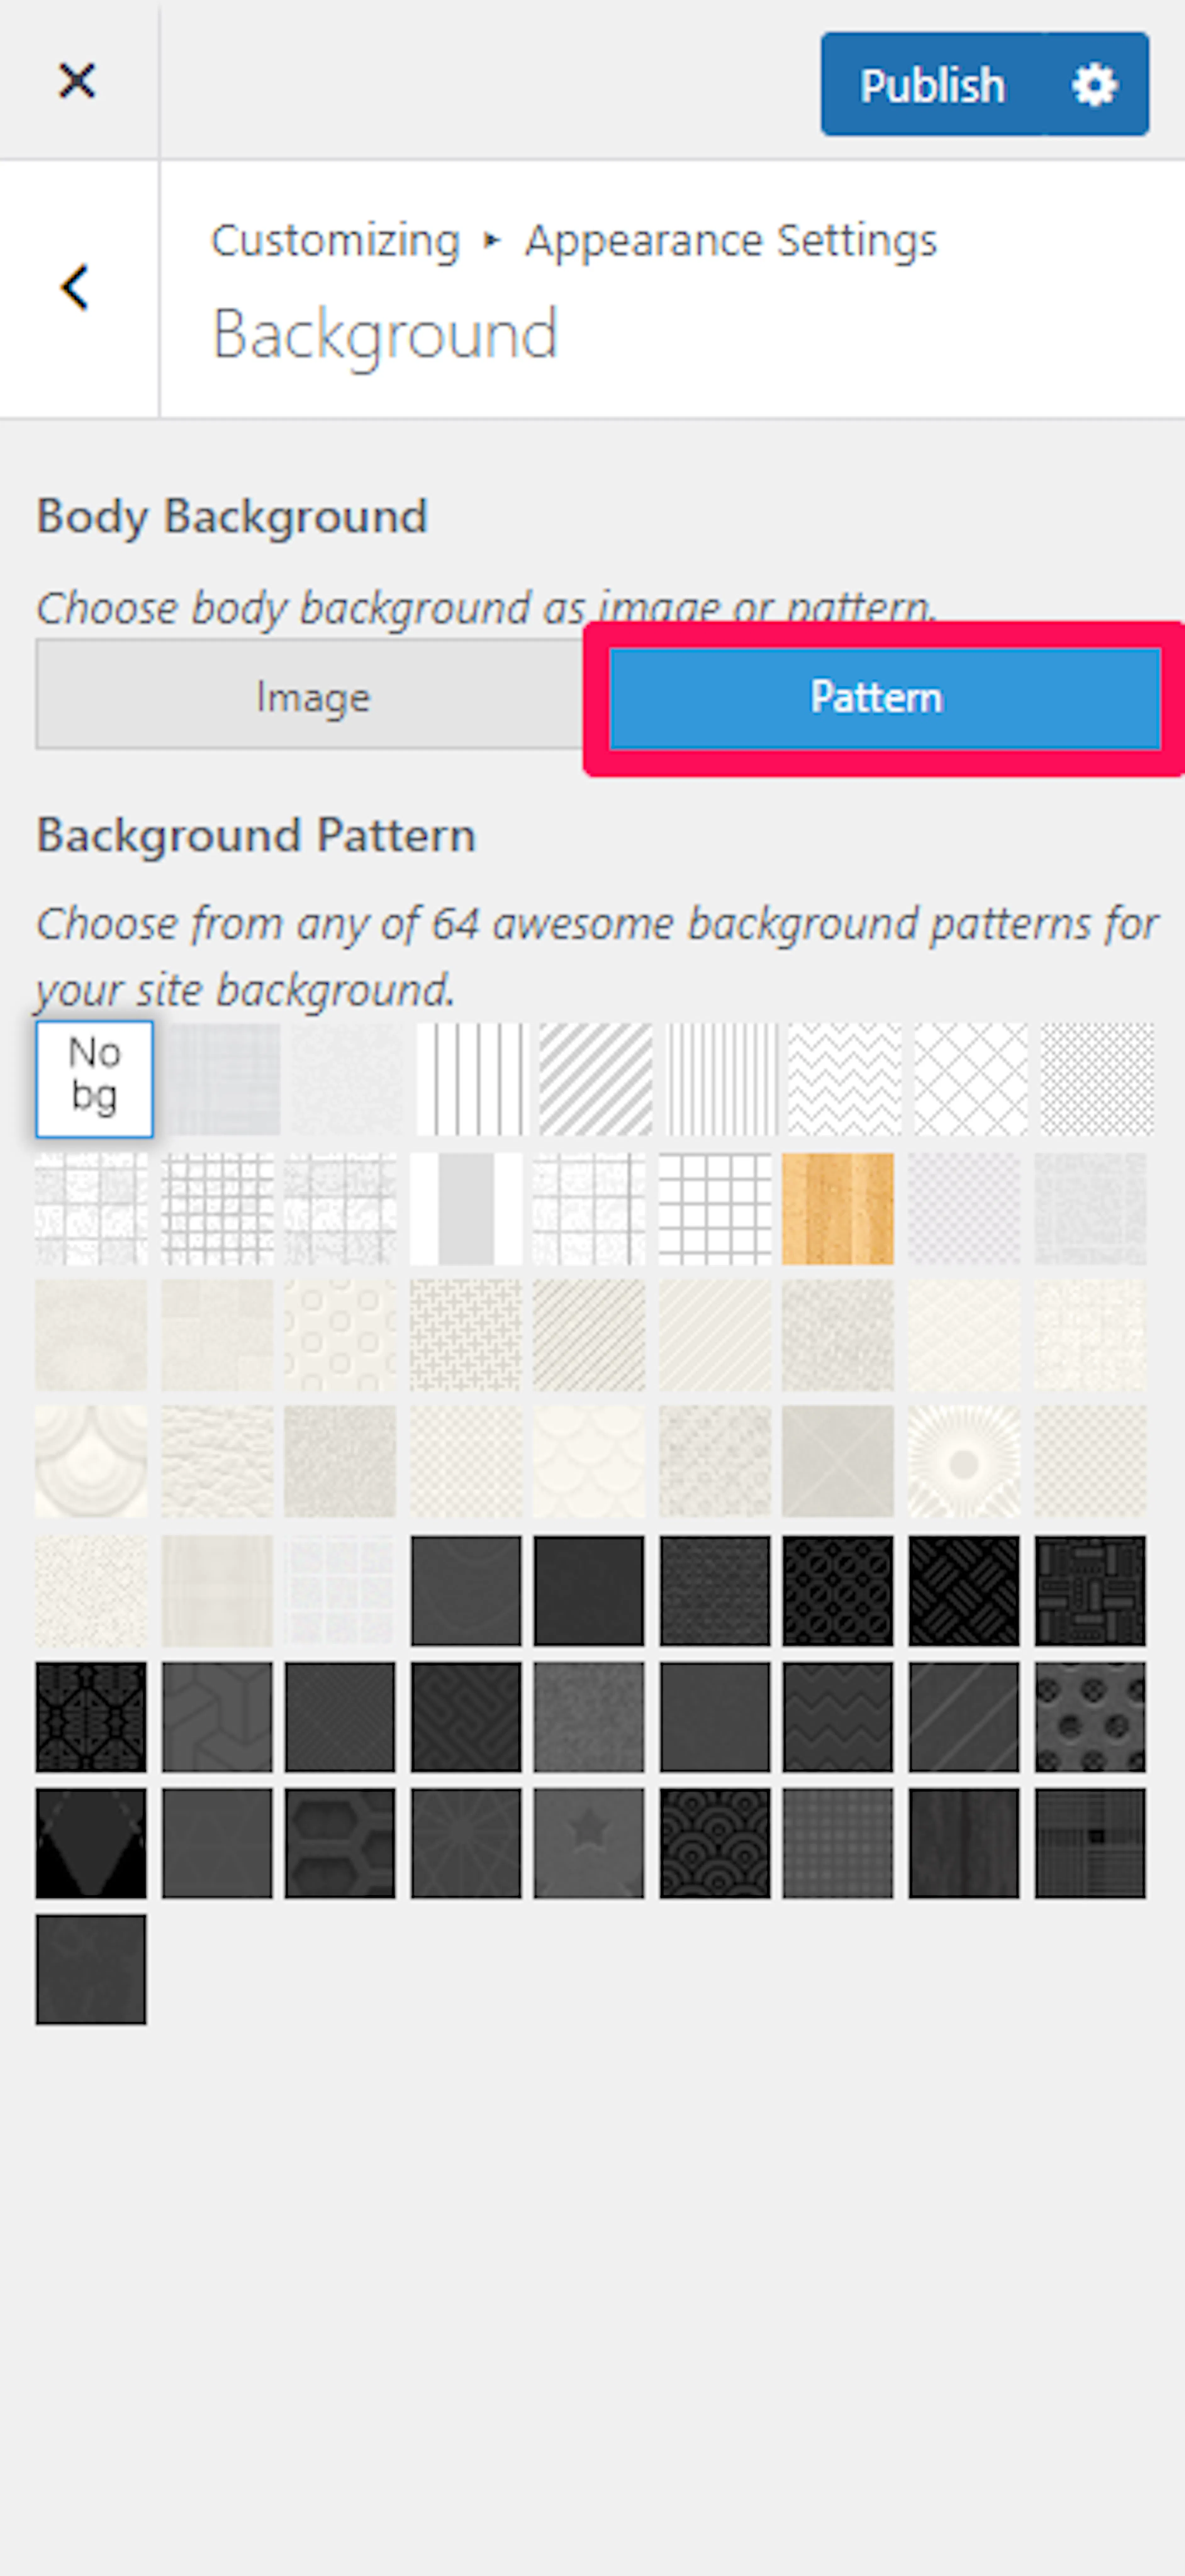
Your color and background choices are complete. The layout settings control where these elements appear.
Layout settings
Layout settings change the shape of your header, banners, sidebars, and page navigation.
Header layout
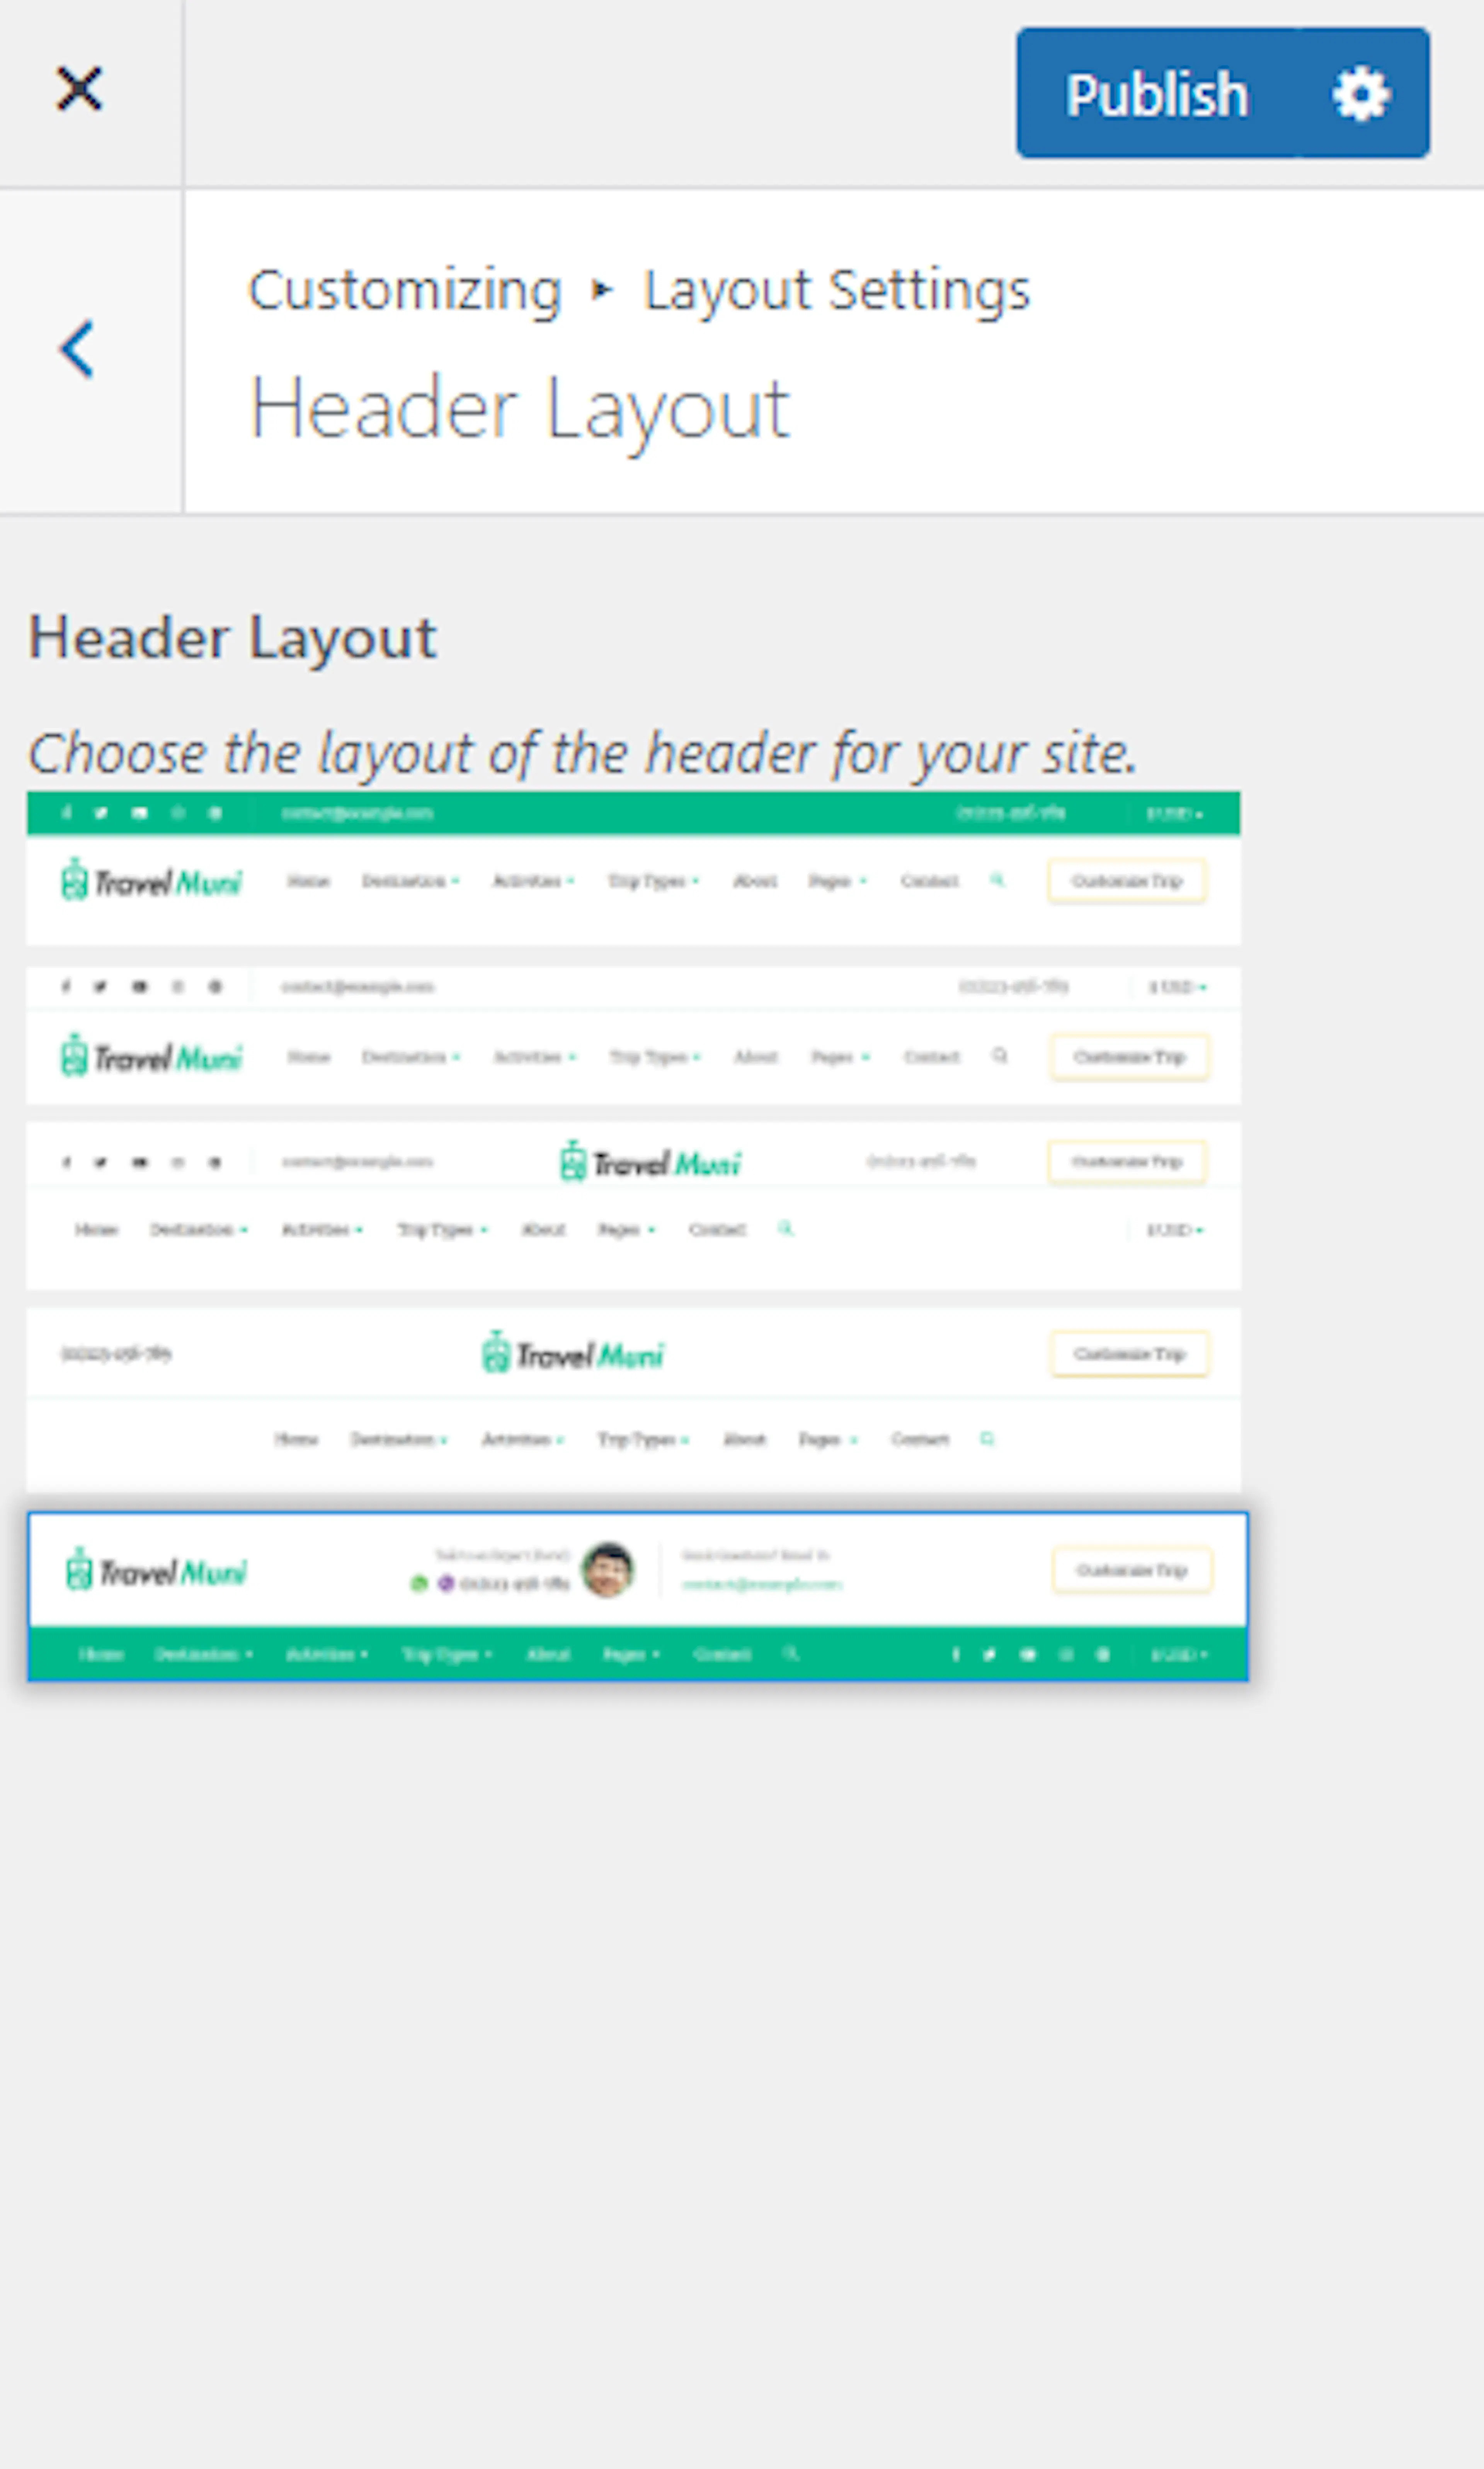
Choose how the header arranges your logo, menu, and contact elements.
Choose a header layout
From Appearance, open Customize, then Layout settings, then Header layout. Select a layout and click Publish.
Banner layout
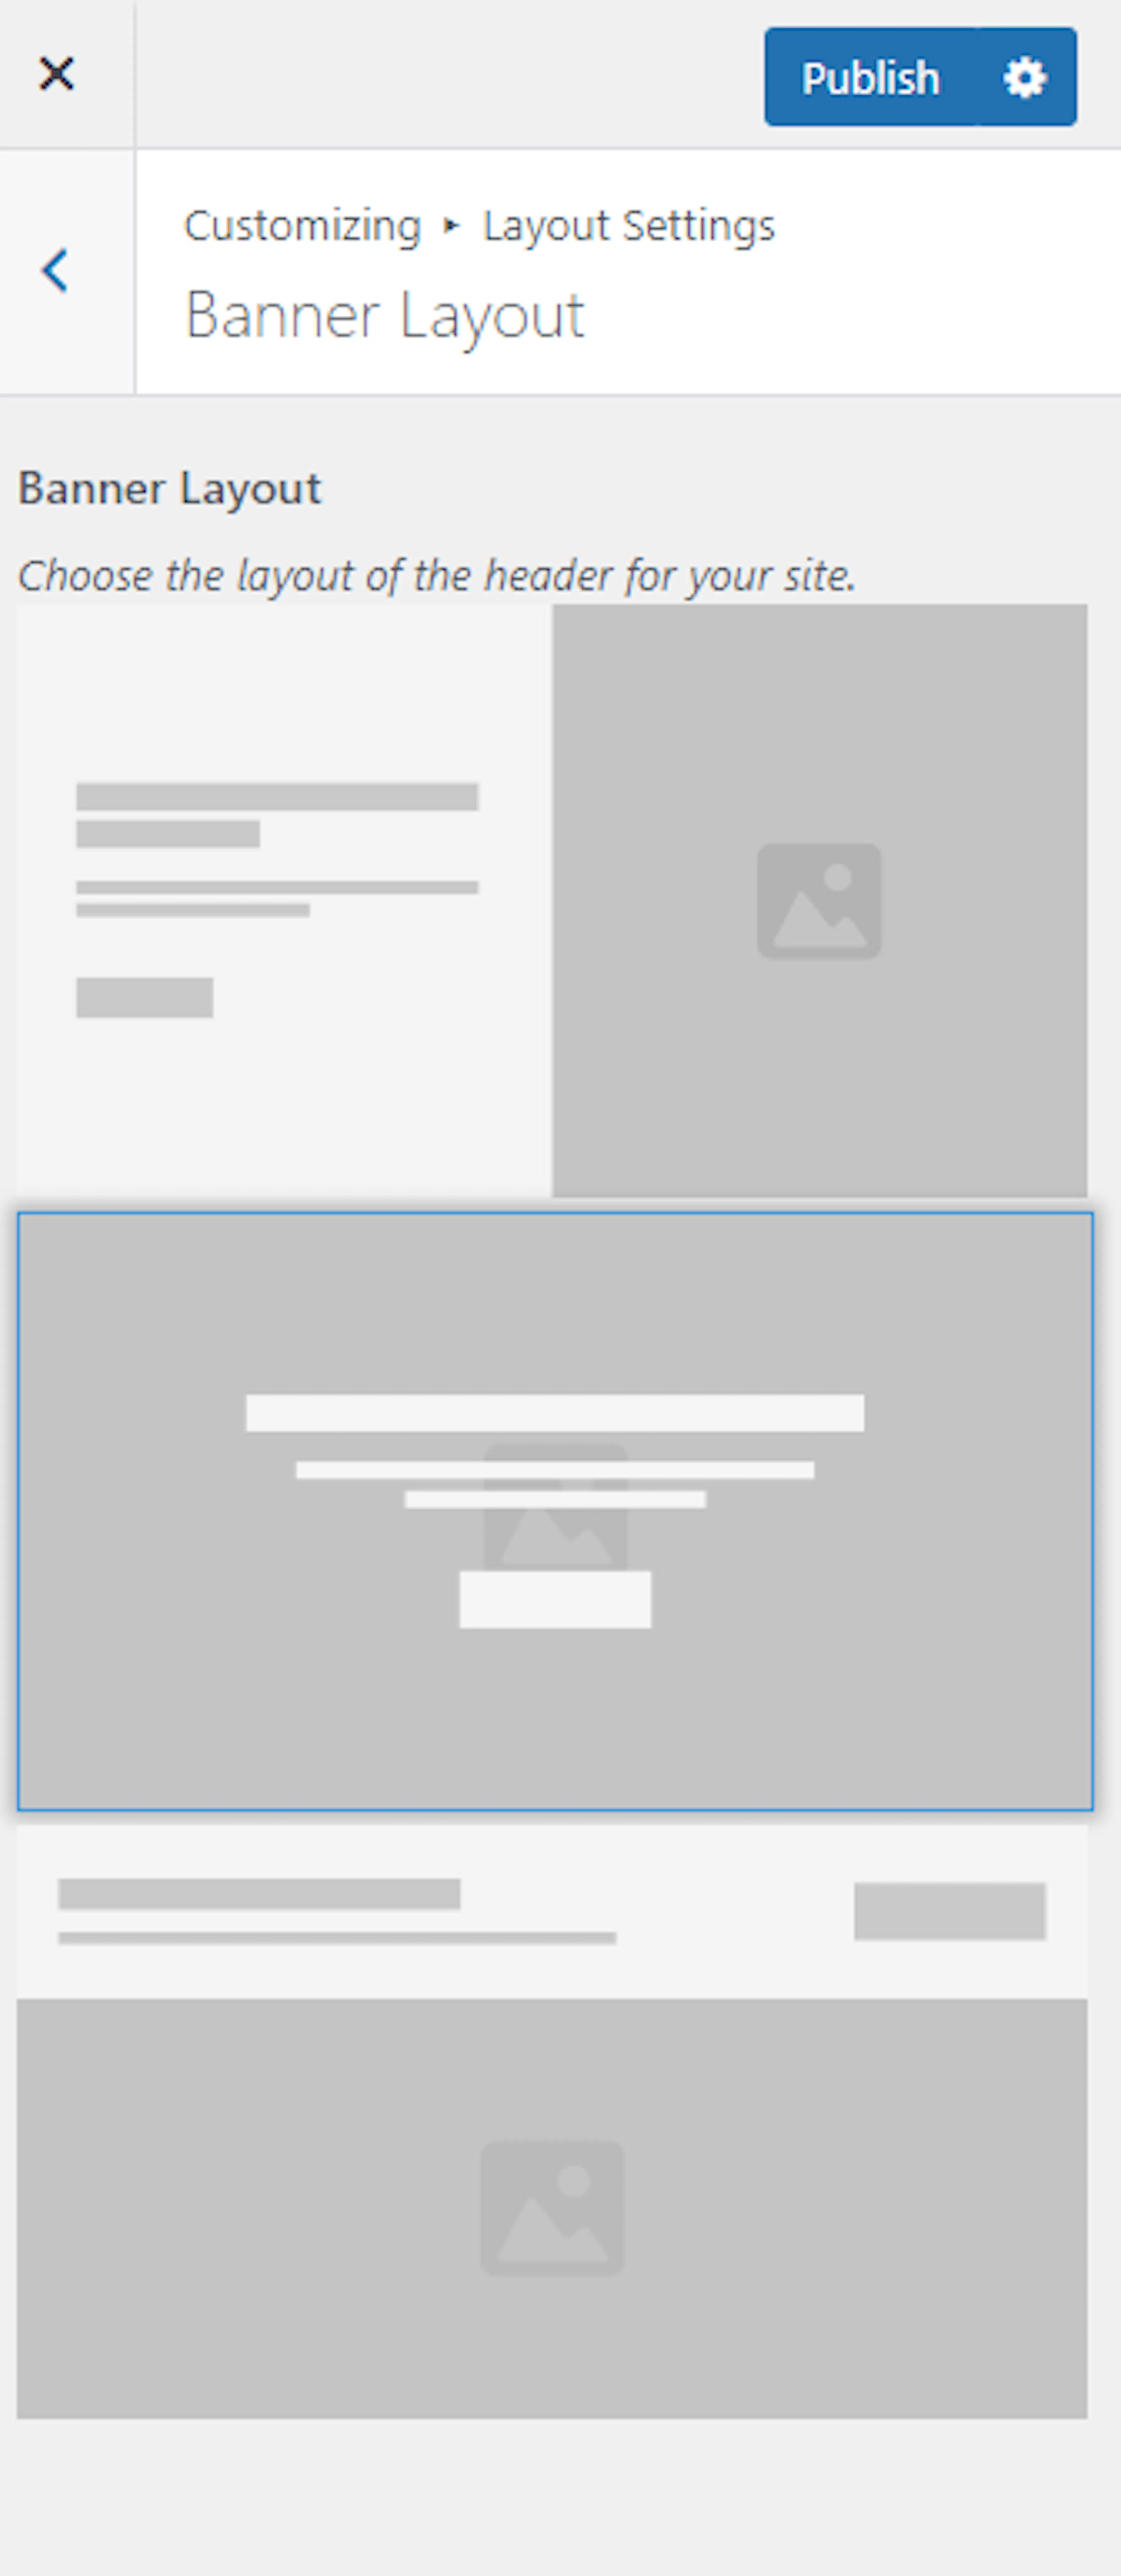
Choose how the banner appears at the top of pages.
Choose a banner layout
From Appearance, open Customize, then Layout settings, then Banner layout. Select a layout and click Publish.
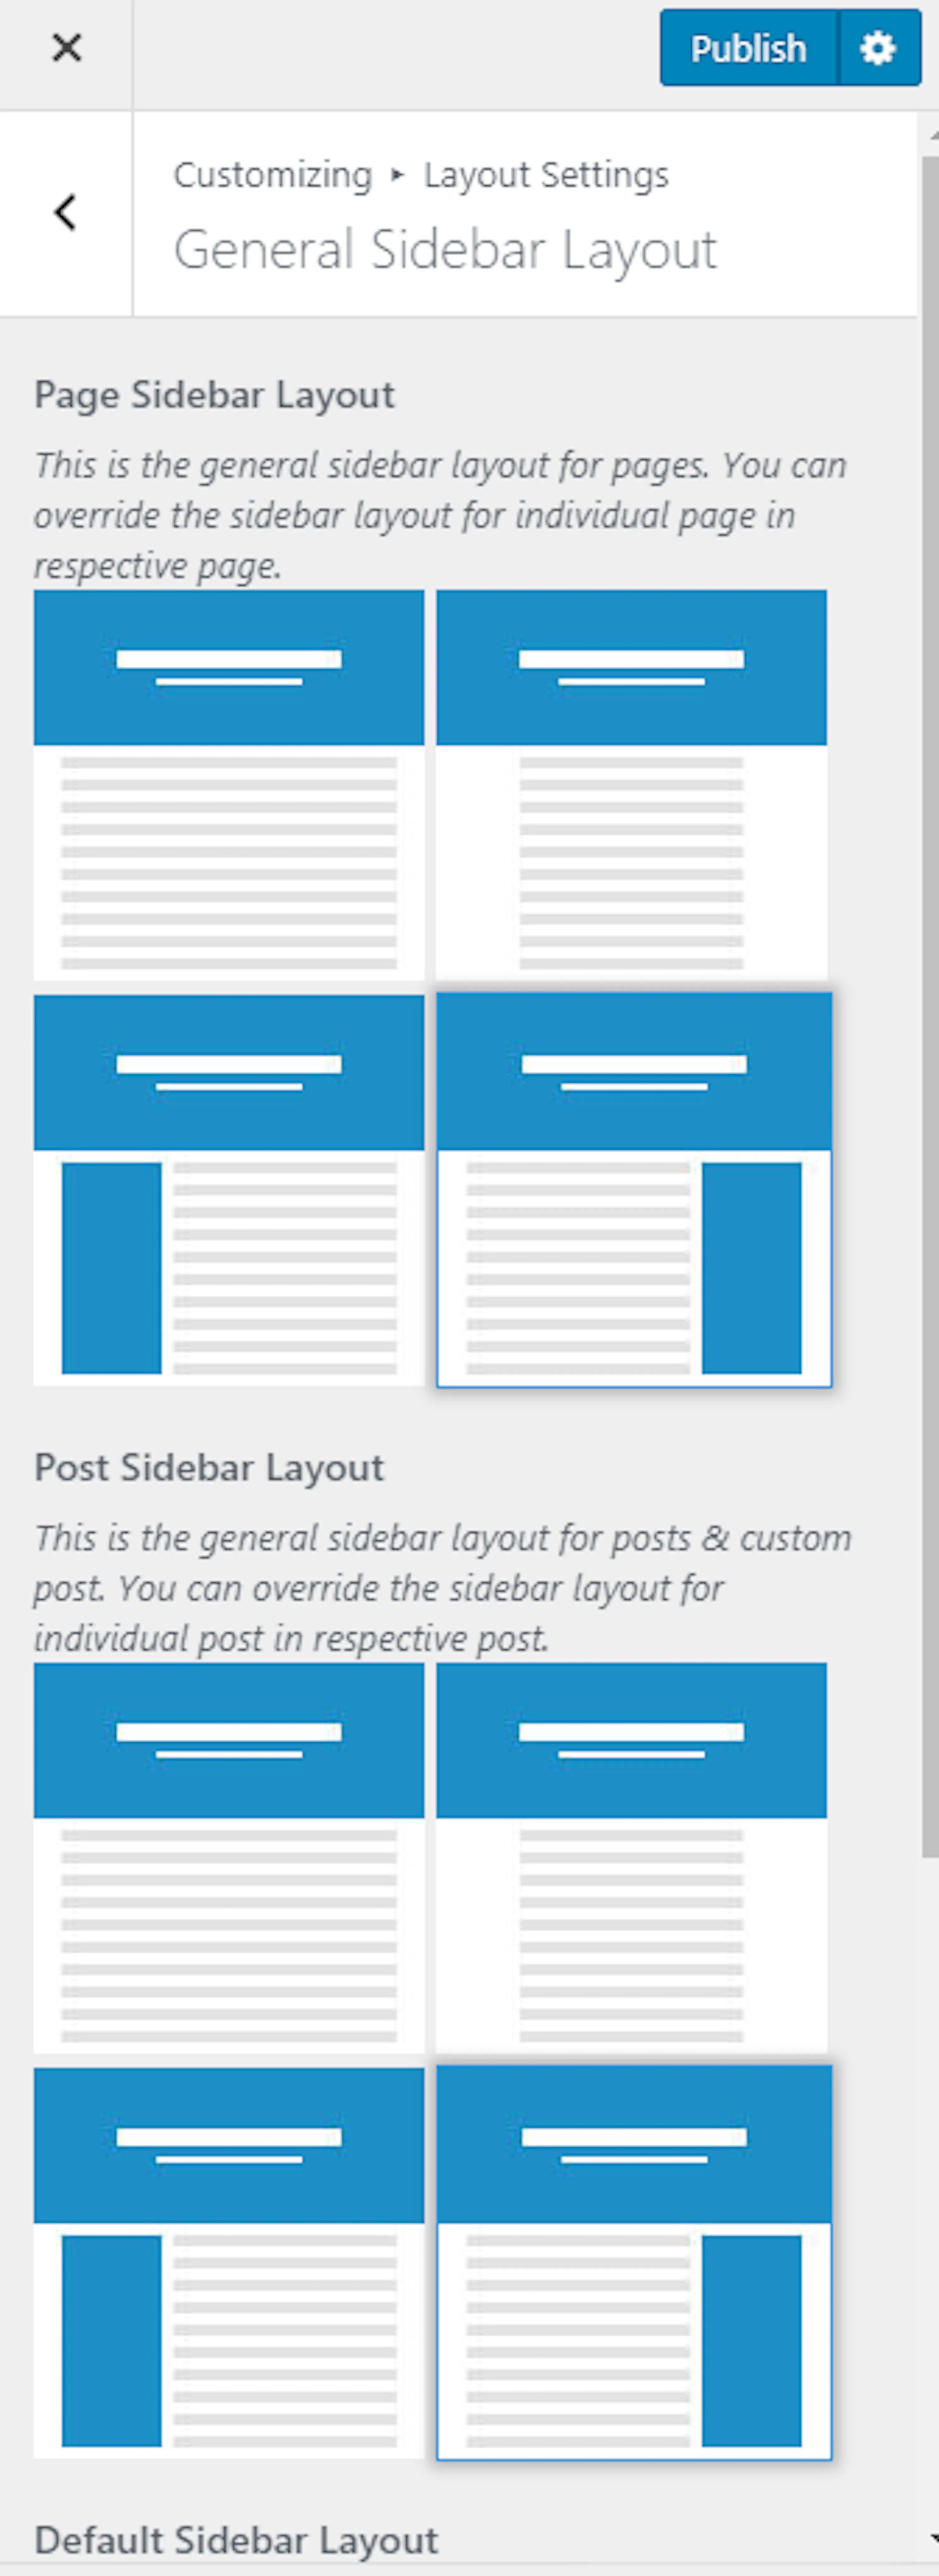
General sidebar layout
Choose whether pages, posts, and other content use a sidebar.
Set the sidebar layout
From Appearance, open Customize, then Layout Settings, then General Sidebar Layout. Choose the sidebar option for pages, posts, and the default layout.
Publish the layout
Click Publish. Your selected sidebar layout now applies to the relevant content.
Pagination type
Pagination controls how visitors move between pages of trips or posts.
Choose pagination
From Appearance, open Customize, then Layout Settings, then Pagination Settings. Select the pagination type you prefer and click Publish.
Your page structure is ready. Typography settings let you make the text easier to read and closer to your brand.
Typography settings
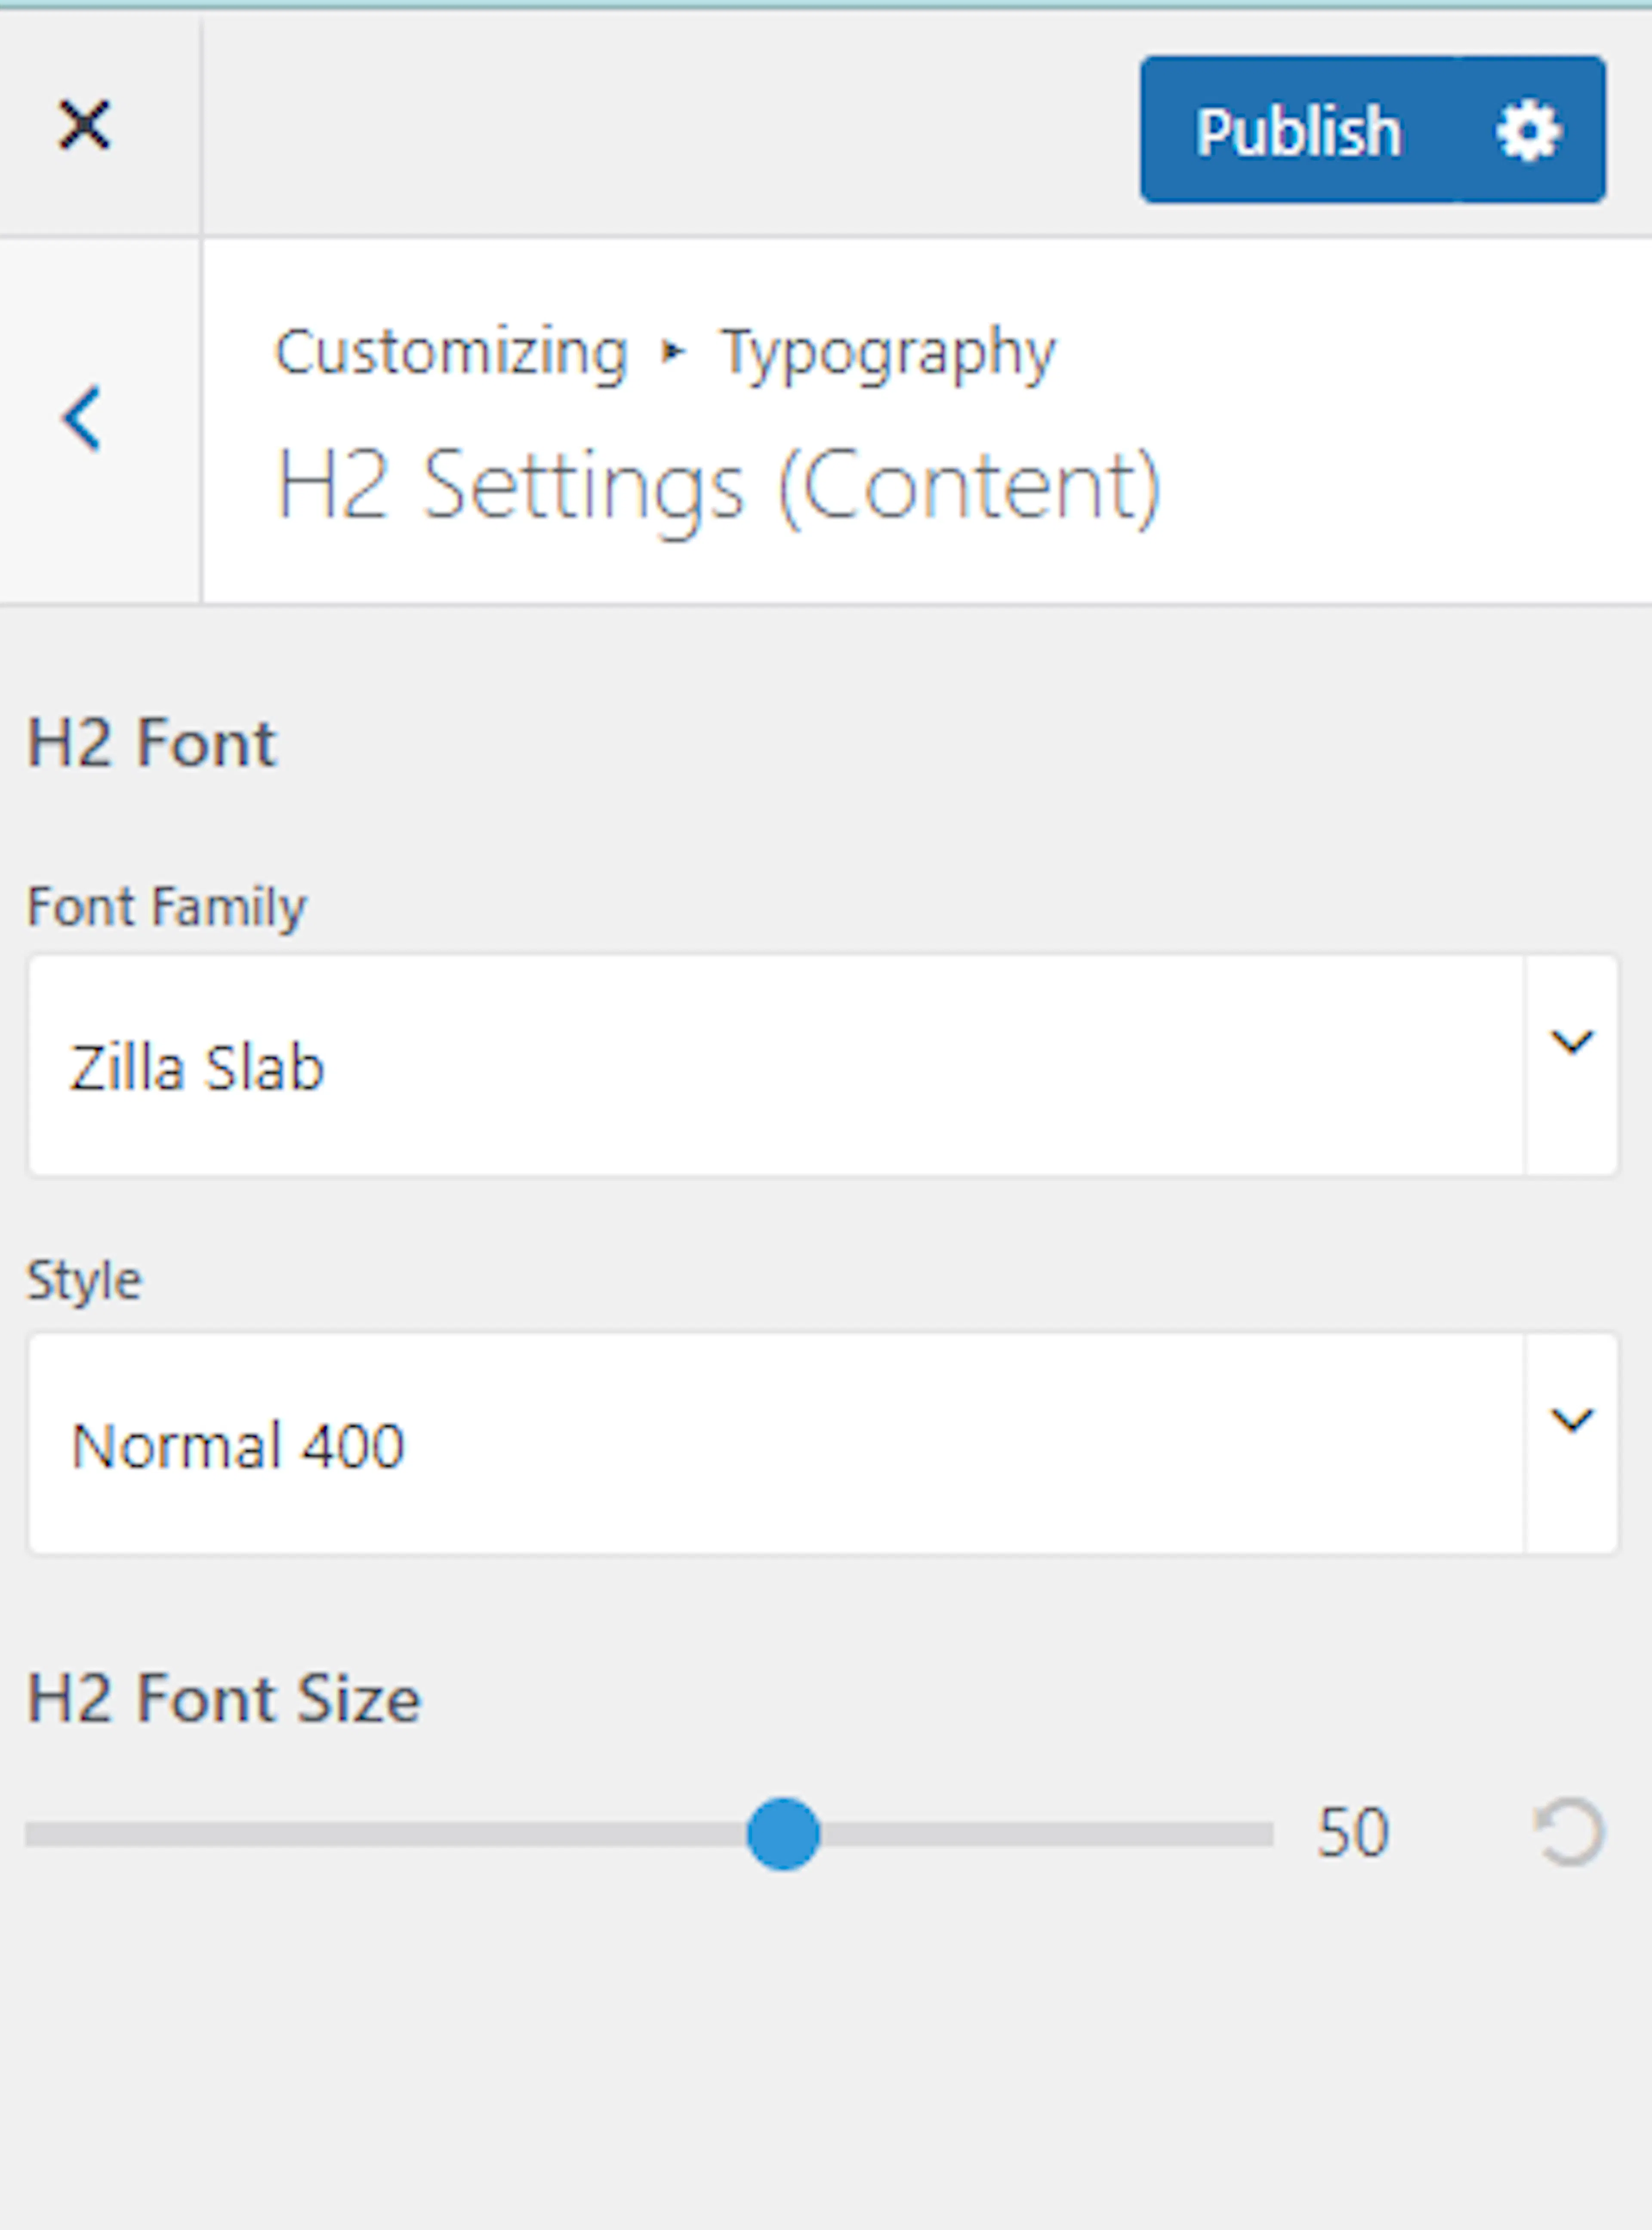
Typography settings control the font family, style, and size of your website text.
Open Typography Settings
From Appearance, open Customize, then Typography Settings. Choose the content type you want to change.

Choose the text style
Set the Font Family, Style, and Size for the selected content type.
Publish your typography
Click Publish. Repeat the process for other content types if needed.
Your website now has its main visual style. The next sections help you build the content visitors see.
Front page settings
You must be viewing your homepage to customize the front page sections. Make sure you selected a static front page in Set up your homepage and blog page.
From the left sidebar, open Appearance, then Customize, then Front Page Settings.
Banner section
The banner is the first large area visitors see. You can use a static image, a video, or a slider.
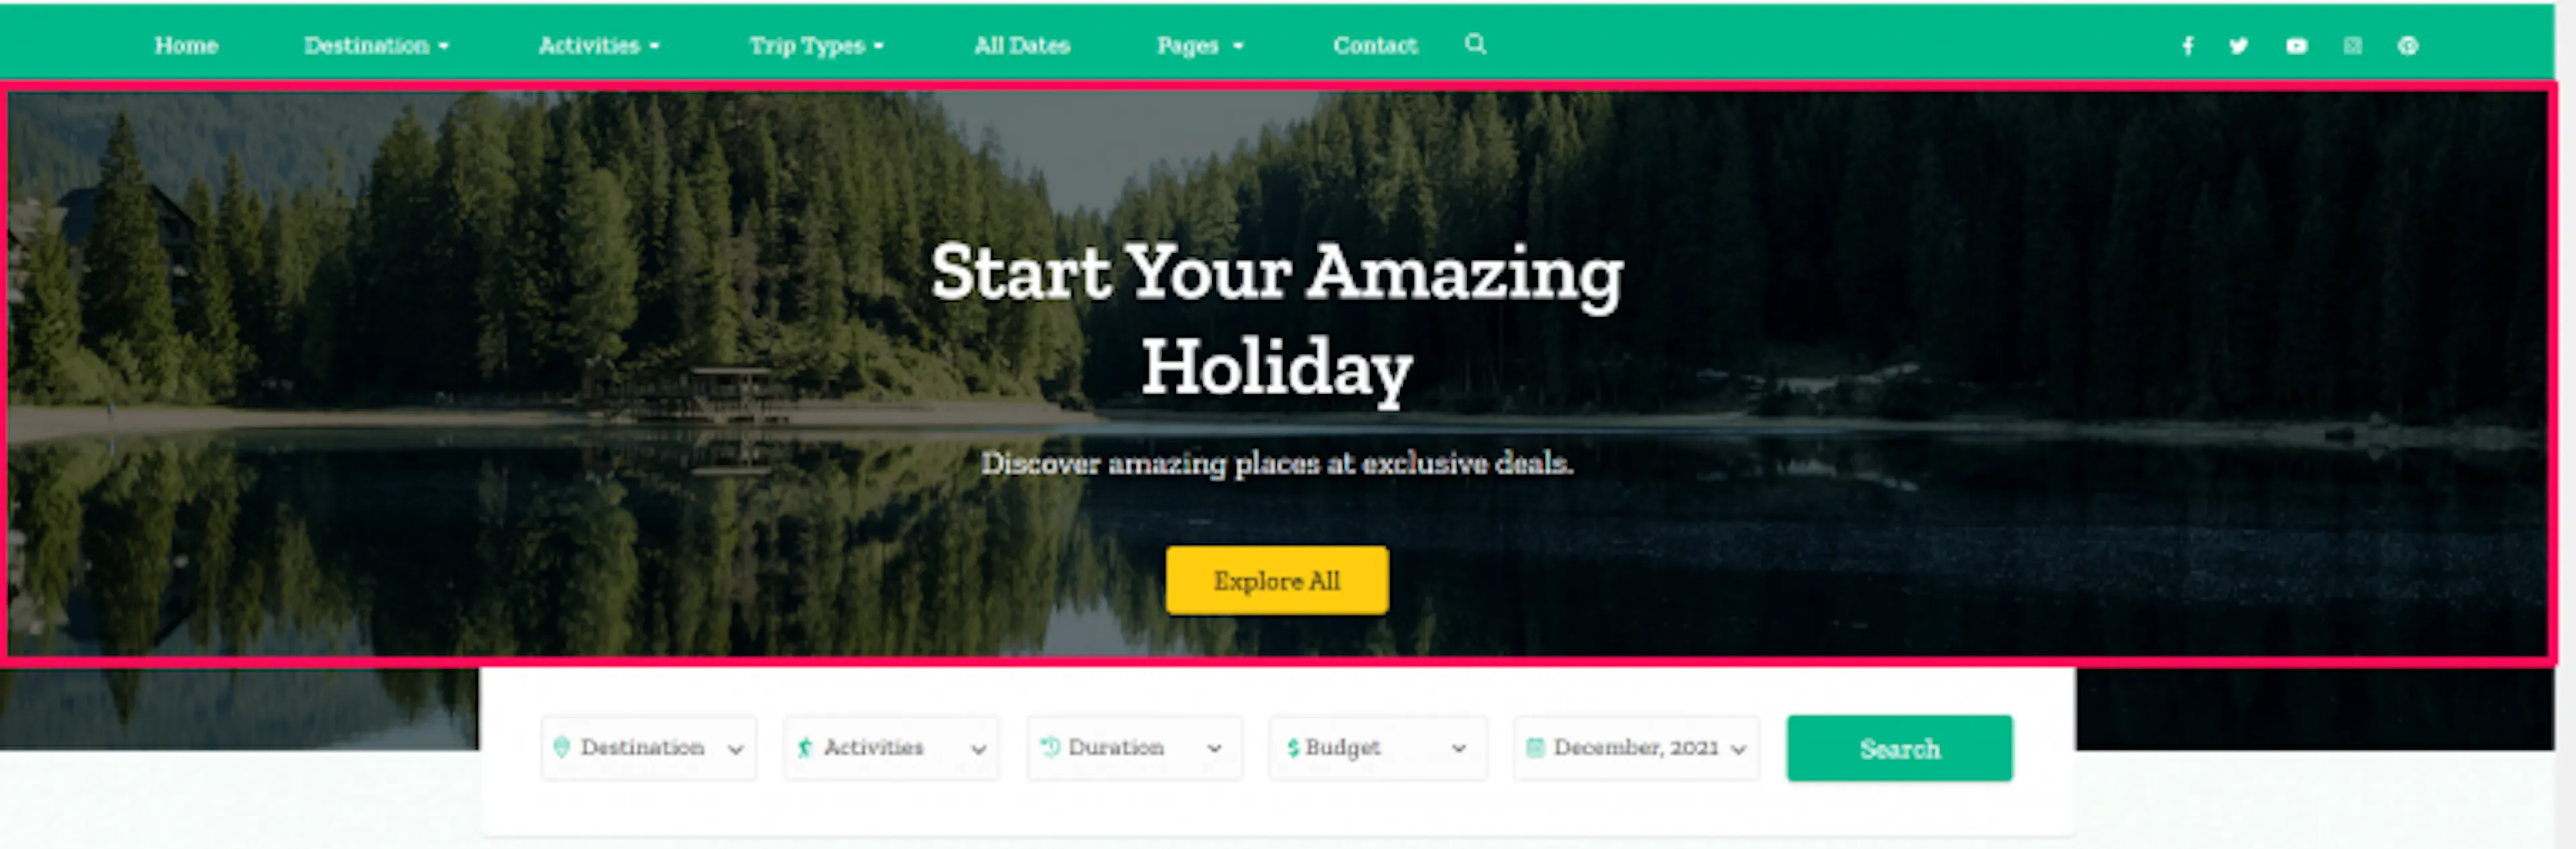
Static or video CTA banner
A static or video banner can introduce your business and guide visitors toward a trip or booking page.
WordPress mutes audio in a Video Header. WordPress also uses the fallback image instead of the video on mobile devices. Add a banner image even when you use a video.
Choose the static or video banner
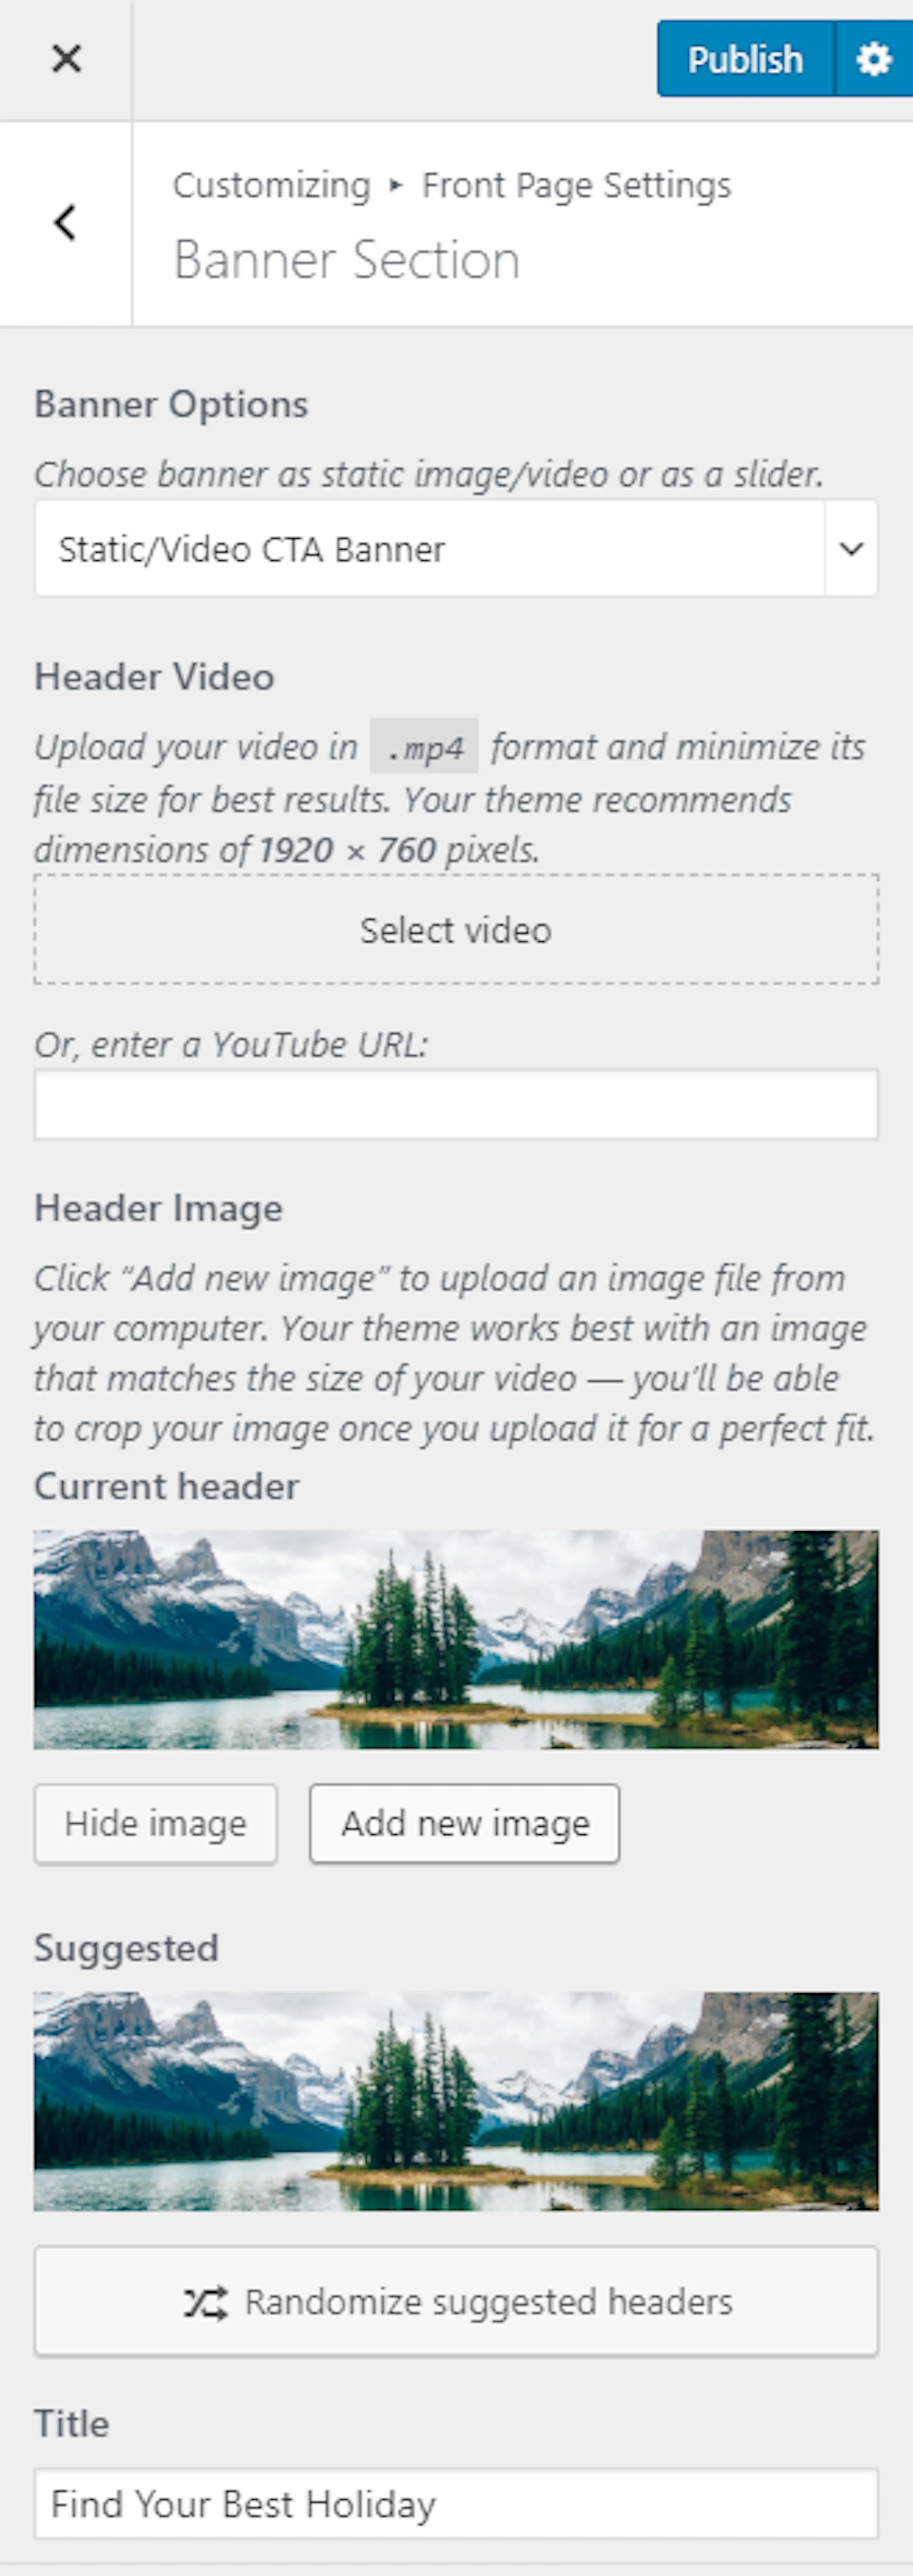
Open Banner Section and choose Static/Video CTA Banner under Banner Options.
Add the video or image
Upload and select a video or enter a YouTube link. If you want to use an image instead, click Add new image and select the image. Do not select a video when you want the image to display.
Add the banner text and link
Enter the banner title and subtitle. Enter the Banner Label and Banner Link. Choose the Slider Caption Position, then click Publish.
Your banner now gives visitors a clear first message and next step.
Banner as slider
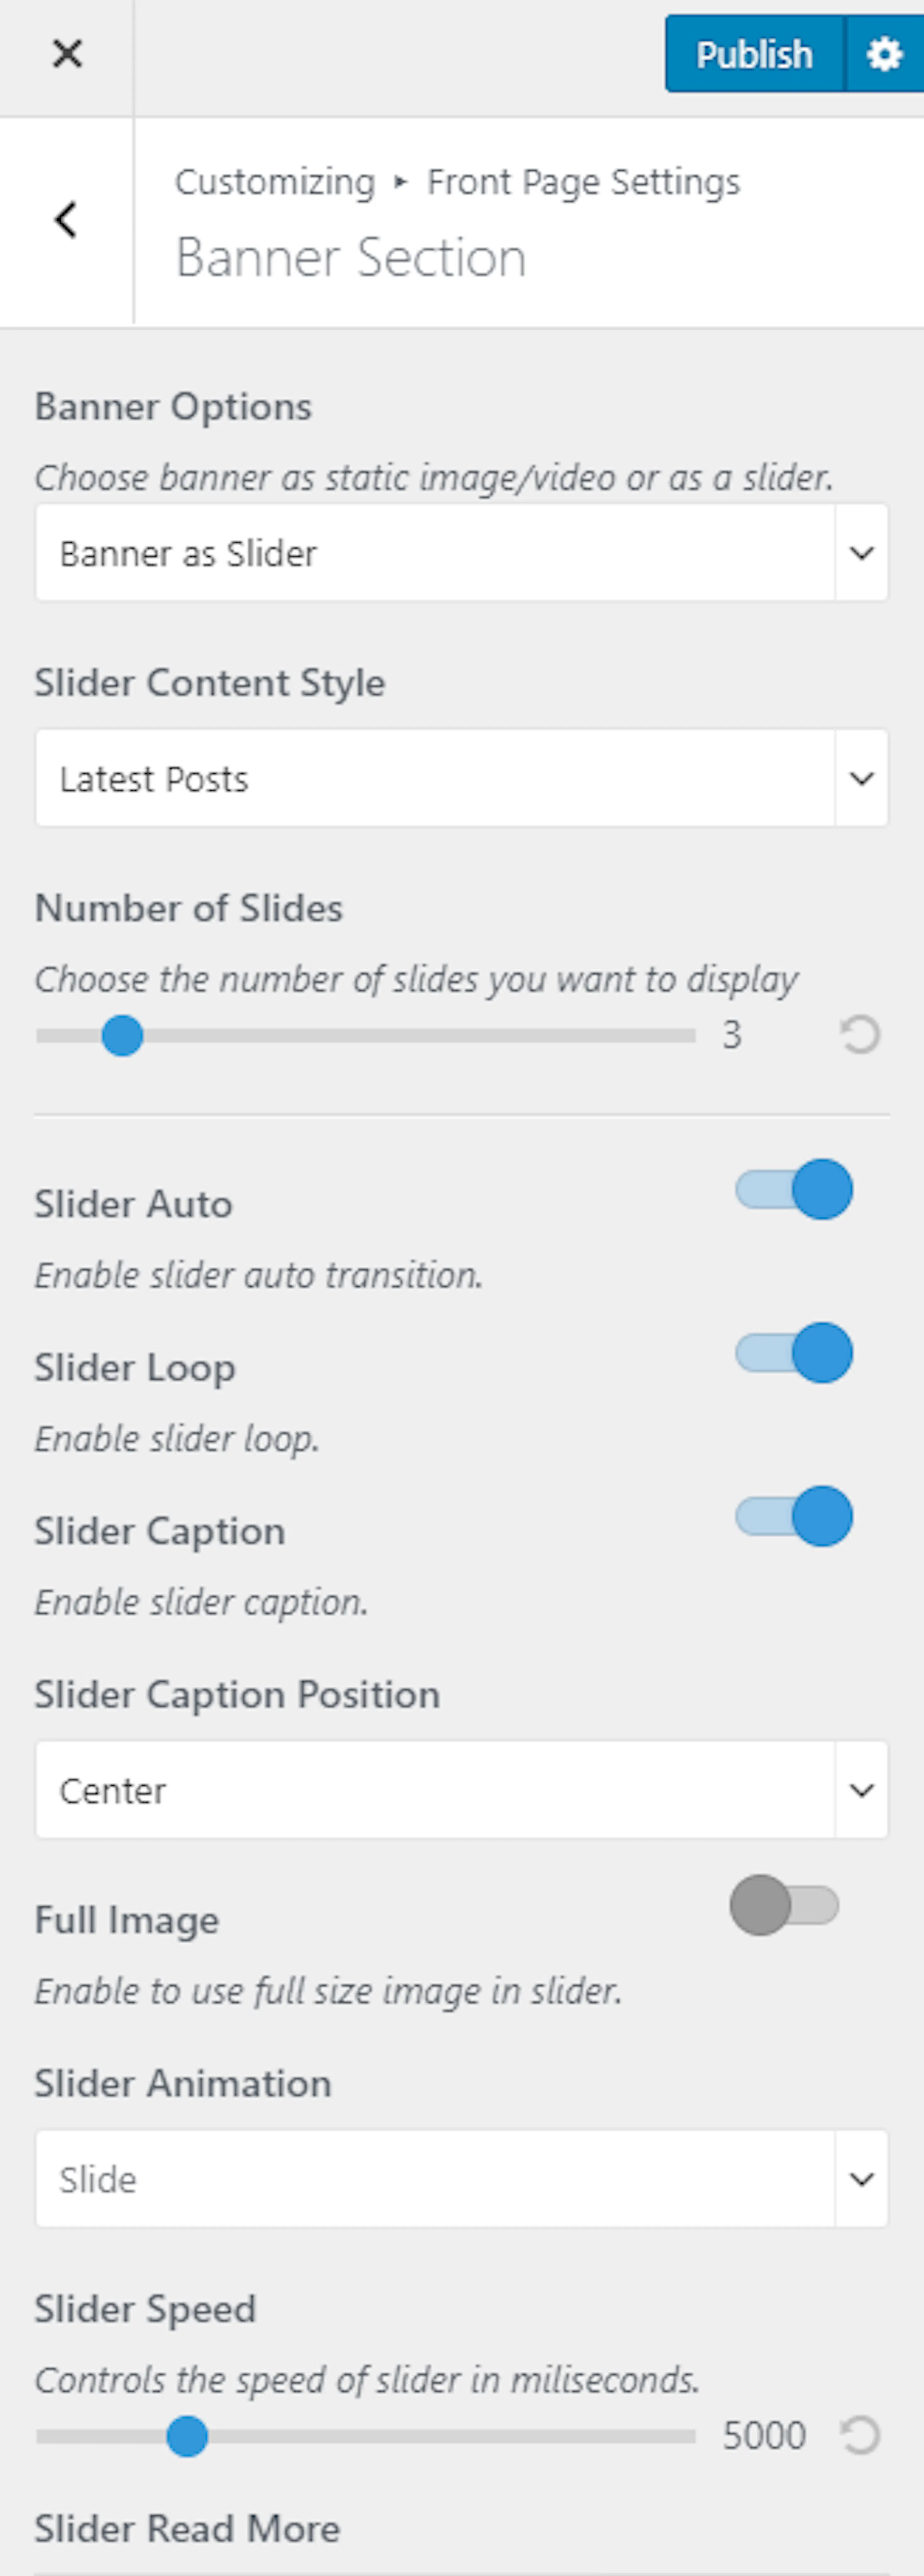
A slider displays several images or posts in the banner area. Choose Banner as Slider under Banner Options.
Slider using latest posts
Use your newest blog posts as slides.
Choose Latest Posts
Set Slider Content Style to Latest Posts and choose the number of slides.
Configure the slider
Enable Slider Auto to advance slides automatically. Enable Slider Loop to repeat the posts. Enable Slider Caption to show post titles. Choose the caption position, enable Full Image, choose the animation and speed, and enter the Read More button label.
Publish the slider
Click Publish. Your latest posts now appear as slides.
Slider using a category
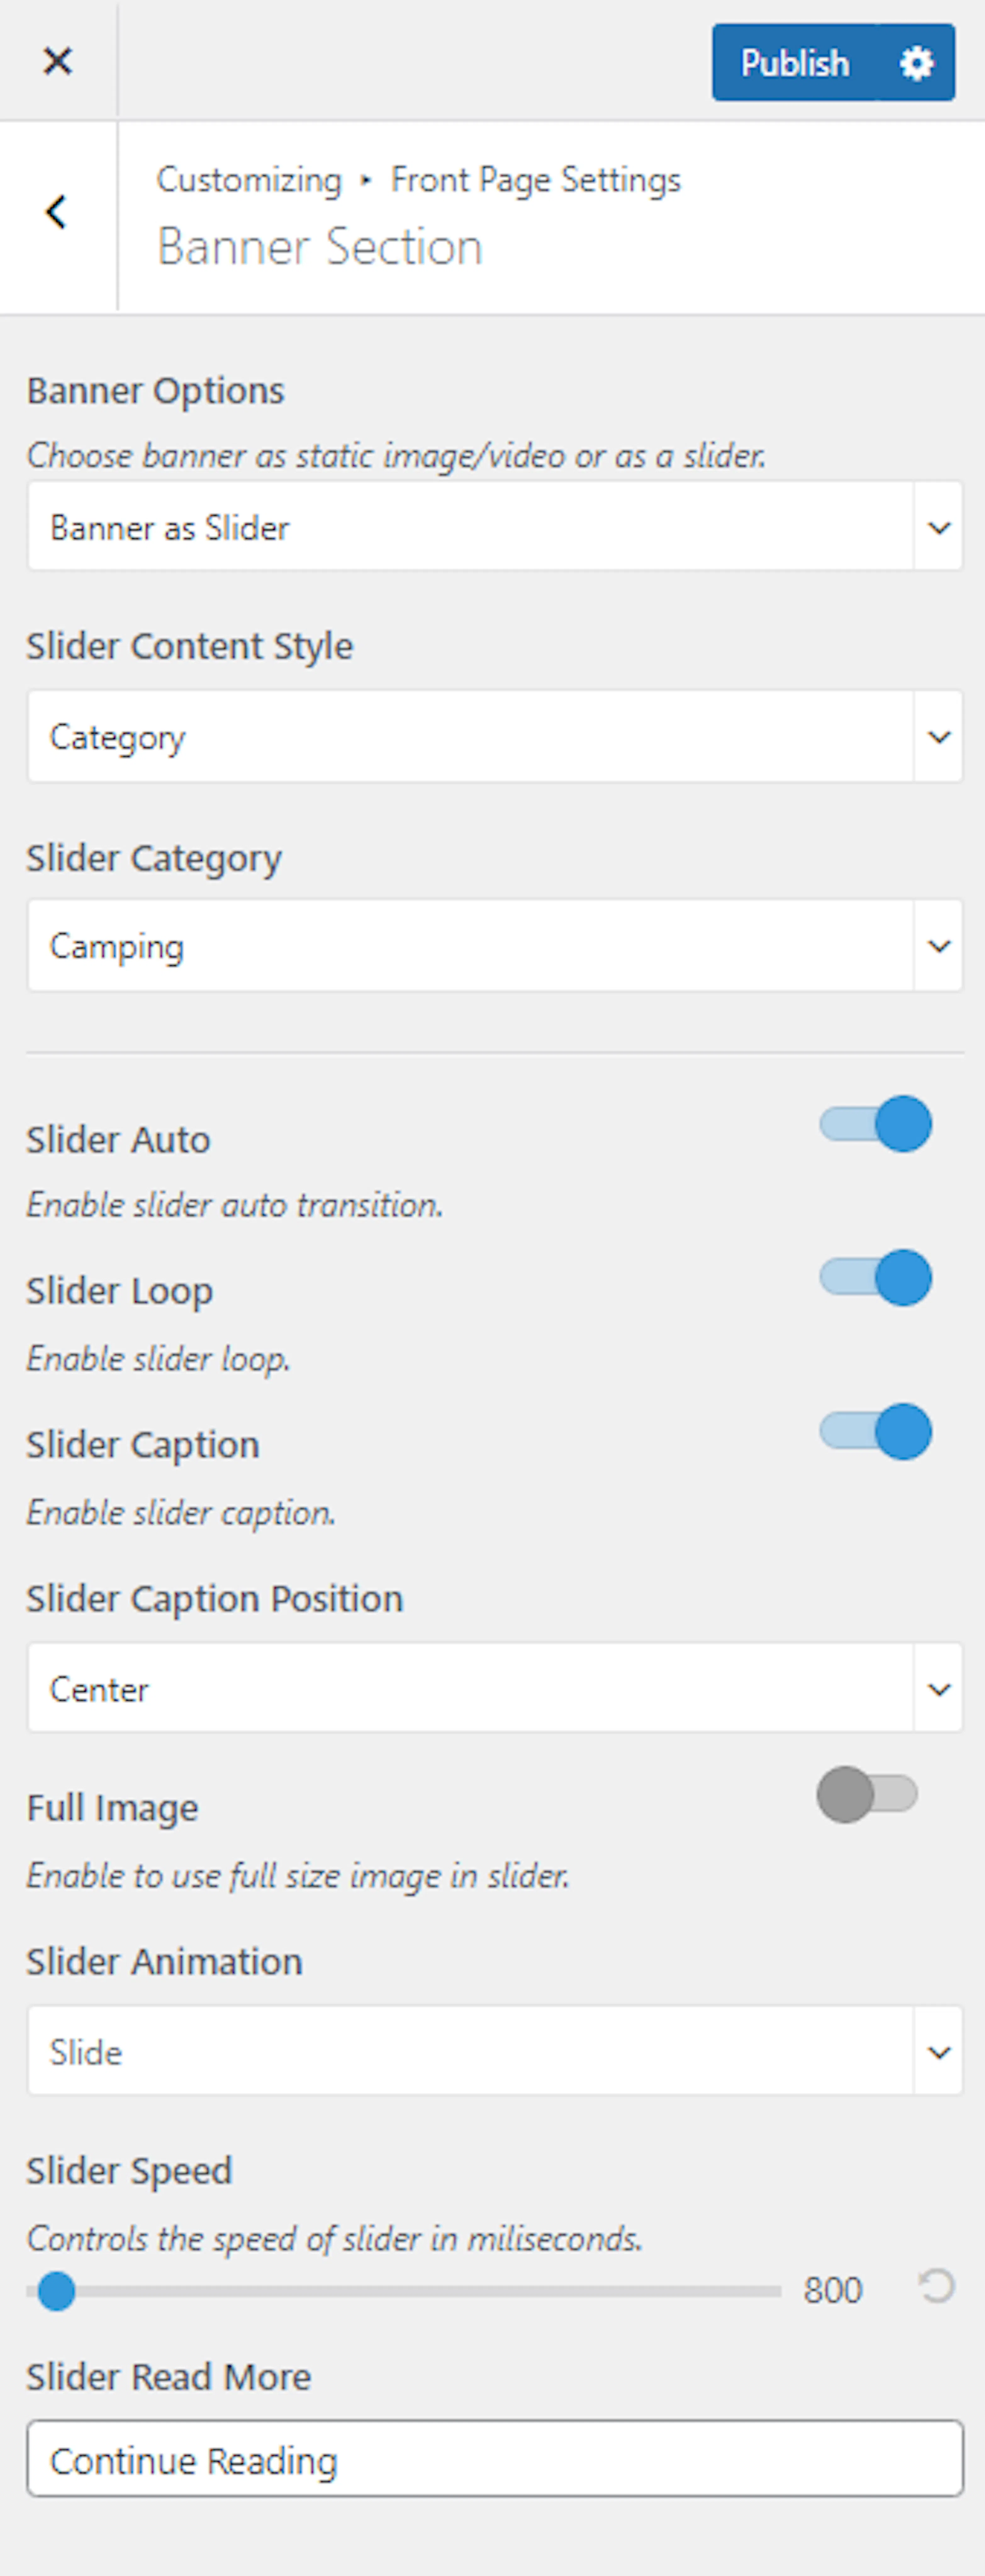
Use posts from one category for a focused collection, such as hiking trips or packing advice.
Choose a category
Set Slider Content Style to Category, then choose the Slider Category. Featured images become slide images. Post titles become slide titles. Post excerpts become slide text.
Configure and publish the slider
Enable Slider Auto, Slider Loop, and Slider Caption as needed. Choose the caption position, enable Full Image, choose the animation and speed, enter the Read More button label, and click Publish.
Slider as pages
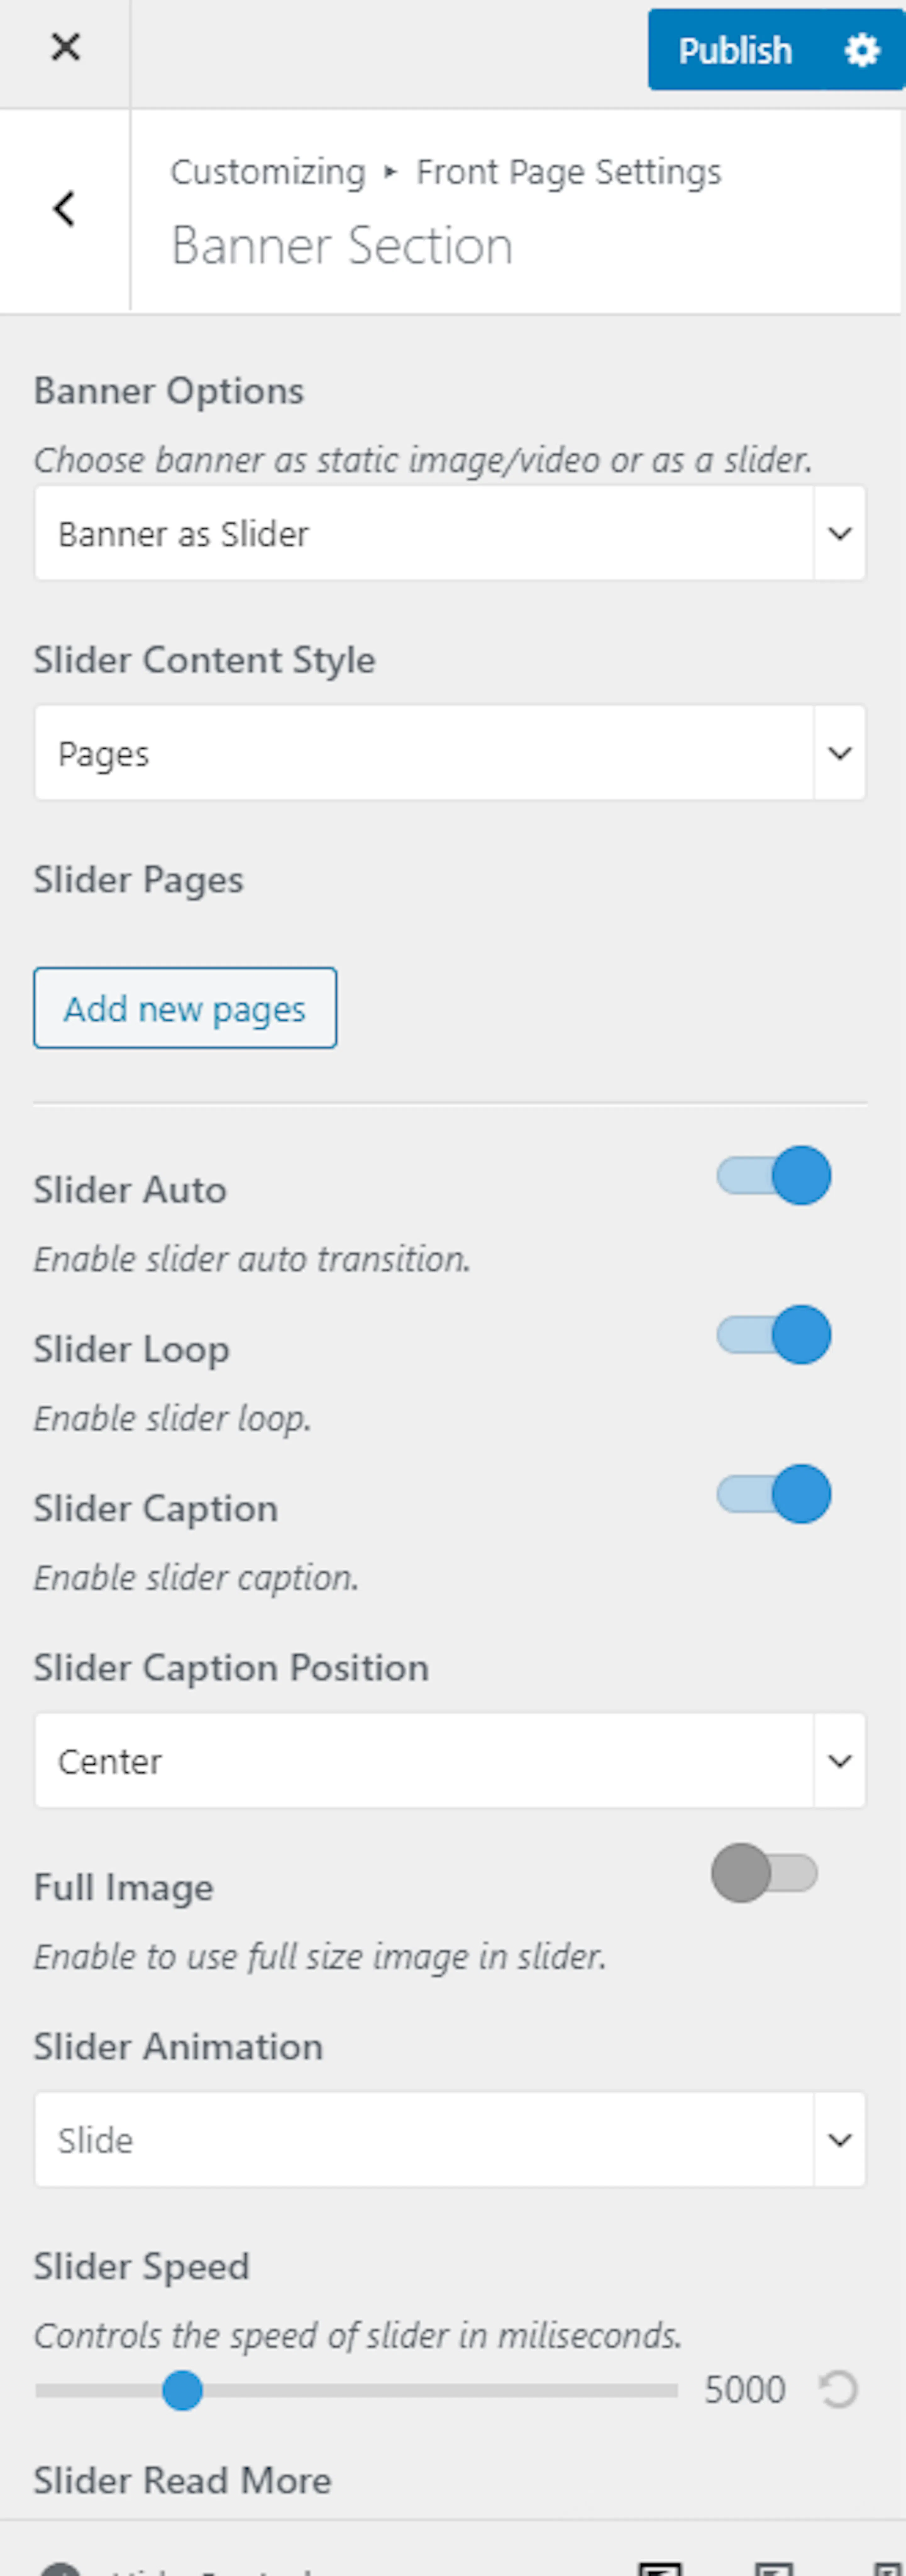
Use selected pages when you want complete control over the content in each slide.
Select pages for the slider
Set Slider Content Style to Pages. Click Add New Pages and select the pages to display.
Configure and publish the slider
Enable Slider Auto, Slider Loop, and Slider Caption as needed. Choose the caption position, enable Full Image, choose the animation and speed, enter the Read More button label, and click Publish.
Slider using custom slides
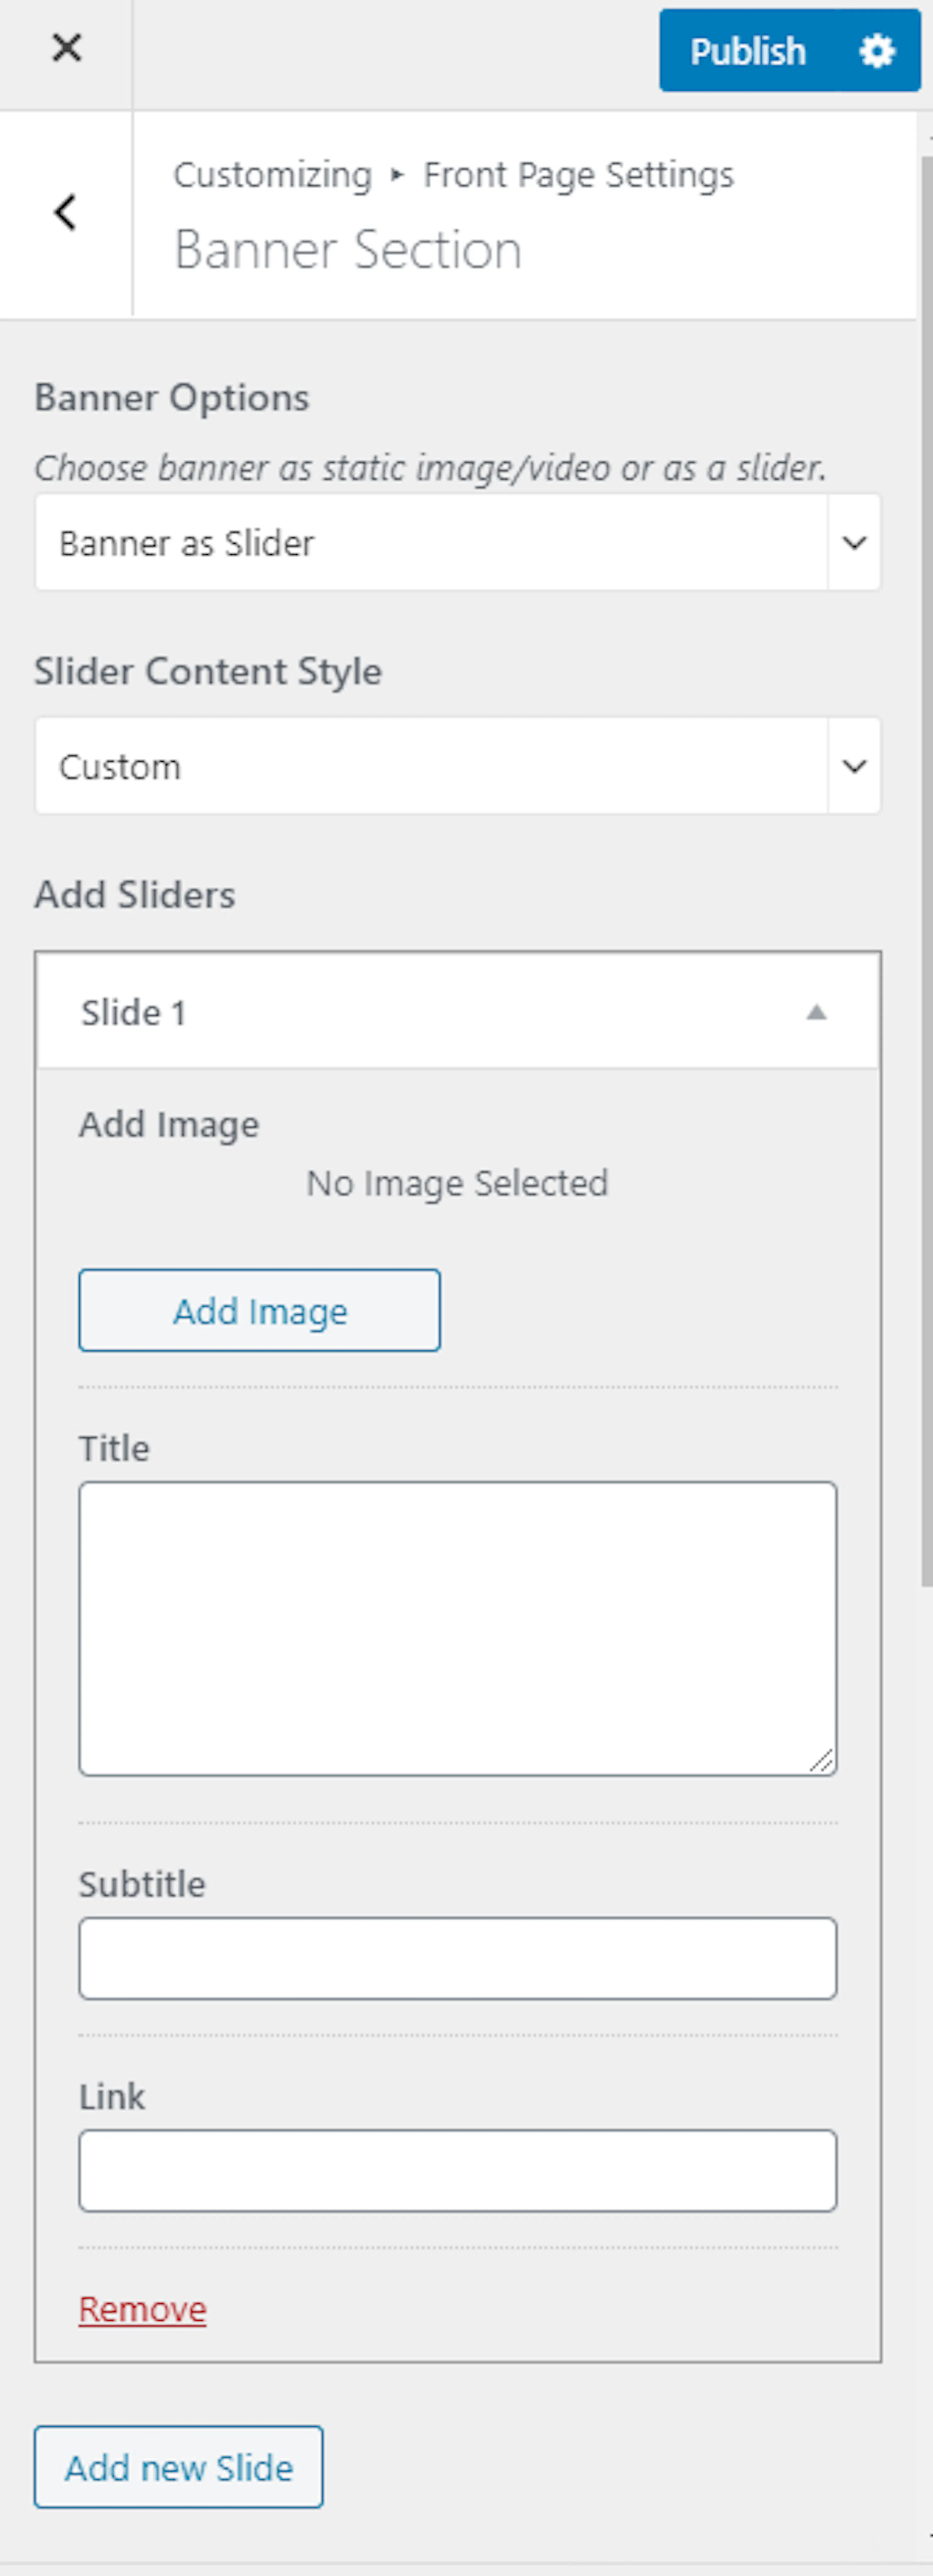
Custom slides let you create a slide with your own image, title, description, and link.
Add a custom slide
Set Slider Content Style to Custom. Click Add new slide, then click Add Image to upload an image. Enter the slide title, description, and link.
Add and edit more slides
Click Add new Slide to add another slide. Click a slide number to edit that slide.
Configure and publish the slider
Enable Slider Auto, Slider Loop, and Slider Caption as needed. Choose the caption position, enable Full Image, choose the animation and speed, enter the Read More button label, and click Publish.
Your banner is complete. The sections below control the content that follows it.
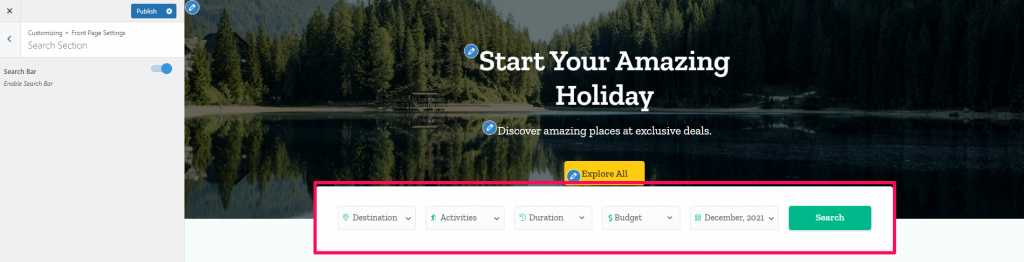
Search section
The search bar helps travelers find trips by the information they care about.
Install and activate the WP Travel Engine Trip Search plugin before you enable this section.
Enable the search bar
Open Search Section and enable Search Bar. Click Publish.
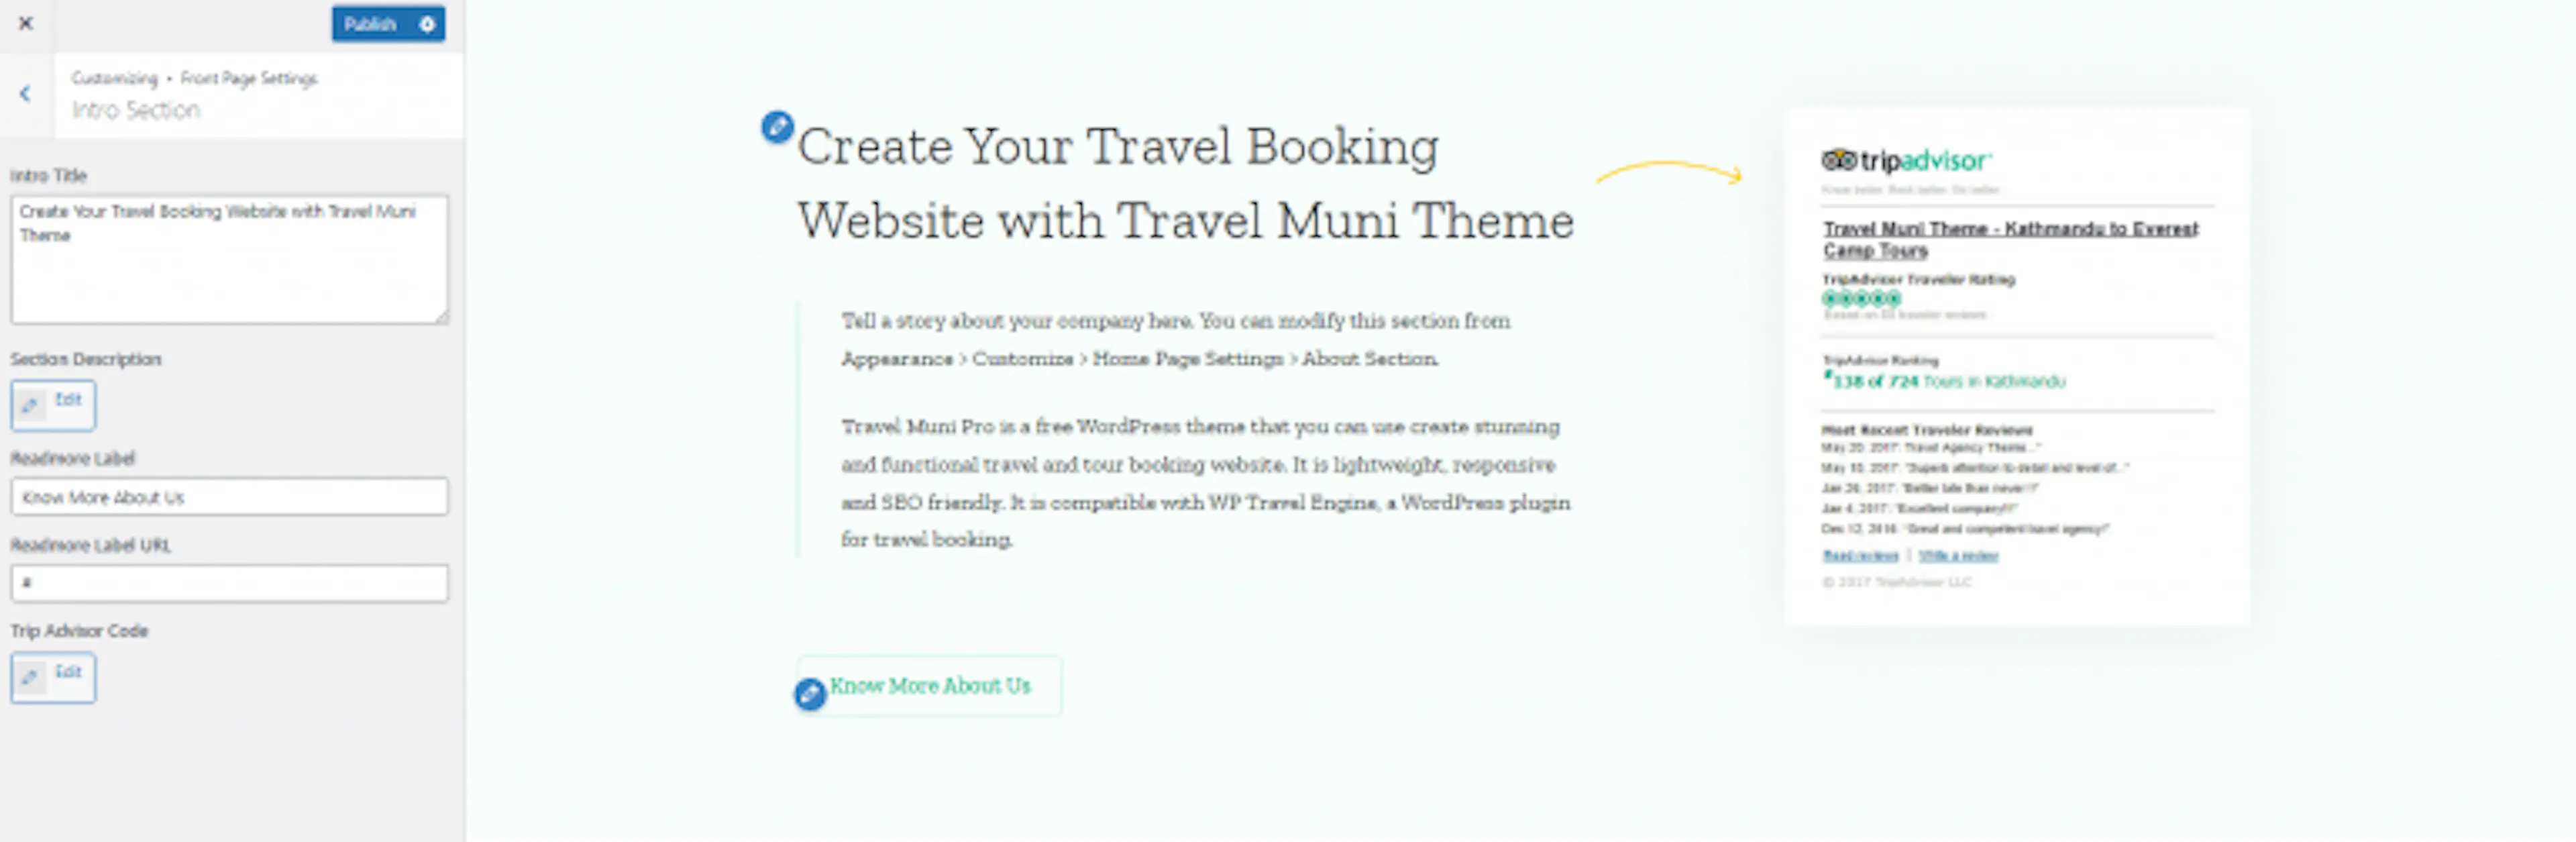
Intro section
The intro section gives visitors a short explanation of your company.
Add your introduction
Open Intro Section. Enter the intro title, section description, Read More Label, Read More Label URL, and Trip Advisor code. Click Publish.
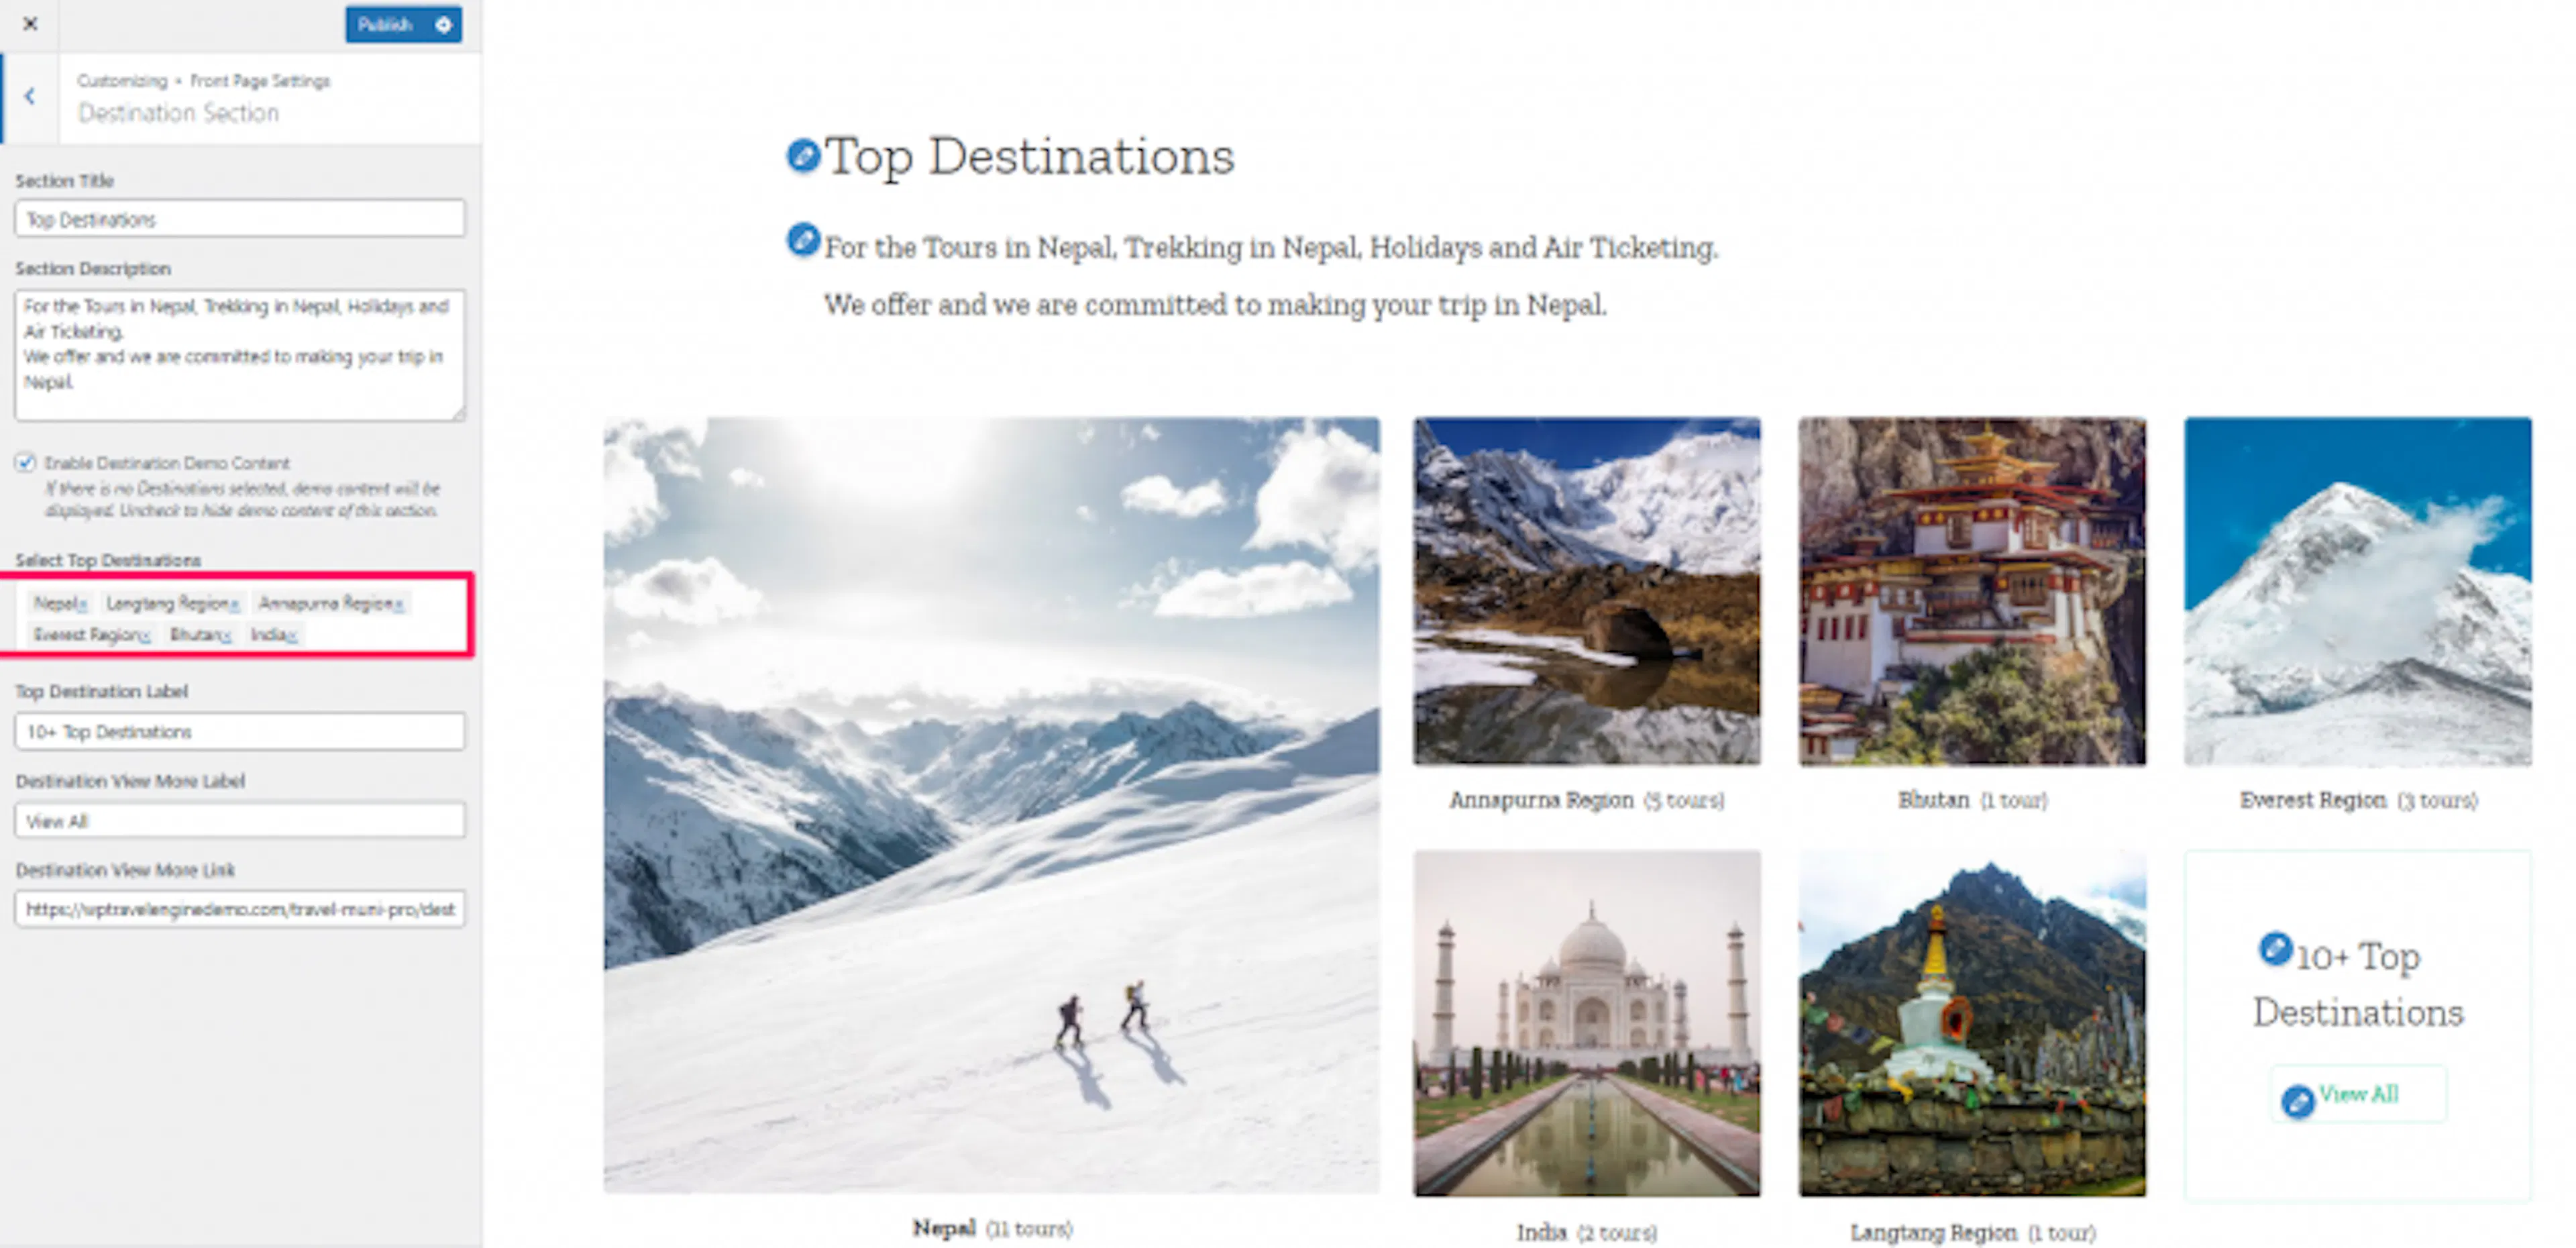
Destination section
The destination section groups trips by place, such as Nepal, Bhutan, or the Annapurna region.
Configure destinations
Open Destination Section. Enter the section title and description. Enable Destination Demo Content if you want sample destinations. Select the top destinations, then enter the top destination label, view more label, and view more link. Click Publish.
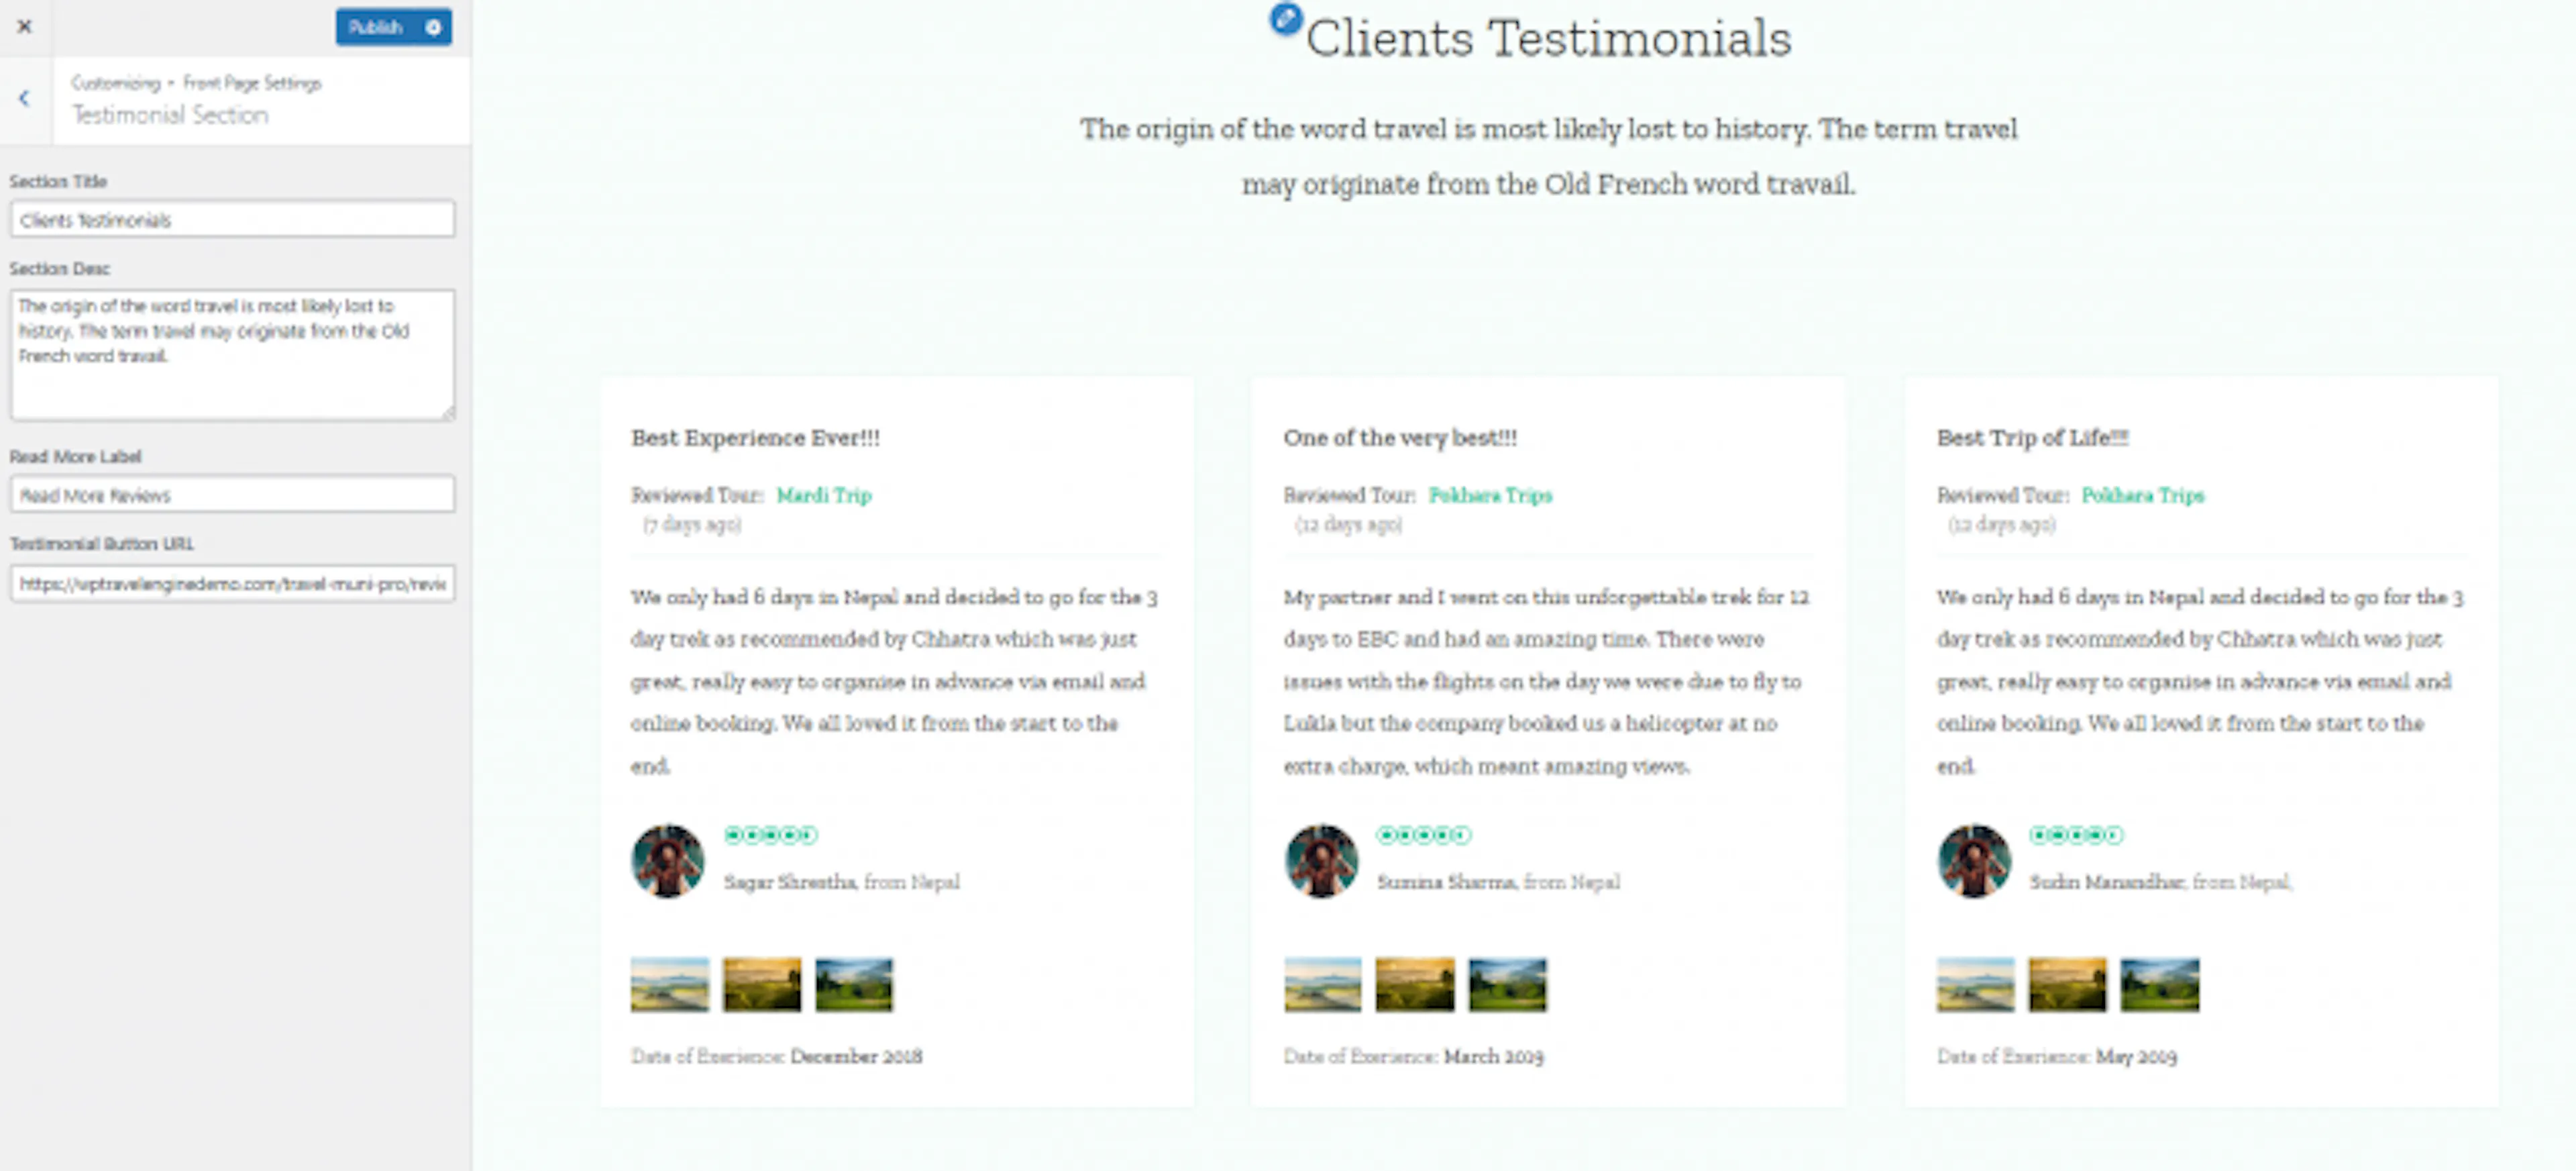
Testimonial section
Testimonials show visitors what past travelers thought about your service.
This section works with the WP Travel Engine Trip Reviews addon.
Configure testimonials
Open Testimonial Section. Enter the section title and description, Read More Label, and testimonial button URL. Click Publish.
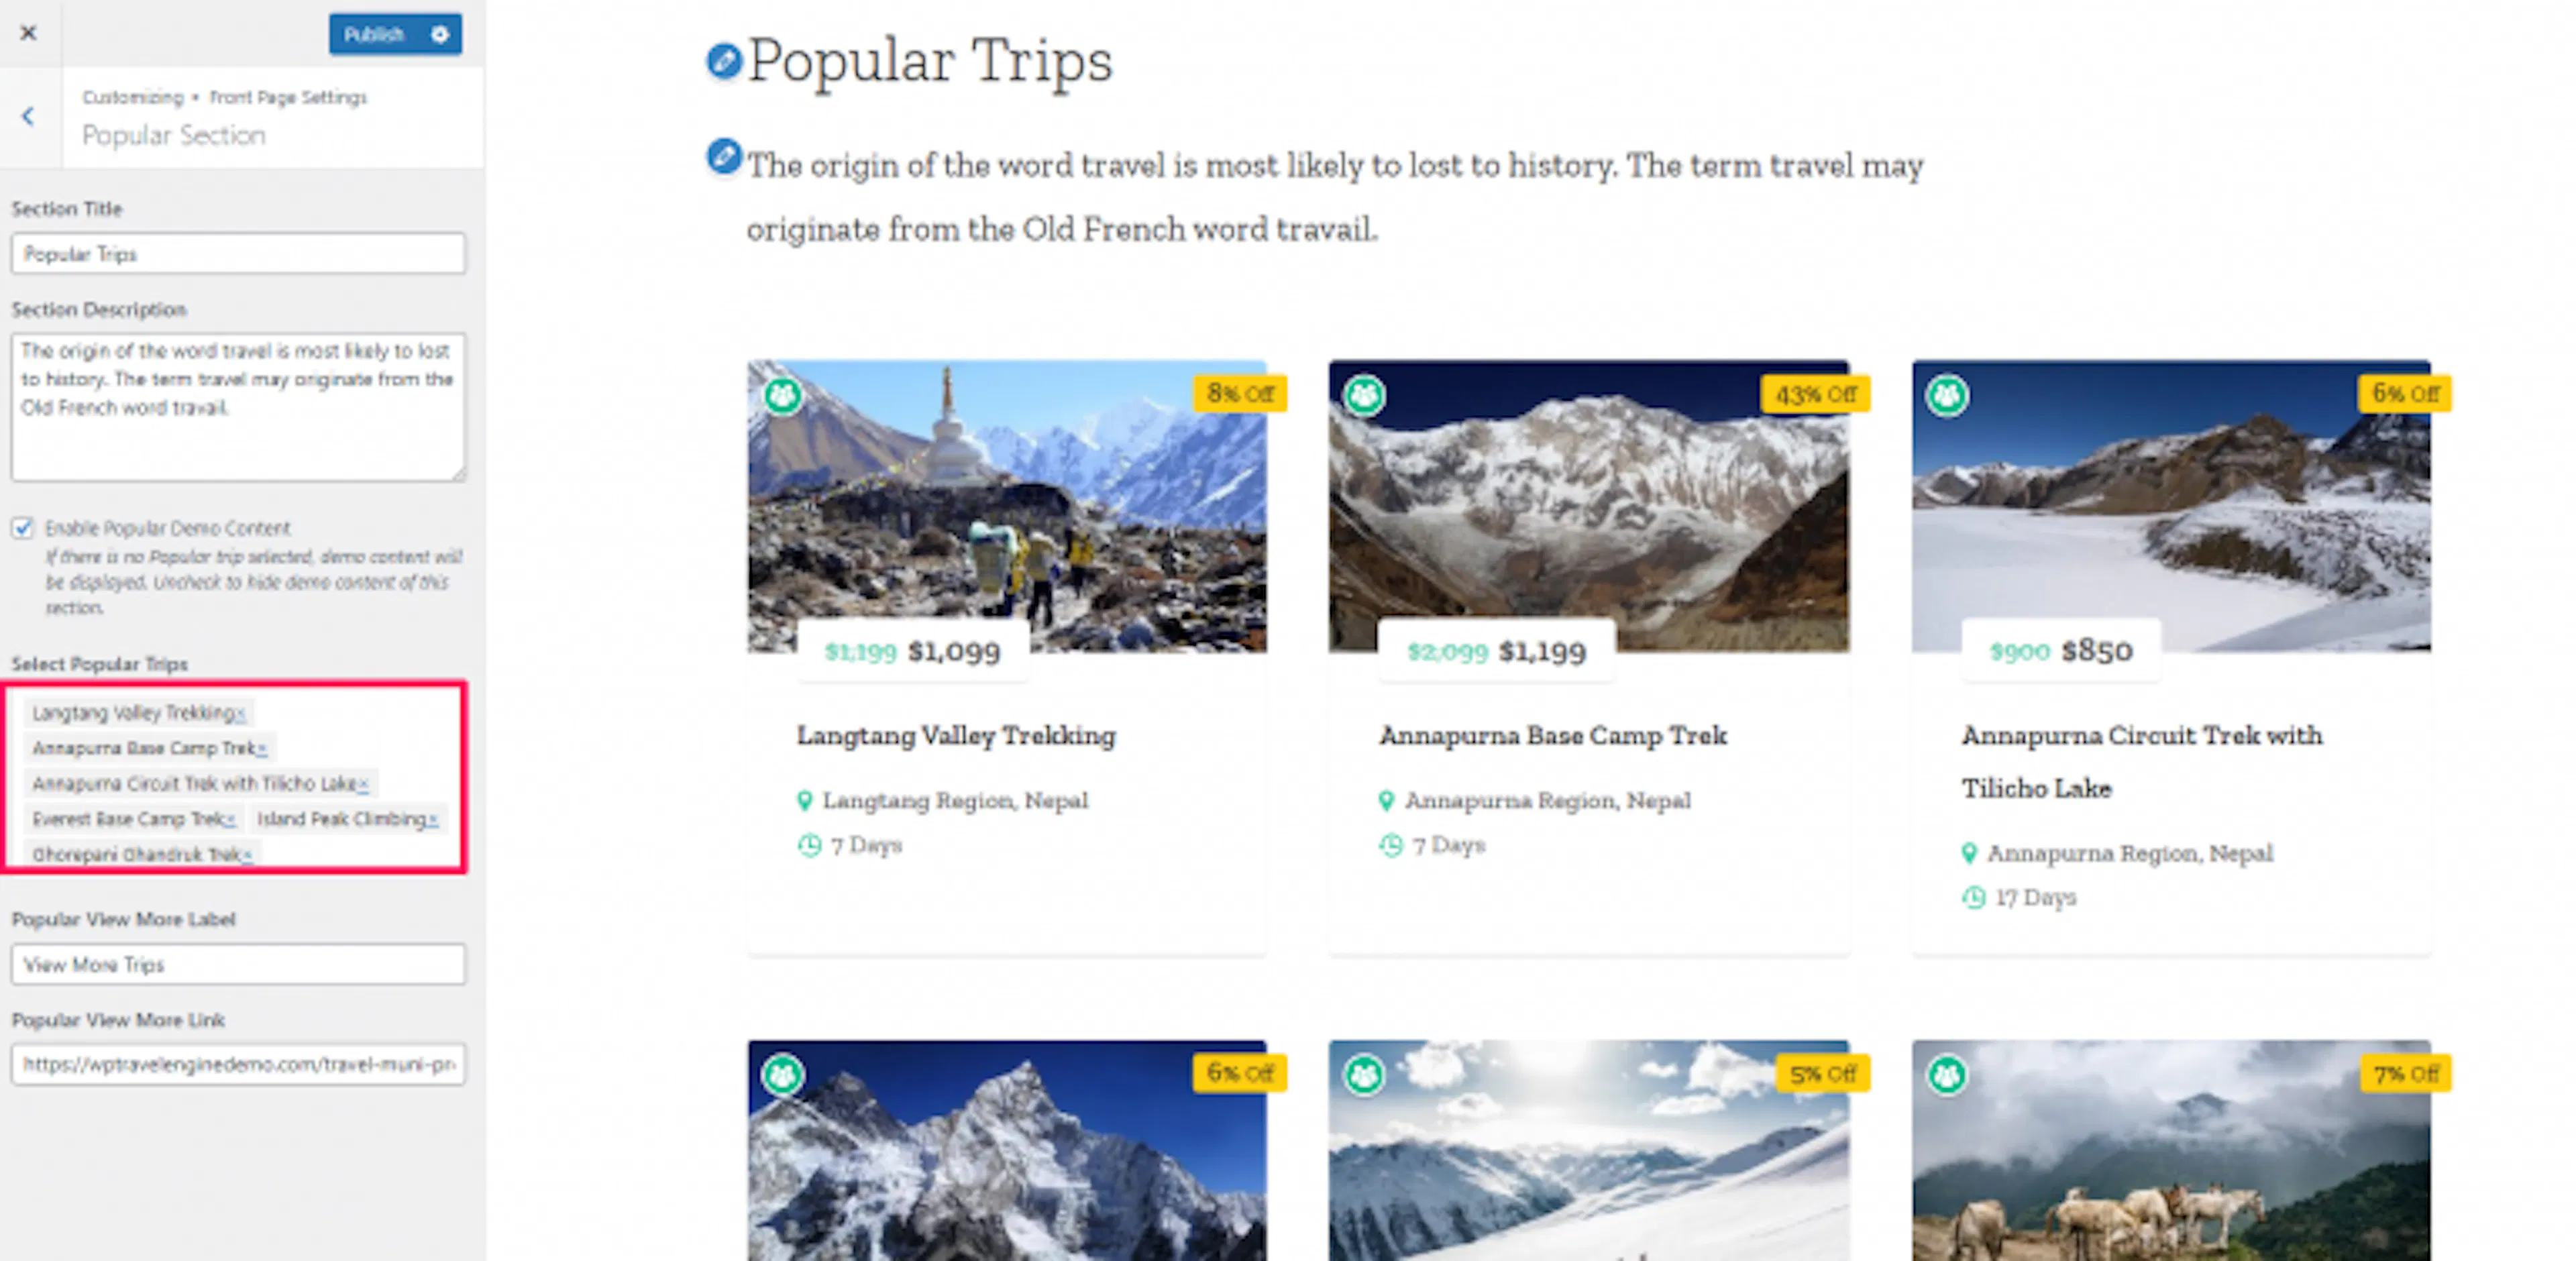
Popular section
Use this section to highlight trips that receive the most interest.
Choose popular trips
Open Popular Section. Enter the section title and description. Enable Popular Demo Content for sample content or select your popular trips. Enter the view more label and link, then click Publish.
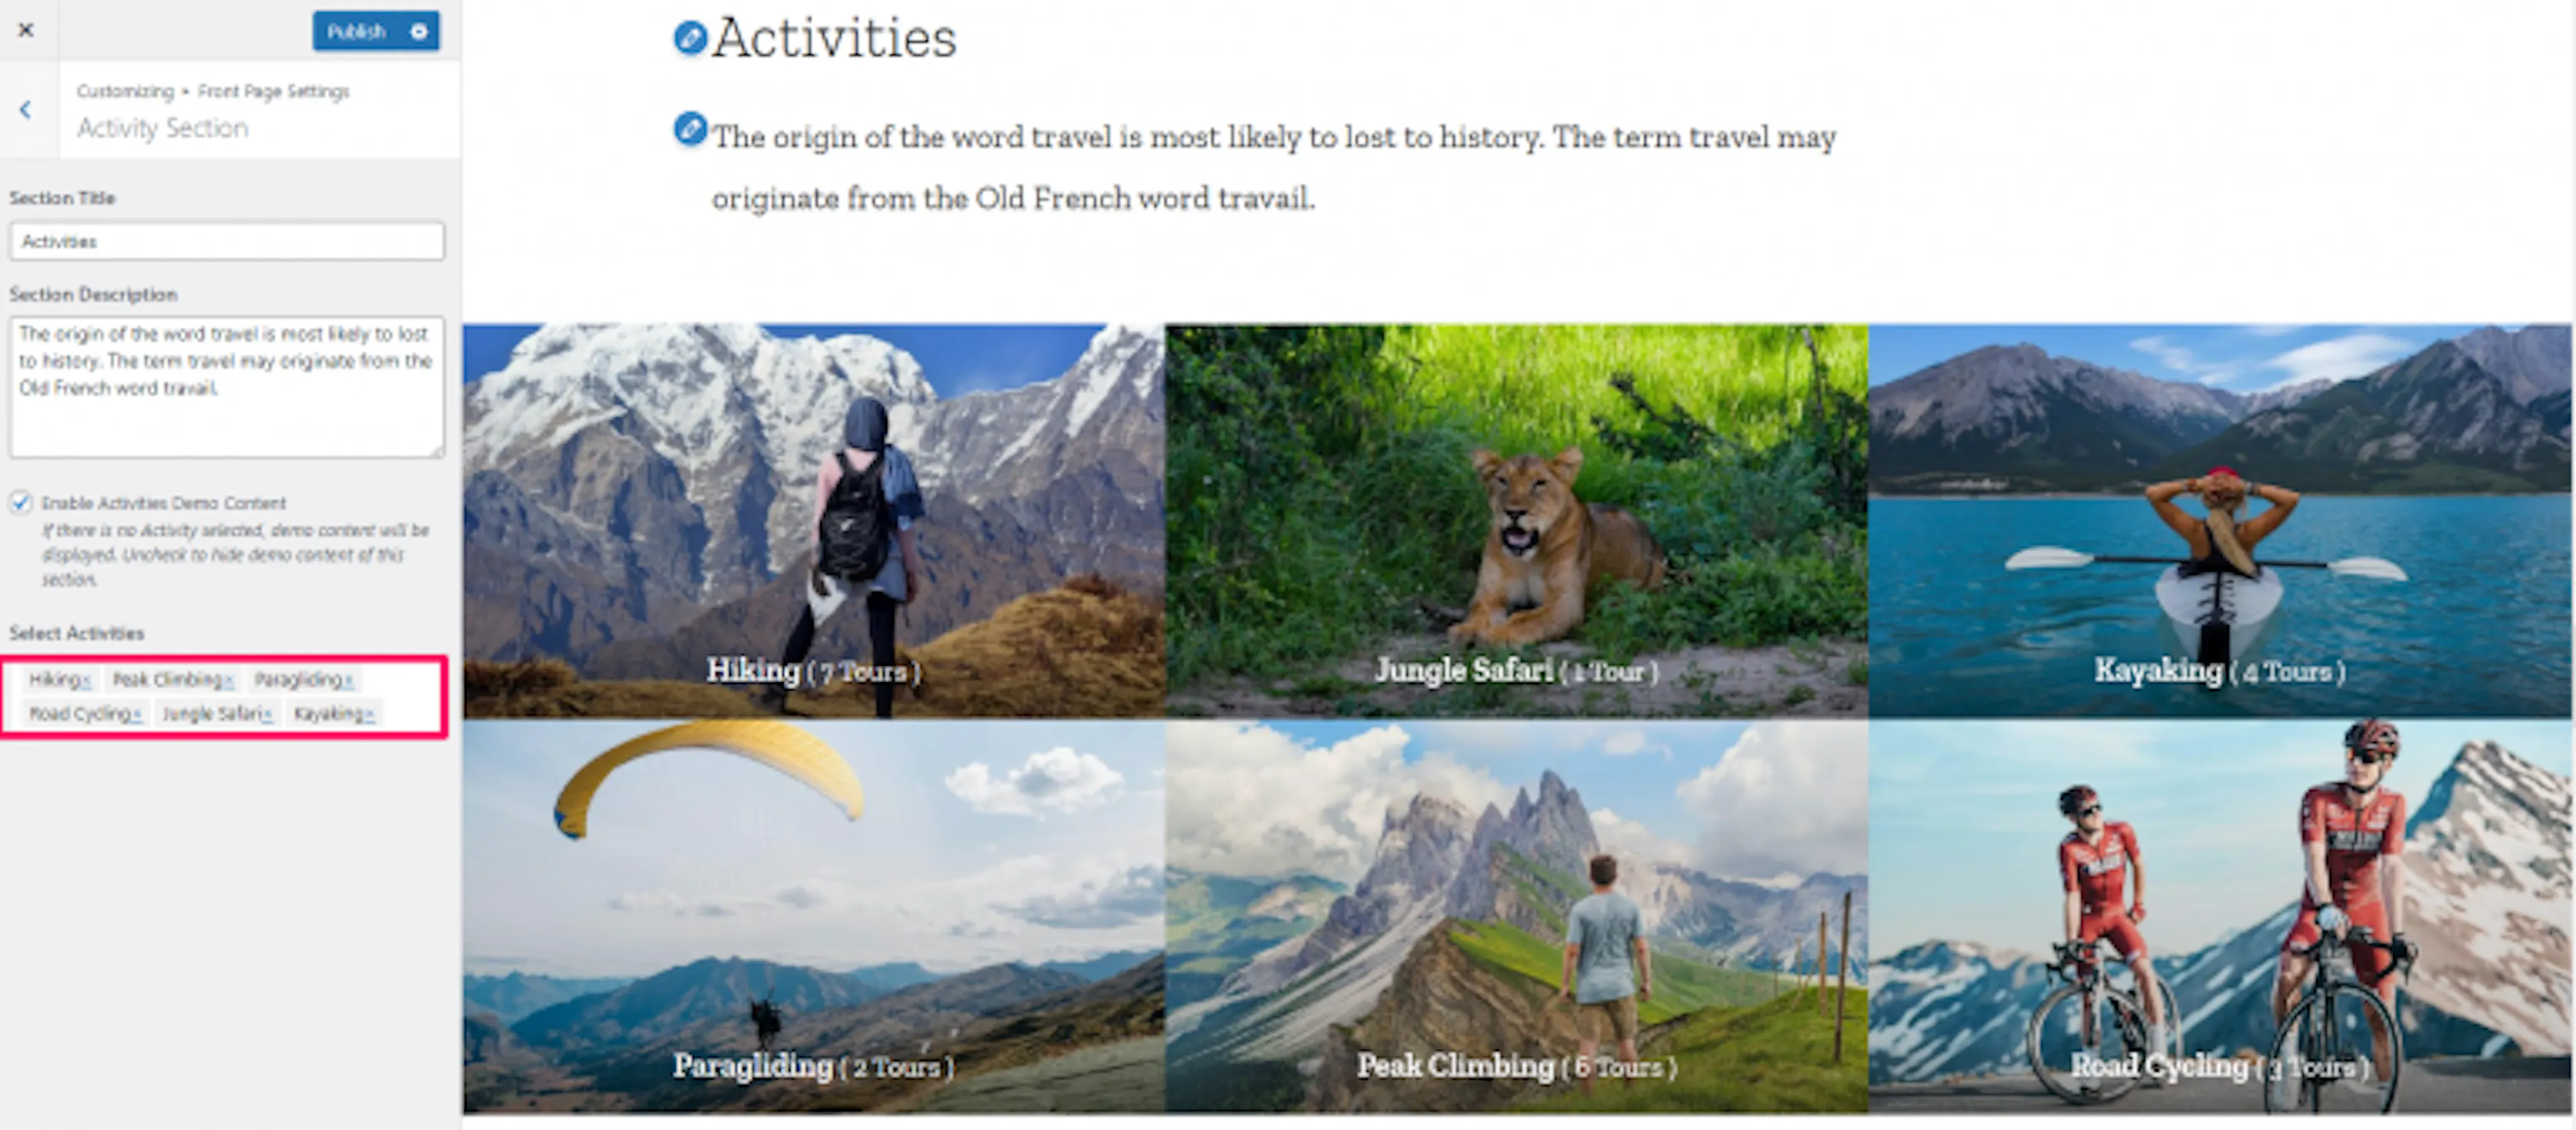
Activity section
Activities help travelers browse experiences such as trekking, rafting, or cultural tours.
Choose activities
Open Activity Section. Enter the section title and description. Enable Activities Demo Content for sample activities or select the activities to display. Click Publish.
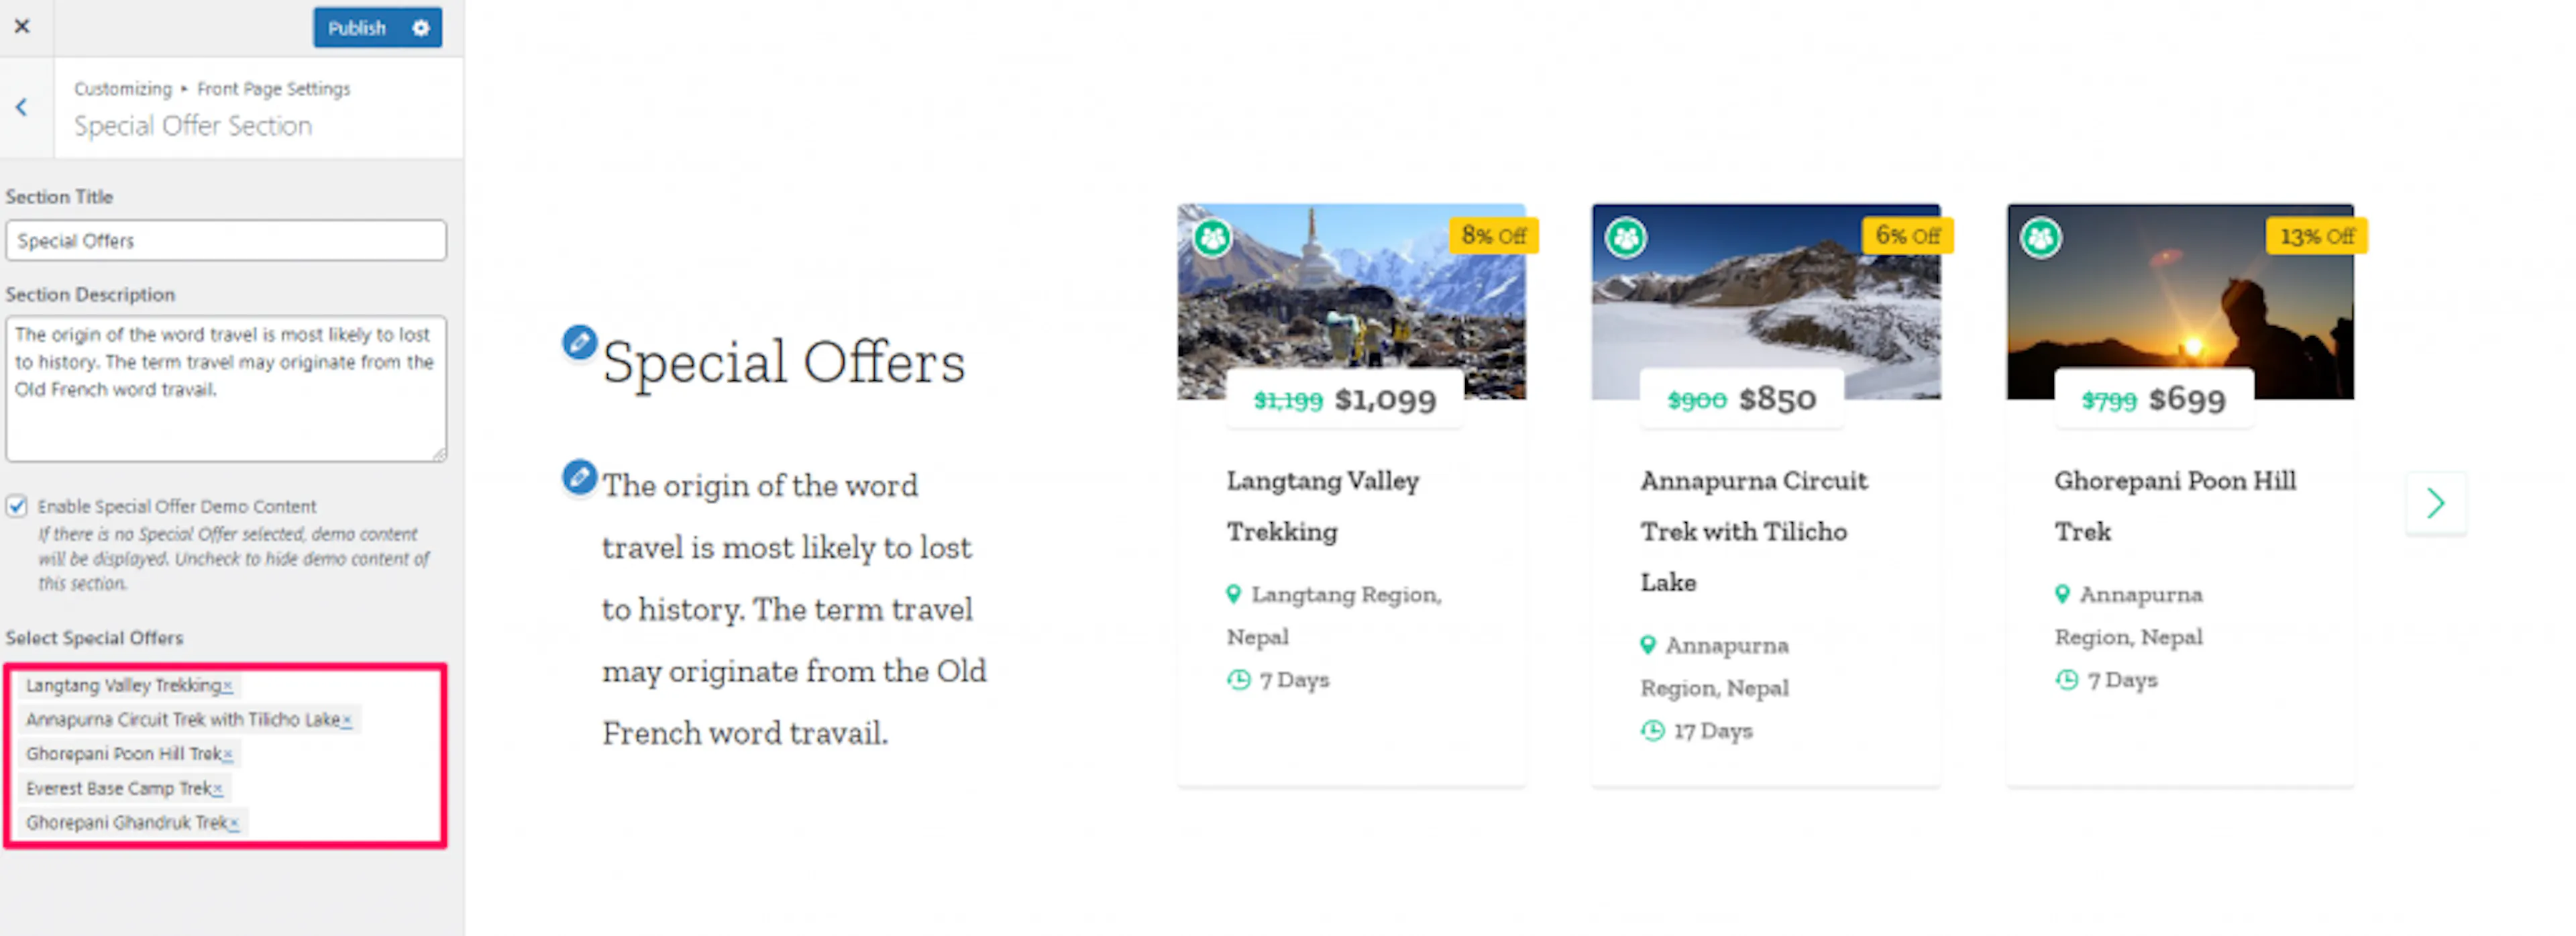
Special offer section
Use special offers to draw attention to seasonal pricing, group discounts, or limited-time packages.
Choose special offer trips
Open Special Offer Section. Enter the section title and description. Enable Special Offer Demo Content for sample content or select trips with special offers. Click Publish.
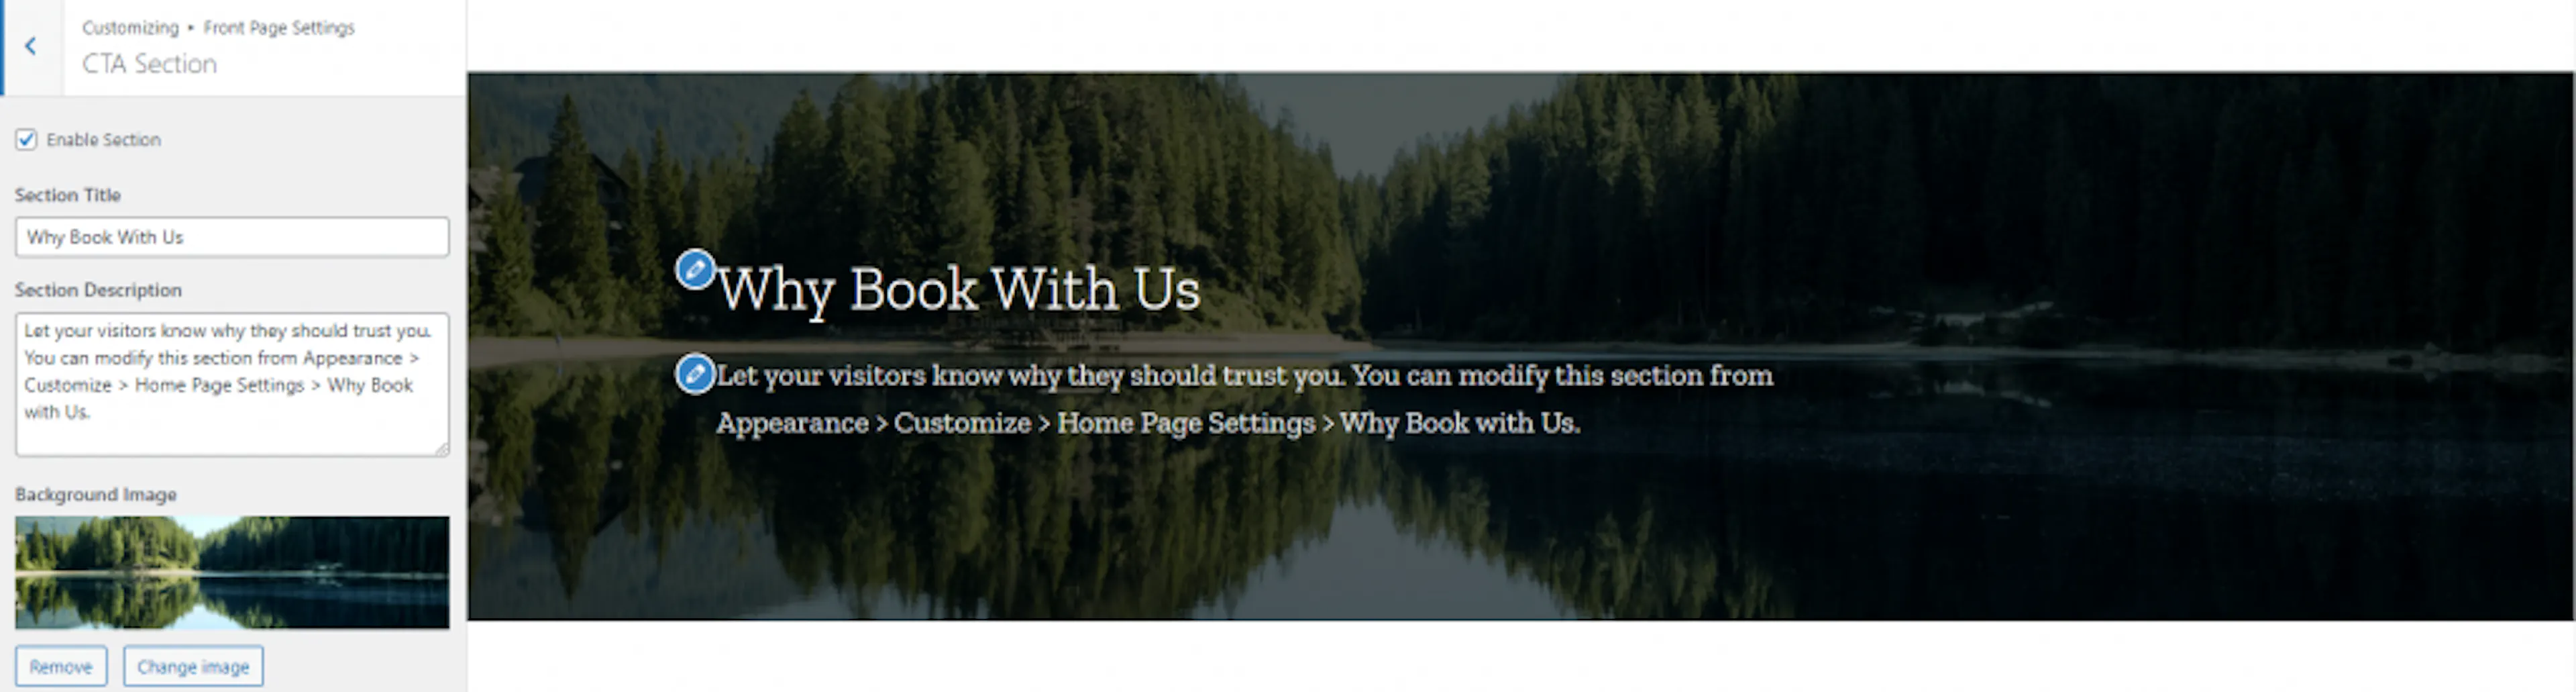
CTA section
A call to action, or CTA, asks visitors to take a specific next step. For example, you can invite them to contact you about a private trek.
Add the CTA
Open CTA Section. Enter the section title and description. Select a background image and click Publish.
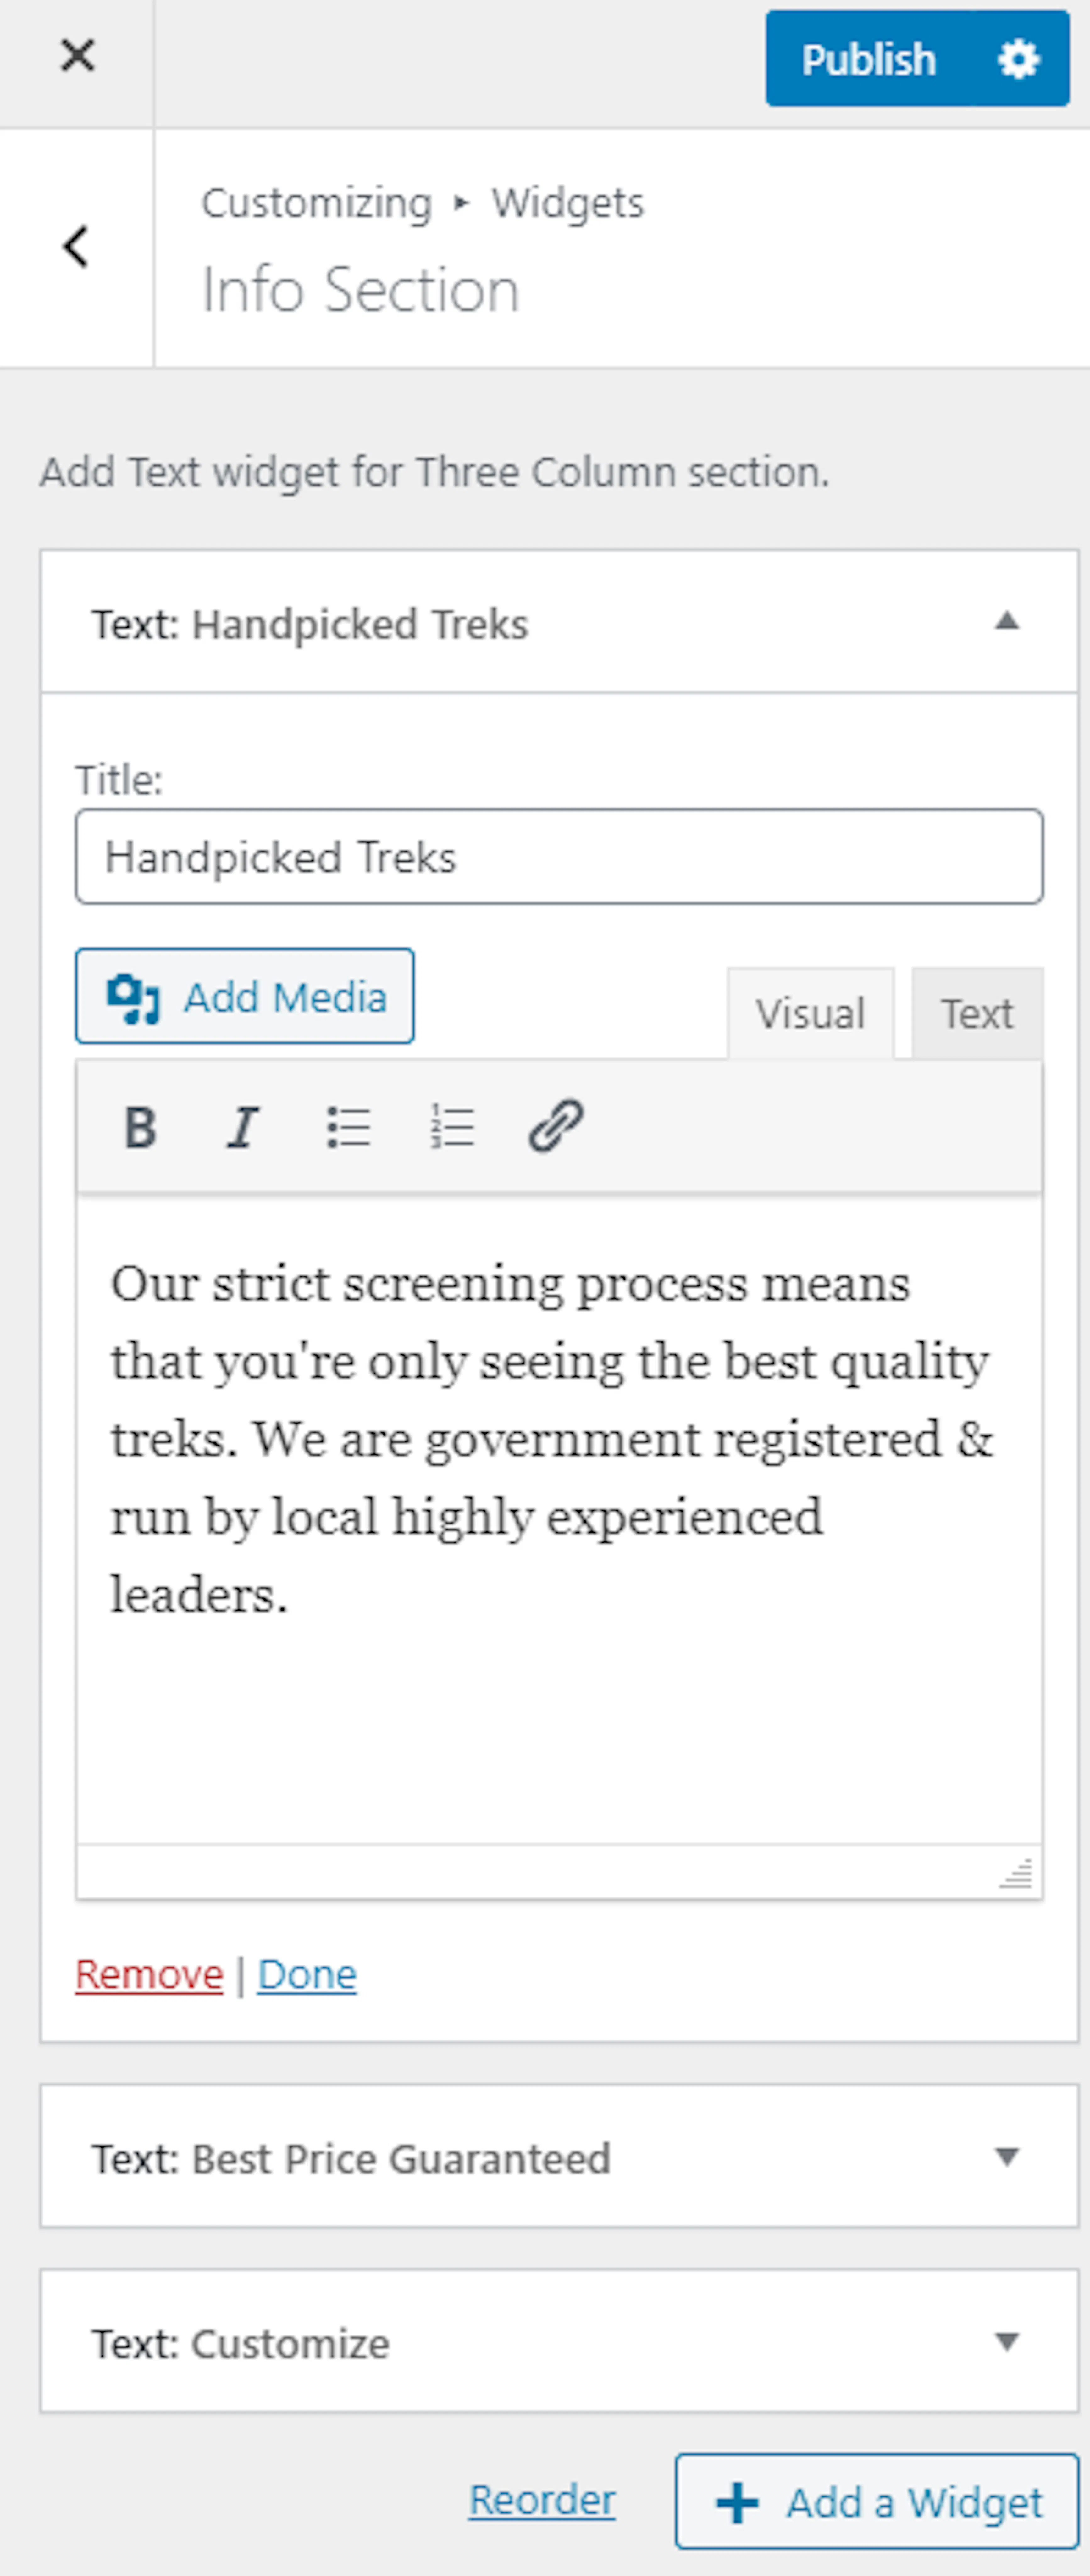
Info section
The Info section displays extra information in a text widget. A widget is a small content block that WordPress places in a selected area.
Add an information widget
Open Info Section and click Add a Widget. Add a Text Widget, then enter its title and description. Click Publish.
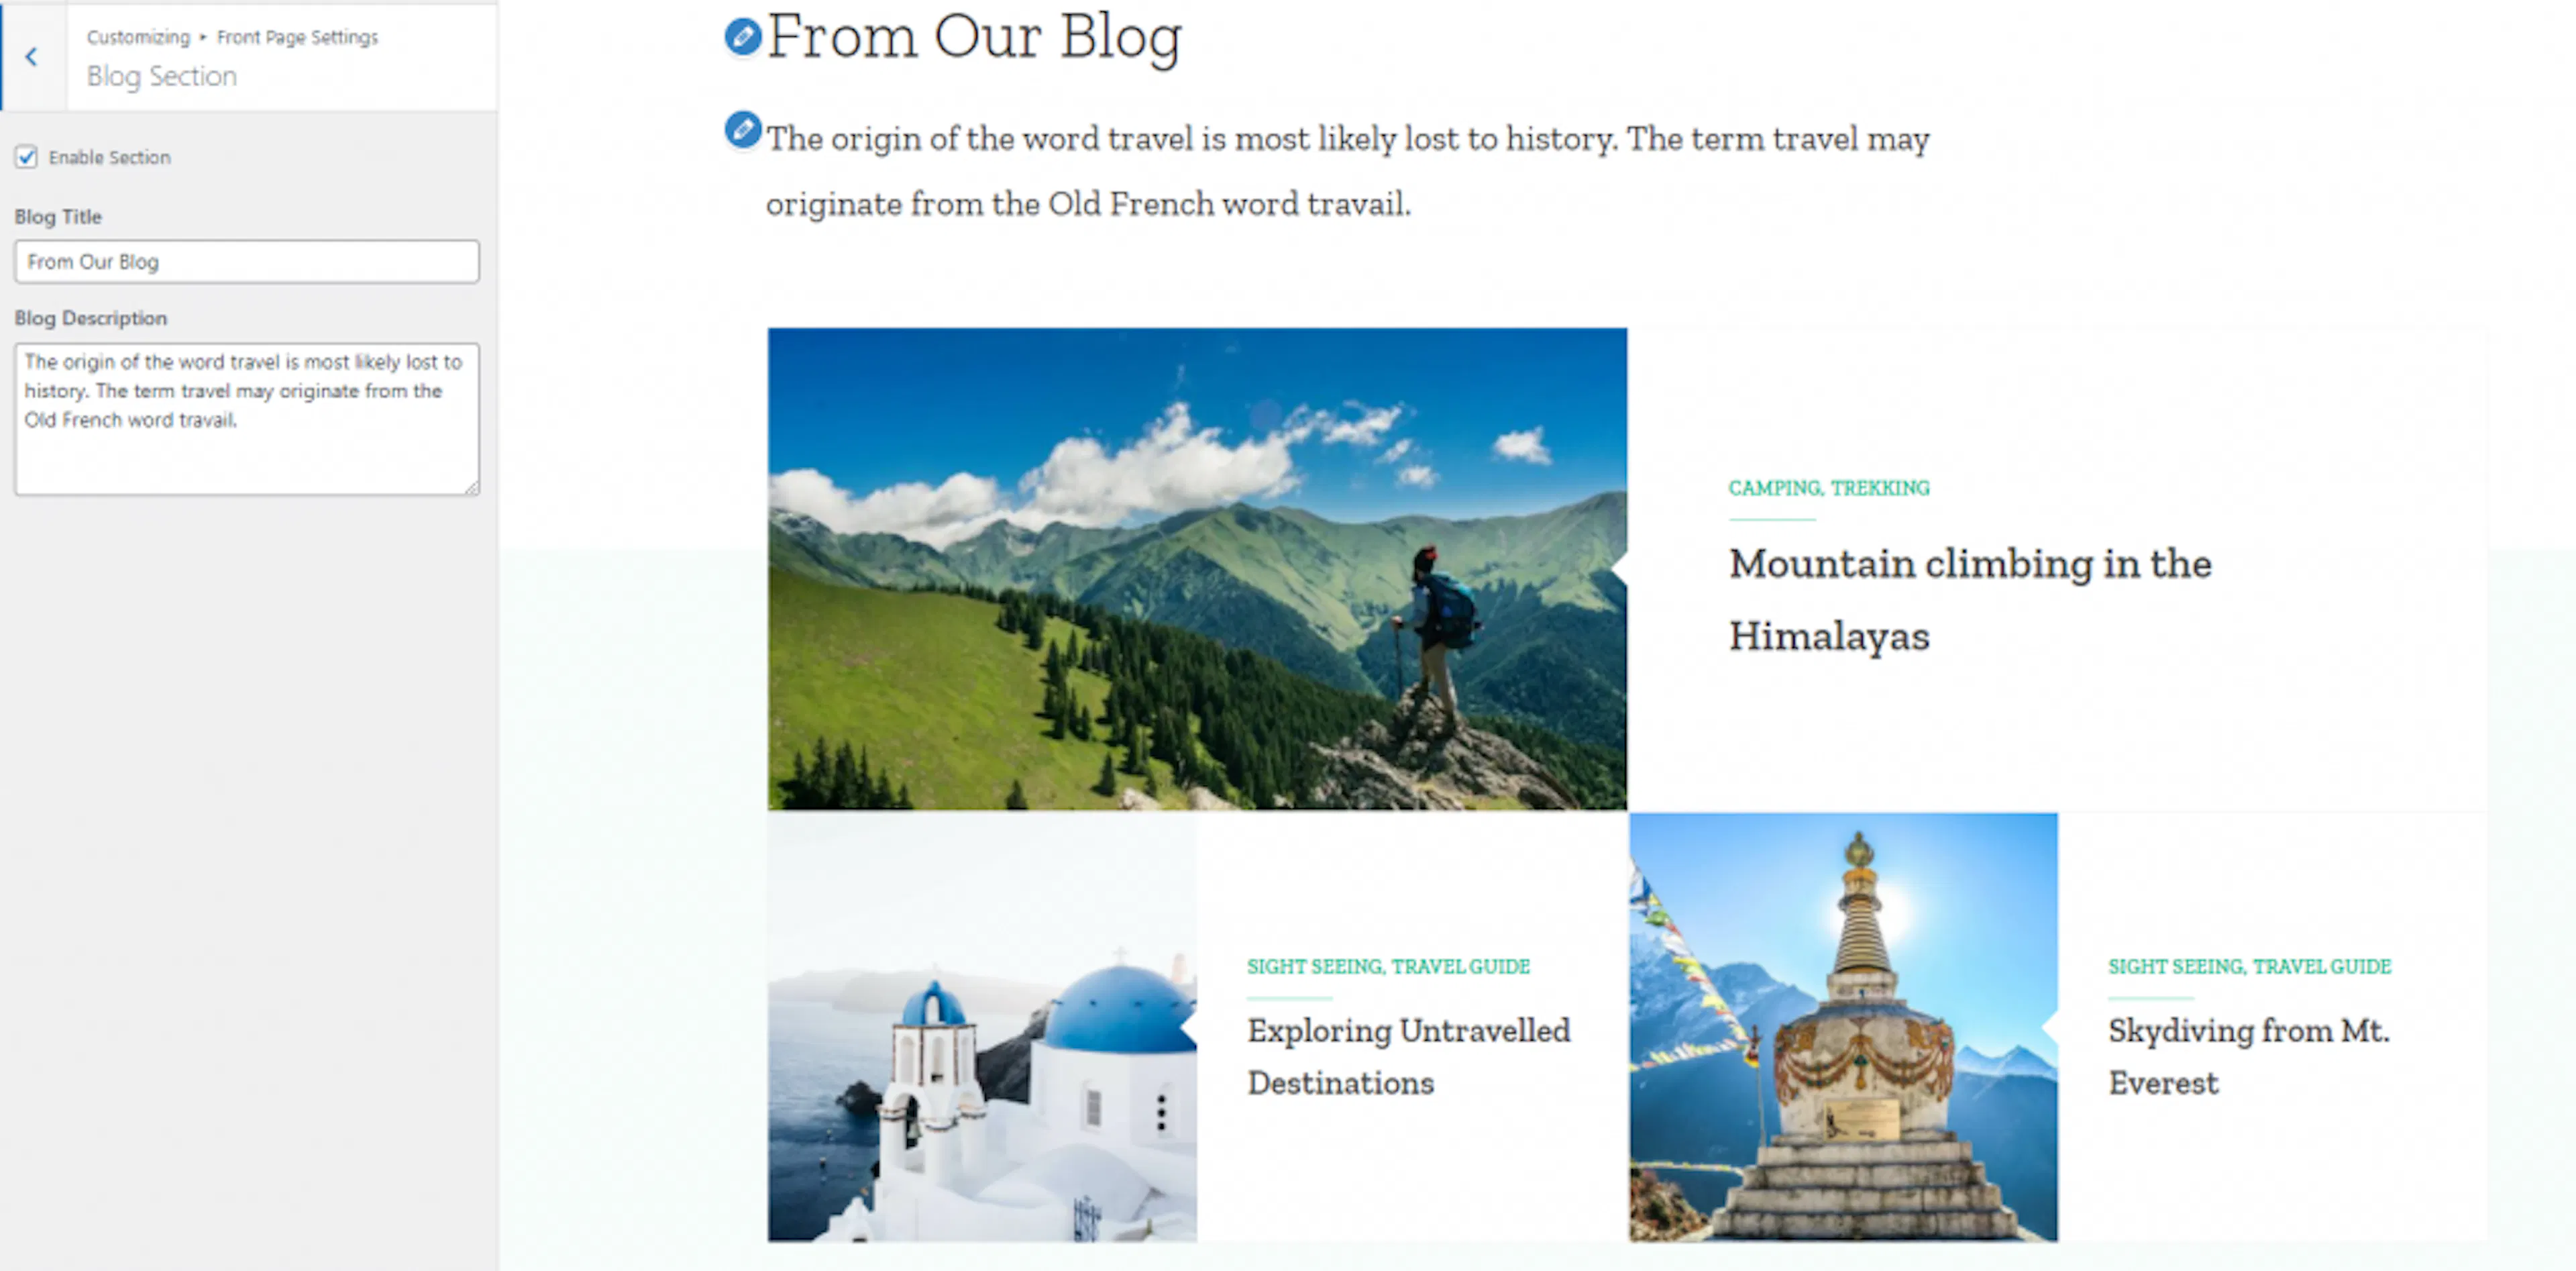
Blog section
The Blog section gives visitors a way to read your latest travel stories and advice.
Add the blog section text
Open Blog Section. Enter the blog title and description, then click Publish.
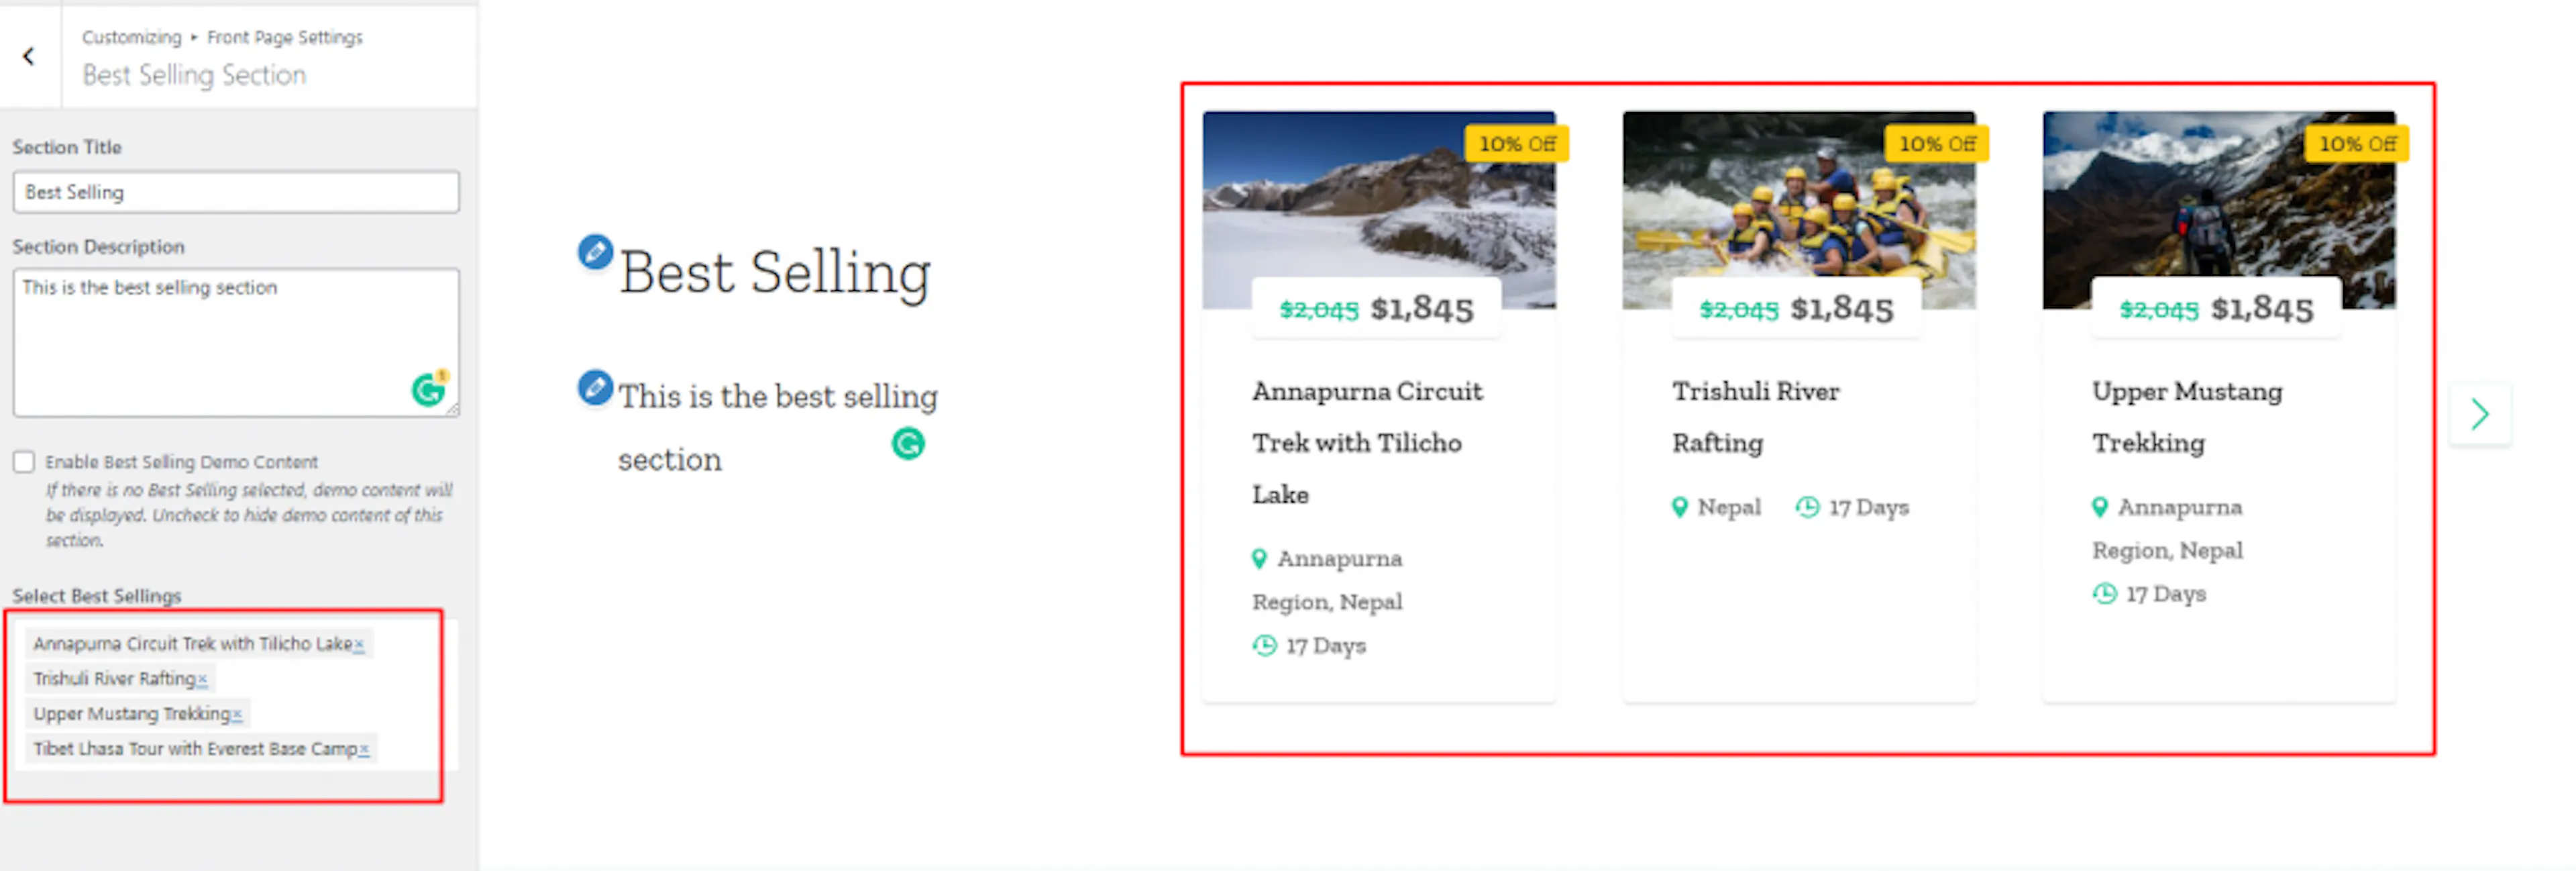
Best selling section
Highlight trips that travelers book most often.
Choose best-selling trips
Open Best Selling Section. Enter the section title and description. Enable Best Selling Demo Content for sample content or select your best-selling trips. Click Publish.
Recommendation and associated section
Use recommendations to suggest related services. Associated content can show connected information beside those recommendations.
Add recommendations and associated content
Open Recommendation & Associated Section. Enter the recommendation title and description. Click Add new Recommendation and add the information you want to show. Enter the associated title and description, then click Add new Associated.
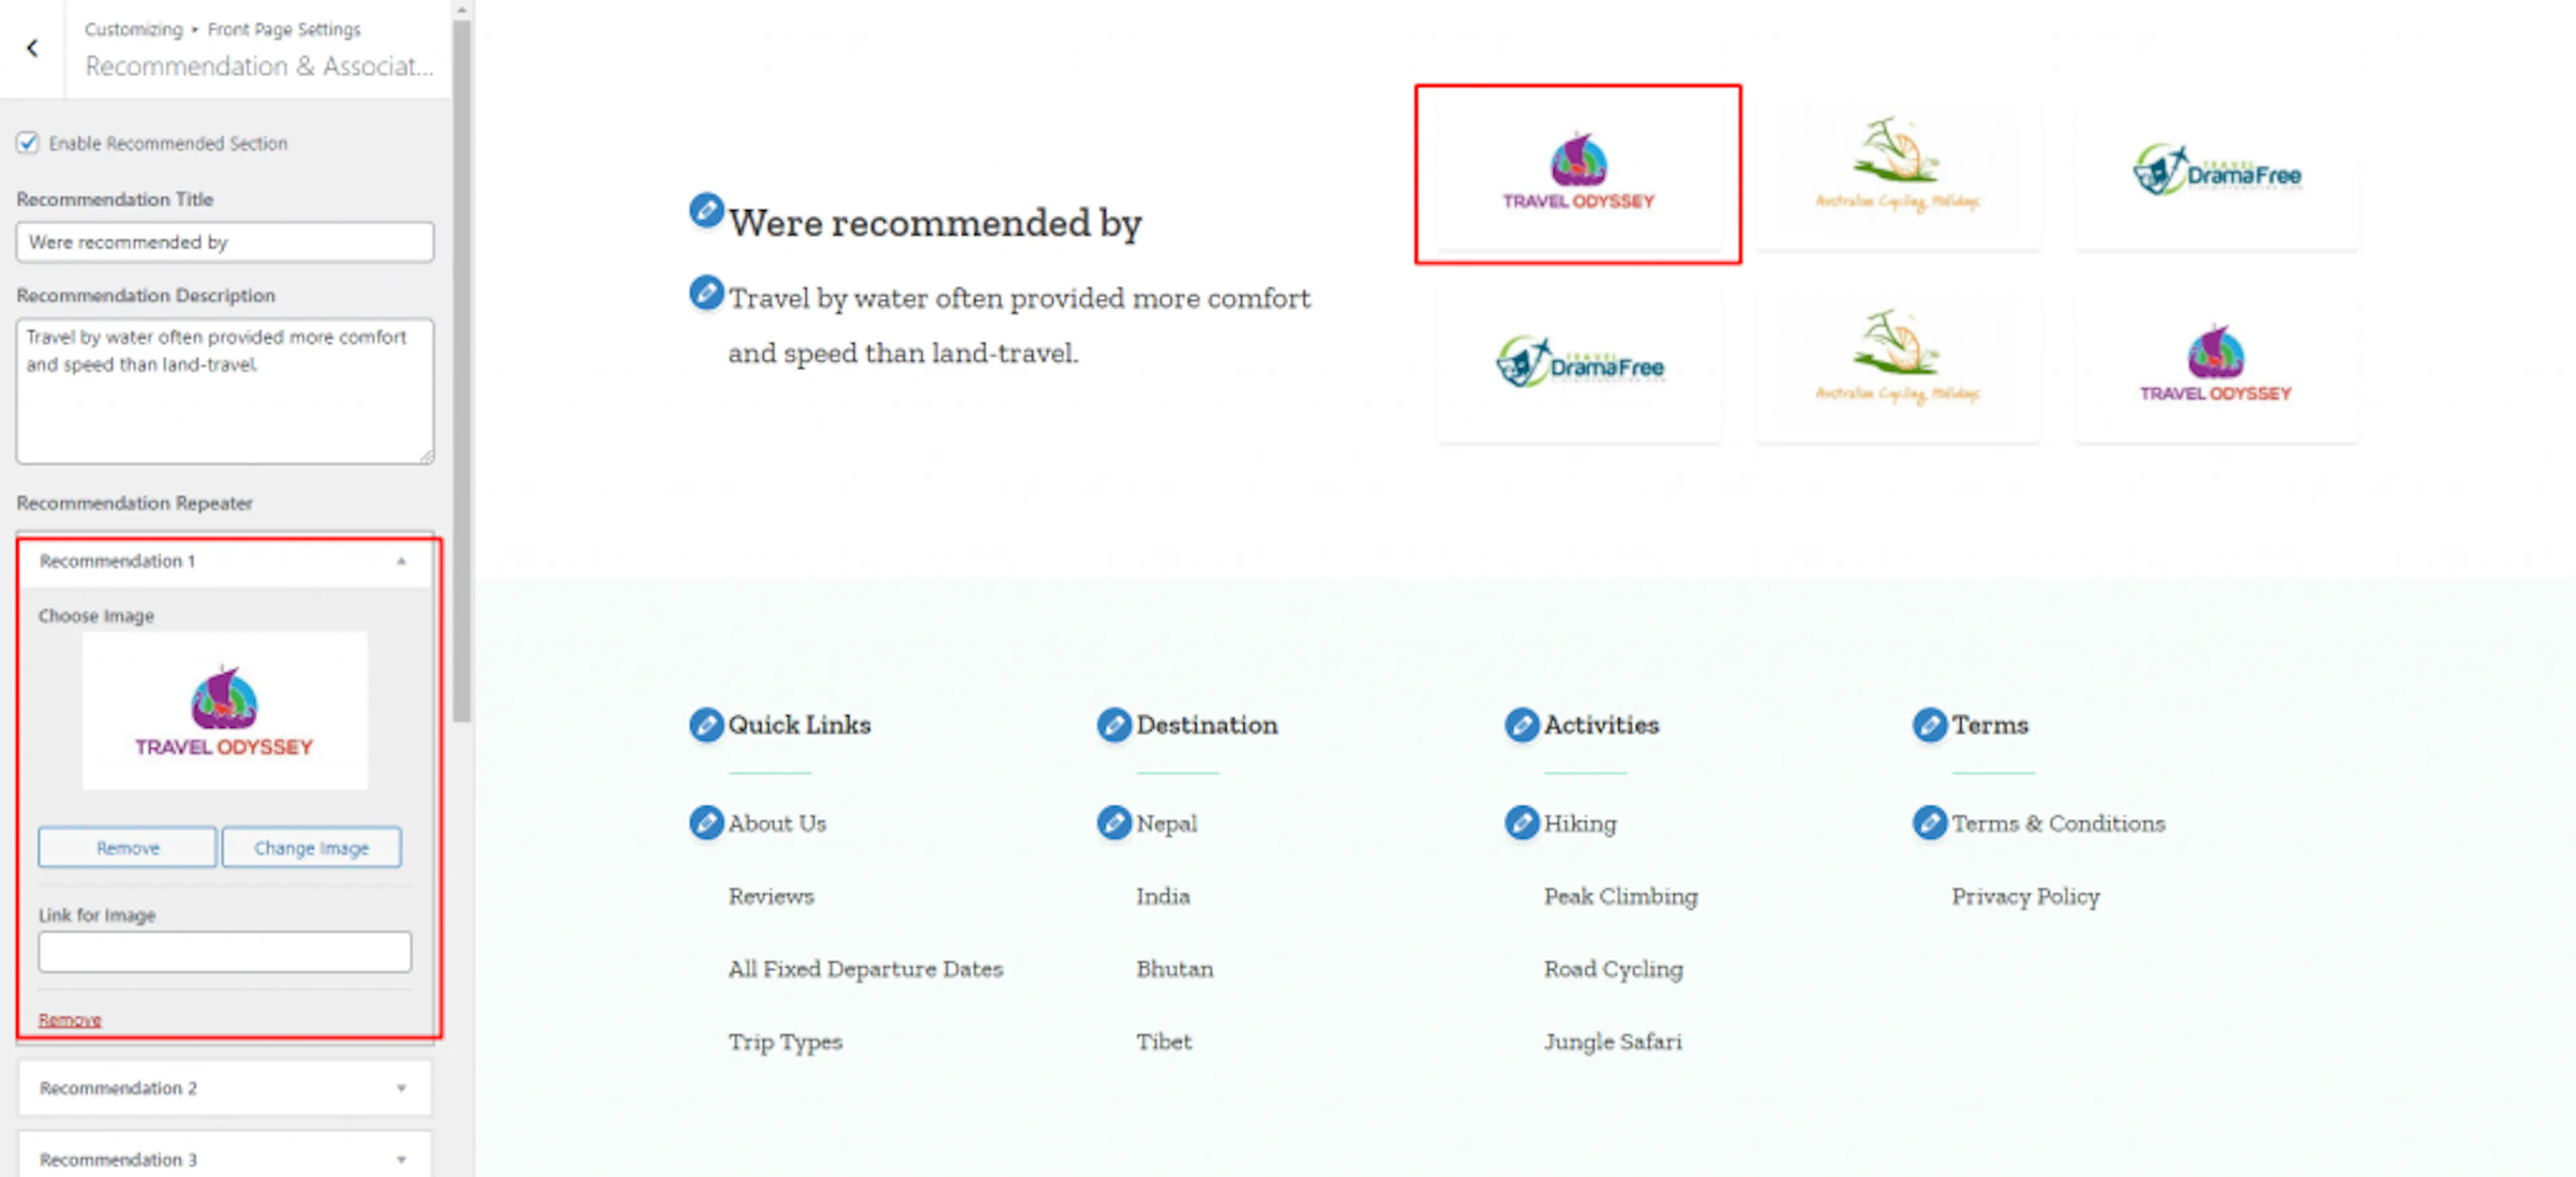
Enable sample content if needed
Enable Recommendation & Associated Content to display demo content. Click Publish.
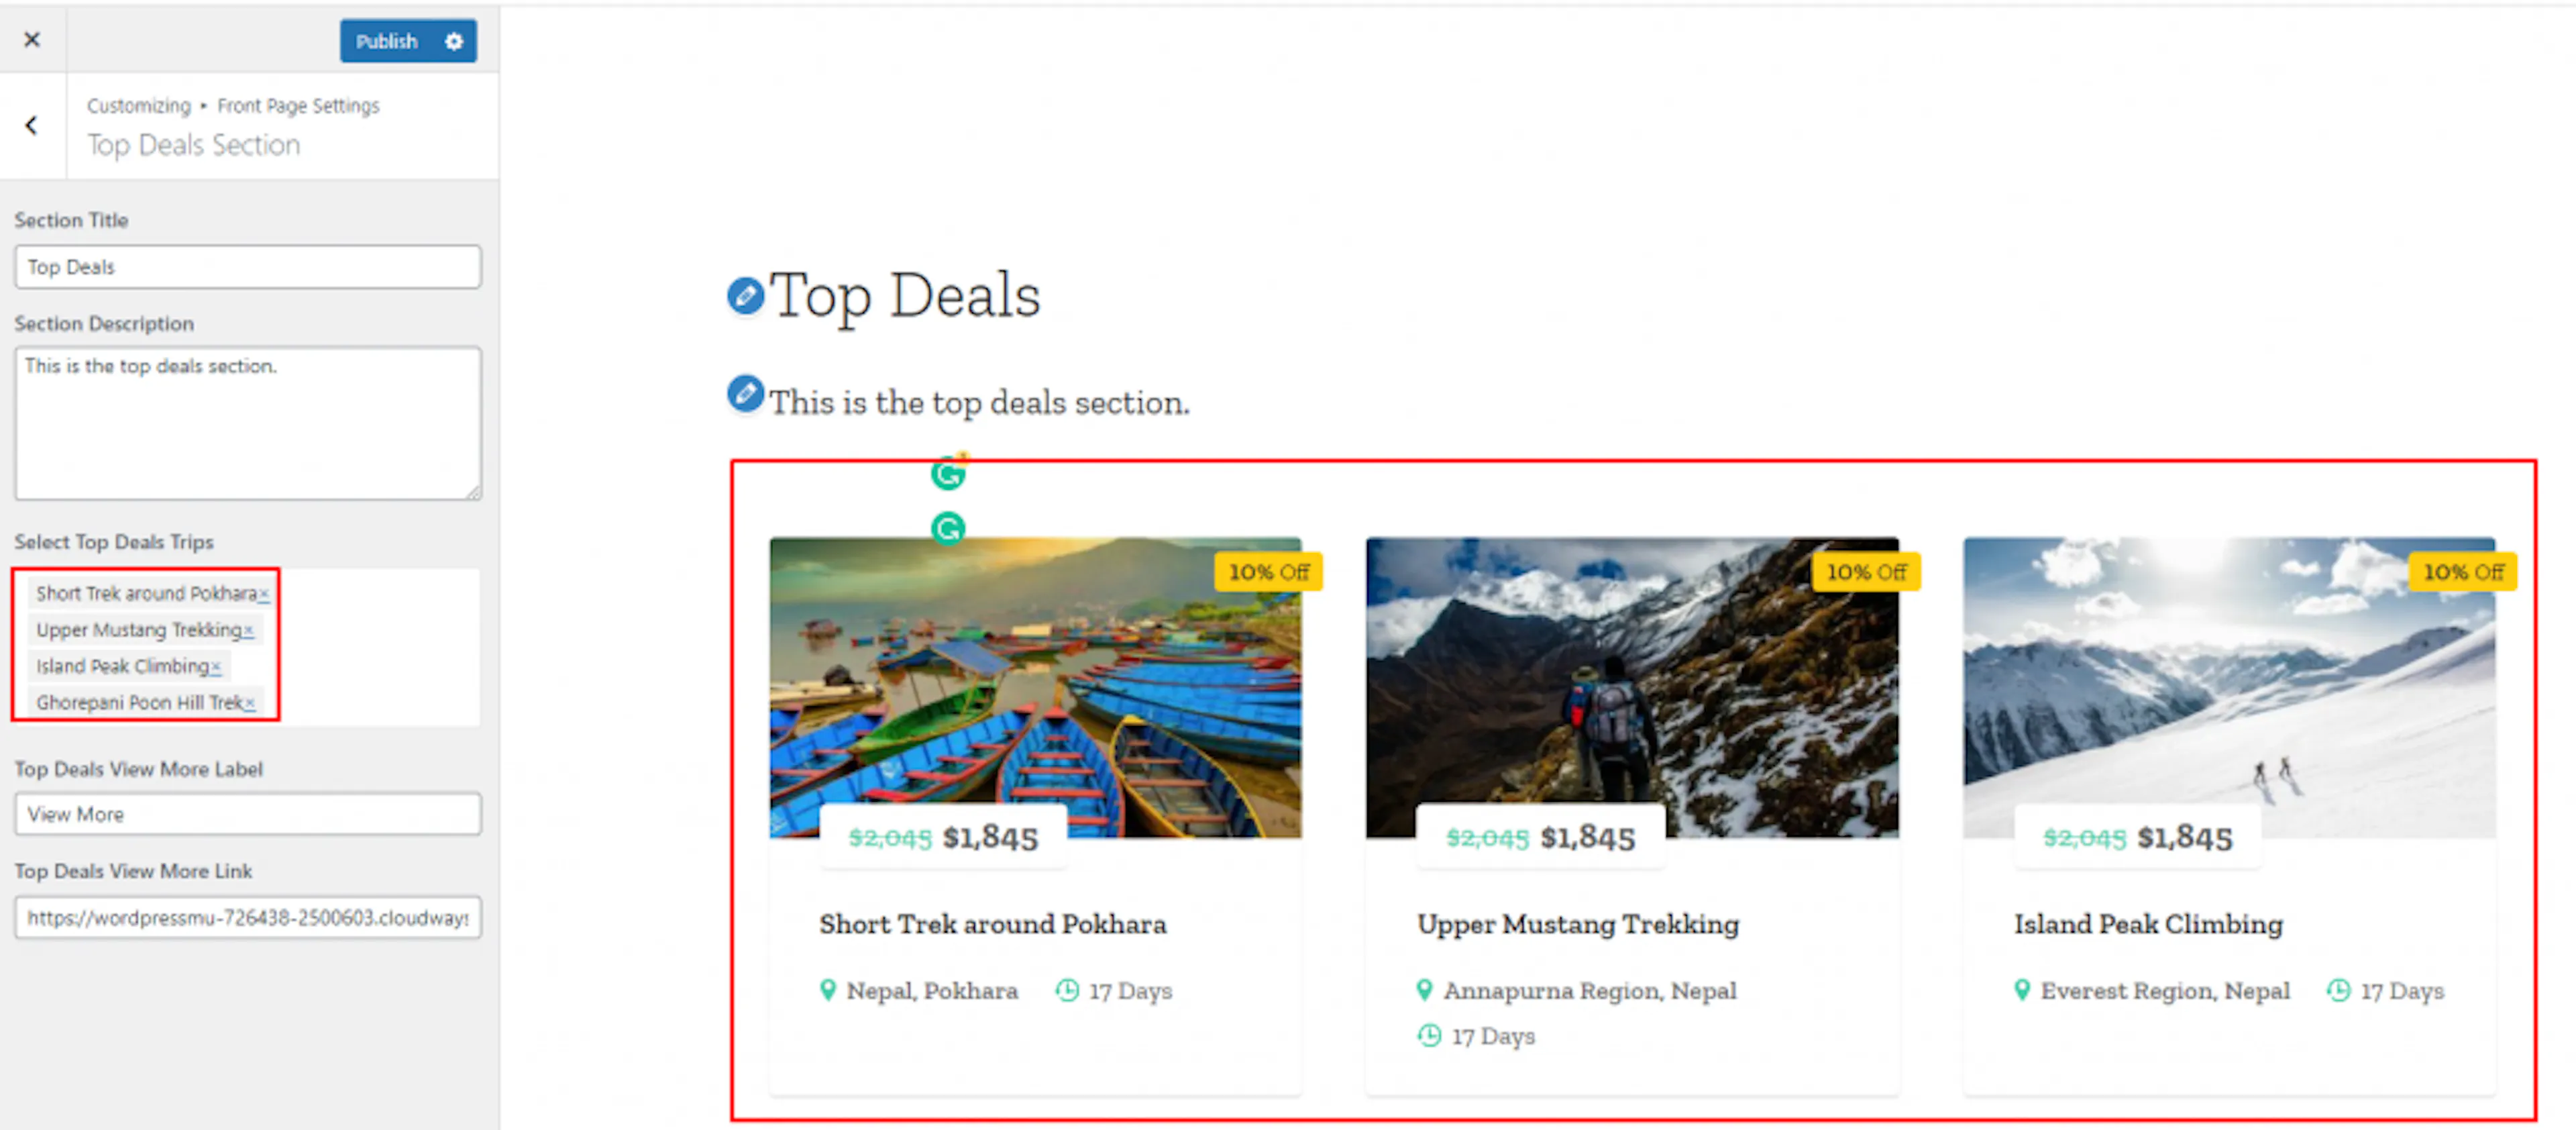
Top deals section
Use Top Deals for discounted trips or packages with a limited booking window.
Choose top deals
Open Top Deals Section. Enter the section title and description. Select the trips to show as top deals. Enter the top deal view more label and link, then click Publish.
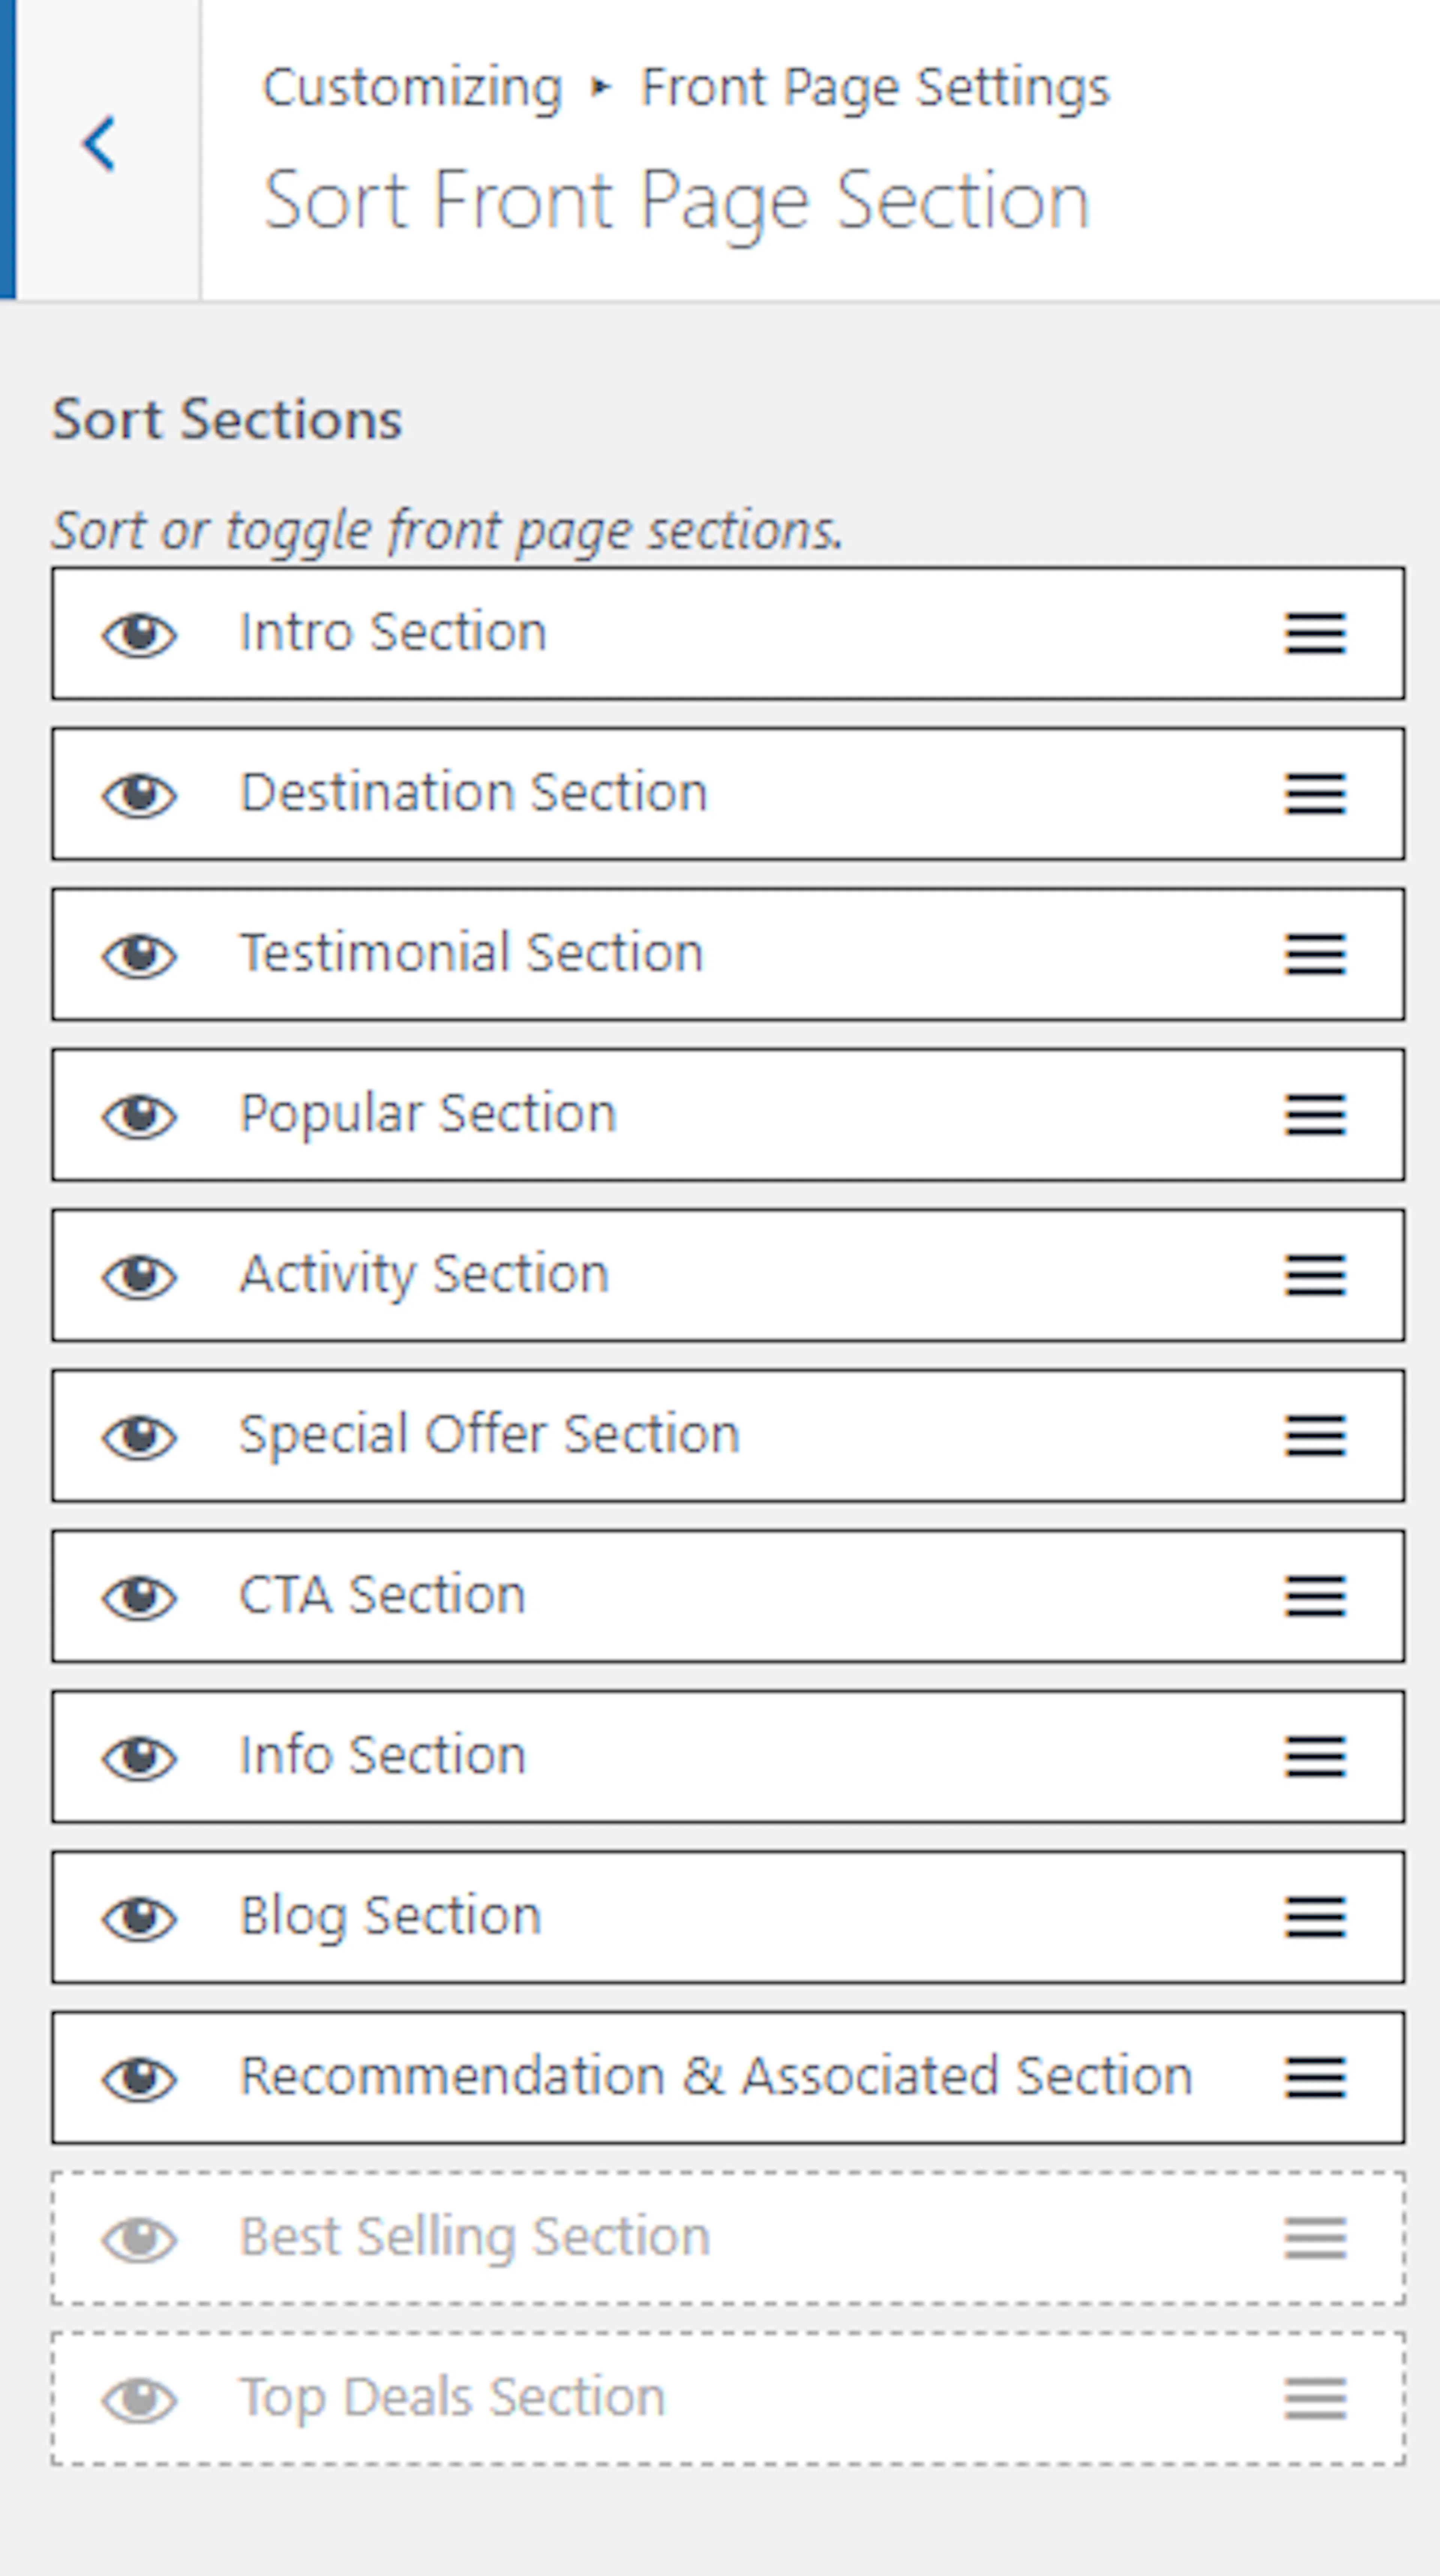
Sort front page sections
The order of sections affects the path visitors follow through your homepage.
Reorder or hide sections
Open Sort Front Page Section. Drag sections into the order you want. Click the eye icon to show or hide a section, then click Publish.
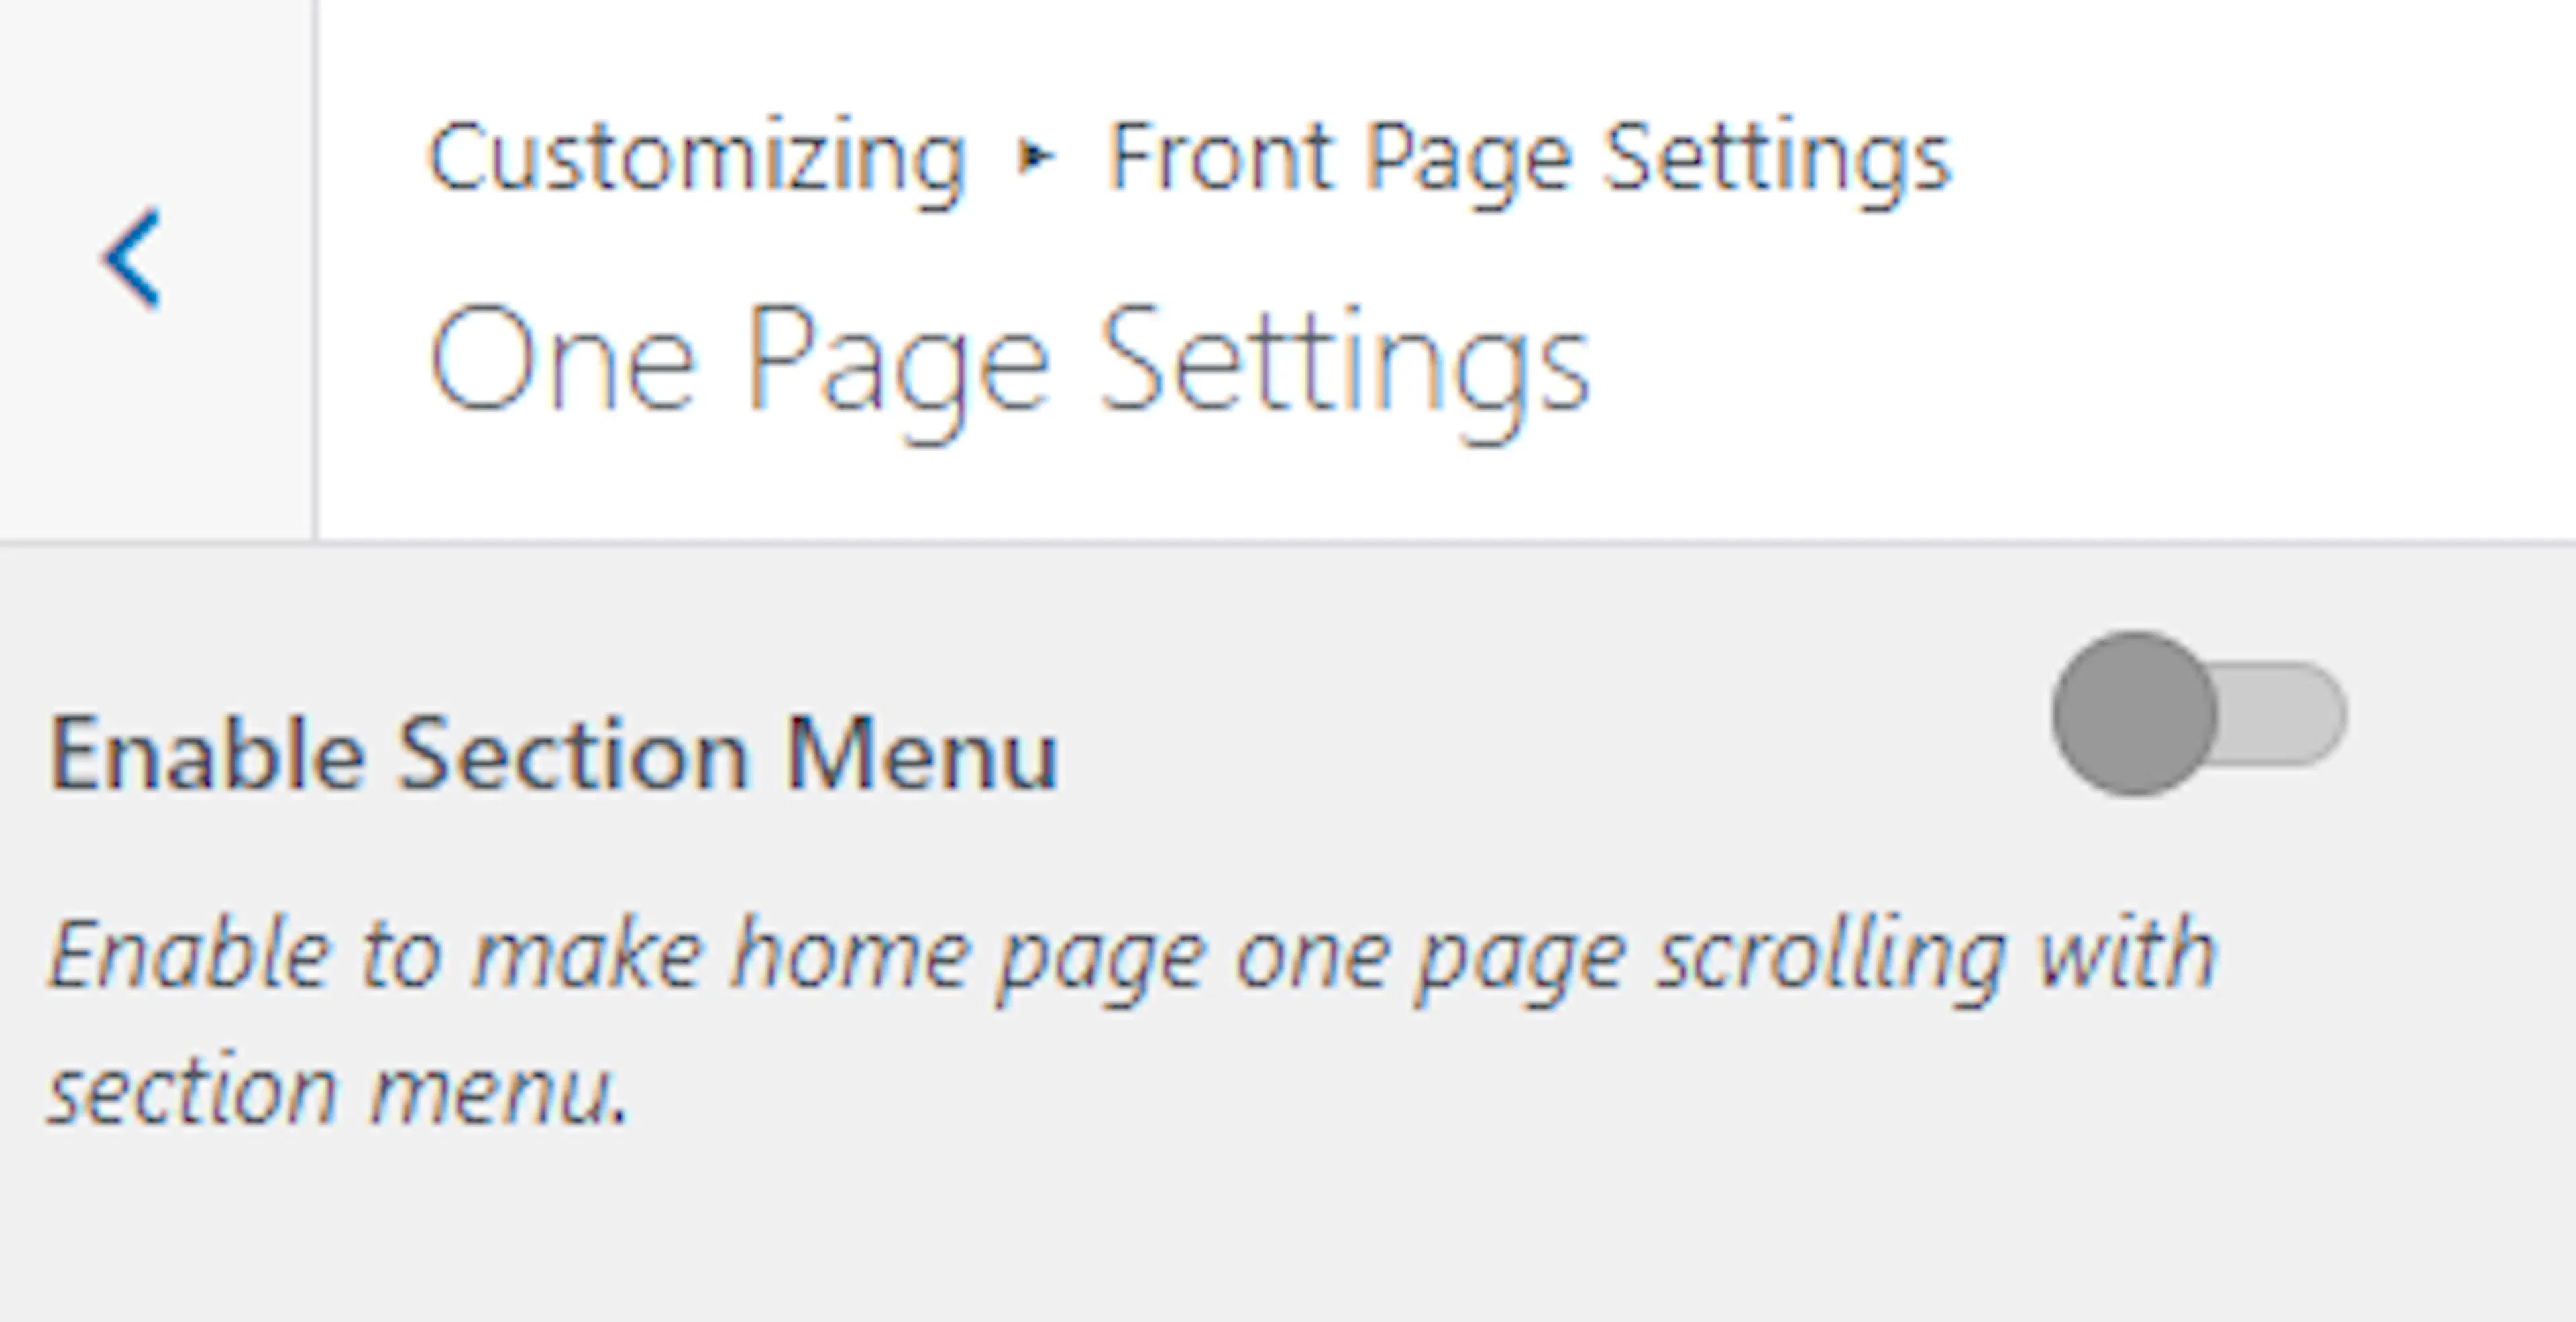
One page section
One-page navigation lets visitors move through homepage sections with a section menu.
Enable one-page navigation
Open One Page Section. Enable the section menu, then click Publish.
Your homepage sections are now configured. You can move on to the pages that explain your company and help visitors contact you.
About page settings
About page settings help visitors understand your company, team, values, and approach to responsible tourism.
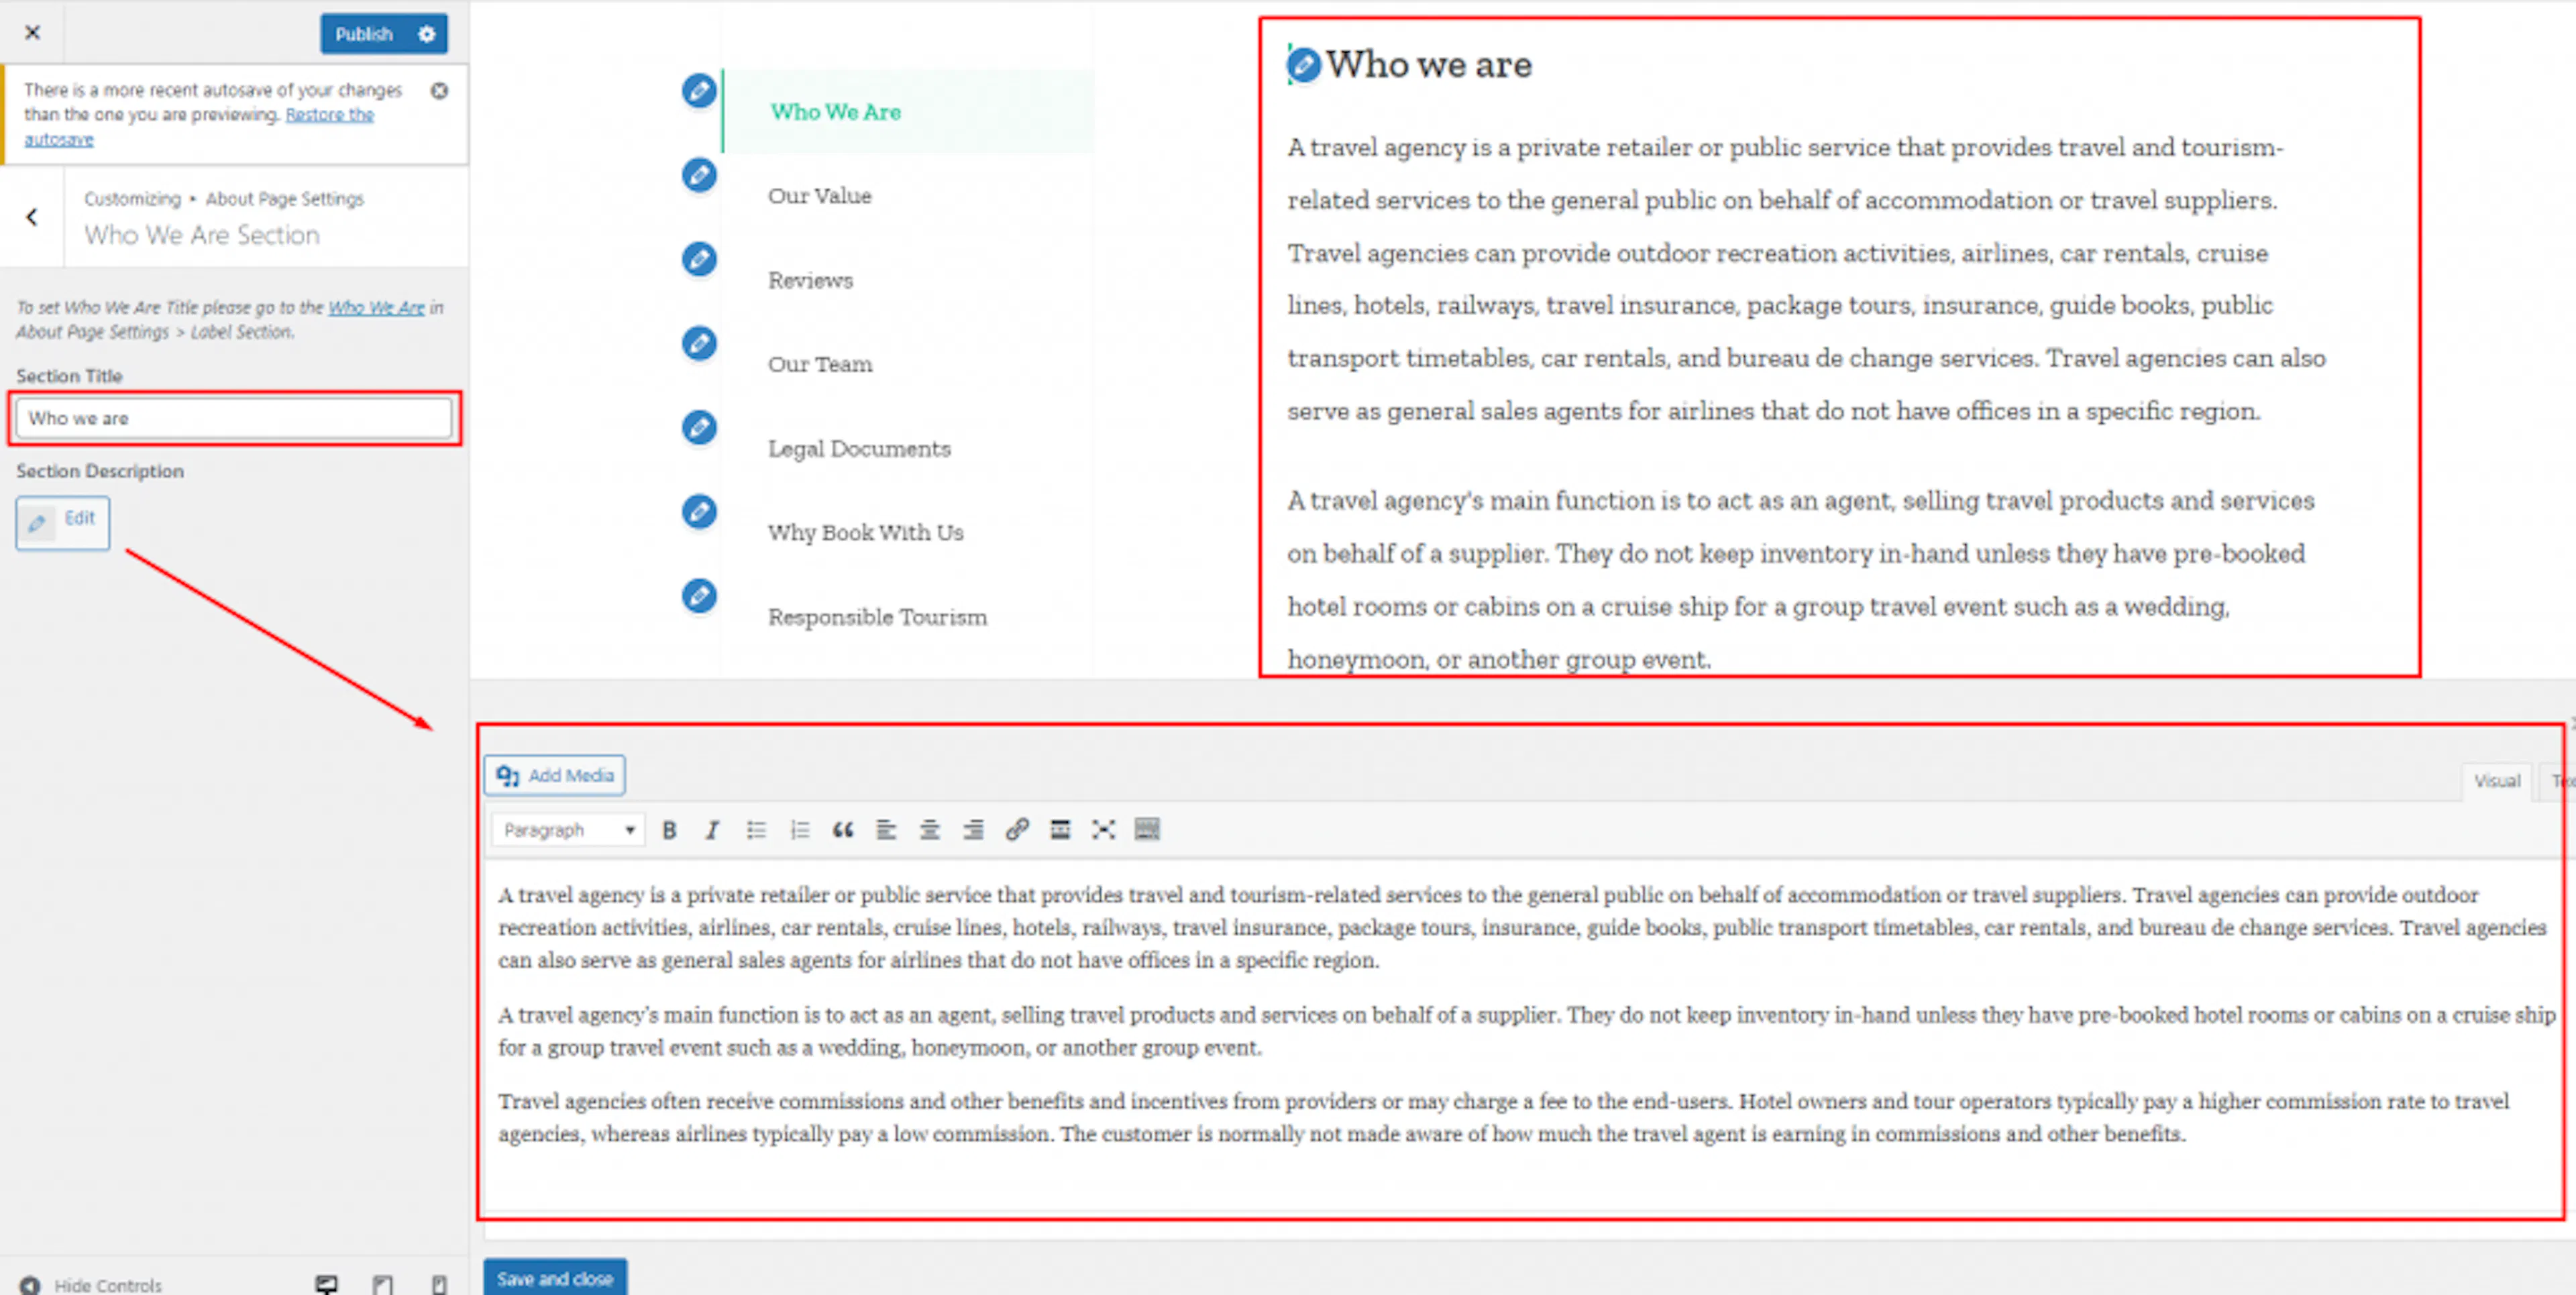
Who we are section
Use this section to introduce your tour company.
Add your company introduction
Open About Page Settings, then Who We Are Section. Enter the section title and description, then click Publish.
Our value section
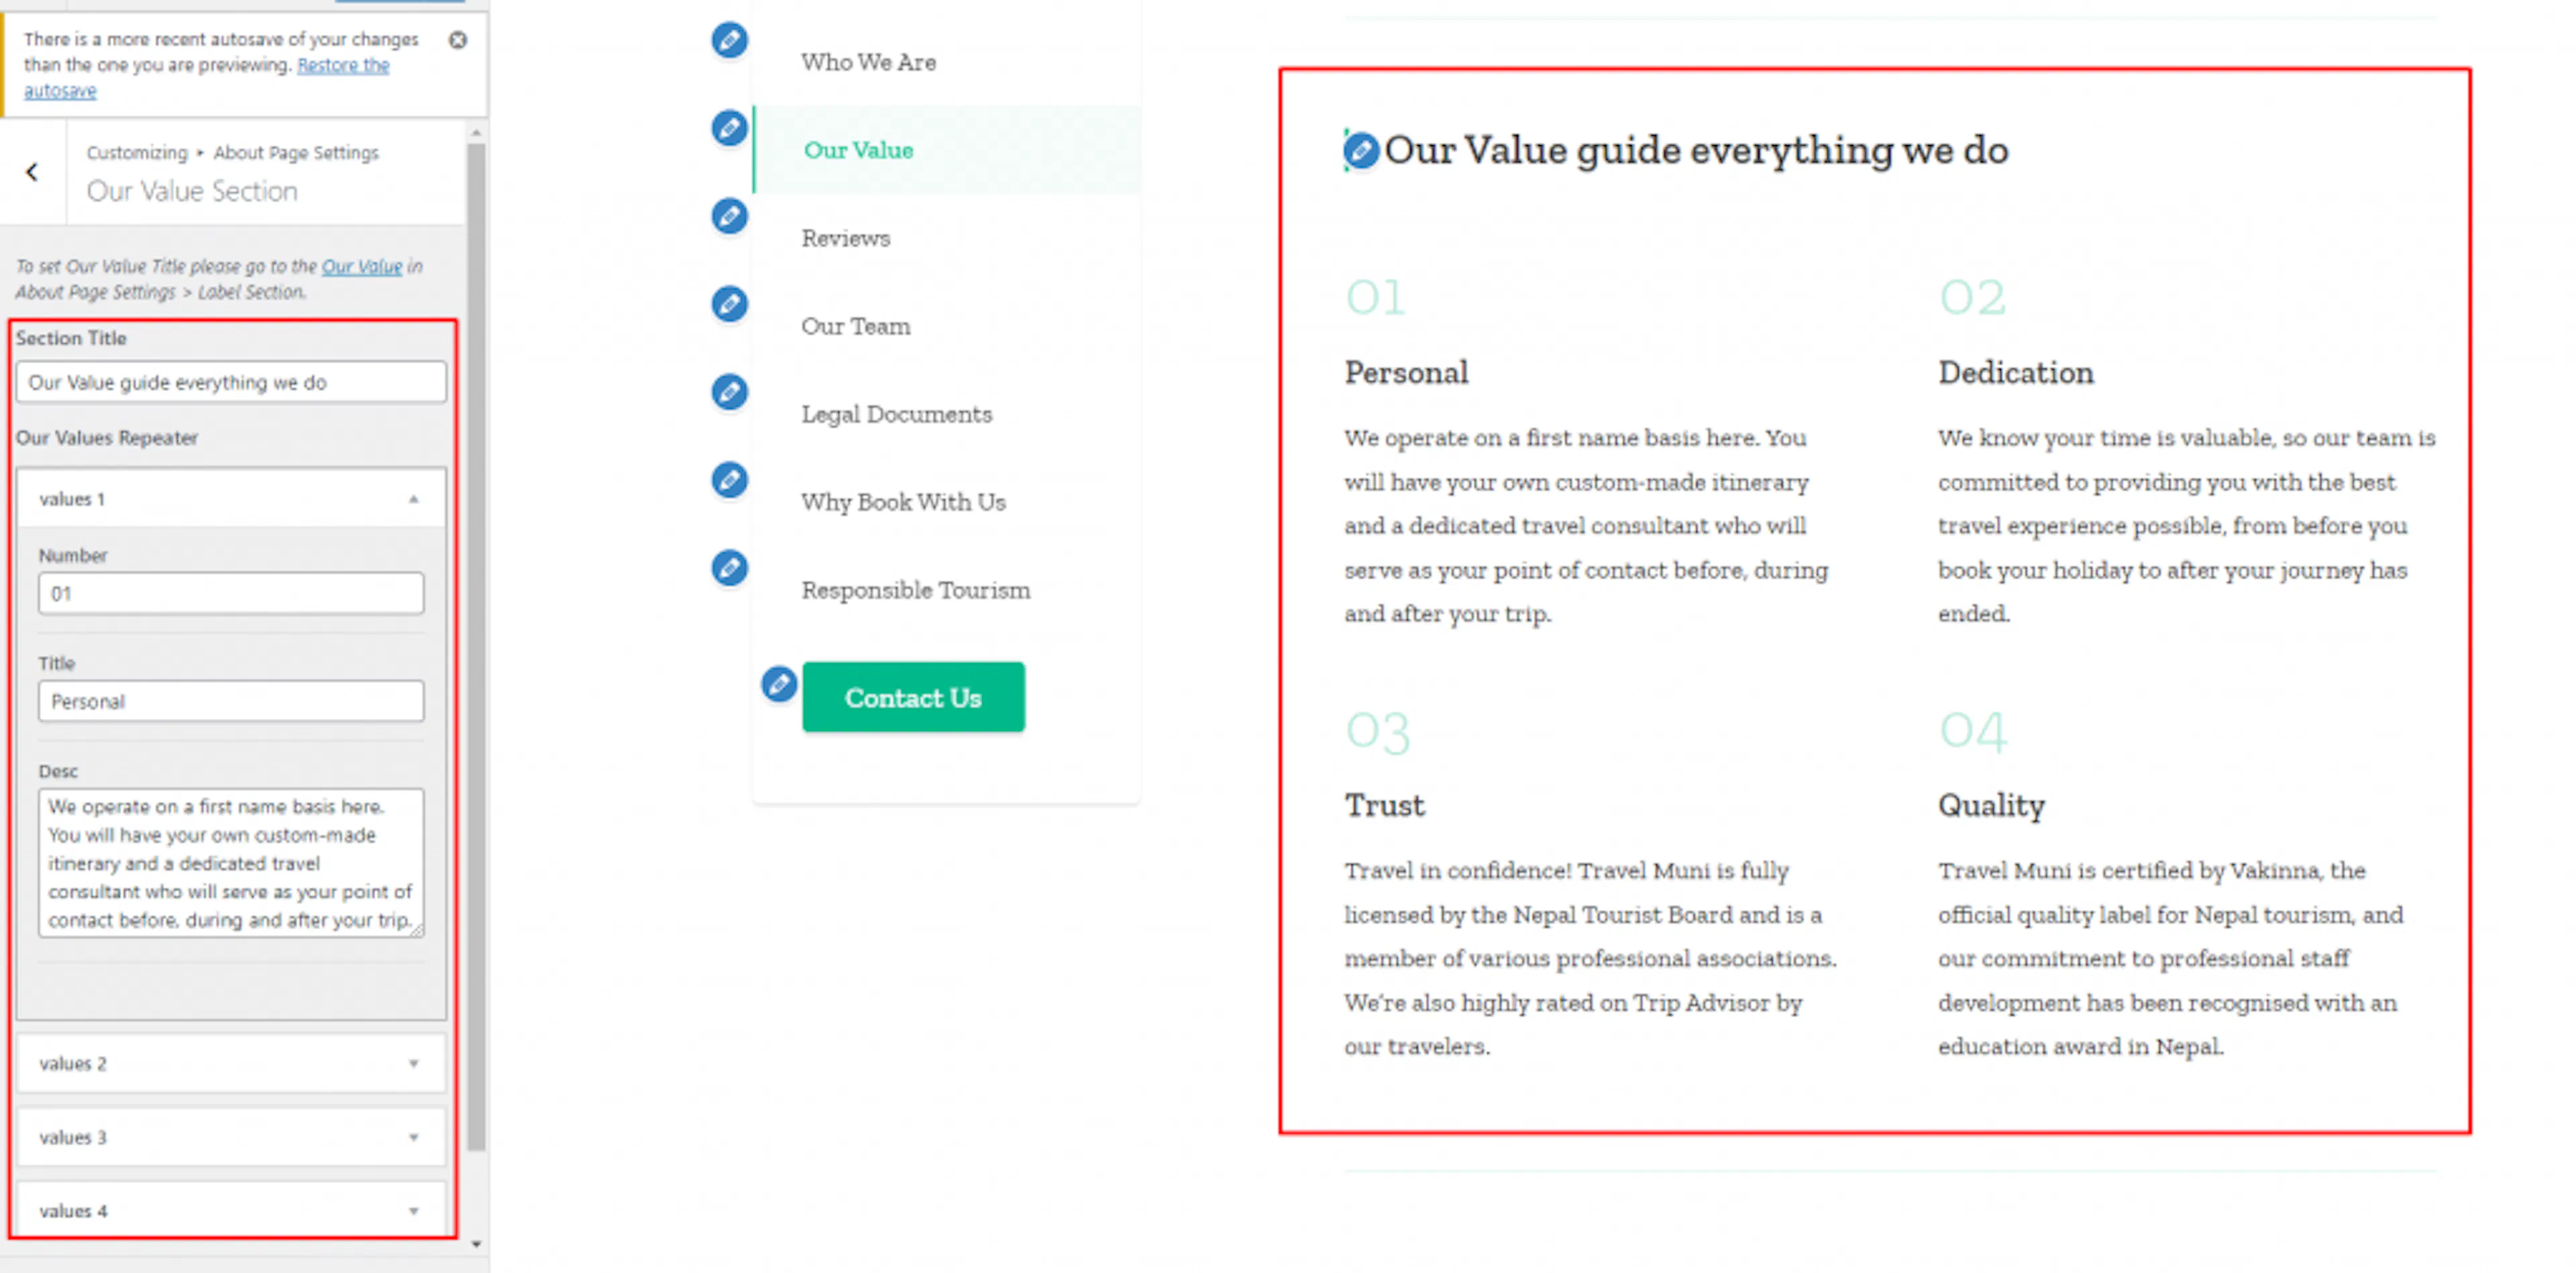
List the values that guide how you run tours. For example, you might highlight safety, local partnerships, and small groups.
Add your values
Open Our Value Section. Click Add new values. Enter a number, title, and description for each value, then click Publish.
Review section
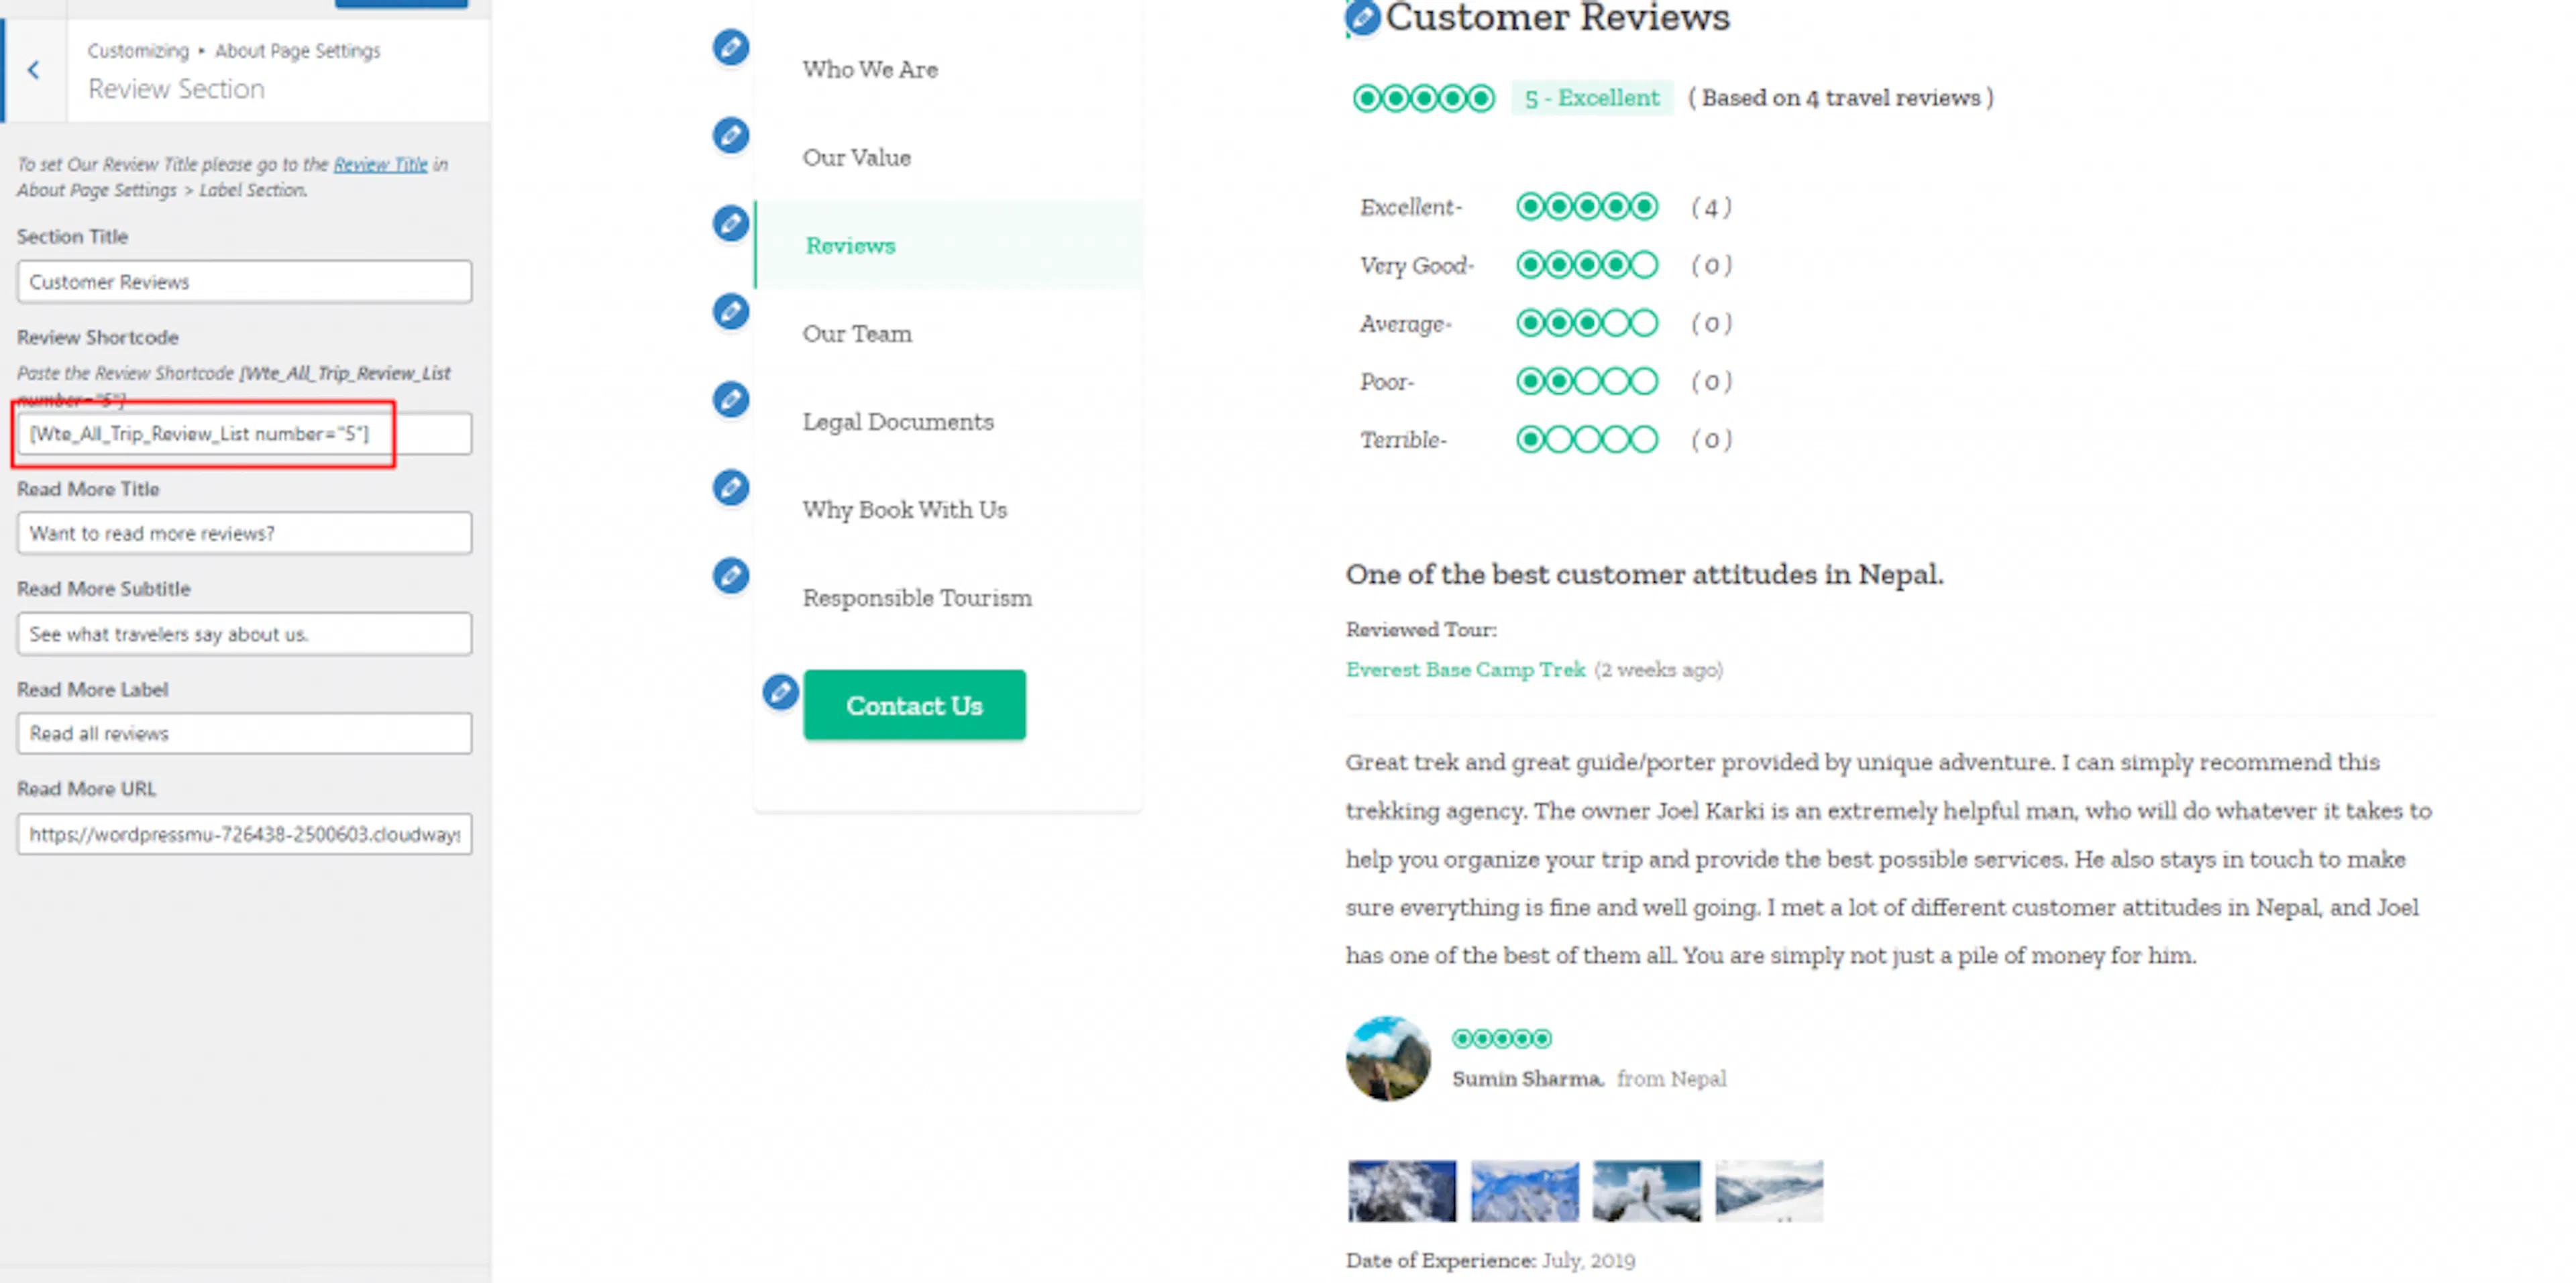
Reviews build trust with people who are comparing tour companies.
This section works with the WP Travel Engine Trip Reviews addon.
Add reviews to the About page
Open Review Section. Enter the section title and add the Trip Reviews shortcode. A shortcode is a small piece of text in square brackets that WordPress replaces with a feature when it displays a page.
Add the review link
Enter the read more title, subtitle, label, and URL. Click Publish.
Team section
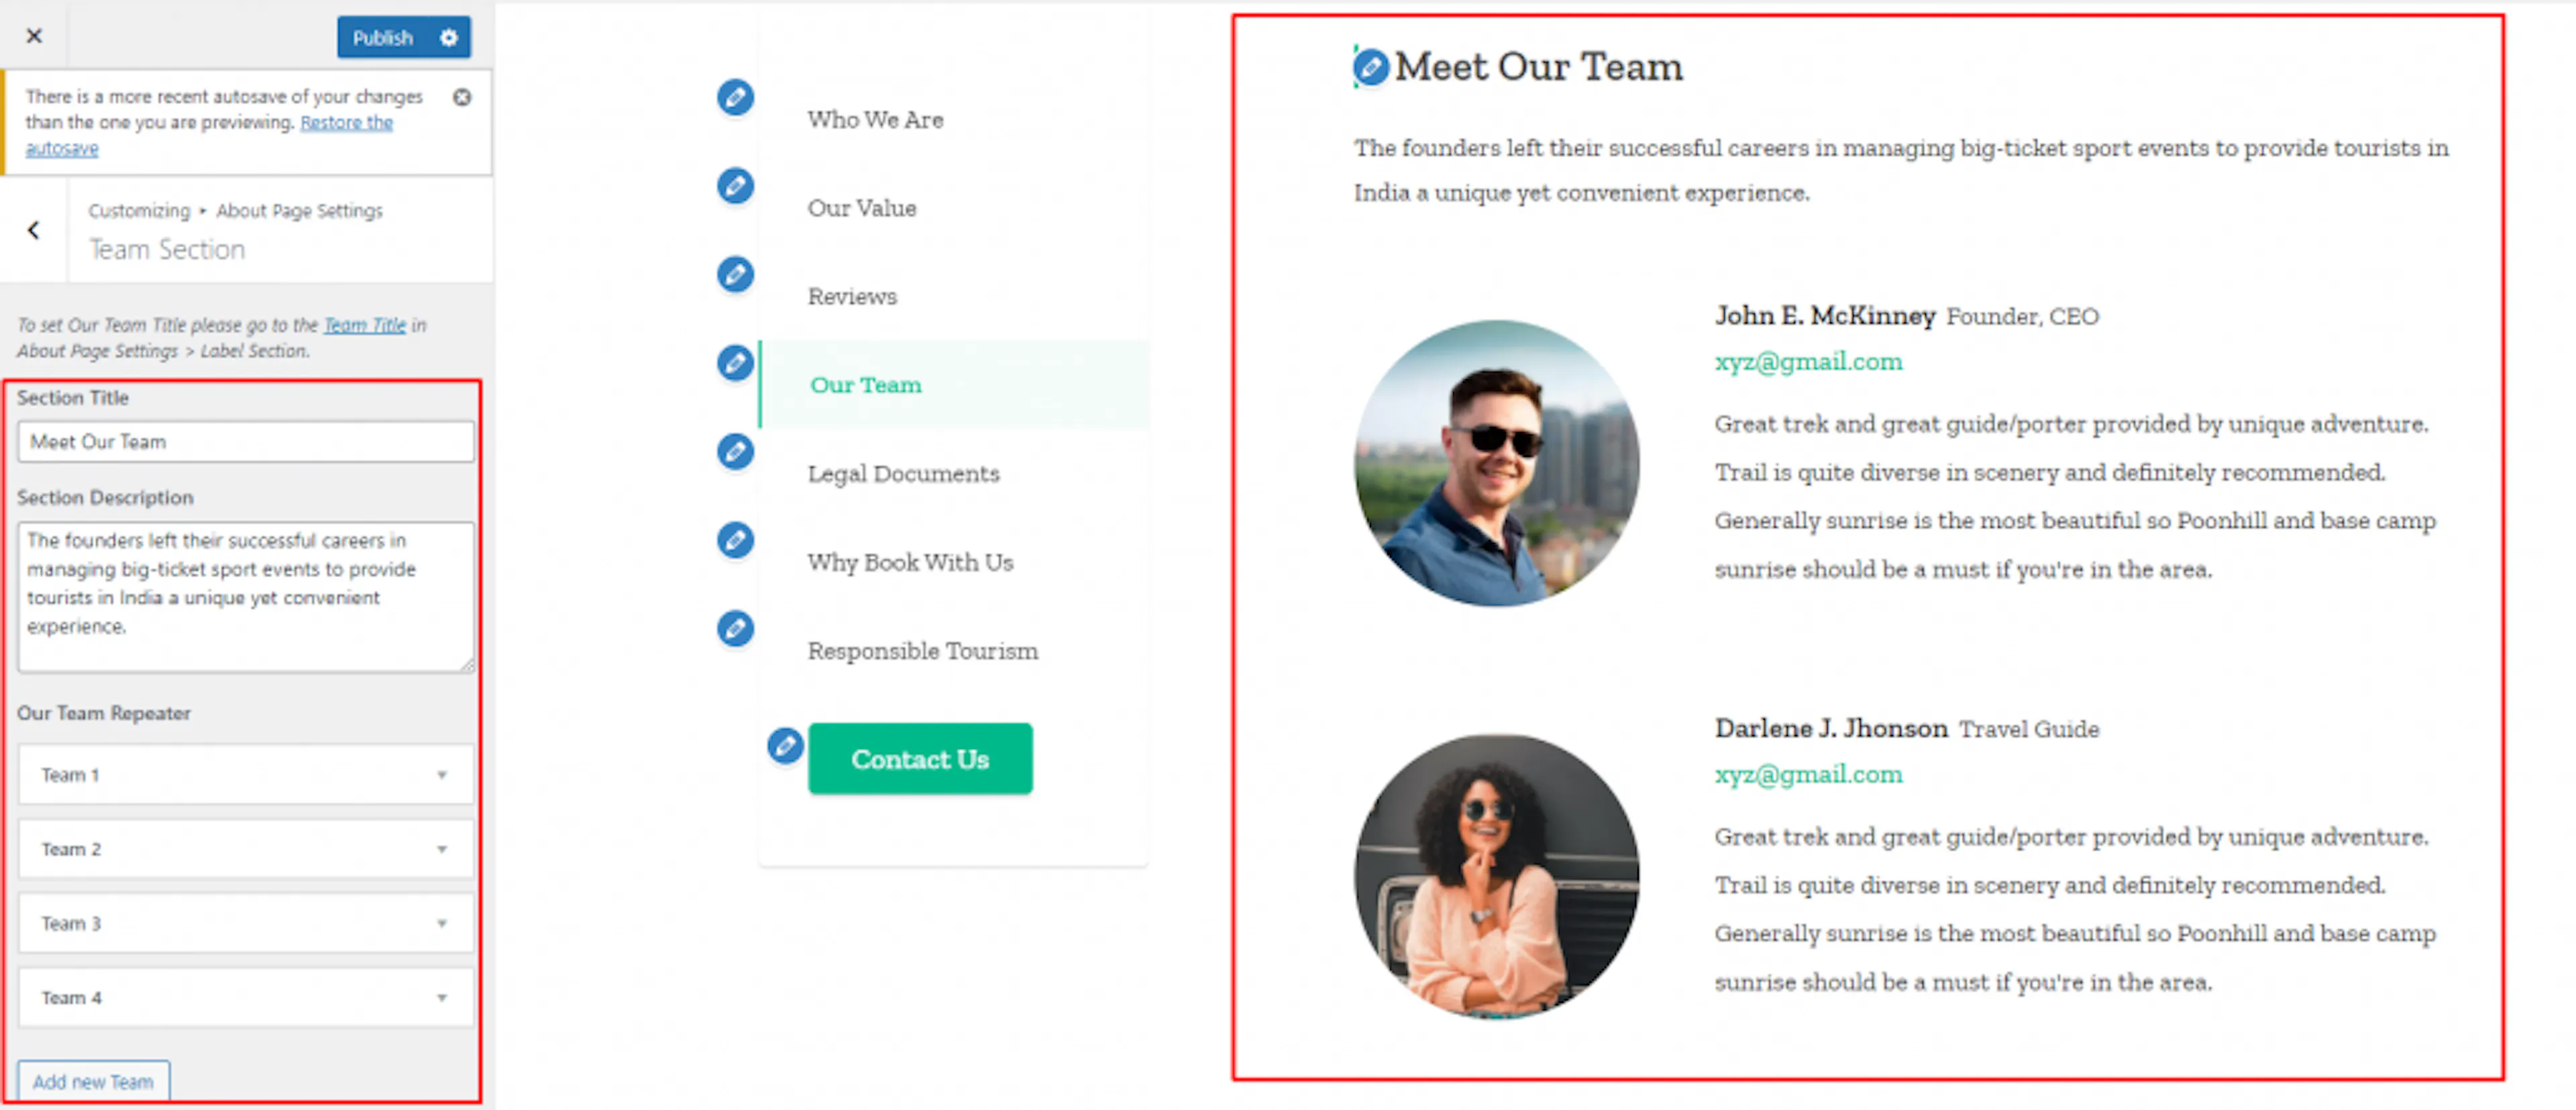
Introduce the people travelers will speak with before and during a trip.
Add team members
Open Team Section. Enter the section title and description. Click Add new Team and enter each member's name, designation, email, description, and image. Click Publish.
Legal documents section
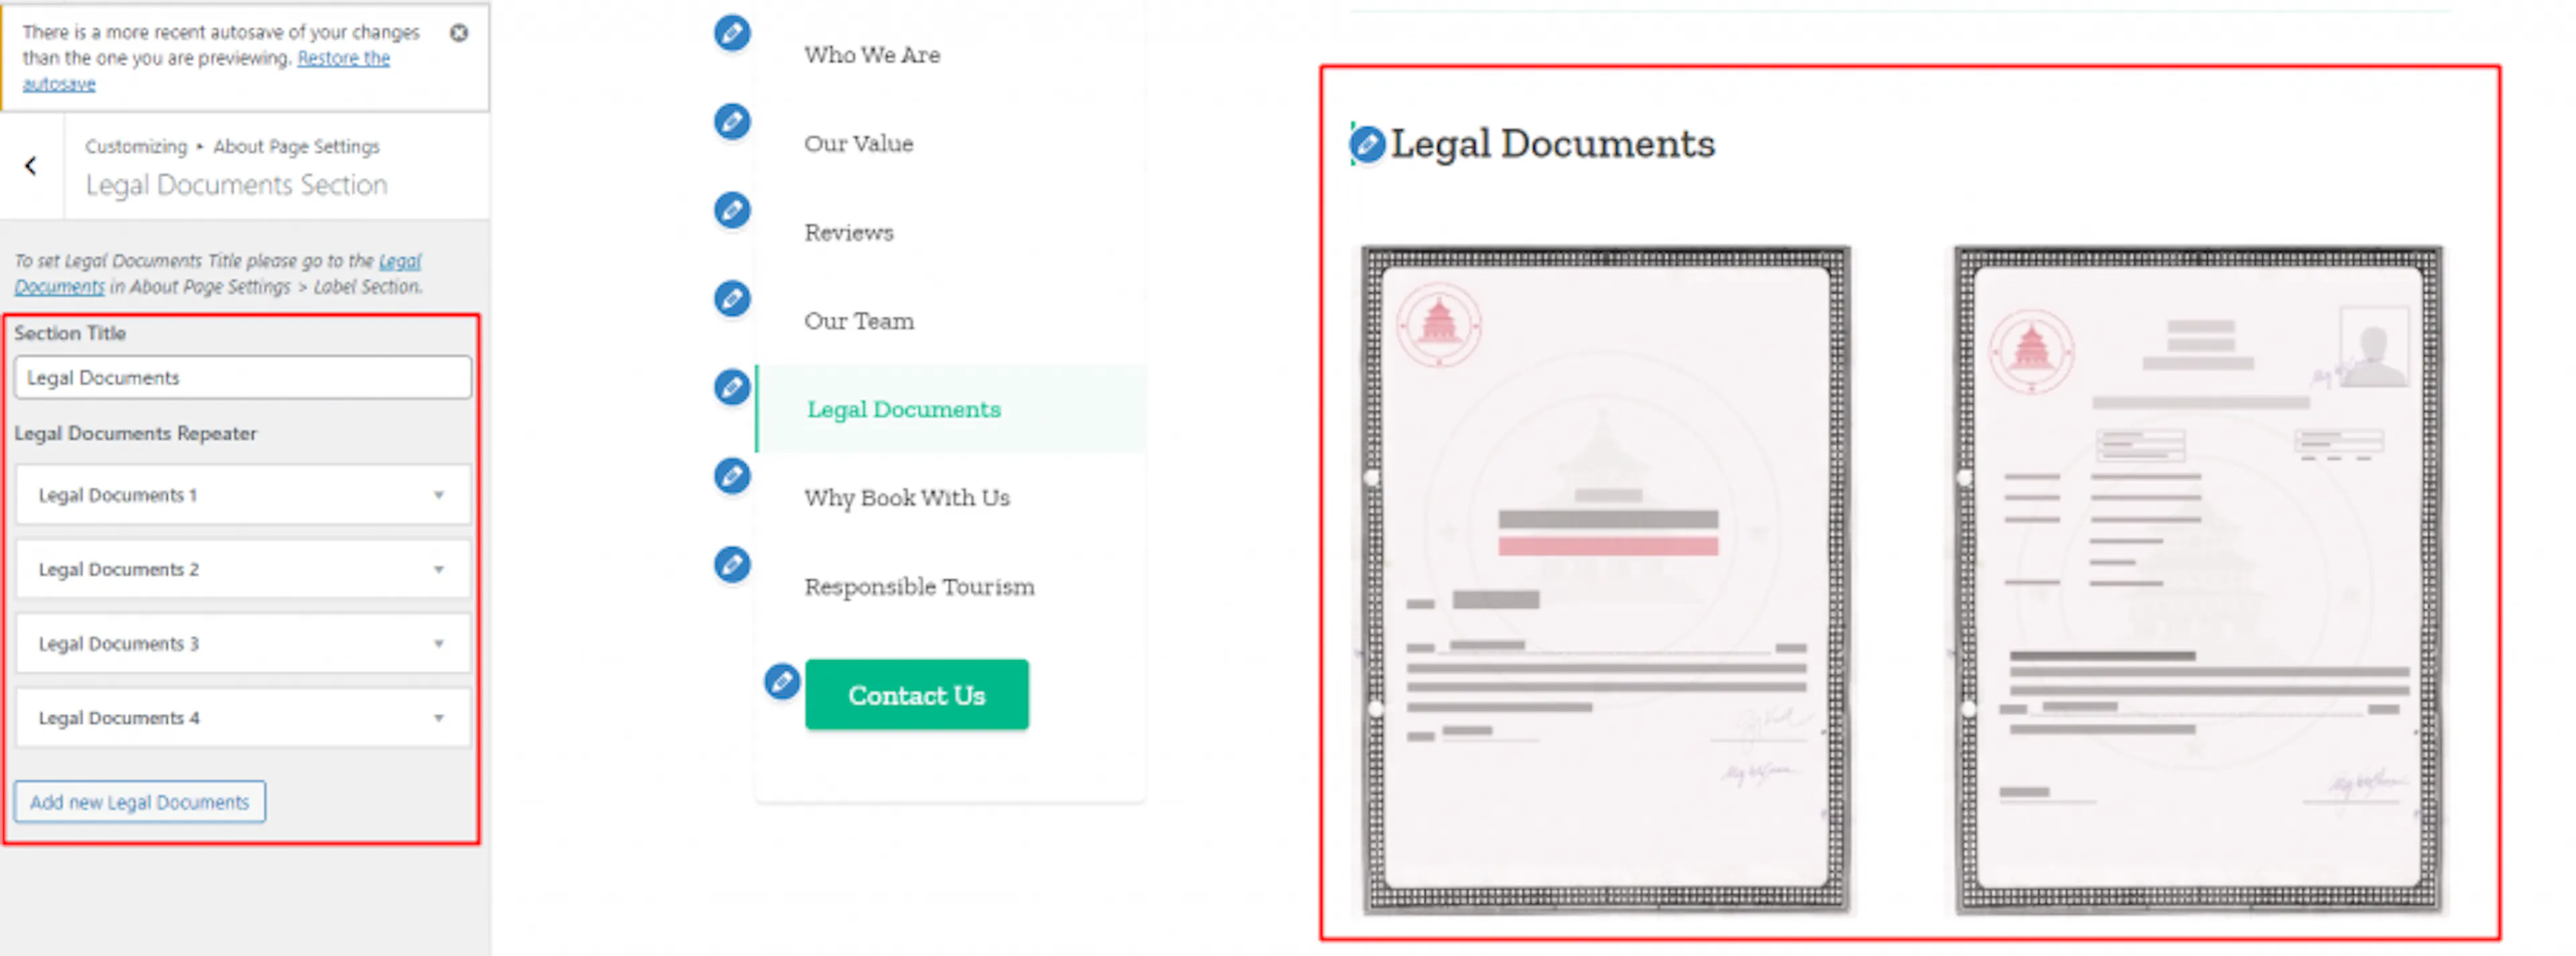
Use this section to show licenses, registration documents, or other trust information.
Add legal documents
Open Legal Documents Section. Enter the section title. Click Add new Legal Documents and upload an image for each document. Click Publish.
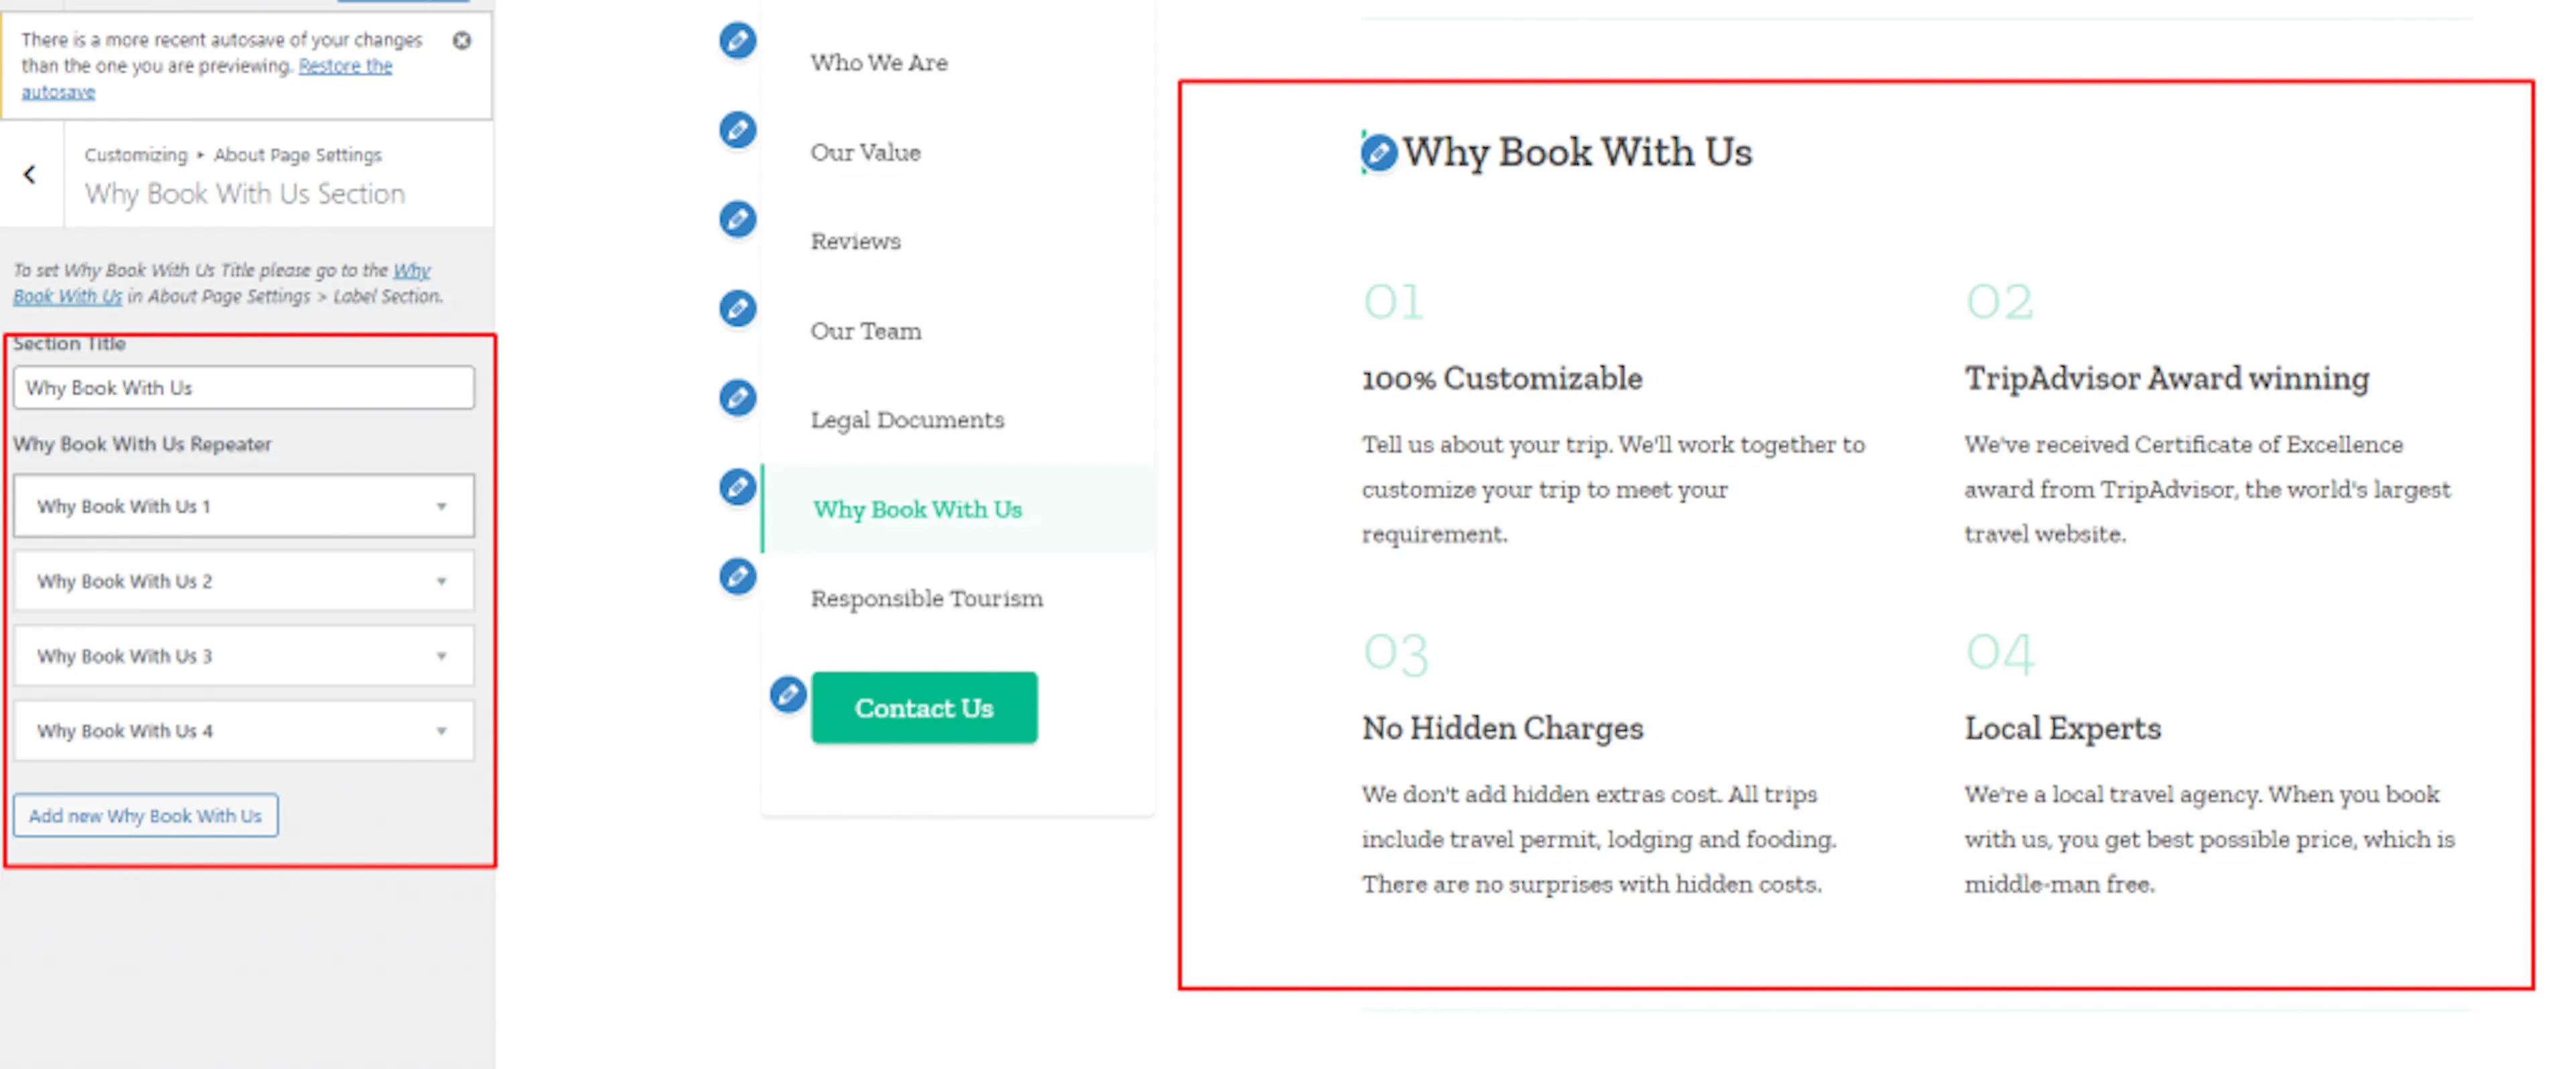
Why book with us section
Explain the practical reasons travelers should choose your company.
Add your reasons
Open Why Book With Us Section. Enter the section title. Click Add new Why Book With Us and add a number, title, and description for each reason. Click Publish.
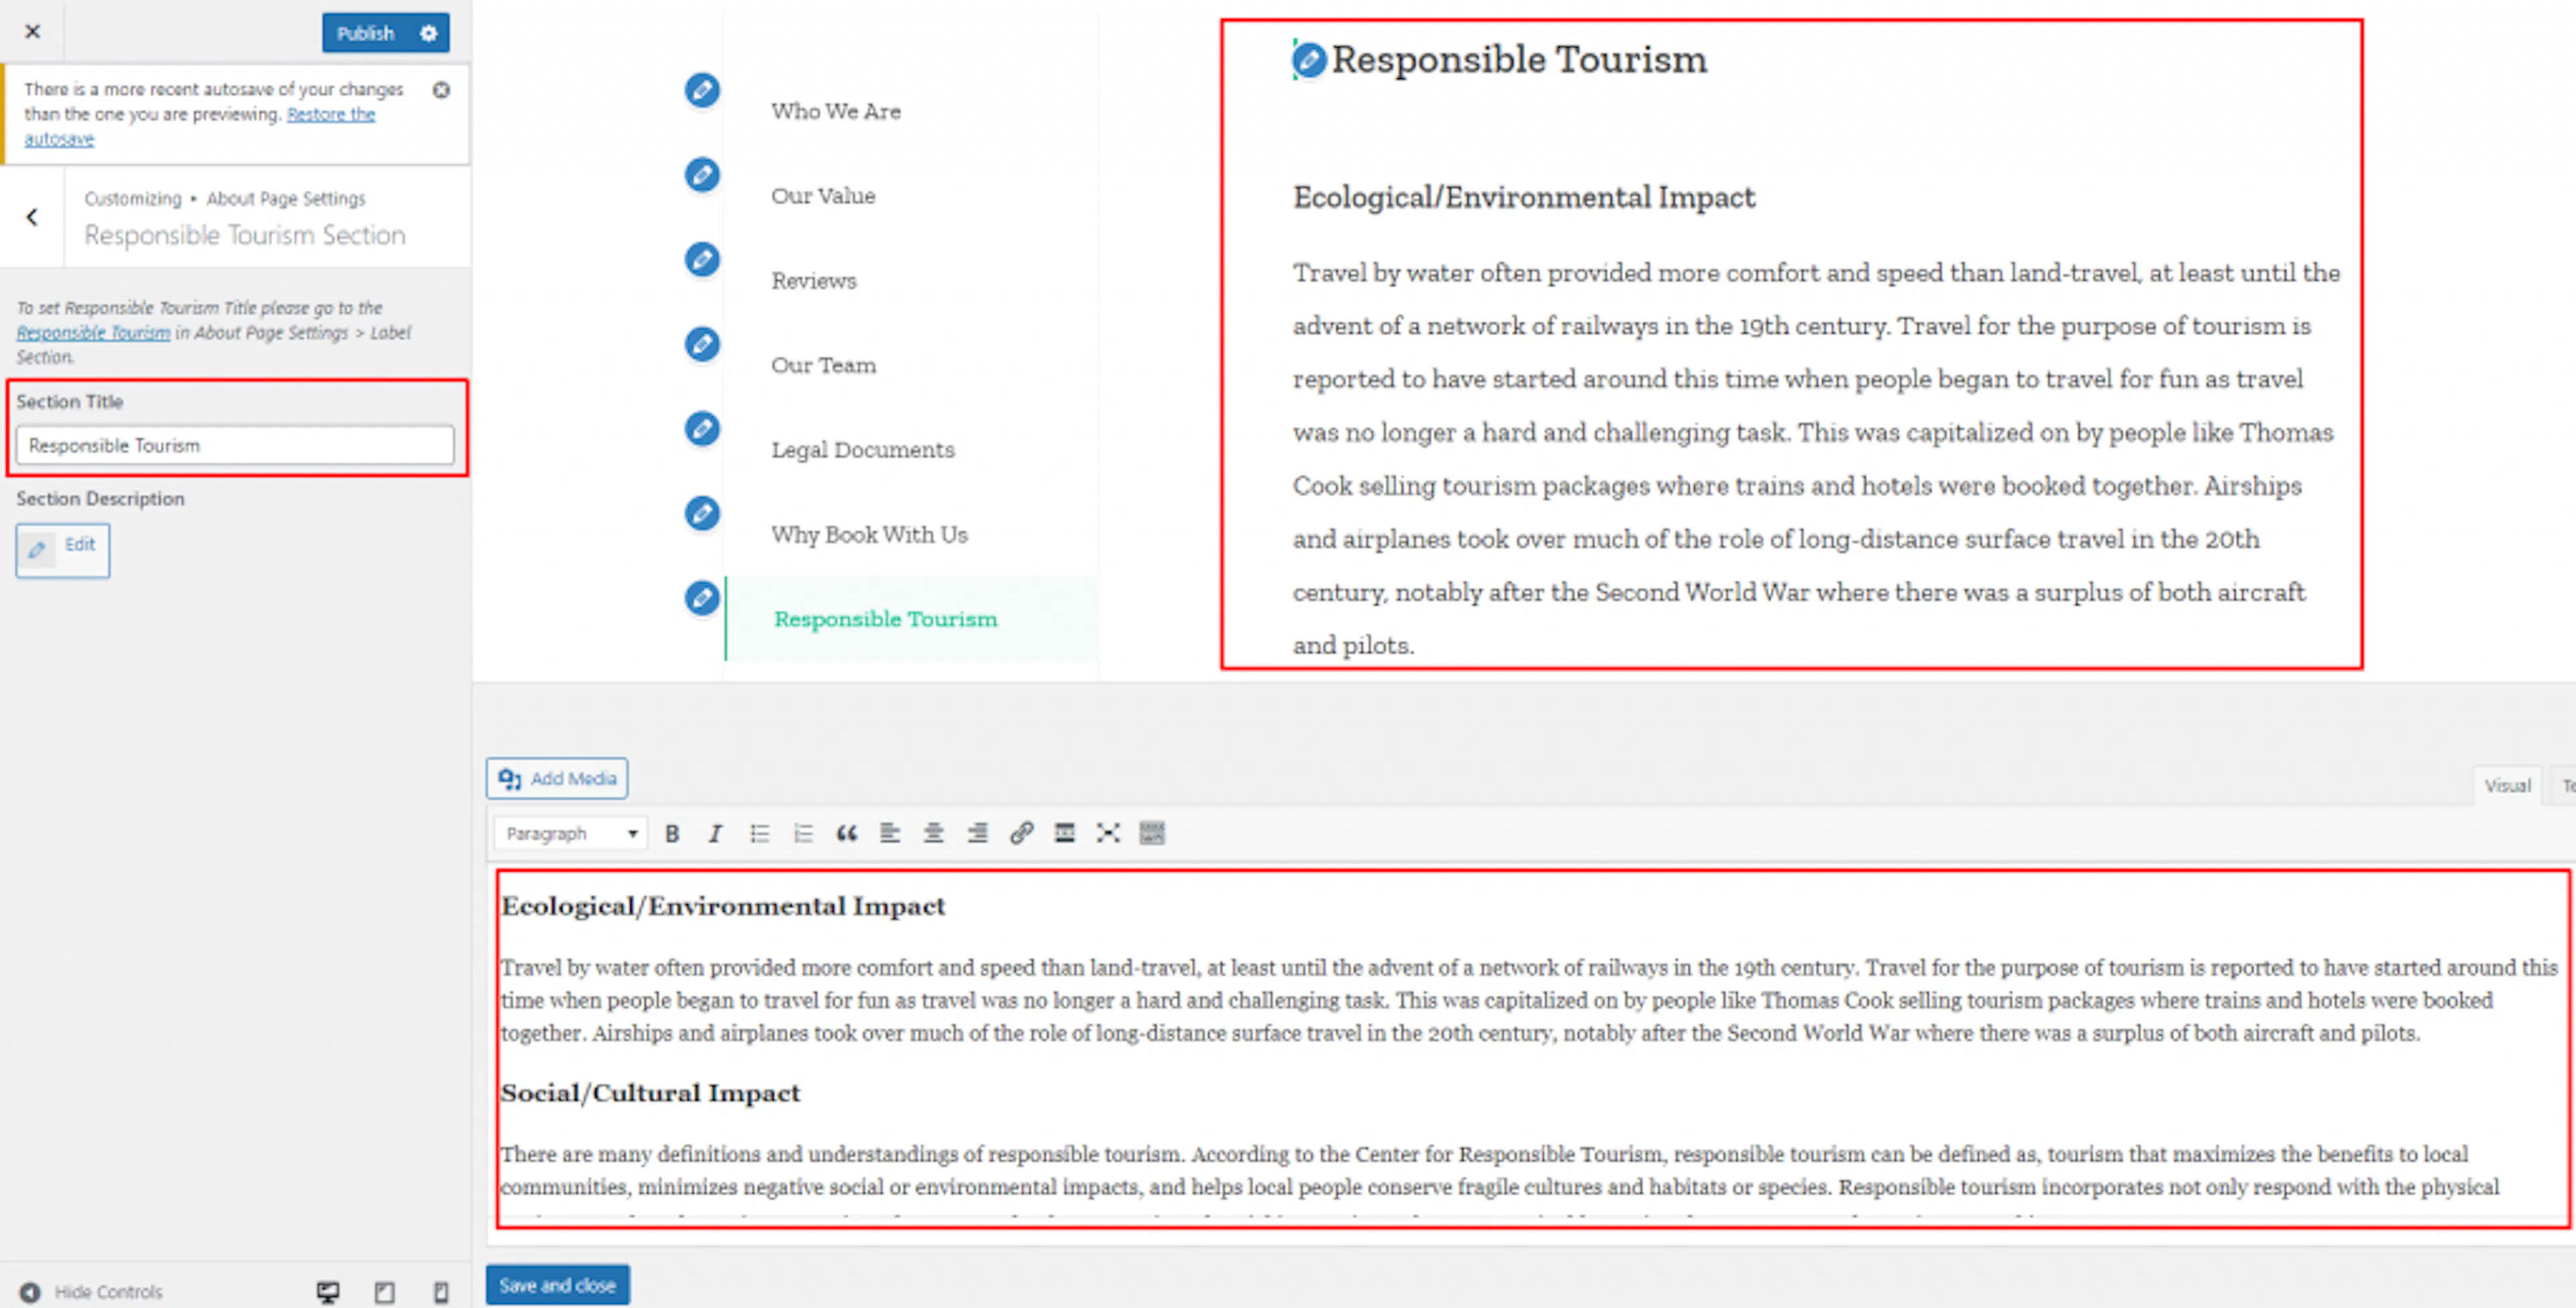
Responsible tourism section
Use this section to explain how your tours support local communities and protect the places you visit.
Add your responsible tourism message
Open Responsible Tourism Section. Enter the section title and description, then click Publish.
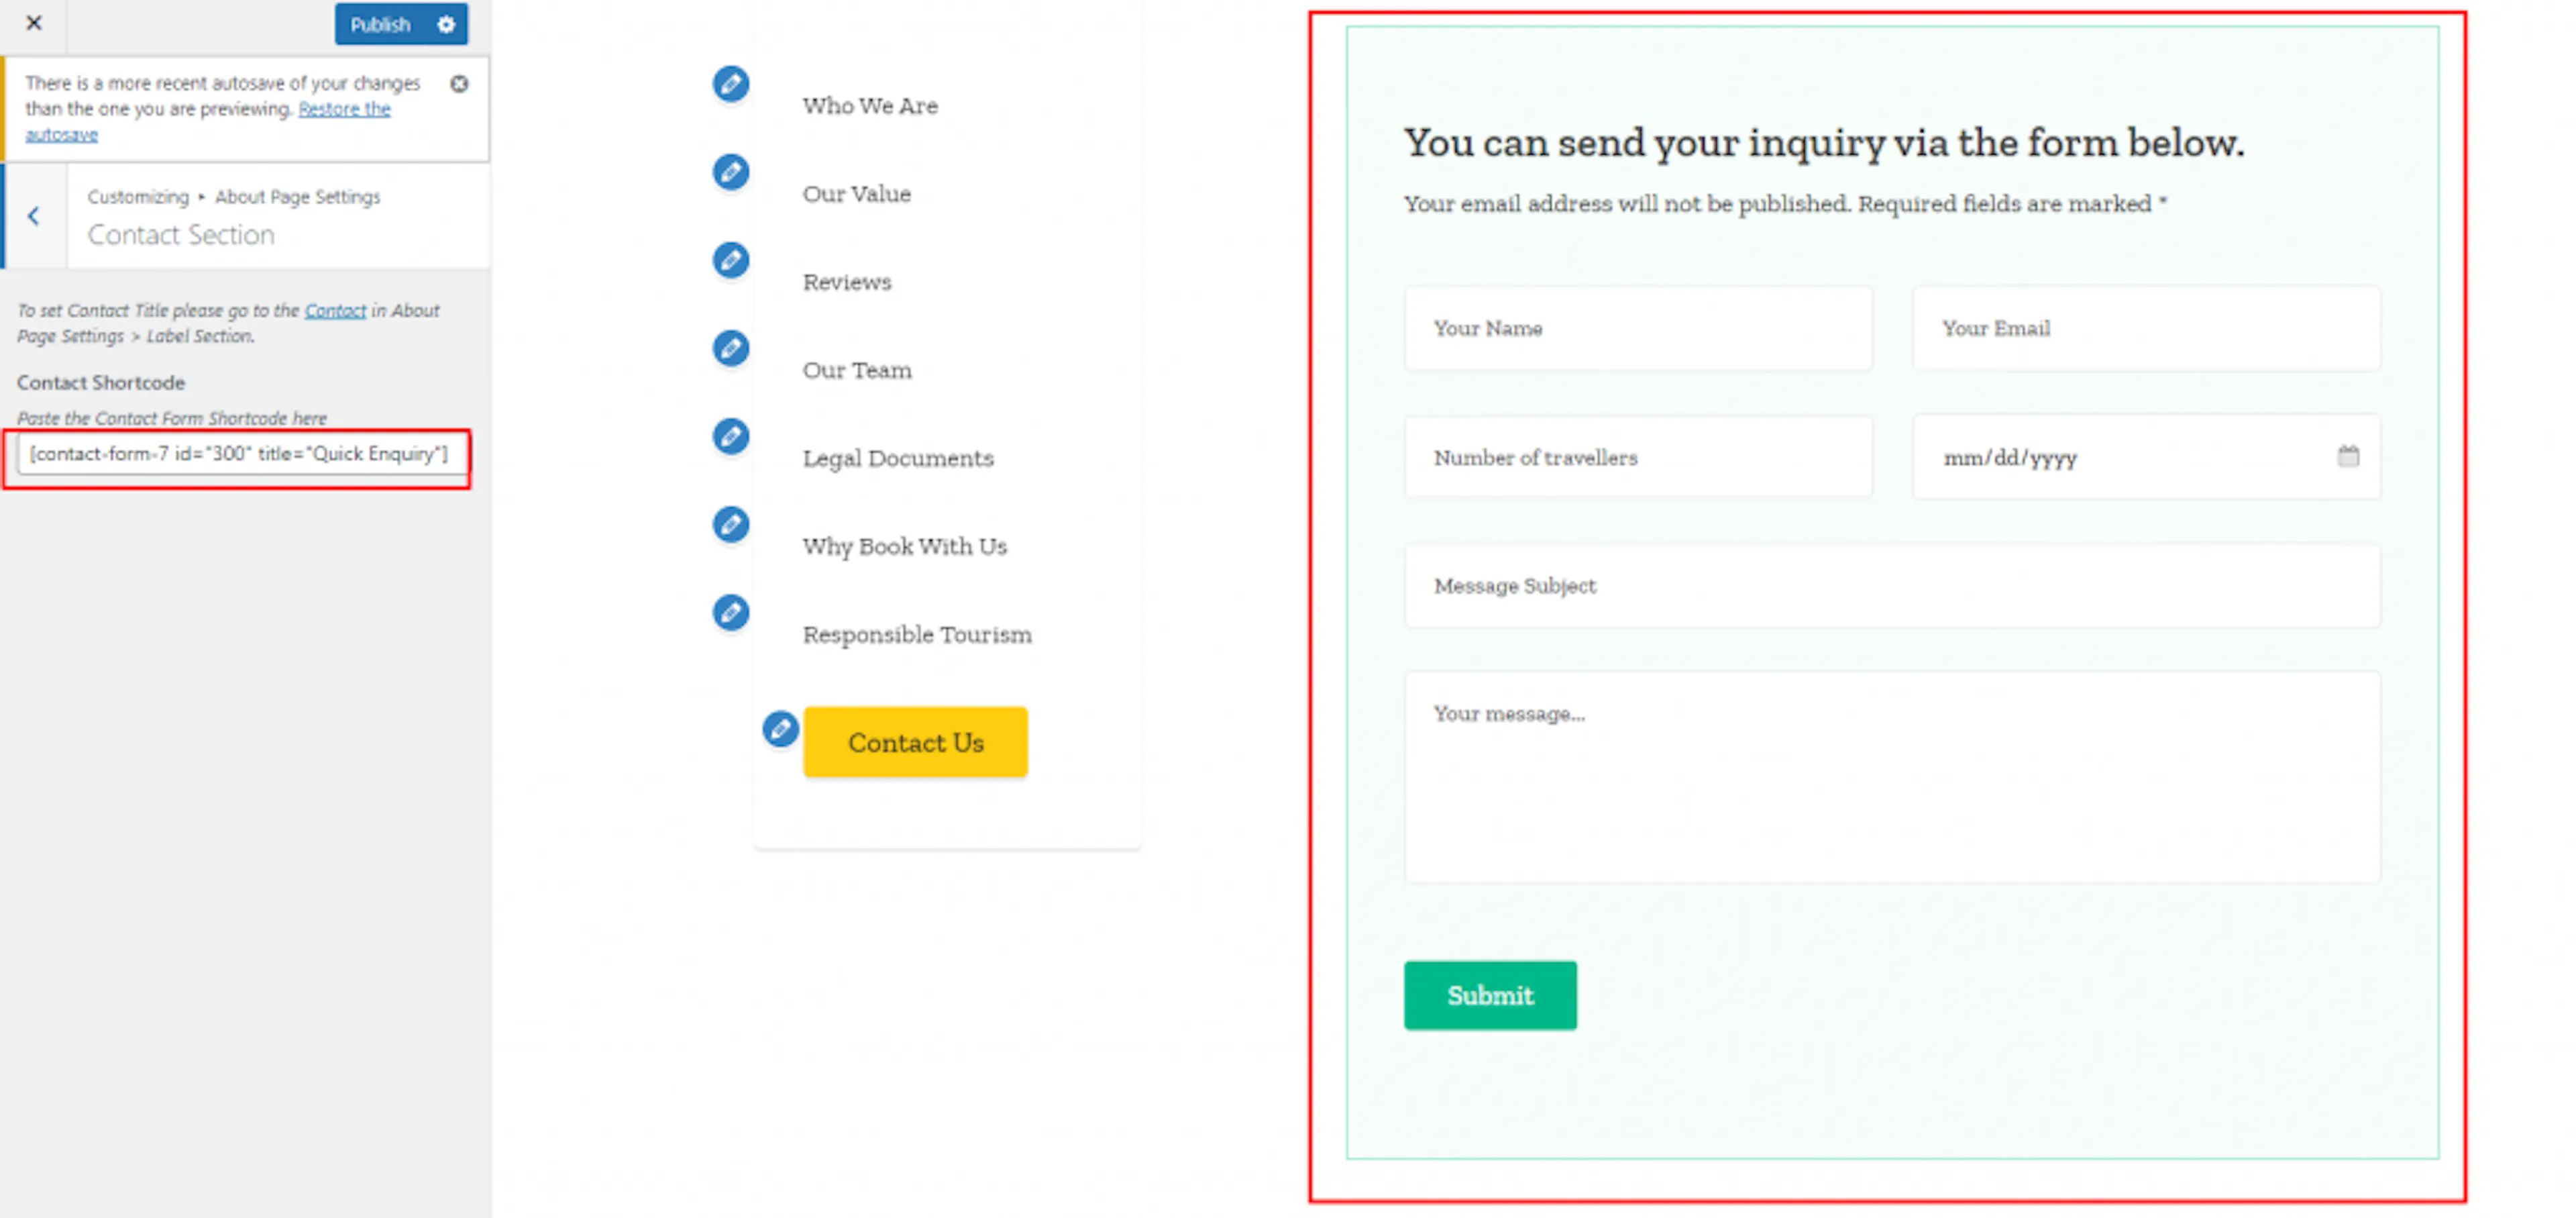
Contact section
Add a contact form to the About page so visitors can ask questions after reading about your company.
This section is compatible with the Contact Form 7 plugin.
Add a contact form
Open Contact Section. Enter the contact shortcode and click Publish.
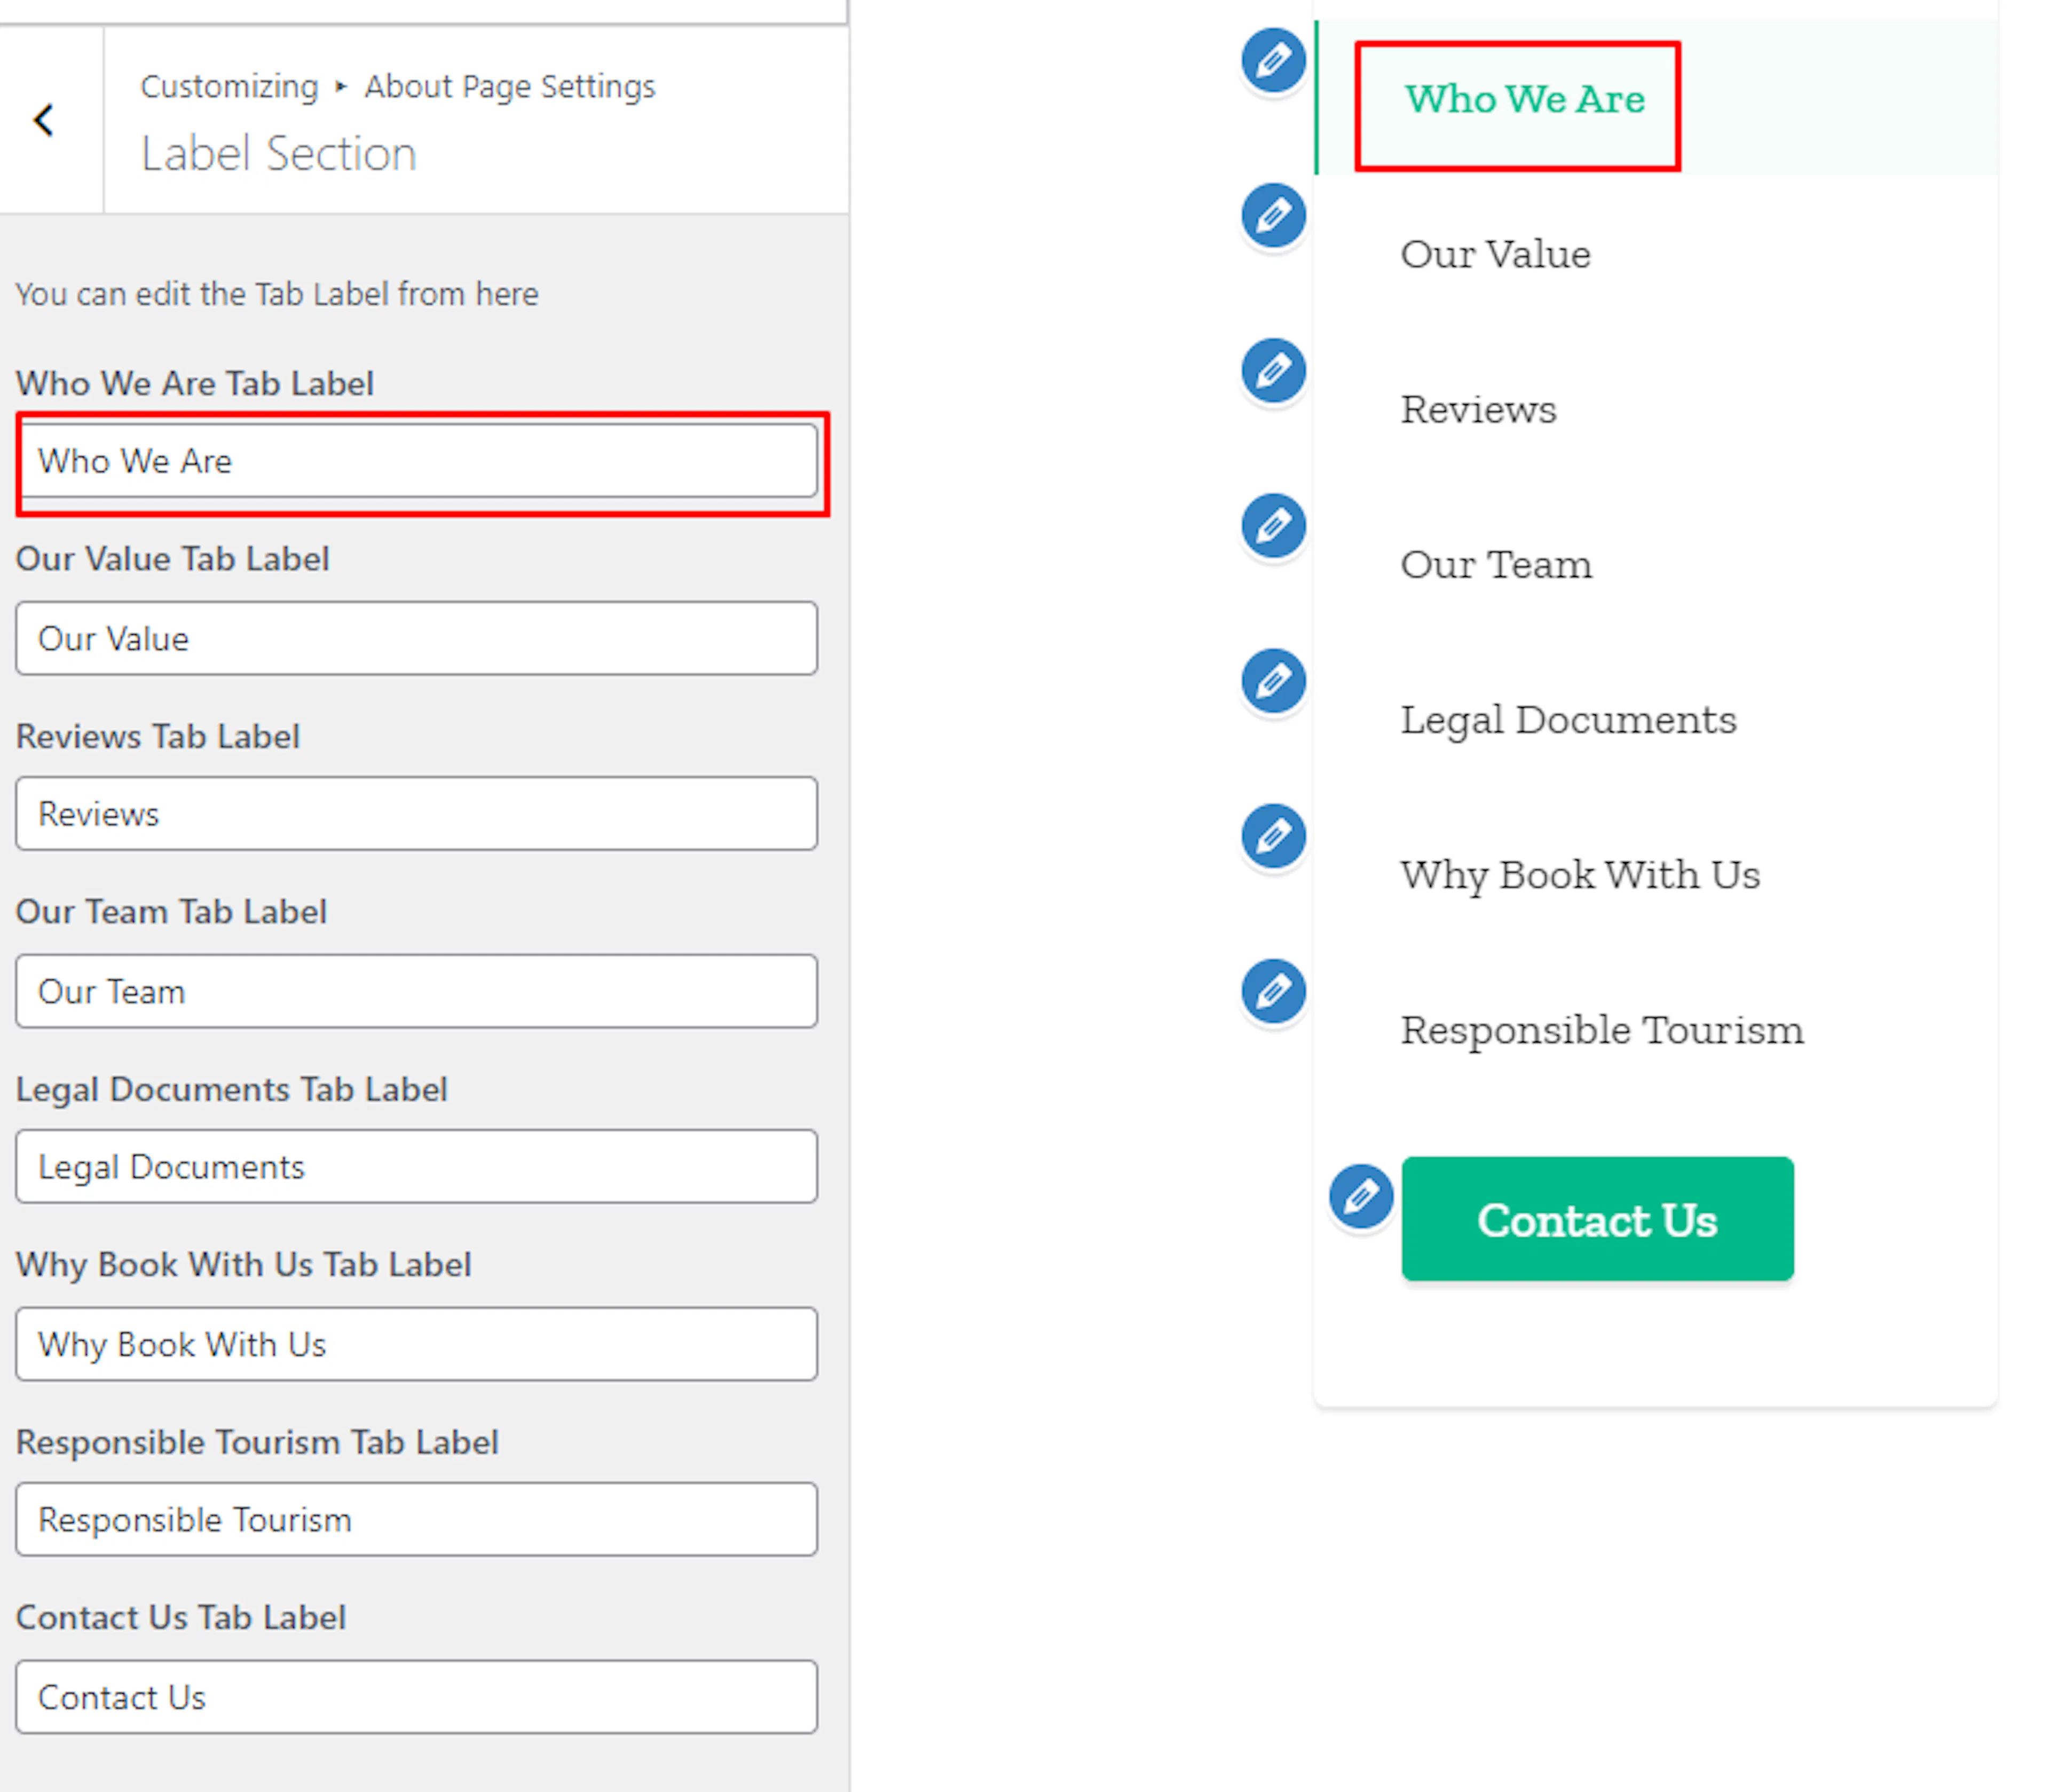
Label section
Change the labels shown on the About page tabs.
Change tab labels
Open Label Section. Set the label for each tab, then click Publish.
Your About page now tells visitors who you are and why they can trust your company.
Contact page settings
Contact page settings give visitors your location, contact details, opening hours, and contact form.
Google Map settings
A map helps travelers find your office or meeting point.
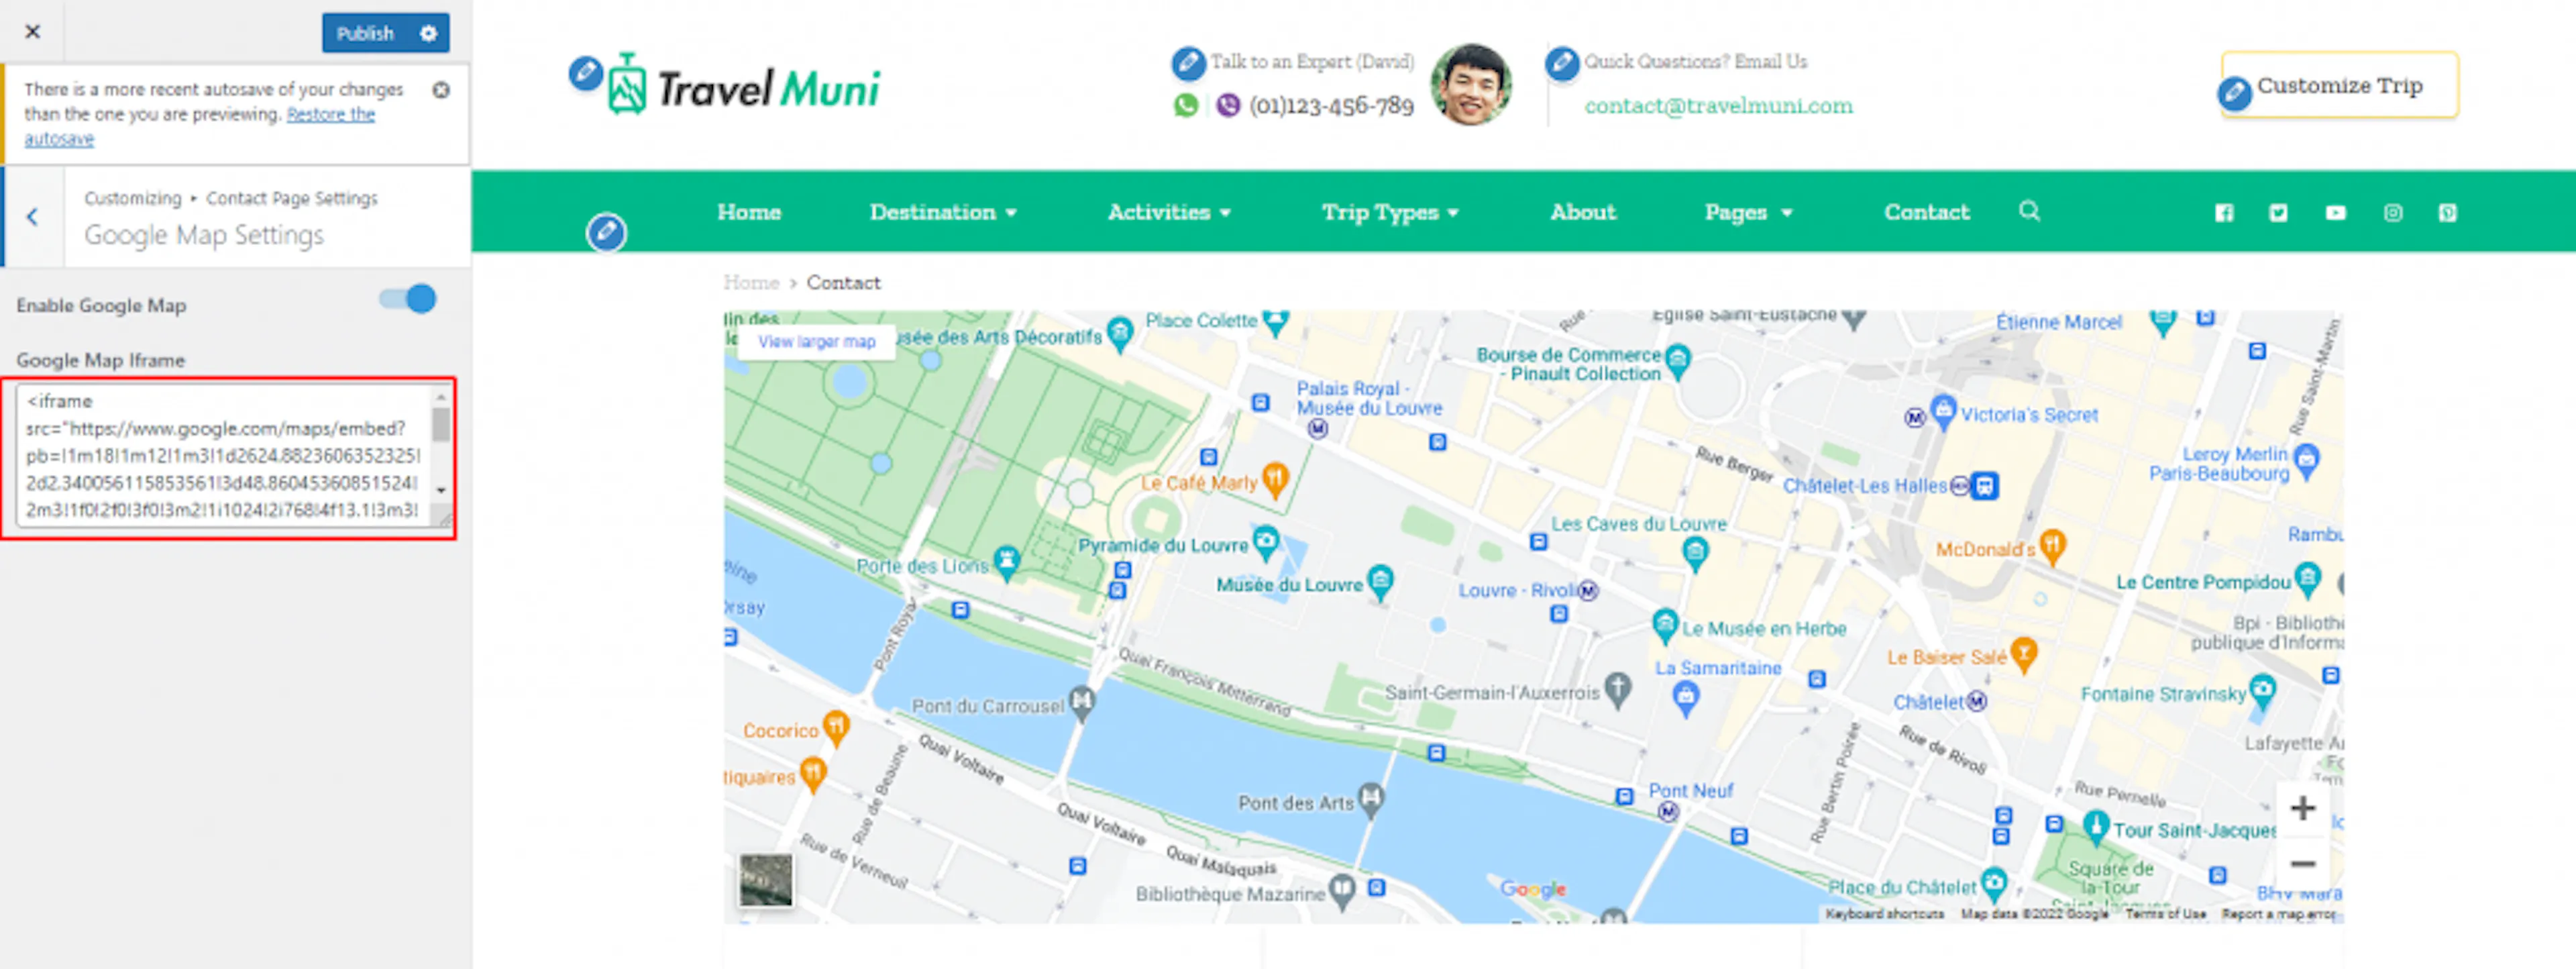
Add your map
Open Contact Page Settings, then Google Map Settings. Enable or disable the map section. Add the Google Map iframe for your location, then click Publish.
Contact details settings
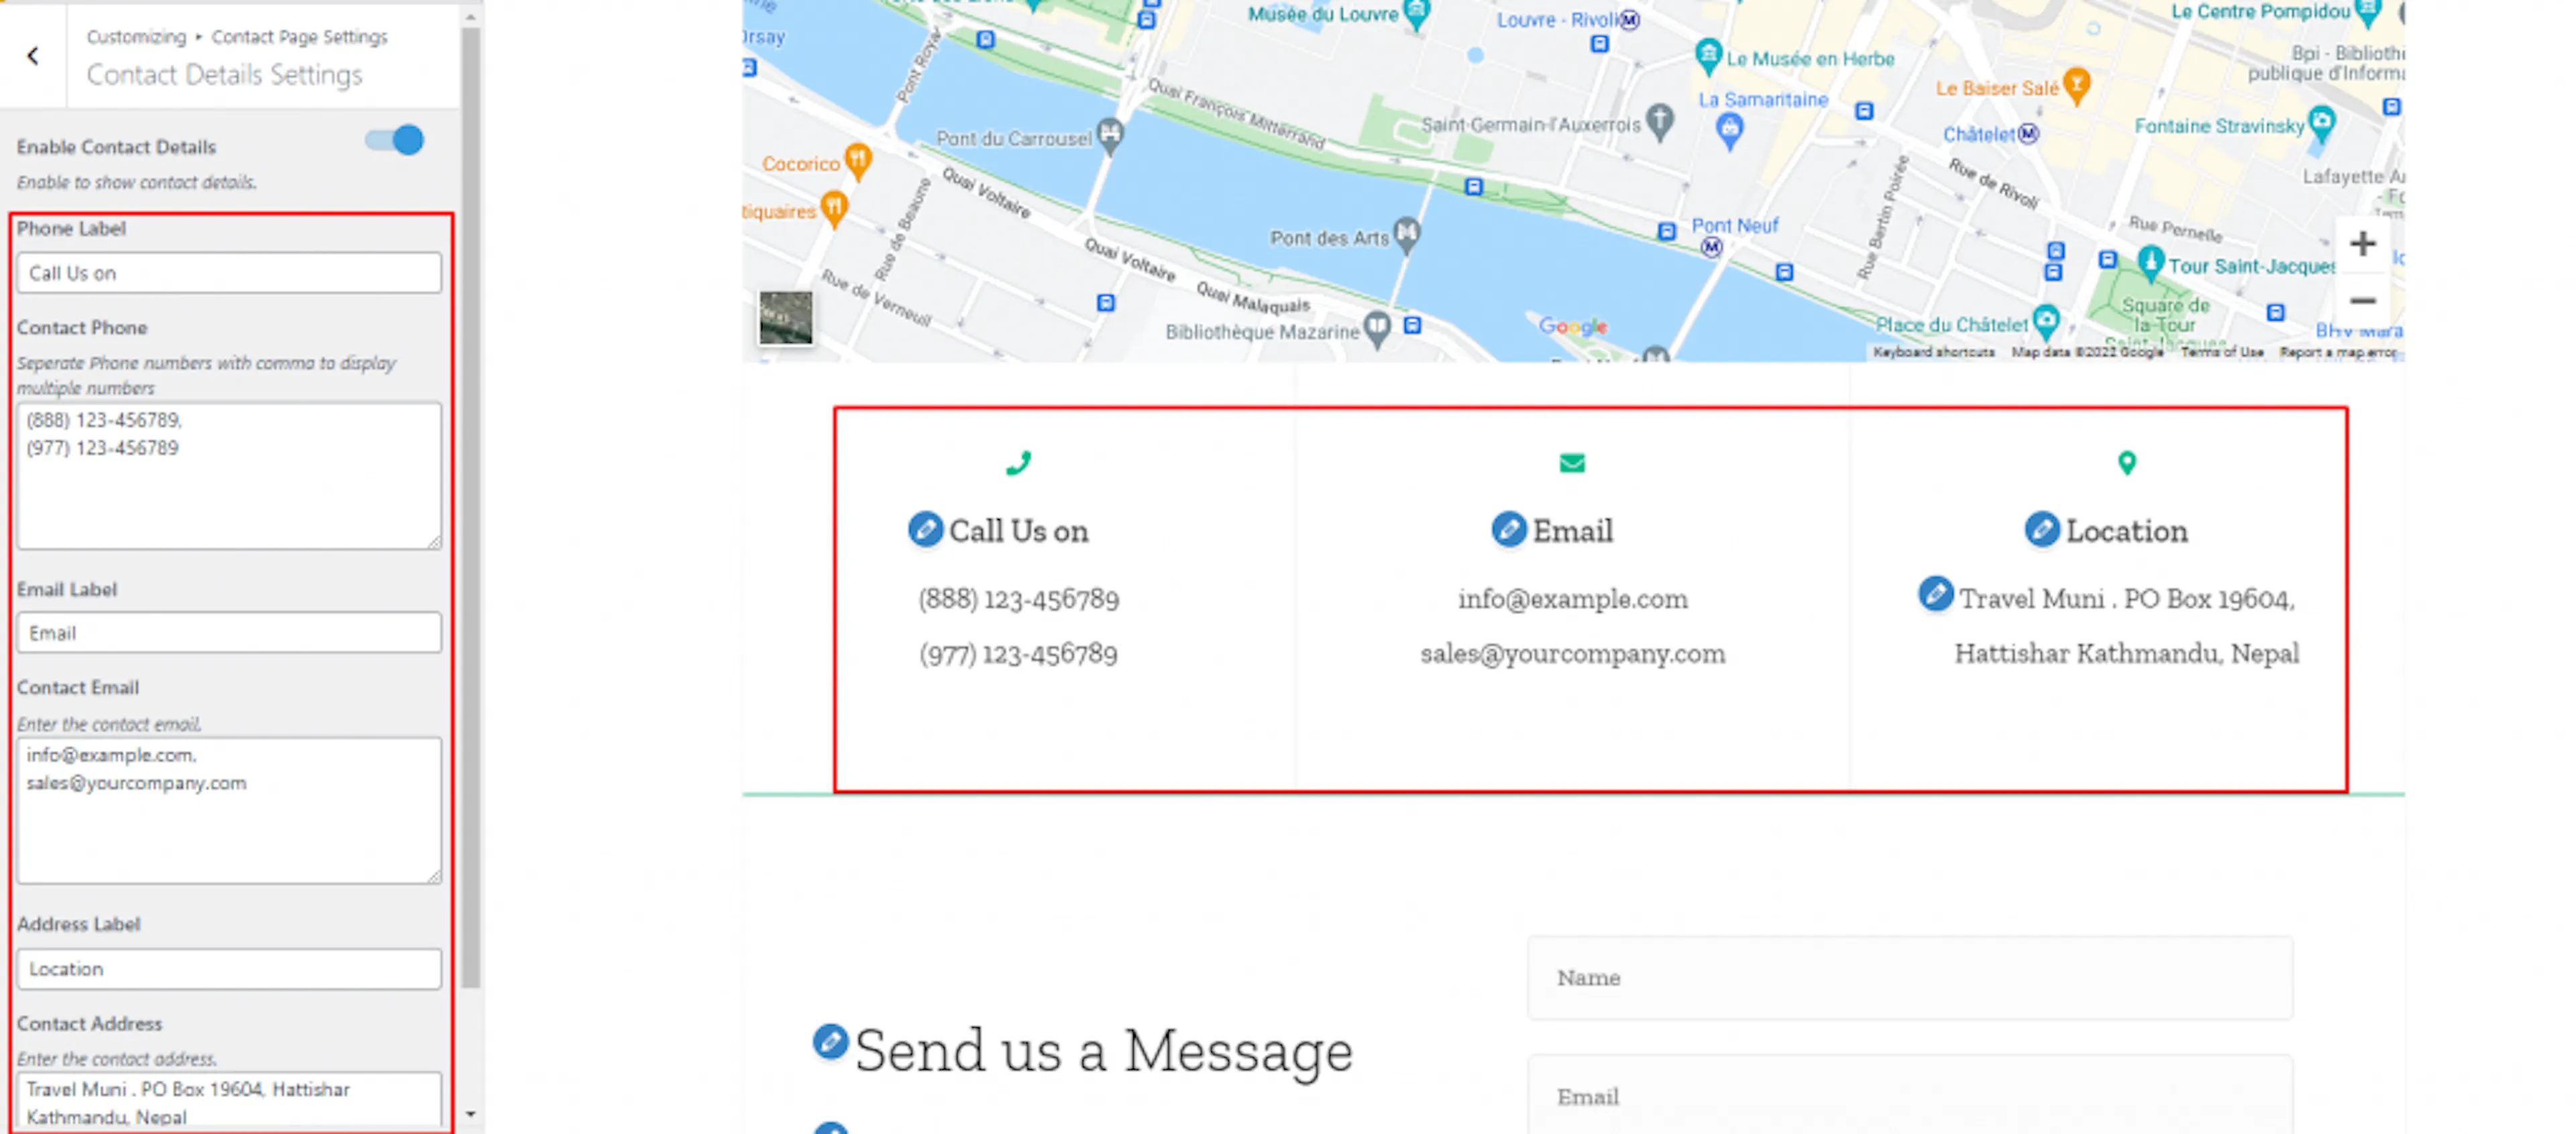
Show the phone number, email address, and physical address travelers can use to reach you.
Add contact details
Open Contact Details Settings. Enable or disable the Contact Details section. Enter the phone label and number, email label and address, and address label and contact address. Click Publish.
Contact form settings
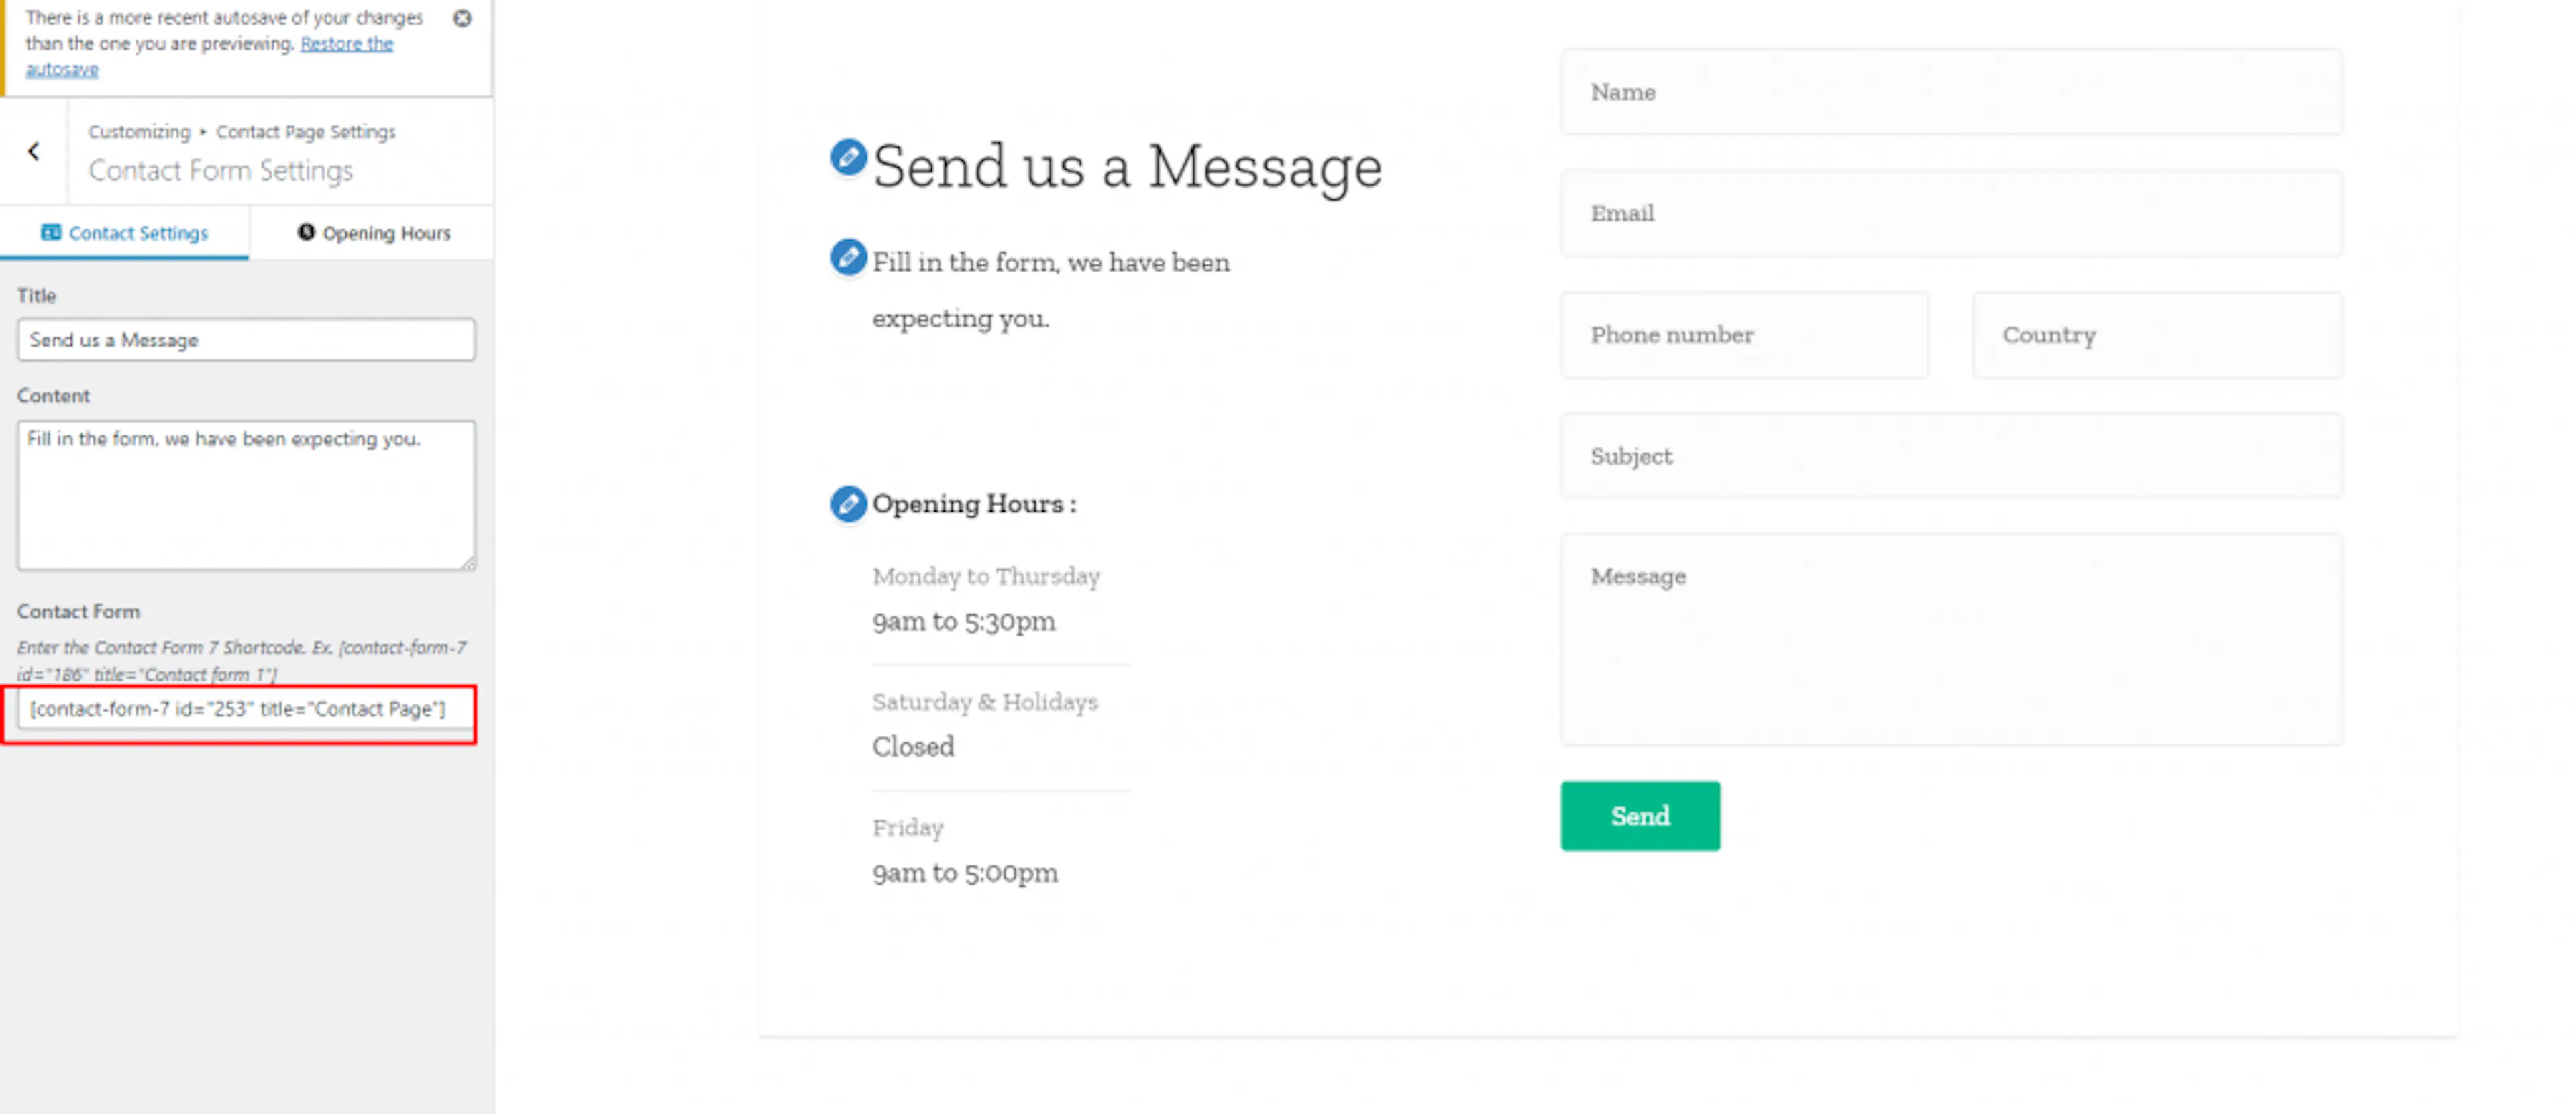
A contact form gives travelers a way to ask about dates, group sizes, and special requests.
Create and activate a Contact Form 7 form before you add its shortcode here.
Configure the contact form tab
Open Contact Form Settings and stay on the Contact Settings tab. Enter the title and content, then add the Contact Form 7 shortcode.
Add opening hours
Open the Opening Hours tab. Enter the opening hours label and hours, then click Publish.
Your Contact page now gives travelers the information they need to reach you.
Trip page settings
Trip page settings control the call-to-action areas, related trips, booking tools, and trip archive description.
You must be viewing a single trip page to customize the trip page sections.
CTA settings
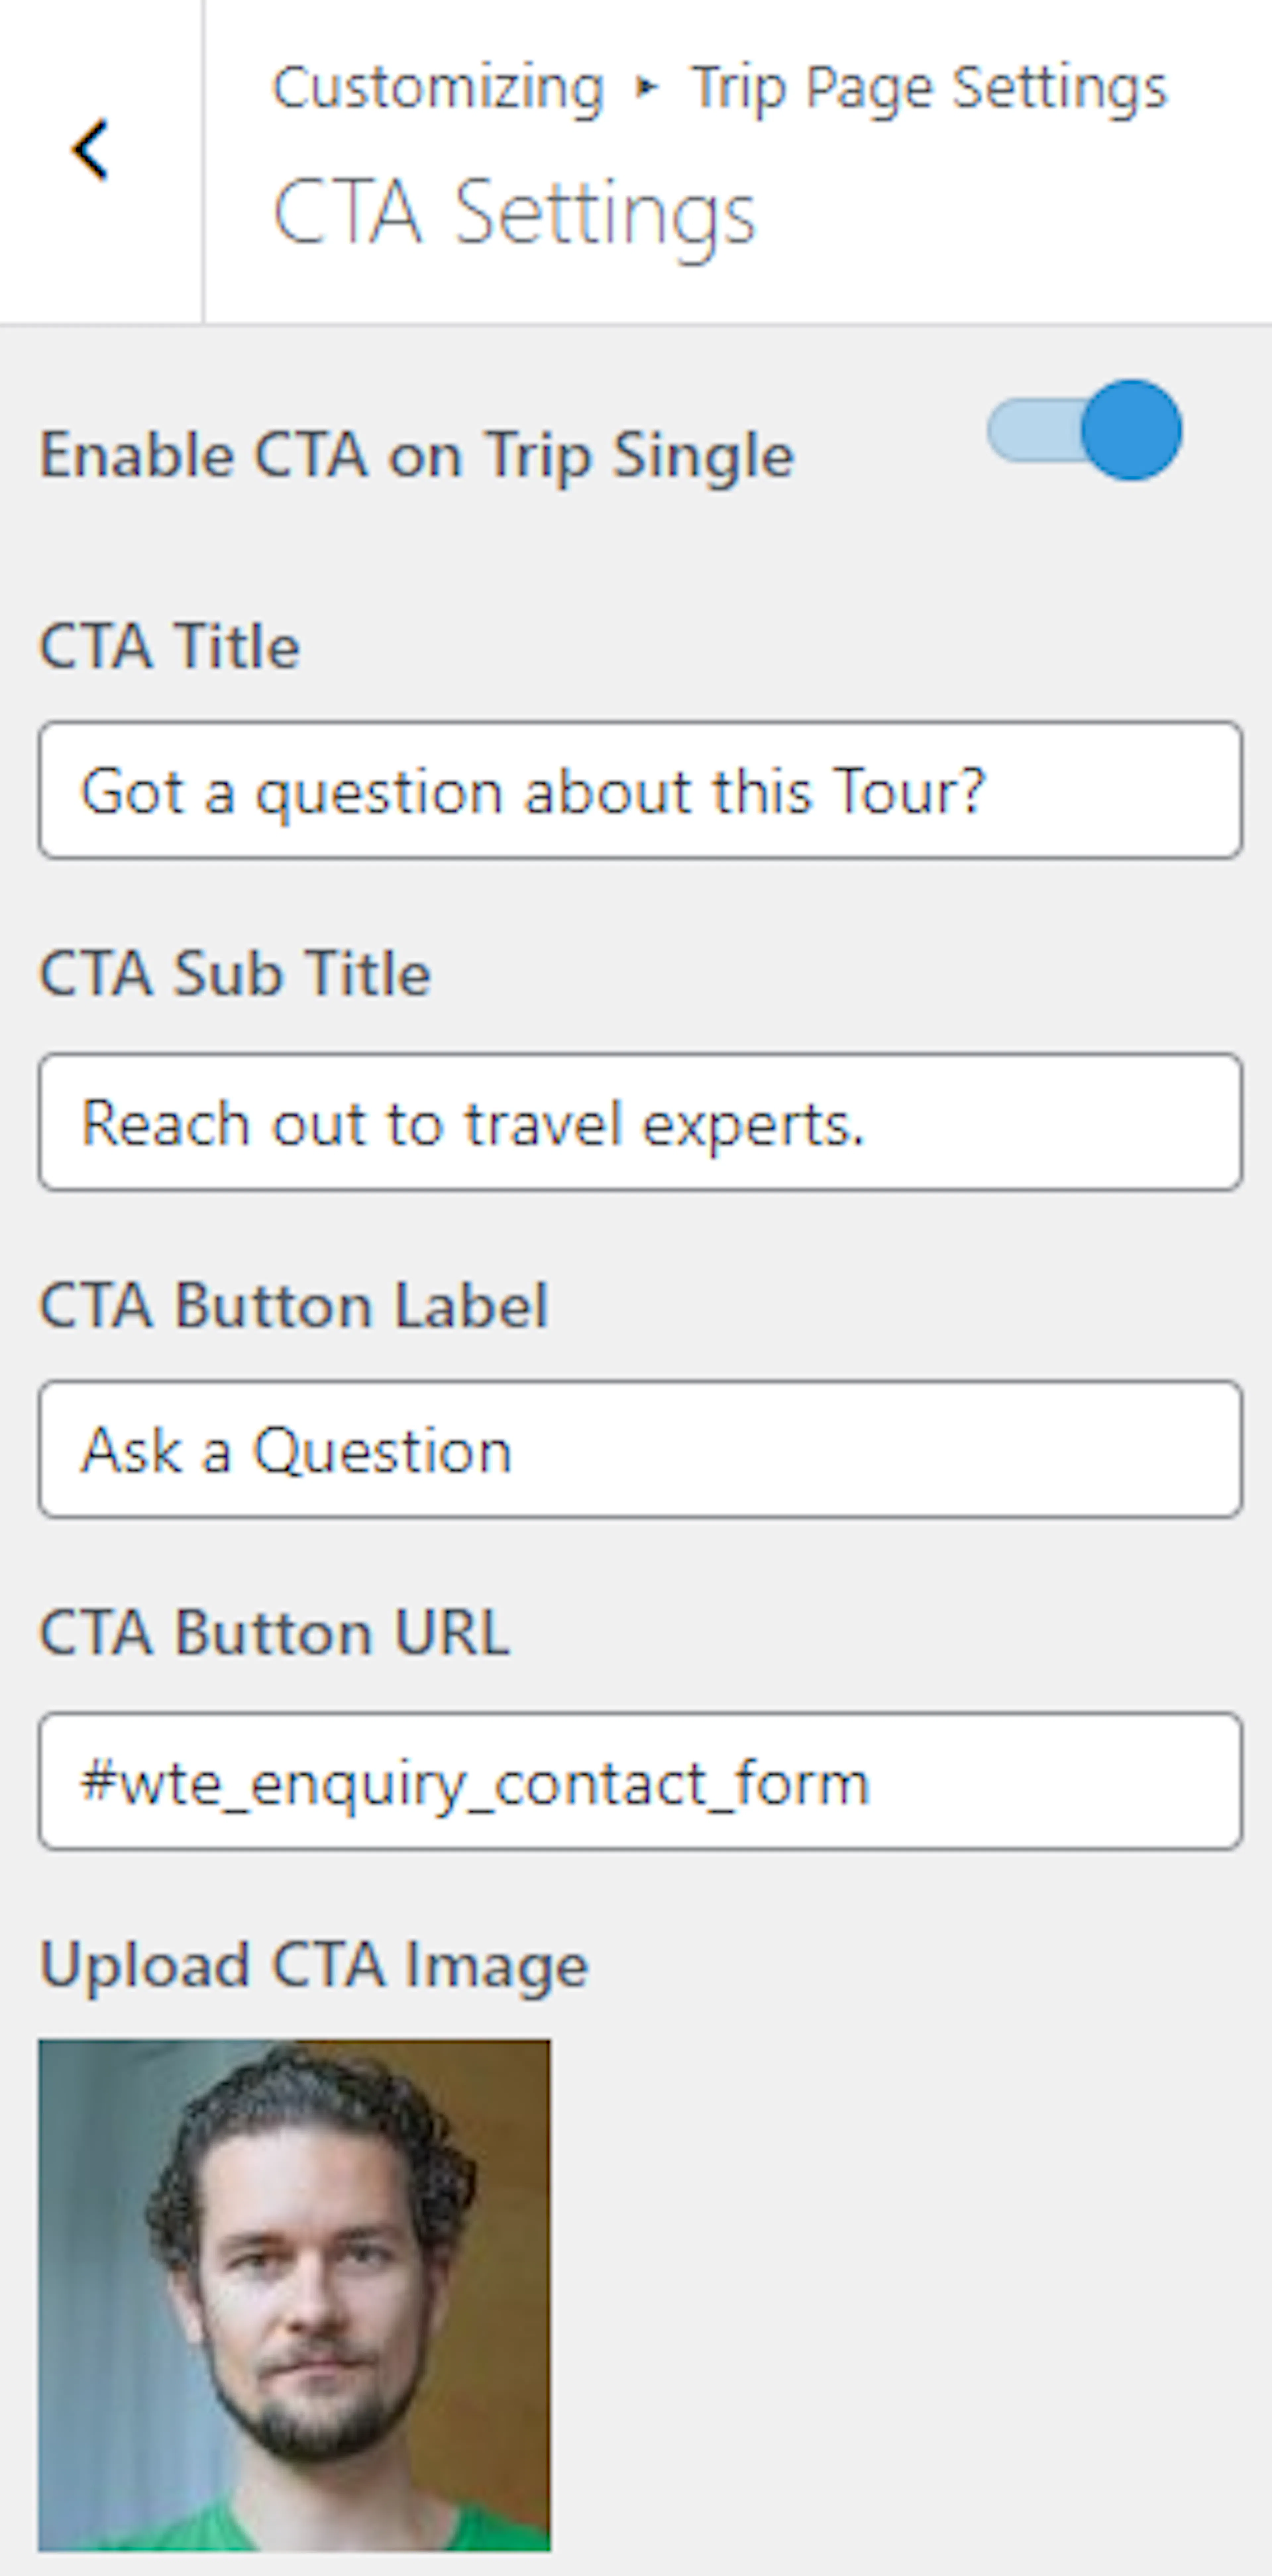
The trip CTA encourages visitors to contact you or continue toward booking.
Configure the trip CTA
Open Trip Page Settings, then CTA Settings. Enable or disable the CTA section. Enter the CTA title, subtitle, button label, and button URL. Upload a CTA image, then click Publish.
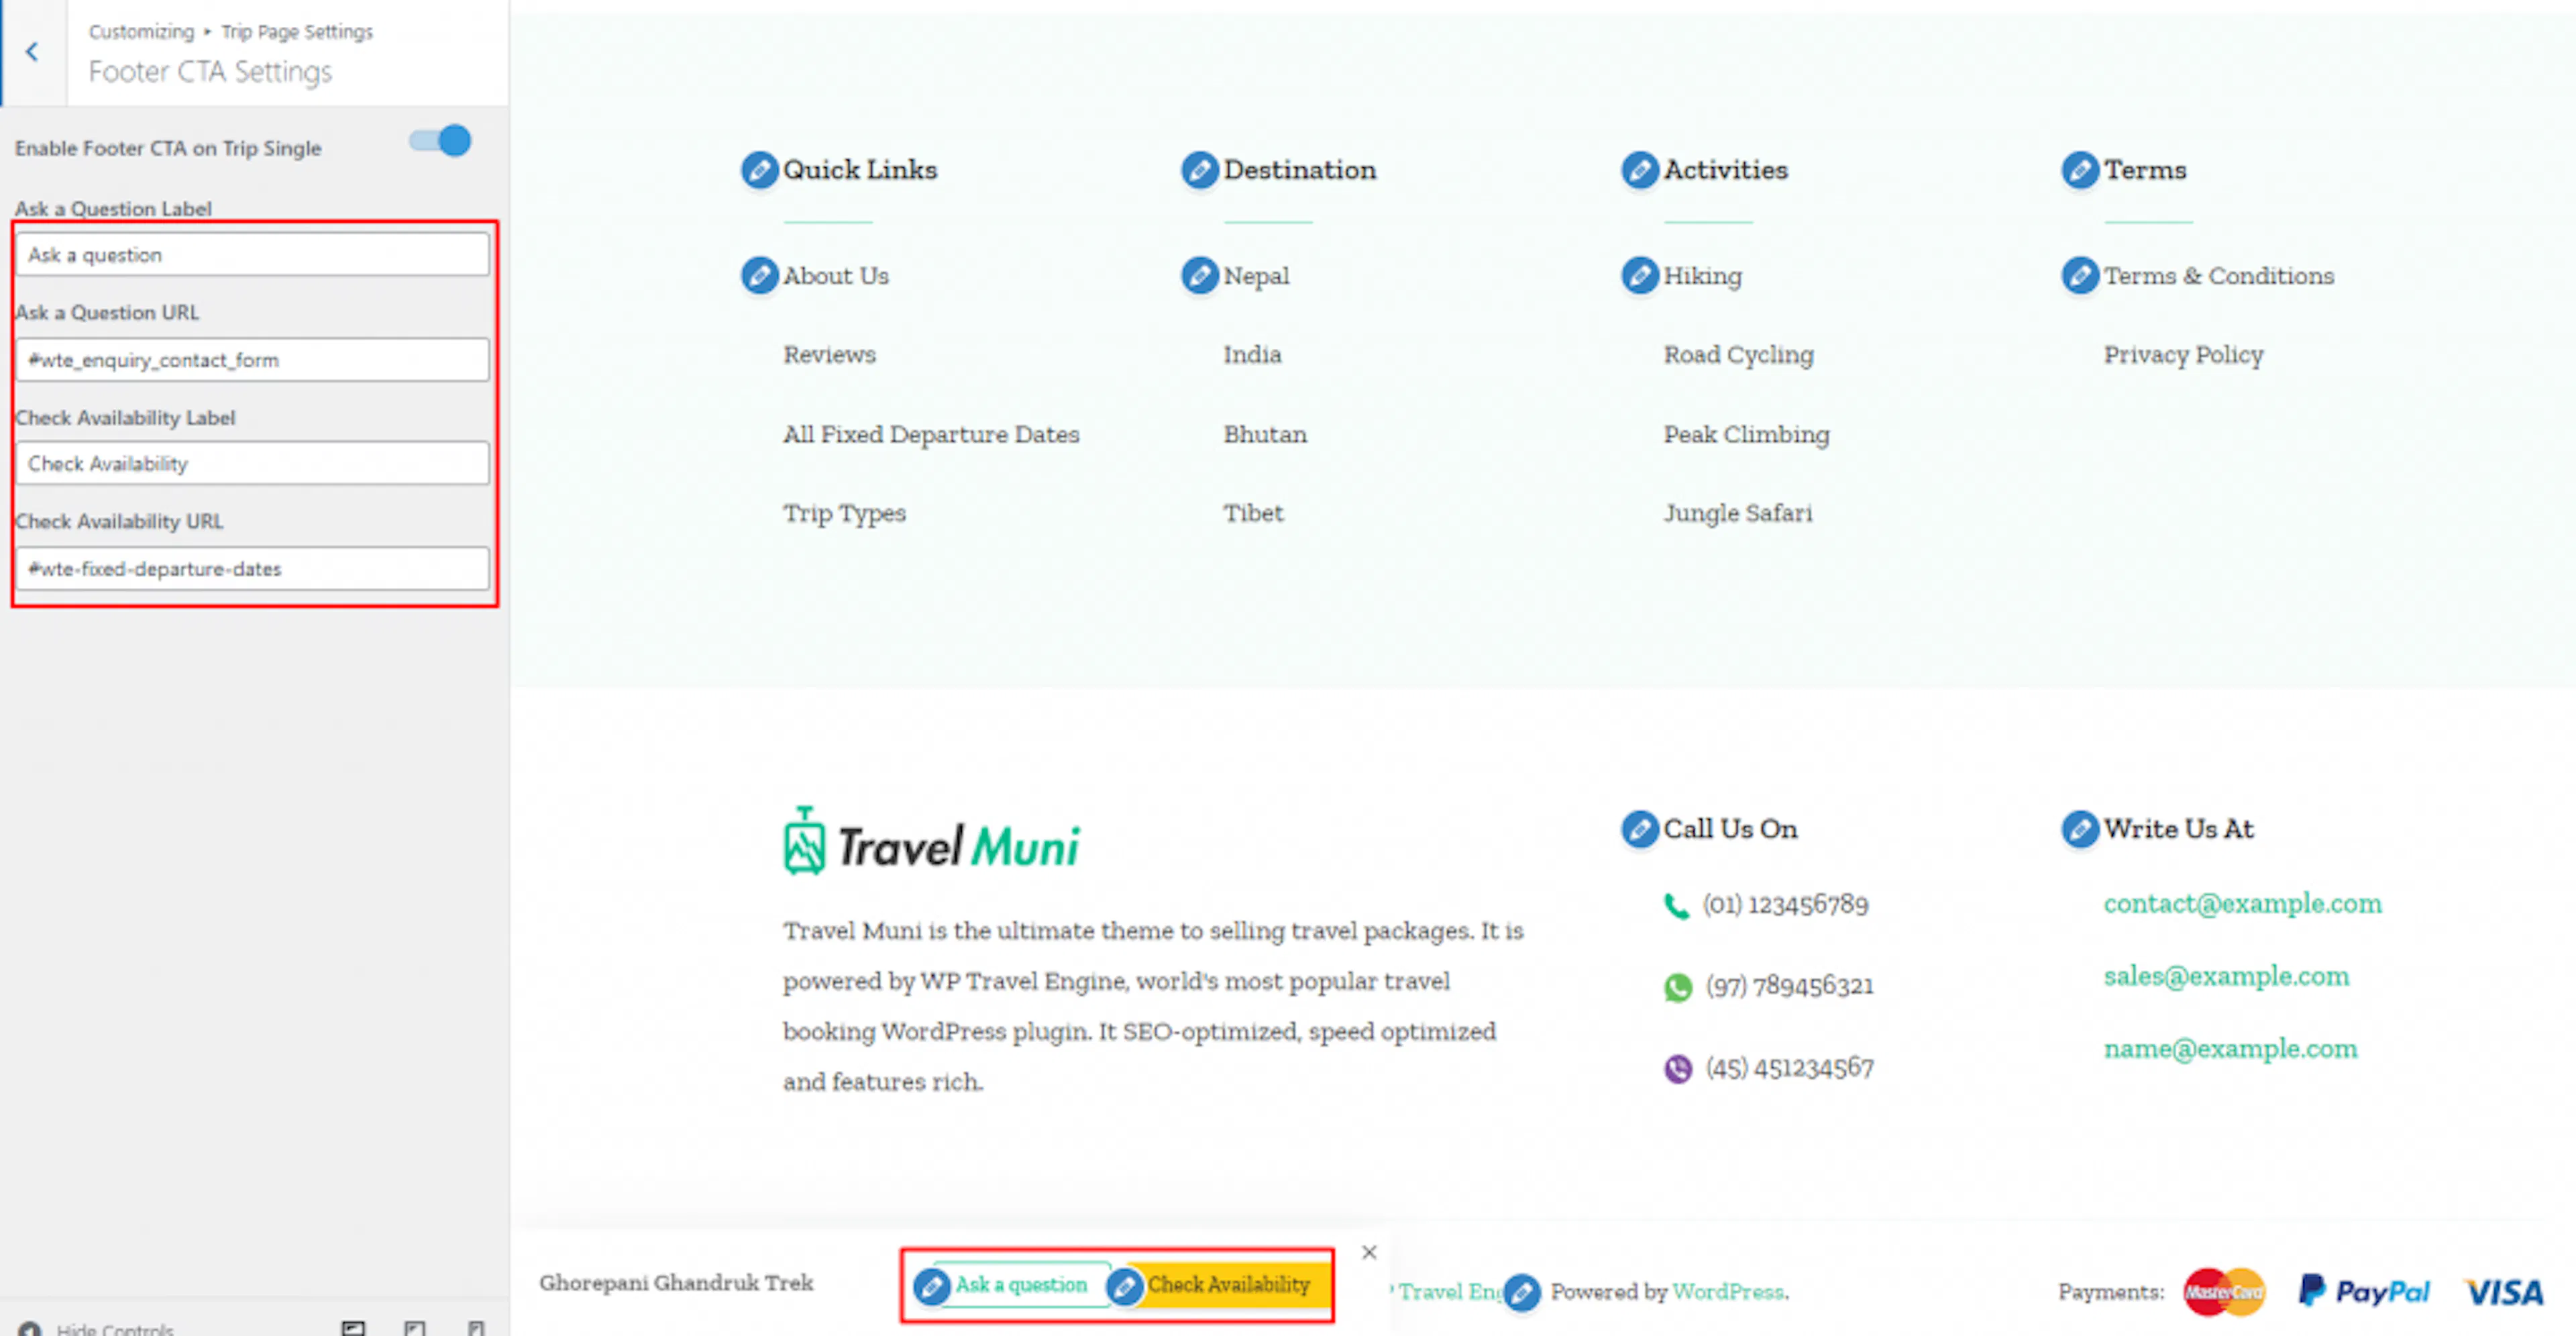
Footer CTA settings
The footer CTA keeps important actions visible at the bottom of a trip page.
Configure the footer CTA
Open Footer CTA Settings. Enable or disable the section. Enter the Ask a Question label and URL. Enter the Check Availability label and URL, then click Publish.
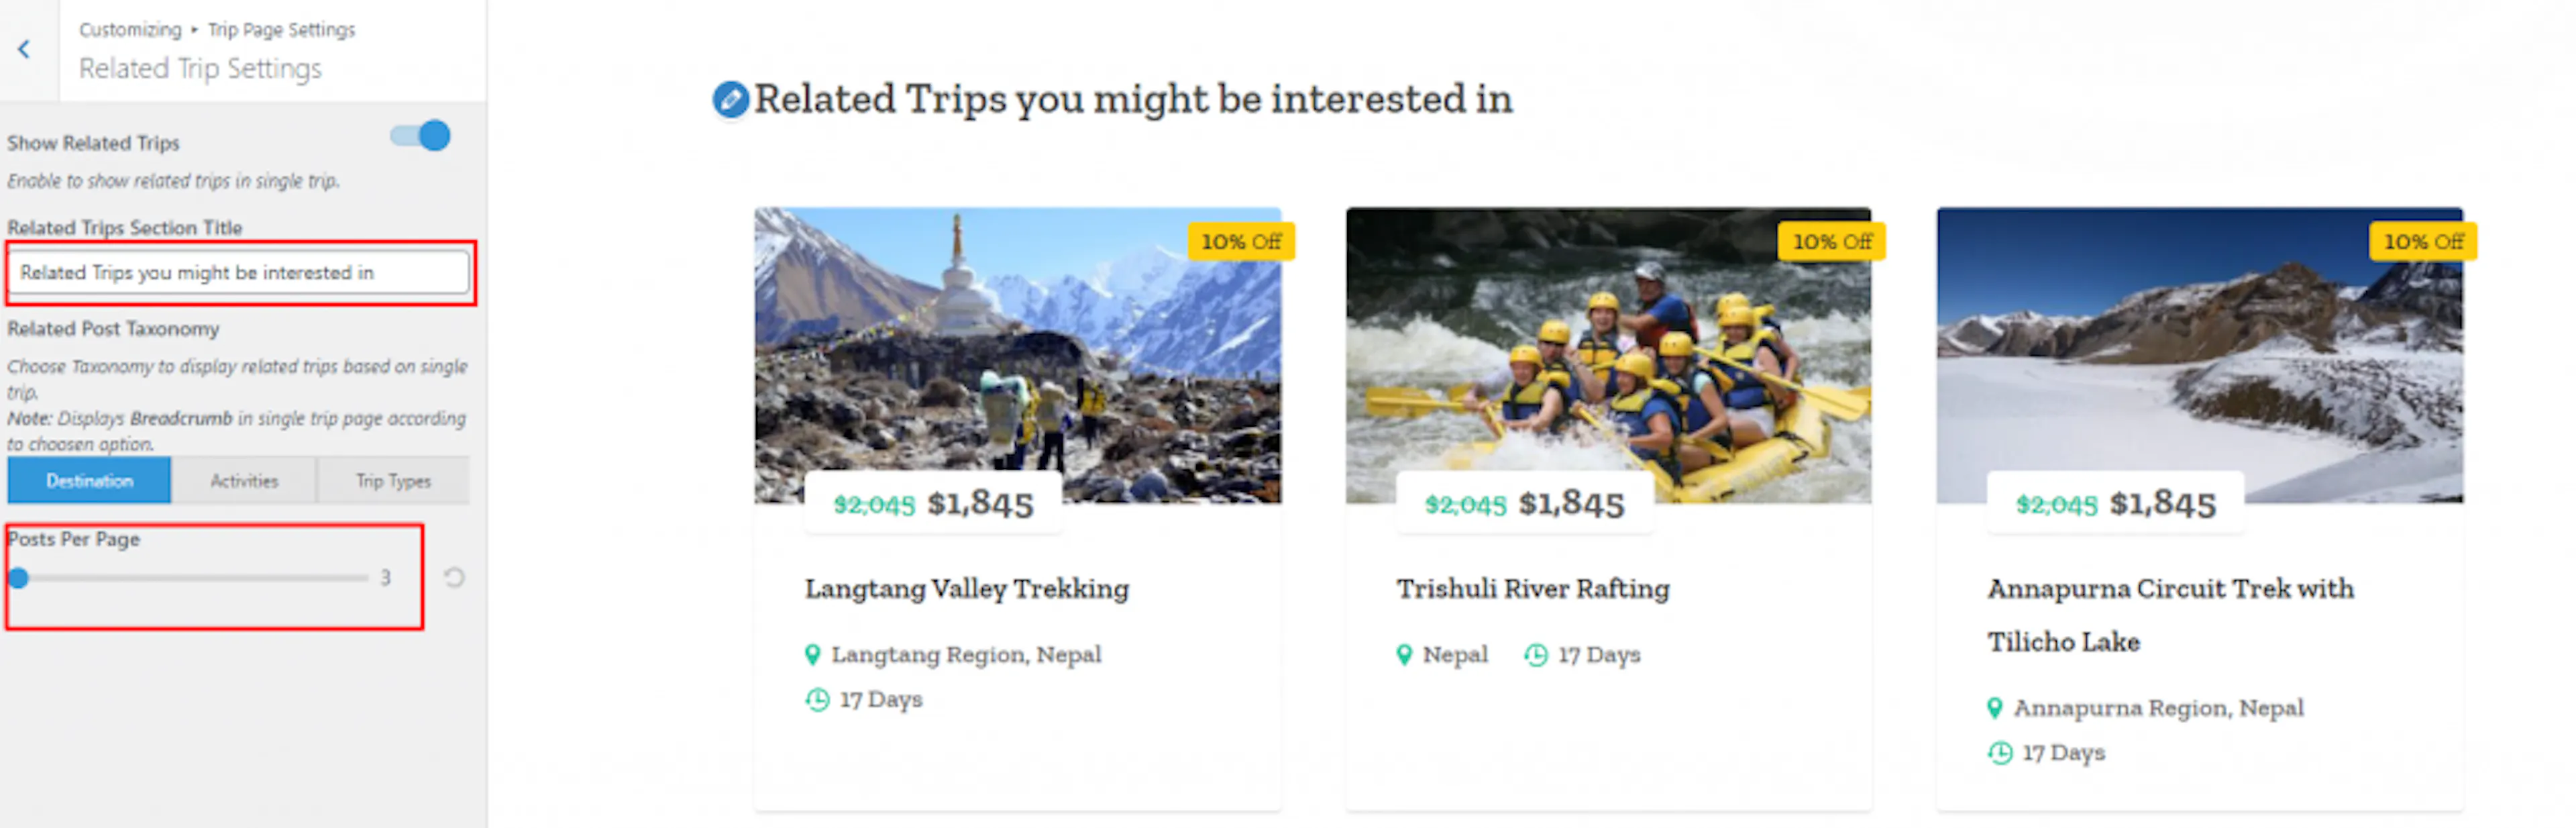
Related trip settings
Related trips help travelers discover similar packages. For example, a visitor viewing a three-day trek might also see a seven-day version.
Configure related trips
Open Related Trip Settings. Enable or disable the Related Trips section. Enter its title. Choose the taxonomy used to select related trips and set the number of posts per page, then click Publish.
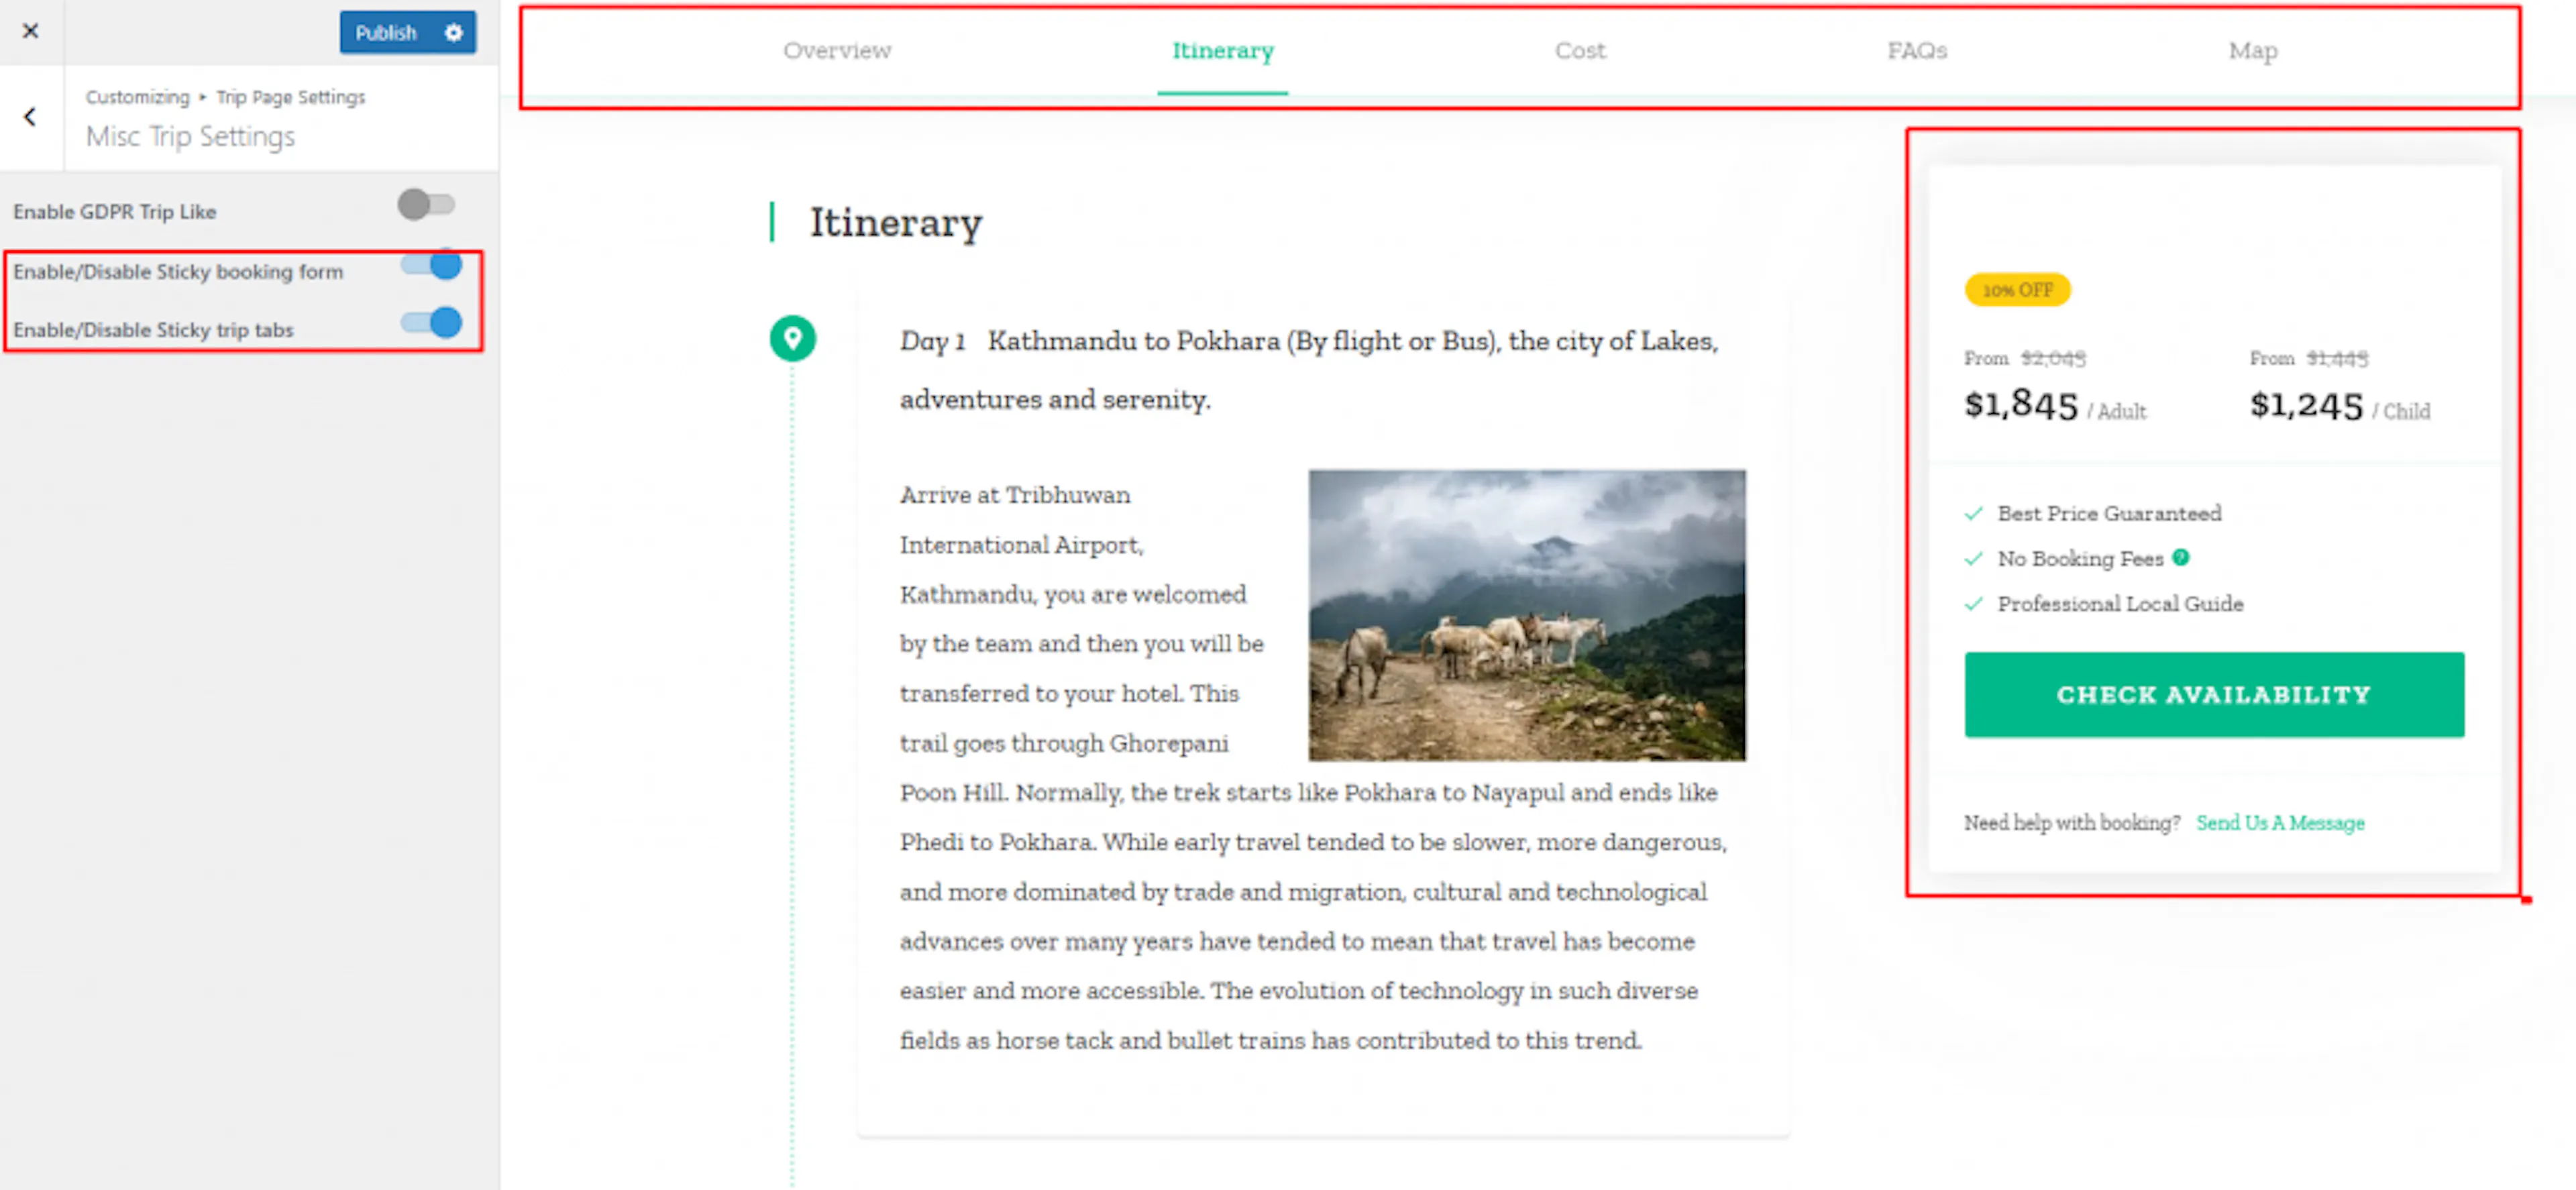
Misc trip settings
These settings control privacy and the way booking tools stay visible while a traveler reads.
Configure trip page options
Open Misc Trip Settings. Enable or disable the GDPR trip link. Enable or disable the sticky booking form and sticky trip tabs, then click Publish.
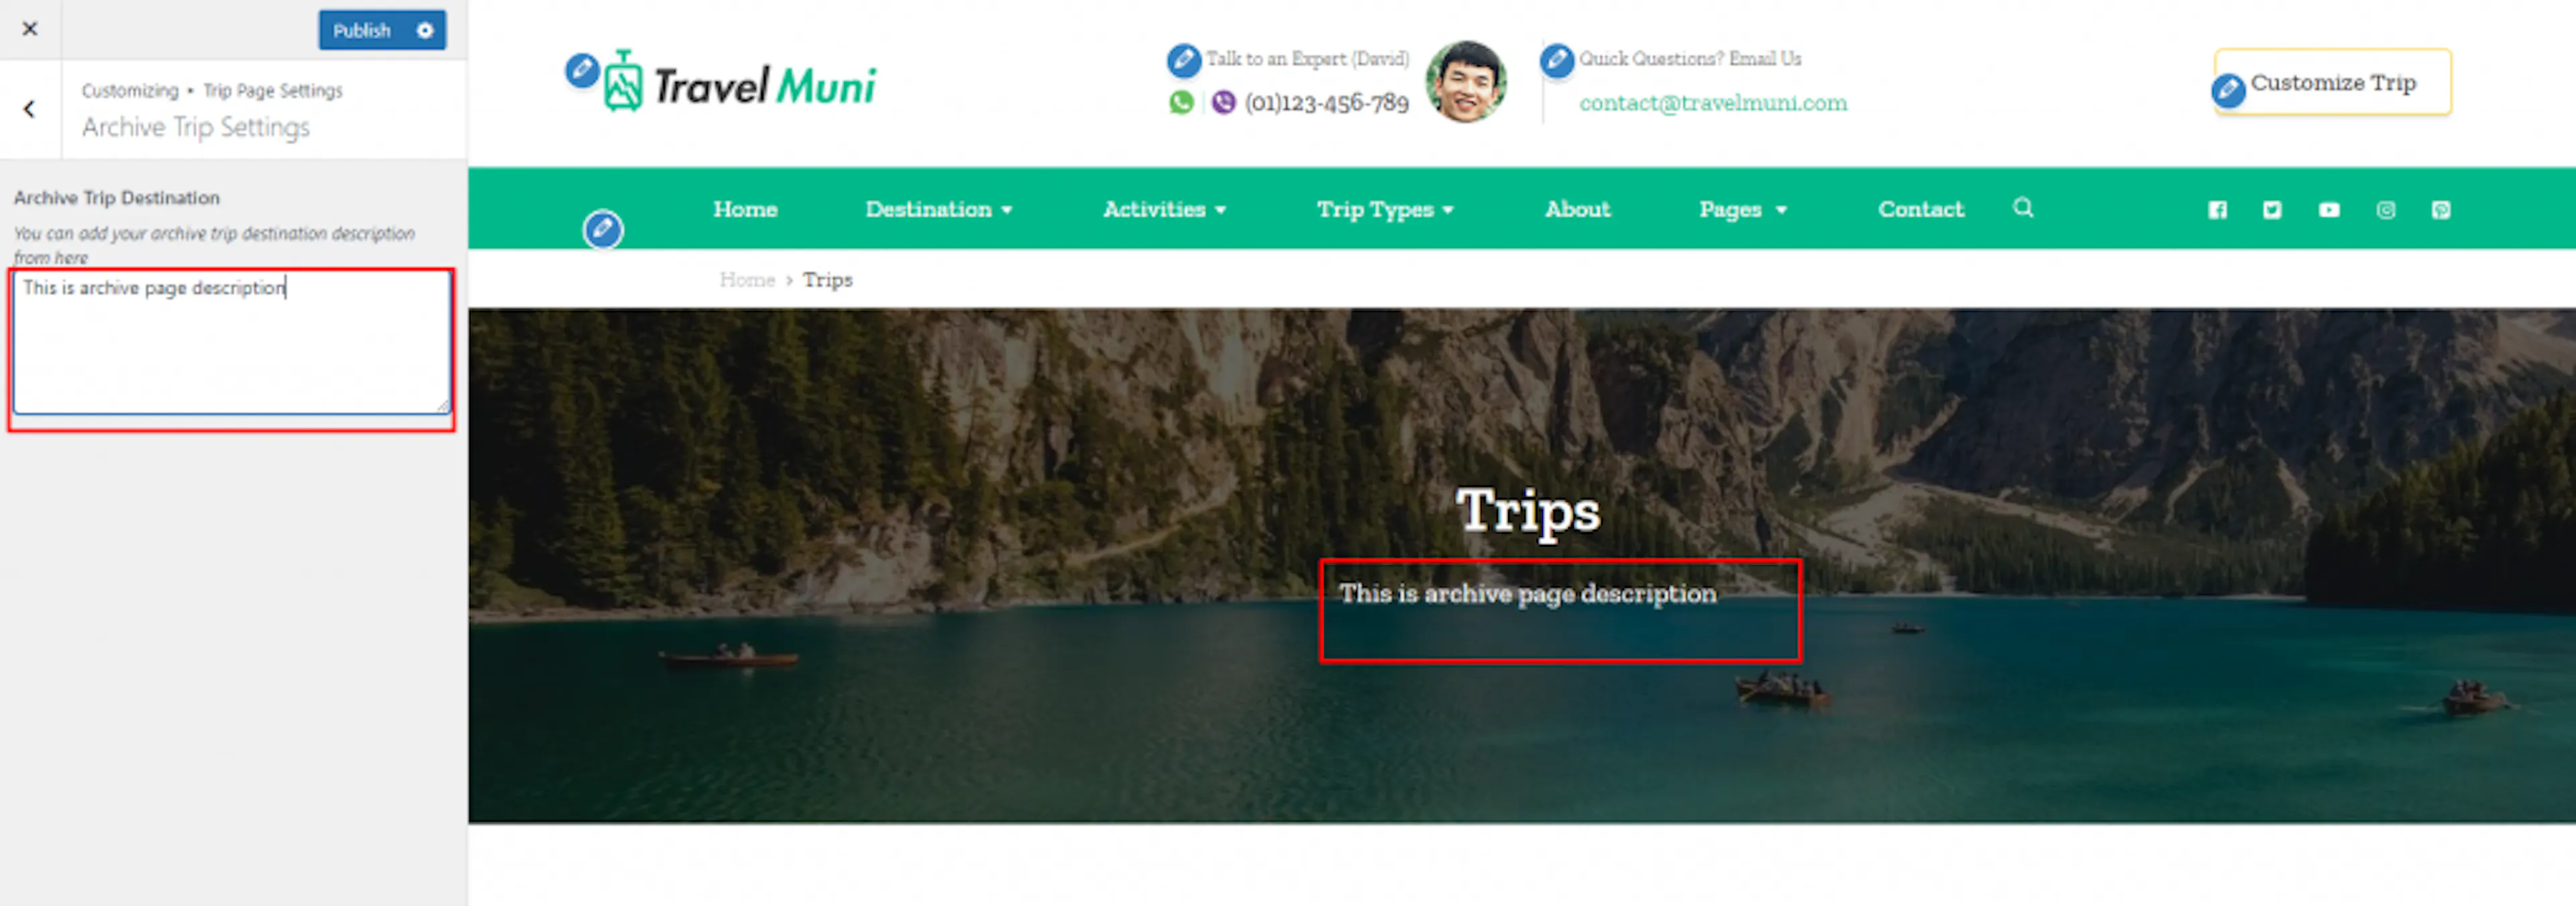
Archive trip settings
The trip archive page lists your trips. A short description can help visitors understand what they will find there.
Add the archive description
Open Archive Trip Settings. Enter the archive trip description, then click Publish.
Your trip pages now guide visitors from trip details to questions and booking.
General settings
General settings control menus, sharing, search visibility, posts, sidebars, performance, and analytics.
Mega menu settings
A mega menu displays destinations, activities, or trip types in larger menu sections.
Enable the mega menu
Open General Settings, then Mega Menu Settings. Enable the Mega Menu option.
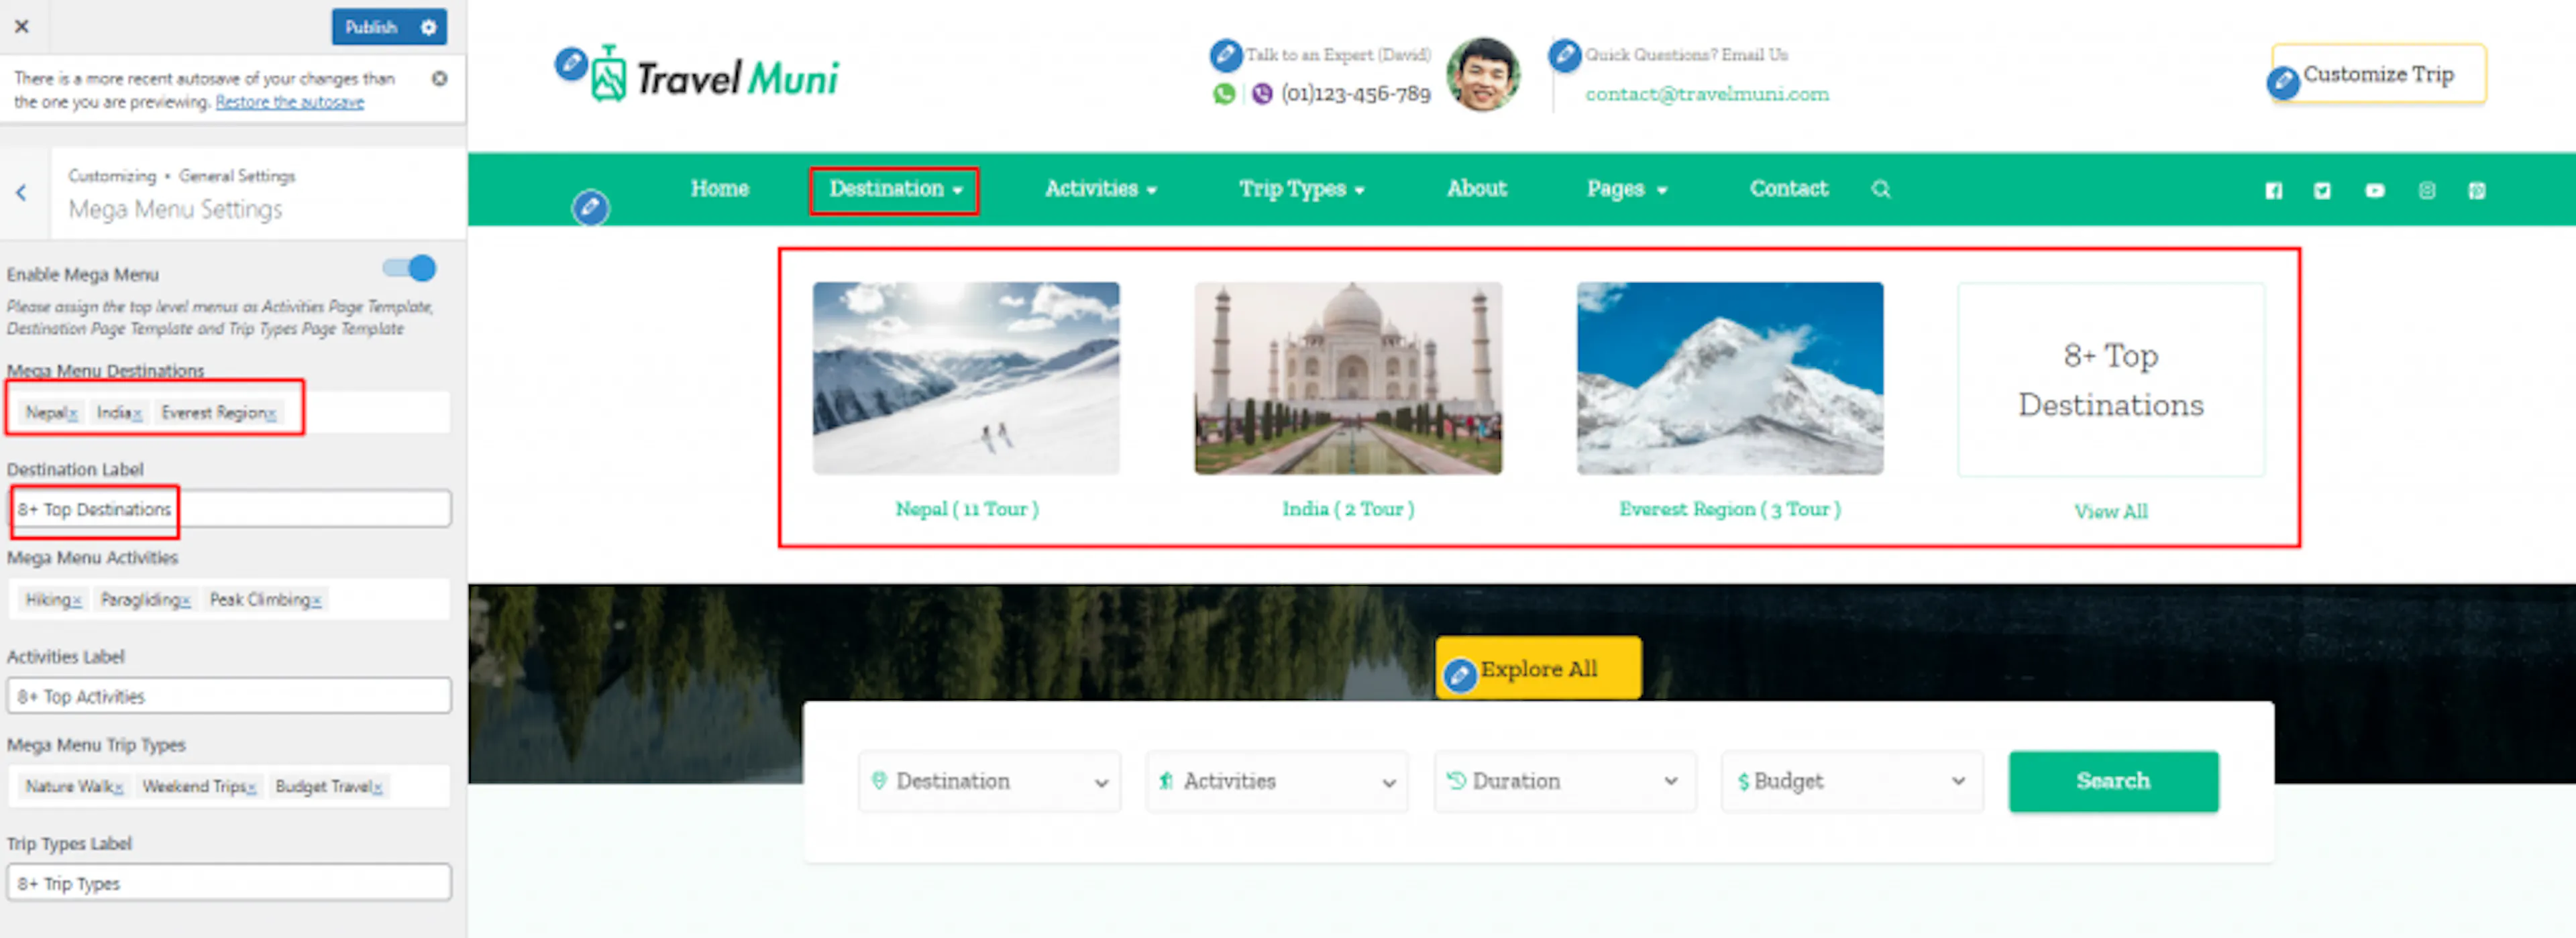
Choose menu templates
Select top-level menus as the Activities Page Template, Destination Page Template, and Trip Types Page Template.
Choose menu content and publish
Select the destinations to show under Destination and set the Destination label. Select activities and set the Activities label. Select trips and set the Trip Types label, then click Publish.
Social media settings
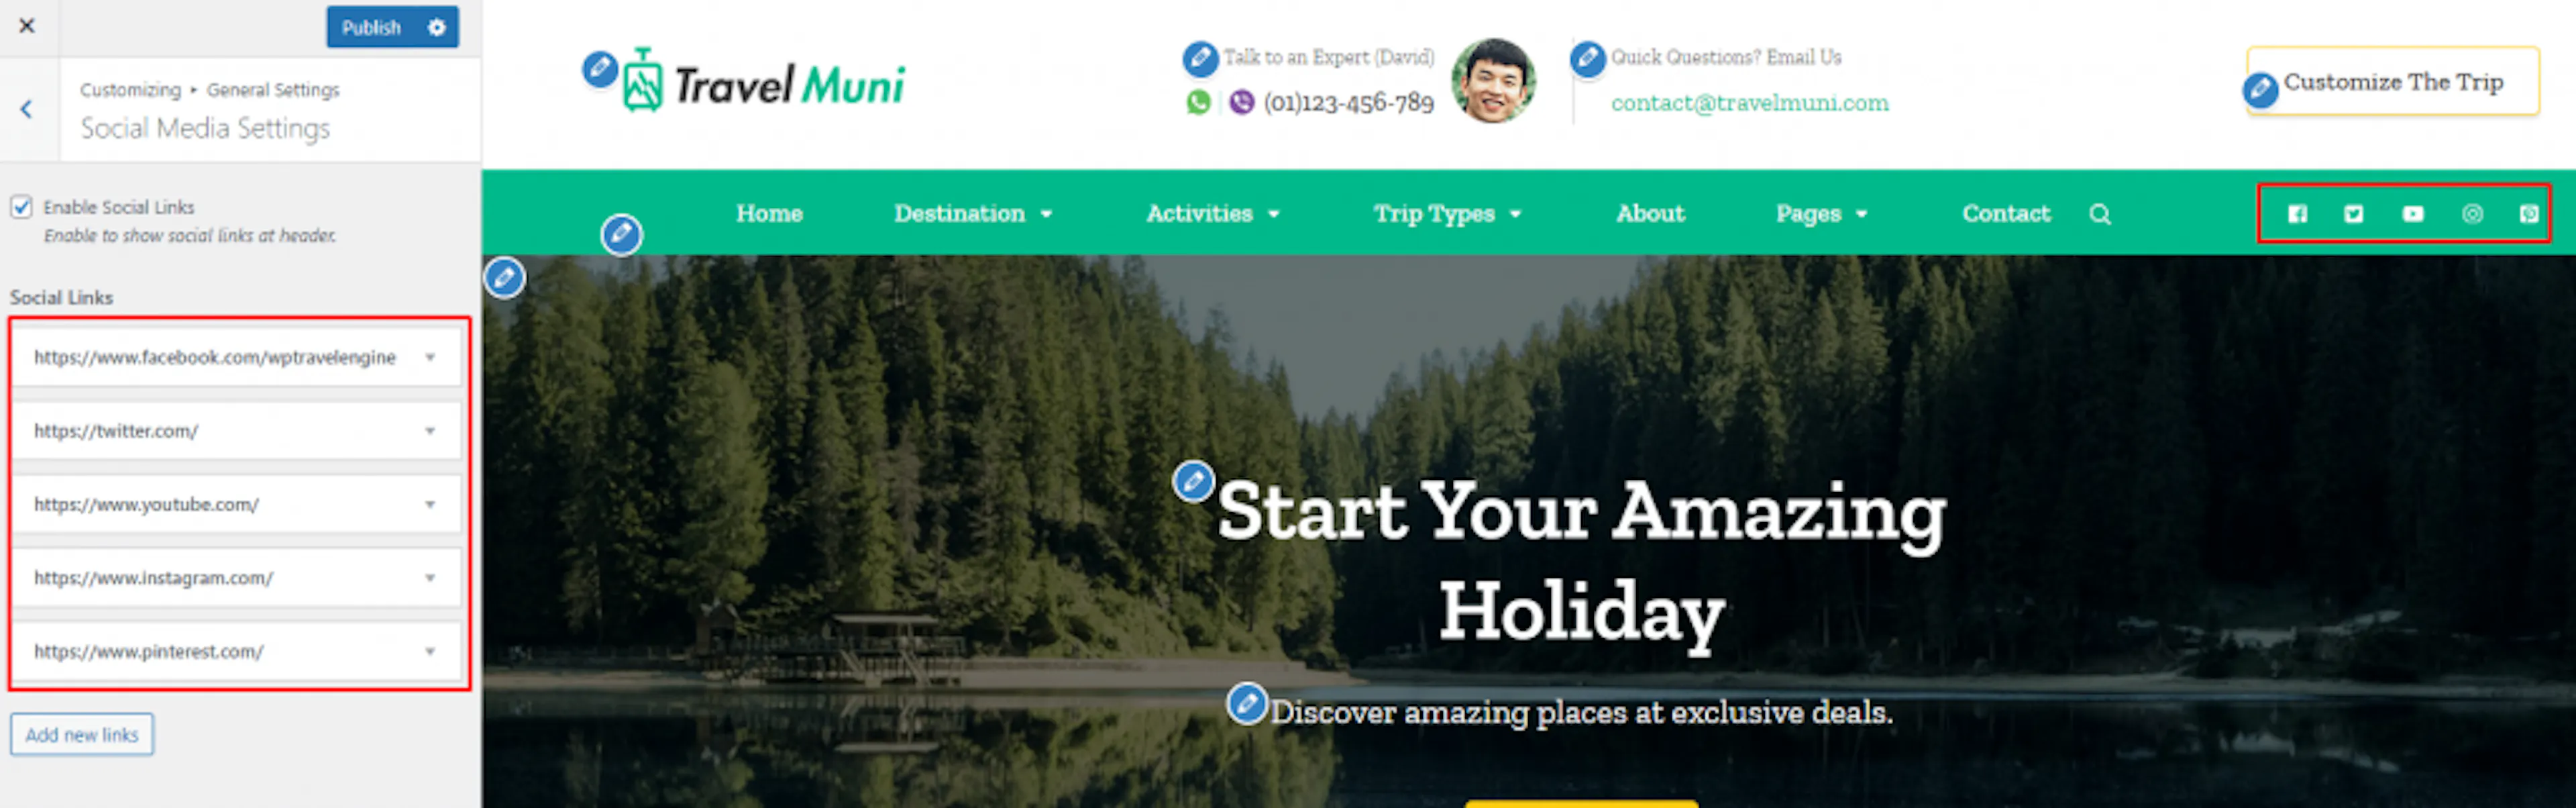
Social links help visitors find your business on social platforms.
Add social links
Open Social Media Settings. Enable social links in the header and add your social media URLs. Click Publish.
Social sharing
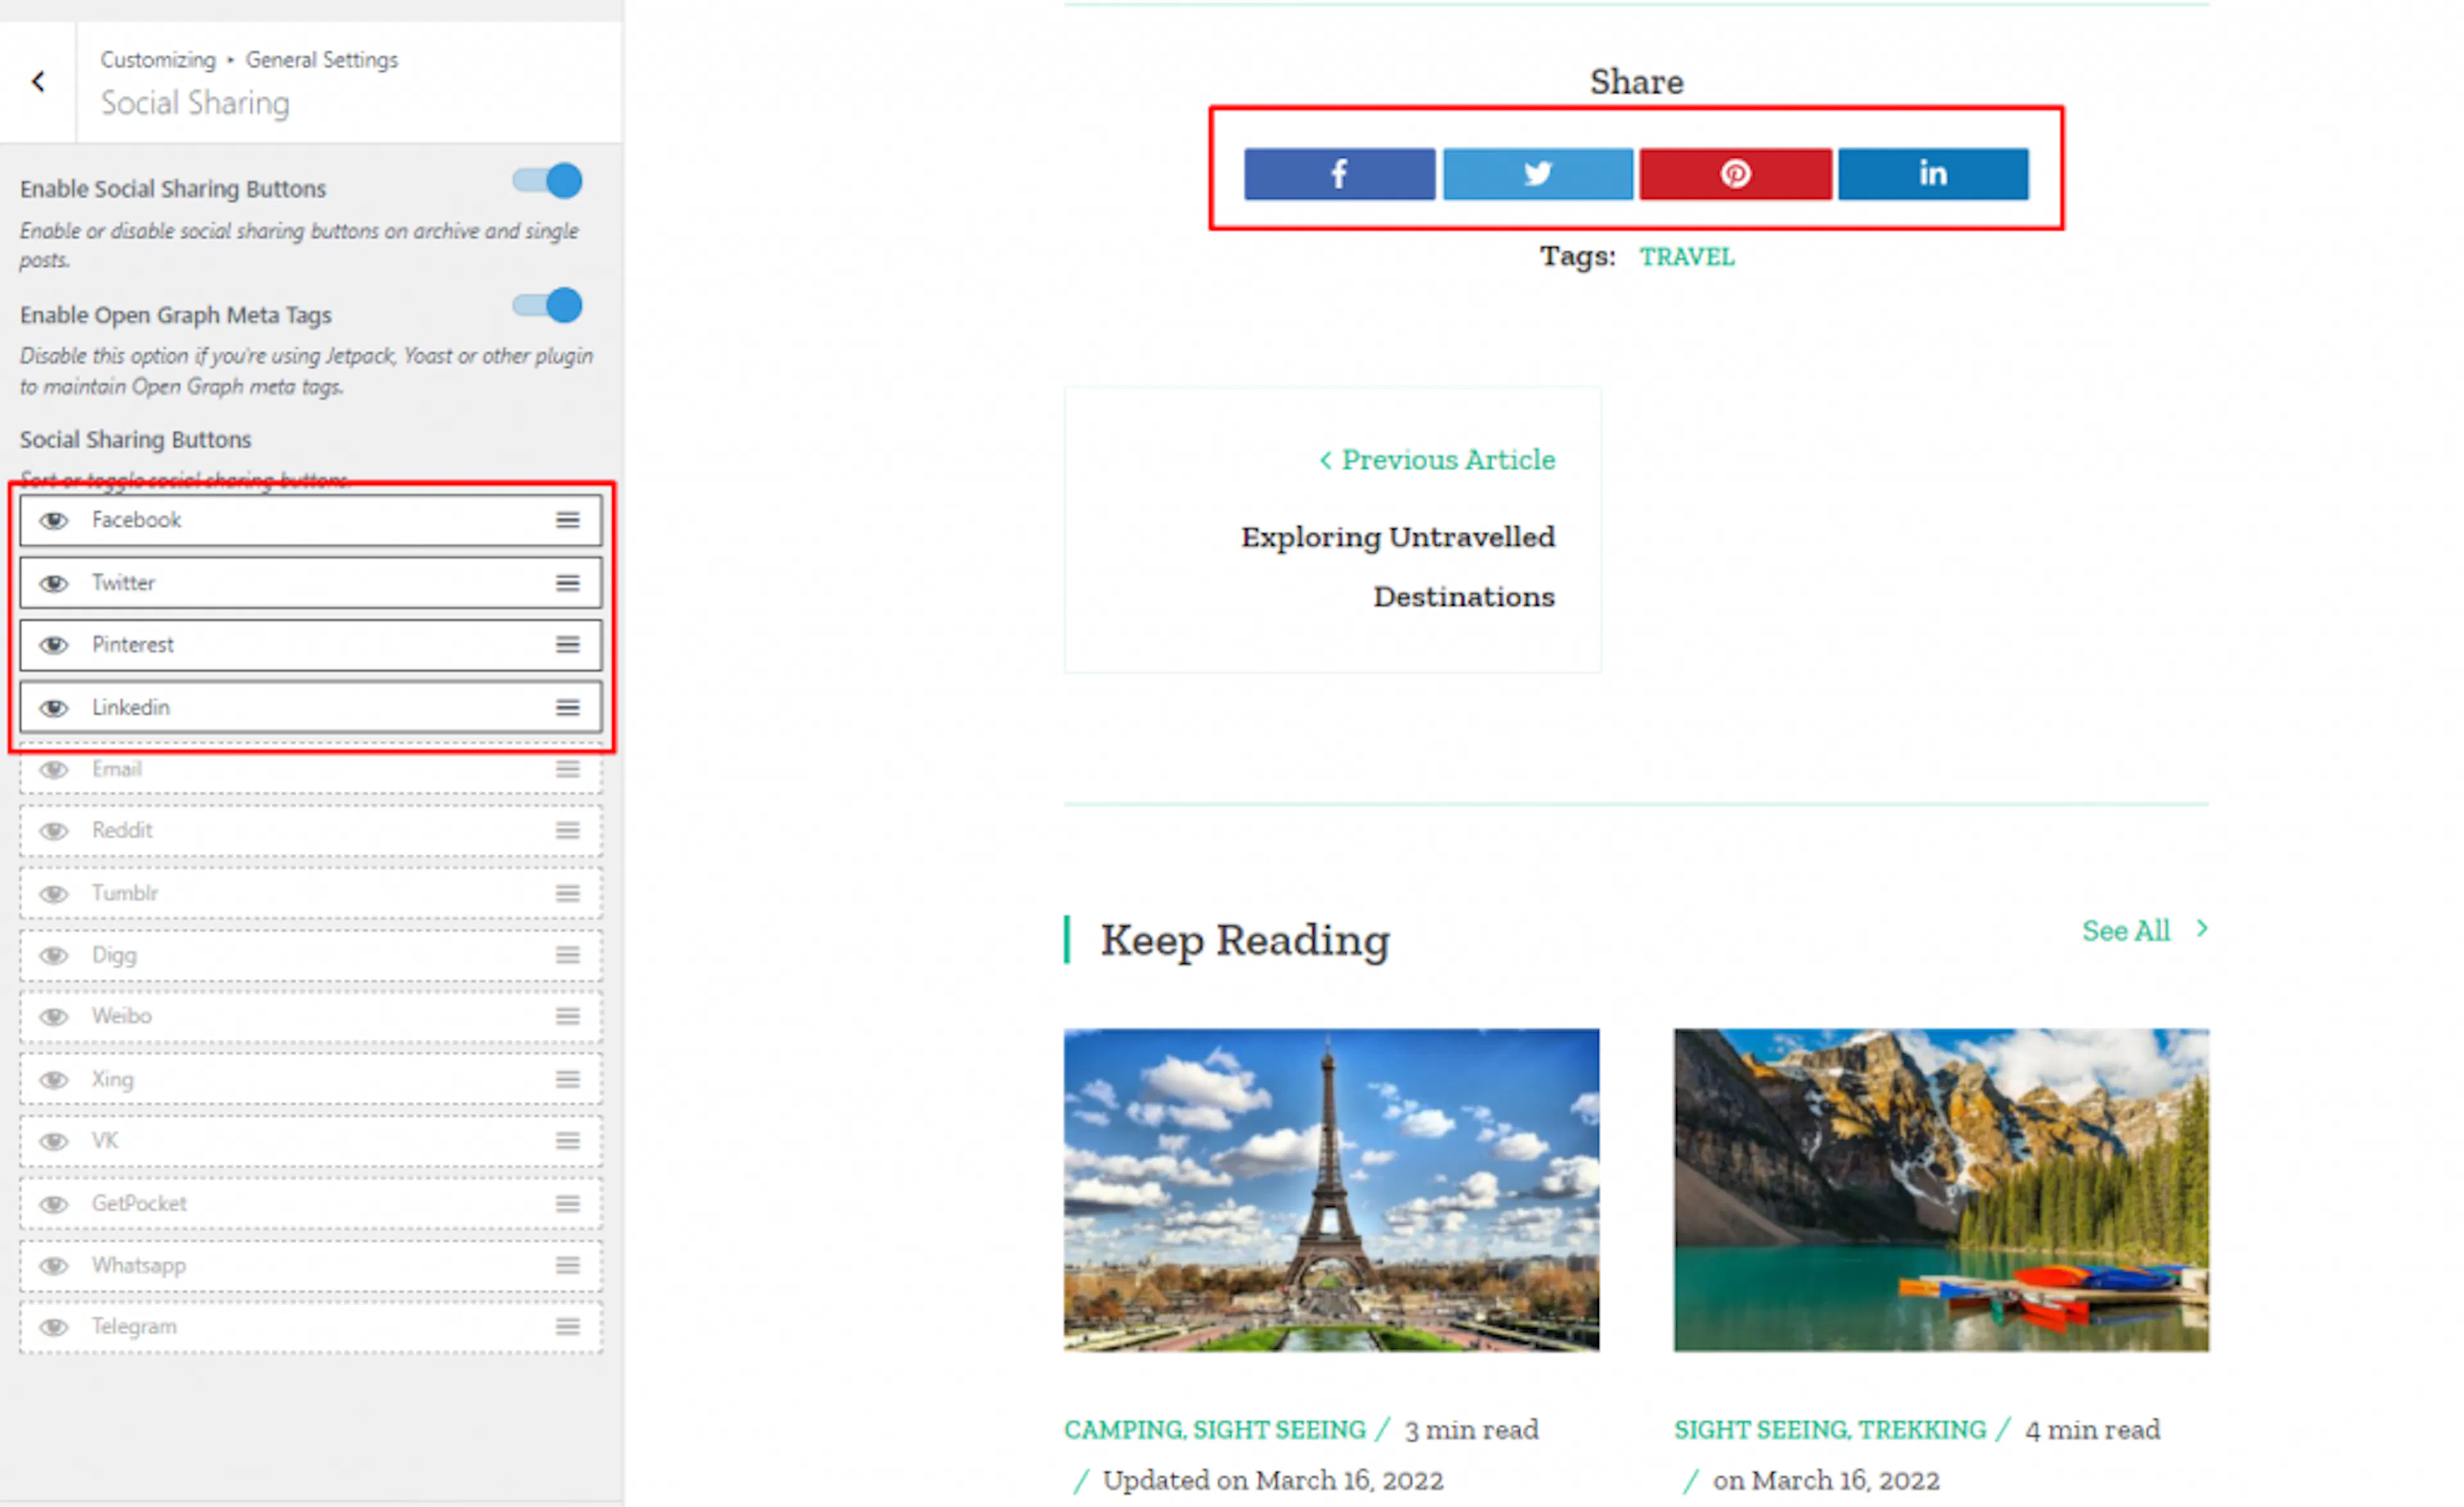
Sharing buttons let visitors share trip posts and blog articles.
Configure sharing buttons
Open Social Sharing. Enable social sharing buttons on archive and single posts. Enable Open Graph Meta Tags. Show, hide, and reorder the available sharing buttons, then click Publish.
SEO settings
SEO settings control information that helps visitors understand your pages in search results.
Configure dates and breadcrumbs
Open SEO Settings. Enable the last updated date on listing and single posts. Enable breadcrumbs and enter the Breadcrumb Home Text, then click Publish.

Posts and pages settings
These settings control how blog posts and pages display images, excerpts, authors, dates, comments, and related posts.
Open Posts and Pages settings
Open Posts(Blog) & Pages Settings.
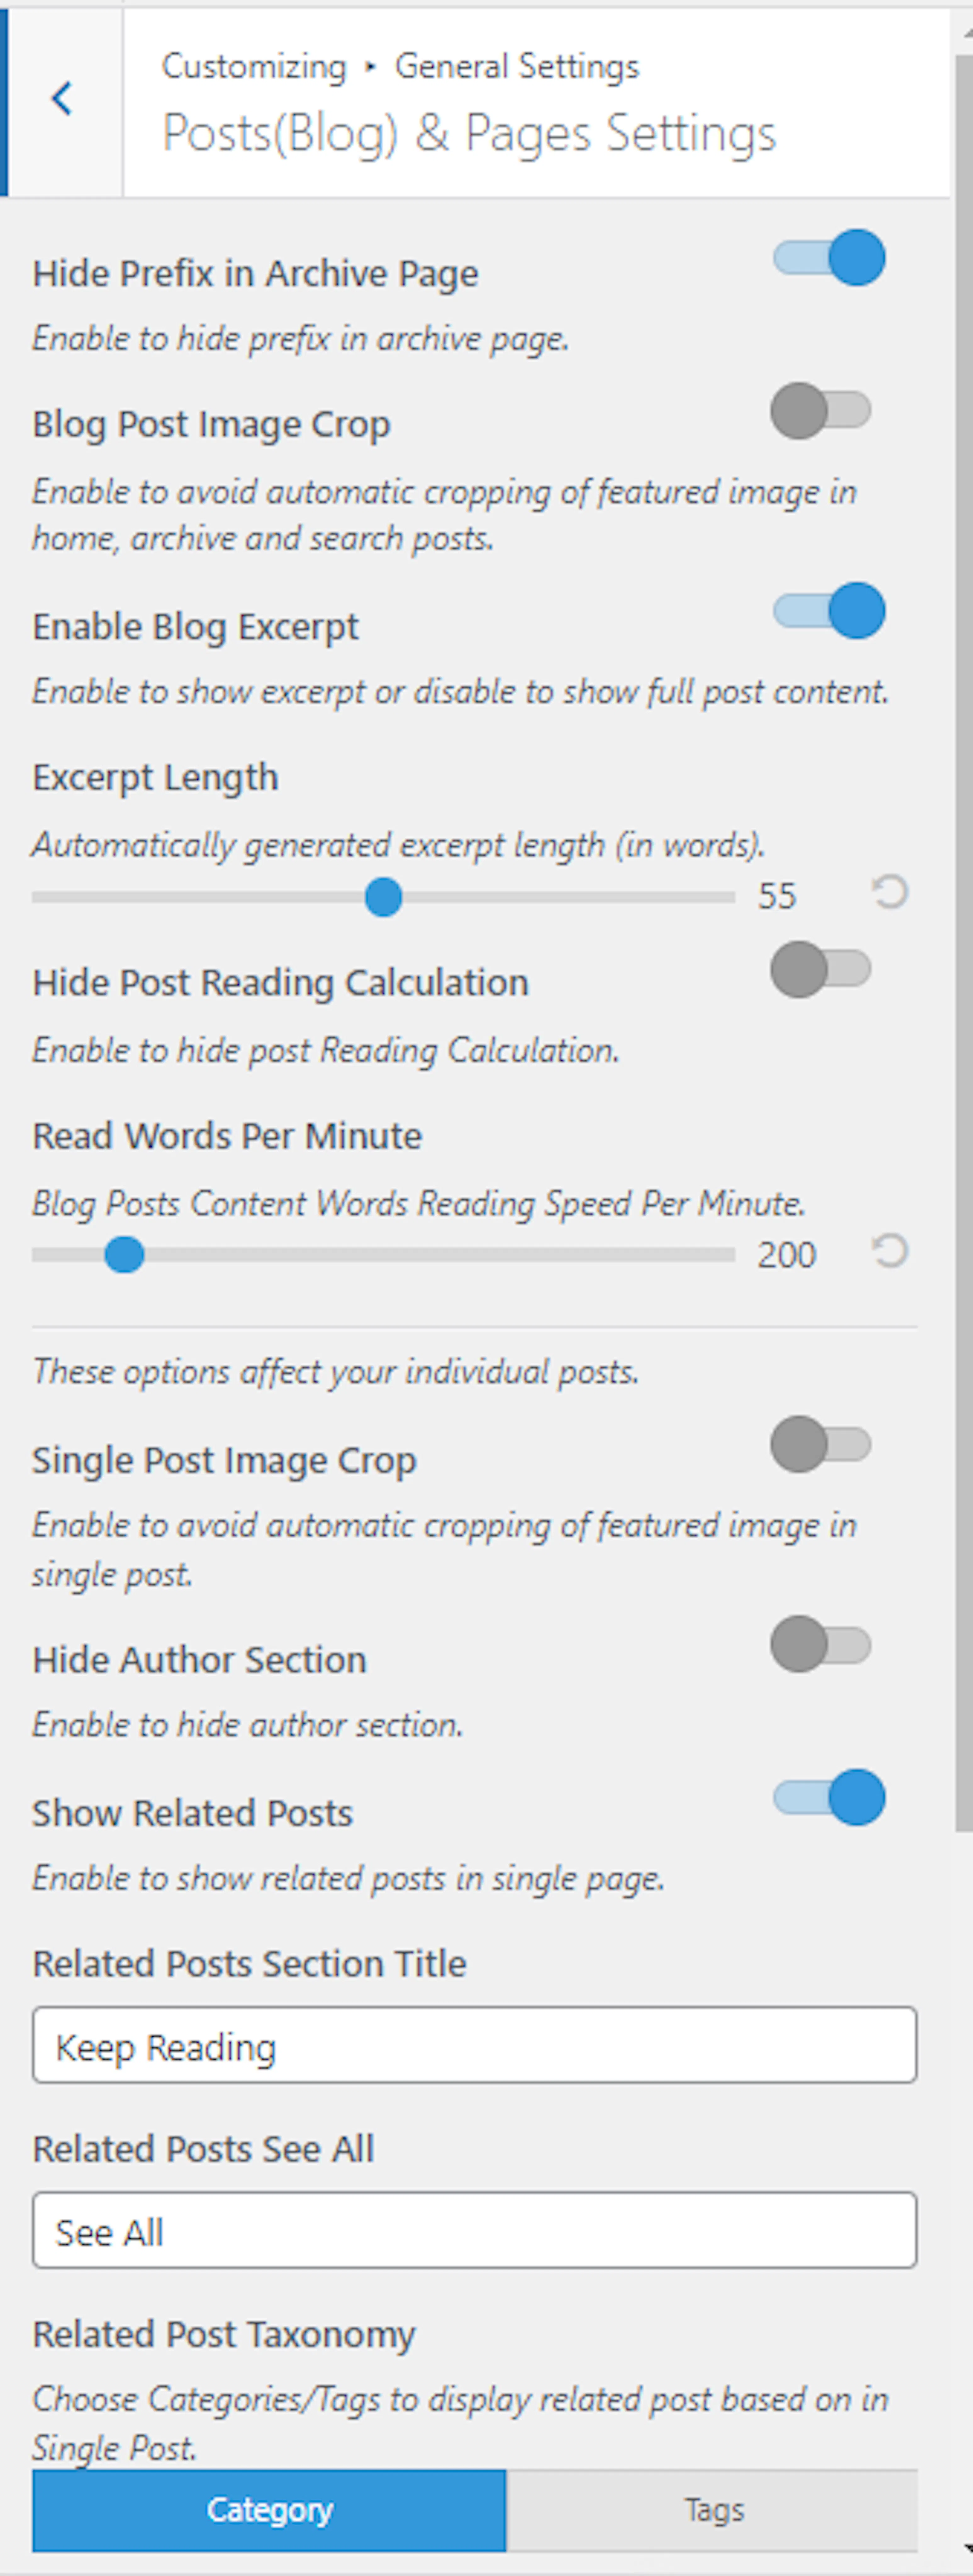
Choose archive and excerpt options
Enable Hide Prefix in Archive Page if you do not want archive prefixes. Enable Blog Post Image Crop to avoid automatic cropping of featured images. Enable Blog Excerpt to show excerpts instead of full content, then set the excerpt length.
Choose single post options
Enable Hide Post Reading Calculation if you do not want reading time shown. Set Read Words Per Minute. Enable Single Post Image Crop to avoid automatic cropping. Show or hide the author section, related posts, comments, category, author, posted date, and featured image as needed.
Set related post options
Enable Show Related Posts. Enter the related posts section title and See All label. Choose whether related posts use categories or tags. Click Publish, then refresh your site to confirm the changes.
Sidebar settings
Sidebars can show contact details, recent posts, or other helpful information beside your content.
Create a sidebar
Open Sidebar Settings and click Add New Sidebar.
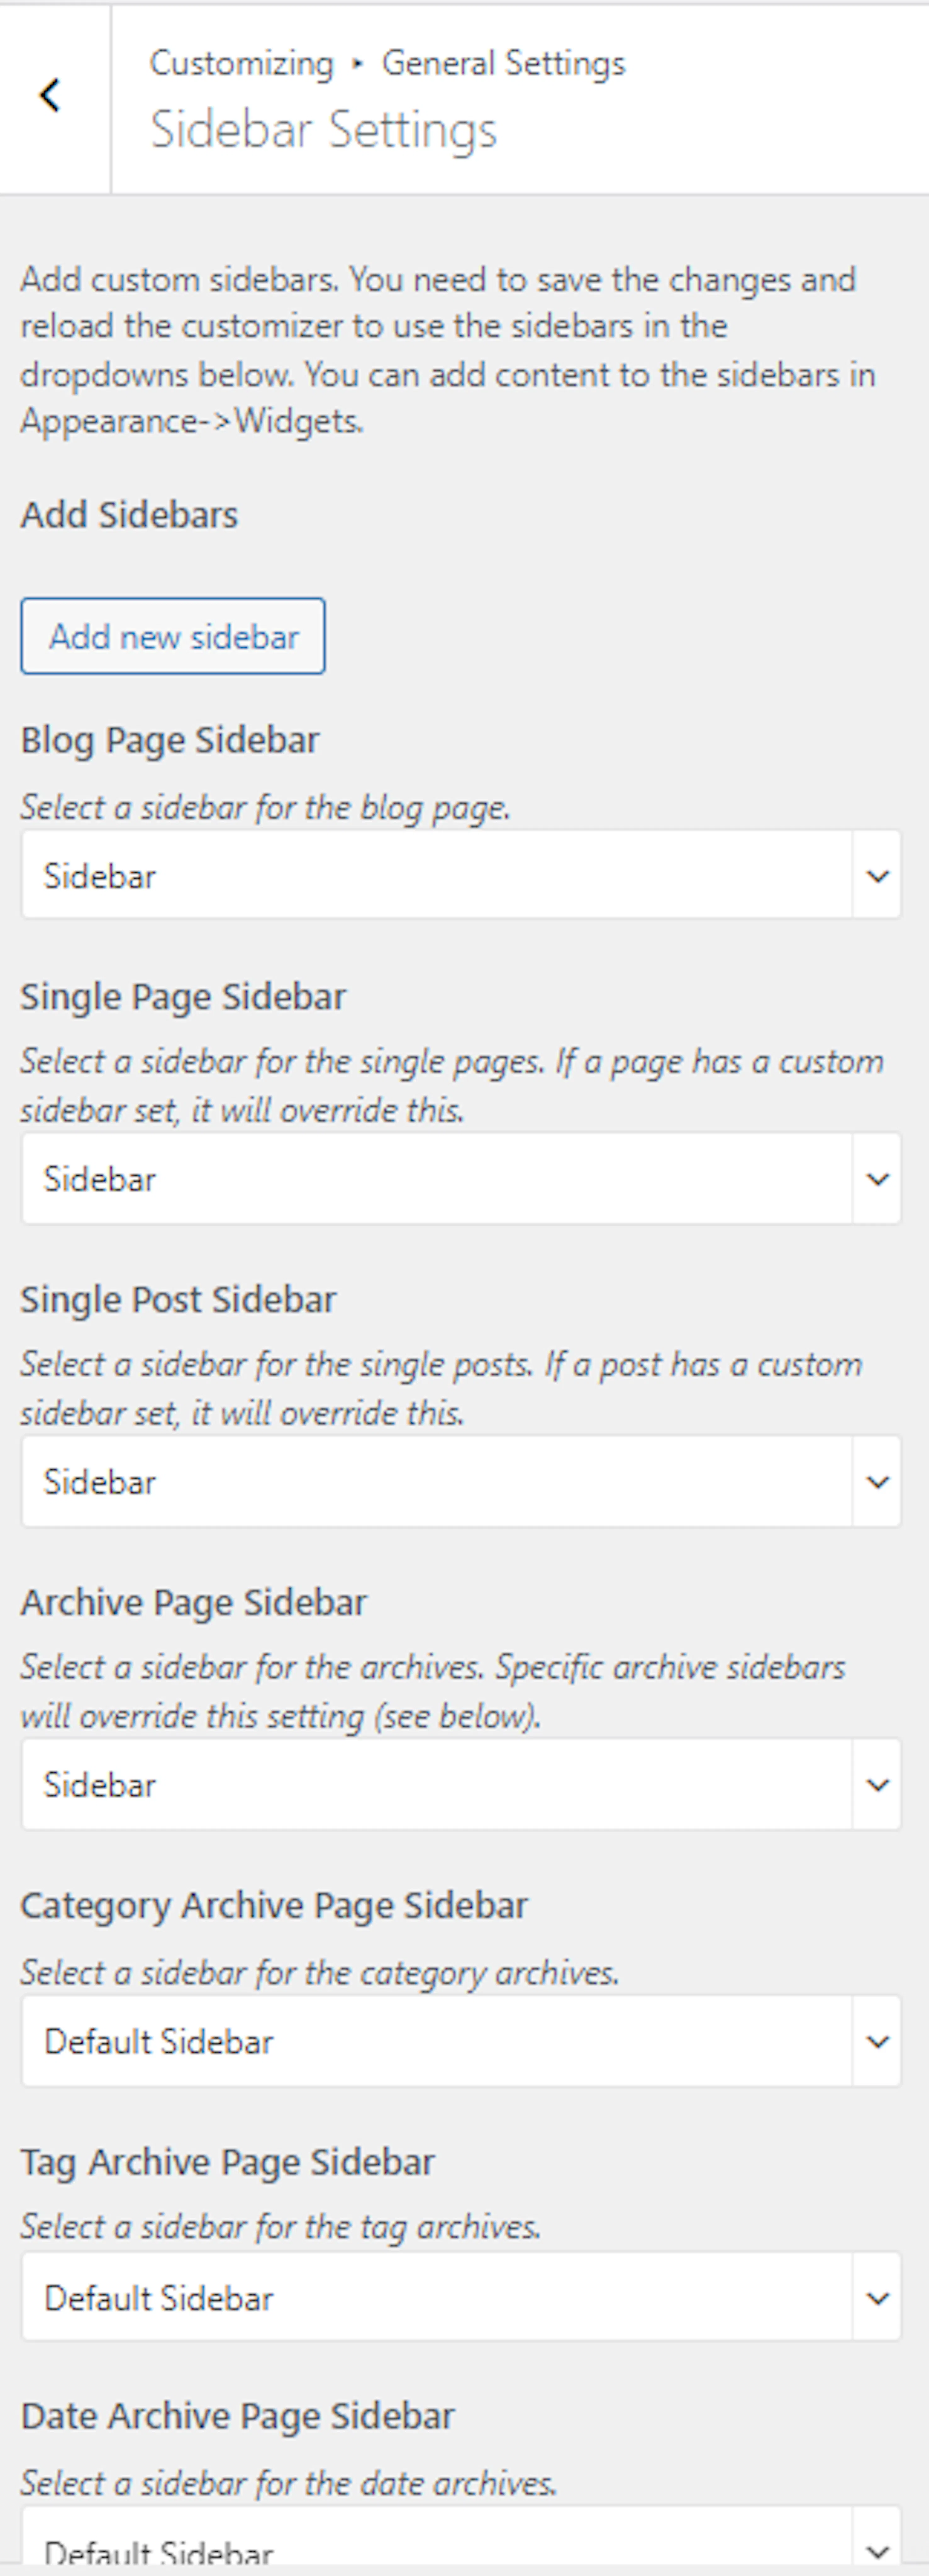
Assign sidebars
Choose sidebars for the Blog Page, Single Page, Single Post, Archive Page, Category Archive Page, Tag Archive Page, Date Archive Page, Author Archive Page, and Search Page. Click Publish.
Performance settings
Performance settings control how images, scripts, fonts, and style files load.
Open Performance Settings
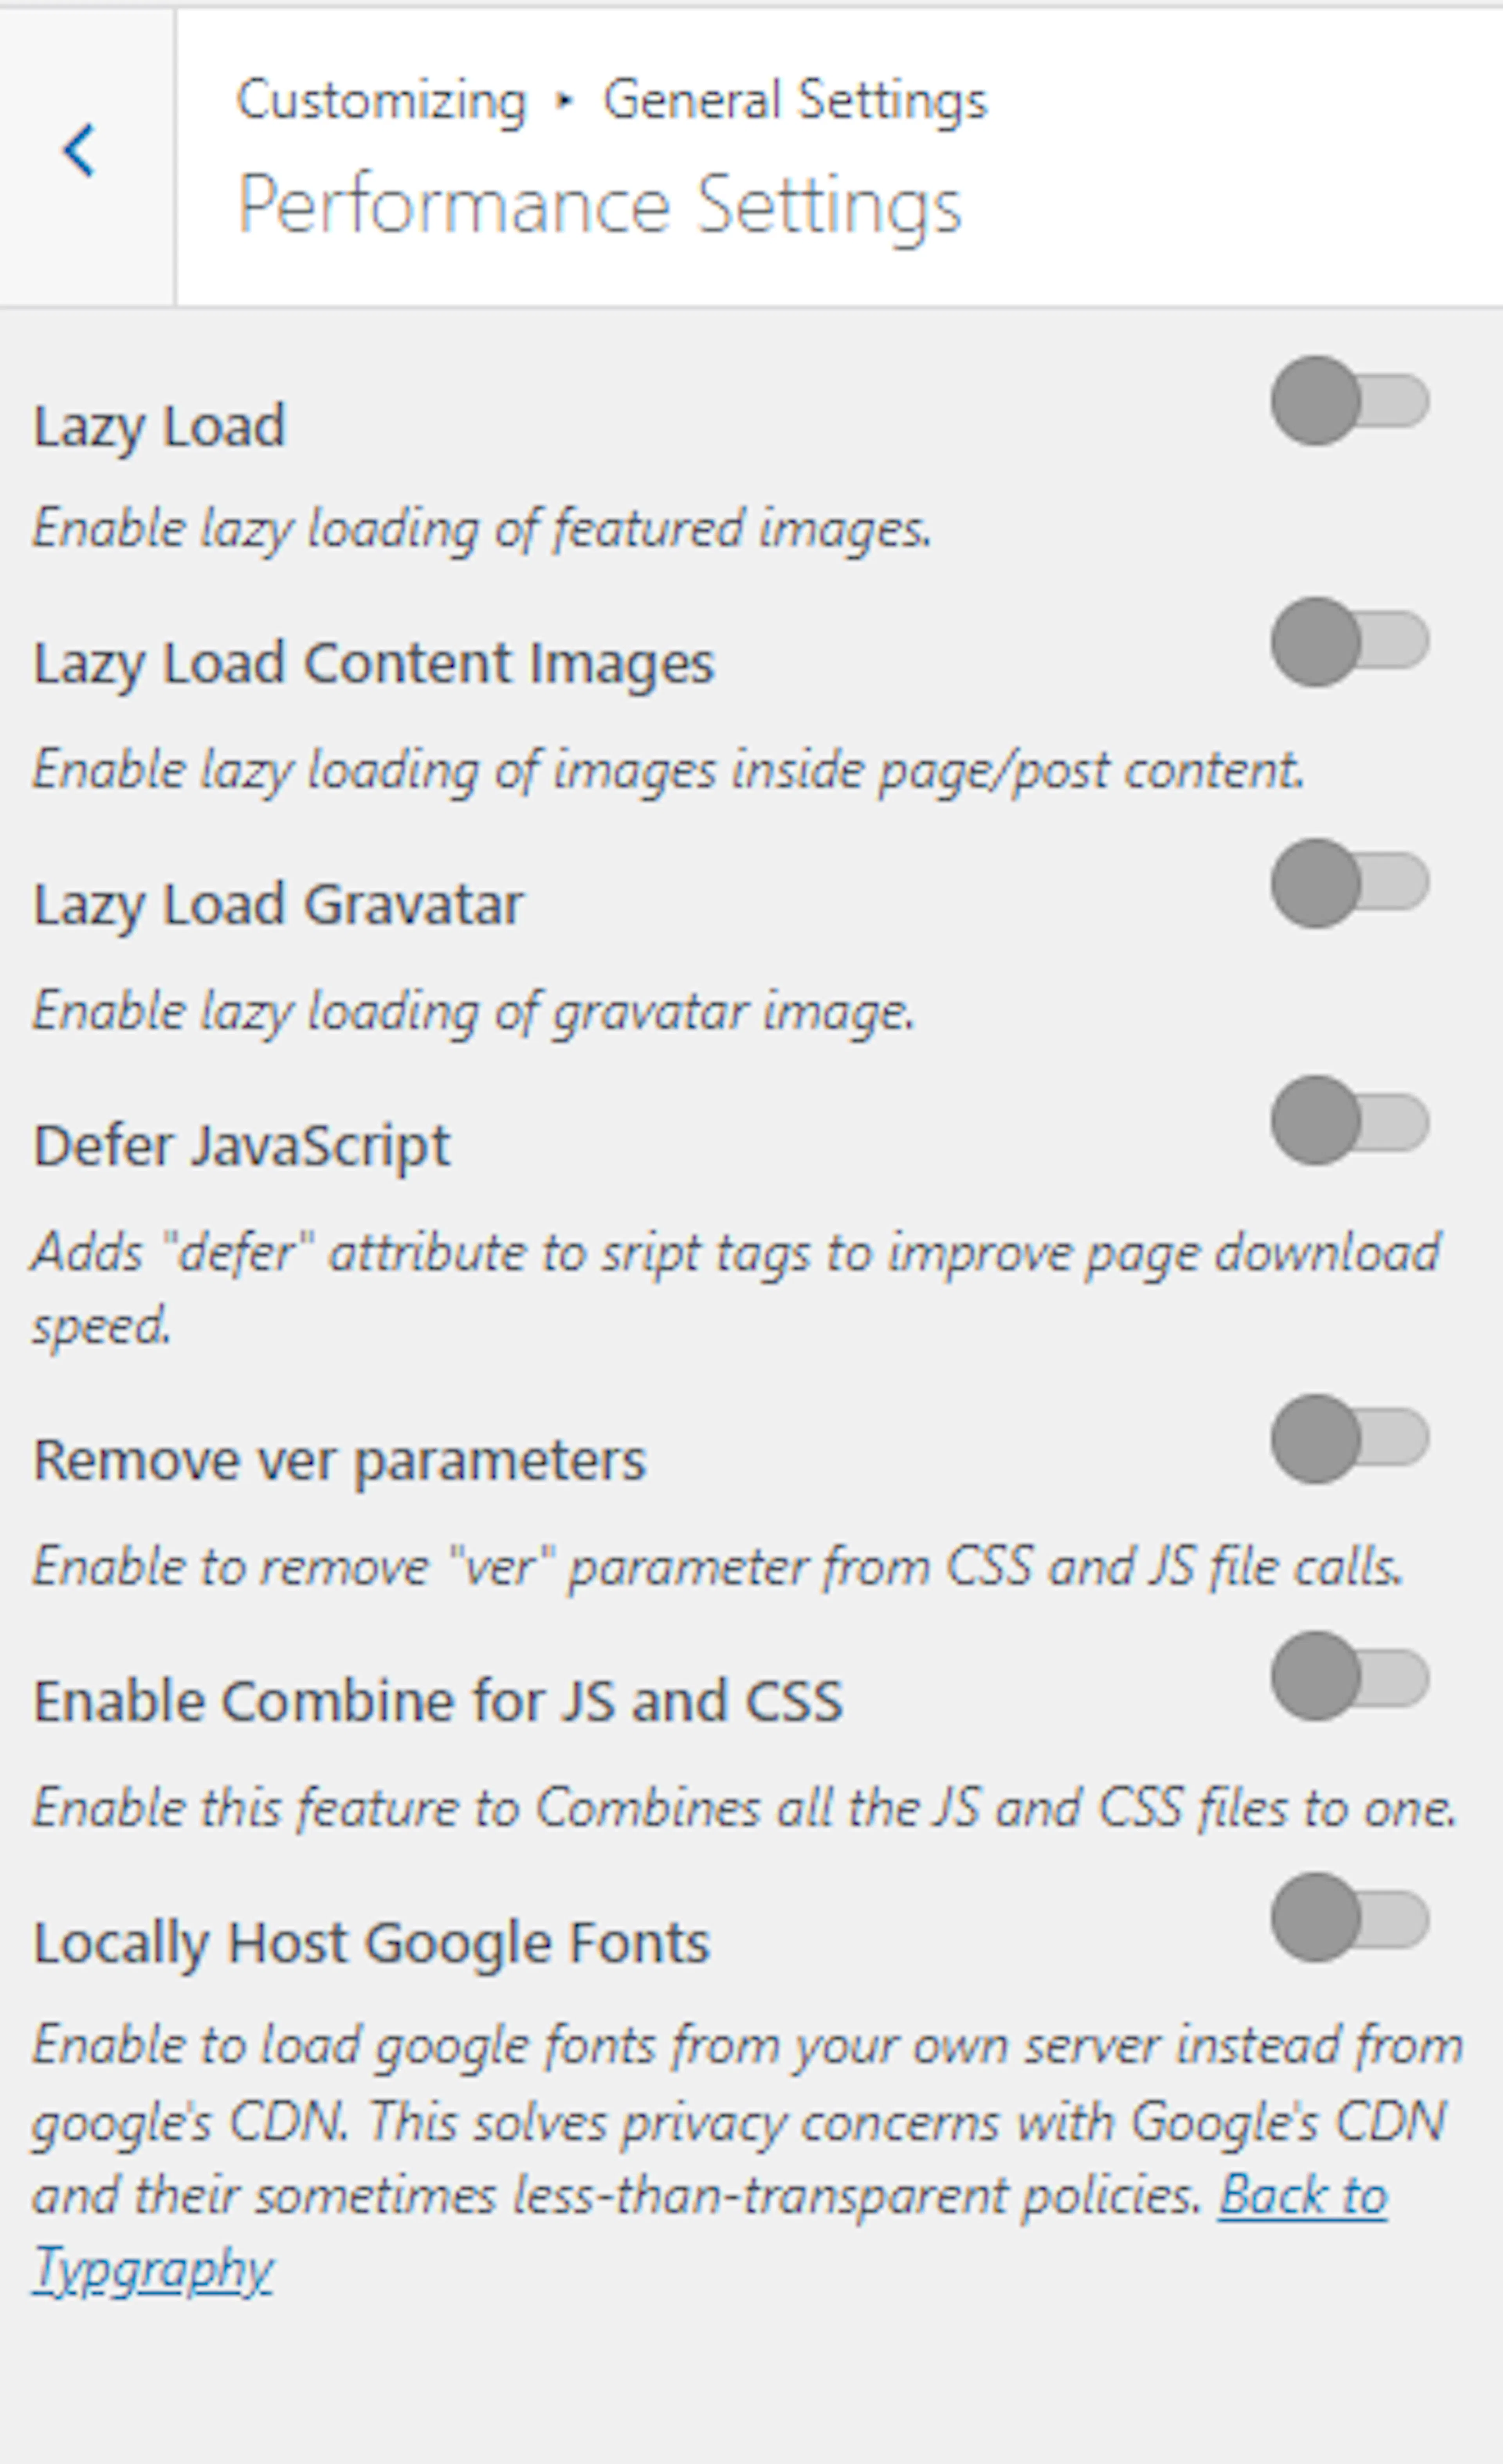
Choose loading and file options
Enable lazy loading for featured images, page and post images, and Gravatar images. Enable Defer JavaScript if you want scripts to load later. Enable Remove ver parameters to remove version parameters from CSS and JavaScript file calls.
Choose font and file options
Enable Combine for JavaScript and CSS if you want each type combined into one file. Enable Locally Host Google Fonts to load fonts from your own server instead of Google's content delivery network. Click Publish.
Misc settings
Miscellaneous settings control small display features across the site.
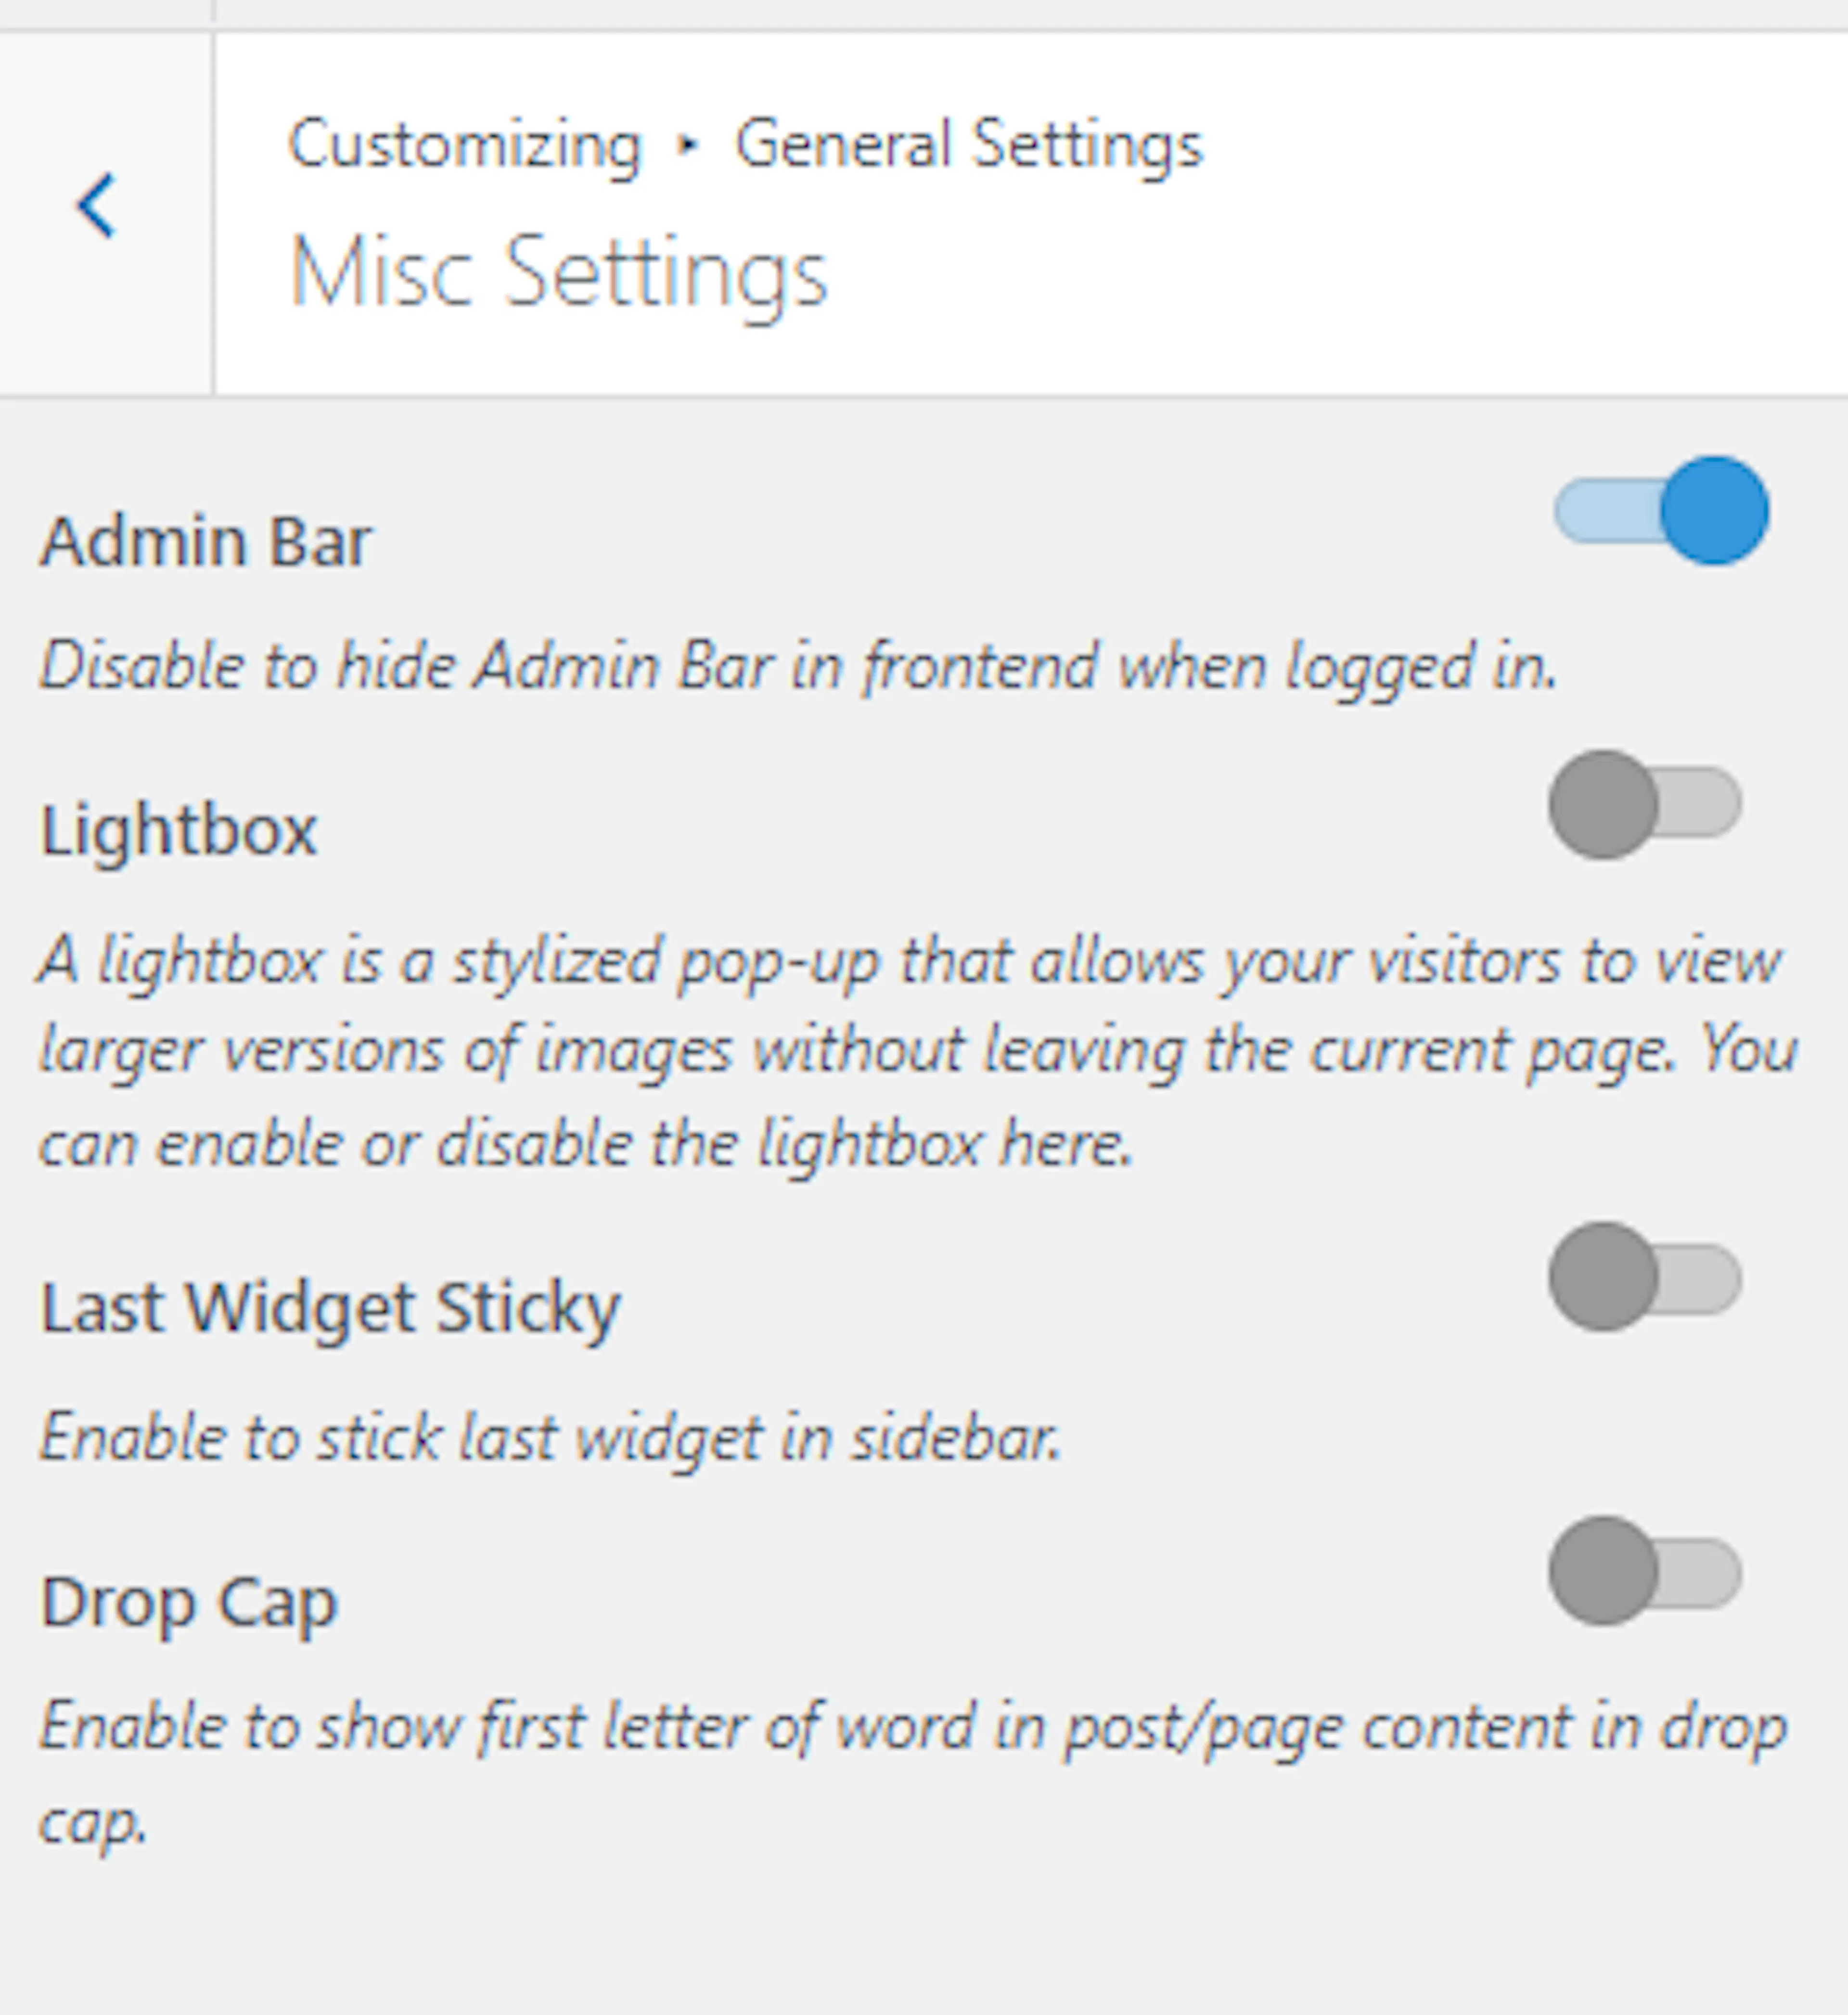
Configure miscellaneous options
Open Misc Settings. Choose whether to hide the Admin Bar on the front end. Enable or disable the Lightbox, Last Widget Sticky, and Drop Cap options, then click Publish.
Google Analytics settings
Google Analytics can help you understand how visitors use your site.
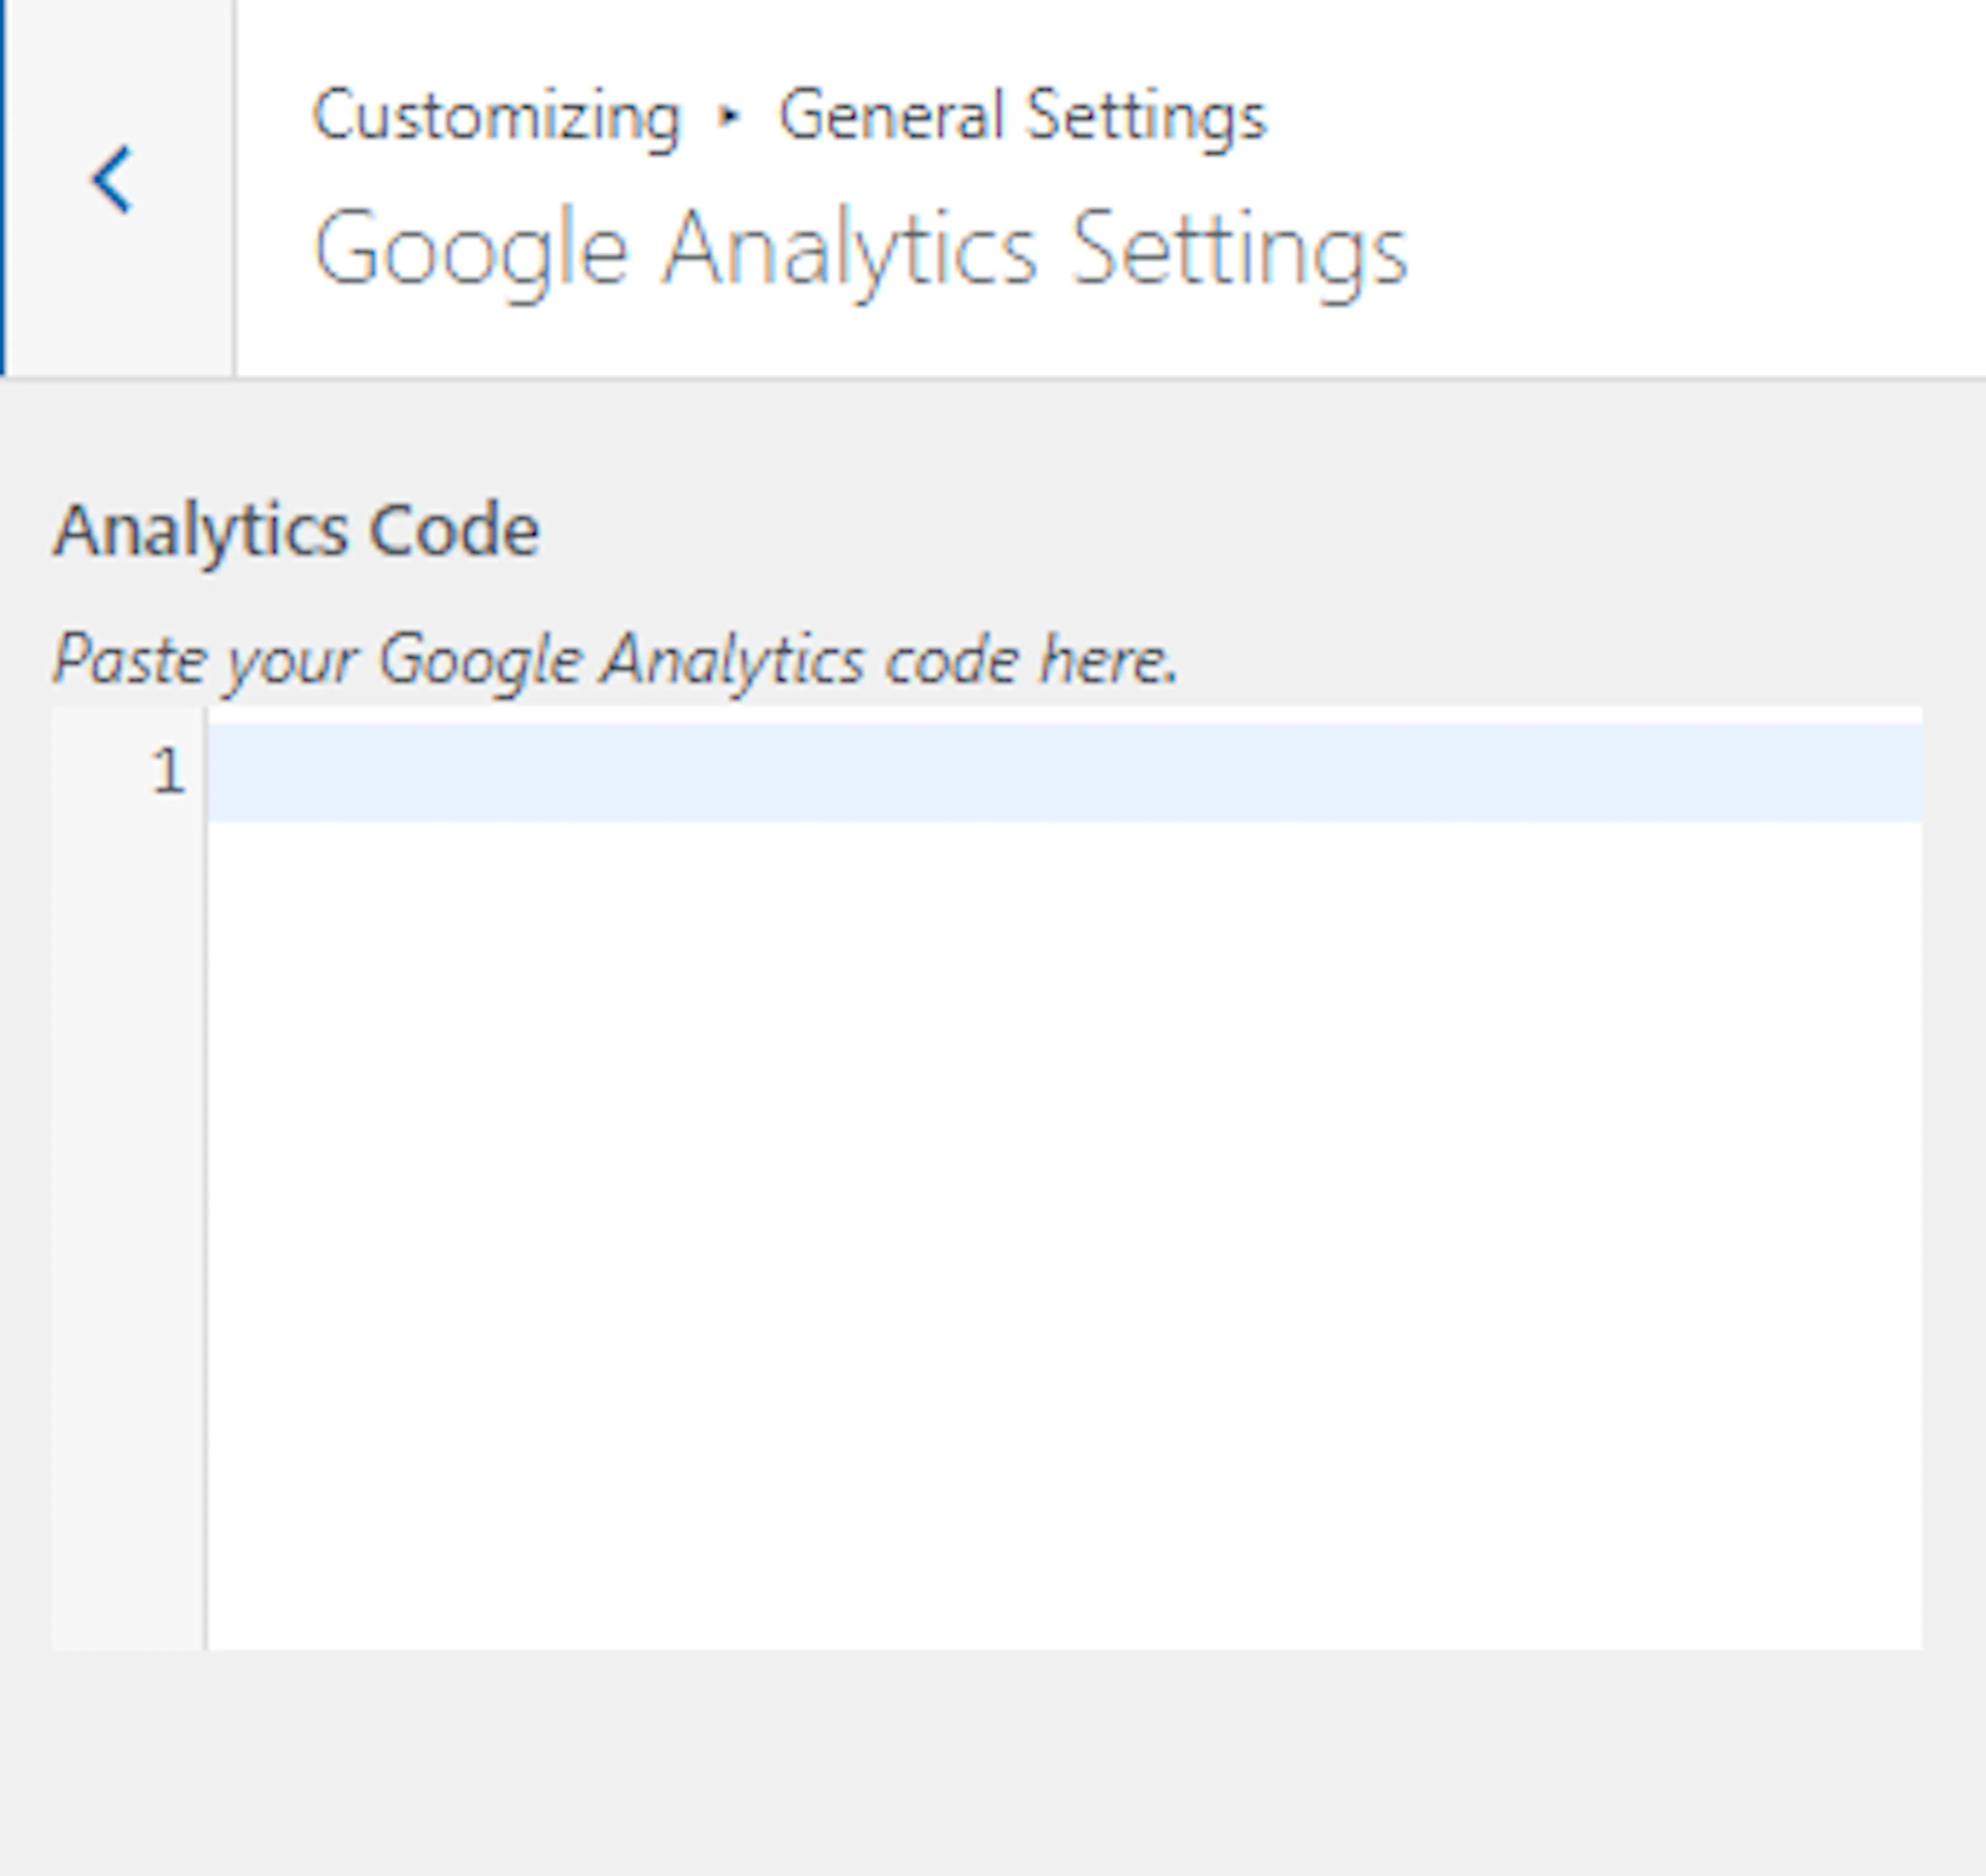
Add your analytics code
Open Google Analytics Settings. Add your Google Analytics code, then click Publish.
Your general settings are complete. The footer settings below control the final contact and payment information visitors see.
Footer settings
Footer settings keep your company information available at the bottom of every page.
Footer bottom settings
The footer bottom can show a description, phone numbers, WhatsApp, Viber, and email addresses.
Open Footer Bottom Settings
Open Footer Settings, then Footer Bottom Settings.
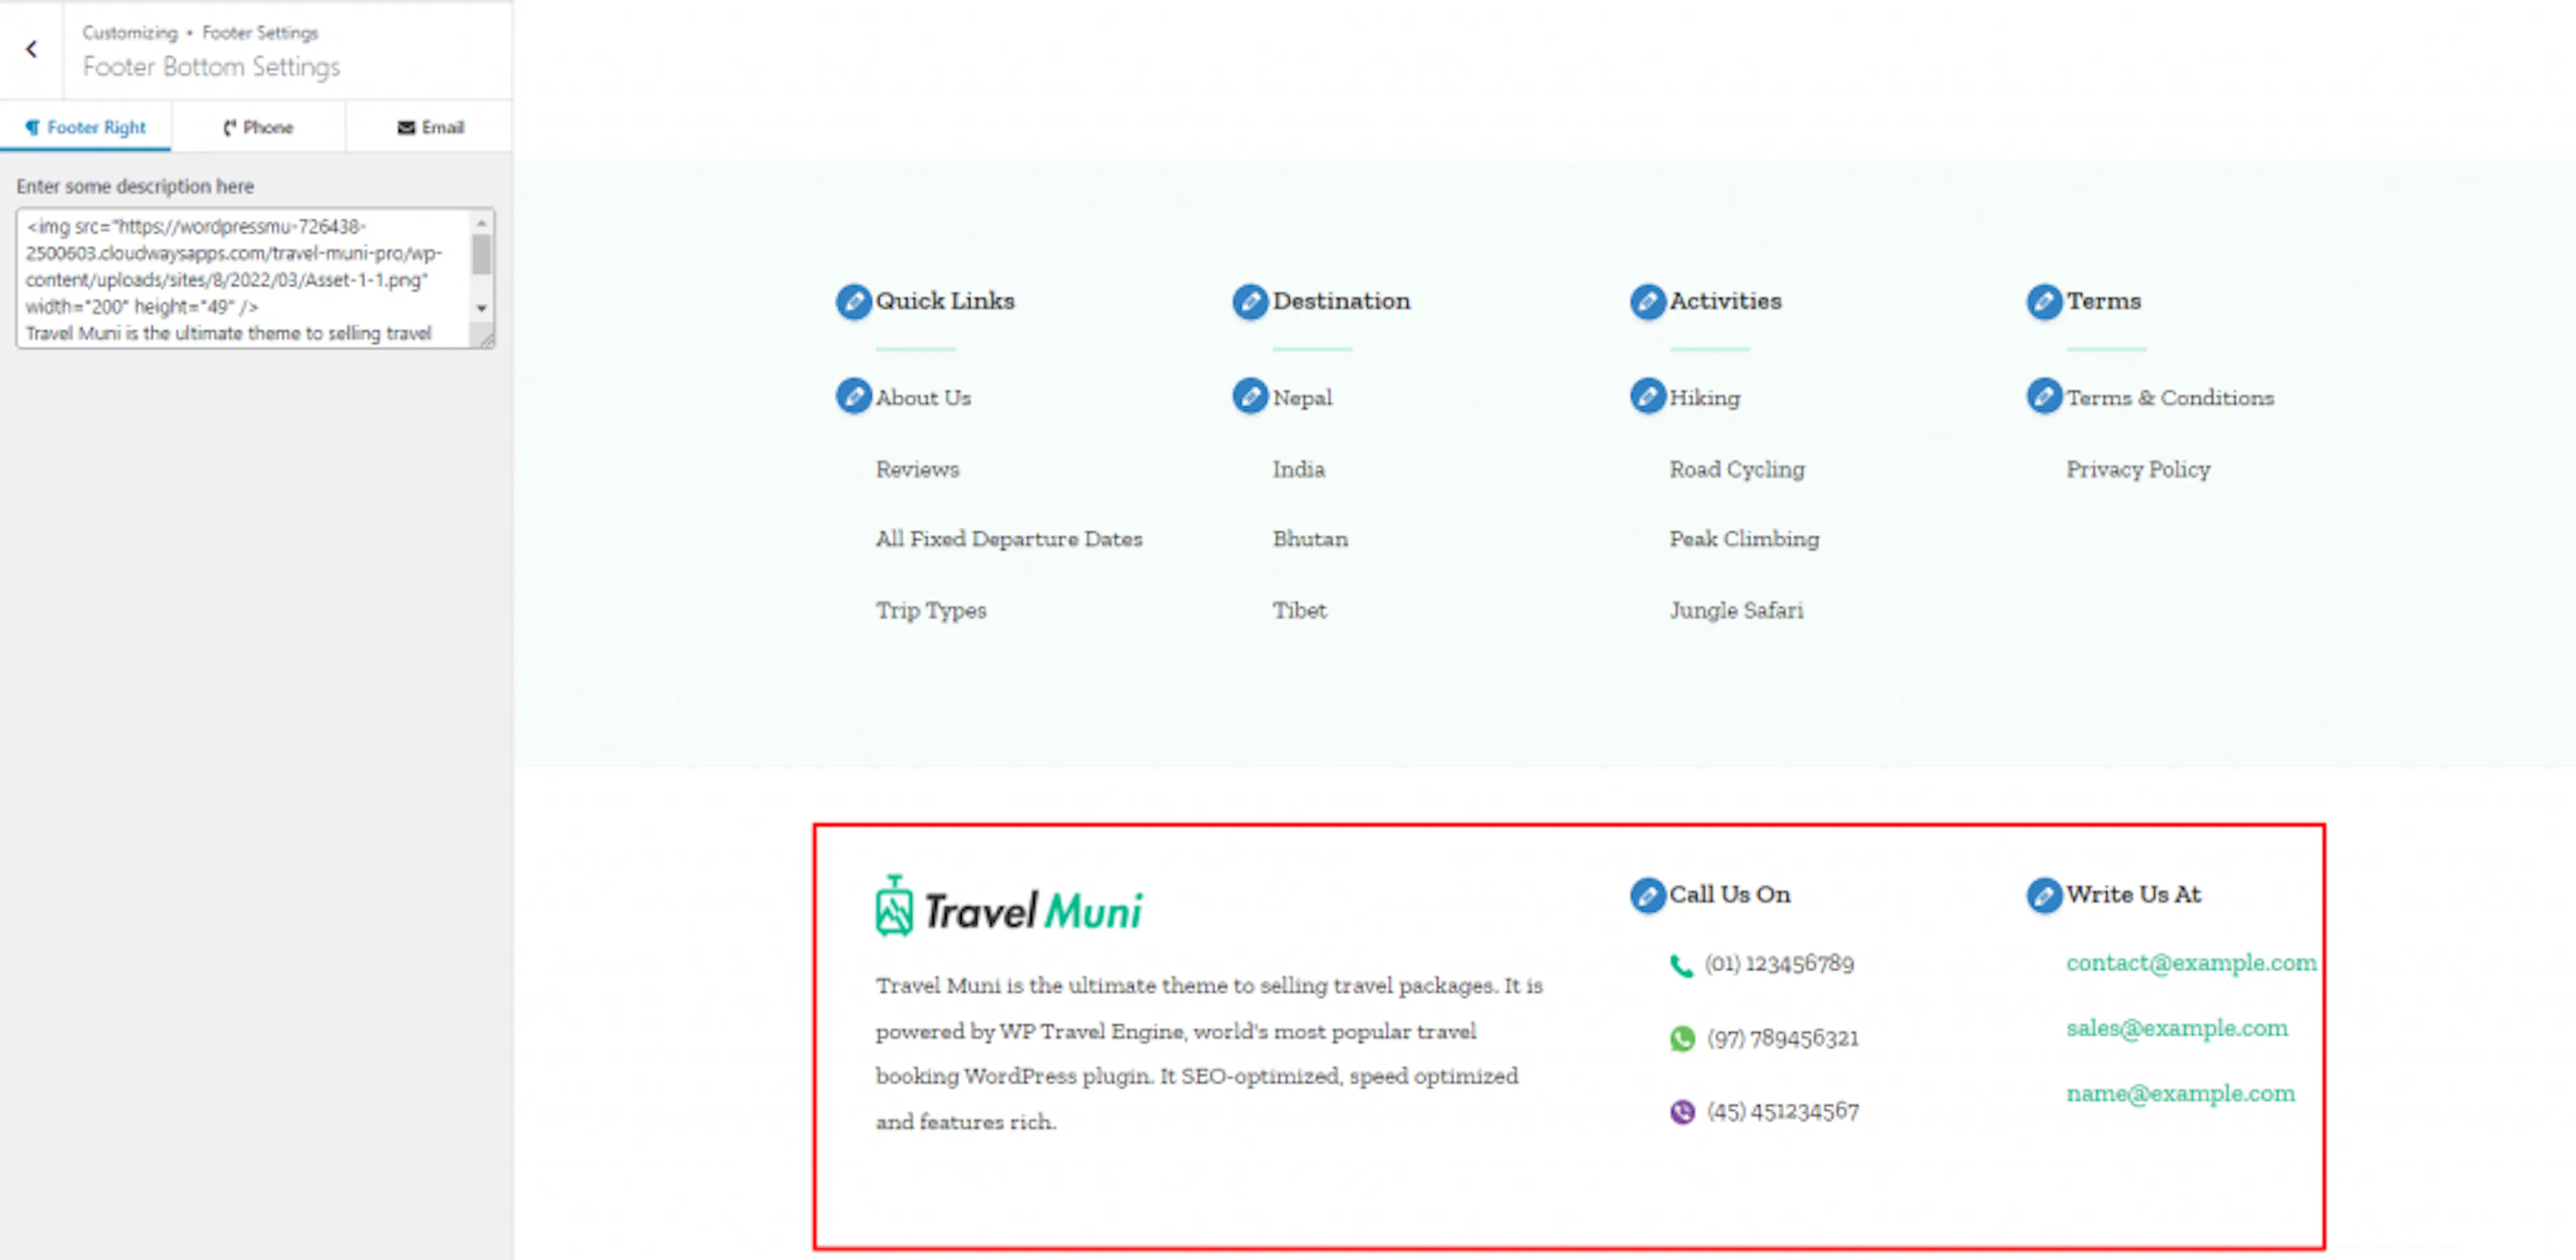
Add footer contact information
In the Footer Right tab, enter the footer description. In the Phone tab, enter the phone label, phone number, WhatsApp number, and Viber number. In the Email tab, enter the email label and email addresses. Click Publish.
Copyright settings
Copyright settings control the text and links at the bottom of your site. You can also show an image for accepted payments.
Add copyright information
Open Copyright Settings and enter the footer copyright text. Enable the options to hide the author link or WordPress link if you do not want them displayed.
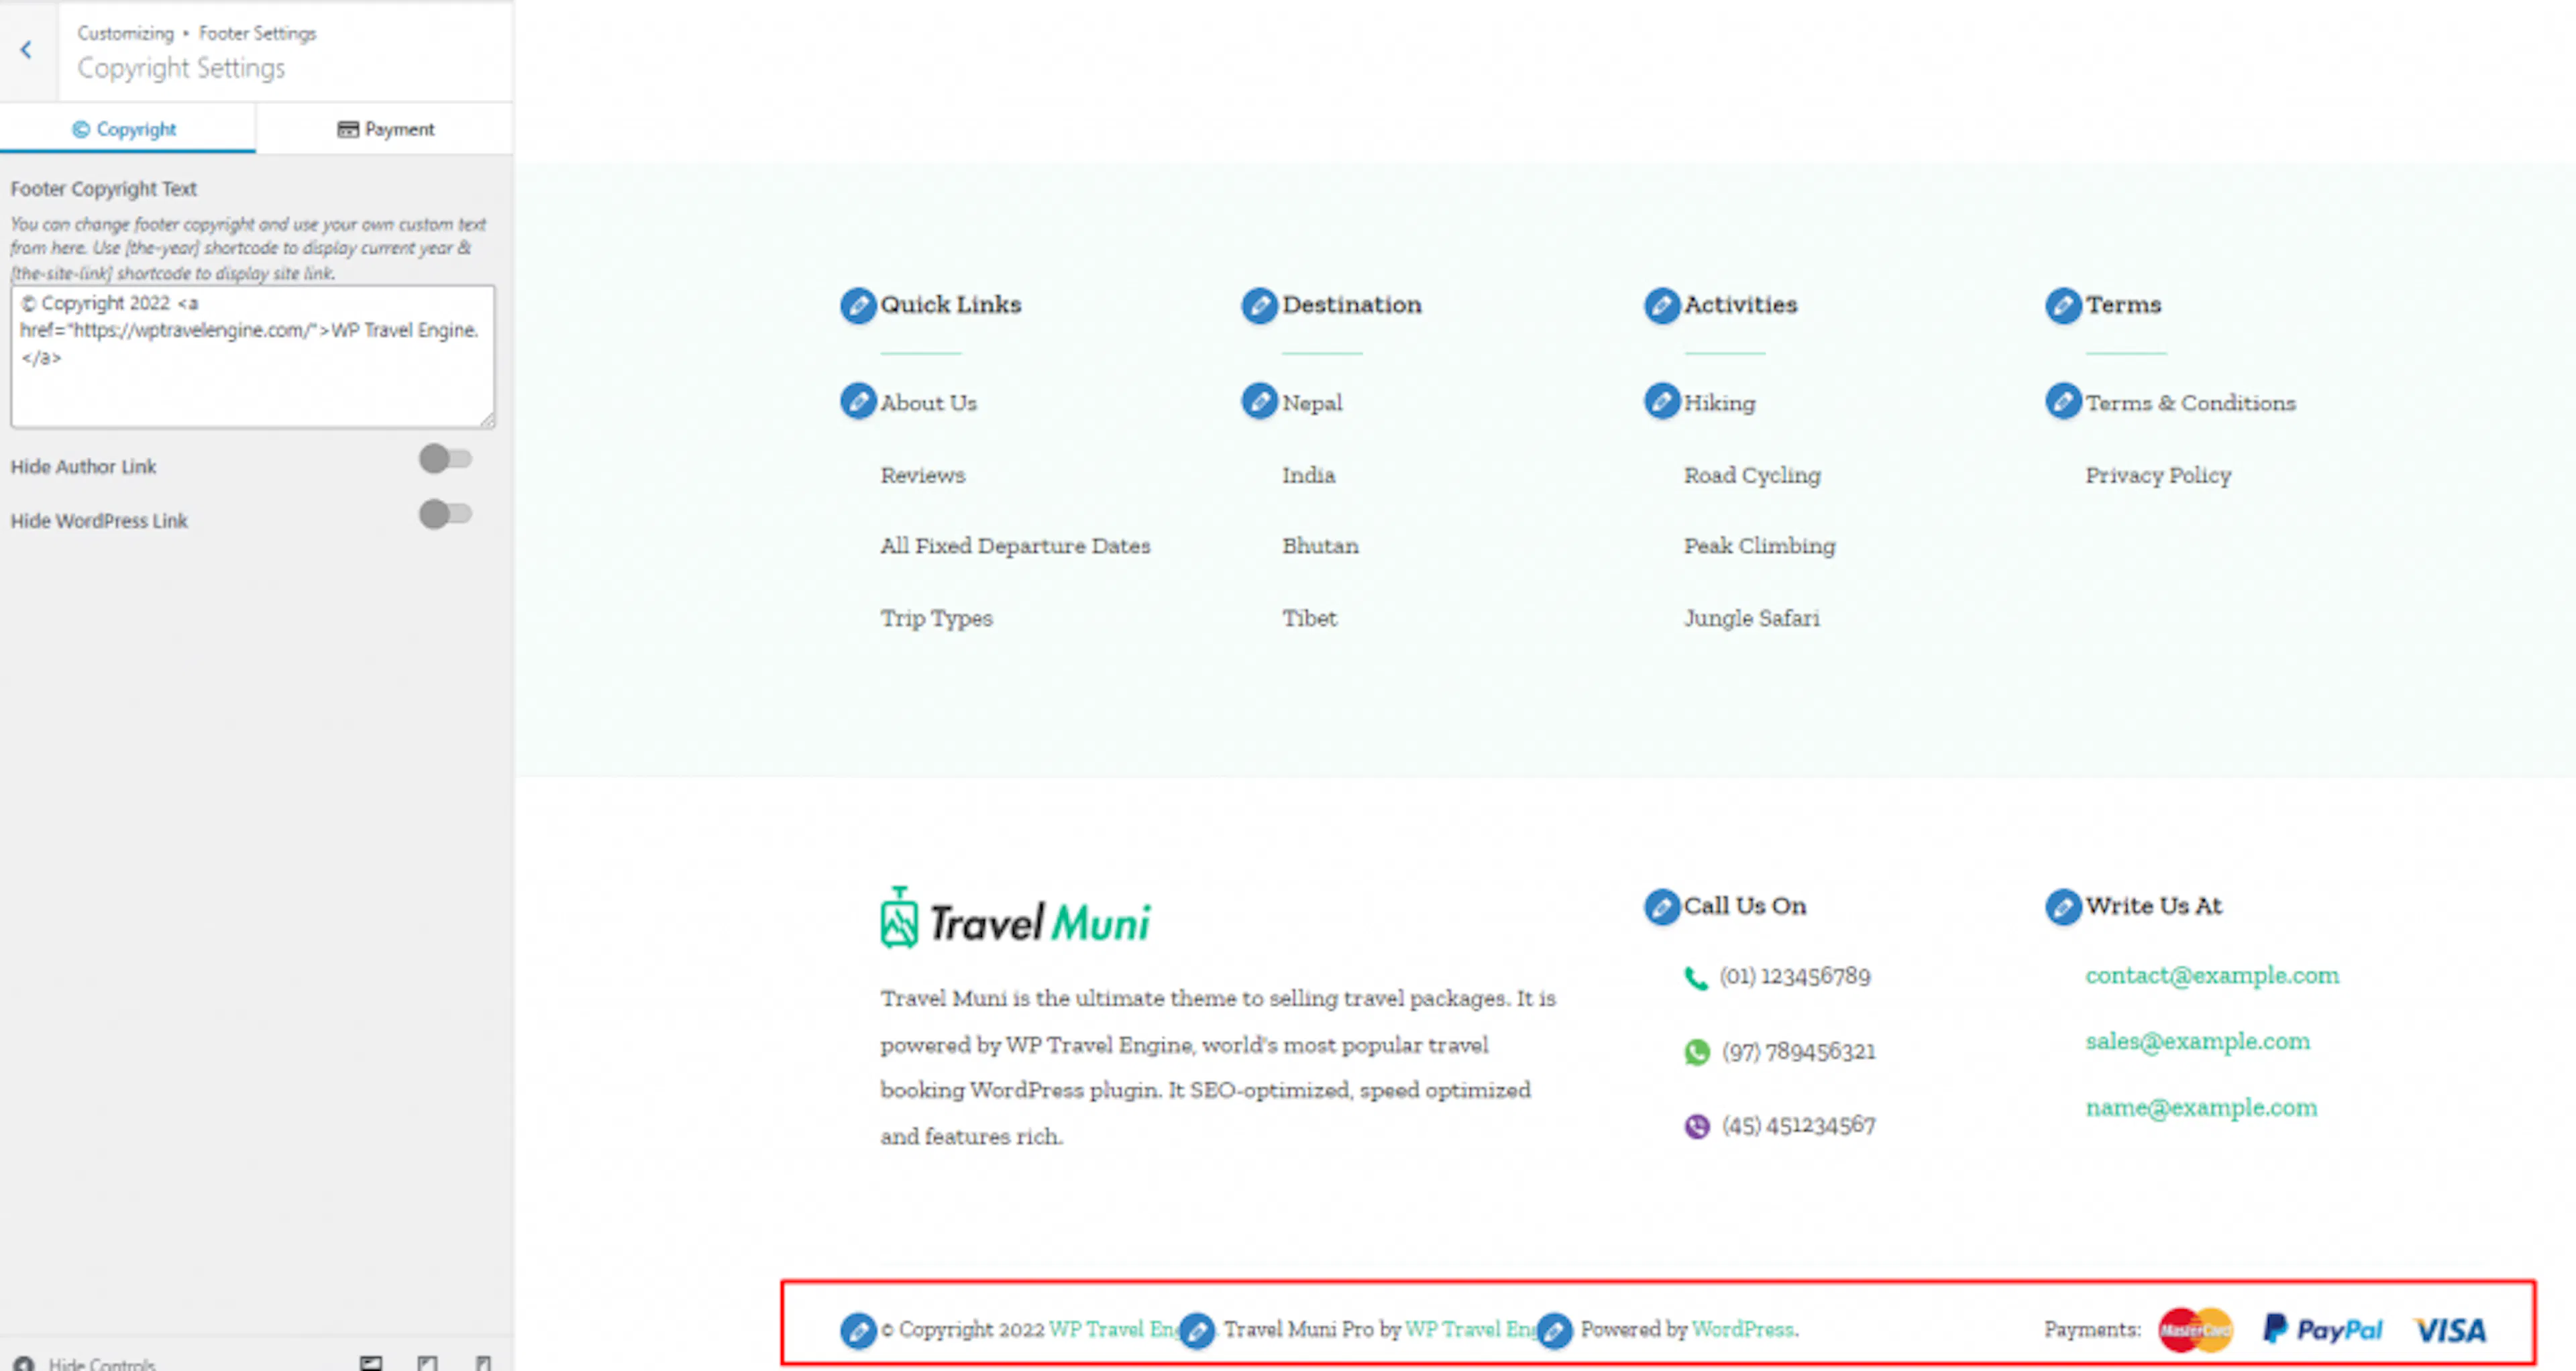
Add payment information
Open the Payment tab. Enter the payments label and add a payment image, then click Publish.
Your Travel Muni Pro site now has its installation, homepage, trip pages, contact details, and footer configured.
If you're still stuck or have a question we didn't cover, our support team is happy to help. Reach out at our support page and we'll get you sorted.
\