

Integrate WP Travel Engine with Ottokit
Connect WP Travel Engine with OttoKit to collect tour enquiries, send booking details to Google Sheets, and keep follow-up work moving automatically.
OttoKit helps you handle information from your tour website without copying it by hand. A plugin is a small tool you add to WordPress to give your website more features. Automation means OttoKit does a task automatically after something happens.
For example, when a traveler sends an enquiry for your 3-day trek, OttoKit can send the enquiry details to a Google Sheet or send you a WhatsApp message. You can spend less time moving information between tools and more time helping travelers.
What you'll need before you start
You will need WP Travel Engine installed and set up on your WordPress website, along with an OttoKit account.
What this integration does for your tour business
OttoKit connects the forms and booking activity on your WP Travel Engine website to the other tools you use every day.
- Collects enquiry details automatically: Save information from trip enquiry forms, including the subject or message, country, number of adults, and number of children. You do not need to copy each enquiry into another system.
- Keeps follow-up work moving: Set up OttoKit to start a task when someone sends an enquiry, books a trip, or updates a booking. For example, you can send a follow-up message after a traveler asks about a multi-day package.
- Keeps contact information in one place: Store traveler details in OttoKit so you can organize contacts for future trips, group discounts, or seasonal offers.
- Helps you understand your enquiries: Review details such as popular destinations, traveler countries, and group sizes. You can use this information when planning packages, add-ons such as gear rental, and marketing.
Connect WP Travel Engine with OttoKit
You can follow the video below for a guided walkthrough of the OttoKit setup. The steps after the video explain each part in plain language.
Step 1: Add the OttoKit plugin to WordPress
Adding the plugin gives your WordPress website a way to send WP Travel Engine information to OttoKit.
Open your WordPress dashboard
Log in to your WordPress dashboard. The dashboard is the control area for your website.
On the left side of the screen, open Plugins, then choose Add New. Search for OttoKit and click Install.
After the installation finishes, click Activate. Then click Get Started in the plugin settings.
Sign in to OttoKit
OttoKit needs to know which account should receive your tour enquiries. When the OttoKit login screen opens, sign in with your OttoKit account details.
After you sign in, OttoKit opens your dashboard. This is where you create a workflow. A workflow is a set of automatic steps that begins when a chosen event happens.
Make sure you already have an OttoKit account. If you do not have one, create your account before continuing.
Step 2: Create a workflow for new enquiries
The workflow tells OttoKit what to watch for. In this case, you want it to notice when a traveler submits a trip enquiry.
Choose the enquiry event
In the OttoKit dashboard, click Create Workflow near the top of the page.
Choose WP Travel Engine as the Trigger App. A trigger is the event that starts an automatic task.
Under the trigger events, choose New Enquiry Submitted. This tells OttoKit to start when someone sends an enquiry form from your website.
Connect your WordPress website
Choose the WordPress website where WP Travel Engine is installed. Click Connect to link that website to OttoKit.
When the connection is ready, you can continue setting up the workflow for your tour enquiries.
Your website name should appear in the connection list if OttoKit is installed and connected correctly.
Step 3: Test the connection and fetch sample data
Sample data lets OttoKit see the information your enquiry form collects. This makes the correct fields available when you connect another tool.
Send a test enquiry
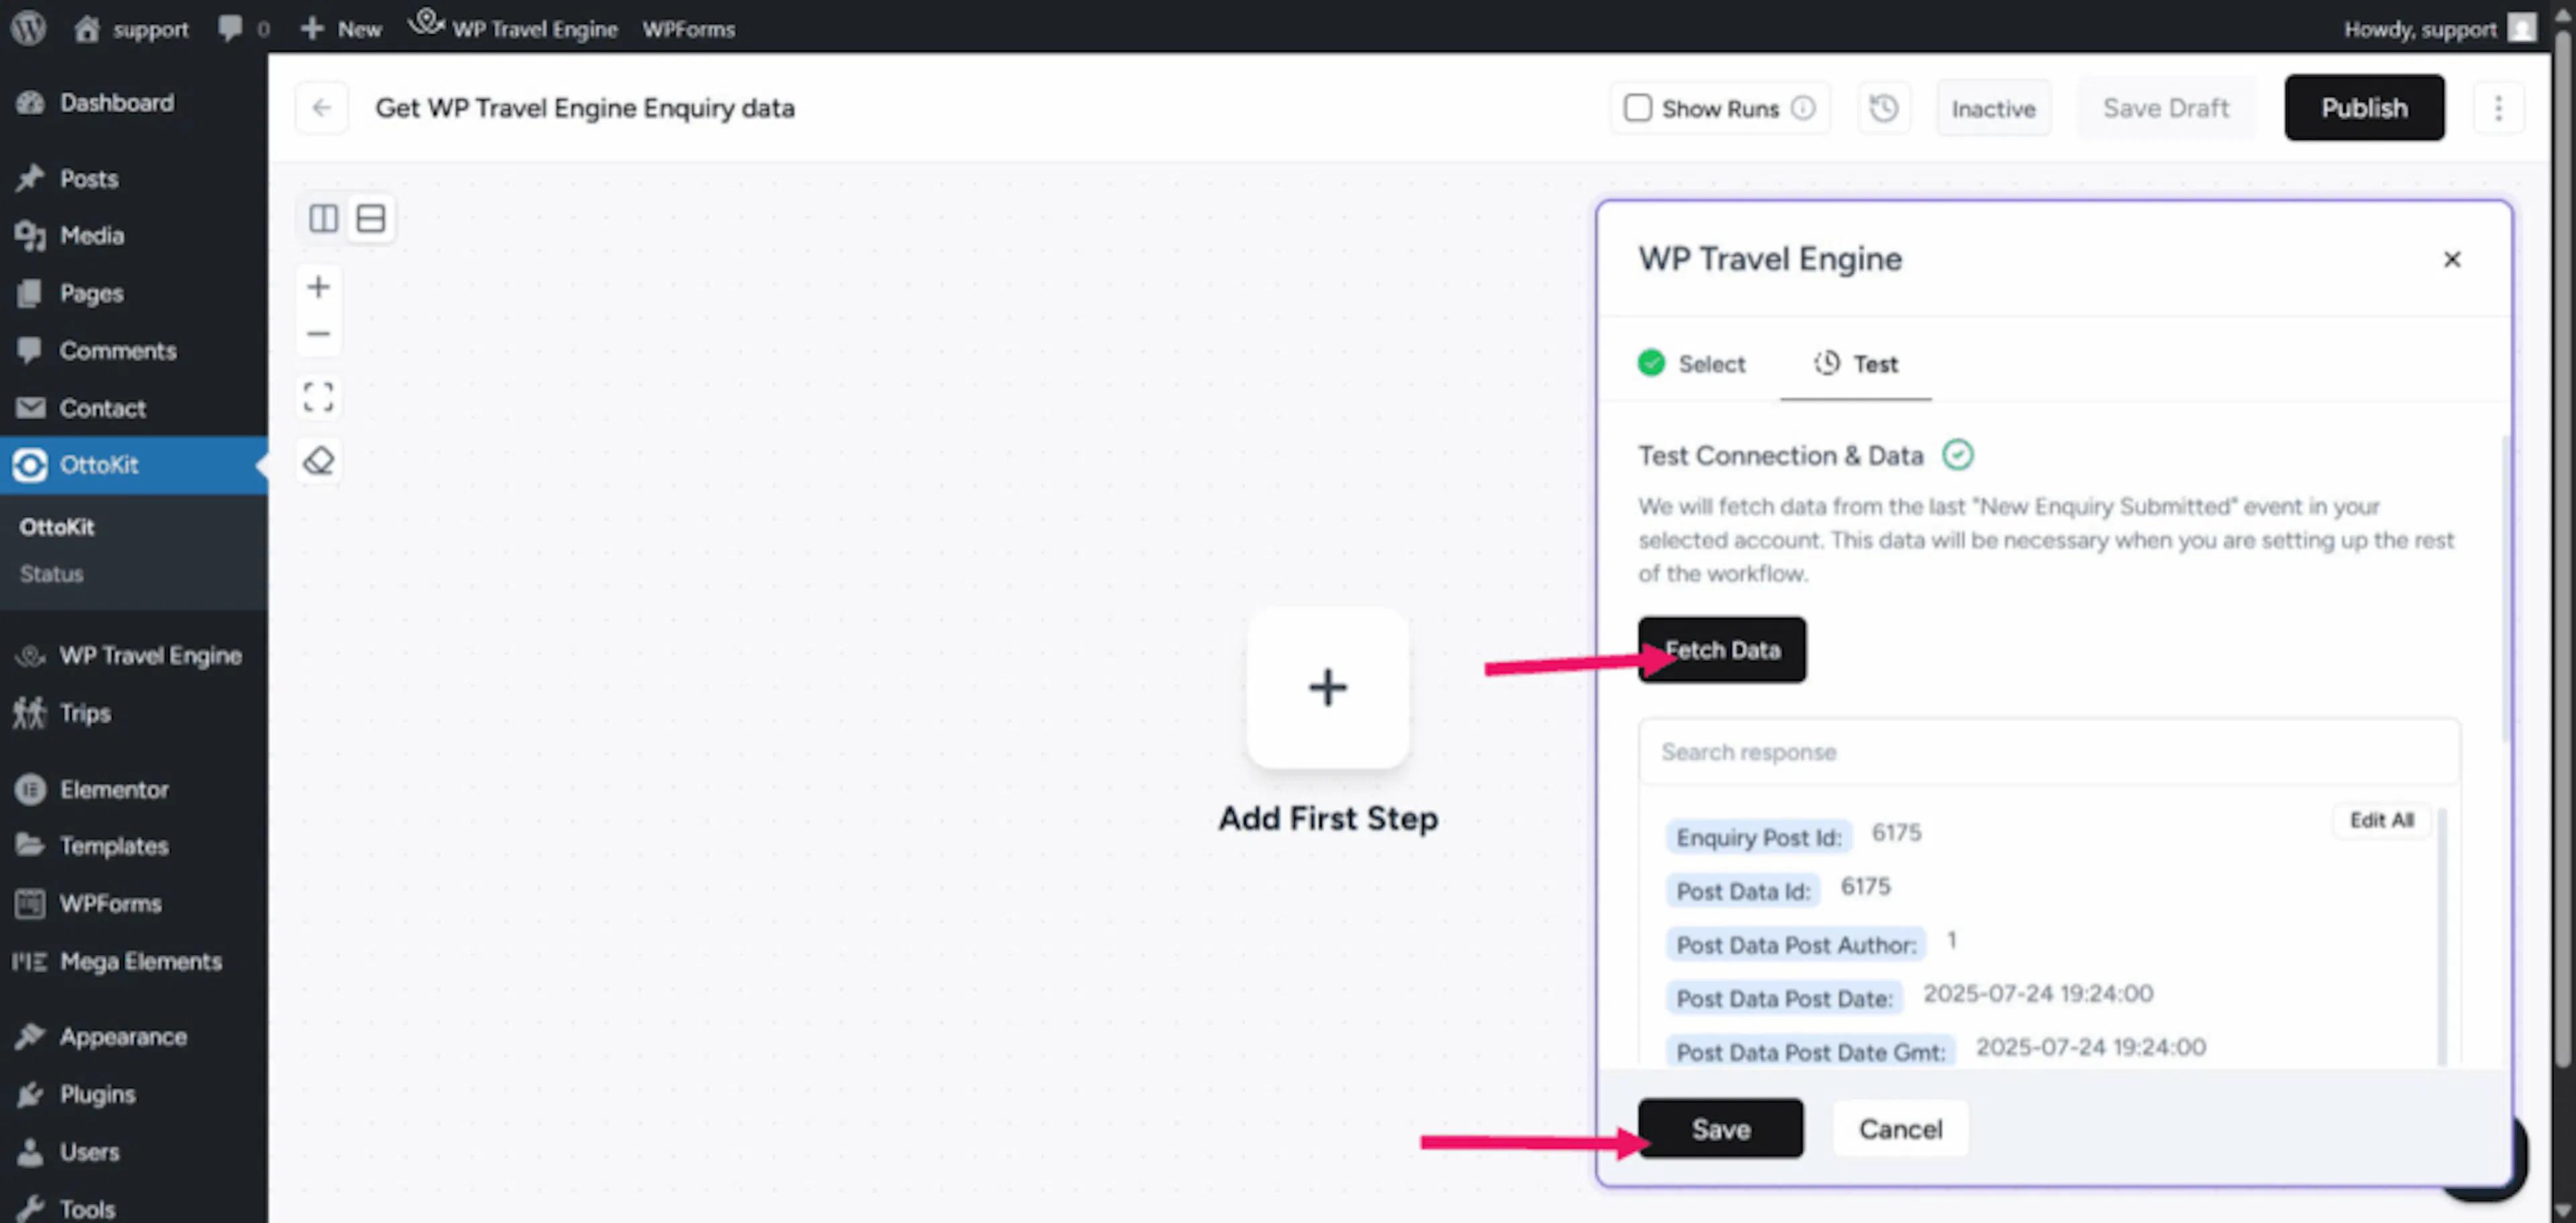
Click the Test tab in OttoKit.
Open your website and submit an enquiry form. You can use a real enquiry or a sample enquiry. For example, enter a country, two adults, and one child for a trekking enquiry.
Click Fetch Data in OttoKit. OttoKit will bring in the information from your latest enquiry.
OttoKit can now recognize fields such as:
- Subject or Message
- Country
- Number of Adults
- Number of Children
Save the sample information
Check that the fields look correct, then click Save. You are ready to connect the enquiry details to another app.
Step 4: Add other events if needed
You can add more events when you want OttoKit to respond to other activity on your website. Useful examples include:
- Trip Booked
- Booking Status Updated
- Trip Viewed
For example, you could create a separate workflow for a confirmed booking so your team knows when a traveler has paid for a multi-day package.
Add another event
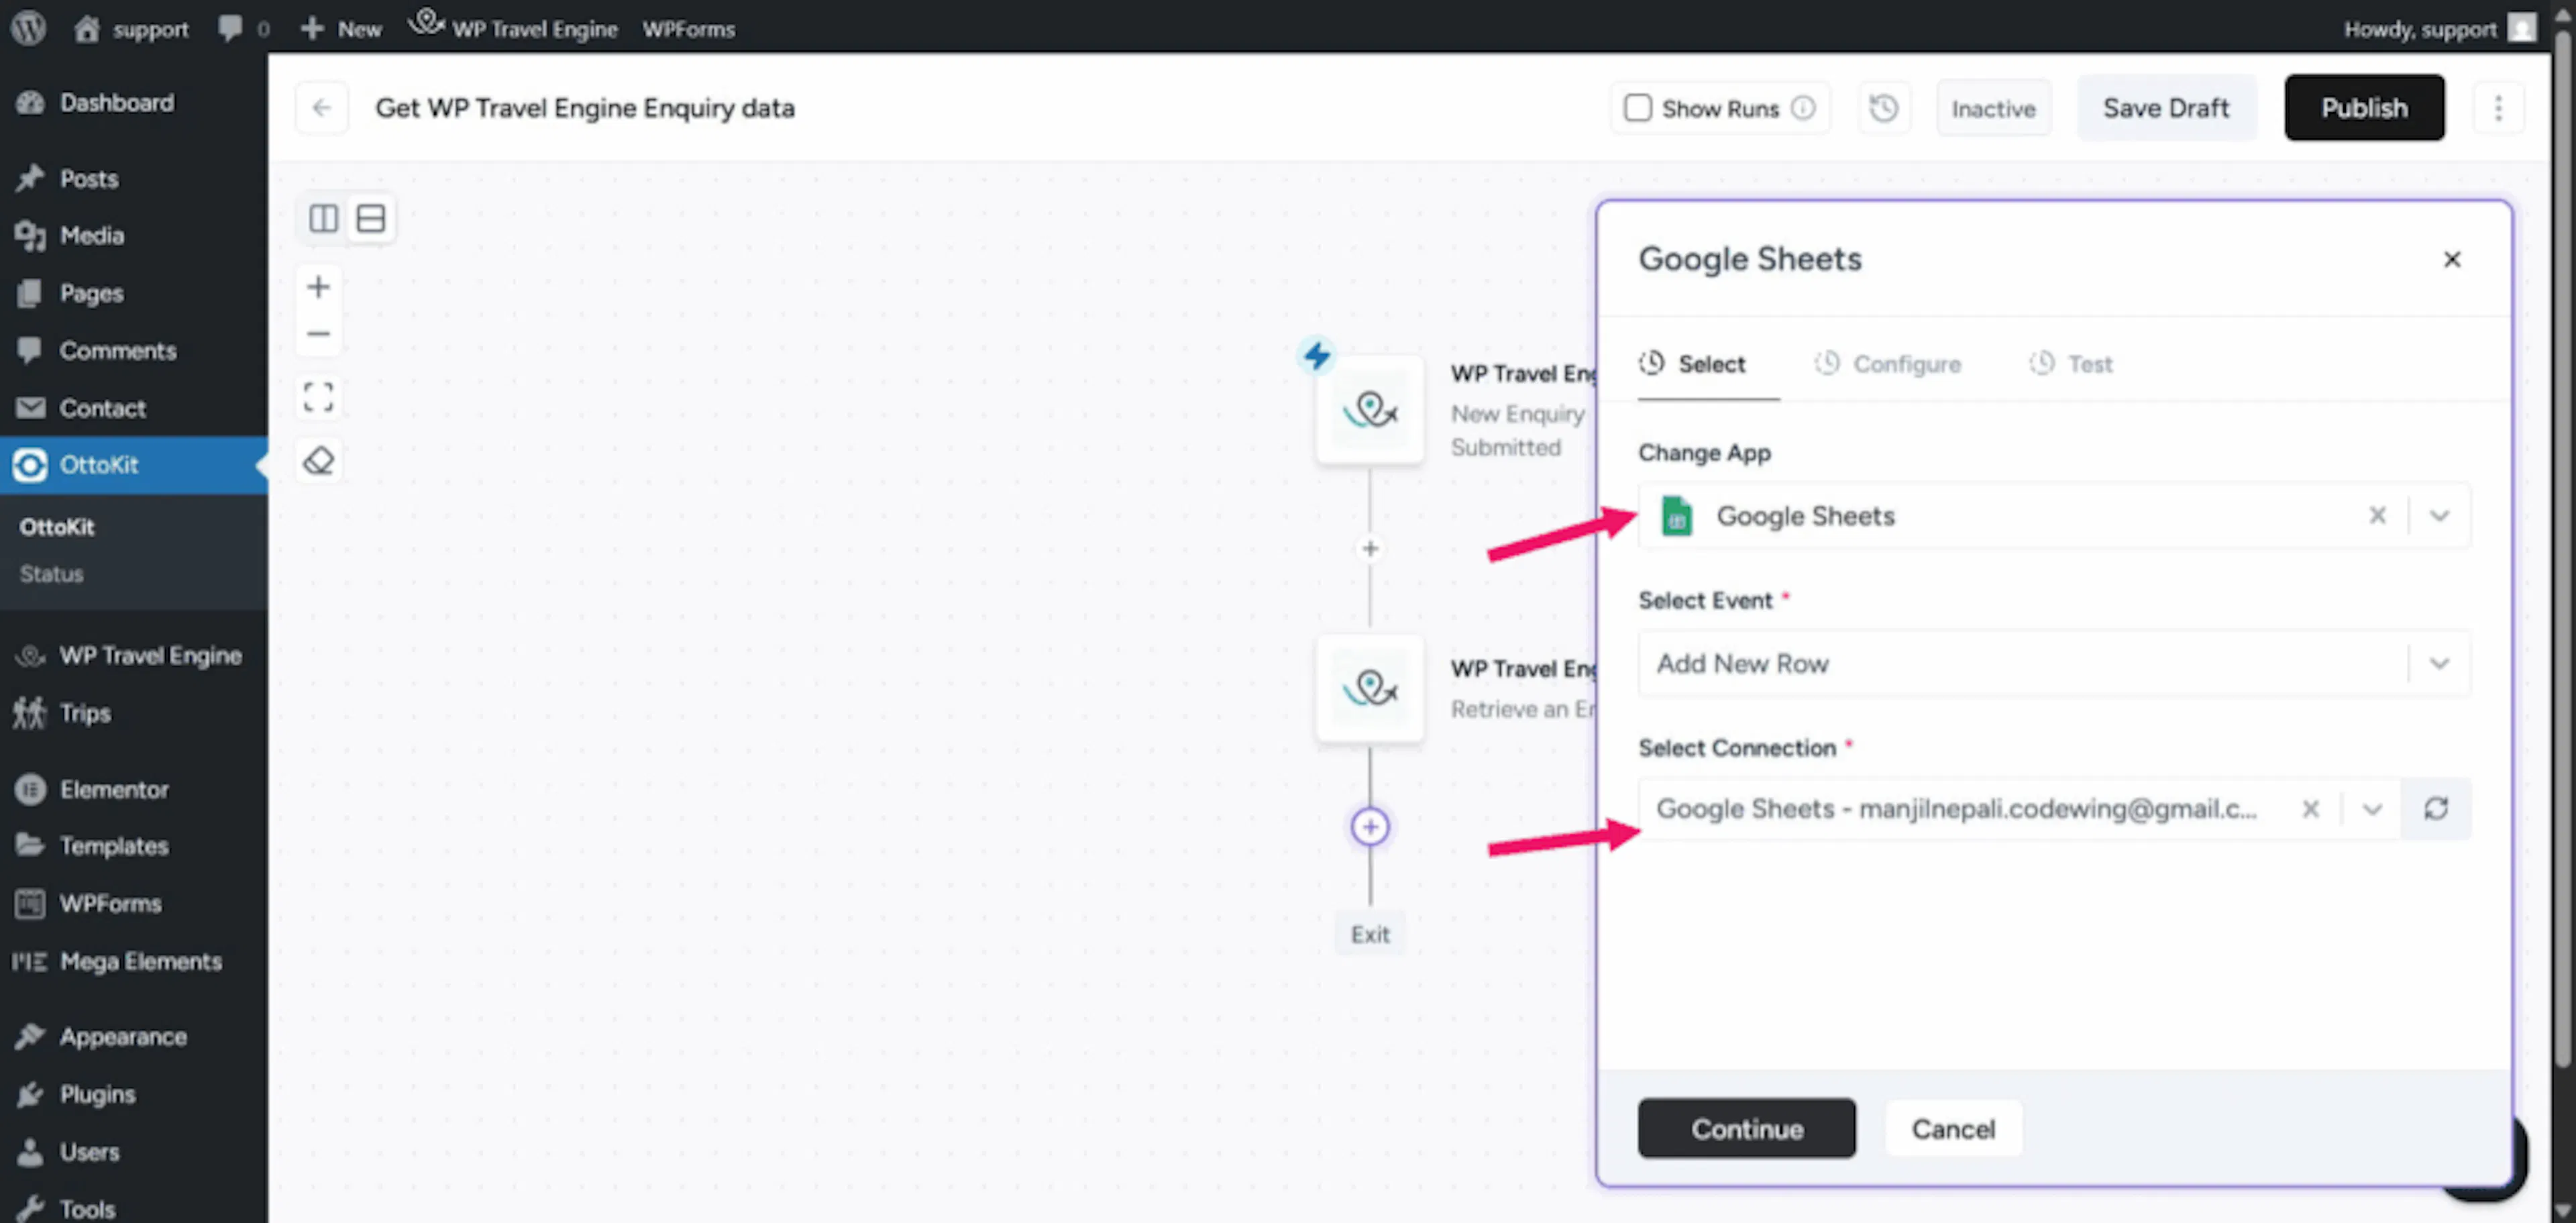
Click the + icon in the workflow builder to add another app or event.
Choose WP Travel Engine again, then select the new event you want to follow.
Use additional events when you want to automate actions after bookings or other traveler activity, not only after enquiries.
Step 5: Add Google Sheets as an action
An action is what OttoKit does after the trigger happens. Google Sheets is a useful choice when you want your team to see new enquiries in one shared list.
Choose Google Sheets
Click the + icon to add a new Action Step.
Choose Google Sheets as the app where you want to store the enquiry information. Under the action list, choose Add New Row.
Connect your Google account
Click Create New Connection and choose the Google account that has access to your enquiry spreadsheet.
Authorize access when Google asks. Use the account that your tour team uses for the sheet.
Sign in with the Google account that can open and edit the spreadsheet you want to use.
Step 6: Connect the enquiry fields to Google Sheets
Field mapping means matching each piece of information from OttoKit with the correct column in your Google Sheet. For example, you can match the OttoKit Country field with a Country column in the sheet.
Choose your spreadsheet and sheet
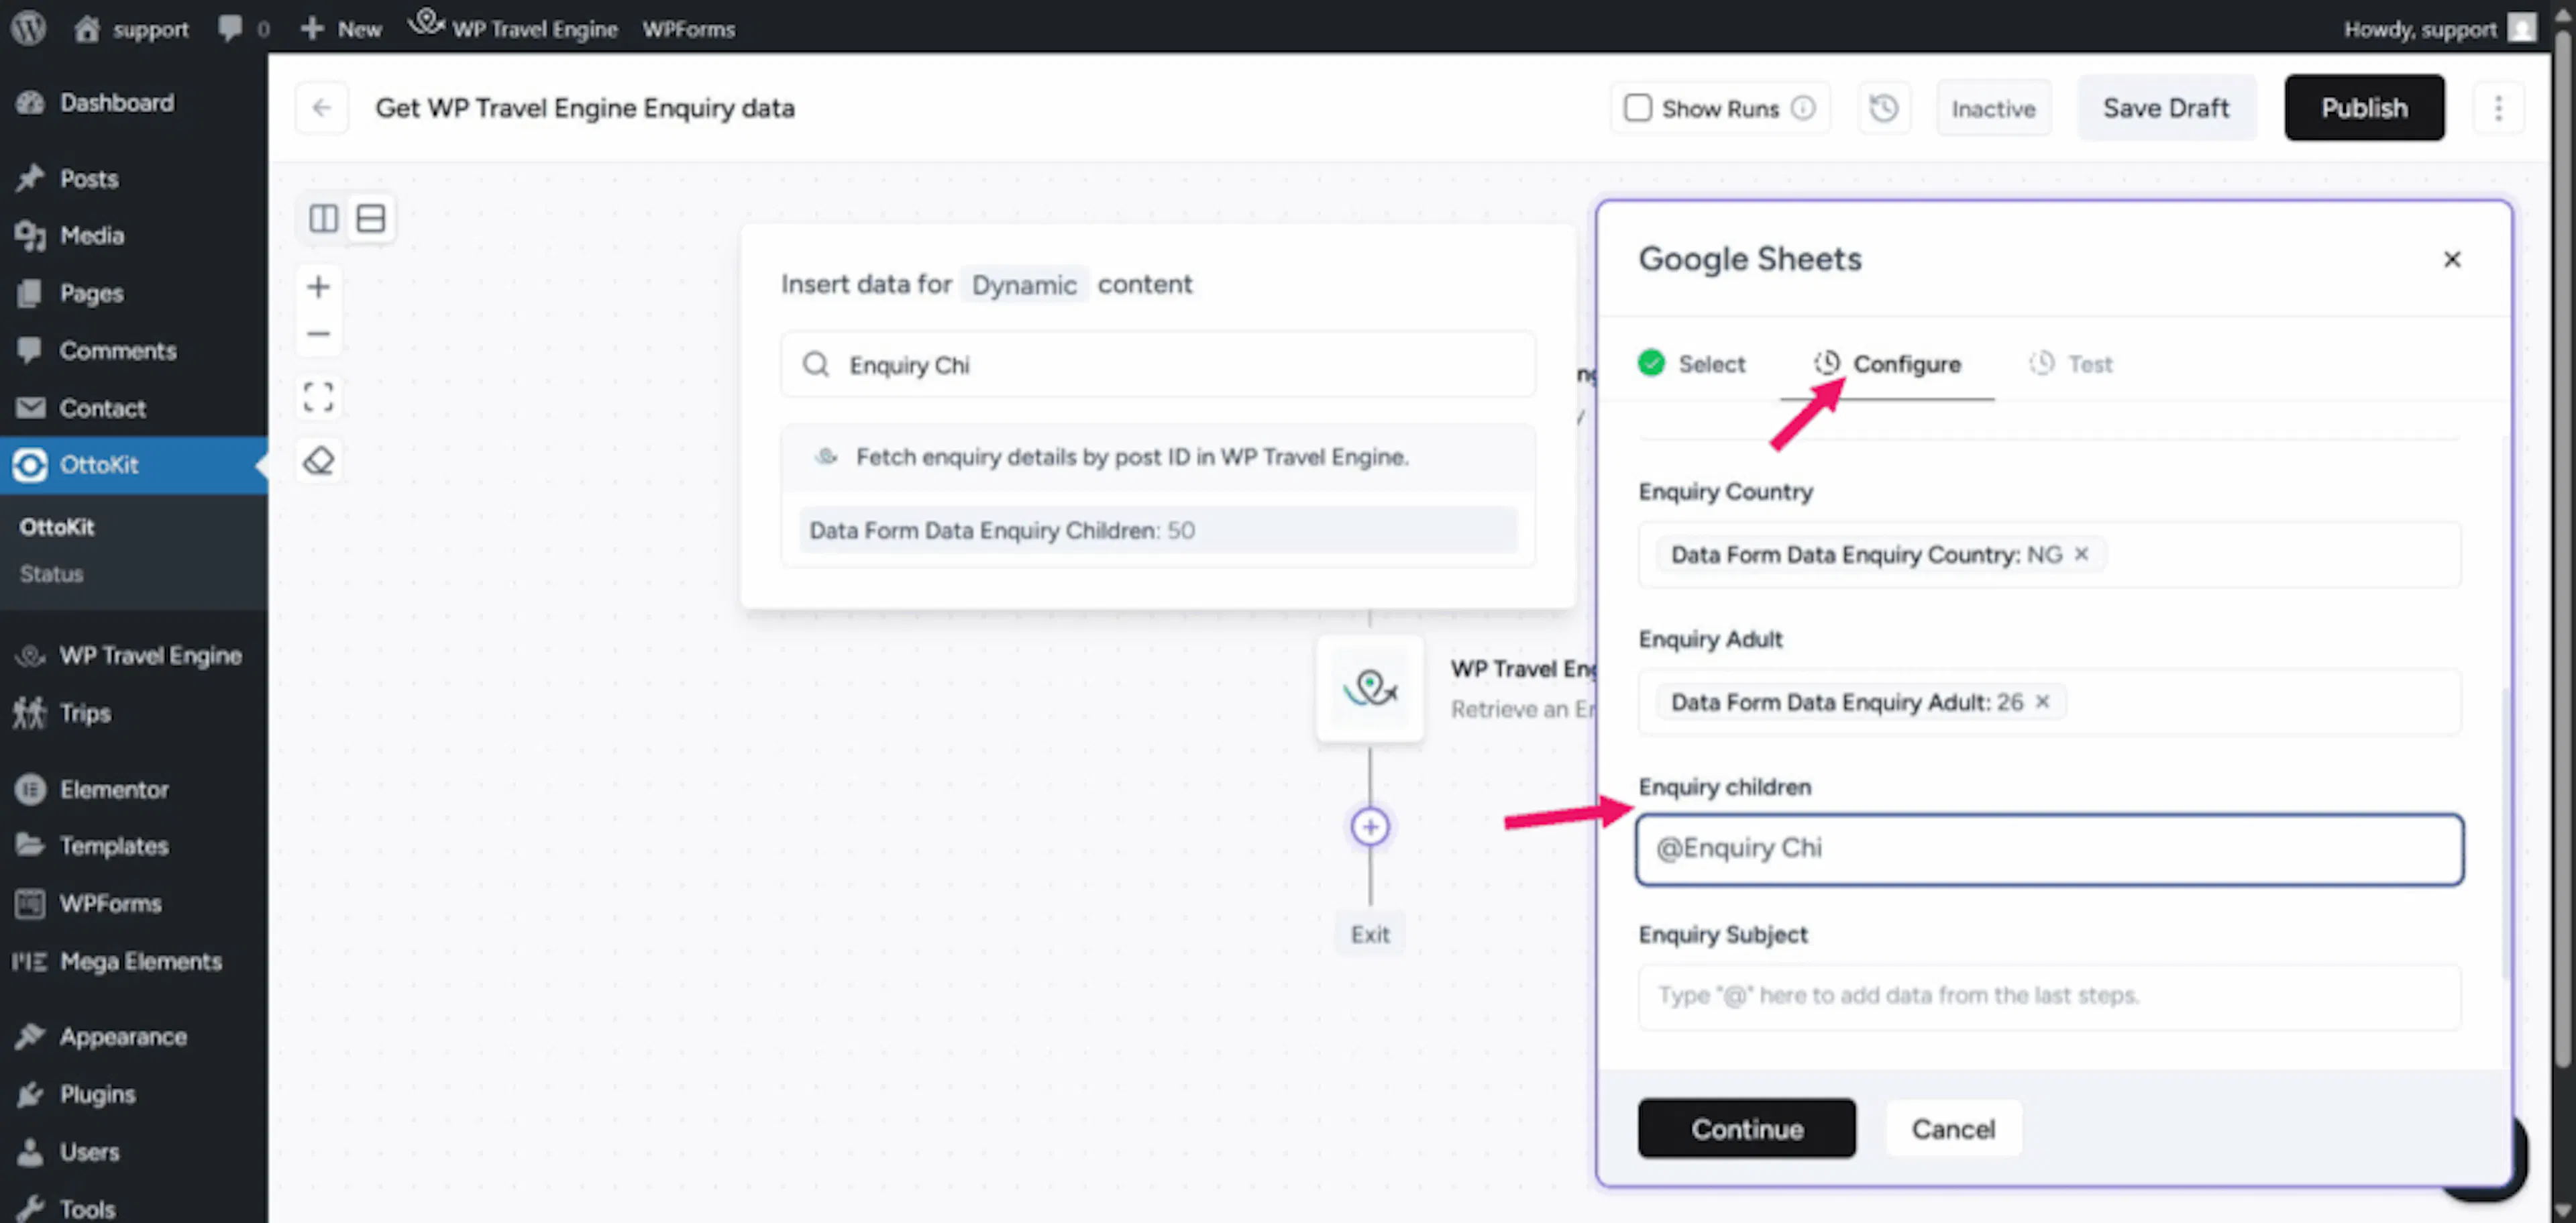
Open the Configure tab.
Choose the spreadsheet where you want to save enquiry information. Then choose the sheet, which is the individual tab inside that spreadsheet.
OttoKit will show the column headings from your selected sheet.
Match the fields
Match each OttoKit field with the column where it belongs. For example, match Number of Adults with the Adults column and Number of Children with the Children column.
Check that every field you want to keep has the correct matching column. Click Save when you finish.
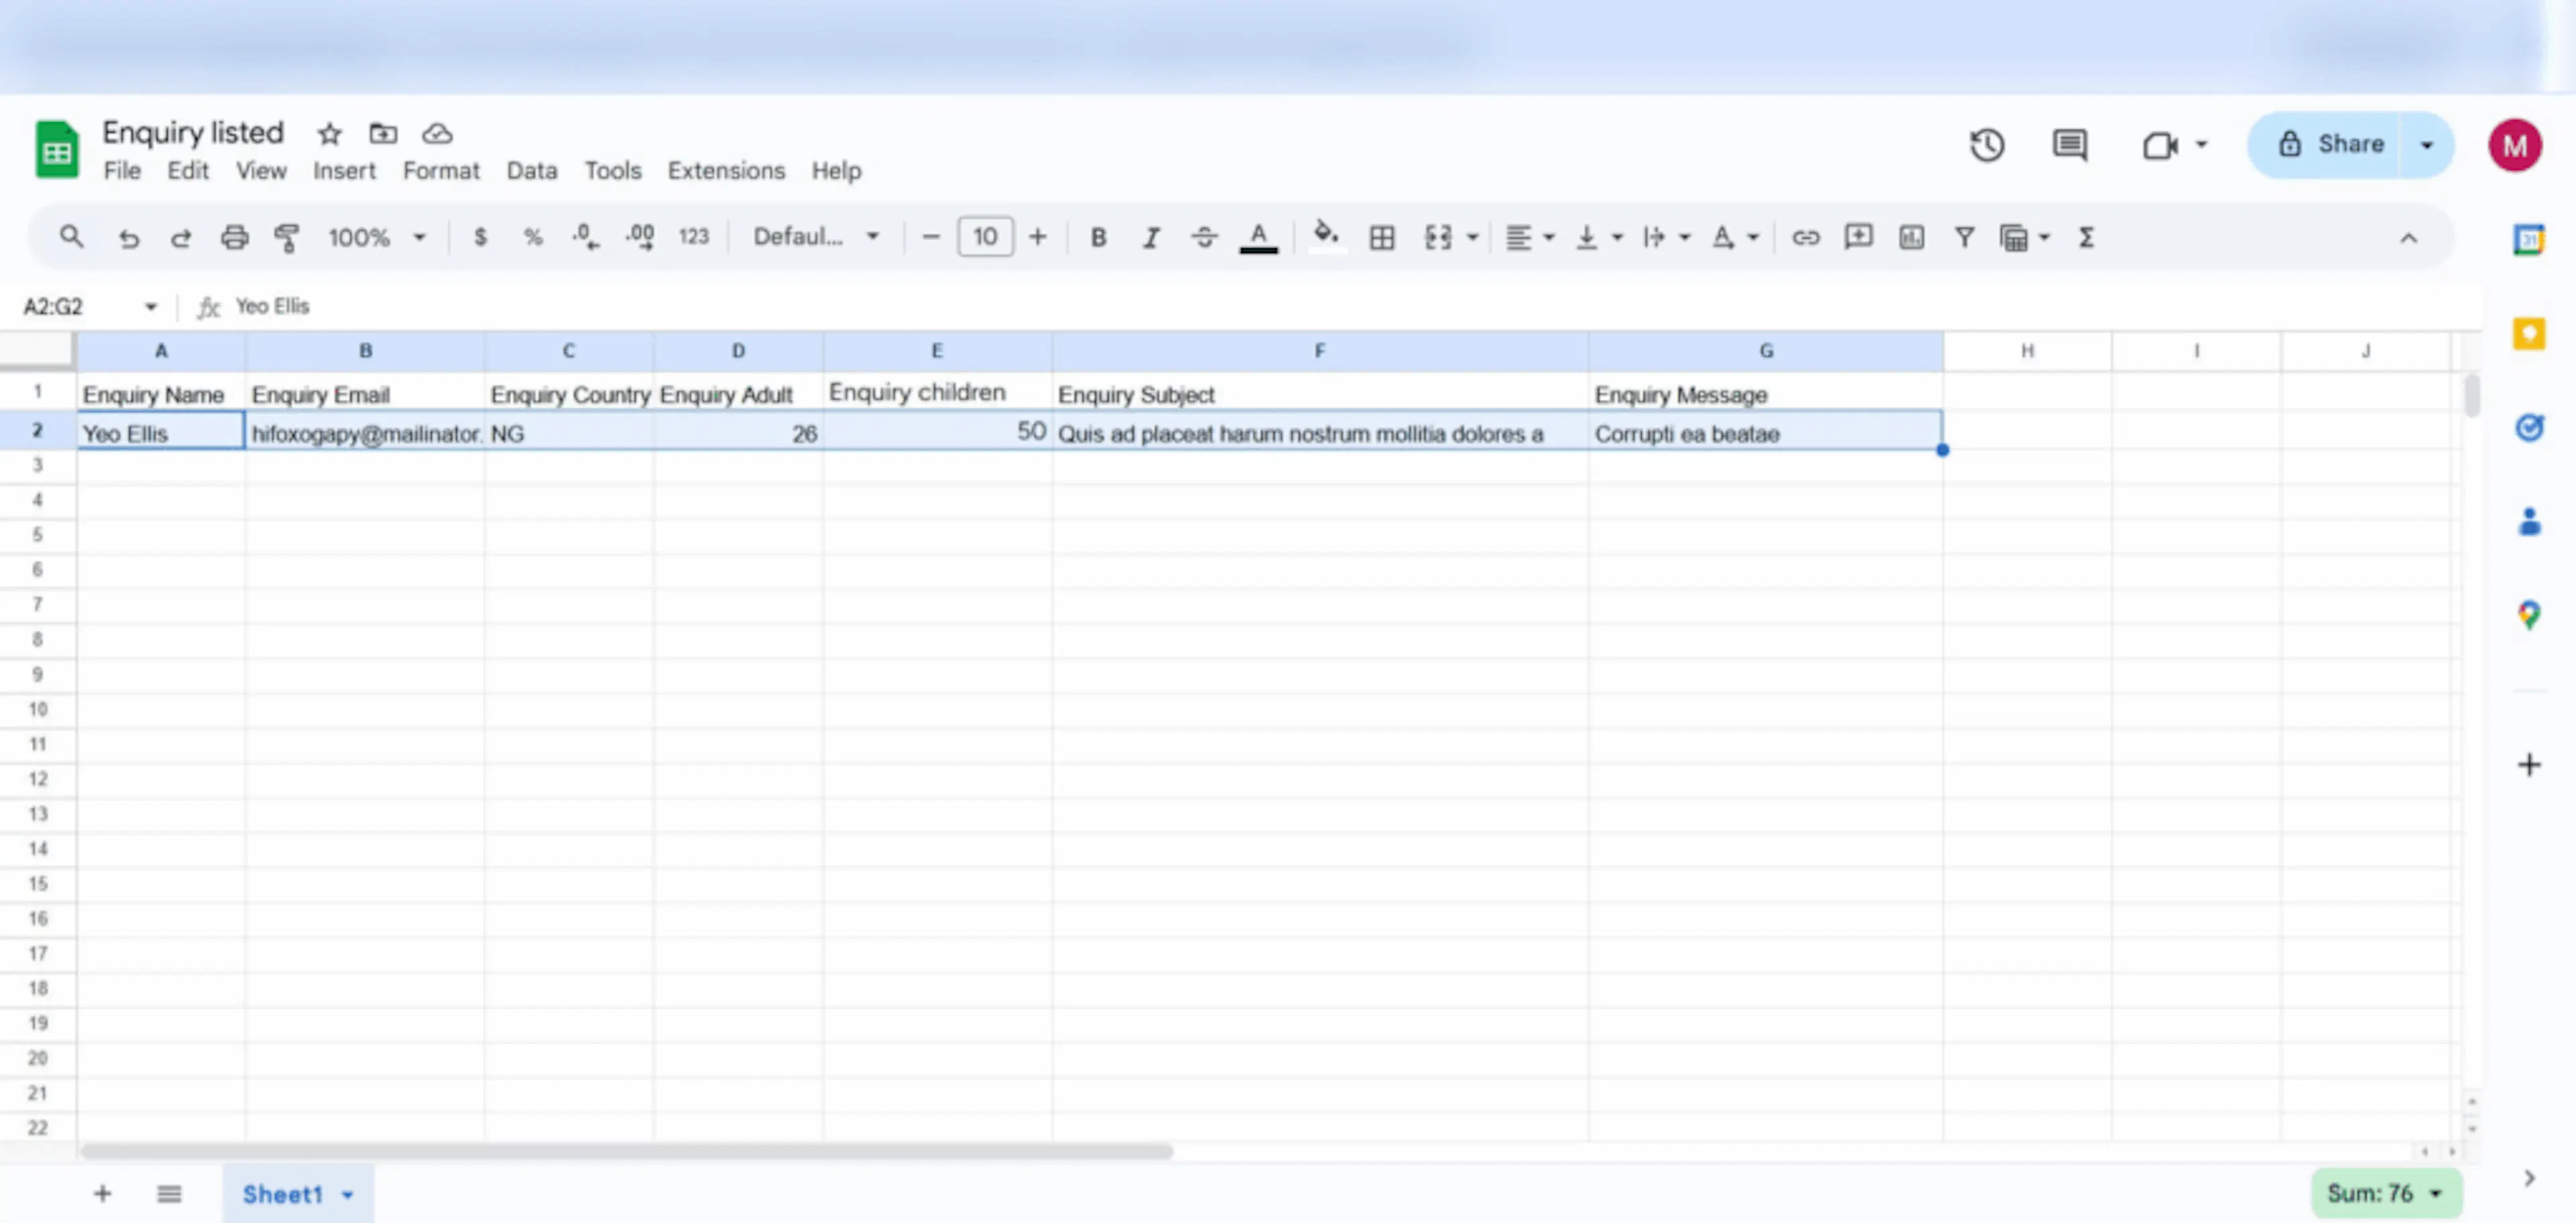
Create your column headings in Google Sheets before you start matching fields. For example, add columns for Name, Country, Adults, Children, and Message.
Step 7: Test the complete workflow
A final test confirms that a traveler enquiry reaches the Google Sheet with the information you need.
Submit a test enquiry
Open your website and complete the Enquiry Form.
Submit sample information such as Name: Sam, Country: Nepal, Adults: 2, and Children: 1.
Check the connected app
Open your connected Google Sheet or another connected app. Look for a new row containing the enquiry details.
When the new row appears with the correct information, your workflow is ready to handle real enquiries.
Troubleshooting
OttoKit is not showing up in my app list
Open OttoKit, then choose App Connections from the left side of the OttoKit dashboard. Make sure your OttoKit account is connected. Return to the workflow and check the app list again.
My enquiry form fields are not showing
Submit a test enquiry from your website first. Then return to OttoKit and click Fetch Data. The fields should appear in the area where you match information to your Google Sheet.
My test information is not appearing
Submit the enquiry again and refresh OttoKit. Check that you selected the correct form in the trigger. Then run Fetch Data again using the newest enquiry.
Frequently Asked Questions
Is OttoKit integration free?
OttoKit and SureTriggers both offer free plans. Some paid features, including WhatsApp automation, may require an upgrade.
Do I need coding experience to connect WP Travel Engine to OttoKit?
No. OttoKit uses a no-code setup. You choose the event you want to follow and the action you want it to take.
Can I use this integration for multiple trips or forms?
Yes. Create a separate workflow for each form or trip type. For example, you could use one workflow for a day tour and another for a multi-day trek.
Does the information sync in real time?
Yes. When a traveler submits a form, SureTriggers passes the information to OttoKit immediately.
Can I send WhatsApp messages based on enquiry details?
Yes. OttoKit supports WhatsApp message flows. You can start a message based on information such as a destination or the number of travelers.
Can I use a Google Sheet for my whole tour team?
Yes. Connect a spreadsheet that your team can access. Each new enquiry can appear as a new row so your staff can follow up from the same list.
Can I use the information for seasonal offers?
Yes. Keep traveler details in OttoKit and use them to organize contacts. For example, you could follow up with travelers who asked about a trek when you offer a seasonal discount or a gear rental add-on.
If you're still stuck or have a question we didn't cover, our support team is happy to help. Reach out at our support page and we'll get you sorted.