

Travel Booking Pro Theme: Complete Setup Guide
Install and customize Travel Booking Pro to launch a polished tour booking website with trips, destinations, contact forms, homepage sections, and more.
Welcome to Travel Booking Pro
Travel Booking Pro gives your tour business a ready-made structure for showcasing treks, day tours, multi-day packages, destinations, team members, and booking information.
Work through the guide in order during your first setup. Later, search this page with Ctrl+F to find a setting quickly.
What you'll need before you start
Travel Booking Pro works with WordPress 4.7 and newer. Update WordPress to the latest available version before installing the theme. Newer versions include current security fixes and work best with the theme and its plugins.
Before you begin:
- Check your WordPress version.
- Install the Travel Booking Pro theme.
- Install and activate the recommended plugins.
Check and update WordPress
Updating WordPress first prevents setup problems later.
Open WordPress updates
Go to Dashboard > Updates. The Dashboard is the left-hand menu in your WordPress admin area.
Install available updates
Install any available WordPress update. When the update finishes, return to the Dashboard.
Download WordPress from the WordPress website if you are setting up a new website.
Recommended image sizes
Use these sizes when preparing images for your website. Correctly sized images keep banners, trip cards, team profiles, and contact sections looking balanced.
| Element | Recommended size |
|---|---|
| Banner Section | 1920 x 800 px |
| Blog Page (Full-width) | 1290 x 737 px |
| Blog Page (Single) | 770 x 440 px |
| Popular Package Section | 370 x 263 px |
| Deals and Discount Section | 270 x 385 px |
| Destination Page | 270 x 330 px |
| Team Section | 370 x 323 px |
| Team Page (Single) | 770 x 450 px |
| Contact Page Map | 530 x 327 px |
Import the demo content
Demo import creates sample pages, sections, and settings. Use it as a visual guideline while building your own site. You can replace the sample content with your own tours, photos, prices, and contact details.
What you'll need before you start
Install the One Click Demo Import plugin before importing the demo.
Install the demo importer
Install and activate One Click Demo Import from the WordPress plugin directory.
Open the importer
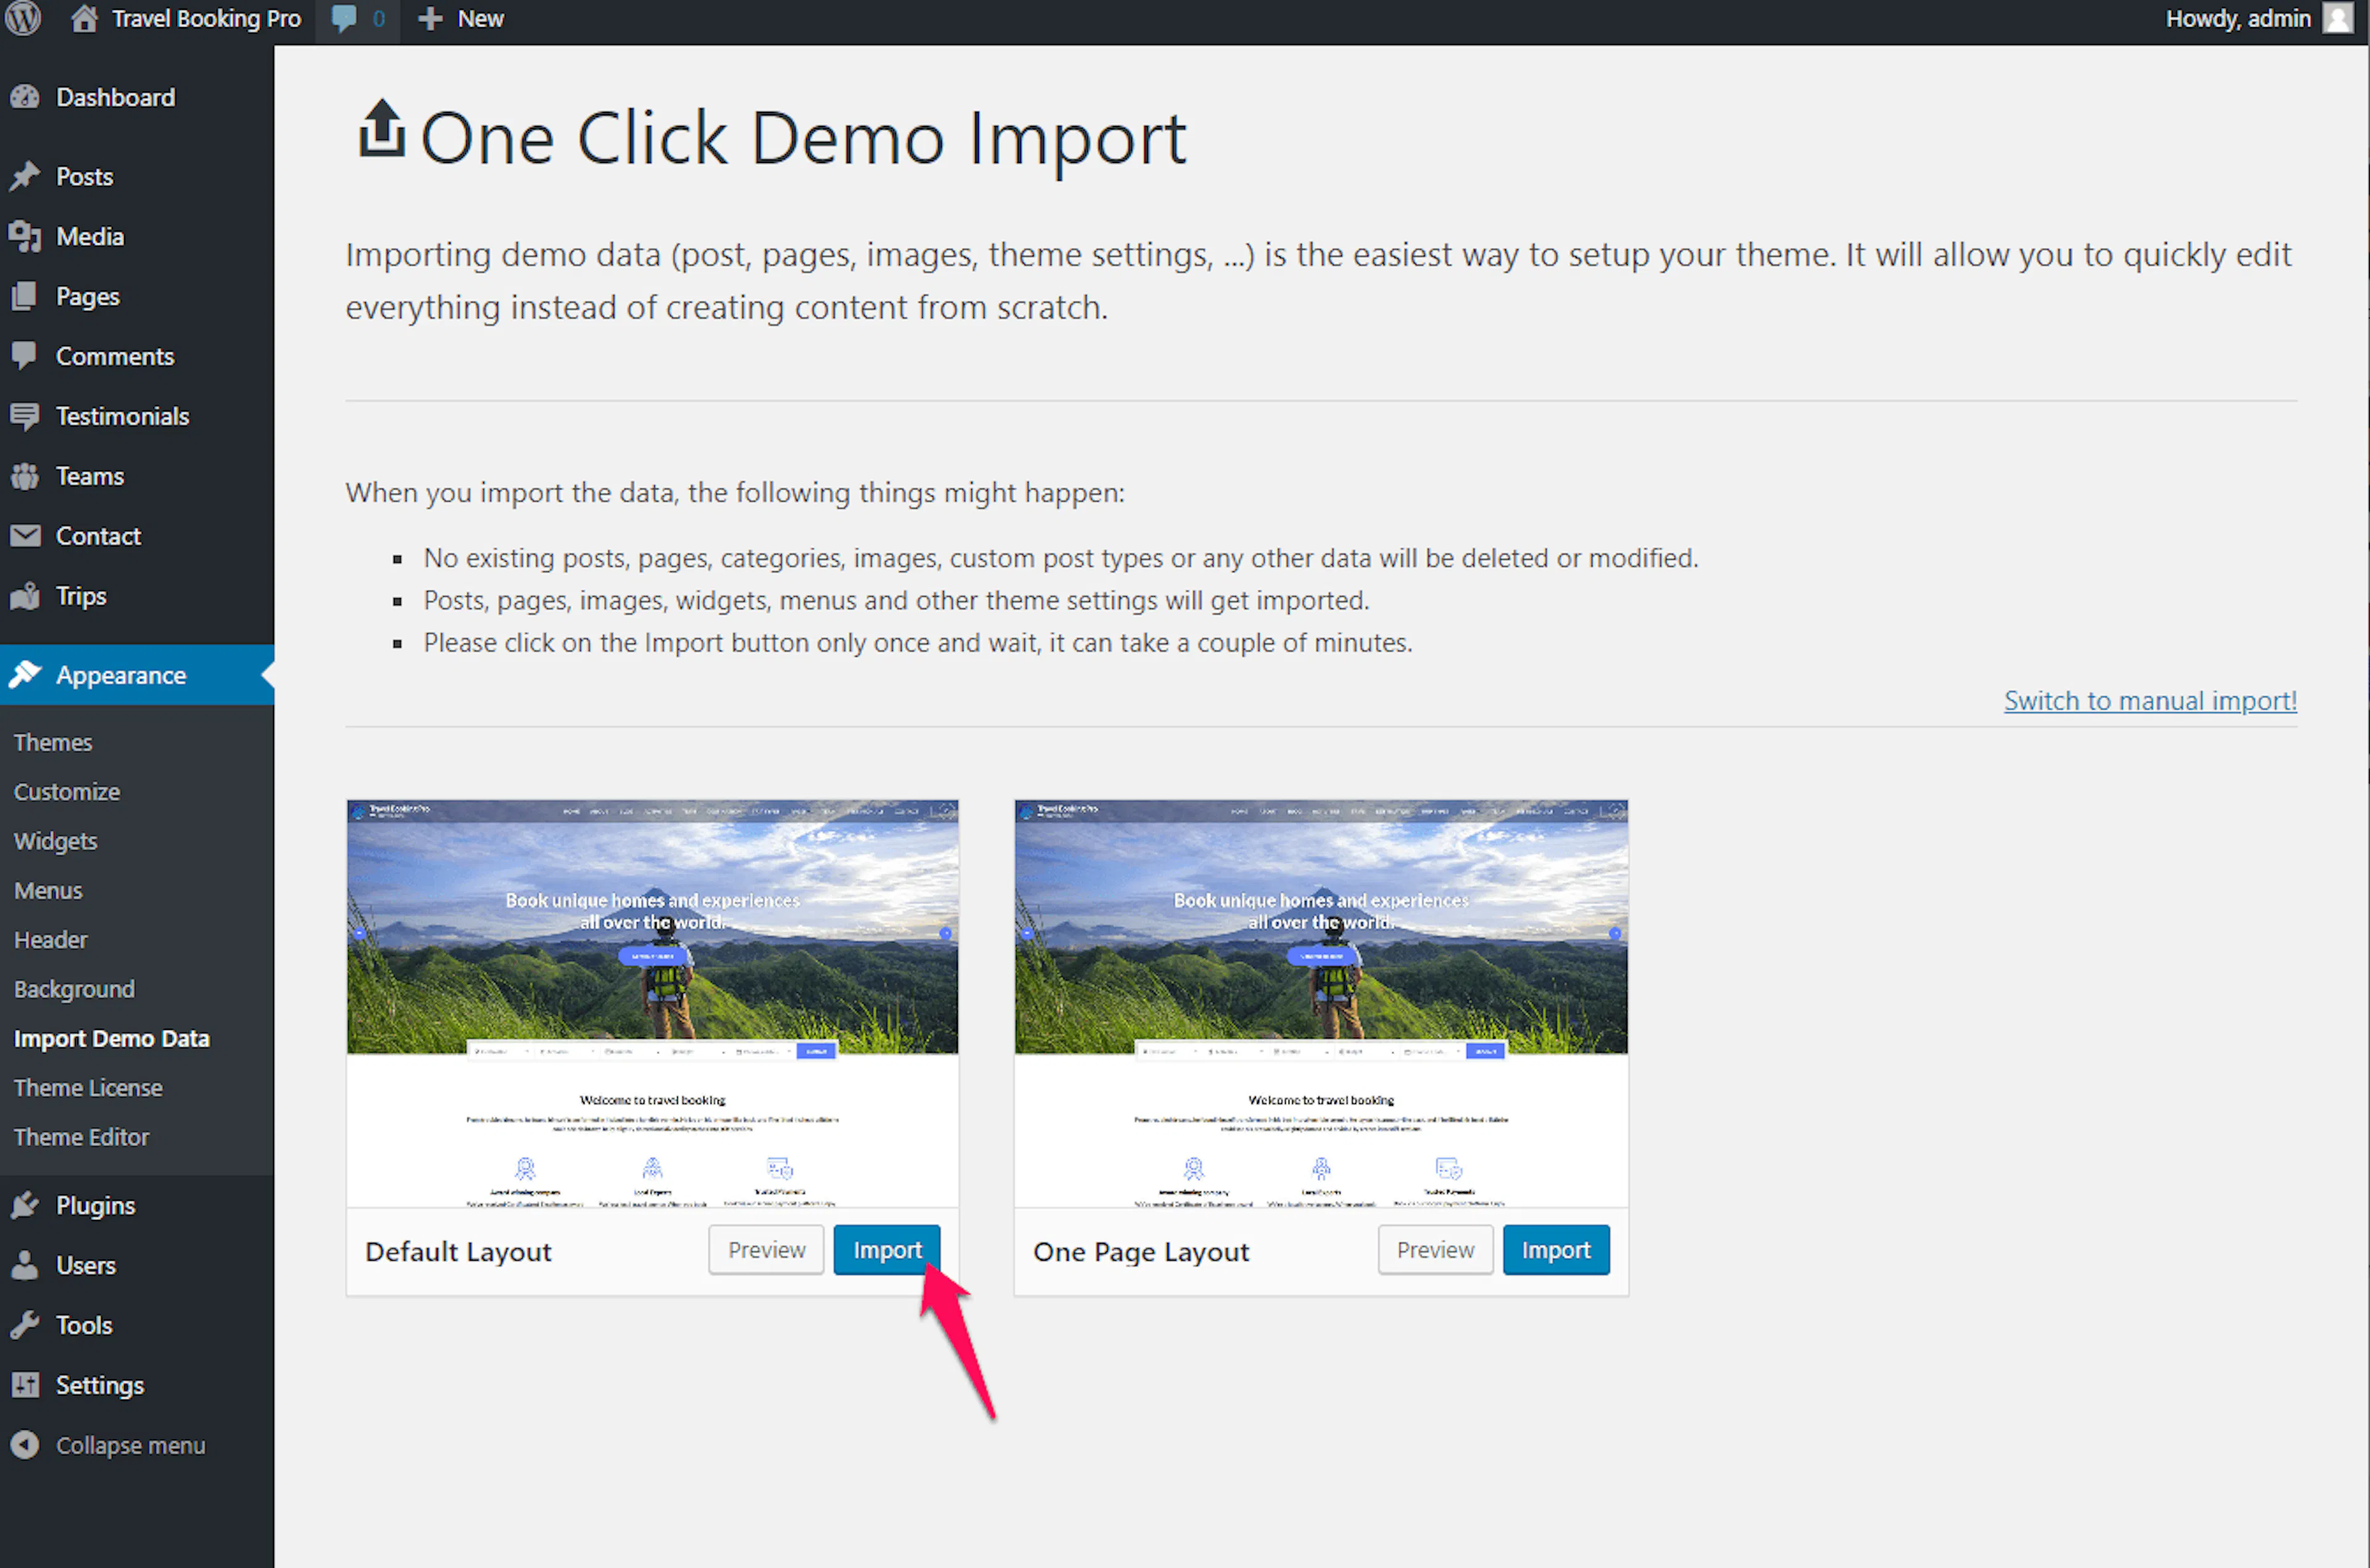
Go to Appearance > Import Demo Data.
Choose a layout
Choose Default Layout for a standard homepage. Choose One Page Layout for a homepage that scrolls through its sections.
Start the import
Click Import and wait for the process to finish.
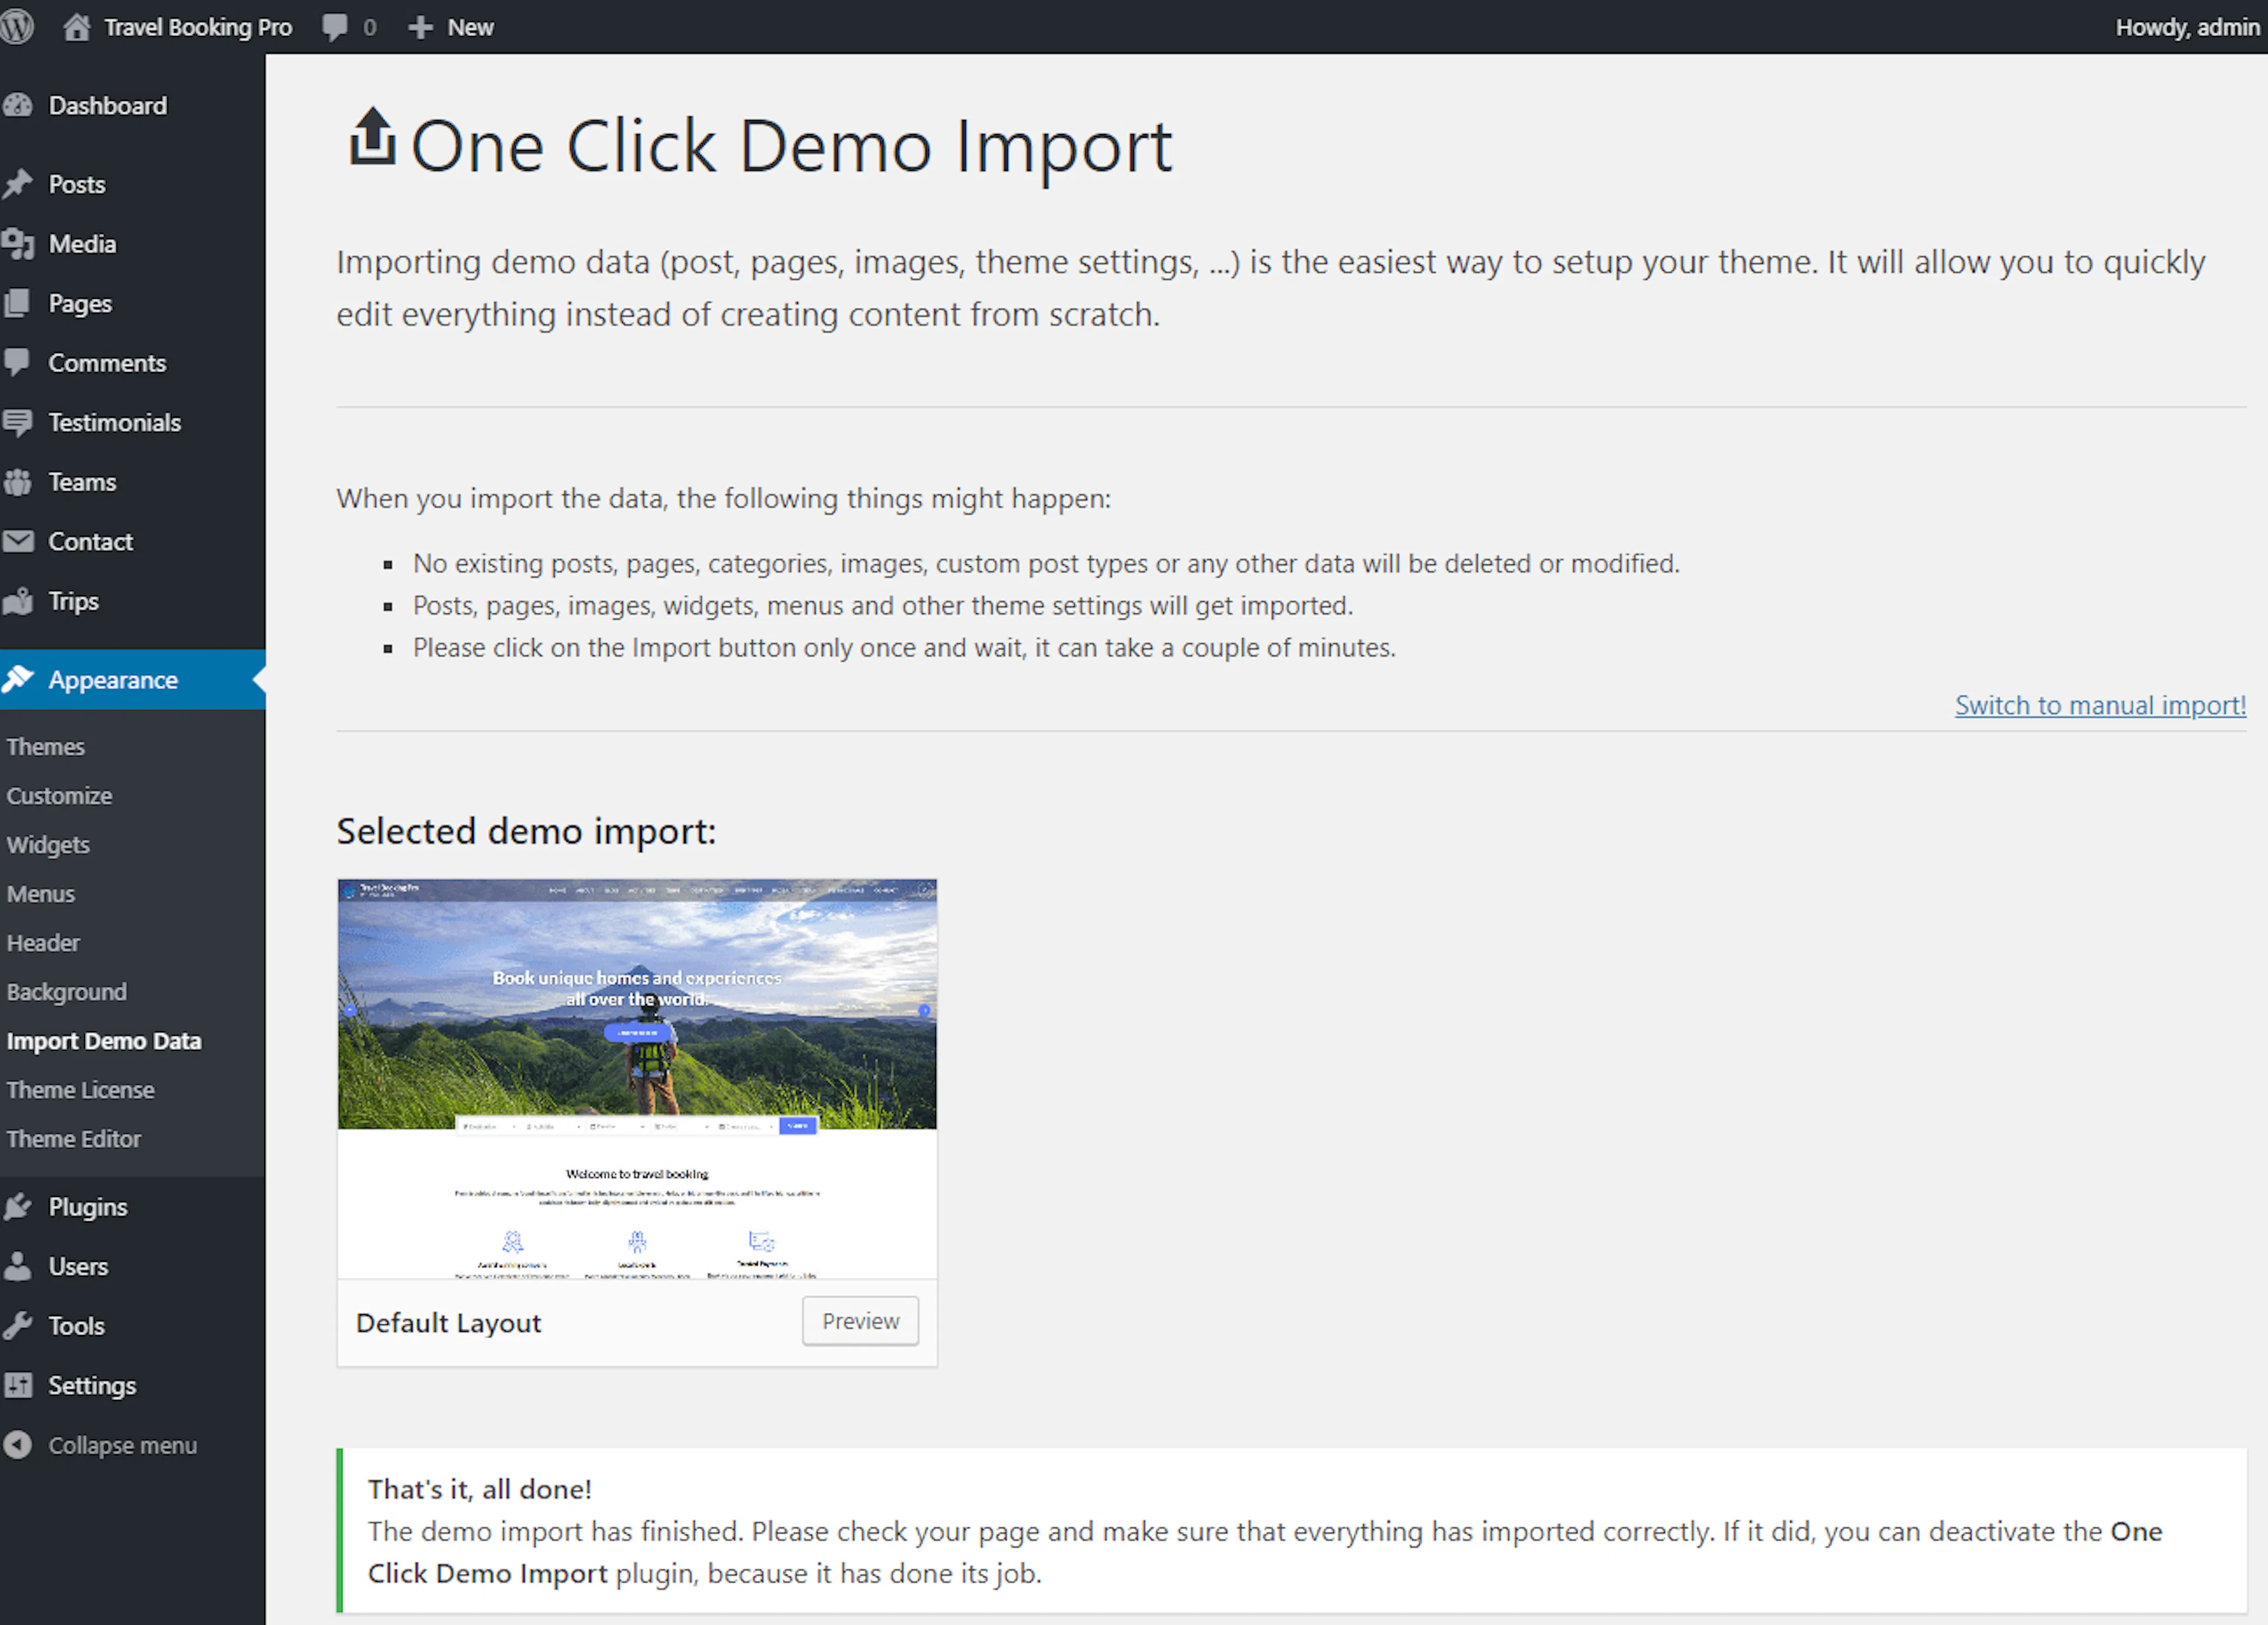
Once the demo import is successful, you will get a demo import successful message as given below:
How to Check and Update WordPress Version:
- Go to Dashboard >Updates.
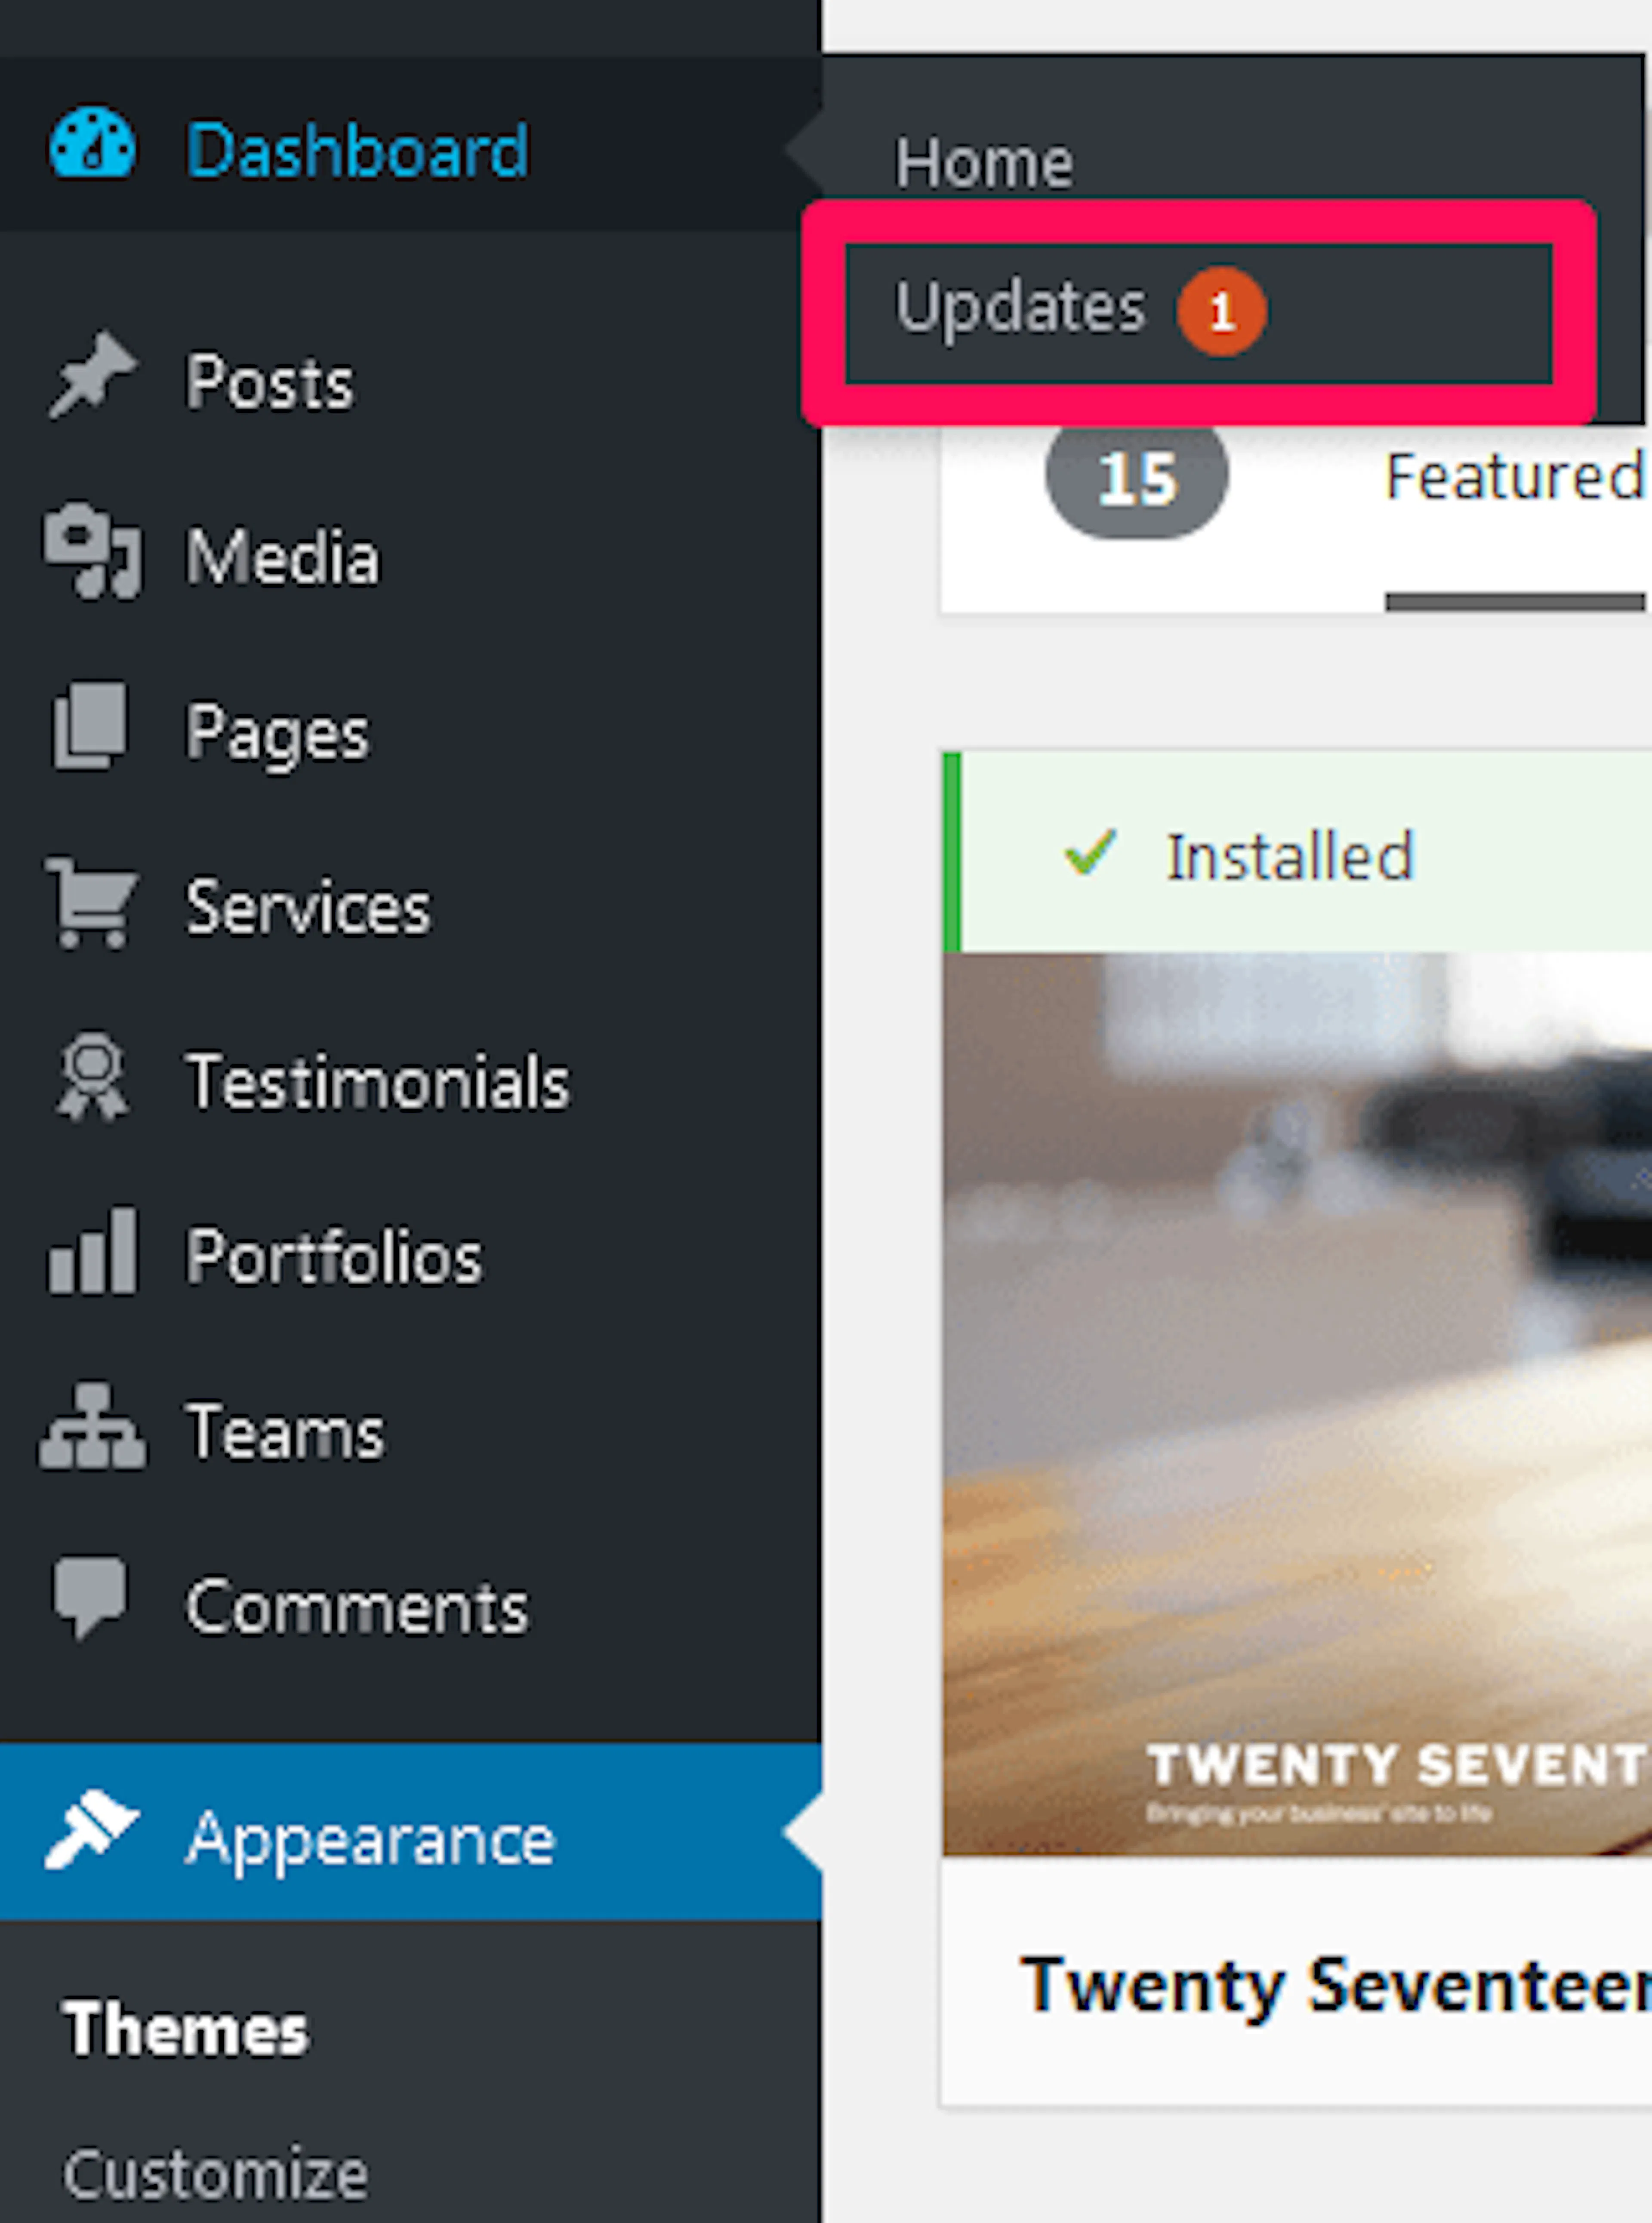
Please update your WordPress version, if there is an update available.
Install and activate the theme
The theme ZIP file contains the templates, images, and icons that Travel Booking Pro uses. Keep the ZIP file intact until WordPress finishes installing it.
On macOS, Safari may unzip downloaded ZIP files automatically. Confirm that your theme file is still named travel-booking-pro.zip. If Safari unzipped it, follow these instructions to stop Safari from unzipping downloaded files.
Find the theme file
Save the downloaded travel-booking-pro.zip file somewhere you can find on your computer.
Open the theme uploader
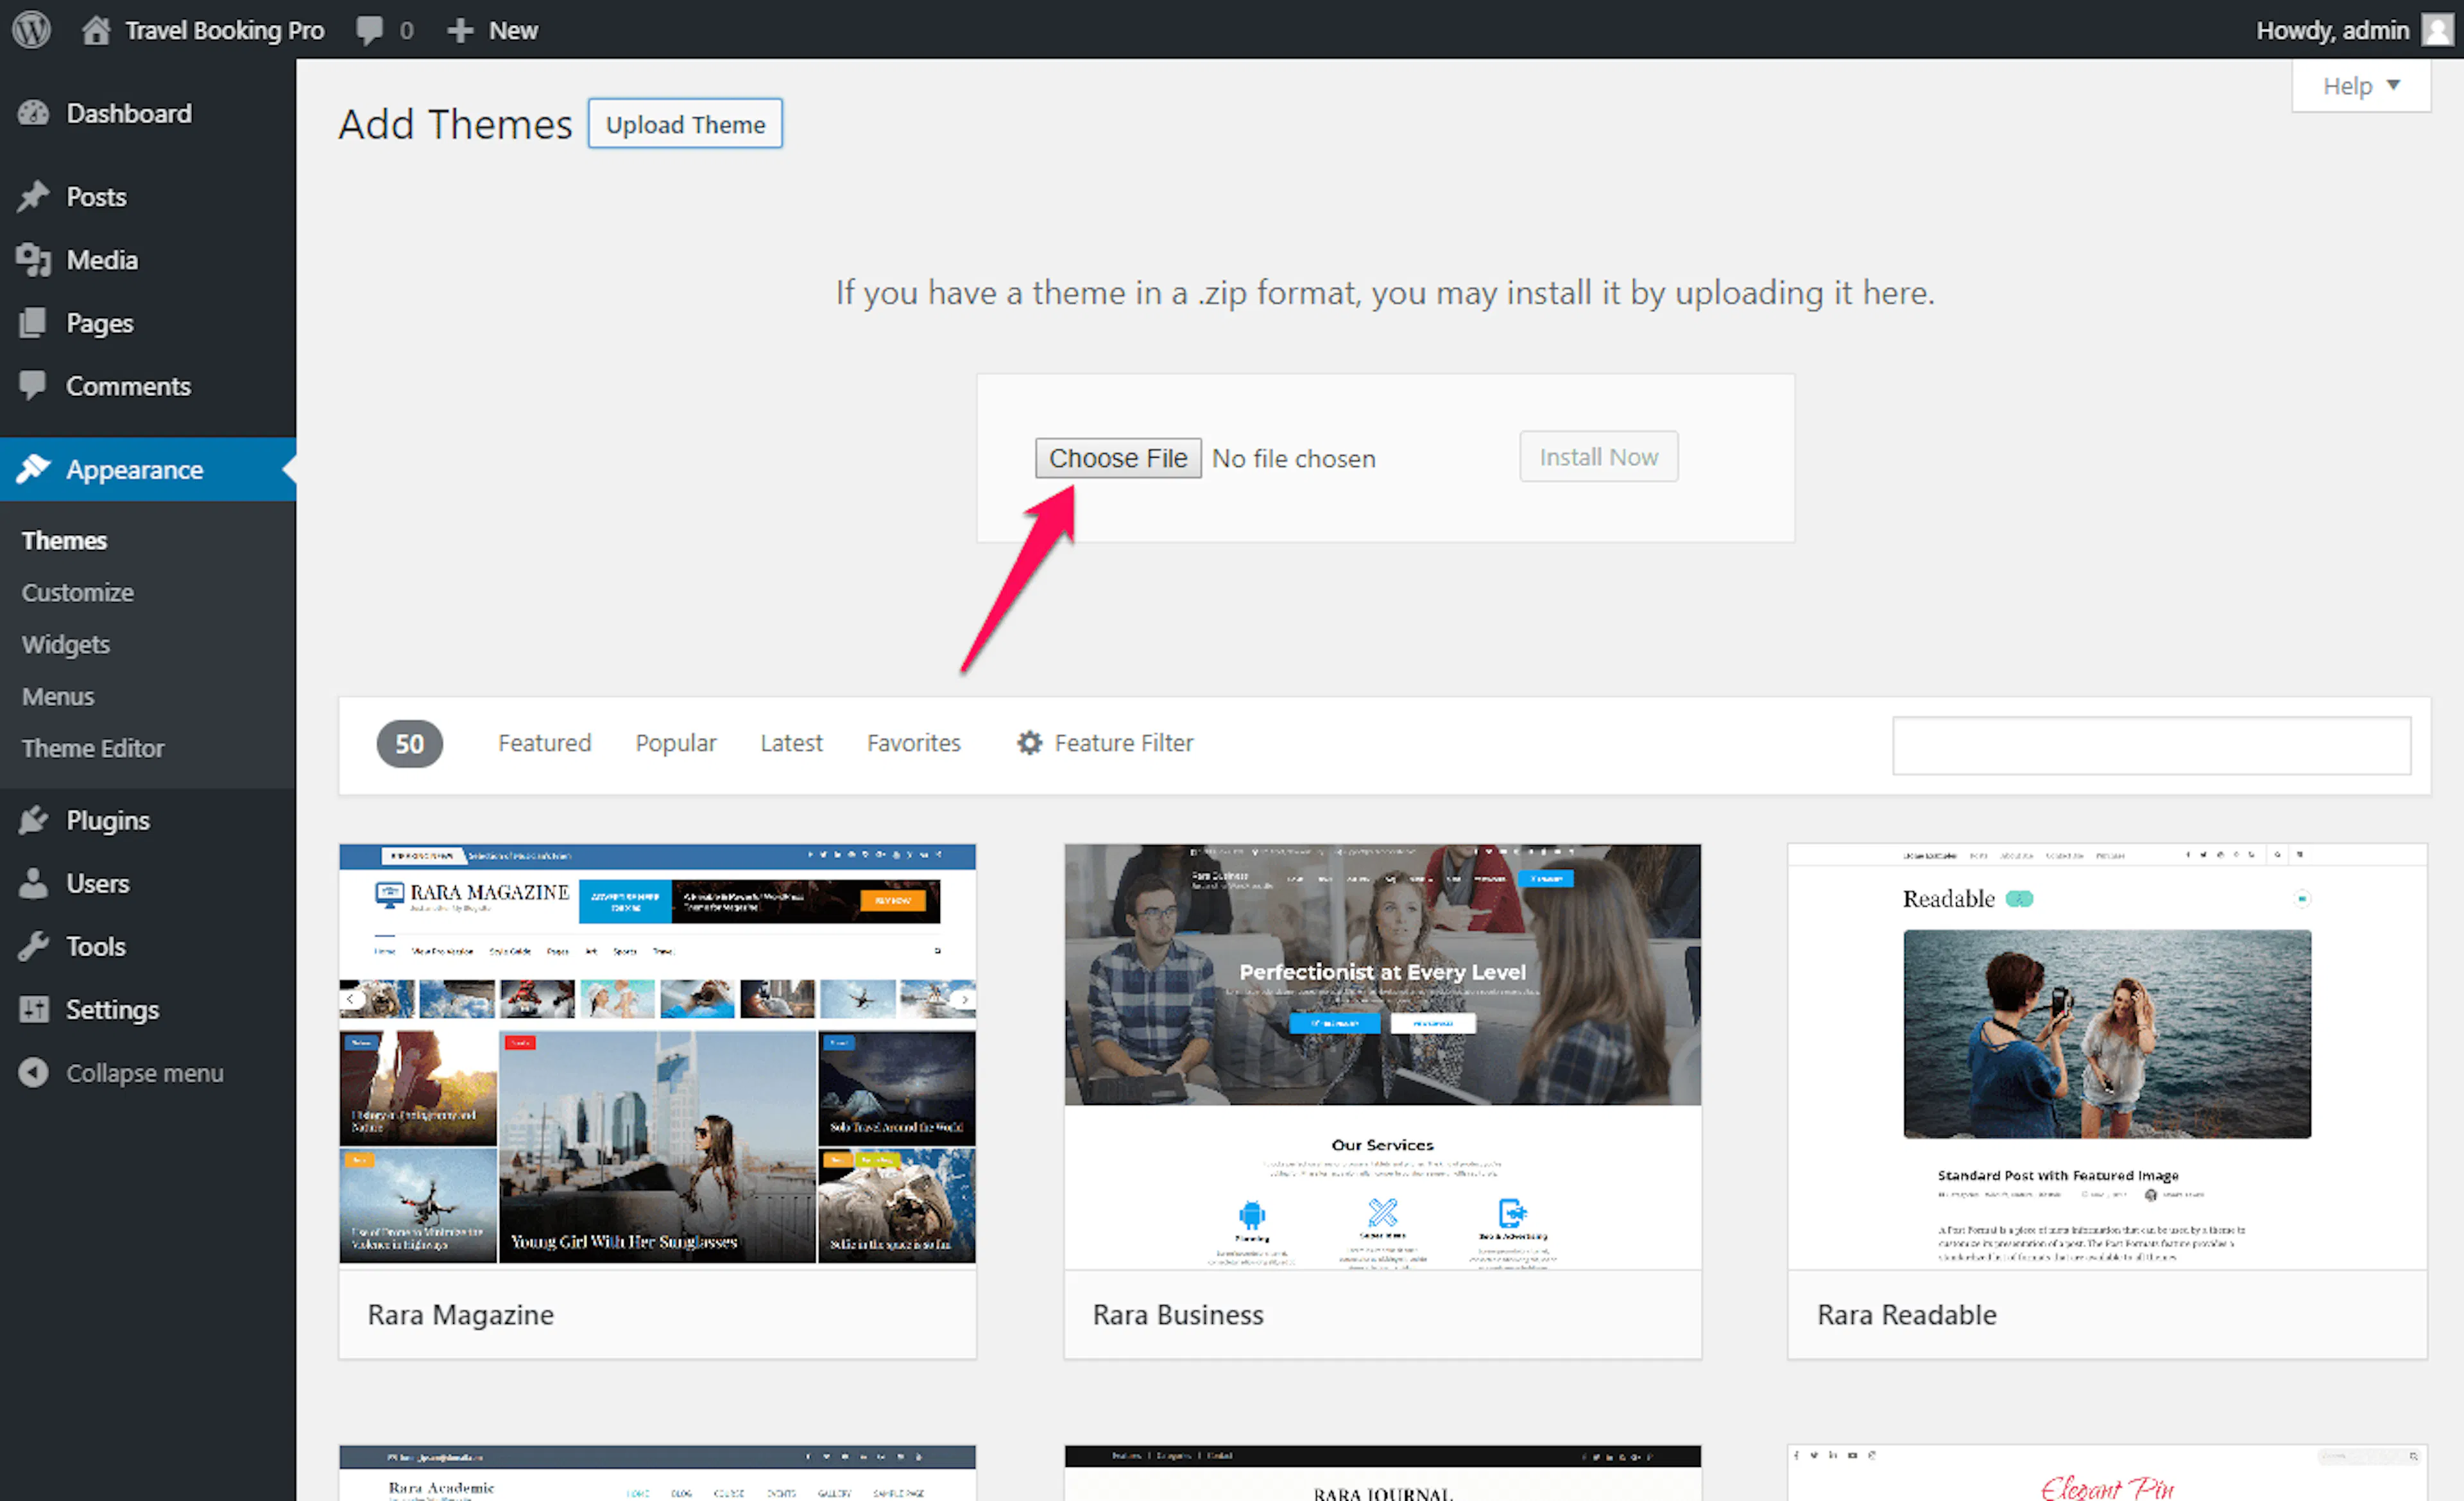
Go to Appearance > Themes. Click Add New, then click Upload Theme.
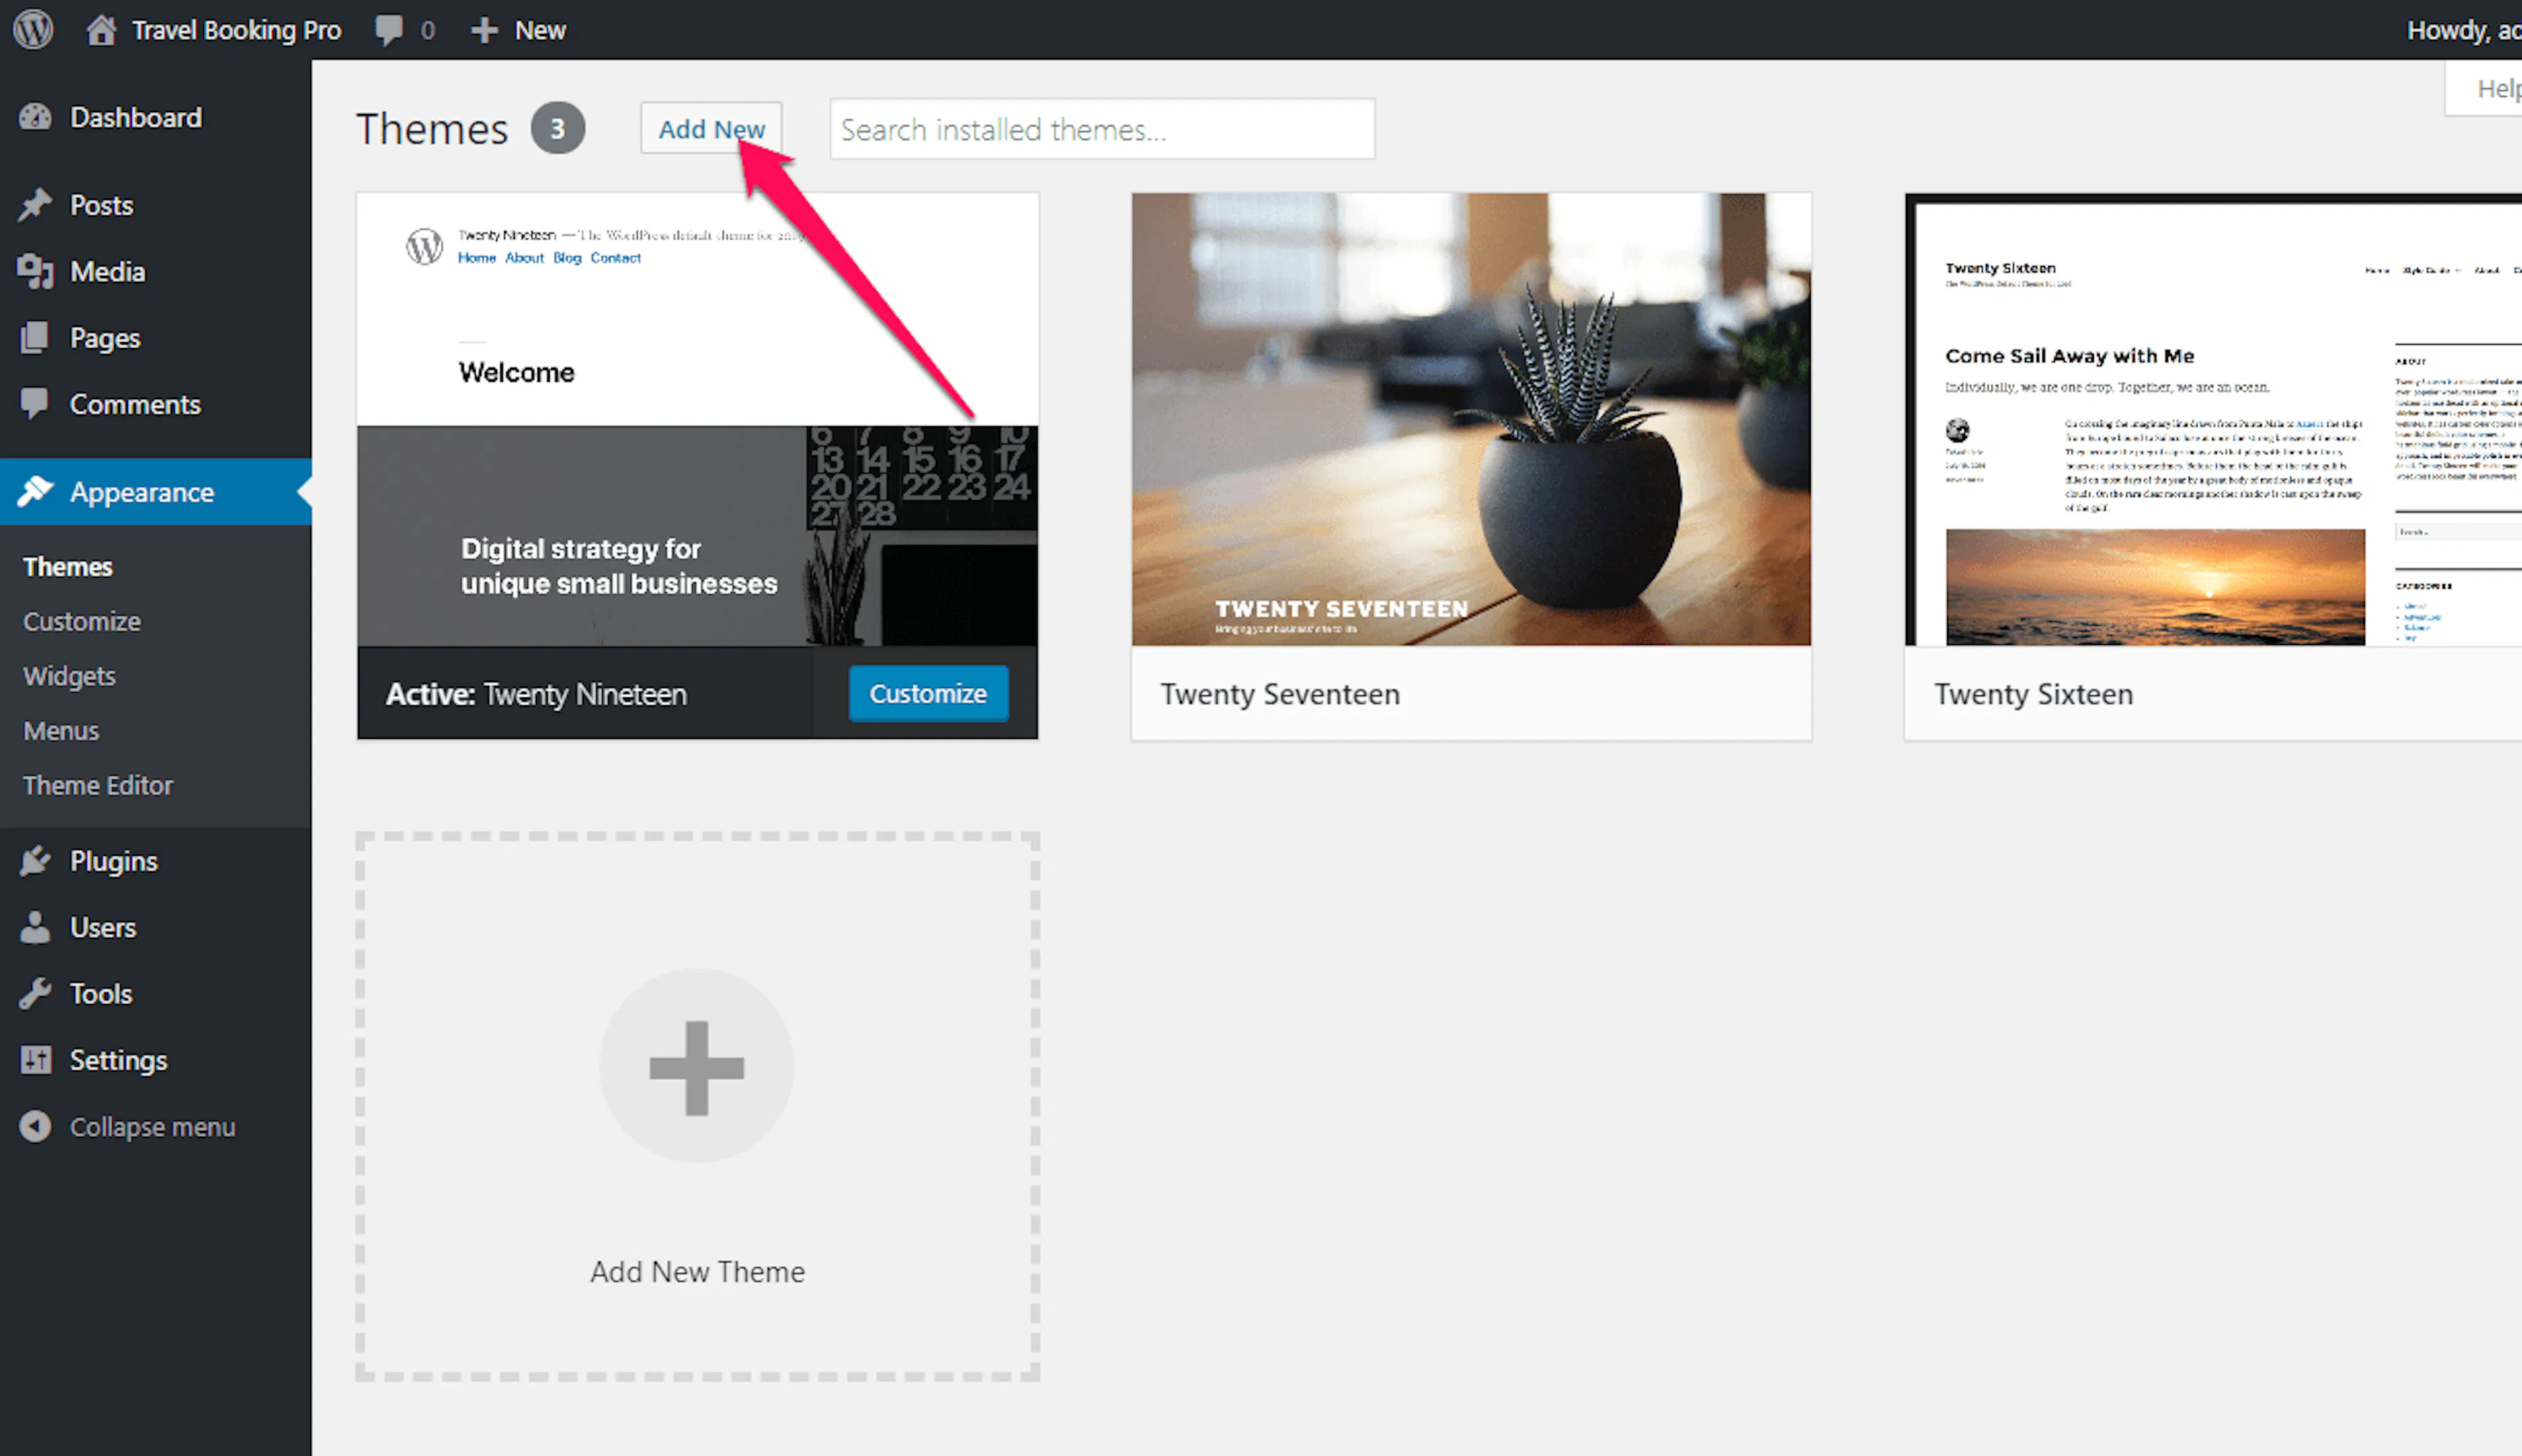
Upload the ZIP file
Click Choose File and select travel-booking-pro.zip. Click Open, then click Install Now.
Activate the theme
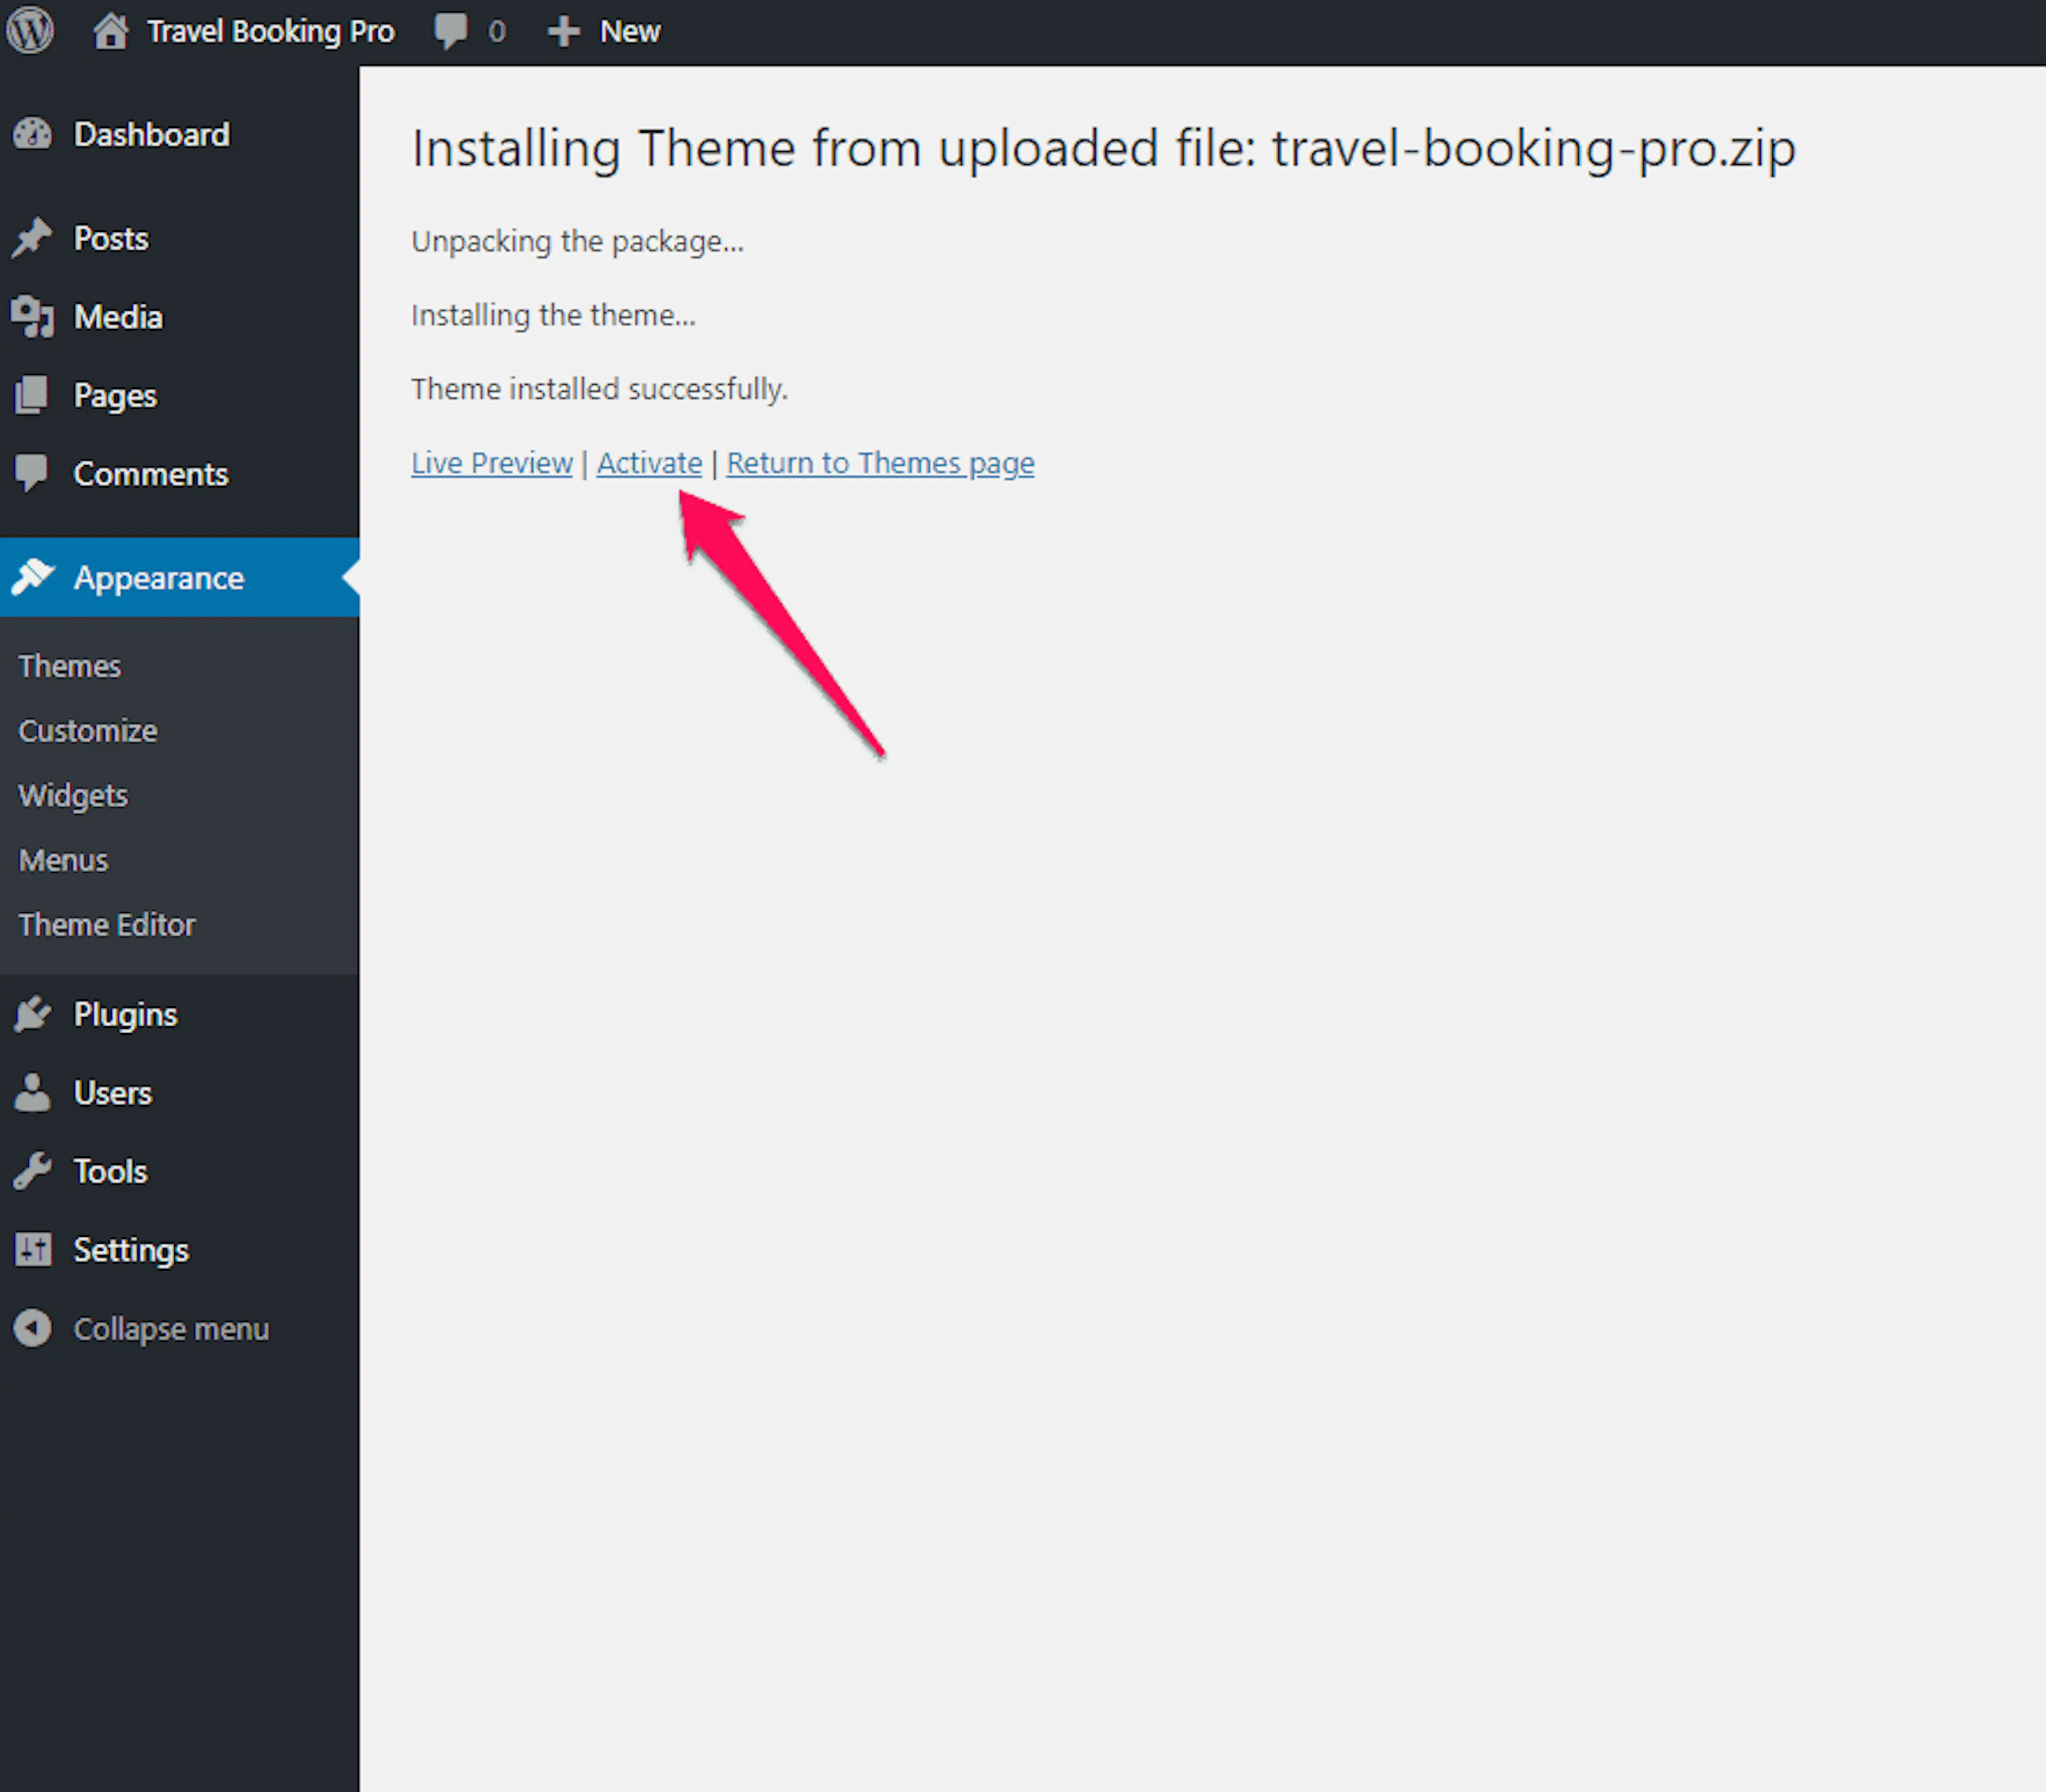
Click Activate when WordPress finishes installing the theme.
Install the recommended plugins
A plugin adds a specific feature to WordPress. These plugins provide trip management, contact forms, homepage sections, image support, and content management tools.
| Plugin | What it does |
|---|---|
| WP Travel Engine | Creates and manages travel trips, destinations, itineraries, and other trip details. |
| Travel Booking Toolkit | Adds extra homepage sections and useful widgets. This plugin is required for all front page sections. |
| Contact Form 7 | Adds and manages multiple contact forms. |
| Regenerate Thumbnails | Updates image thumbnail sizes for existing content. Use it after moving existing media into the theme. |
| Post Type Switcher | Changes the content type of existing posts. |
Open the plugin installer
Go to Appearance > Install Plugins.
Install the plugins
Click Install next to each recommended plugin.
Activate the plugins
Click Activate next to each plugin after installation finishes.
Your trip tools and homepage widgets are now available. Next, choose which page WordPress displays as your homepage.
Set up your homepage and blog page
Set a front page before changing homepage sections. Use a static page if you want your website to match the Travel Booking Pro demo.
Open Homepage Settings
Go to Appearance > Customize > Homepage Settings.
Choose a static homepage
Select A Static Page under Your homepage displays.
Assign your pages
If this is a fresh WordPress installation, continue to the next step. If the website already has content, choose the page for Front Page and the page for Posts Page.
Publish the settings
Click Publish.
Configure your logo and header
The header appears at the top of every page. Use it for your logo, tagline, phone number, search form, and social media links.
Add your site identity
Your site identity tells visitors who operates the tours. For example, use your business name as the title and “Guided treks across the Annapurna region” as the tagline.
Open Site Identity
Go to Appearance > Customize > Logo & Header Settings > Site Identity.
Add your logo and text
Click Select Logo and upload your logo. Enter your Site Title and Tagline. Check Display Site Title and Tagline if you want both to appear beside the logo.
Add a site icon
Click Select Image for Site Icon and upload a square image. This image appears in the browser tab as your favicon.
Publish the identity
Click Publish.
Choose a color scheme
Use your brand colors so visitors recognize your tour company throughout the website.
Open Color Scheme
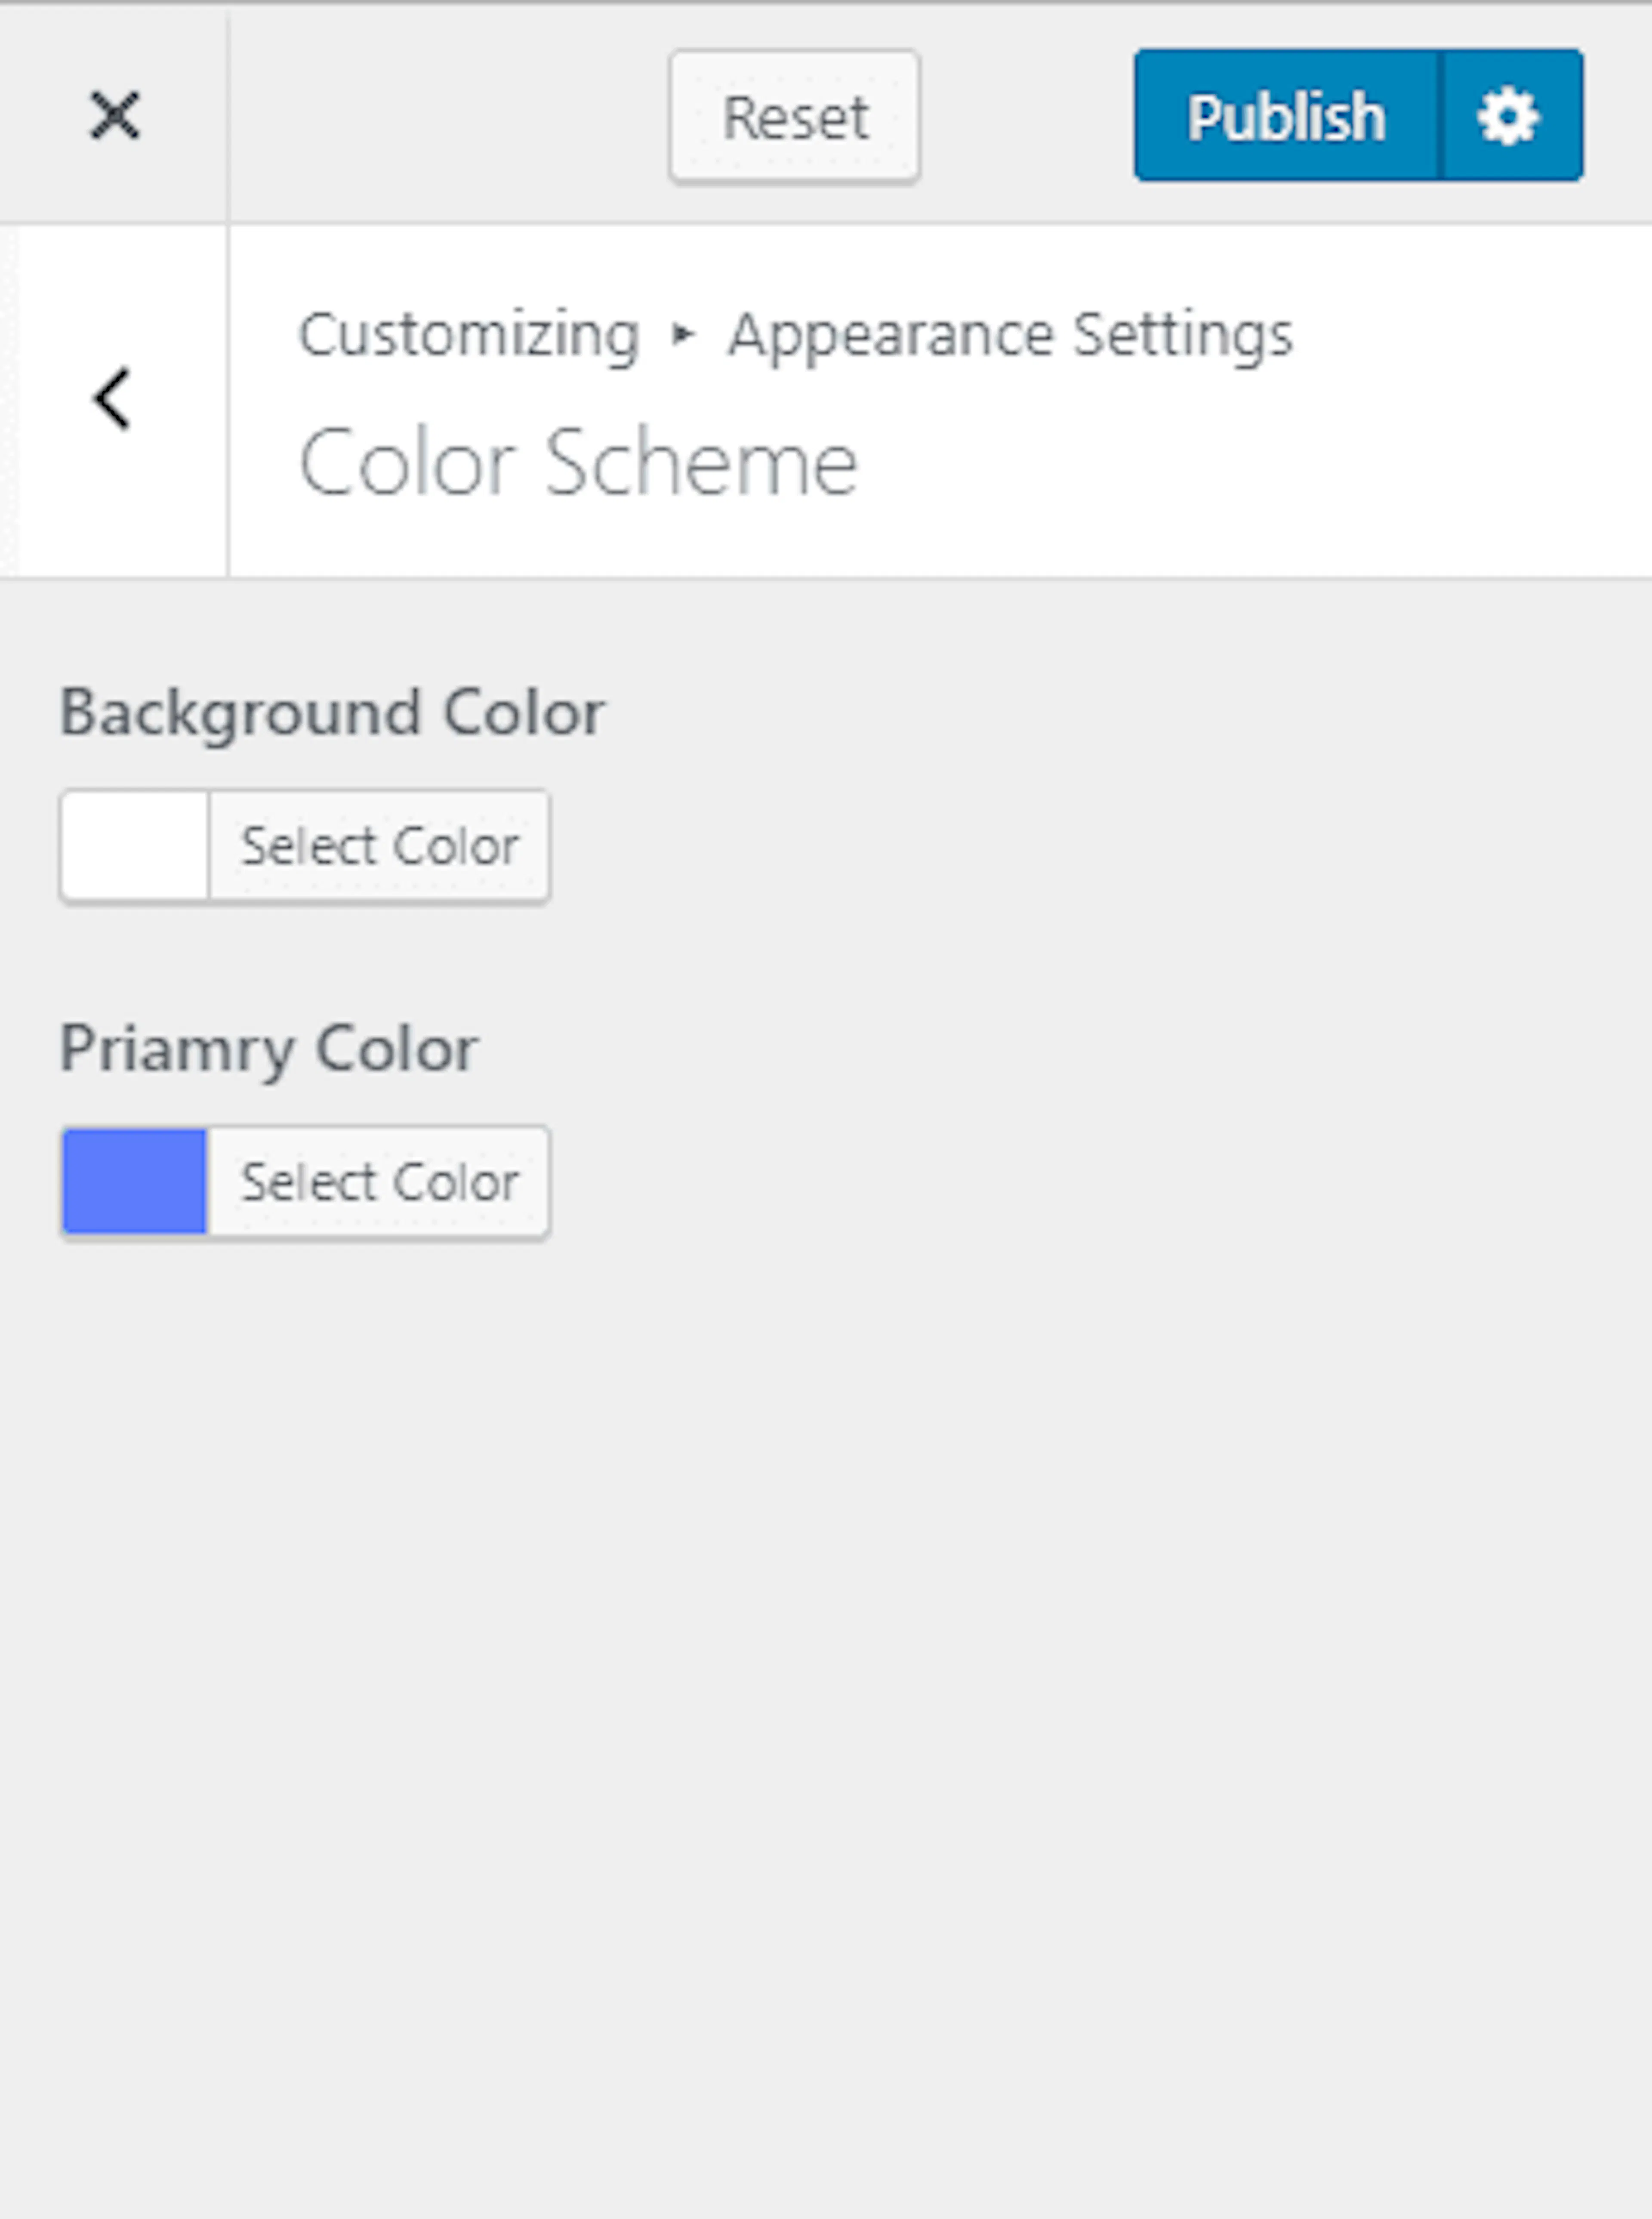
Go to Appearance > Customize > Appearance > Appearance Settings > Color Scheme.
Choose your colors
Select a Background Color and Primary Color.
Publish the colors
Click Publish.
Add a background image
A background image can add texture or atmosphere behind your content. Use a subtle image that does not make text difficult to read.
Open Background Settings
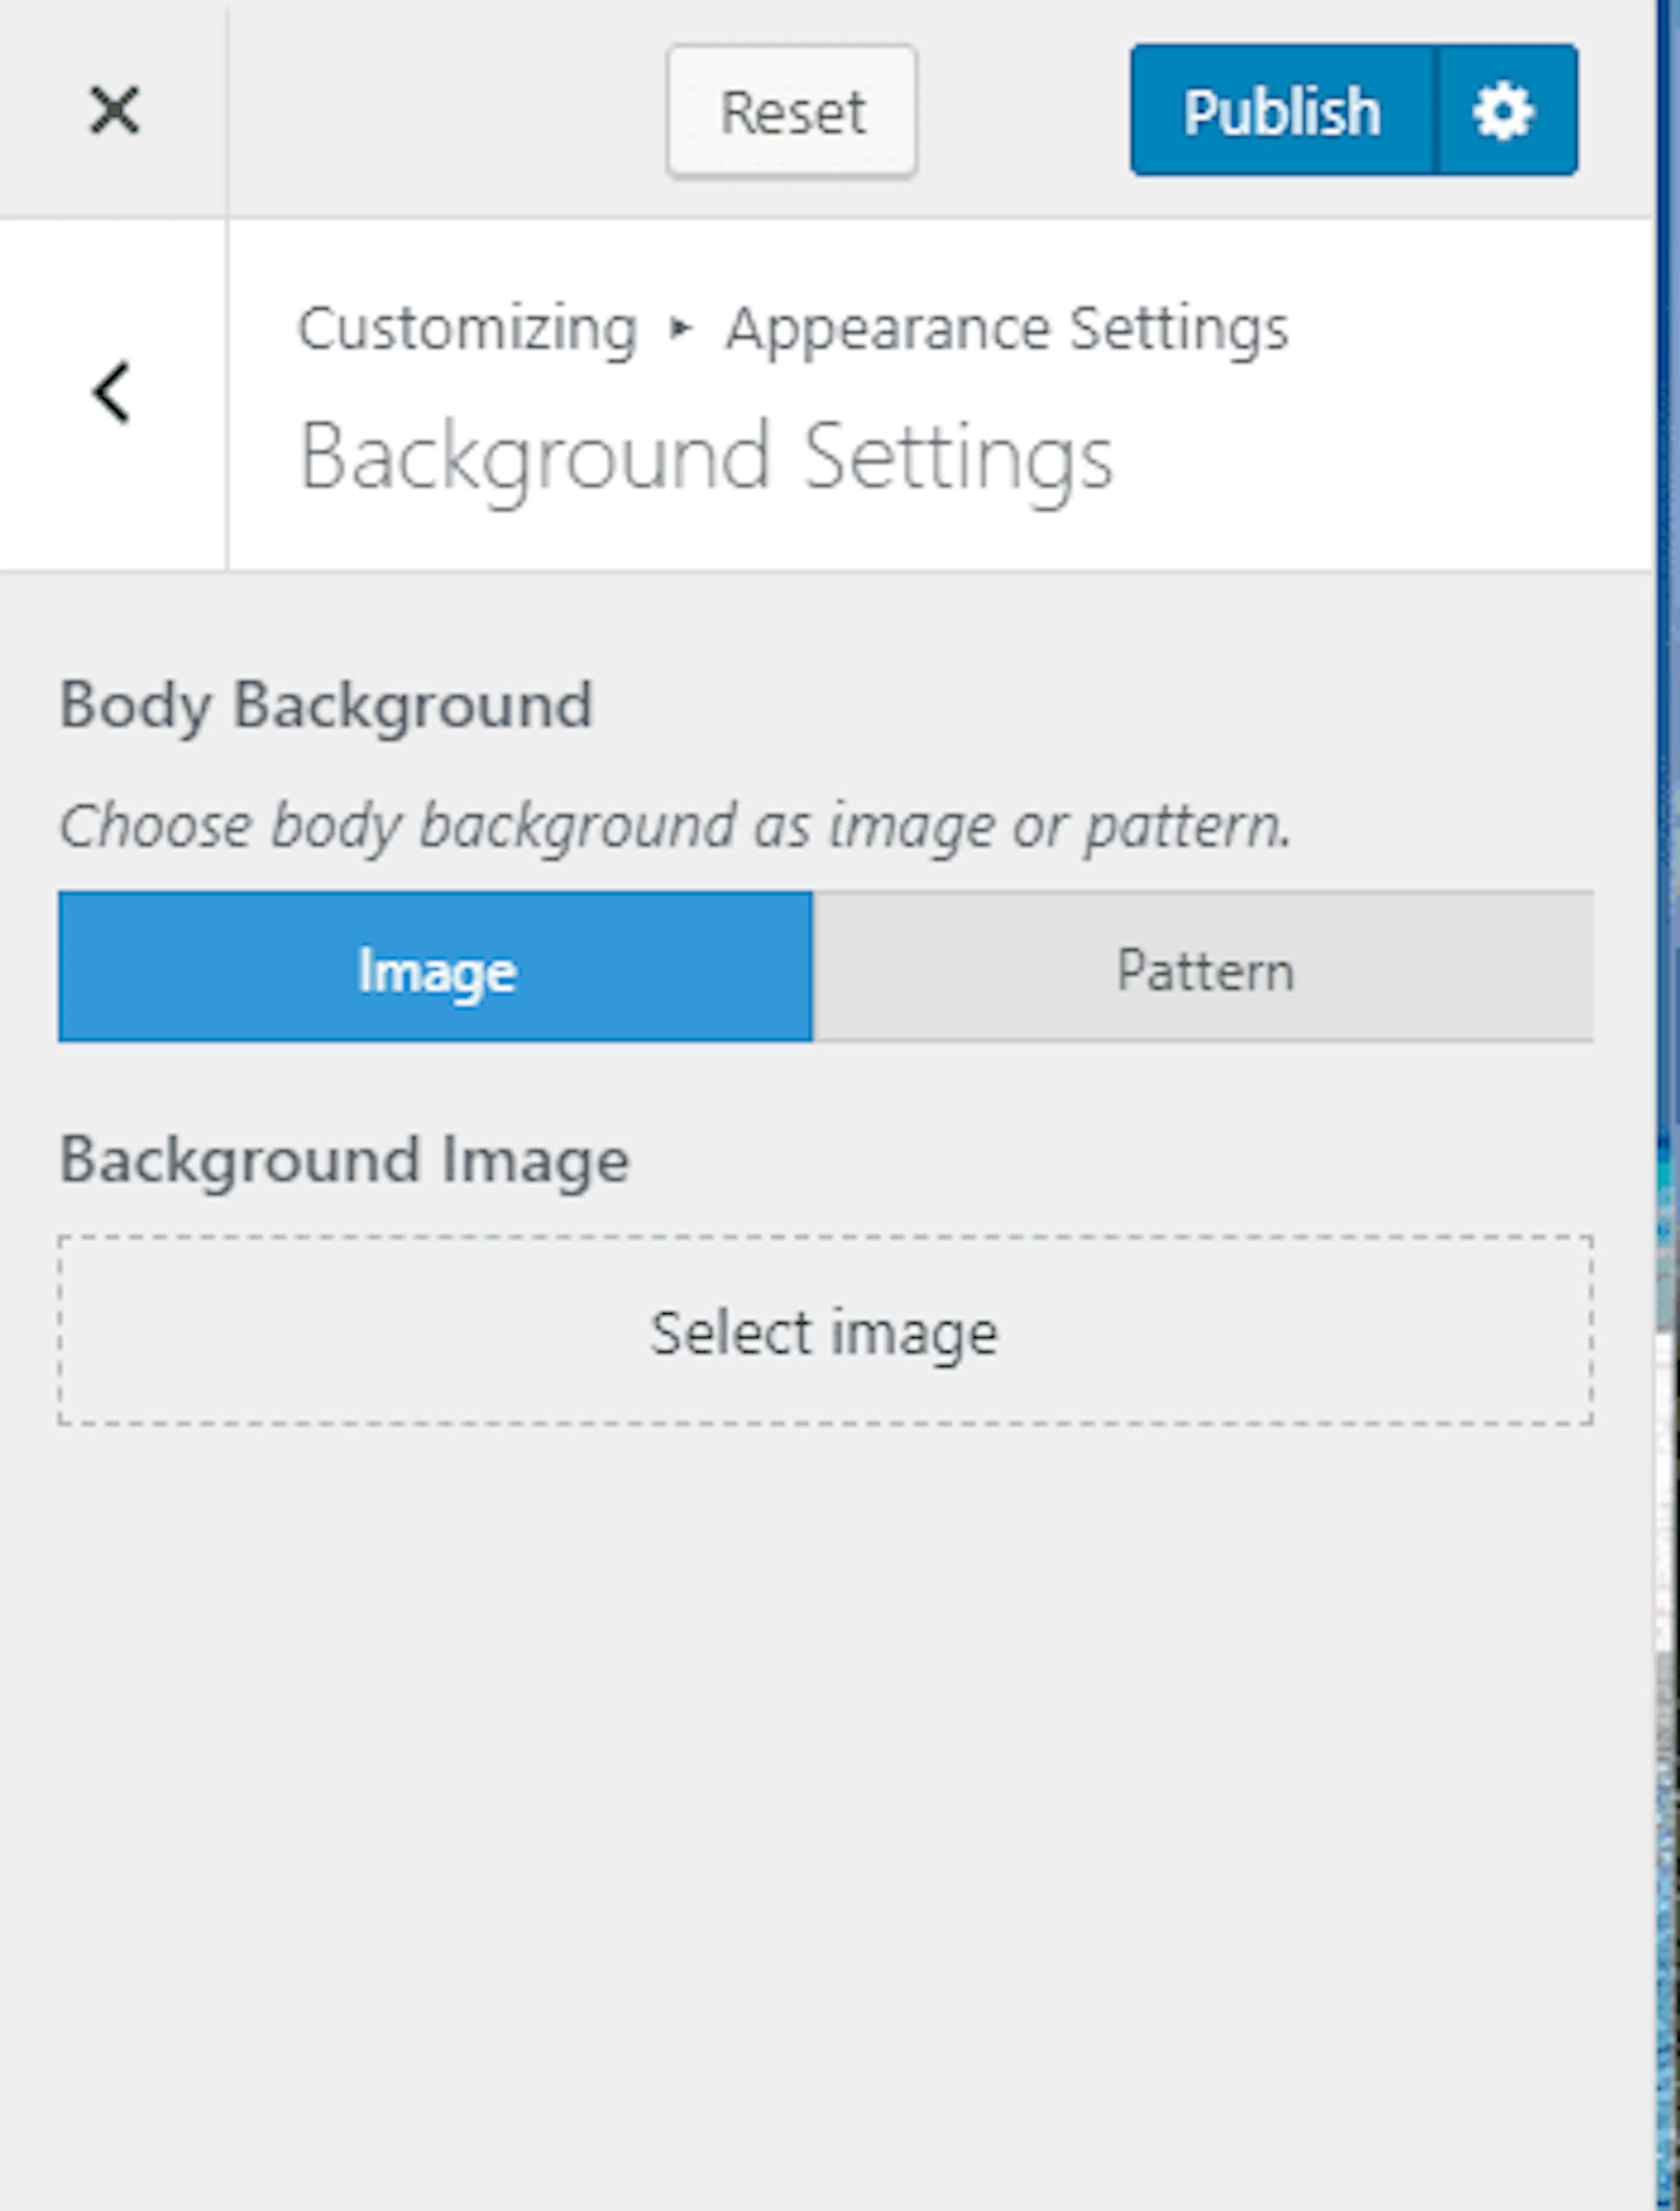
Go to Appearance > Customize > Appearance Settings > Background Settings.
Choose the background
Click Image and upload a background image. You can also choose one of the predefined patterns.
Publish the background
Click Publish.
Choose a header layout
Header layouts control how your logo and navigation are arranged.
Open Header Layout
Go to Appearance > Customize > Layout Settings > Header Layout.
Choose and publish a layout
Select a header layout, then click Publish.
Set the general sidebar layout
Sidebars are narrow areas beside your main content. Choose whether pages, posts, and blog archives display a sidebar.
Open General Sidebar Layout
Go to Appearance > Customize > Layout Settings > General Sidebar Layout.
Choose sidebar options
Select a Sidebar option for the page, post, blog, or default layout.
Publish the layout
Click Publish.
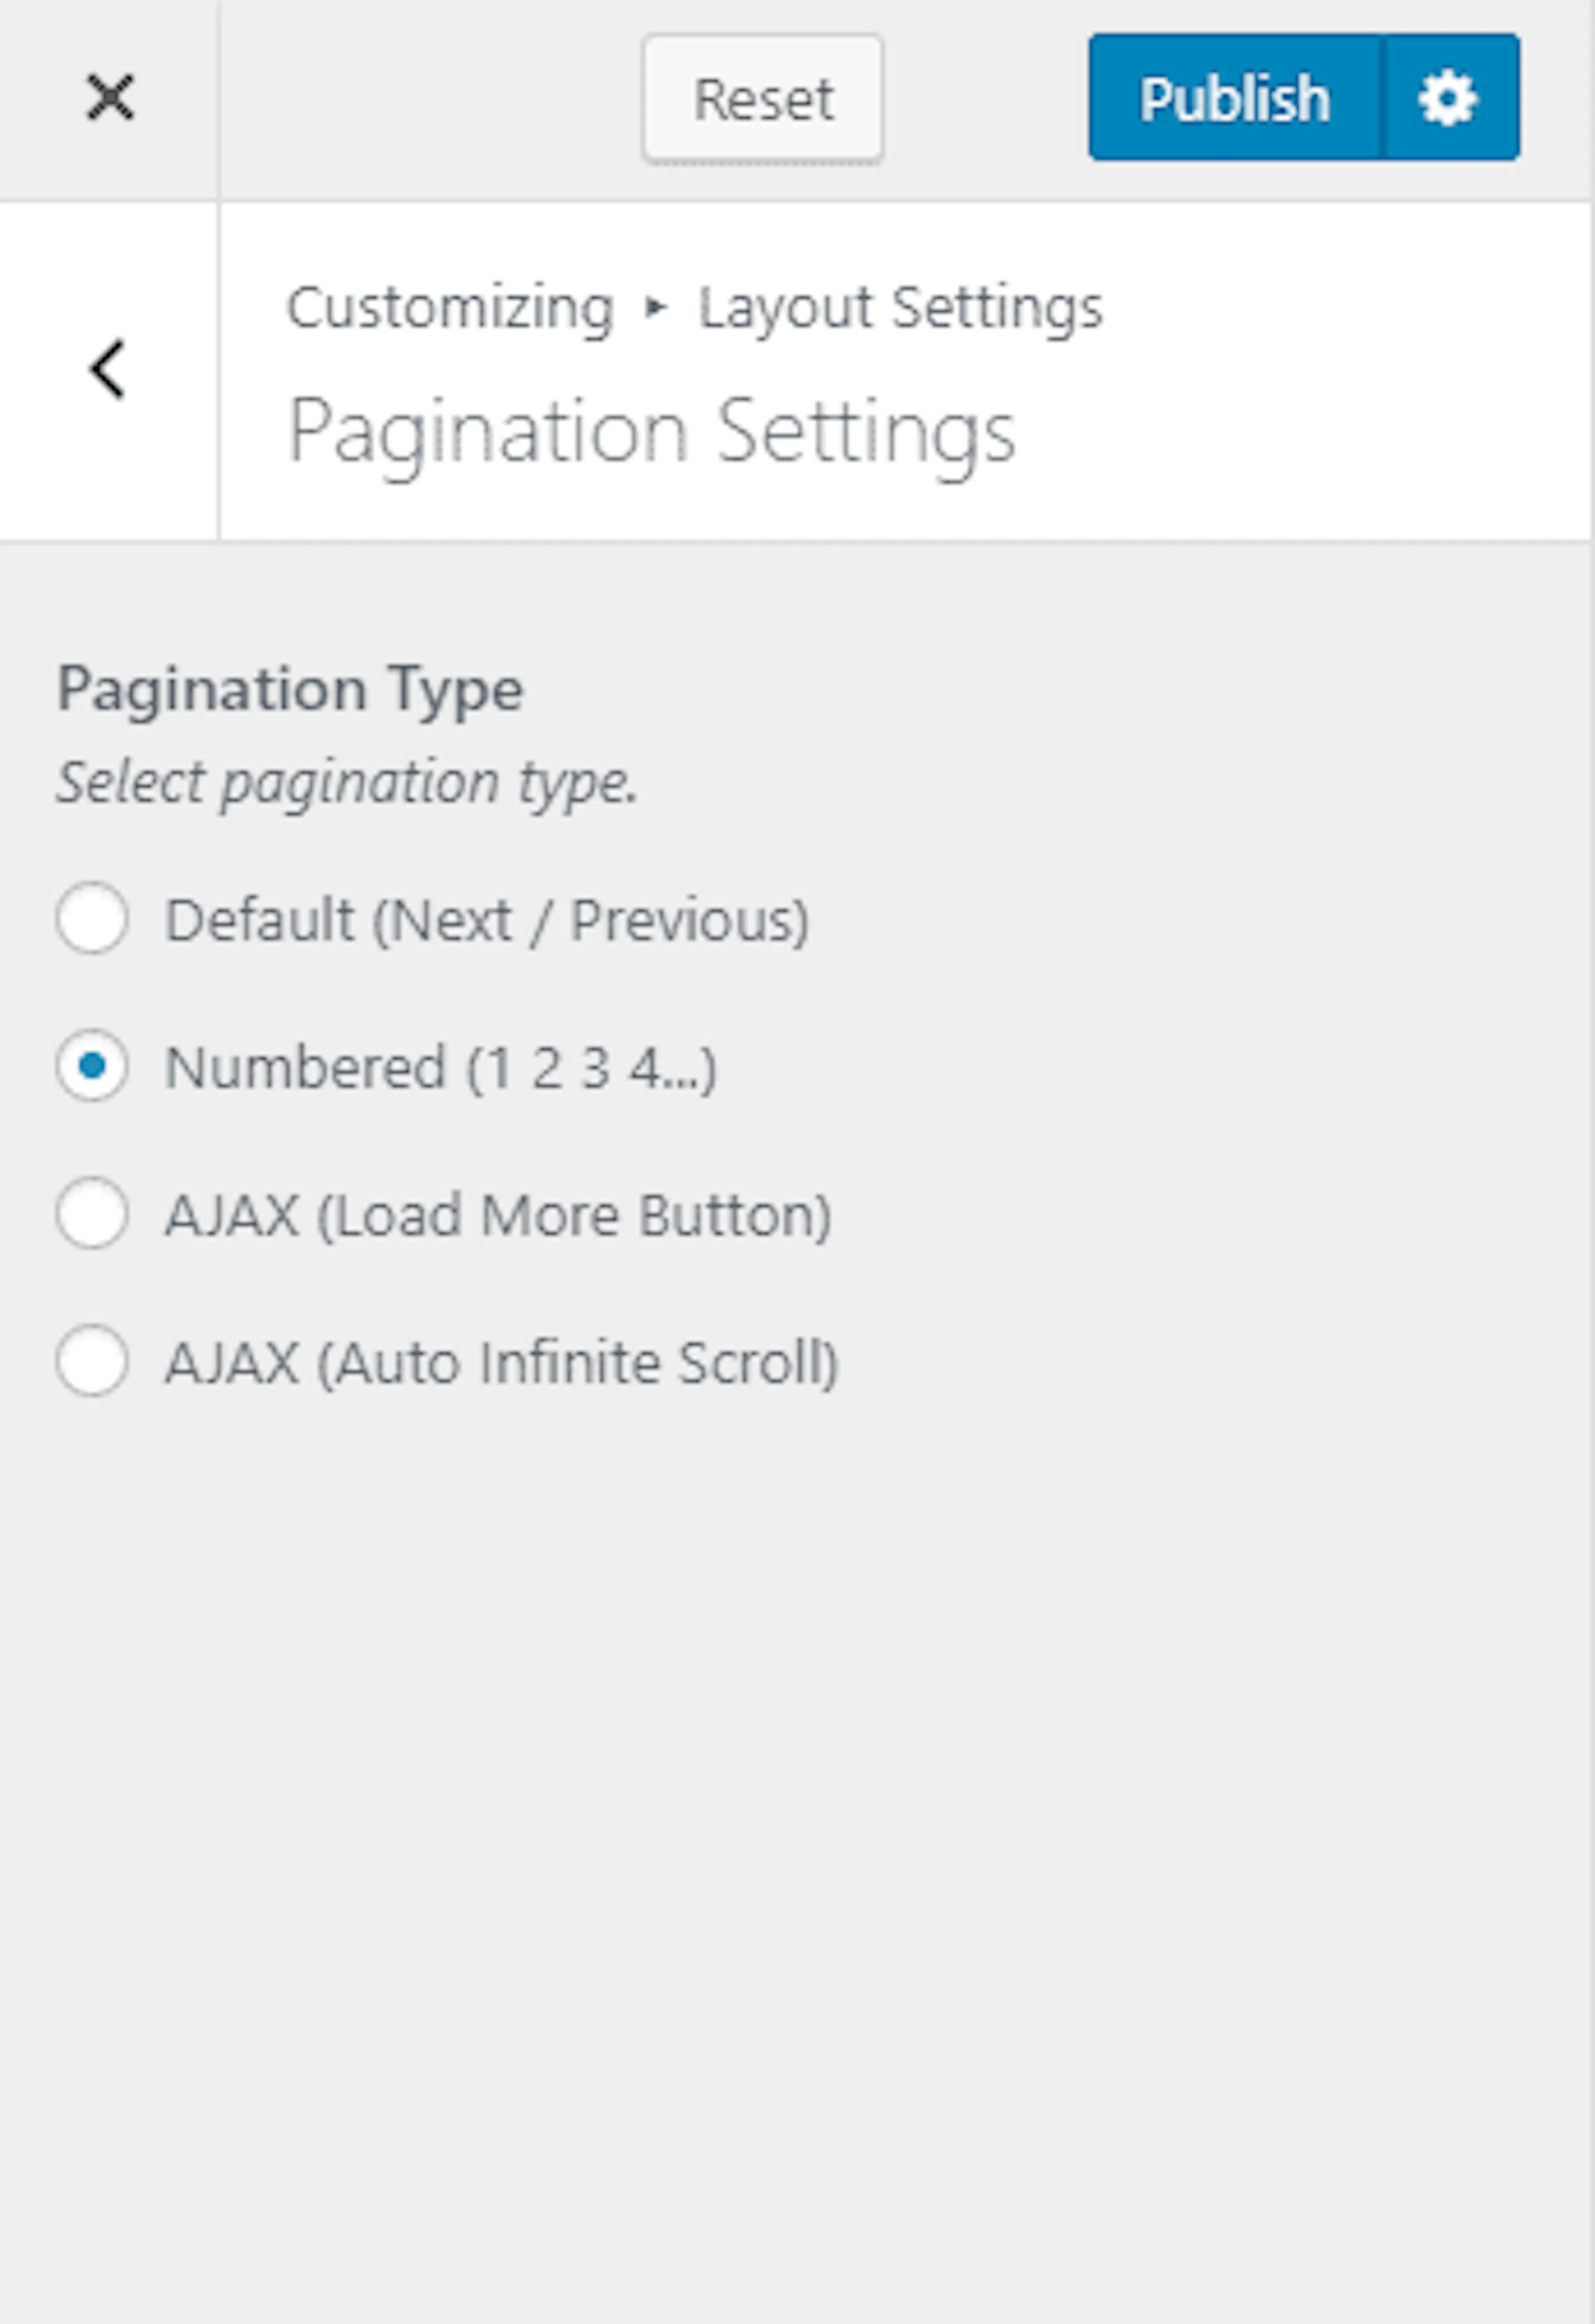
Choose pagination
Pagination controls how visitors move between multiple pages of posts or trips.
Open Pagination Settings
Go to Appearance > Customize > Layout Settings > Pagination Settings.
Choose a pagination type
Select the pagination type you want to use.
Publish the setting
Click Publish.
Set typography
Typography controls the fonts used for your content and heading tags. Use a readable font for descriptions and a distinctive but clear font for headings.
Open Typography Settings
Go to Appearance > Customize > Typography Settings.
Choose and style content
Select the content type. Configure its Font Family, Style, Size, and Color.
Publish the typography
Click Publish.
Build your front page
Front Page Settings controls the homepage sections visitors see first. Confirm that your homepage is a static front page before changing these settings.
You must install and activate the Travel Booking Toolkit plugin to see all available homepage sections. Open the Customizer while viewing your homepage.
Add a banner
The banner is the first section visitors see. Use a strong destination photo, a short message, and a search form to help visitors find a suitable tour.
You can use an image, video, or slider. A video takes priority over an image. If a video is selected, the image does not display.
Use a static or video CTA banner
Open the Banner Section
Go to Appearance > Customize > Front Page Settings > Banner Section.
Choose the banner type
Choose Static/Video CTA Banner under Banner Options.
Add video or images
Upload or select a video, or enter a YouTube link. To use an image instead, click Add new image and select an image. Use Randomize uploaded headers to rotate uploaded header images. Do not select a video when you want to display an image.
Add the banner message
Enable or disable the Search Form. Enter a banner title and subtitle.
Publish the banner
Click Publish.
Use a newsletter banner
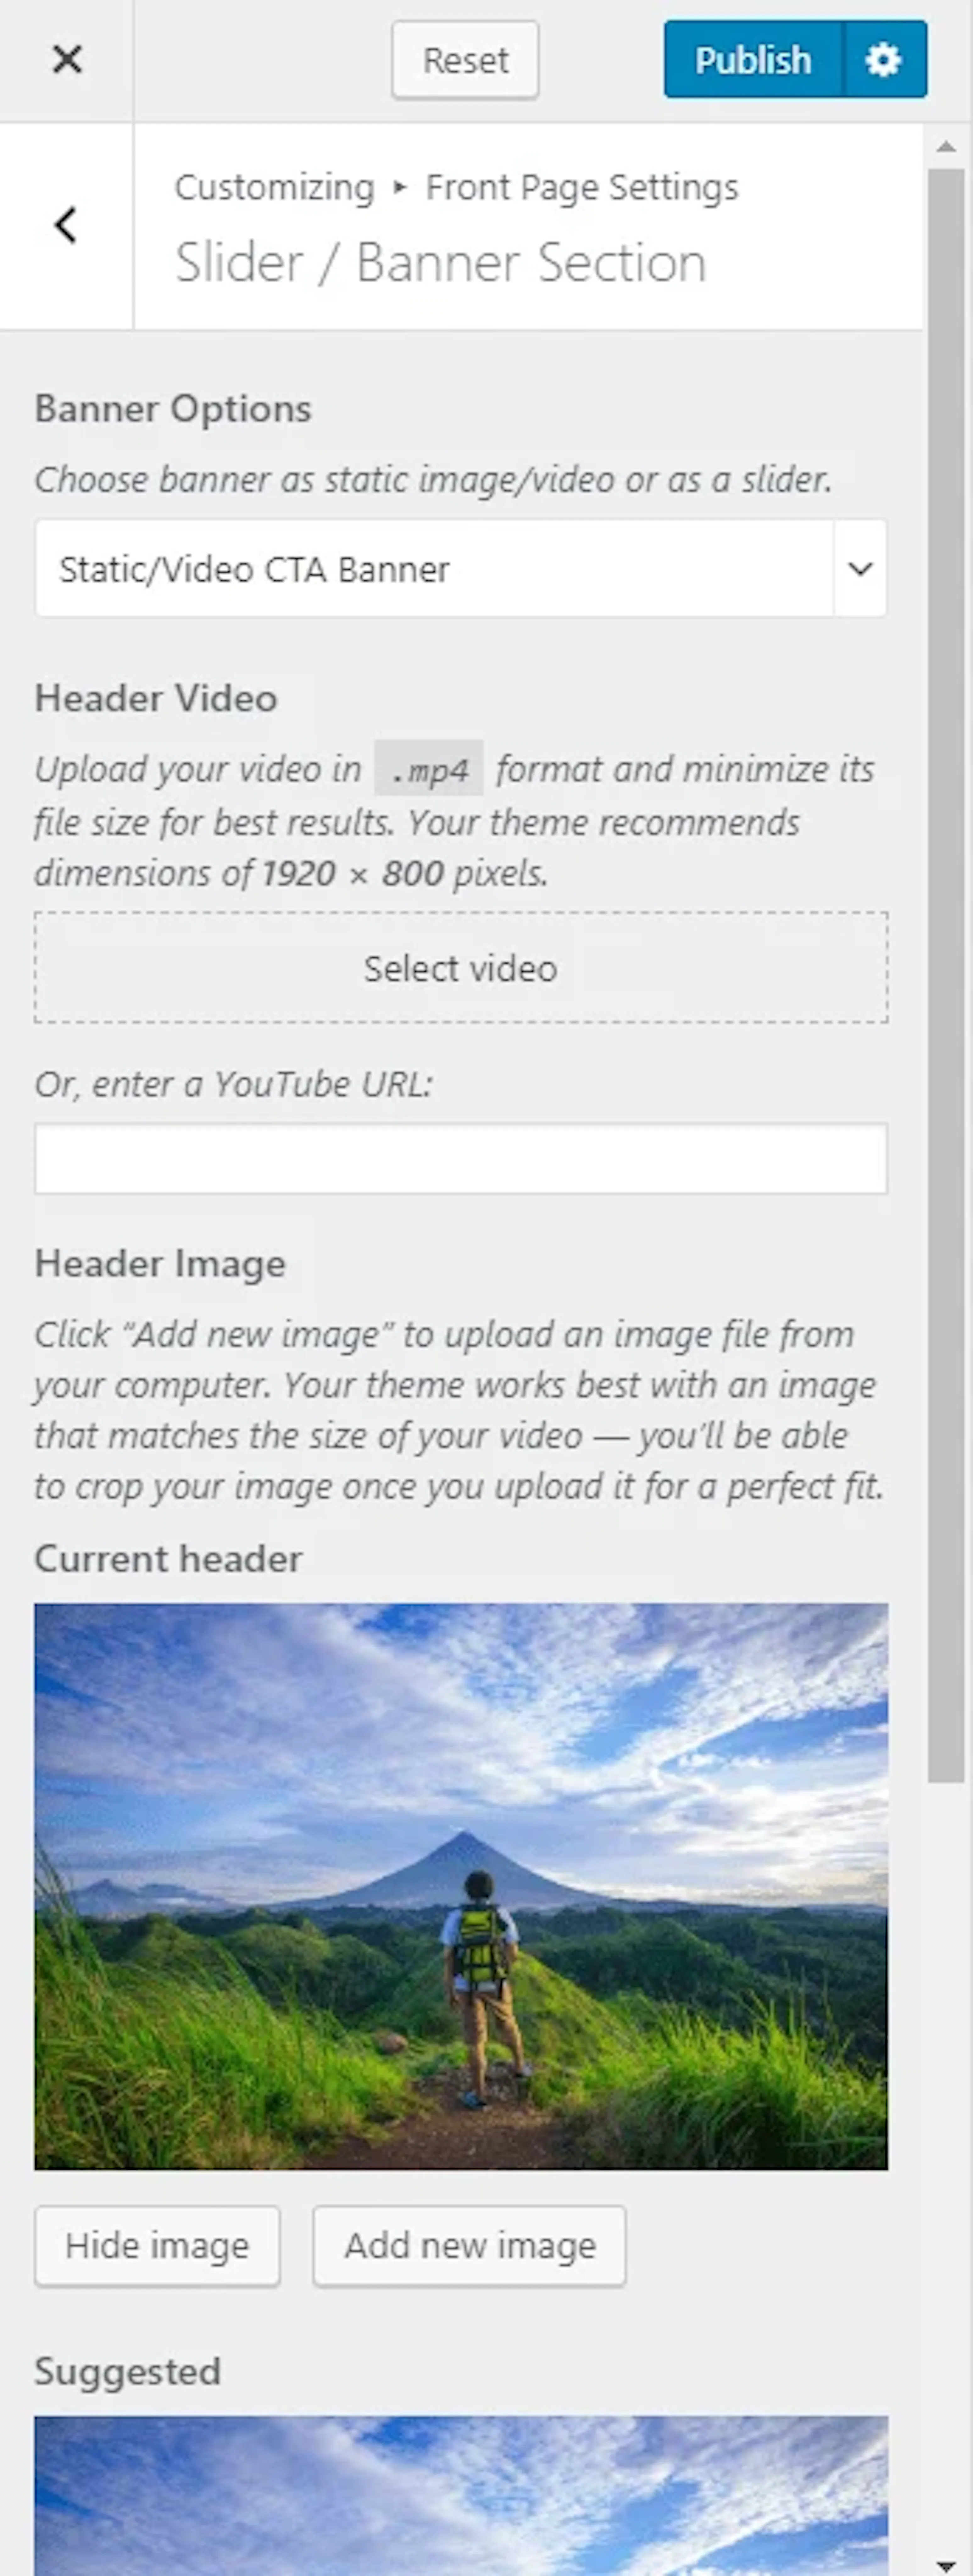
A newsletter banner collects visitor interest instead of sending visitors directly to trip search.
Choose the newsletter banner
Open Appearance > Customize > Front Page Settings > Banner Section and choose Static/Video CTA Banner under Banner Options.
Add the banner media
Upload a video or enter a YouTube link. For an image, click Add new image and select an image. You can randomize uploaded headers.
Add the newsletter form
Enter the Banner Newsletter shortcode. A shortcode is a short instruction in square brackets that tells WordPress to display a feature, such as a newsletter form.
Publish the banner
Click Publish.
Create a banner slider
A slider rotates several banner images. Use it to highlight seasonal pricing, group discounts, or different destinations.
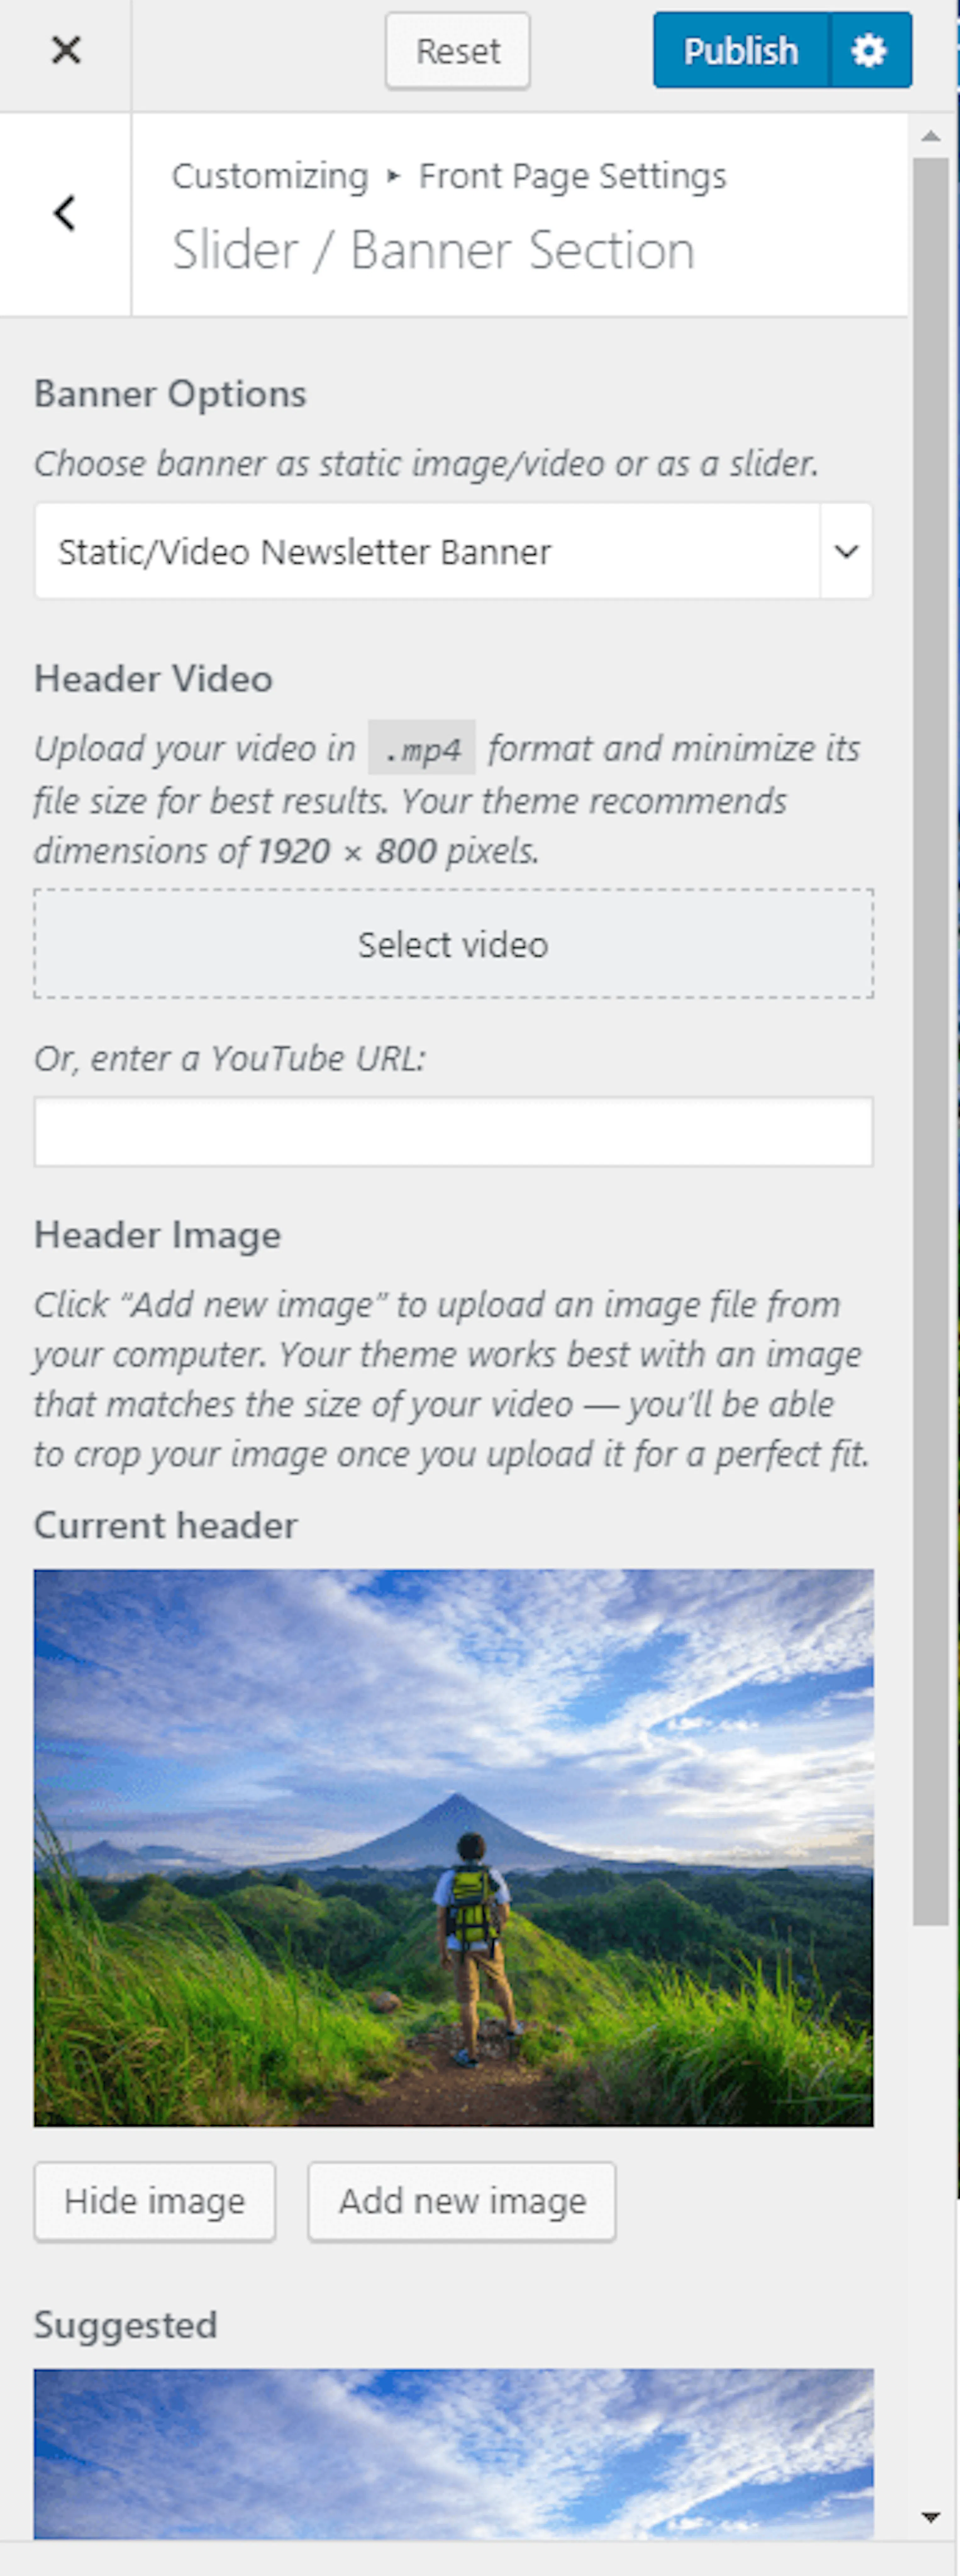
Choose the slider option
Go to Appearance > Customize > Front Page Settings > Banner Section. Choose Banner as Slider under Banner Options.
Use the latest posts
Configure latest posts
Select Latest Posts for Slider Content Style. Choose the number of Slides.
Configure slider behavior
Enable Slider Auto to transition slides automatically. The blue state means the option is enabled. Enable Slider Loop to repeat posts. Enable Slider Caption to show the post title on the image.
Choose the animation
Choose a Slider Animation type from the dropdown, then click Publish.
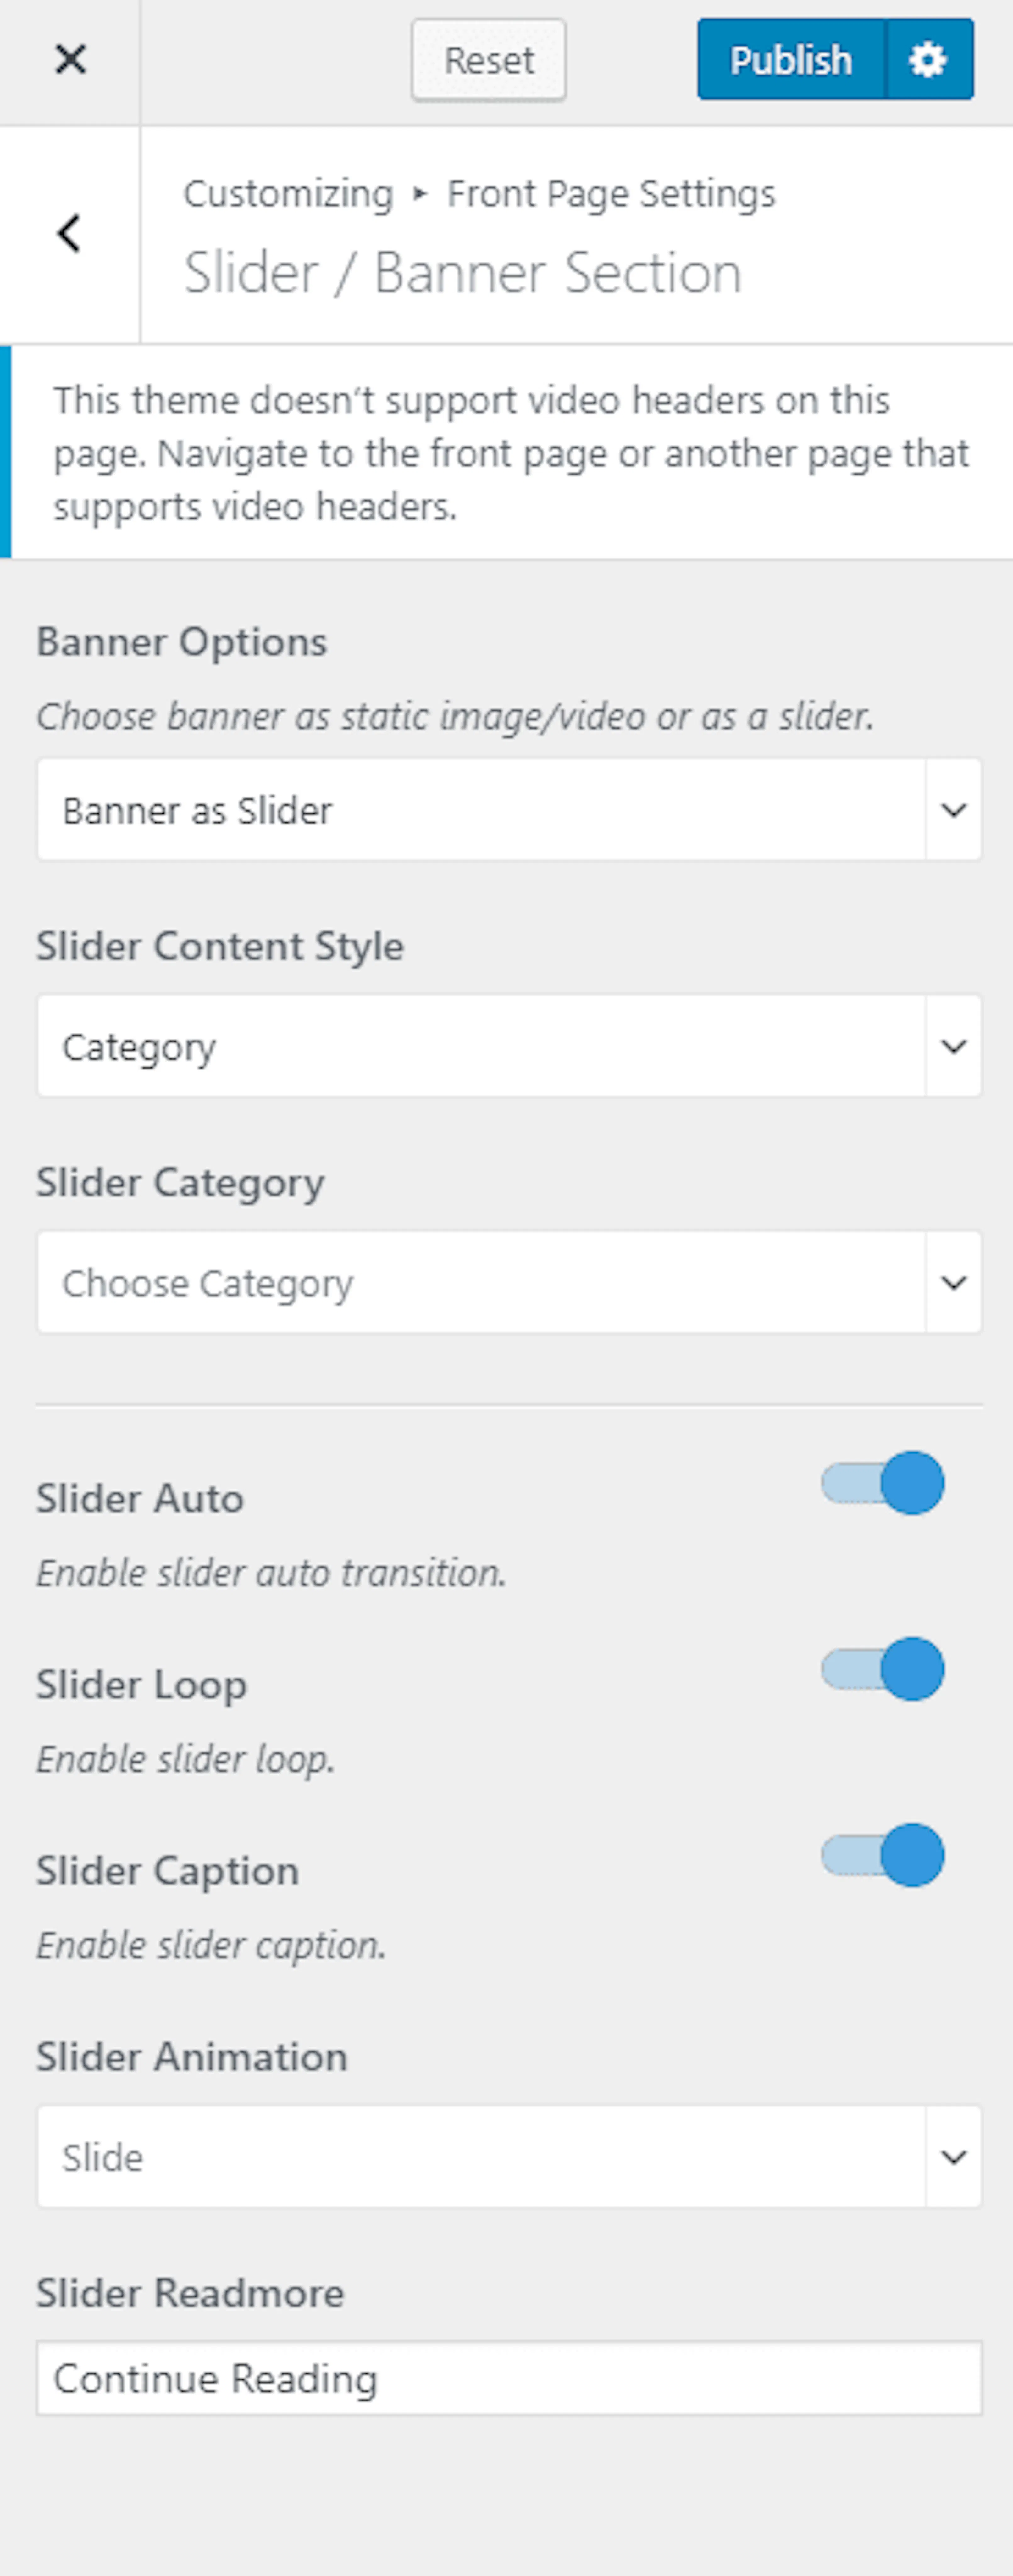
Create a slider from a category
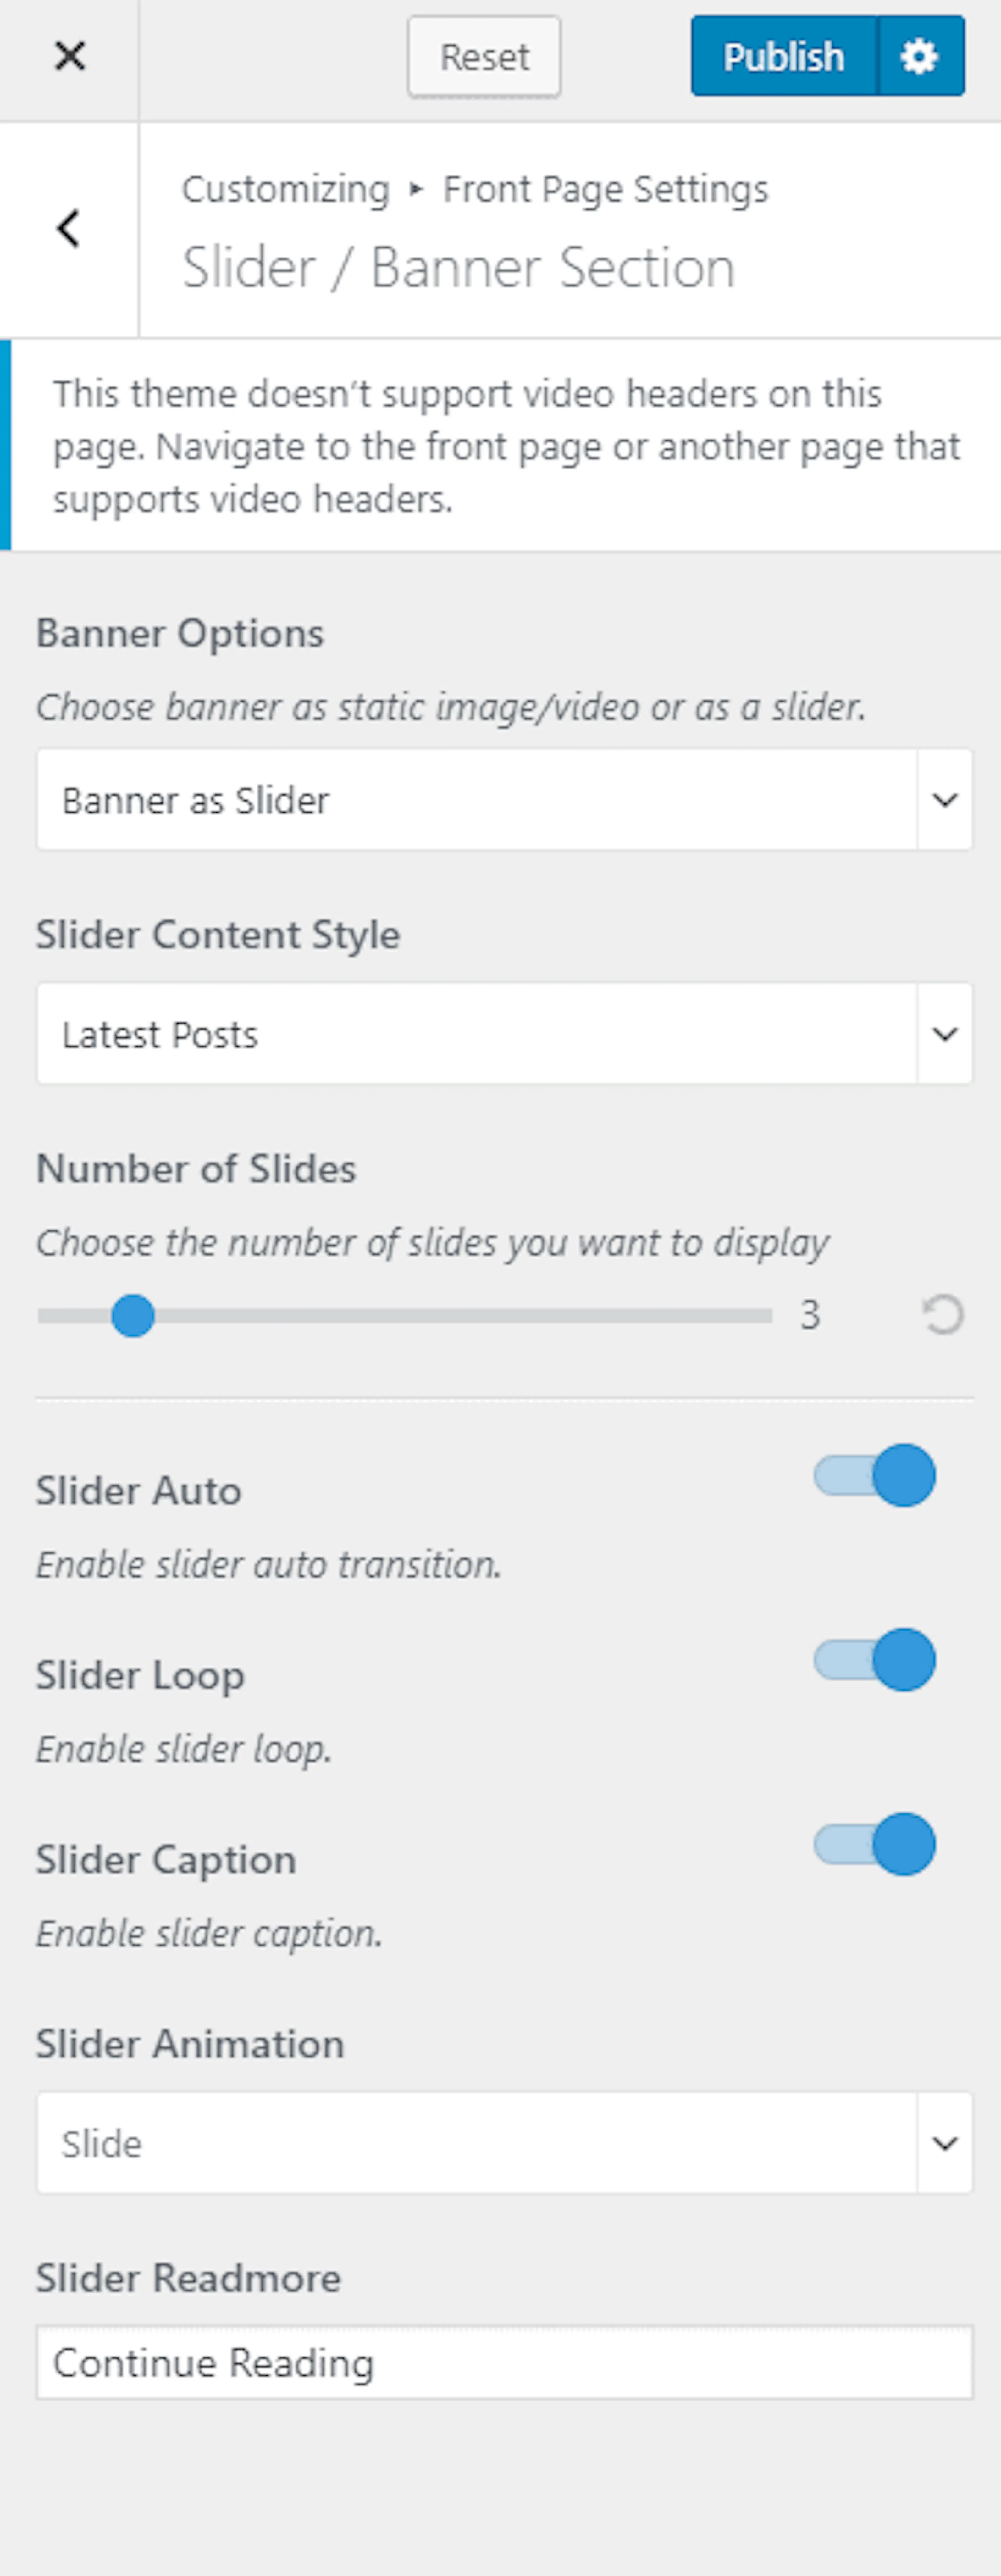
Category sliders use existing posts. The featured image becomes the slide image, the post title becomes the slide title, and the post excerpt becomes the slide content. If a post has no excerpt, the first few sentences are used.
Choose a category
Set Slider Content Style to Category, then choose a Slider Category.
Configure the slider
Enable Slider Auto, Slider Loop, and Slider Caption. Choose a Slider Animation and enter the Readmore Button Label.
Publish the category slider
Click Publish.
Create a slider from pages
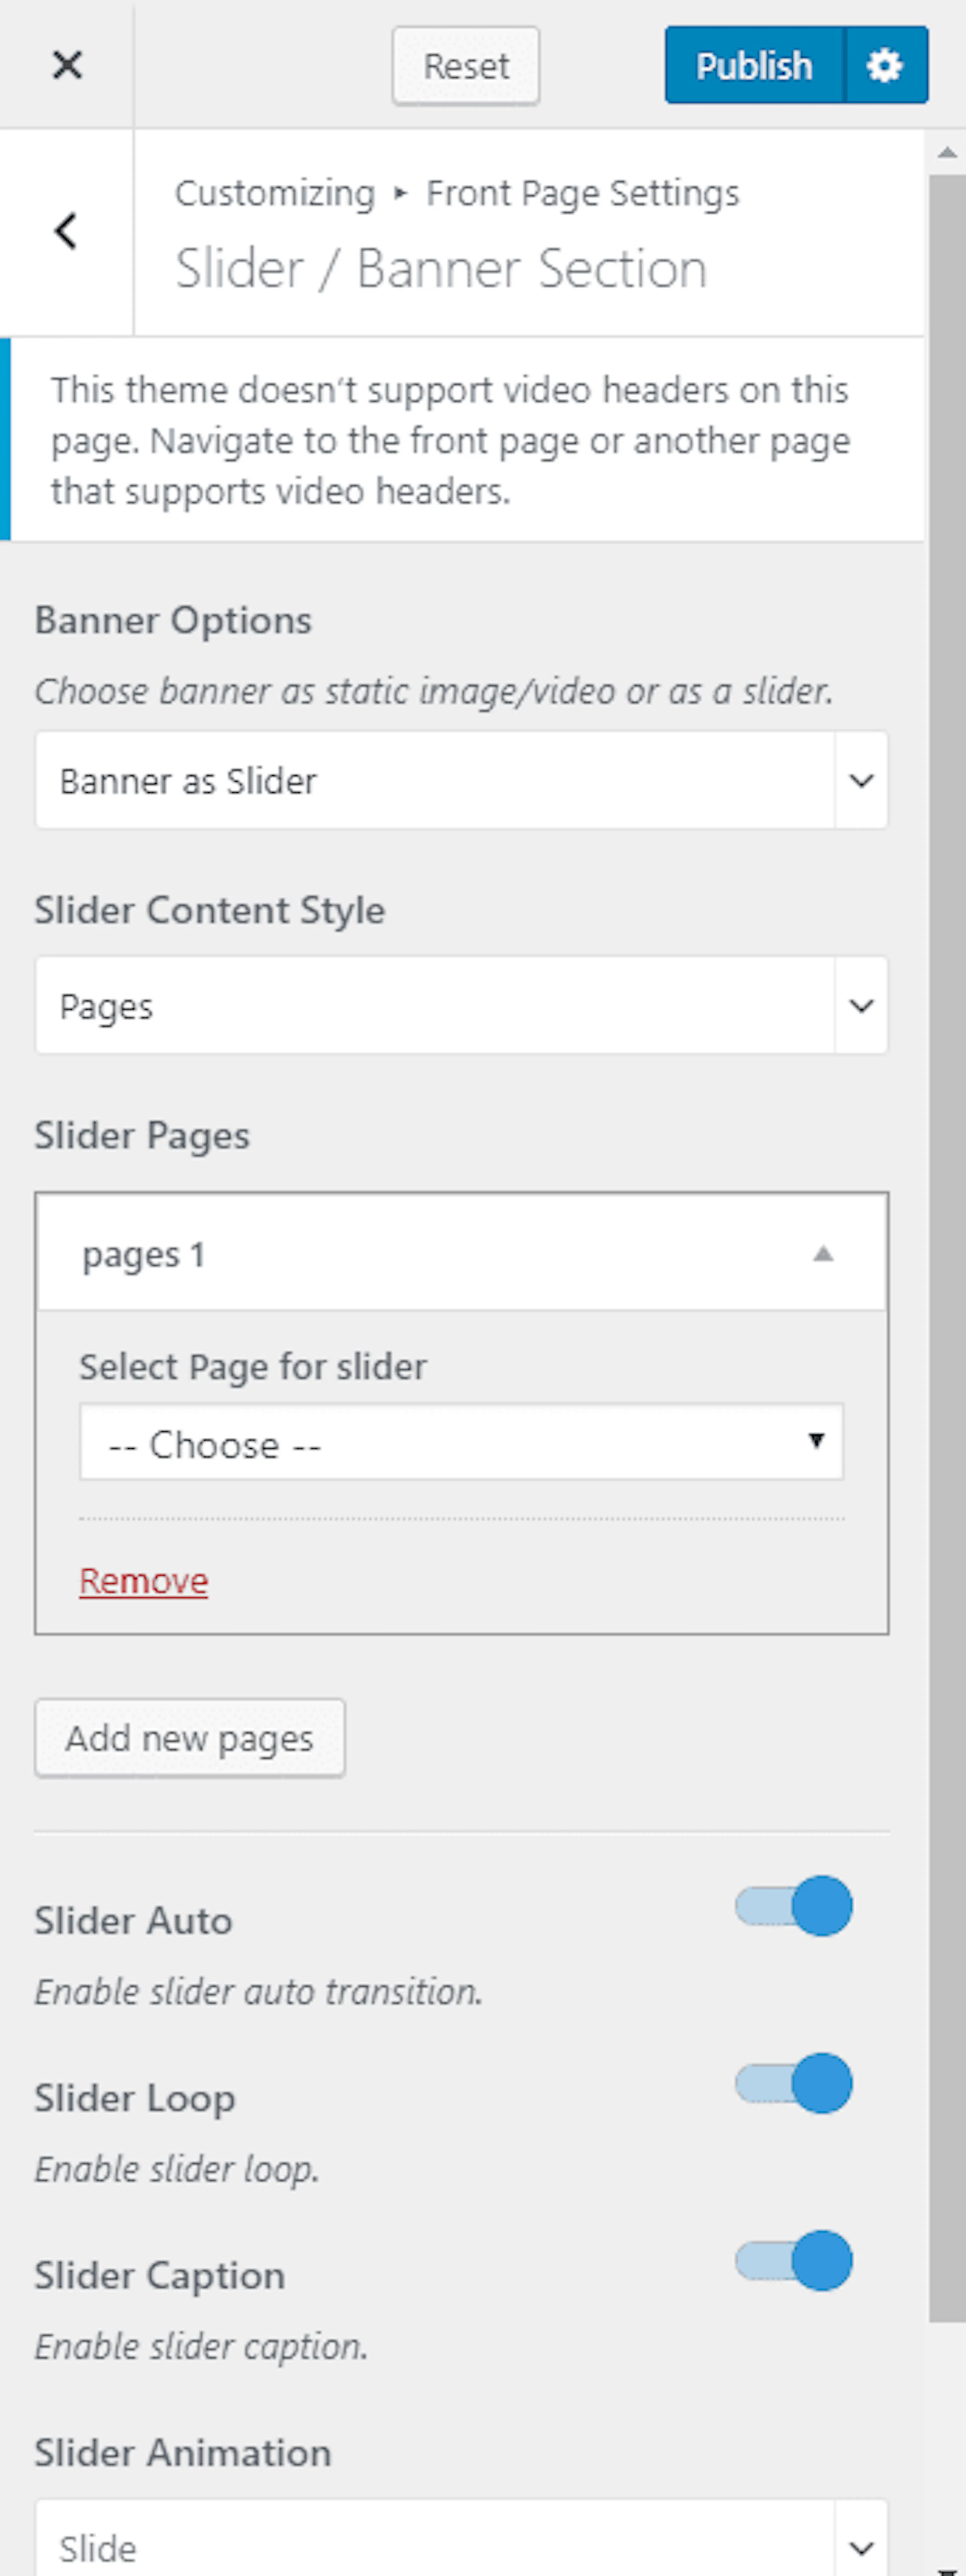
Choose pages
Set Slider Content Style to Pages. Click Add New Pages and select the pages to display.
Configure and publish
Enable Slider Auto, Slider Loop, and Slider Caption. Choose a Slider Animation, enter the Readmore Button Label, and click Publish.
Create custom slides
Custom slides let you create a banner without using posts or pages.
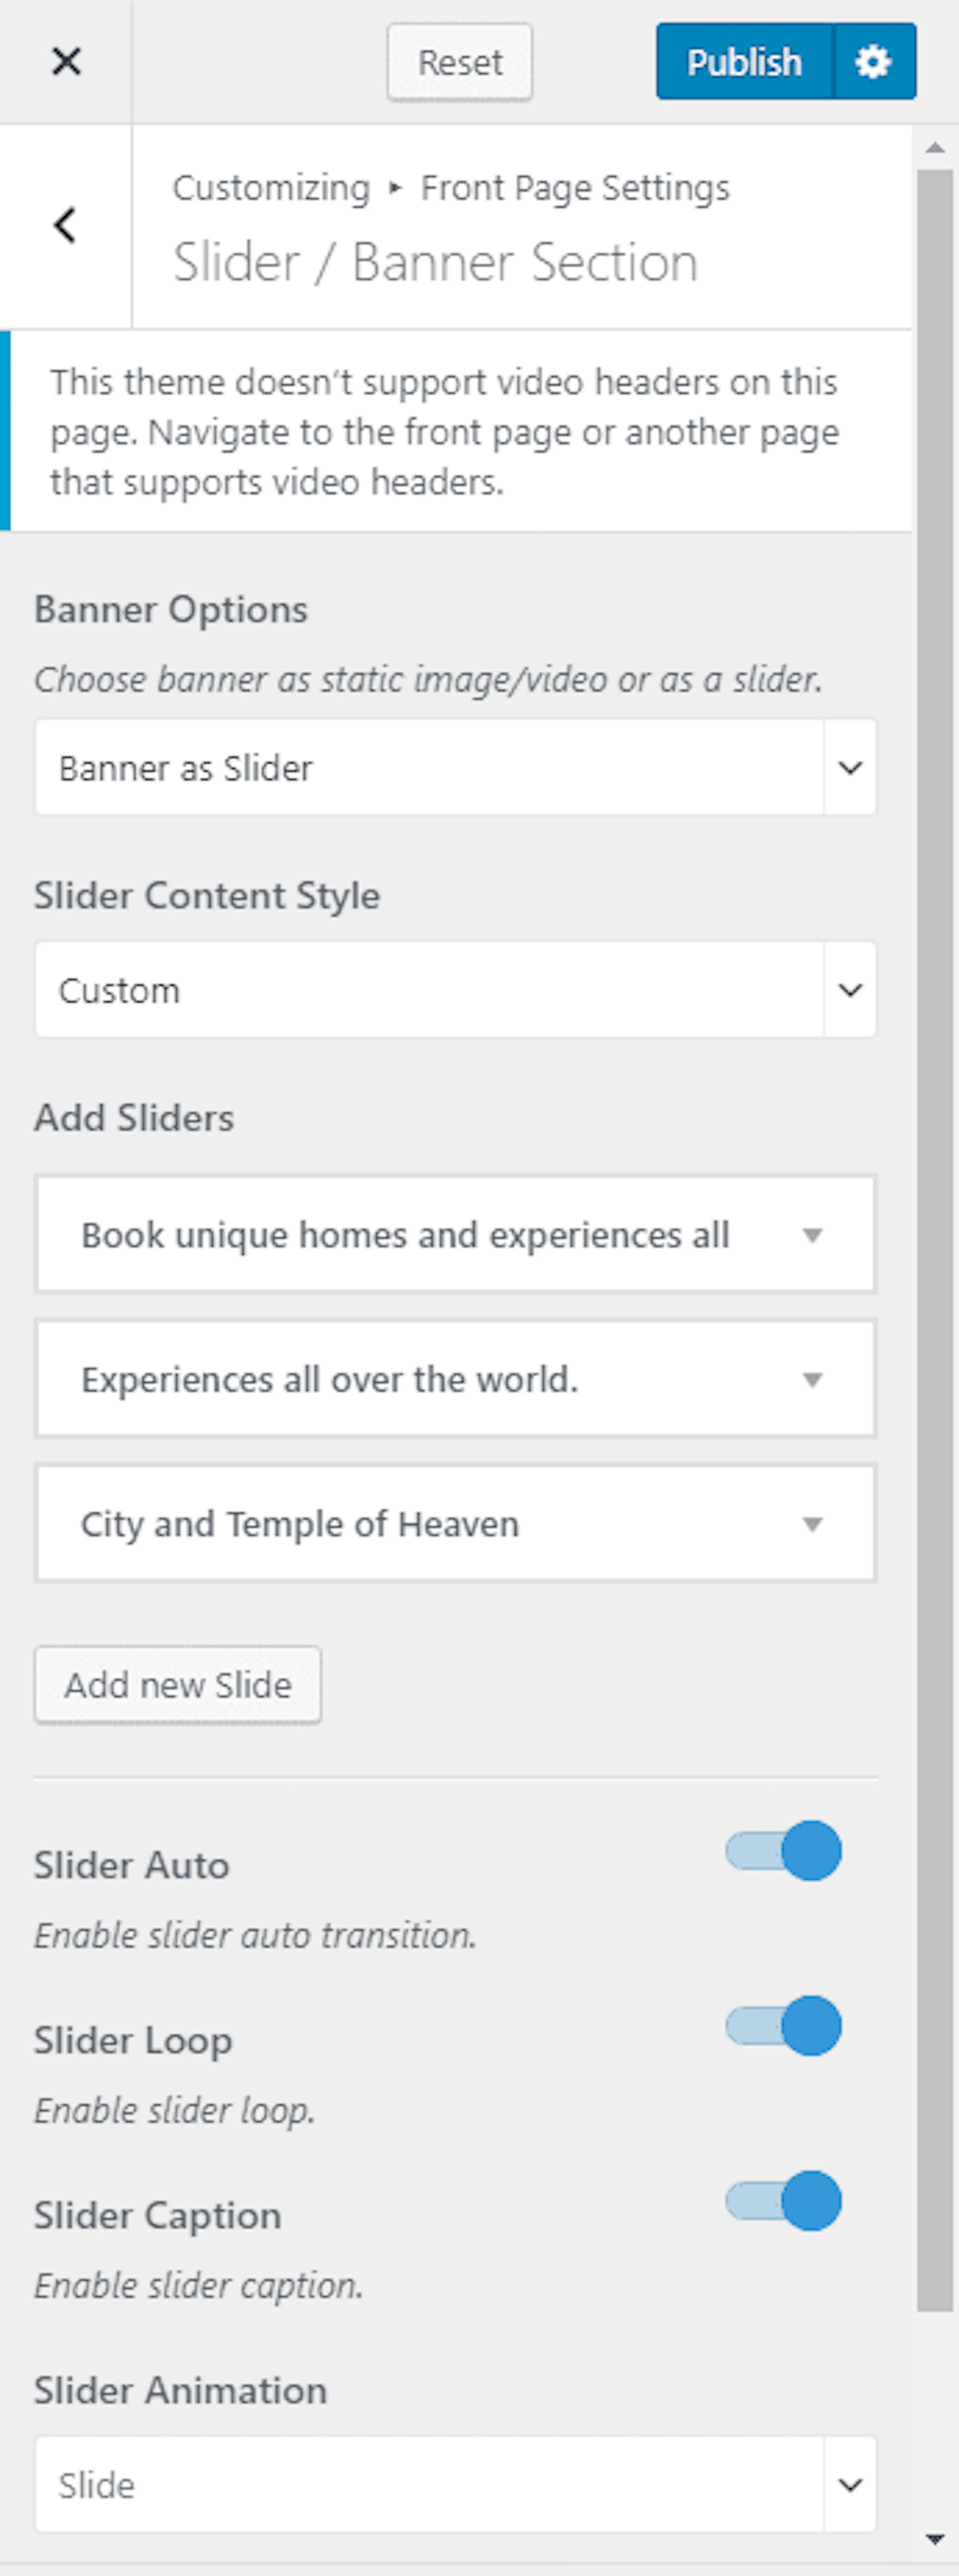
Add a slide
Set Slider Content Style to Custom. Click Add new slide, then click Add Image to upload an image.
Add slide content
Enter the slide Title, Description, and Link. Click Add new Slide to add another slide. Click a Slide No. to modify an existing slide.
Configure and publish
Enable Slider Auto, Slider Loop, and Slider Caption. Choose a Slider Animation, enter the Readmore Button Label, and click Publish.
Add a trip search section
The search section helps visitors find a trip by destination, activity, or other available trip details.
Install and activate the WP Travel Engine Trip Search plugin before enabling this section.
Open Search Section
Go to Appearance > Customize > Front Page Settings > Search Section.
Enable the search bar
Enable Search Bar, then click Publish.
Add an About section
Use the About section to explain what makes your tour company different. Mention details such as local guides, small groups, safety practices, or gear rental.
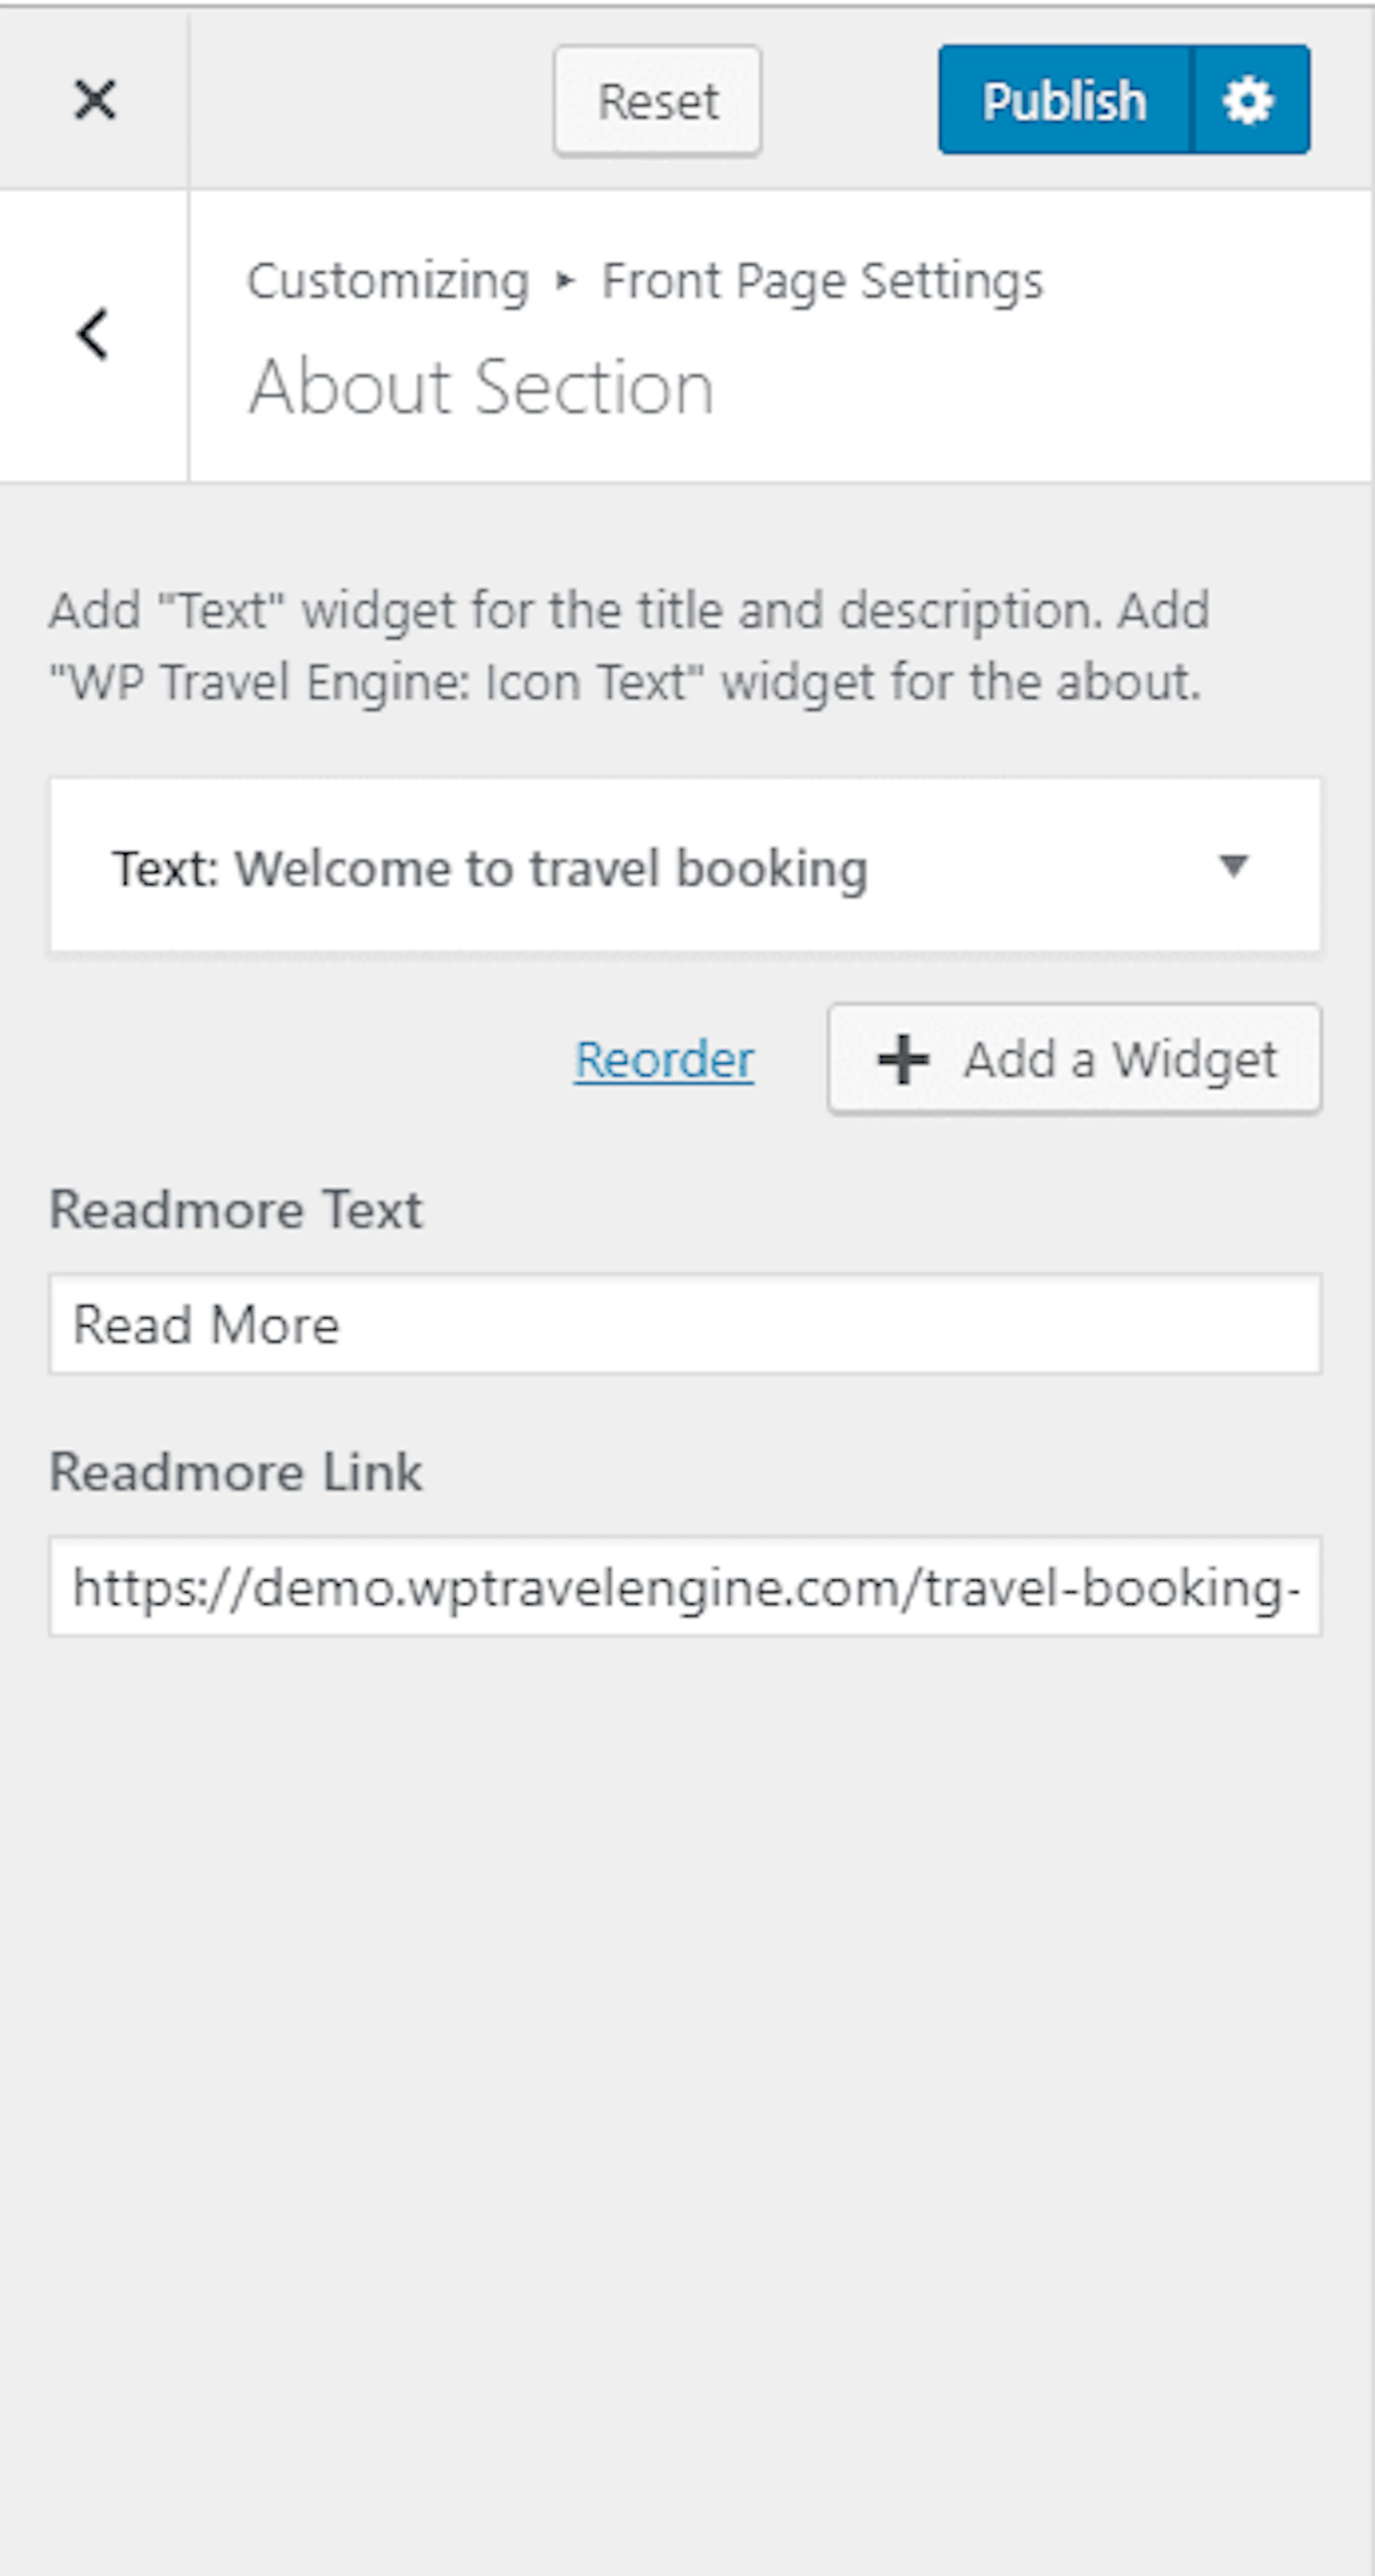
Open About Section
Go to Appearance > Customize > Front Page Settings > About Section.
Add the introduction
Add a Text widget for the section title and description.
Add feature details
Add the WP Travel Engine: Icon Text widget. Enter its title and content. Upload an image or choose an icon. Add more widgets for additional features.
Add the link
Enter the Read more text and URL, then click Publish.
Show popular packages
Popular Packages highlights tours you want visitors to notice first.
Add trips before configuring this section. Go to Trips > Add New trips to create a trip.
Open Popular Packages
Go to Appearance > Customize > Front Page Settings > Popular Packages.
Enable the section
Check Enable Popular Packages Section. Enter the section title and description.
Choose the packages
Uncheck Enable Popular Package Demo Content to hide the sample content. Choose Popular Packages One, Popular Packages Two, or Popular Packages Three.
Add labels and publish
Enter the Read More Label, View All Label, and View All URL. Click Publish.
Add Call to Action One
Use this section for a direct invitation, such as “Plan your next trek” or “Ask about group discounts.”
Open Call to Action One
Go to Appearance > Customize > Front Page Settings > Call To Action One.
Add the CTA widget
Add the WP Travel Engine: Call To Action Widget. Enter the title and content.
Add buttons and background
Choose the button Alignment and the number of CTA buttons. Enter each Button text and Button Link. Choose a background color or image.
Publish the CTA
Click Publish.
Show featured trips
Featured trips are useful for highlighting seasonal packages or your most important tour category.
Create packages before configuring this section.
Open Featured Section
Go to Appearance > Customize > Front Page Settings > Featured Section.
Enable featured trips
Check Enable Featured Trip Section. Enter the section title and description. Uncheck Enable Featured Demo Content.
Choose trips
Choose a featured trip category or the latest trips. Choose the number of trips to display.
Add labels and publish
Enter the Read More Label and View All Label, then click Publish.
Show deals and discounts
Use this section for seasonal pricing, group discounts, or limited-time offers.
Add trips before configuring the Deals section.
Open Deals Packages
Go to Appearance > Customize > Front Page Settings > Deals Packages.
Enable the section
Check Enable Deal and Discount Section. Enter the section title and description. Uncheck Enable Deal Demo Content.
Choose deal trips
Choose Deal Post One, Deal Post Two, Deal Post Three, and Deal Post Four as needed.
Add labels and publish
Enter the Read More Label, View All Label, and View All URL. Click Publish.
Show destinations
Destinations help visitors browse your trips by location.
Add destinations before configuring this section. Go to Trips > Add New trips > Add destination.
Open Destination Section
Go to Appearance > Customize > Front Page Settings > Destination Section.
Enable and configure destinations
Check Enable Destination Section. Enter the section title and description. Uncheck Enable Destination Demo Content. Choose Destination One, Destination Two, Destination Three, and Destination Four as needed.
Publish destinations
Click Publish.
Add Call to Action Two
Use the second CTA section for a different audience or offer. For example, use the first CTA for individual bookings and the second for private groups.
Open Call to Action Two
Go to Appearance > Customize > Front Page Settings > Call To Action Two.
Add the CTA widget
Add the WP Travel Engine: Call To Action Widget. Enter the title and content.
Add buttons and background
Choose the button Alignment and the number of CTA buttons. Enter each Button text and Button Link. Choose a background color or image.
Publish the CTA
Click Publish.
Show activities
Activities let visitors browse by experience, such as hiking, rafting, wildlife viewing, or cultural tours.
Add activities before configuring this section. Go to Trips > Add New trips > Add activities.
Open Activities Section
Go to Appearance > Customize > Front Page Settings > Activities Section.
Enable and configure activities
Check Enable Activities Section. Enter the section title and description. Uncheck Enable Activities Demo Content. Choose Activities One through Activities Eight as needed.
Publish activities
Click Publish.
Add testimonials
Testimonials show visitors what previous guests thought about your tours.
Open Testimonial Section
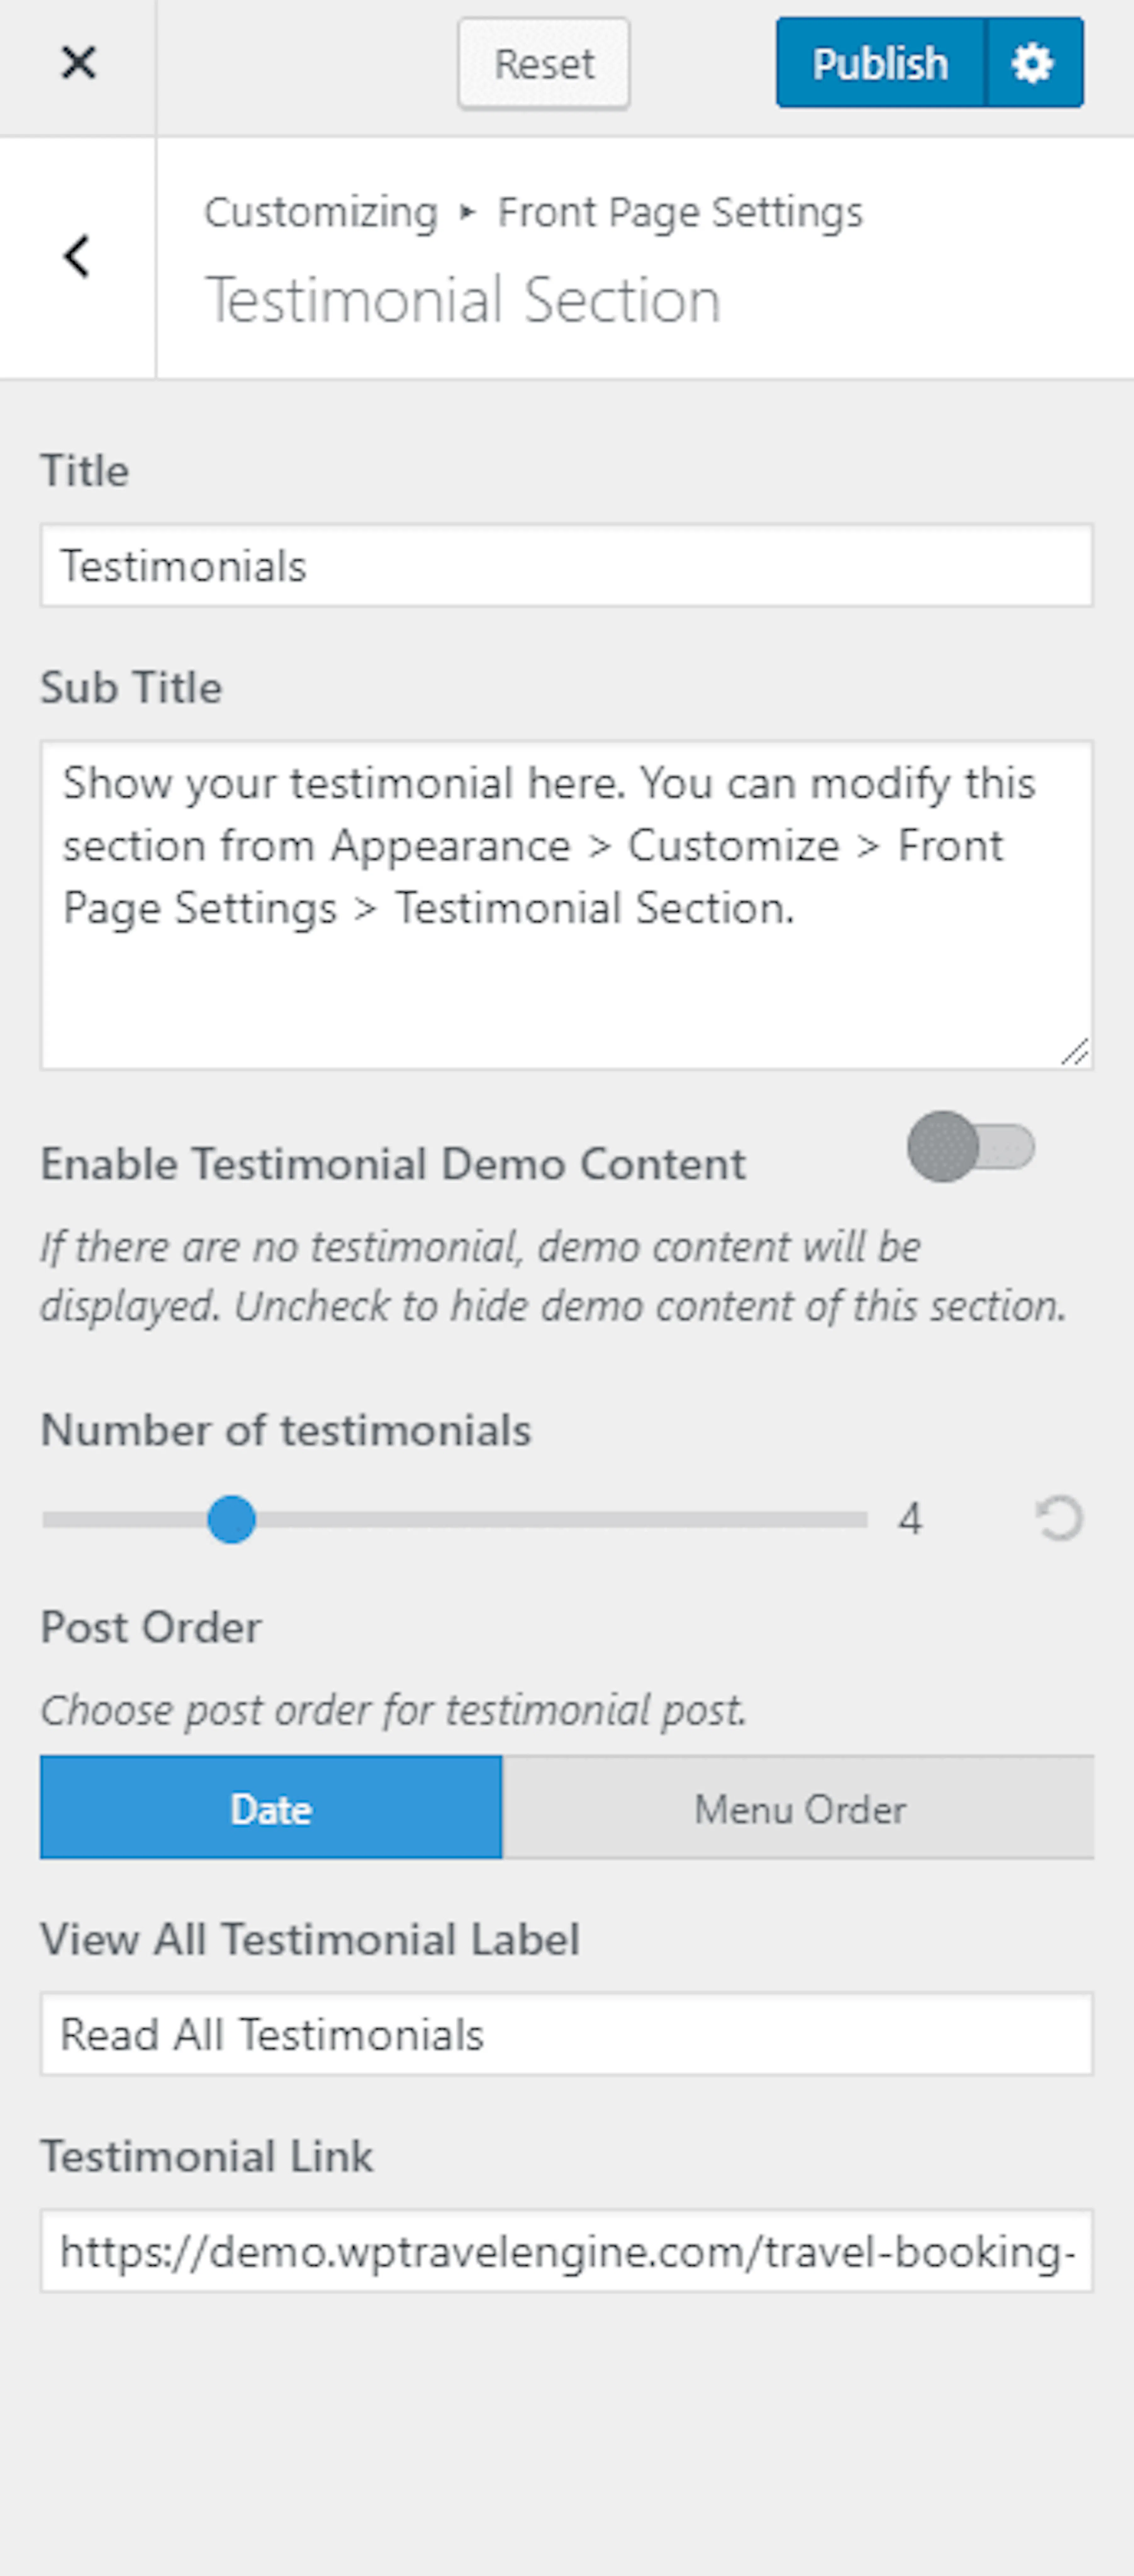
Go to Appearance > Customize > Front Page Settings > Testimonial Section.
Configure testimonials
Enter the section title and subtitle. Check Enable Testimonial Demo Content if you want sample testimonials to display while you have no testimonials of your own. Choose the number of testimonials and the Post Order.
Add the link and publish
Enter the View all Label and Testimonial Link, then click Publish.
Add a blog section
Use the blog to share packing advice, destination guides, seasonal updates, and travel stories.
Open Blog Section
Go to Appearance > Customize > Front Page Settings > Blog Section.
Configure and publish
Check Enable Blog Section. Enter the section title and subtitle, Readmore text, and View all Label. Click Publish.
Add client logos
Client logos can show partnerships with hotels, travel organizations, or other businesses.
Open Client Section
Go to Appearance > Customize > Front Page Settings > Client Section.
Add logos
Click Add a Widget and add WP Travel Engine: Client Logo. Enter the section title. Optionally check Display logo in black and white. Click Add Another Logo for more logos.
Publish the logos
Click Publish.
Sort homepage sections
Control which sections appear and the order visitors see them.
Open the sorting controls
Go to Appearance > Customize > Front Page Settings > Sort Homepage Section.
Show or hide sections
Click the eye icon to enable or disable a section.
Reorder and publish
Drag sections up or down to arrange them. Click Publish.
Create a one-page homepage
A one-page homepage lets visitors scroll through your sections. The section menu helps visitors move directly to a section such as Packages, Destinations, or Contact.
Open one-page settings
Go to Appearance > Customize > Front Page Settings > Sort or Toggle Frontpage Sections.
Enable the section menu
Enable Section Menu and Home link.
Name the sections
Enter menu titles for each homepage section, then click Publish.
Configure the About page
The About page gives visitors more detail about your company, services, team, and experience.
Add the About introduction
Open the About introduction
Go to Appearance > Customize > About Page Template Settings > About Page Intro Section.
Add the introduction widgets
Click Add a widget and add a Text widget for the title and description. Add WP Travel Engine: Icon Text widgets.
Configure the icon text
Enter the Title, Content, Link, and Link Text. Click Upload to add an image or select an icon. Add more widgets for additional sections.
Publish the introduction
Click Publish.
Add client logos to the About page
Open the client section
Go to Appearance > Customize > About Page Template Settings > About Page Client Section.
Add client logos
Add the WP Travel Engine: Client Logo widget. Enter the section title. Optionally check Display logo in black and white. Click Add Another Logo for additional logos.
Publish the section
Click Publish.
Add About page services
Describe the services that make your business useful to travelers, such as airport transfers, custom itineraries, or equipment rental.
Open the service section
Go to Appearance > Customize > About Page Template Settings > About Page Service Section.
Add service content
Add a Text widget for the title and description. Add the WP Travel Engine: Image Text widget. Enter the Title, Content, Link, and Link Text, then upload an image.
Publish the services
Click Publish.
Add About page testimonials
Open the testimonial section
Go to Appearance > Customize > About Page Template Settings > Testimonial Section.
Configure testimonials
Enter the title. Choose the number of testimonials and the Post Order, then click Publish.
Add a team section
Show the guides, trip leaders, and office team members visitors will work with.
Open Team Section
Go to Appearance > Customize > Team Section.
Configure and publish
Enter the title. Choose the number of team members and the Post Order, then click Publish.
Sort About page sections
Open the sorting controls
Go to Appearance > Customize > About Page Template Settings > Sort About Page Section.
Arrange the sections
Click the eye icon to enable or disable a section. Drag sections to rearrange them, then click Publish.
Configure the Contact page
The Contact template can display a contact form, map, and business details. A shortcode is a short instruction in square brackets that WordPress turns into a form or another feature.
Open Contact Template Settings
Go to Appearance > Customize > Contact Template Settings.
Add the contact form
Enter the shortcode from Contact Form 7.
Configure the map
Enable Google Map to show a map. If you disable it, the contact template's featured image is used instead. Enable Scrolling wheel for mouse-wheel zoom, Map controls for map controls, and Map marker for the location marker.
Add map details
Enter the Marker Title, Google API Key, Latitude, Longitude, and Zoom level. An API key is a special password from Google that allows your website to use Google Maps.
Add contact details
Enter your Contact Details and click Publish.
Configure team page templates
Use separate team sections when you want to distinguish senior guides from the wider team.
Configure the Core Member section
Open Core Member Section
Go to Appearance > Customize > Team Page Template Settings > Core Member Section.
Configure core members
Enable Core member. Enter the title and subtitle. Choose the number of team members and the Post Order, then click Publish.
Configure the Our Team section
Open Our Team Section
Go to Appearance > Customize > Team Page Template Settings > Our Team Section.
Configure the team
Enable Our Team. Enter the title and subtitle. Choose the Post Order, then click Publish.
Configure individual trip pages
Single Trip Page Settings controls how each individual trip page looks. Use related trips to help visitors discover another trek or day tour after reading about one package.
Open Single Trip Page Settings
Go to Appearance > Customize > Single Trip Page Settings.
Enable related trips
Enable Related Trips. Enter the Related Trip Title and Read More text. Choose the Related Trip Taxonomy.
Publish the trip settings
Click Publish.
Configure general settings
Configure the header
Open Header Settings
Go to Appearance > Customize > General Settings > Header Settings.
Add header features
Enable Search Form to show search in the header. Enter your Phone Number. Enable Social Links and enter your social links.
Publish the header
Click Publish.
Configure the 404 page
A 404 page appears when a visitor opens a URL that does not exist. Showing popular trips gives visitors a useful next step instead of leaving them at an error page.
Open 404 Page Settings
Go to Appearance > Customize > General Settings > 404 Page Settings.
Add popular trips
Check Enable Popular on 404 Page and choose the popular trips to display.
Publish the page
Click Publish.
Configure social sharing
Open Social Sharing
Go to Appearance > Customize > General Settings > Social Sharing.
Choose sharing options
Enable or disable social sharing buttons on archive and single posts. Sort or toggle the sharing buttons.
Publish the settings
Click Publish.
Configure SEO settings
SEO settings help your pages appear in search results. Clear trip titles and useful descriptions still matter most, but these settings improve the information shown around your content.
Open SEO Settings
Go to Appearance > Customize > General Settings > SEO Settings.
Configure dates and breadcrumbs
Enable Last Update Post Date to show when a post was last updated. Enable Breadcrumbs to show the visitor's navigation trail, such as Home, Destinations, and Annapurna Trek. Enter the Home Text for the breadcrumb.
Publish the SEO settings
Click Publish.
Configure post pages
Open Post Page Settings
Go to Appearance > Customize > General Settings > Post Page Settings.
Configure post summaries
Enter the Excerpt Length and Read More Label. Enable or disable Category Meta. Rearrange the Post Meta.
Configure author and image options
Choose whether to Show Prefix in Archive Page. Choose whether to hide or show the author section. Choose whether to show or hide featured images in posts. Enable Highlight Author Comments when you want author replies to stand out.
Configure related and recent posts
Enable or disable Related Posts and enter its title. Enable or disable Recent Posts and enter its title.
Save the settings
Click Save & Publish.
Add a sidebar
Sidebars are narrow content areas beside your pages. Add tools such as a search box, contact details, recent posts, or a trip category in Appearance > Widgets.
Open Sidebar Settings
Go to Appearance > Customize > Sidebar Settings.
Create a sidebar
Click Add New Sidebar and give the sidebar a name.
Save the sidebar
Click Save & Publish. The new sidebar now appears in Appearance > Widgets.
Add widgets
Open Appearance > Widgets, add a widget to the new sidebar, and click Save.
Configure sidebars by page
Assign different sidebars to different parts of your site. For example, a blog sidebar might contain recent posts, while a trip sidebar might contain a booking enquiry widget.
Open Sidebar Settings
Go to Appearance > Customize > Sidebar Settings.
Assign sidebars
Select sidebars for pages such as Blog Page, Single Page, and Single Post Page. Each sidebar appears only on its assigned page type.
Save the assignments
Click Save & Publish.
Configure miscellaneous settings
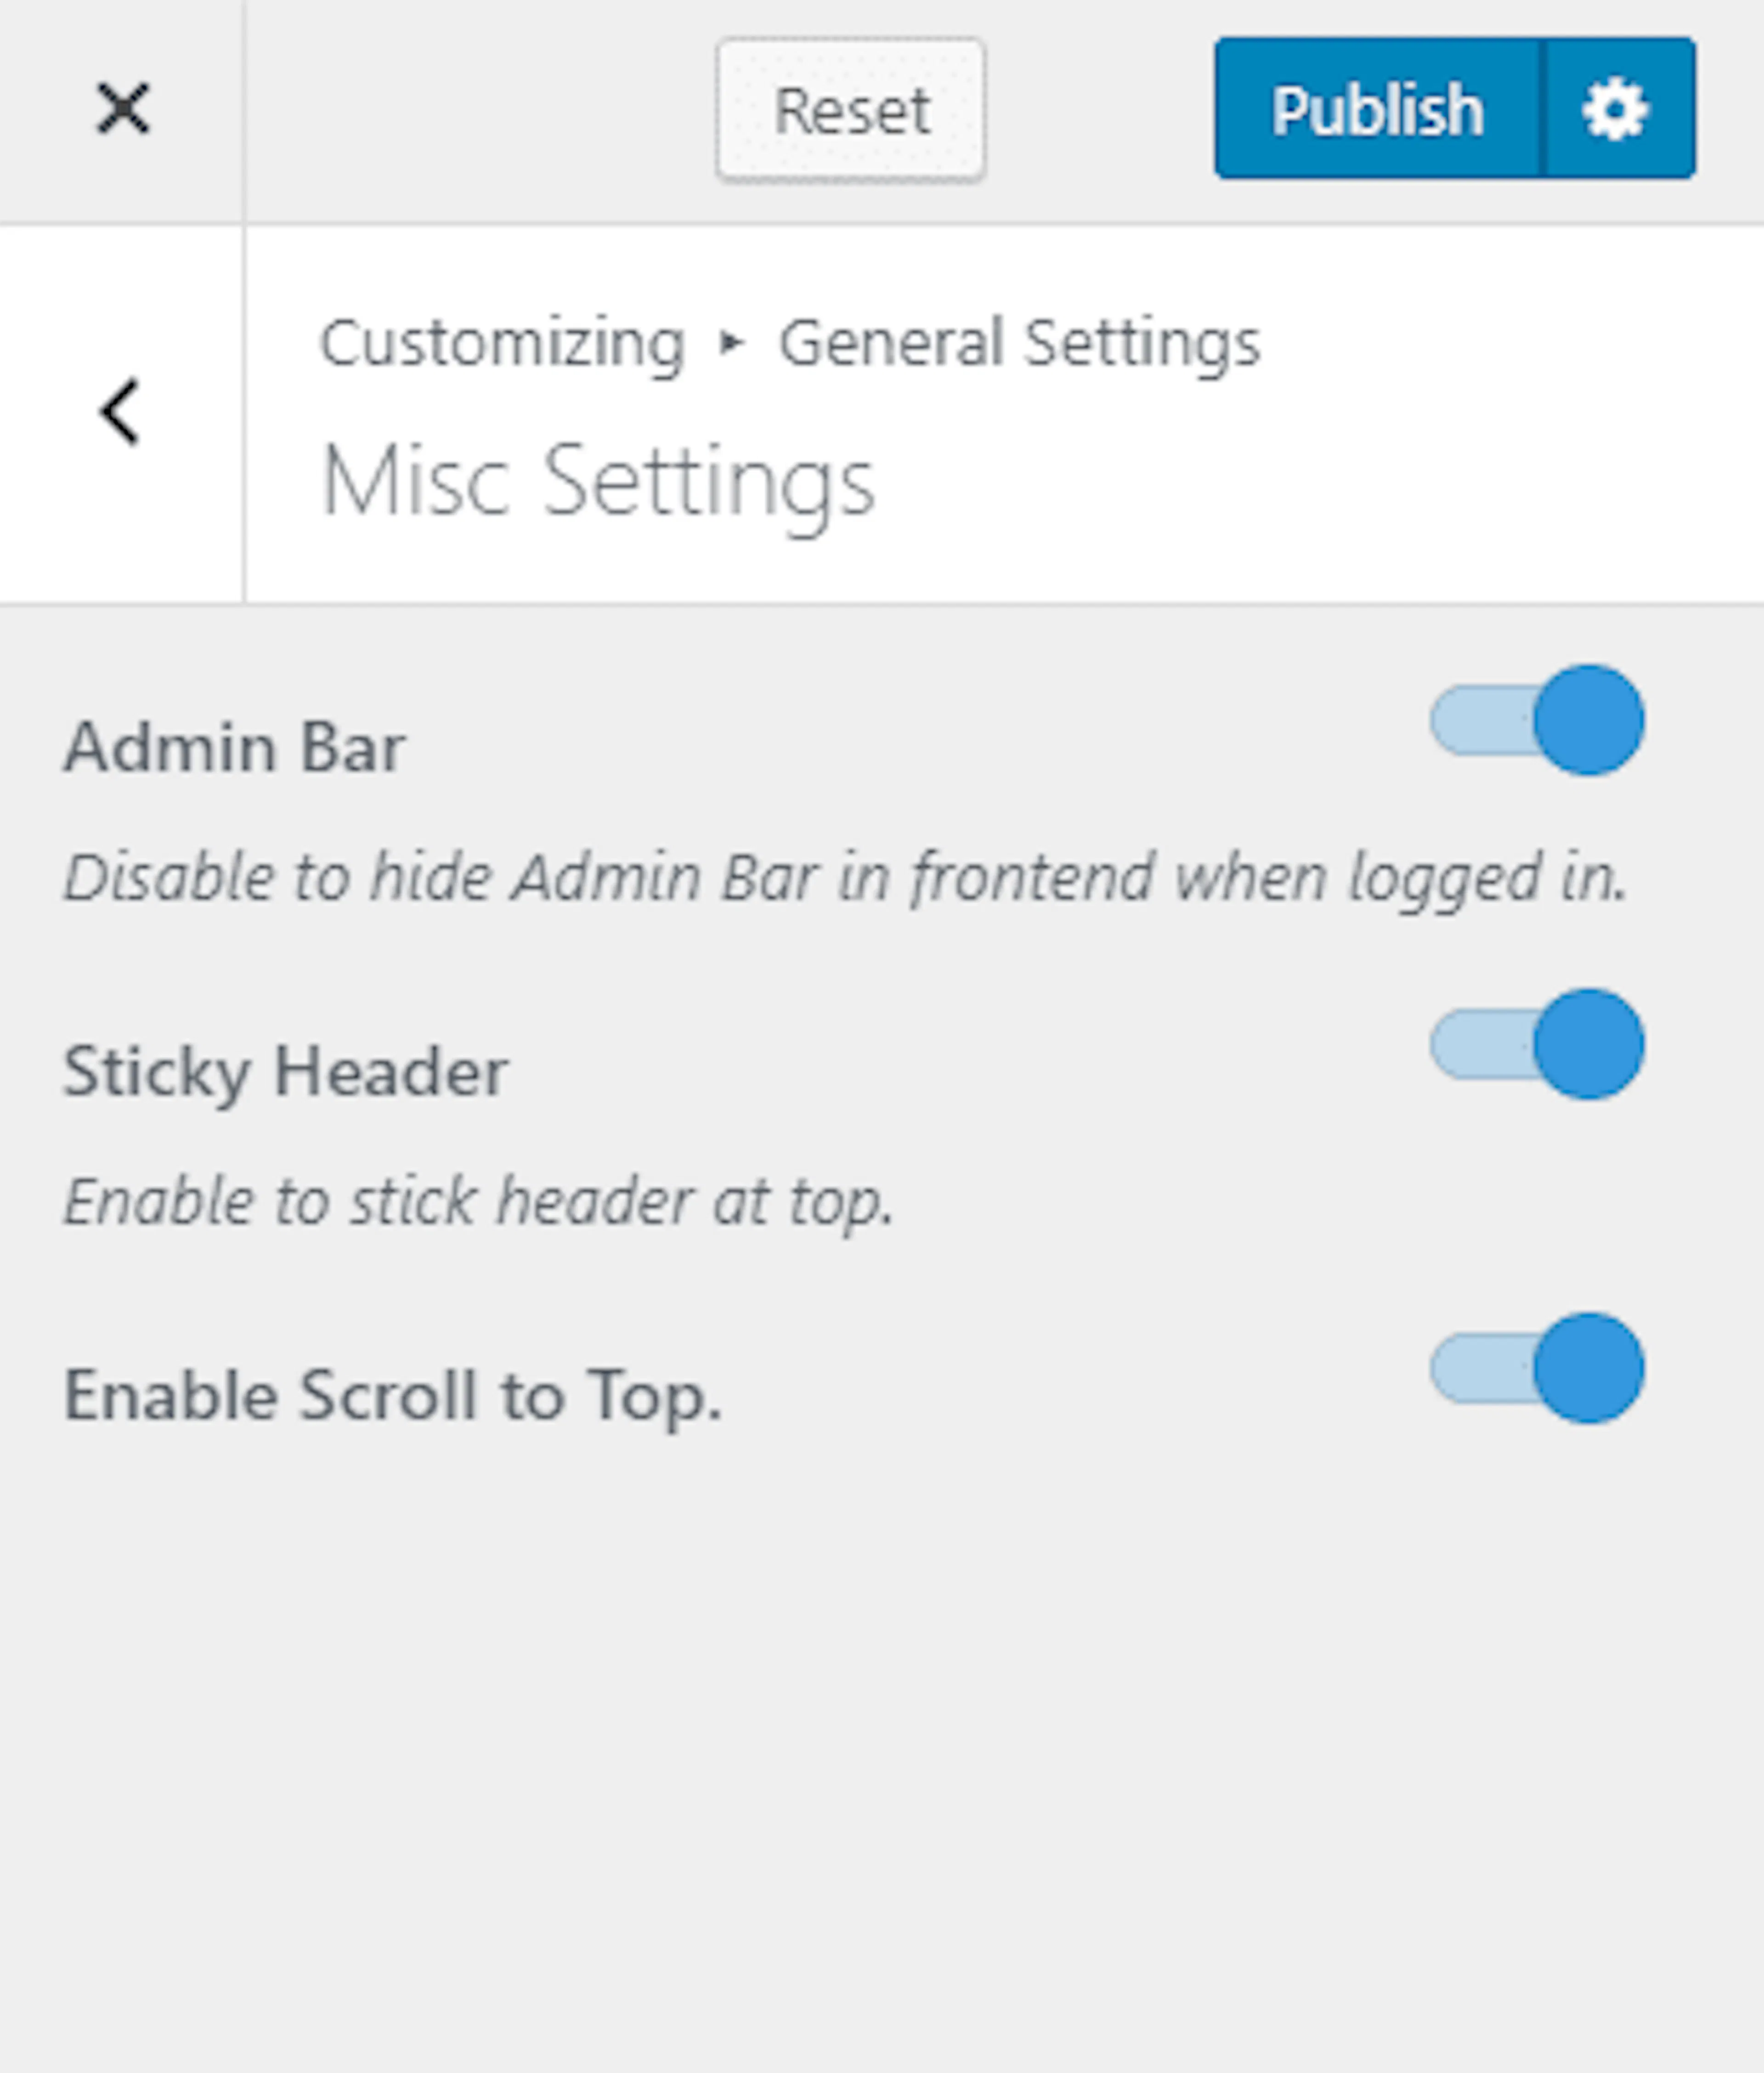
Open Misc Settings
Go to Appearance > Customize > General Settings > Misc Settings.
Choose the options
Enable Admin Bar to disable the admin bar on the front end while you are logged in. Enable Sticky Header to keep the header at the top while visitors scroll. Enable Scroll to Top to show a button that returns visitors to the top of the page.
Publish the settings
Click Publish.
Create a navigation menu
Menus are the navigation links at the top or bottom of your website. Add pages such as Home, Trips, Destinations, About, and Contact.
Create a menu from the Customizer
Open Menus
Go to Appearance > Customize > Menus.
Create the menu
Click Add a menu, enter a name, and click Create Menu.
Add menu items
Click Add Items. Click the + icon beside pages, posts, categories, or custom links to add them.
Arrange and assign the menu
Drag and drop items to rearrange them. Choose Primary or Footer for the menu location.
Publish the menu
Click Save & Publish.
Create a menu from the Dashboard
Open Menus
Go to Appearance > Menus.
Create the menu
Click create a new menu, enter a Menu Name, and click Create Menu.
Add items
Select items from Pages, Posts, Custom Links, or Categories. Click Add to Menu.
Arrange and assign the menu
Drag and drop items to rearrange them. Choose Primary or Footer for the menu location.
Save the menu
Click Save Menu.
Add widgets
Widgets are small content blocks for sidebars and footers. Examples include a contact box, recent posts list, search bar, or trip category list.
Add widgets with the Customizer
Open Widgets
Go to Appearance > Customize > Widgets.
Choose the location
Make sure you are viewing the page where you want the widget to appear. Click the desired sidebar or footer location.
Add and configure widgets
Click Add a Widget, select a widget, and give it a title. Click Add a Widget again to add more widgets. Drag widgets to change their order.
Save the widgets
Click Save & Publish.
Add widgets from the Dashboard
Open Widgets
Go to Appearance > Widgets.
Place the widgets
Available widgets appear on the left. Sidebars and footer areas appear on the right. Drag each widget to the sidebar or footer area where you want it to appear.
Improve website performance
Performance settings help pages load faster. Faster pages give visitors less reason to leave before viewing a trip.
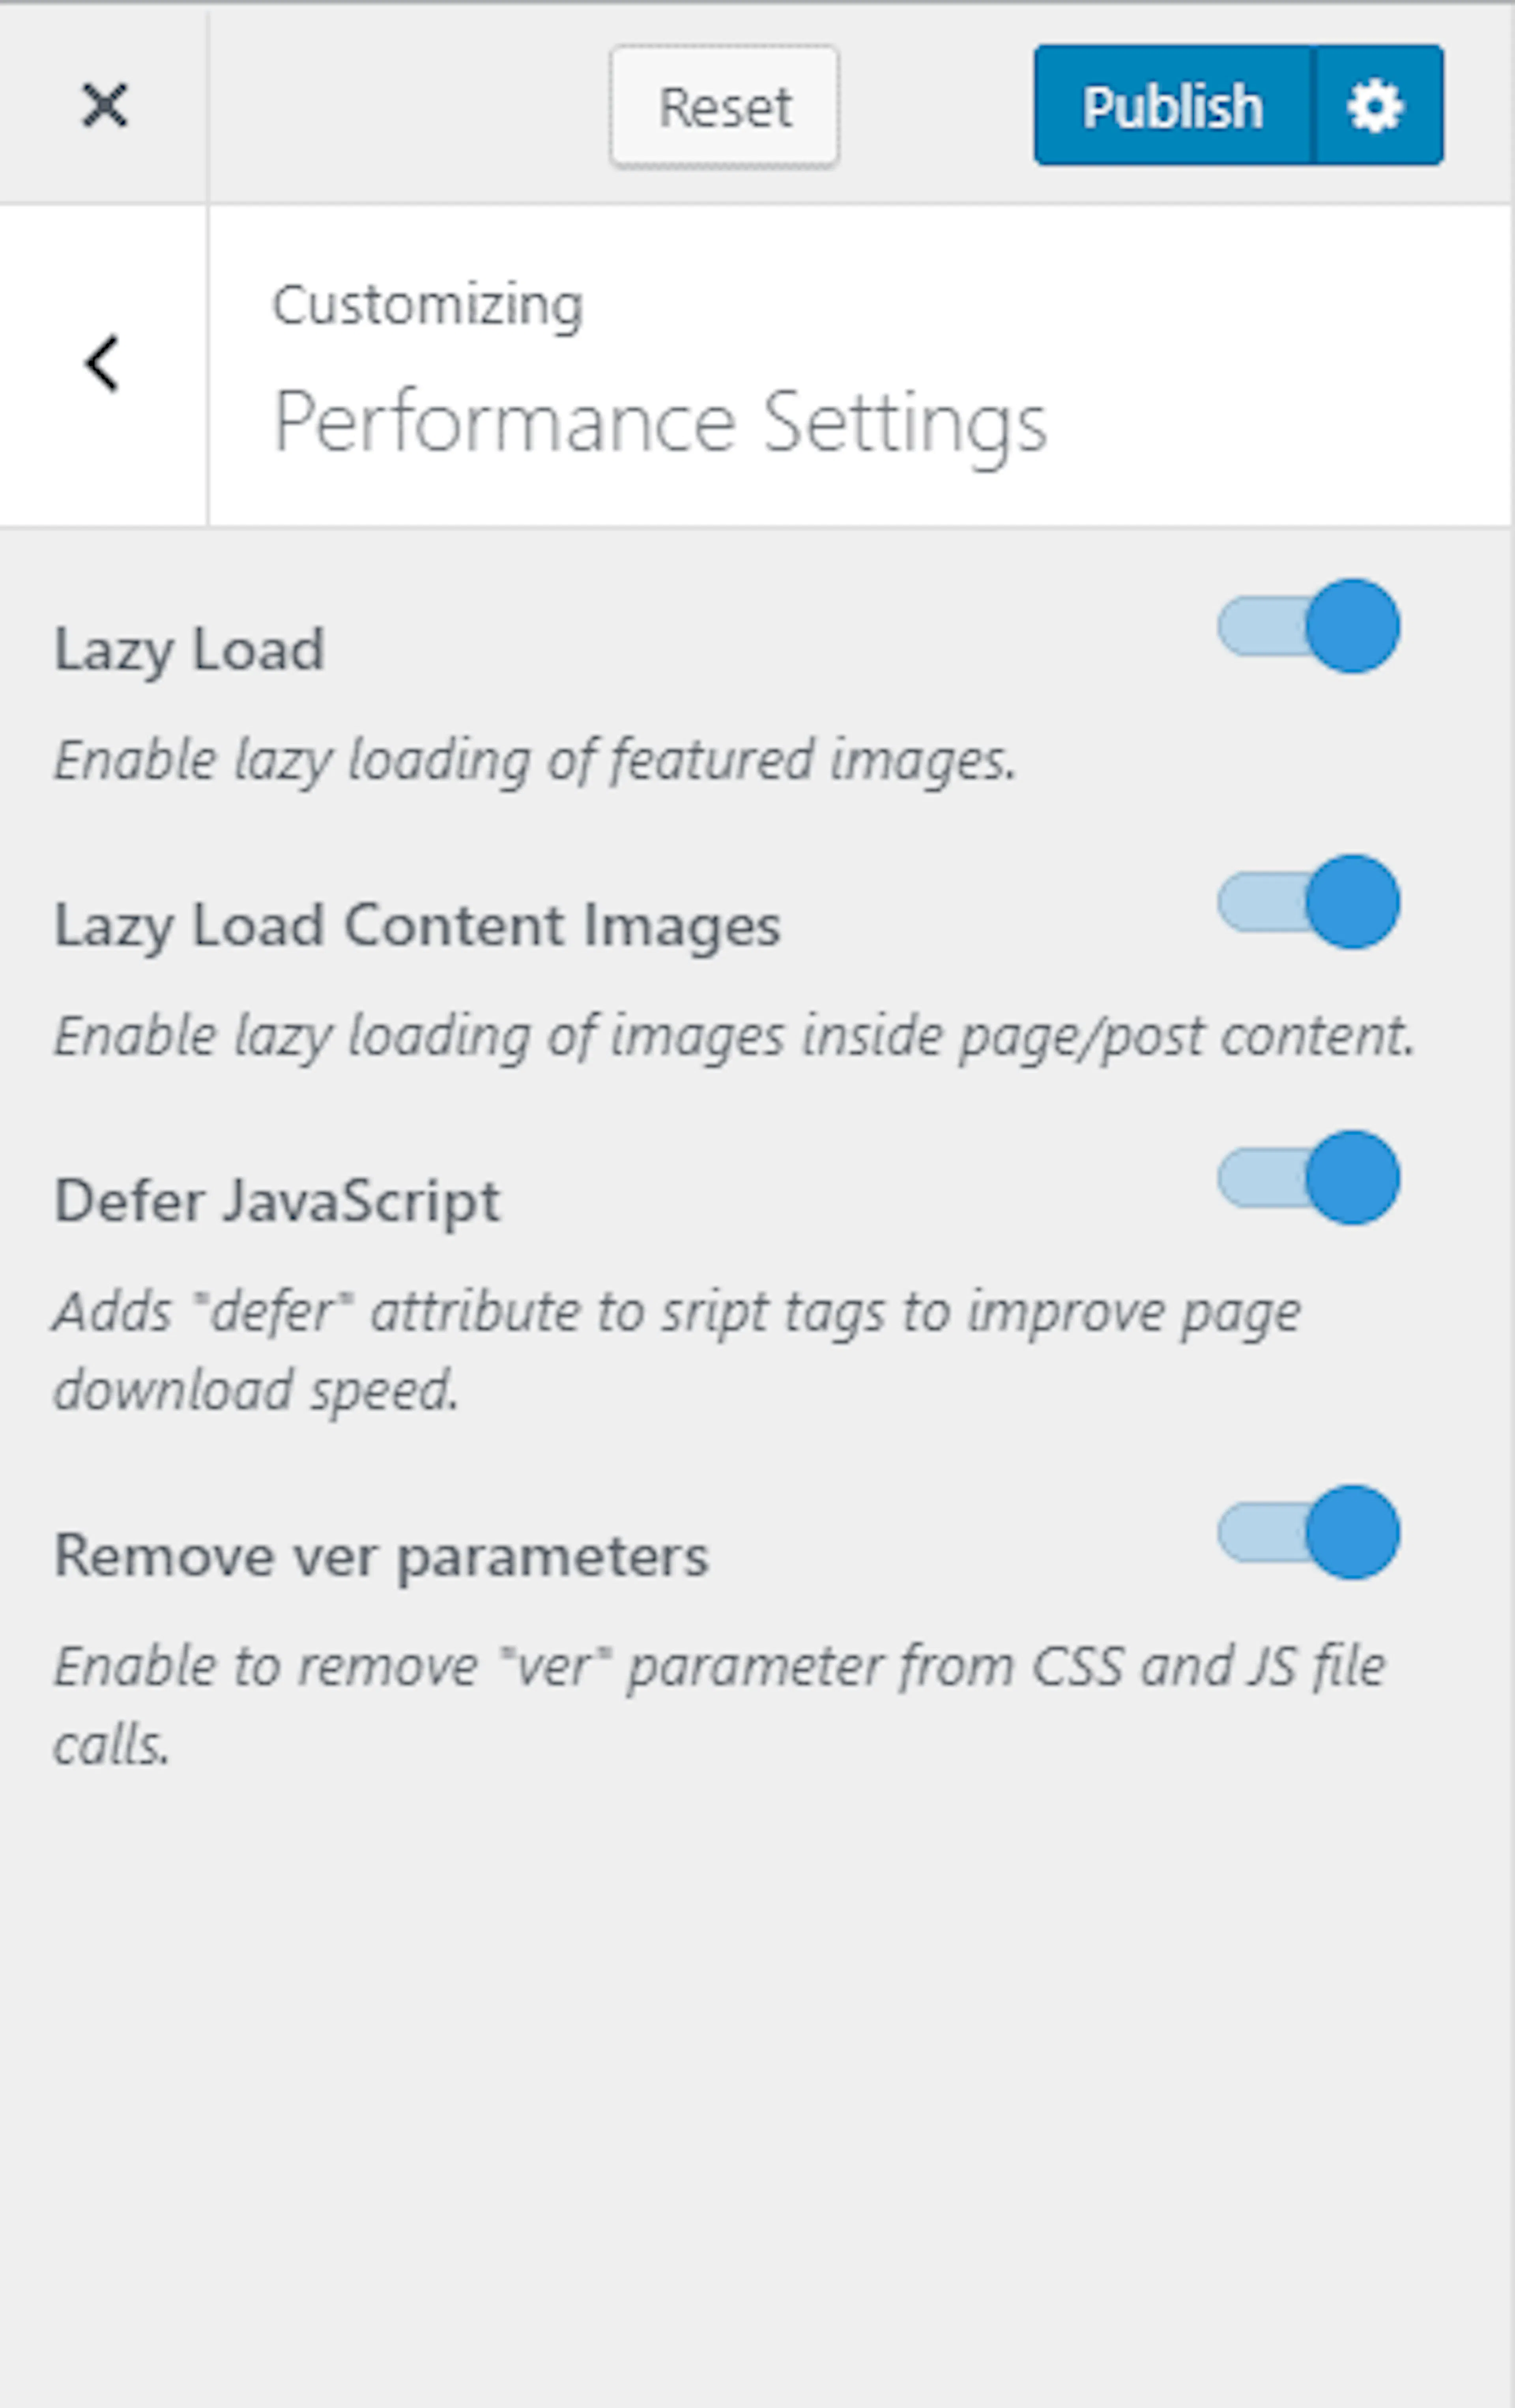
Open Performance Settings
Go to Appearance > Customize > General Settings > Performance Settings.
Configure loading options
Enable Lazy Load so featured images load as visitors scroll to them. Enable Lazy Load Content Images. Enable or disable Defer JavaScript. Enable or disable Remove ver parameters to remove version numbers from CSS and JavaScript file calls.
Publish the settings
Click Publish.
Add custom CSS
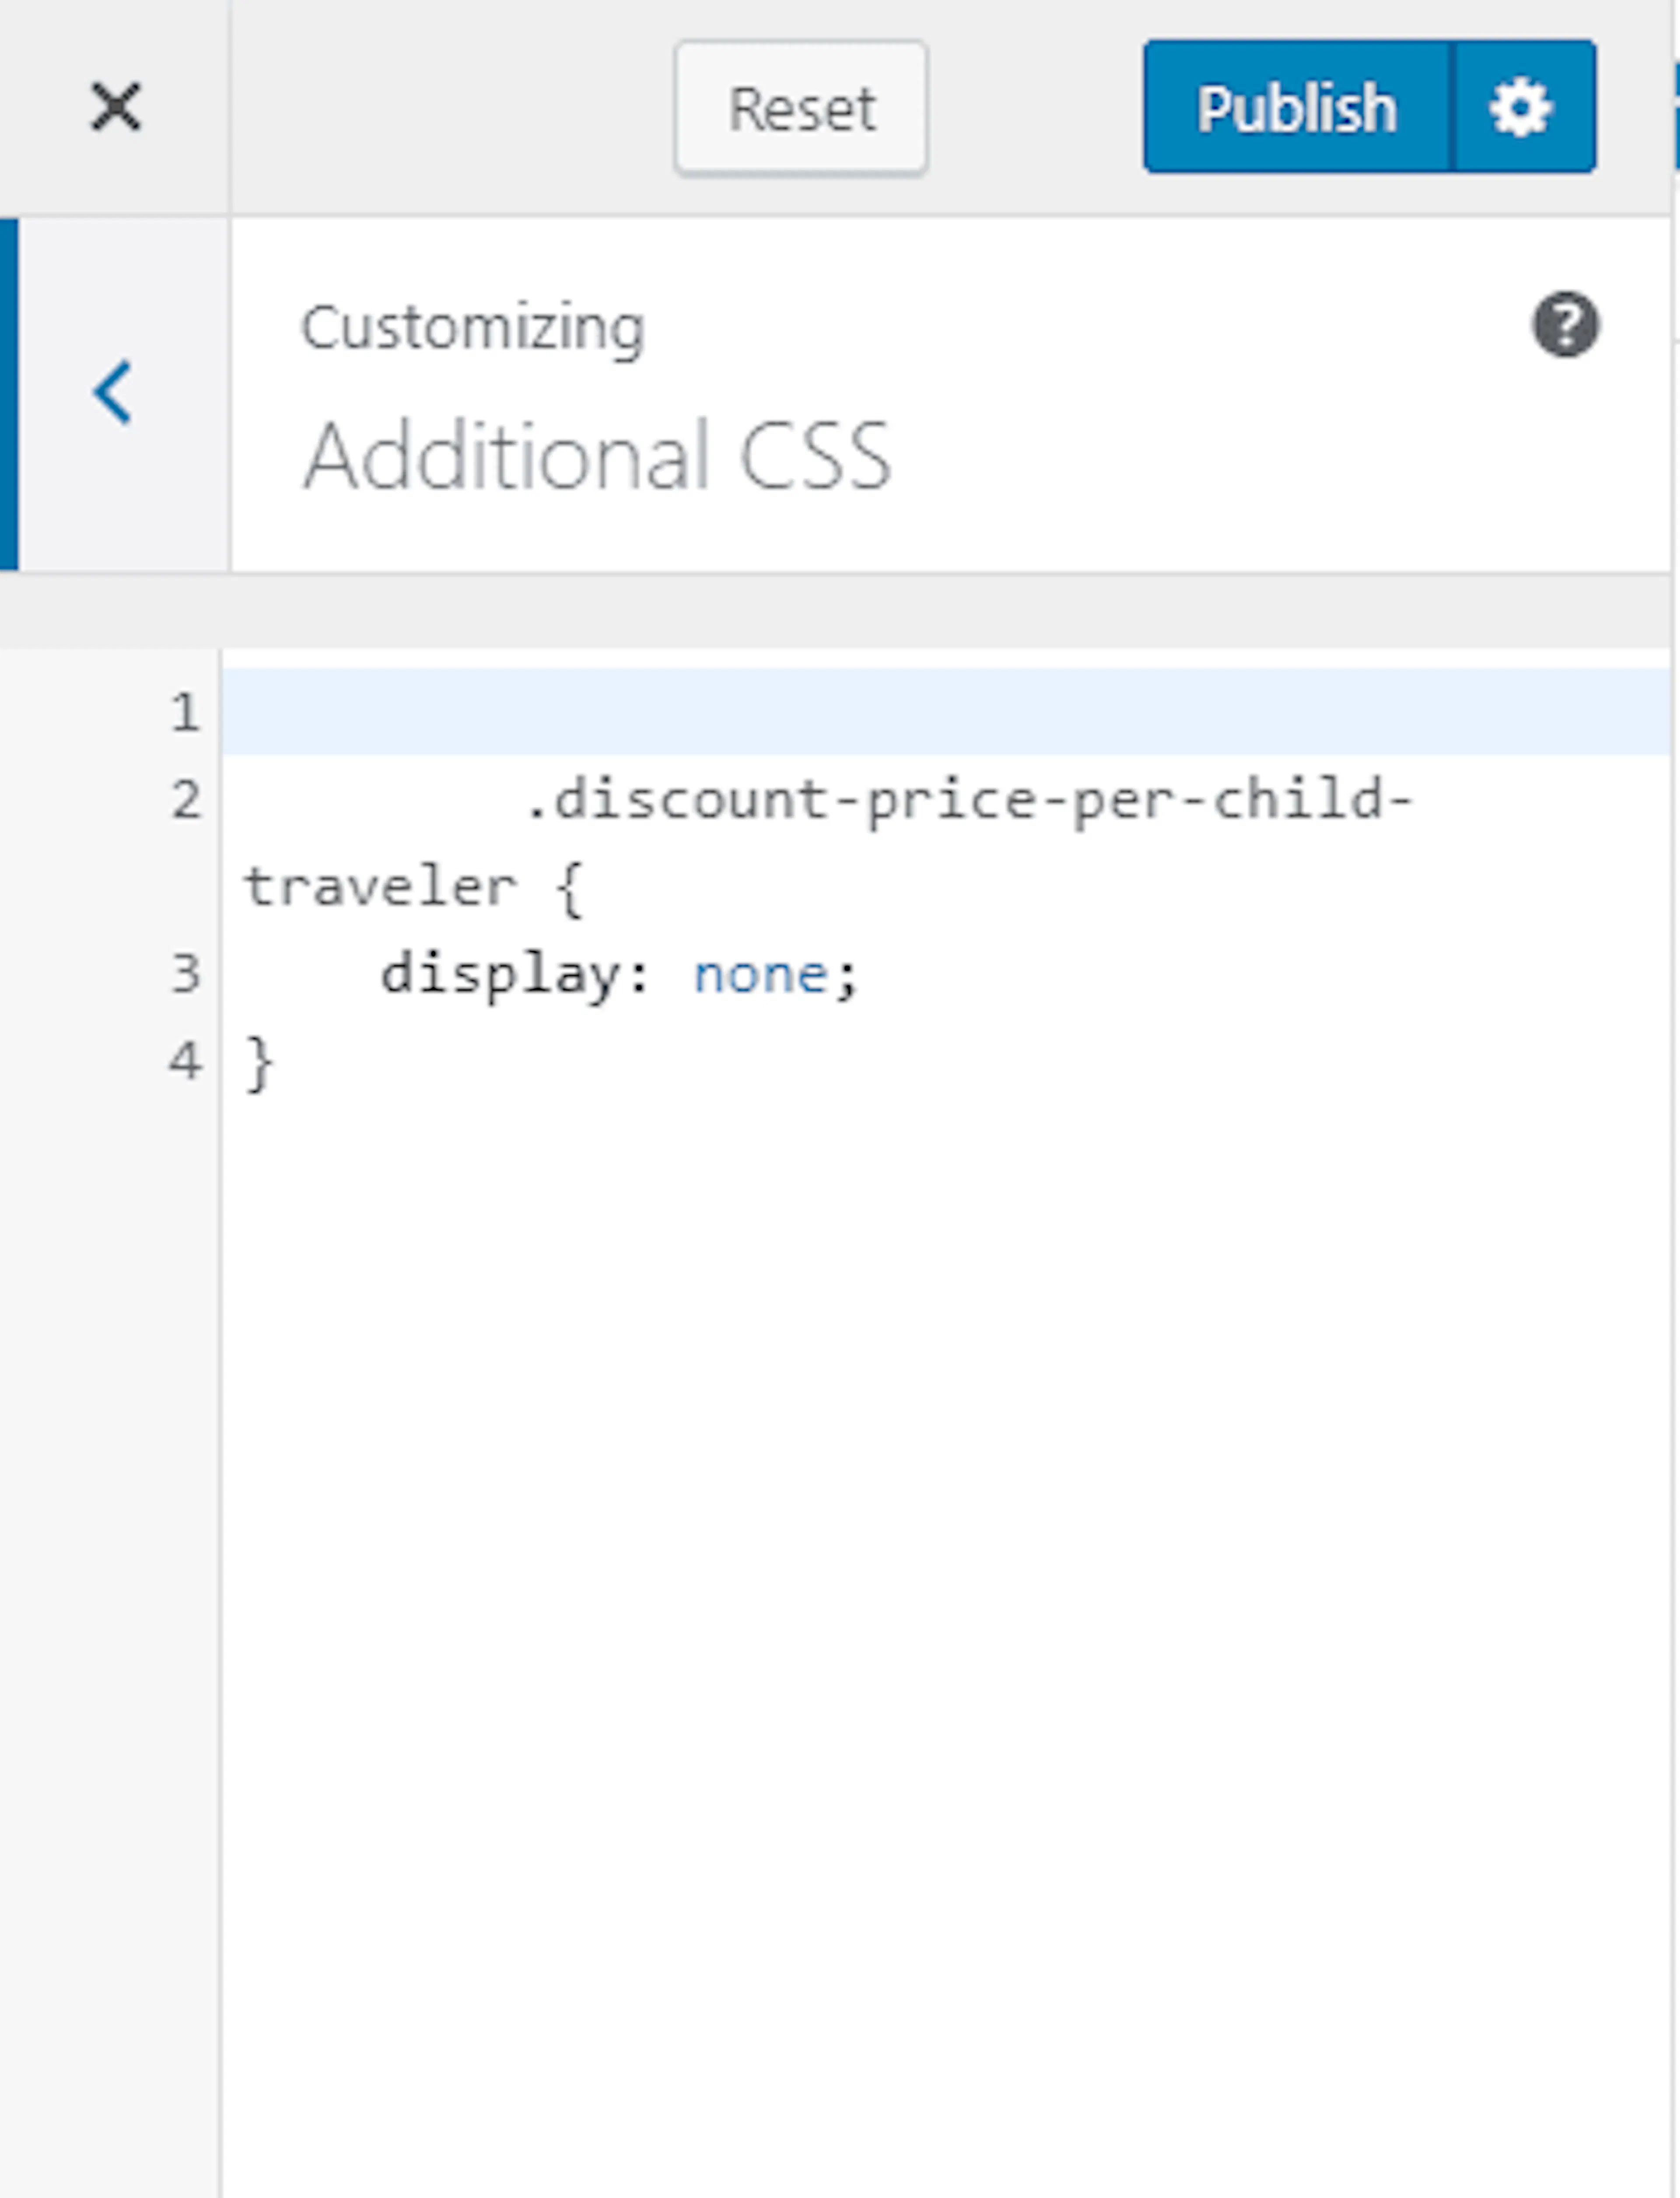
CSS is code that controls appearance, including colors, fonts, spacing, and alignment. Use Additional CSS for small visual changes without editing the theme files.
Open Additional CSS
Go to Appearance > Additional CSS.
Add and save your CSS
Enter your CSS code and click Save & Publish.
Configure the footer
The theme has four footer widget areas. Use them for contact details, booking links, social links, newsletter forms, or a short business description.
Open footer widgets
Go to Appearance > Customize > Widgets.
Choose a footer area
Select Footer One, Footer Two, Footer Three, or Footer Four.
Add footer widgets
Add and configure the widgets for that footer area.
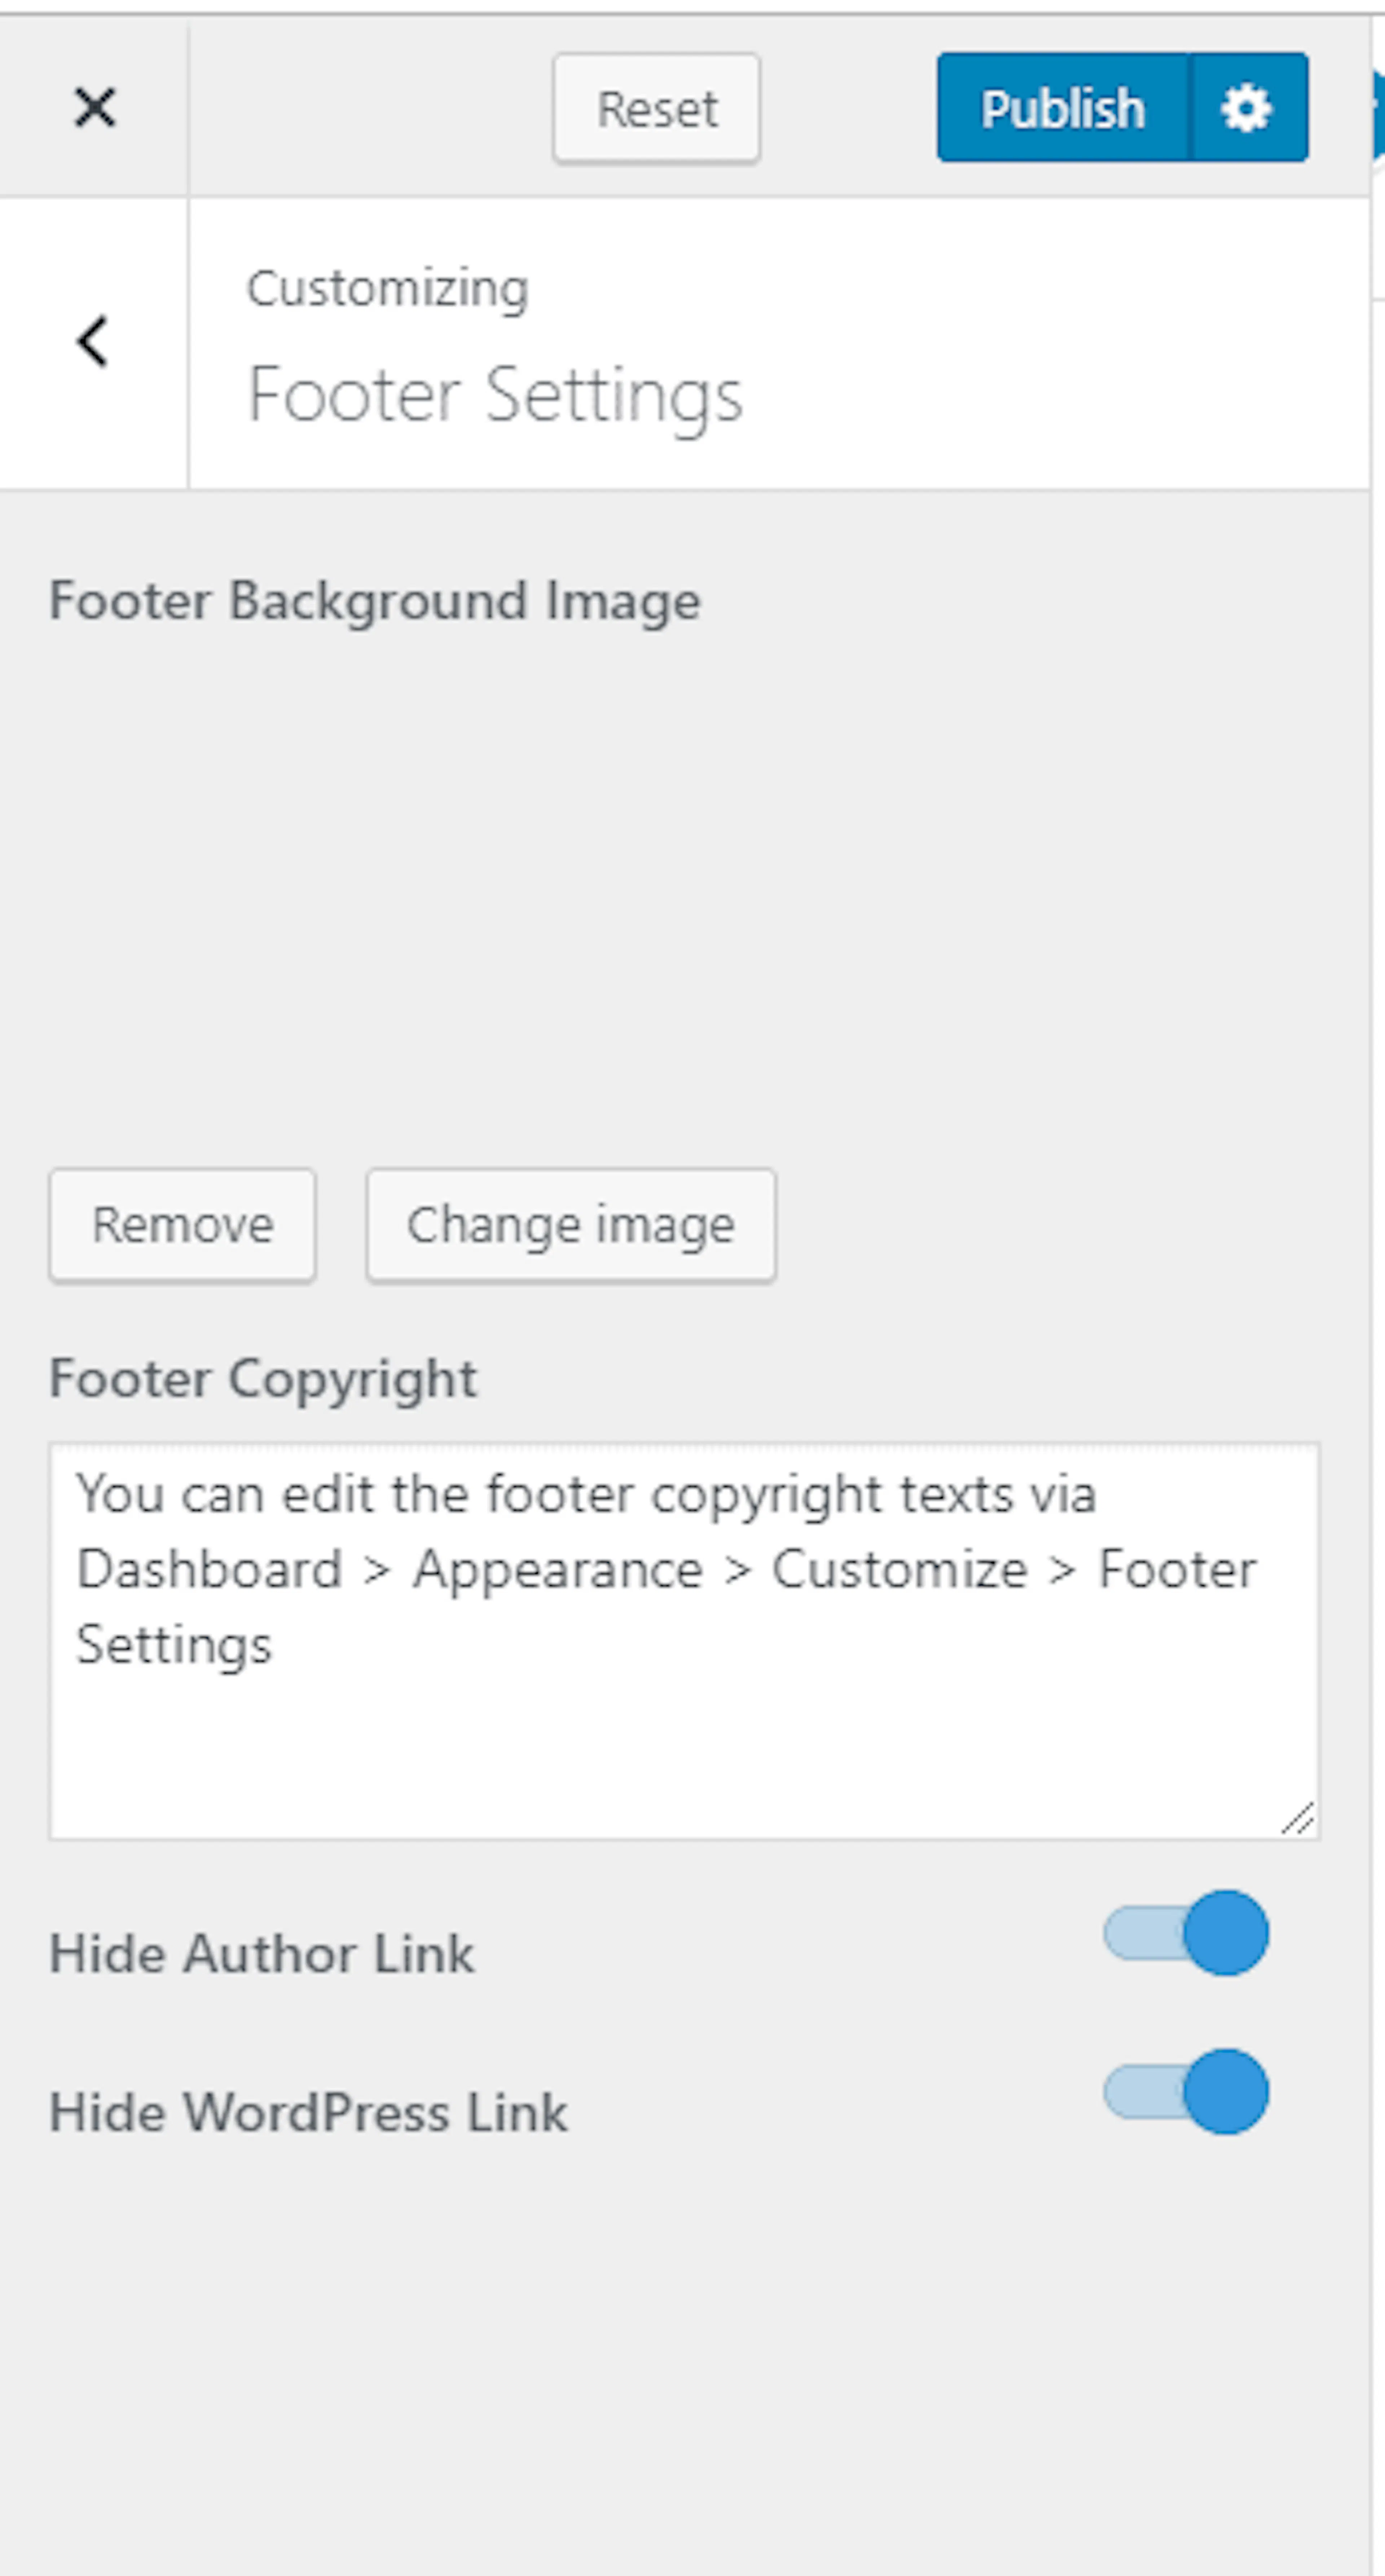
Configure footer credits
Open Footer Settings
Go to Appearance > Customize > Footer Settings.
Configure the footer
Upload a background image and enter your footer credit text. Enable Hide Author Link & WordPress Link if you want to hide those credits.
Publish the footer
Click Publish.
Helpful tips for maintaining your website
- Use a child theme if you need to change code. A child theme is a safe copy that keeps your changes when the main theme updates. Do not edit the parent theme files directly.
- Always create a backup before making changes.
- If something breaks, deactivate unused plugins first. Plugin conflicts can cause display or functionality problems.
- Replace modified code with the original code if a code change caused the issue.
- Contact support if the problem continues.
If you're still stuck or have a question we didn't cover, our support team is happy to help. Reach out at our support page and we'll get you sorted.