

How to Configure Single Trip Settings in WP Travel Engine
Control how your trip pages look - from the banner layout at the top to the booking form, pricing widget, enquiry form, and related trips at the bottom.
Your Single Trip page is the main page travelers see before they book. It is where they look at photos, check prices, read trip details, and decide whether to enquire or reserve a spot.
A few small settings here can change how clear and trustworthy that page feels. If you are setting this up for the first time, take it one section at a time.
Accessing Single Trip settings
Before you start, log in to your WordPress dashboard. That is the main admin area of your website, with the menu on the left sidebar.
Use these steps to open the Single Trip settings area.
Open your WordPress dashboard
If you are not logged in yet, sign in to your WordPress Admin Dashboard.
You should now see the main admin menu on the left side of the screen.
Go to WP Travel Engine settings
In the left sidebar, click WP Travel Engine.
Then click Settings.
Open the Single Trip settings
At the top of the settings page, click Display.
Then open Single Trip.
You are now in the place where you can control how each trip page looks and works.
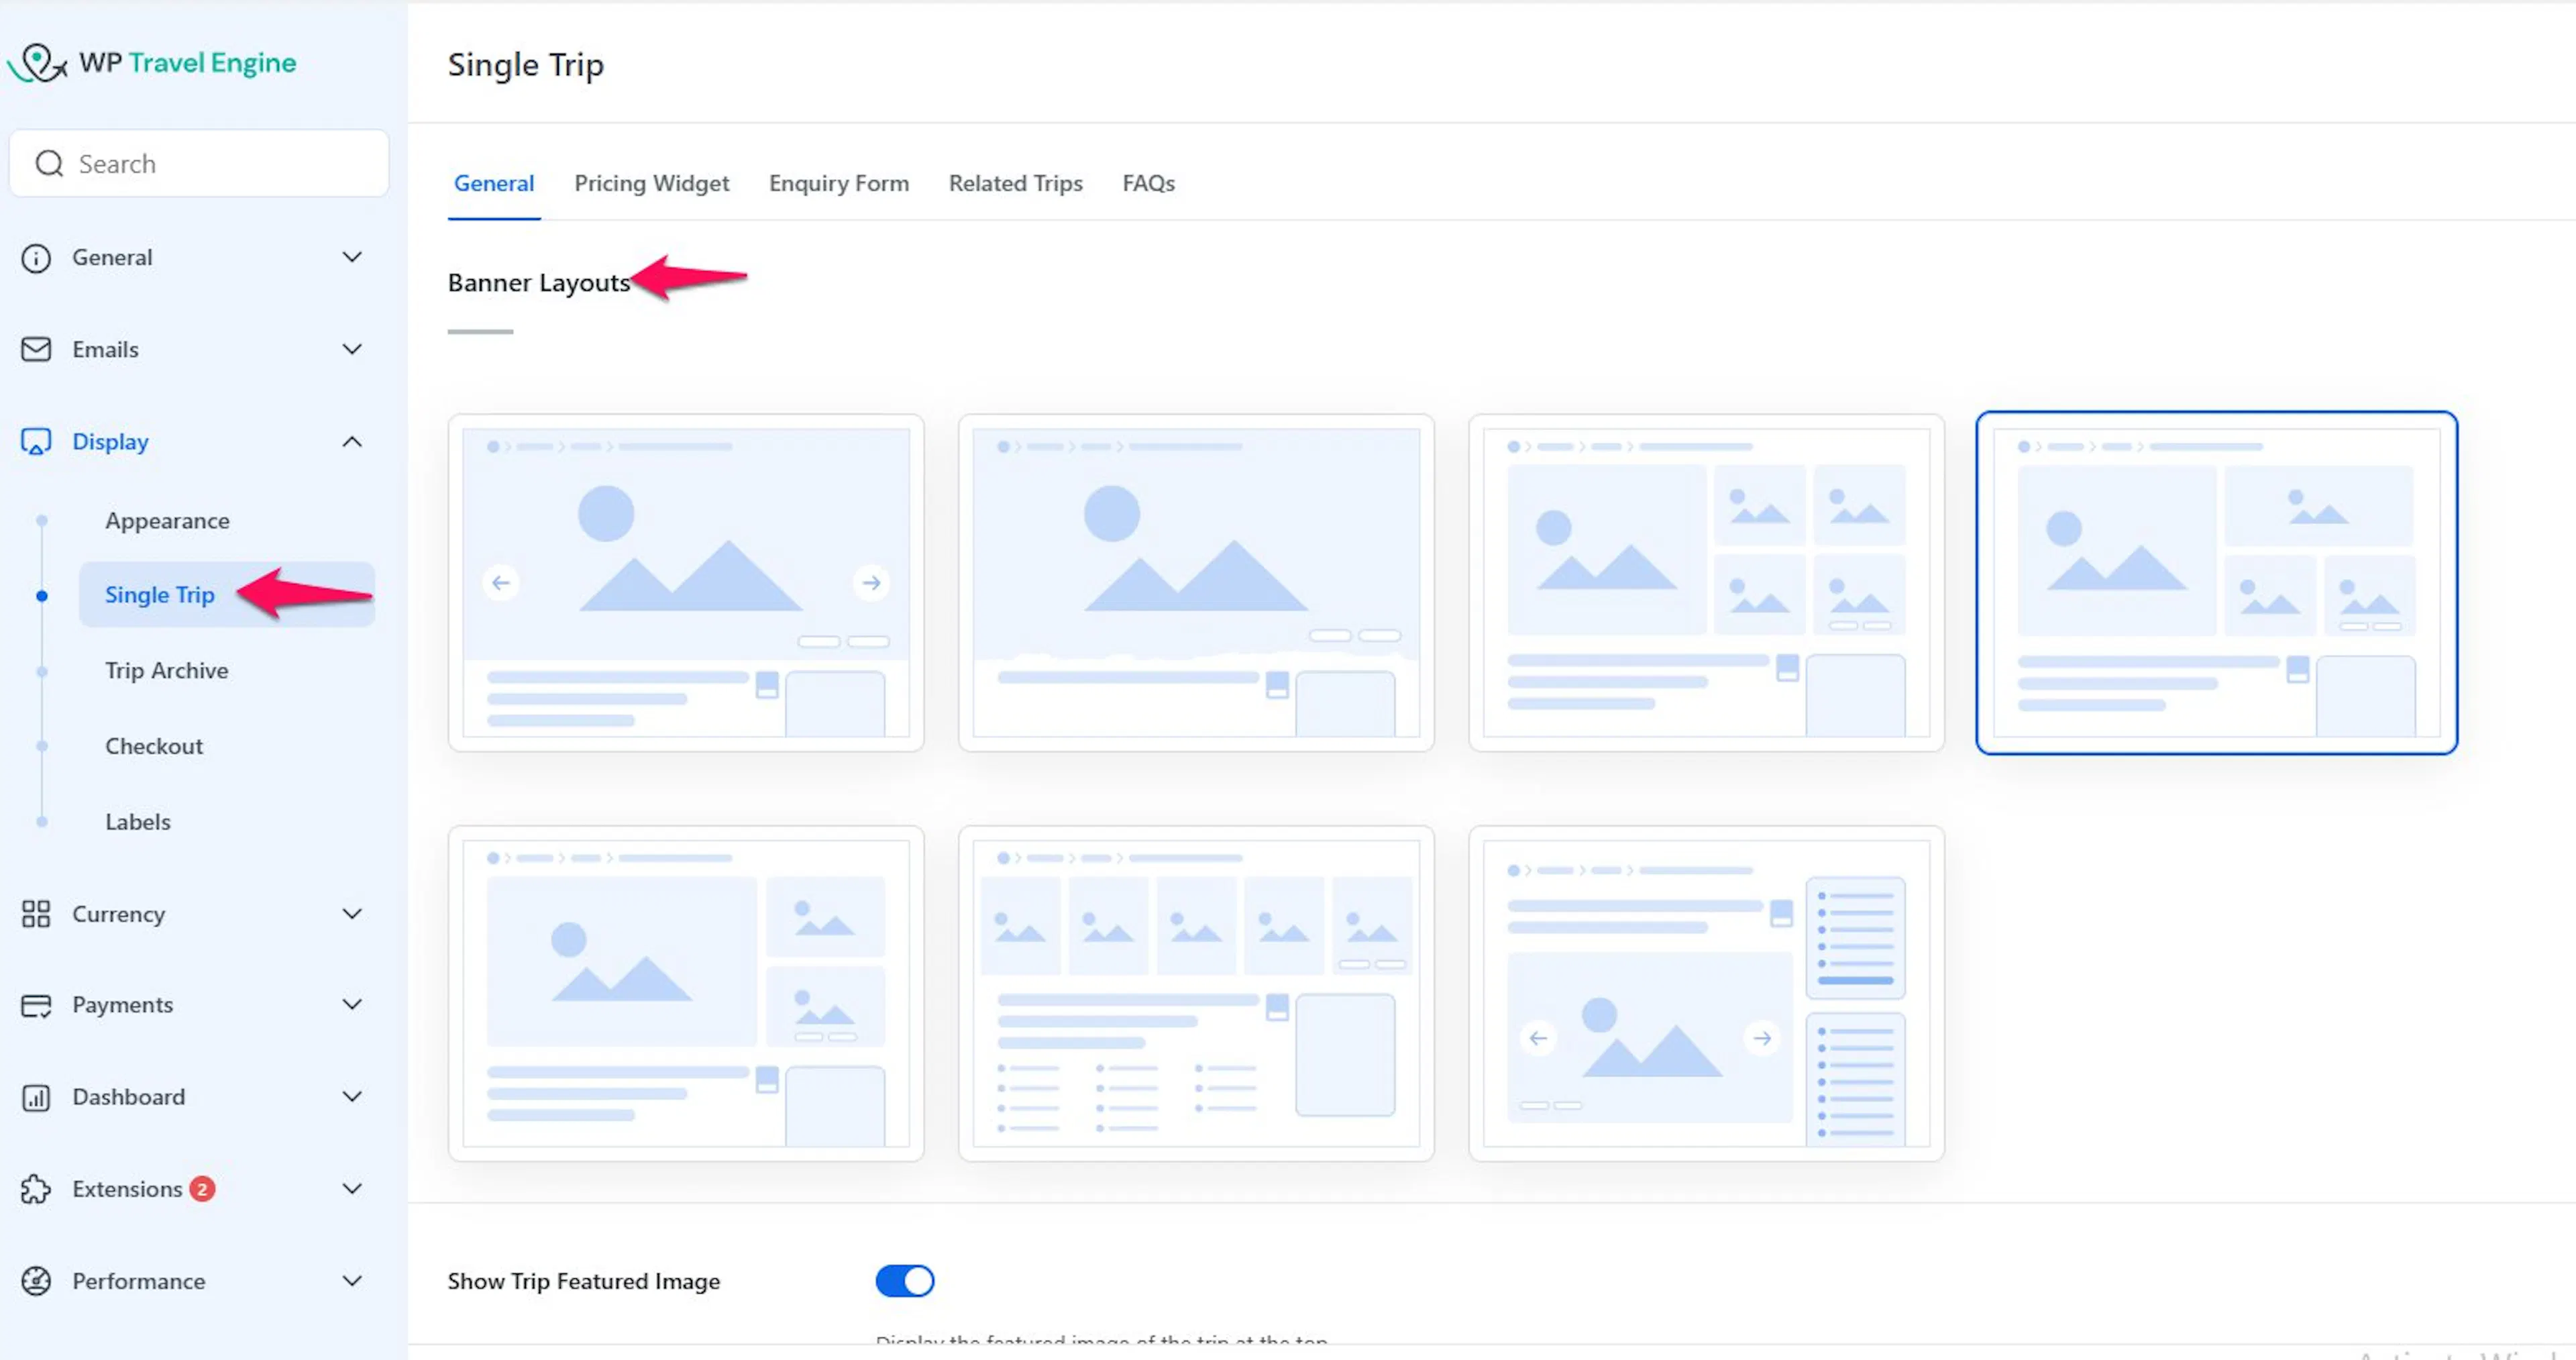
Once you are here, you can start with the top of the page and work your way down.
Banner layouts
The banner is the first thing travelers notice on your trip page. A good layout helps your trip look polished right away.
If you run photo-heavy trips like treks, safaris, or multi-day adventure packages, this section can make a big difference. You can choose from 7 banner layouts based on how you want your images to appear.
Banner Layout 1
This layout shows a full-width image slider with navigation arrows.
Visitors can move through your gallery images using the slider or the arrows. They can also click the Gallery button in the bottom-right corner to open a Lightbox modal. A Lightbox modal is a pop-up image viewer that shows the full-sized photos without sending the visitor to a new page.
Recommended image size: 1920 × 800 pixels.
This works well if you want travelers to get a strong first impression from large destination photos.
Banner Layout 2
This layout shows the original image by default.
If you want the banner to stretch across the full width of the page, turn on Display Fullwidth for this layout.
This is a good choice if you want to keep your image presentation simple and close to the original photo shape.
Banner Layout 3
This layout uses a split-screen design.
The left side shows one large featured image in a 324/284 aspect ratio. The right side shows a grid of smaller supporting images.
This layout is useful when you want to show both the main experience and a few extra highlights. For example, you might show a mountain trail on the left and camp scenes, meals, or village stops on the right.
Banner Layout 4
This layout is similar to Layout 3.
The difference is that the right side includes one image above instead of two supporting images.
This gives you a little more breathing room if you want a cleaner look with fewer images on display.
Banner Layout 5
This layout includes a large featured image on the left and two supporting images on the right.
It works well when you have one main hero image and two more photos that help sell the trip. For example, a rafting tour might show the river on the left and equipment and group shots on the right.
Banner Layout 6
This layout shows five images side by side in a static grid.
When a visitor hovers over an image, it zooms in slightly.
This is a nice option if you want to show a fuller visual story at a glance instead of leading with one main photo.
Banner Layout 7
This layout places an image slider below the trip title, inside the trip content area.
That is different from the other layouts, which place the banner outside the trip content area.
This layout can feel more compact. It can suit operators who want the page title and trip details to feel more connected.
Banner layouts are designed for desktops and tablets. On mobile devices, a standard image slider replaces all banner layouts to ensure optimal functionality and responsiveness.
Once your banner looks right, the next settings help you control how the rest of your trip photos appear.
Image and gallery settings
These settings control which images travelers see and how those images behave. If photos help you sell your trips, this section is worth a quick check.
Show Trip Featured Image - Displays the featured image on the trip detail page.
Show Featured Image in Image Gallery - Includes the featured image in the trip's image gallery, both on the single trip page and on the trip card.
- Image Gallery Autoplay - Automatically cycles through images in the trip's image gallery. Disabled by default.
For example, if you only have three strong photos for a day hike, you may want to keep the featured image in the gallery so the page feels fuller. If you already use that image at the top, you may prefer to leave it out of the gallery to avoid repeating it.
With your images in place, you can move on to how your trip details are shown.
Trip Duration Format
This setting changes how travelers read the length of your trip. It sounds small, but it helps avoid confusion.
Choose how the trip duration displays on the single trip page:
- Days - Shows only the number of days.
- Days and Nights - Shows both the number of days and nights.
For example, if you run a 5-day package with 4 overnight stays, Days and Nights gives travelers a clearer picture of what they are booking.
Next, you can choose how discounts appear on the page.
Show Discounts In
This setting controls how your savings are displayed. It helps travelers understand the deal at a glance.
Choose whether to display trip discounts as a percentage or a fixed amount.
For example, a seasonal offer might look better as 10% off. A solo traveler supplement or limited promotion might be clearer as a fixed amount.
After that, decide where to place your key trip facts.
Show Trip Info
Trip Info is the section that shows quick facts about the tour. That might include details like duration, destination, or difficulty.
You can place this information where it feels most useful on the page:
- Show Trip Info on Sidebar - Displays the trip info section in the sidebar.
- Show Trip Info on Main Content Area - Displays the trip info section within the main content area.
If you want travelers to compare details while reading, the sidebar can work well. If you want everything in one main reading flow, the content area may feel more natural.
Now you can decide whether the booking form stays visible on the page.
Show Booking Form
The booking form is the part of the page where travelers start the reservation process. If you want people to book directly from the trip page, this needs to be visible.
When enabled, the Booking Form appears on the trip detail page. When disabled, the Booking Form is hidden.
For example, if you only take bookings by enquiry for custom tours, you may want this turned off. If you sell fixed departures online, you will usually want it on.
The next setting helps on longer trip pages.
Make Tabs Sticky and Scrollable
If your trip page has a lot of content, travelers can lose track of the tabs as they scroll. This option helps keep navigation usable.
When enabled, the trip content tabs become scrollable, keeping all content accessible on longer trip detail pages.
This is helpful for longer trips with sections like itinerary, cost includes, FAQs, and map details. It helps visitors move around the page without hunting for the tab bar again.
Next is a more technical setting, but the basic idea is straightforward.
FSE Template
FSE stands for Full Site Editing. It is a WordPress way of controlling page templates and layout blocks across your site.
Enable Full Site Editing (FSE) templates provided by WP Travel Engine. For setup details, see WP Travel Engine – Blocks, Patterns & Templates.
If you are not using a block-based WordPress theme, you may not need this setting right away. You can leave it alone and come back later if you are unsure.
The next setting is useful when bookings depend on a minimum group size.
Show warning message in booking modal
A booking modal is the pop-up window travelers see when they begin booking. This message helps you set expectations before they confirm anything.
Add a warning message shown inside the booking modal, informing travelers about the minimum participant requirement. Include the placeholder {min_pax} in the message to automatically display the required minimum number of participants.
For example, you could write: This trip runs with a minimum of {min_pax} travelers.
That way, if you run a small-group trek that only departs with four people, the traveler sees that clearly before booking.
After that, you can adjust how the price box works on smaller screens.
Pricing Widget Layouts (for smaller devices)
Many travelers check trips on their phones first. This section helps your pricing widget stay clear on smaller screens.
A widget is a built-in content box that shows something important on the page. In this case, it is the pricing area.
Navigate to WP Travel Engine > Settings > Display > Single Trip > Pricing Widget to choose your preferred layout:
- Default - A mobile-friendly layout with a toggle-style button that lets visitors show or hide prices. Ideal for a clean, user-friendly design.
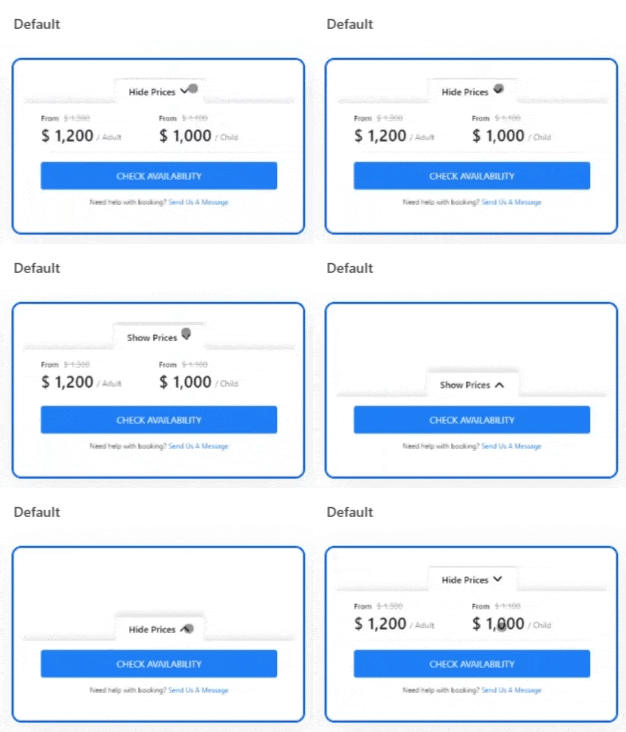
- Compact Layout - Similar to the default layout but replaces the toggle button with a compact button, freeing up more space on smaller screens.
- Breeze Layout - The most mobile-friendly option. The entire widget collapses into a button. Tapping it opens a popup showing all category pricing. Ideal for a minimalistic design.
If most of your visitors browse on mobile, it is worth checking which layout feels easiest to use.
Compact Layout
This setting matters when screen space is tight. It helps the pricing area take up less room on mobile devices.
Enable this option to make the pricing widget modals compact on mobile devices, taking up less screen space.
For example, if you offer adult, child, and private group pricing on a day tour, a compact layout can make those options easier to browse on a phone.
Make Sticky and Scrollable
This setting keeps pricing close at hand while a traveler reads the page. That can help when your itinerary or trip details are long.
Enable this option to make the pricing widget sticky and scrollable, so the booking form stays visible as travelers scroll down the page.
If someone is halfway through reading a 10-day itinerary and decides to book, they do not need to scroll all the way back to the top to find the pricing box.
Once your pricing display feels right, you can add contact options.
Show WhatsApp
Some travelers would rather ask a quick question than fill out a form. This setting gives them a direct contact option.
Enable this option to add a link to your WhatsApp number, letting customers message you directly with inquiries.
This can work especially well for custom trips, last-minute departures, or questions about availability.
The next setting controls the message around your enquiry link.
Enquiry Message
This message helps point travelers toward the next action. It is useful when someone is interested but not ready to book.
Enter the enquiry message displayed in the trip pricing widget. Include [[Your Link Label]] in the message to show a clickable link directing users to the enquiry form.
For example, you might write something like: Need help choosing dates? [[Send us an enquiry]]
That gives travelers a clear path if they have questions about private departures, group rates, or add-ons like gear rental.
Now you can decide how the enquiry form itself should work.
Enquiry Form
The enquiry form gives travelers a way to contact you from the trip page. This is often useful for custom tours, private trips, or travelers who need more details before booking.
Configure the enquiry form via WP Travel Engine > Settings > Display > Single Trip > Enquiry Form.
Show Enquiry Form
Turn this on if you want an enquiry form to appear on single trip posts. This helps people contact you without leaving the trip page.
Enable this toggle to display the enquiry form on a single trip post.
If you do a lot of tailor-made tours, this is often worth keeping on.
Enquiry Info
This setting controls where the enquiry link sends the traveler. That matters if you want to keep them on the same page or send them somewhere else.
Enable this option to display an enquiry form on the single trip page. By default, this links to the enquiry section of the page. Enabling it reveals additional settings:
- Default - The enquiry form links to the enquiry section of the page, where travelers submit questions or requests.
- Custom - Lets you add a custom URL in the Enquiry Form Link field, linking to a different page or external destination.
For example, you might use Default for normal trip questions. You might choose Custom if you send luxury trip enquiries to a separate consultation page.
Custom Enquiry Form
A custom enquiry form lets you use a form built with another WordPress form plugin. A plugin is an add-on tool that gives your site extra features.
Enable this option to use a custom enquiry form. Make sure the custom form includes a notification email to receive submissions, then add the shortcode for your custom form. A shortcode is a small piece of text that tells WordPress where to display something, such as a contact form. WP Travel Engine is compatible with popular form plugins such as Gravity Forms, Ninja Forms, and WPForms.
If you test a custom form, send yourself a sample enquiry after saving the settings. That confirms the form is showing properly and that email notifications are arriving where you expect.
GDPR Message
GDPR is a privacy rule that explains how businesses should collect and handle personal information. This message helps reassure travelers when they submit their details.
Enter the GDPR message shown on the trip enquiry form.
This is a good place to let people know how you will use their information, such as replying to their trip question or sending a quote.
Once enquiries are set up, you can decide whether to keep visitors looking at more trips.
Show Related Trips
Related trips help travelers keep browsing. They are especially useful when someone likes one trip but wants a different duration, activity, or destination.
Displays related trips on the single trip page. Once enabled, you get these configuration options:
- Related Section Title - A custom title for the related trips section.
- No. of Related Trips to Display - The number of related trips to show.
- Enable Related Trips By - Which taxonomies (Destinations, Activities, Trip Types, Difficulty, Tags) to use for filtering related trips.
- Show Pricing Type Label - Displays the pricing unit, such as “/ person” or “/ group,” alongside the trip price on the trip cards.
For example, if someone lands on a 7-day Annapurna trek, you might want to show other Nepal treks, similar difficulty trips, or trips in the same activity type.
New Layout for Related Trips
This gives the related trips section a newer design. It also unlocks more display options that match your Trip Card Display settings.
Enable this option to switch to a newer layout for related trips. Once enabled, you can configure the following, which mirror the Trip Card Display settings:
- Enable Slider - Adds a slider showcasing images from the trip's gallery.
- Show Featured Tag on Card - Displays a "Featured" tag on trips marked as featured.
- Show Wishlist - Adds a Wishlist icon, letting visitors save trips they're interested in.
- Enable Map - Adds a map icon that displays the trip's location when clicked.
- Enable Difficulty - Displays the trip's difficulty level (e.g., Easy, Extreme, Hard).
- Show Tag - Displays tags associated with the trip (e.g., Adventure, Family-friendly).
- Show Next Departure Dates - Displays the next available departure dates.
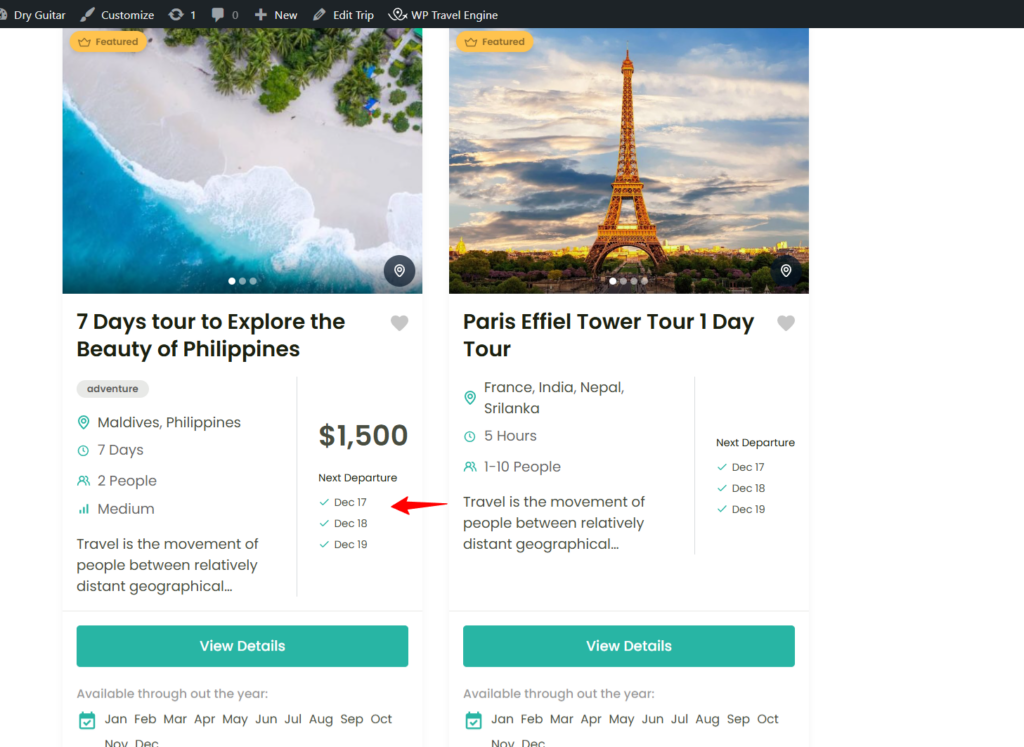
This feature is only available after activating the Trip Fixed Starting Dates (FSD) plugin.
- Show Available Months - Displays the months available for booking.
- Show Available Dates - Displays specific available dates for the trip.
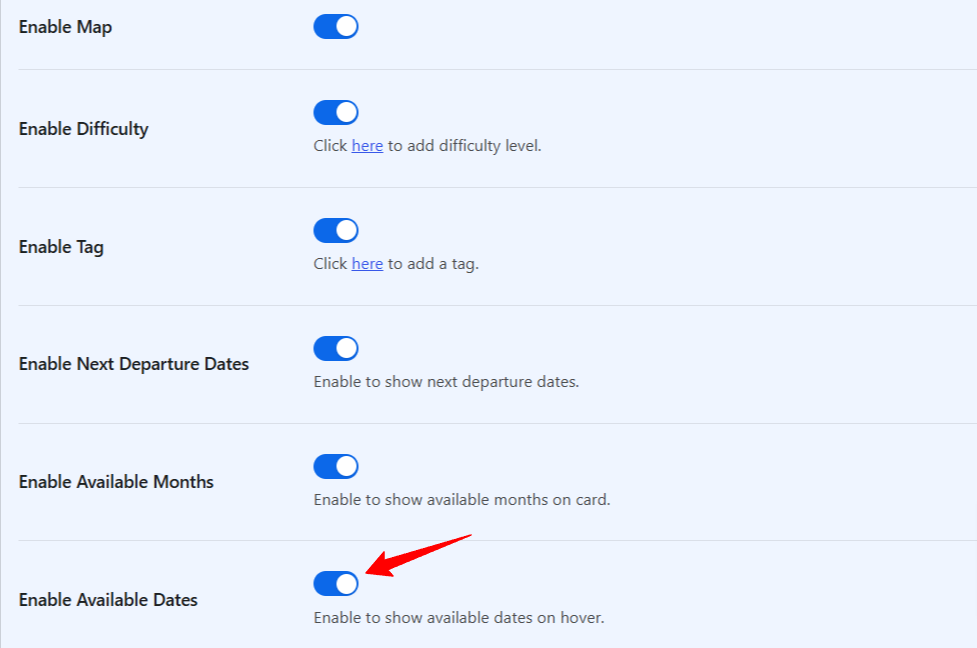
This feature is only available after activating the Trip Fixed Starting Dates (FSD) plugin.
FAQs
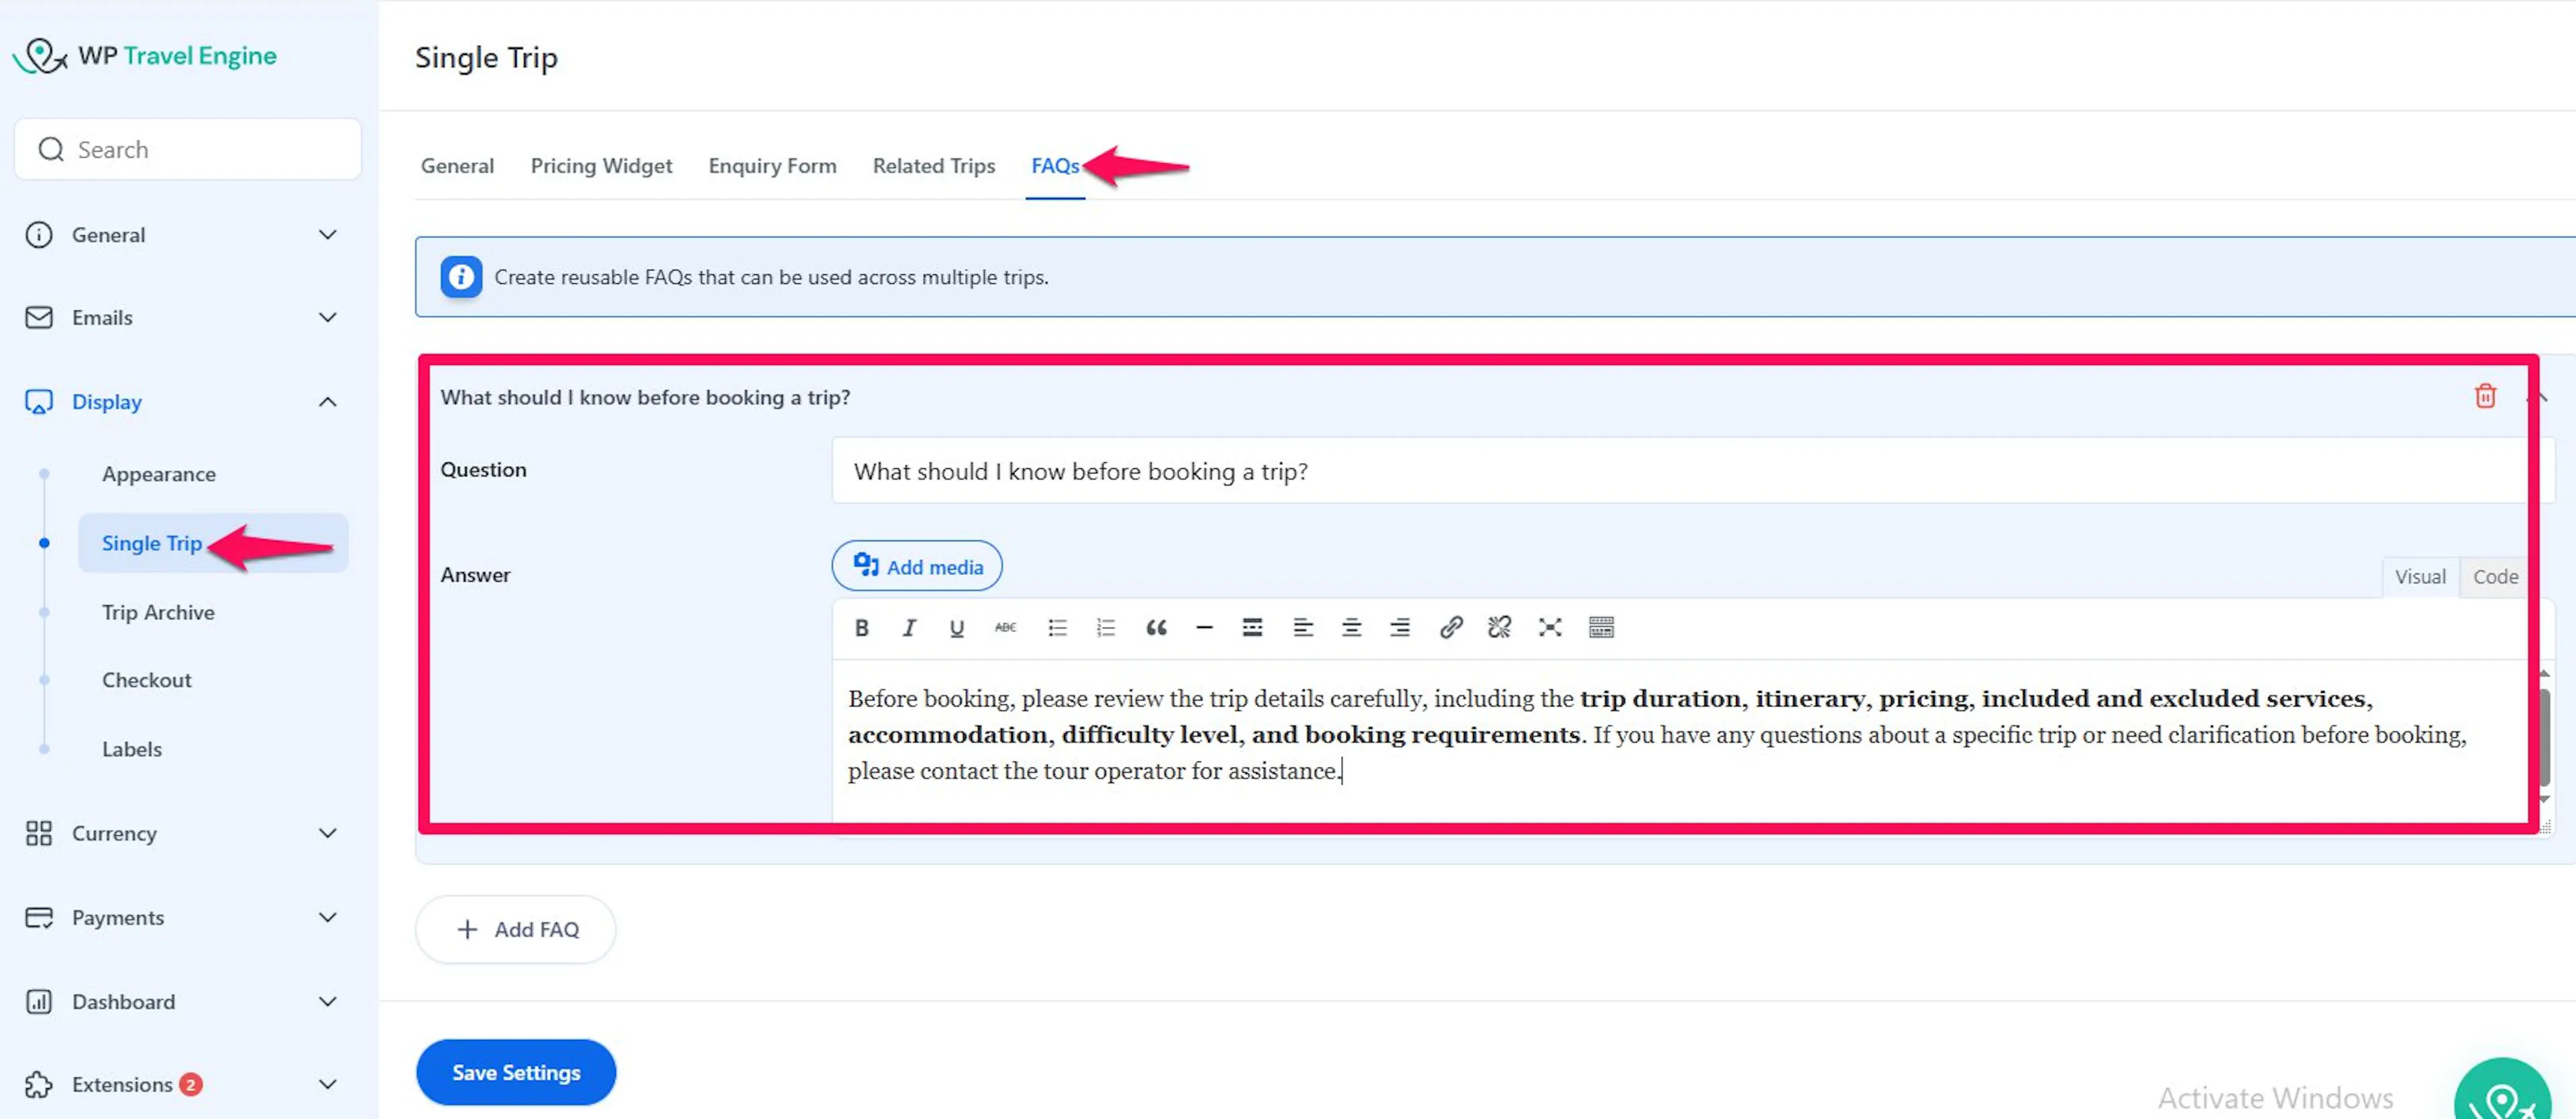
The FAQs settings allow you to create reusable Frequently Asked Questions that can be displayed across multiple trips. This helps provide customers with common information without adding the same FAQ manually to each trip.
- Add FAQ: Click Add FAQ to create a new FAQ item.
- Question: Enter the question that will be displayed to customers.
Example:What should I know before booking a trip? - Answer: Enter the answer or information that customers should see when they view the FAQ.
Add Media: Click Add Media to insert an image or other supported media into the FAQ answer. - Delete FAQ : Click the Delete icon to remove an FAQ item from the list.
- Save Settings: Click Save Settings to save the FAQ configuration. The saved FAQs can then be used across multiple trips.
If you want travelers to keep exploring after one trip catches their eye, this section is worth setting up carefully.
If you're still stuck or have a question we didn't cover, our support team is happy to help. Reach out at our support page and we'll get you sorted.