

Pickup Points
Define free or paid pickup points for each trip so travelers can choose their preferred pickup location at checkout.
Offer pickup choices for each trip
The Pickup Points add-on for WP Travel Engine helps you offer pickup locations for each trip. An add-on is a small extra feature that extends what WP Travel Engine can do.
You can set pickup points as free or paid for every trip you run. Your travelers can then choose the pickup location that works best for them during checkout. If a pickup point has a cost, that amount is added to the cart automatically.
This is helpful if you offer airport pickup, hotel pickup, or meeting-point pickup for day tours, treks, or multi-day packages. Once you set it up, the choice appears during booking without extra manual work from you.
Why use the Pickup Points add-on?
Pickup points help you give travelers more choice while keeping your pricing clear.
- Offer free or paid pickup options. You might include free pickup from a central meeting point, then charge extra for airport pickup or hotel pickup.
- Show pickup charges automatically. If you charge for a location, the cost is added during checkout so the traveler sees the full price before paying.
- Make booking easier for travelers. Instead of sending pickup details later by message or email, travelers choose their preferred location while booking.
That means fewer follow-up questions for you and a clearer booking experience for your customers.
What you'll need before you start
Before you begin, make sure the basics are ready.
- The Pickup Points add-on is installed and activated.
- You have created at least one trip in WP Travel Engine.
If you have not installed the add-on yet, follow how to install and activate the license for Pro add-ons.
Once that is done, you are ready to add pickup points to a trip.
Adding pickup points to a trip
You add pickup points inside each trip. This means you can offer different pickup options for different tours.
For example, your airport transfer options for a city tour may be different from your pickup options for a mountain trek. That is why pickup points are set trip by trip.
Open the trip
This step takes you to the page where you manage the trip details. In WordPress, this page is called the Trip Editor.
Go to your Admin Dashboard and look at the left sidebar. Click Trips. Find the trip where you want to add pickup points, then click Edit.
If you run several tours, make sure you open the correct one before moving on.
Open the Pickup Points tab
This is where you will add the pickup choices for that trip.
Inside the Trip Editor, look for the Pickup Points tab in the Trip Edit Settings panel. The Trip Edit Settings panel is the area where you manage options for that specific trip.
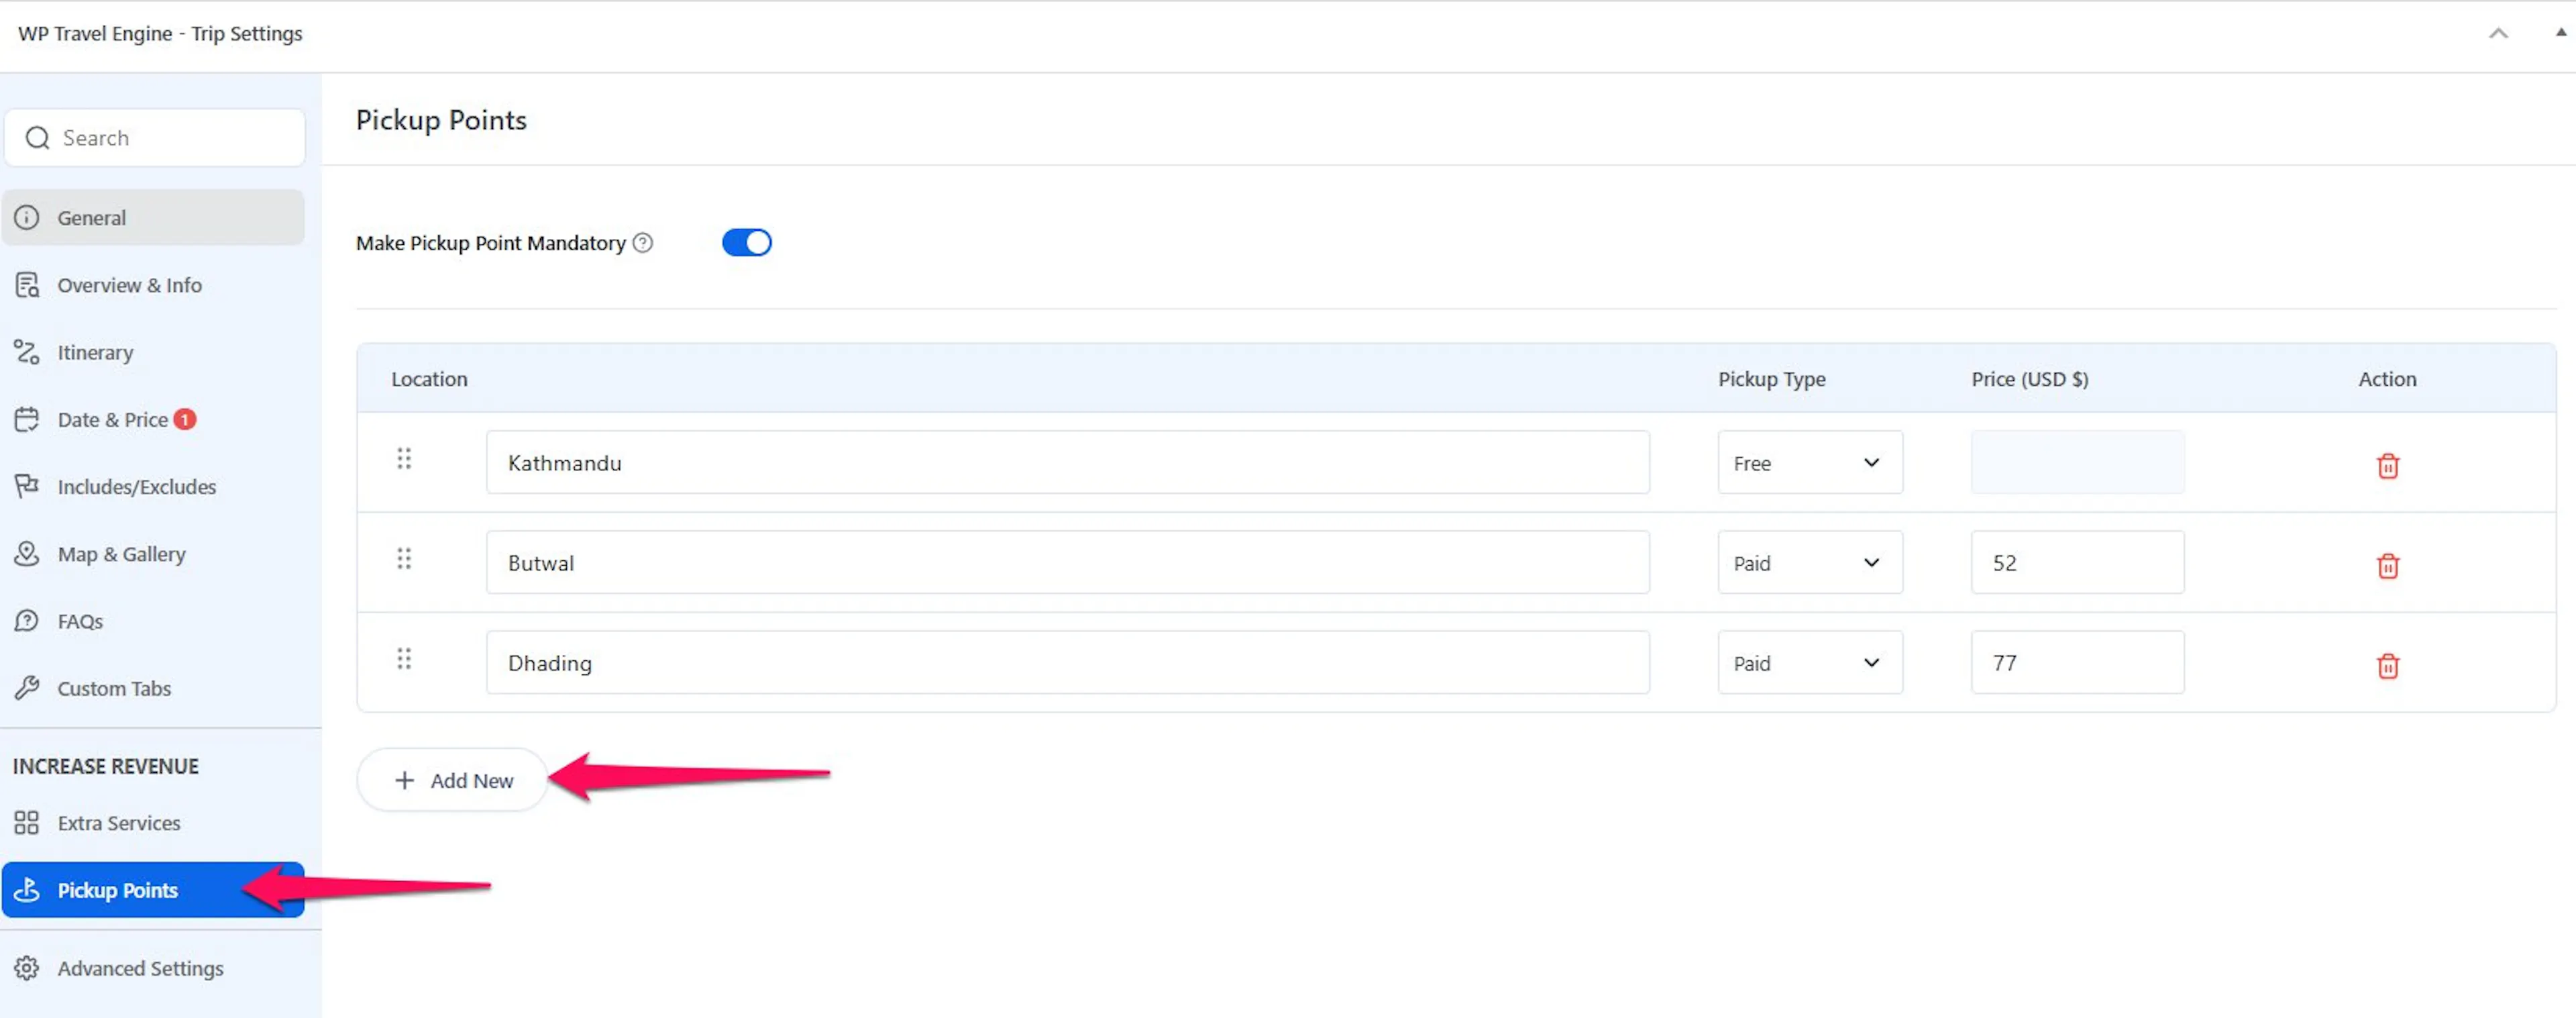
Once you open this tab, you are in the right place to add locations.
Add a new pickup point
This creates one pickup option that travelers can choose later at checkout.
Click the Add New button.
If you want to offer several locations, you will repeat this process for each one.
Fill in the pickup point details
This step tells the system what the pickup location is and whether it should cost extra.
Add the details for the pickup point:
- Location - Enter the name of the pickup location.
- Pickup Type - Choose whether the pickup is Free or Paid.
- Price - If you choose Paid, enter the amount travelers should pay for that pickup point.
For example, you might enter Kathmandu Airport as a paid pickup, or Tourist Bus Park as a free pickup. Use names your travelers will understand right away.
Save your changes
Saving makes the pickup points available for this trip.
After you add all the pickup points you need, click Save Changes.
If you offer the same pickup choices for many trips, check each trip carefully before saving. Some tours may need different locations or different prices.
Once saved, the trip is ready for the next part of setup.
Making pickup points visible at checkout
Travelers can only choose a pickup point if the right checkout setting is turned on. If this setting is off, the pickup option will not appear during booking.
Make sure the Traveler's Information Form is enabled. You can find it in Admin Dashboard > WP Travel Engine > Settings > Display > Checkout. The WordPress dashboard is your main control area, and the menu is on the left sidebar.
Once this setting is enabled, your travelers will be able to see and choose pickup points while booking.
What your customers see
At checkout, the traveler fills out the Traveler's Information Form. They will see a pickup point field if you have added pickup points to the trip and enabled the checkout setting.
The pickup point field appears as a dropdown, which is a list that opens when you click it. The traveler can open the list and choose the location that suits them best.
If the selected pickup point has a cost, that amount is added to the booking summary automatically. This helps the traveler understand the total before payment.
For example, someone booking a 3-day trek might choose Hotel pickup - $15 from the list. The extra cost then appears in the booking summary on the same page.
That gives your customer a clear view of what they are paying for.
How it works end to end
Here is a simple example of how this works in a real booking.
You create a trip and add three pickup points: Kathmandu, Chitwan, and Mustang. Some of these can be free, and some can be paid, depending on how your business handles transport.
A traveler then books that trip on your website. During checkout, they choose Chitwan - $150 as their pickup point.
The system adds the $150 pickup fee to the booking total automatically. The traveler sees that cost in the booking summary before they complete the booking.
After the booking is complete, the selected pickup point stays saved with the booking details. That gives you a clear record of where the traveler expects to be picked up.
Where you might use this
Pickup points are useful in a few common tour situations.
- Airport pickup services - Offer pickup from the airport for travelers arriving in a new city. You might make it free for premium packages or charge extra for standard bookings.
- Custom pickup locations - Let travelers choose from places like a hotel, a bus station, or a city center meeting point. This works well for day tours and short packages.
- Different prices for different locations - Charge based on distance or convenience. For example, a city center pickup might be free, while a remote hotel pickup costs extra.
These options help you match your transport service to the type of trips you sell.
Wrapping up
The Pickup Points add-on gives you a practical way to manage transport choices inside your booking flow. You can offer free pickups, paid pickups, or a mix of both, and your travelers can choose what works for them during checkout.
Once you set it up for a trip, the process stays clear for both you and your customers.
If you're still stuck or have a question we didn't cover, our support team is happy to help. Reach out at our support page and we'll get you sorted.