How to Configure Performance Settings in WP Travel Engine
Turn on the right performance settings to help your trip pages load faster, feel smoother for travelers, and support better SEO.
Your single trip pages can load faster when you turn on the right Performance settings in WP Travel Engine. Faster pages give travelers a better experience. They can also help with SEO, which means helping your pages show up better in search results.
Accessing performance settings
You only need a few clicks to get to these settings. Once you are there, you can turn the options on and save them.
You will need to be logged in to your WordPress admin area and have permission to change WP Travel Engine settings.
Log in to WordPress
Open your WordPress admin dashboard and sign in.
If you are not sure where to start, this is the back-end area of your website where you manage pages, trips, and plugin settings.
Open Performance settings
This is where all speed-related options for your trip pages live.
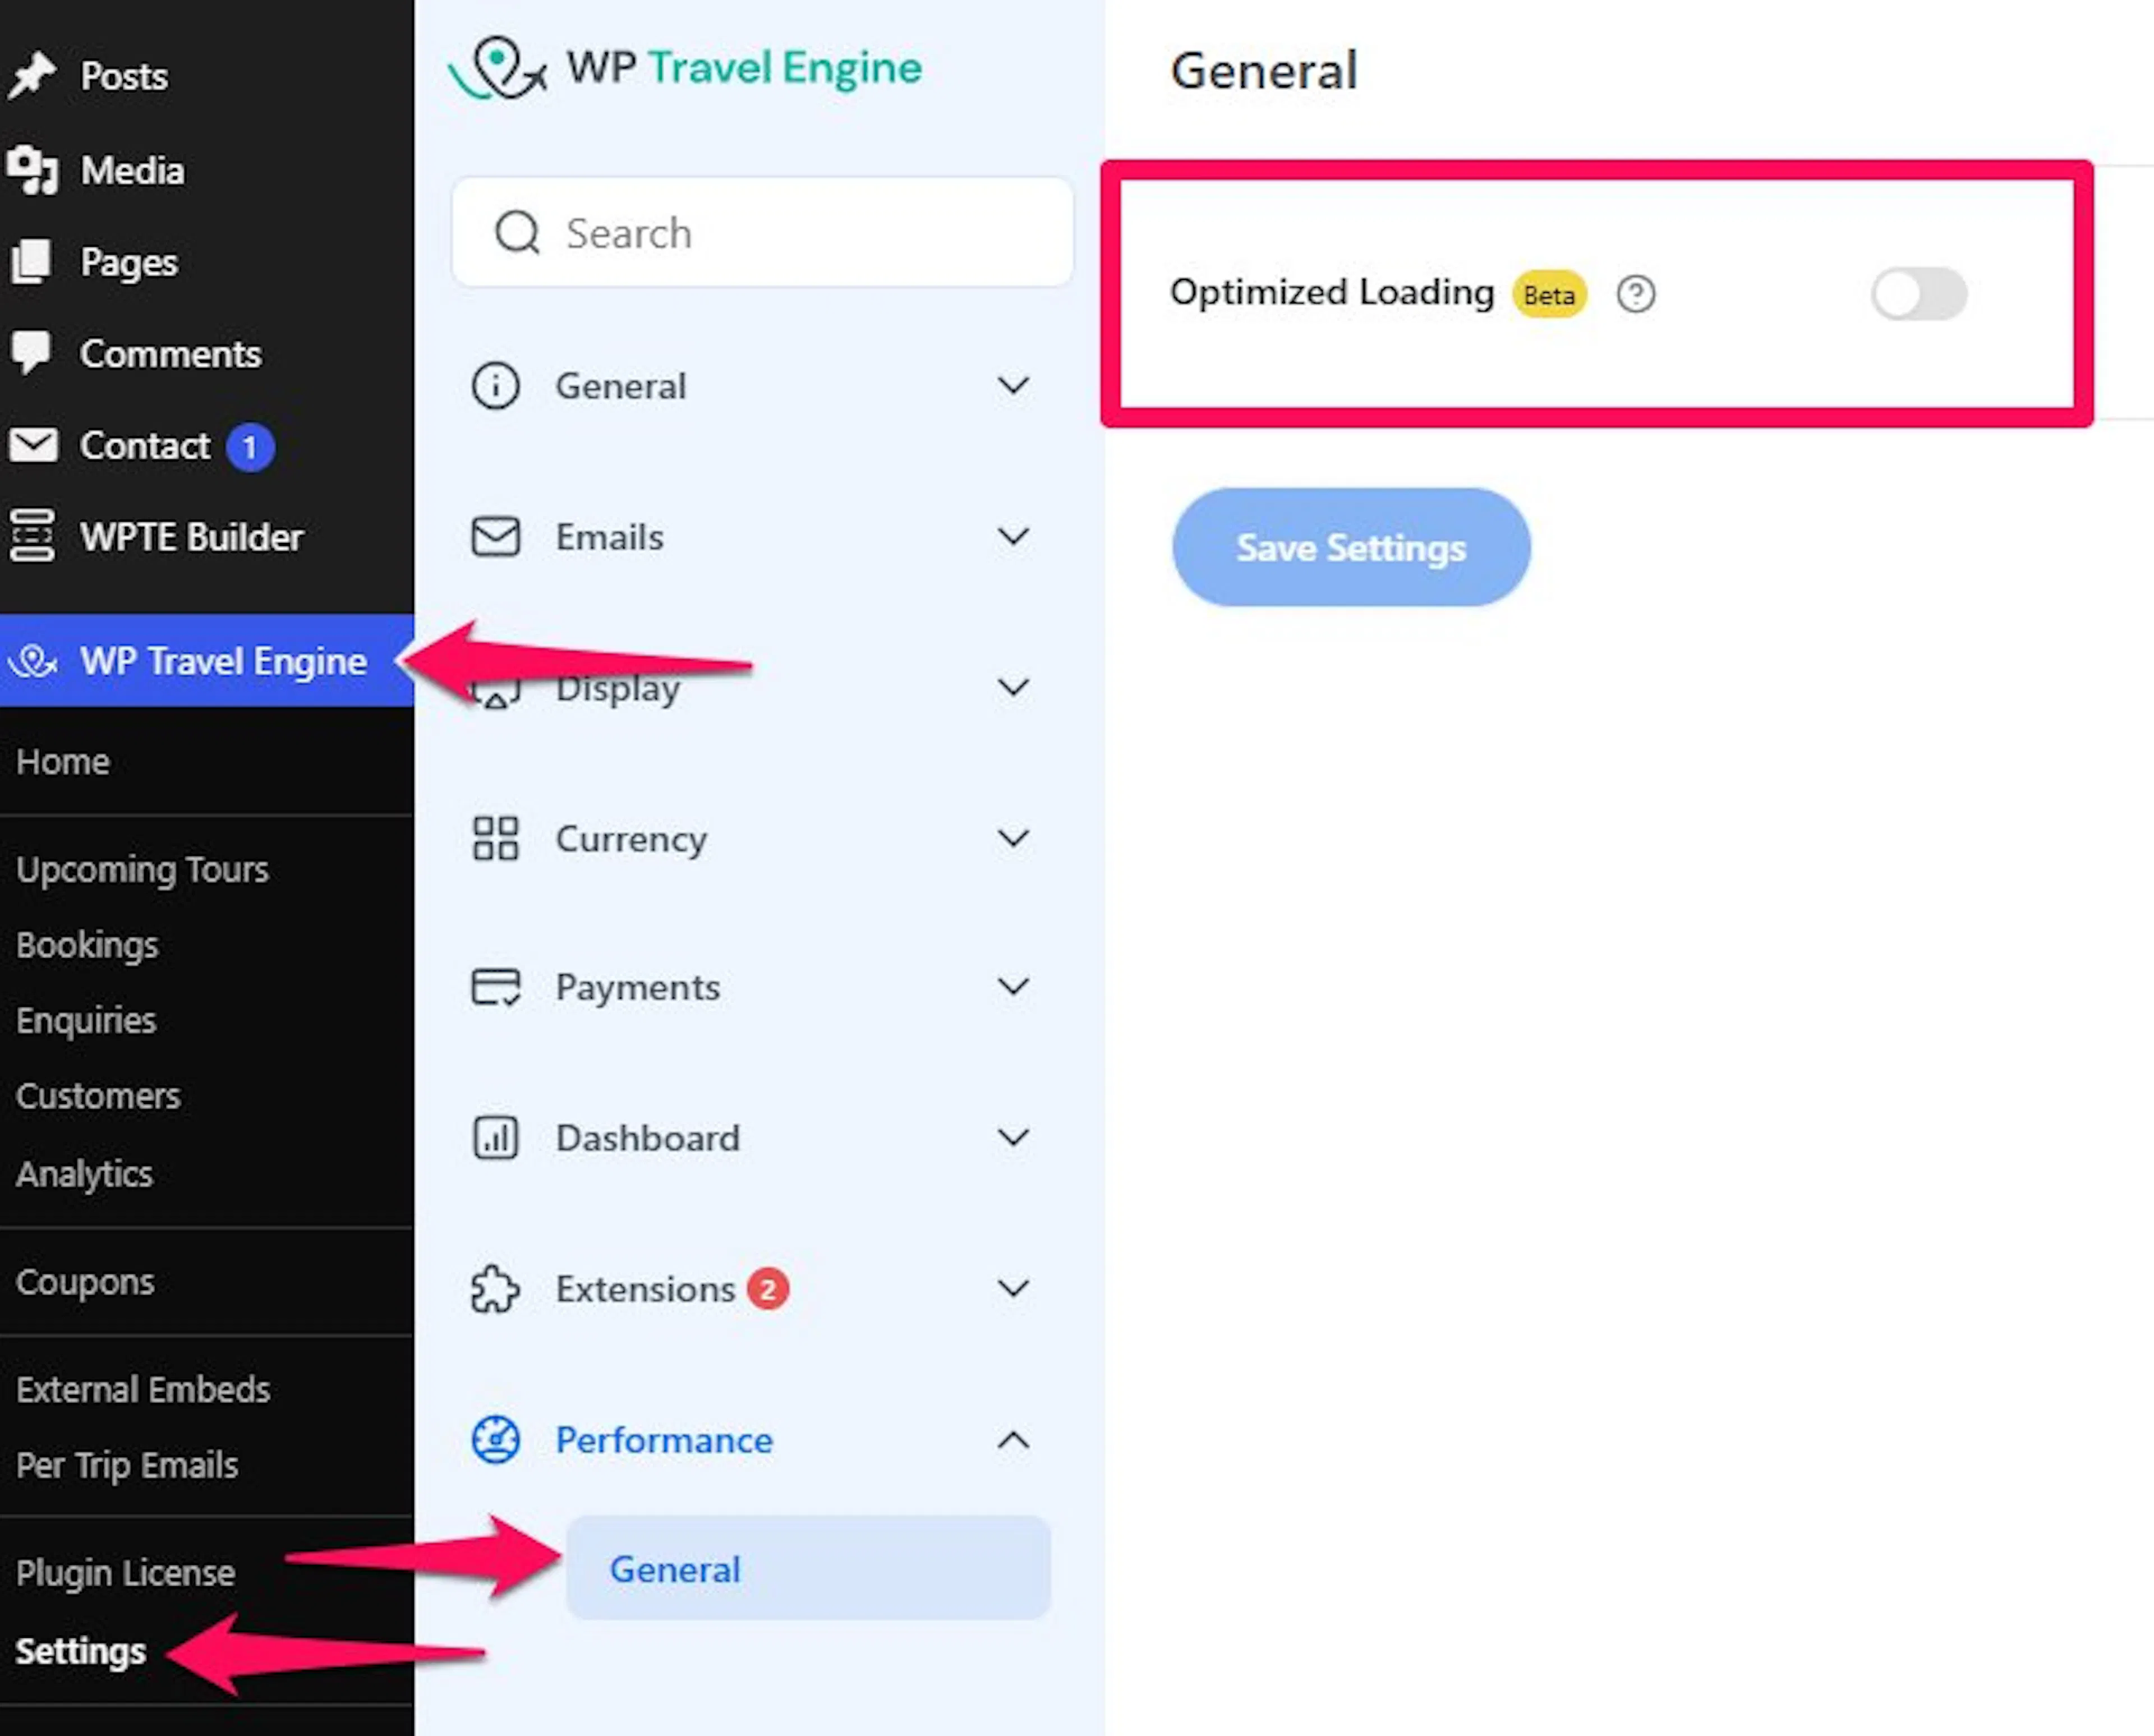
On the left sidebar of your WordPress dashboard, go to WP Travel Engine > Settings > Performance.
Open the General tab
The main Performance options are inside this tab.
Click General to see the available settings.
Now that you are in the right place, it helps to know what each option actually does before you switch anything on.
Available performance options
The Performance area includes four main options. Each one improves a different part of how your trip pages load.
Optimized Loading
Optimized Loading tells WP Travel Engine to load only the files a page needs. Scripts and stylesheets are the behind-the-scenes files that make your pages look and work the way they should.
That means your site avoids loading extra files on pages that do not need them. This keeps the page lighter and helps it open faster.
For example, a traveler looking at a short city tour page should not have to load extra files meant for features that do not appear on that page. Cutting out that extra load can improve speed.
This usually means faster page loads, smaller page size, and better overall site performance. That can also support better SEO over time.
Lazy Loading (Experimental)
Lazy Loading waits to load some media until the visitor actually needs it. Media can include things like images, videos, or other visual content on a single trip page.
Instead of trying to load everything at once, the page starts with the most important content first. The rest loads as the visitor scrolls or interacts with the page.
Say your Everest Base Camp trip page has a large photo gallery near the bottom. Without lazy loading, every image may try to load right away, even before the traveler scrolls down to see them. That can slow the page for no real benefit.
This can make the first page view feel faster. It can also help travelers on mobile data or slower internet connections.
Map Lazy Loading
Map Lazy Loading delays loading embedded maps until the visitor interacts with them. An iframe is the small embedded box used to show content from another service, such as a Google Map, inside your page.
So instead of loading the map as soon as the page opens, the map waits until the visitor scrolls to it or clicks it. This is especially helpful on trip pages with maps.
For example, if you run multi-day treks and each trip page includes a route map, loading every map right away can add extra weight to the page. Delaying that load can make the trip page open faster.
This helps reduce trip page load time and cuts down on extra resource use. It is especially useful if you have multiple maps on one page.
Image Lazy Loading
Image Lazy Loading waits to load images until they are close to appearing on the visitor's screen. The viewport is the visible part of the page the visitor is looking at right now.
So if a traveler lands at the top of your Annapurna trek page, the images far below do not need to load yet. They can load later when the traveler scrolls down to them.
This is helpful on image-heavy trip pages with large banners, itinerary photos, or gallery sections. It can improve load speed, use less bandwidth, and make the page feel smoother. Bandwidth is the amount of internet data needed to load the page.
Once you know what each option does, you can turn on the ones that fit your site.
Enabling each option
You do not need to change any code here. You only need to switch the settings on and save them.
Enable Optimized Loading
This setting helps remove unnecessary page weight.
Turn on Optimized Loading.
WP Travel Engine will then start loading resources only where they are needed. That helps speed up pages that do not need every file all the time.
Enable Lazy Loading
This setting can improve the first load of media-heavy trip pages.
Turn on Lazy Loading.
This feature is still experimental. It can improve performance, but you should test it on your own site before relying on it fully.
Enable Map Lazy Loading
This setting is useful if your trip pages include route maps or location maps.
Turn on Map Lazy Loading.
Your map iframes will wait to load until the visitor interacts with the page. That can reduce the amount of work your page does right away.
Enable Image Lazy Loading
This setting is especially helpful if your trips include many photos.
Turn on Image Lazy Loading.
Images outside the visitor's screen will wait to load until needed. That can improve loading speed on gallery-heavy trip pages.
Save your changes
Your settings will not apply until you save them.
Click Save Changes.
After that, your selected Performance settings will be active.
After you save, it is worth checking a few trip pages on your site to make sure everything looks and works the way you expect.
Best practices
These settings are helpful, but a quick check after turning them on can save you trouble later.
- Testing - Since Lazy Loading is experimental, test it on your site before using it widely. Check a few real trip pages on desktop and mobile. If you have a page with galleries, maps, or videos, test that too.
- Compatibility - Some themes and plugins may not work perfectly with Lazy Loading. After you turn on any performance setting, open your trip pages and make sure images, maps, and page sections still appear correctly.
- Mobile performance - These settings are especially useful for mobile visitors. Many travelers browse trips on phones while using slower connections or limited data.
- Caching - Use a caching plugin together with these settings. A cache is a saved copy of your page that loads faster than building it from scratch each time. This can reduce server work and speed up your site even more.
Once you have checked your pages, you should have a better sense of which settings work best for your trips.
Conclusion
The Performance feature in WP Travel Engine gives you a practical way to speed up your site and improve the experience for travelers. Turning on Optimized Loading, Lazy Loading, Map Lazy Loading, and Image Lazy Loading can reduce load time and cut down unnecessary resource use.
That means your trip pages can feel faster, especially on mobile. It also gives you a stronger setup for SEO and a smoother browsing experience for visitors.
If you're still stuck or have a question we didn't cover, our support team is happy to help. Reach out at our support page and we'll get you sorted.