

User History
See which trip pages a customer browsed before they booked or sent an inquiry, so you can follow up better and understand what caught their interest.
See which pages a visitor looked at before they book a trip or send an inquiry. After the booking or inquiry comes in, that browsing history is saved with timestamps and shown in your admin dashboard.
Say a customer books your 7-day Annapurna trek. You can see they also looked at your Everest Base Camp trek and a day tour in Kathmandu before booking. That gives you a clearer picture of what else caught their eye.
The WP Travel Engine User History add-on requires WP Travel Engine plugin v2.2.0 or later installed and activated on your site. A plugin is a piece of software you add to WordPress to give it new features.
Installation
You can install the add-on in WordPress or upload it with FTP. FTP (File Transfer Protocol) is a way to move files from your computer directly to your website's server.
What you'll need before you start: the wp-travel-engine-user-history.zip file downloaded to your computer and access to your WordPress dashboard.
Upload through WordPress
This is the quickest way to install the add-on from inside WordPress.
Open Add New in Plugins
In the left sidebar of your WordPress dashboard, hover over Plugins and click Add New. You will find Add New near the top of the Plugins page.
Open the upload area
This lets you upload the add-on file from your computer.
Click Upload Plugin at the top of the page.
Select the plugin file
Now you will choose the file WordPress needs to install.
Select the wp-travel-engine-user-history.zip file from your computer.
Install the plugin
WordPress will now add the files to your website.
Click Install Now.
Activate the plugin
Activation turns the add-on on so it can start working.
After installation finishes, click Activate Plugin.
Upload via FTP
Use this method if you prefer to upload the files directly to your website server.
Download the plugin file
Download the wp-travel-engine-user-history.zip file to your computer.
Extract the file
WordPress cannot use the zipped file in an FTP program. You need the folder inside it.
Extract or unzip the file to get the wp-travel-engine-user-history folder.
Upload the folder to your server
This places the add-on in the right folder on your website.
Upload the wp-travel-engine-user-history folder to the /wp-content/plugins/ directory on your website's server using an FTP program.
Activate the add-on in WordPress
After the files are uploaded, turn the add-on on from your dashboard.
Go to the Plugins page in your WordPress dashboard and activate the add-on.
Once the add-on is active, you are ready to add your license key and receive updates.
Plugin license
A license key is a code you receive after purchasing the add-on. It proves you own it and lets you receive updates.
What you'll need before you start: your User History license key from your purchase email or account area.
Open Plugin License
This is where WP Travel Engine keeps license settings.
In the left sidebar of your WordPress dashboard, go to WP Travel Engine and click Plugin License.
Enter the license key
Adding the key connects your site to future updates for this add-on.
Find the User History section and enter your license key in the License field.
Save the key
This stores the key in WordPress.
Click Save Changes.
Activate the license
This confirms the key is valid and ready to use.
Refresh the page and click Activate License when the button appears. An activation message confirms it worked.
After activation, you can update the add-on from the Plugins page whenever a new version is released. That means you can keep everything current without reinstalling it.
How does it work?
Once the add-on is active, it automatically tracks which pages each visitor browses on your site. It uses cookies to do that. A cookie is a small file a website stores on a visitor's browser to remember information about their visit.
Each time a visitor opens a new page, the page address and the time of the visit are saved for a short time in your website's database. The database is the storage area on your hosting server where your website's information is kept. The pages are linked together with a temporary ID, so the visit can be tracked without the visitor needing to log in.
When the visitor makes a booking or sends an inquiry, that browsing history is saved with the booking or inquiry details. You can view it in the booking and inquiry details section of WP Travel Engine.
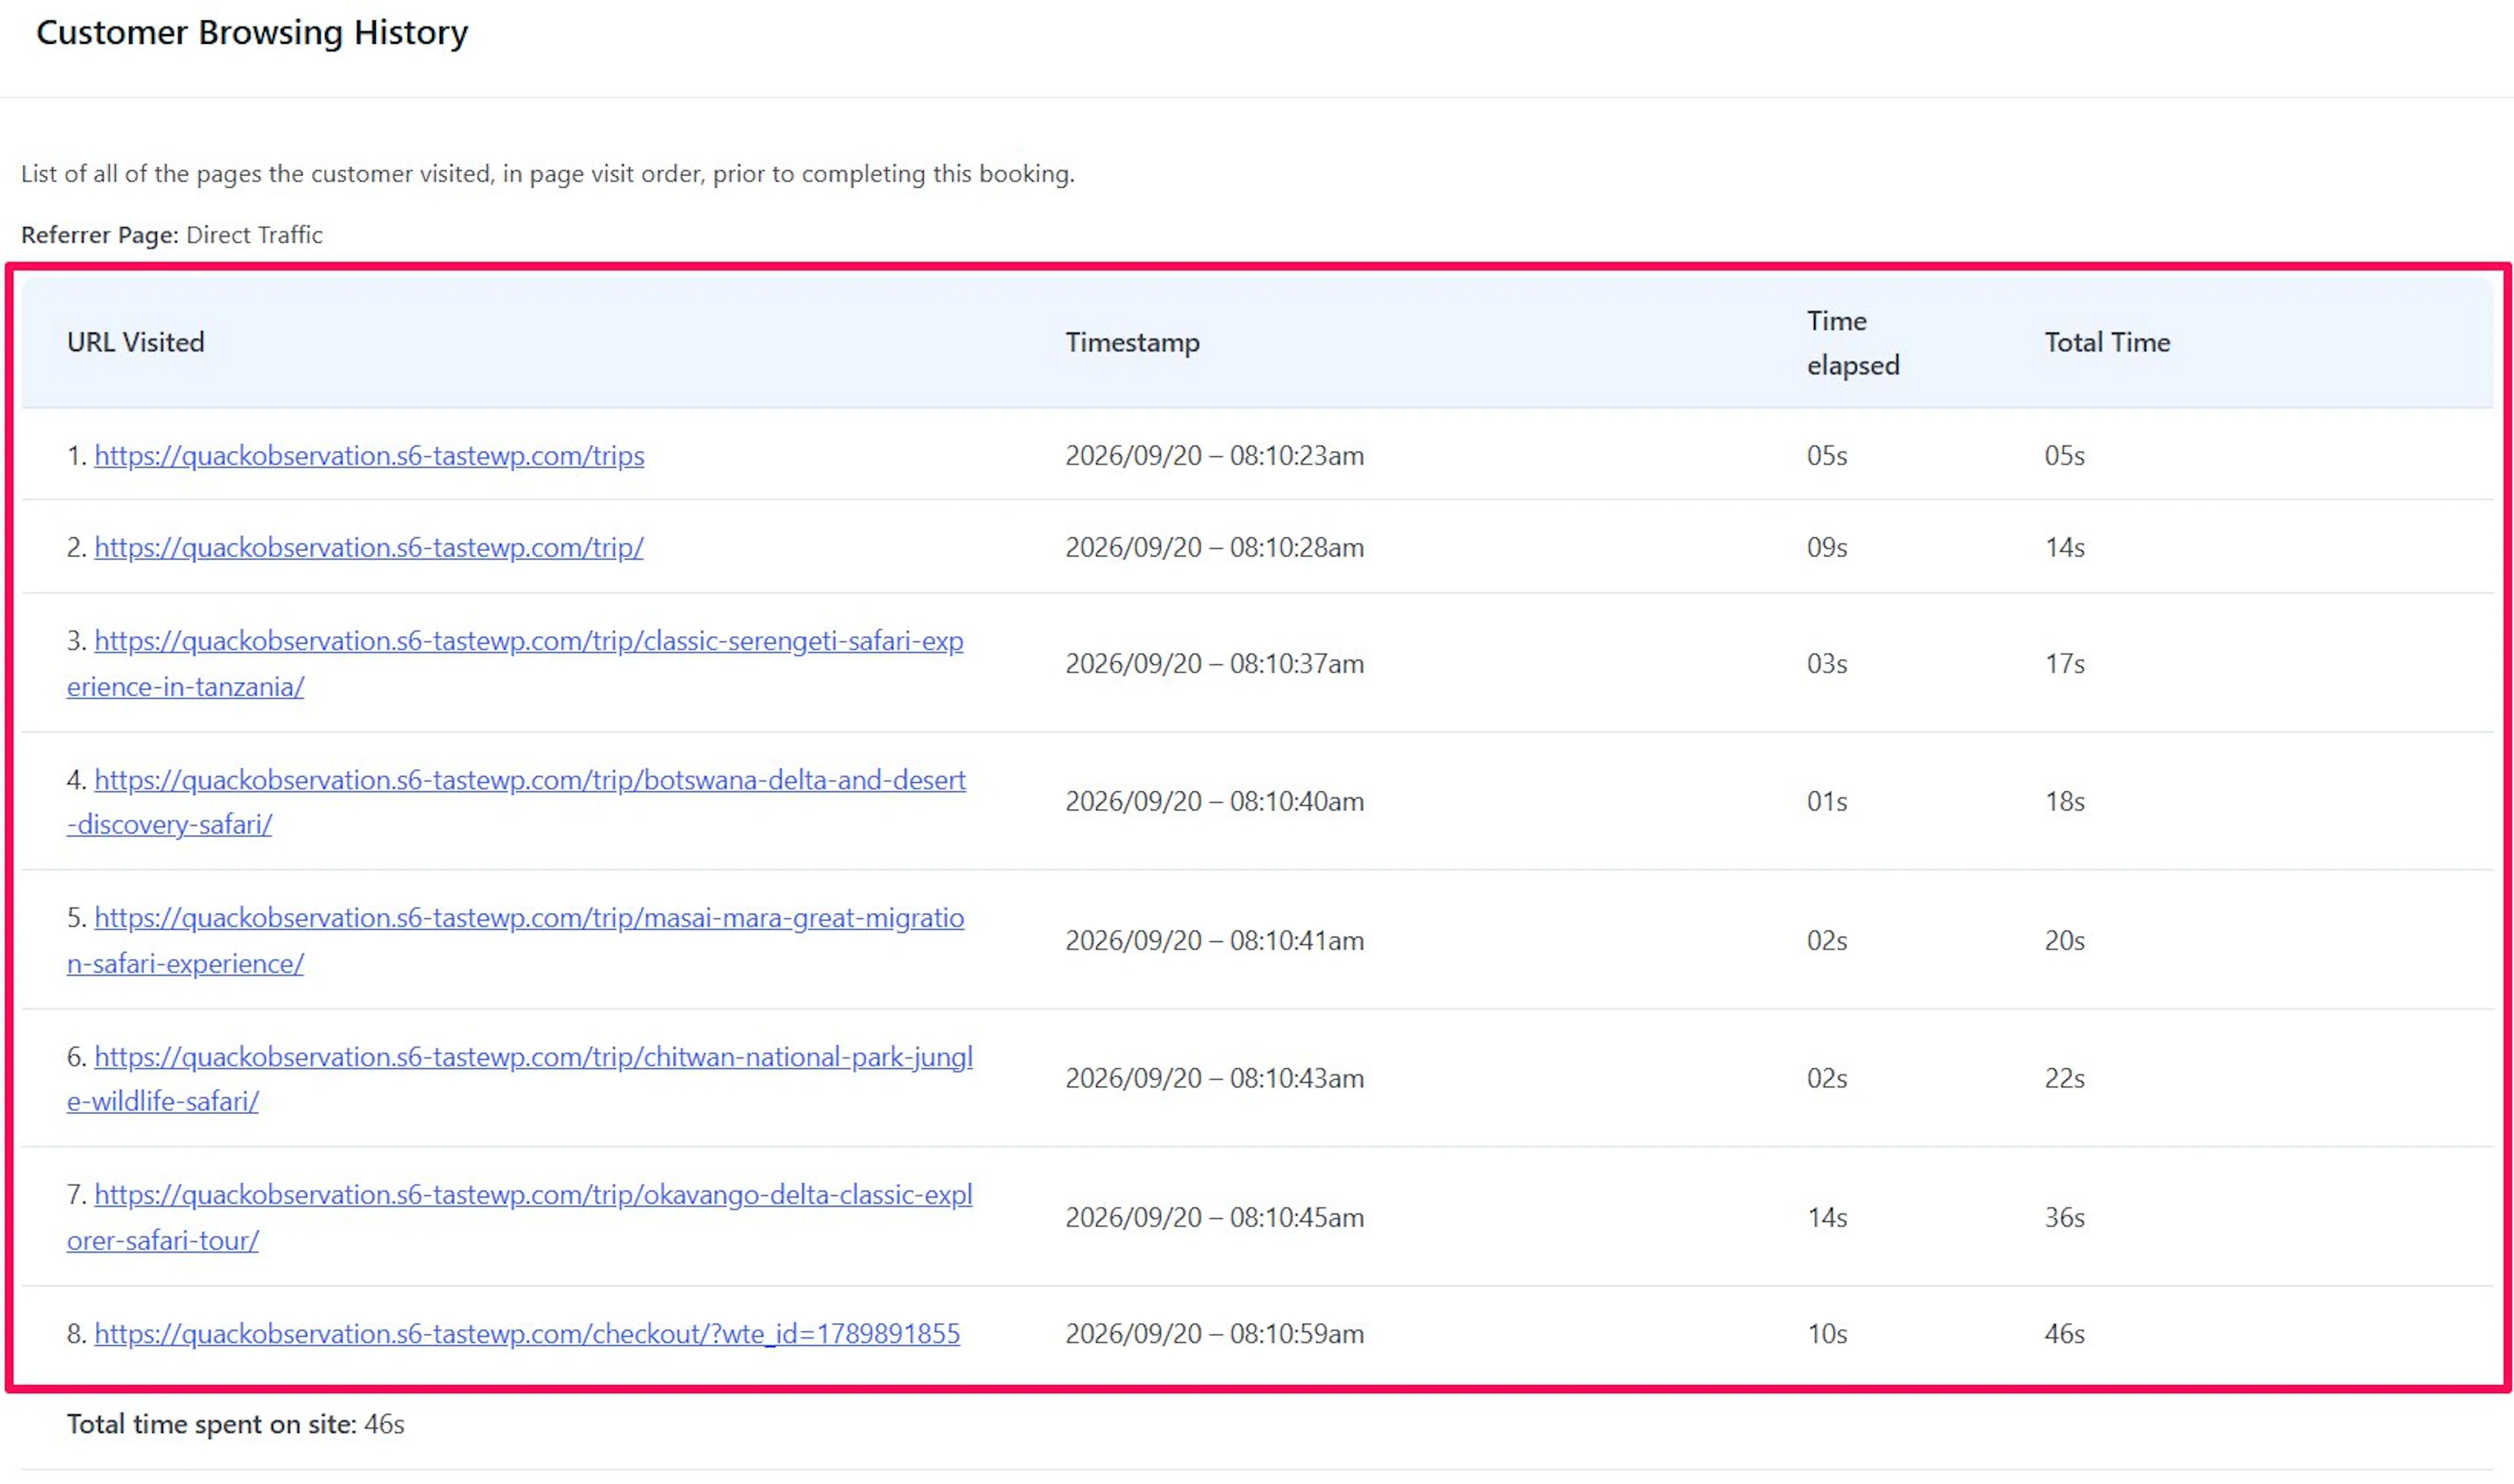
The browsing history table shows where the visitor came from before reaching your site, which pages they visited before booking, how long they spent on each page, and the total time they spent on your site before booking or sending an inquiry.
For example, if someone ends up booking a family day tour, you might see that they first landed on a seasonal pricing page, then viewed your private jeep add-on, then checked a group discount offer before completing the booking. That helps you understand what mattered most in their decision.
No data is saved if visitors don't make a booking or send an inquiry on the site.
Now that you know what the add-on records, the next step is to look at the settings you can control.
Global options
You can find these settings in the left sidebar of your WordPress dashboard. Go to WP Travel Engine, then Settings, then Extensions, then User History.
These settings let you decide how tracking works on your site and what visitors see. You can leave the defaults in place or adjust them to suit how you run your tour business.
User History Tracking
Use this setting when you want to turn tracking off completely.
When this setting is enabled, no new user history data is saved for bookings or inquiries. Any history already saved on older bookings stays exactly as it is.
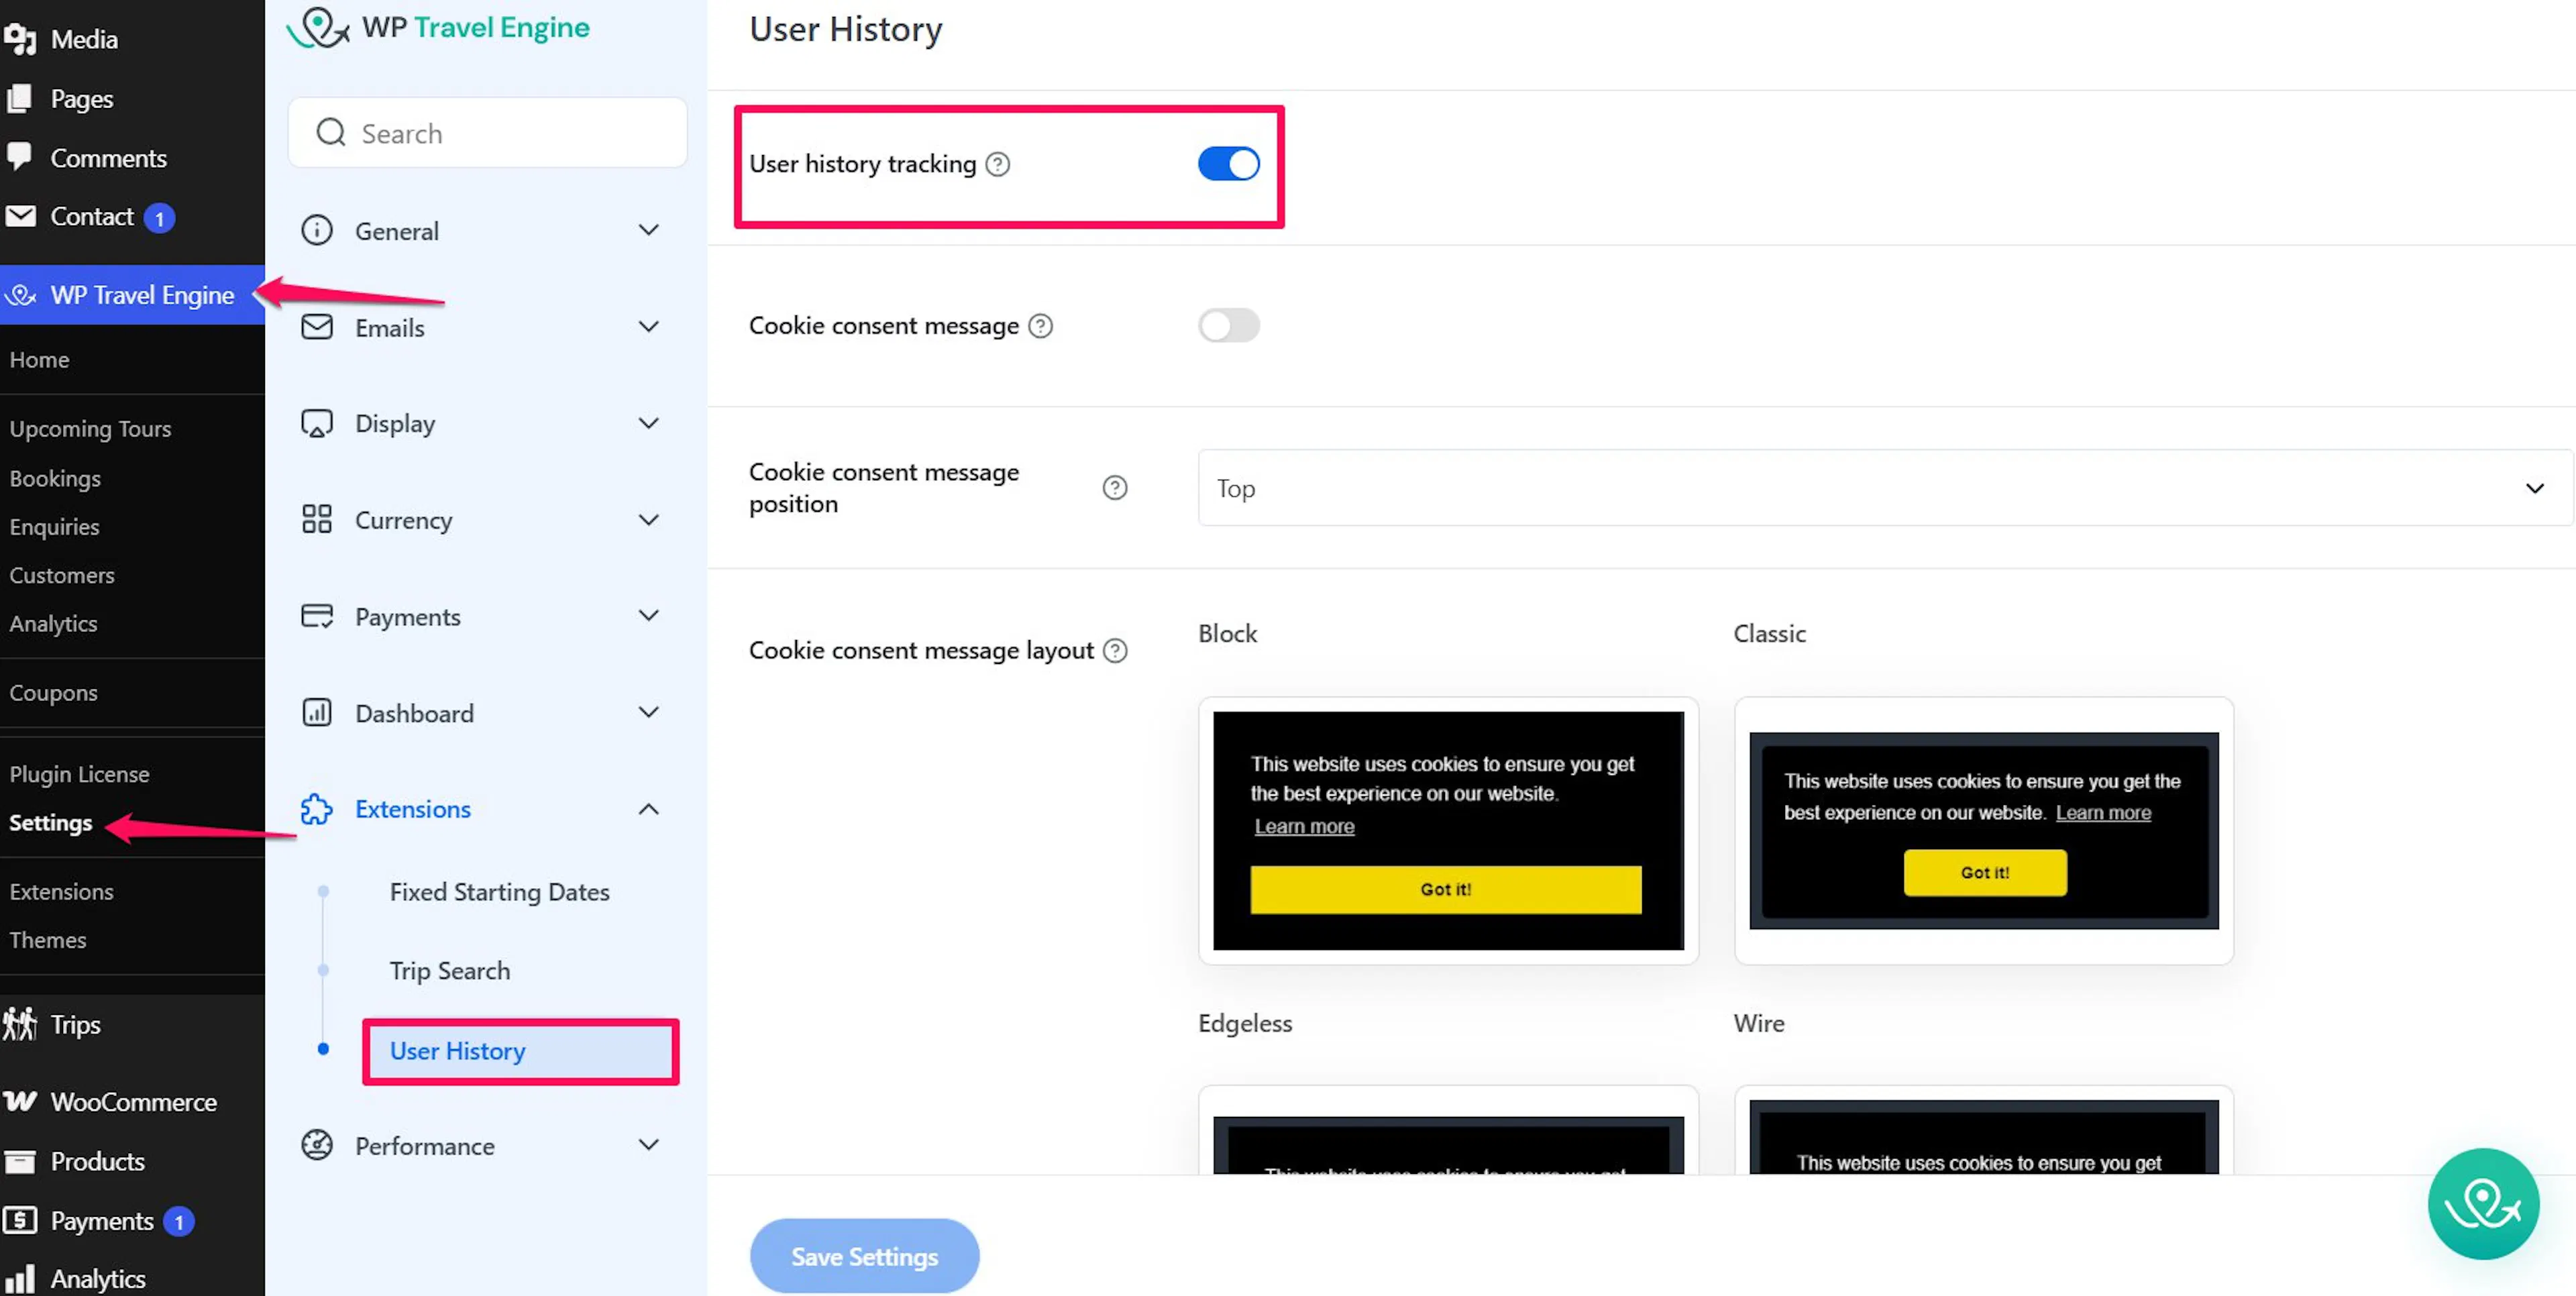
That gives you a safe way to stop future tracking without losing past records.
Enable cookie consent message
Because the add-on uses cookies, you can choose to show a cookie message to visitors. A cookie is a small file a website stores on a visitor's browser to remember information about their visit.
When this setting is enabled, visitors see a message about cookie use on your site. This helps with privacy requirements such as EU GDPR and CASL.
If you want the message to better match your site, you can customize how it looks and what it says.
Customizing the cookie consent message
You can change the layout, colors, position, and text of the cookie consent message.
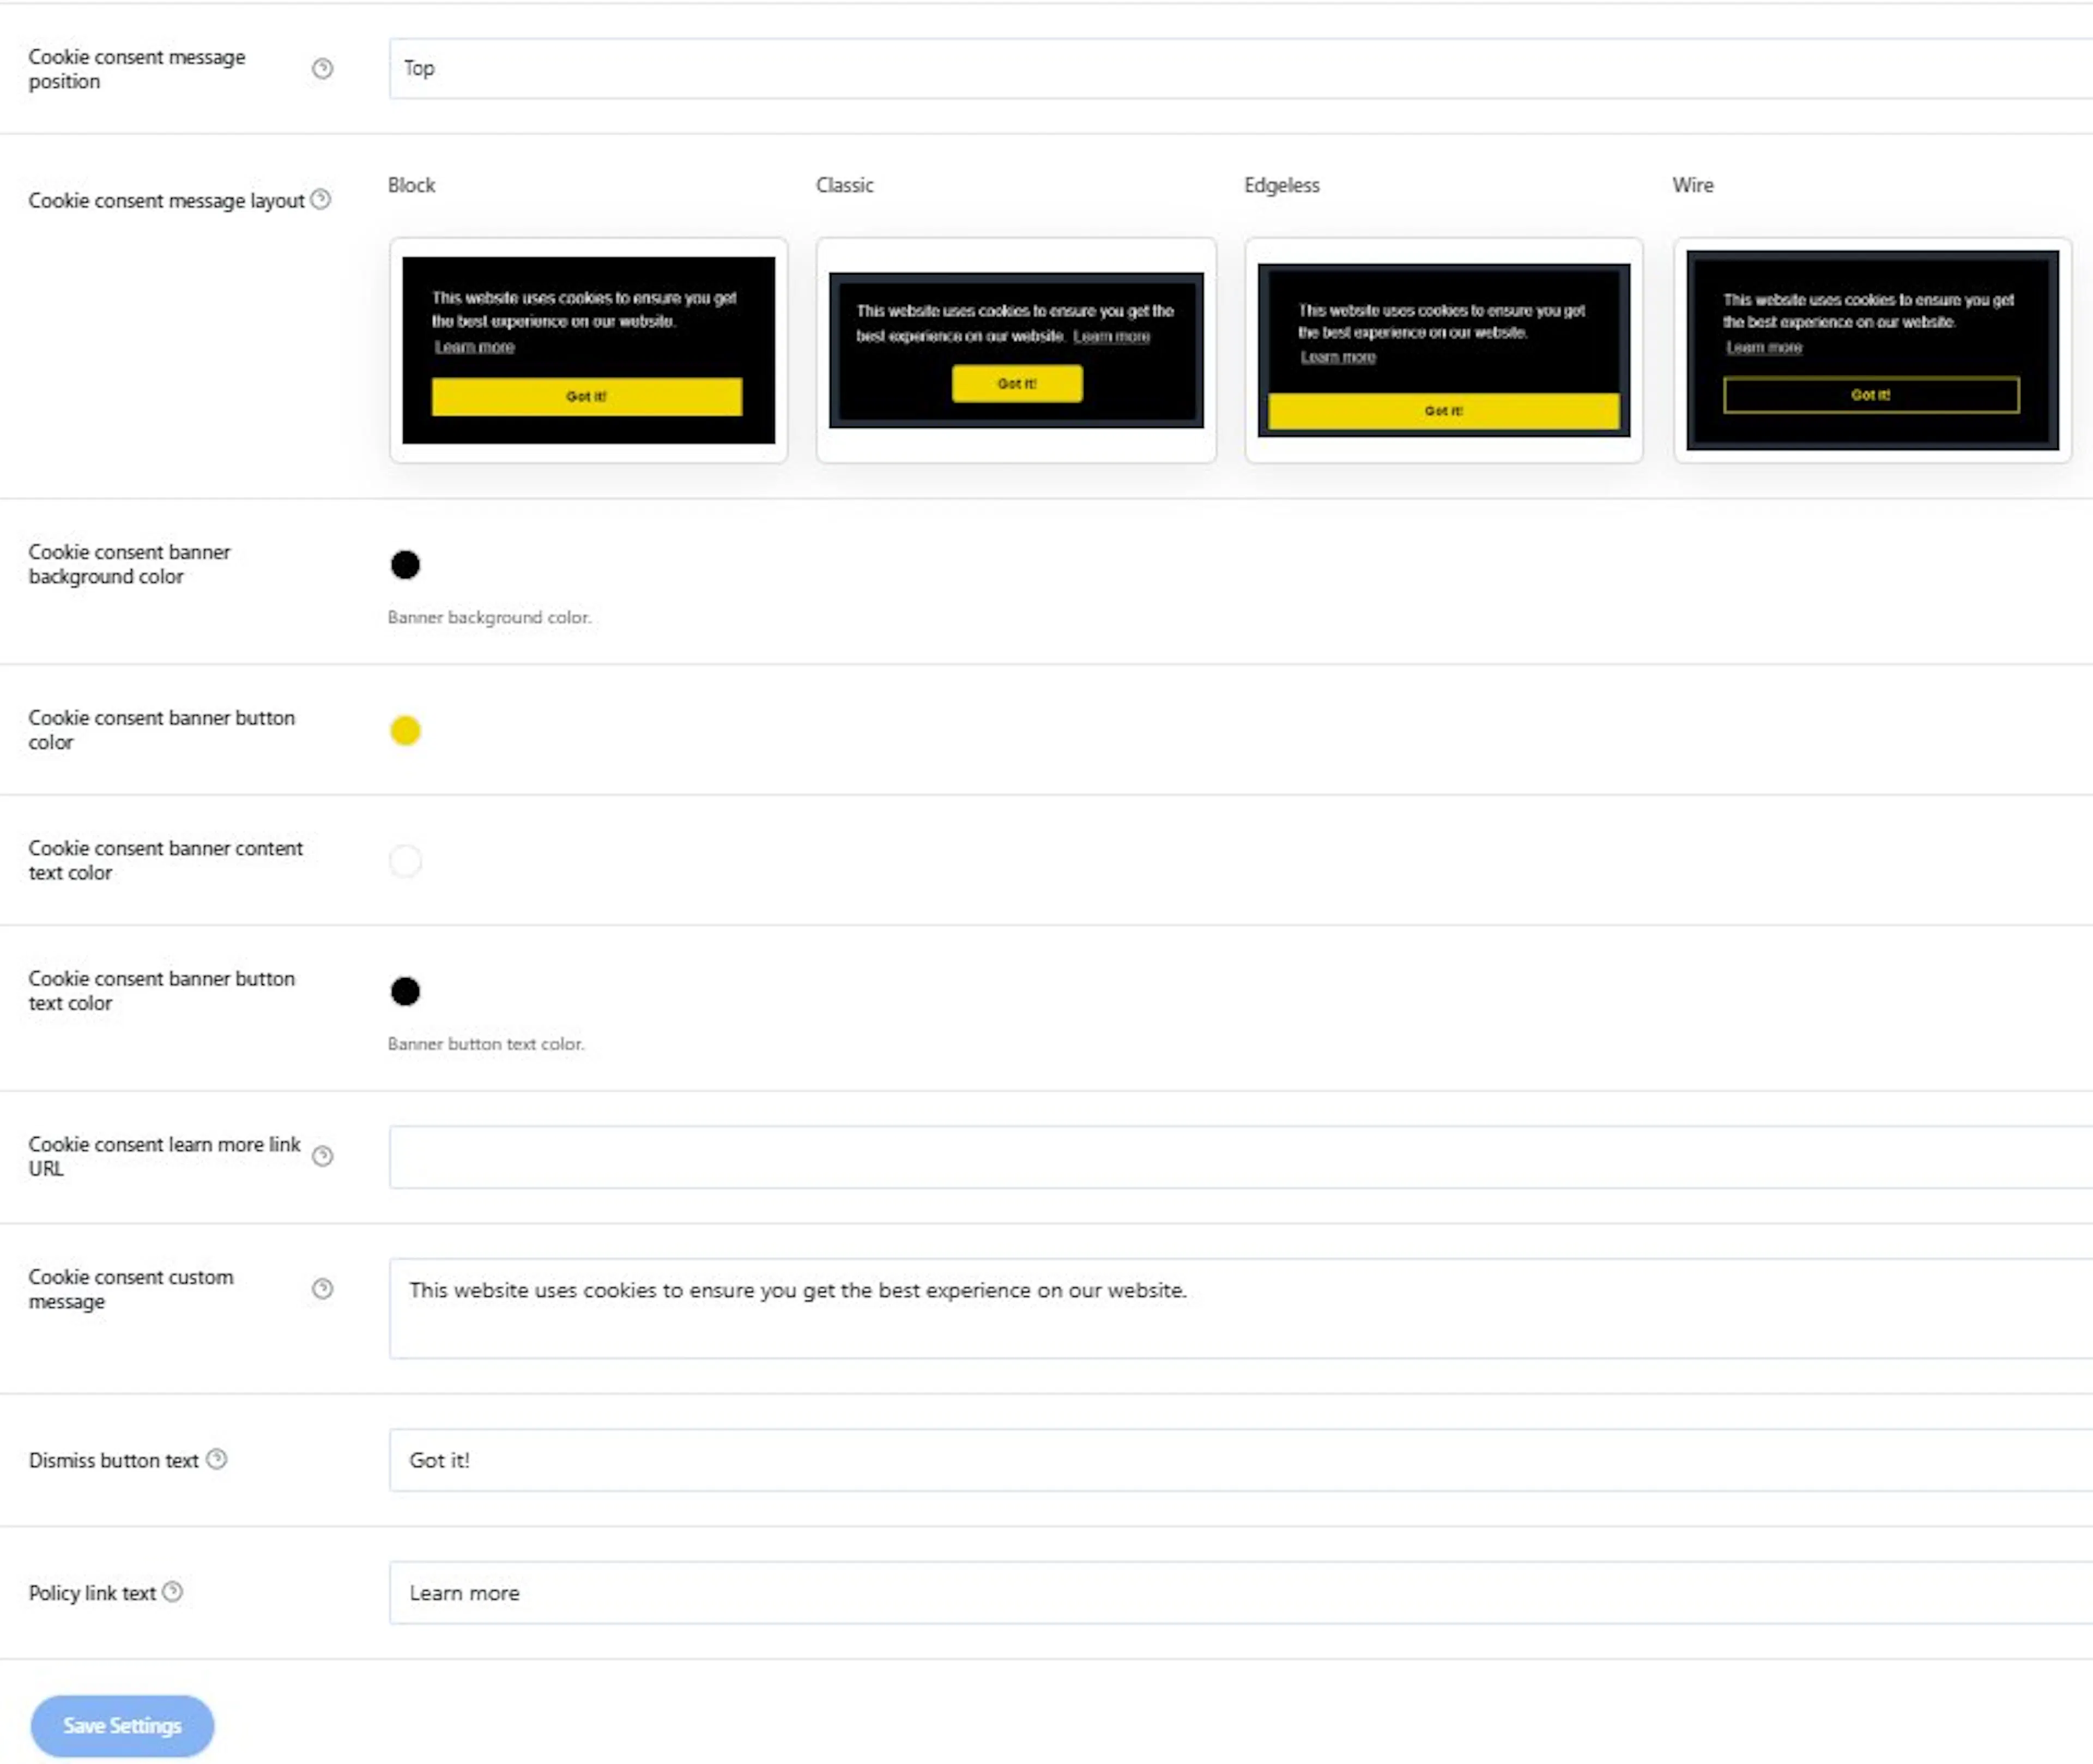
- Cookie consent message position - Controls where the message appears. You can place it at the top, bottom, bottom-left, or bottom-right.
- Cookie consent message layout - Choose from four available layouts. All layouts work in any position on the page.
- Color options - Control four color settings: background color, text color, button background color, and button text color.
- Cookie consent learns more link URL - Add a link to your privacy policy or cookie terms page so visitors can learn more.
- Cookie consent custom message - Use this text field to write or change the message visitors will see.
- Dismiss button text - Set the text on the button visitors click to close the message.
- Policy link text - Set the text for the Learn More link in the message.
For example, if you run multi-day treks and rent out gear, you might link this message to a privacy page that explains how your site remembers trip searches, gear rental choices, or inquiry details. That can make the message clearer for visitors.
Additional email tags
The User History add-on includes extra email tags for booking notifications sent to the site admin. An email tag is a short code you type in your email template. When the email is sent, the tag gets replaced with real information.
The available tag for this add-on is {user_history}. Add it to the admin booking email notification if you want the customer's browsing history included in the email.
When you place {user_history} in the booking email template editor, the email outputs a table showing the pages the customer visited before booking.
This can be useful when you want your team to understand booking intent without logging in to WordPress first.
Additional options
Gravity Forms support
The User History add-on also works with Gravity Forms. Gravity Forms is a popular WordPress plugin for building custom forms like contact forms or inquiry forms.
When a visitor submits a Gravity Forms form, the add-on can save the pages they visited before submitting that form. That browsing history is stored with the form entry, and you can view it in the entry detail screen in the admin area.
This is useful if you use custom inquiry forms for things like private group tours, gear rental requests, or off-season departures.
Gravity Forms selection
You can choose exactly which forms should capture user history data.
What you'll need before you start: Gravity Forms must already be installed if you want to save user history from form submissions.
Open User History settings
This is where you choose which forms should save browsing history.
In the left sidebar of your WordPress dashboard, go to WP Travel Engine, then Settings, then Extensions, then User History. Find the Gravity Form (s) to capture user history settings.
Select the forms
Only the forms you choose here will save user history data.
Select the forms you want from the dropdown. You can select multiple forms. Browsing history is only saved when one of these selected forms is submitted.
Once this is set up, you will have a better view of what visitors looked at before they filled out your forms.
If you are still stuck or have a question we did not cover, our support team is happy to help. Reach out at our support page and we will get you sorted.