

Stripe Payment Gateway
Accept credit cards, Apple Pay, and Google Pay on your tour booking form using Stripe. Set it up in a few steps without writing any code.
Overview
Stripe processes card payments for businesses around the world. When you connect Stripe to WP Travel Engine, travelers can pay for trips on your website with a credit card, Apple Pay, or Google Pay. The Stripe Payment Gateway addon works inside your existing booking form, so travelers can choose a trip, enter their details, and complete payment without visiting a separate page. Stripe handles the card security for you.
What's new: Stripe Payment Gateway v2.5.7 redesigns the Stripe settings page. You can now create your Stripe webhook with one click instead of copying values between Stripe and WordPress. The new Verify Connection button checks your API keys and webhook together. This guide covers the new setup flow. If your site uses WP Travel Engine core older than 6.8.8, you will see the previous manual-only version of the page. The manual steps are included below for that case.
What you'll need before you start
Before you set up Stripe, make sure you have these ready:
- The WP Travel Engine plugin installed and active on your WordPress site. A plugin is a small add-on that adds features to WordPress. WP Travel Engine powers your trip bookings.
- The Stripe Payment Gateway addon purchased and installed. An addon is a separate extension that connects WP Travel Engine to Stripe.
- A verified Stripe account. You can create one for free at stripe.com. Stripe will ask for basic information about your business. Verification usually takes a day or two.
Not sure how to install the addon or activate your license key? See our guide on how to activate the Pro addon license key.
How to turn on Stripe as a payment option
Turning on Stripe adds it to the payment methods travelers see at checkout. Do this before connecting your Stripe account.
Open your WordPress dashboard
Log in to your WordPress dashboard. This is the admin area of your website. You usually open it at yoursite.com/wp-admin.
Go to Payment settings
On the left sidebar, click WP Travel Engine. Click Settings, then click Payments at the top of the page. Click General.
Turn on Stripe
Find Stripe in the list of payment gateways. Check the box next to it.
Save your changes
Scroll to the bottom of the page and click Save Settings.
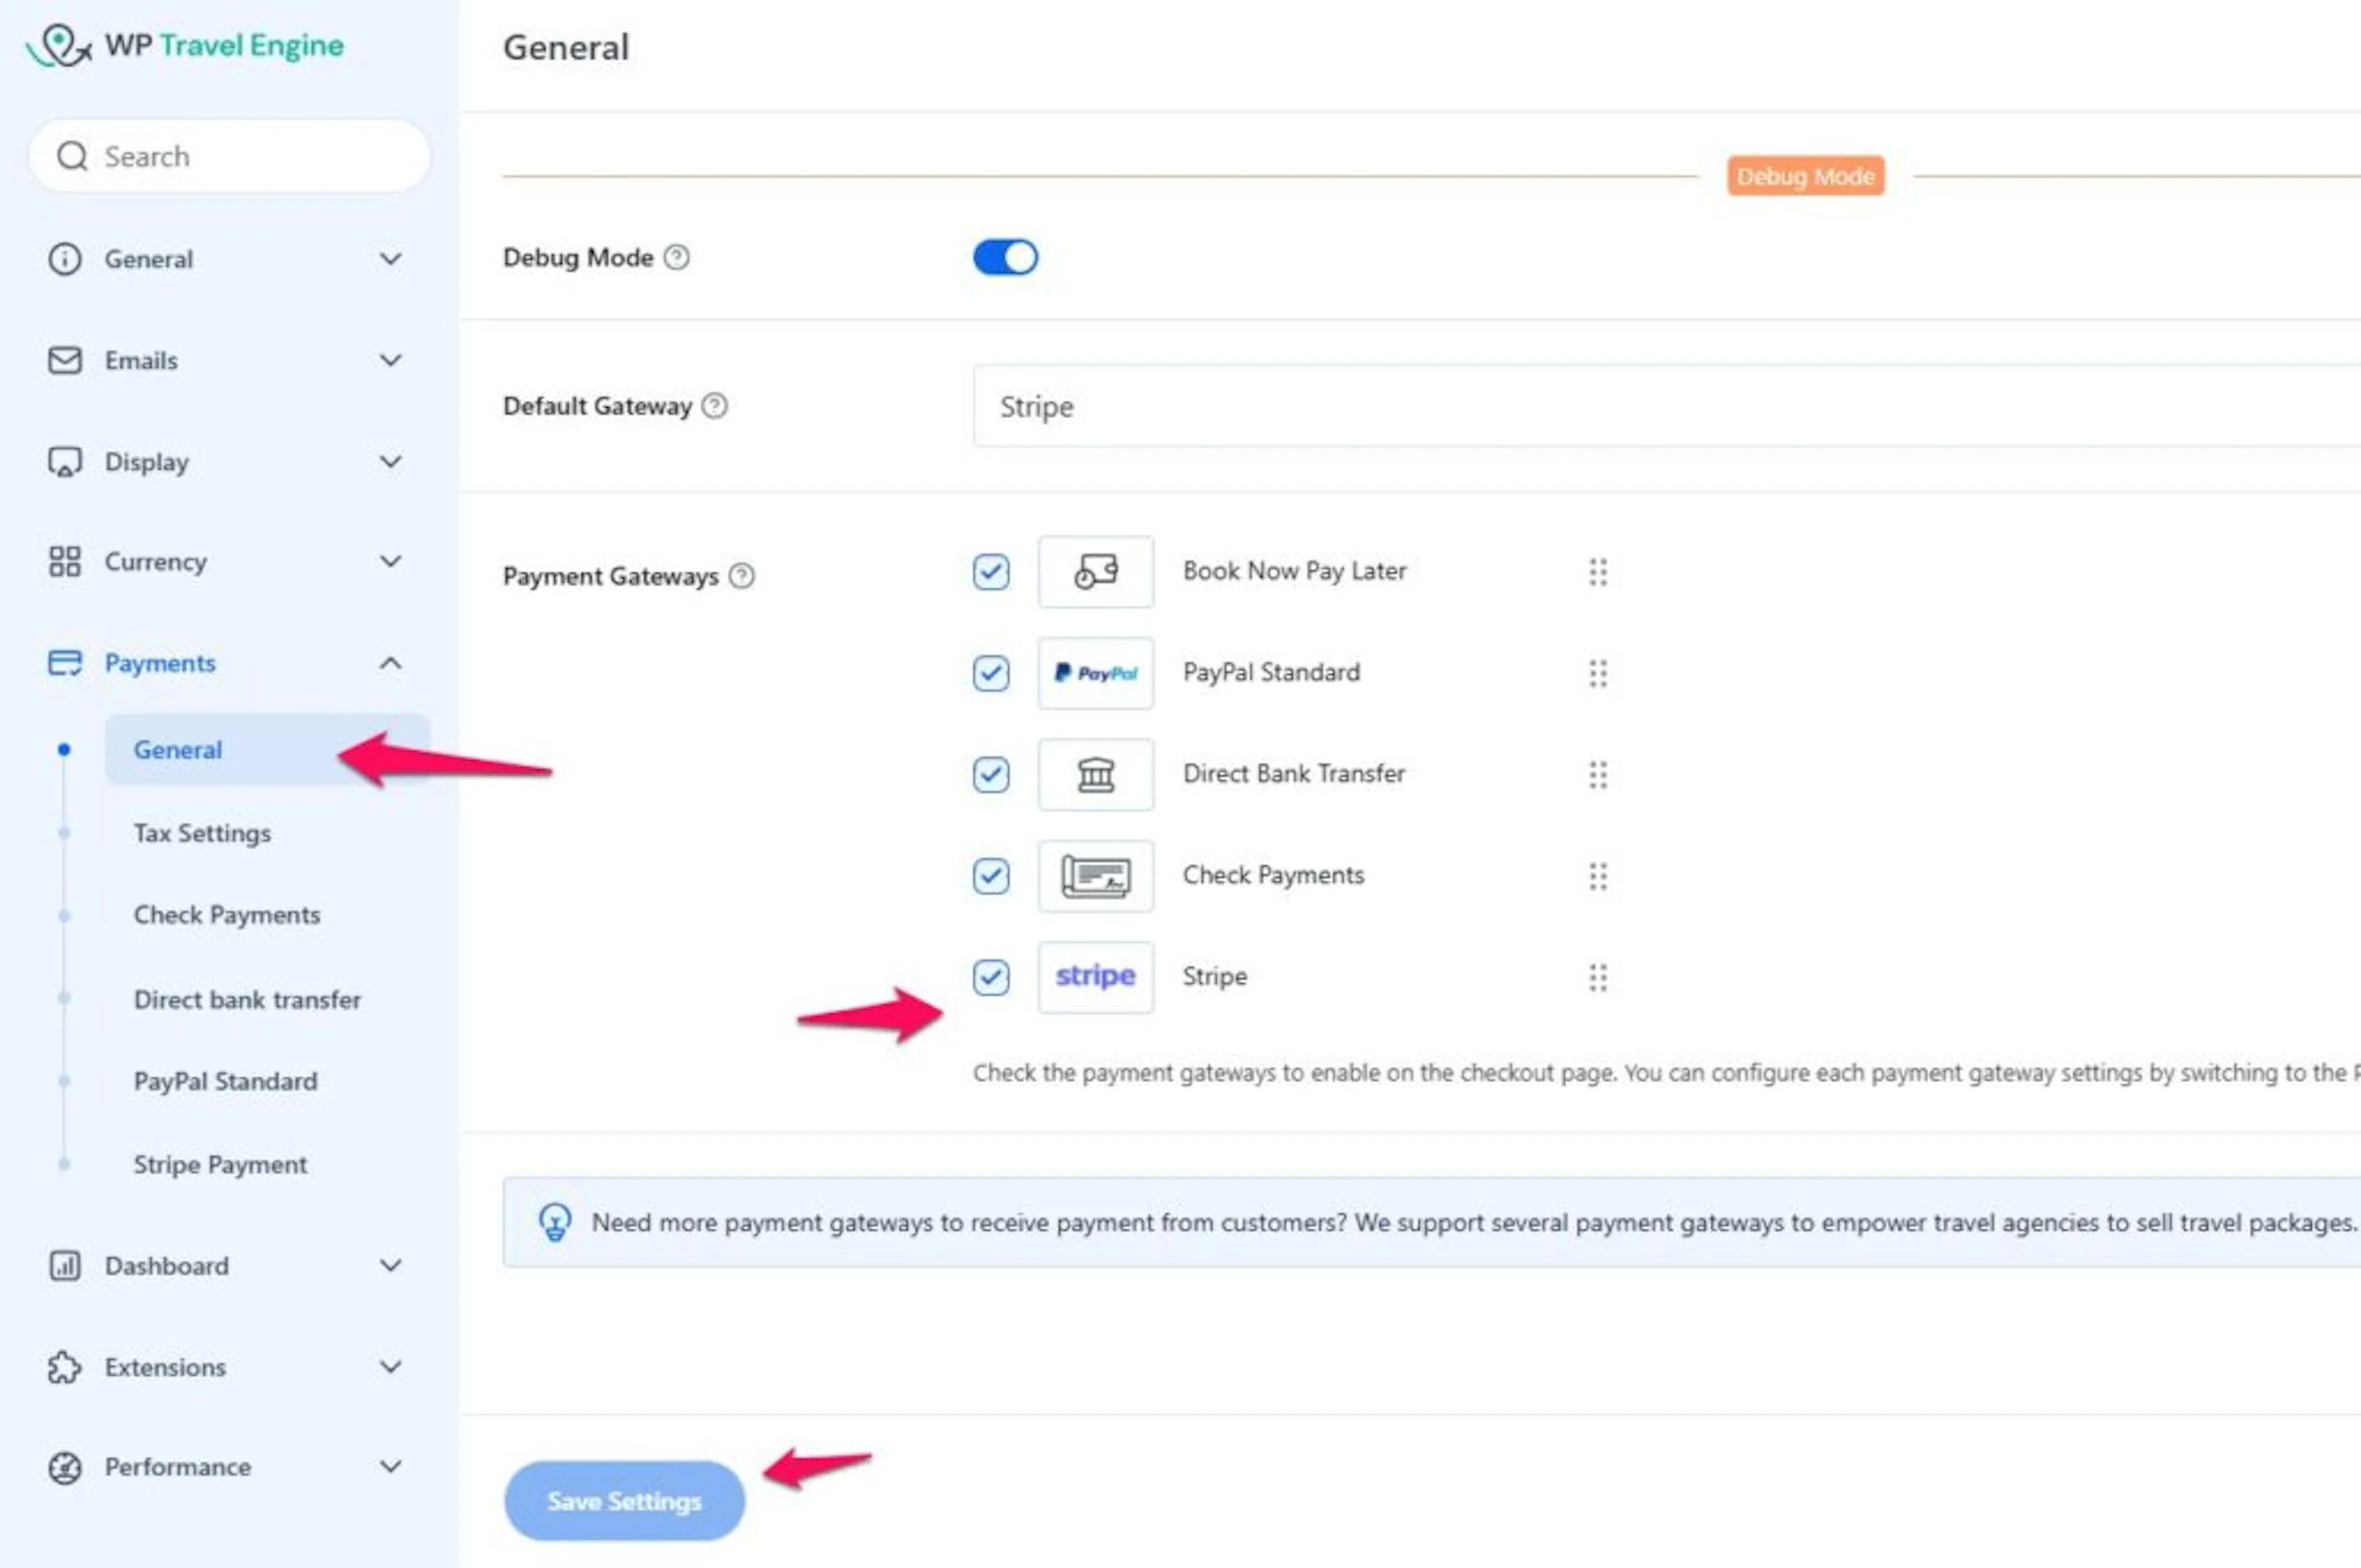
You can turn on more than one payment method at the same time. For example, check both Stripe and PayPal if you want travelers to choose between them at checkout.
Stripe is now available at checkout. Next, connect it to your Stripe account so it can process payments.
Connecting your Stripe account
Your website needs permission to use your Stripe account. You give it that permission with two API keys. An API key is a secure code that lets your website communicate with Stripe. You need a Publishable Key and a Secret Key.
Find your API keys in Stripe
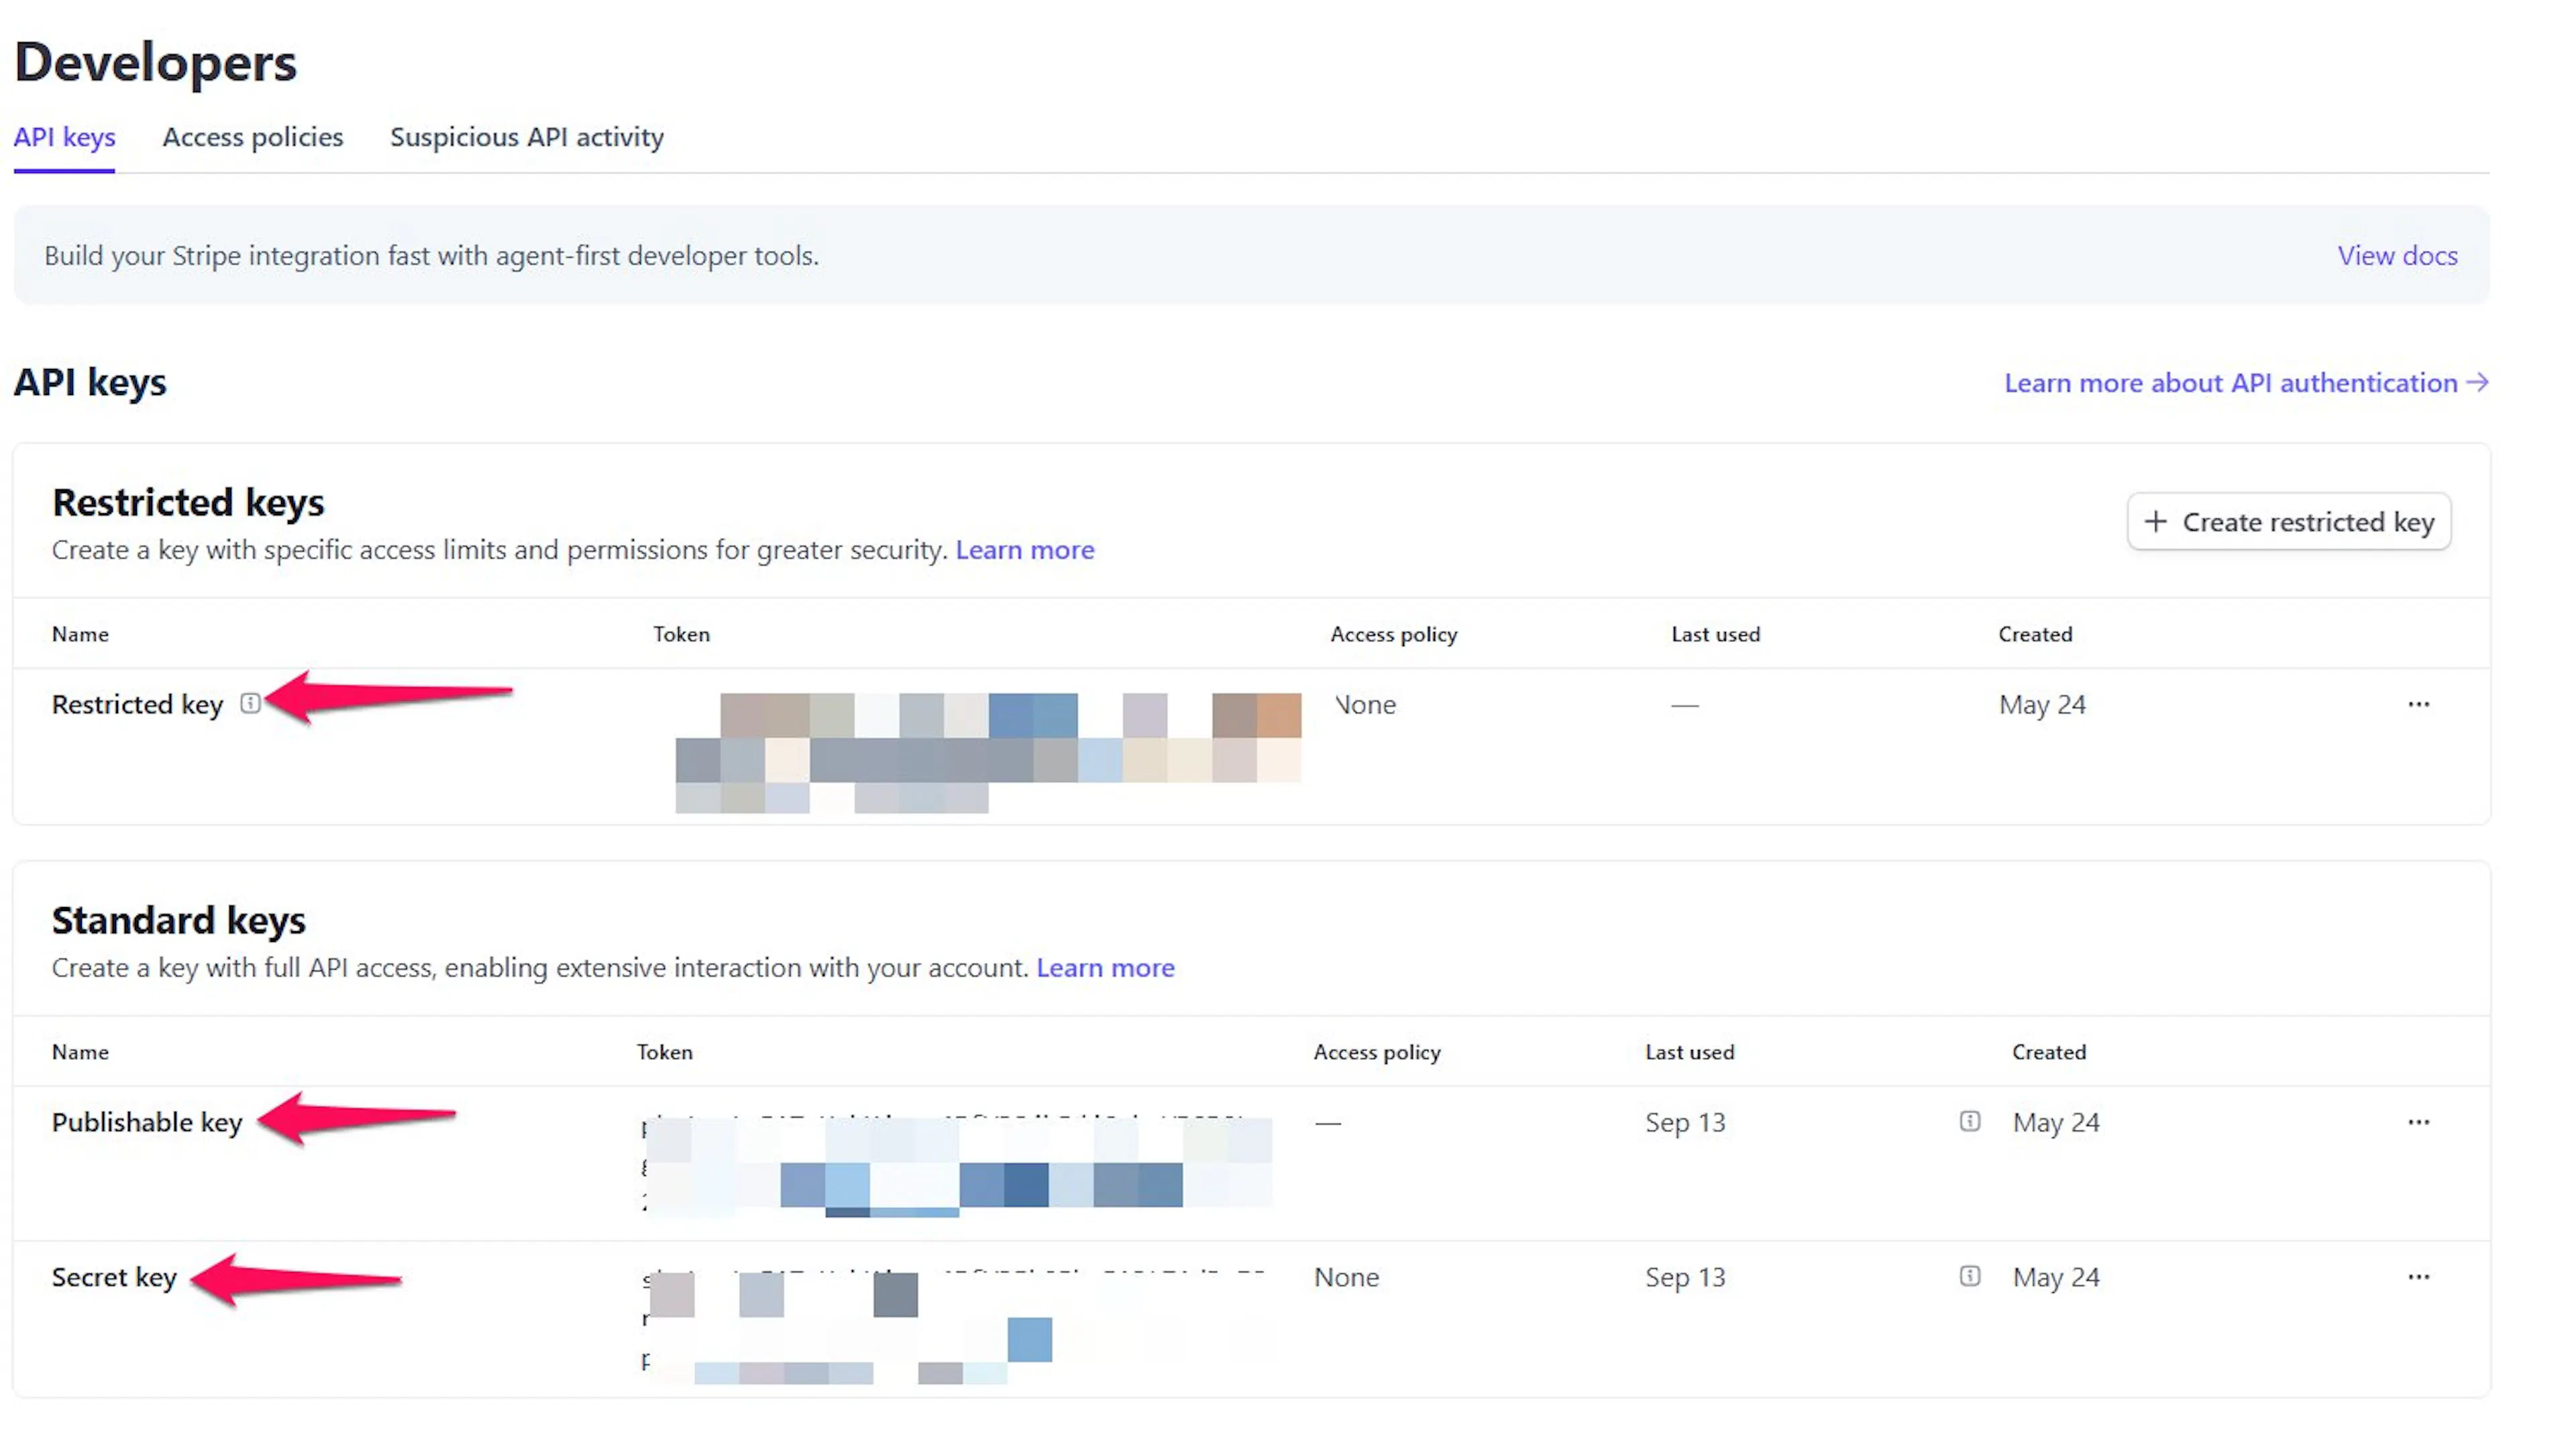
Log in to your Stripe Dashboard. On the left sidebar, click Developers, then click API Keys.
Copy your keys
Copy the Publishable Key and the Secret Key. The live versions start with pk_live_ and sk_live_.
Go back to your WordPress site
Open a new browser tab and go to your WordPress dashboard. Navigate to WP Travel Engine > Settings > Payment > Stripe Payment.
Paste your keys
Paste the Publishable Key into the Publishable Key field. Paste the Secret Key into the Secret Key field.
Save your changes
Click Save Changes at the bottom of the page.
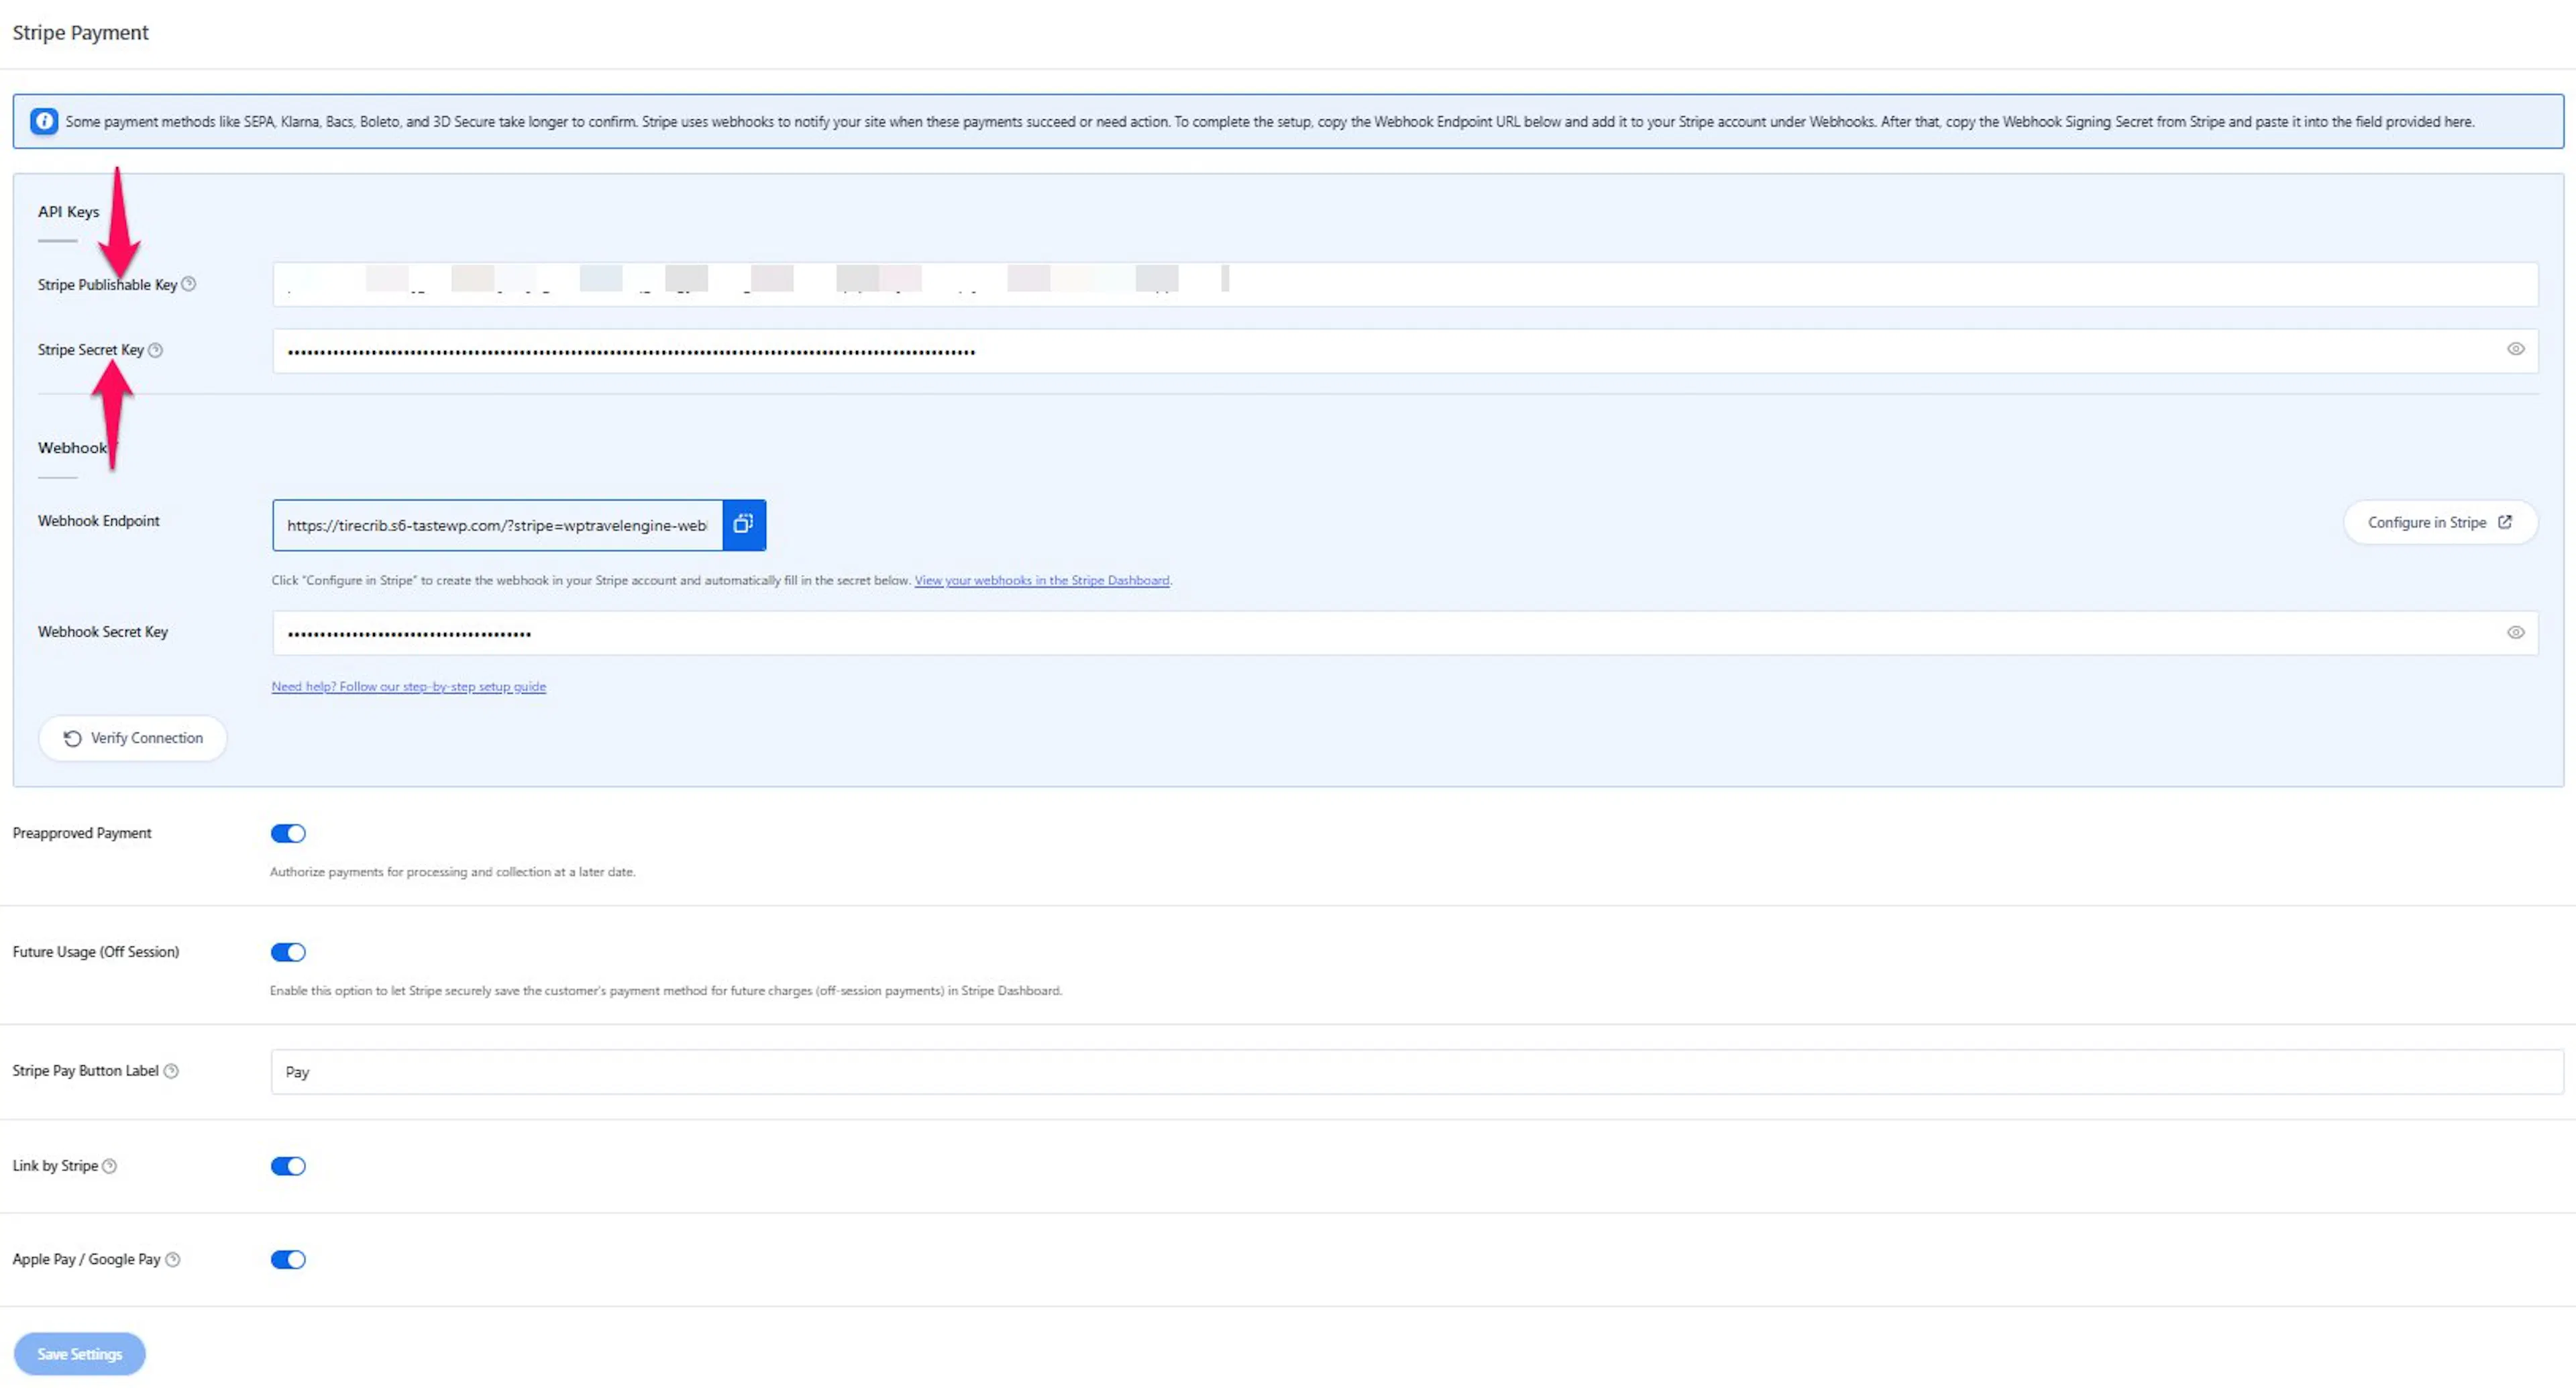
Stripe provides live keys and test keys. Use test keys while you practice or check your setup. Switch to live keys when you are ready to accept real payments. Live keys start with pk_live_ and sk_live_.
Your Stripe account is now connected. Verify the connection before you continue with webhooks.
Verifying your connection
Verification checks whether your API keys work and whether Stripe can reach your webhook. This helps you find setup problems before a traveler tries to pay.
What you'll need before you start: enter your Stripe Publishable Key, Stripe Secret Key, and, after webhook setup, your Webhook Secret Key.
Open the Stripe Payment settings
In your WordPress dashboard, go to WP Travel Engine > Settings > Payment > Stripe Payment.
Enter your keys
Enter your Stripe Publishable Key and Stripe Secret Key. If you already set up a webhook, enter the Webhook Secret Key too.
Verify the connection
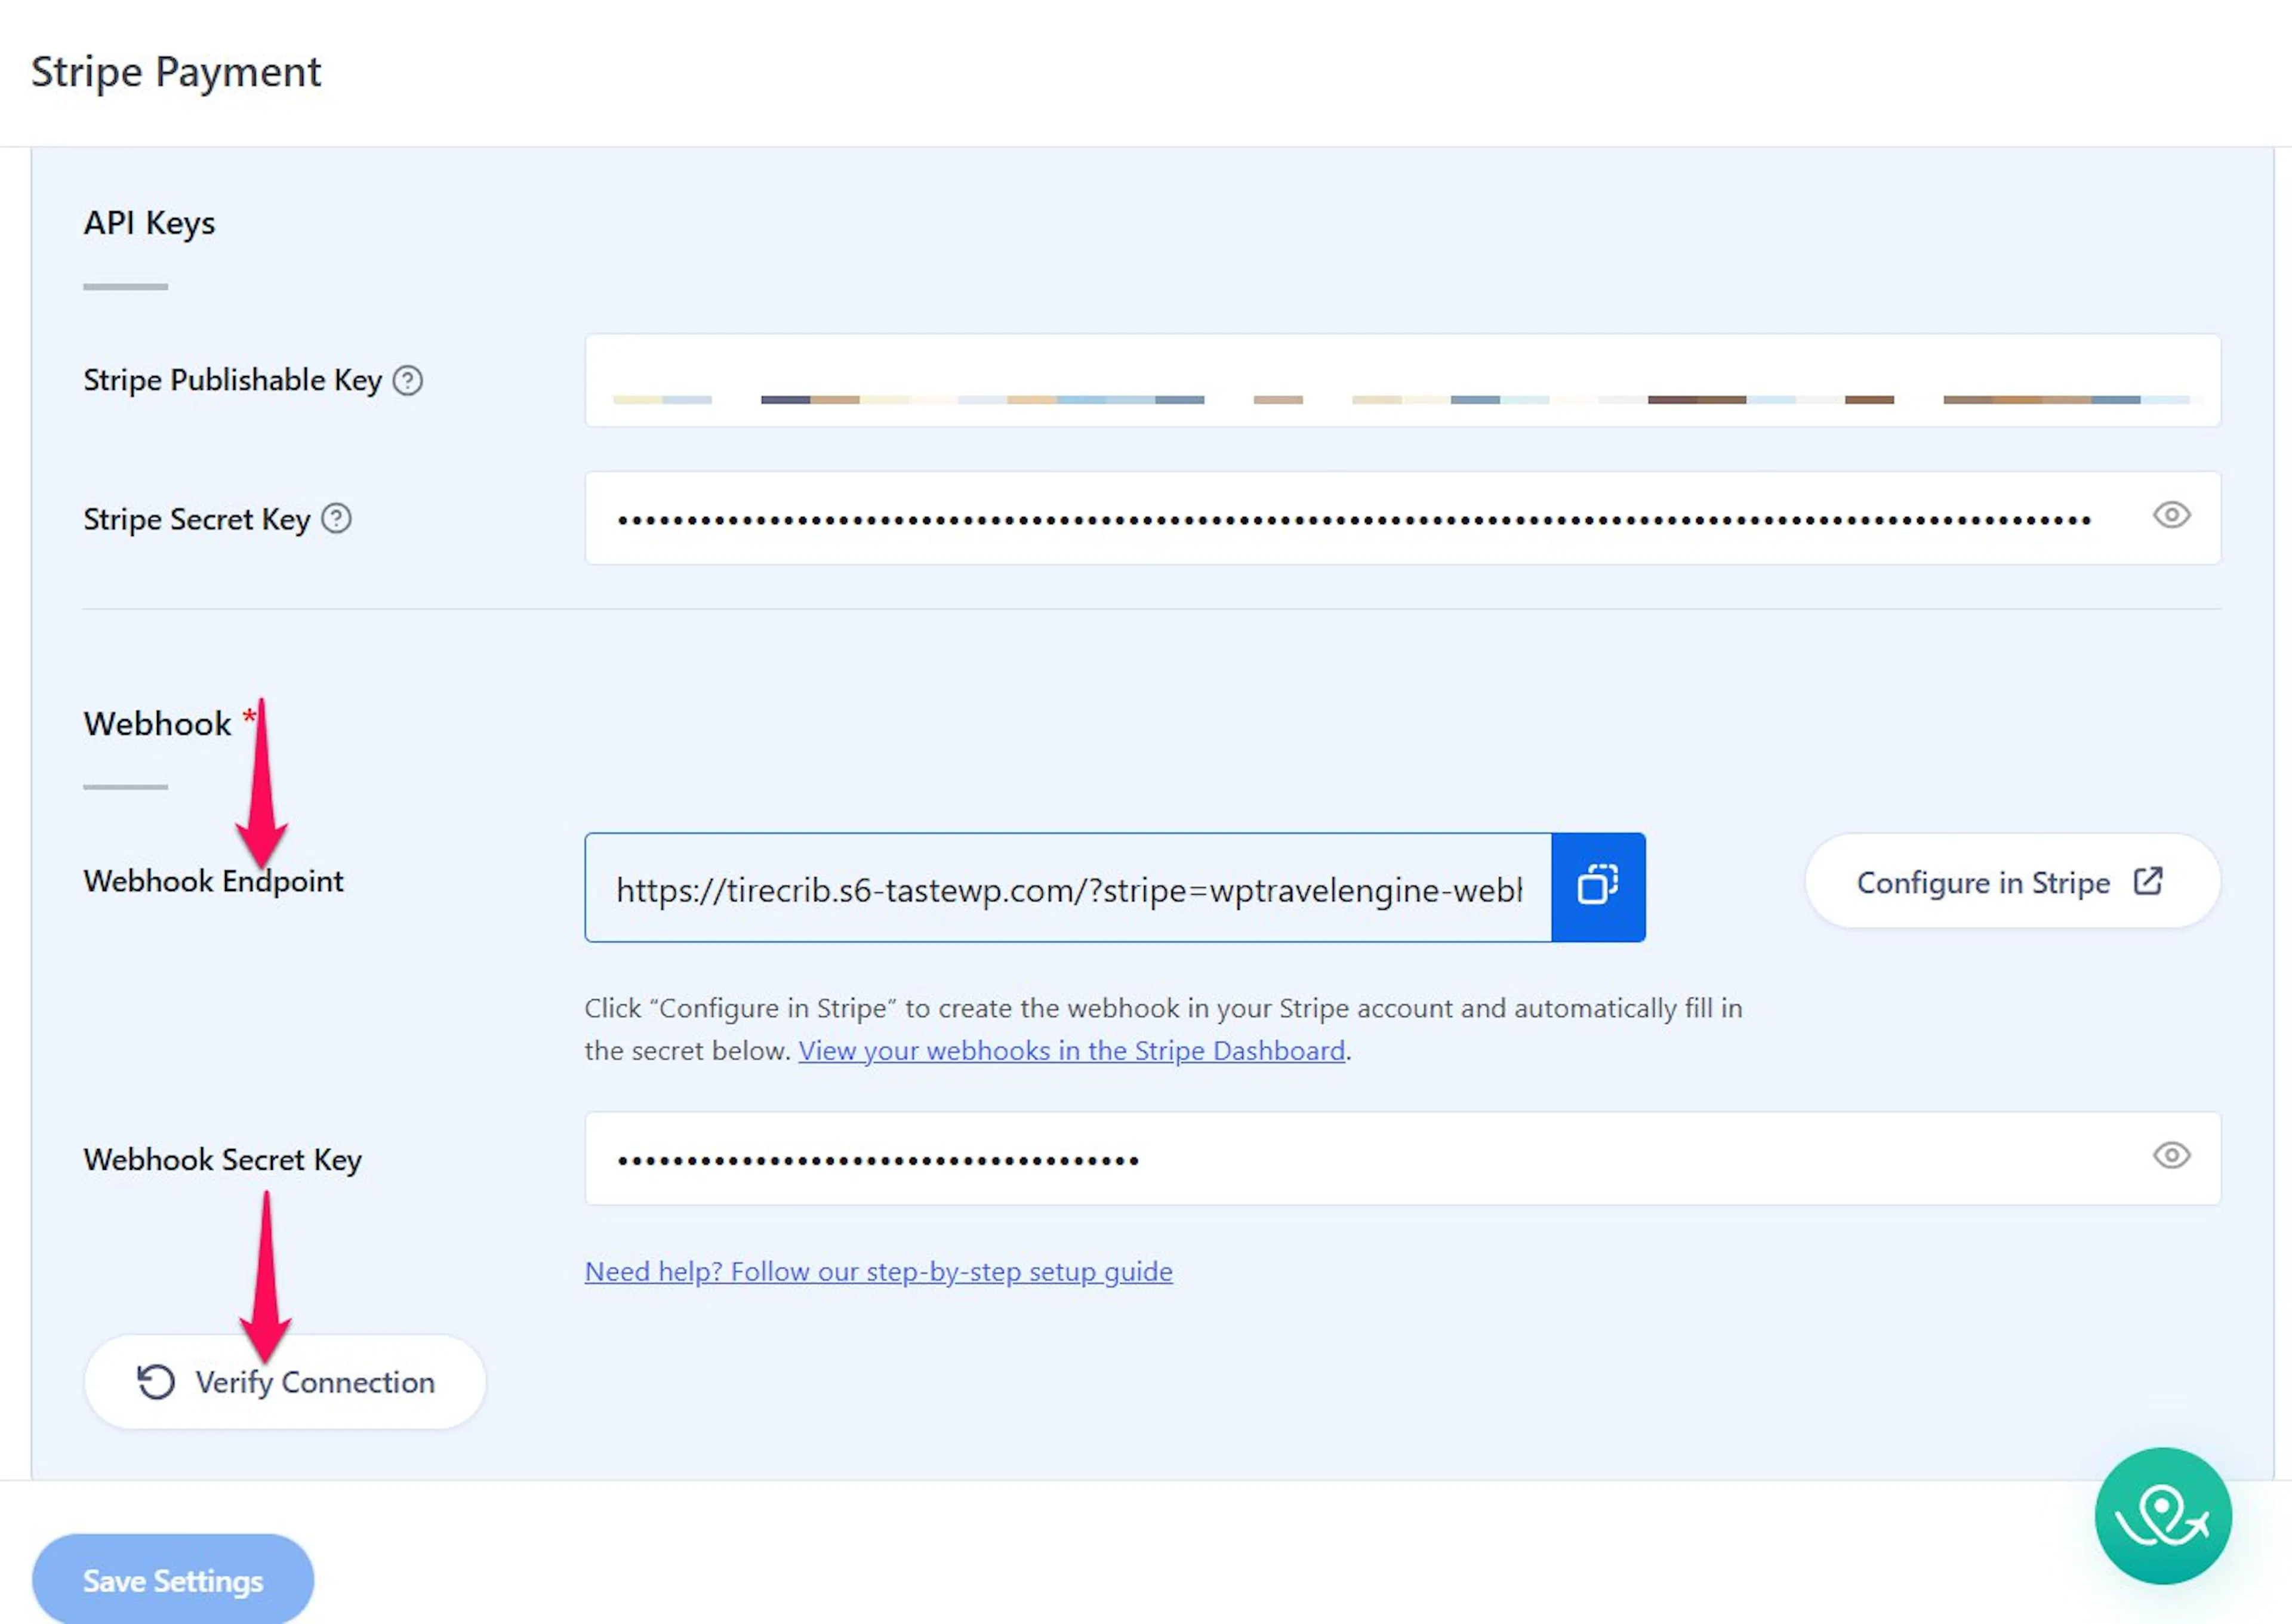
Click Verify Connection at the bottom of the card.
Review the result
WP Travel Engine checks your keys against Stripe. If a webhook secret is present, it sends a real test event to your webhook.
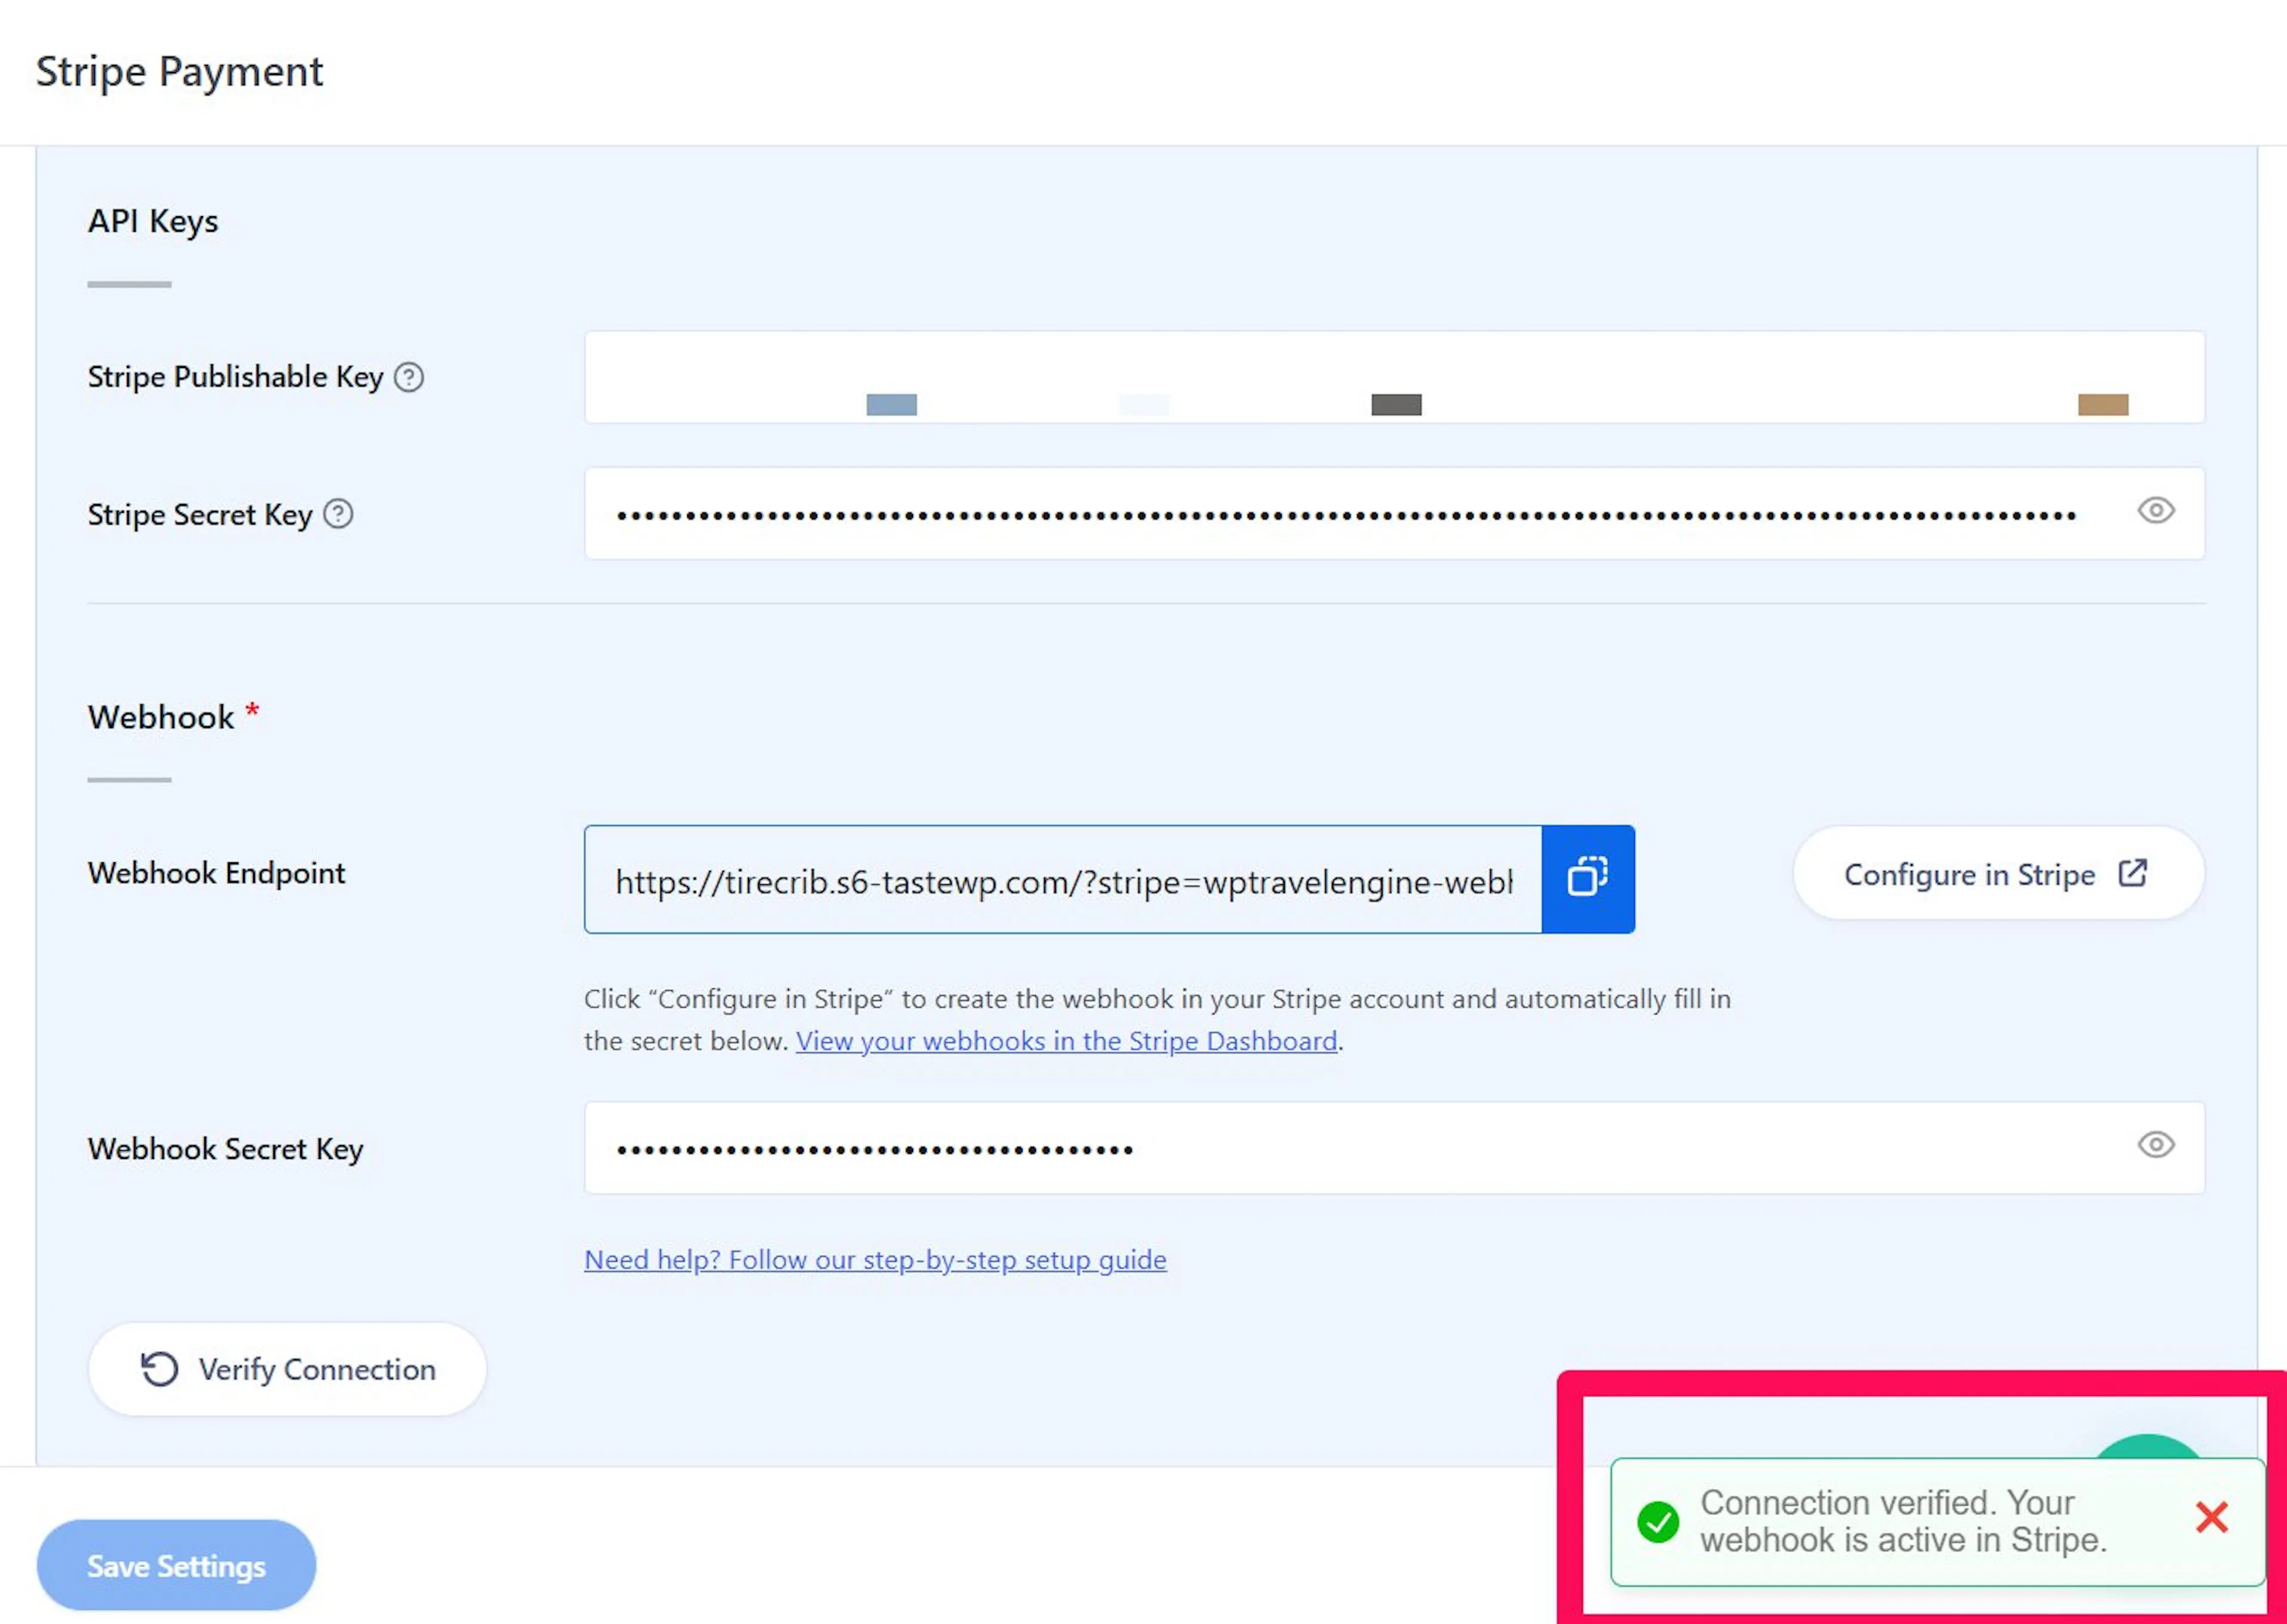
You may see one of these messages:
- Invalid API key. The Publishable Key and Secret Key do not match, use the wrong format, or belong to different modes.
- Could not reach Stripe. Please try again. Your site could not connect to Stripe. This message does not necessarily mean your keys are wrong.
- Connection verified. No webhook is configured yet. Your API keys work, but no webhook is set up. Card payments can still work. Features such as SEPA, Klarna, or 3D Secure need a webhook to update booking status correctly.
- Connection verified, but the webhook secret key is invalid. Your API keys work, but the value in the Webhook Secret Key field does not look valid. It should start with
whsec_. - Connection verified, but no webhook was found in your Stripe account. Your keys work, but Stripe has no matching webhook endpoint for this site.
- Connection verified, but the webhook is disabled in Stripe. The endpoint exists but is turned off in your Stripe Dashboard.
- Connection verified, but the webhook secret is incorrect. The endpoint exists and is enabled, but the secret does not match.
- Connection verified. Your webhook is active in Stripe. Your connection is working correctly.
If your keys are verified but no webhook exists, set one up next. You can verify the connection again after saving the webhook secret.
Setting up webhooks so Stripe can update your bookings
A webhook is a message Stripe sends to your website when a payment changes. For example, Stripe can tell WP Travel Engine that a payment succeeded, failed, or needs more action. This lets your booking status update without manual checks.
Option A: One-click setup (recommended)
Use one-click setup when your site uses WP Travel Engine core 6.8.8 or newer. WP Travel Engine creates the Stripe endpoint and retrieves its signing secret for you.
What you'll need before you start: save your Stripe Secret Key in the API Keys card. Live API keys also require an HTTPS website.
Open the Stripe Payment settings
In your WordPress dashboard, go to WP Travel Engine > Settings > Payment > Stripe Payment.
Create the webhook
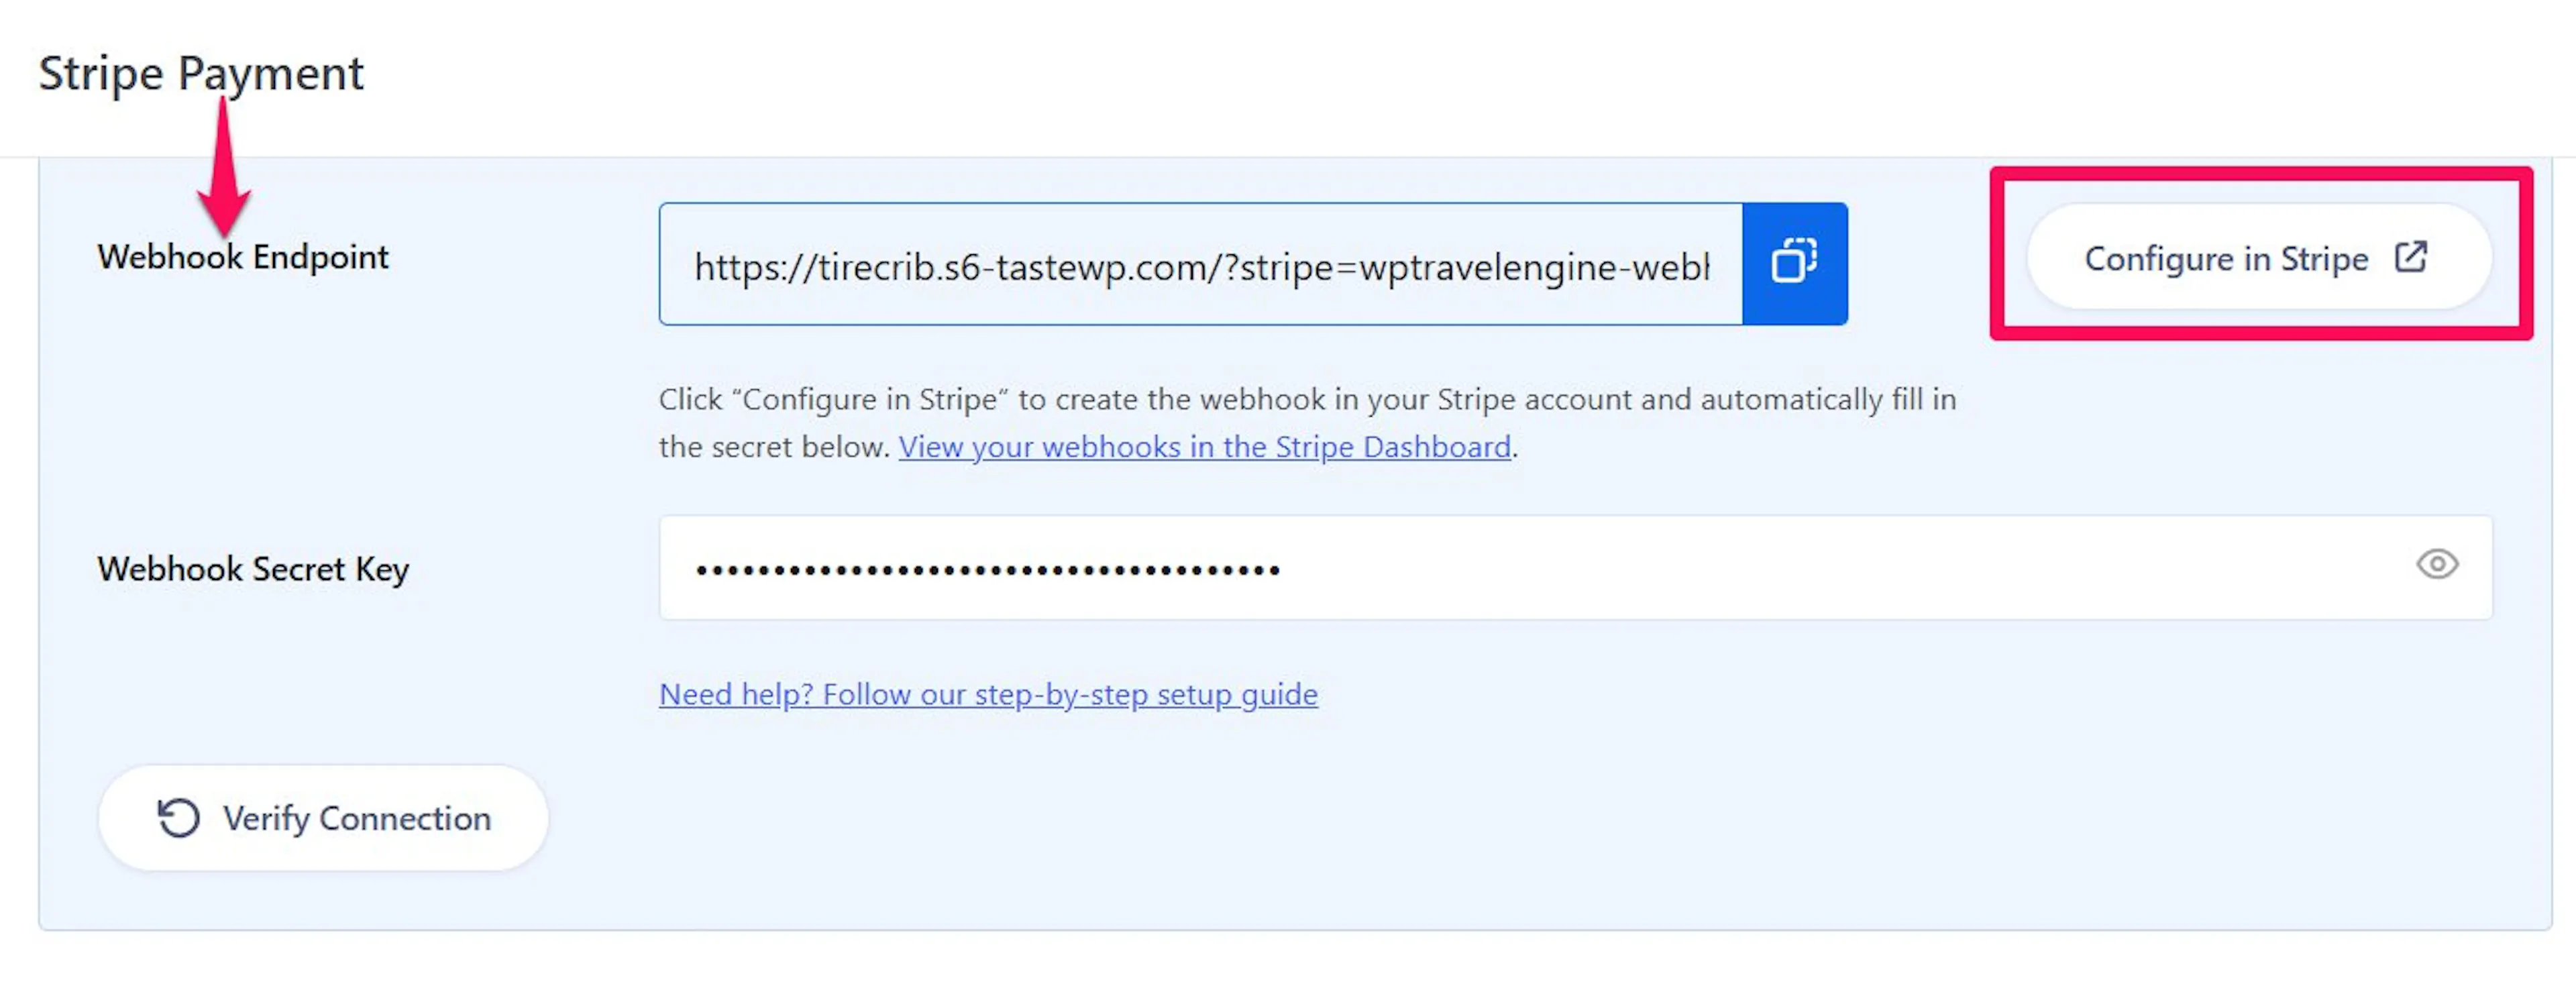
In the Webhook card, click Configure in Stripe next to the Webhook Endpoint field.
Wait for WP Travel Engine to configure Stripe
WP Travel Engine creates an endpoint in your Stripe account. It subscribes to the required payment and invoice events. These include payment succeeded, canceled, failed, processing, requires action, amount capturable updated, invoice payment succeeded, and invoice payment failed.
Save the secret
The Webhook Secret Key field fills in automatically. Click Save Settings.
Keep these details in mind when you use one-click setup:
- Your site must use HTTPS with live API keys. HTTPS encrypts the connection between your website and Stripe. If your site does not use HTTPS, set up the webhook manually.
- If a webhook for your site already exists in Stripe, Stripe will not provide its secret again. Delete the existing endpoint and try again, or copy its signing secret into the Webhook Secret Key field.
- Check the created endpoint in your Stripe Dashboard.
Option B: Manual setup
Use manual setup if your site does not use HTTPS, if a webhook for your site already exists, or if you use a WP Travel Engine version older than 6.8.8.
What you'll need before you start: access to your WordPress dashboard and your Stripe Dashboard.
Copy your webhook URL from WordPress
In your WordPress dashboard, go to WP Travel Engine > Settings > Payment > Stripe Payment. Copy the URL shown in the Webhook Endpoint field. It looks like https://yoursite.com/?stripe=wptravelengine-webhook.
Add an endpoint in Stripe
Go to your Stripe Dashboard. On the left sidebar, click Developers, then click Webhooks. Click + Add Endpoint. Stripe may label this button Add Destination.
Select the payment events
Select the Payment Intent events for succeeded, canceled, payment failed, processing, requires action, and amount capturable updated. Also select the Invoice events for payment succeeded and payment failed.
Add your webhook URL
Paste the URL from WordPress into the endpoint URL field. Click Create Destination or Add Endpoint.
Copy the signing secret
After Stripe creates the endpoint, copy its Signing Secret. This code confirms that messages came from Stripe.
Save the signing secret in WordPress
Return to WP Travel Engine > Settings > Payment > Stripe Payment. Paste the signing secret into the Webhook Secret Key field. Click Save Settings.
Your webhook is now ready. Stripe can tell your website when a payment succeeds or fails. Click Verify Connection to confirm that the endpoint and secret work together.
Preapproved payments: hold the card, charge later
Preapproved payments let you hold a traveler's card and charge it later. This gives you time to review the booking before taking payment.
For example, imagine that you run a small-group trek with limited spaces. A traveler books online, but you want to confirm availability first. Stripe checks that the card is valid and holds the funds. You can review the booking and charge the card when you approve it.
This option also helps when you need to confirm trip details before payment. It can be useful for custom itineraries, seasonal pricing, or bookings that need manual approval.
To turn it on, go to WP Travel Engine > Settings > Payment > Stripe Payment. Check Enable Preapproved Payment. Click Save Changes.
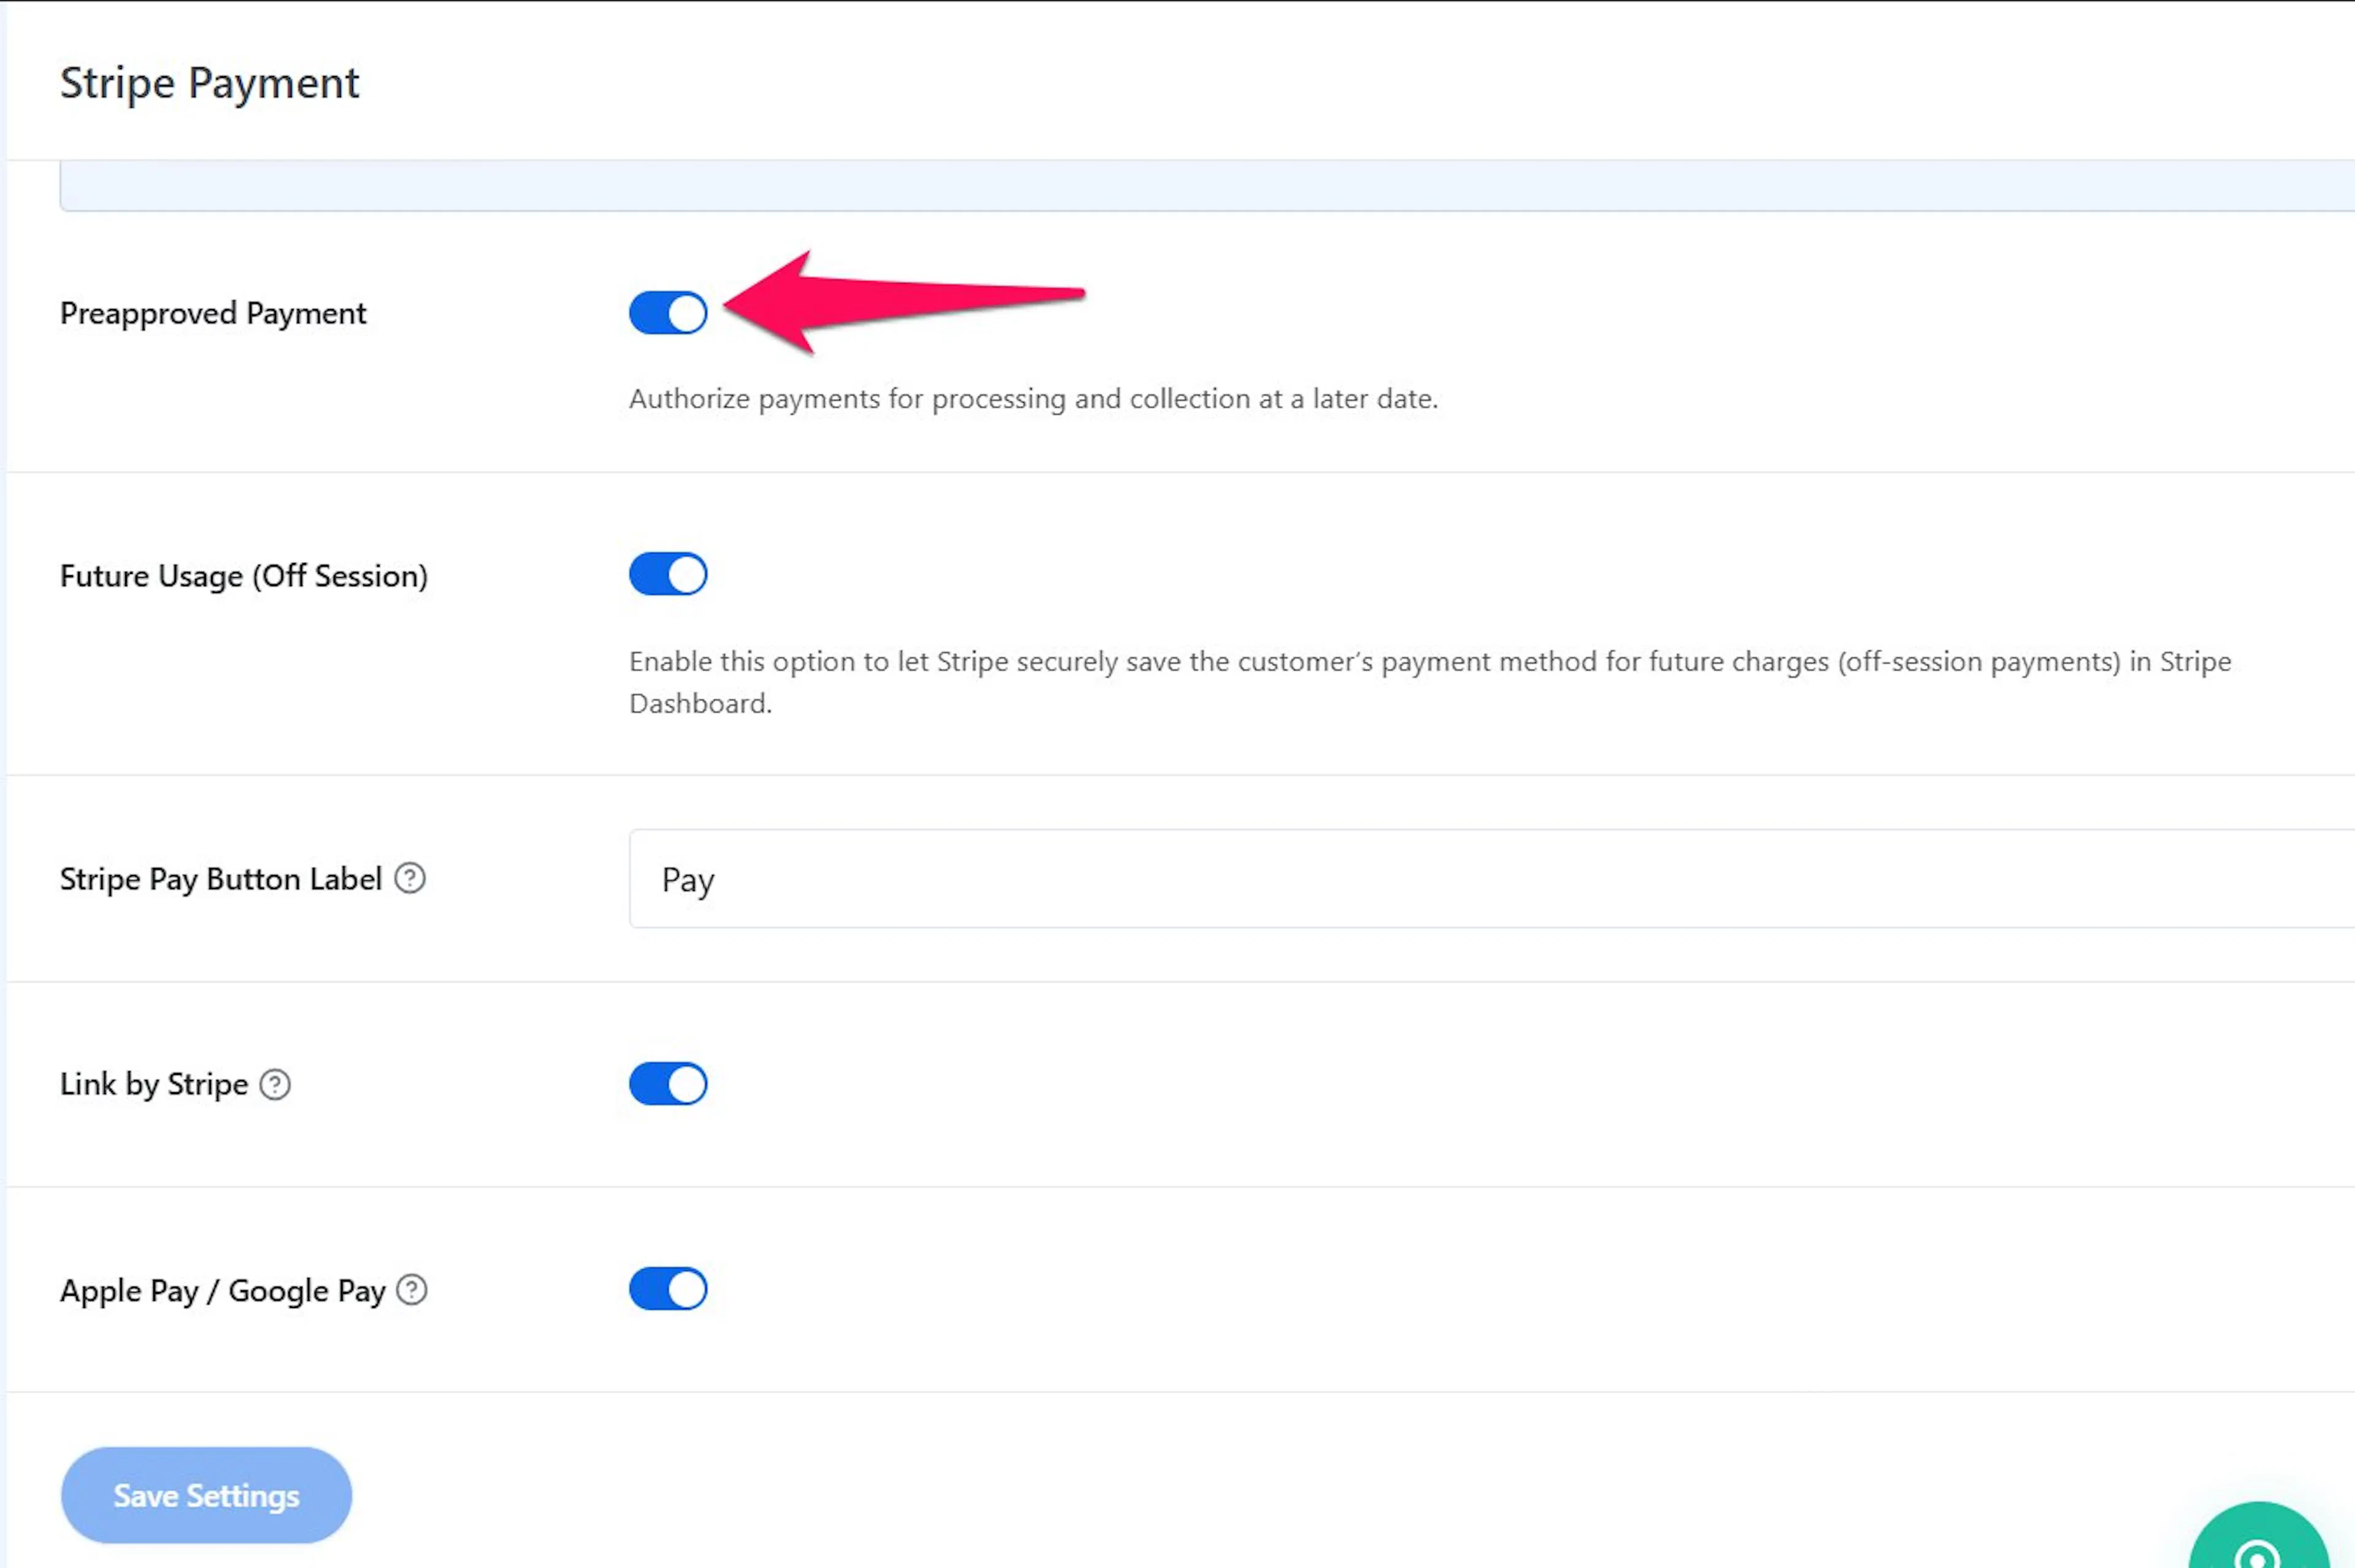
When preapproved payments are enabled, travelers see this option at checkout alongside other payment methods that support preapproval. After you approve a booking, open your Stripe Dashboard and capture the payment manually. Capturing the payment charges the held card.
Saving payment details for later charges
You may need to charge a traveler after the original booking. For example, you may need to charge for damaged equipment or a last-minute gear rental. The Setup Future Usage (Off Session) setting lets Stripe save the payment details securely so you can charge the traveler later without asking for the card again.
An off-session payment happens when the traveler is not actively checking out on your website. You create the later charge from your Stripe Dashboard.
How to turn it on
This setting tells Stripe to save a traveler's payment method during checkout.
Open Stripe Payment settings
In your WordPress dashboard, go to WP Travel Engine > Settings > Payment > Stripe Payment.
Turn on Future Usage
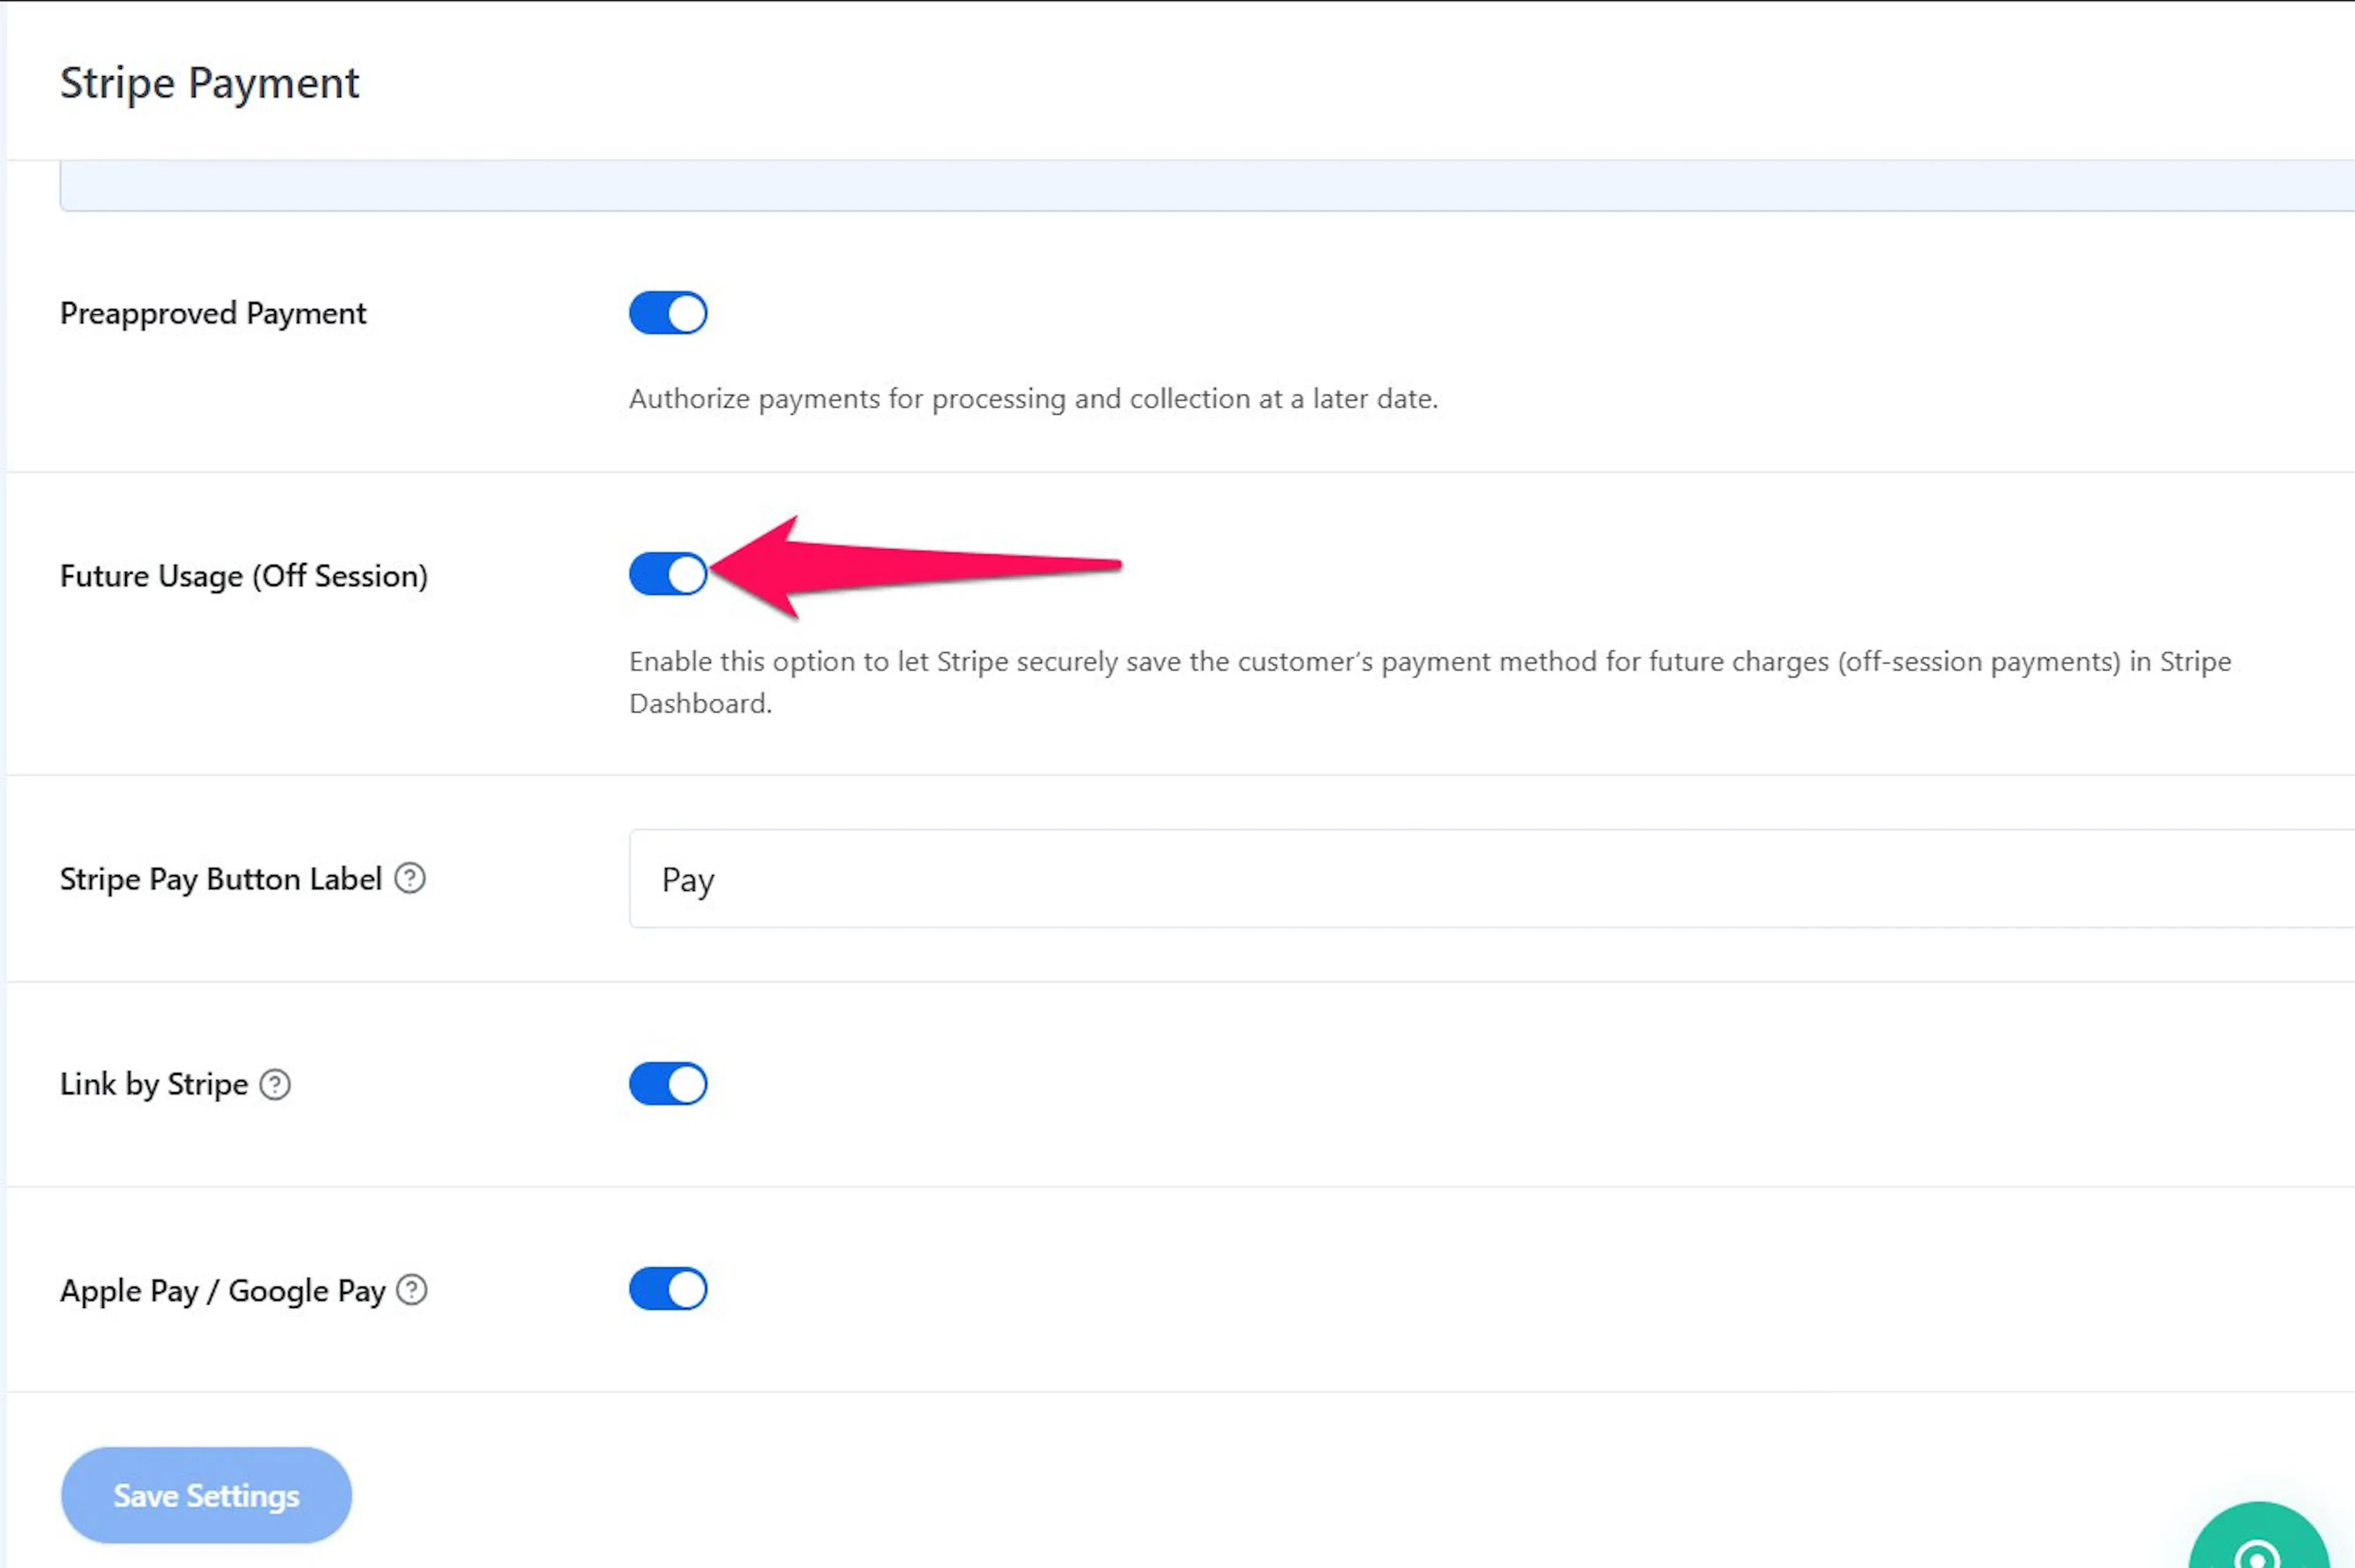
Find Setup Future Usage (Off Session) and turn it on.
Save your changes
Click Save Changes at the bottom of the page. Stripe will save each traveler's payment method during checkout.
How to charge a customer using saved details
When a traveler completes a payment after you enable Future Usage, their payment method is saved in Stripe.
Open your Stripe Dashboard
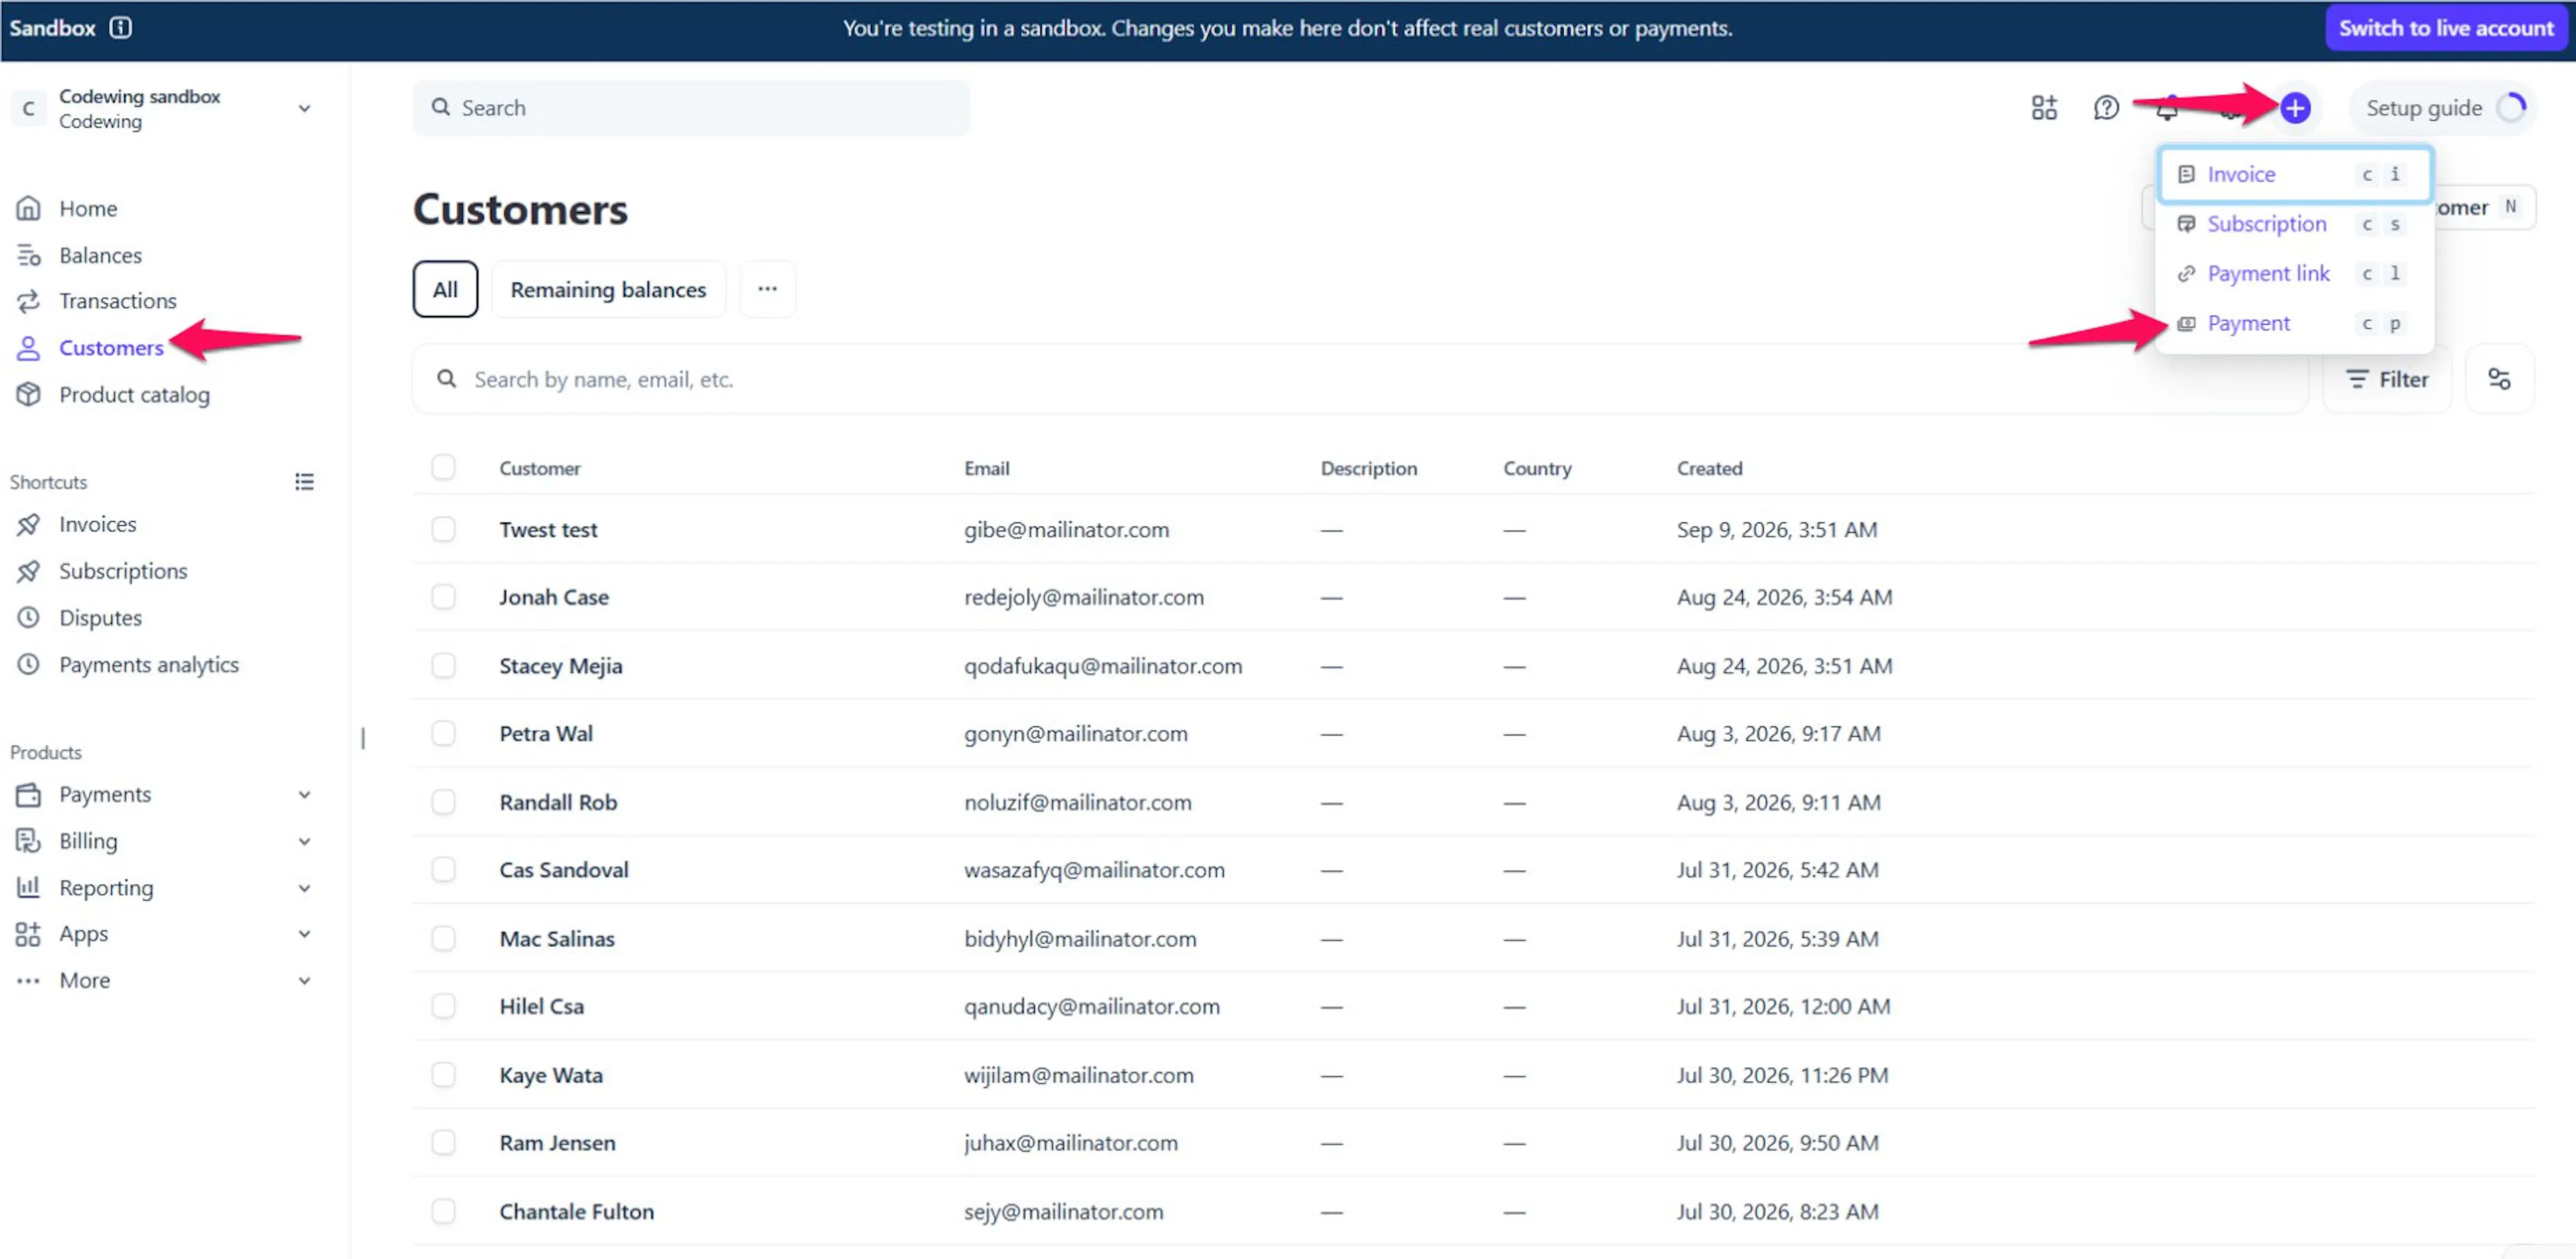
Log in to your Stripe Dashboard. Click Customers on the left sidebar.
Find the customer
Search for the traveler by name or email. Click the traveler's name to open their profile.
Create the payment
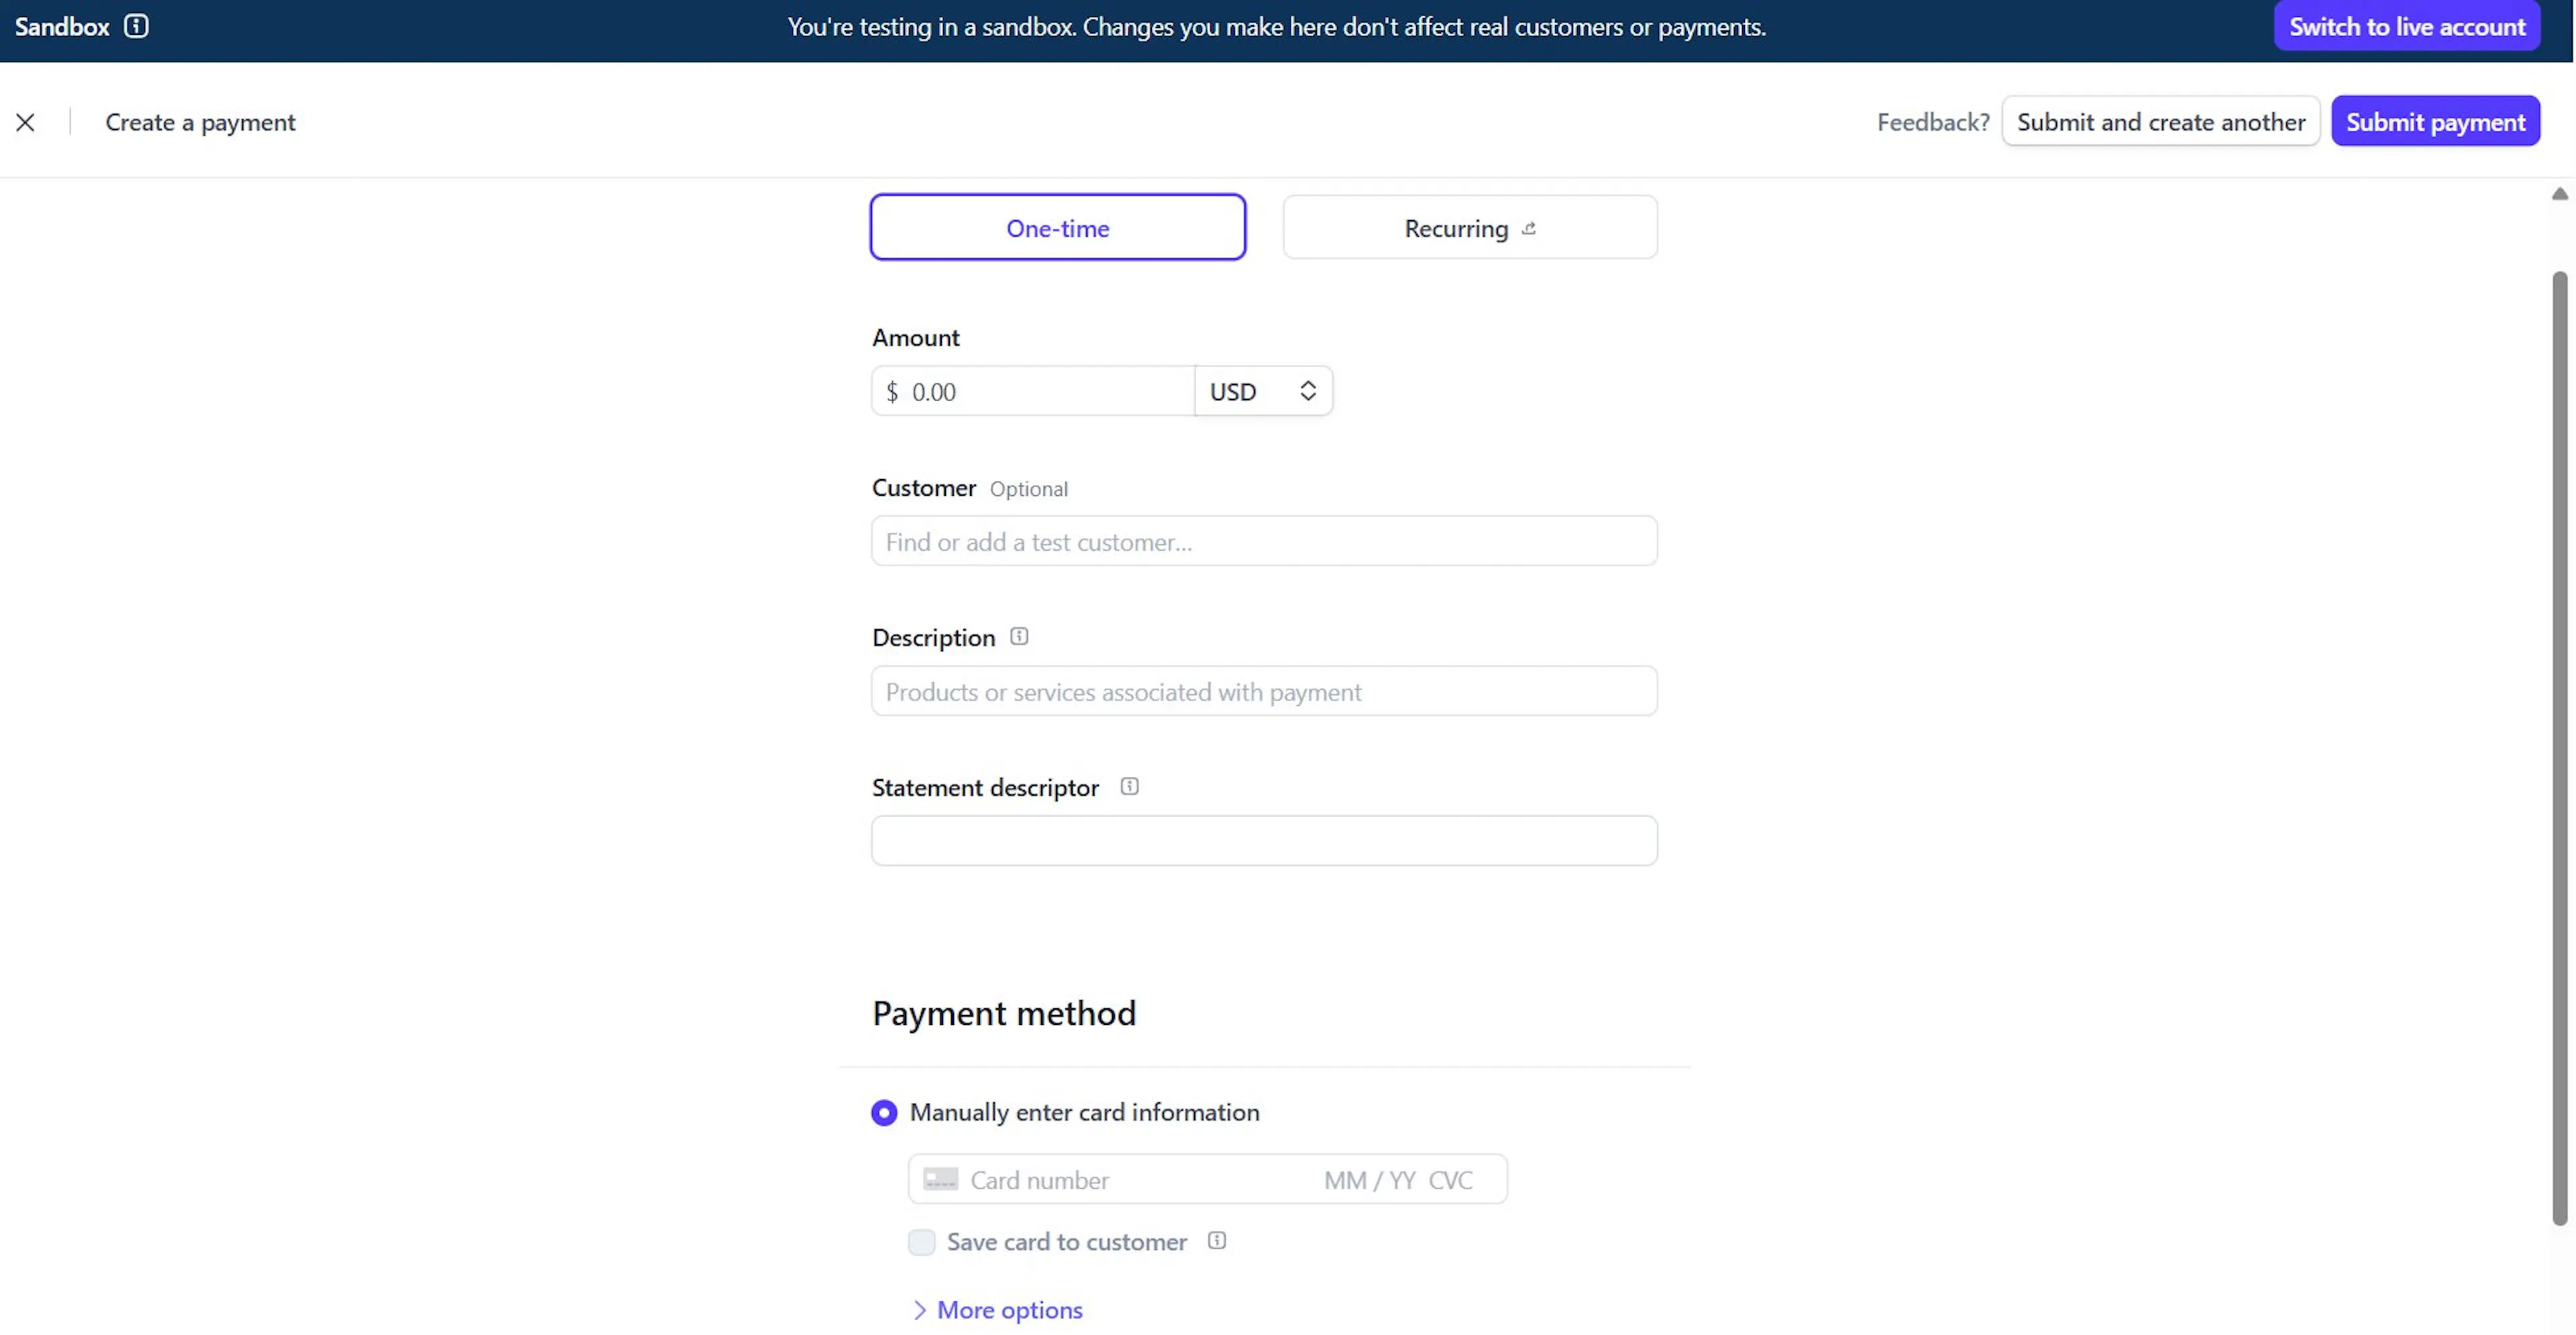
Click Create Payment and follow the prompts. Stripe uses the saved card details, so the traveler does not need to enter the card again.
When this comes in handy
Saving payment details can help in situations such as:
- A traveler cancels at the last minute and your cancellation policy allows a fee. You can charge the fee without requesting the card again.
- A traveler adds gear rental or a room upgrade during a trek. You can bill them after the original booking.
- You want to save a card when a traveler inquires about a trip and charge it after they confirm.
Link by Stripe: faster checkout for returning travelers
Link is a Stripe feature that remembers a traveler's payment details across websites. A traveler who has used Link before can pay on your site with one click. They do not need to enter their card number or address again.
For example, a traveler might book a day tour in the spring and return for a multi-day trek in the fall. Link makes the second checkout faster because the traveler can use the saved payment details.
You can turn Link on in two places:
- In your Stripe Dashboard: Go to Stripe Dashboard, click Settings, then Payment Methods, then Stripe Payment. Find Link by Stripe and turn it on.
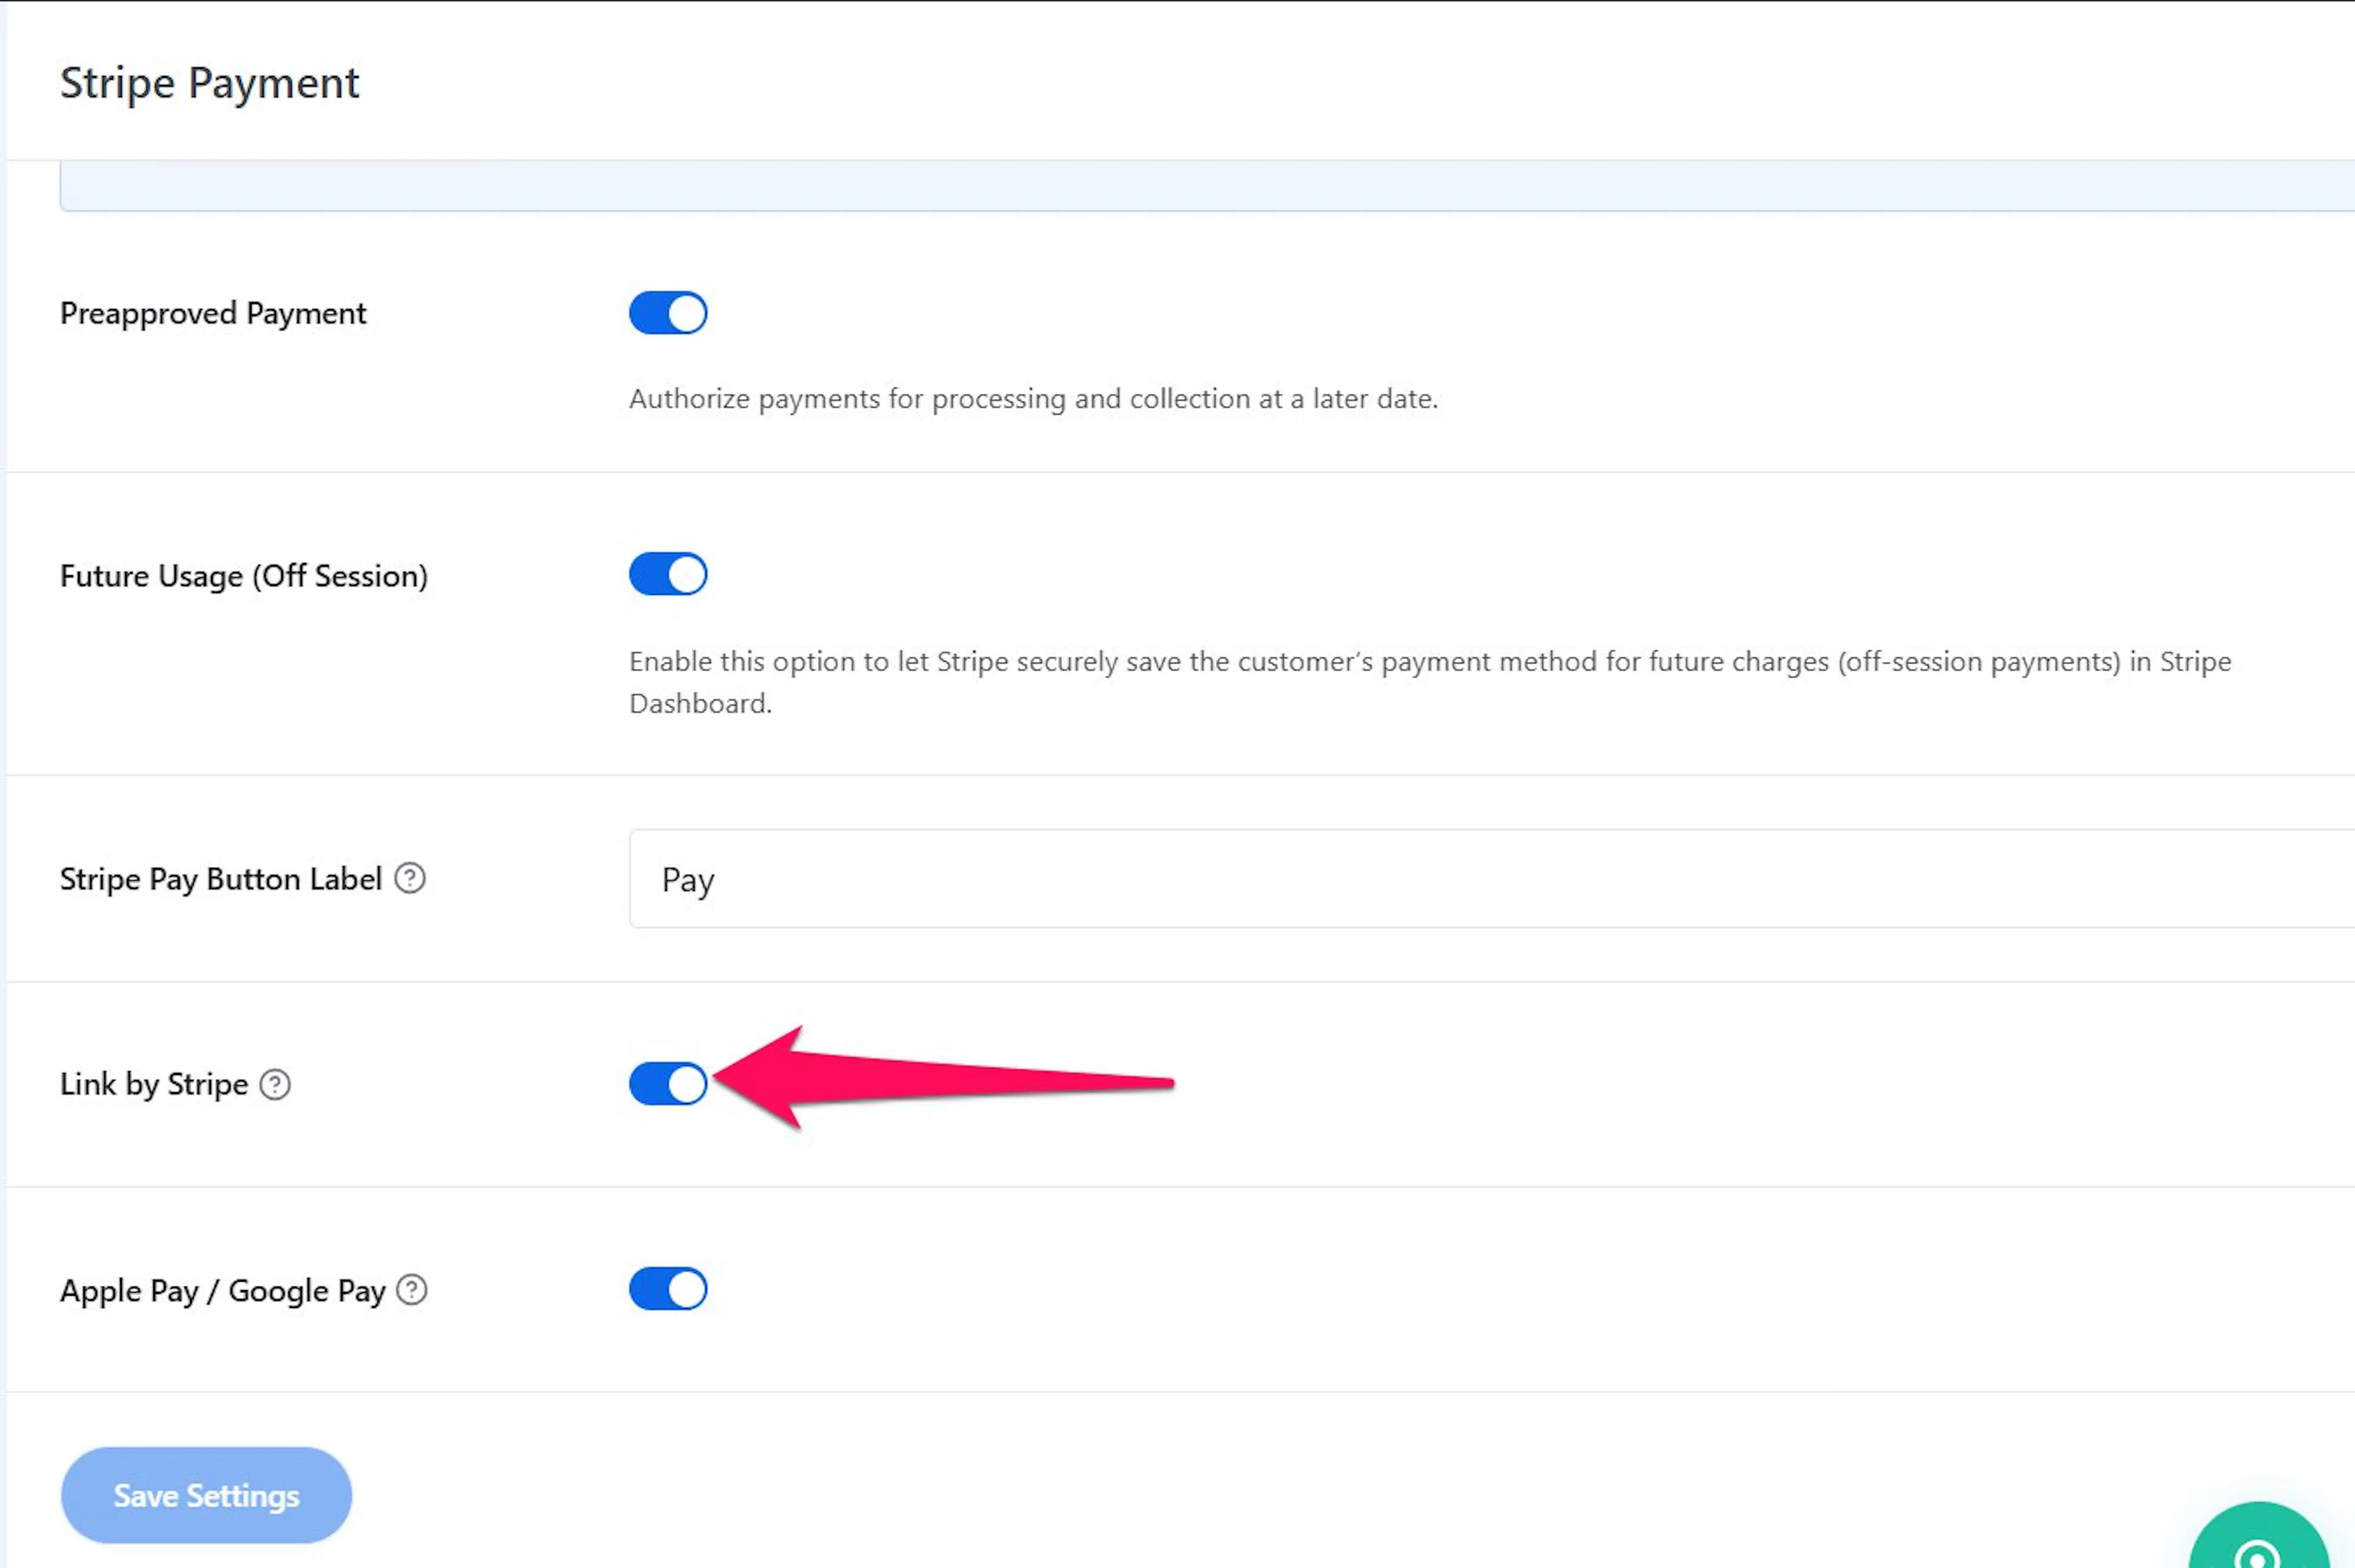
- In WP Travel Engine: Go to WP Travel Engine > Settings > Payment > Stripe Payment. Turn on Link by Stripe, then click Save Settings.
For the most reliable results, keep Link enabled in both places.
Apple Pay and Google Pay
Apple Pay and Google Pay let travelers pay with a card saved in their phone's digital wallet. Travelers do not need to type their card details. This is useful for people booking a tour from their phone.
- Apple Pay works in Safari on iPhone and Mac.
- Google Pay works in Chrome on Android phones and desktop computers.
How to turn them on
You need to enable these payment methods in both Stripe and WP Travel Engine.
Turn them on in Stripe
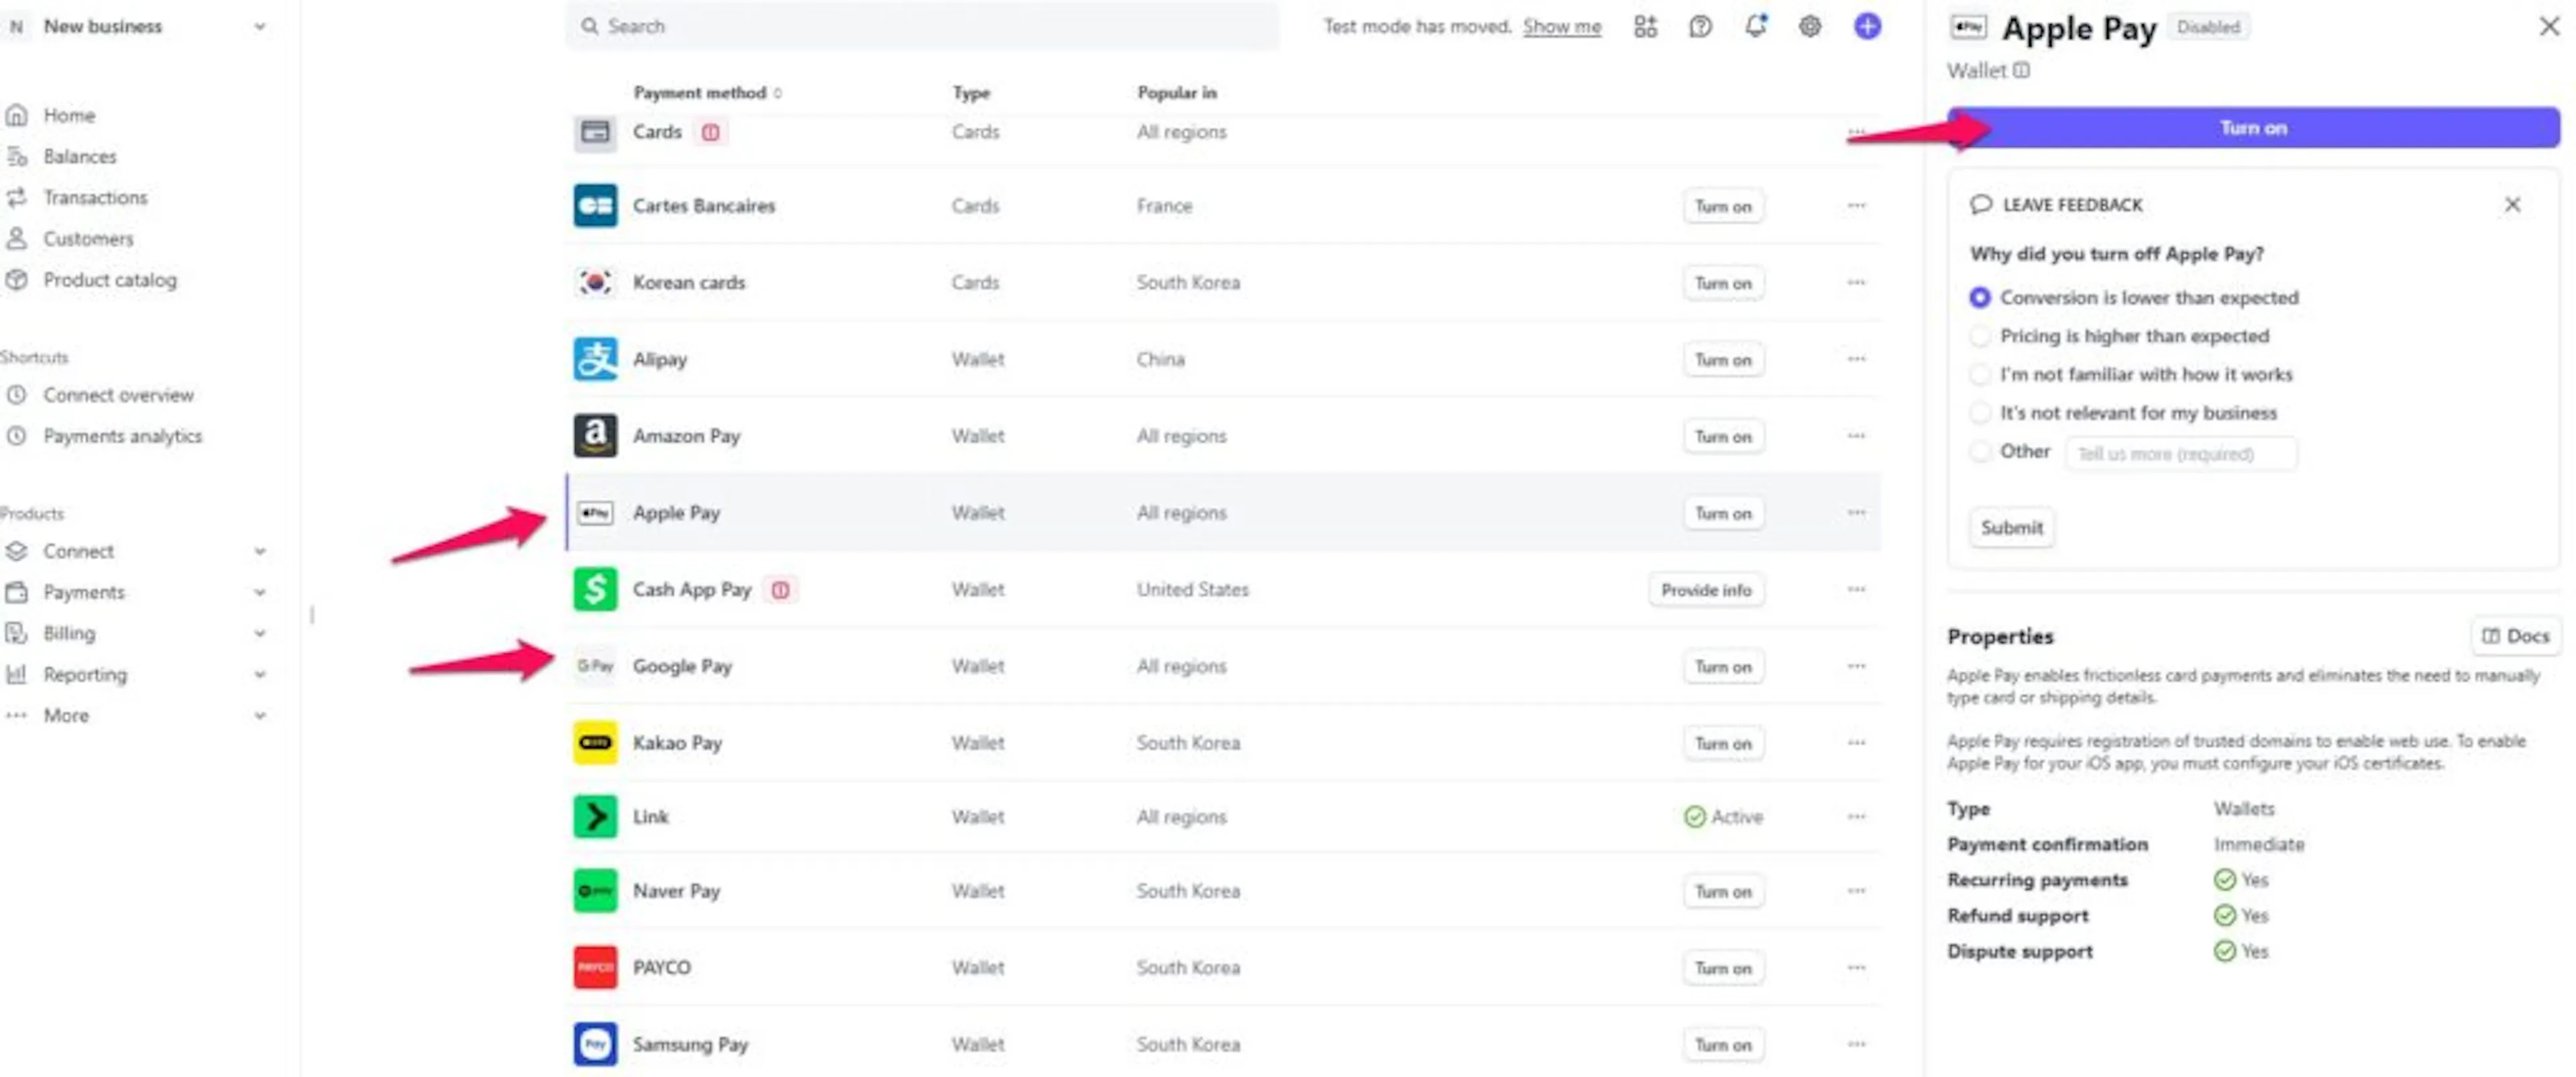
Log in to your Stripe Dashboard. Go to Settings > Payment Methods. Turn on Apple Pay and Google Pay.
Turn them on in WP Travel Engine
In your WordPress dashboard, go to WP Travel Engine > Settings > Payment > Stripe Payment. Turn on Apple Pay/Google Pay. Click Save Settings.
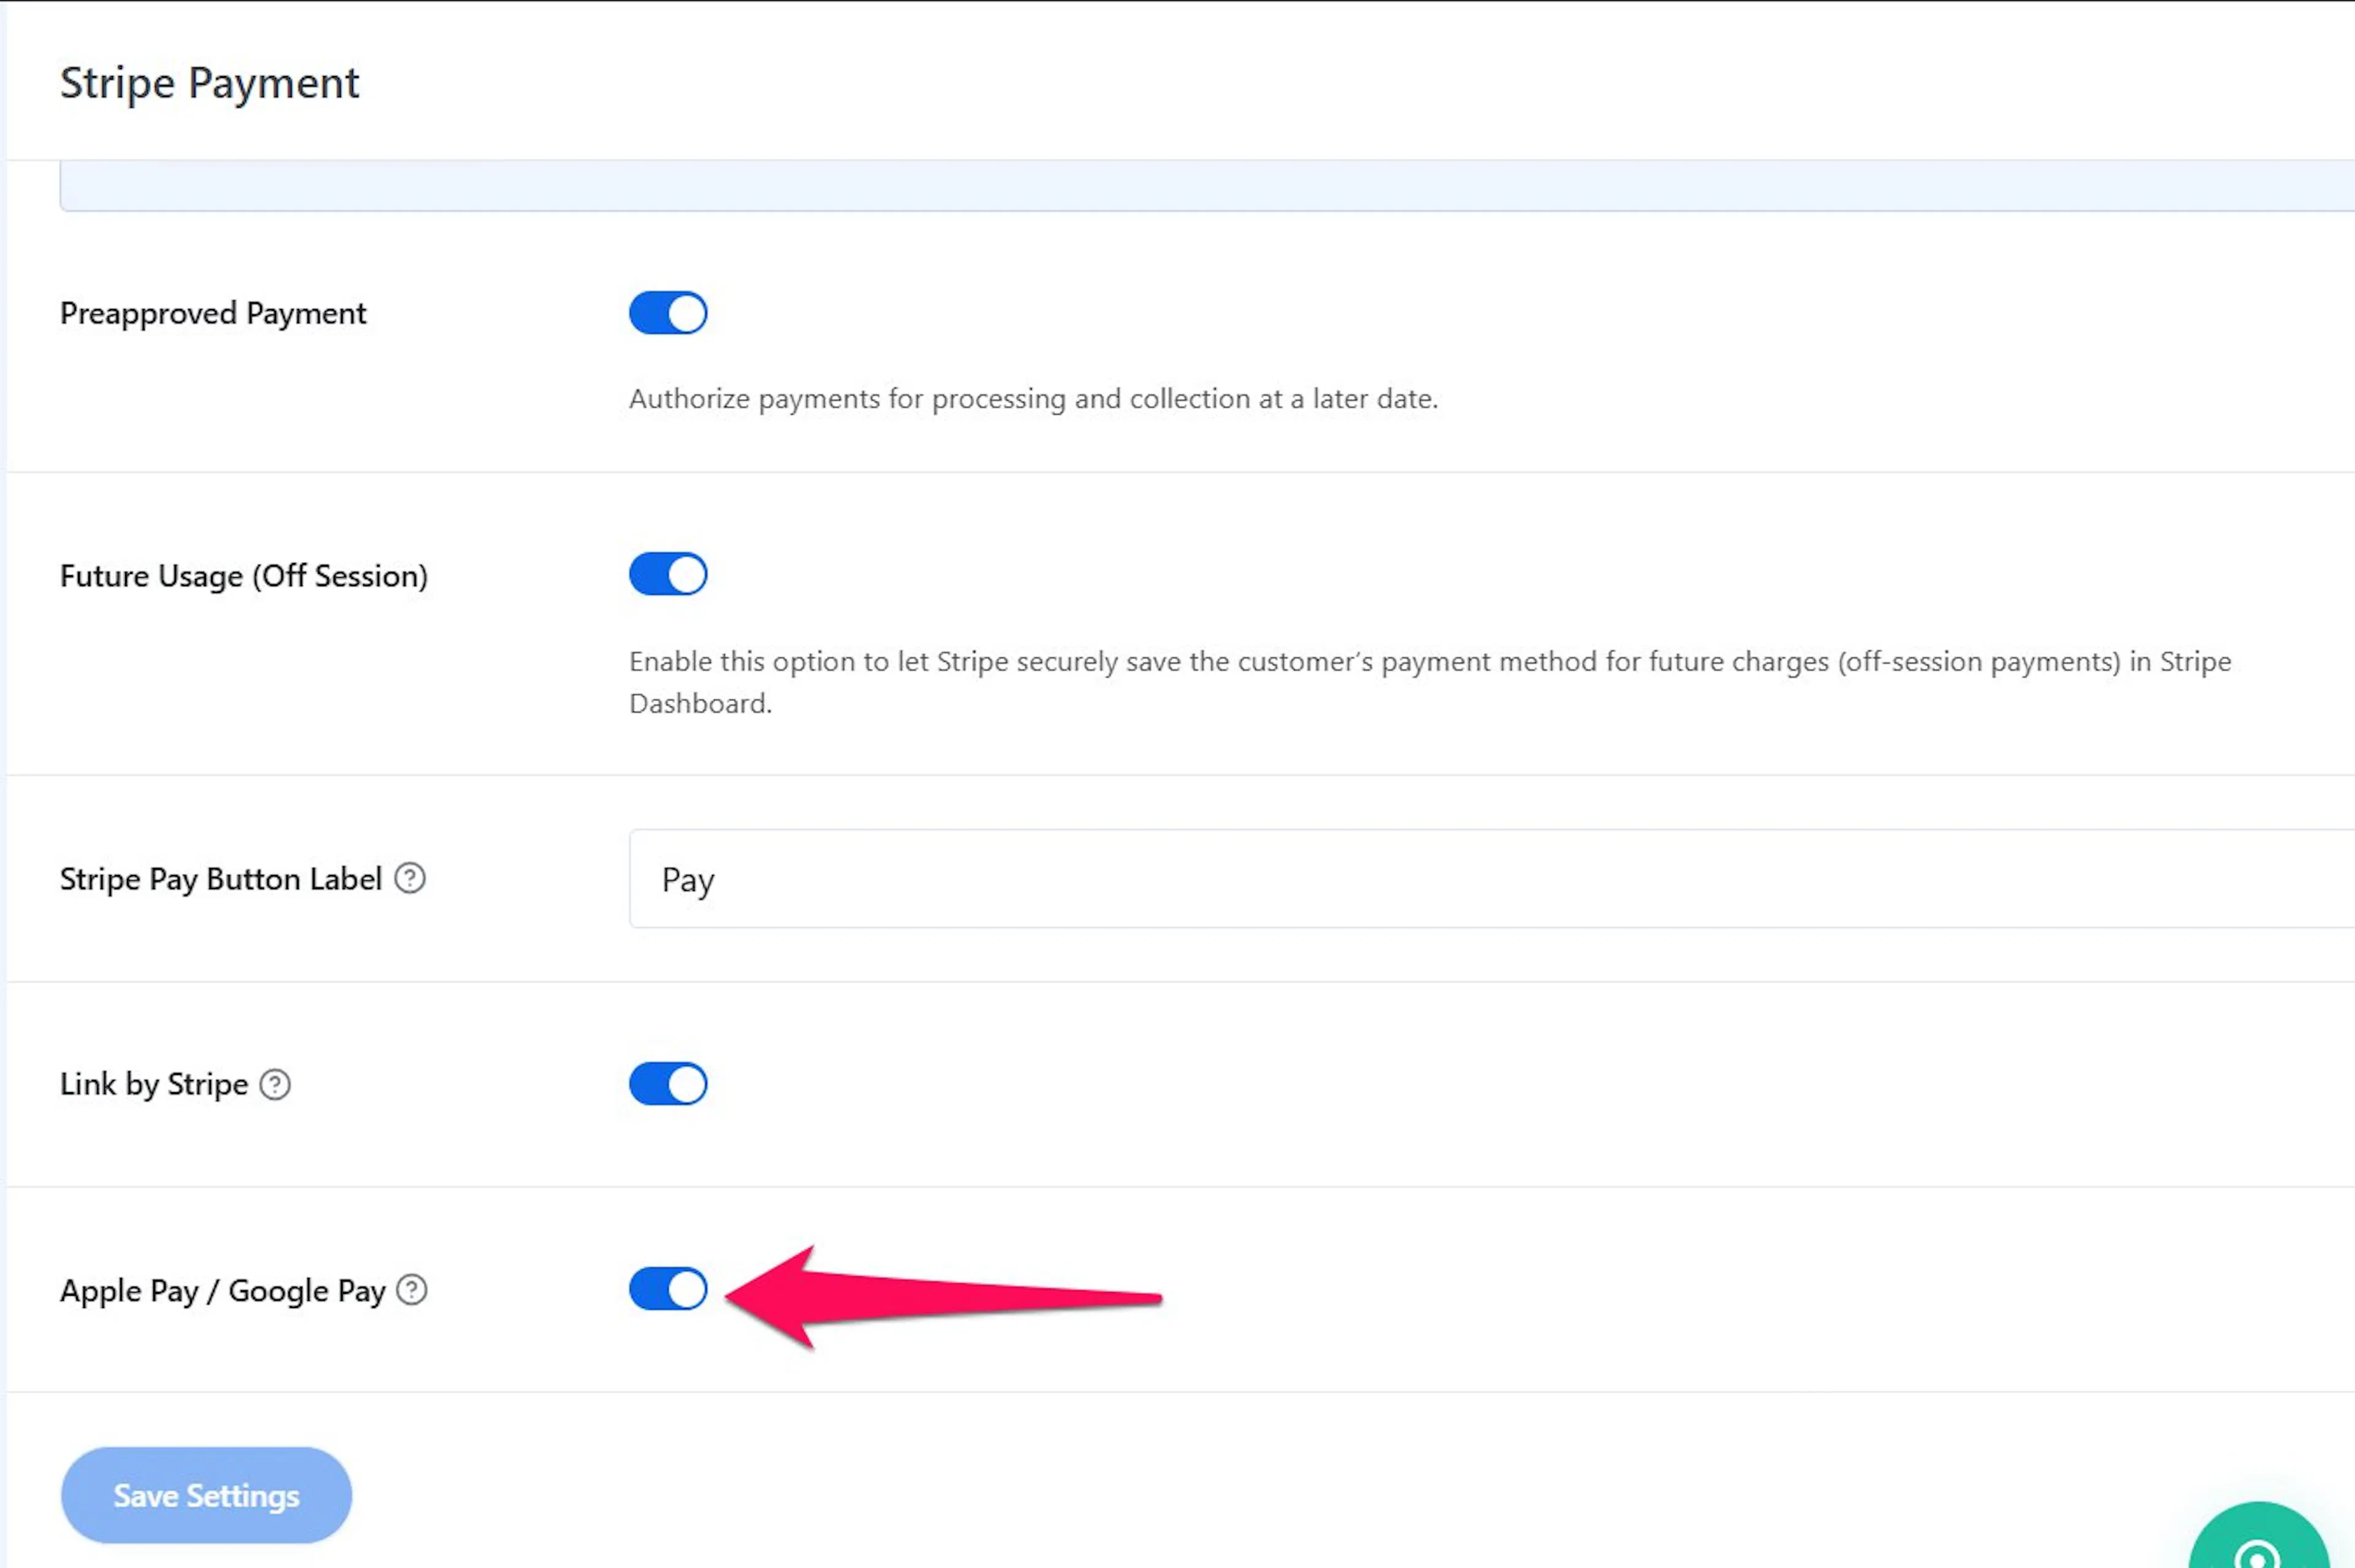
Both payment methods are now enabled. The checkout form shows Apple Pay or Google Pay when the traveler's device and browser support it.
Good to know: why Apple Pay or Google Pay might not appear on your checkout page
If you do not see Apple Pay or Google Pay while testing, the device or browser may not meet the requirements:
- The traveler's phone wallet must have at least one valid card.
- Apple Pay requires Safari and a device that supports Face ID or Touch ID. Google Pay requires Chrome.
- The browser must be allowed to check for saved payment methods:
- Chrome: Go to Settings > Autofill and passwords > Payment methods. Turn on Allow sites to check if you have payment methods saved.
- Safari: Go to Settings > Advanced. Turn on Allow websites to check for Apple Pay and Apple Card.
- The traveler must be in a supported region. Stripe does not show Apple Pay or Google Pay for IP addresses in India or for Stripe accounts based in India.
- Private browsing modes, such as Chrome Incognito or Safari Private Browsing, can prevent these payment methods from appearing.
- Apple Pay requires you to register your website domain in your Stripe Dashboard under Settings > Payment.
These requirements mainly affect your testing. Travelers who do not meet them can still pay with a regular card.
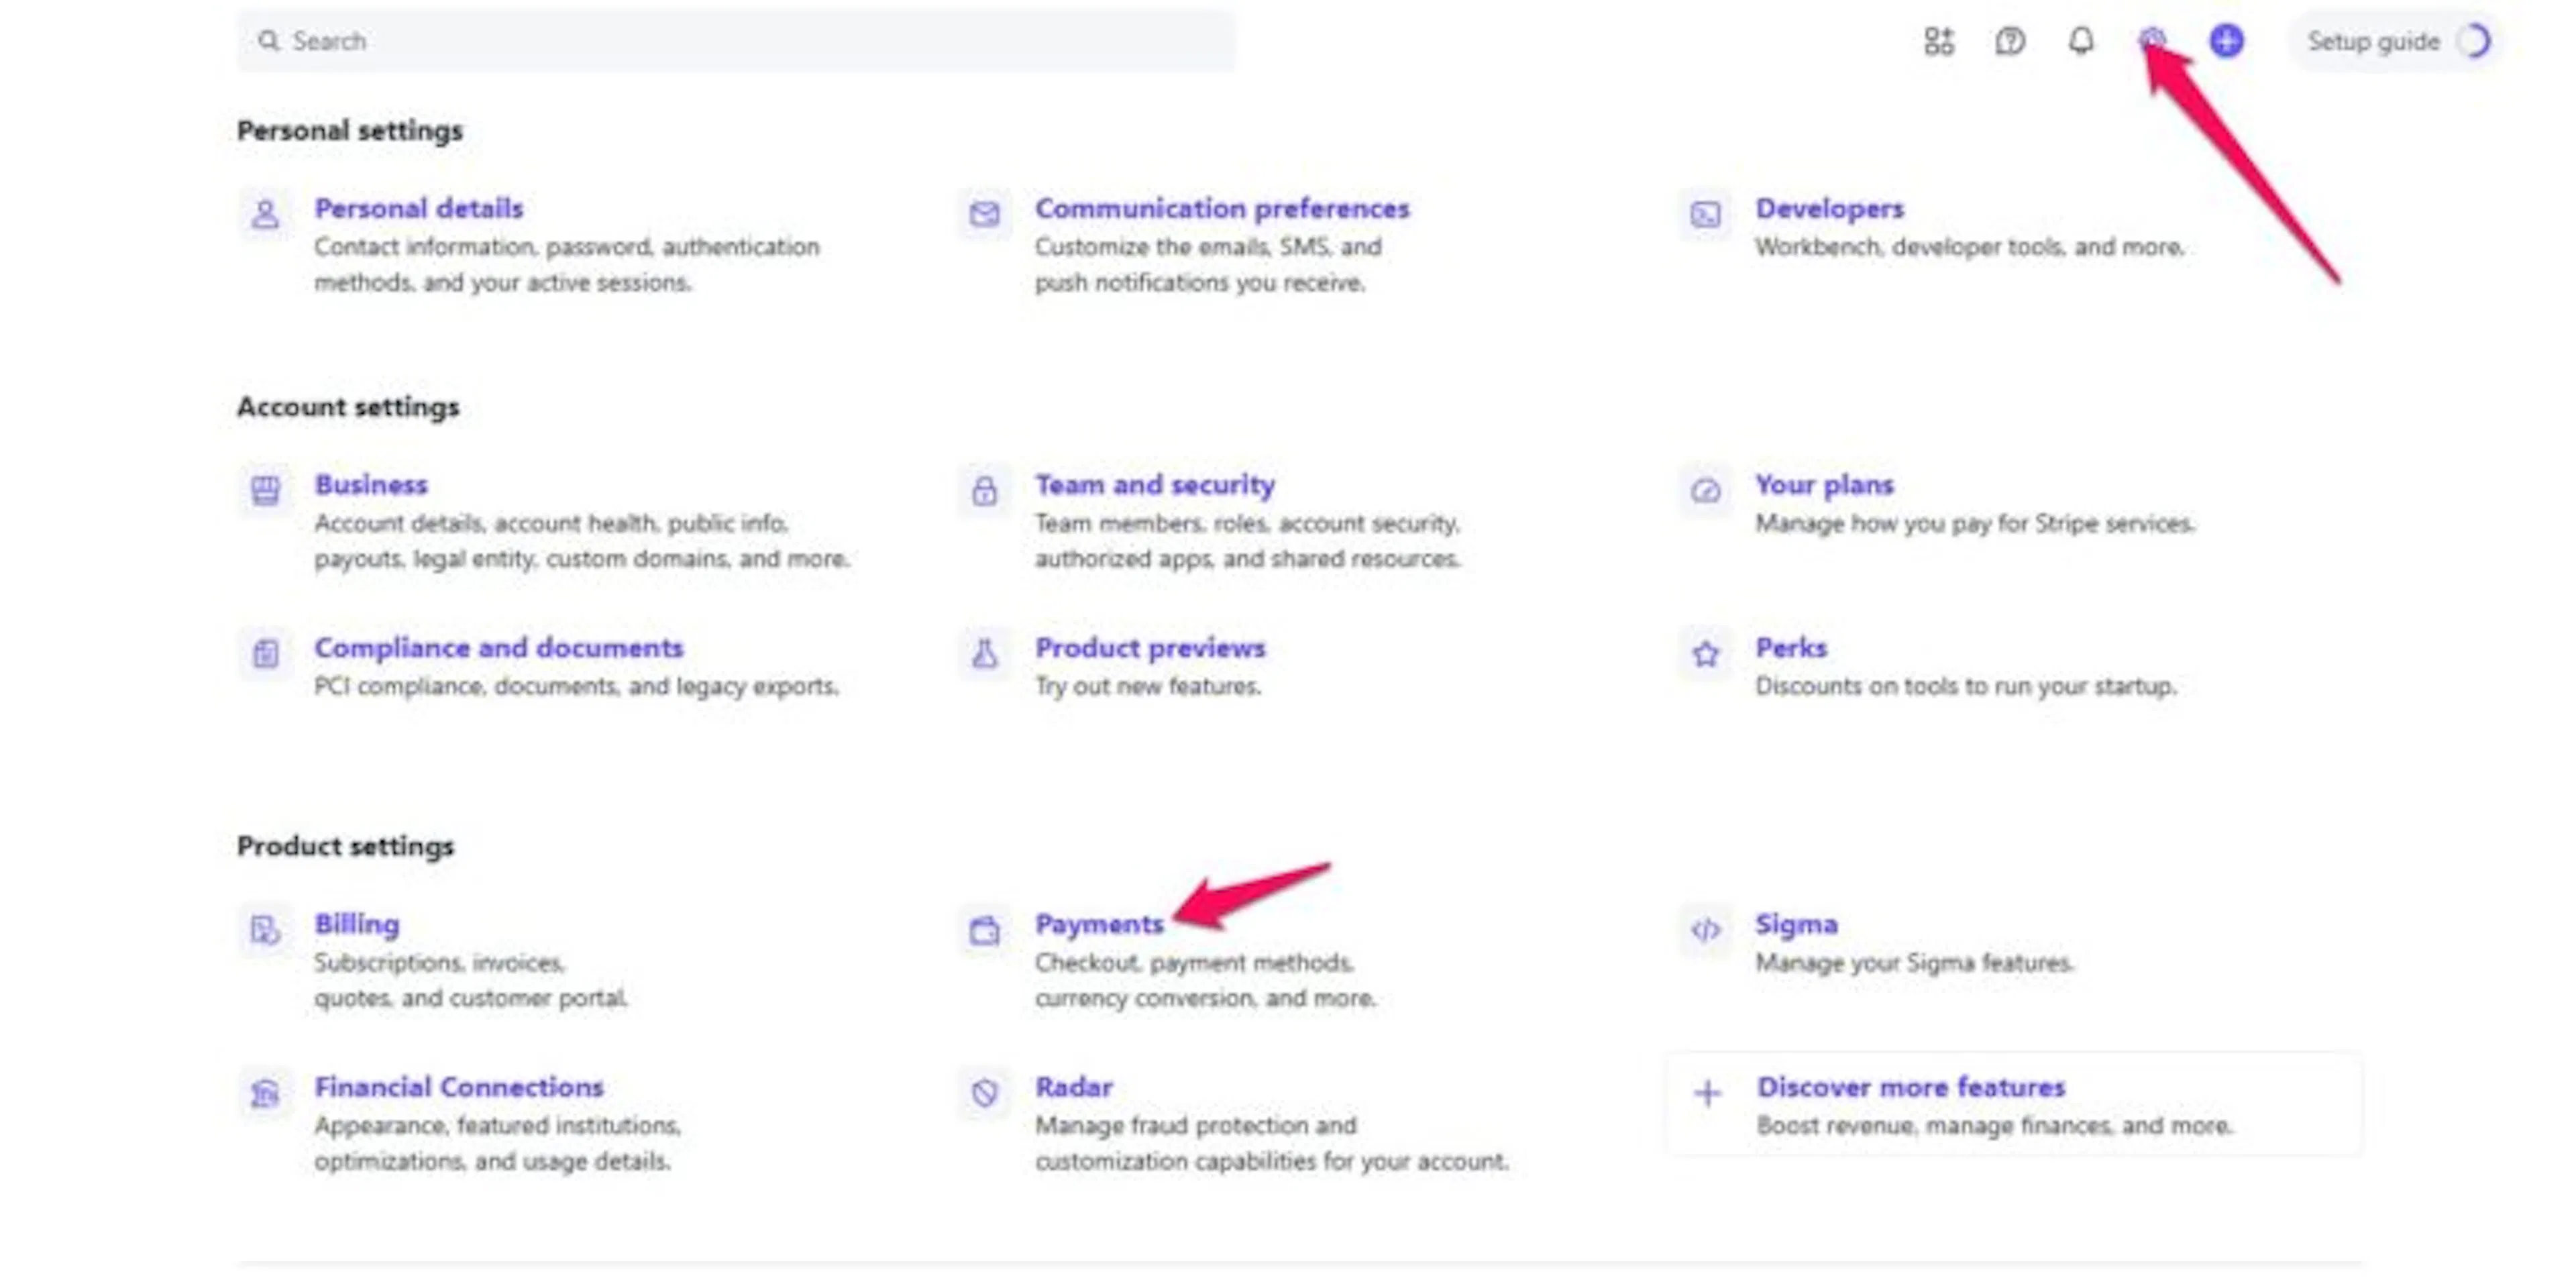
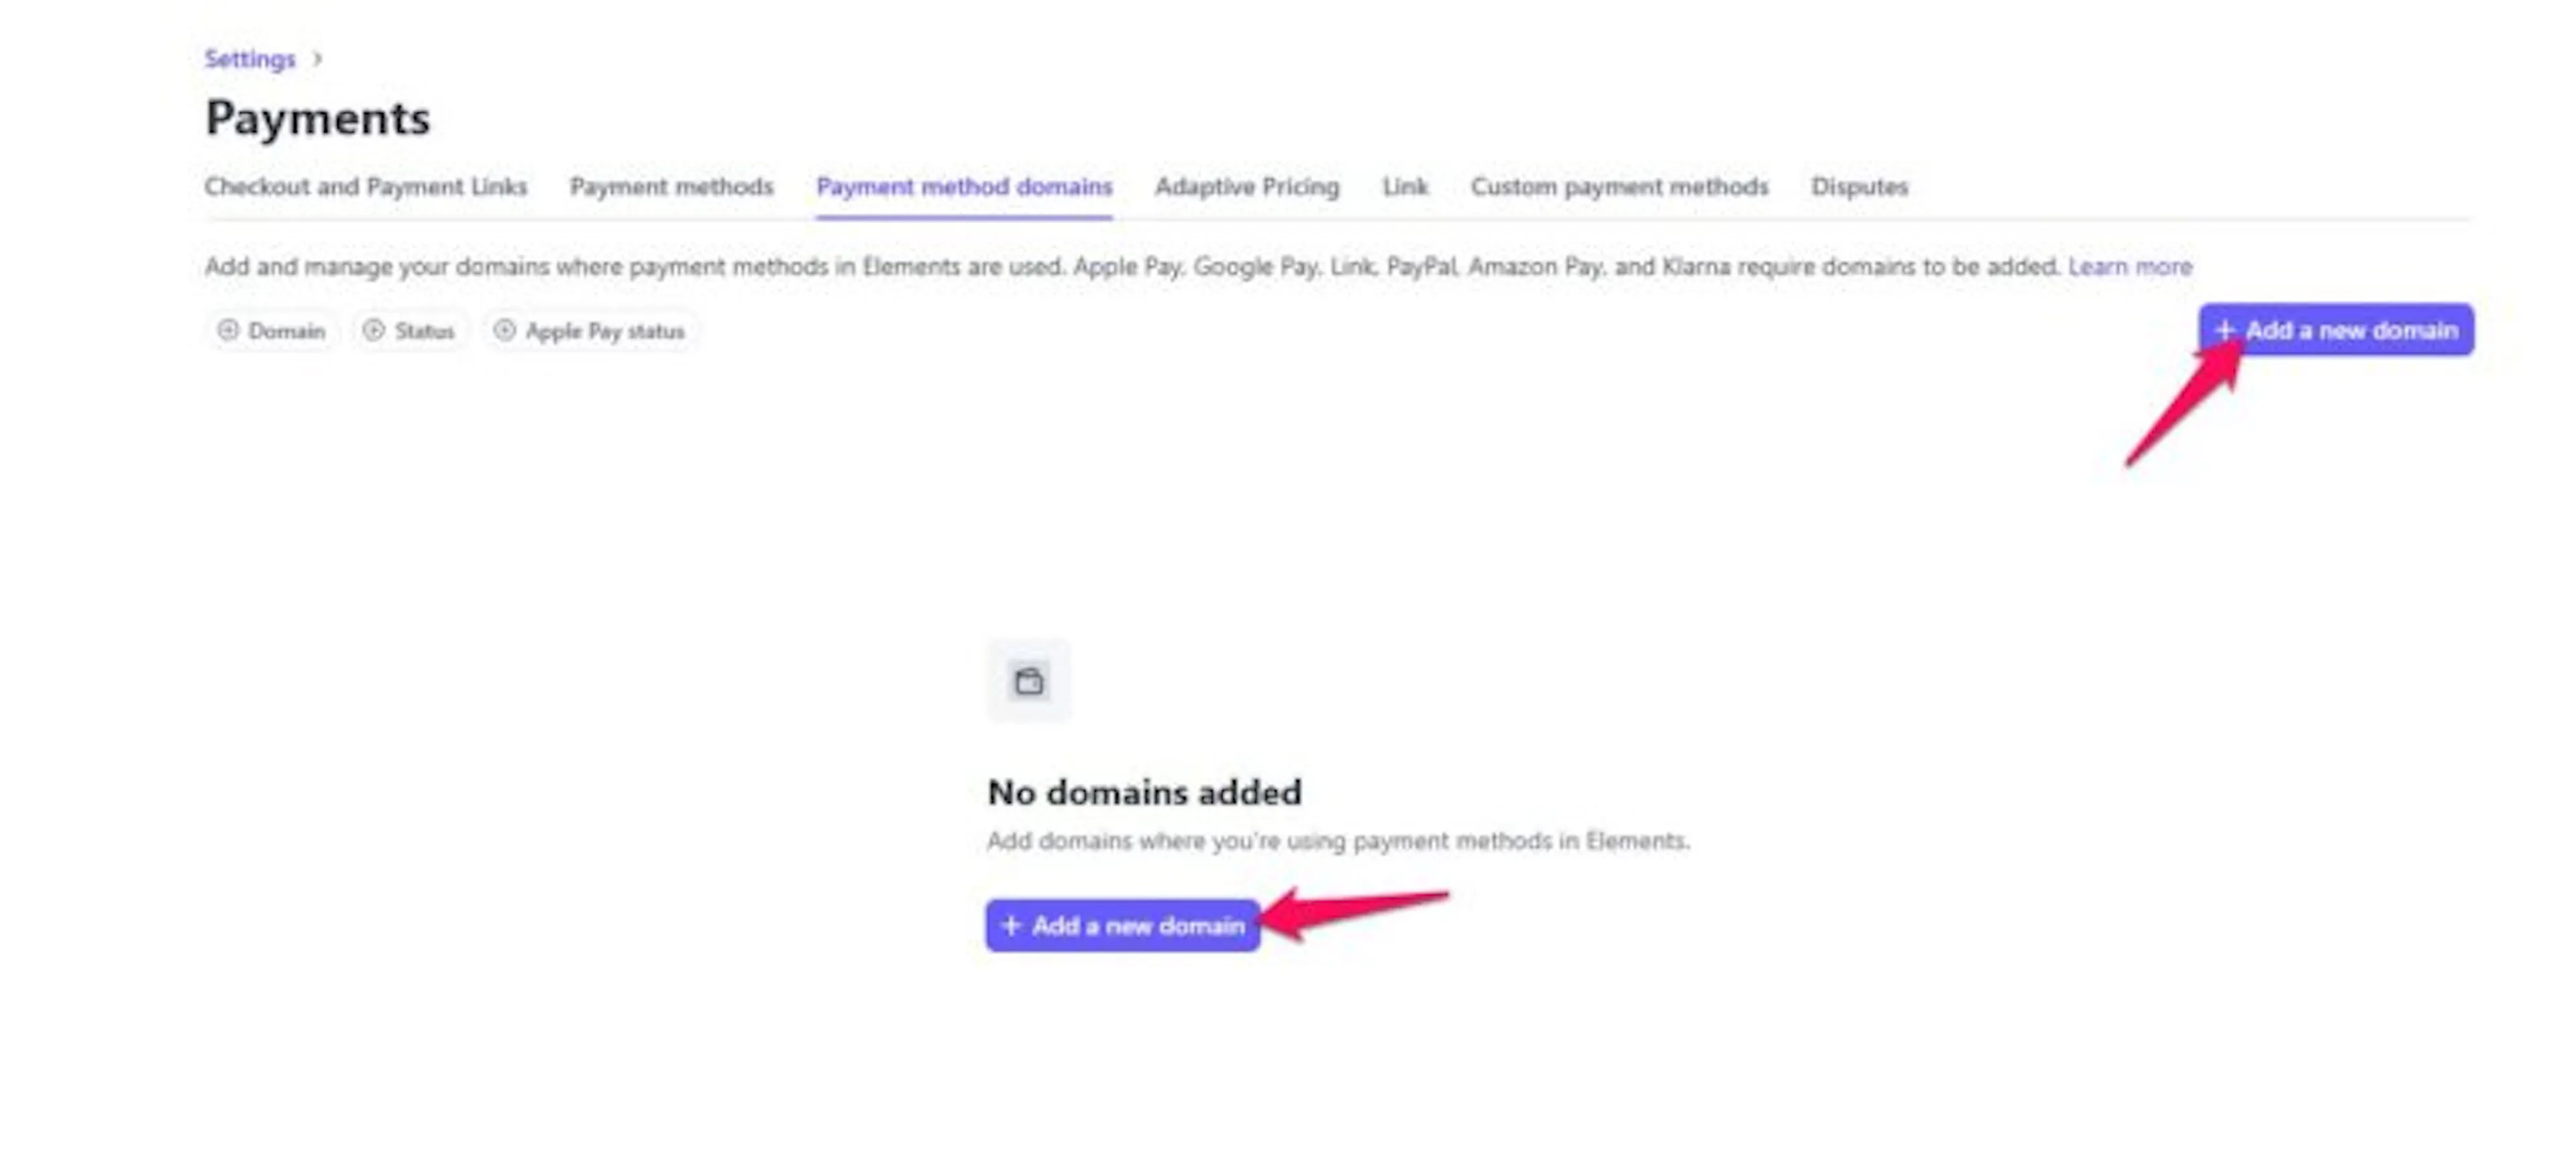
Enabling other payment methods in Stripe
Stripe supports more than just cards. You can also offer buy-now-pay-later options like Klarna or Afterpay, depending on what's available in your country. These extra options are turned on in your Stripe Dashboard, and WP Travel Engine will automatically show them on your checkout form if they're compatible with your setup. No extra work is needed on your WordPress site, though methods like these do need the webhook set up (see above) since they can take longer to confirm.
Open Payment Methods in Stripe
Log in to your Stripe Dashboard and go to Settings > Payment Methods.
Browse the available options
You'll see a list of payment methods, including card payments (Visa, MasterCard, AMEX), Apple Pay, Google Pay, Link by Stripe, and buy-now-pay-later options like Klarna or Afterpay.
Turn on the ones you want
Click the toggle next to each payment method you want to accept. That's it. WP Travel Engine will detect them automatically.
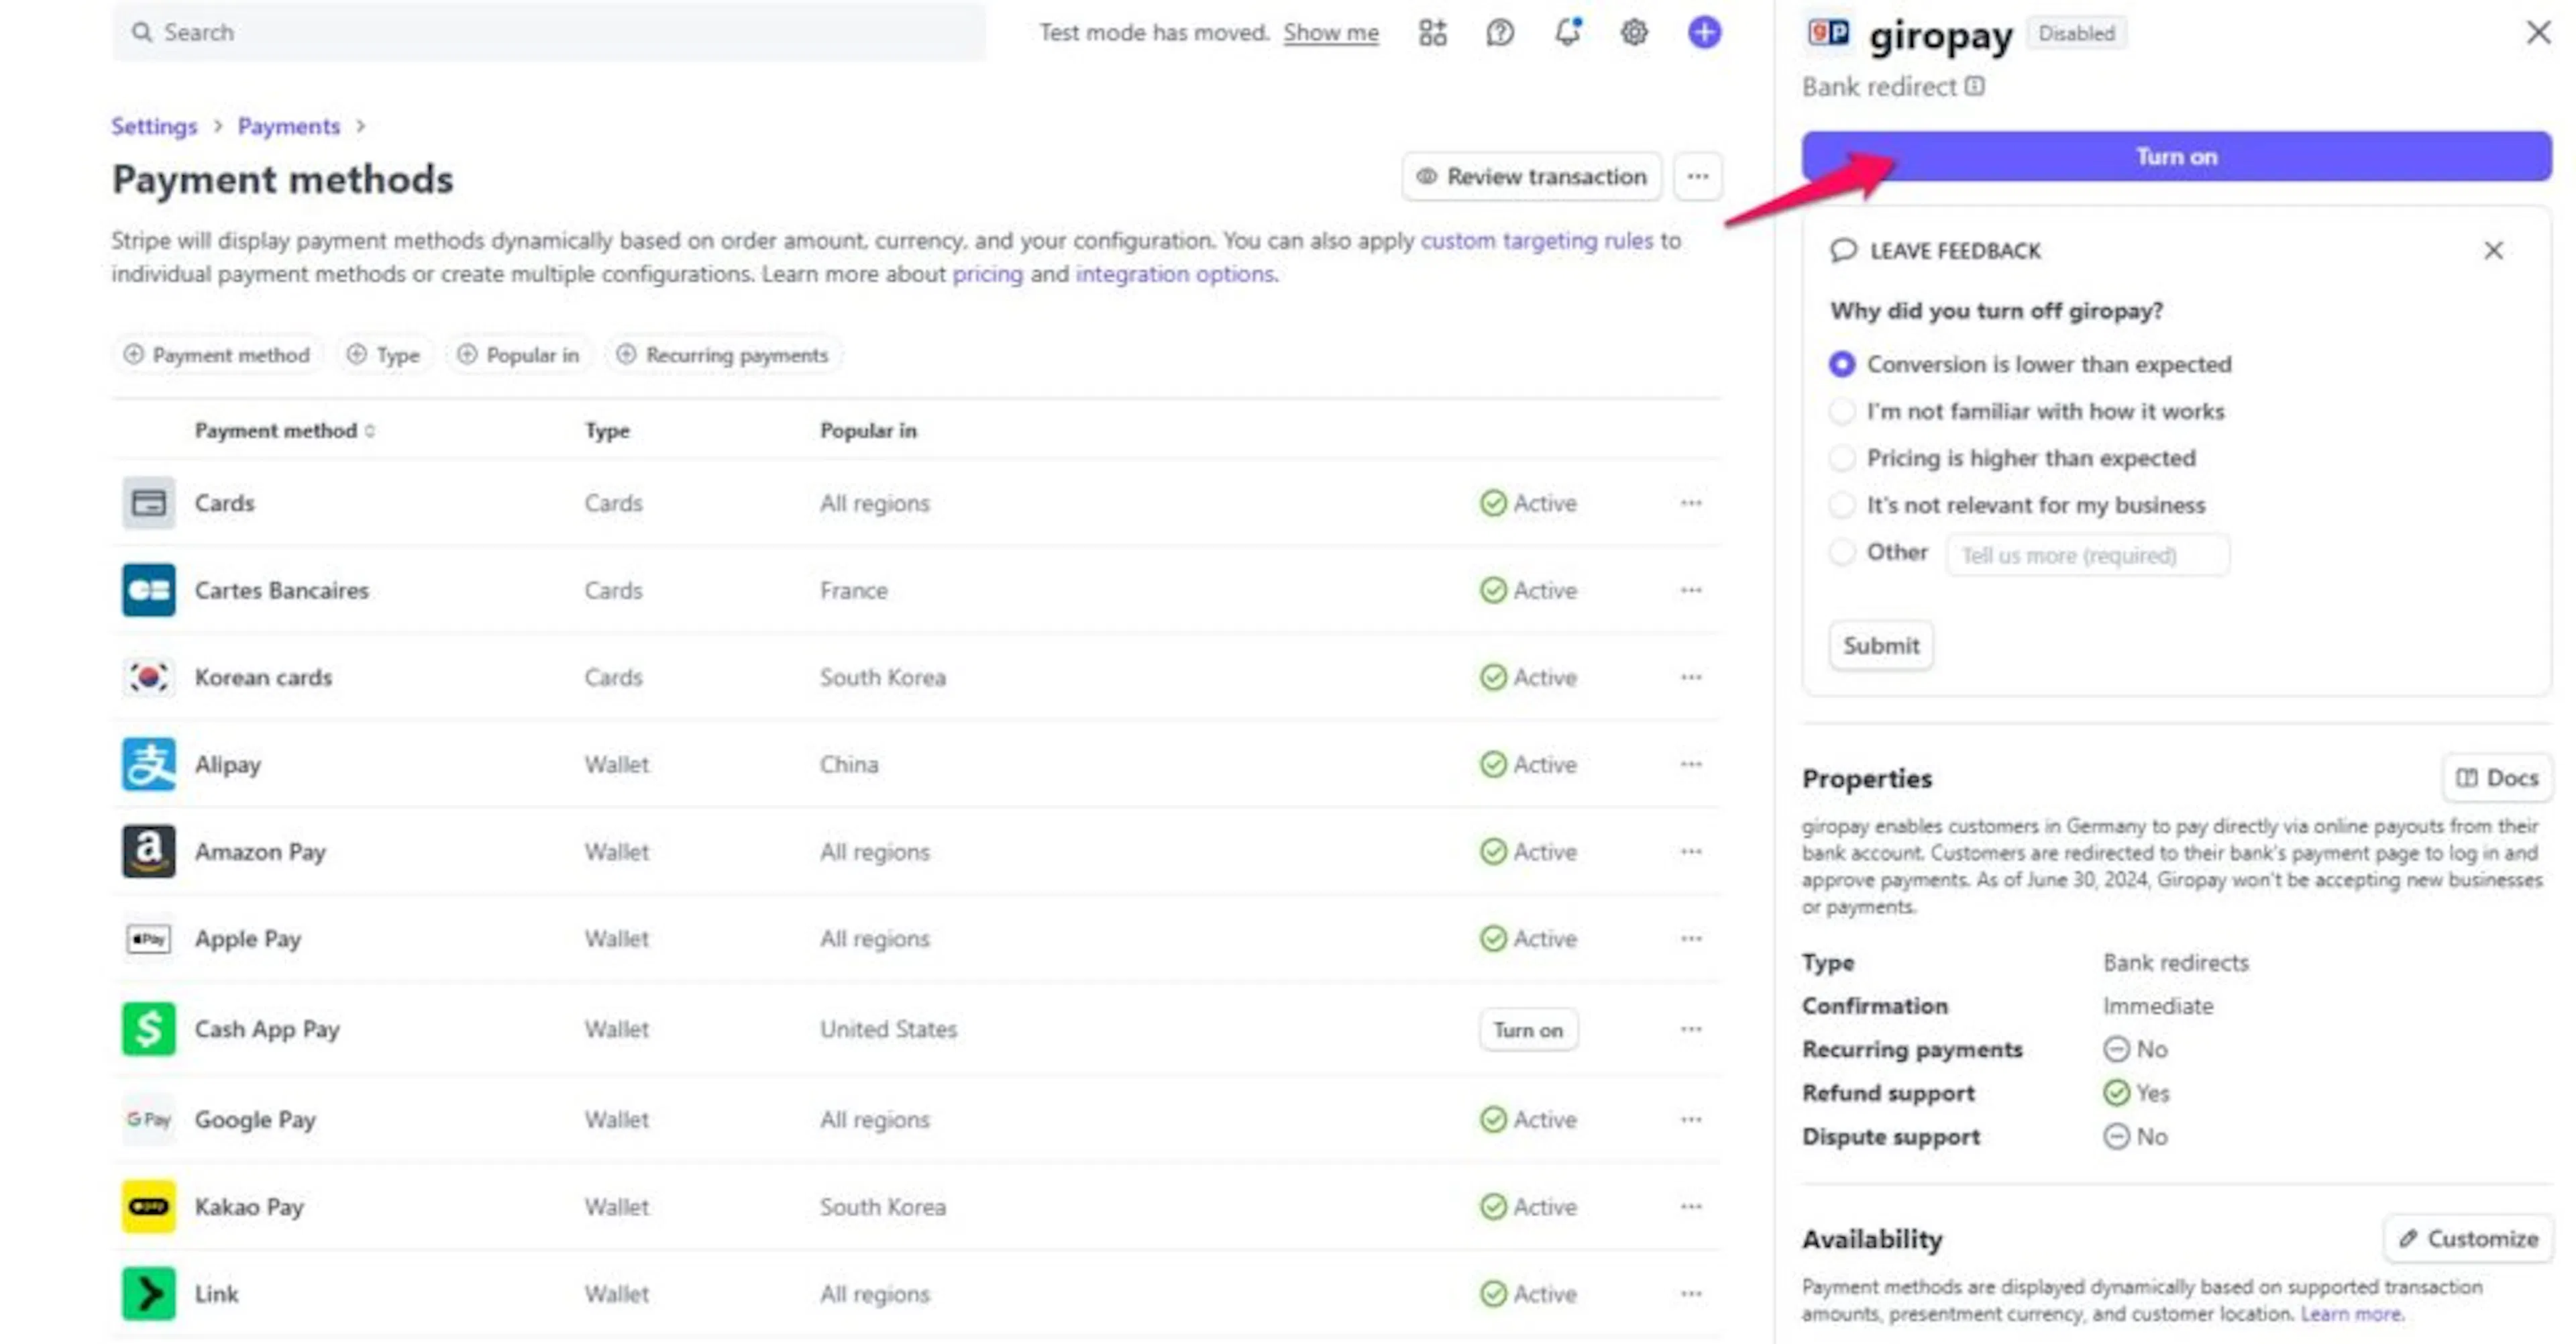
The currency you set in WP Travel Engine affects which payment methods show up at checkout. Go to WP Travel Engine > Settings > General > Currency to set your preferred currency. Only payment methods that work with that currency will appear. For example, if you choose EUR, travelers will see card payments, Apple Pay, Google Pay, and Klarna, since all of these support euros.
Troubleshooting
Stripe isn't showing up at checkout
First, check that Stripe is turned on in WP Travel Engine > Settings > Payment > General. Then check your currency setting in WP Travel Engine > Settings > General > Currency. Stripe only shows up if it supports the currency you've selected. If you recently changed your currency, try saving your settings again.
My API keys aren't working
Click Verify Connection to see a specific reason. Common causes: you copied extra spaces at the beginning or end of a key, you mixed a test key with a live key (or vice versa), or you're using test keys while trying to accept real payments. Switch to live keys (starting with pk_live_ and sk_live_) for that.
"Configure in Stripe" didn't work
This usually means one of the following:
- Your Stripe Secret Key isn't entered or saved yet. Add and save it first, then try again.
- Your site isn't using HTTPS, and you're using live keys. Set up SSL on your site, or add the webhook manually in Stripe instead (see the manual setup steps above).
- A webhook for your site already exists in your Stripe account. Delete it from your Stripe Dashboard and click Configure in Stripe again, or copy that endpoint's signing secret and paste it into the Webhook Secret Key field yourself.
Booking status isn't updating after a payment
This usually means your webhook isn't set up correctly. Click Verify Connection to check the specific issue, or go back to the webhook setup steps above and either use Configure in Stripe or make sure you copied the webhook URL from WordPress into Stripe manually, selected the right events, and copied the signing secret back into your WordPress settings.
Payment was approved but the customer wasn't charged
You probably have preapproved payments turned on. This means Stripe holds the card but doesn't charge it automatically. You need to go to your Stripe Dashboard and capture the payment manually. Look for the payment under Payments in Stripe and click Capture.
Apple Pay or Google Pay aren't appearing
Check the requirements listed in the "Good to know" note in the Apple Pay and Google Pay section above. Most commonly, this happens because you're testing on a device that doesn't support these features, or you're using a private browsing window. Try opening your checkout page in a regular Safari or Chrome window on a device that has Apple Pay or Google Pay set up.
Frequently asked questions
Do I need a Stripe account to use this addon?
Yes. You need a verified Stripe account to accept payments through this addon. You can sign up for one at stripe.com.
Can I test Stripe before going live?
Yes. Stripe gives you test API keys that let you run through the checkout process without charging a real card. Use the test keys (starting with pk_test_ and sk_test_) while you're setting things up. Switch to live keys when you're ready to accept real payments.
Where do I find my API keys?
Log in to your Stripe Dashboard and go to Developers > API Keys. You'll see both your Publishable Key and Secret Key on that page.
Do I still have to set up the webhook manually?
No, not by default. As of v2.5.7, clicking Configure in Stripe creates the webhook endpoint in your Stripe account and fills in the signing secret for you, as long as your Secret Key is saved and (for live keys) your site uses HTTPS. Manual setup is still available if you'd rather do it yourself, or if one-click setup can't be used on your site.
What does the Verify Connection button check?
It checks that your Publishable Key and Secret Key are valid and match each other's mode (test or live). If a webhook secret is entered, it also confirms a matching, enabled webhook exists in your Stripe account and sends a real test event to make sure the secret is correct.
What does Link by Stripe do?
Link saves a traveler's payment details so they can check out faster next time. If a traveler has used Link on any website before, they can pay on your site with one click. No card number needed.
What is preapproved payment?
Preapproved payment holds a traveler's card without charging it right away. You review the booking first, then charge the card from your Stripe Dashboard when you're ready. It's useful when you want to confirm availability or approve a booking before taking payment.
Will my travelers' card details be stored on my website?
No. Stripe handles all card details on their own secure servers. Your website never sees or stores the actual card numbers. This is one of the main reasons tour operators choose Stripe for online payments.
If you're still stuck or have a question we didn't cover, our support team is happy to help. Reach out at our support page and we'll get you sorted.