

Form Editor
Customize your enquiry and booking forms so travelers see the right questions, upload the right files, and complete checkout with less back-and-forth.
Control what travelers see and fill out at every stage of booking. You can use the Form Editor add-on to change your enquiry form, checkout form, traveler details, and emergency contact form so they match the way you run your tours.
Key features and benefits
The Form Editor helps you ask for the right details at the right time. That means fewer follow-up emails, fewer missing details, and a smoother booking experience for your travelers.
| Feature | Benefit |
|---|---|
| Five default forms (Enquiry, Checkout, Lead Traveler, Additional Traveler, Emergency Contact) | Manage the full booking journey in one place without building forms from scratch. |
| Drag-and-drop field reordering | Put questions in the order that feels natural for your travelers. |
| Live preview | Check how the form will look before you save, so you can catch mistakes early. |
| 10+ field types (Text, Radio, Checkbox, Date Picker, Attachment, Captcha, and more) | Collect the exact details you need for each trip, from passport copies to meal choices. |
| Conditional logic | Show extra questions only when they matter, so forms stay shorter and clearer. |
| Per-field settings (Label, Placeholder, Width, Required, CSS Class) | Fine-tune how each field looks and works for your business. |
| Attachment upload controls (multiple files, max file size) | Decide what travelers can upload and stop files that are too large. |
| Reset to default | Start over if a form stops working the way you want. |
Prerequisites
Before you make changes, make sure everything is ready in WordPress.
What you'll need before you start:
- WP Travel Engine installed and activated on your WordPress site. You need Version 6.5.0 or higher.
- WP Travel Engine updated to the latest version, 6.7.12.
- The Form Editor add-on installed and activated.
Once those are in place, you are ready to open the Form Editor.
Installing the Form Editor add-on
See how to activate a Pro add-on license key for the full installation and activation walkthrough.
Verification
This quick check helps you confirm the add-on is active before you start changing anything.
Go to your WordPress Dashboard
This is where all your WP Travel Engine settings live. If you are new to WordPress, this is the main admin area you see after logging in.
Log in to your site's admin area.
Open Form Editor
This tells you whether the add-on is installed properly.
On the left sidebar of your WordPress dashboard, go to WP Travel Engine and click Form Editor.
Confirm your forms appear
If the add-on is working, you will see the default forms listed here.
You should see all your default forms on the page.
If you can see the forms, you are ready to start editing them.
Configuring the settings for the Form Editor add-on
The Form Editor lets you change the forms your travelers fill out. You can add new fields, remove fields you do not need, change the order, and decide which fields appear in each form.
To open it, go to WP Travel Engine on the left sidebar of your WordPress dashboard, then click Form Editor. At the top of the page, you will see tabs for five different forms.
- Enquiry Form - This appears on individual trip pages. Travelers use it to ask questions before booking.
- Checkout Form - This appears during payment. It collects billing details when a traveler buys a trip.
- Lead Traveler Information - This collects details for the main traveler on the booking.
- Additional Traveler Information - This collects details for other travelers when a booking includes more than one person.
- Emergency Contact - This collects the emergency contact details for the booking.
- Waitlist Form - This collects the waitlist details when a traveler fills out the waitlist form.
A simple way to think about it is this: each tab controls a different part of the booking journey. If you run multi-day treks, for example, you might collect basic questions in the Enquiry Form and passport details later in Lead Traveler Information.
The Checkout, Lead Traveler, Additional Traveler, and Emergency Contact forms all appear on the checkout page. Changes to any of these forms affect every booking going forward.
The Waitlist Form is available in Form Editor only when the Waitlist add-on is enabled. It appears on the trip page when a trip is fully booked or when the waitlist option is enabled from the start. Changes made to the Waitlist Form will apply to all trips using the waitlist feature going forward.
Now that you know where each form is used, you can start changing the fields inside them.
Managing fields
Each field is one question or input on the form. For example, a field could ask for a passport number, a pickup location, or a dietary preference.
Adding a field
Add a new field when your current form is missing something important. For example, you might want to ask for a hotel pickup point on a day tour or collect a passport copy for an international trek.
What you'll need before you start:
- The Form Editor add-on must be active.
- You should know which form you want to change.
Open the form
Start with the form where the new question belongs.
Click the tab for the form you want to edit at the top of the Form Editor page.
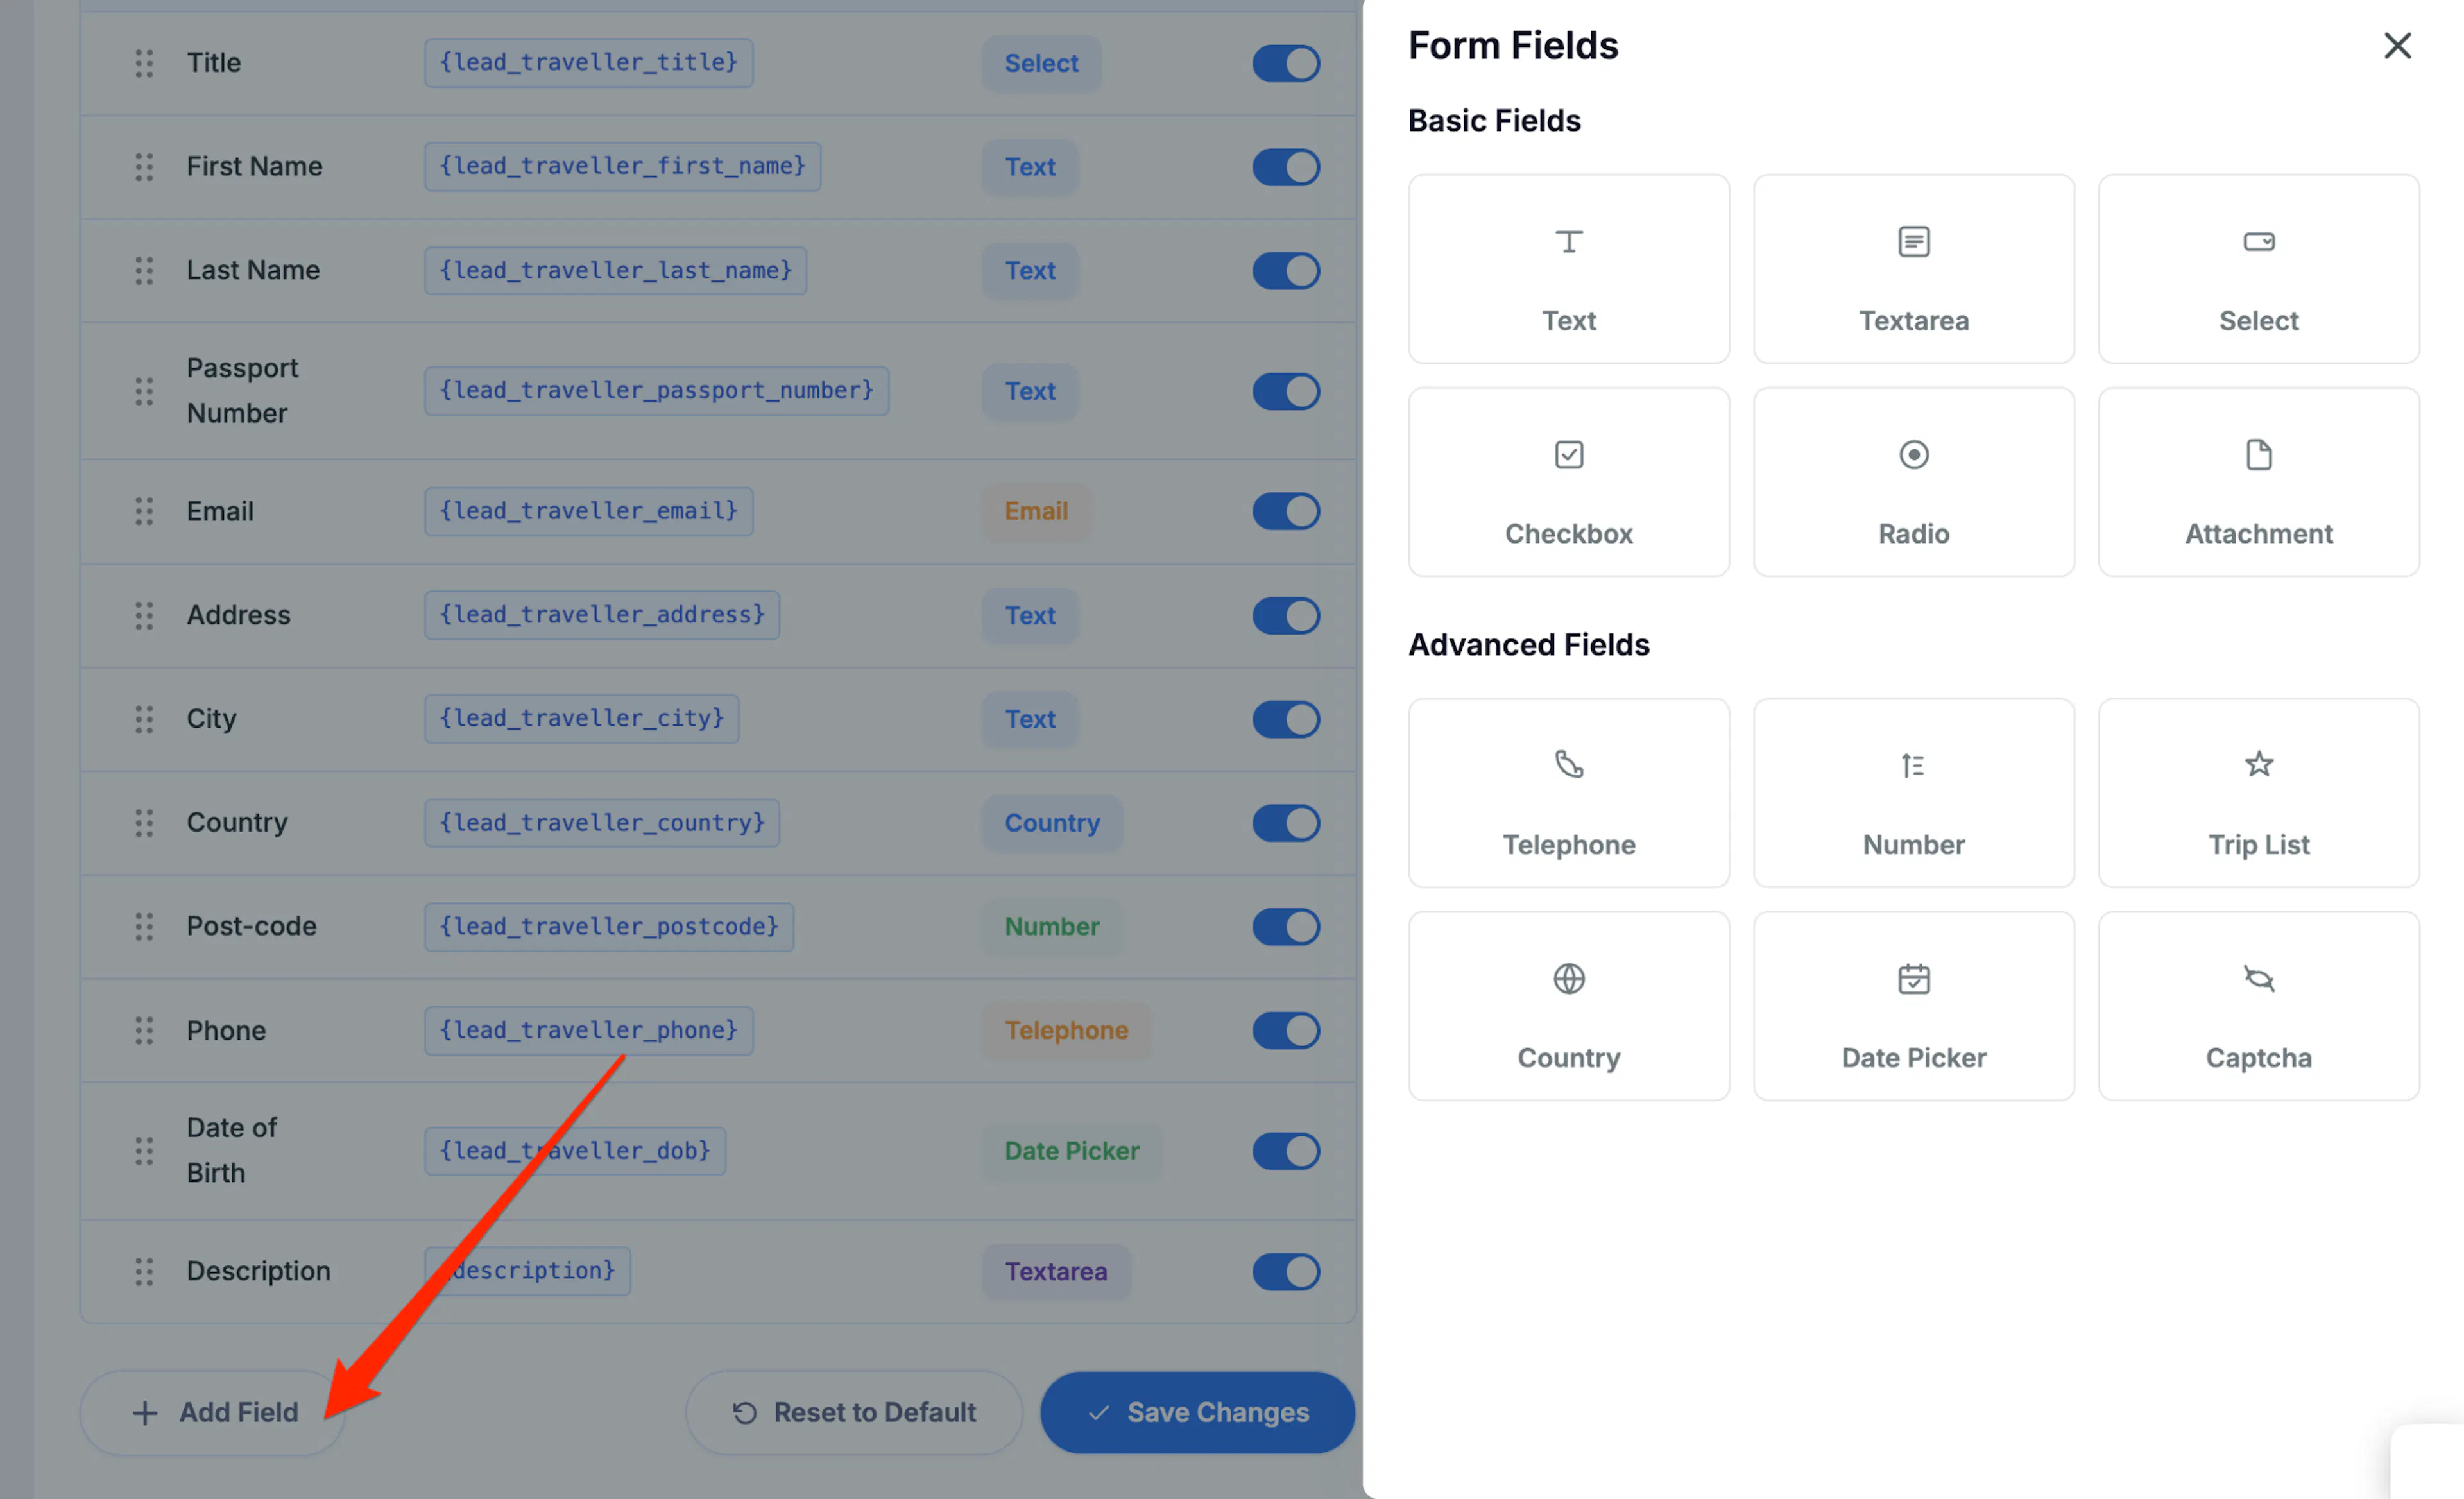
Click Add Field
This opens the list of field types you can add.
Click + Add Field at the bottom left of the field table.
Choose a field type
Pick the type that best matches the answer you want from the traveler. For example, use Radio for a yes-or-no question, or Attachment if you need a document upload.
A Form Fields panel opens on the right. It shows all available field types under Basic Fields and Advanced Fields. Click the field type you want to add.
Configure the field
This is where you decide what the traveler sees and how the field behaves.
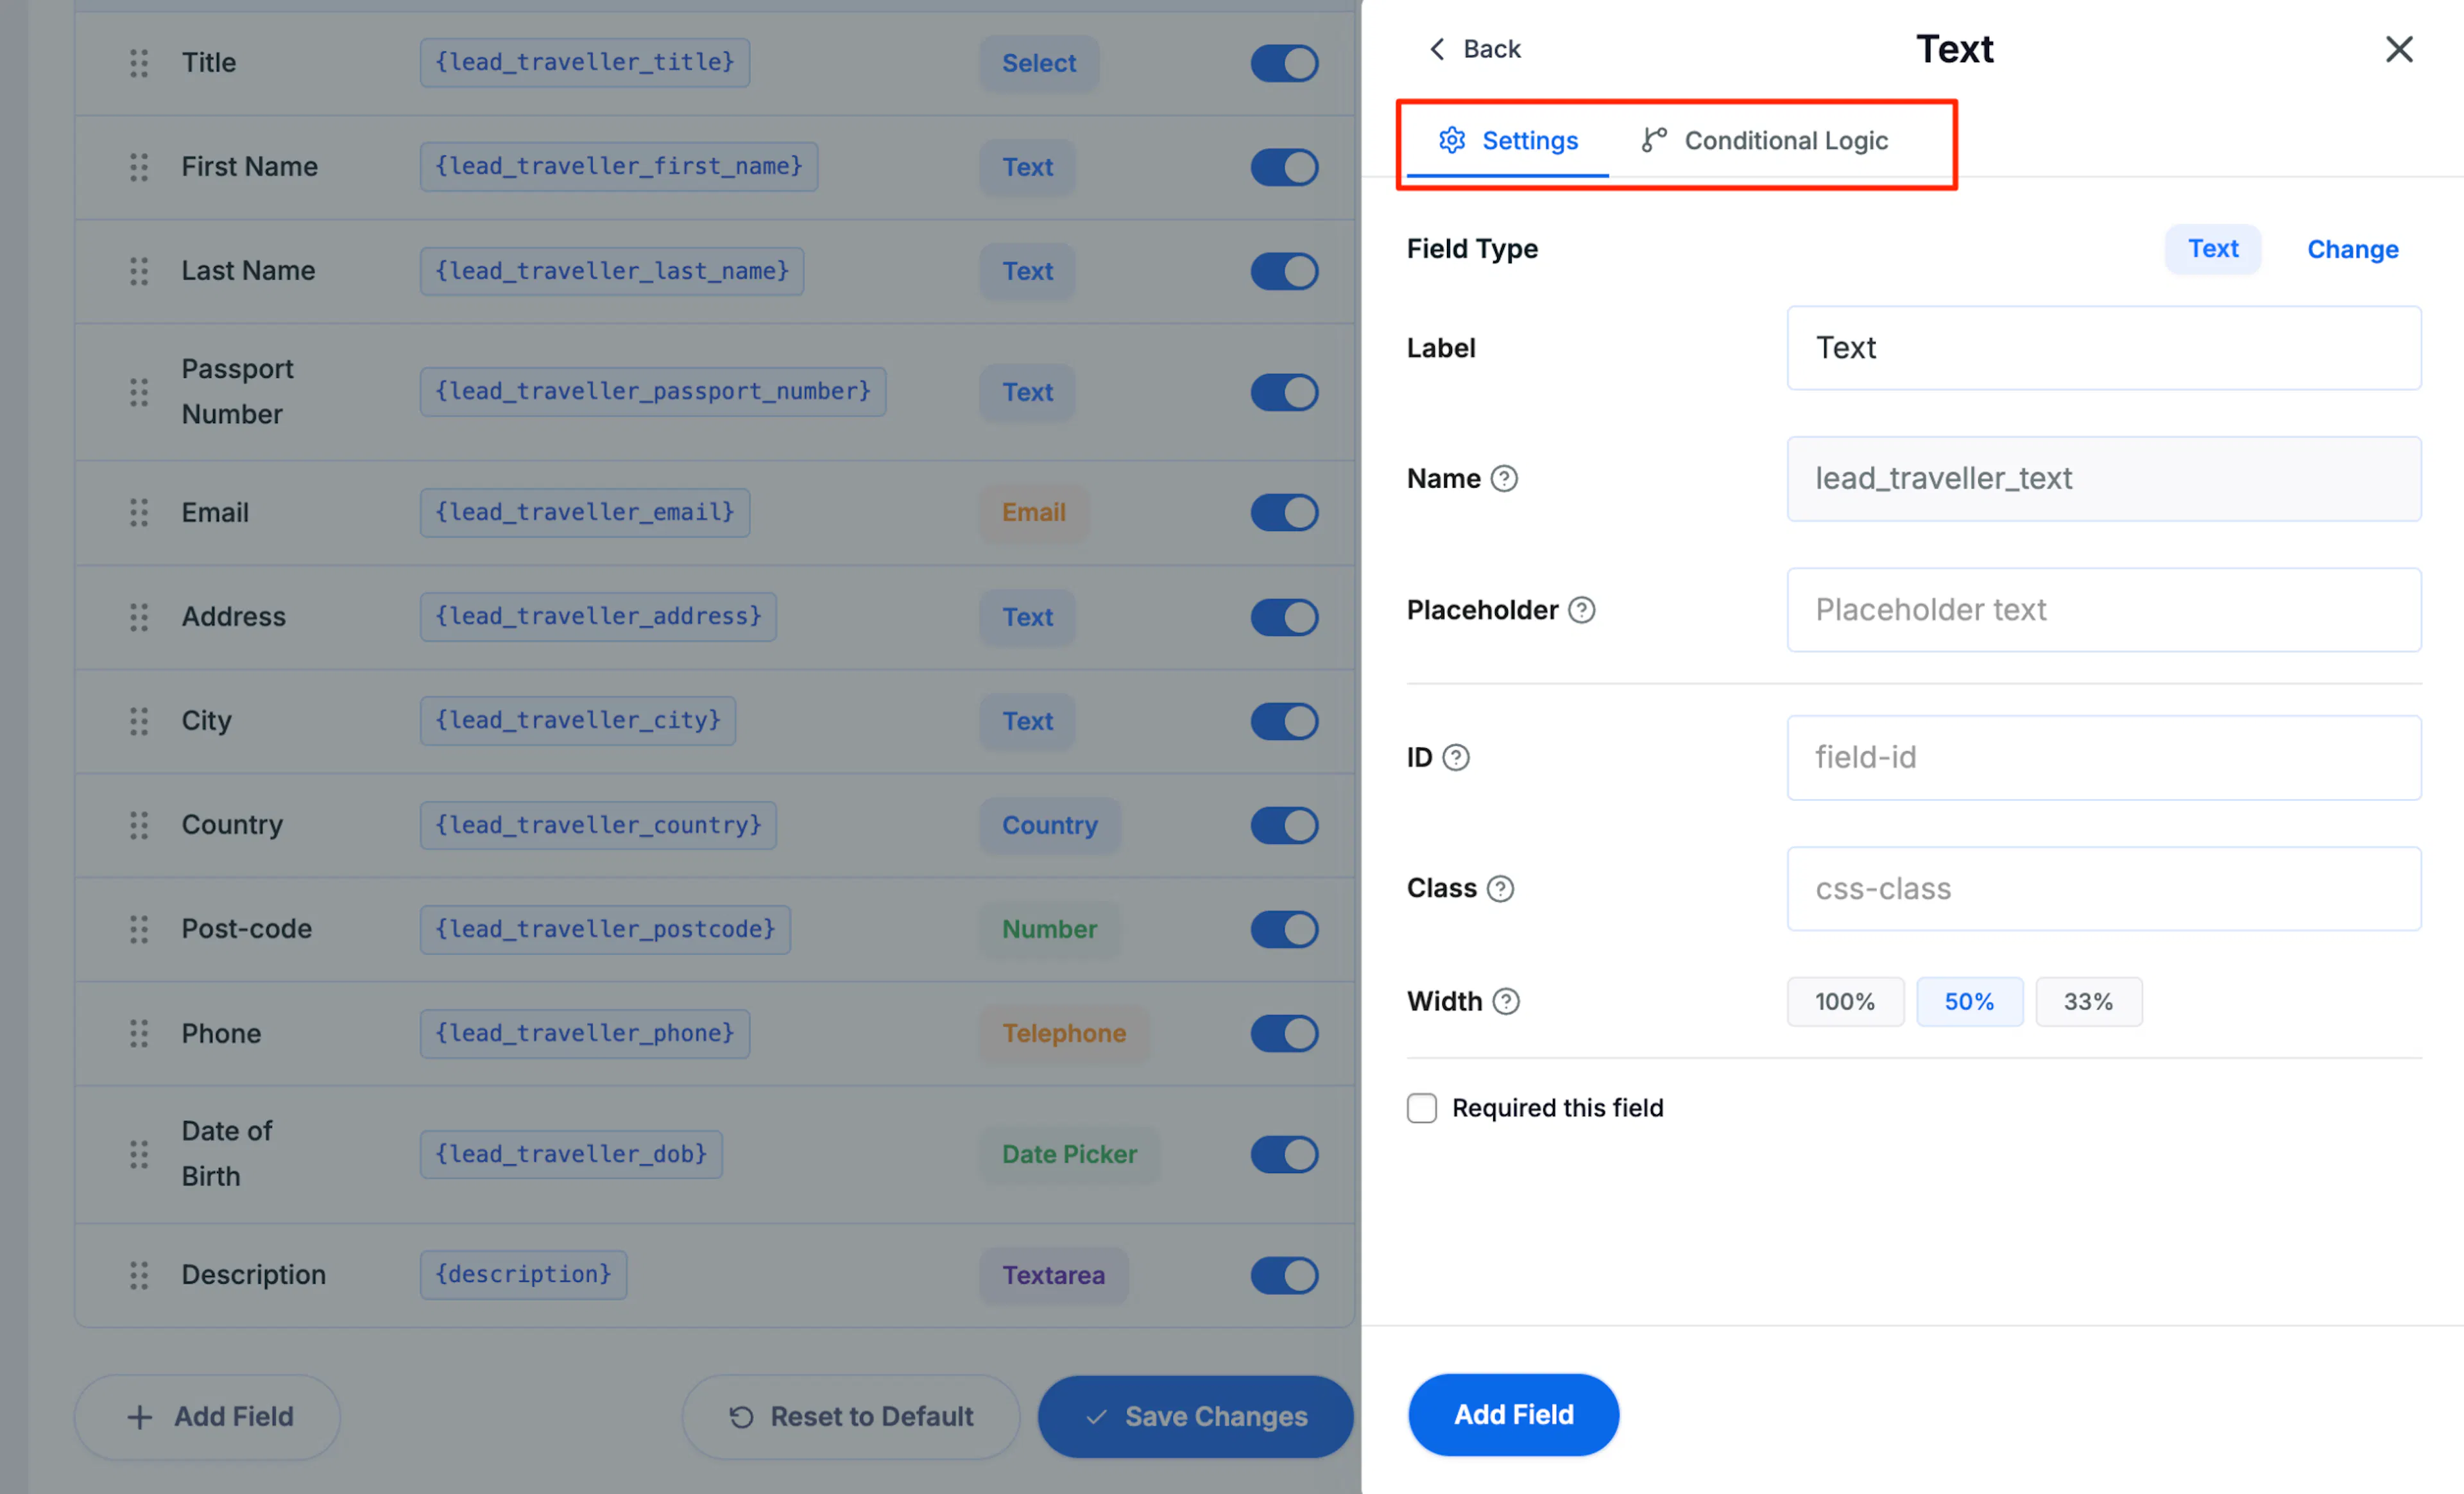
A settings panel opens with two tabs: Settings and Conditional Logic. Under Settings, fill in the label, name, and any other settings you need. Under Conditional Logic, choose to show or hide a field based on how a traveler answers another field, and optionally scope it to specific trips.
Add and save
Saving is what makes the new field part of your form.
Click Add Field at the bottom of the settings panel to add it to the form, then click Save Changes.
Once the field is saved, it becomes part of that form.
Editing a field
Edit a field when you want to change its wording, make it required, or adjust how it appears. This is useful if a field is confusing travelers or missing an important detail.
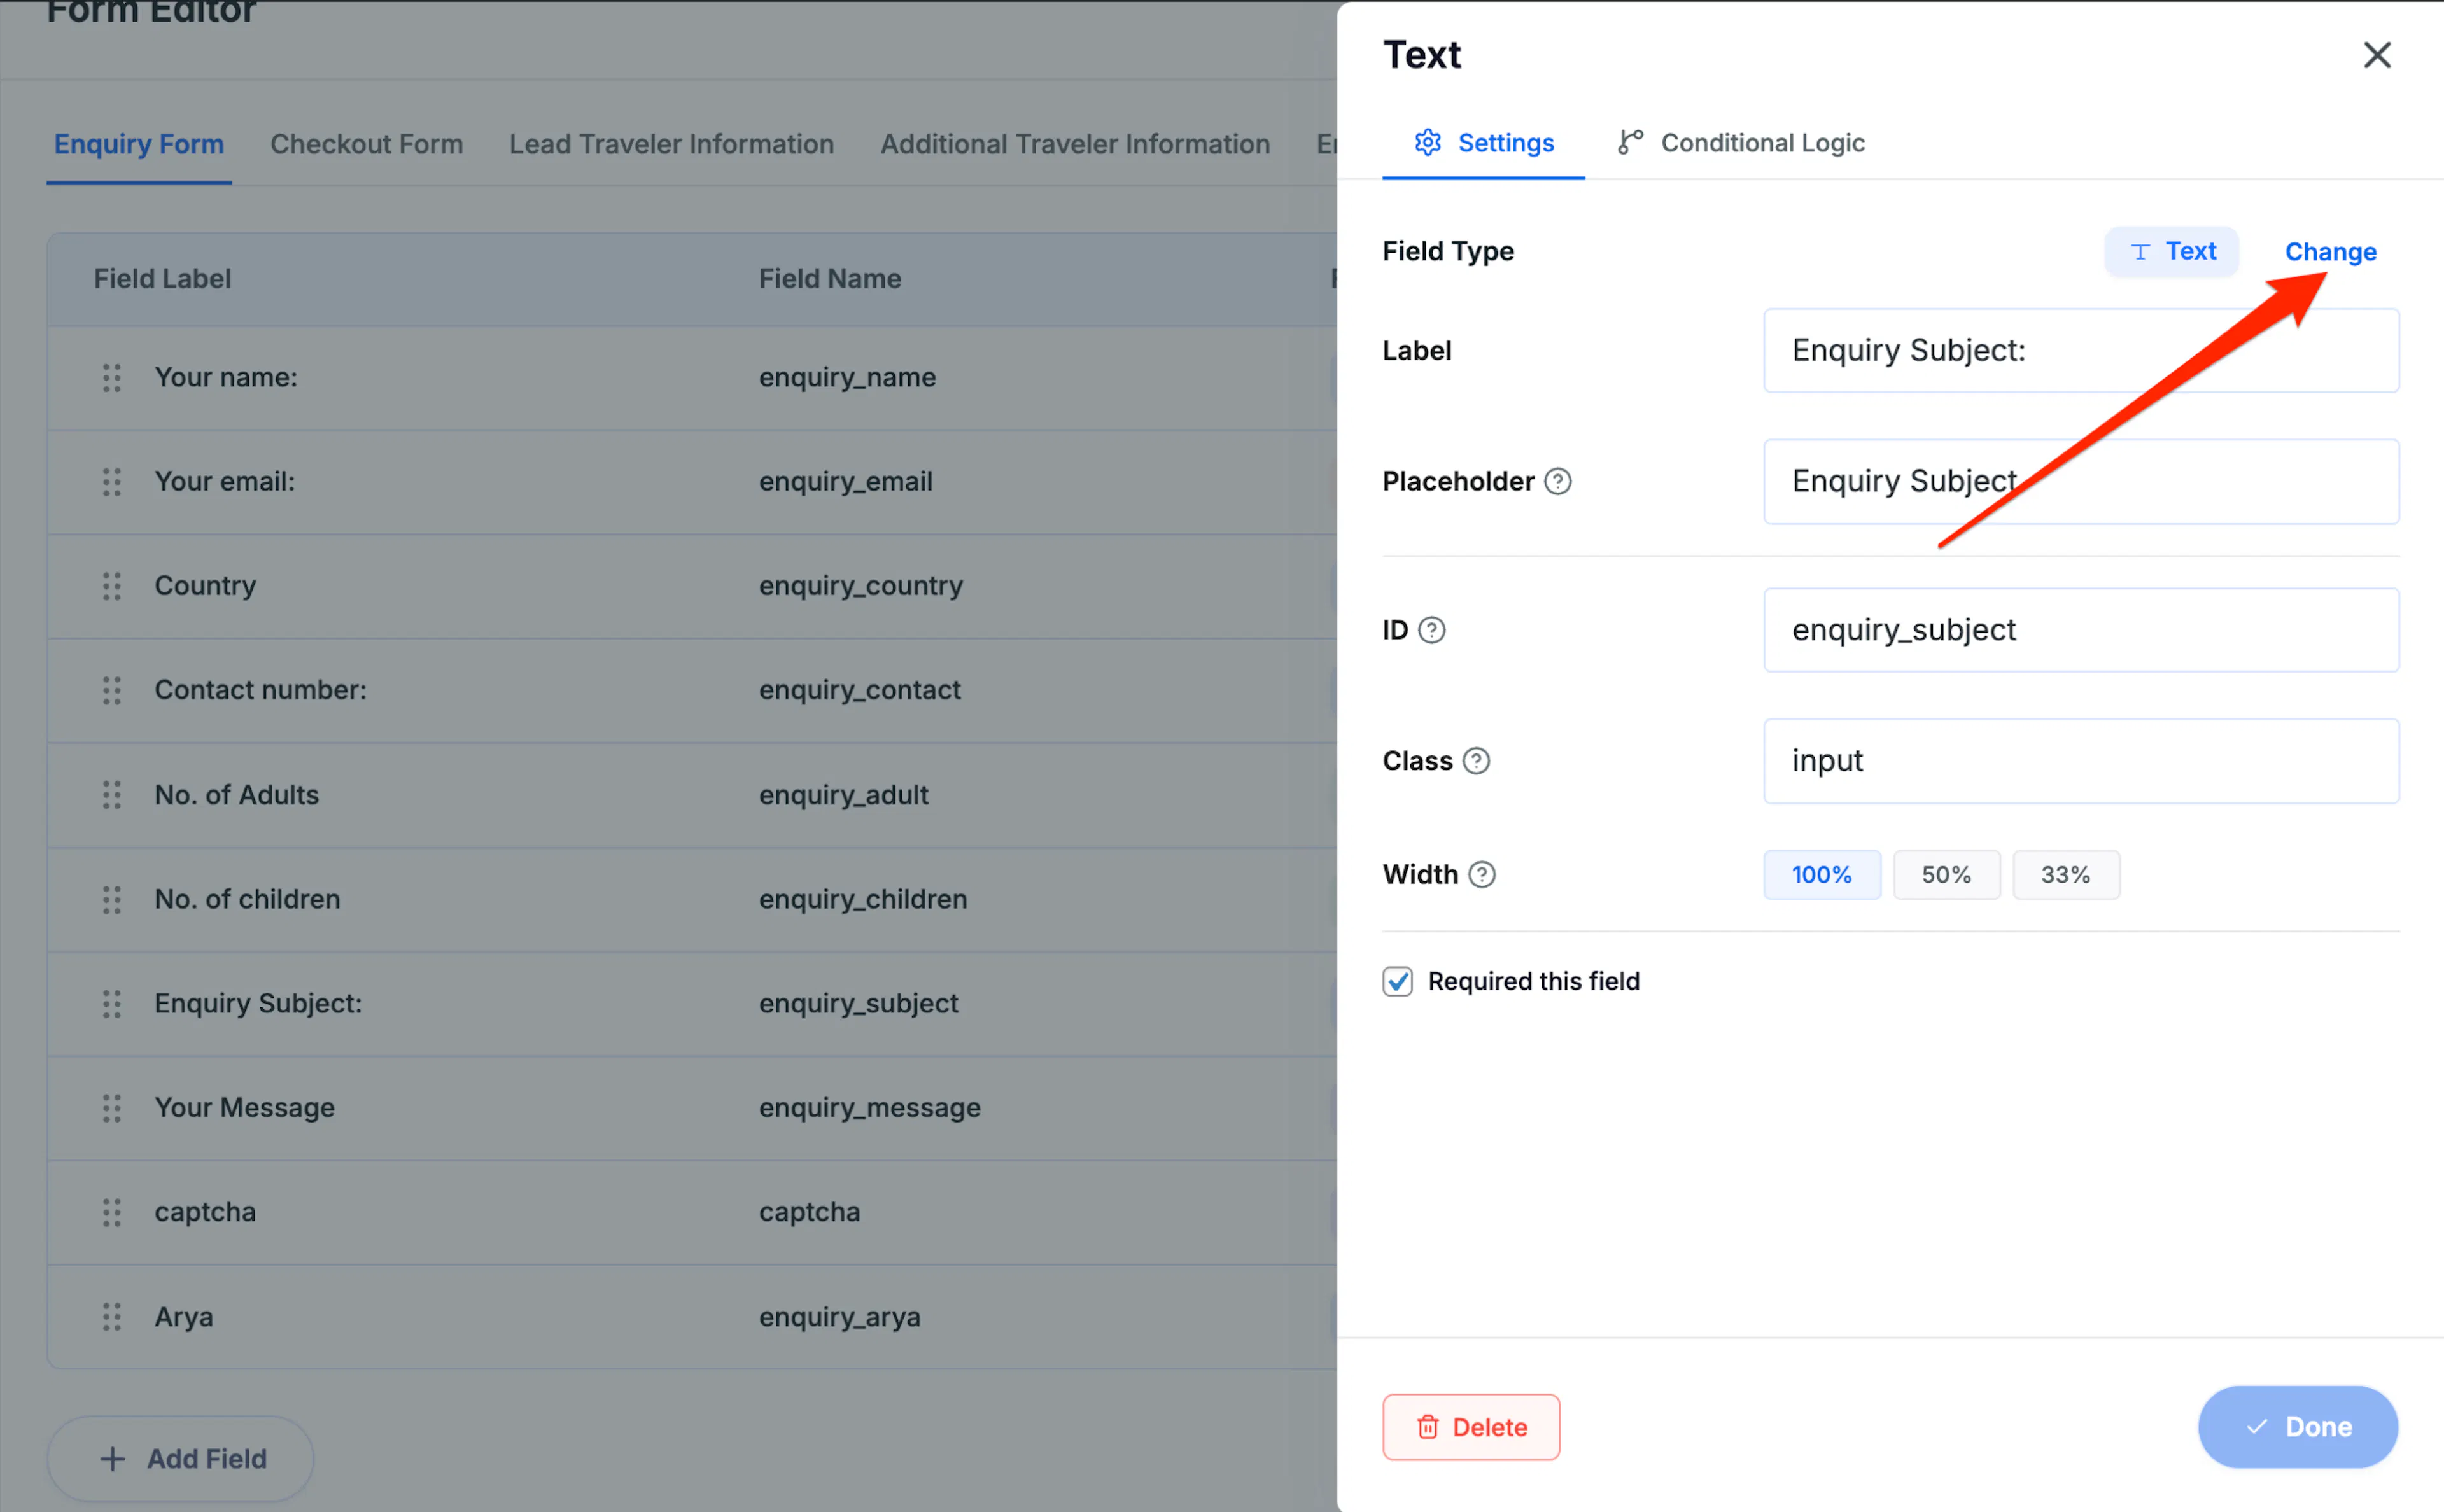
Click the edit icon, which looks like a pencil, next to any field in the table. The field settings panel opens on the right. Make your changes and click Save Changes. You can also change the field type of a saved field by clicking the Change button.
For example, if your field says "Transfer" and travelers keep asking what that means, you could change the label to "Do you need airport pickup?" so the question is clearer.
Reordering fields
The order of your questions affects how easy the form feels to complete. Put the most important questions first and group related questions together.
Click and drag the drag handle, which is the six-dot icon, on the left of any row to move it up or down in the form. Click Save Changes when done.
For example, you might place "Arrival Date" and "Departure Date" near each other, or move "Dietary Preference" closer to other traveler details.
Deleting a field
Delete a field when you no longer need to ask that question. This helps keep forms shorter and avoids confusing travelers.
Click the delete icon next to the field you want to remove, then click Save Changes to confirm.
If you stop offering gear rental, for example, you can remove a field that asks whether the traveler wants to rent equipment.
Toggling a field on or off
Use the toggle when you want to hide a field for now without deleting it completely. This is helpful if a question is seasonal or only used during part of the year.
Use the toggle in the Active column to show or hide a field without deleting it. A blue toggle means the field is active and visible to travelers. Click Save Changes after making any changes.
For example, you could switch off a field about monsoon-season gear needs when that season ends, then turn it back on later.
"Your name" and "Your email" fields don't have a delete or disable option. These are core fields and can't be removed from the Enquiry Form.
Using the live preview
The live preview helps you spot problems before travelers do. You can check the order, labels, and layout while you work.
Click Show Preview in the top right corner of the Form Editor to open the live preview panel. The panel appears on the right side of the screen and updates in real time as you make changes to the form.
Use the preview to check field order, labels, and layout before saving. Inactive fields do not appear in it. To close the preview, click Hide Preview in the top right corner.
That preview step can save you from small mistakes. Next, it helps to know which field type to choose for each kind of question.
Field types reference
The field type controls how travelers answer a question. Choosing the right one makes the form easier to complete.
Basic fields
- Text - A one-line answer box. Use it for short answers such as a subject line, a city name, or a traveler name.
- Textarea - A larger box for longer answers. Use it when travelers need space to write a message, special request, or trip question.
- Select - A dropdown list. Use it when travelers need to choose one option from a set list, such as a pickup point or meal preference.
- Checkbox - One or more boxes the traveler can tick. Use it for yes-or-no items or when travelers can choose more than one option.
- Radio - A set of options where the traveler picks one answer only. Use it for questions like "Do you need airport transfer?" with options such as "Yes" or "No."
- Attachment - A file upload field. Use it when you need travelers to send documents such as passport scans, medical letters, or permits.
Advanced fields
- Telephone - A phone number field with country code support. Use it when you need a contact number in the right format.
- Number - A field for numbers only. Use it for things like group size, number of children, or luggage count.
- Trip List - A dropdown that pulls in your published trips automatically. Use it when you want travelers to choose from your trip list.
- Country - A dropdown list of countries. Use it instead of asking travelers to type the country manually.
- Date Picker - A calendar field for choosing a date. Use it for arrival dates, departure dates, or preferred travel dates.
- Captcha - A spam check field. It helps block unwanted form submissions from bots.
If you are unsure which one to choose, think about the kind of answer you want from the traveler first. Then pick the field type that makes that answer easiest to give.
Configuring field settings
When you add or edit a field, a panel opens on the right side with two tabs: Settings and Conditional Logic.
The Settings tab controls what the field looks like and how it behaves. Here are the options you may see, depending on the field type.
- Label - This is the field name travelers see on the form. For example, you might use "Passport Number" or "Preferred Pickup Location."
- Name - This is the internal field identifier used by the system. It fills in automatically based on the label. You cannot edit this field.
- Placeholder - This is the light grey hint text inside the field before the traveler types anything. For example, a phone field might say "Enter your mobile number with country code."
- ID - This is an optional HTML ID for the field. An HTML ID is a behind-the-scenes label used by the page code. Leave it blank unless you have a specific reason to set one.
- Class - This is an optional CSS class. A CSS class is a label used for custom styling. Leave it blank unless someone is styling the form for you.
- Width - This controls how wide the field appears on the form. Choose from 100%, 50%, or 33%. If you set two related fields to 50%, they can sit side by side. A common example is putting "First Name" and "Last Name" next to each other.
- Required - Turn this on when travelers must fill in the field before they can submit the form.
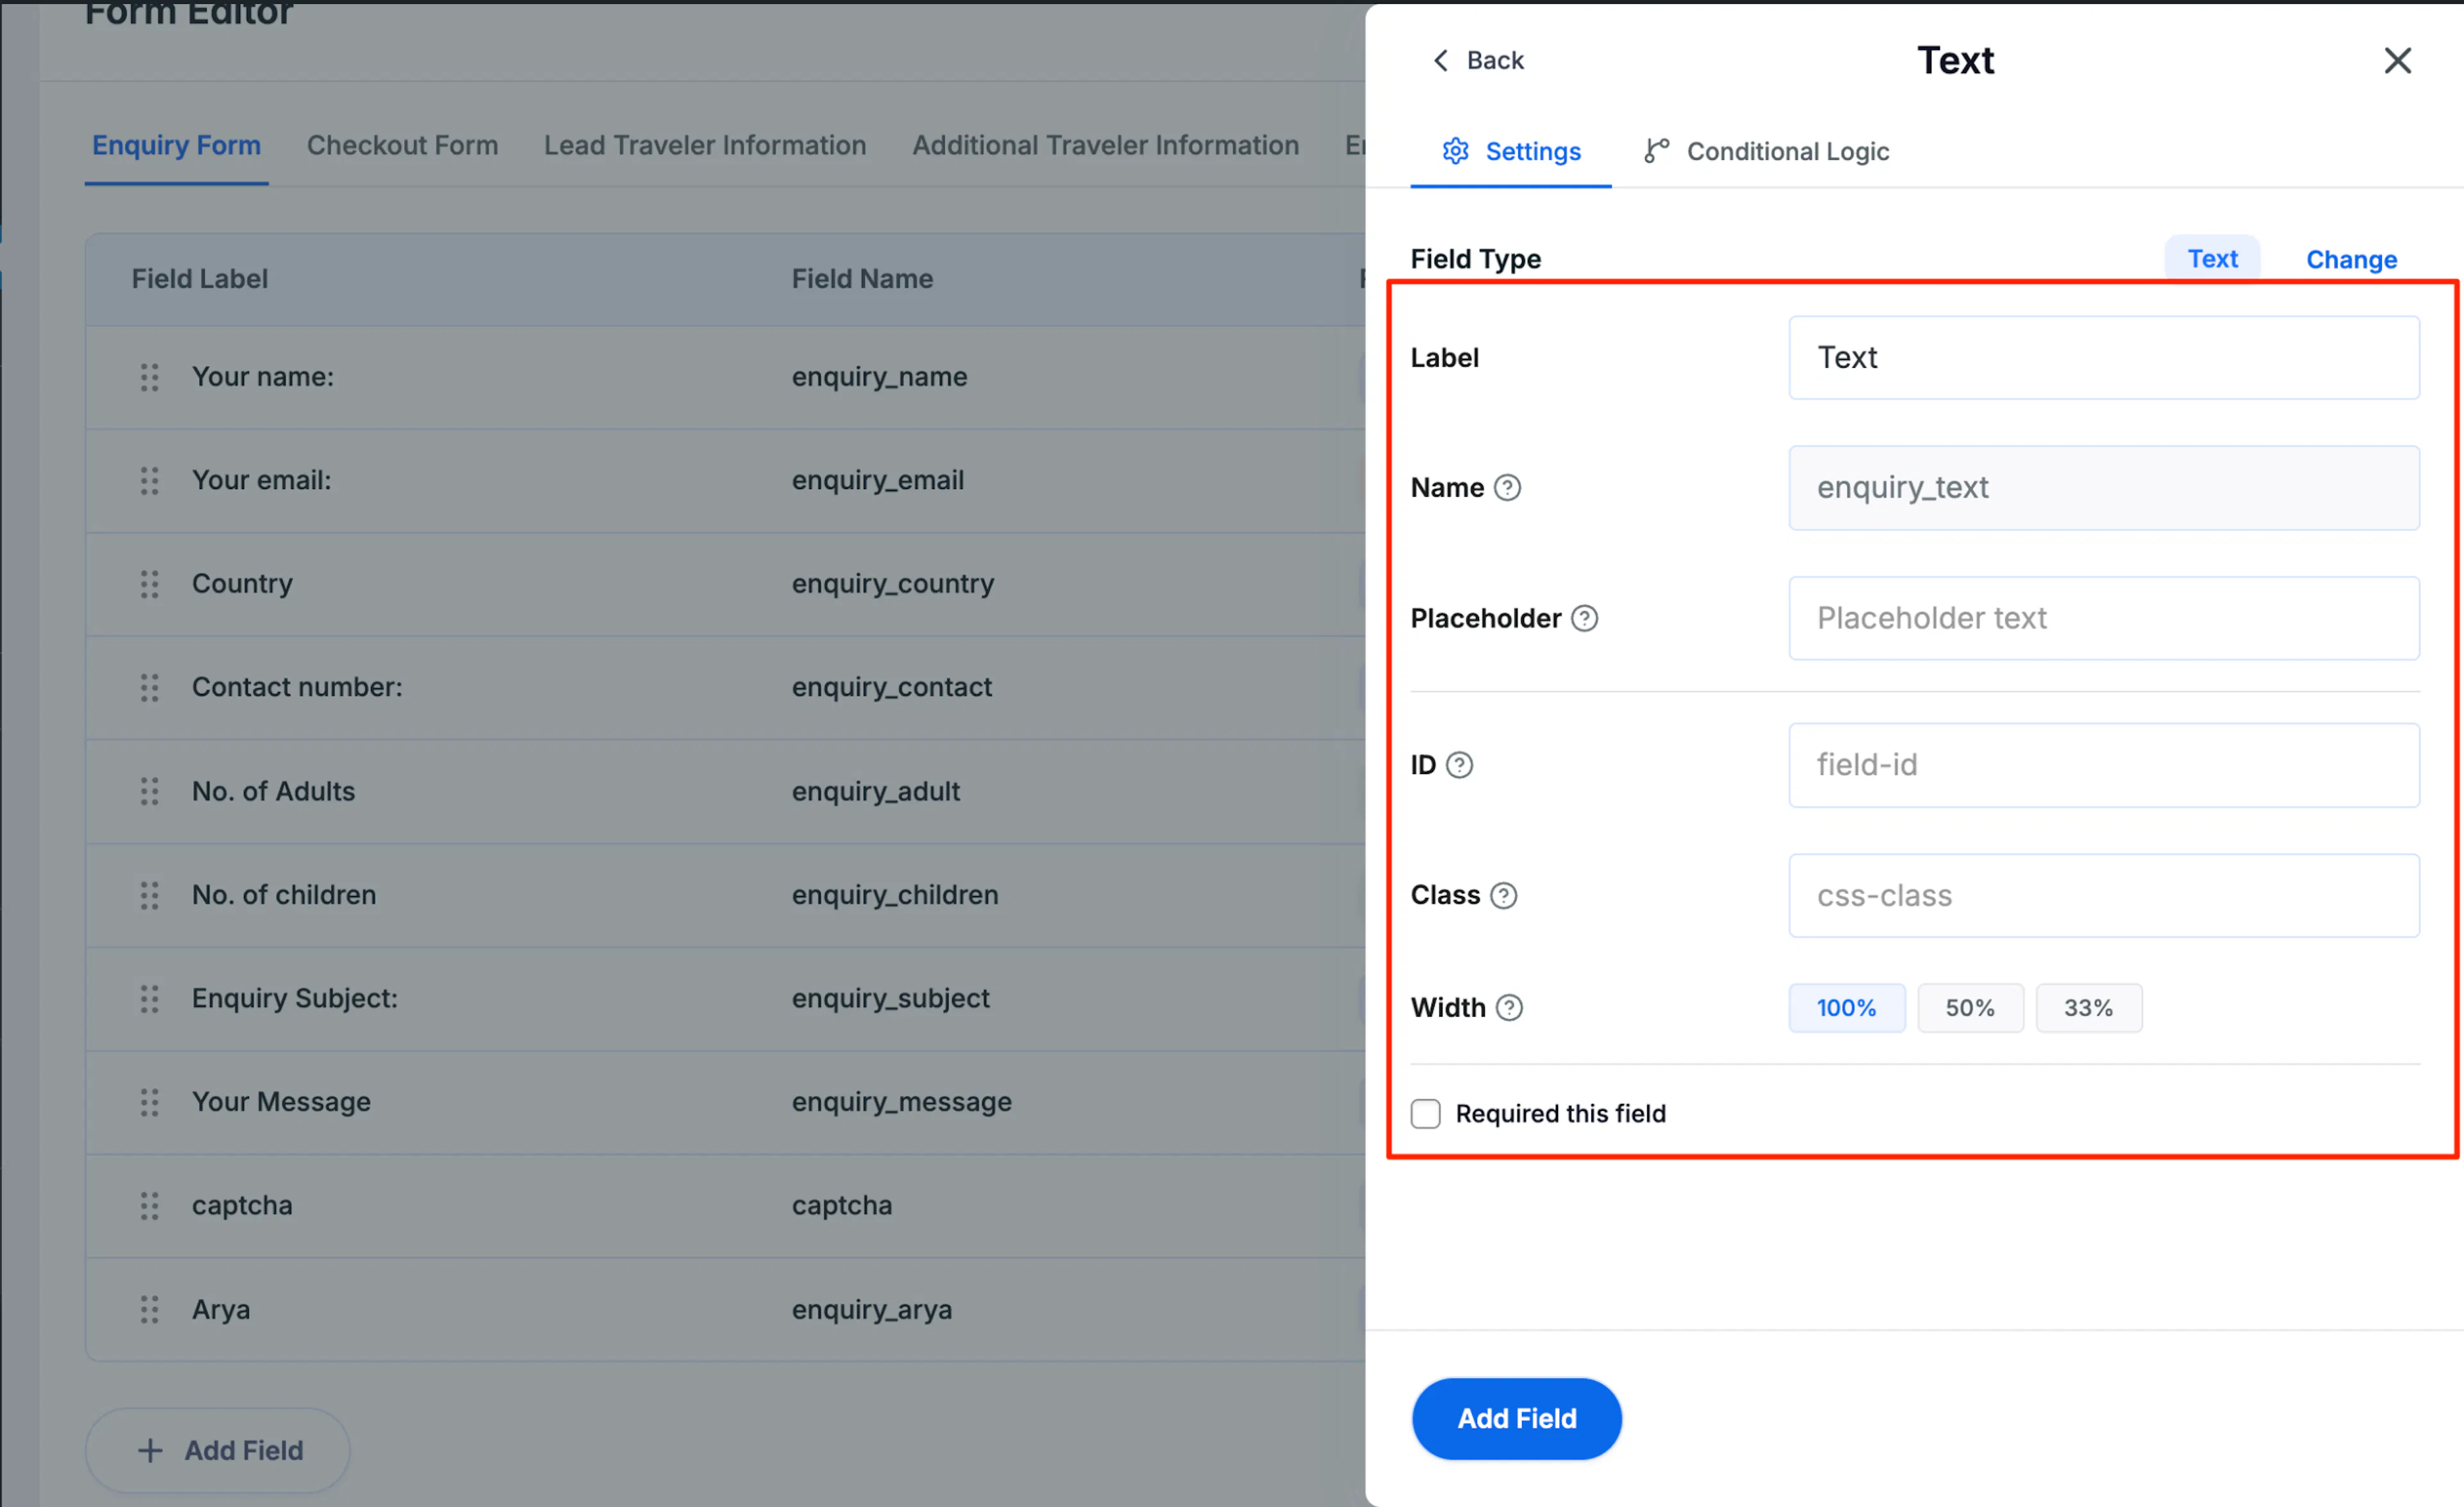
When you create a new field, the Name is generated automatically from the label you enter. Once you save the field, the Name locks permanently - changing the label later won't update it. Make sure your label is correct before clicking Add Field.
A good way to use these settings is to keep labels clear and widths tidy. If the form looks clean, travelers are more likely to finish it.
New in Attachment field settings
If you use the Attachment field, you get two extra settings to control uploads.
- Allow Multiple Files - Let travelers upload more than one file in a single submission. Supported formats:
.jpg,.jpeg,.png,.doc,.docx. - Maximum File Size - Set the upper limit for uploaded files, in MB.
This is useful if a traveler needs to upload both a passport copy and a medical document for the same trip.
Conditional logic
Conditional logic means the form shows or hides certain fields based on what the traveler answered in a previous field. This helps you keep forms shorter and only ask follow-up questions when they matter.
For example, if a traveler answers "Yes" to "Do you need an airport transfer?", you can show a second field asking for the pickup location. If they answer "No", that second field stays hidden.
You can also choose whether the field appears on all trips, only on selected trips, or on all trips except a few.
To set up conditional logic on a field:
What you'll need before you start:
- The field you want to control must already exist.
- The field you want to use as the trigger must also already exist in the same form.
Open the field's settings
Start by opening the field you want to show or hide.
Click the edit icon next to the field you want to show or hide conditionally, then click the Conditional Logic tab in the settings panel.
Enable conditional logic
This turns the rule system on for that field.
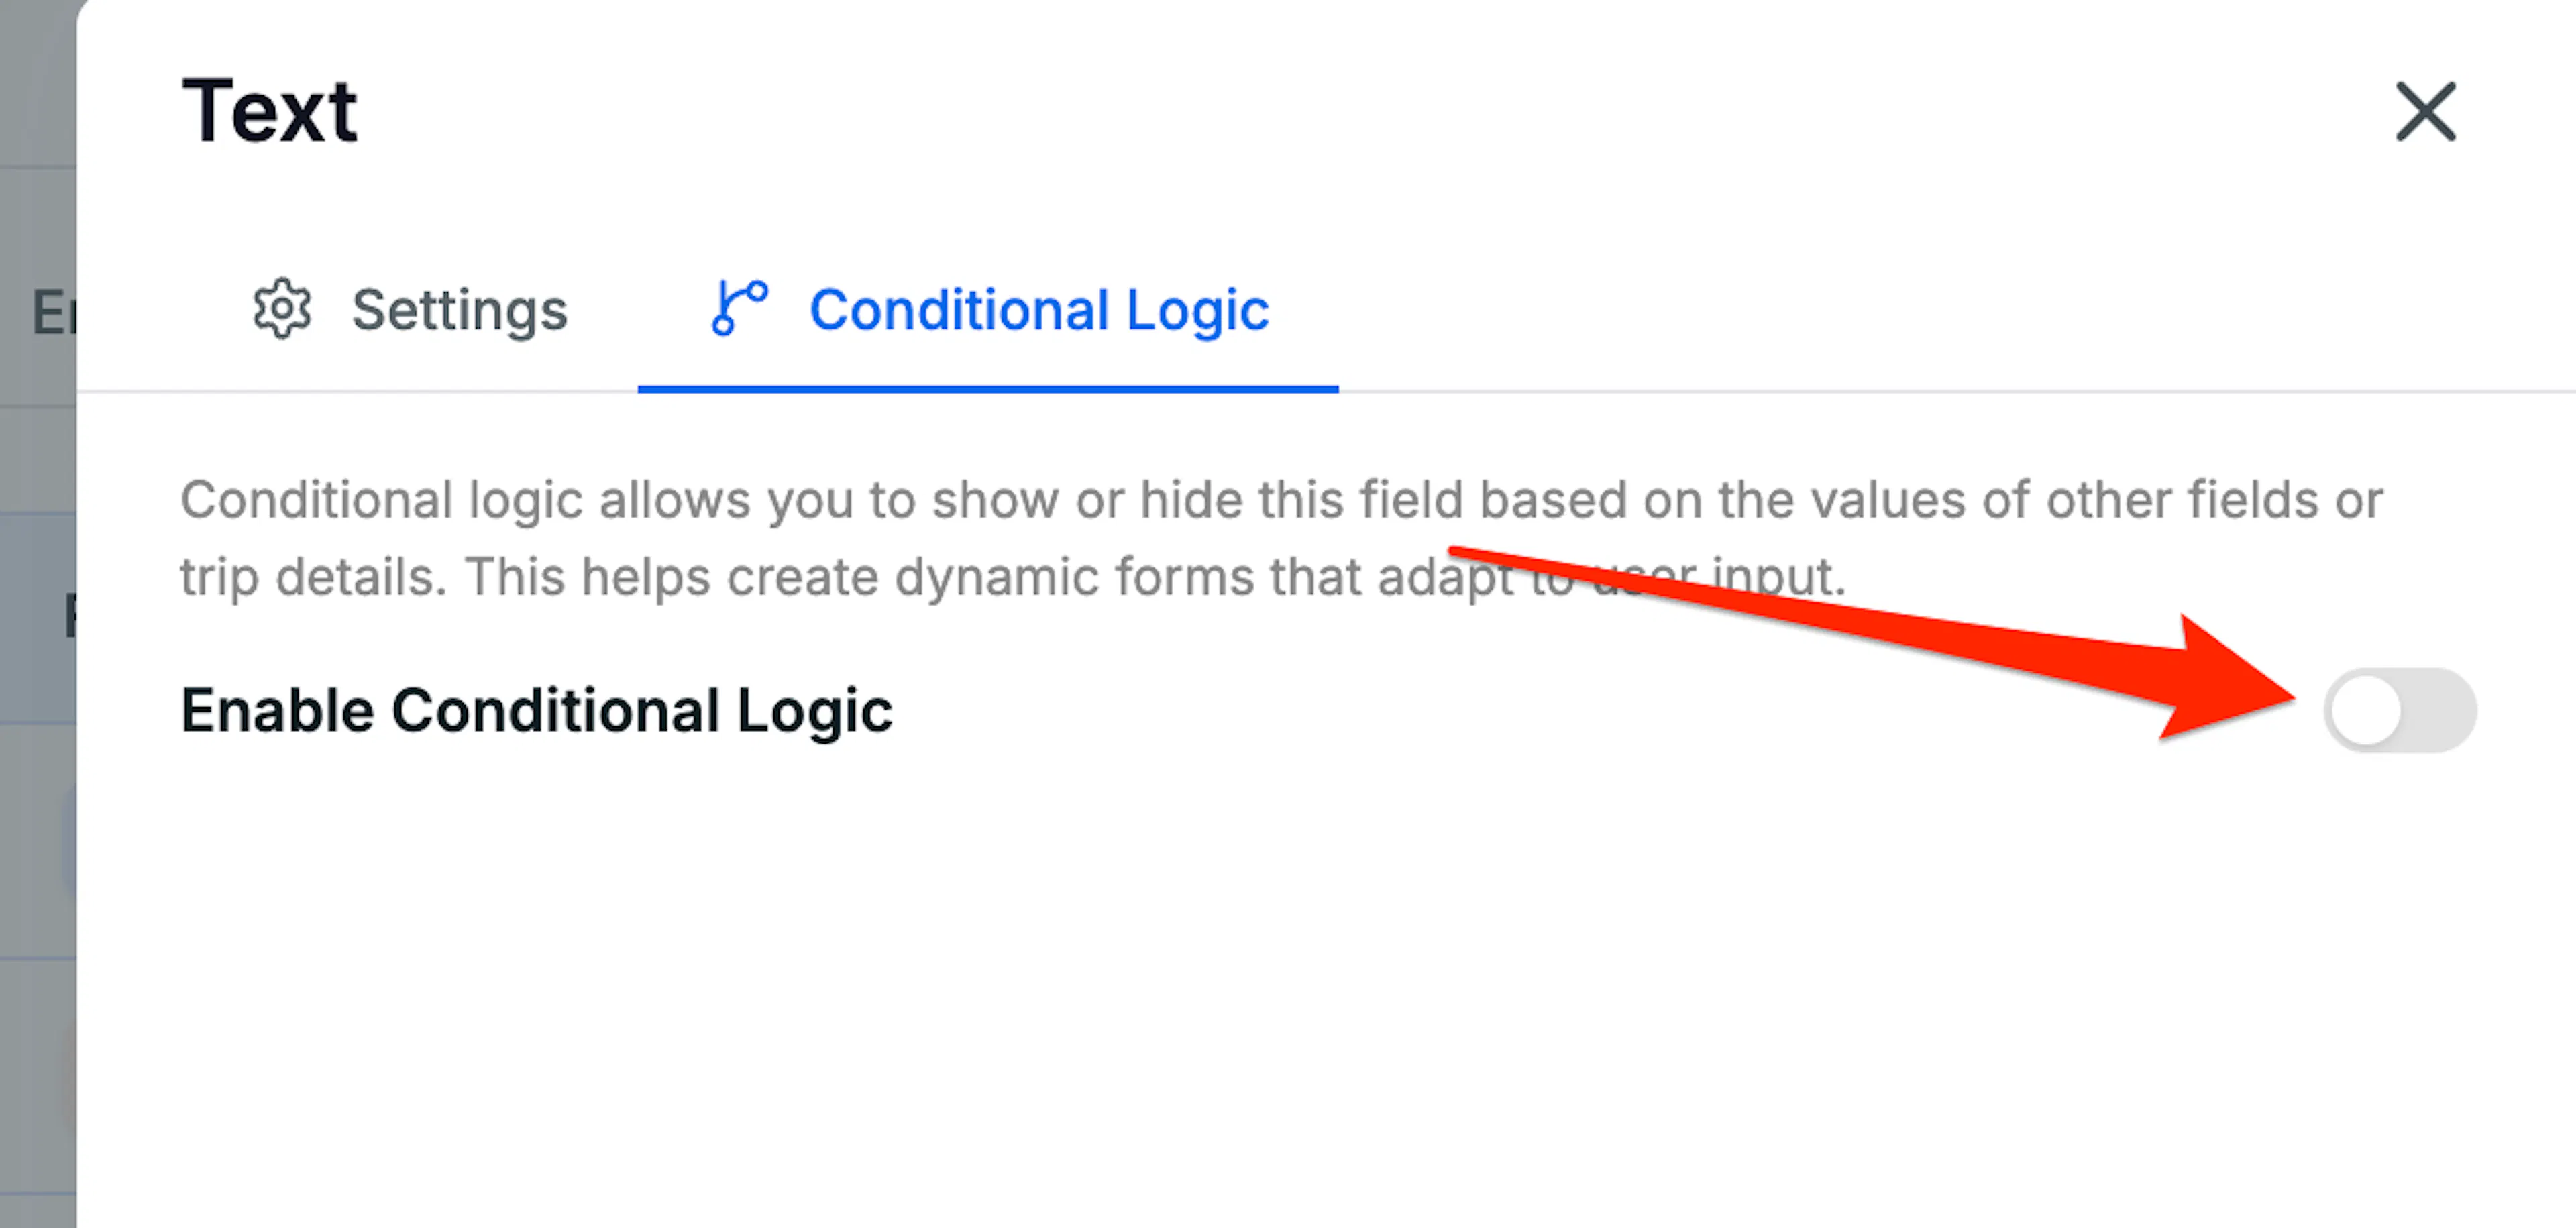
Toggle Enable Conditional Logic on.
Choose which trips the rule applies to
This helps when a question matters only for certain trips.
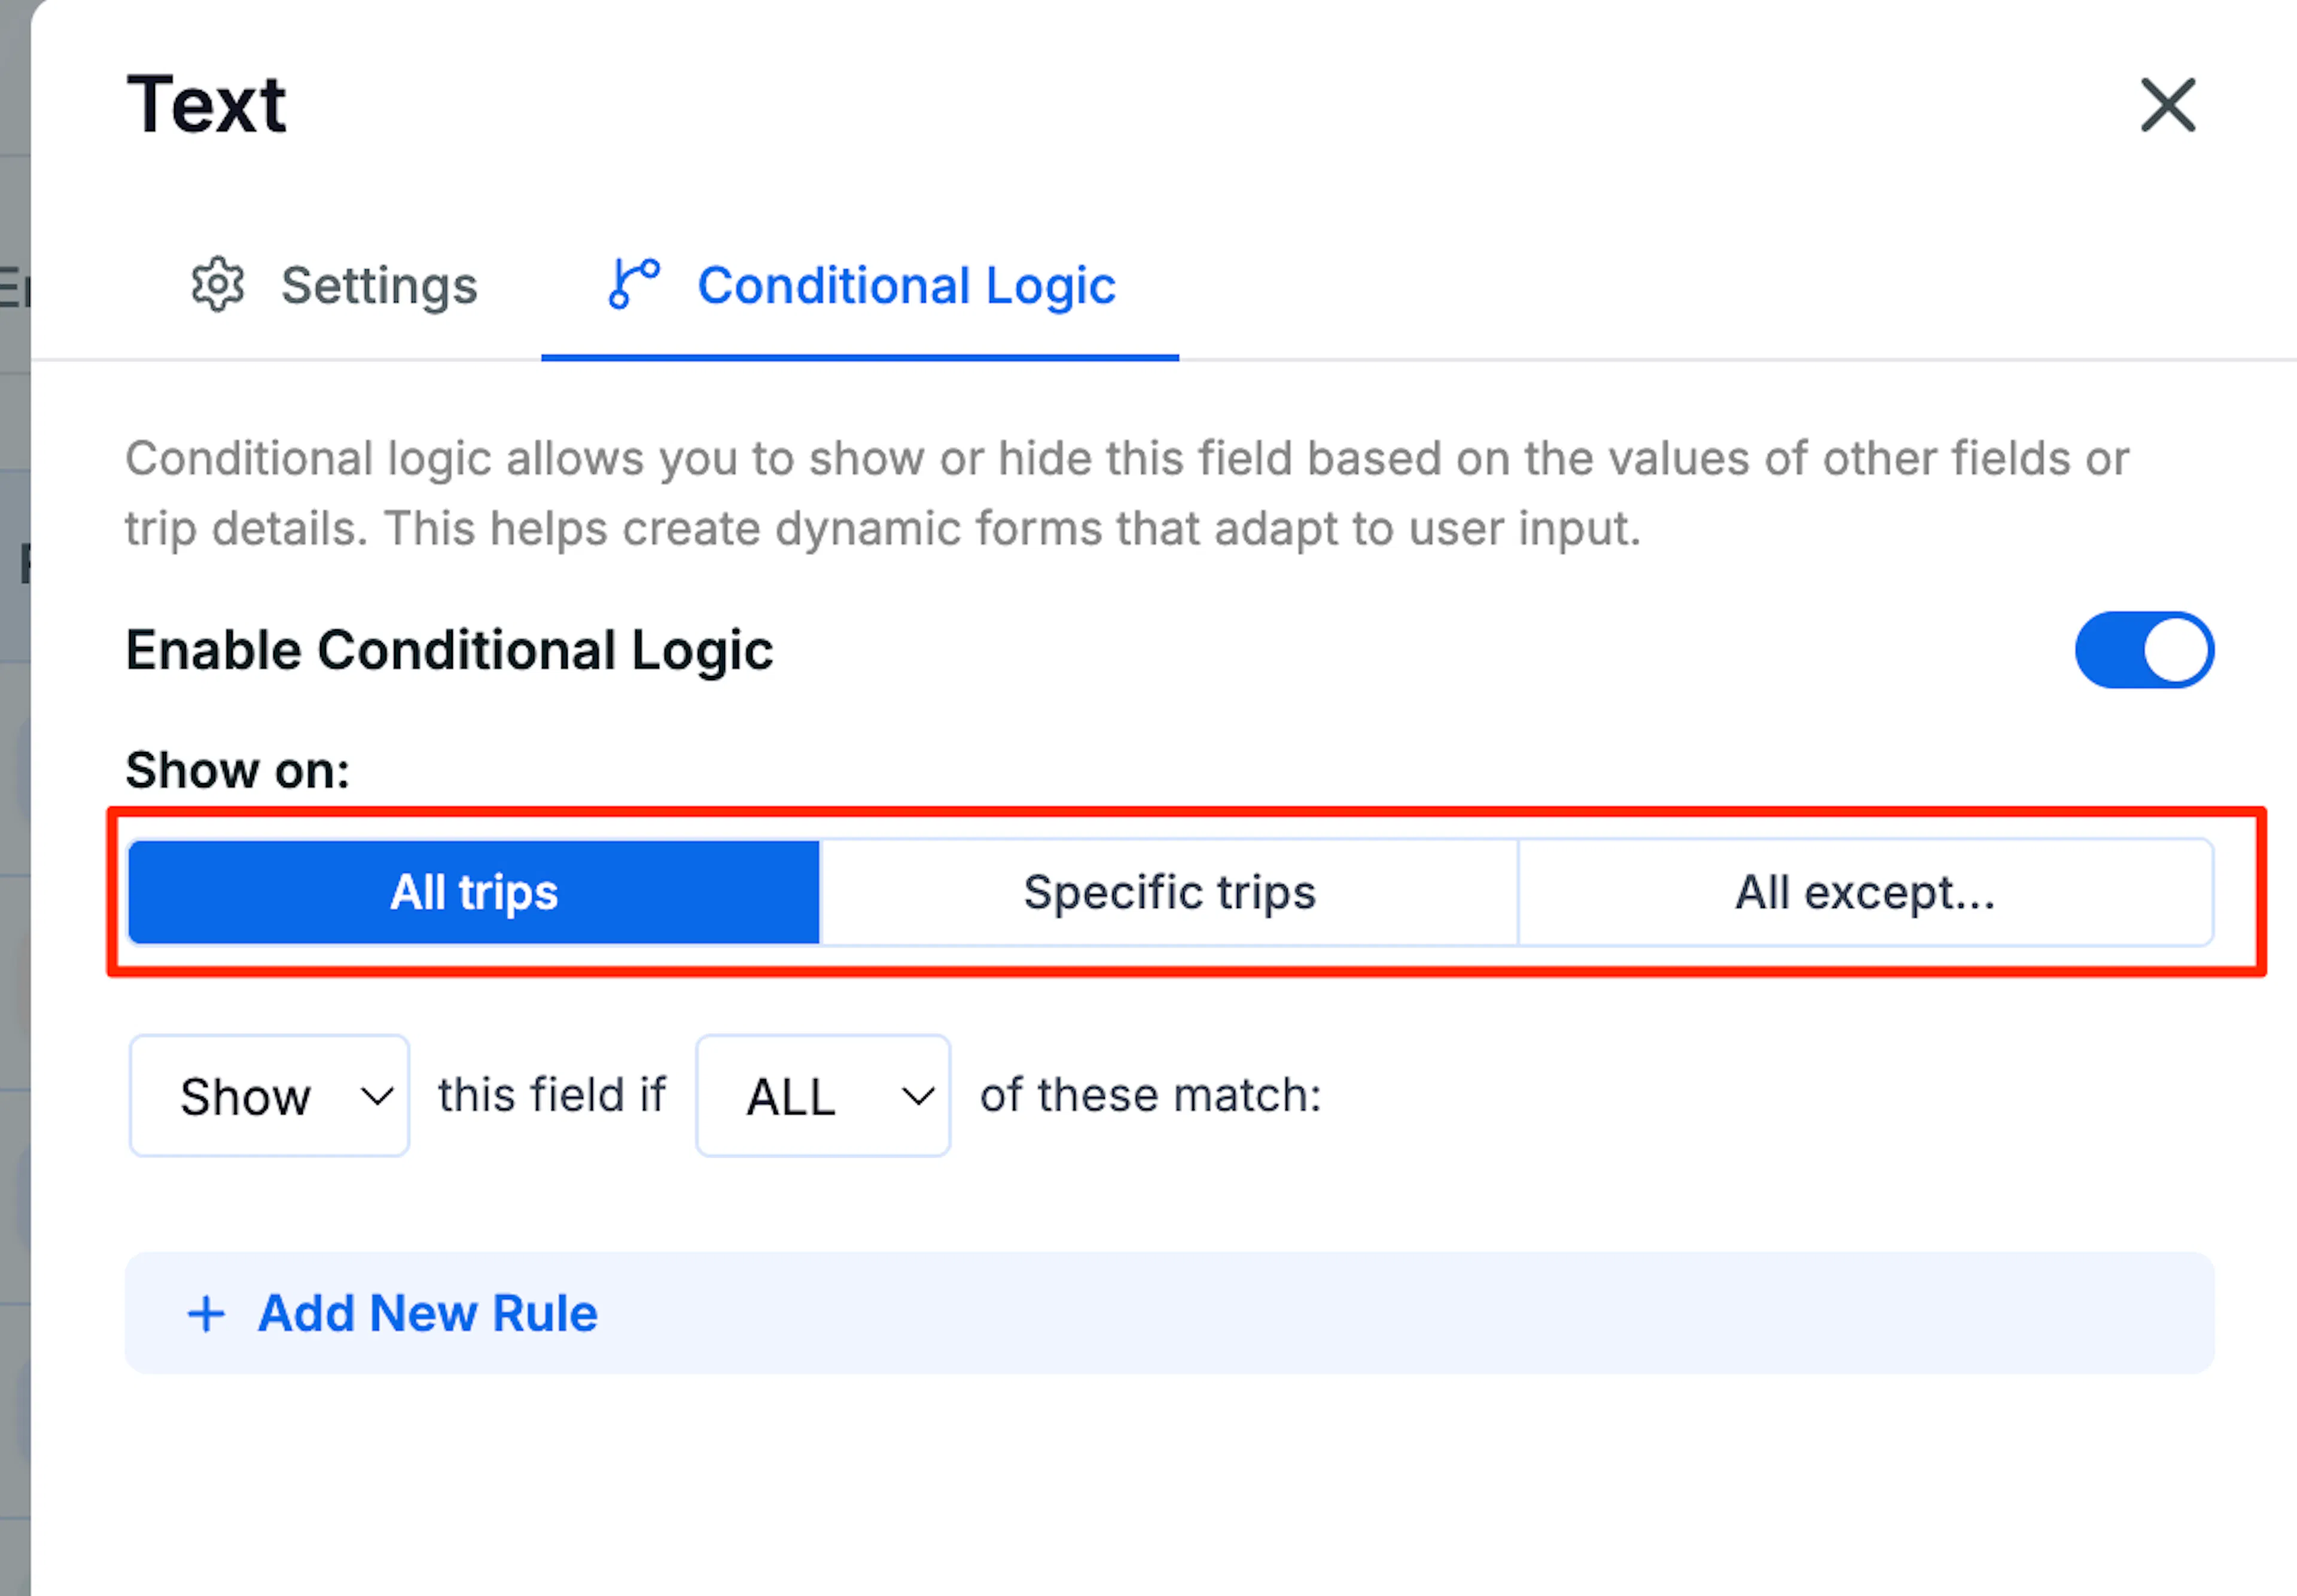
Under Show on, choose one of the following:
- All trips - The conditional rule applies across all trips.
- Specific trips - The rule applies only to the trips you select.
- All except - The rule applies to all trips except the ones you select.
Choose the action
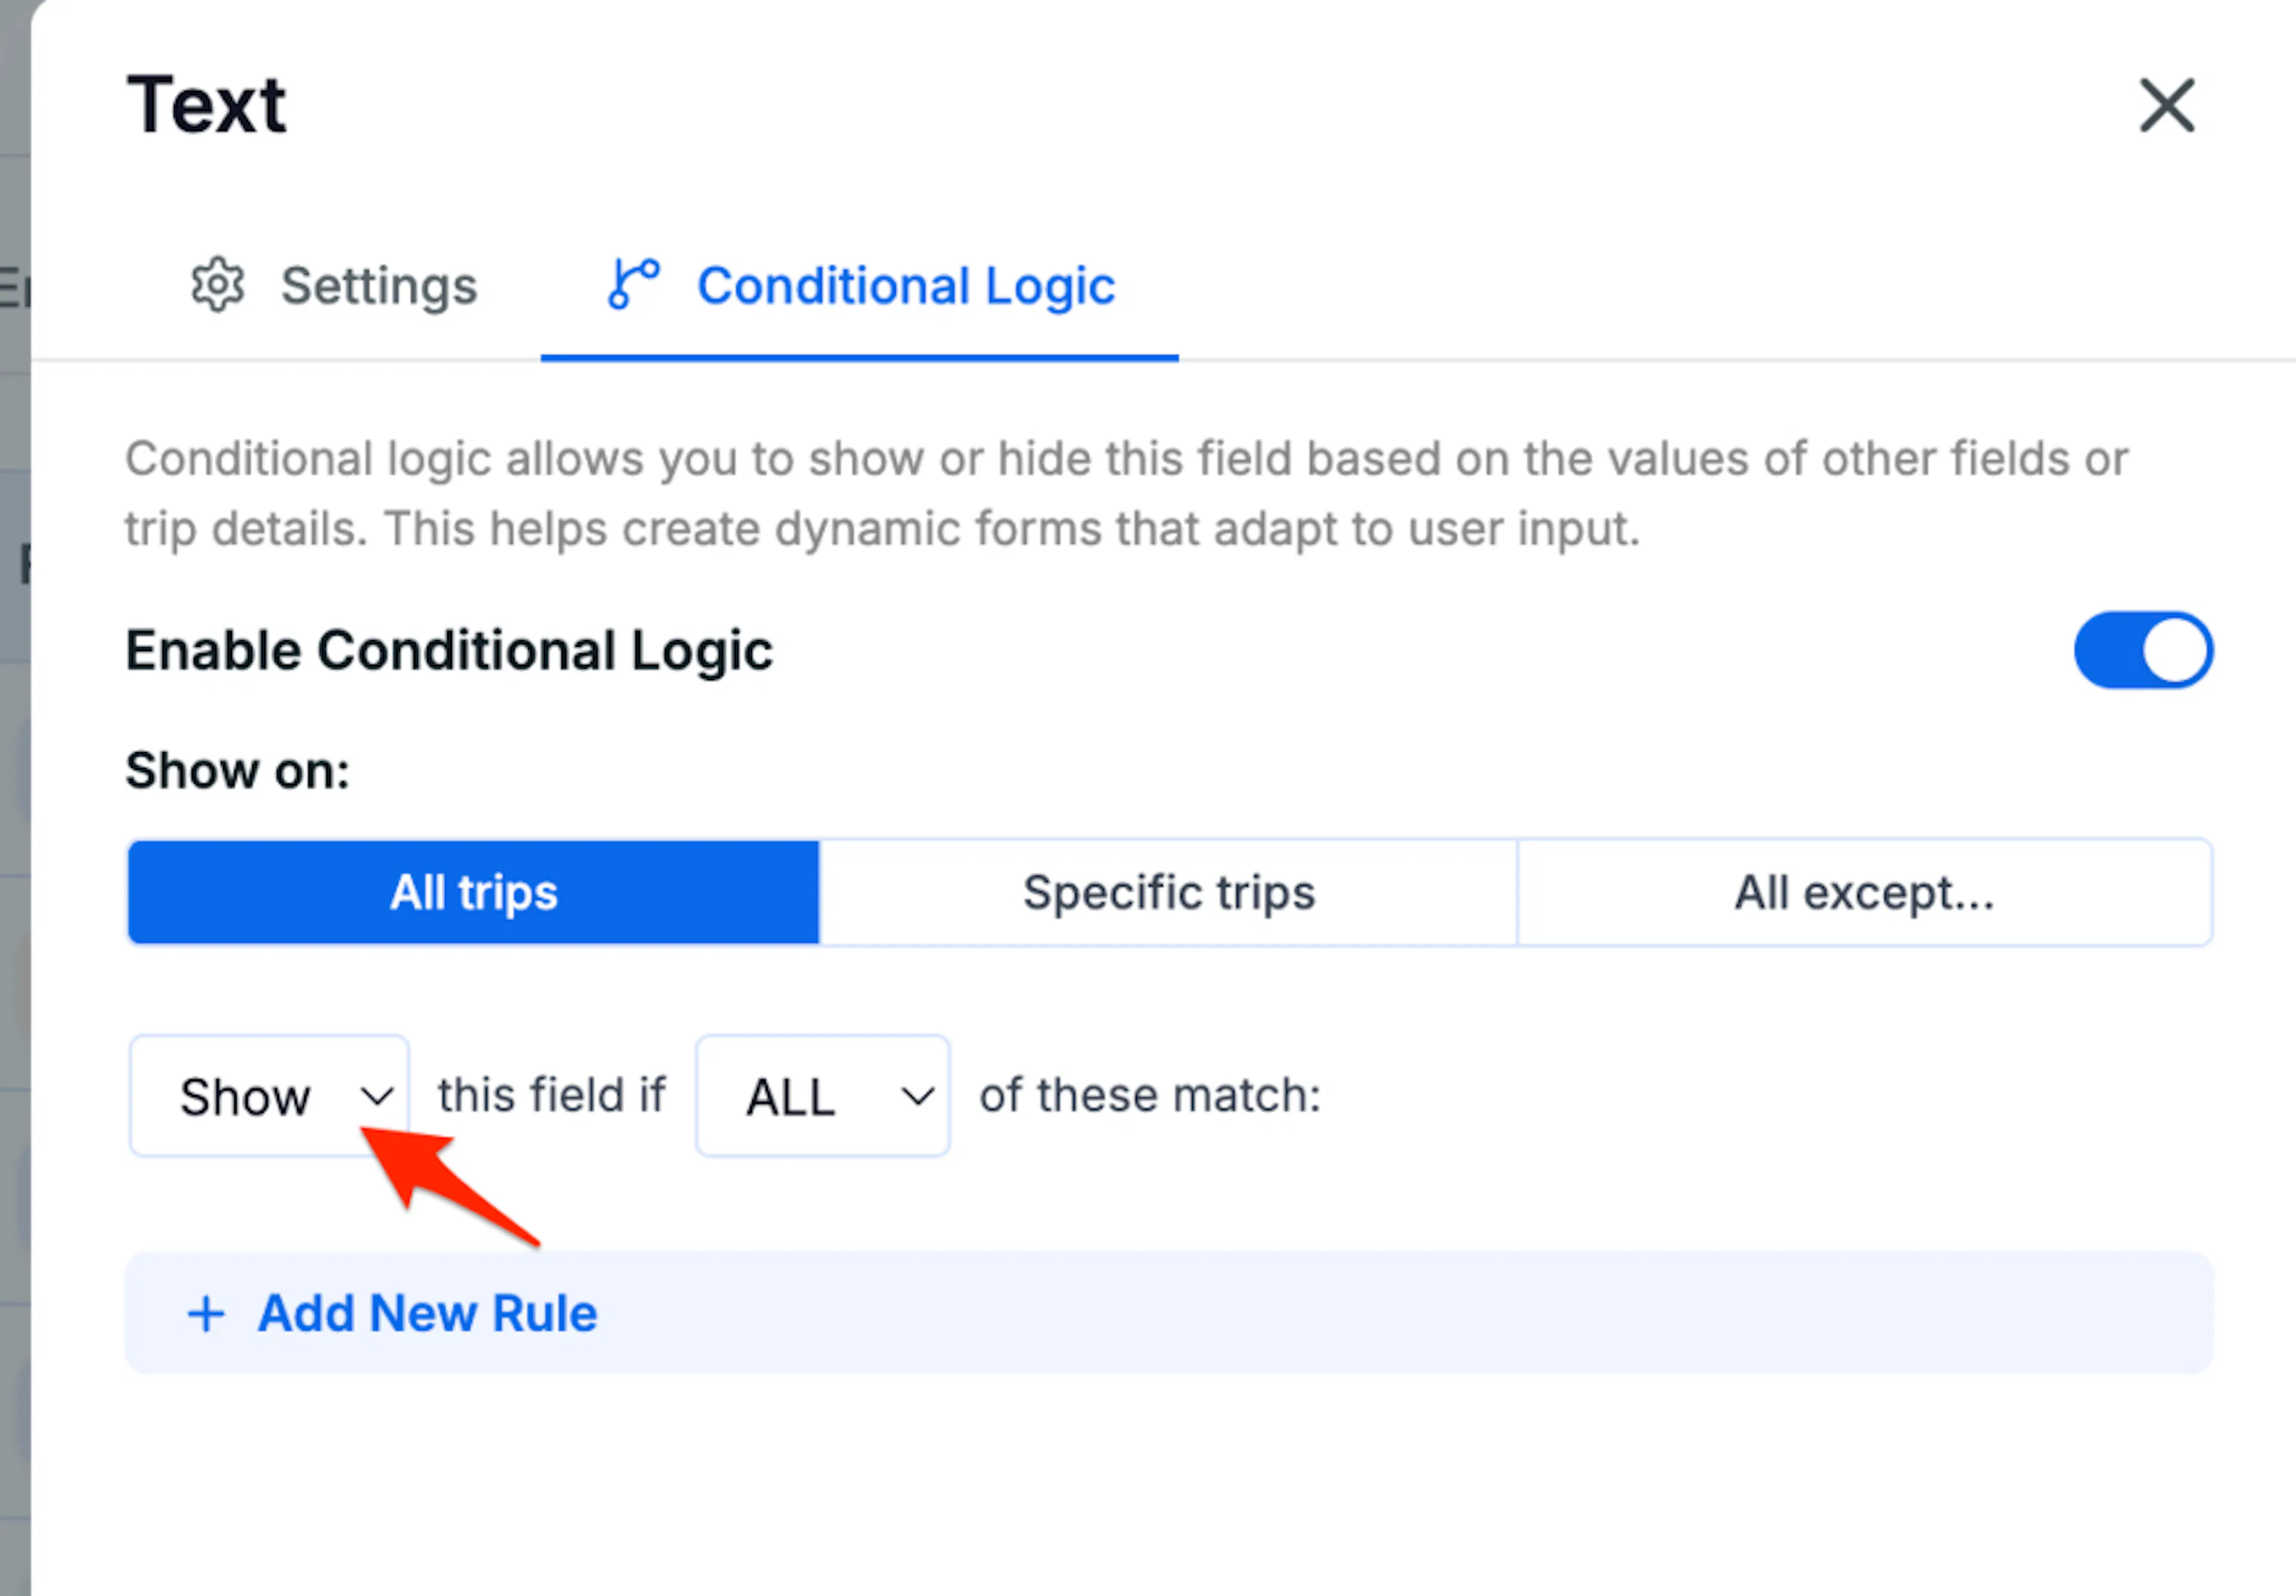
This decides whether the field appears or disappears when the condition is met.
The default action is Show. Leave this as is if you want the field to appear when the condition is met, or change it to Hide if you want the field to disappear instead.
Set the matching behavior
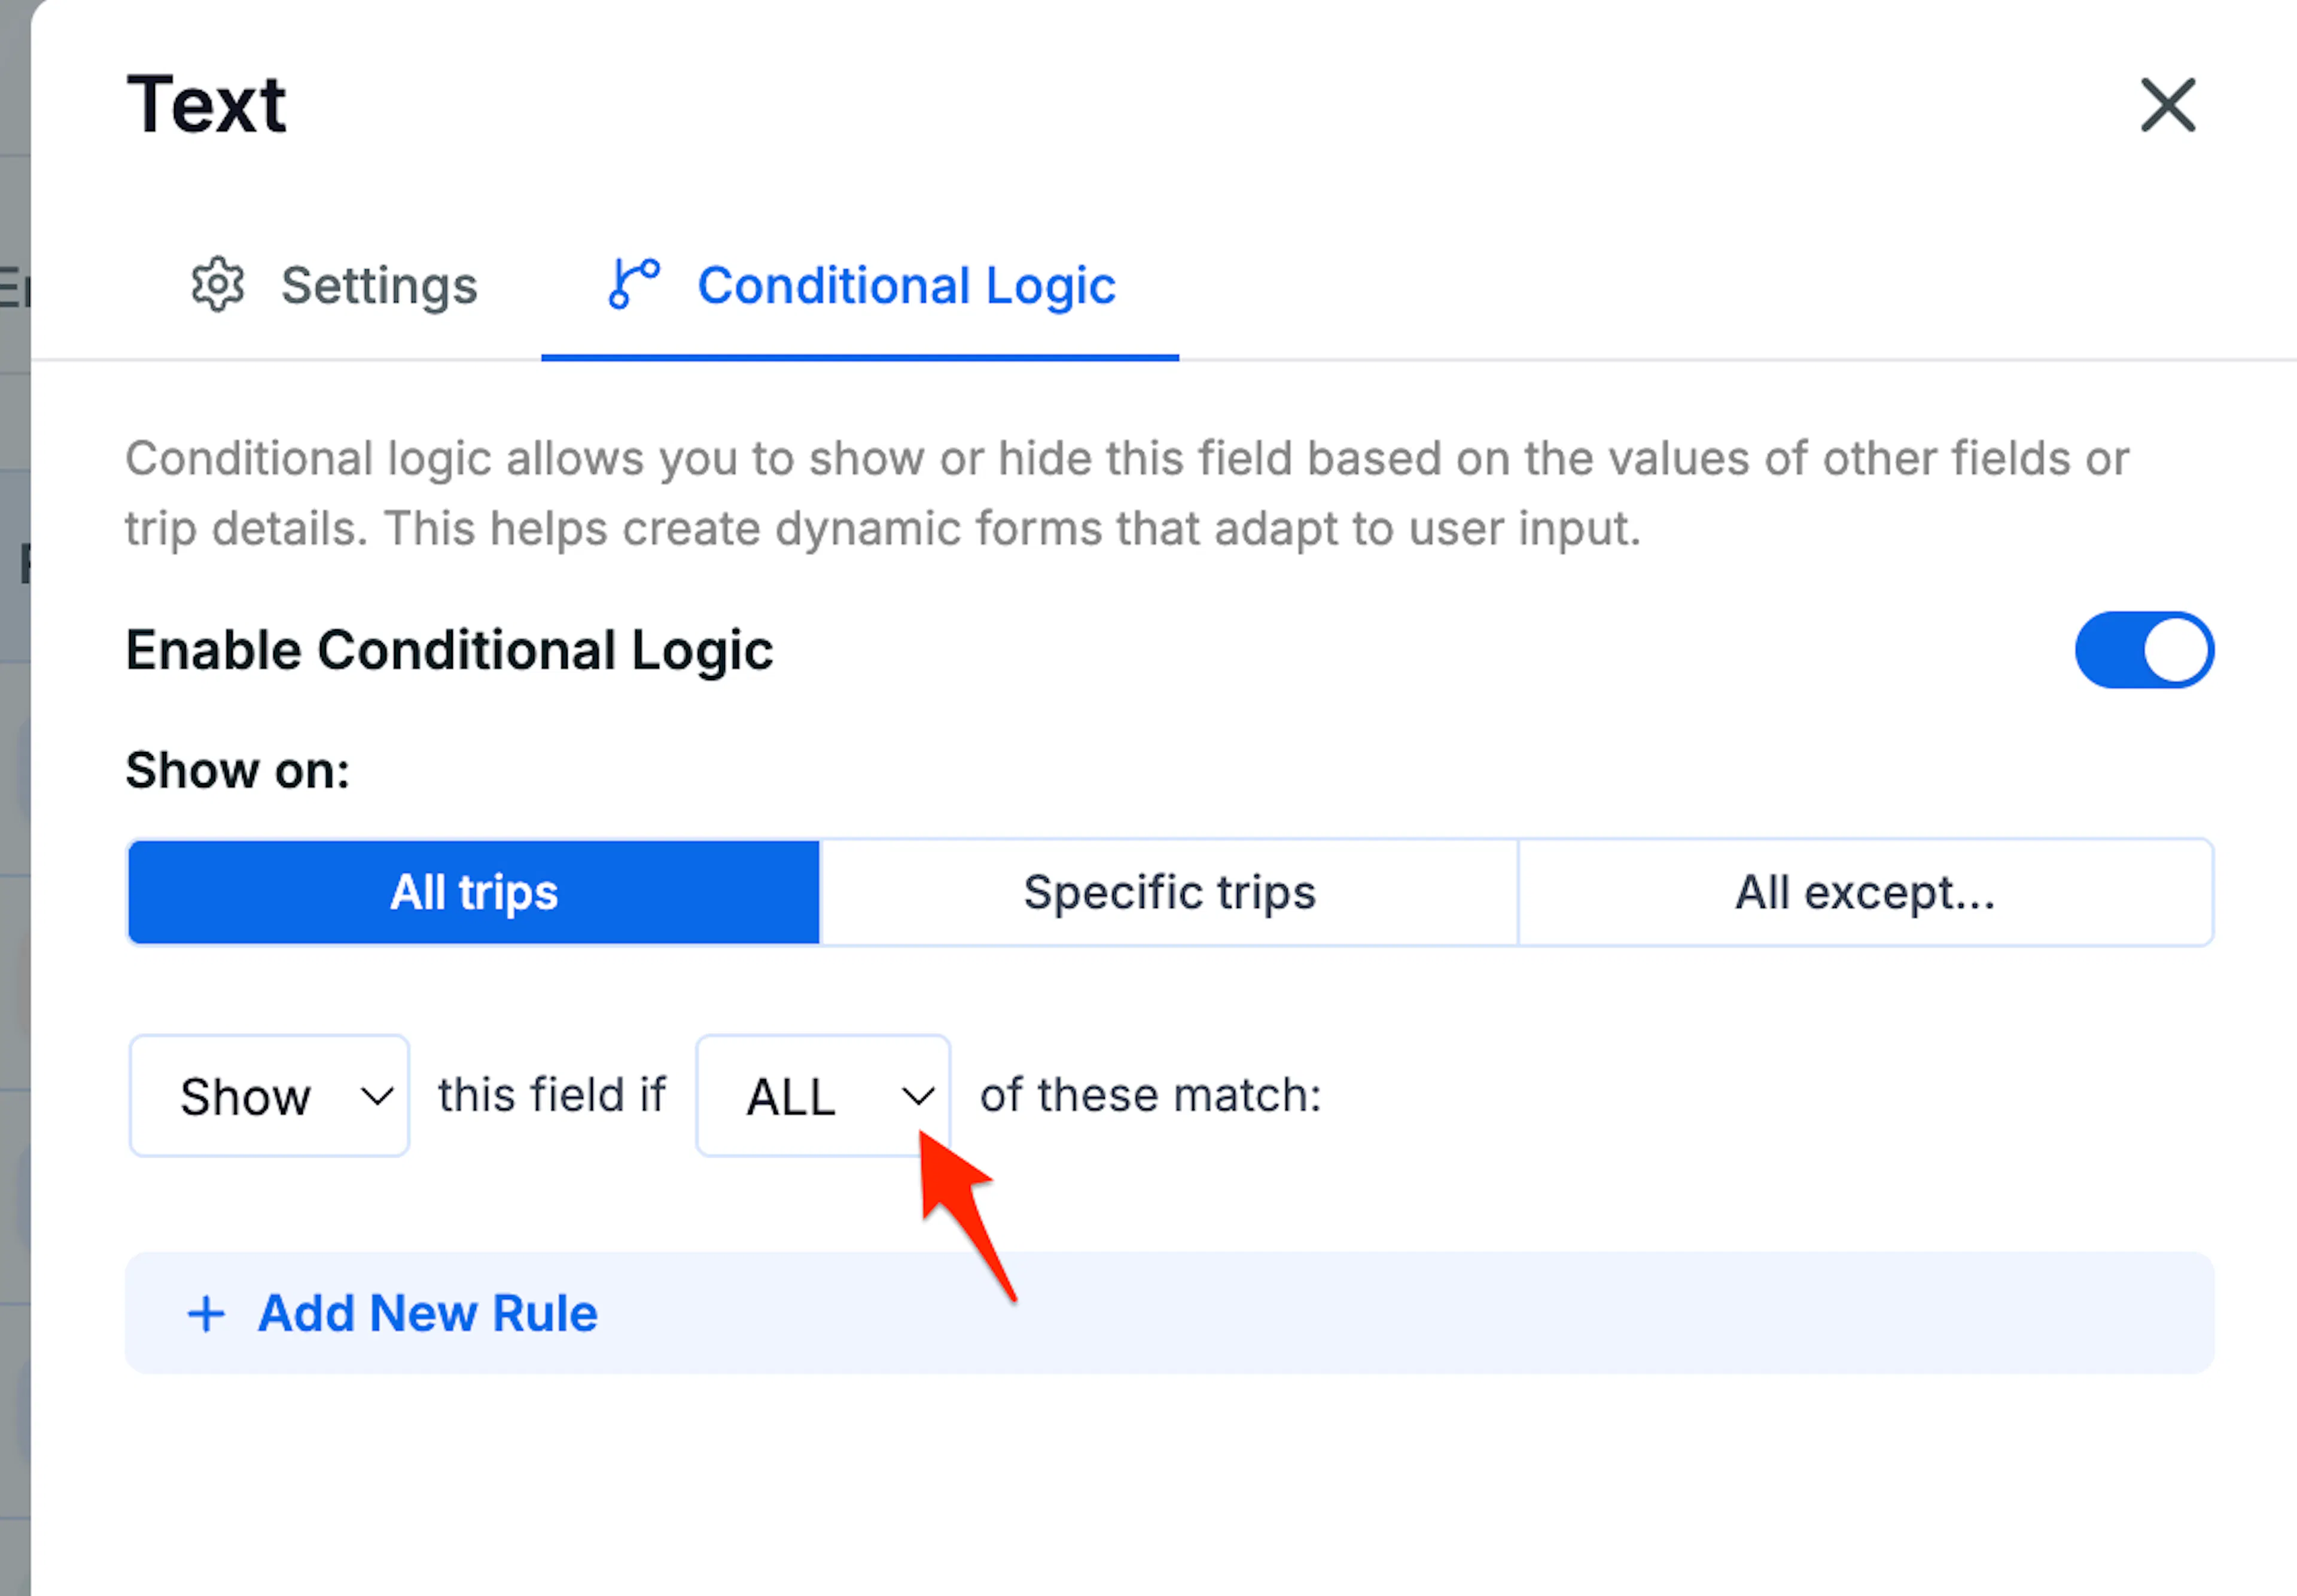
This matters if you plan to use more than one rule.
- ALL - Every rule in the list must match for the field to show or hide.
- ANY - At least one rule must match.
Add a rule
This is where you tell the form what answer to watch for.
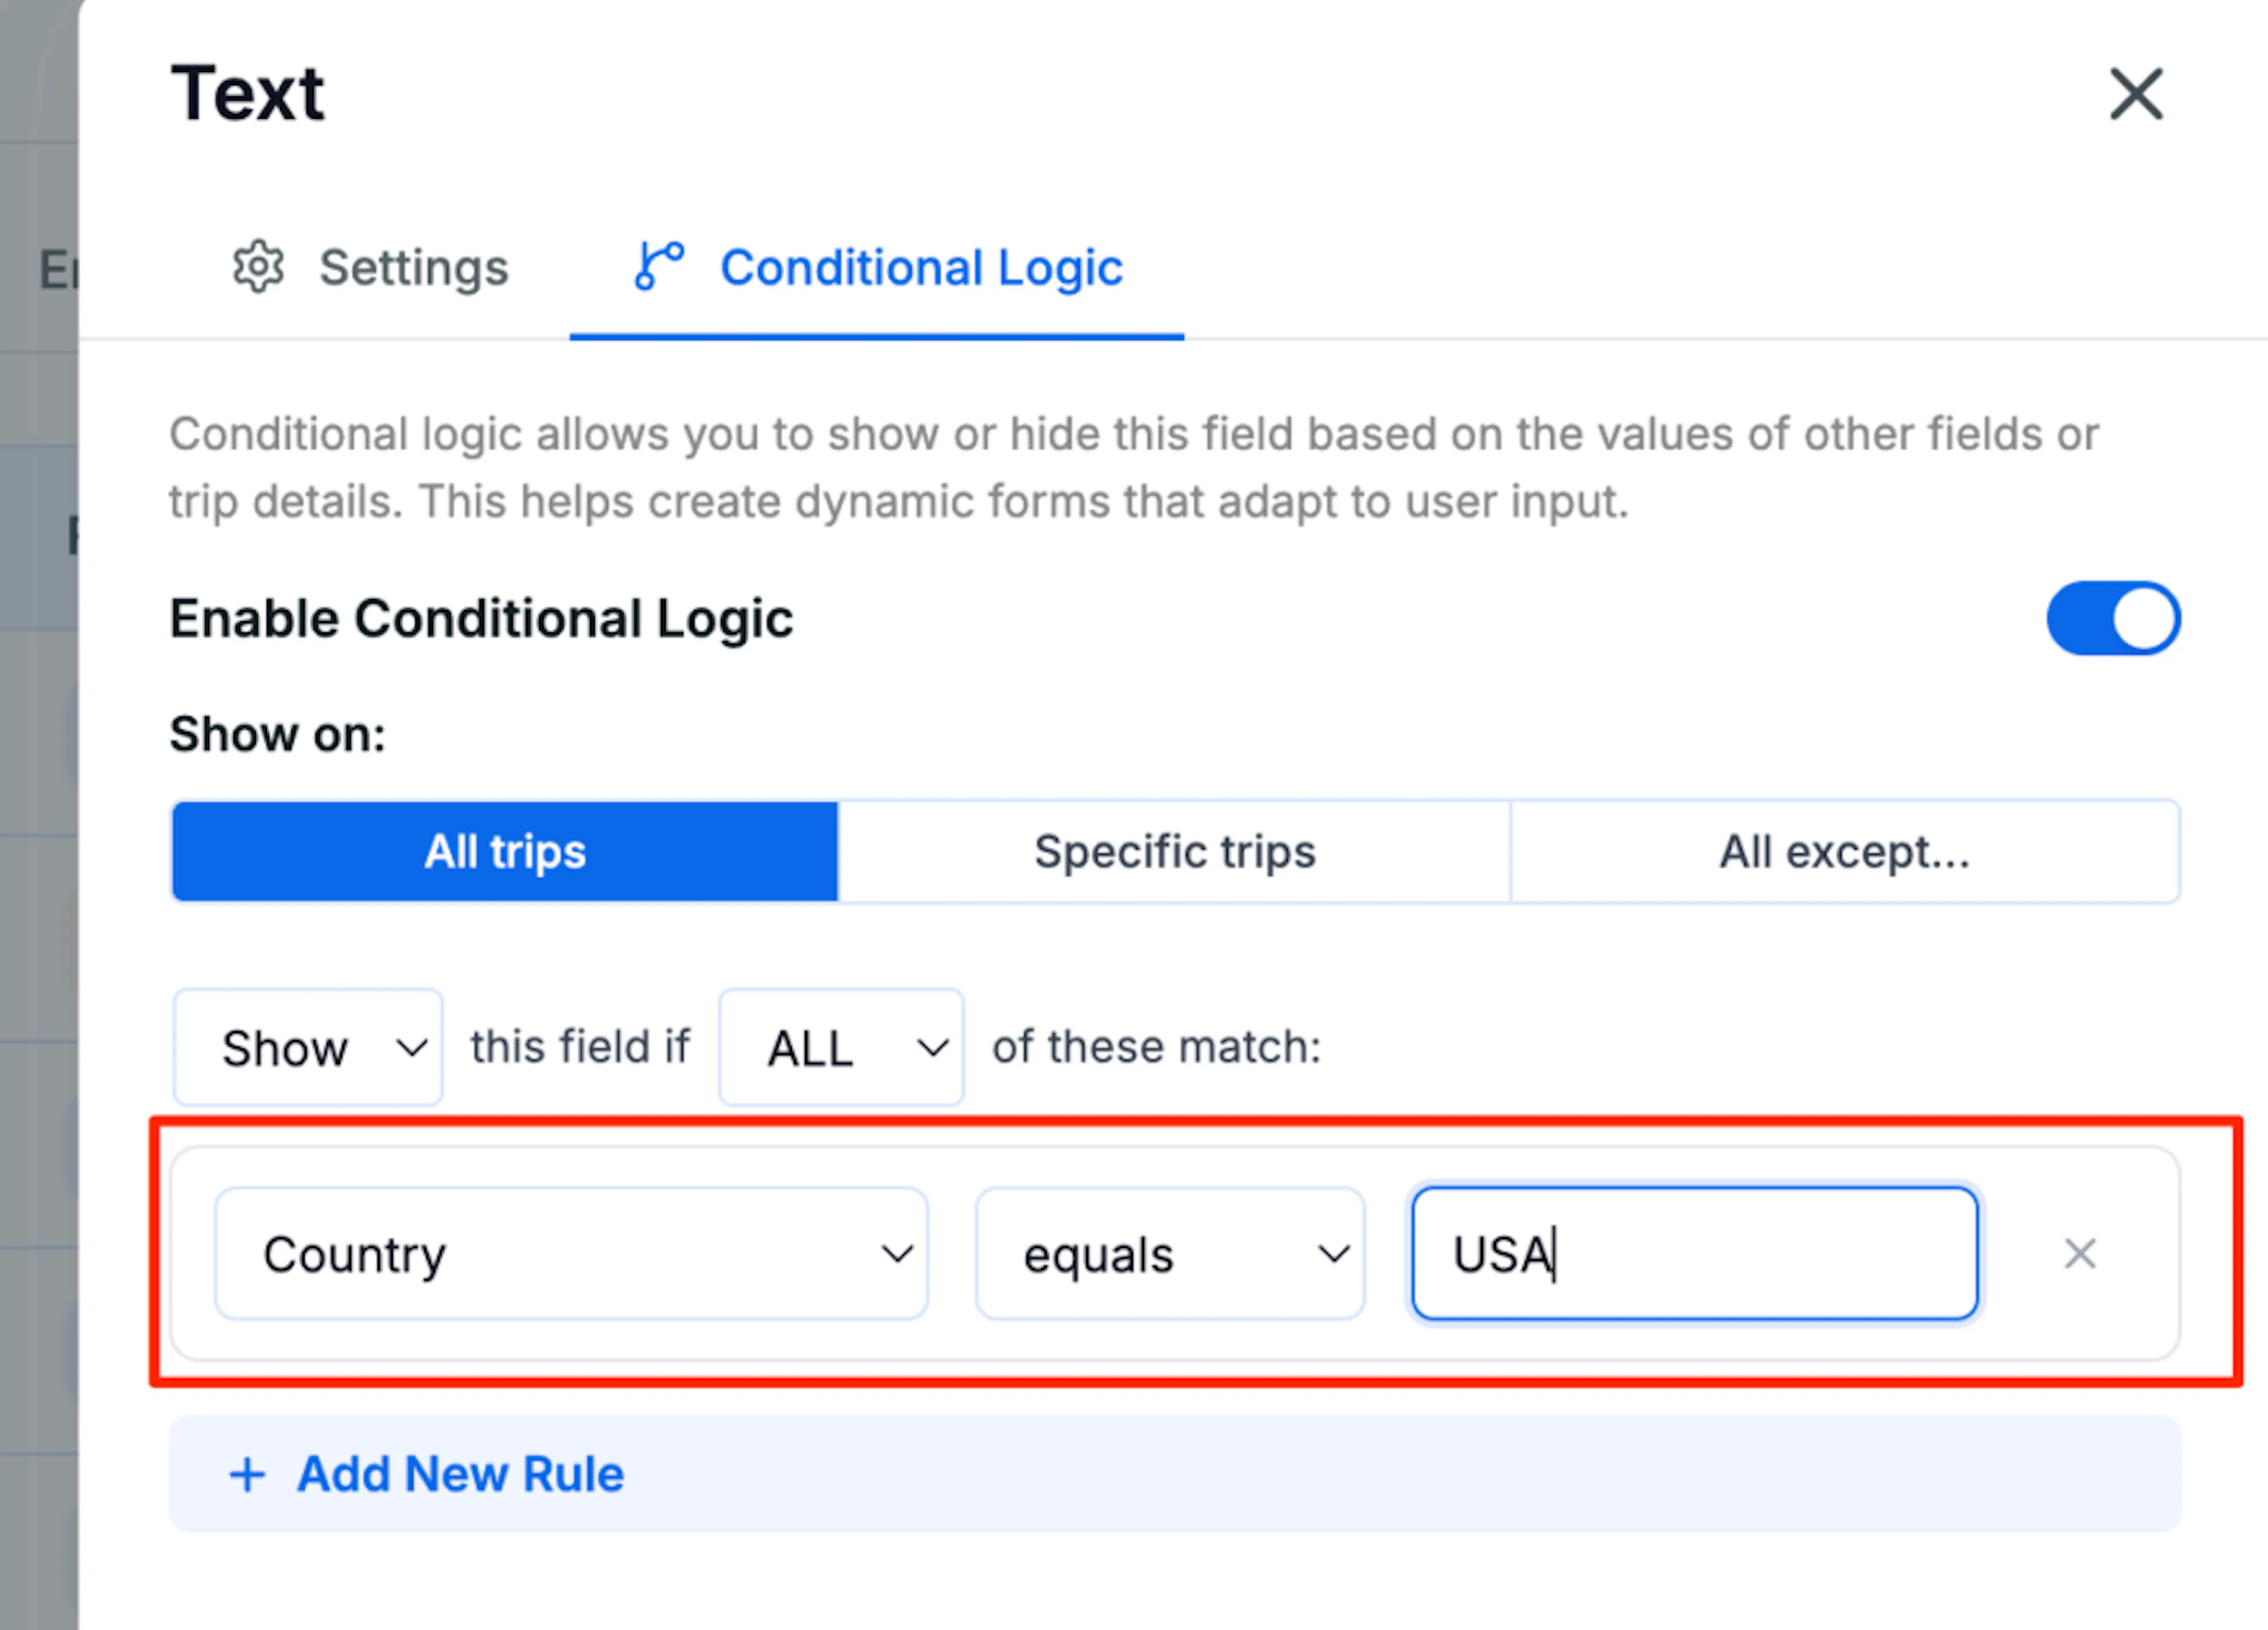
Click + Add New Rule to define a condition. Each rule has three parts: the field whose value you're checking, the operator, and the value to match against.
For example, you might choose the field "Country", set the operator to equals, and set the value to "USA".
Save your changes
Saving makes the rule active.
Add more rules if needed by clicking + Add New Rule again, then click Done to close the panel and Save Changes.
The field you reference in a rule must already exist in the same form. If you haven't added it yet, add it first, then come back to set up the conditional logic.
Once you set up one or two rules, the idea becomes much easier to use in everyday forms.
Use cases
These examples show how the Form Editor can solve common tour booking tasks.
Requiring travel documents for specific trips
Some trips need extra paperwork. Others do not. If you only ask for those documents on the trips that require them, checkout stays cleaner for everyone else.
Situation: Some of your trips, particularly international or high-altitude treks, require travelers to upload a passport scan or medical clearance before you confirm the booking. You don't want this requirement showing up on every trip.
Implementation:
- Add an Attachment field to the Lead Traveler Information form with the label "Upload Passport / Medical Document."
- Mark it as required in the field settings so travelers cannot complete checkout without uploading a file.
- Open the Conditional Logic tab for this field and set Show on to Specific trips. Select only the trips that require the document.
- Set a Maximum File Size to avoid oversized uploads.
- Save Changes.
Benefit: Travelers booking trips that require documentation are prompted to upload at checkout. Travelers booking other trips never see the field.
Showing transfer preferences only for travelers who need a pickup
If only some travelers need a transfer, there is no reason to show that question flow to everyone. A shorter form feels clearer and gets completed more often.
Situation: You offer airport transfers as part of some tours, but not every traveler needs one. Showing a transfer preference field to everyone clutters the form and causes confusion.
Implementation:
- Add a Radio field to the Enquiry Form with the label "Do you need an airport transfer?" and options "Yes" and "No."
- Add a Select field with the label "Preferred Pickup Location" and options for each pickup point you offer (e.g., "Kathmandu Airport," "Pokhara Airport," "Hotel in Thamel").
- Edit the Preferred Pickup Location field and open the Conditional Logic tab.
- Enable Conditional Logic and set the rule: show this field if "Do you need an airport transfer?" equals "Yes."
- Save Changes.
Benefit: Travelers who don't need a transfer see a shorter form. Those who do are immediately prompted for their pickup preference, so you have everything you need without a follow-up.
Collecting dietary requirements at checkout
Meal planning gets easier when you collect dietary details during booking instead of chasing them later.
Situation: You include meals on most of your tours and need to know each traveler's dietary preferences before departure. Right now, you're following up by email after every booking, which takes time.
Implementation:
- Add a Select field to the Lead Traveler Information form with the label "Dietary Preference."
- Add options such as "No restrictions," "Vegetarian," "Vegan," "Halal," and "Gluten-free," and "Other."
- Leave conditional logic off so the field appears on all trips where meals are included, or use Specific trips if only some of your tours include meals.
- Save Changes.
Benefit: Dietary information is collected at checkout for every booking. No follow-up emails needed, and your operations team has everything before the trip departs.
Troubleshooting
My changes aren't showing up on the booking page
Most of the time, this happens because the form was edited but not saved.
Go back to WP Travel Engine → Form Editor and make sure you clicked Save Changes after editing the form. If you added a field and clicked Add Field but did not click Save Changes, the change will not appear on the live booking page.
I can't delete the Name or Email field from the enquiry form
That is expected.
The Your name and Your email fields are core fields in the Enquiry Form. They do not have a delete or disable option, so they cannot be removed.
The field I set up with conditional logic isn't appearing
Start by checking the trigger field.
The field you use in the rule must already exist in the same form. If it does not, add that field first and then return to your conditional logic setup.
Next, check the value in your rule. The value must match exactly what the traveler would enter or select. This is case-sensitive, so yes and Yes are treated differently.
My field label changed but the field name didn't update
That happens because the field name locks after the first save.
When you first create a field, the Name is generated from the Label. Once you save the field, the Name stays the same even if you change the label later.
Travelers can't upload files
Check the upload rules on the Attachment field.
Make sure the file is within the Maximum File Size you set. Also make sure the file type is supported. The supported formats are .jpg, .jpeg, .png, .doc, and .docx.
I messed up my form and want to start over
Use the reset option to restore the original version of the form.
The Form Editor includes a Reset to default option. Use it if you want to return a form to its original state and remove your custom changes.
Frequently asked questions
If you're still stuck or have a question we didn't cover, our support team is happy to help. Reach out at our support page and we'll get you sorted