

Per Trip Emails
Send each trip its own booking confirmation email with trip-specific details like packing lists, meeting points, and what to bring.
Send trip-specific emails to each traveler
The Per Trip Emails add-on lets you send a different booking email for each trip. An add-on is an extra plugin that adds a new feature to WP Travel Engine.
That means you do not have to send the same message to every traveler. You can match the email to the trip they actually booked.
For example, say you run a 5-day Everest Base Camp trek. You might want the booking email to include a packing list, an altitude sickness reminder, and your guide's name.
Now imagine you also run a half-day Kathmandu city tour. That email would need very different details, like the meeting point, pickup time, and what to wear. Same plugin. Two completely different emails.
Once you set up one template, the rest will start to feel familiar.
Create a personalized email template
Before you start, make sure these are active on your WordPress site:
- WP Travel Engine Pro
- Per Trip Emails add-on
If you are not sure, check Plugins on the left sidebar of your WordPress dashboard.
Add a new template
This is where you start creating a separate email for one specific trip.
On your WordPress dashboard, go to WP Travel Engine > Per Trip Emails > Add New. The WordPress menu is on the left side of your dashboard.
Name the template
This helps you recognize the template later when you have several trips.
Enter a title for your template. You might name it Maldives Trip Booking Email or Annapurna Trek Confirmation Email.
A clear title helps you stay organized when you manage several tours. That makes the next updates easier too.
Write the subject line
The subject line is the first thing your customer sees in their inbox.
Enter an email subject line. You can use tags like booking_id and payment_id.
A tag is a short code wrapped in curly braces that pulls in real booking information when the email is sent. For example, you could write Your booking order has been placed {booking_id}.
Compose the email body
This is where you add the trip details your customer needs.
Write your email in the text area. You can use tags to personalize the message.
Tags are short codes that get replaced with real information when the email is sent. For example, a multi-day trek email might include a trip page link, while a day tour email might remind guests what to bring and where to meet.
You will find various tags listed below the text area in each email template to personalize your email for each trip.
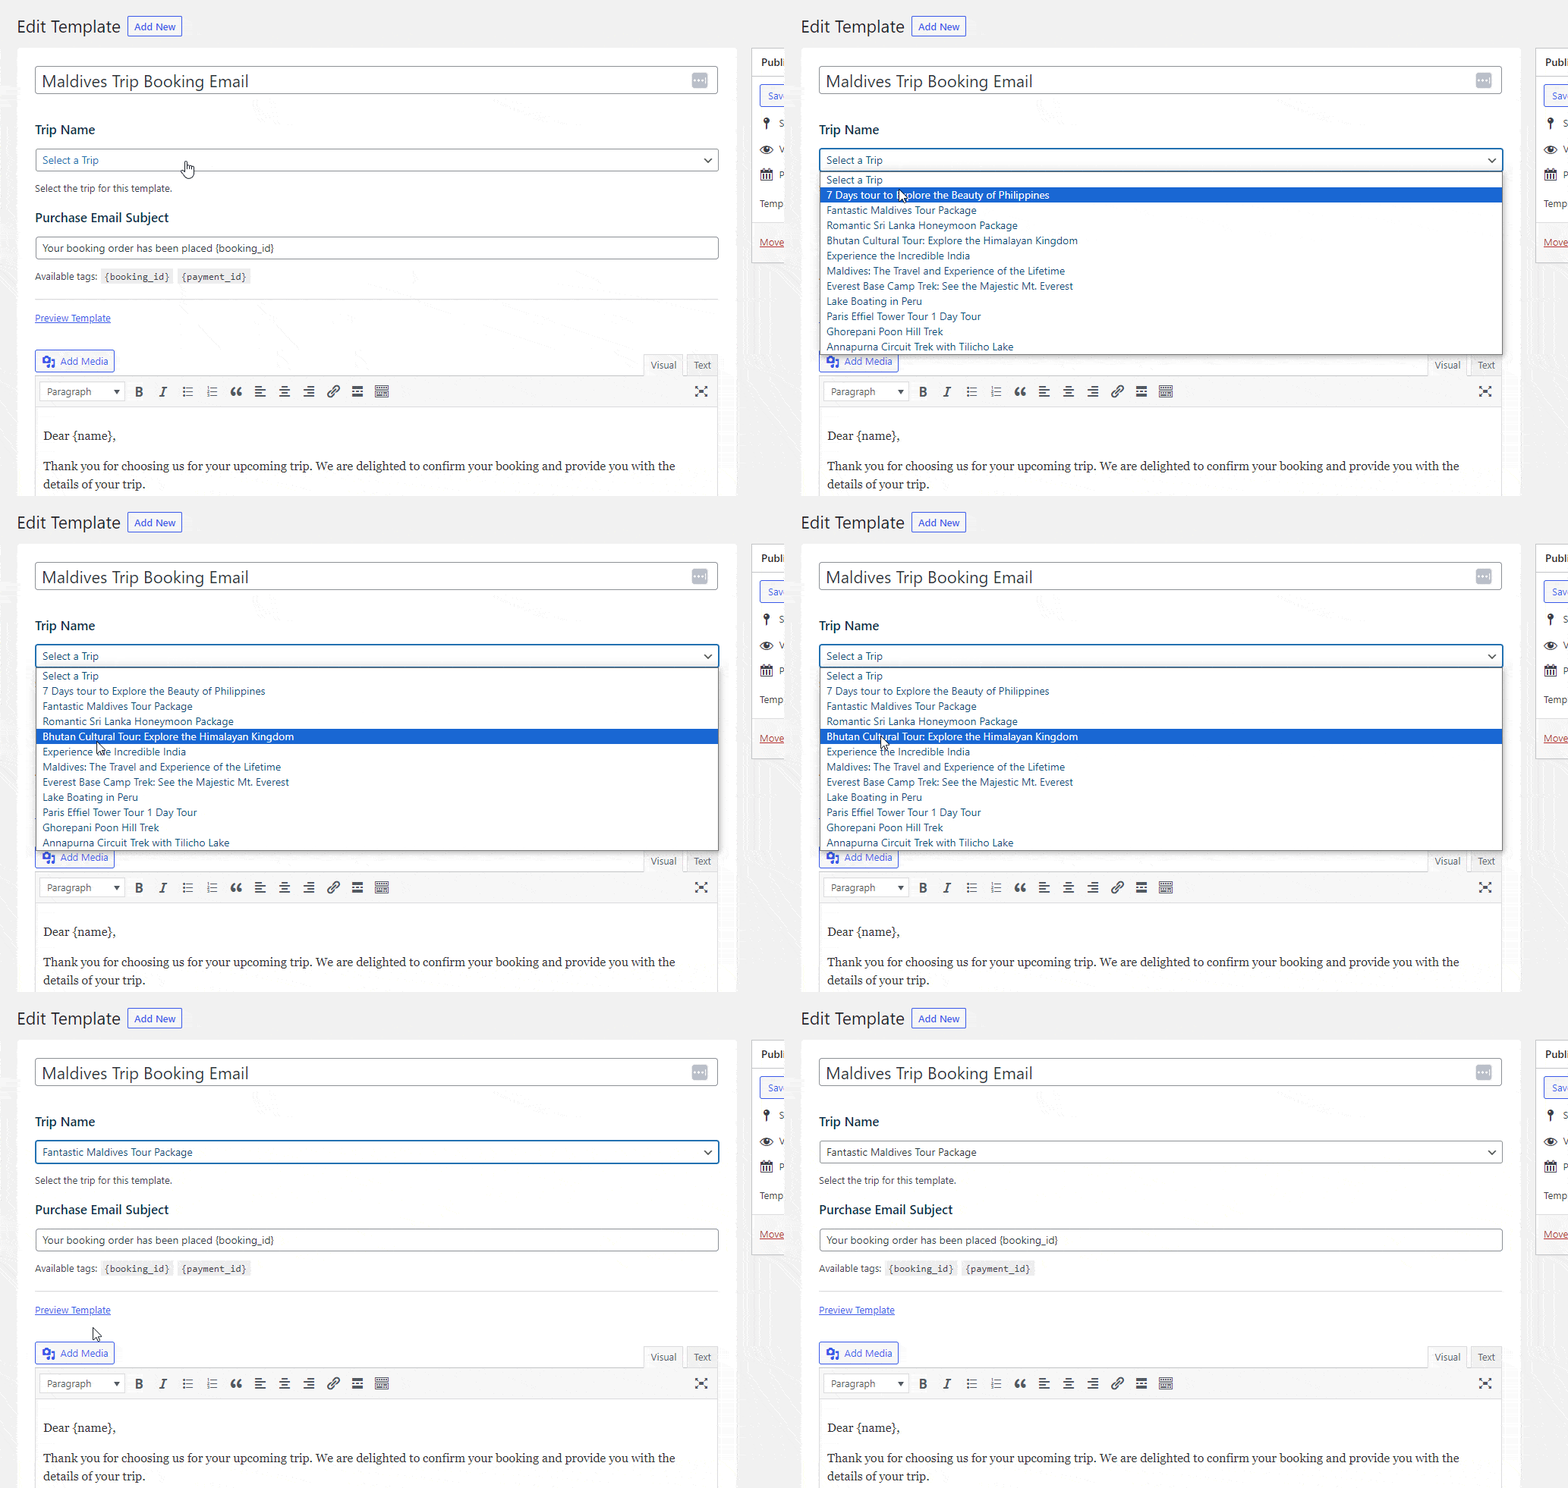
Assign the email to a trip
This step connects the template to the trip that should use it.
Select the trip from the Trip Name drop-down menu. This tells WP Travel Engine which travelers should receive this email.
For example, you can assign one email to a winter departure with cold-weather notes, and another to a family day tour with child-friendly instructions.
Preview the email
Previewing helps you catch mistakes before travelers see them.
Click Preview to check how the email looks. Read through the subject line and message body.
Make any changes you need before you save or publish the template. A quick check here can save you from sending the wrong details later.
Publish or save as draft
This decides whether the template starts sending now or stays saved for later.
Under the Publish settings, save the template as a draft or publish it right away. If you are still working on the wording, save it first and come back later.
If you do not change the template status from Inactive to Active, the default email template is sent to your customers instead.
You can create a personalized email template for each unique trip by repeating the same process. Once your first one is ready, the rest will feel much faster.
Troubleshooting
My custom email isn't going out
The template status is probably still set to Inactive. Go back to your template, change the status to Active, and save it again.
That is the most common reason this happens. Once that is fixed, you can test the email again.
The tags are showing as plain text in the email
Check that each tag is wrapped in curly braces, like {name} or {booking_id}. If the braces are missing, or if there is a typo, the tag will not be replaced.
When that happens, your customer sees the raw text instead of the real booking detail. A quick spelling check usually fixes it.
I can't find the Per Trip Emails menu
The add-on might not be activated. Go to Plugins on your WordPress dashboard and check that Per Trip Emails is active.
If you do not see it in your plugins list at all, you may need to install it first. Once it is active, the menu should appear in the left sidebar.
My trip isn't showing up in the Trip Name dropdown
Make sure the trip is published, not saved as a draft. Only published trips appear in the dropdown when you assign an email template.
If you recently created the trip, open it once and confirm its status. Then return to your email template and check the list again.
I edited my email but travelers are still getting the old version
This can happen if your website is using a caching tool. A cache is a temporary copy of your site that helps pages load faster, but it can also hold onto old content.
Try clearing your cache and test again. The option is usually inside your caching plugin or your hosting settings. If you are not sure how to do that, your hosting provider can help.
My email looks fine in preview but broken when it arrives
Some email apps display emails differently. The preview shows how the email looks in a browser, but your traveler might be using Gmail, Outlook, or their phone.
If something looks off, make a test booking with your own email address. That shows you what the message actually looks like when it arrives.
FAQs
If you're still stuck or have a question we didn't cover, our support team is happy to help. Reach out at our support page and we'll get you sorted.