

PayFast Payment Gateway
Set up PayFast in WP Travel Engine so travelers can book trips on your site and pay securely in South African Rand, including deposit and balance payments.
Introduction
PayFast is a payment service popular in South Africa. When you connect it to WP Travel Engine, travelers can book a trip on your site and pay through PayFast's secure payment page.
This means you don't handle card details on your own website. PayFast takes care of that part. The booking details stay in your WordPress dashboard the whole time. Your WordPress dashboard is the main control area for your website.
PayFast only works with South African Rand (ZAR). If you run trips for South African travelers, this is a solid choice for collecting payments.
For example, say you operate a 3-day Kruger Park safari priced in Rand. A traveler books on your site, picks PayFast at checkout, and finishes the payment on PayFast's page. The booking shows up as paid in your dashboard right after.
What PayFast gives you
Here's what this add-on brings to your trip booking setup:
| Feature | What it does for you |
|---|---|
| Hosted checkout on PayFast | Travelers enter their card details on PayFast's page, not on your site. You never touch card data. |
| ZAR-native processing | Charge and settle trips in South African Rand. No currency conversion step needed. |
| Deposit and balance payments | Let travelers pay a deposit through PayFast and settle the rest later. No need to switch payment methods. |
| Automatic booking sync | Booking and payment status update in your WordPress dashboard as soon as PayFast confirms the payment. |
| Works with WP Travel Engine Pro | Runs alongside Pro add-ons like Partial Payment with no extra gateway setup. |
What you'll need before you start
A few things need to be ready before you turn on PayFast. If you gather them first, the setup goes more smoothly.
- WP Travel Engine installed and active on your WordPress site. A plugin is a small add-on that gives your WordPress site extra features. You need version 5.0 or later.
- An active merchant account with PayFast. A merchant account is the business account PayFast uses to send your payments to.
- Your Merchant Key and Merchant ID from PayFast. These are two codes that link your website to your PayFast account.
- Your site's payment currency set to South African Rand (ZAR). PayFast does not process any other currency.
- If you want to offer deposit-based bookings through PayFast, the Partial Payment add-on installed and set up on the trips you want to sell that way.
Once you have these ready, the next part walks you through turning everything on.
How to install
The add-on needs to be installed and activated before you can configure it. If you haven't done that yet, check the instructions to install the add-on and activate your license key. A license key is a code that proves you've purchased the add-on. It unlocks the add-on so it can run on your site.
Make sure the add-on is active
After installing, it's worth checking that WordPress recognizes the add-on. This takes a few seconds and saves you from troubleshooting later.
Open your WordPress dashboard
This is the main control area for your website.
Log in to your WordPress dashboard.
Go to payment settings
This is where WP Travel Engine keeps all your payment methods.
On the left sidebar, click WP Travel Engine. Then click Settings. Then open Payments.
Look for Payfast in the list
If you see PayFast in the list of payment gateways, the add-on is active and ready to configure.
Confirm that PayFast appears in the list of payment gateways.
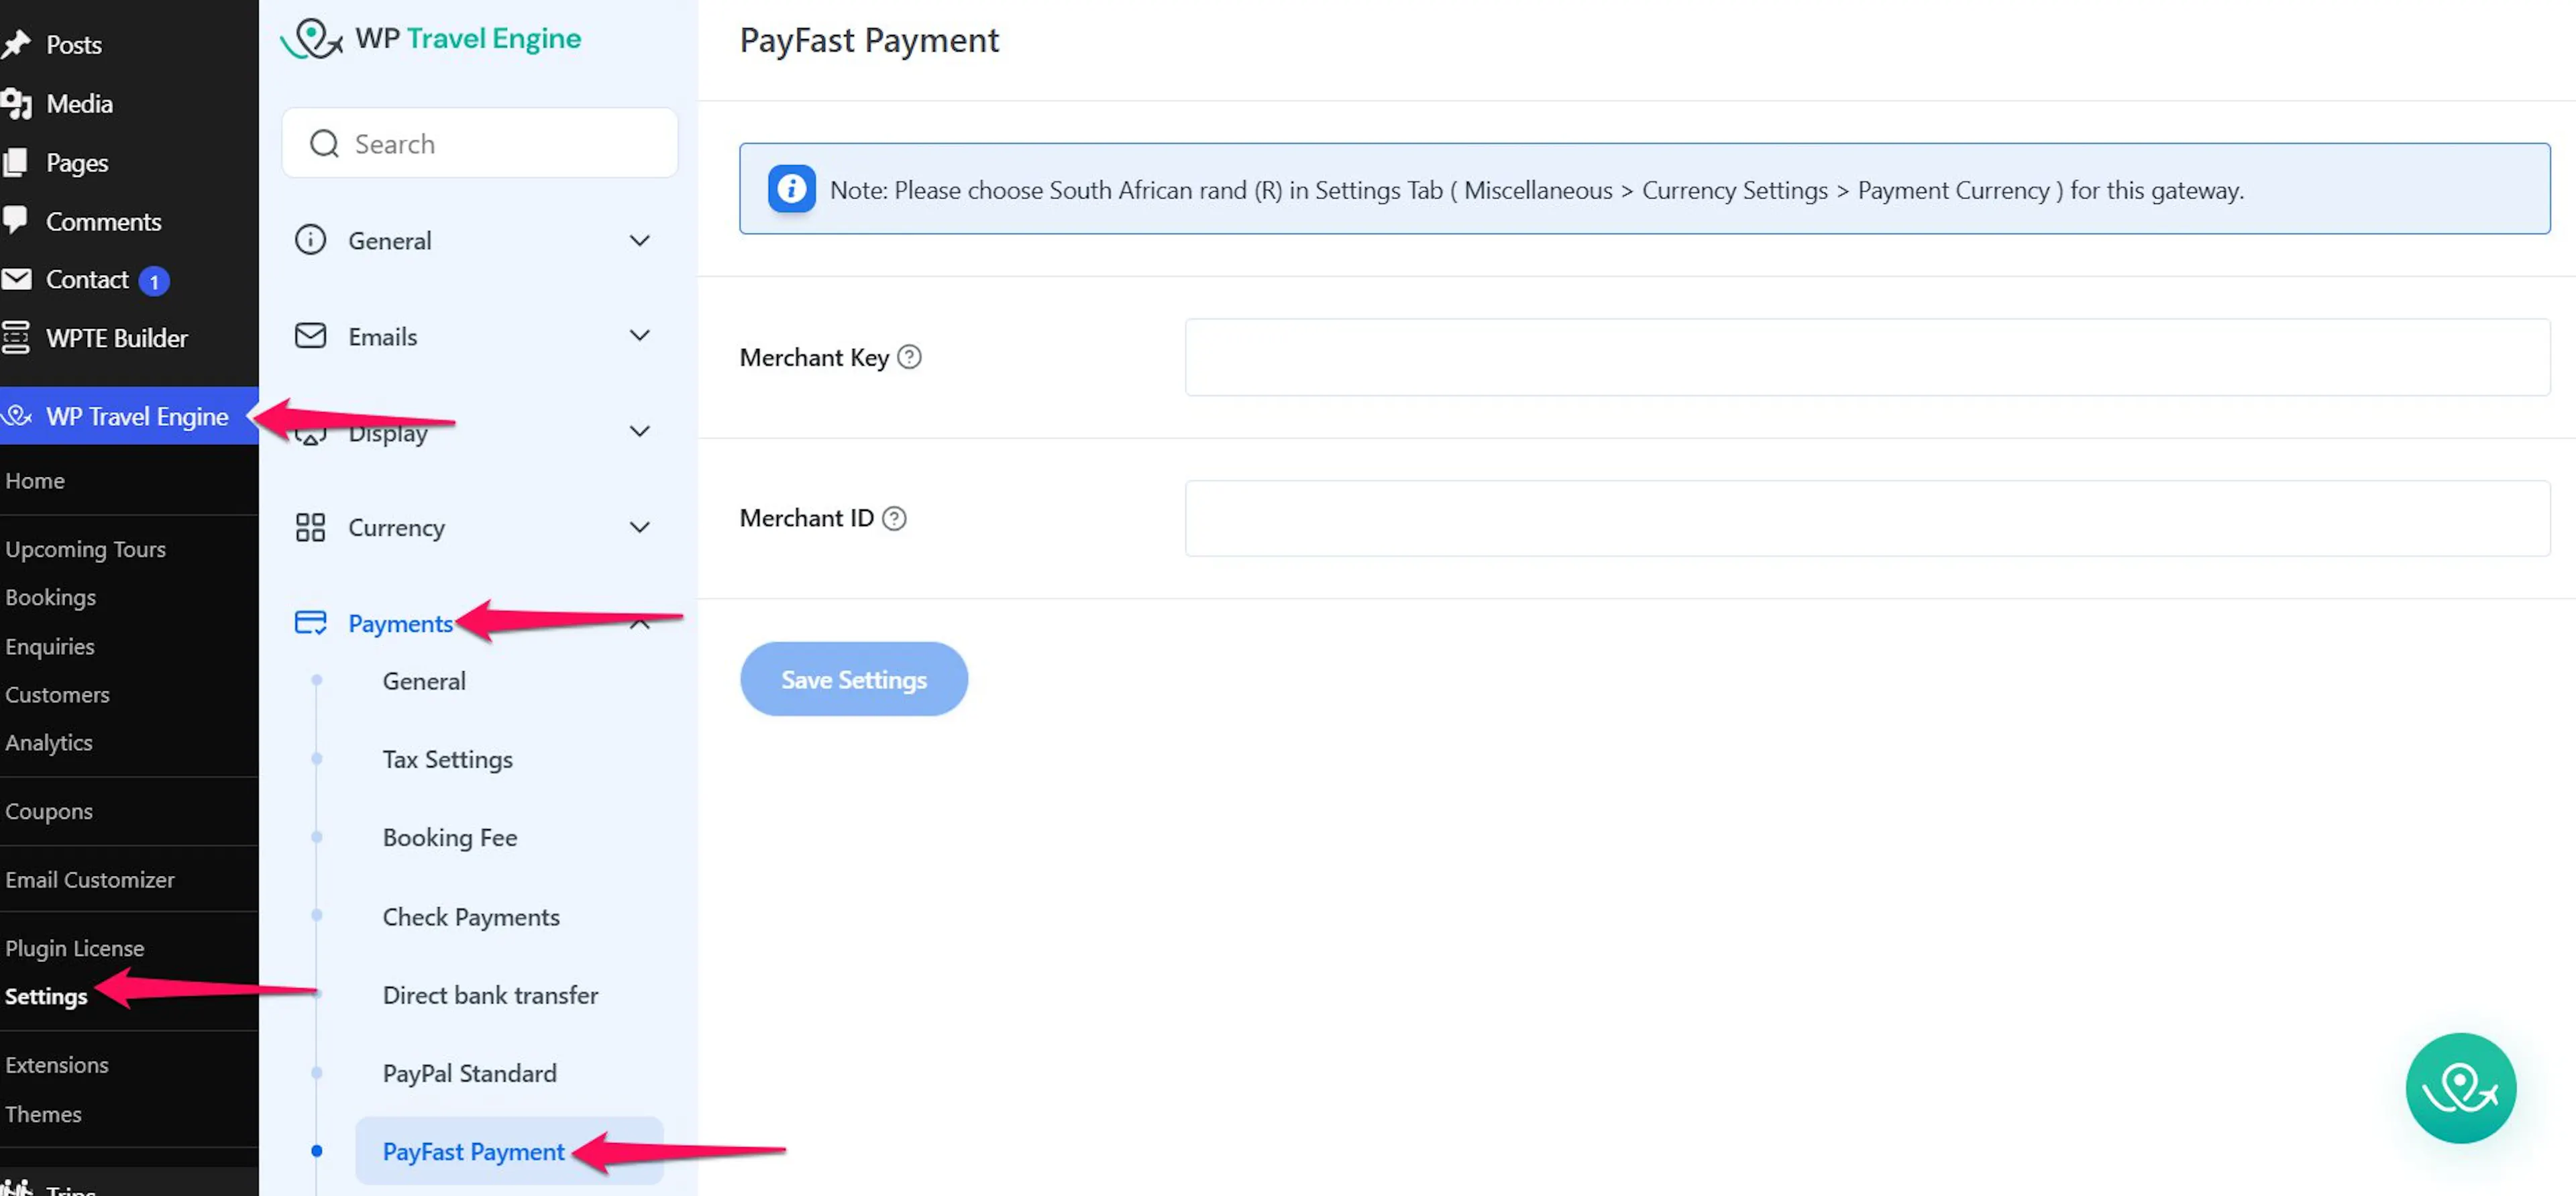
If PayFast is there, you're in good shape. Next, you'll connect it to your PayFast account.
Connecting your PayFast account
This part links your website to your PayFast merchant account. Once you save these settings, PayFast can appear as a payment option when someone books a trip.
Set your payment currency to ZAR
This step matters because PayFast only shows up in the payment list when your site currency is South African Rand. Without this, the gateway stays hidden.
Open currency settings
This is where you tell WP Travel Engine which currency to use for payments.
Go to WP Travel Engine Dashboard. Then Settings. Then Currency. Then General.
Select South African Rand
This tells WP Travel Engine to process payments in ZAR.
Set Payment Currency to South African Rand (R).
Save your changes
This locks in the currency setting so PayFast can appear.
Click Save Settings.
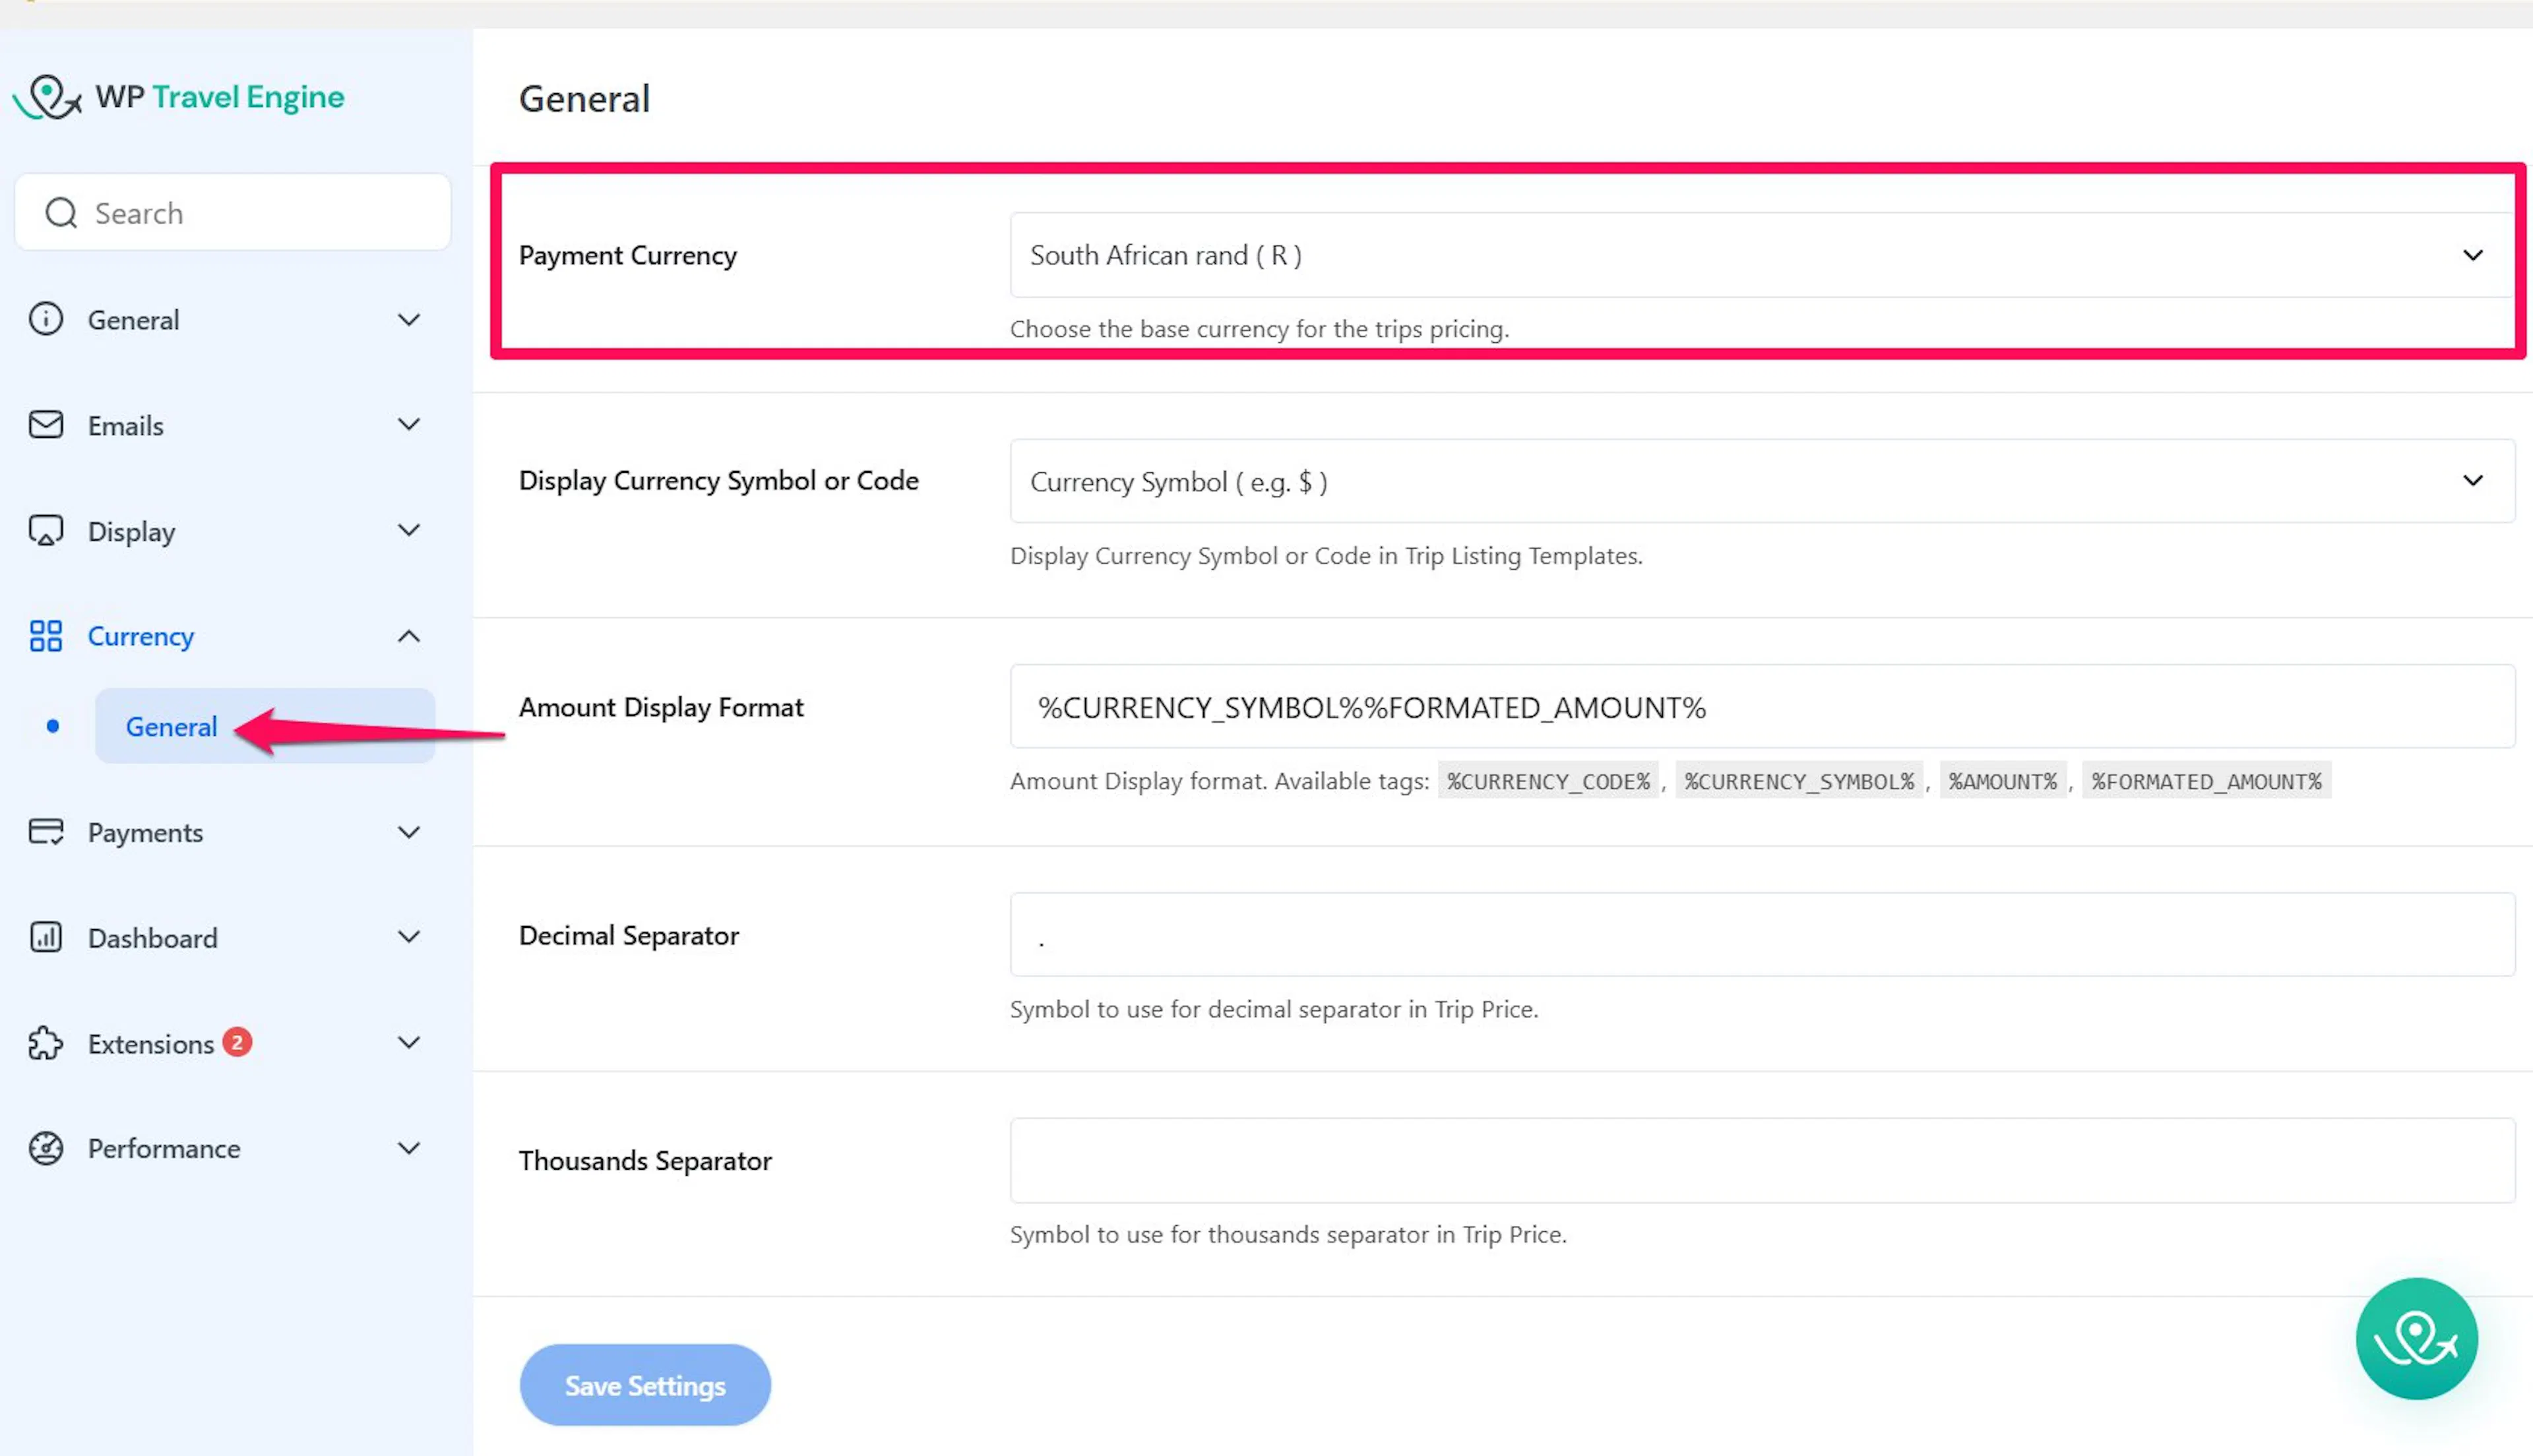
If you sell trips to travelers who pay in USD or EUR, you'll need a separate gateway for those currencies. PayFast won't process anything outside ZAR. For example, if you offer a Table Mountain day tour to international visitors who prefer paying in USD, you'd need a different payment gateway for those bookings.
Now that your currency is set, the PayFast gateway should be visible in your payment settings.
Turn on the PayFast gateway
This switches PayFast on so travelers can see it as a payment option at checkout.
Open payment settings
This is where you manage all your payment methods.
Go to WP Travel Engine. Then Settings. Then Payments.
Check the Payfast box
This tells WP Travel Engine to show PayFast as a payment option on your checkout page.
Find PayFast in the list of gateways and check its box.
Save your changes
This makes the change live on your site.
Click Save Settings.
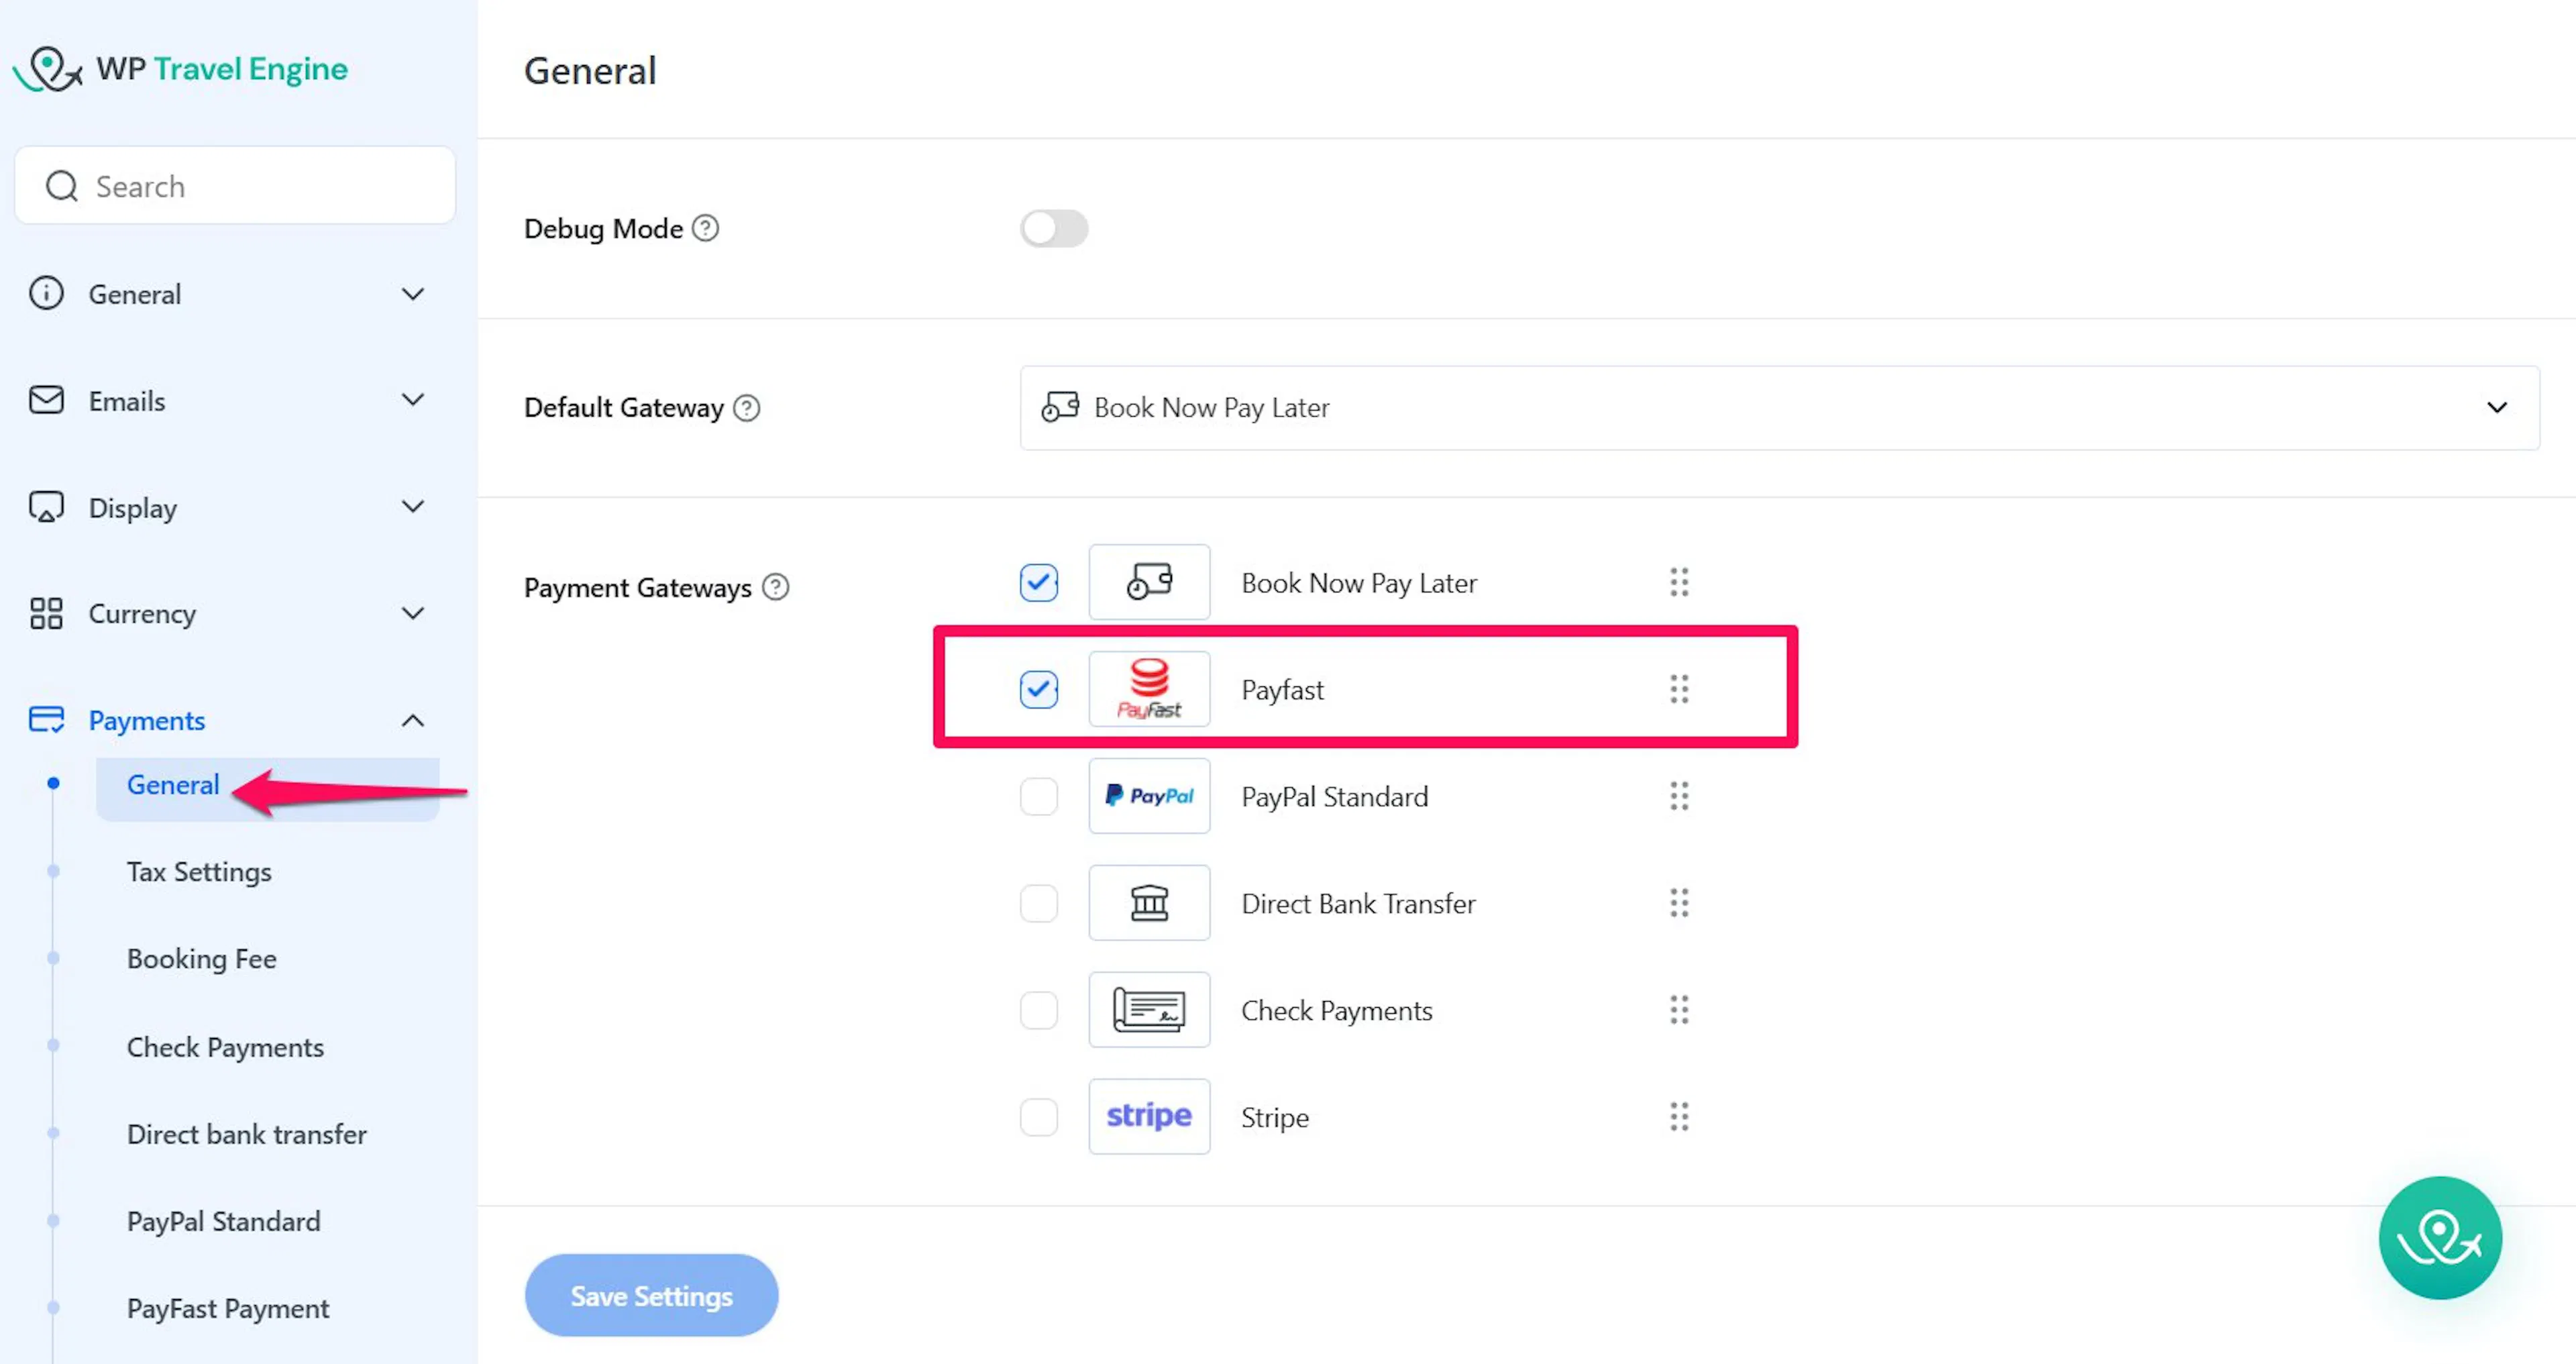
PayFast is now visible at checkout. But it won't actually process payments until you add your account details. That's next.
Add your merchant credentials
These two codes tell PayFast that payments coming from your website belong to your business. Without them, PayFast won't know where to send the money.
Open the PayFast sub-tab
This is where you enter your PayFast account details.
On the same Payments screen, open the PayFast Payment sub-tab.
Enter your Merchant Key
This links your site to your PayFast account. Make sure it matches the account where you want payments to land.
Enter your Merchant Key.
Enter your Merchant ID
This is the second code PayFast uses to identify your account.
Enter your Merchant ID.
Save your changes
This stores your credentials so PayFast can start processing payments.
Click Save.
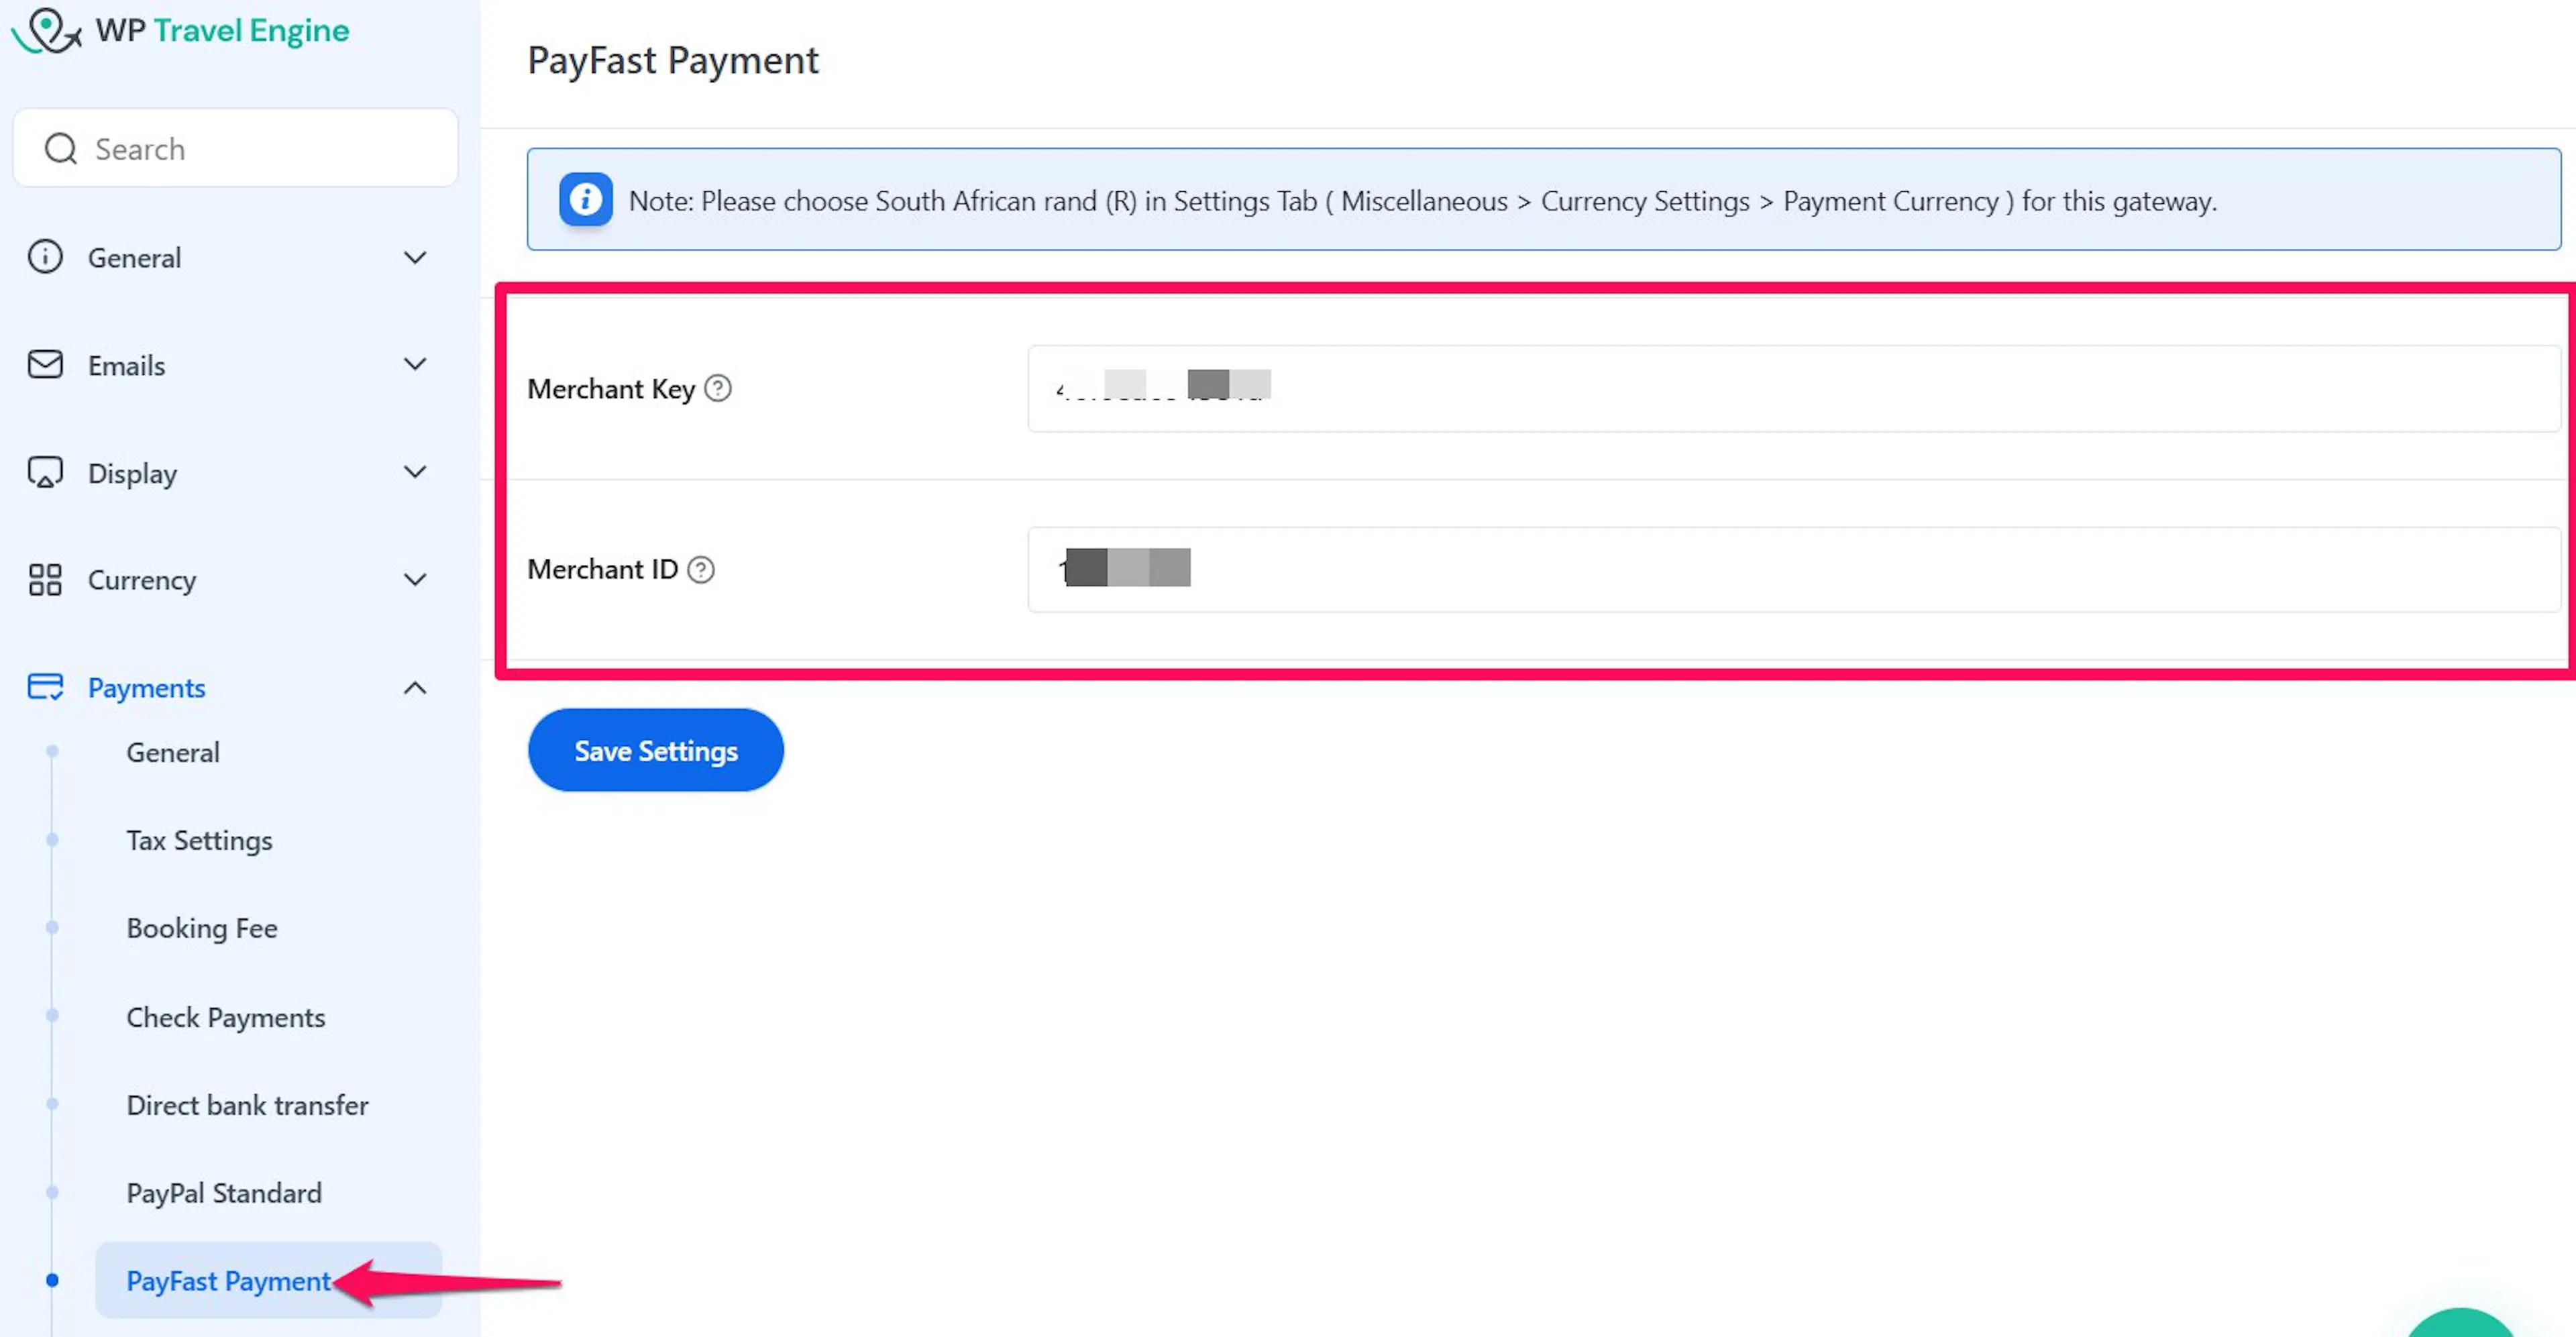
You can find both values in your PayFast merchant dashboard, under your account settings. Copy them carefully. An extra space at the start or end, or a missing character, will cause connection problems.
Your PayFast gateway is now connected. Travelers can pay through PayFast at checkout. If you want to let them pay a deposit instead of the full amount, the next section explains how.
Accepting deposit and balance payments
PayFast works with WP Travel Engine's Partial Payment add-on. If you've turned on Partial Payment for a trip, travelers can pay a deposit through PayFast at checkout instead of the full amount.
You don't need to do anything extra on the PayFast side. Once your merchant credentials are saved and Partial Payment is set up on a trip, the deposit option shows up automatically at checkout.
Here's how it works for your traveler:
Book a trip with Partial Payment enabled
This lets the traveler choose a deposit instead of paying the full trip price.
A traveler books a trip where Partial Payment is enabled and picks PayFast.
Pay the deposit
PayFast securely processes the traveler's initial payment.
The traveler pays the deposit amount through PayFast's secure page.
Create the booking with a balance due
The booking records the deposit and keeps the remaining amount open.
The booking is created with the remaining balance marked as due.
Pay the remaining balance
The traveler can complete the payment before the trip starts.
The traveler comes back later, from their booking confirmation or user dashboard, and pays the remaining balance through PayFast.
Say you run a 5-day Garden Route tour and want to let travelers hold their spot with a 30% deposit. You'd enable Partial Payment on that trip, set the deposit percentage, and PayFast handles the rest. The traveler pays the deposit now and the balance before the trip starts.
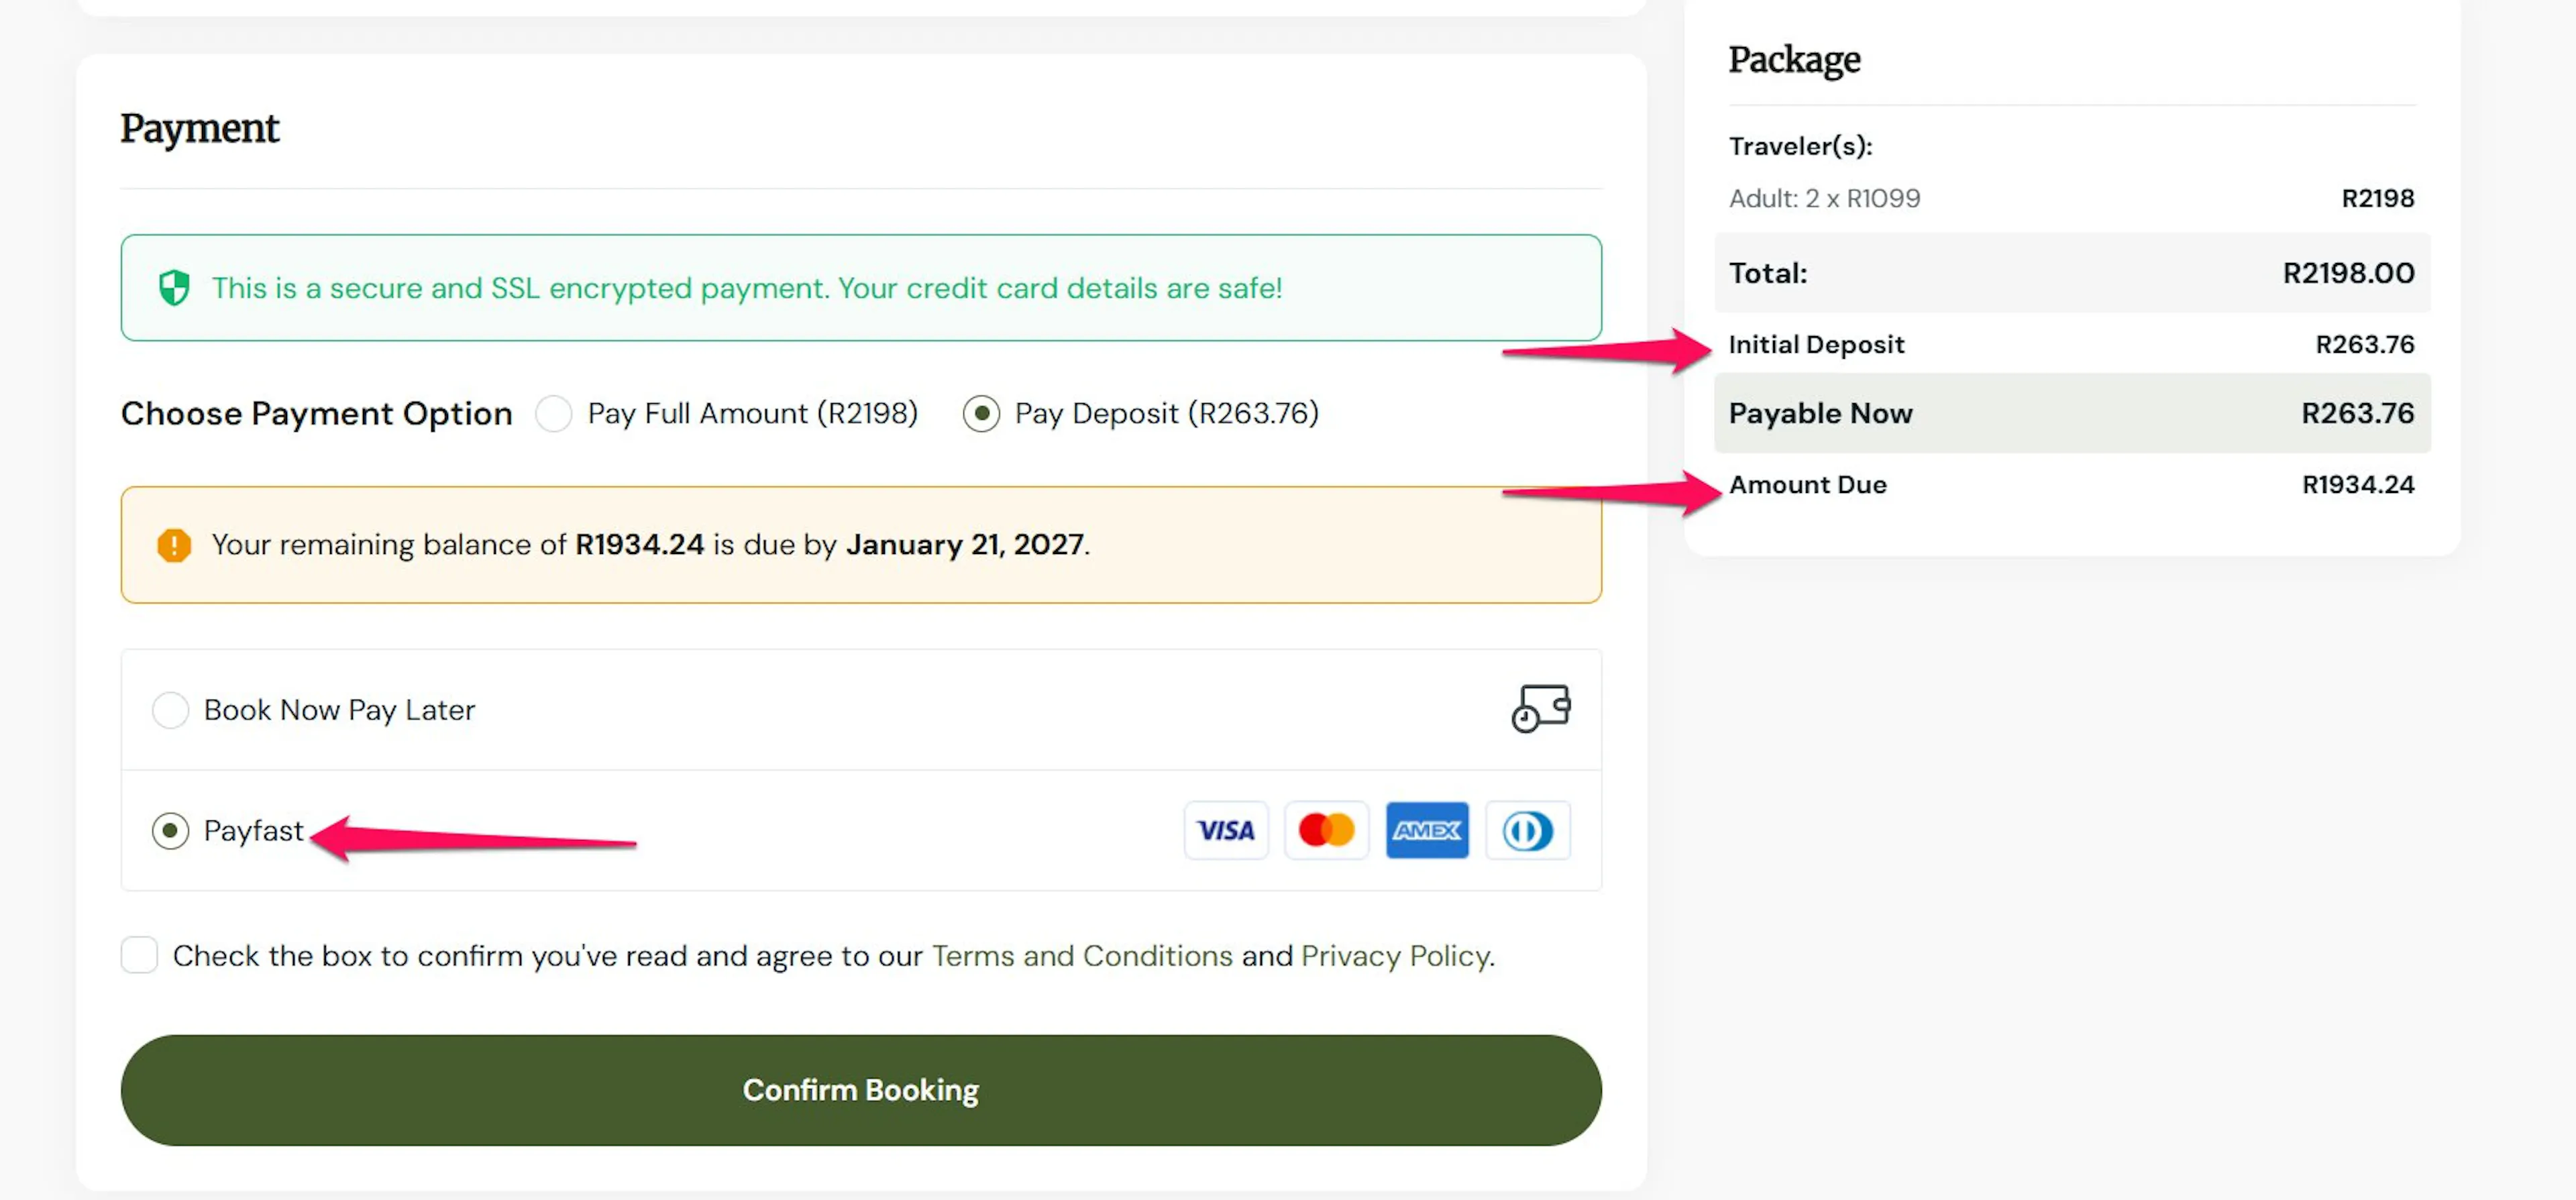
For setting up deposits on a trip, see the Partial Payment add-on documentation. This section only covers how PayFast handles that payment.
What happens at checkout
The traveler stays on your site while booking. At payment, they move to PayFast's secure page to enter their card details and complete the payment.
Once PayFast confirms the payment, the traveler returns to your site's confirmation page and gets a confirmation email. You'll see the booking, with its payment status, in your WordPress dashboard.
That covers the main setup and what your travelers will experience. If something isn't working as expected, the next section has the most common fixes.
Troubleshooting
PayFast isn't showing up in my list of payment gateways
This almost always means your site's payment currency isn't set to ZAR yet. Go to WP Travel Engine, then Settings, then Currency, then General. Confirm Payment Currency is set to South African Rand (R). Then go back to the Payments tab and check again.
A traveler paid but the booking still shows as unpaid
Give it a minute. The booking updates once PayFast's confirmation reaches your site. If it's still unpaid after that, check the booking's PayFast Payment Details panel on the individual booking screen for a payment status. Also confirm your Merchant Key and Merchant ID are entered correctly under the PayFast Payment sub-tab.
I entered my Merchant Key and ID, but payments aren't going through
Double-check that you copied the values exactly as they appear in your PayFast merchant dashboard. An extra space at the start or end, or a missing character, will stop the connection from working. Go back to the PayFast Payment sub-tab, re-enter both values, and save again.
The deposit option isn't appearing at checkout
This means Partial Payment isn't active or isn't configured on the trip. Make sure the Partial Payment add-on is installed and activated. Then check that the trip has a deposit percentage set in its pricing settings. The deposit option only shows up when both are in place.
Frequently Asked Questions
Which currencies does PayFast support in WP Travel Engine?
South African Rand (ZAR) only. If you also sell trips priced in other currencies, you'll need a different gateway for those bookings.
Can travelers pay a deposit through PayFast?
Yes. If the Partial Payment add-on is active and enabled on a trip, PayFast handles both the deposit at checkout and the remaining balance later.
Where do I find my Merchant Key and Merchant ID?
Both are in your PayFast merchant account dashboard. Copy them into the PayFast Payment sub-tab under WP Travel Engine, then Settings, then Payments.
Does PayFast require a specific WP Travel Engine version?
Yes, WP Travel Engine 5.0 or later. Keeping WP Travel Engine updated also keeps the checkout flow running smoothly.
If you're still stuck or have a question we didn't cover, our support team is happy to help. Reach out at our support page and we'll get you sorted.