

Custom Booking Link
Send travelers to an external booking platform or replace the booking button with your own code. Set it once for all trips, choose which trips use it, or customize it per trip.
Introduction
The Custom Booking Link add-on changes what happens when a traveler clicks your trip booking button. You can send travelers to another booking website, or replace the button with your own booking form or widget.
For example, you might show your treks on your website but take payments through Rezdy or Bokun. This add-on sends travelers directly to the right booking page. You can use one link for every trip, choose only certain trips, or set a different link for one trip.
Key Features & Benefits
| Feature | How it helps your tour business |
|---|---|
| External link redirect | Send travelers to Rezdy, Bokun, or another booking page without editing every trip separately. |
| Custom HTML mode | Replace the booking button with a booking form, calendar, or widget from your booking provider. |
| Choose which trips use it | Send selected trips to another booking service while the rest continue using the standard WP Travel Engine booking form. |
| Per-trip link | Give one special trip its own booking page or widget while your other trips use the main setting. |
| New tab control | Keep your website open while travelers view the booking page in a new browser tab. |
| Safer custom code | People without full code permissions cannot add scripts to the booking button. This helps protect your site from unwanted or accidental code. |
What's New in Version 1.2.0
Version 1.2.0 makes it clearer which trips use your booking settings.
- Apply To is now available in Global Settings. Choose All trips or Selected trips, then search for and select the trips you want.
- Booking Link Source is now available on each trip. Choose Global Configuration or Configure for This Trip. This replaces the earlier Override Global Booking Link toggle.
- Status messages now appear in Global Settings and on each trip. These messages explain what travelers see and why.
- Booking Link Type is the new name for the earlier Booking Type setting.
- Custom HTML is the new name for the earlier HTML Code field.
- New booking links must start with
https://. Links saved before this version that usehttp://continue to work. - Custom HTML can be up to 64 KB. Only trusted users can add scripts.
Prerequisites
Before you begin, make sure you have:
- WP Travel Engine installed and activated on your WordPress website.
- The latest version of WP Travel Engine installed.
- The Custom Booking Link add-on installed and activated. Use Version 1.2.0 or newer to follow everything in this guide.
How to Install
See how to activate a Pro add-on license key for the full installation and activation walkthrough.
Verification
To confirm the add-on is active and working:
- Go to your WordPress Dashboard.
- Navigate to WP Travel Engine > Settings > Extensions.
- Confirm that the Custom Booking Link tab appears alongside the other settings tabs.
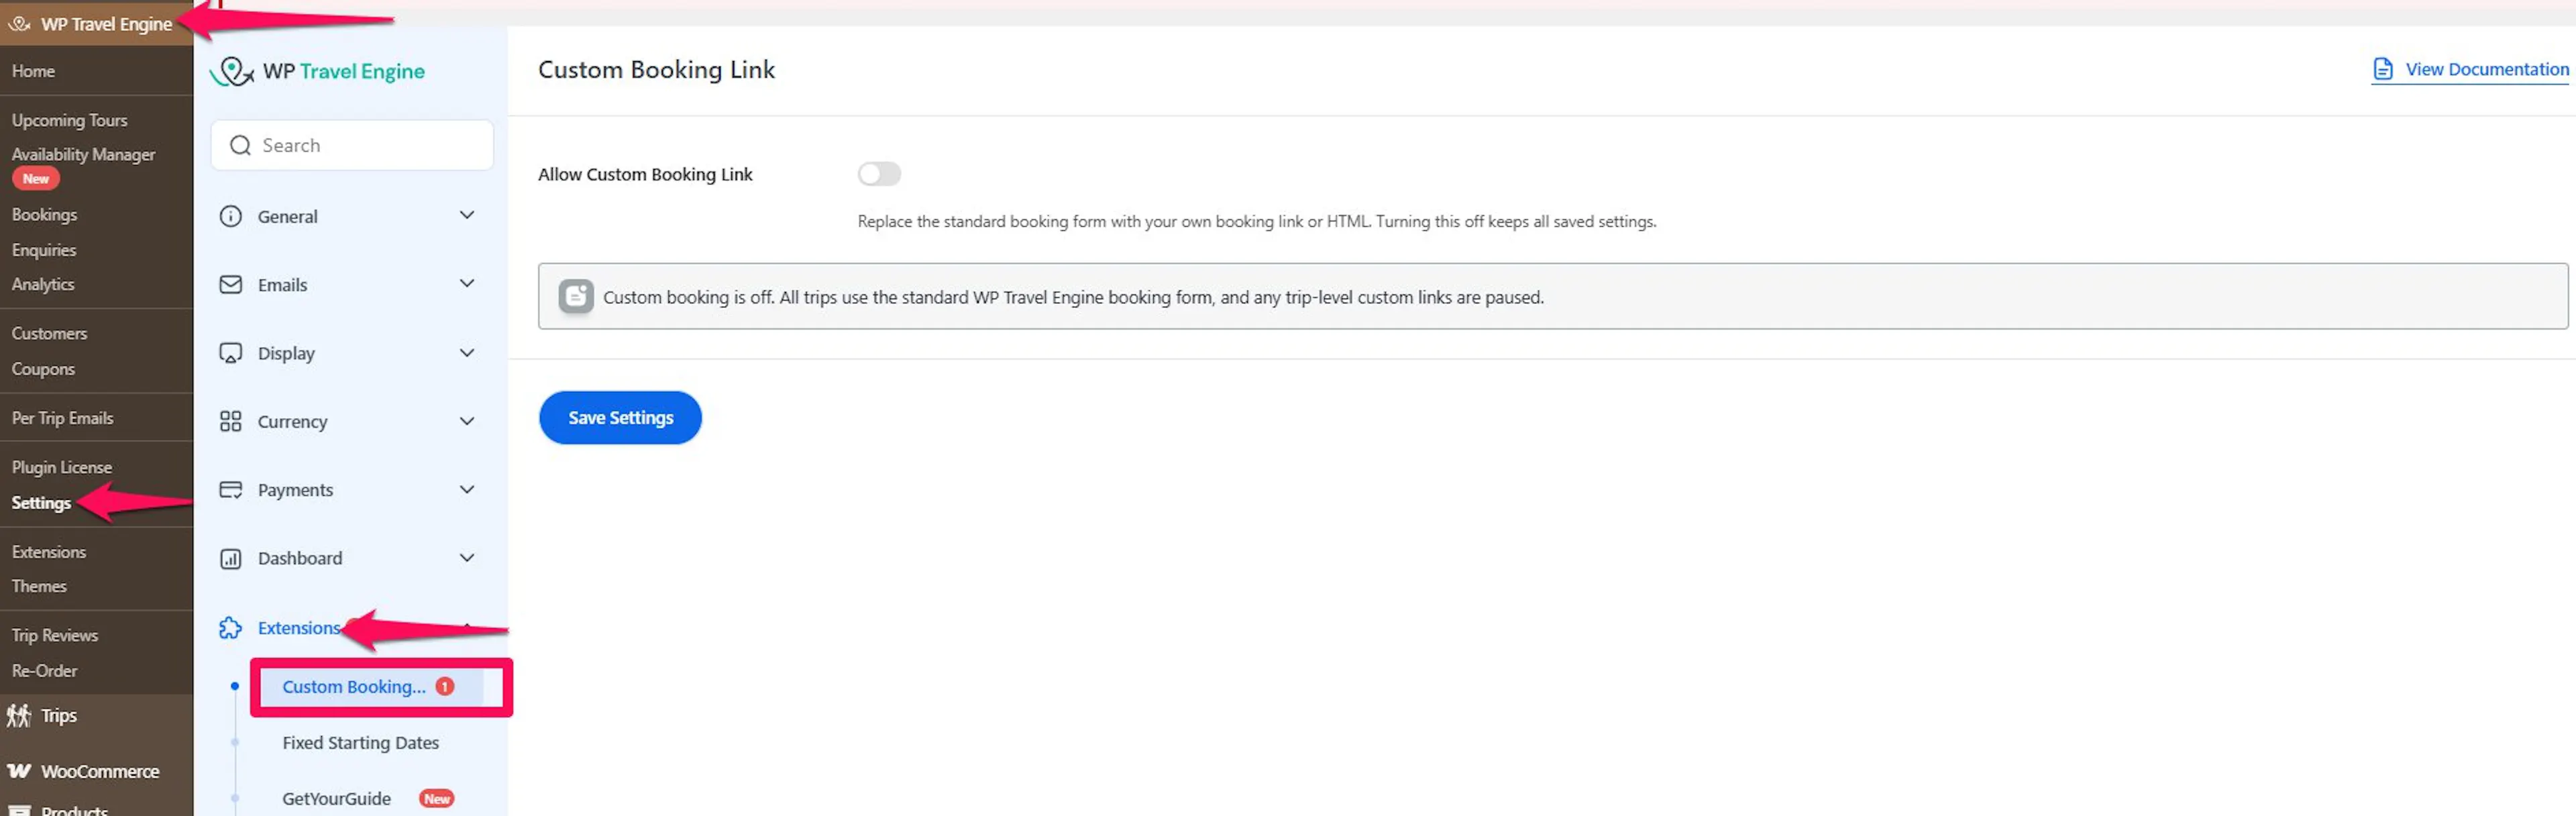
If the tab doesn't appear, deactivate and reactivate the add-on from the Plugins screen.
Setting Up Your Booking Link for All Trips
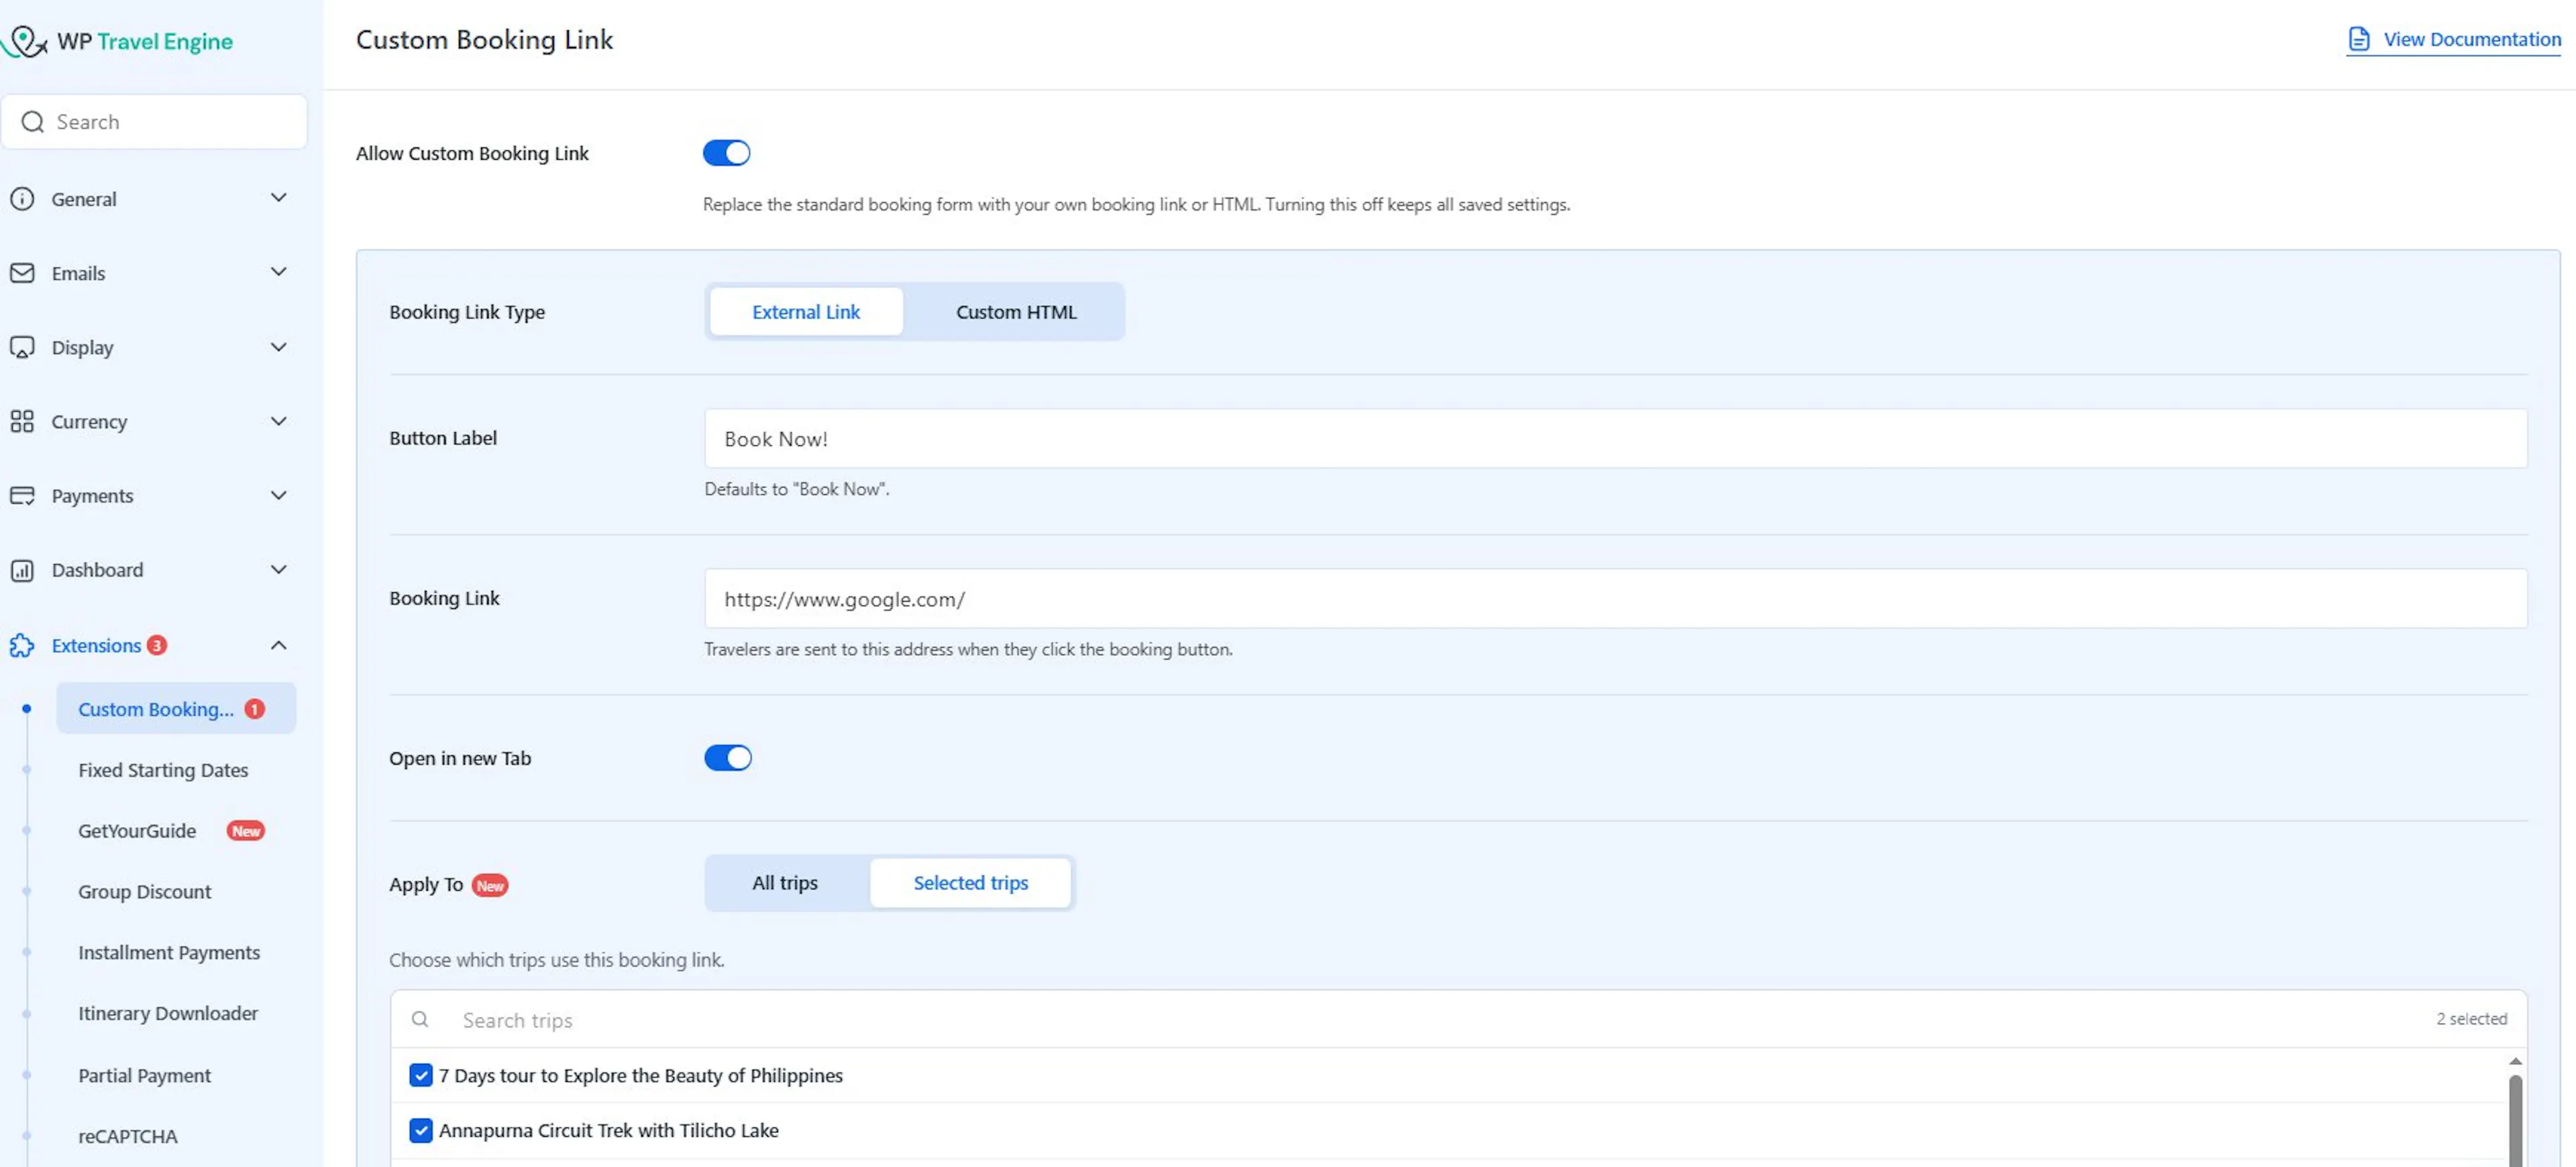
These settings live in the Custom Booking Link tab under WP Travel Engine Dashboard > Settings > Extensions. They work across your site. Any trip without its own link follows them.
Turning It On
Toggle on Allow Custom Booking Link. WP Travel Engine then uses your booking link or HTML instead of the standard booking form.
Turning this off keeps all your saved settings. All trips go back to the standard booking form, and any trip-level links pause until you turn it on again.
Choosing How the Booking Button Works
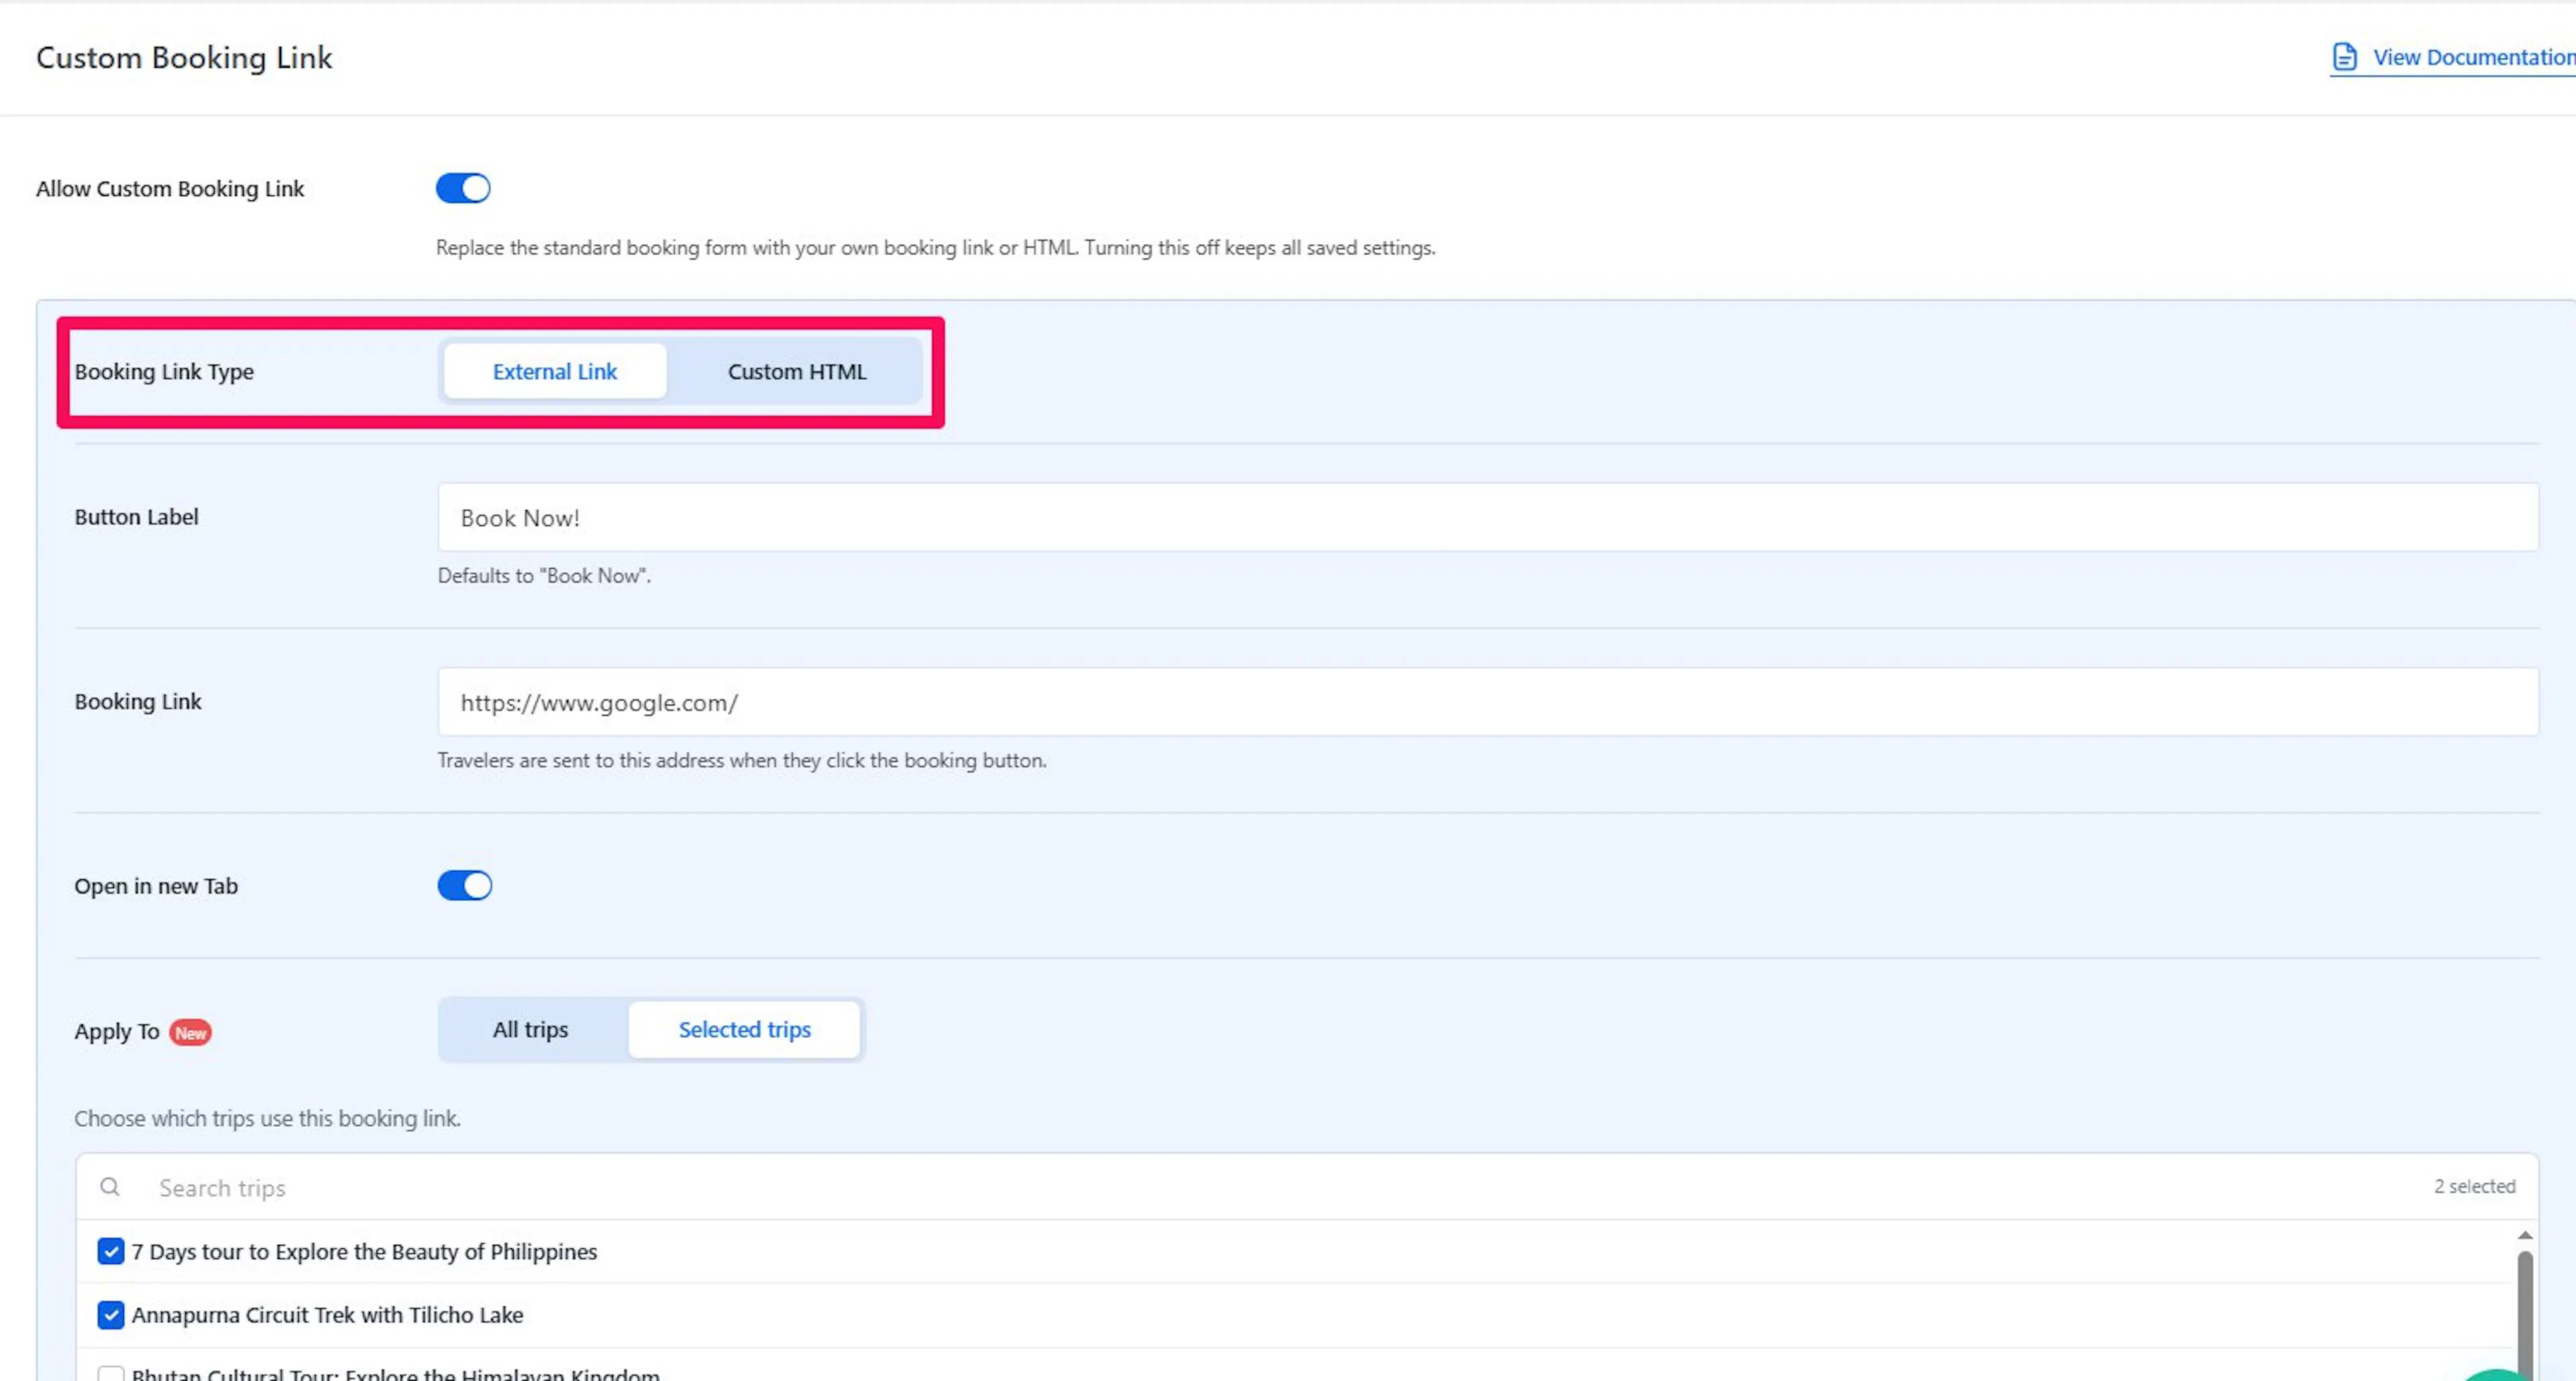
Under Booking Link Type, choose one of these options:
- External Link sends travelers to another page when they click the booking button. Use it if you take bookings on a separate platform such as Rezdy or Bokun.
- Custom HTML replaces the button with your own code. HTML is the code that places buttons, forms, and widgets on a page. Use it if your booking tool gives you an embed code for a form or widgets.
If You Choose External Link
Use this option to send travelers to another website or booking page. For example, if your Annapurna trek is listed on your site but bookings happen in Rezdy, point the button to that Rezdy booking page.
- Enter the text travelers will see on the button in Button Label. If you leave it blank, WP Travel Engine uses Book Now.
- Enter the full web address in Booking Link. It must start with
https://, for example,https://your-site.com/book. - Toggle on Open in new Tab if you want the booking page to open in a new browser tab.
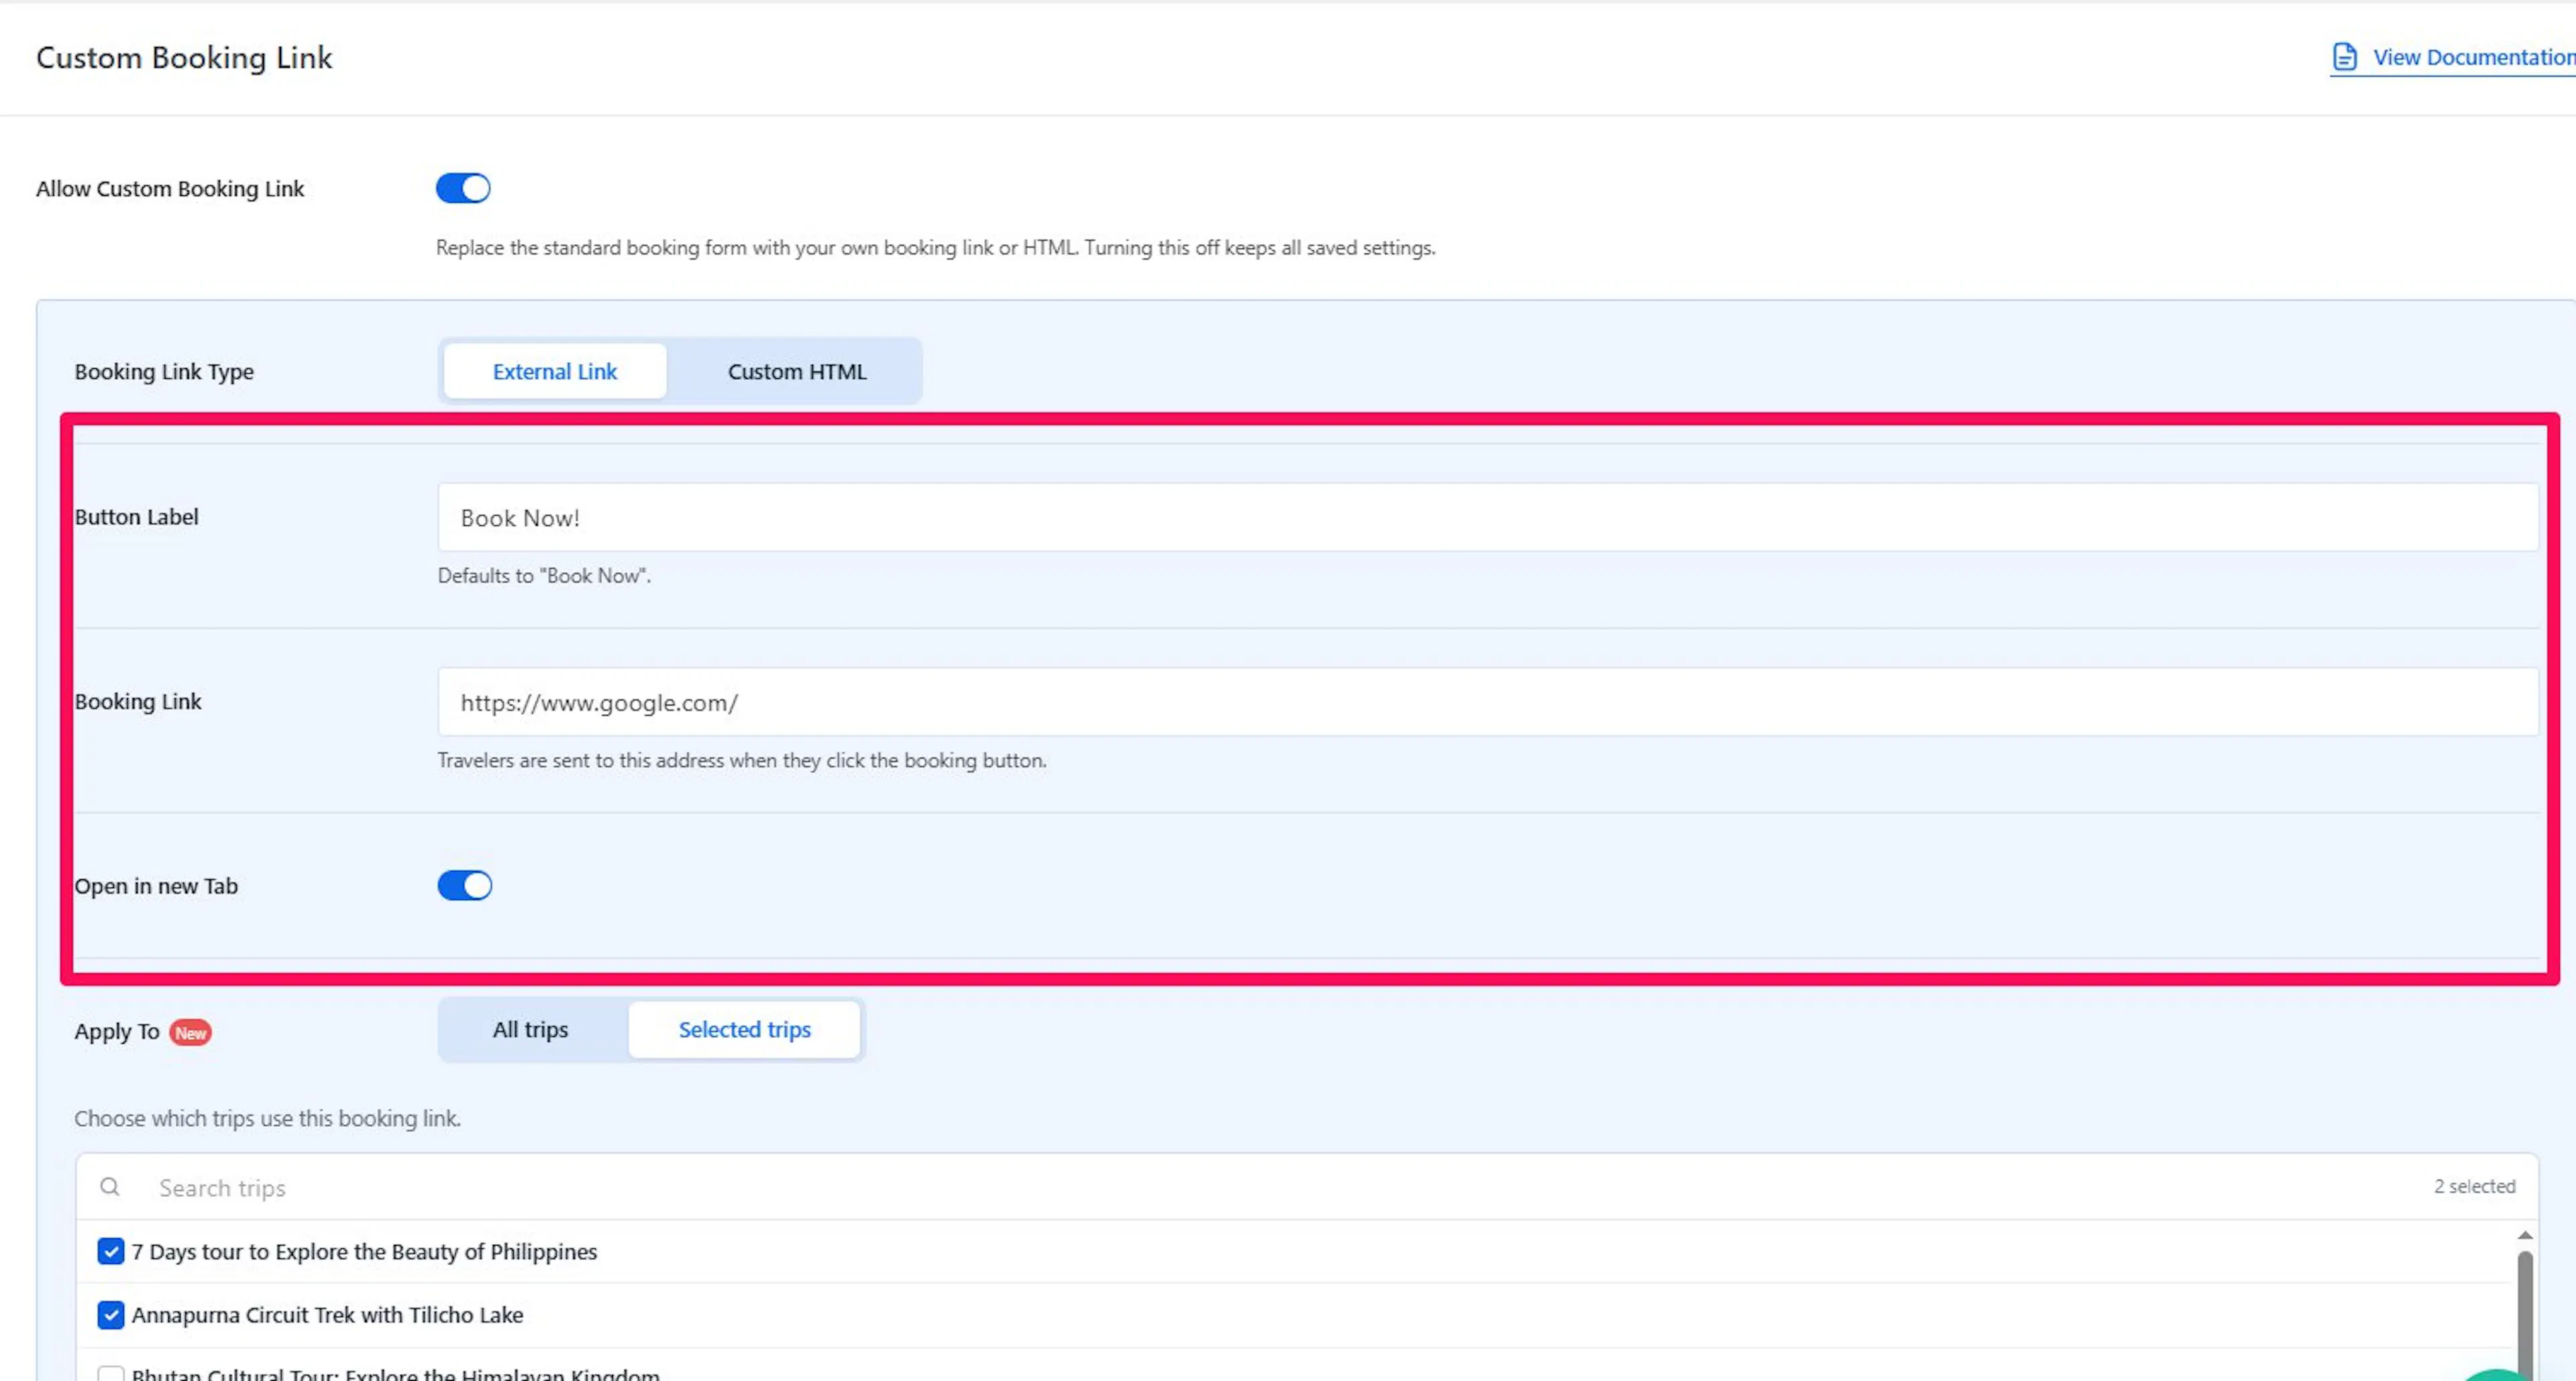
If the link doesn't start with https://, WP Travel Engine shows a message asking for a full URL starting with https://. Links saved before Version 1.2.0 that start with http:// keep working, but new links must use https://.
If You Choose Custom HTML
Use this option when your booking platform gives you code to paste into your website. A widget is a small tool, such as a form, calendar, or booking box, that appears right on the page.
Paste your booking widget or embed code into Custom HTML.
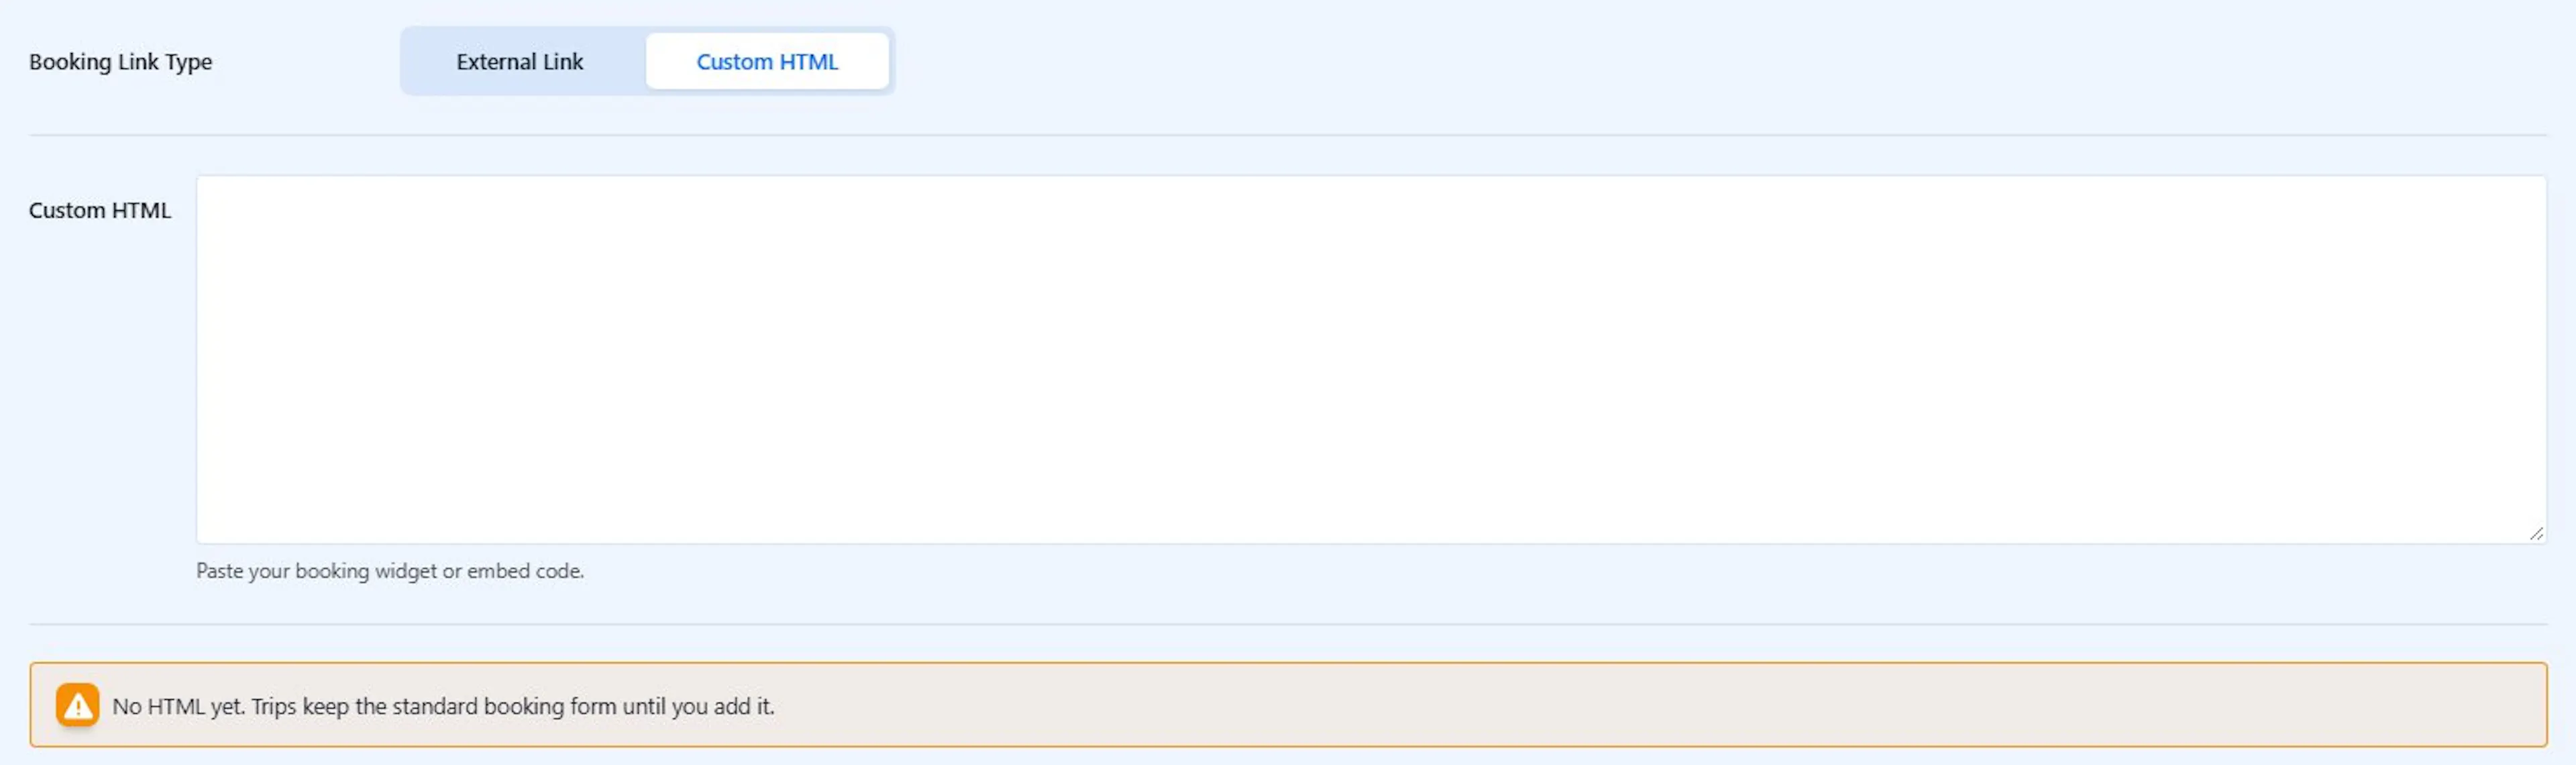
Custom HTML replaces the booking button completely. Make sure your code includes a working button or call to action, because travelers won't see the default booking button.
Keep these limits in mind:
- The code can be up to 64 KB. Longer code is not saved, and WP Travel Engine shows a message with the maximum size.
- Users with full code permissions can add scripts. For everyone else, WP Travel Engine removes scripts and other risky code, and allows iframes only if their address starts with
https://. When this happens, you see the message "Some code was removed for security. Only trusted users can add scripts."
If your booking widget doesn't work after saving, ask the site administrator to paste the code, since only trusted users can add scripts.
Choosing Which Trips Use the Link
Under Apply To, choose one of these options:
- All trips: applies the link to every trip. Trips that have their own link keep it.
- Selected trips: apply the link only to trips you pick. Selected trips always use this link. Other trips use their own link or the standard booking form.
If you choose Selected trips, a trip list appears.
- Use Search trips to find a trip by name.
- Select the trips that should use this link. The list shows how many you have selected, for example, "3 selected".
- Click Load more if the trip you want isn't showing.
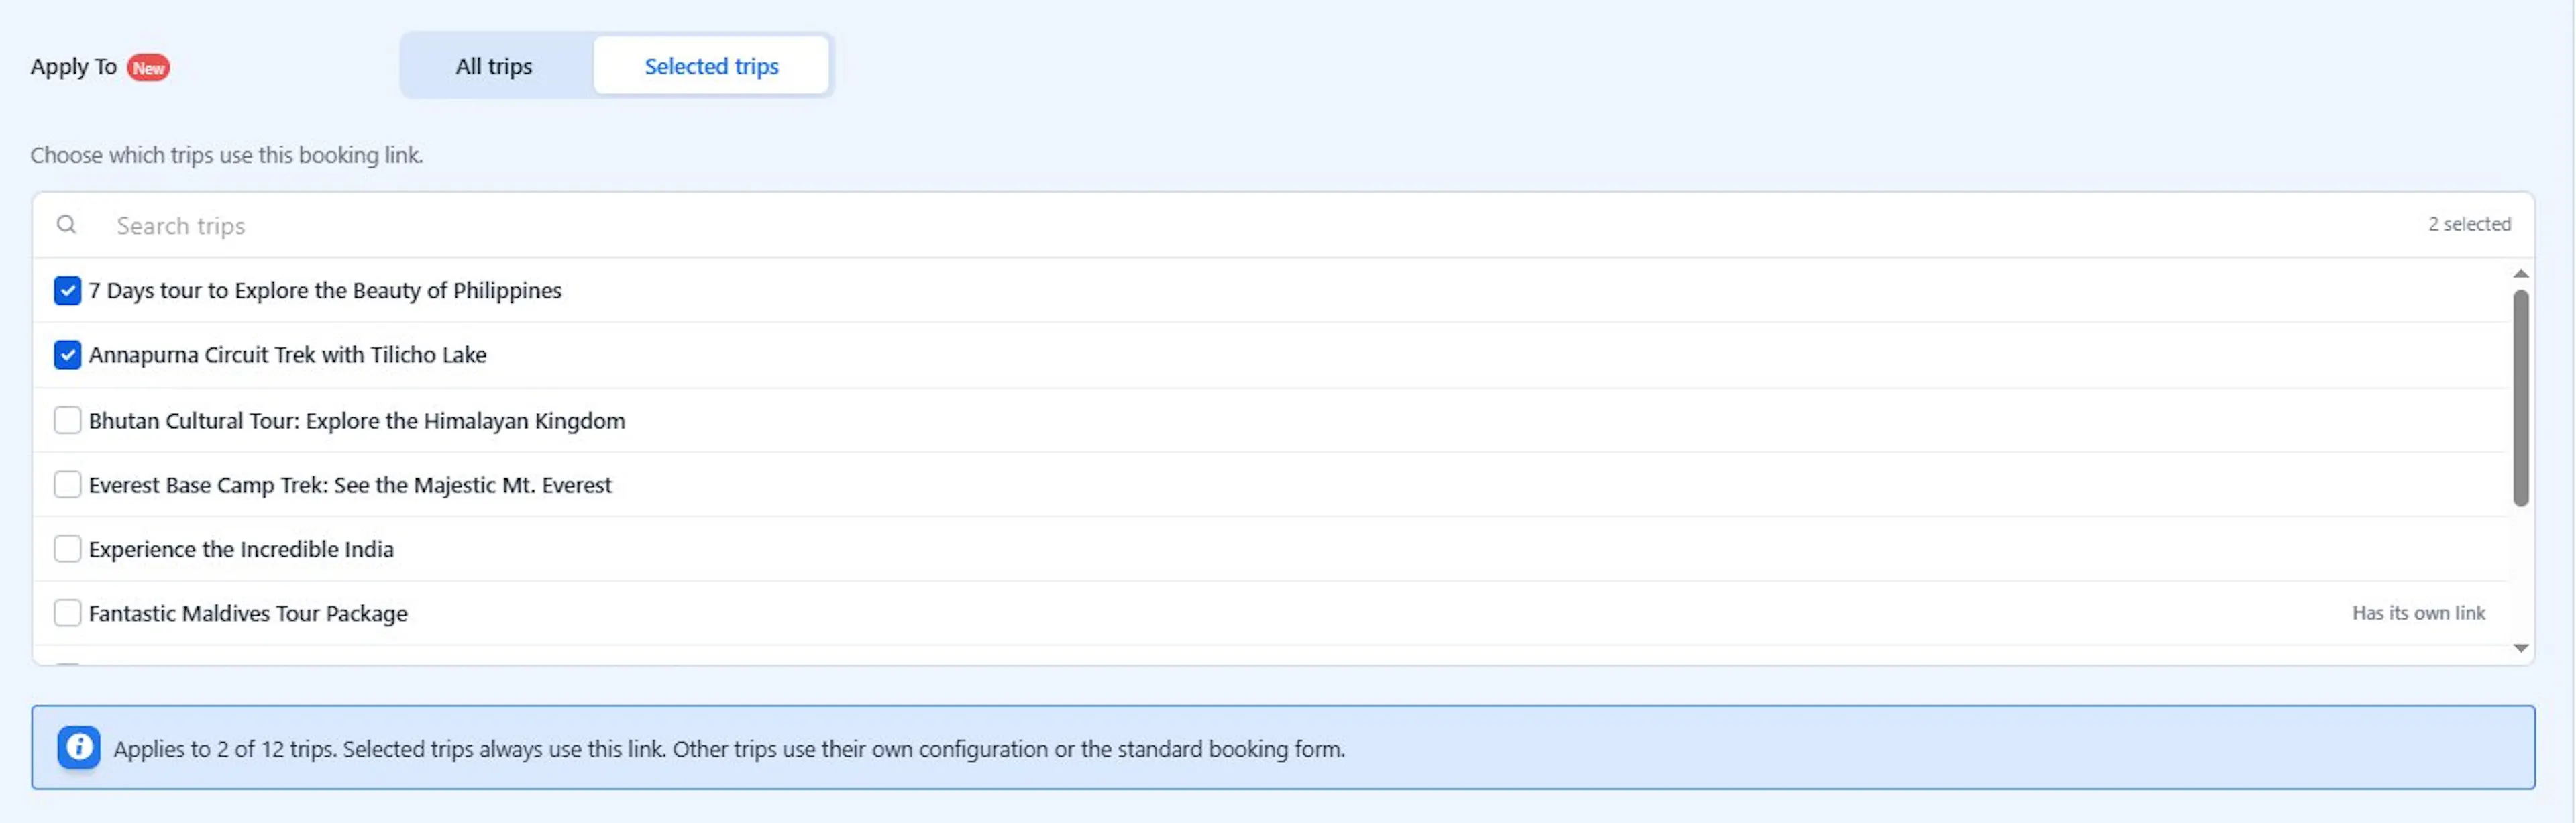
If you choose Selected trips but don't select any trip, the booking link won't appear on any trip. Select at least one trip.
If you trash or delete a trip, WP Travel Engine removes it from the Selected trips list.
Using a Different Booking Link for One Trip
This helps when most of your tours use one booking platform but one trek or partner package uses another. For example, you might send most day tours to Bokun while one multi-day partner trek goes to a separate booking page. Leave your main setup in place and give that one trip its own link.
- Open the trip you want to edit and click Edit.
- Go to WP Dashboard > Trips> Edit > Settings > Advanced Settings.
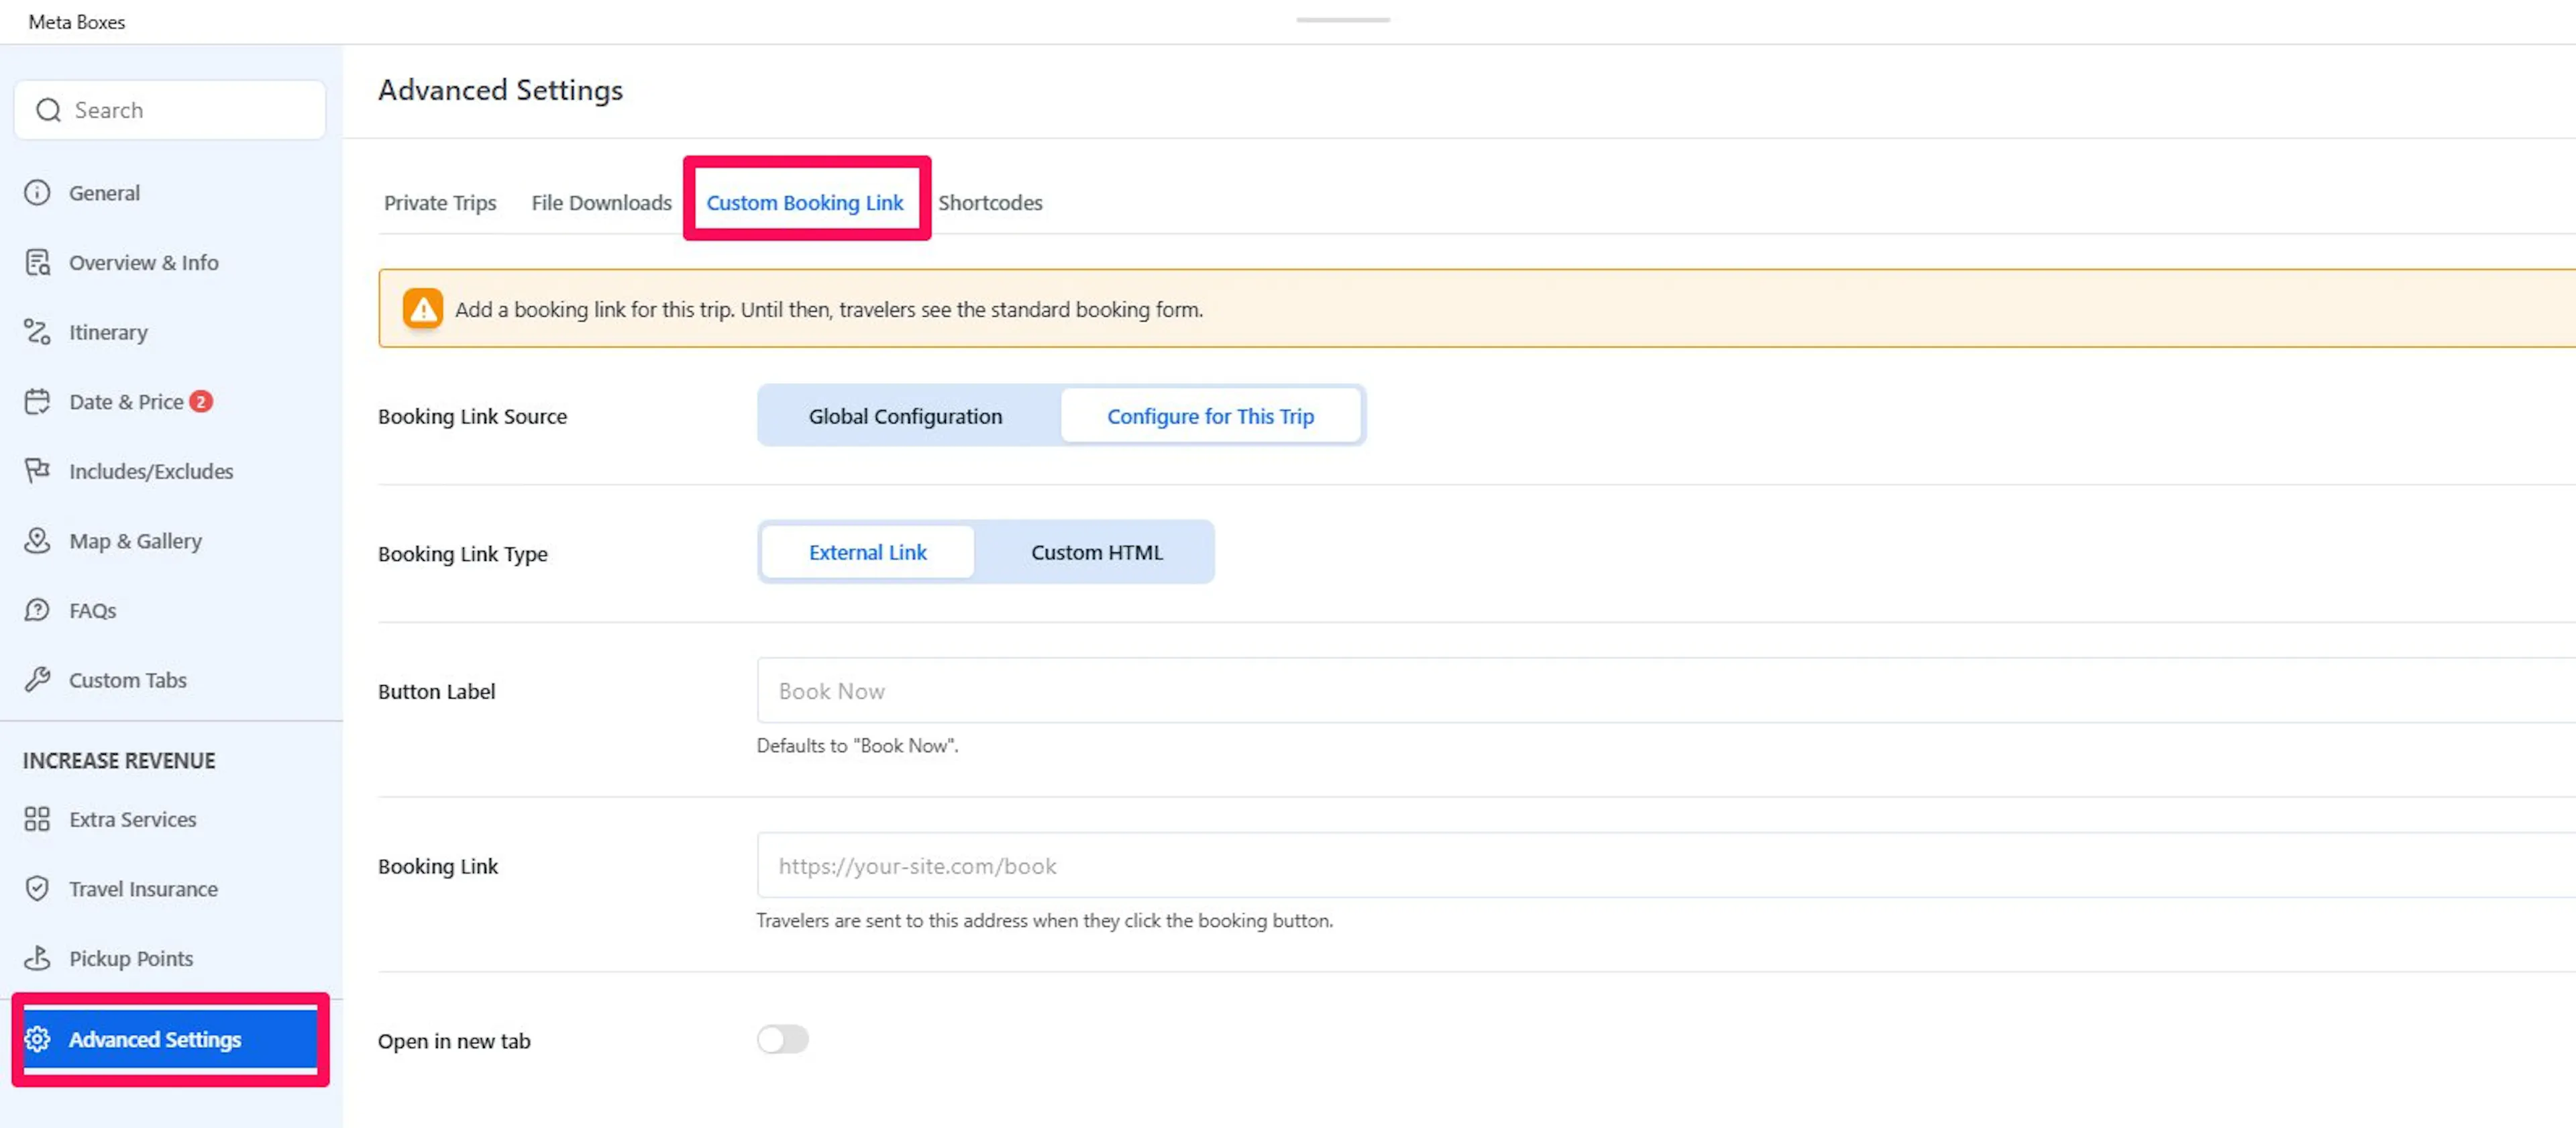
- Click the Custom Booking Link tab.
- Under Booking Link Source, select Configure for This Trip.
- Under Booking Link Type, choose External Link or Custom HTML.
- Fill in the fields that match your choice:
- For External Link, enter Button Label, Booking Link, and toggle Open in new tab if needed.
- For Custom HTML, paste your code into Custom HTML.
- Click Save.
After saving, WP Travel Engine shows a message such as "Trip updated. Travelers now see: ...". Open the trip page on your website to confirm the new booking setup appears.
The trip's own link affects this trip only. Every other trip keeps following the global settings.
To go back to the global link, select Global Configuration under Booking Link Source and click Save.
Trips Locked to the Global Link
If you set Apply to Selected trips in Global Settings and a trip is on that list, the trip is locked to the global link. The trip's Custom Booking Link tab shows a message that it uses the global booking link, with the address travelers are sent to. You can't set a different link for it.
To give that trip its own link, click Manage in Global Settings and remove the trip from the Selected trips list first.
Messages on the Trip Tab
The Custom Booking Link tab on a trip also tells you what travelers see.
| Message | What it means |
|---|---|
| This trip uses the global booking link. It's included in the Selected trips list in Global Settings, so travelers are sent to {domain}. | The trip is locked to the global link. |
| This trip uses the global booking link, but no global link is set yet, so travelers see the standard booking form. | The trip is locked to the global link, but the global link is empty. |
| This trip uses the global booking link ({domain}). Changes in Global Settings apply here automatically. | Apply To is All trips and this trip follows the global settings. |
| The global booking link only applies to selected trips, and this trip isn't one of them. Travelers see the standard booking form. | Apply To is Selected trips and this trip isn't selected. Click Add this trip in Global Settings → to add it. |
| No global booking link is set yet, so travelers see the standard booking form. | Click Set up global link → to add one. |
| This trip uses its own booking link instead of the global one. | Configure for This Trip is selected and the link is valid. |
| Add a booking link for this trip. Until then, travelers see the standard booking form. | Configure for This Trip is selected but the link or code is empty. |
| Custom booking is turned off in Global Settings, so no custom booking link is shown on this trip. | Click Turn on in Global Settings → to turn it on. |
What Travelers See on Each Trip
WP Travel Engine checks these rules for every trip.
| Situation | What travelers see |
|---|---|
| Allow Custom Booking Link is off | The standard booking form |
| The trip is on the Selected trips list | The global booking link or HTML |
| The trip is set to Configure for This Trip with a valid link or code | The trip's own booking link or HTML |
| Apply To is All trips and the global link or code is valid | The global booking link or HTML |
| Anything else, such as a trip not selected or no link entered | The standard booking form |
On a trip page, the custom link or HTML replaces the booking button. It also replaces the Book Now buttons in the Fixed Starting Dates availability list when that add-on is in use.
Troubleshooting
The booking button hasn't changed on my trip page
- Check that Allow Custom Booking Link is turned on in the Custom Booking Link tab.
- Check that you entered a link or code. Without one, the trip keeps the standard booking form.
- If Apply To is set to trips, check that this trip is on the list or has its own link.
- Check that the trip isn't set to Configure for This Trip with an empty link.
- Clear your site cache. A cache is a saved copy of your page that loads faster but can show an older version.
My booking link won't save or shows an error
Enter the full web address starting with https://, for example https://your-site.com/book.
My custom link opens in the same tab and takes people away from my site
Toggle on Open in new Tab in your booking link settings, then click Save.
The Custom Booking Link tab isn't showing up in my settings
The add-on may not be active. Deactivate and reactivate the add-on from the Plugins screen. Then check WP Travel Engine > Settings > Extensions again.
My custom HTML code isn't showing up
- Check that Custom HTML is selected under Booking Link Type. If External Link is selected, WP Travel Engine ignores the HTML.
- Check that the field isn't empty and the code is under 64 KB.
- Check your code for typos or a missing closing tag.
- Look for the message "Some code was removed for security." If it appears, your account can't add scripts. Ask the site administrator to paste the code, or use code without scripts.
- If your code uses an iframe, check that its address starts with
https://. - Clear your cache and check the trip page again.
I set a link for one trip, but it isn't working
- Check that Configure for This Trip is selected under Booking Link Source.
- Check that the trip isn't on the Selected trips list in Global Settings. Trips on that list always use the global link.
- Check that you clicked Save.
- Clear your cache and check the trip page again.
My Selected trips list lost a trip
WP Travel Engine removes a trip from the list when you trash or delete it. Restore the trip, then add it to the list again.
FAQs
Can I use Custom HTML globally and an External Link for a specific trip?
Yes. Set Booking Link Type to Custom HTML in Global Settings. Then open the trip, select Configure for This Trip, and choose External Link. The trip must not be on the Selected trips list.
Will the Button Label set globally show on all trips?
It shows on every trip that uses the global link. Trips with their own link use their own Button Label. If a label is blank, the button says Book Now. The label applies to External Link only.
Does Custom HTML support embedded booking widgets from third-party platforms?
Yes. Paste the embed code from your booking platform into Custom HTML. Scripts need a user with full code permissions, and iframes need an https:// address.
Can I use a different booking link for each trip without setting up a global link first?
You still need to turn on Allow Custom Booking Link in Global Settings, because the trip settings only work when the add-on is on. You don't need to enter a global link. Open each trip, select Configure for This Trip, and add its link.
Can I use the custom link on only some of my trips?
Yes. Set Apply To to Selected trips and pick the trips. Or leave Apply To on All trips and give only the trips you want their own link.
If you're still stuck or have a question we didn't cover, our support team is happy to help. Reach out at our support page and we'll get you sorted.