

Single Trip Settings in FSD
Unlike the global FSD settings, which apply to all trips, these settings are trip-specific.
Assigning dates to packages in FSD
Use trip-specific dates when one trip needs its own schedule. This helps travelers see exactly when each package is available. A package can be something like Standard or Premium. Each one can have its own dates, seat limit, and availability label. This works for one-day trips, date ranges, and repeating departures.
How to assign dates to a package
Before you start, open the trip you want to edit in your WordPress dashboard. You will find it on the left sidebar under Trips.
This is where you connect a package to the dates travelers can actually book. Once you save the dates, your trip calendar starts to make more sense for both you and your customers.
Open the trip's Dates tab
Go to Trips > Edit a Trip > Date and Price > Dates tab.
Select the package
Choose the package you want to work on. For example, you might open your Premium package if it has different departures from your Standard package.
Edit pricing and dates
Under Package Dates, click Edit Pricing and Dates.
Open the Date tab
Click the Date tab. This is where you assign the date for that package.
Choose the starting date
Pick the starting date from the calendar. That date now becomes available for that package.
Once the first date is in place, you can add more dates in the way that fits your trip schedule.
Selecting a range of dates
Use a date range when the same package is available on several days in a row. This saves time if you run a tour on consecutive dates.
Check the box Select a range of dates using the range calendar. Then choose the start and end dates. For example, if you select August 1 to August 7, the package becomes available on each of those dates.
A date range works well for week-long departures, festival tours, or holiday trips that run every day for a short season.
Adding a conditional price as per the date
Use date-based pricing when the same trip costs more or less during certain periods. This is helpful for peak season, off-season, or special event departures.
For example, you might charge more for an Everest view trek in October and less in July. If you do not set a date-specific price, the system uses your global pricing. See the full Conditional Price documentation for details.
That gives you flexible pricing without changing the trip's main price every time.
Adding time slots for booking
Use time slots when the same trip runs more than once on the same day. This is common for city tours, museum visits, rafting trips, and other day tours.
Before you add time slots, make sure you have already selected the date for that package.
Add a time
After selecting a date, click Add Time.
Enter the time slots
Enter the times when the trip runs on that date. For example, you might offer a morning departure at 9:00 AM and an afternoon departure at 3:00 PM.
Each time slot shares the same seat limit for that date. See the Seat Allocation and Booking Capacity documentation for how seat allocation works.
Once your times are added, travelers can choose the departure that suits them best.
Recurring time
Use recurring time when the trip repeats on a pattern. This is useful when you do not want to add each date one by one. You can choose only one recurring option for a particular date.
- Daily: The trip repeats every day starting from the chosen date.
- Weekly: The trip repeats every week on the same weekday. You can also select specific weekdays.
- Monthly: The trip repeats once a month. You can choose which months to include, such as January and February only.
- By default, it repeats on the same date each month (the date you originally selected).
- You can also turn on Run only on specific weekdays of the month. This replaces the fixed date with one or more weekday patterns, so the trip repeats on days like “the first Monday” or “the last Sunday” instead of a set date.
- Each pattern has three parts: an order (First, Second, Third, Fourth, or Last), a weekday, and the months it applies to. You can add more than one pattern. For example, a trip can occur on the 1st Monday and the Last Sunday of each selected month.
- Yearly: The trip repeats once a year on the same date.
If you set a trip to repeat weekly starting on 5 August (Monday), it will automatically create departures for every Monday that follows.
Example: If you set a trip to repeat weekly starting on August 5, which is a Monday, it automatically creates departures for every Monday that follows.
Stopping repeats
You can also decide when that repeating schedule should stop. That helps you avoid keeping old departures open by mistake.
- Repeat Until: Select a specific end date. For example, repeat until December 31, 2025.
- Repeat Limit: Enter the number of times the trip should repeat. For example, 10 times only.
Now your repeating trips can stay active only for the season you want.
Setting total seats
Use Total Seat to control how many travelers can book a package date or time slot. This is one of the most important settings if you run small groups or limited departures.
For example, if you set 3 seats, only 3 travelers can book that package for that date and time. After that limit is reached, no more bookings are allowed.
See the Seat Allocation and Booking Capacity documentation for how seat allocation works across general settings, packages, and time slots.
This helps you avoid overbooking and keeps your trip capacity clear.
Availability Label
Availability labels tell travelers what the booking status looks like at a glance. They are useful when you want to build confidence or show urgency in a clear way.
Set an Availability Label to show the booking status of the package:
- Guaranteed: The trip will definitely run.
- Available: Seats are still open.
- Limited: Only a few seats are left.
You can also use labels you created earlier under the Availability Labels section in the global FSD settings.
A label is a small detail, but it helps travelers decide faster.
Date settings in a single trip
These settings affect one trip only. You can find them under Trips > Edit a Trip > Date and Price > Date Settings in your WordPress dashboard.
Section Title
Use Section Title when you want to change the heading that appears above the trip's date list on the trip page.
For example, if you enter "Upcoming Departures," that exact heading shows above the list of dates. If you leave it blank, the default title is used.
This is helpful when you want the trip page to match your brand voice or the type of trip you are selling.
Hide Fixed Trip Starts Dates Section
Turn this on when you do not want the fixed departure dates section to show on that single trip page.
By default, this section appears between the featured image or slider and the main trip content. Hiding it can help if you want a cleaner page layout for a custom sales page or a special trip landing page.
You can always turn it back on later if you change your mind.
Trip Expiry Date
Use a trip expiry date when bookings should stop after a certain day. This is useful for seasonal trips, expired offers, or tours that are no longer running.
Choose the date after which the trip can no longer be booked. The trip page still stays visible. Bookings are automatically disabled once the expiry date is reached.
Example: If you set the expiry date to December 31, 2025, travelers can still view the trip details after that date, but they will not be able to book it.
That way, your trip stays online without accepting late bookings.
Excluded Dates
Use excluded dates when a trip should not run on certain days. This setting applies only to this trip. It does not affect your other trips.
You can block single dates or a date range from the calendar. You can also choose how the blocked date behaves. If needed, you can repeat that exclusion every year. This is helpful for public holidays, lodge closures, permit blackout dates, or days when your guide team is unavailable.
How excluded dates work for this trip:
There are three ways to block a date. Pick the one that matches how your trip runs.
Block Entire Trip Duration
The trip cannot be booked if any part of the trip includes the excluded date. That is true even if the trip starts before that date or ends after it.
This is the strictest option. Use it for holidays or maintenance days when nothing should run at all.
Block Start Date Only
The trip cannot start on the excluded date. Bookings are still allowed if the trip includes that date during the trip duration.
This works well for peak days when you do not want new trips starting but ongoing ones are fine.
Block Specific Time Slots
This blocks only the departure times you choose on that date. The other time slots for that same date stay available.
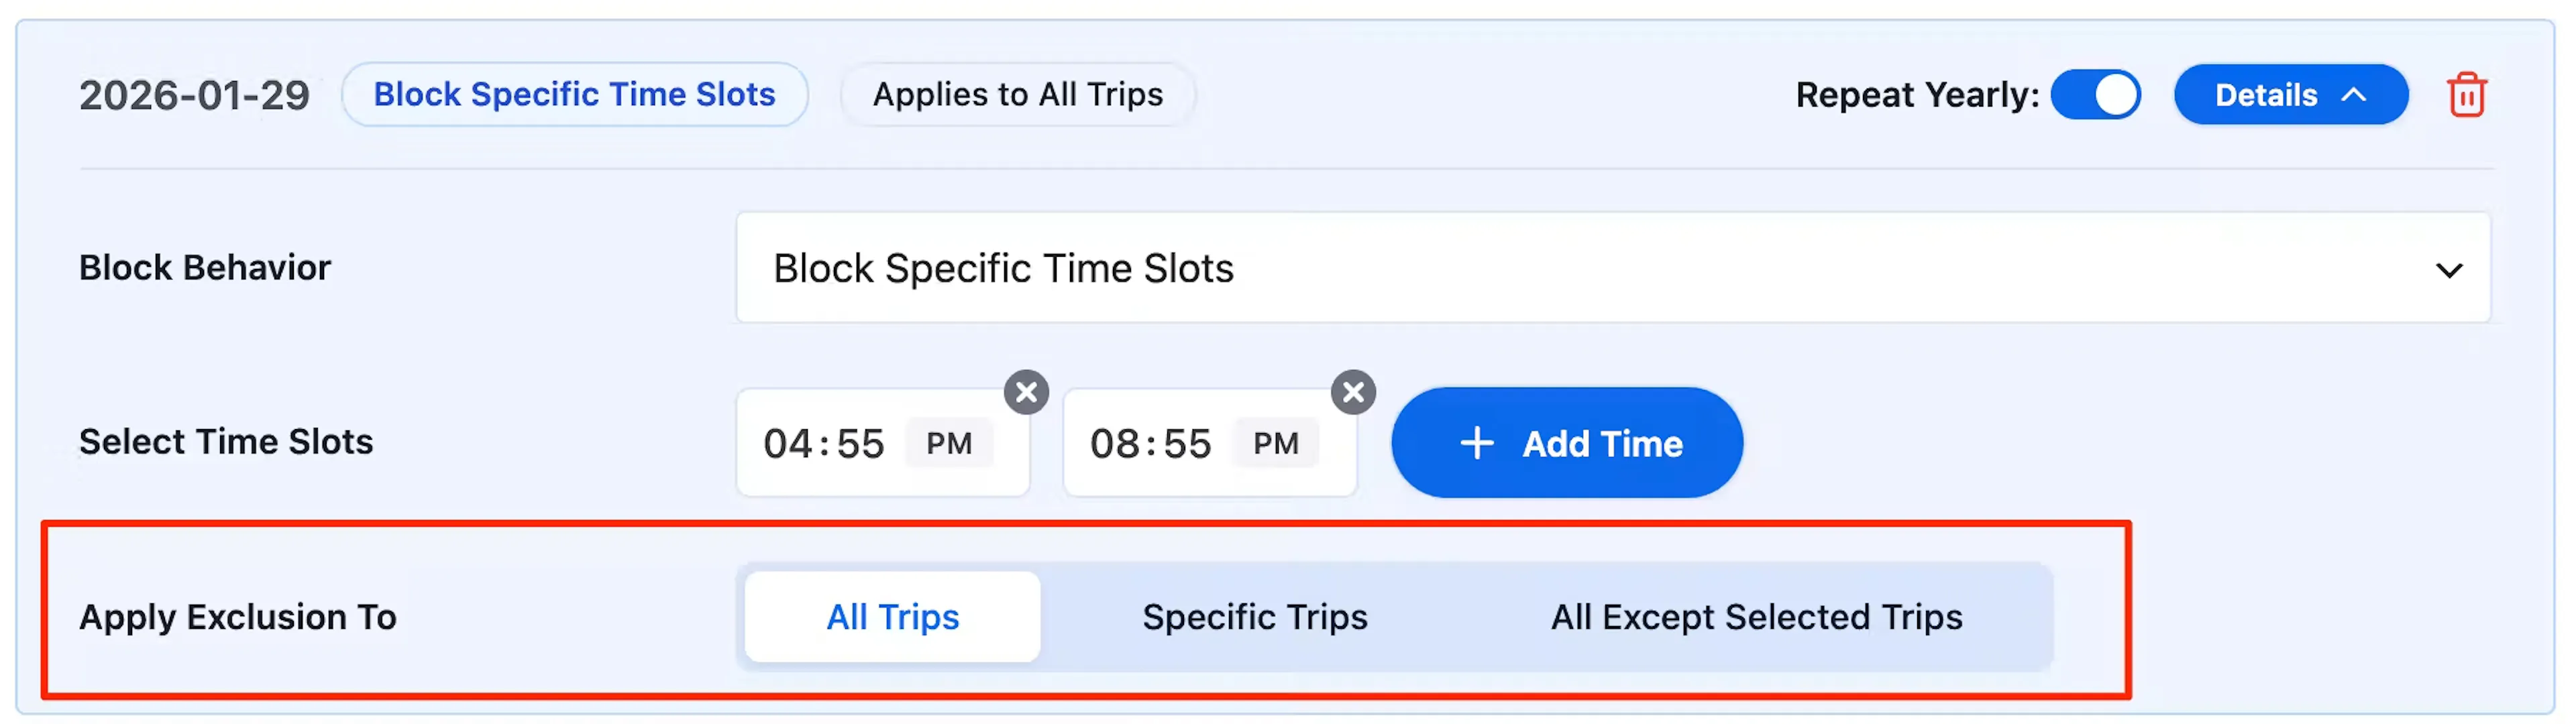
Under Select Time Slots, choose the times you want to block.
Only the departure times already set up for that date appear here. If the trip has no time slots for that date, there is nothing to select.
Examples:
- If a trip runs daily in August but cannot operate on August 15, exclude that date using Block Entire Trip Duration.
- If a trip should not start on August 15 but can still continue through that day, exclude the date using Block Start Date Only.
- If a trip runs three departures a day and one departure on August 15 is fully staffed elsewhere, exclude only that time using Block Specific Time Slots and keep the other departures open.
There are two kinds of exclusions. Global Exclusions are set in the global settings and apply to all trips. Trip-Specific Exclusions are set here and apply only to this trip.
If the same date is excluded in both places, the trip-specific setting takes priority. That includes the way the date is blocked.
For example, January 2, 2027 might be excluded globally with Block Entire Trip Duration. If this trip has that same date excluded with Block Specific Time Slots, this trip will only block the selected time slots. The global rule will not apply to this trip for that date.
The final unavailable dates for a trip come from both global and trip-specific exclusions together.
Once exclusions are in place, you have more control over real-world scheduling problems without changing every trip on your site.
Shortcode
A shortcode is a small piece of text you paste into WordPress to show something on a page, post, or widget. A widget is a content block you can place in areas like a sidebar or footer.
The FSD plugin provides shortcodes so you can show departure dates anywhere on your site.
How shortcodes work:
- Copy and paste the shortcode into a post, page, or widget.
- The shortcode automatically pulls in the trip dates configured for each trip.
- On the frontend, travelers see the list of available departure dates, the price for each date, and the number of seats left.
As bookings come in, available seats update in real time until the trip is sold out.
All Fixed Starting Dates
Use this shortcode when you want to display all fixed starting dates from all trips across your site.
[WTE_TRIPS_FIXED_STARTING_DATES]
This shows a complete calendar of all available trips, organized by months and years.
Example use case: Create a page called "Upcoming Departures" and place the shortcode there so travelers can browse all available trip dates in one place.
This is a good option if you want one central page for all upcoming departures.
Troubleshooting
My dates are not showing on the trip page
Check that you added the dates to the correct package and saved your changes. Also make sure the fixed departure section is not hidden in Date Settings.
If the trip page still looks empty, go back and confirm you selected the date under the package and not only the main trip details.
I added a date range but some dates are missing
Look at the start date and end date again in the range calendar. A wrong month or year is easy to miss.
Also check whether any of those dates were excluded later in the trip settings. An excluded date can make a date look like it was never added.
I cannot choose any time slots in excluded dates
Time slots only appear there if you already added them to that date first.
Go back to the package date, add the trip times, save, and then return to Excluded Dates. After that, the available time slots should appear for selection.
My trip stopped accepting bookings
Check the Trip Expiry Date first. If that date has passed, the trip page stays visible but bookings are turned off.
Then check seat limits for the date or time slot. If the seats are full, travelers will not be able to book.
My weekly or monthly repeats are going too far
Open the recurring settings and look for Repeat Until or Repeat Limit. If neither is set the way you want, the schedule may continue longer than expected.
Set an end date or a repeat count so the pattern stops at the right point.
I blocked one date globally but this trip behaves differently
That can happen when the same date is also excluded inside the trip itself.
Trip-specific exclusions take priority over global exclusions for that trip. Check the trip's own Excluded Dates settings to see which block behavior is active.
I expected different seat limits for different times on the same day
In this setup, each time slot shares the same seat limit for that date.
If you need to plan around capacity, check the date's total seats carefully before opening bookings. The Seat Allocation and Booking Capacity documentation explains how the seat rules work.
FAQs
If you're still stuck or have a question we didn't cover, our support team is happy to help. Reach out at our support page and we'll get you sorted.