

Configure global settings for trip fixed starting dates
Set the default fixed departure date rules for every trip on your site, including booking display, exclusions, archive cards, and calendars.
Configuring the global settings for Trip Fixed Starting Dates
These settings control how fixed departure dates work across every trip on your site. You only need to set them up once. After that, every trip you create follows these rules unless you change something for one specific trip. If this is one of your first plugin setups, take your time. You can come back and adjust any of these settings later.
You'll need the Trip Fixed Starting Dates add-on activated before you start. A plugin (an add-on that extends what WP Travel Engine can do) needs to be turned on before its settings appear.
This first step takes you to the right screen so all the settings below are in one place.
Open the Fixed Starting Dates settings
In your WordPress dashboard, look at the left sidebar. This is the admin area you see after logging in.
Find WP Travel Engine and click Settings. Then click Extensions, Fixed Starting Dates, and General.
That page contains all the settings covered below.
Enable Trip Fixed Starting Dates for trips
This is the main switch for the add-on. Turn it on to show the Fixed Starting Dates section on your trip pages. Turn it off and that section disappears from all trips.
Fixed Starting Dates Section Title: This is the heading travelers see above your departure dates list. You can type any title that fits your business. "Available Departures" and "Trip Dates" are both clear choices. Leave it blank if you want to keep the default heading.
If you run guided treks with set departure days, a clear title helps travelers spot the dates quickly. That is especially useful when the trip page also includes itineraries, maps, and package details.
Once this is on, you can decide how the booking window behaves.
Booking Modal options
These settings control what happens after a traveler clicks Book Now next to a date.
When a traveler clicks Book Now, a small pop-up window opens to complete the booking. You can choose how much information shows in that window.
Skip Date Selection in Booking Modal: Turn this on to hide the date field in the booking pop-up. The traveler already clicked a date from the list, so they do not need to pick it again. The system already knows which date they chose.
This makes the booking flow feel shorter. It also cuts down on mistakes.
Say you run a weekend hiking trip with three departure dates. A traveler clicks Book Now on the March 15 date. With this setting on, the pop-up opens straight to the booking form. The traveler does not have to choose the same date a second time.
Next, you can choose where the dates section appears on the trip page.
Enable FSD below the Banner
This setting controls where the departure dates section appears on your trip pages. That changes what travelers notice first.
Show FSD below Banner: Turn this on to place the departure dates section right below the main banner image at the top of the trip page. This is the default position for all trips.
If you turn it off for a specific trip in that trip's own settings, that trip uses its own preference instead. In that case, the dates section appears lower on the page. It shows below the main trip content.
If dates are the main thing your travelers need to see, this placement works well. It is especially useful for fixed-date group tours where people want to check departures before reading everything else.
That takes care of placement. The next setting helps you handle trips that are no longer bookable.
Trip Expiry Message
This message appears after a trip passes its expiry date. It tells travelers the trip is no longer available.
You can write this message in your own words. "This trip has ended" and "Bookings closed for this season" both work well. Keep it short so the message is clear at a glance.
Say you run a summer trek that finishes in September. After the last departure is gone, you do not want people trying to book it in October. This message gives them a clear answer instead of leaving them guessing.
Now you can choose what information appears in the dates table itself.
Display Options
These settings control what information appears in the departure dates table on your trip pages. You can choose whether to show availability labels, prices, and remaining seats. Think of it as choosing which columns to display in a spreadsheet - each one gives travelers another piece of helpful information.
Date Availability Label: These are small tags like "Guaranteed," "Limited," or "Available" that appear next to each departure date. They help travelers understand availability quickly. Turn this off if you prefer a cleaner table.
If you have a trek with 12 seats and only 2 left, a "Limited" label helps travelers decide sooner. It gives them useful context without making them open the booking form first.
Price: This shows the price for each departure date directly in the table. By default, it shows the price of your primary package, which is the first package you created for that trip.
If you sell Standard and Premium packages, travelers will see the Standard price in the table. That gives them a starting price before they open the full booking form.
Space left: This shows how many seats are still available for each date. Turn it on if you want travelers to see at a glance whether a trip is filling up.
Once enabled, you can choose how the seat count is displayed:
- Primary Package: Shows the number of seats left in the primary package only.
- Total Seats: Shows the combined number of seats left across all packages for that date.
Say your General Settings set 10 seats total, and you created two packages: Standard with 4 seats and Premium with 3 seats. With Primary Package, the table shows 4 seats (from Standard). With Total Seats, it shows 7 seats (from both packages combined). Using Total Seats is recommended so customers see the overall availability.
Number of Trip Dates per pagination: This controls how many departure dates appear on one page before the rest move to the next page. A shortcode is a small piece of text in square brackets that tells WordPress where to display something. When you use the [WTE_TRIPS_FIXED_STARTING_DATES] shortcode to show your trips, this setting keeps the list from getting too long.
If you have a trip with 20 departure dates, setting this to 10 means travelers see the first 10 dates, then click to see the next 10. That keeps the page tidy and easier to scan.
Configuring Departure Date status
These settings let you show travelers how full each trip is by using labels and seat counts. The colors help people spot availability quickly.
- Display Booked Seats: Shows how many seats have already been booked for each date. This can help travelers see which departures are popular.
- Display Status: Shows the availability labels, such as "Available" or "Sold Out," next to each date.
- Available: This label appears when a trip still has open seats. It uses a green color by default. The percentage is fixed at 0% booked.
- Sold Out: This label appears when every seat is taken. It uses a red color by default. The percentage is fixed at 100% booked.
- Add Status: Use this to create your own label. For example, you could add "Limited" when 80% of seats are filled. You choose the label, the color, and the percentage for custom statuses.
Say you run a 10-seat trek. You could set it up like this: 0% booked shows "Available" in green. 80% booked shows "Limited" in yellow. 100% booked shows "Sold Out" in red. Travelers see the color change as seats fill up, which encourages earlier bookings.
Once your table is showing the right details, you can block dates you never want people to book.
Adding excluded dates
Excluded dates let you block specific dates without editing every trip one by one. This is useful for public holidays, staff shortages, office closures, or days when a guide is unavailable.
Here's how to set up an excluded date, step by step.
Open Exclude Dates
This takes you to the area where all blocked dates are managed.
Open the settings under Fixed Starting Dates and go to the Exclude Dates tab.
Select the dates to block
Start here when you know the exact day or date range you want to close.
In Select Dates, pick one or more dates, or check "Select a range of dates using the range calendar" to block a date range at once, then click Add Dates.
Choose a block behavior
This choice decides how strict the block should be.
You have three options:
Block Entire Trip Duration
No trip that includes this date anywhere in its schedule can be booked. This is the strictest option. Use it for holidays when nothing should run at all.
Block Start Date Only
Trips can't start on this date. But if a trip started earlier and is still running on this date, it stays bookable. Use this for peak days when you don't want new trips starting but ongoing ones are fine.
Block Specific Time Slots
This blocks only the specific start times you choose on this date. Other time slots on the same day stay open. This works well for high-frequency tours, like hourly city walks, where you want to stop overbooking on one slot without shutting down the whole day.
Select time slots (if applicable)
Only use this step if you chose "Block Specific Time Slots."
If you picked "Block Specific Time Slots," add the start times to block under Select Time Slots. Click Add Time to block more than one slot on the same date.
Choose which trips the exclusion applies to
This setting matters when a blocked date should affect some trips but not others.
Under Apply Exclusion To, choose:
- All Trips - blocks the date for every trip on your site.
- Specific Trips - blocks the date only for the trips you choose.
- All Except Selected Trips - blocks the date for every trip except the ones you choose.
Select specific trips (if applicable)
Use this when the exclusion should apply only to certain trips.
If you chose Specific Trips or All Except Selected Trips, search for and select the trips in Trips to Exclude.
Use "All Except Selected Trips" when most of your trips should stay closed on a date but a few need to stay bookable, like a private charter that still runs on a public holiday.
Save the exclusion
This final step makes the block live on your site.
Optionally enable Repeat Yearly to block the same date every year, then click Save Settings. Click Details on any saved entry to review or change it later, or use the delete icon to remove it.
Examples of using excluded dates:
- Blocking public holidays when your office is closed (Block Entire Trip Duration).
- Preventing trips from starting on certain peak days while allowing ongoing trips (Block Start Date Only).
- Excluding peak days when guides are unavailable.
- Blocking a single overbooked departure time while keeping other time slots open on the same day (Block Specific Time Slots).
- Marking company retreat days where no trips should be booked.
The scope of an excluded date depends on what you choose under Apply Exclusion To. If you set a date to All Trips, no trip can be booked on that day, even if individual trips have seats available. If scoped to Specific Trips or All Except Selected Trips, only the chosen trips are affected.
Once excluded dates are in place, you can decide how fixed dates appear on your archive pages.
Trip Archive
Your trip archive page is where travelers browse all your trips. These settings control how departure dates appear on the trip cards on that page.
- Show trips with fixed starting dates: Turn this on so only trips that have fixed departure dates appear on your trip archive pages. This keeps the archive focused on trips with scheduled departures.
- Show Dates on Cards: Turn this on to show departure dates directly on each trip card. Turn it off to hide them.
- No. of Dates on Cards: Choose how many upcoming departure dates appear on each trip card. For example, setting this to 3 shows the next three dates. If a trip has more than that, travelers can open the trip page to see the rest.
If you run many scheduled departures, these settings help people compare trips faster. They can see dates before opening each trip one by one.
From there, you can also support trips that are not tied to fixed dates.
Private Trips
This section helps when a trip is not built around scheduled departures. You might offer private treks, custom family tours, or trips that need a quote before booking.
- Enable Private Trip: Turn this on to show private trips on your site.
- Private Trip Description: Write a short message for the traveler here. For example, "Want a private trek for your group? Send us a message and we'll arrange it for you."
- Private Trip Form: Add a form shortcode here so travelers can contact you. You can use the Enquiry Form Shortcode or any other form plugin you have installed. The form appears next to the departure dates section, so travelers can ask a question or request a quote without leaving the page.
This works well for custom departures, school groups, or trips with add-ons like gear rental and private transport.
The next section lets you manage the labels travelers see beside each date.
Availability Labels
Availability labels are small colored tags that appear next to your departure dates. They tell travelers at a glance whether a trip is guaranteed to run, has limited spots, or is fully booked. You can create your own labels and pick a color for each one.
The plugin comes with three labels ready to use: Guaranteed, Available, and Limited. You can add more by clicking Add More Labels.
For example, if you run multi-day treks and want a "Filling Fast" label for trips that are 70% booked, you can create that label, choose an orange color, and assign it to any trip date.
- Color Picker: Each label gets its own color. Pick colors travelers understand quickly. Green for "Available," yellow for "Limited," and red for "Sold Out" is a familiar pattern.
- Actions: You can remove any custom label you no longer need. When you delete a label, it is also removed from any trips where it was assigned. The "Choose Label" option on those trips resets to empty.
Once your labels are ready, you can bring all departures together in one calendar view.
Trip Departure Calendar
The Trip Departure Calendar shows all your upcoming trip departures in one place. Instead of browsing trip by trip, travelers can scan dates across your whole site and choose what suits them best.
You'll need WP Travel Engine version 6.6.9 or newer and the Fixed Starting Dates add-on version 2.6.2 or newer to use the Departure Calendar.
Departure Calendar settings
These settings control how the calendar looks and what travelers see first.
Default Layout: Pick how trips should appear. Grid shows compact cards in rows. List shows trips one per row in a single column. There are two List variations.
Why this matters: the layout changes how quickly travelers can compare many trips.
List View is not available on mobile devices. On phones, the calendar always shows the Grid layout.
Number of Trips per Row (Grid only): This controls how many trip cards appear side by side in the Grid layout. You can pick 2, 3, or 4 per row. On tablets, it automatically adjusts to two per row. On phones, everything stacks into one column so it stays readable.
Why this matters: it changes how crowded or spacious the calendar feels.
Number of Trips to Display: This sets how many trips show when the calendar first loads. You can enter any number between 3 and 48. If you have more trips than this number, the rest load automatically as the traveler scrolls down.
Why this matters: the first screen loads faster and feels easier to browse when you choose a sensible number.
For the tidiest look, use a number that matches your row layout. If you chose 3 trips per row, try 9 or 12 so the rows fill evenly.
Trip Info to Display: Pick which trip details appear under each trip title in the calendar. You can show details like Duration, Difficulty, and Activities. You can choose up to four trip facts.
Why this matters: travelers can compare trips without opening each one.
If you sell both easy day tours and demanding multi-day treks, showing Duration and Difficulty helps people sort options quickly.
Show Available Seats: This adds small badges to each trip card showing seat availability. Travelers see labels like "5 Spots left" or "Sold Out."
Why this matters: people can tell right away whether a trip is still open.
The badge shows the total availability across all packages. On the frontend, the Primary Package displays as the main reference.
The badge colors are set in the Fixed Starting Dates settings under Configure Departure Date status. If you want to change the colors, go back to that section.
Show Only Booked Trips: Turn this on to show only trips that have at least one confirmed booking.
Why this matters: it can help you highlight departures that already have demand.
Show Only Available Trips: Turn this on to hide fully booked trips from the calendar. Travelers only see trips that still have open seats.
Why this matters: it keeps people focused on trips they can still book.
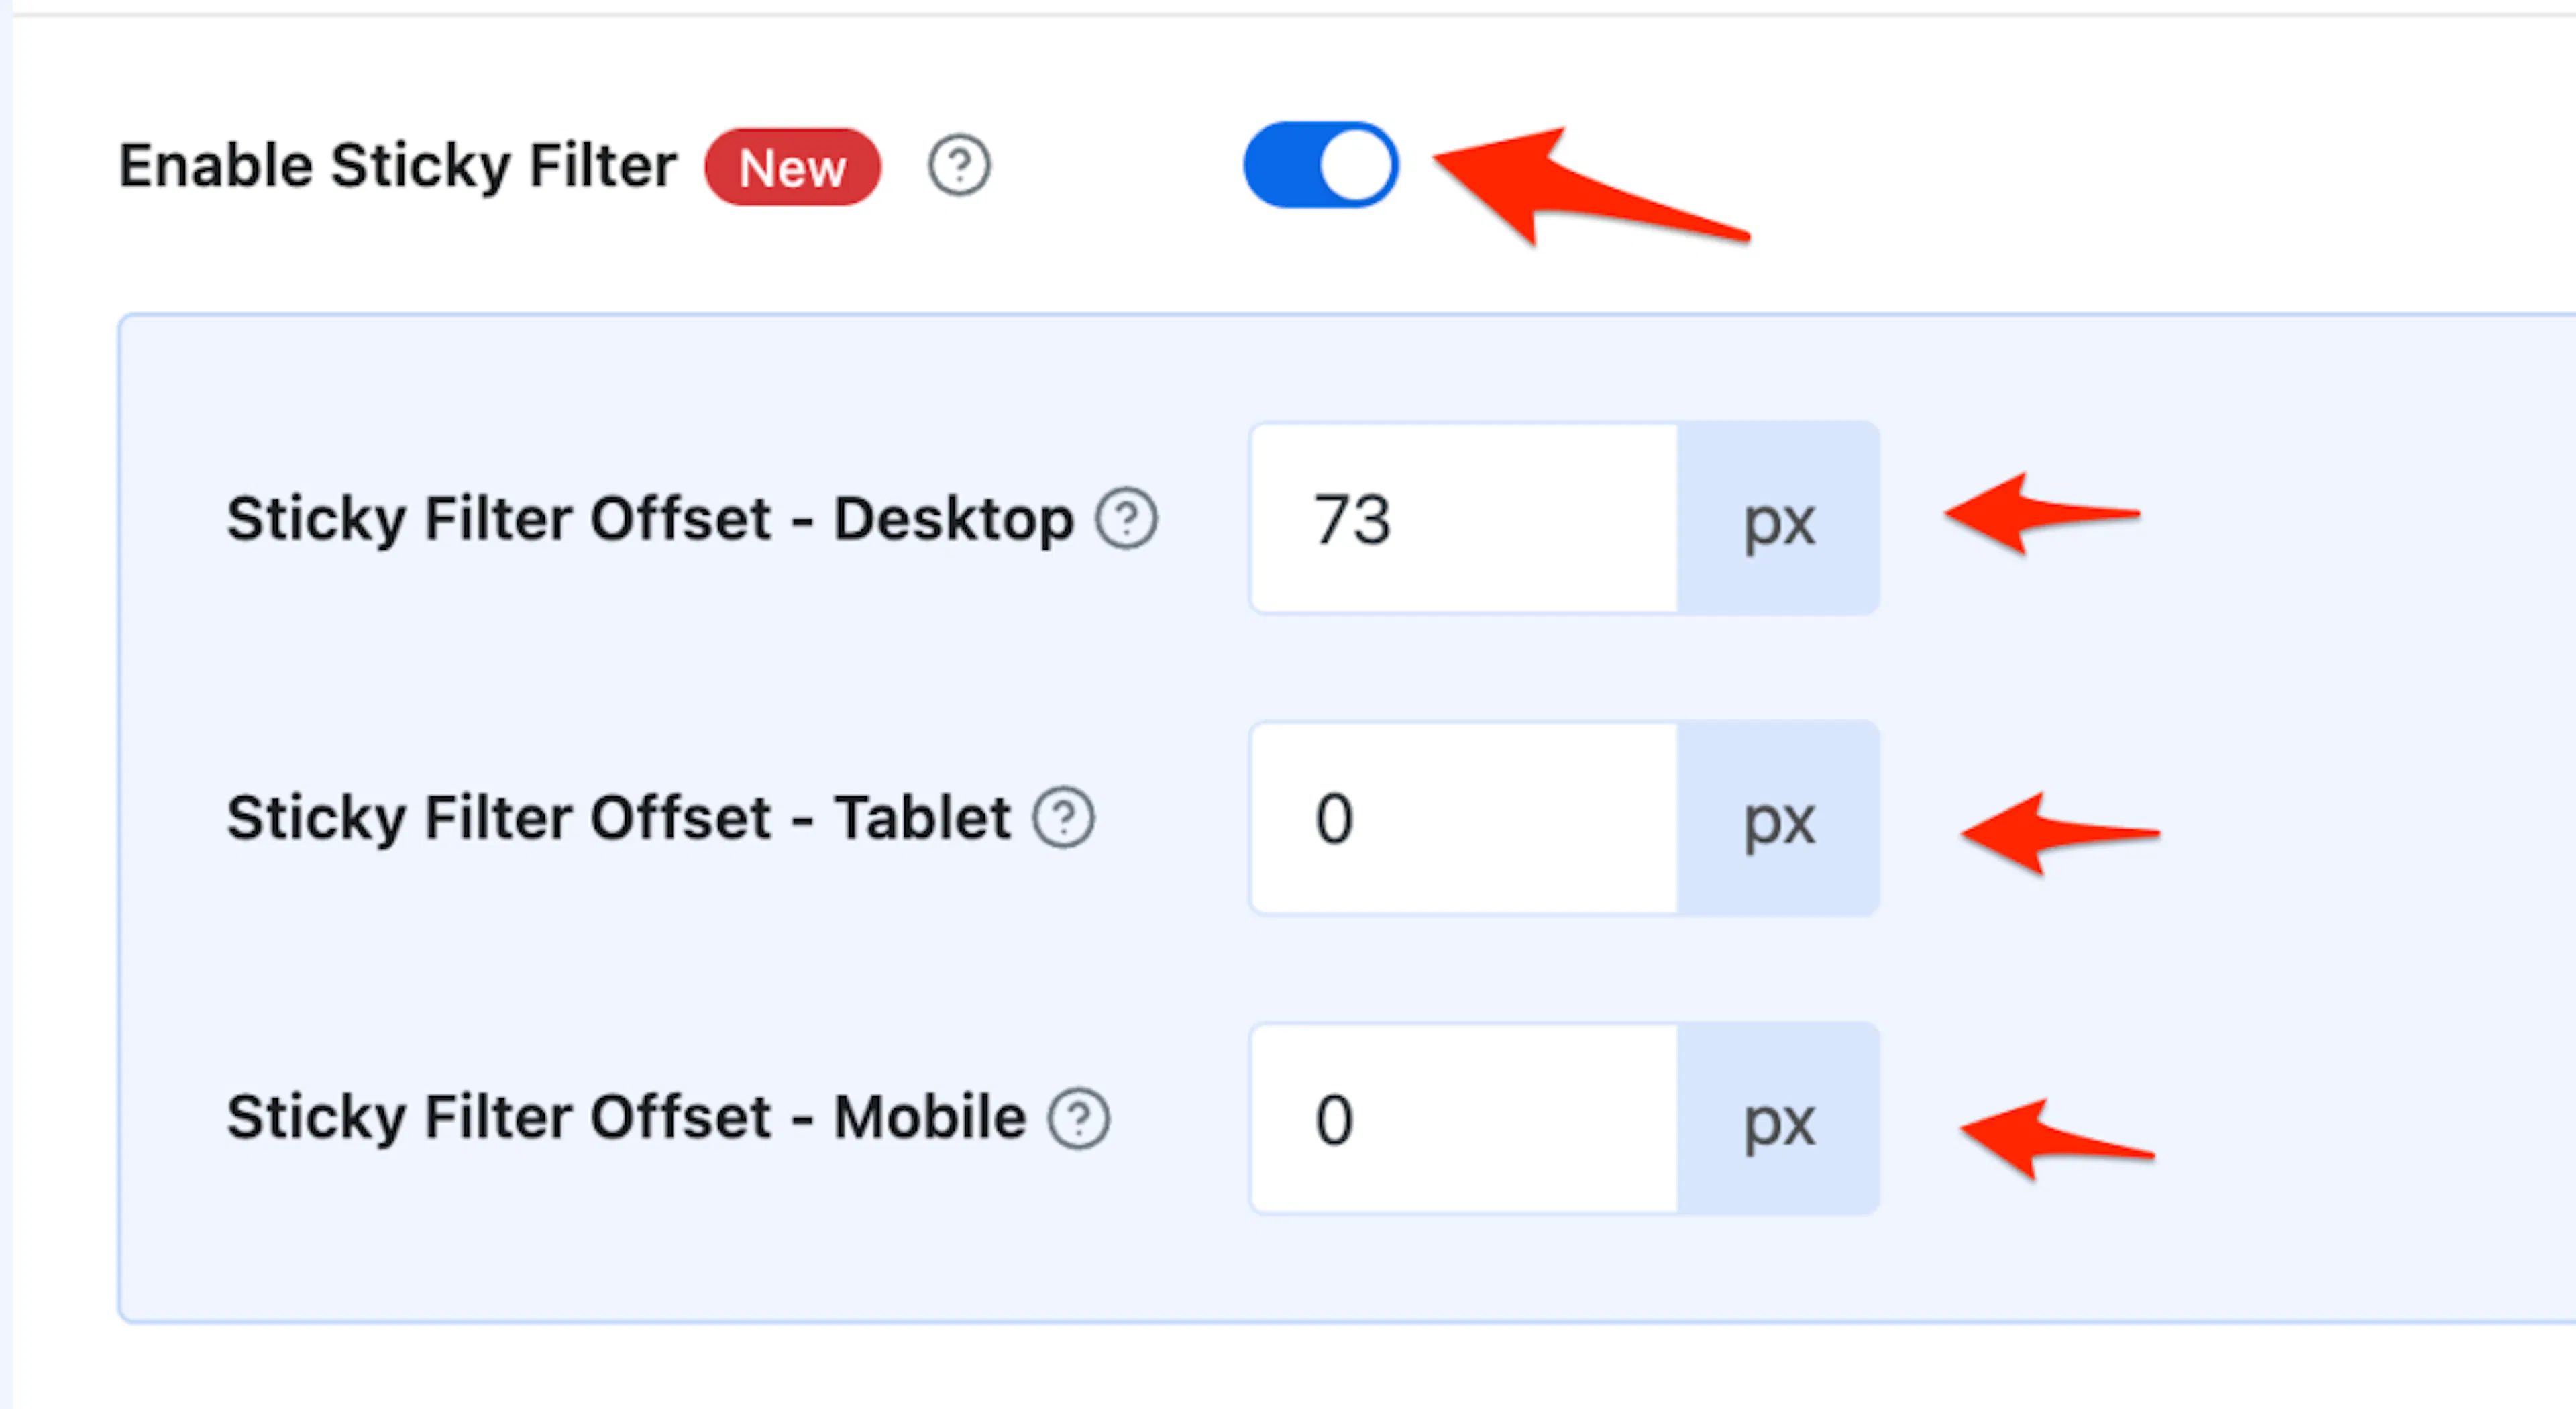
Enable Sticky Filter: This keeps the filter bar, where travelers switch between years and months, fixed at the top of the screen while they scroll.
Why this matters: travelers can change filters without scrolling back to the top.
You can control the spacing between the sticky filter and the top of the screen using these offsets:
- Sticky Filter Offset - Desktop: Space in pixels for desktop screens.
- Sticky Filter Offset - Tablet: Space in pixels for tablets.
- Sticky Filter Offset - Mobile: Space in pixels for phones.
Set the offset to match the height of your site's header or menus. This stops the filter bar from overlapping with your site's navigation.
The Sticky Filter doesn't work while you're logged in as an admin. To see it in action, open your site in a private or incognito browser window, or log out of WordPress first.
Show Contact Button: This adds a "Contact Us" button to each trip card or row in the calendar. You can change the button label, such as "Ask About This Trip," and choose whether the link opens in the same tab or a new one. If the main toggle is off, the button will not appear.
Why this matters: some travelers want to ask a question before booking, especially for private trips, custom dates, or group discounts.
Using Shortcodes: Once you've saved your settings, you can place the departure calendar on any page of your site using a shortcode. You copy it into a page, and WordPress displays the calendar there.
Simple shortcode
Copy this shortcode and paste it into any page or post:
[WPTravelEngine_Trip_Departure_Calendar]
It displays the calendar exactly as you configured it in the global settings. No extra setup is needed.
Advanced shortcode (optional)
Use the advanced shortcode when you want one page to behave differently from your global settings. These extra settings override the global settings for that one page only.
For example, you could keep a grid layout across your site but show a list layout on a dedicated departures page.
[WPTravelEngine_Trip_Departure_Calendar layout="list-one" display_contact_us="yes" display_available_seats="yes" display_only_booked_trips="yes" display_available_trips_only="yes" no_of_trips="24" exclude="trip_id1,trip_id2" include="trip_id1,trip_id2" default_year="20xx" default_month="all"]
| Attribute | Accepts | Description |
|---|---|---|
layout | grid, list-one, list-two | Force that layout for this page. |
display_contact_us | yes / no | Show or hide the Contact Us button. |
display_available_seats | yes / no | Show or hide Spots Left / Sold Out badges. |
display_only_booked_trips | yes / no | Show only trips with at least one confirmed booking. |
display_available_trips_only | yes / no | Hide fully booked (sold-out) trips. |
no_of_trips | 3–48 | How many trips load initially. |
exclude | comma-separated trip IDs | Trips to leave out, e.g., 6380,6783. |
include | comma-separated trip IDs | Trips to display exclusively. |
default_year | 20xx or a specific year | 20xx shows the current year; a specific year (e.g., 2027) shows trips for that year by default. |
default_month | all or 1–12 | all shows trips from all months; a number shows a specific month (e.g., 6 for June). |
How to find the trip ID
If you want to use the exclude or include options in the advanced shortcode, you'll need your trip IDs. A trip ID is the number WordPress uses to identify each trip behind the scenes.
Open Trips
This takes you to the list of all trips on your site.
Go to Trips in your WordPress dashboard. You'll find it on the left sidebar.
Hover over a trip
This lets you see the trip link without opening the trip.
Move your mouse over the trip you want to find the ID for. Don't click it. Just hover.
Read the URL preview
The trip ID appears inside the link preview.
Look at the bottom-left corner of your browser. You'll see a small link appear. It contains something like post=1234. The number after the equals sign is your trip ID. In this example, the trip ID is 1234.
Use the IDs in the shortcode
Once you have the ID, you can filter which trips appear in the calendar.
Copy the trip ID numbers and paste them into the shortcode. If you're listing more than one, separate them with commas and no spaces. For example: exclude="1234,5678".
If you add an attribute to the shortcode but leave its value empty (for example, no_of_trips=""), the calendar will use the value from your global settings instead.
That covers the calendar. The last thing to remember is saving your changes.
Saving settings
Once you've adjusted the options you want, scroll to the bottom of the page and click Save Settings. Your changes do not take effect until you save them.
If you are working through several sections in one sitting, save after each major change. That way you do not lose your work if your browser closes or refreshes.
Troubleshooting
I changed the settings, but nothing changed on my trip page
Make sure you clicked Save Settings at the bottom of the page. If you changed settings but did not save, nothing updates on your site. Also check that the Trip Fixed Starting Dates add-on is activated. Go to Plugins in your WordPress dashboard and look for the Fixed Starting Dates add-on in the list. If it is not active, click Activate.
I blocked some dates, but travelers can still see or book them
Check what you selected under Apply Exclusion To. If you chose Specific Trips, the exclusion only affects those trips. If you want the date blocked everywhere, switch it to All Trips and save again.
I added the departure calendar shortcode, but no calendar is showing
Make sure you copied the full shortcode including the square brackets. The shortcode should look like this: [WPTravelEngine_Trip_Departure_Calendar]. Check that you pasted it into the page content area, not into a heading or an image block. If you're using the WordPress block editor, paste it into a Shortcode block or a Paragraph block.
The sticky filter bar is not staying at the top when I scroll
The sticky filter does not work while you're logged in as an admin. This is normal. To see it working, open your site in a private or incognito browser window. You can also log out of WordPress and visit the page as a regular traveler would.
My trip cards are not showing departure dates
Check that Show Dates on Cards is turned on in the Trip Archive settings. Also make sure the trip has at least one fixed departure date assigned to it. You can check this by editing the trip and looking at the Date and Price section.
FAQs
If you're still stuck or have a question we didn't cover, our support team is happy to help. Reach out at our support page and we'll get you sorted.