

How to Get Approved by GetYourGuide
Step-by-step setup for the GetYourGuide Integration add-on, from creating your Integrator Portal account to passing live testing.
Introduction
GetYourGuide approves your connection, not each trip. You set it up once: create an Integrator Portal account, point GetYourGuide at your site, pass their tests, then link your real trips package. Plan on a couple of hours for setup and about a week for GetYourGuide's review.
This guide covers the approval process. For what each plugin setting does, see the GetYourGuide Integration settings guide.
Note: The practice trips you create along the way exist only to get you approved. Delete them afterward. Once you are approved, adding a new product takes two steps: create it on GetYourGuide, then map its package under the trip's Date & Price > Packages > GetYourGuide Product Mapping.
Before You Begin
- You have a staging or test copy of your website. GetYourGuide makes real test bookings during setup, and you do not want those among your genuine ones.
- You have at least one product published on GetYourGuide.
- You have installed and activated the GetYourGuide Integration add-on and the Fixed Starting Dates add-on.
- You have installed and activated the Group Discount add-on if you sell tickets priced per group instead of per person.
When something does not work at any point, open WP Travel Engine > Settings > Extensions > Get Your Guide >
Logs: It records every exchange between your site and GetYourGuide.
Creating Your GetYourGuide Account
Setup happens in the Integrator Portal, which is separate from the supplier portal where you manage your listings.
- Go to https://integrator.getyourguide.com/signup
- Fill in the form.
- Tick the terms, clear the reCAPTCHA, and click Sign up.
- Confirm your email address.
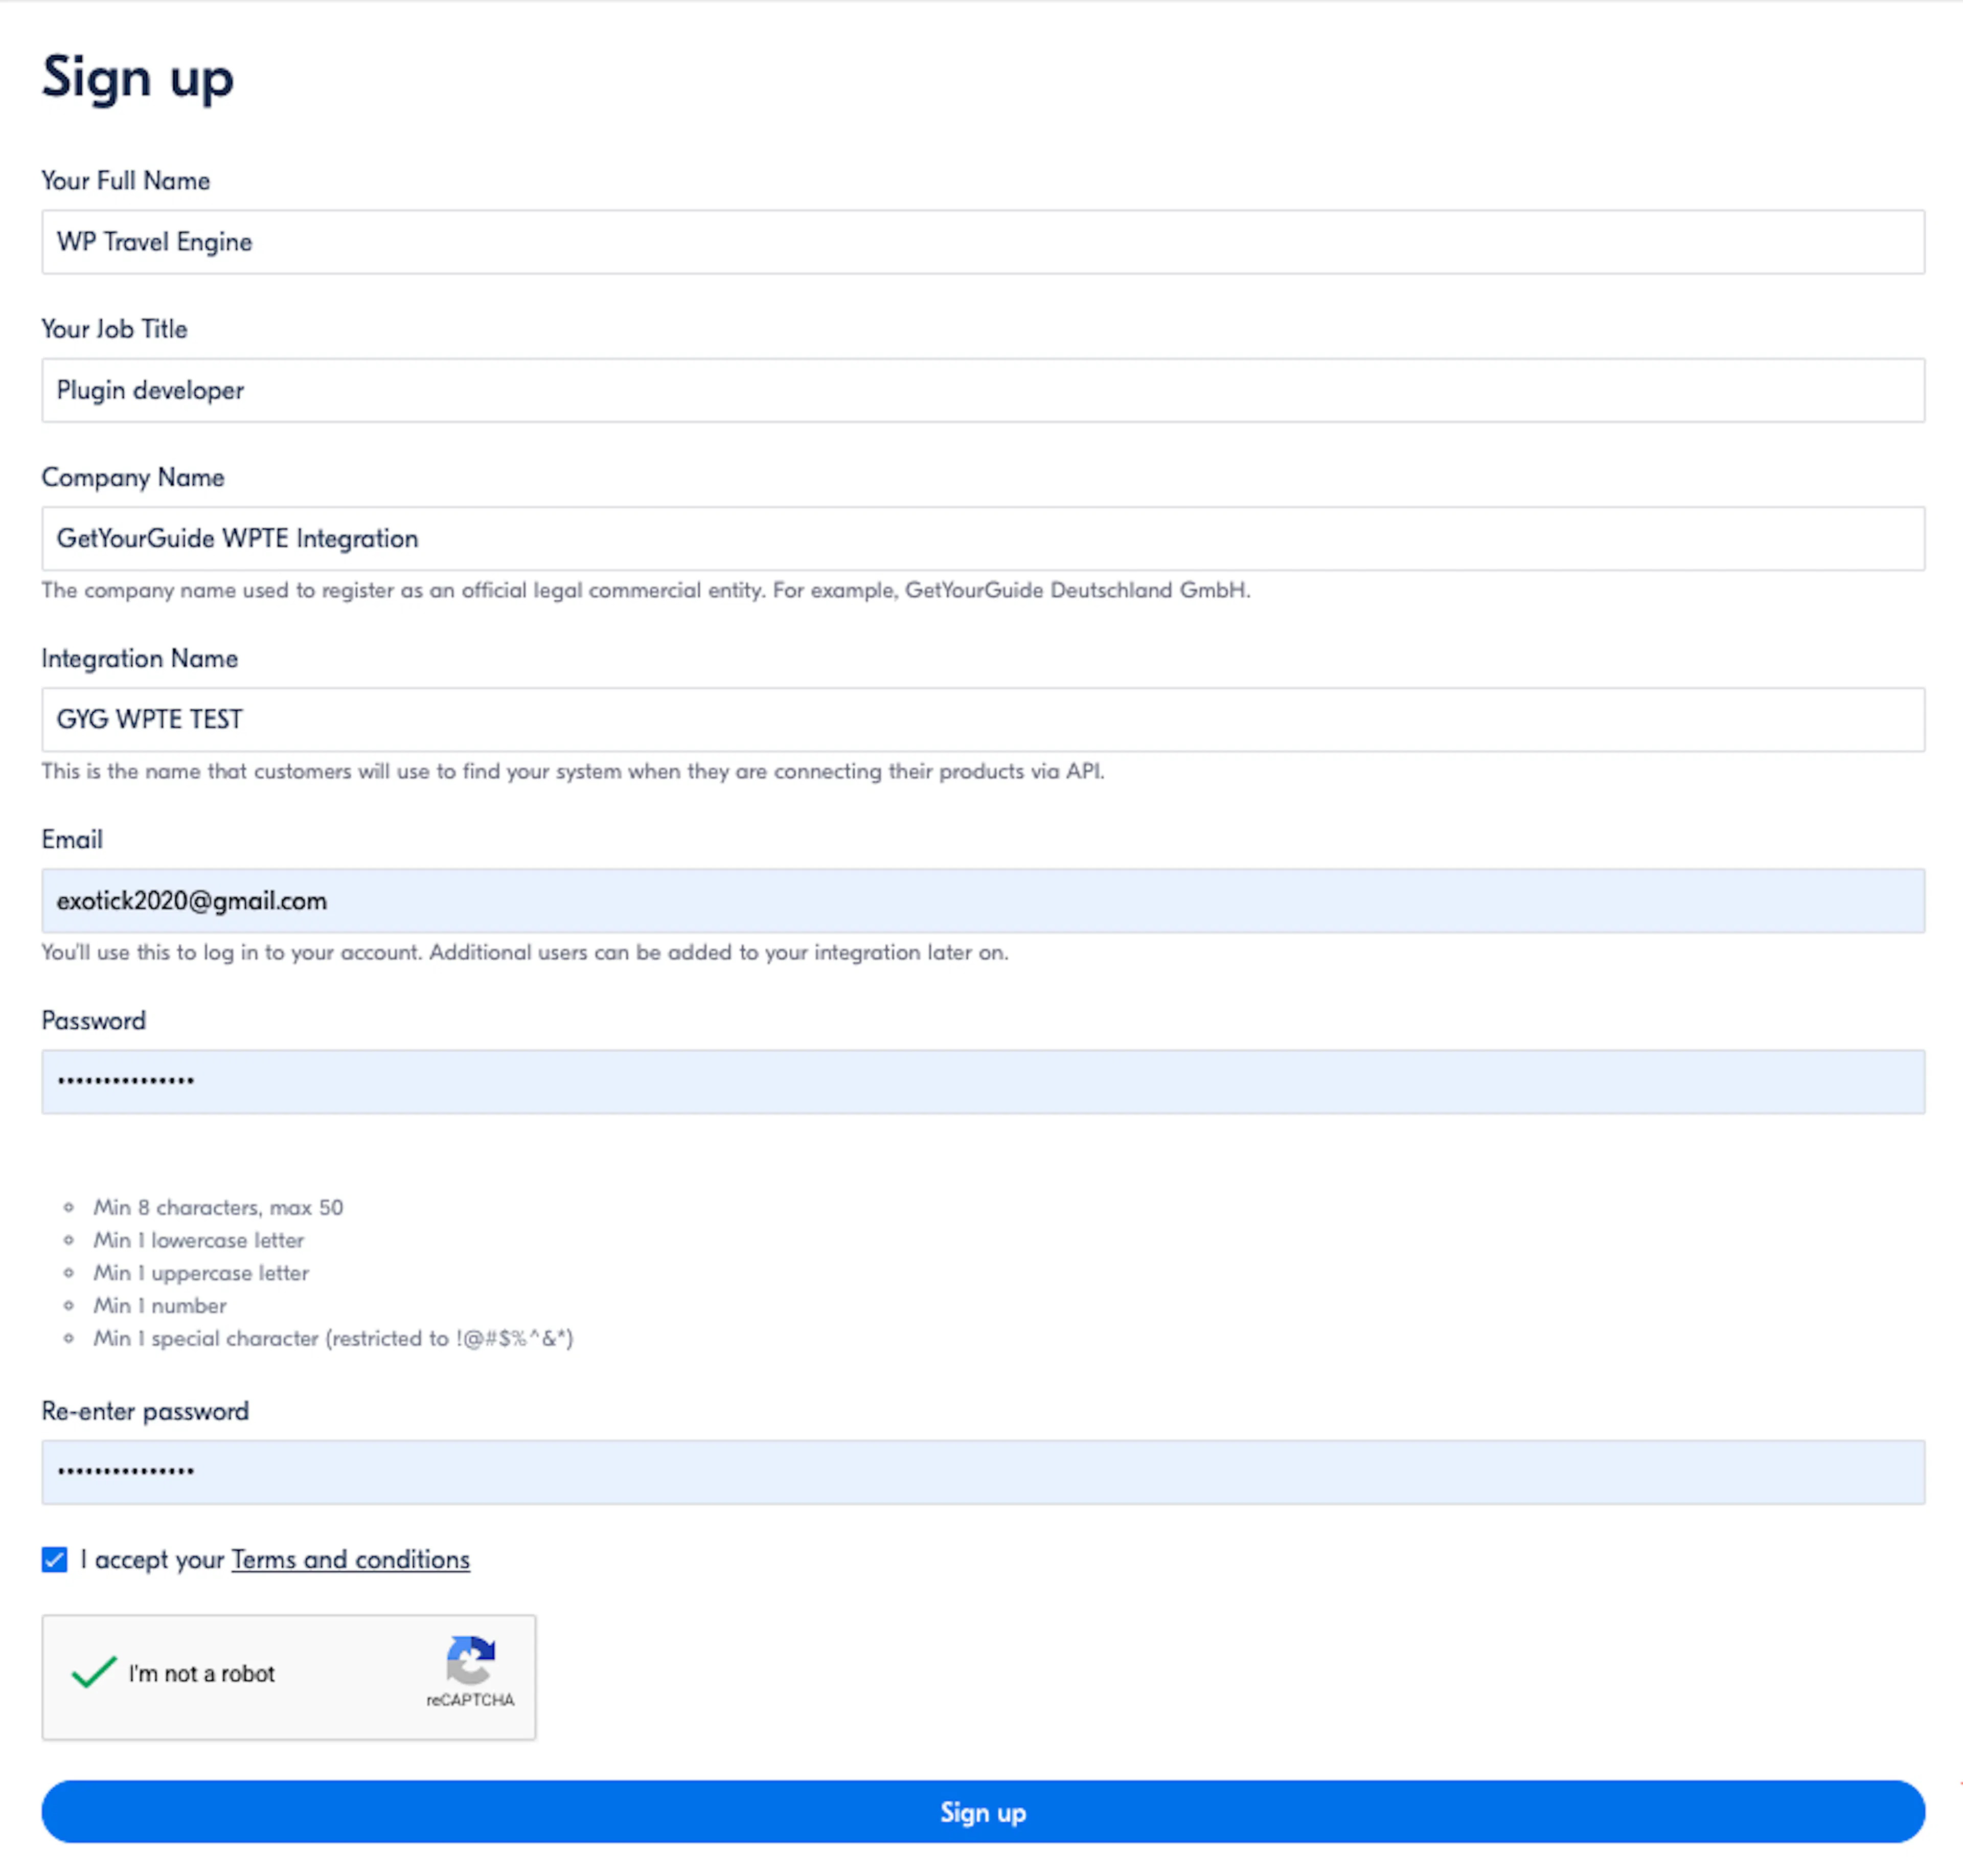
| Field | What to enter |
|---|---|
| Your Full Name | The person who will own this connection |
| Your Job Title | For example, Plugin developer |
| Company Name | Your registered business name |
| Integration Name | The name other suppliers see when they search for your system. Choose something recognizable. |
| Your login. You can add more people later. | |
| Password | At least 8 characters, with an uppercase letter, a lowercase letter, a number, and one of !@#$%^&* |
Sign up with a company email, not a personal one. This login controls your live bookings, so it should outlast any one team member.
Turning On Two-Factor Authentication
GetYourGuide requires this and prompts you at your first sign-in.
- Scan the code with an authenticator app such as Google Authenticator, Authy, or 1Password.
- Enter the six-digit code to confirm.
- Save the recovery codes somewhere safe.
Without the recovery codes, losing your phone means losing access to the account.
Setting Up the Testing Configuration
Understanding the Setup Checklist
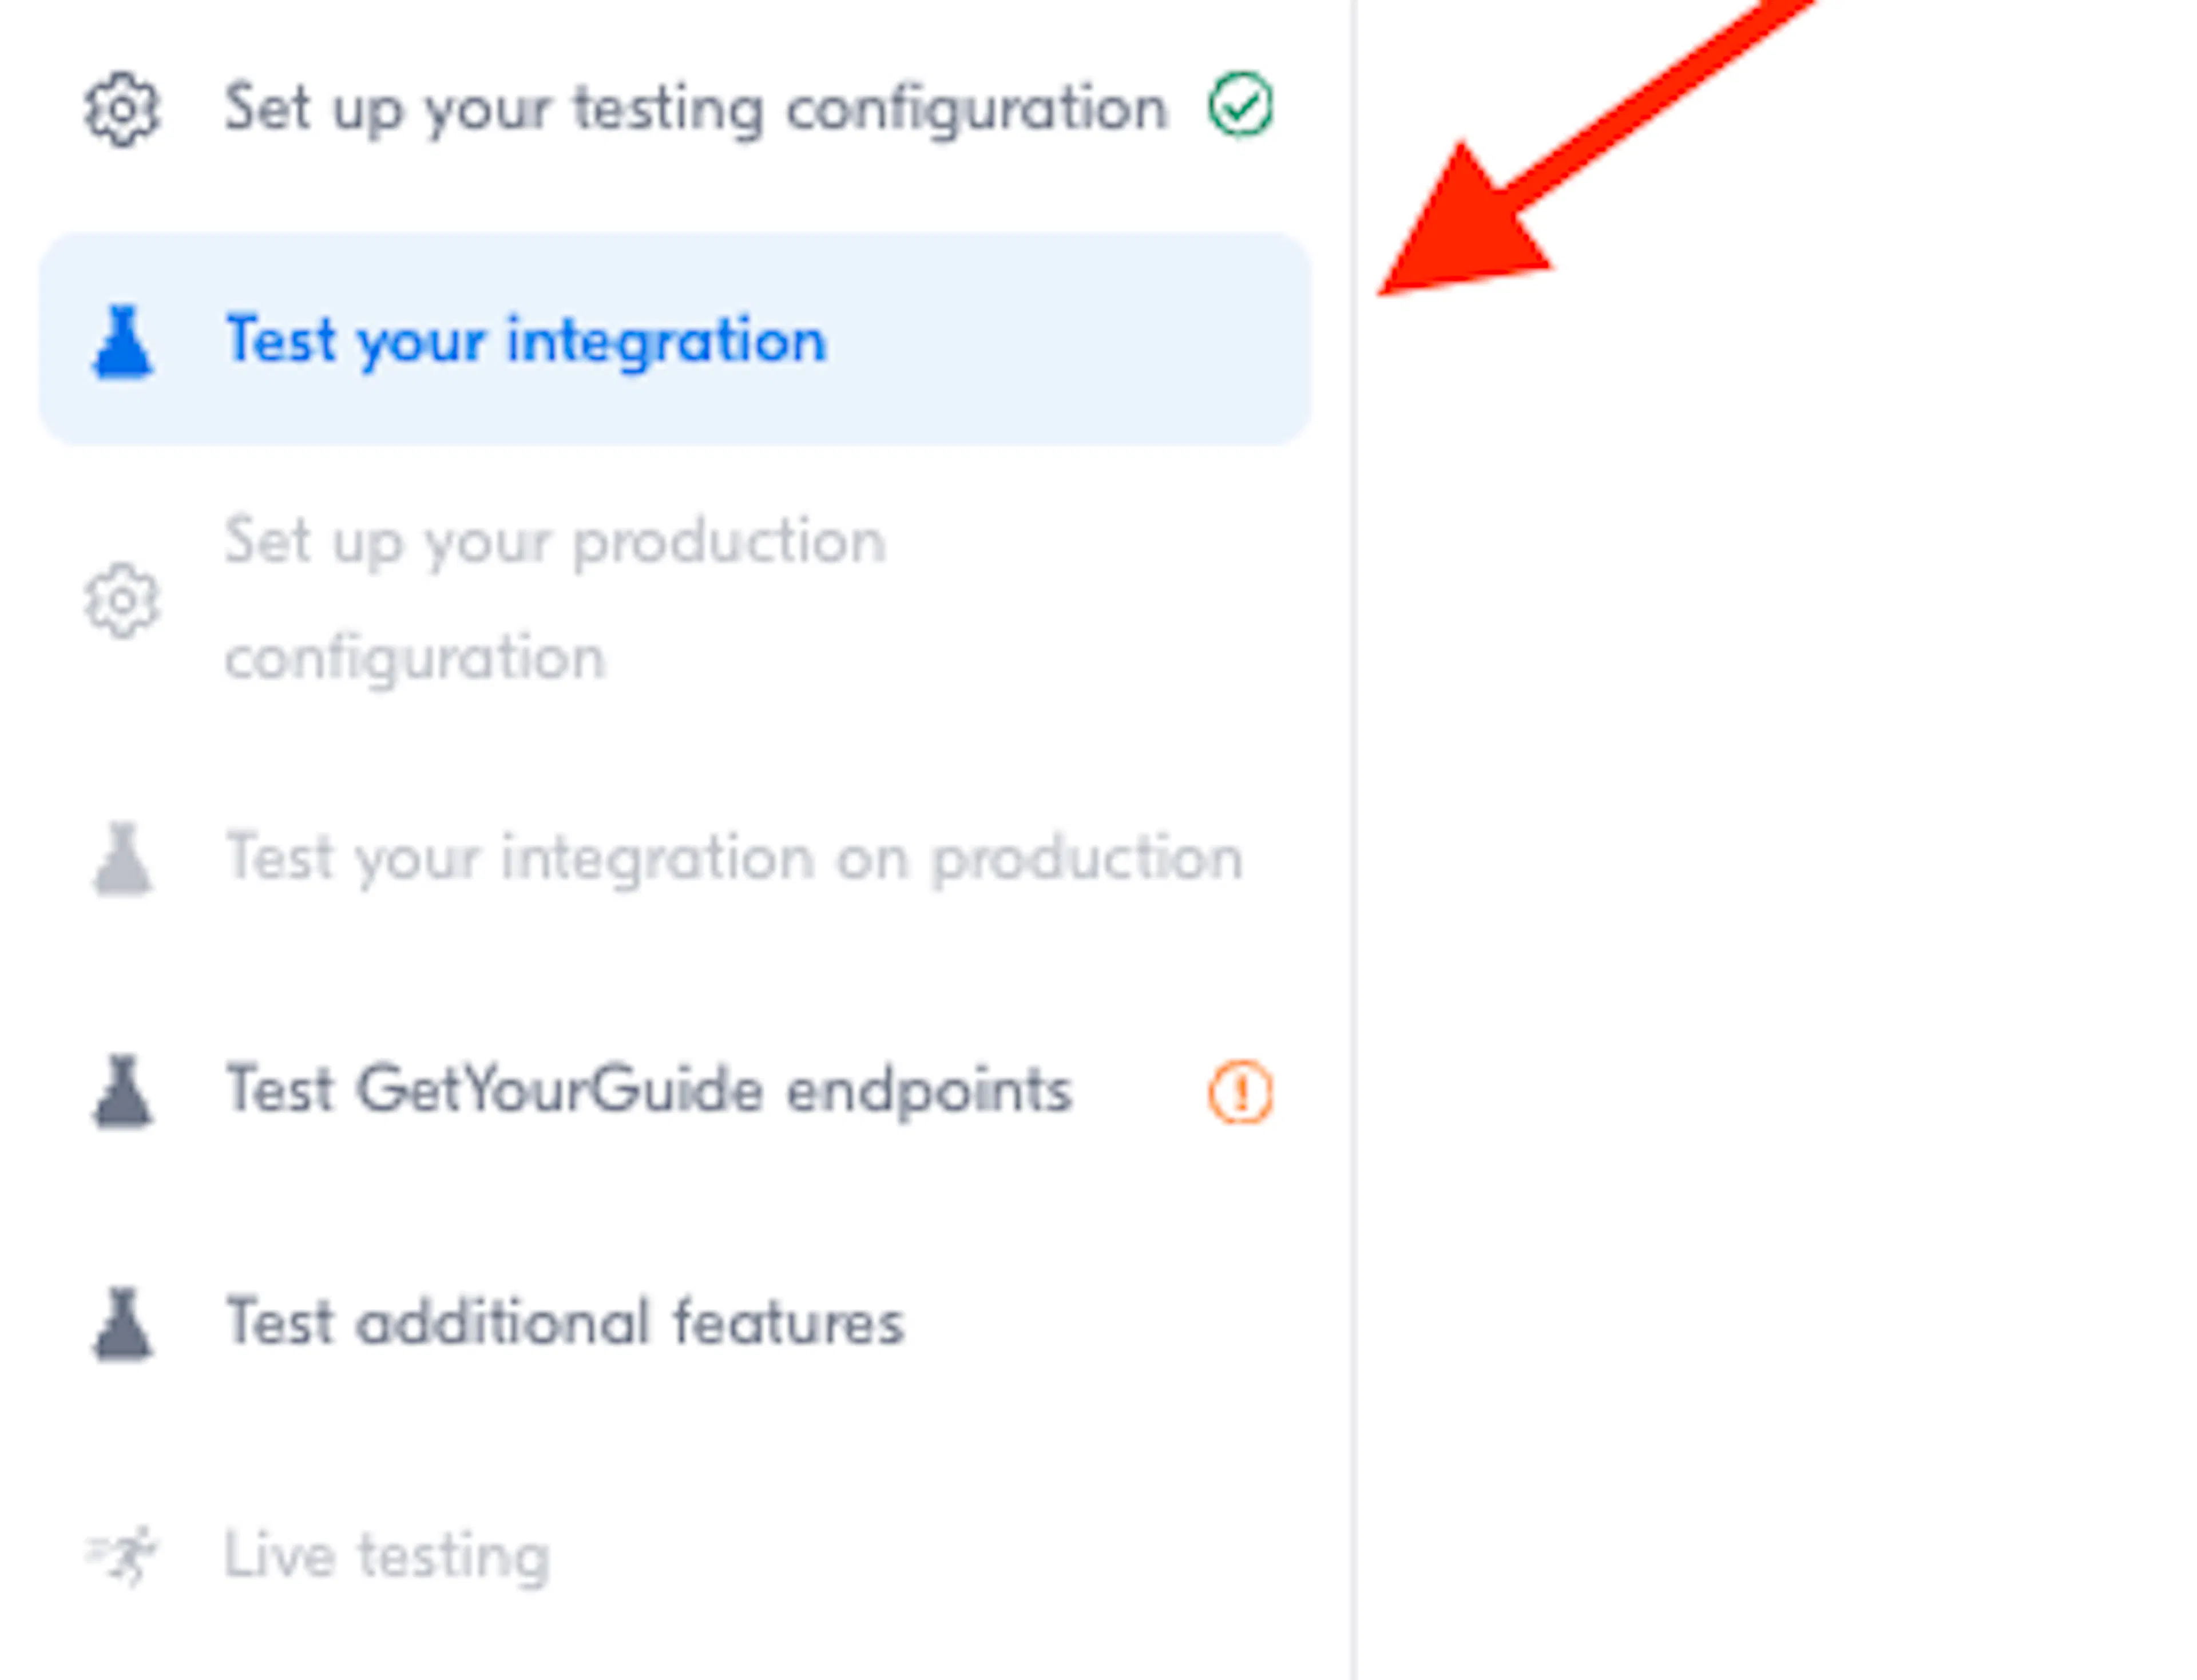
After you sign in, you land on the setup checklist at https://integrator.getyourguide.com/setup#/test_configuration. The list on the left is your whole journey. It unlocks in order, so only the first item is open at the start.
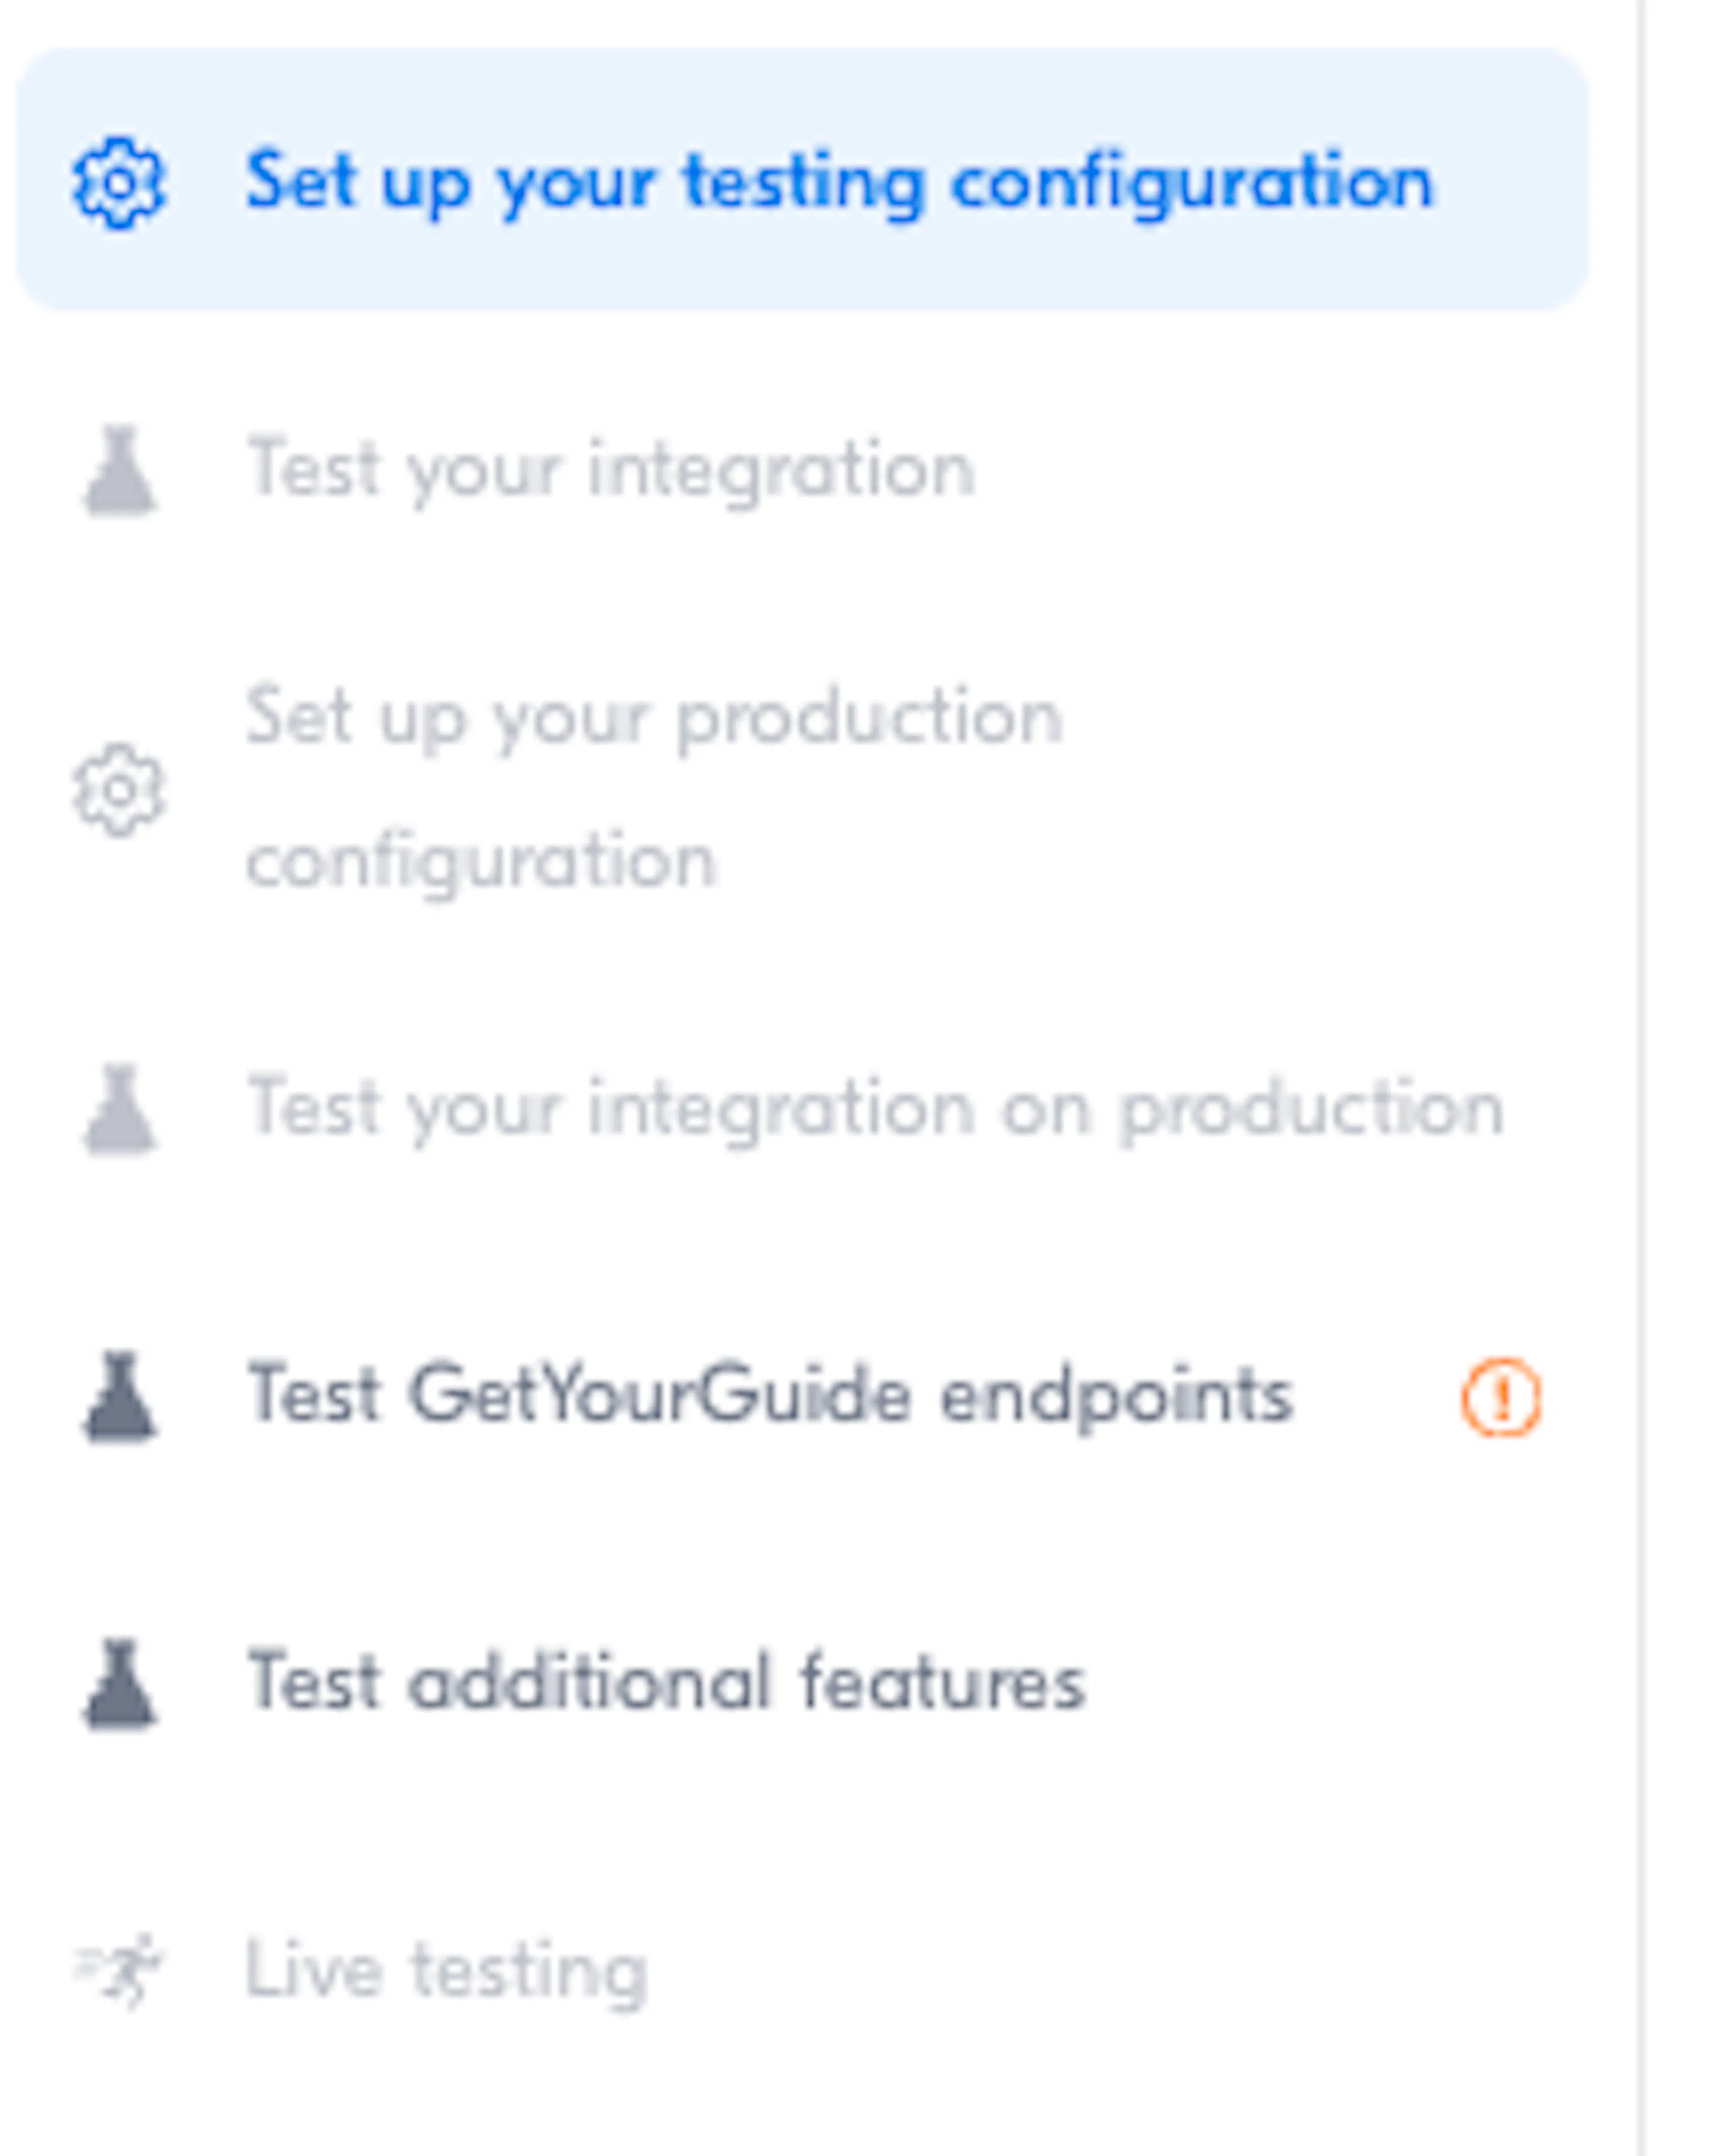
| Step | Opens when |
|---|---|
| Set up your testing configuration | Available now |
| Test your integration | You have submitted the testing configuration |
| Set up your production configuration | Testing has passed |
| Test your integration on production | You have submitted the production configuration |
| Test GetYourGuide endpoints | Covered in Skipping the Optional Steps below |
| Test additional features | Covered in Skipping the Optional Steps below |
| Live testing | Everything above has passed |
You cannot skip ahead. You will switch between this page and your WordPress settings at almost every step.
Using Your Staging Site
Do this on a staging or test site, never your live one. GetYourGuide runs a full booking cycle against whatever site you give them: they reserve seats, confirm a booking, then cancel it. On a live site, those become real bookings among your genuine ones, with seat numbers moving on trips you sell.
Point GetYourGuide at a copy of your site, finish testing there, and set up your live site later as its own step.
Giving GetYourGuide Your Site's Login
The Username and Password at the top of the page are the login GetYourGuide uses to reach your site. The add-on has already created them.
- In WordPress, go to WP Travel Engine > Settings > Extensions > Get Your Guide and copy Inbound Key and Inbound Secret.
- In the portal, paste them into the testing credentials.
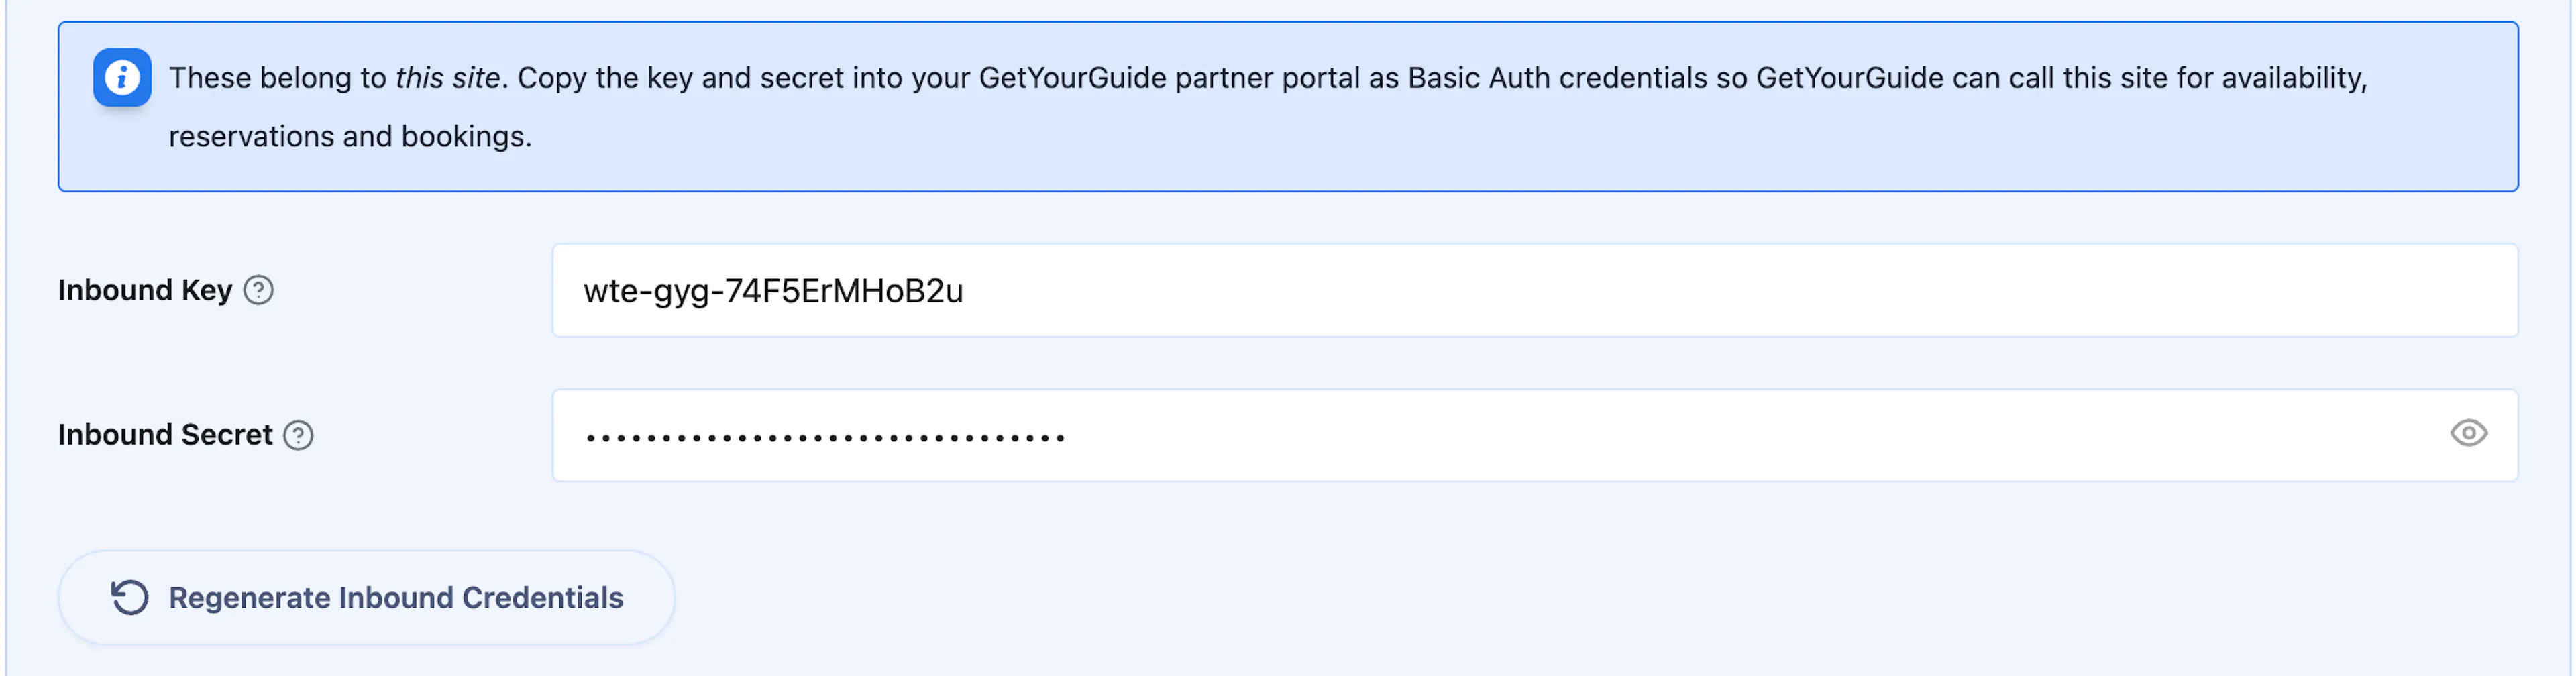

| In WordPress | In the portal |
|---|---|
| Inbound Key | Username |
| Inbound Secret | Password |
For more detail, see the Inbound Key and Inbound Secret section of the settings guide.
Telling GetYourGuide Where Your Site Is

| Field | What to enter |
|---|---|
| Host | Your staging web address without https://, for example staging.example.com |
| Port | 443 |
| Path | The Endpoint Path shown in your plugin settings: /wp-json/wptravelengine-gyg/1/ |
Your staging site has to be reachable online. An address that works only on your own computer will not do. Use a real staging domain or a tunnelling service such as ngrok.
Choosing Your System Type
This decides which kinds of products GetYourGuide expects you to handle. Read both options before you choose.
Option A: Reservation System
Choose this if you are a system that serves multiple tour & activity operators, or the attraction ticketing equivalent, and you commit to all four product types. The tick boxes fill in on their own and cannot be changed.
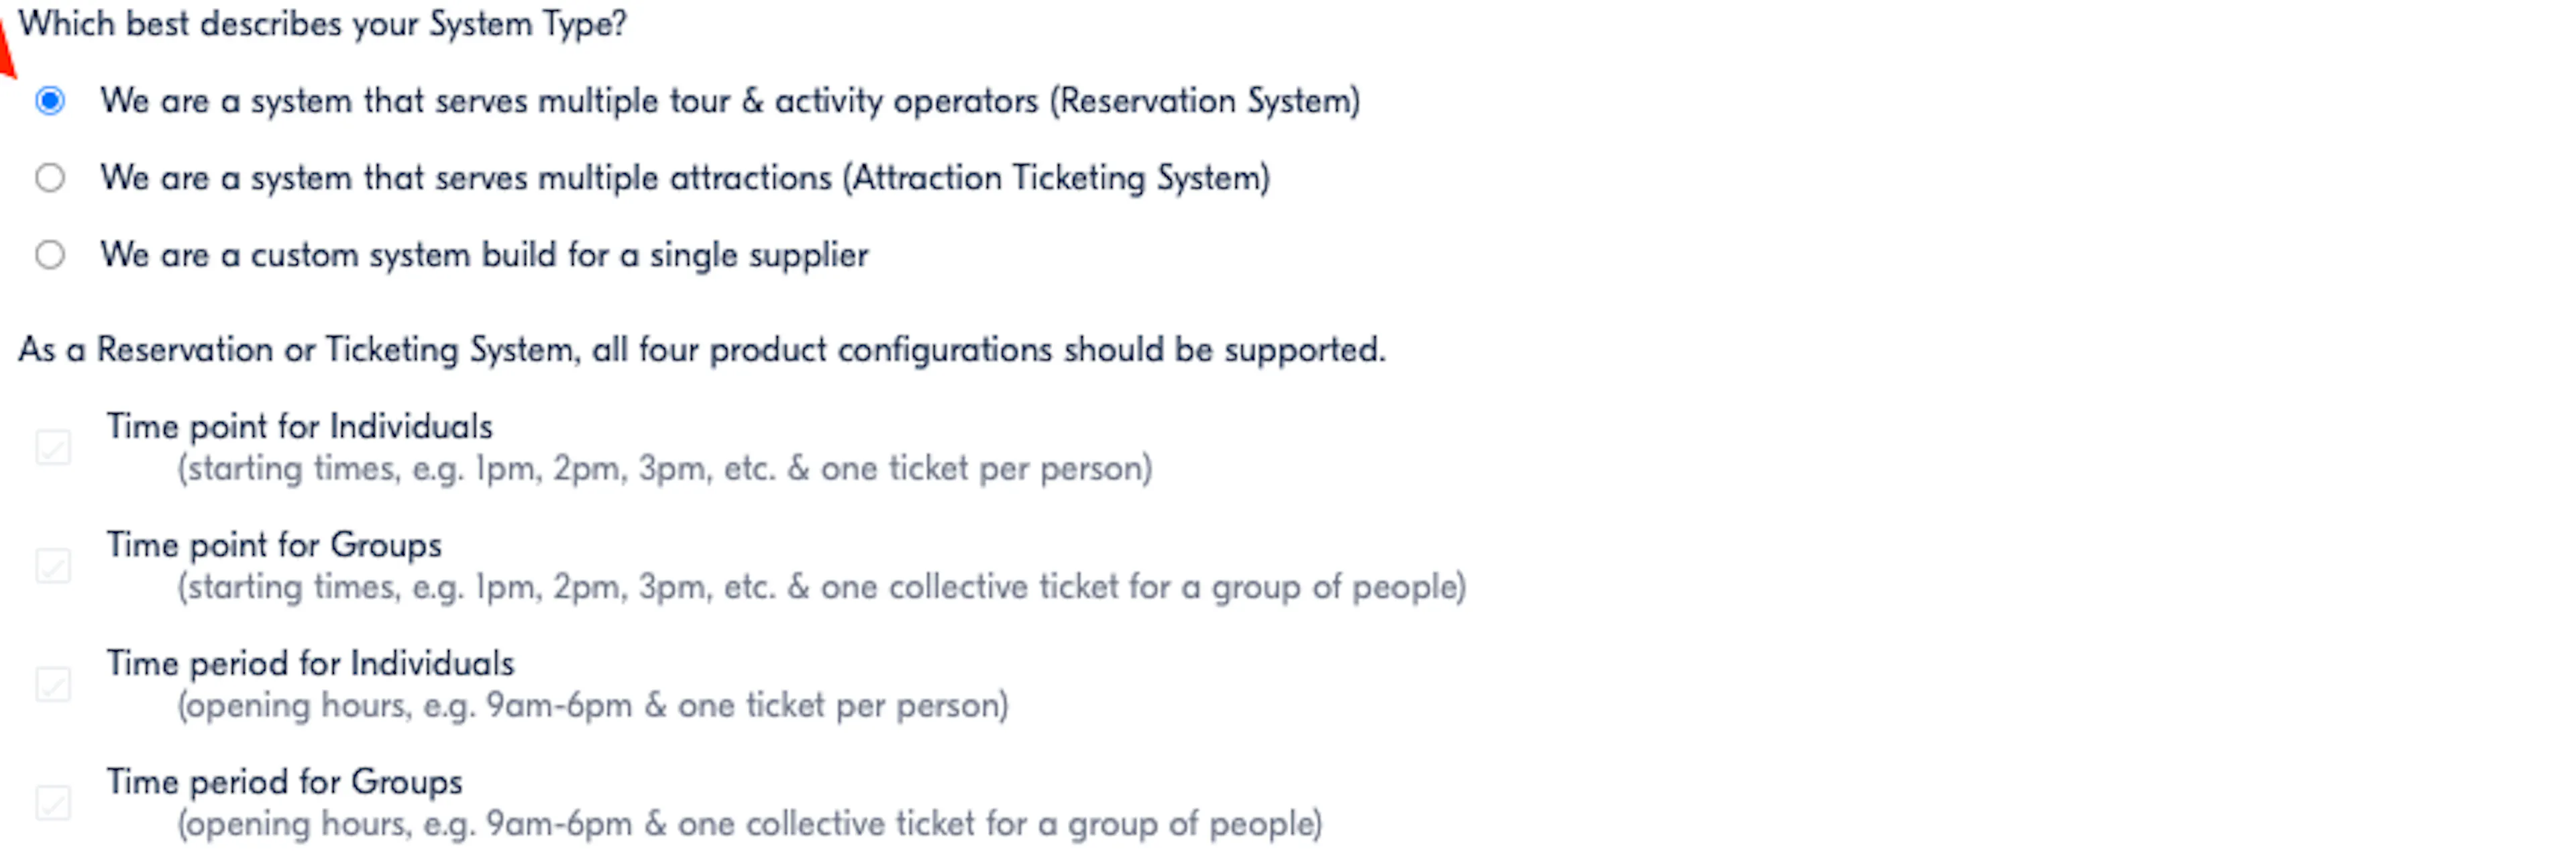
| Product type | What it means |
|---|---|
| Time point for Individuals | Set departure times, one ticket per person |
| Time point for Groups | Set departure times, one ticket for a whole group |
| Time period for Individuals | Opening hours, one ticket per person |
| Time period for Groups | Opening hours, one ticket for a whole group |
Both group types need the Group Discount add-on. Choose this option only if you have it and your trips use group pricing.
Option B: Custom System for a Single Supplier
Choose this option if you are a custom system built for a single supplier, and you tick only what you sell. If you do not have Group Discount, or you do not sell group tickets, leave both Groups boxes empty:
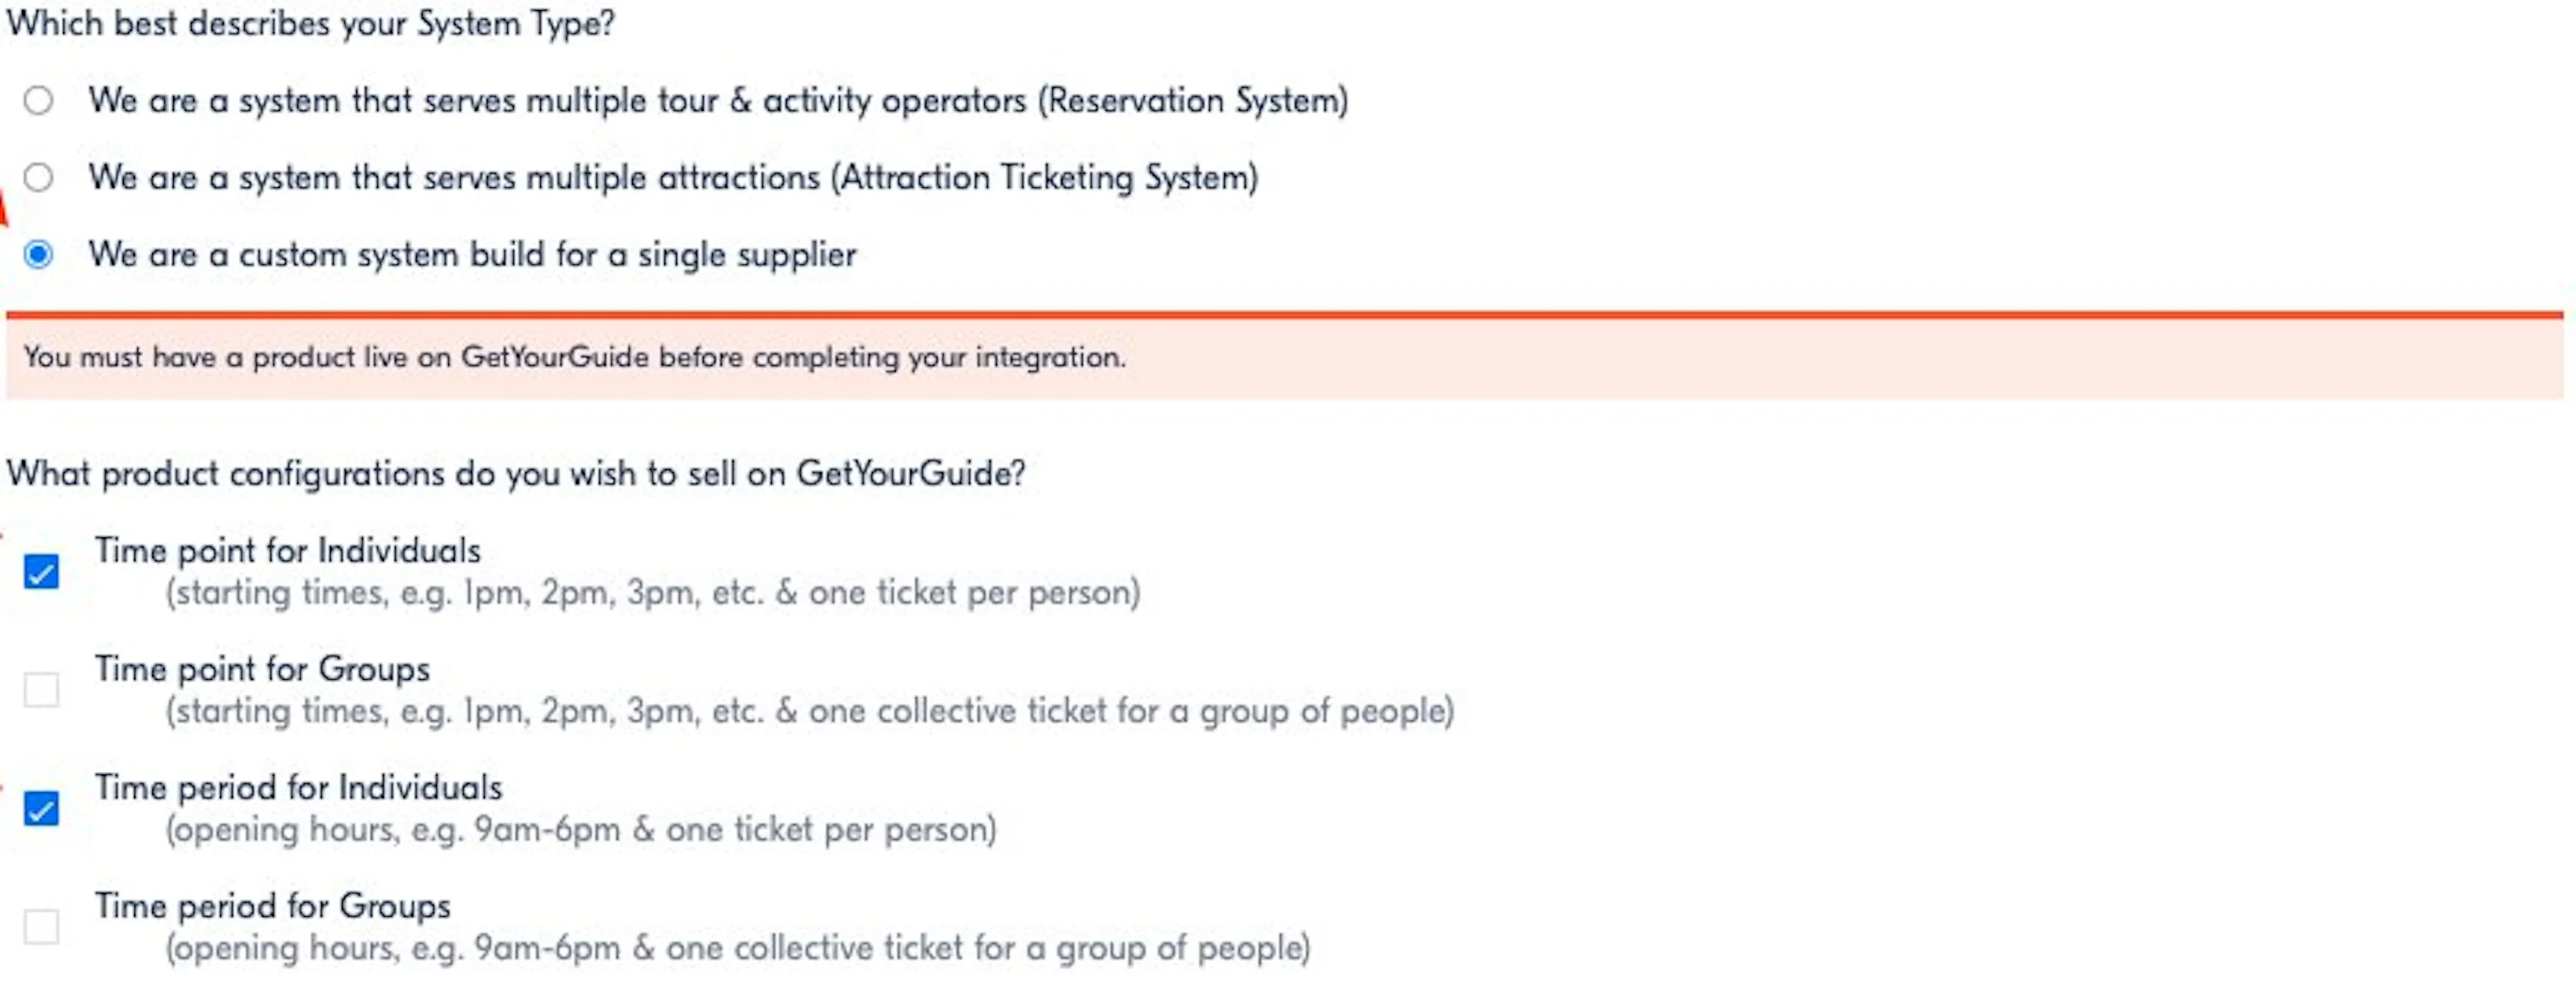
This is the right choice for a single website that sells per-person trips.
A red notice appears here. You need at least one product live on GetYourGuide before you can finish, so publish one on their side first.
Submitting the Configuration
With the login copied, the address filled in, and a system type chosen, click Submit. Test your integration now unlocks in the list on the left.
Collecting GetYourGuide's Login
After you submit, a GetYourGuide Credentials section appears at the bottom of the page. This is the login in the other direction: GetYourGuide issues it, and your site uses it to send them availability updates.
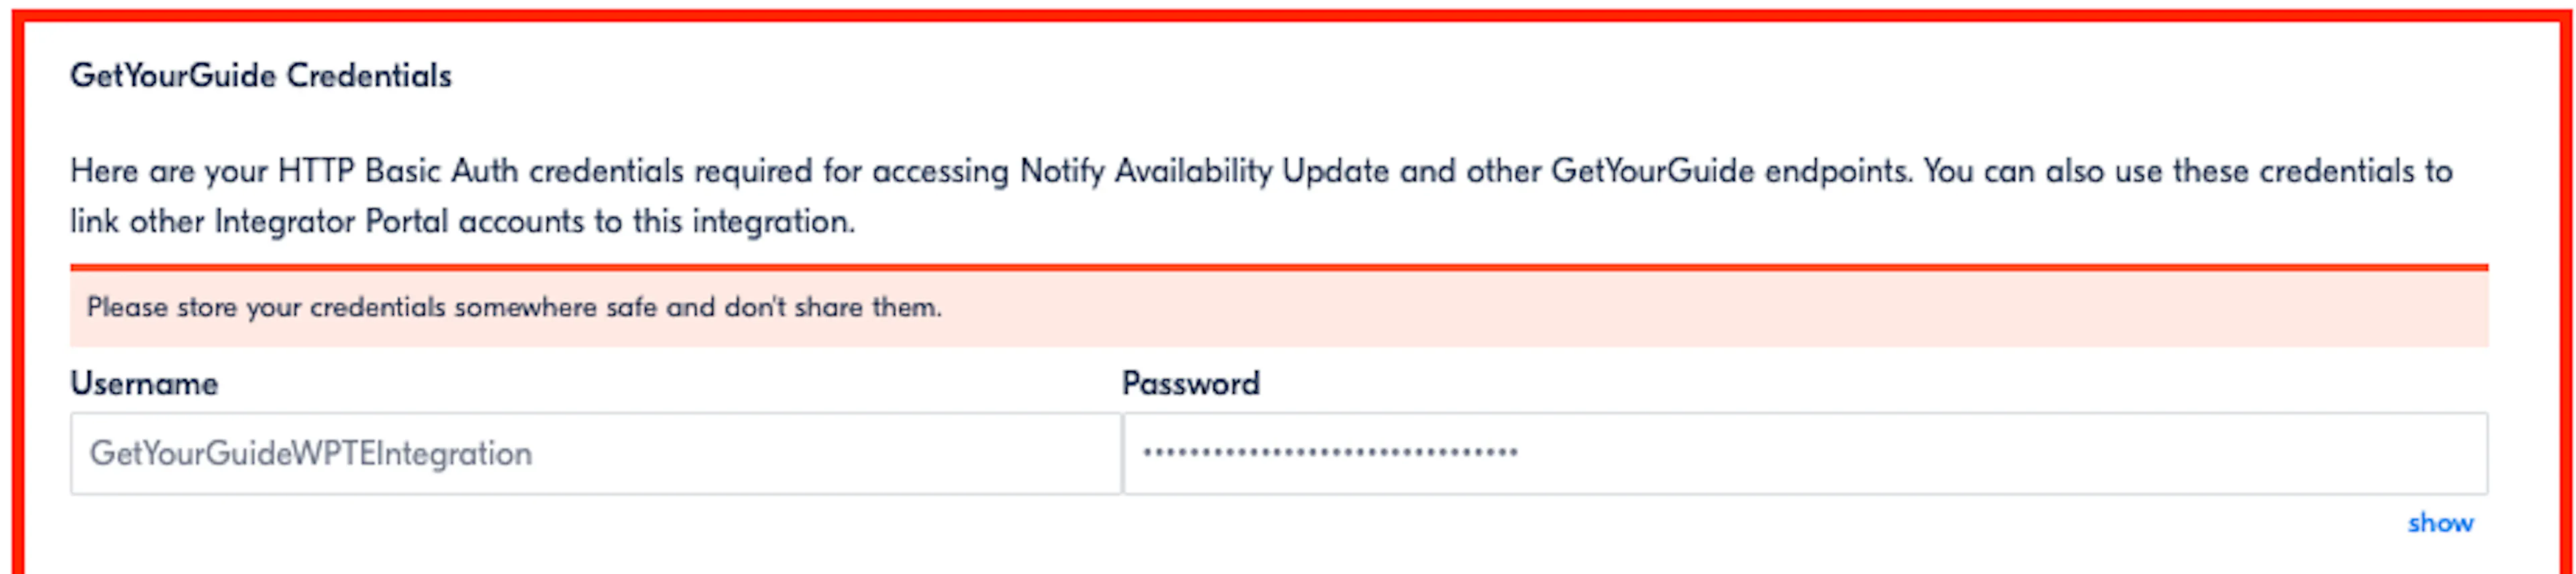
- Click Show to reveal the password.
- Copy the username and password.
- In WordPress, go to WP Travel Engine → Settings → Extensions → Get Your Guide and paste them into GYG Username and GYG Password.
- Click Save Settings.

| In the portal | In WordPress |
|---|---|
| Username | GYG Username |
| Password | GYG Password |
Copy the password before you leave the page. GetYourGuide hides it afterward and does not show it again.
Both directions are now connected. GetYourGuide can reach your site, and your site can reach GetYourGuide.
Running the Self-Test
Test your integration is now unlocked in the sidebar. Open it to reach the Self-testing tool, where GetYourGuide books against your site and checks every reply.
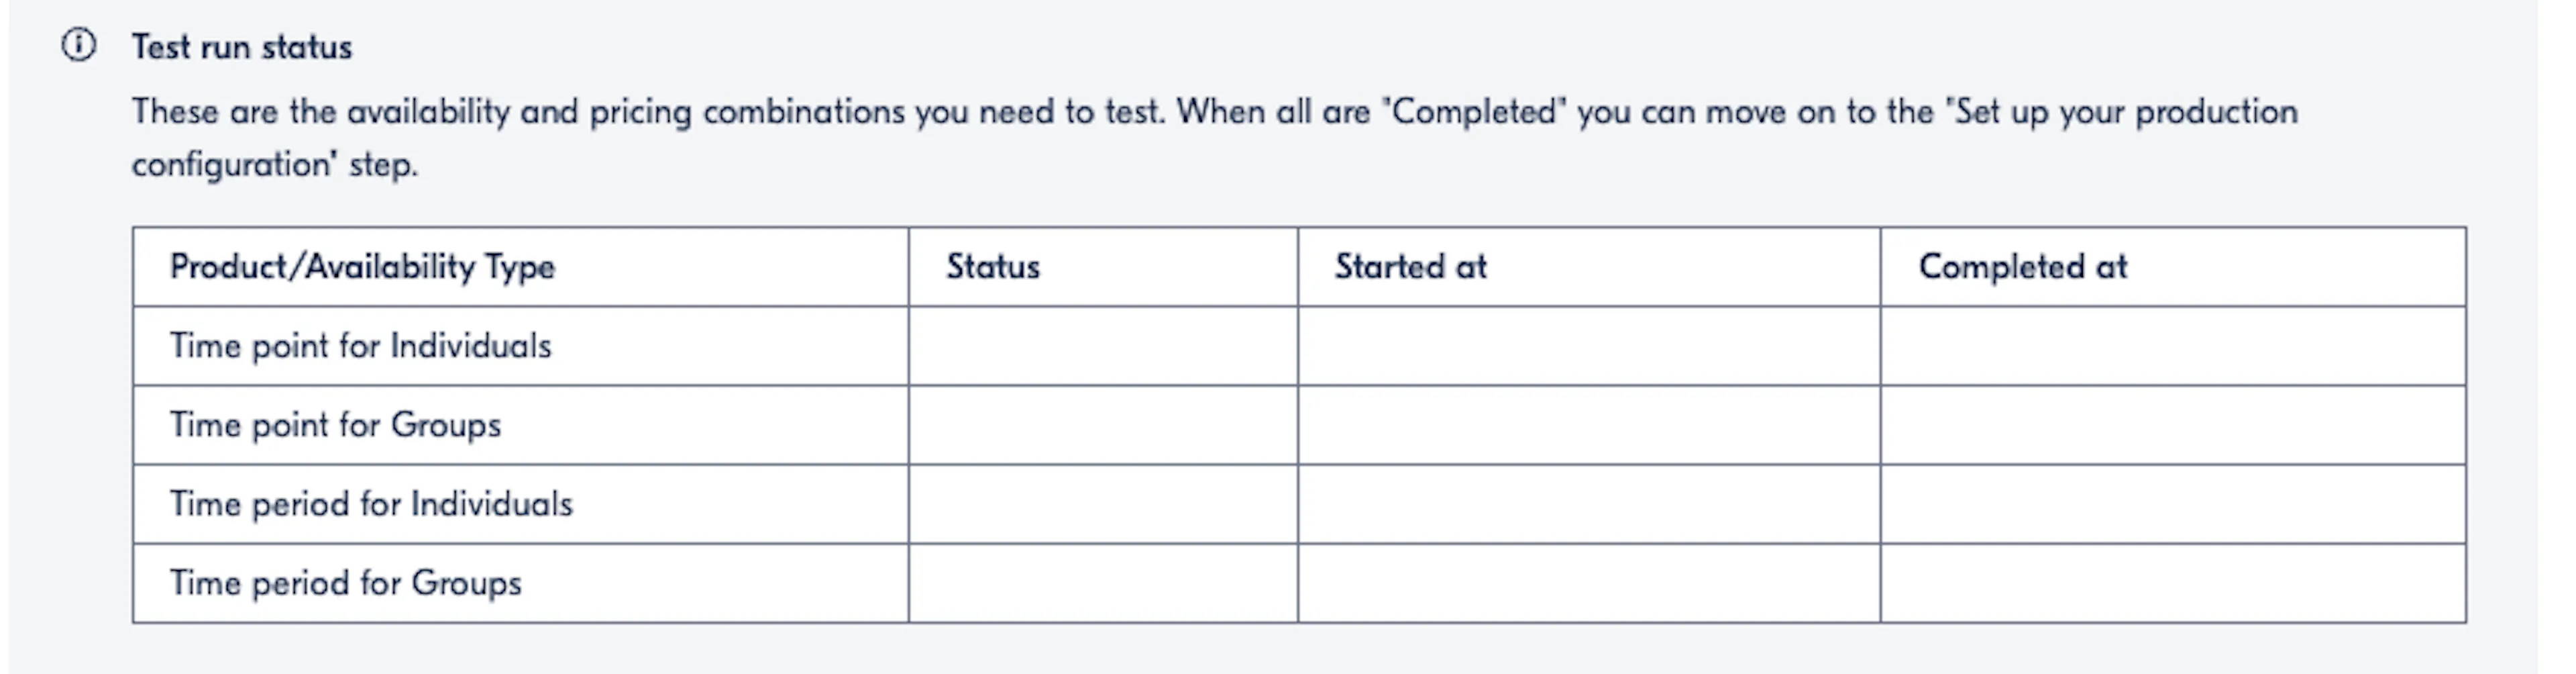
The Test run status table lists the product types you chose earlier, and every row must reach Completed before you move on.
- If you chose Reservation System, all four rows must pass.
- If you chose custom system for a single supplier, only the rows you ticked must pass.
Each row is its own test, so you fill in the form below more than once.
Creating Practice Trip Packages
GetYourGuide asks for a product number, and your site has to recognize it. That means a WP Travel Engine package mapped to the number you type into the portal. Use one practice trip with a separate package for each product type.
Each package keeps its own availability settings, prices, and dates, so the tests do not
interfere with each other. A real GetYourGuide product is only one thing, so donot keep changing one package between tests.
- In WP Travel Engine > Trips, add one practice trip, for example GYG TEST. Under Date & Price > Packages, click Add New Package once per product type and give each package a name that shows its type. Click Save to save the trip. A new package can only be mapped after the trip is saved.
Product type Suggested trip packages name Suggested product number Time point for Individuals GYG TEST - Point / Individual prod-point-indTime period for Individuals GYG TEST - Period / Individual prod-period-indTime period for Groups GYG TEST - Period / Group prod-period-grpTime point for Groups GYG TEST - Point / Group prod-point-grpIf you skip the group types, create the first two trip packages only. - Give each trip package its own product number. Type the matching one into the portal's Valid product ID box before each test.

Map every package. On the same trip, scroll below Add New Package to GetYourGuide Product Mapping. Click Add Package Map once per package, choose the package under Package, type the same number under GYG Product ID, and click Save to save the trip.
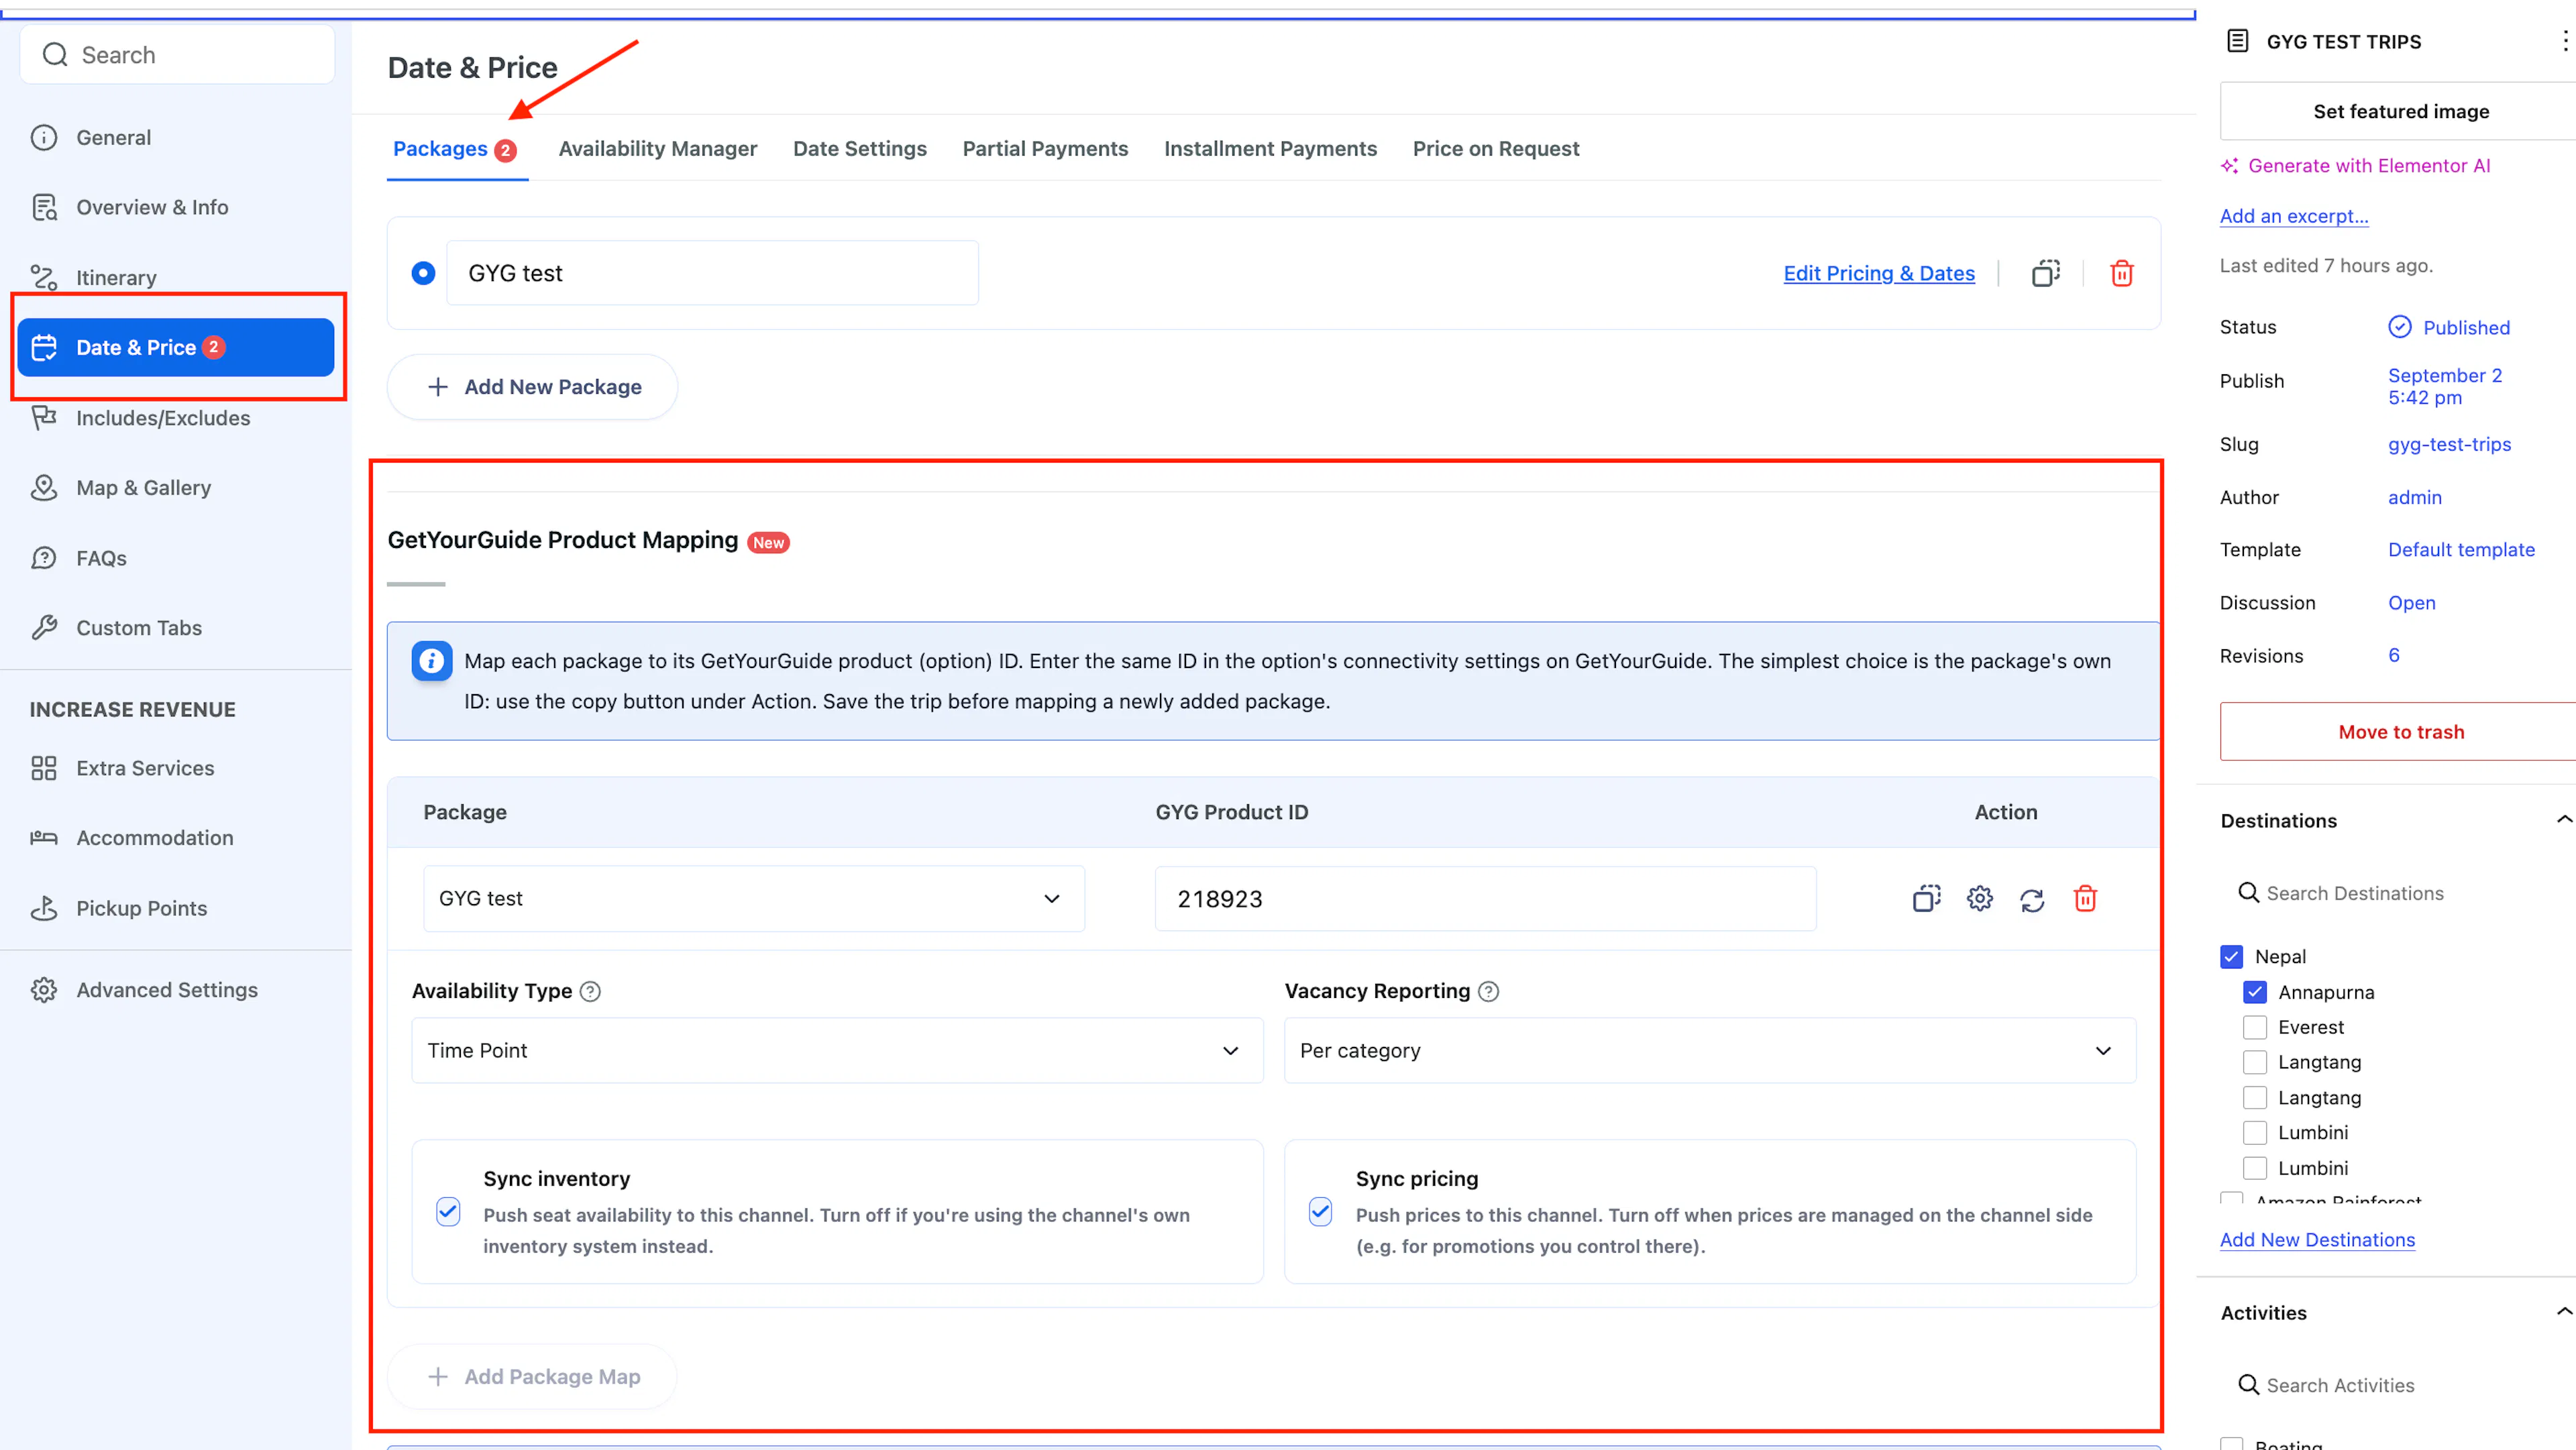
The two must match exactly, letter for letter. This is how GetYourGuide's
request finds your package. A typo means the test fails with an unknown product.
The simplest product number is the package's own ID. Click the copy
icon under Action and paste it into GYG Product ID and into the portal.
The screenshots use 218923; substitute your own.

What actually gets sent. Only seat availability and prices. Trip descriptions, photos, and itineraries stay on GetYourGuide and are never overwritten. You can switch off per package. See Linking Your Trip Packages for more details
Settings That Stay the Same
Three fields lower in the form get the same answer every time.
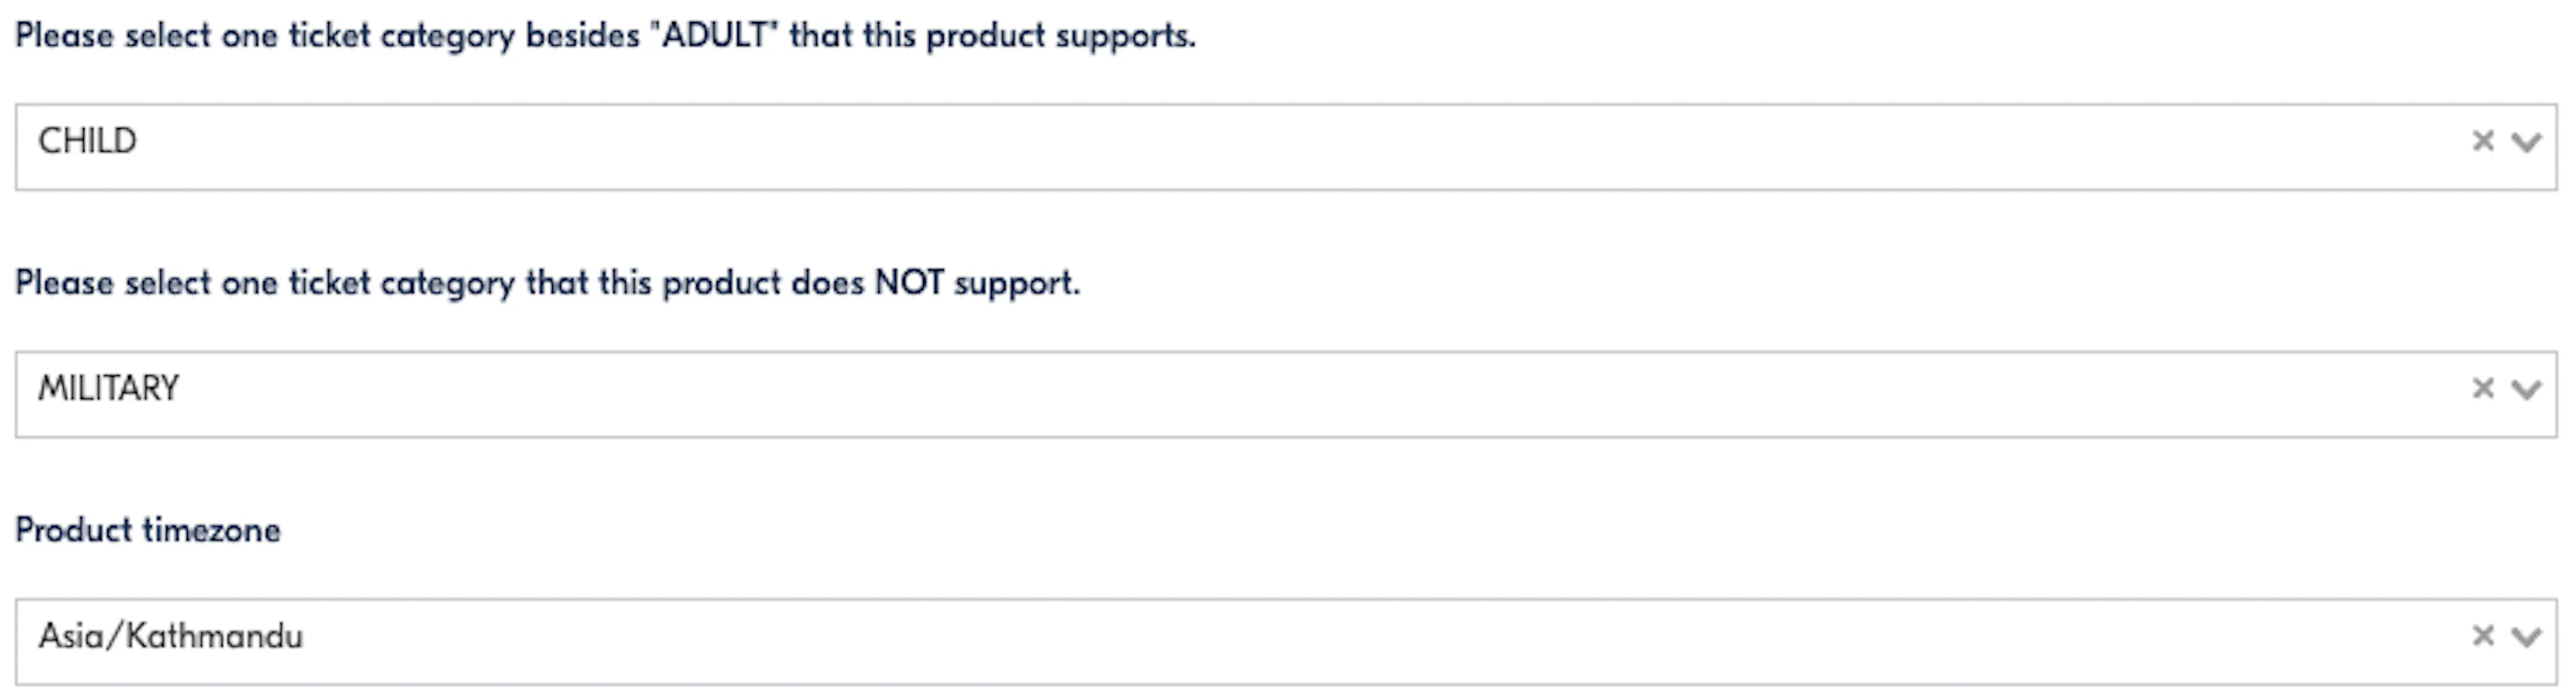
- A ticket type you sell: Choose one besides
ADULT.CHILDis the usual pick. GetYourGuide checks that your site returns a price for it. - A ticket type you do not sell: Choose
MILITARY. GetYourGuide checks that your site turns it down. - Product timezone: Select the same timezone as your website. Find yours under Settings > General > Timezone in WordPress. The screenshot shows
Asia/Kathmandu, and yours will differ.
Note: A wrong timezone shifts every departure time, and the tests fail.
GetYourGuide never converts prices, so your site's currency must match your GetYourGuide listing.
Matching Dates on Both Sides
The portal asks for two sets of dates. Whatever you enter there must also exist on your trips, or the tests find nothing to book.
| Portal field | What to enter |
|---|---|
| Dates your product is available | About five days starting next week. You choose the length, but it needs at least two bookable times. |
| Dates your product is NOT available | A short range further ahead to block off, for example 2027-01-01 to 2027-01-02 |
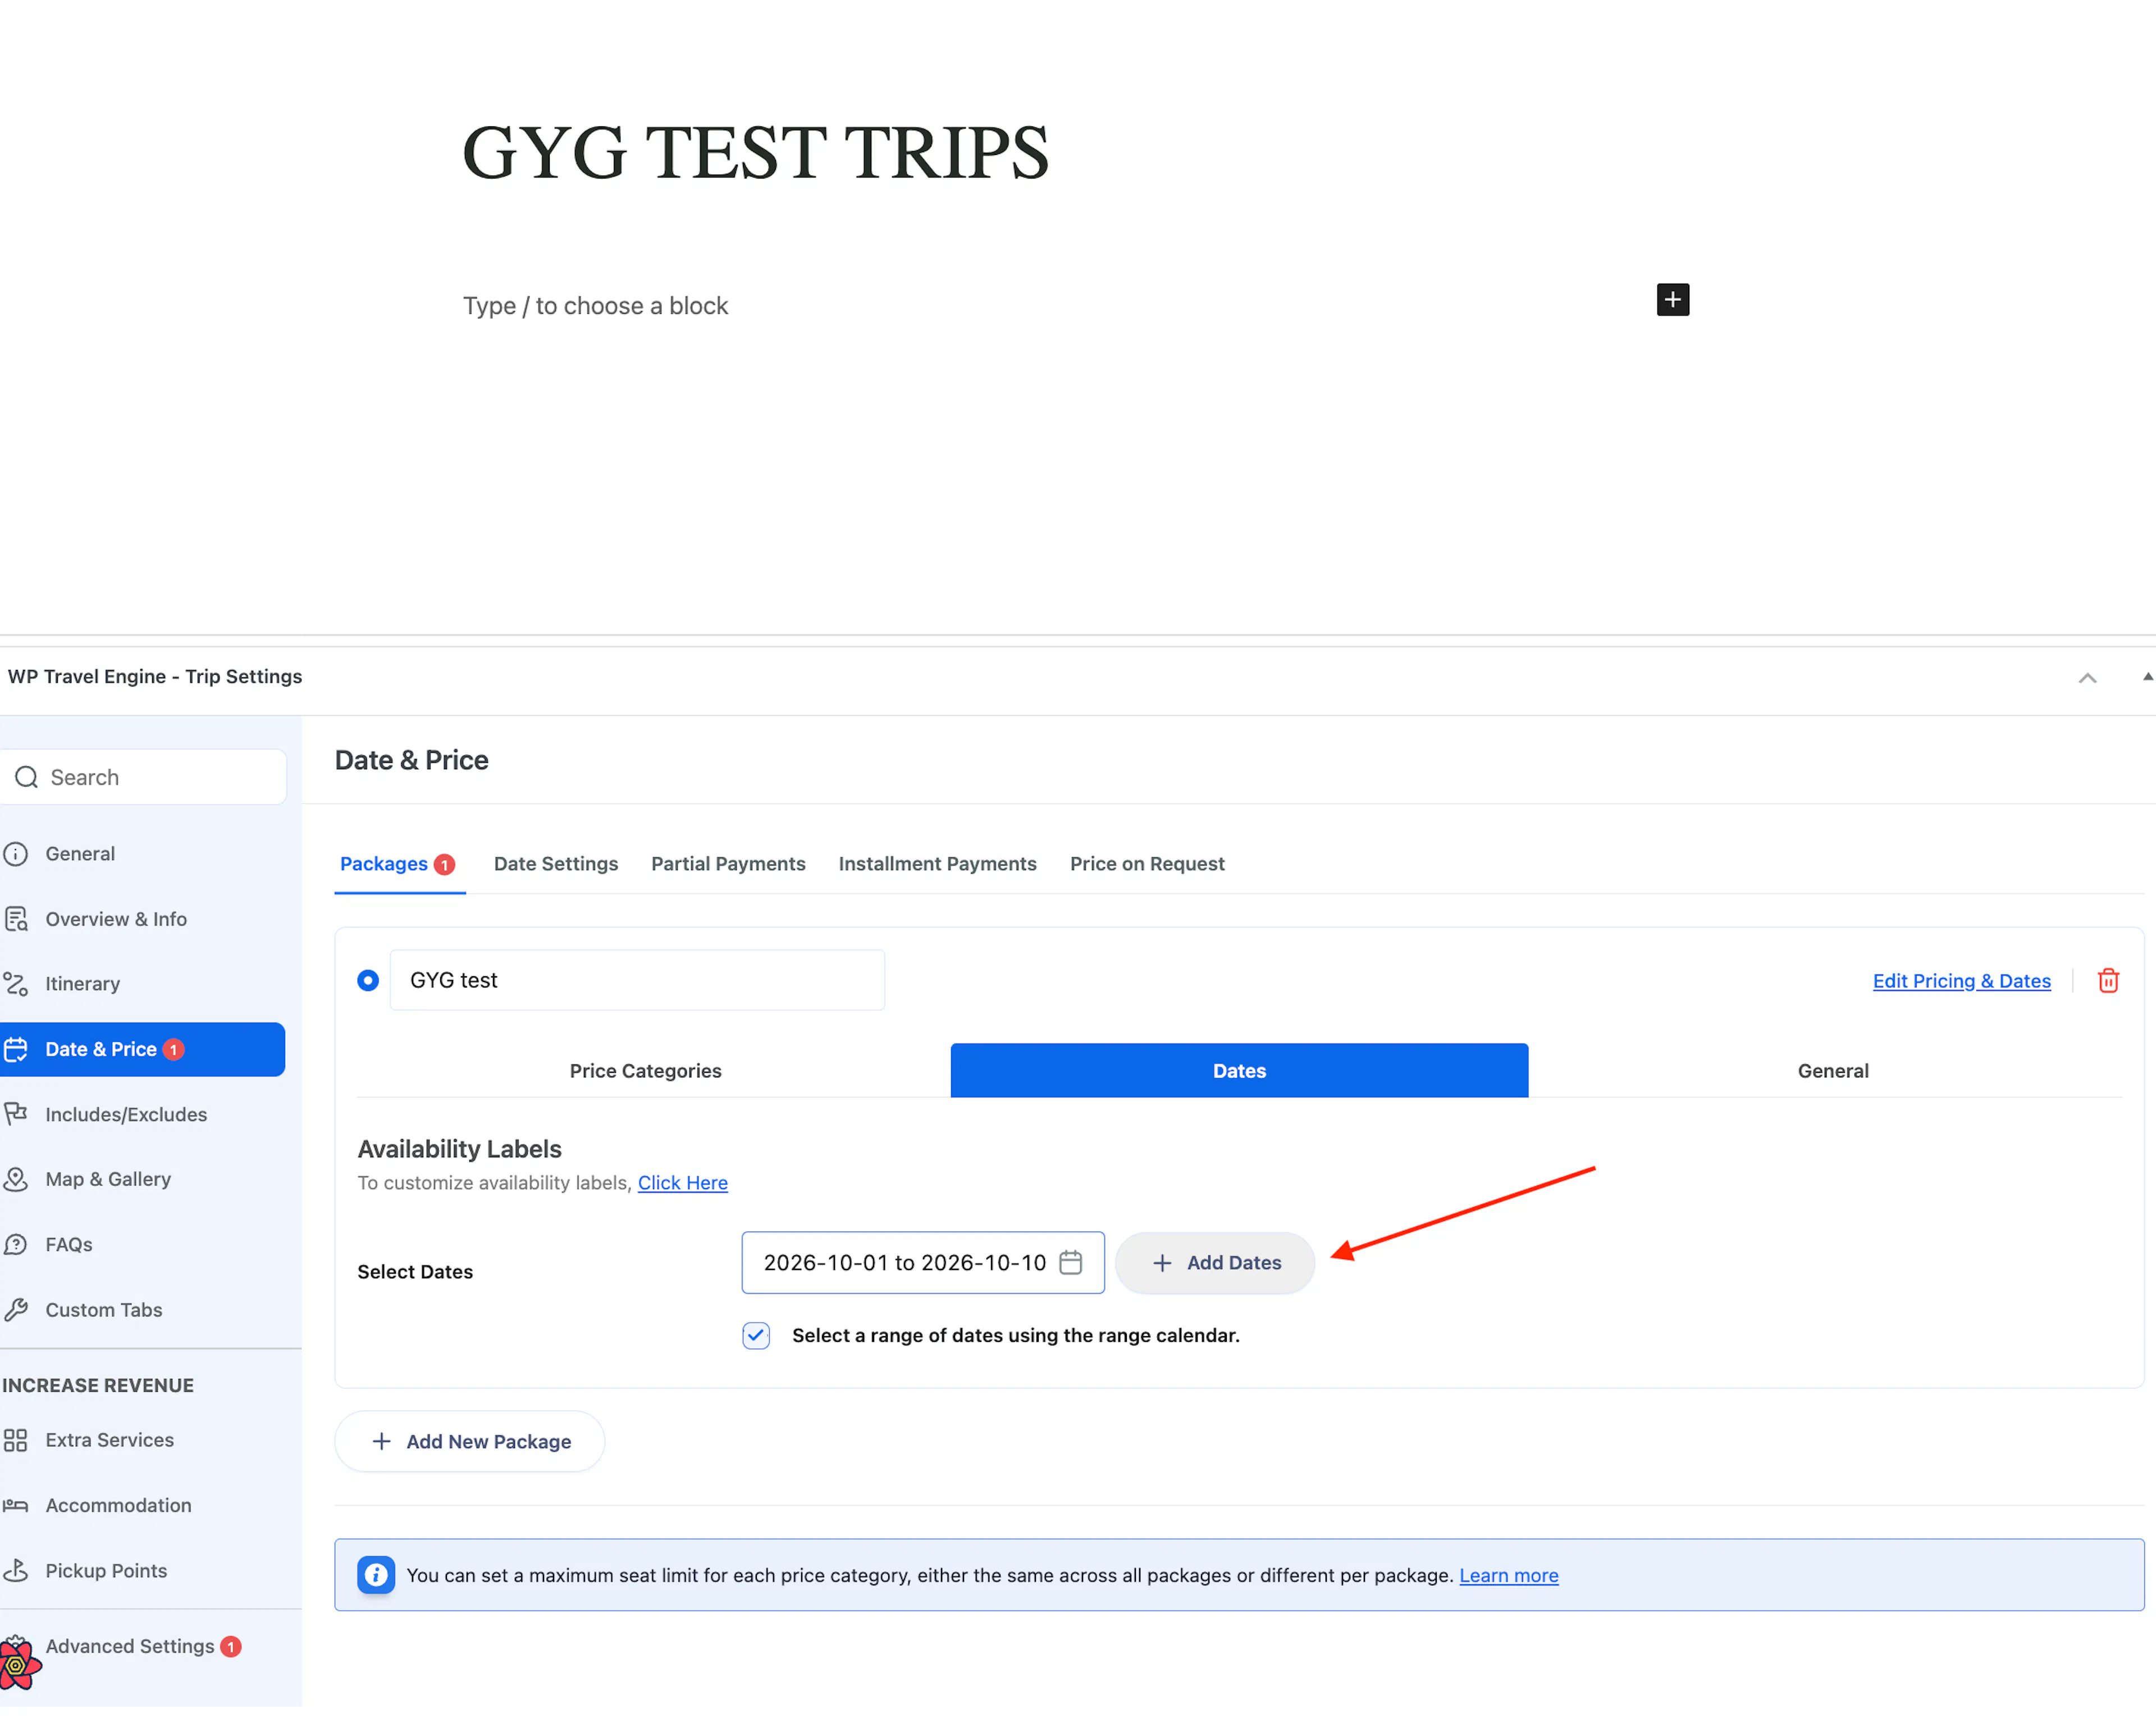
Add the available dates to each practice trip:
- Open the trip and go to Date & Price > Packages.
- Create a package and set your prices.
- Under Dates, add the same range you gave the portal.
Repeat for every practice trip. The same range works for all of them.
Then add the blocked dates:
- Still under Date & Price, open Date Settings.
- Scroll to Excluded Dates.
- Add the dates you blocked in the portal, again on every practice trip.
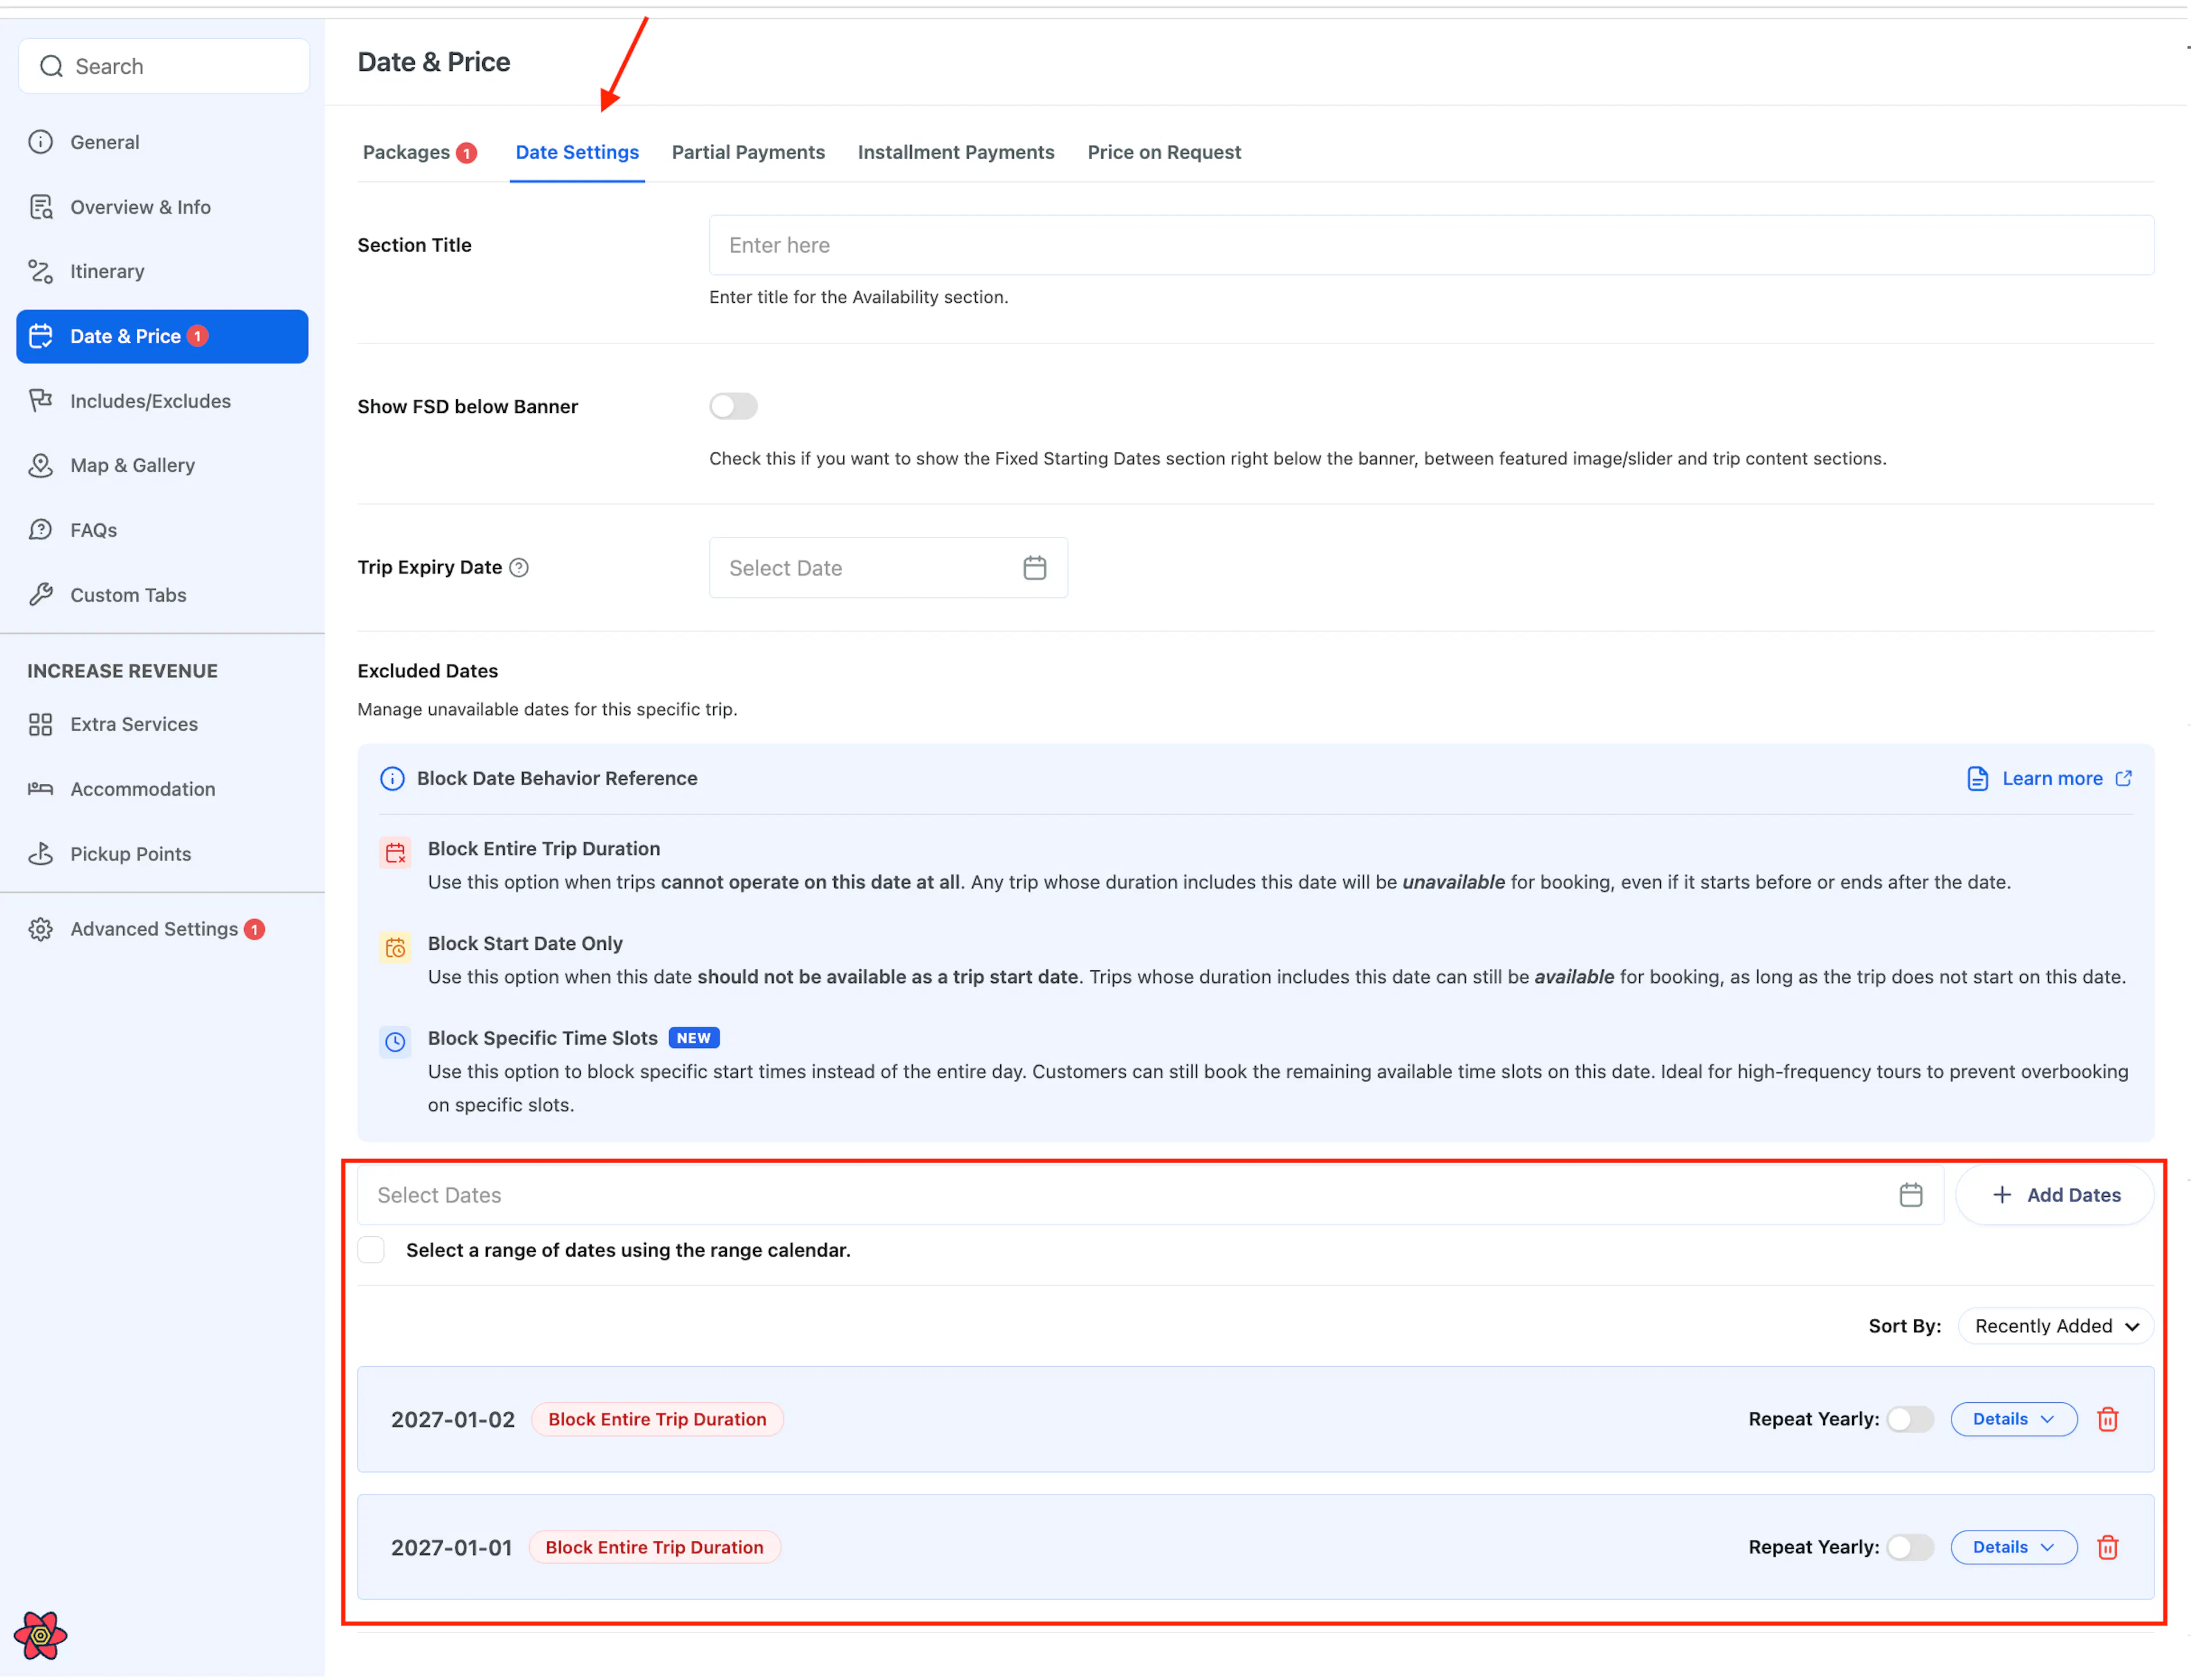
GetYourGuide checks both sides: the available dates must be bookable, and the blocked ones must not be. A date in the portal with no package behind it fails.
Your trips are ready. Work through each product type in turn.
Product Type 1: Time Point for Individuals
Set departure times, one ticket per person.
In the portal, answer the form like this:
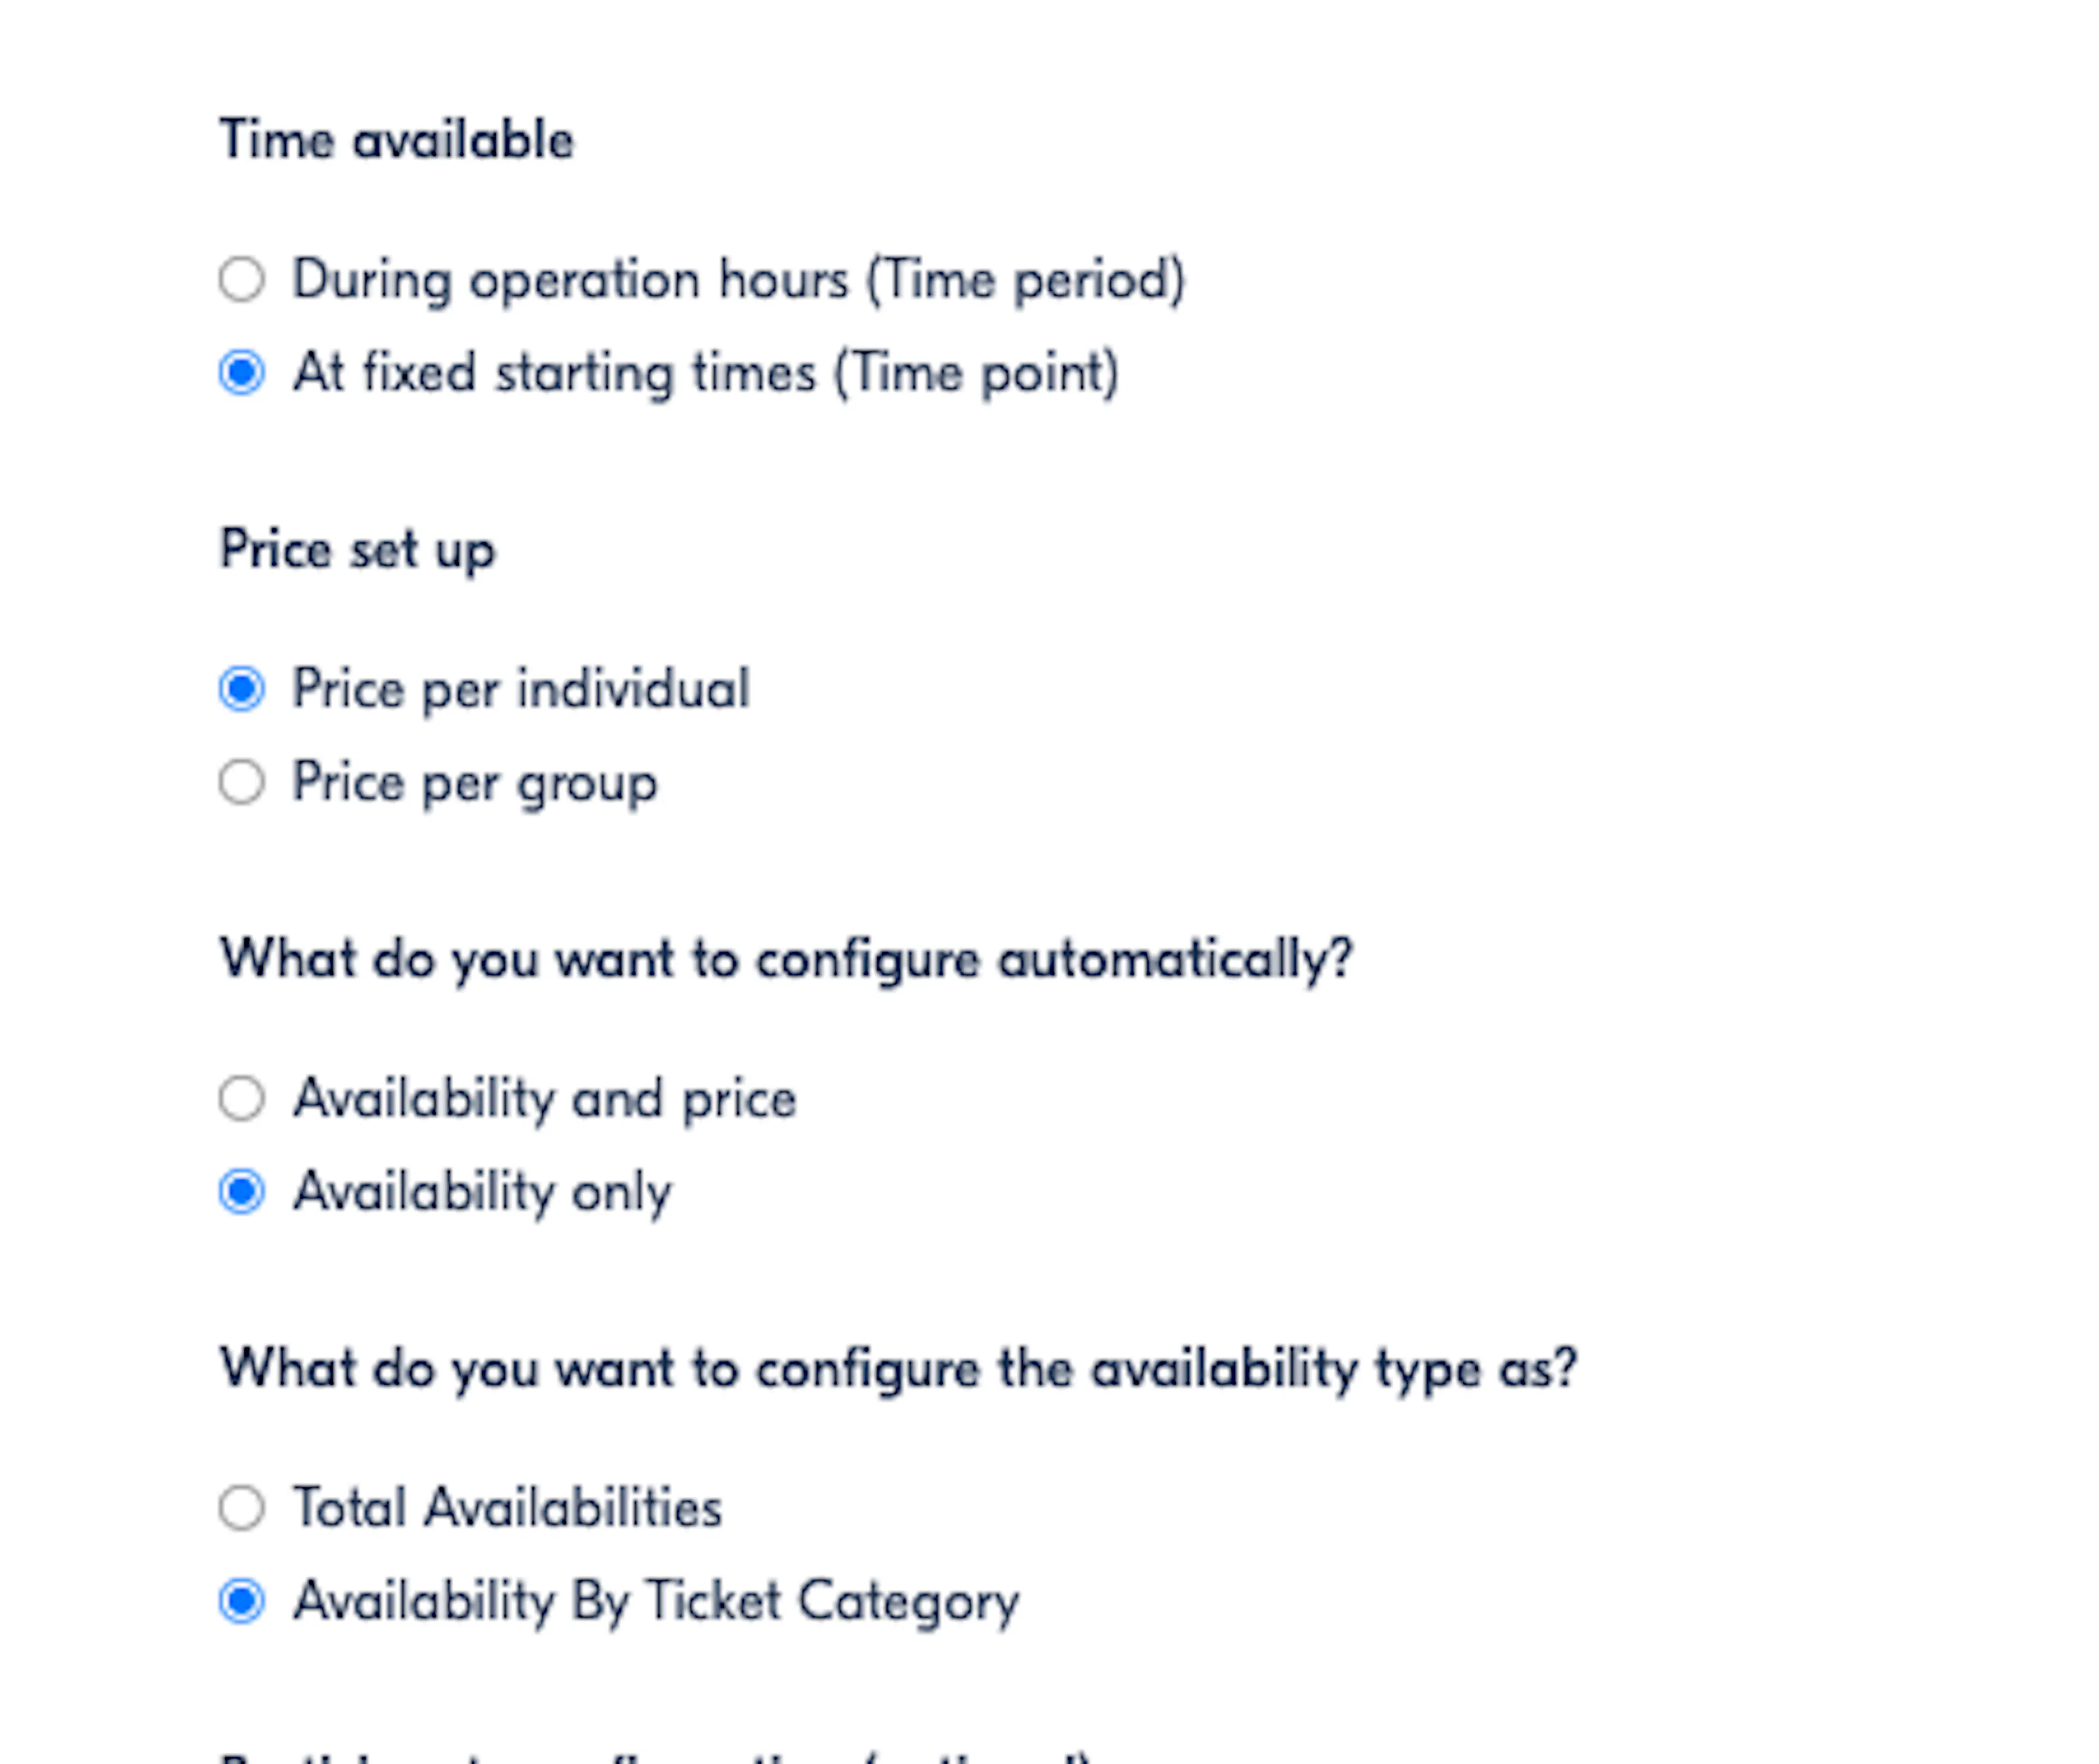
| Question | Answer |
|---|---|
| Time available | At fixed starting times (Time point) |
| Price set up | Price per individual |
| What do you want to configure automatically? | Availability only |
| What do you want to configure the availability type as? | Availability By Ticket Category |
On your site
On the practice trip, go to Date & Price > Packages. Under GetYourGuide Product Mapping, click the gear icon on the Point / Individual package's row.
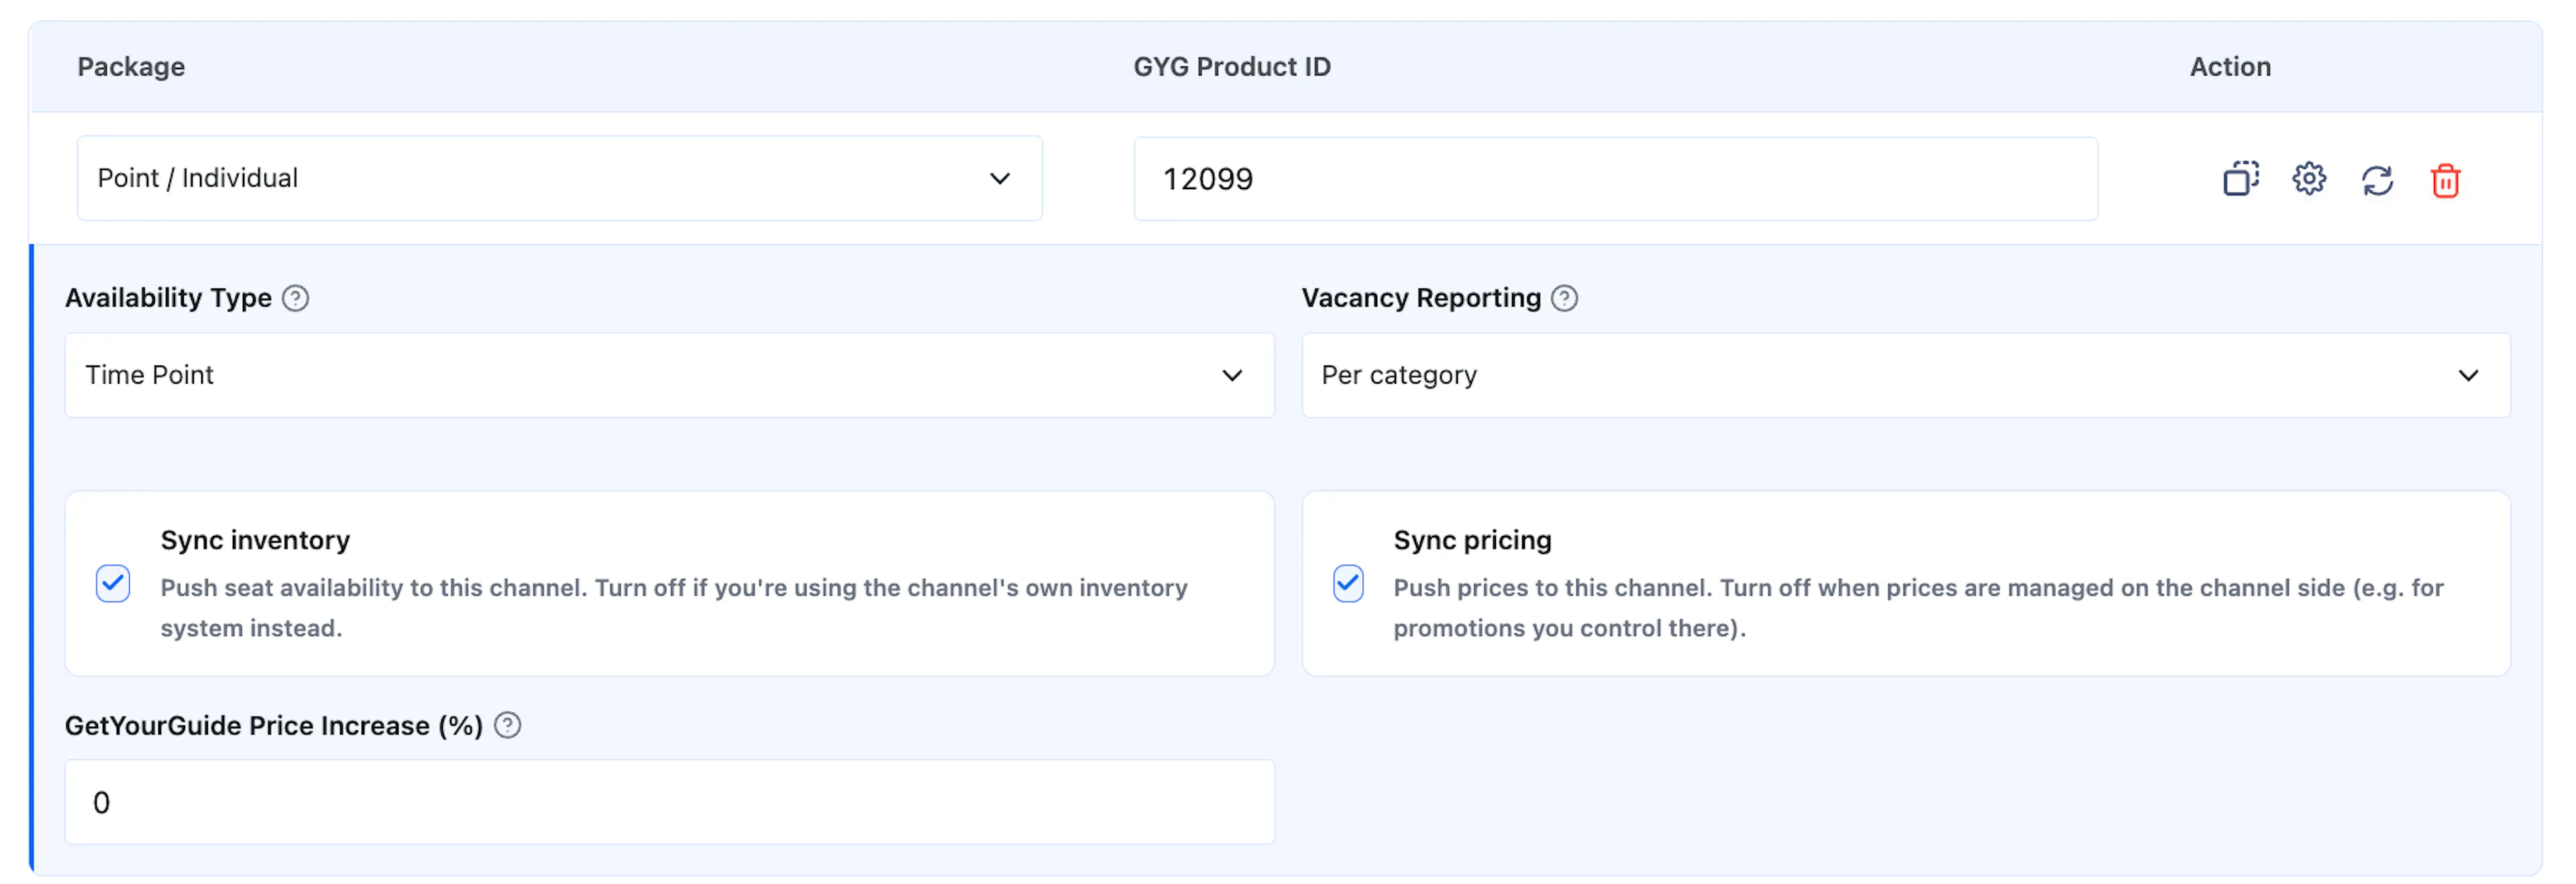
| Field | Value |
|---|---|
| Availability Type | Time Point |
| Vacancy Reporting | Per category |
Check that the GYG Product ID on the row is this type's product number. If it looks wrong, go back to 5.1.
The notice on this tab confirms which product number the trip is linked to. If it looks wrong, go back to Creating Practice Trips.
To run the test, click Test your integration.
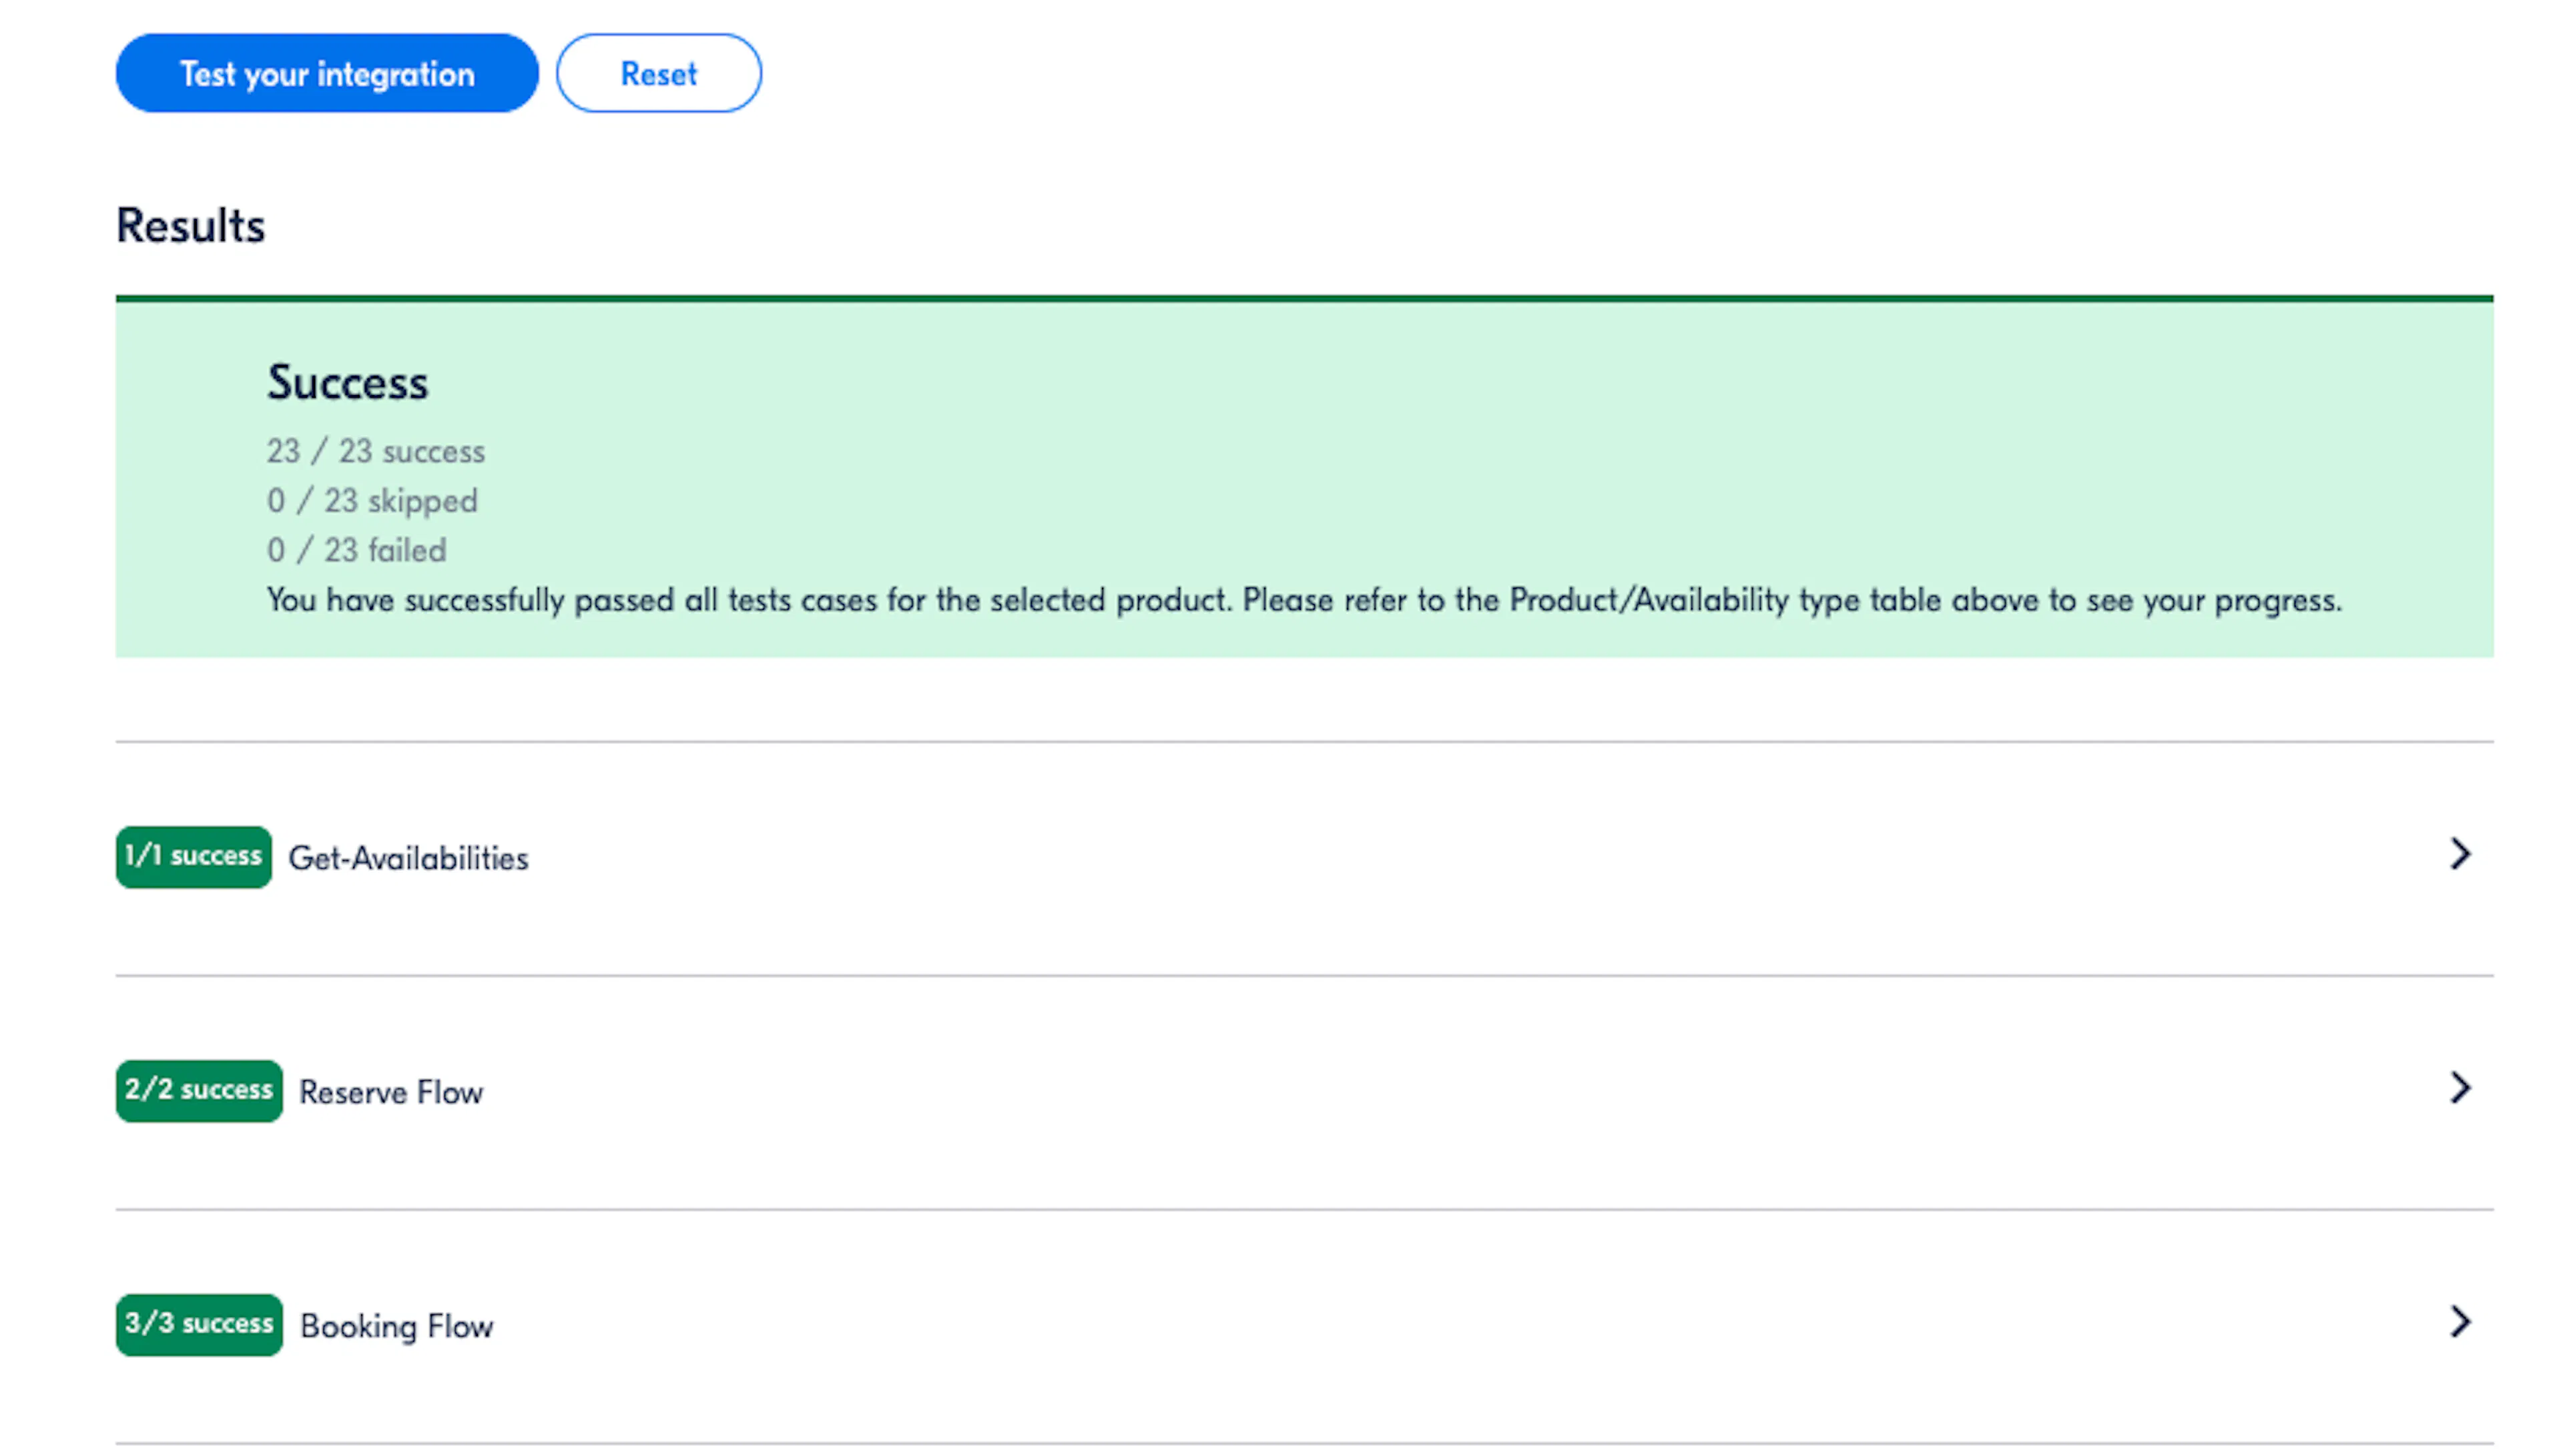
A pass reads Success with nothing failed, and shows each stage on its own:
- Get-Availabilities: your site listed the right open dates.
- Reserve Flow: seats were held.
- Booking Flow: the hold became a booking.
The Time point for Individuals row now reads Completed.
Note: If the test fails, the usual causes are a product number that does not match Trip package Mapping, a timezone that differs from your website's, or portal dates with no package behind them. Open the failed stage to see what went wrong, fix it, then run the test again.
Product Type 2: Time Period for Individuals
Opening hours, one ticket per person.
In the portal, the form is the same as before with one answer changed:
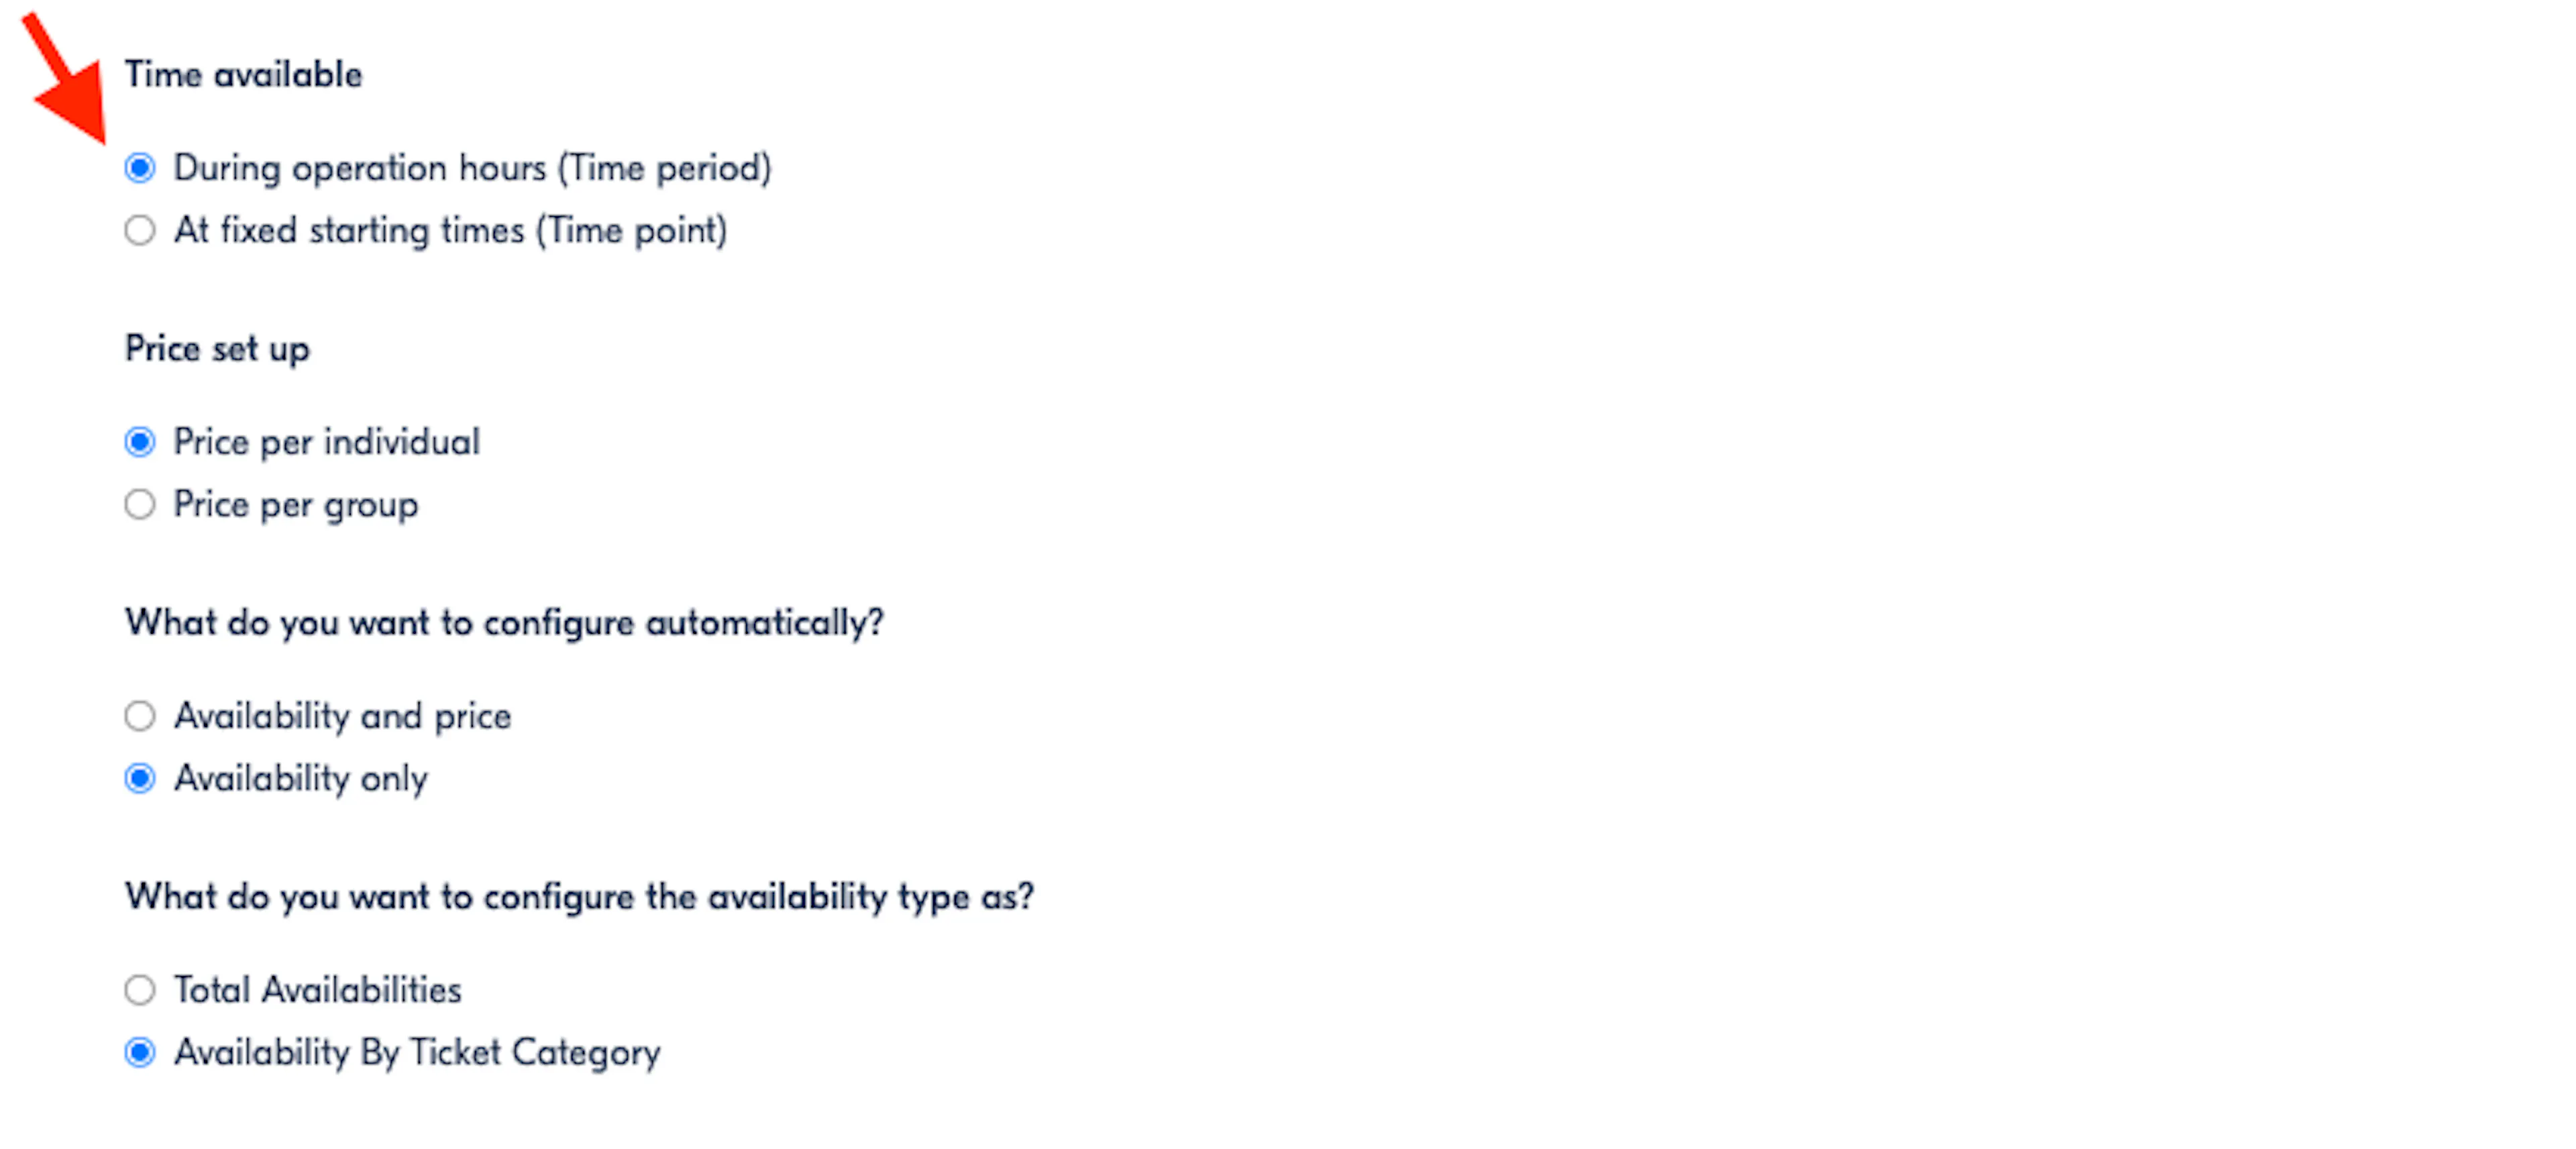
| Question | Answer |
|---|---|
| Time available | During operation hours (Time period) (changed) |
| Price set up | Price per individual |
| What do you want to configure automatically? | Availability only |
| What do you want to configure the availability type as? | Availability By Ticket Category |
On your site, go to Date & Price > Packages on the practice trip. Under GetYourGuide Product Mapping, click the gear icon on the Period / Individual package's row and set Availability Type to Time Period. Opens and Closes appear. Click Save to save the trip.
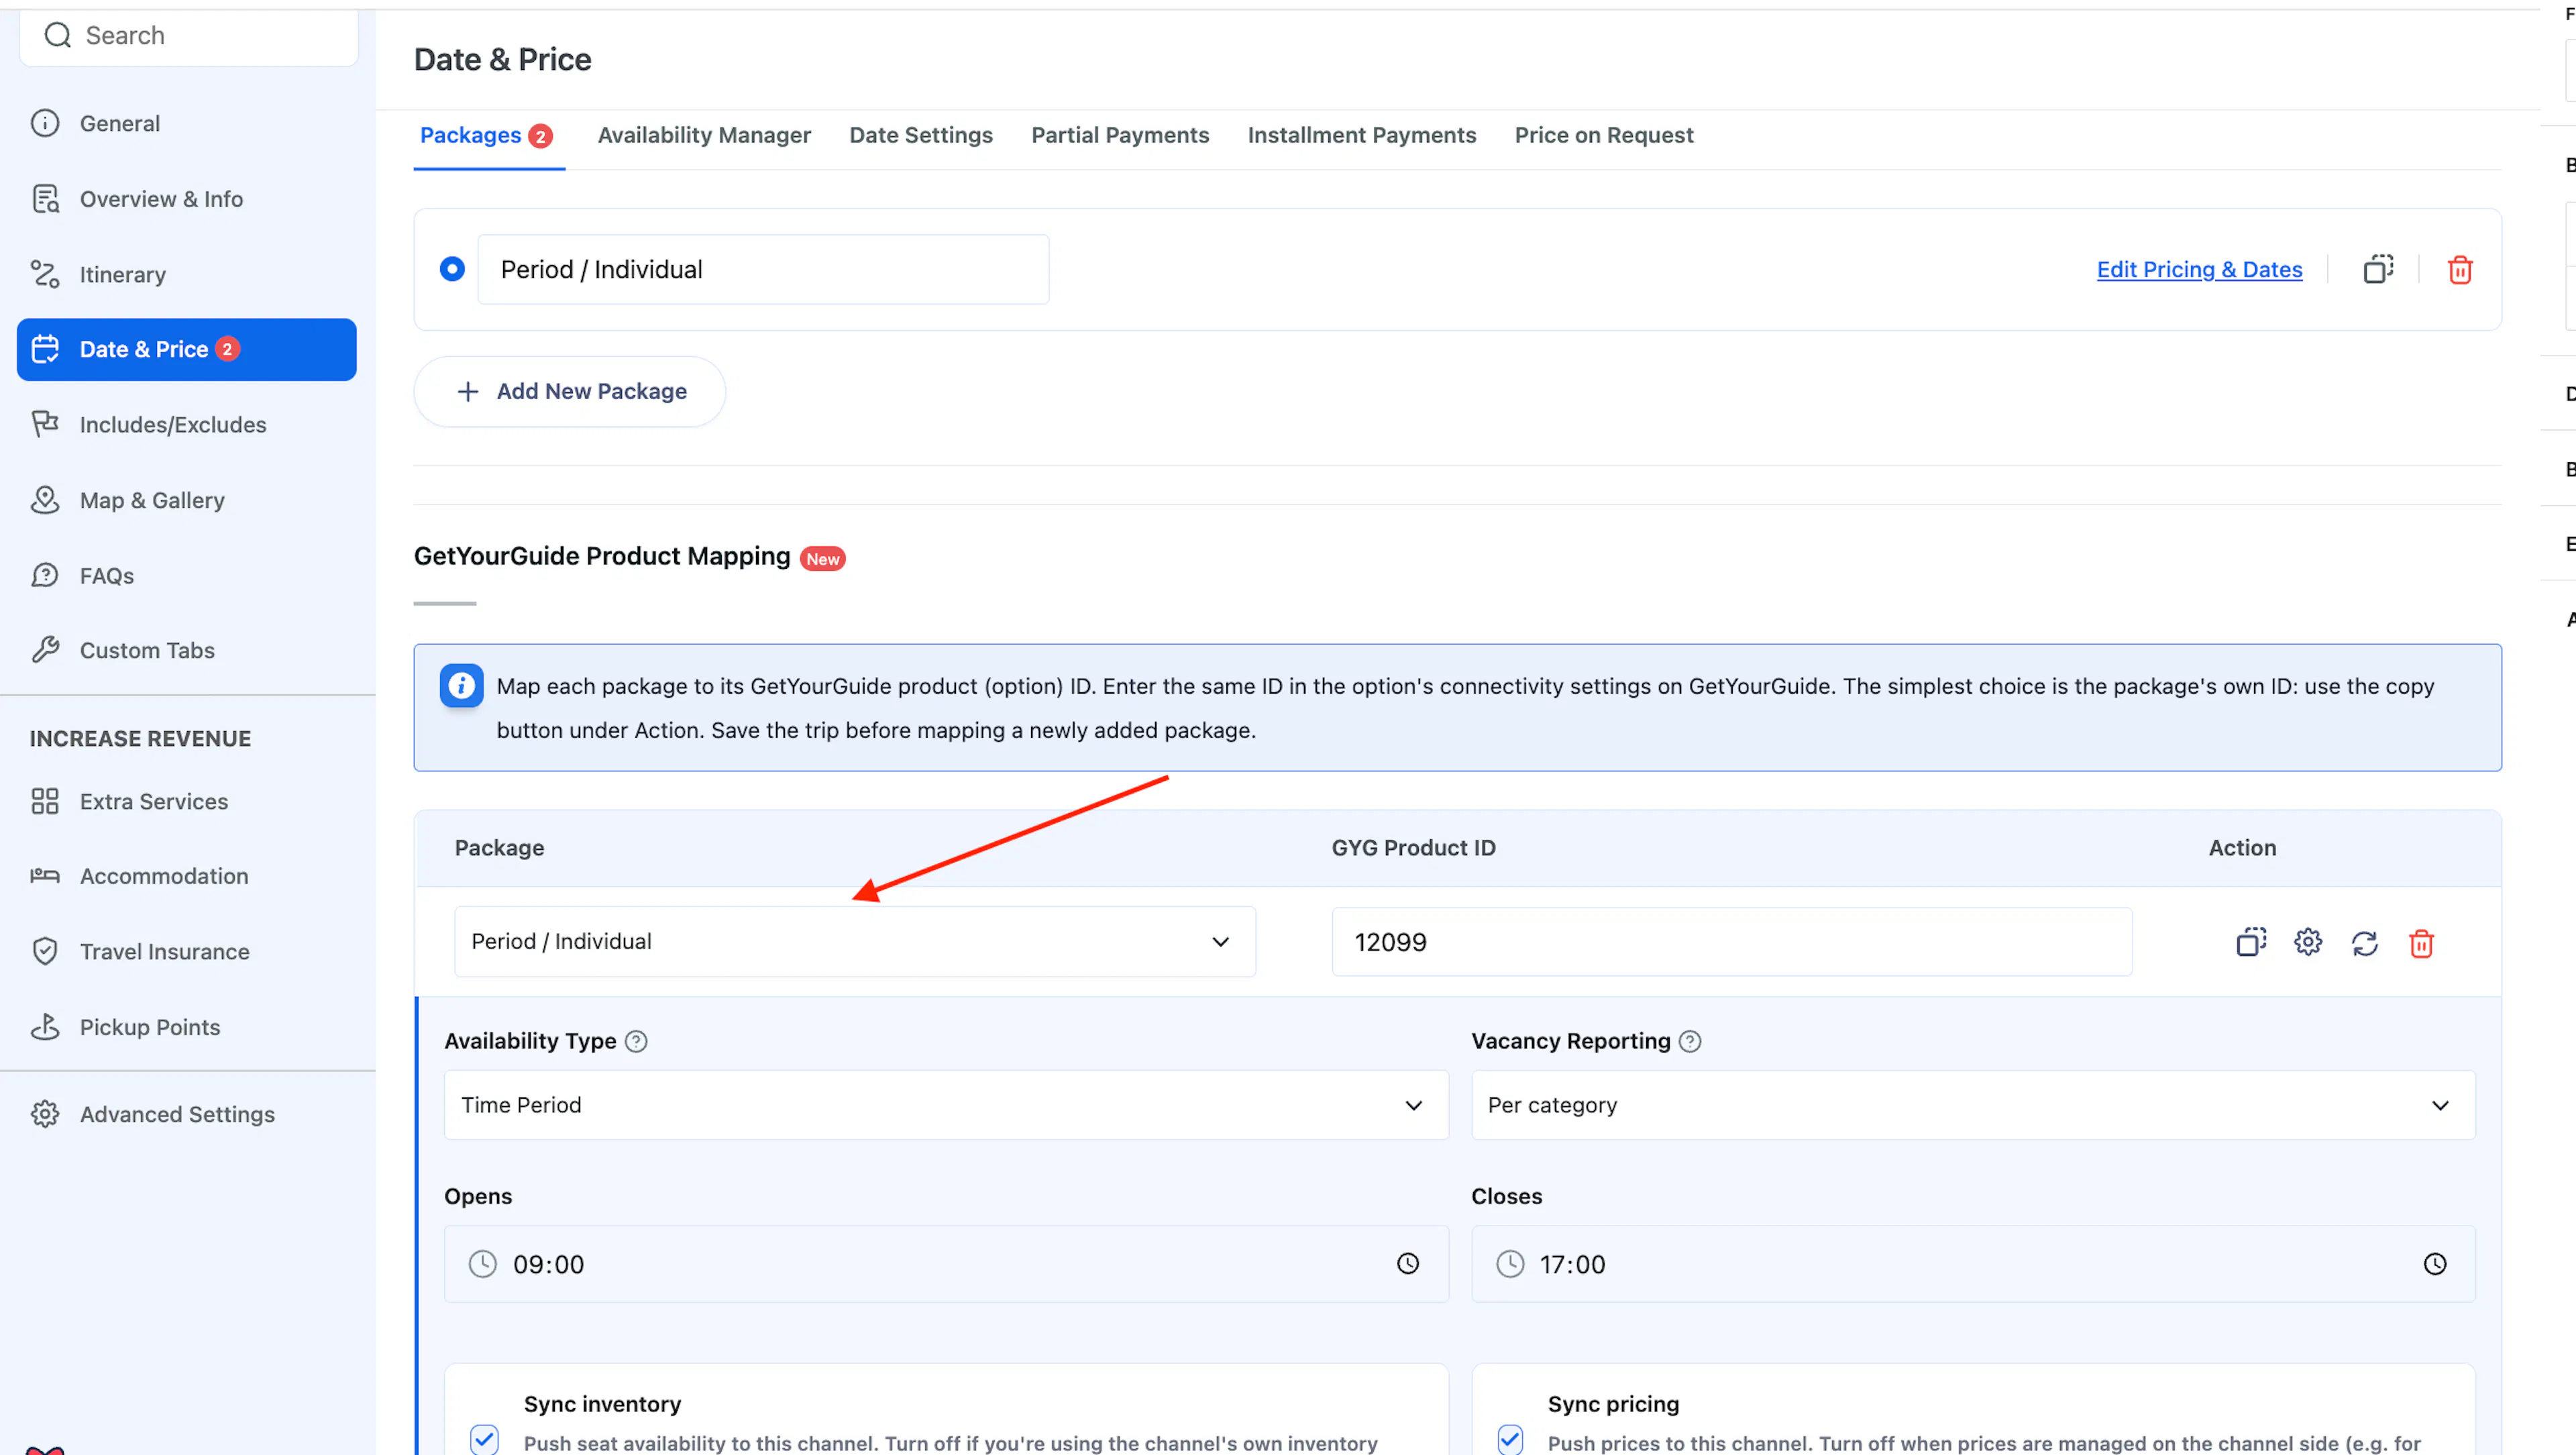
| Field | Value |
|---|---|
| Availability Type | Time Period (changed) |
| Opens | 09:00 |
| Closes | 17:00 |
| Vacancy Reporting | Per category |
Tip: Any sensible opening hours work for testing. For real trips, use the hours on your GetYourGuide product.
To run the test, click Test your integration. On success, Time period for Individuals reads Completed.
Note: If the test fails, check the setting you just changed. Time Period on the trip must go with During operation hours in the portal.
Group Ticket Types
Product types 3 and 4 cover group products, where one ticket covers a whole party.
Note: Skip both if you do not sell group departures. If you chose custom system build for a single supplier and left the Groups boxes empty, go straight to Moving to Your Live Site. These two types apply only if you chose Reservation System or Attraction Ticketing System, which cover all four types.
Group prices come from the Group Discount add-on. Install and activate it before you start, or there is no group price to send.
Product Type 3: Time Period for Groups
Opening hours, one ticket for a whole group. This needs the Group Discount add-on.
In the portal, change the price answer:
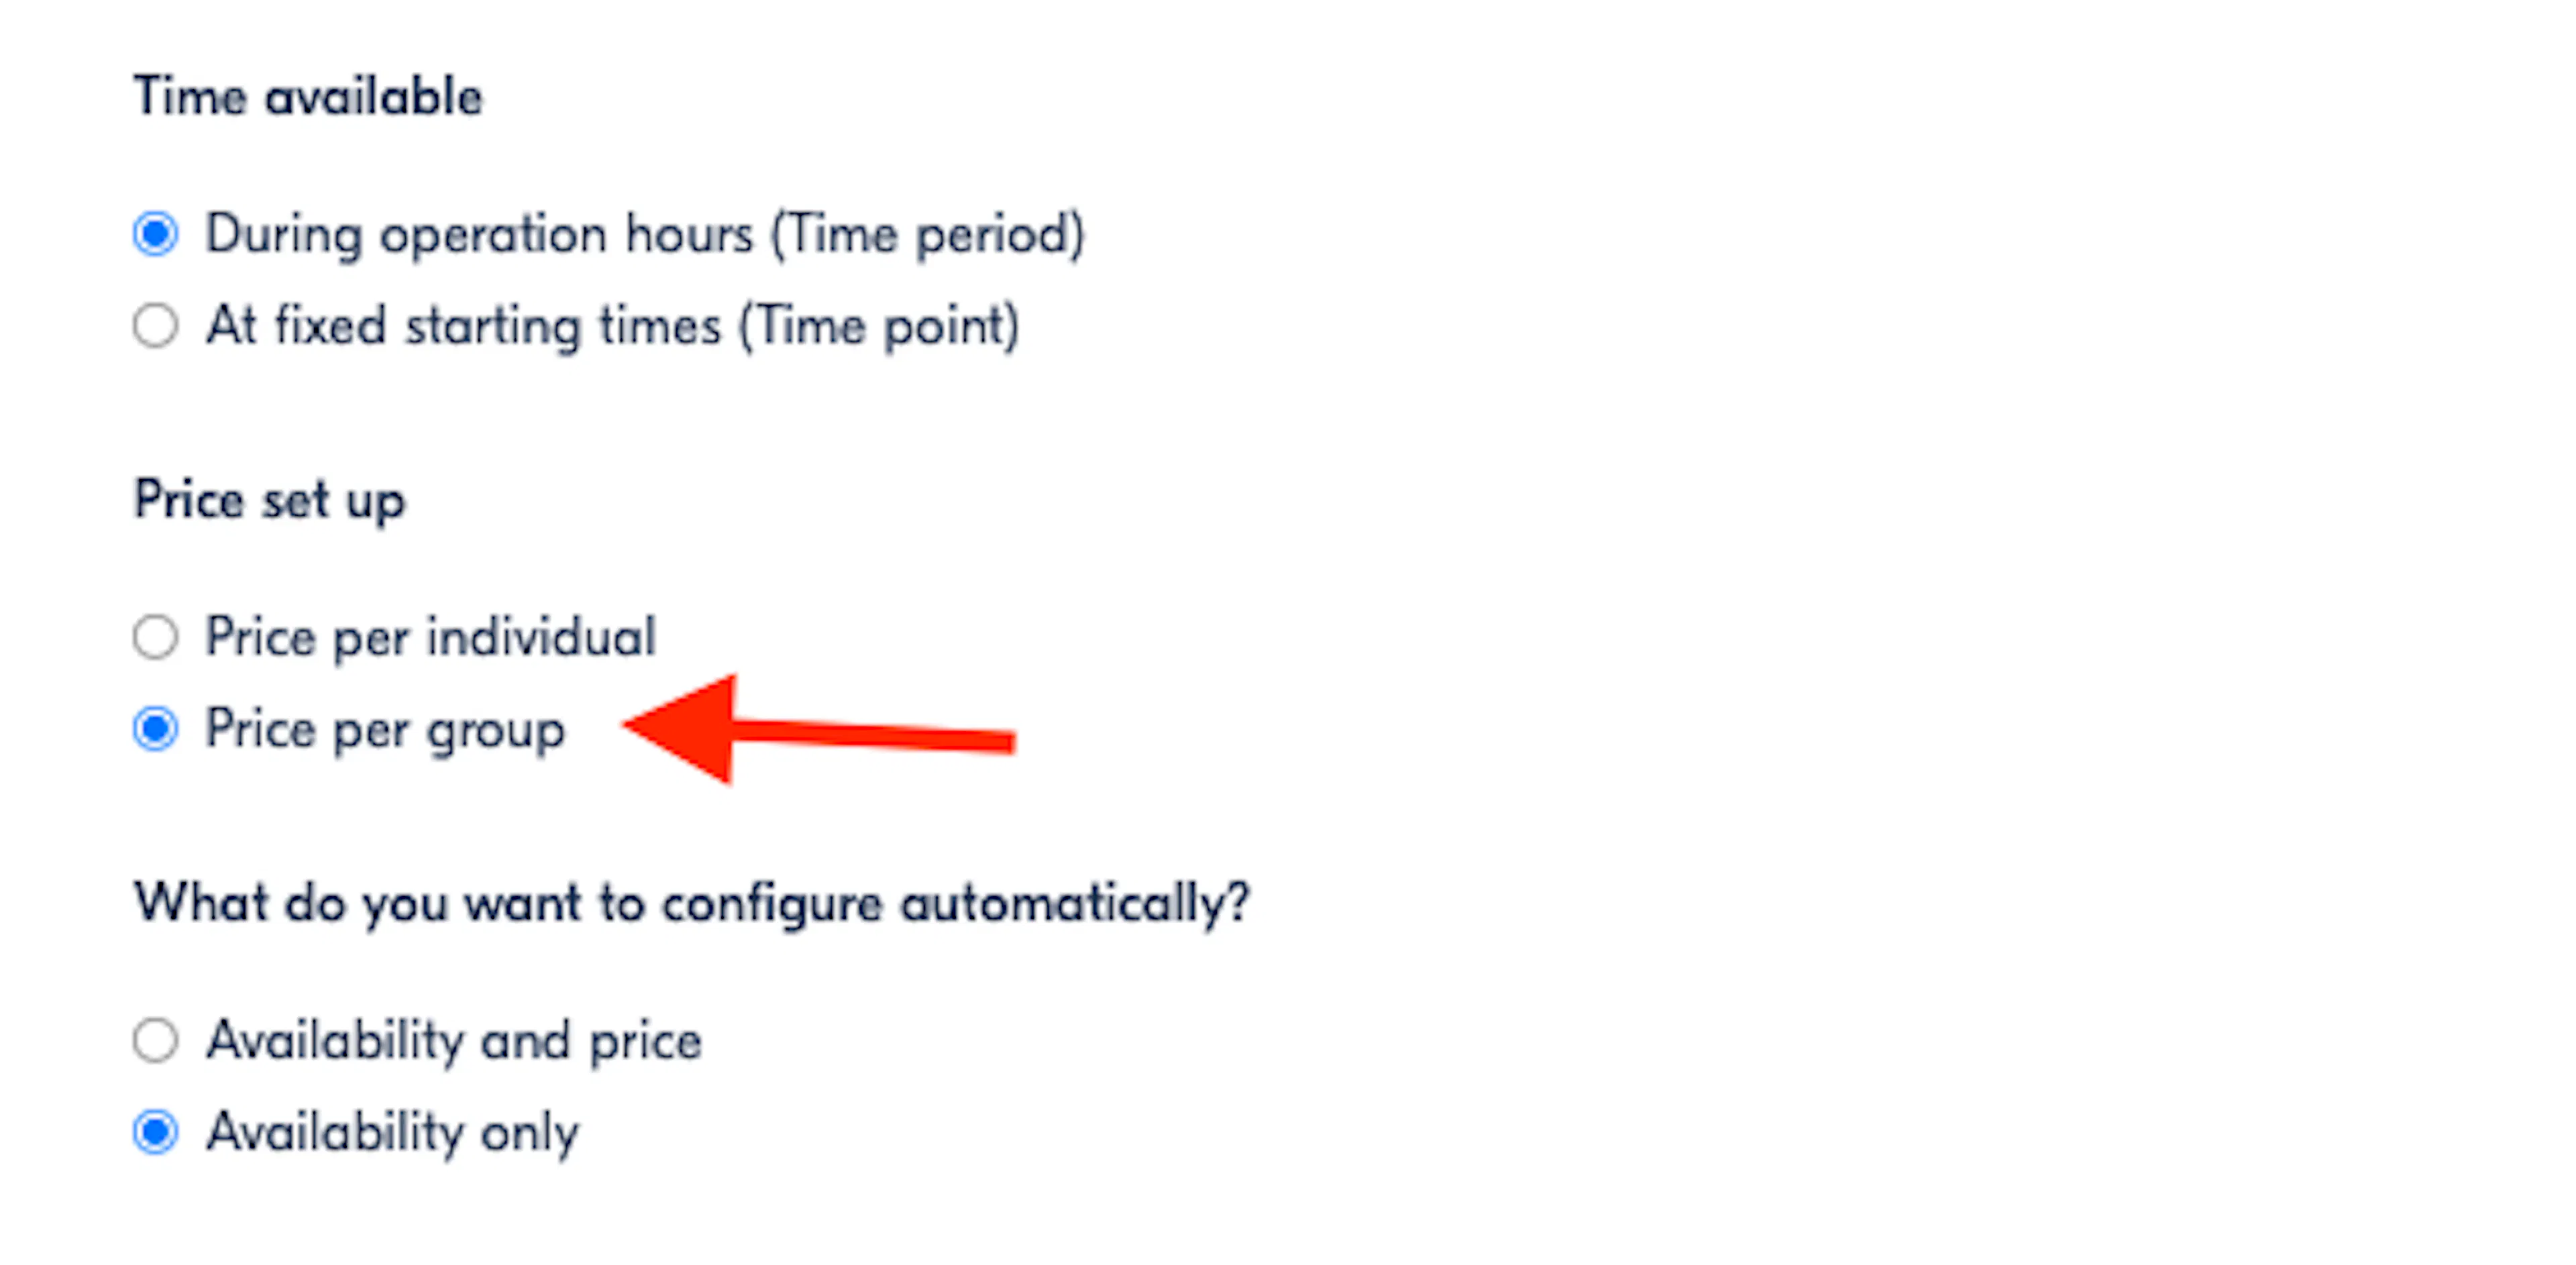
| Question | Answer |
|---|---|
| Time available | During operation hours (Time period) |
| Price set up | Price per group (changed) |
| What do you want to configure automatically? | Availability only |
| What do you want to configure the availability type as? | Availability By Ticket Category |
On your site, click the gear icon on the Period / Group package's row and set Availability Type to Time Period with Vacancy Reporting on Per category, as in the previous type.
Then set the price. On the same trip, go to Date & Price → Packages → Price Categories, open a category and set Pricing Type to Per Group.
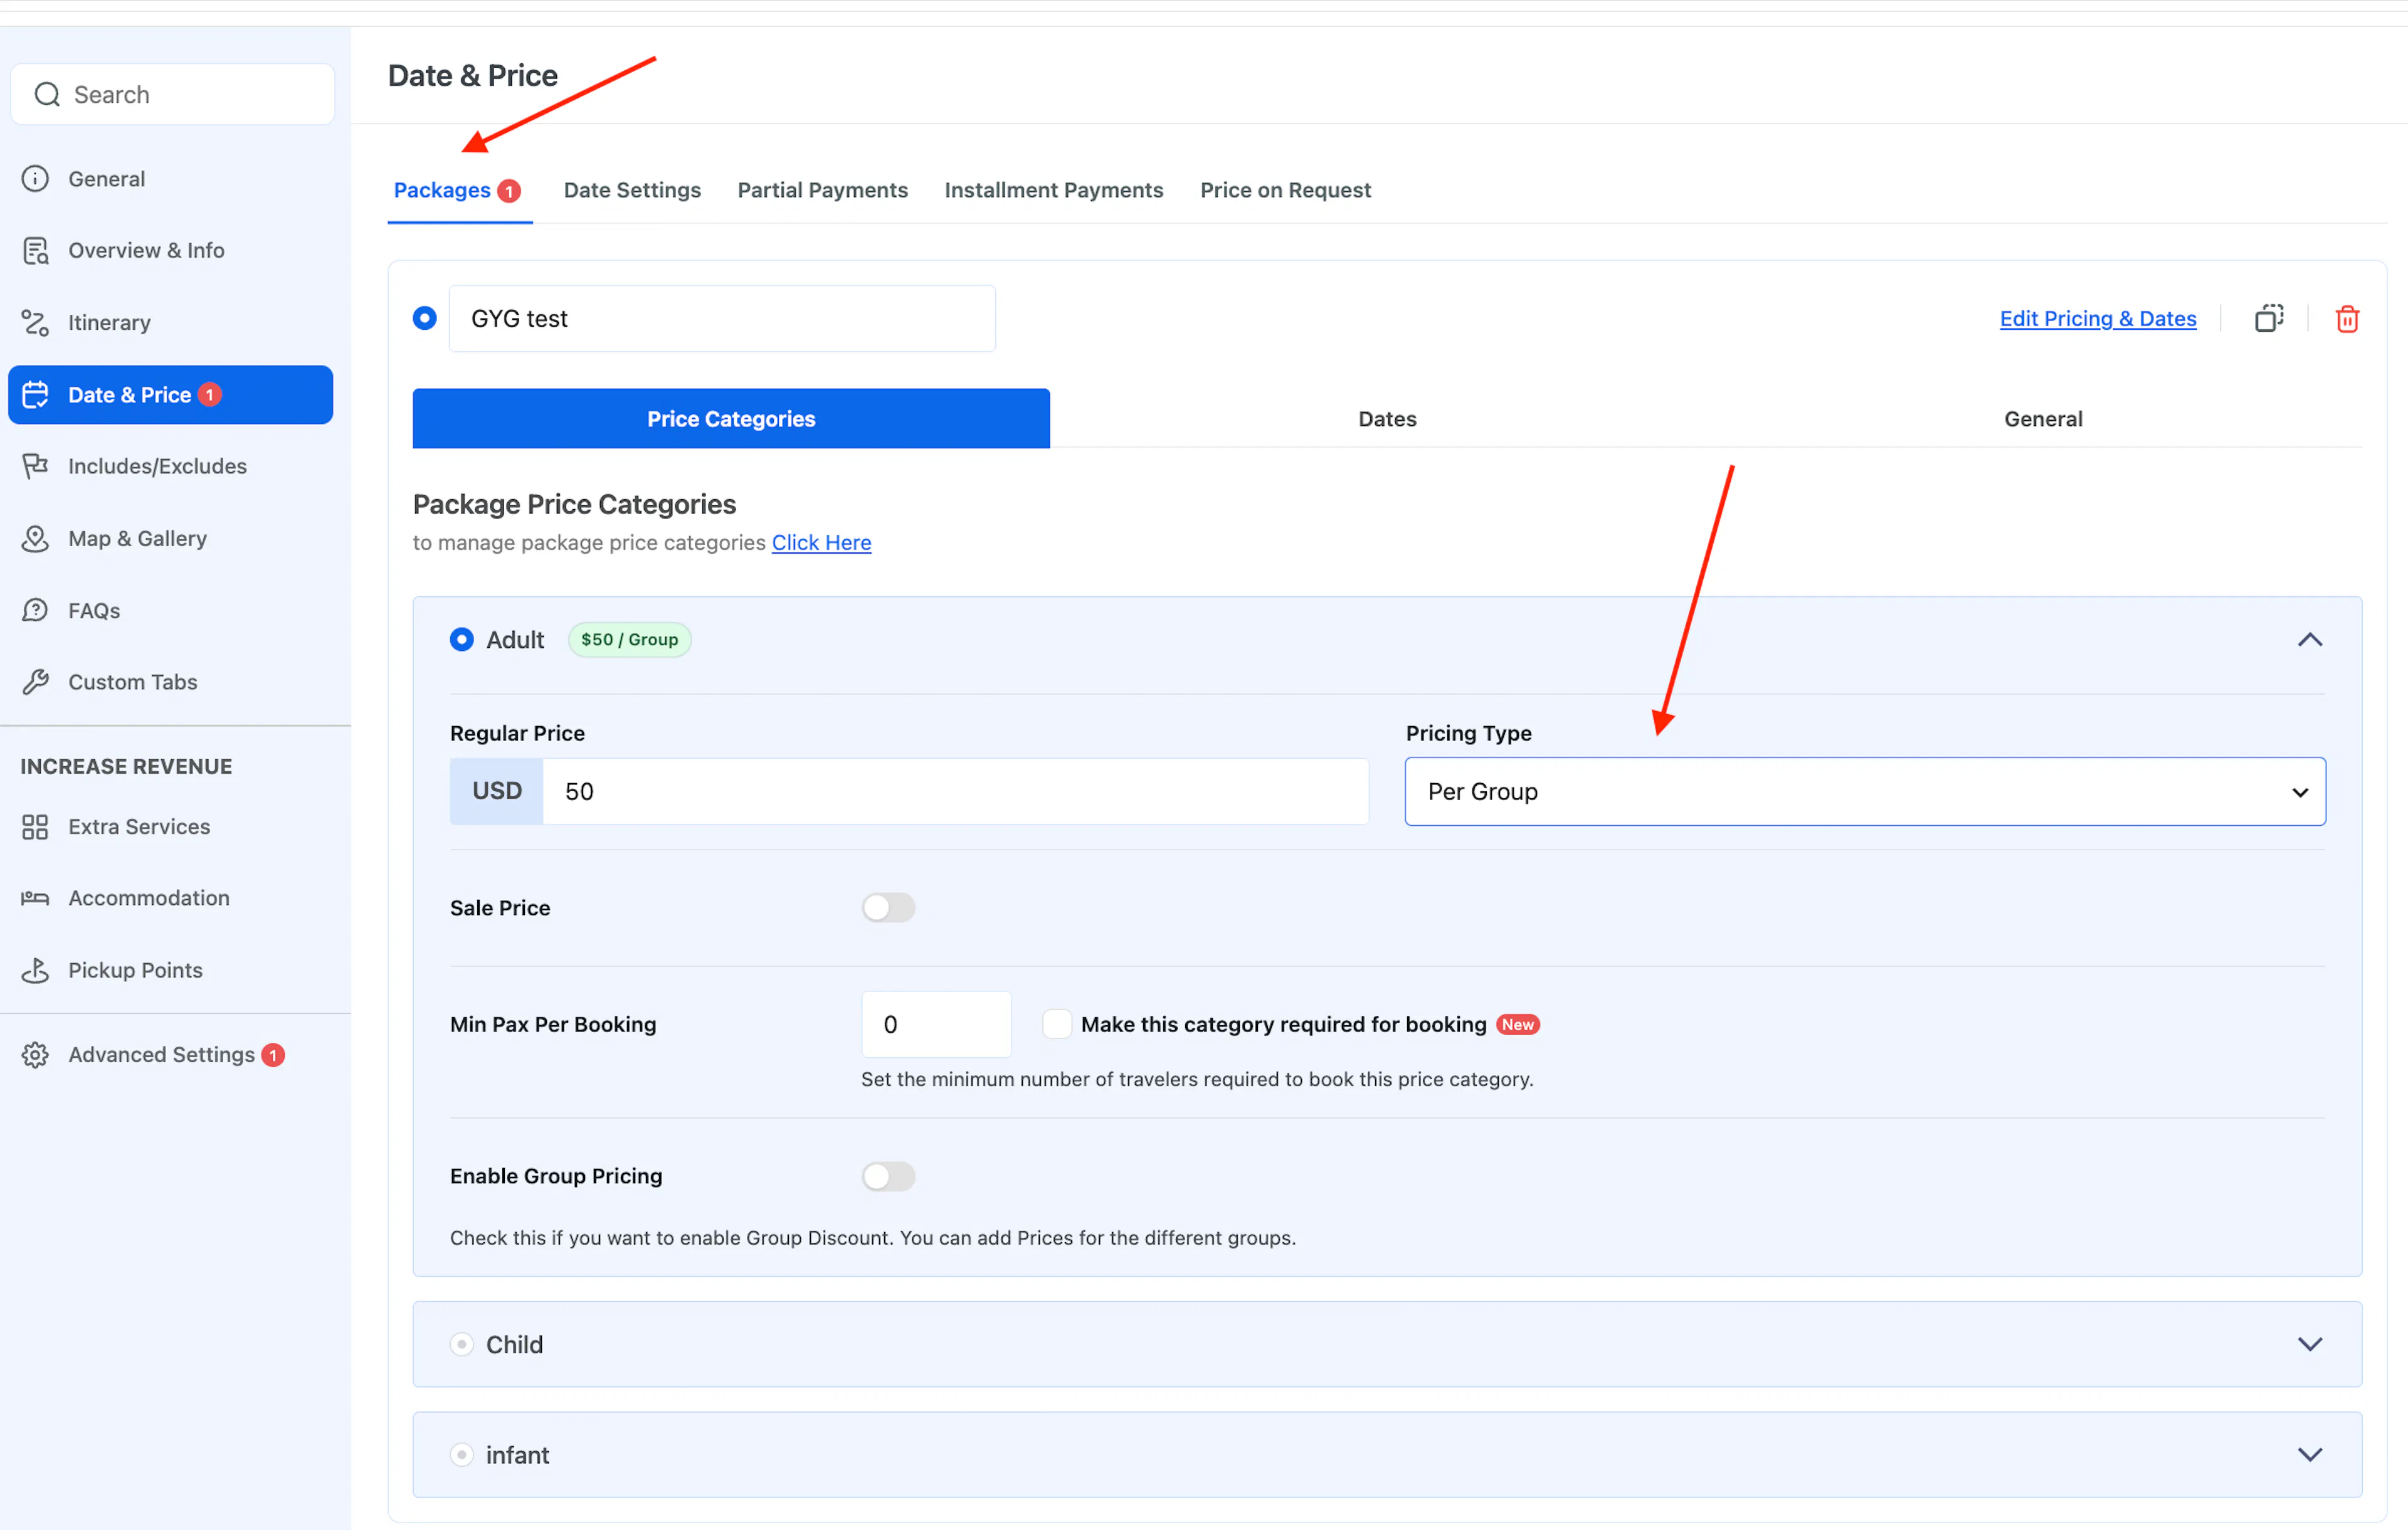
| Field | Value |
|---|---|
| Regular Price | Your group price, 50 in the example. Use whatever your GetYourGuide product charges for a group. |
| Pricing Type | Per Group, instead of Per Person |
To run the test, click Test your integration. On success, Time period for Groups reads Completed.
Note: If the test fails, check that the Group Discount add-on is active and that the price saved. The category heading should read $50 / Group.
Product Type 4: Time Point for Groups
Set departure times, one ticket for a whole group. This needs the Group Discount add-on.
In the portal, change the time answer back:
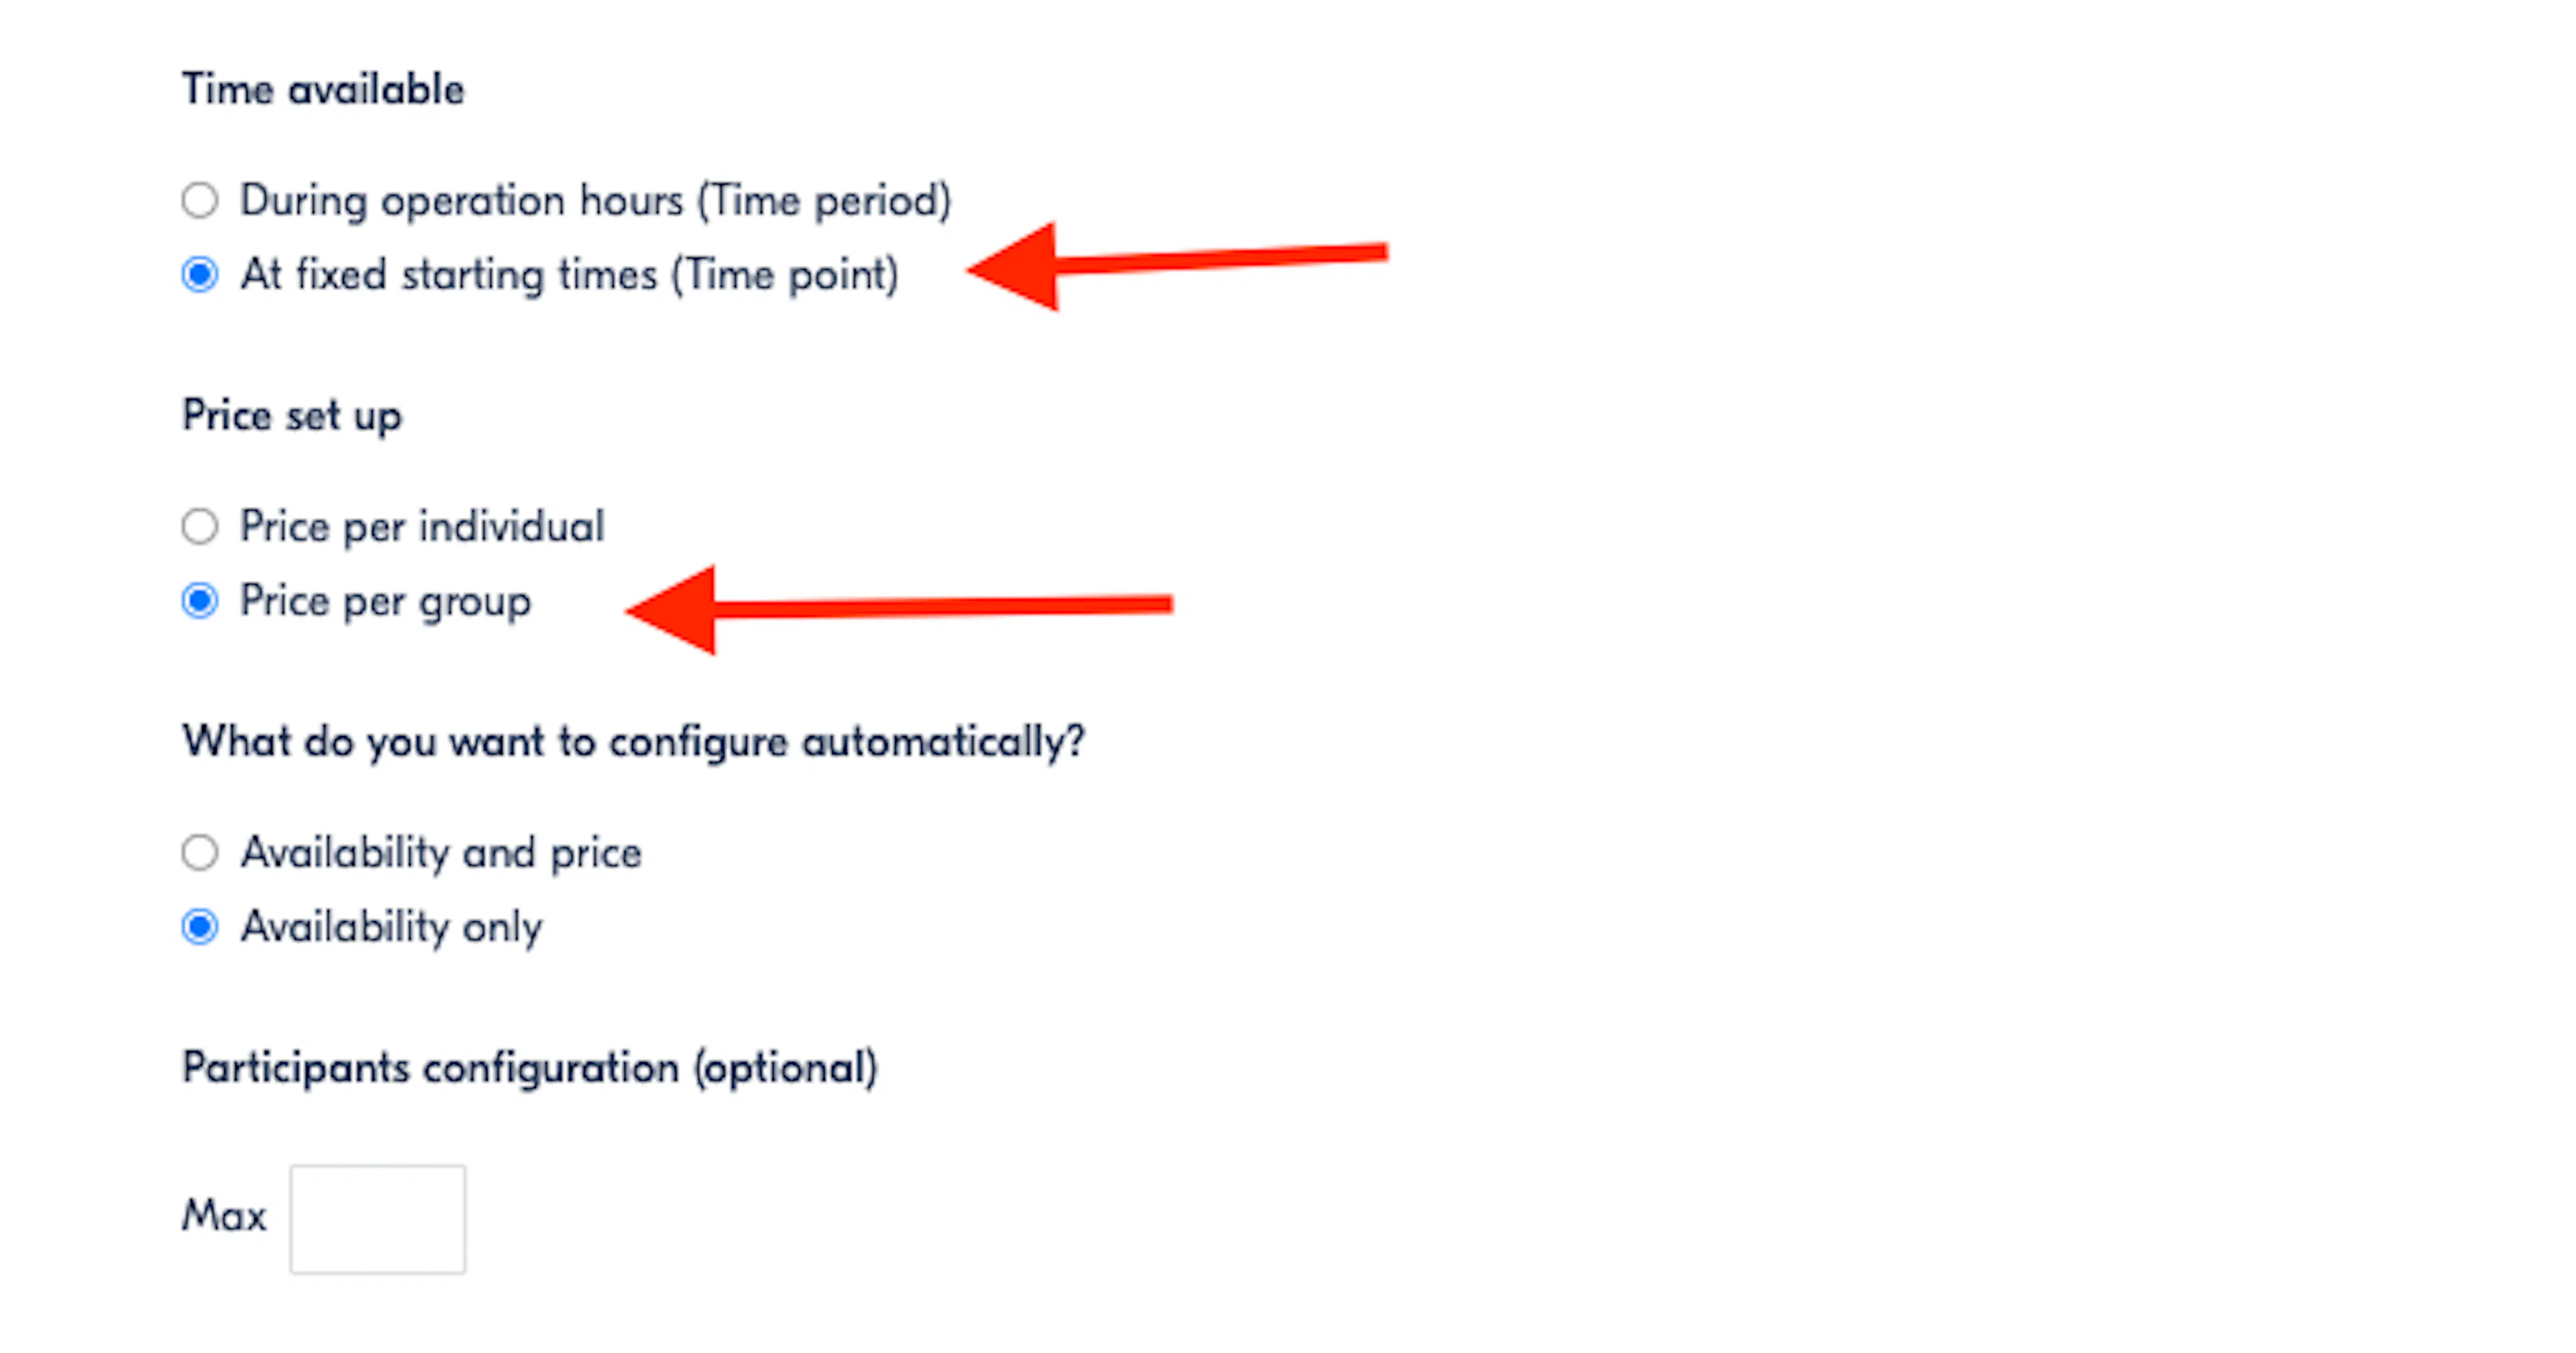
| Question | Answer |
|---|---|
| Time available | At fixed starting times (Time point) (changed) |
| Price set up | Price per group |
| What do you want to configure automatically? | Availability only |
| Participants configuration (optional) | Leave Max empty, or set a limit if your groups have one |
On your site, click the gear icon on the Point / Group package's row:
| Field | Value |
|---|---|
| Availability Type | Time Point |
| Vacancy Reporting | Per category |
Then set the price to Per Group as in the previous type, under Date & Price → Packages → Price Categories → Pricing Type.
To run the test, click Test your integration. On success, Time point for Groups reads Completed, and with it every row in the table.
Note: If the test fails, check that Time Point on the trip goes with At fixed starting times in the portal, and that you used the right trip's product number.
Confirming All Tests Passed
Reload the page. Every row now has a green tick, and Set up your production configuration is unlocked.
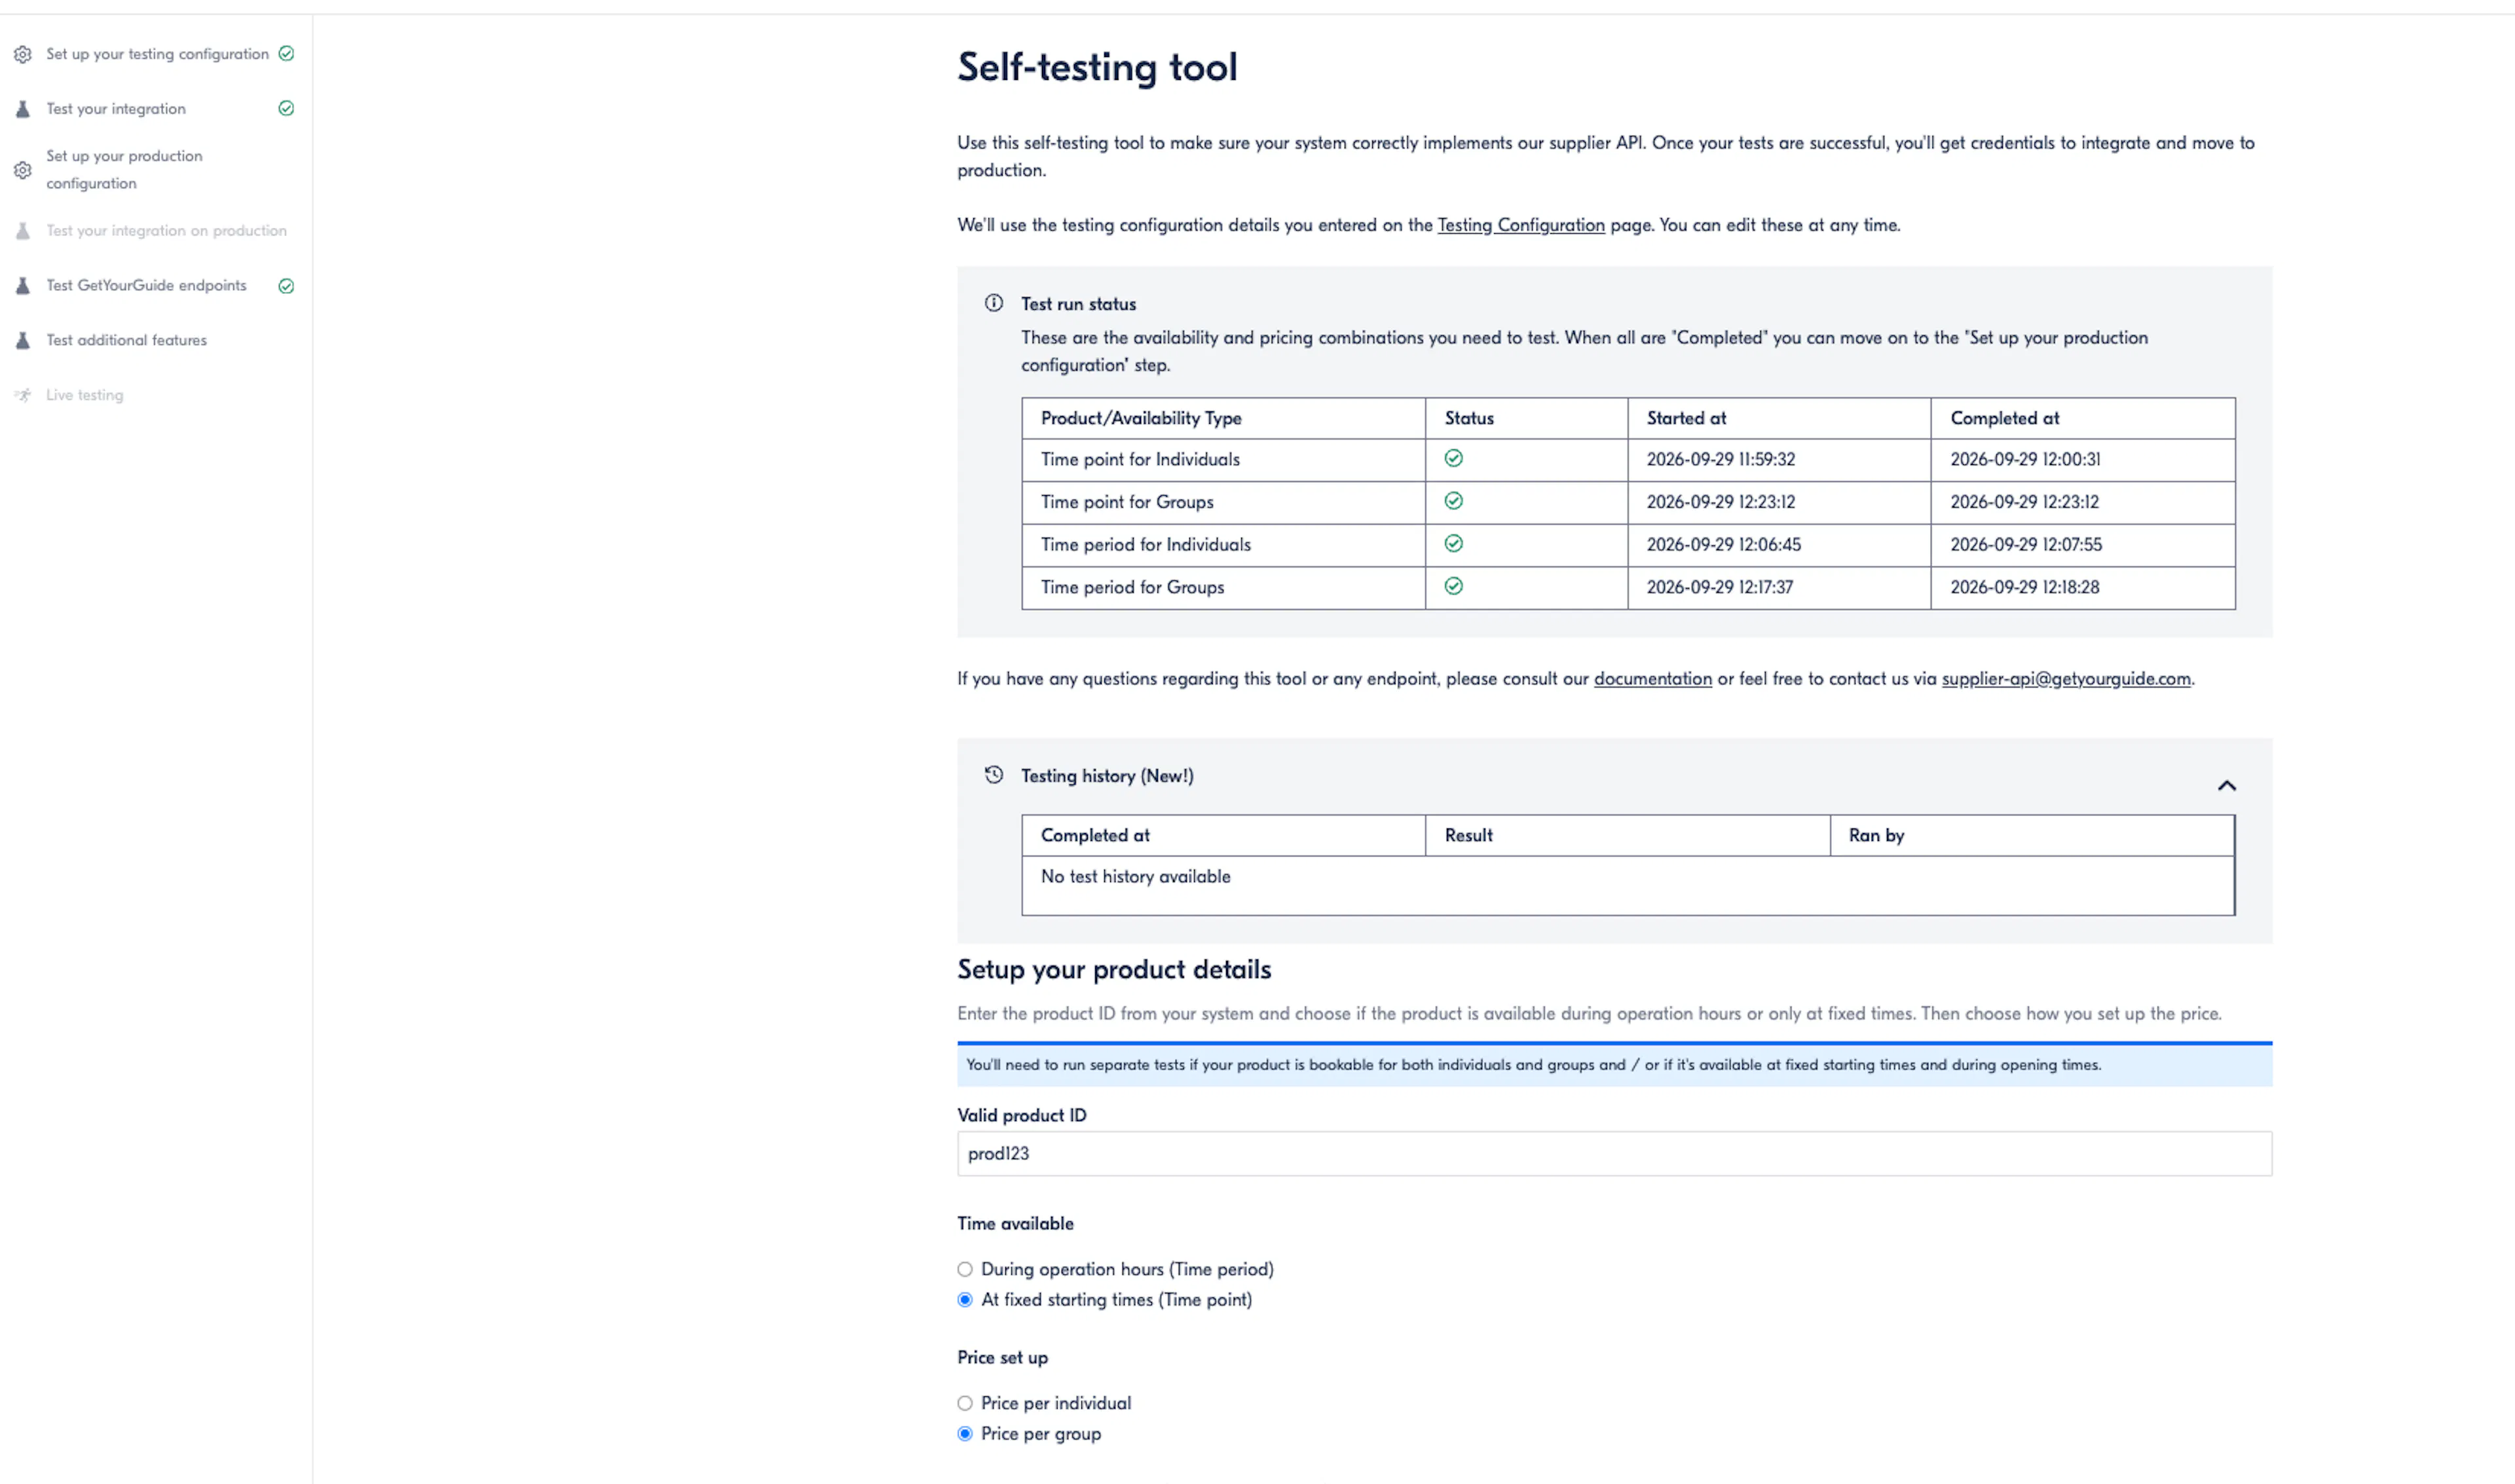
Everything so far ran against your staging site. Next, you repeat the setup for your live one.
Moving to Your Live Site
Setting Up the Production Configuration
Open Set up your production configuration. It is the testing configuration again, pointed at your live site. The fields are the same and only the address changes.
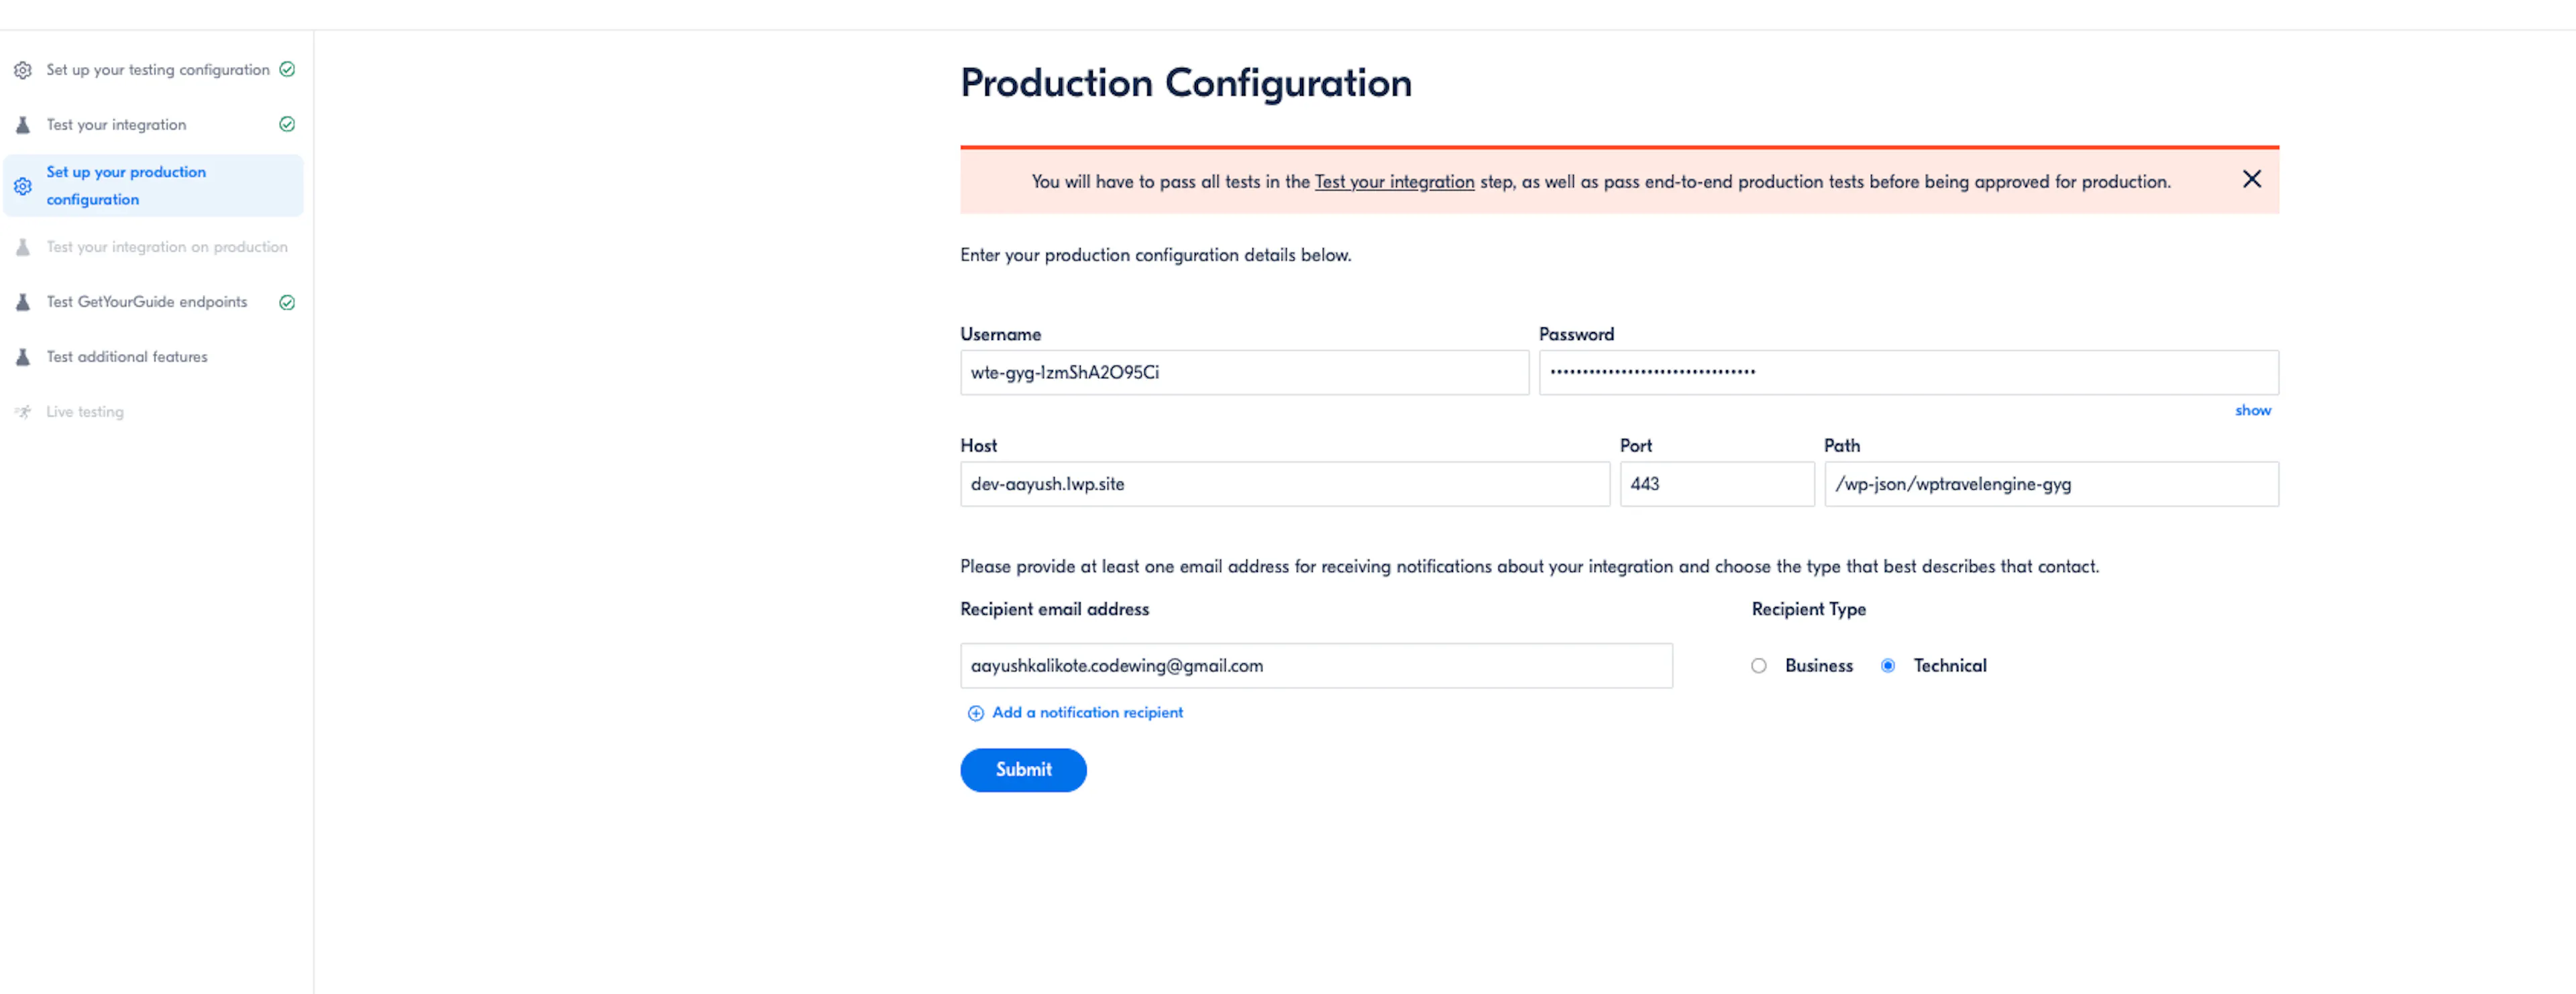
| Field | What to enter |
|---|---|
| Username | The Inbound Key from your live site's plugin settings |
| Password | The Inbound Secret from your live site |
| Host | Your live web address, for example example.com |
| Port | 443 |
| Path | The Endpoint Path from your live site: /wp-json/wptravelengine-gyg/1/ |
| Recipient email address | Where GetYourGuide sends notifications |
| Recipient Type | Technical for a developer, Business for an account owner. Click Add a notification recipient to add more. |
Each WordPress site creates its own login, so your live site's key and secret are not the staging ones. Copy them from the live site's own settings page.
Note: Keep the /1/ at the end of the Path. Without it, GetYourGuide's requests arrive nowhere.
Click Submit.
Next, turn off Sandbox Mode in your live site's plugin settings. Until you do, your updates keep going to GetYourGuide's test environment and your live listing never changes. See the Sandbox Mode section of the settings guide.
Tip: Reload the portal page after you submit. The next step often still looks locked until you do. The page is out of date, and your submission went through.
This is setup, not going live. That comes later.
Testing Your Live Site
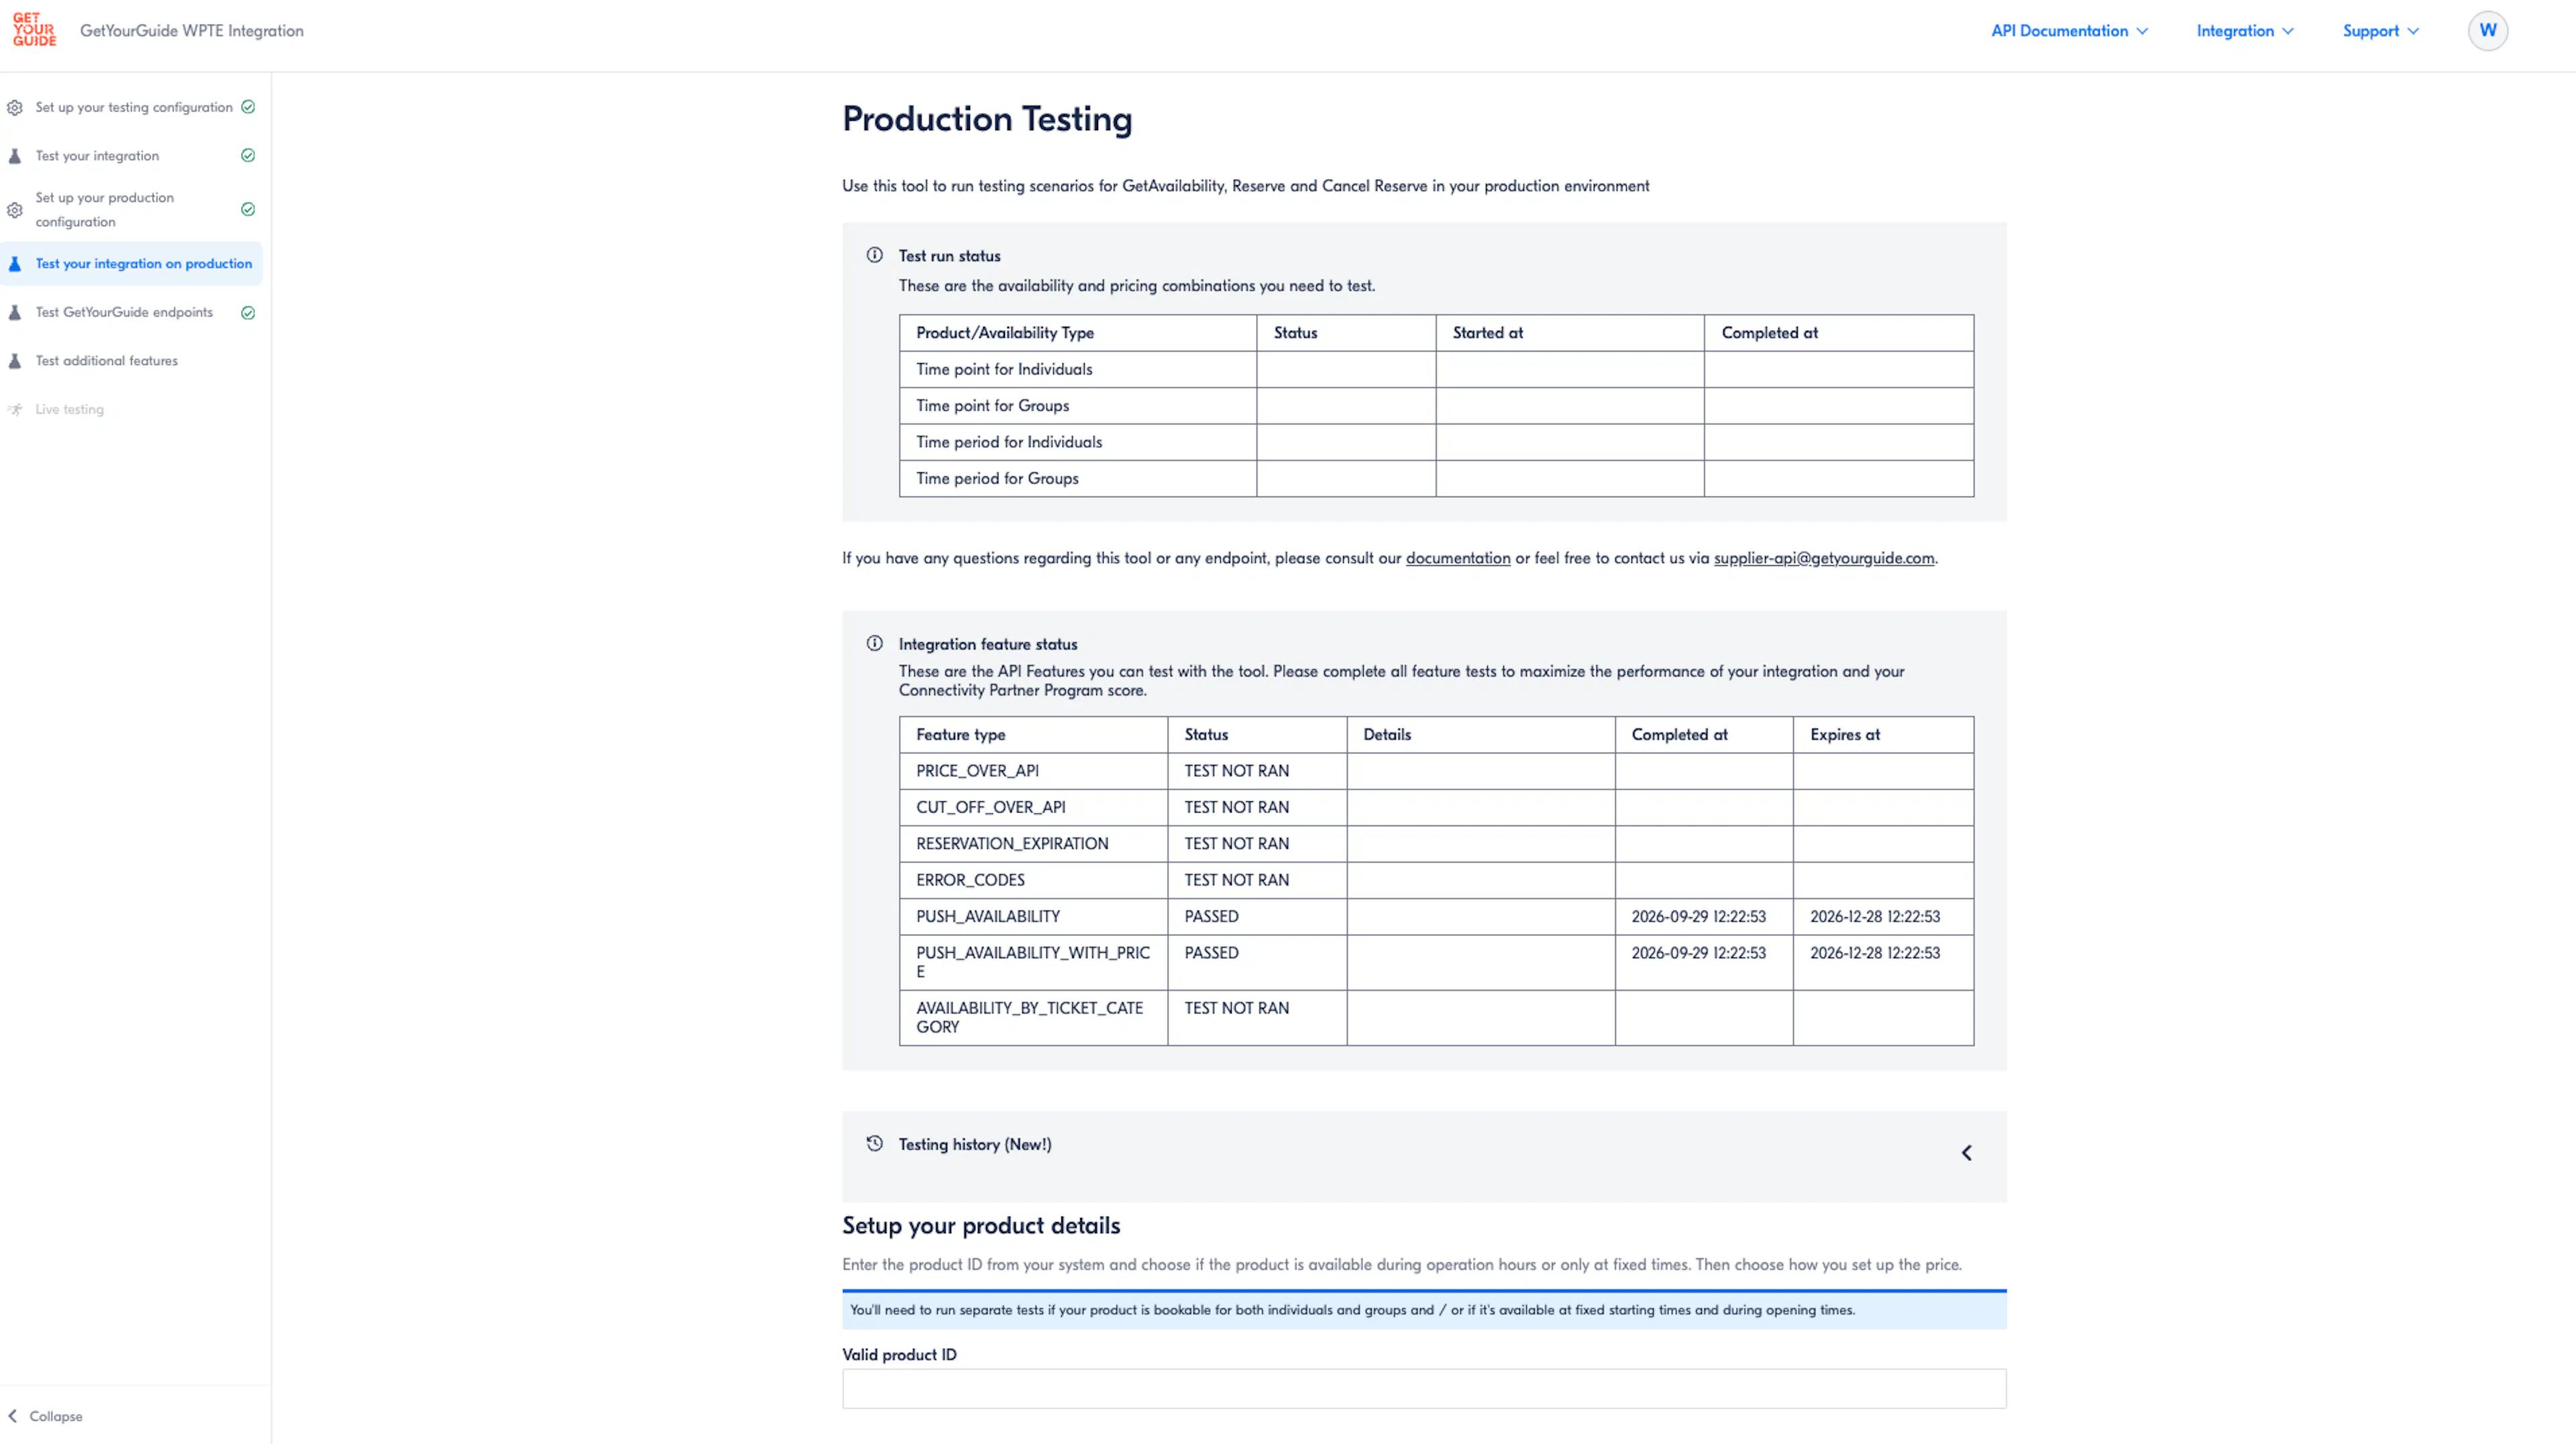
This repeats the self-test against your live site, with the same table, product types and form. Work through whichever types apply, with portal settings on one side, package settings on the other and Test your integration after each. Go back to Running the Self-Test if you need the detail.
Two things differ:
- Your practice trip must exist on the live site this time. Create the same packages, map each to its product number under Date & Price > Packages > GetYourGuide Product Mapping, and set up the timezone and dates there too.
- An extra Integration feature status table appears. Those features are optional and not needed to pass this step.
When every row reads Completed, reload the page.
Skipping the Optional Steps
Test GetYourGuide endpoints and Test additional features do not apply to you. The WP Travel Engine team already completed them when the add-on was built.
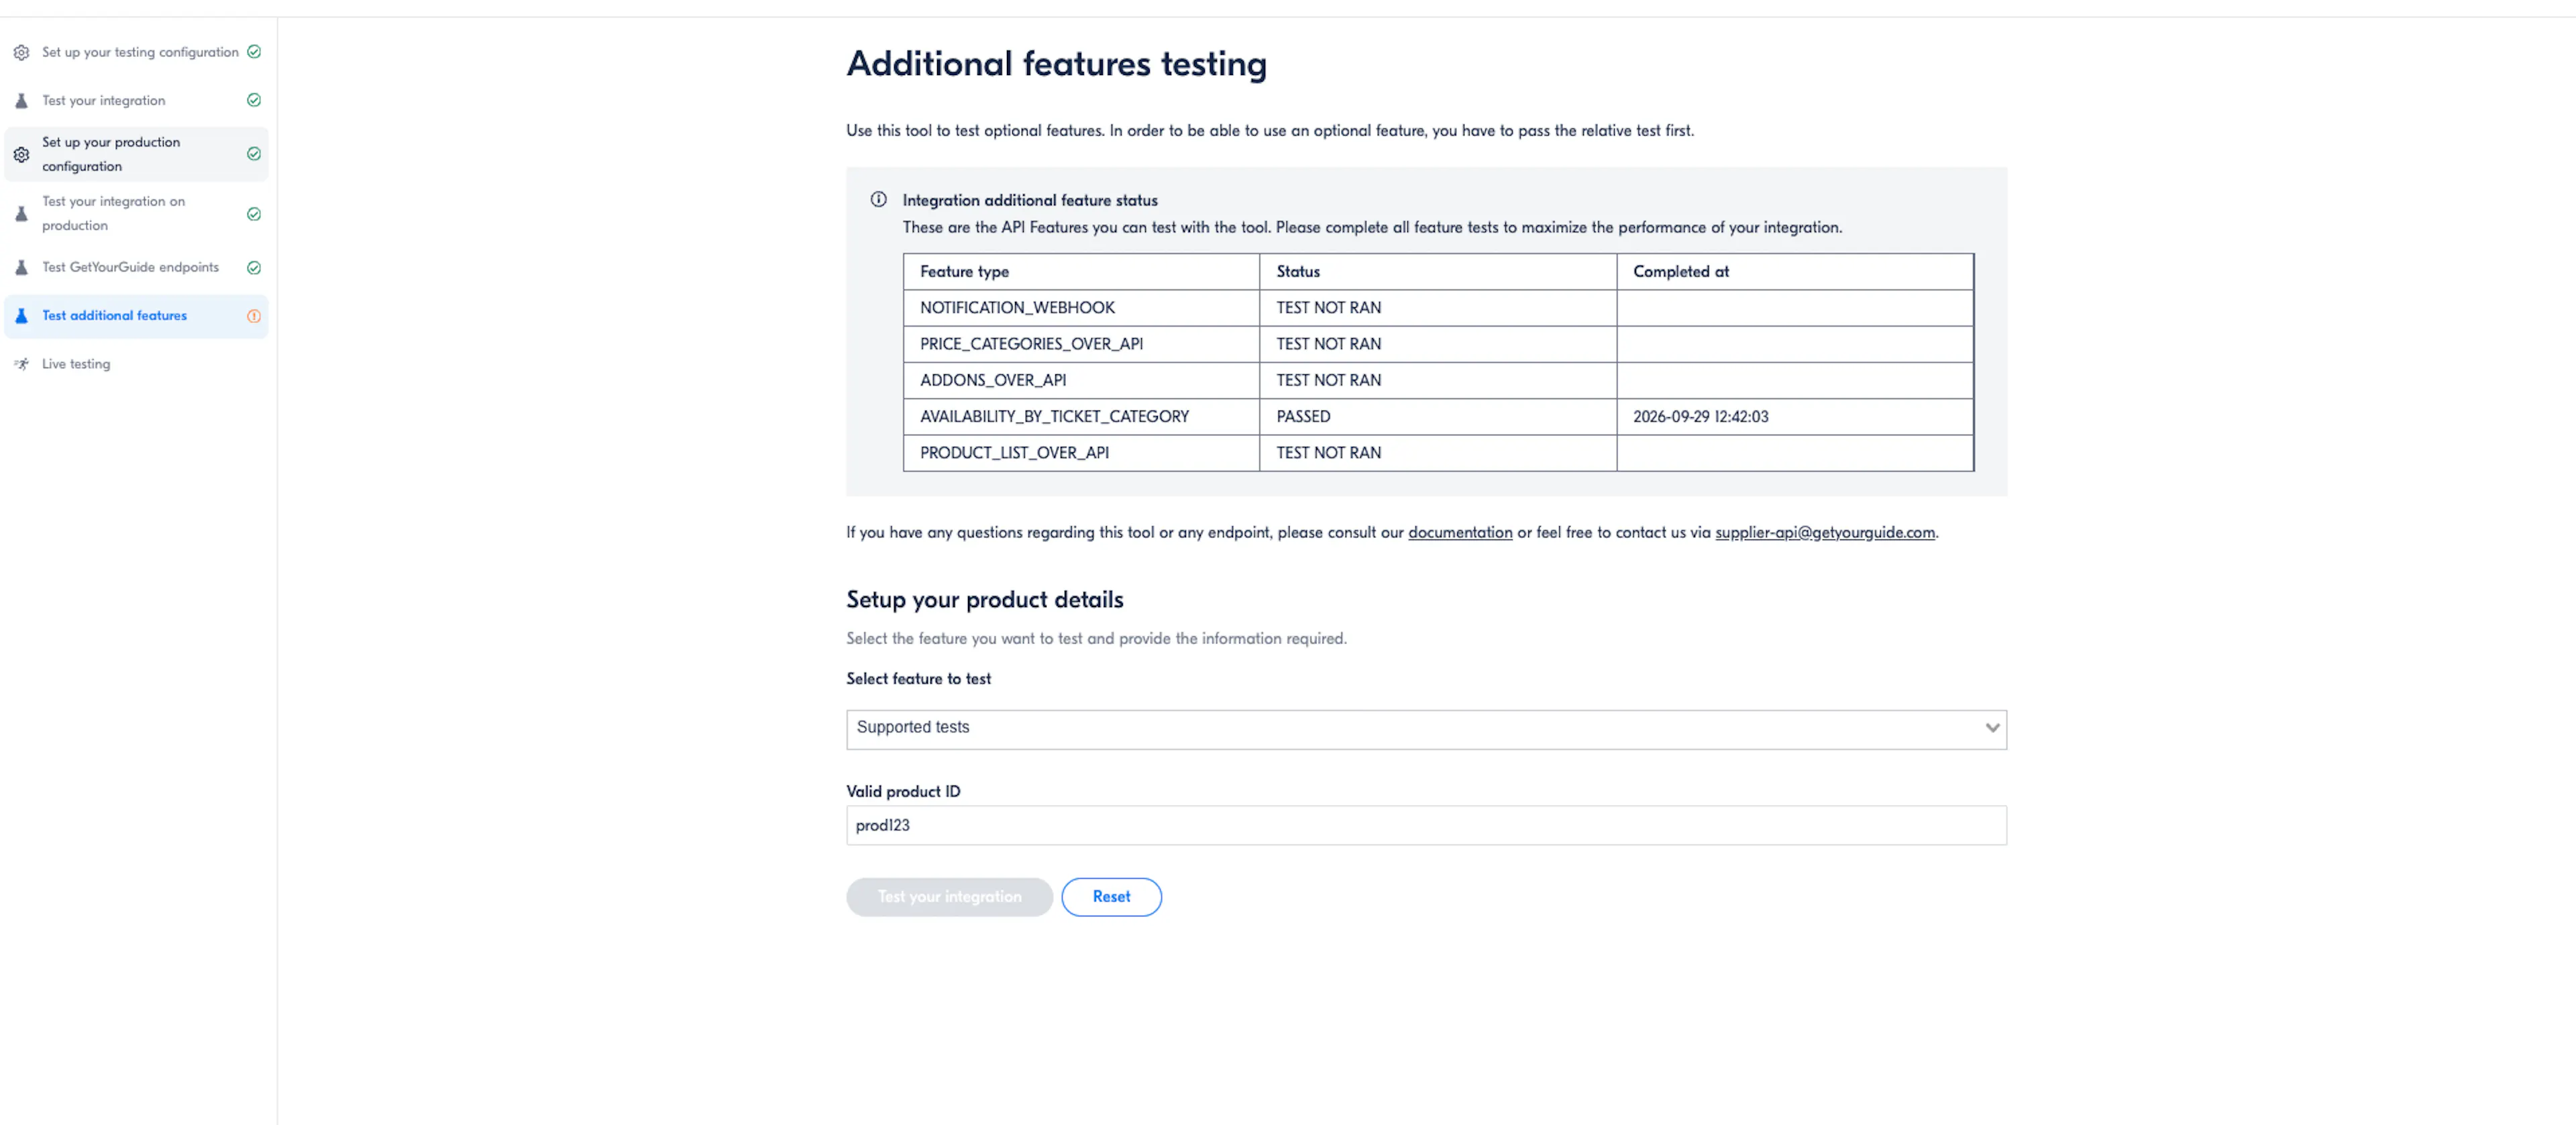
The features listed are optional extras that improve your standing in GetYourGuide's partner program. You do not need them to start selling. Go straight to Live testing.
Live Testing and Going Live
You need one live GetYourGuide product option for each type you sell, each linked to a matching package. The form has a row for each type:
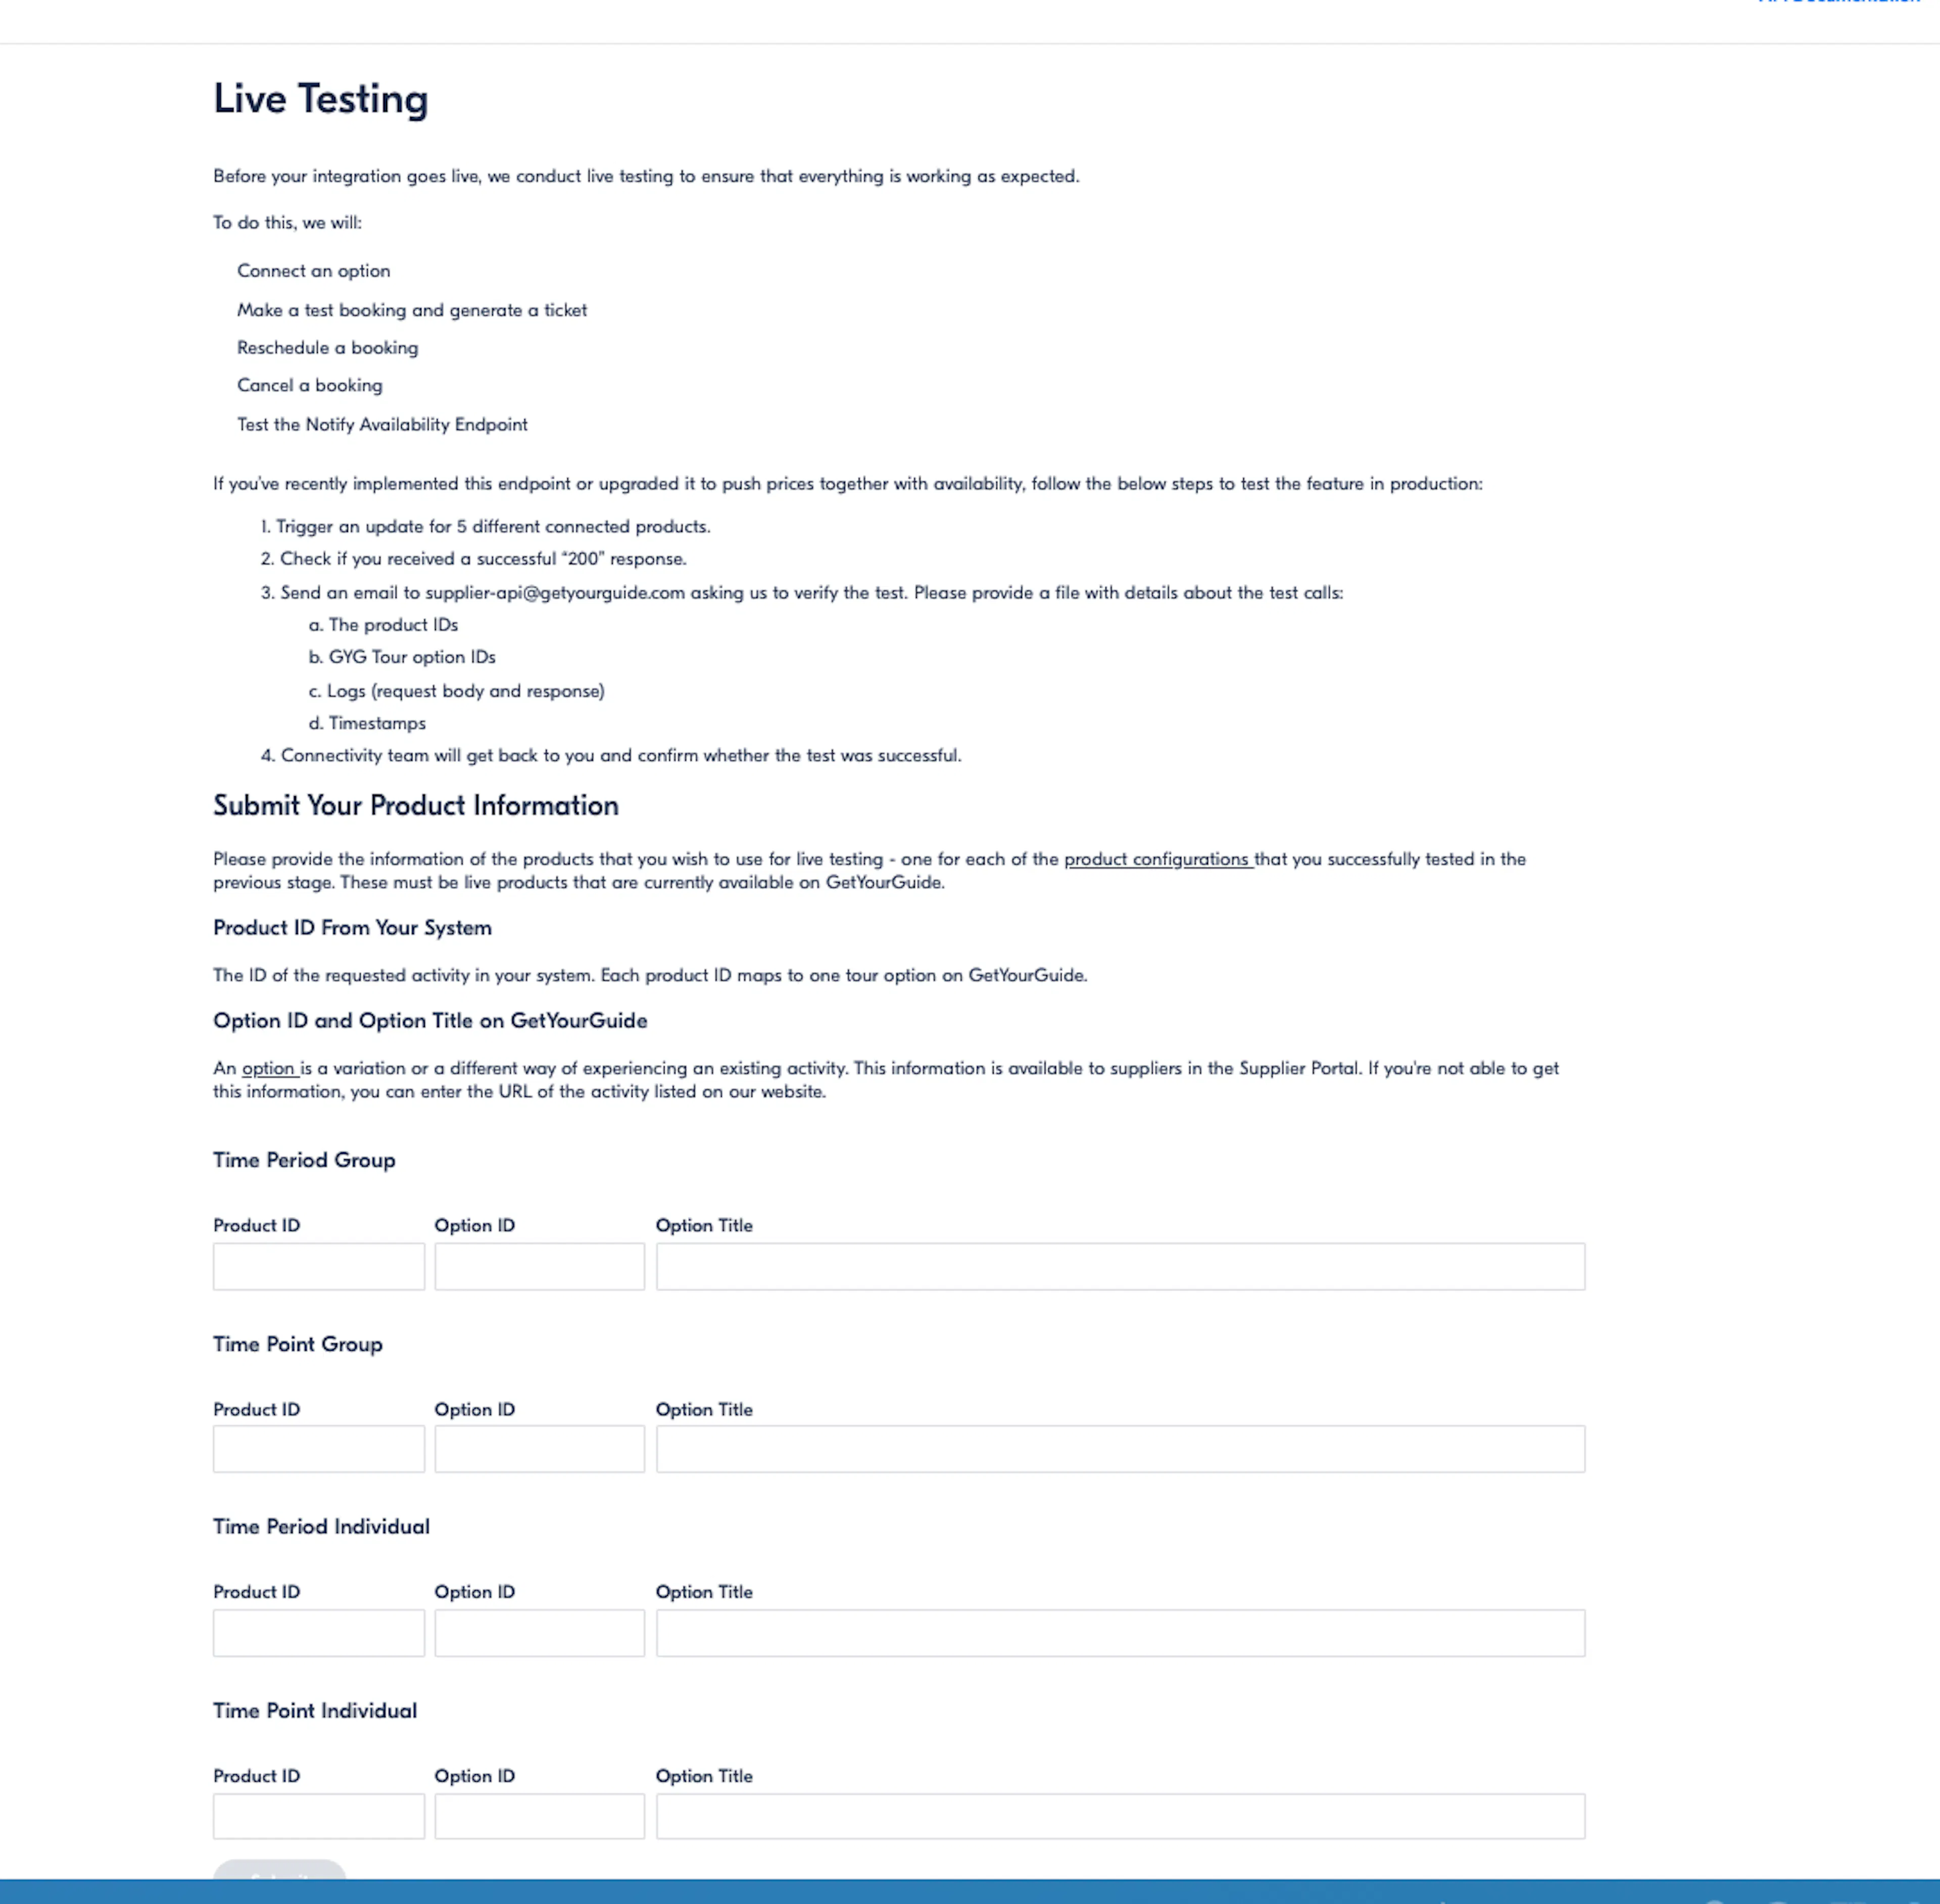
GetYourGuide connects a product, makes a test booking and issues a ticket, moves it to another date, cancels it, and checks that your site sends availability updates.
What You Need
You need one live GetYourGuide product option for each type you sell, each linked to a matching trip. The form has a row for each type:
- Time Period Individual
- Time Point Individual
- Time Period Group
- Time Point Group
Tip: If you do not sell group departures, fill in the two Individual rows and leave the Group rows empty.
Matching GetYourGuide's Wording
GetYourGuide's supplier portal does not say "time point" and "time period". This causes more mistakes than anything else in the setup.
| On your site | On GetYourGuide | What the customer sees |
|---|---|---|
| Time Point | Time slots | They pick a specific departure time |
| Time Period | Opening hours | They can start any time within a window |
Prices use different words too:
| On your site | On GetYourGuide |
|---|---|
| Pricing Type Per Person | Price per person |
| Pricing Type Per Group | Price per group/vehicle |
Creating the Products on GetYourGuide
In the supplier portal, open your activity and create one option for each type you sell. An option is GetYourGuide's version of a WP Travel Engine package.
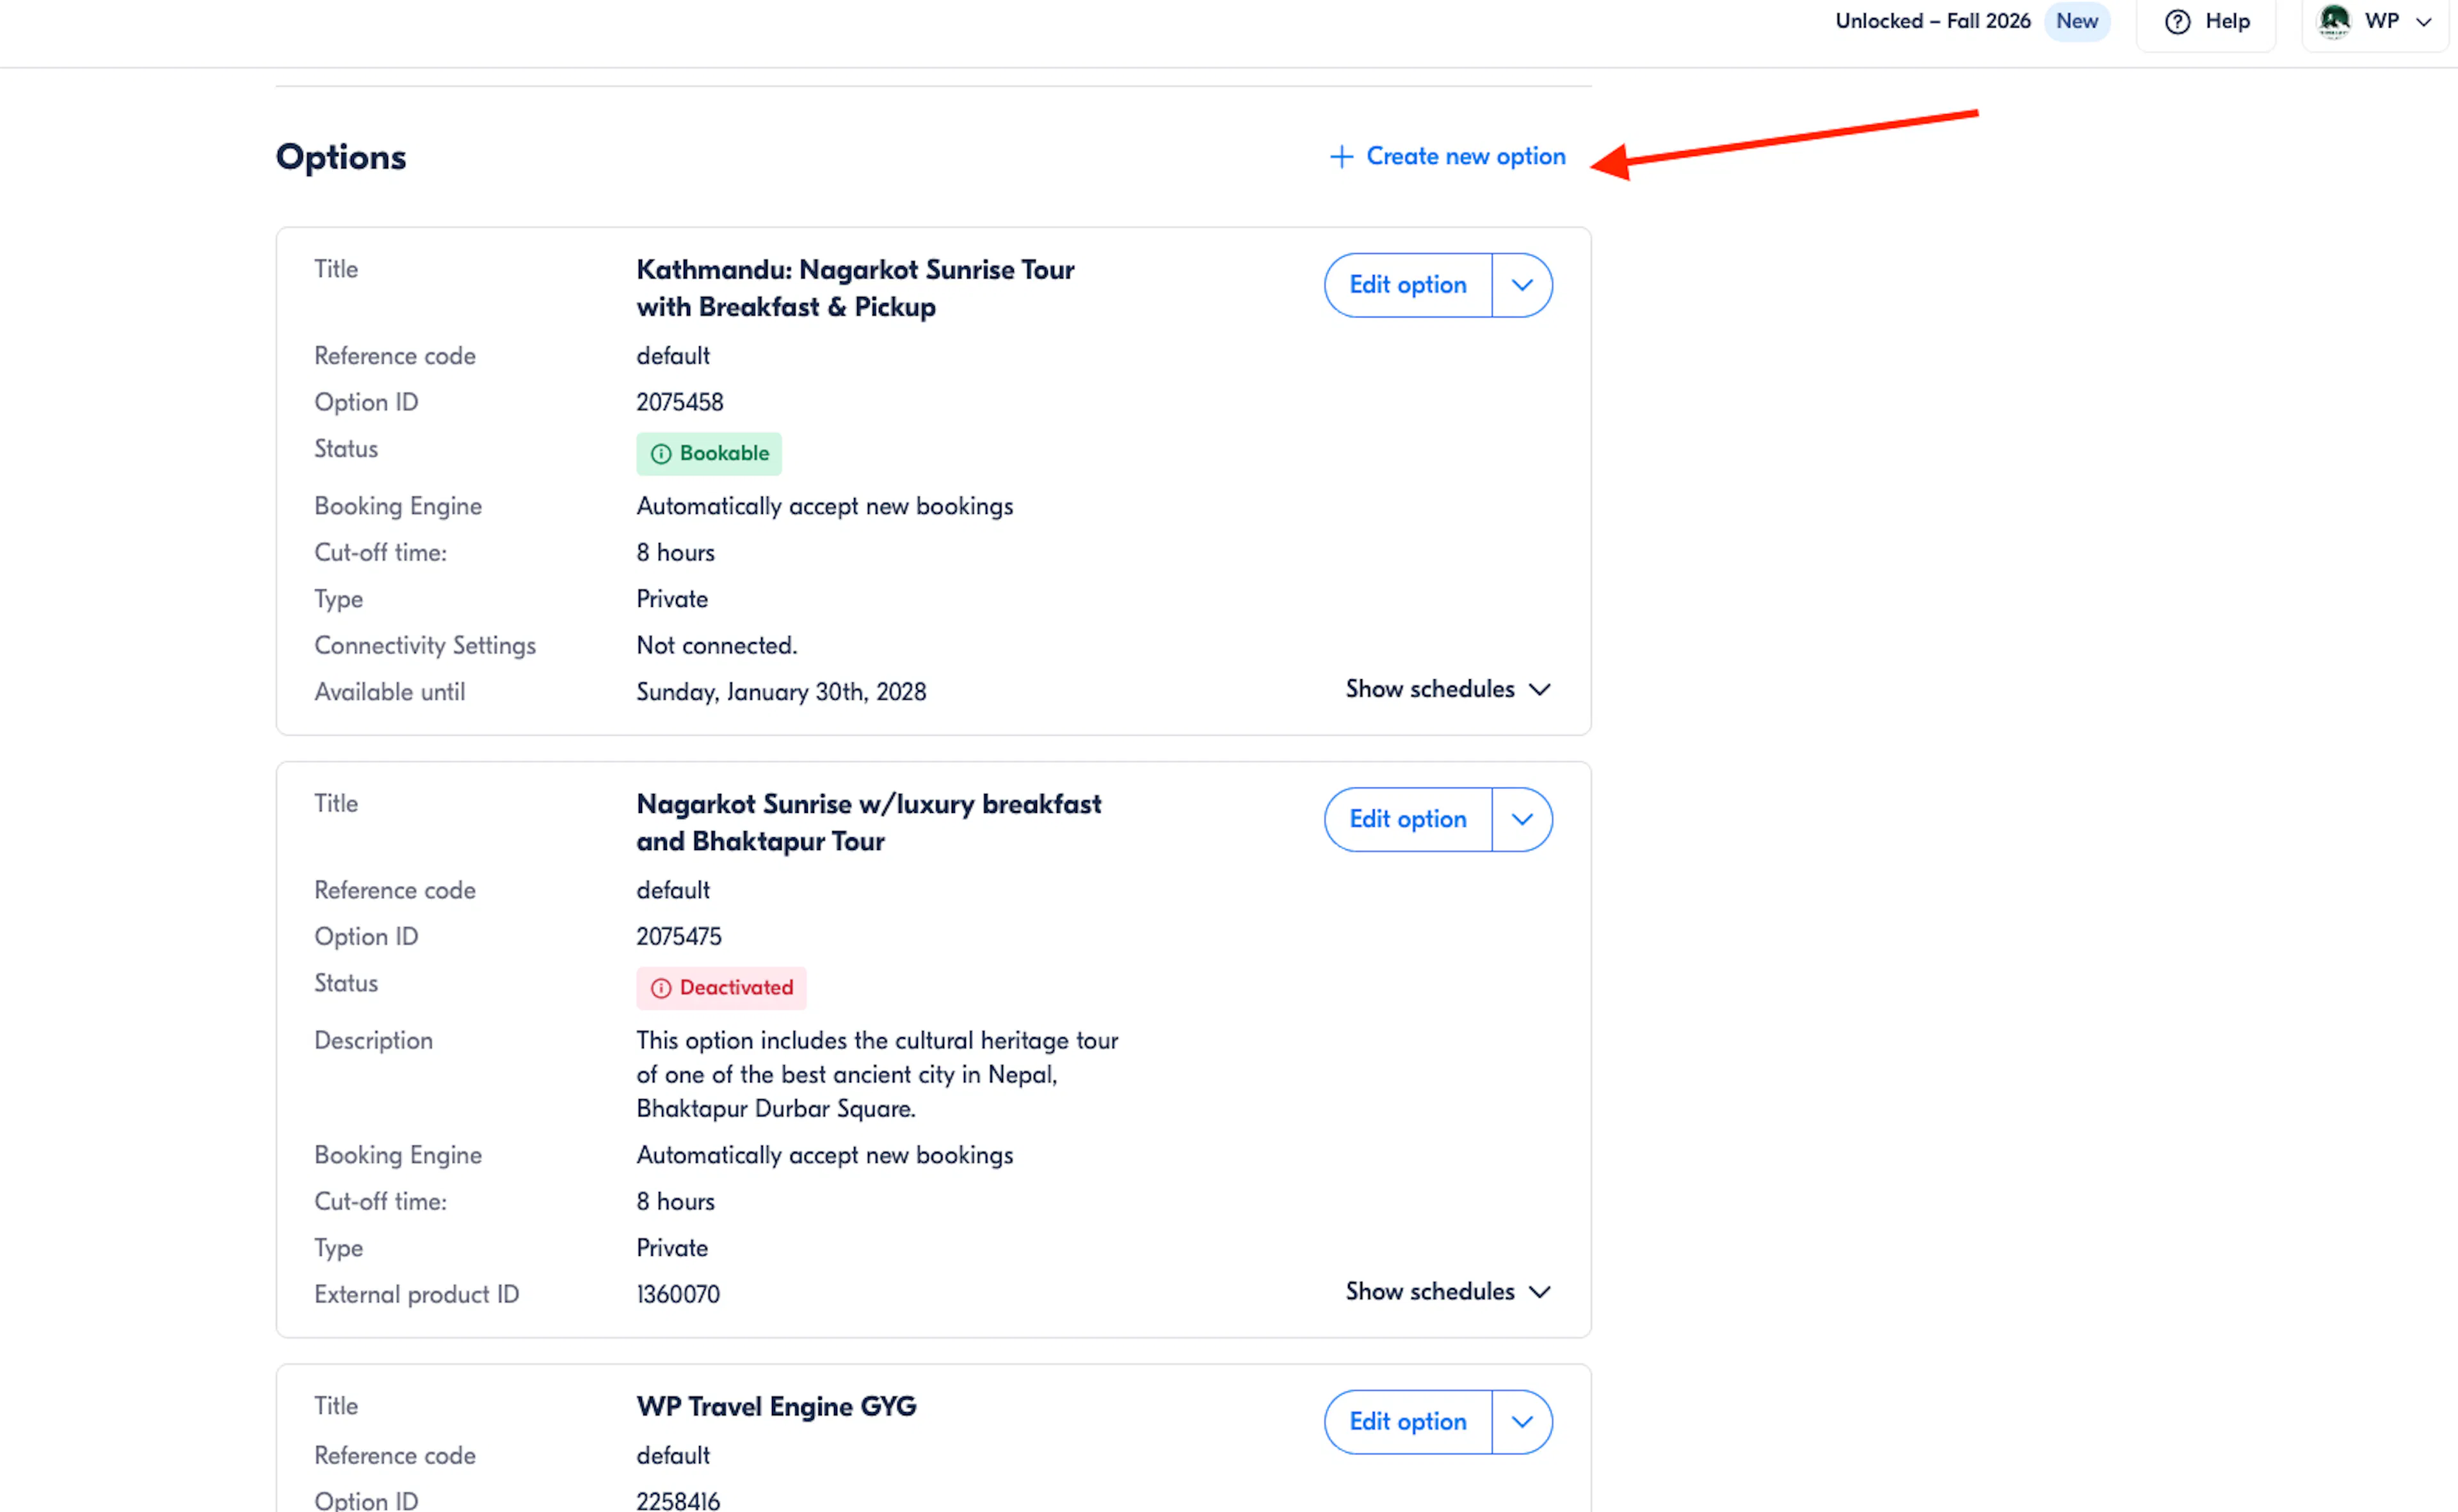
Work through the wizard to Availability & Pricing and answer the two questions to match the type the option represents.
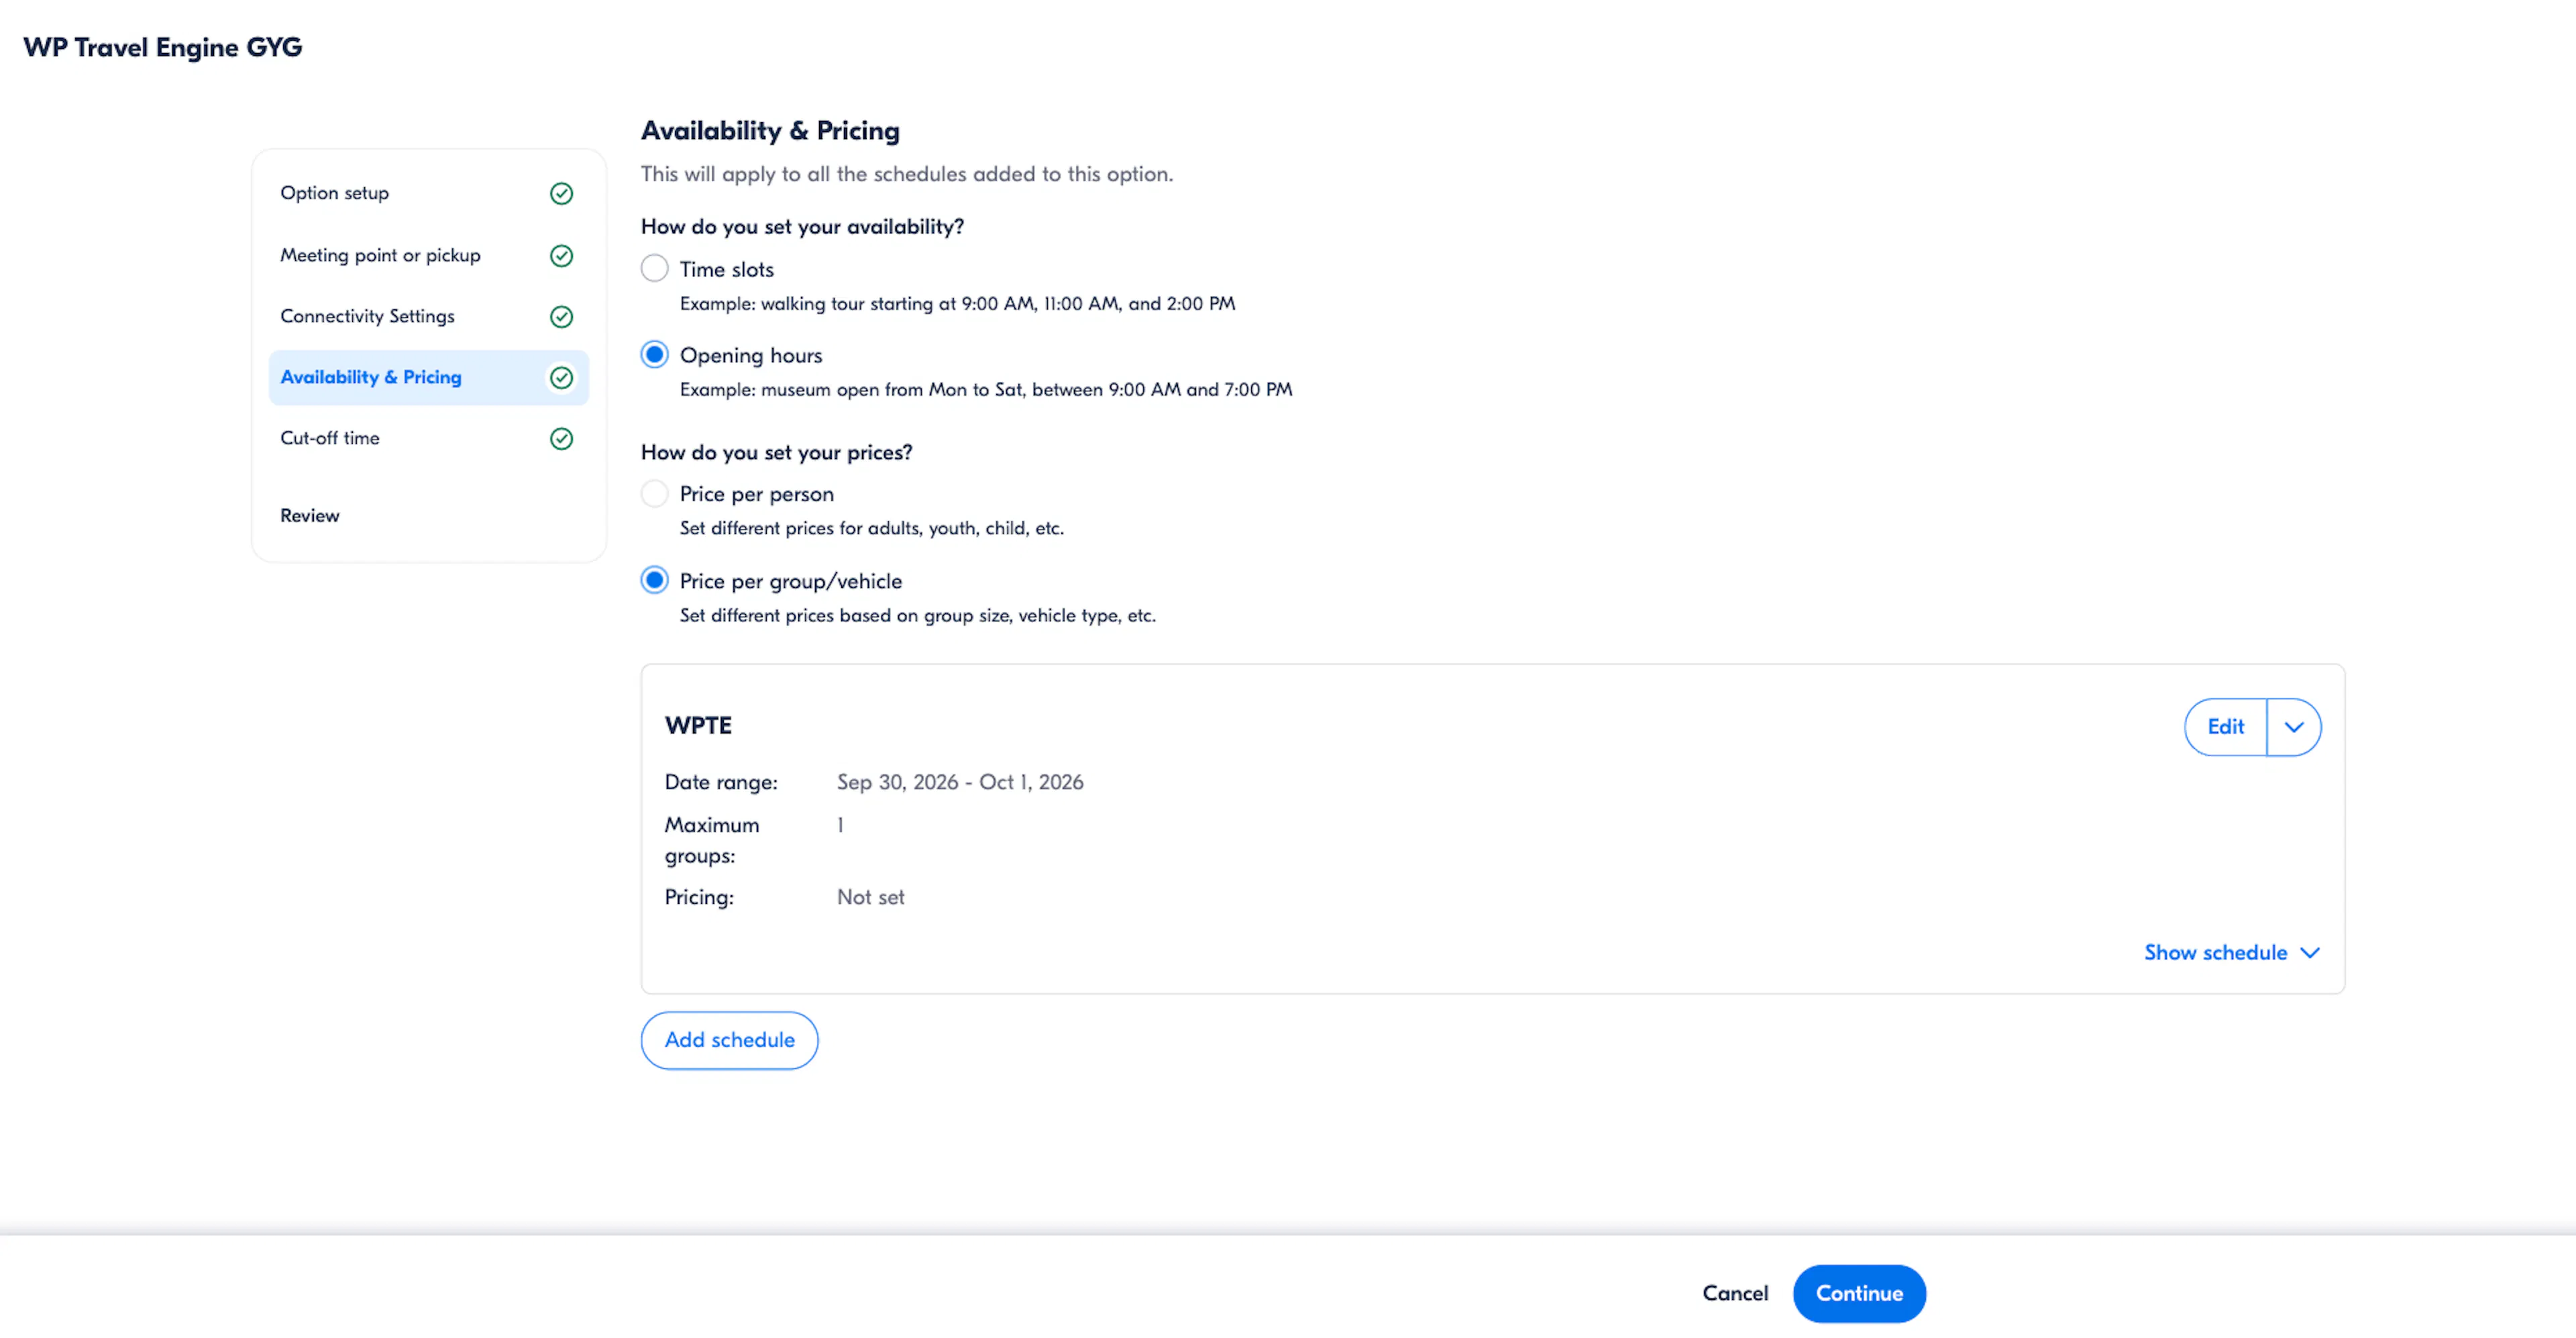
| Option | How do you set your availability? | How do you set your prices? |
|---|---|---|
| Time Point Individual | Time slots | Price per person |
| Time Period Individual | Opening hours | Price per person |
| Time Point Group | Time slots | Price per group/vehicle |
| Time Period Group | Opening hours | Price per group/vehicle |
The screenshot shows Time Period Group, which is opening hours with a group price. Repeat the wizard for the other types and change only those two answers.
Note: Write down each option's Option ID and Title. You need both in a later step.
Linking Each Product to Its Trip Package
- On each trip, under Date & Price > Packages > GetYourGuide Product Mapping,
add a row for each product's trip package. - Use the real product number from GetYourGuide this time, not a practice one.
- Click Save Settings.
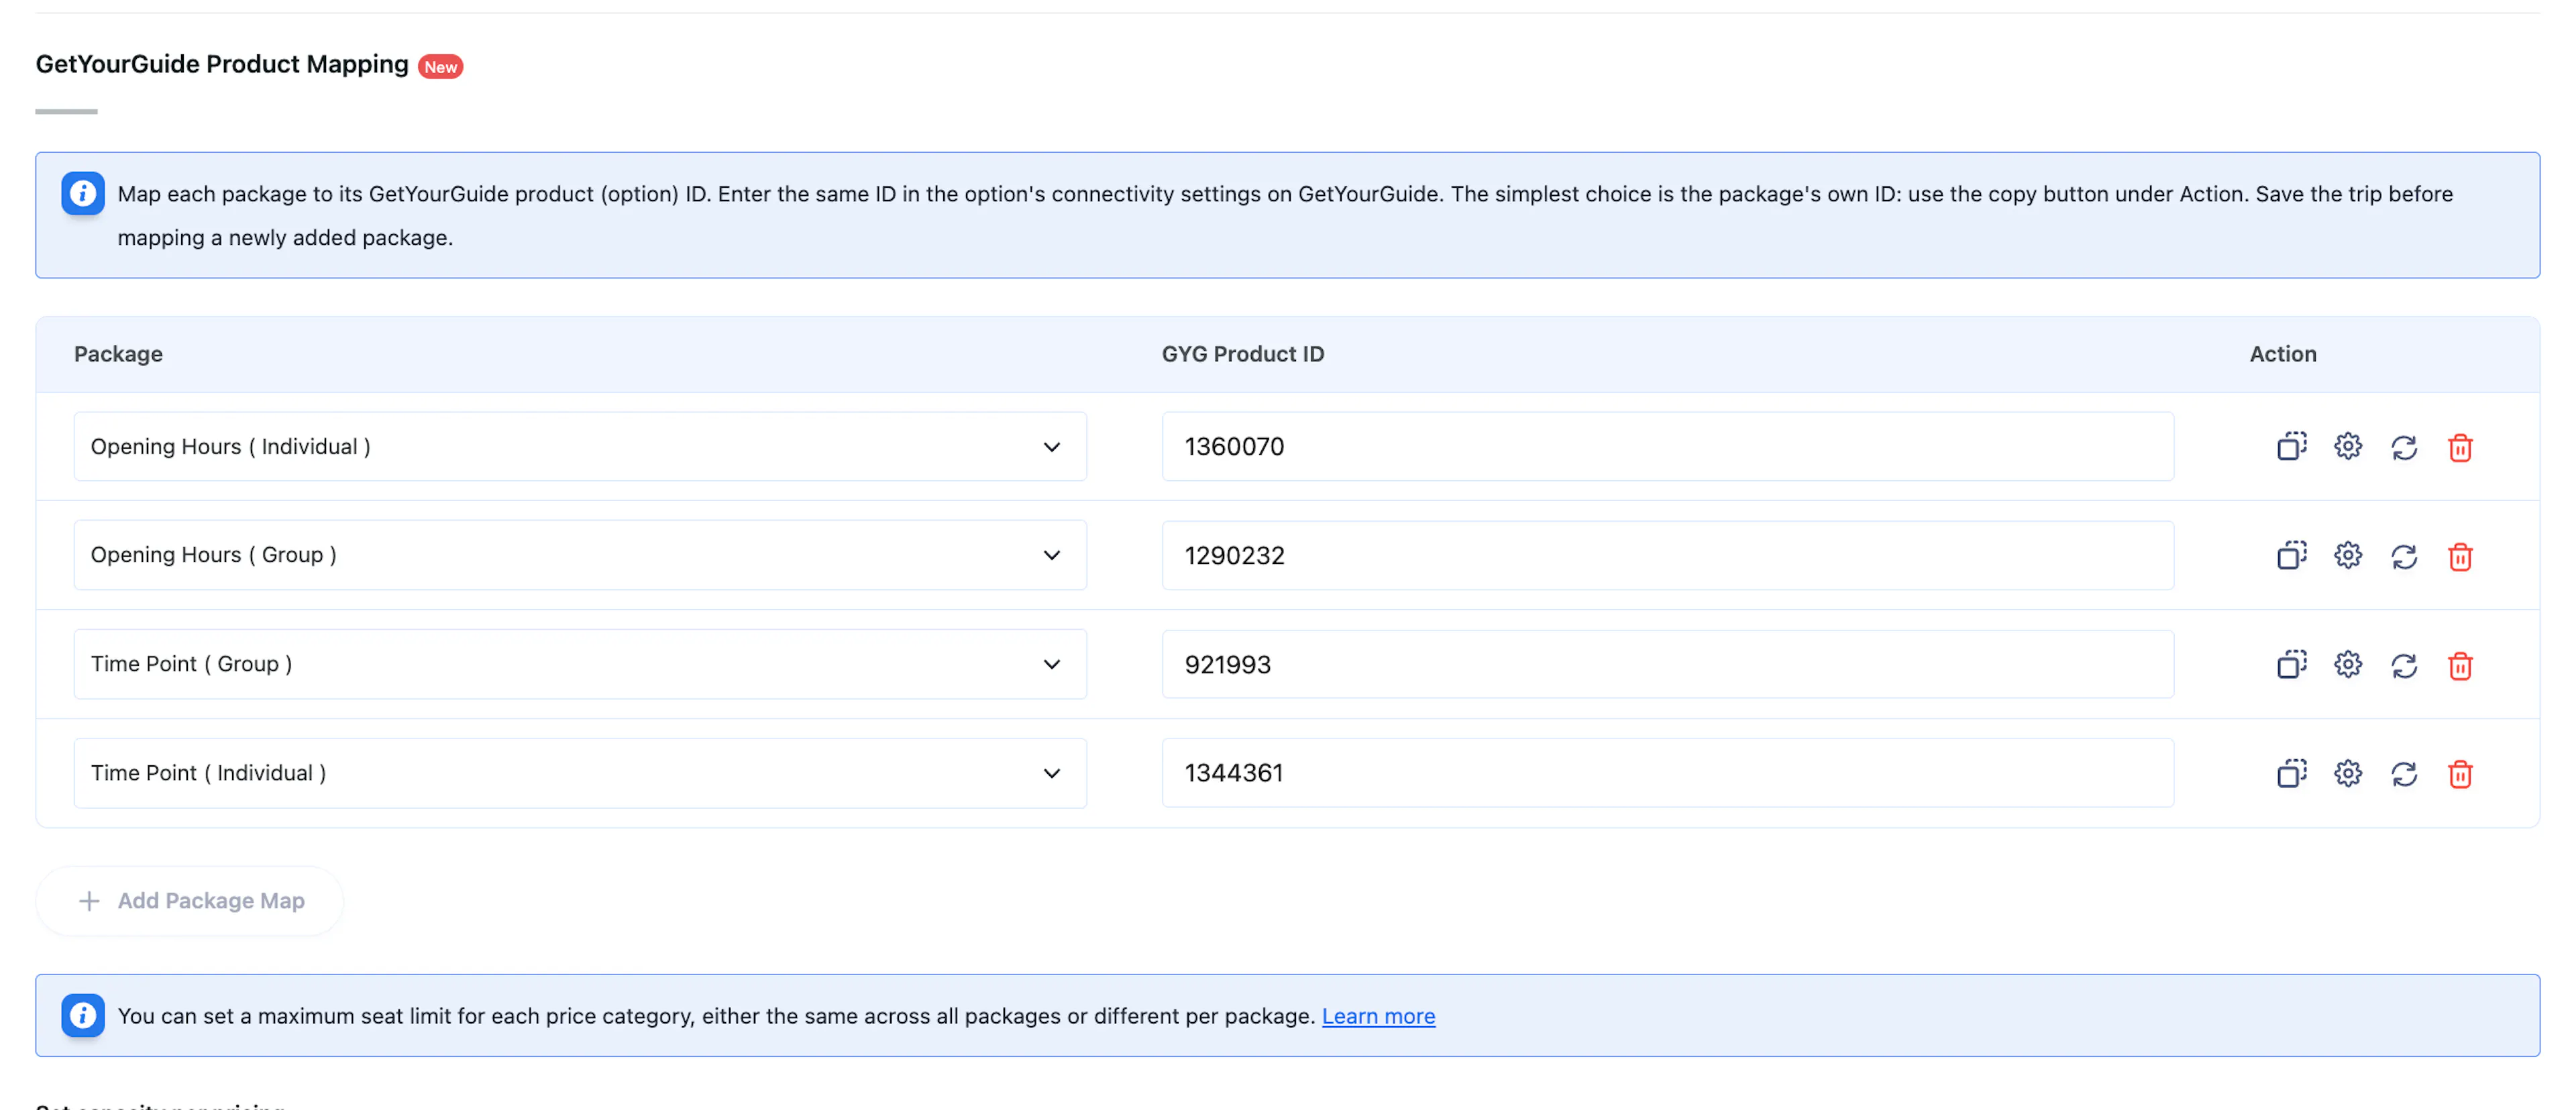
Each trip package must be set up to match the product it is linked to:
| Trip Package | GetYourGuide option | Availability Type | Pricing Type |
|---|---|---|---|
| Time Point (Individual) | Time slots, per person | Time Point | Per Person |
| Opening Hours (Individual) | Opening hours, per person | Time Period | Per Person |
| Time Point (Group) | Time slots, per group | Time Point | Per Group |
| Opening Hours (Group) | Opening hours, per group | Time Period | Per Group |
Note: A trip and its GetYourGuide product must describe the same thing. A trip set to Time Period and linked to an option that uses Time slots fails live testing. Once live, it would also sell the wrong departures.
Submitting Your Product Details
With the products created and the trips package linked, go to https://integrator.getyourguide.com/setup#/live_testing. Fill in one row per type and click Submit.
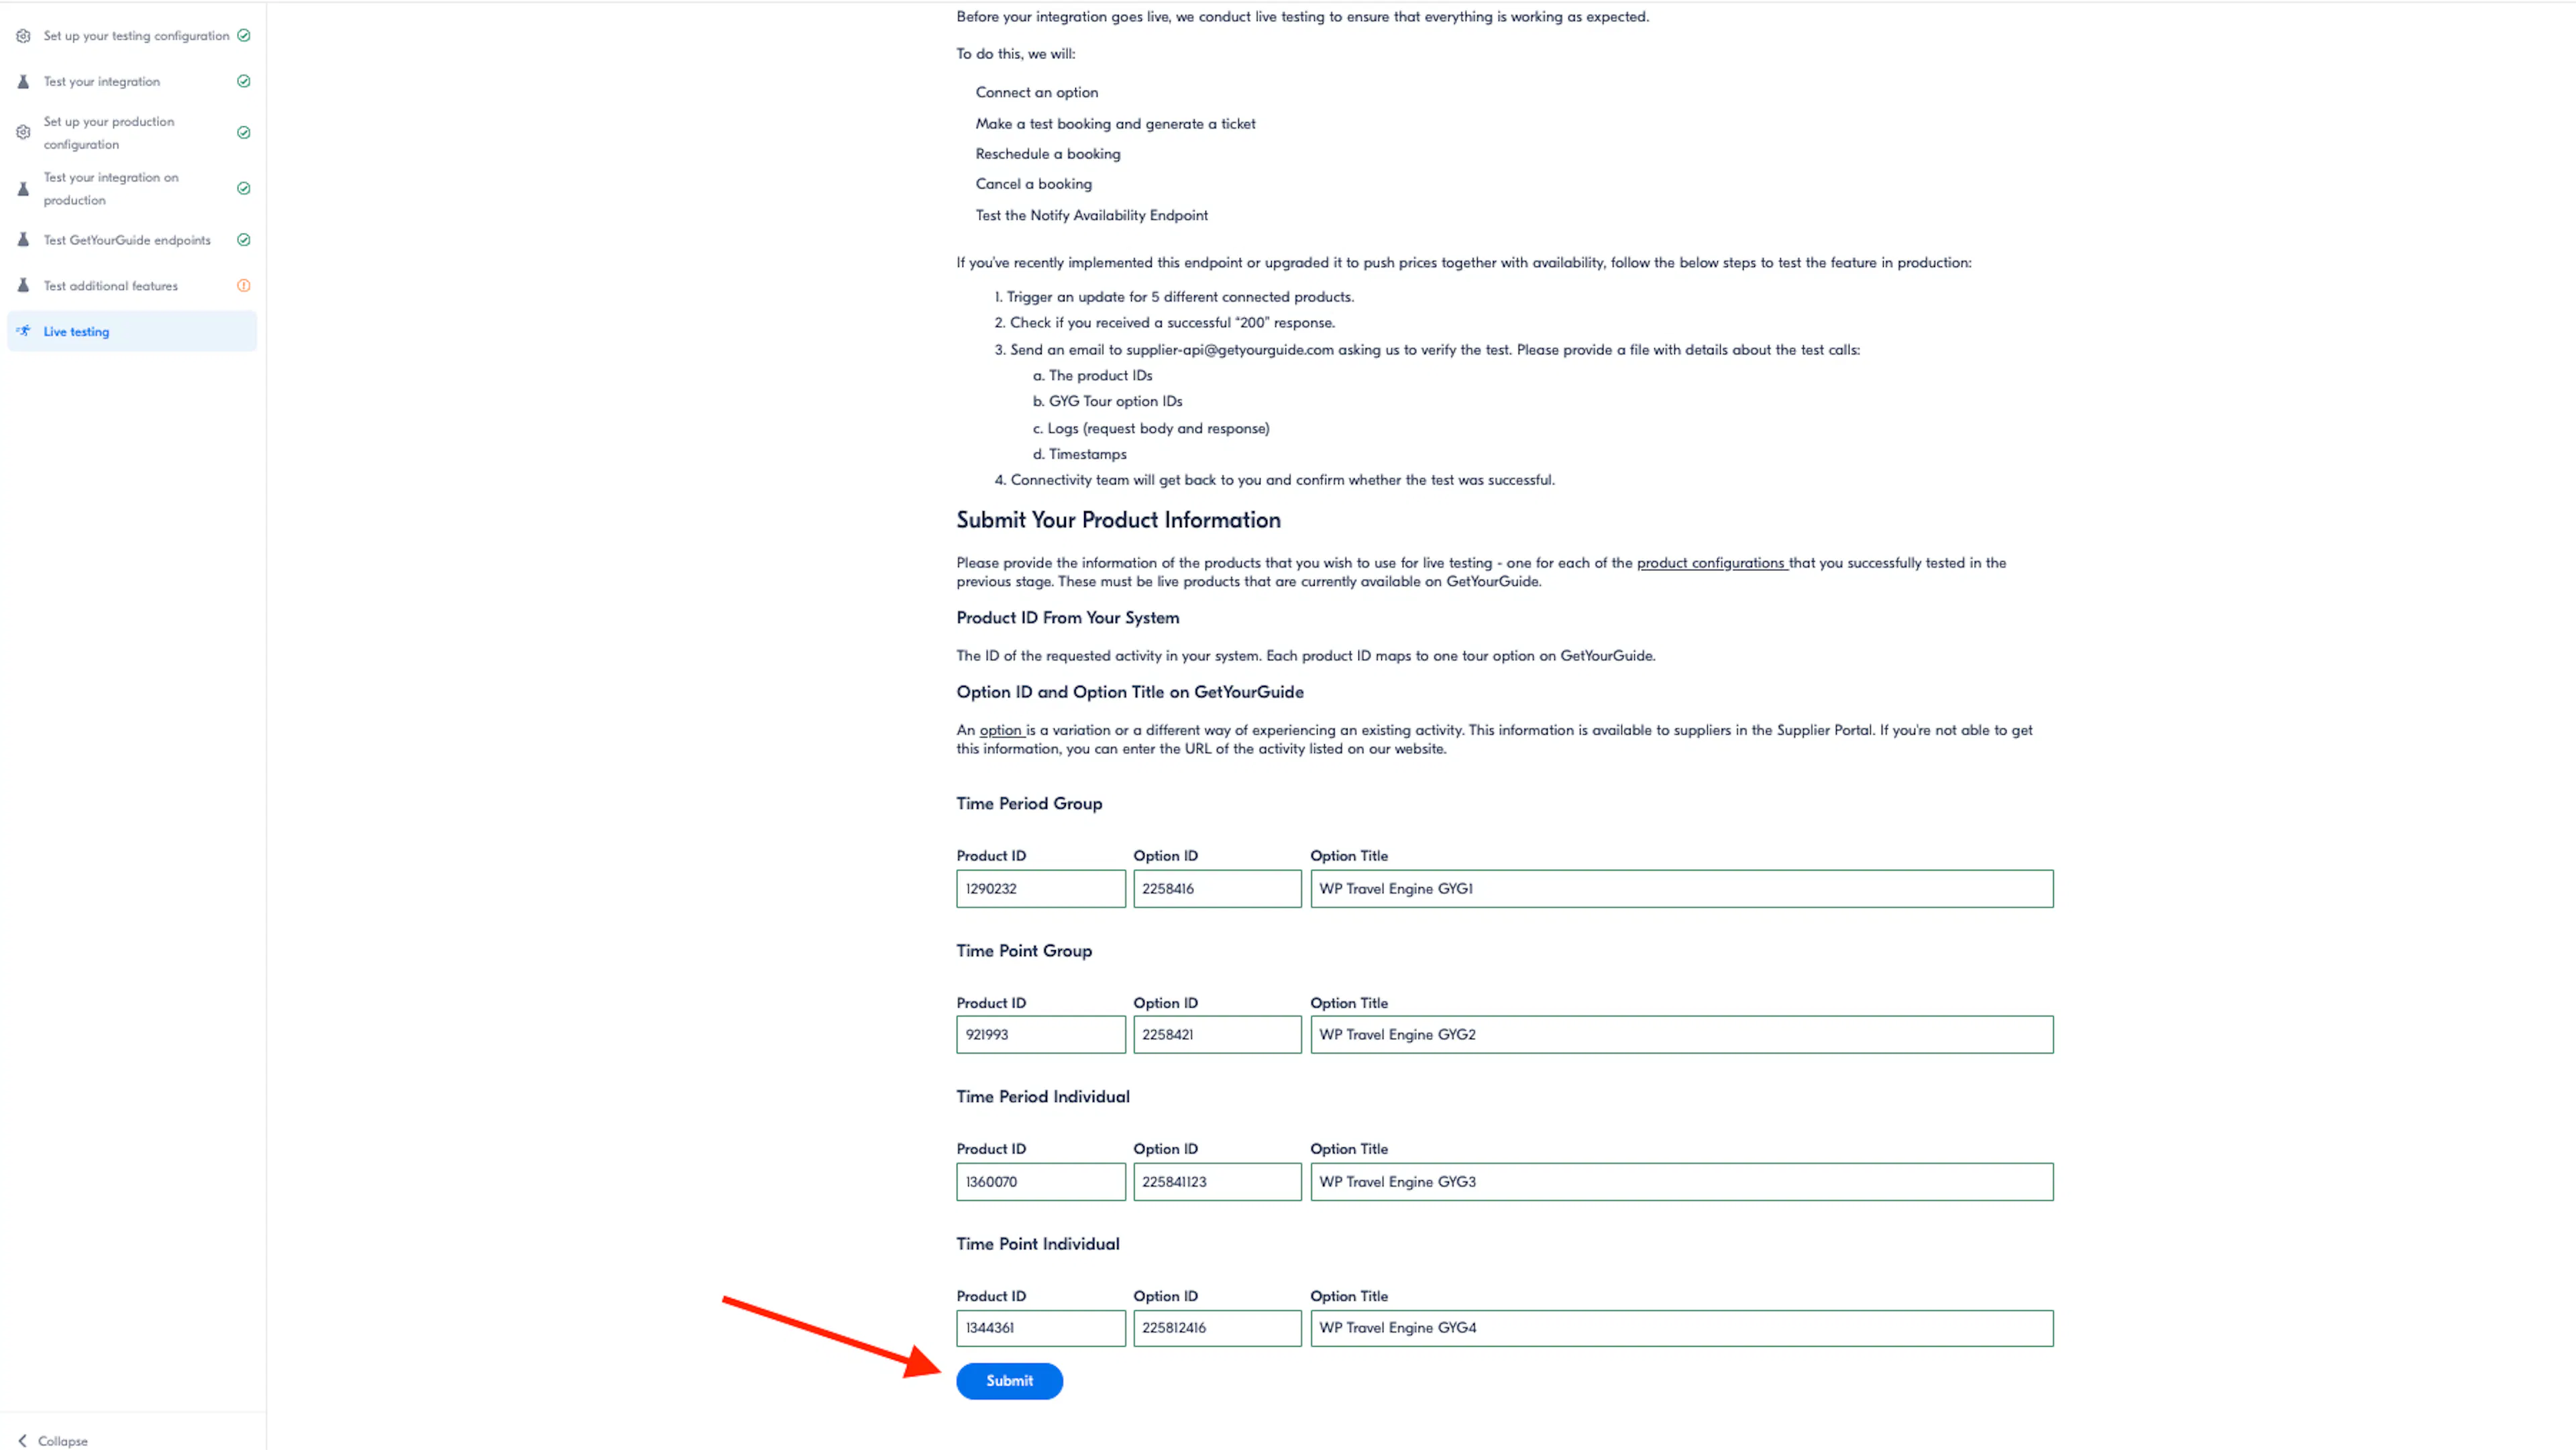
| Field | Where to find it |
|---|---|
| Product ID | The ID from your system, not a GetYourGuide number: the package's GYG Product ID from GetYourGuide Product Mapping. If you used the package ID, copy it with the copy icon under Action. |
| Option ID | The option in the supplier portal |
| Option Title | The option's title, as written in the supplier portal |
Leave the Group rows empty if you do not sell group departures.
Waiting for GetYourGuide
From here, GetYourGuide takes over. Their team runs the live tests and reports back.
- They reply to the email address you signed up with.
- If everything is set up right, expect to hear within about a week. Mistakes mean another round and a longer wait.
- If you hear nothing, email
supplier-api@getyourguide.com.
Once GetYourGuide confirms the tests passed, your connection is approved and appears in their supplier portal as a reservation system.
Adding Products After Approval
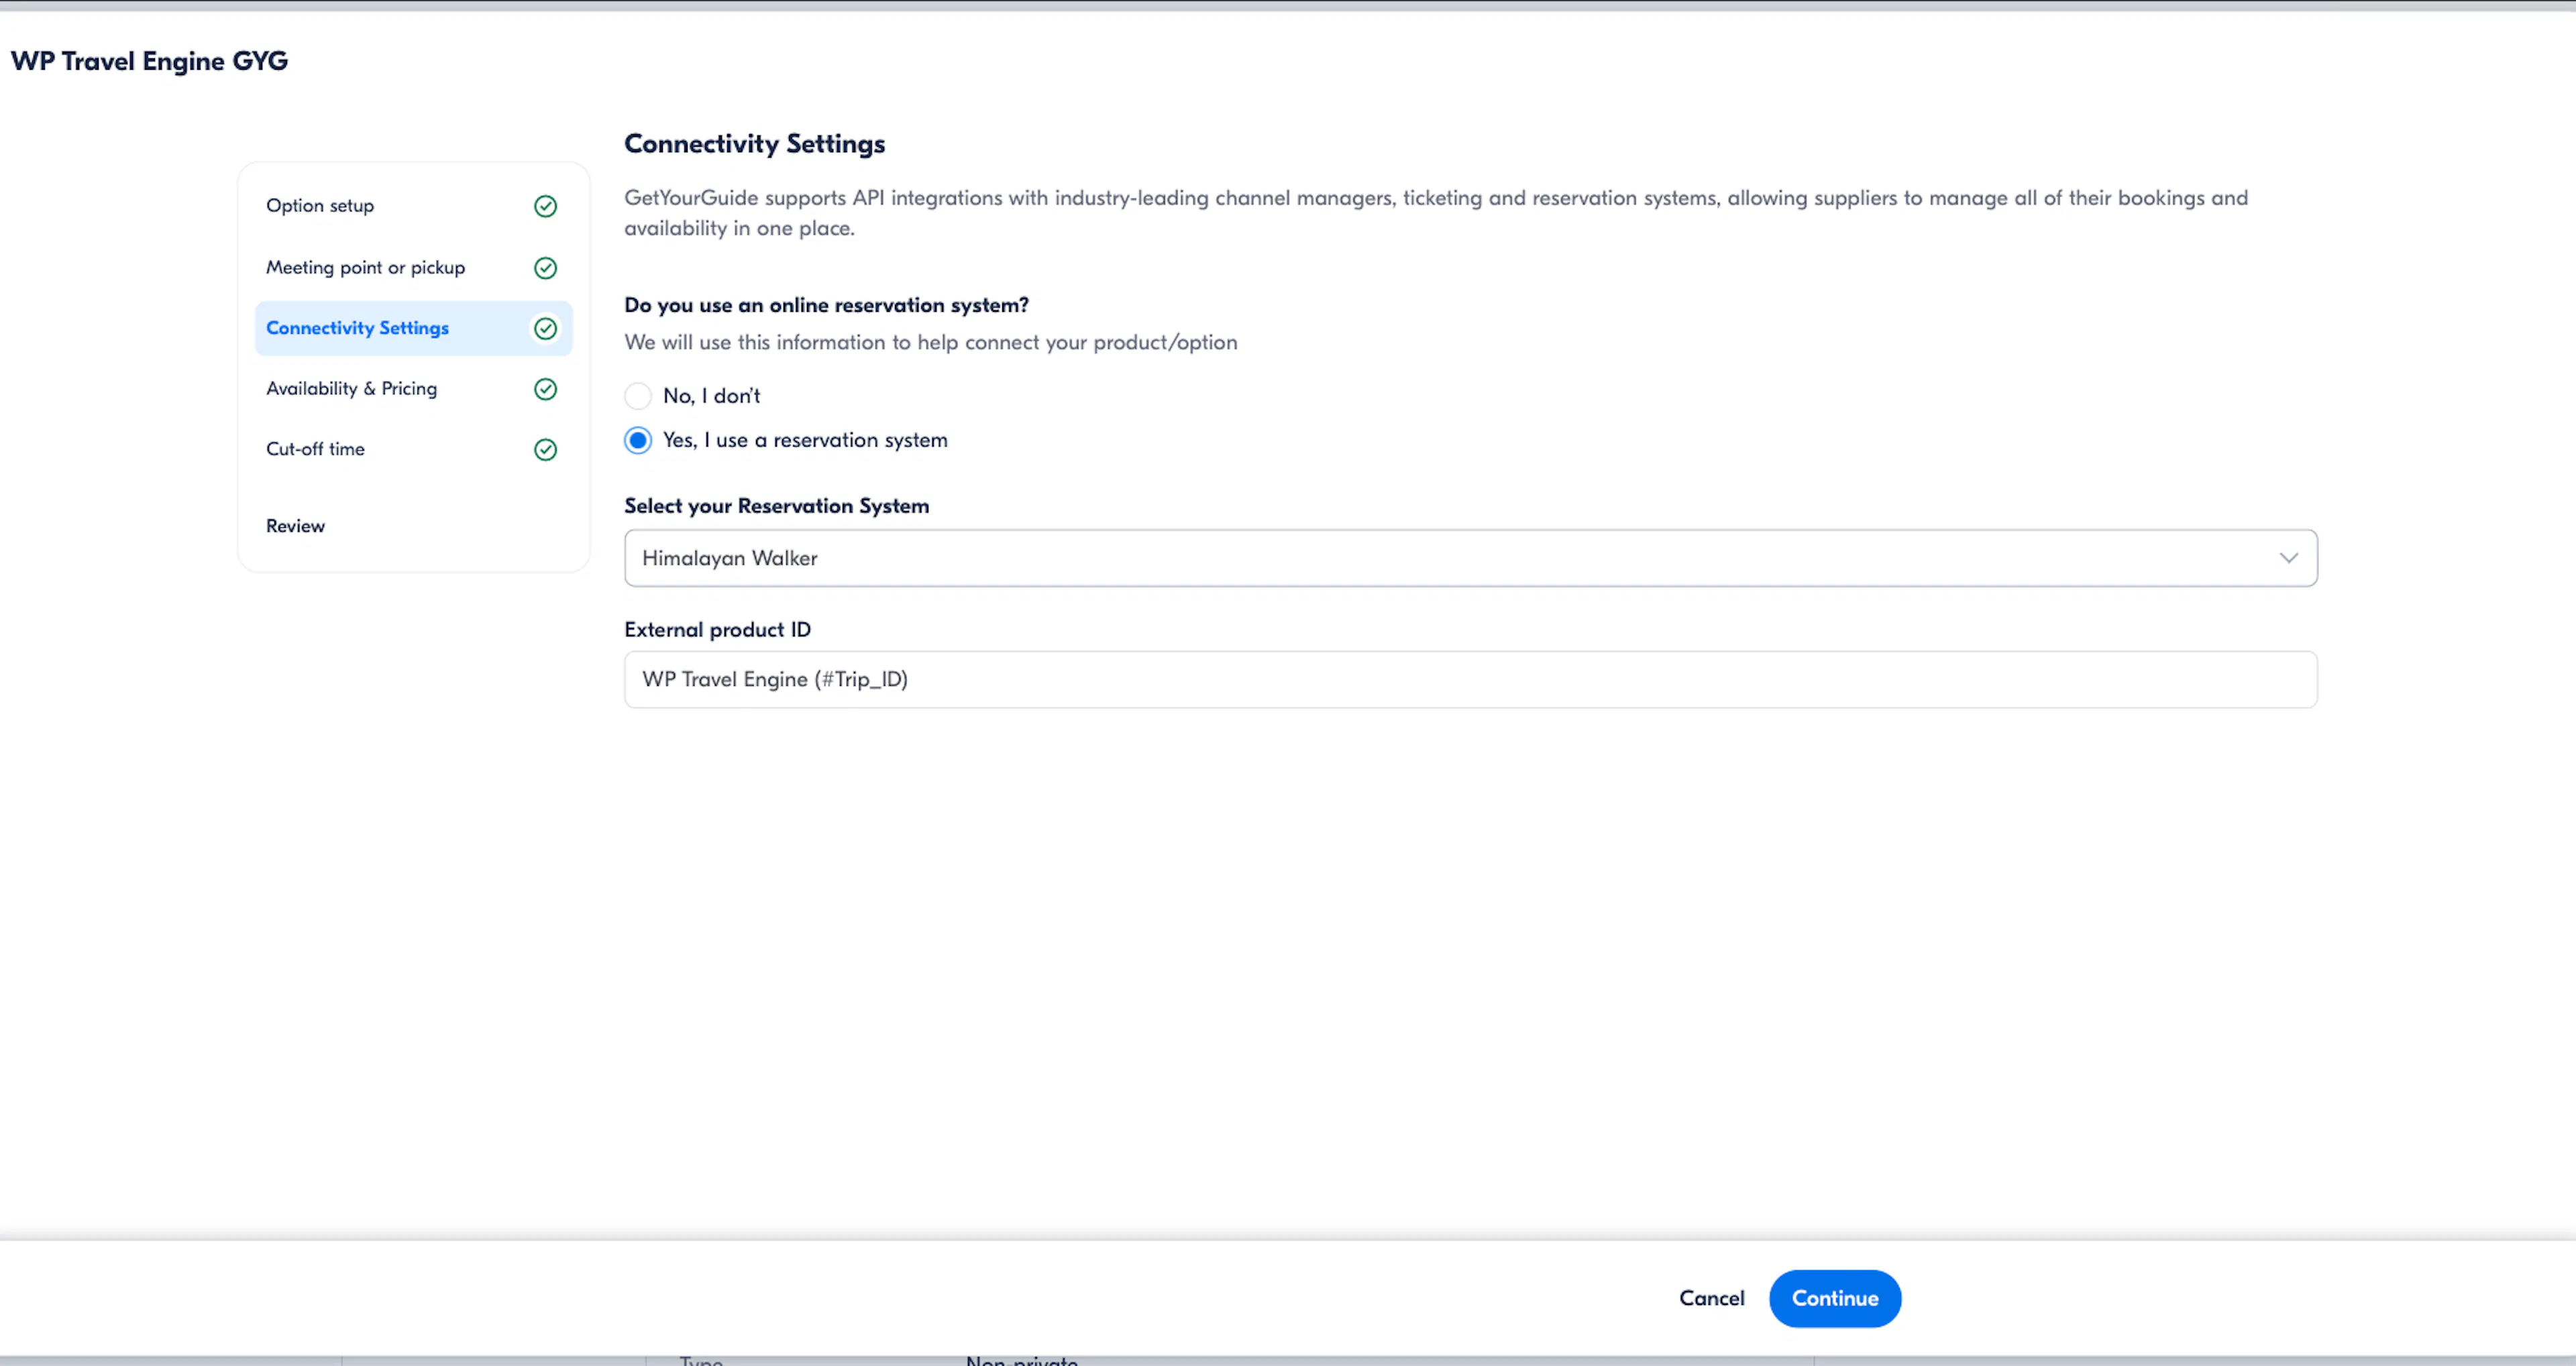
You were approved as a system, not as a product, so you never repeat this guide. Each new trip needs three fields in the option wizard, under Connectivity Settings:
- Set Do you use an online reservation system? to Yes, I use a reservation system.
- Select your reservation system under Select your Reservation System.
- Enter the trip's product number from Trip Mapping under External product ID.
Add each real trip the same way you added the practice ones: create the option with the matching availability and price type, then link the trip in WP Travel Engine. Availability, prices and bookings then stay in step on their own.
You can delete the practice trips whenever you like.
If you're still stuck or have a question we didn't cover, our support team is happy to help. Reach out at our support page and we'll get you sorted.