

Trip Reviews
Let travelers leave star-rated reviews on your trip pages, approve them before they go live, and add testimonials yourself so new visitors see real proof your trips are worth booking.
Trip Reviews
Trip Reviews lets travelers share what their trip was like after they return. Their reviews appear on the trip pages they reviewed. Future visitors can read feedback about the trip, the guides, and the overall experience before they decide to book.
For example, someone browsing your 5-day Annapurna trek might see five reviews from past trekkers. If four or five of those reviews have 4 or 5 stars, that visitor may feel more confident clicking Book Now. Reviews help show that your trips deliver what you promise.
A plugin is a small add-on that gives WordPress new features. The Trip Reviews plugin, also called an add-on, adds reviews to WP Travel Engine.
What you'll need before you start
- You have WP Travel Engine installed and activated on your WordPress site.
- You have bought and installed the Trip Reviews add-on, version 2.3.2 or later.
- You have activated the add-on with a valid license key.
See how to activate a Pro add-on license key for the full installation and activation walkthrough.
Once these requirements are ready, you can set up the review settings.
Setting up the global review settings
These are one-time settings for the review section on all your trip pages. They control what potential customers see when they read reviews or submit their own.
Take a few minutes to choose these settings carefully. The choices you make here apply across your trips, so they help keep your review sections consistent.
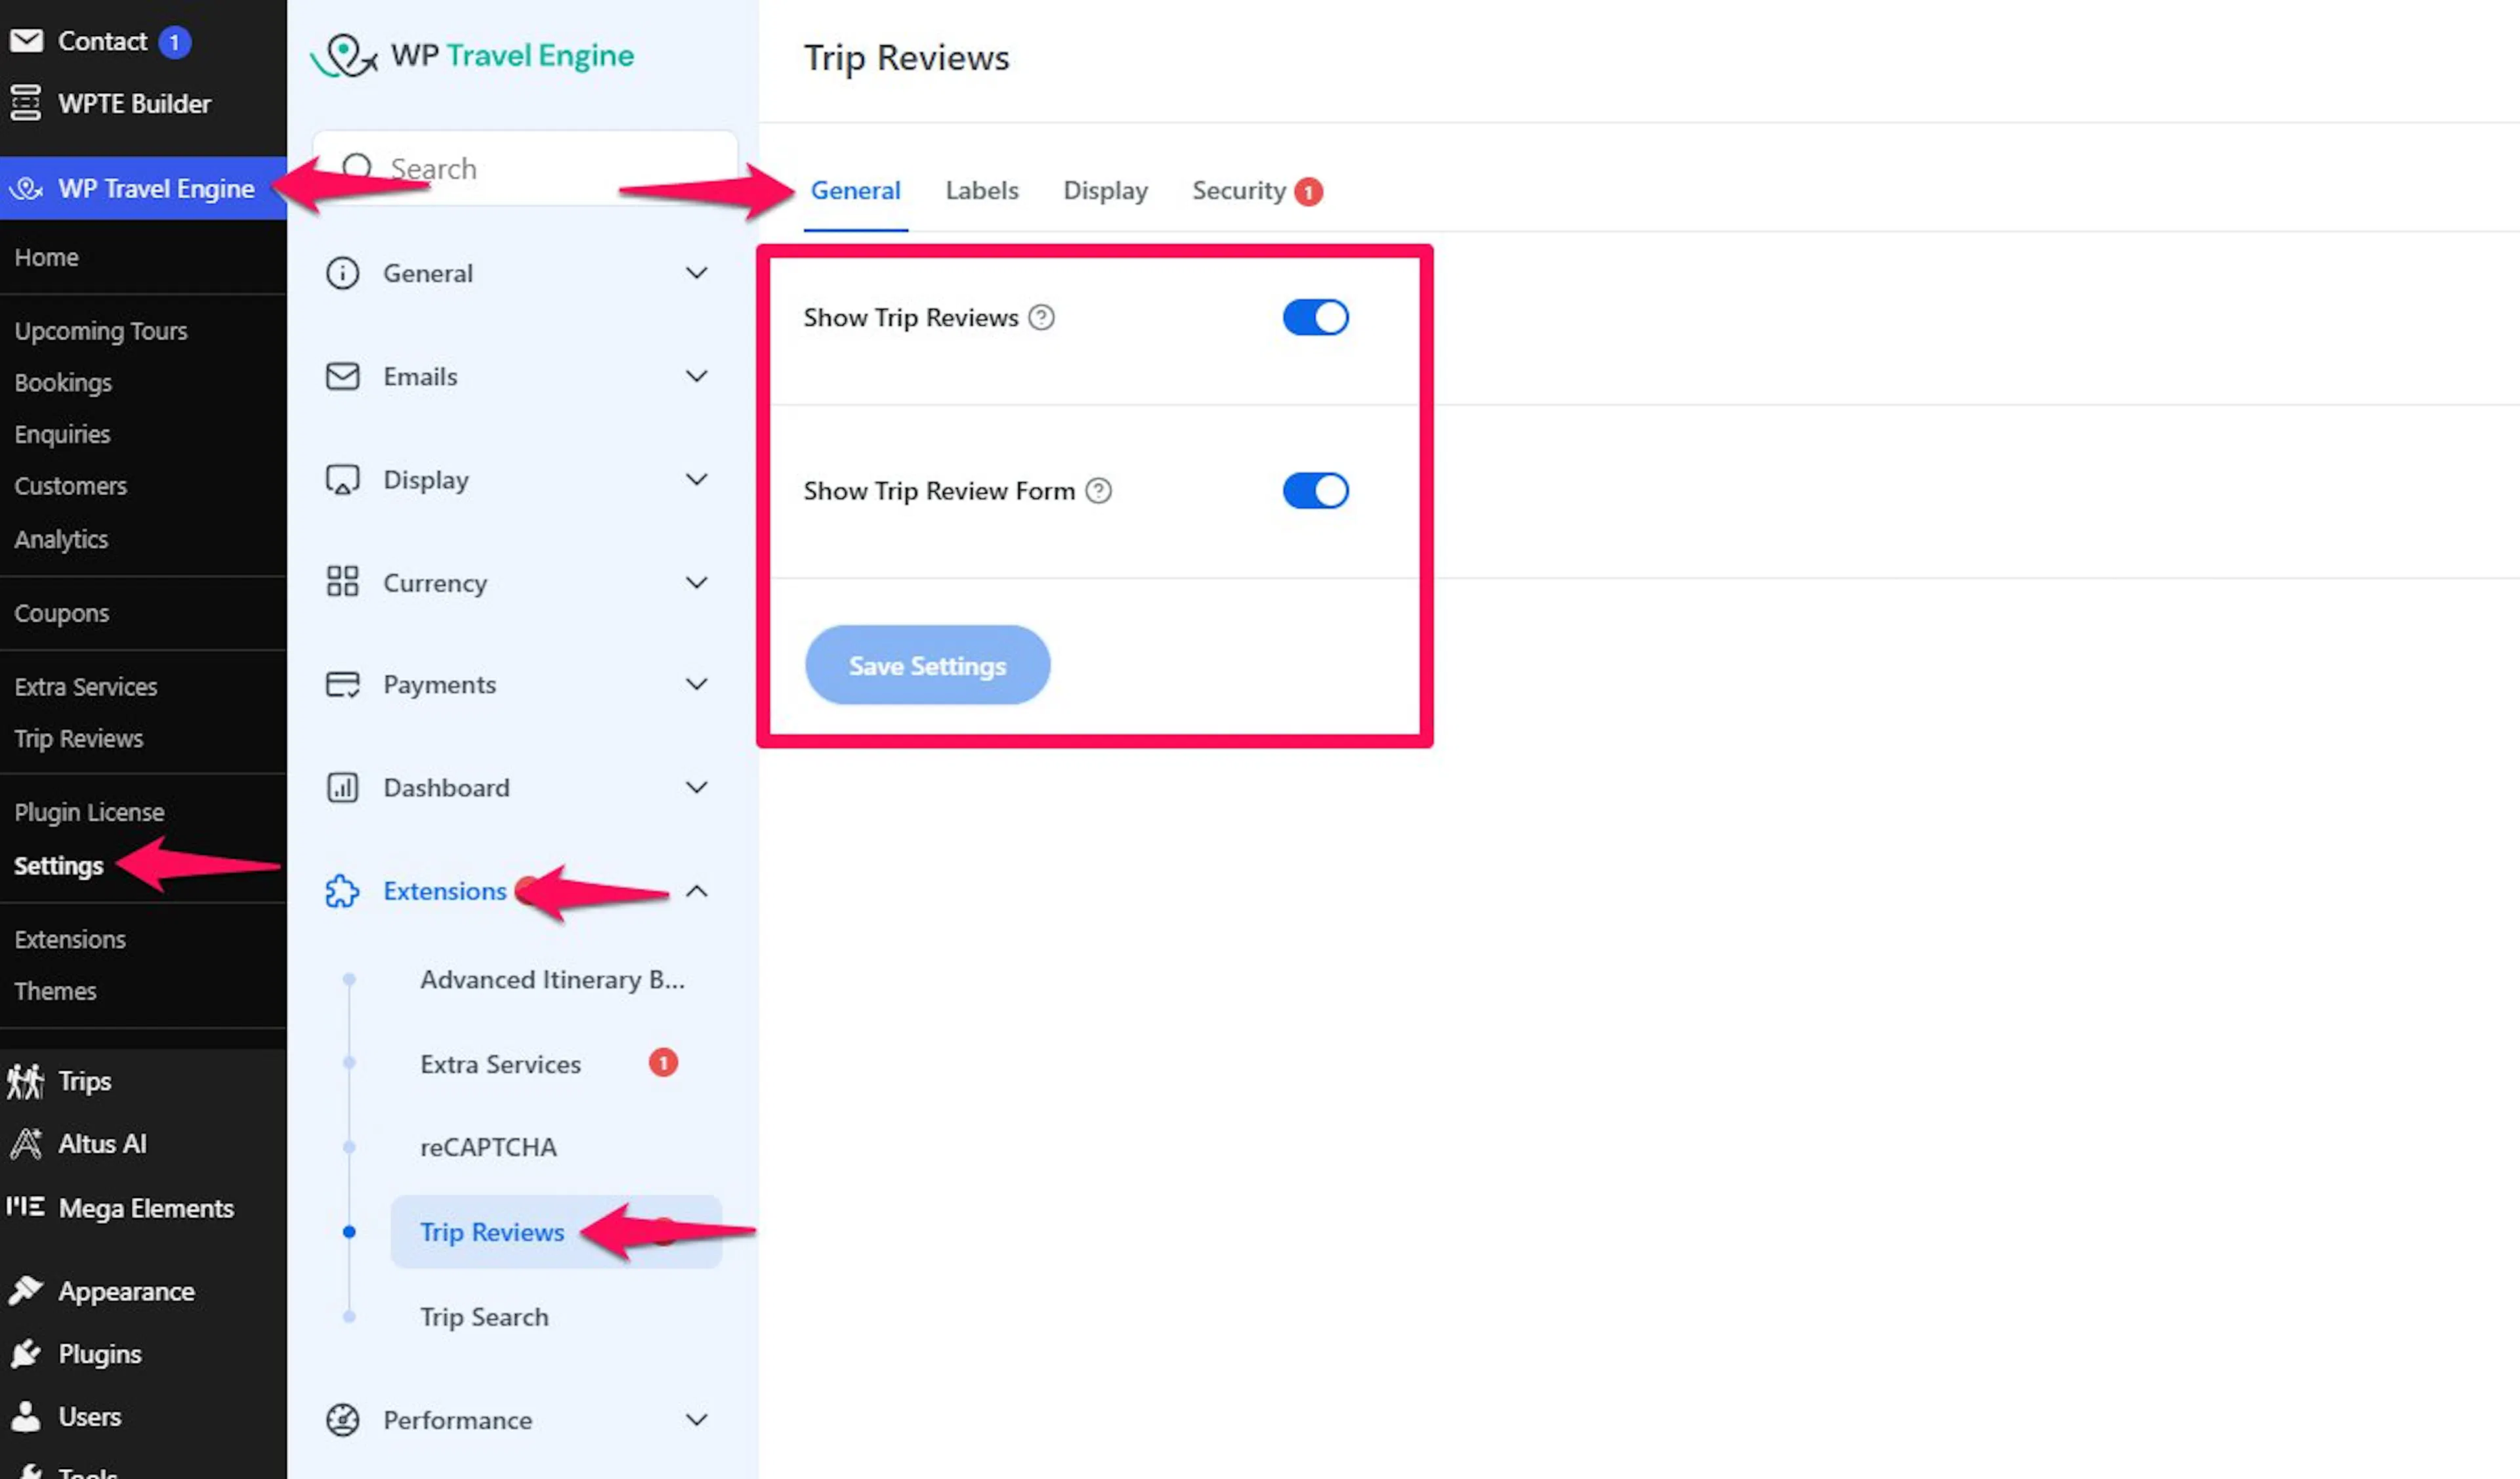
Open the Trip Reviews settings These settings control the review feature across your entire site.
On the left sidebar of your WordPress dashboard, go to WP Travel Engine, then Settings. Open Extensions and select Trip Reviews.
General
These switches decide whether visitors can see reviews and whether travelers can submit them.
- Show Trip Reviews: Turn this on to show the review section on your trip pages. It is off by default. Leave it off while you are collecting reviews if you do not want an empty section to appear.
- Show Trip Review Form: This switch appears after Show Trip Reviews is turned on. Turn it on to let travelers write reviews from your trip pages. Leave it off if you only want to add reviews yourself.
Labels
Labels are the words shown around the review section. You can change them to match the way you speak to your travelers.
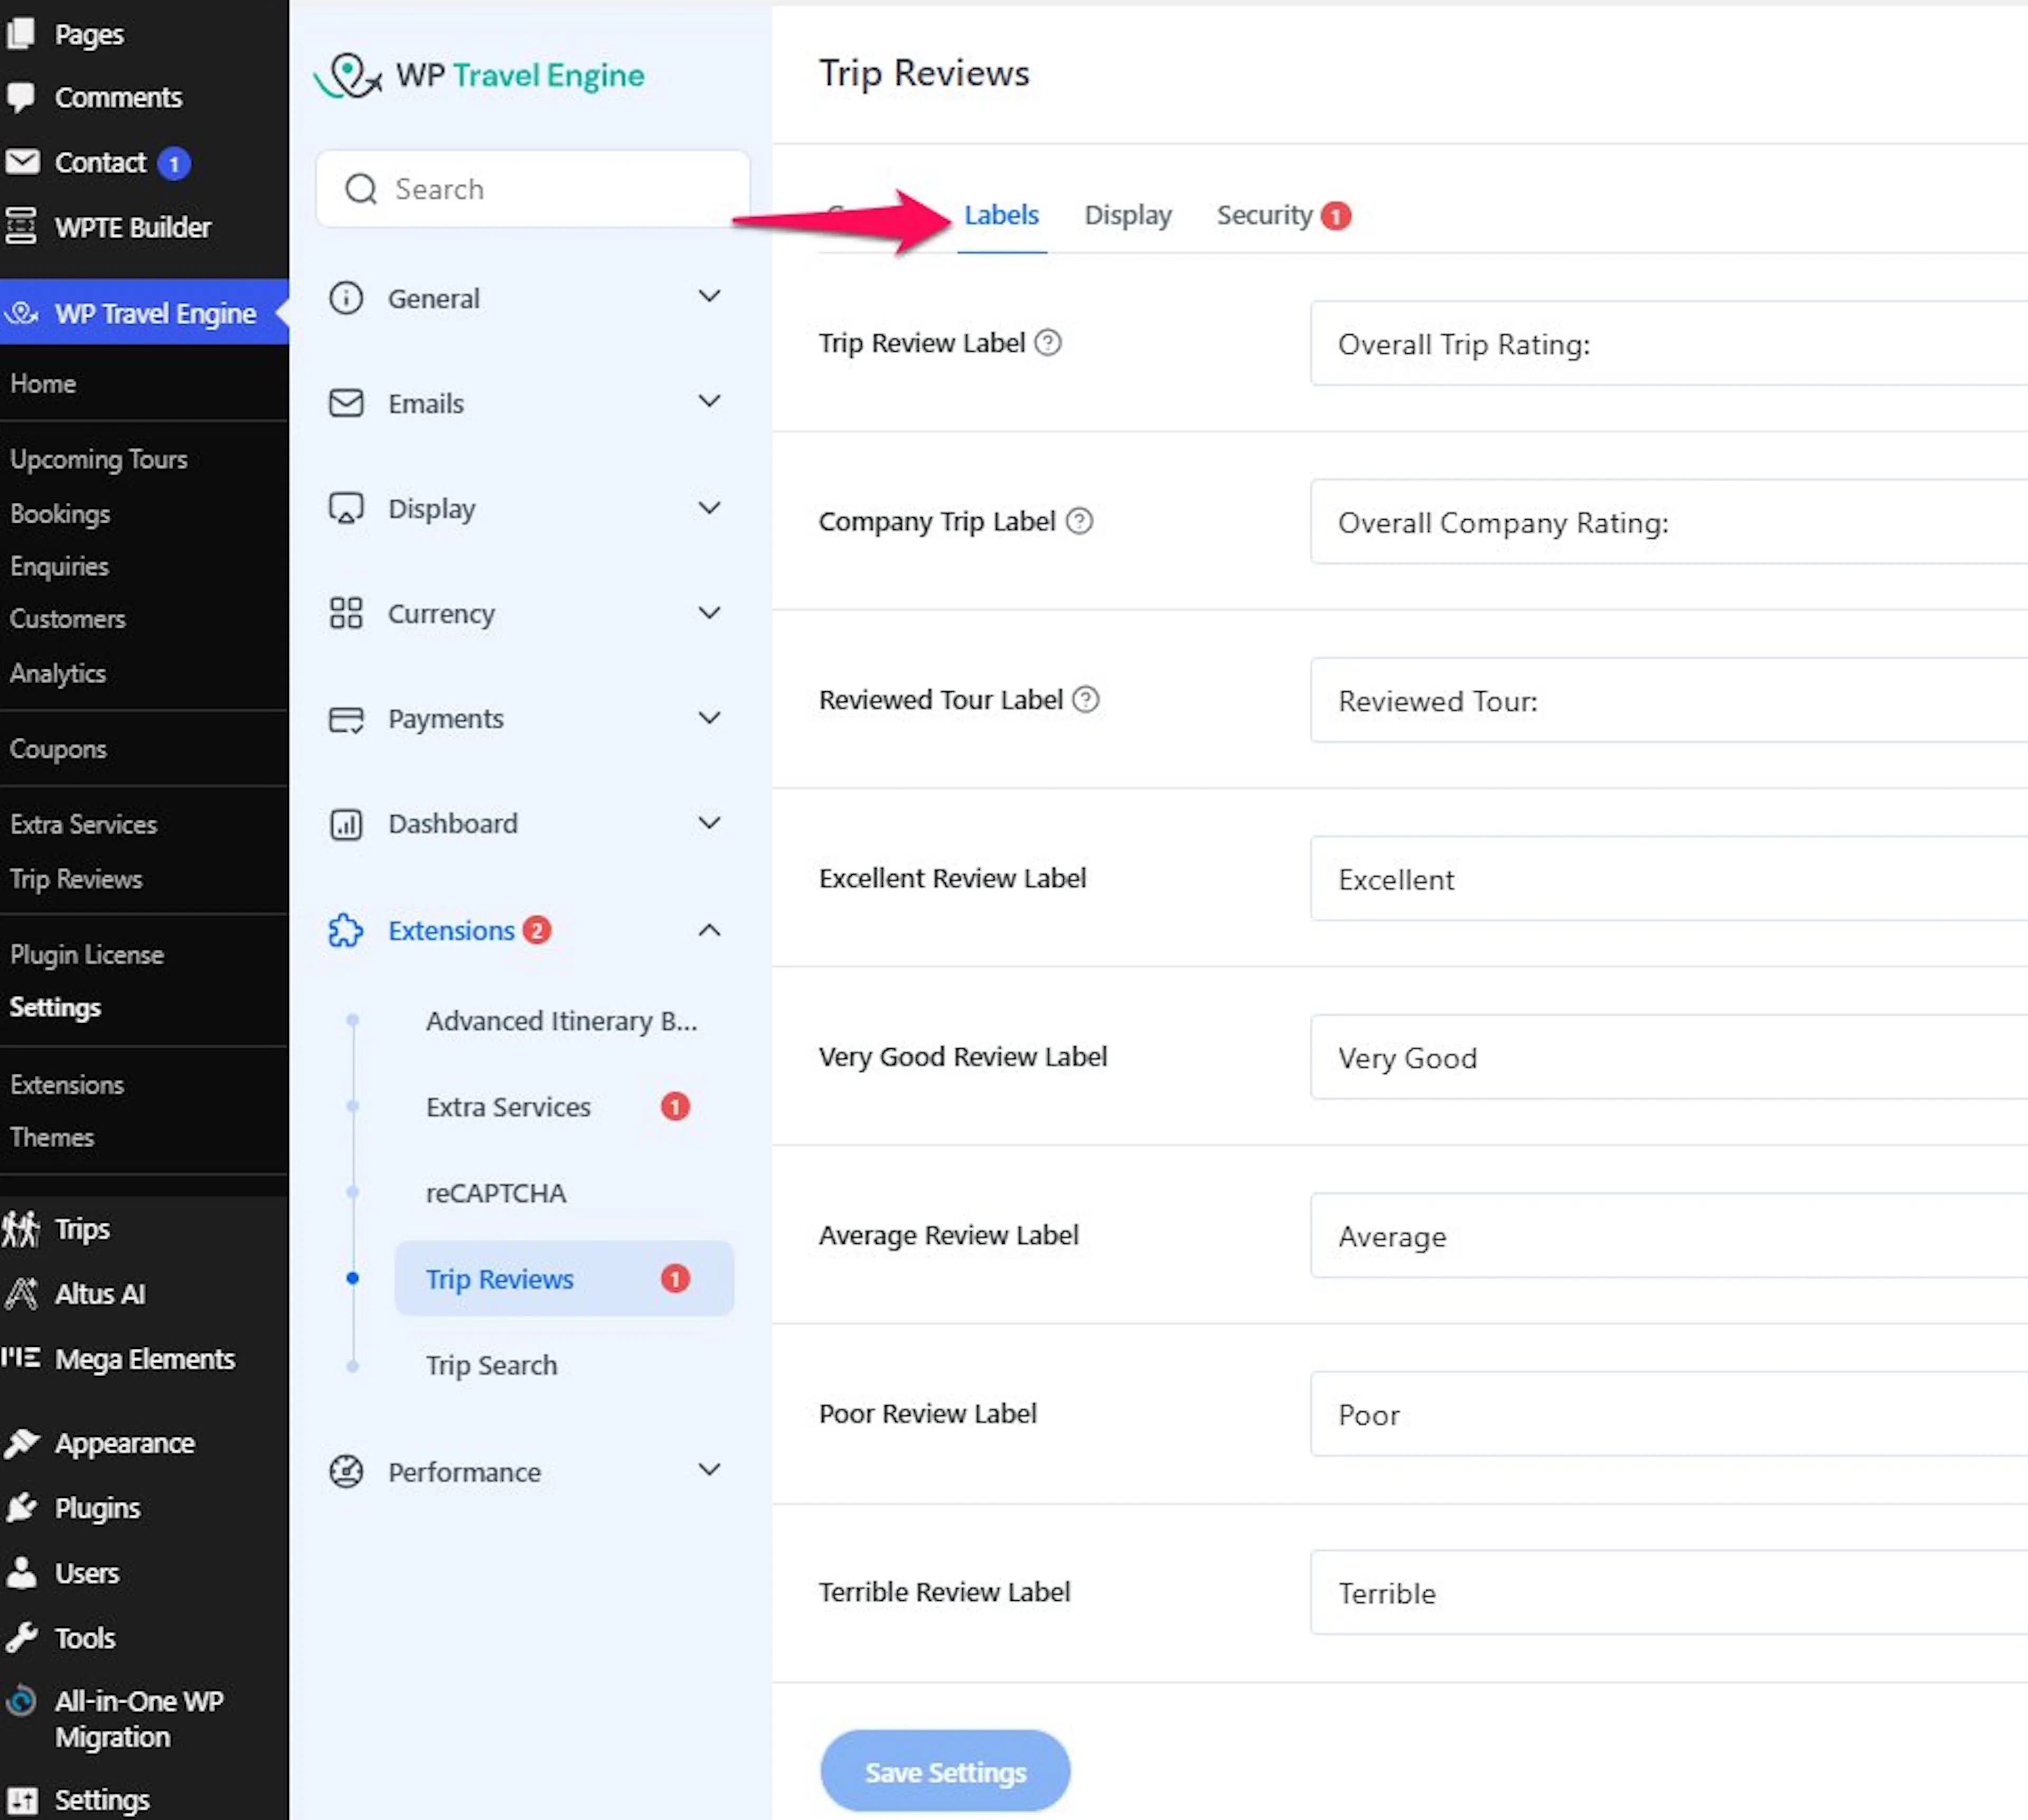
You can change these labels:
- Trip Review Label: The heading above the reviews on the trip page. The default is "Overall Trip Rating:"
- Company Trip Label: The label for your company name in the review section. The default is "Overall Company Rating:"
- Reviewed Tour Label: The label for the trip name in the review section. The default is "Reviewed Tour:"
- Excellent Review Label: The text shown for 5-star reviews. The default is "Excellent"
- Very Good Review Label: The text shown for 4-star reviews. The default is "Very Good"
- Average Review Label: The text shown for 3-star reviews. The default is "Average"
- Poor Review Label: The text shown for 2-star reviews. The default is "Poor"
- Terrible Review Label: The text shown for 1-star reviews. The default is "Terrible"
These labels help you match the tone of your business. For example, an adventure tour company could change "Excellent Review Label" to "Unforgettable Experience" and "Very Good Review Label" to "Great Adventure." Travelers would see those phrases instead of the default labels.
Display
These switches control which information appears in the review section and review form.
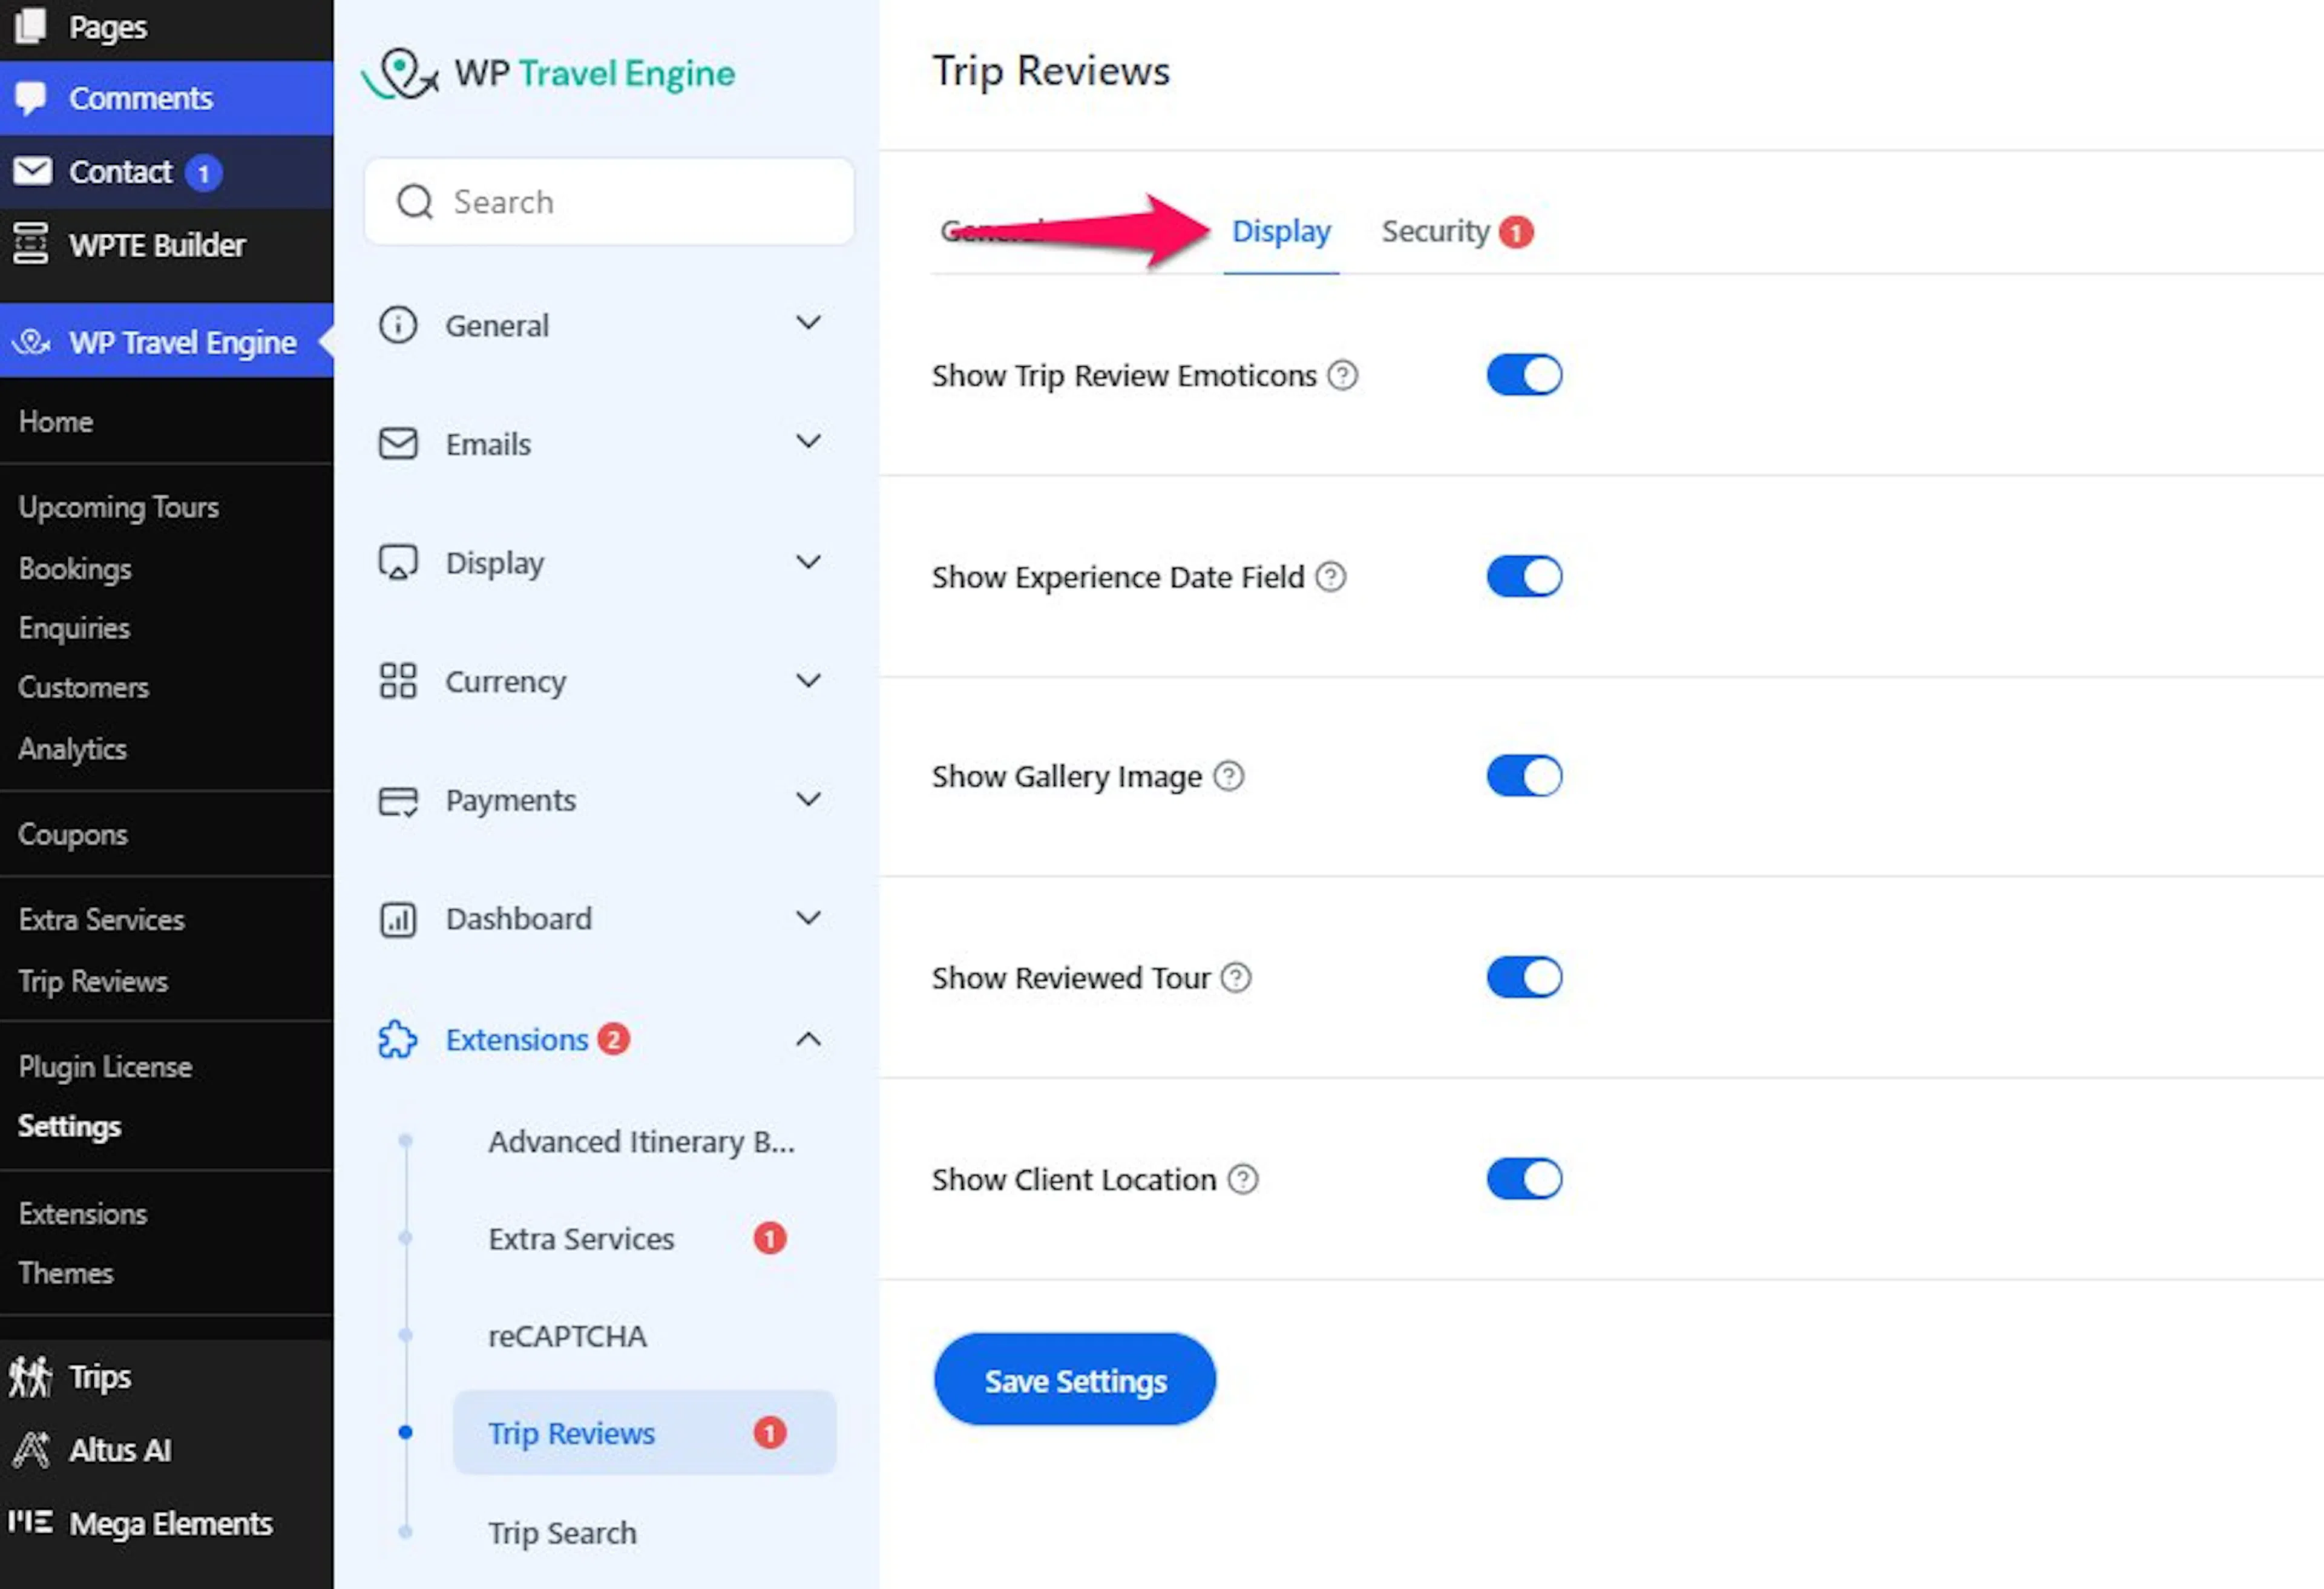
Leave a Show switch on when you want that information to remain visible. Turn it off when you want to hide it.
- Show Trip Review Emoticons: Off by default. Turn this on to show emoticons beside the average rating. This gives the review section a warmer, more casual feel.
- Show Experience Date Field: On by default. Turn this off to hide the date the traveler took the trip in both the review form and published review. This can help when your trips run throughout the year and the date is not useful to visitors.
- Show Gallery Image: On by default. Turn this off to hide the photo upload field. Travelers will not be able to add photos, and photos already attached to reviews will not display.
- Show Reviewed Tour: On by default. Turn this off to hide the link back to the trip from the review section.
- Show Client Location: On by default. Turn this off to hide the field where travelers enter their country or city. This may be useful for local day tours where most travelers come from the same area.
Choose only the details that help future travelers make a booking decision. You can always return to these settings later.
Security
Enable reCAPTCHA adds Google reCAPTCHA to the review form. It helps prevent spam submissions.
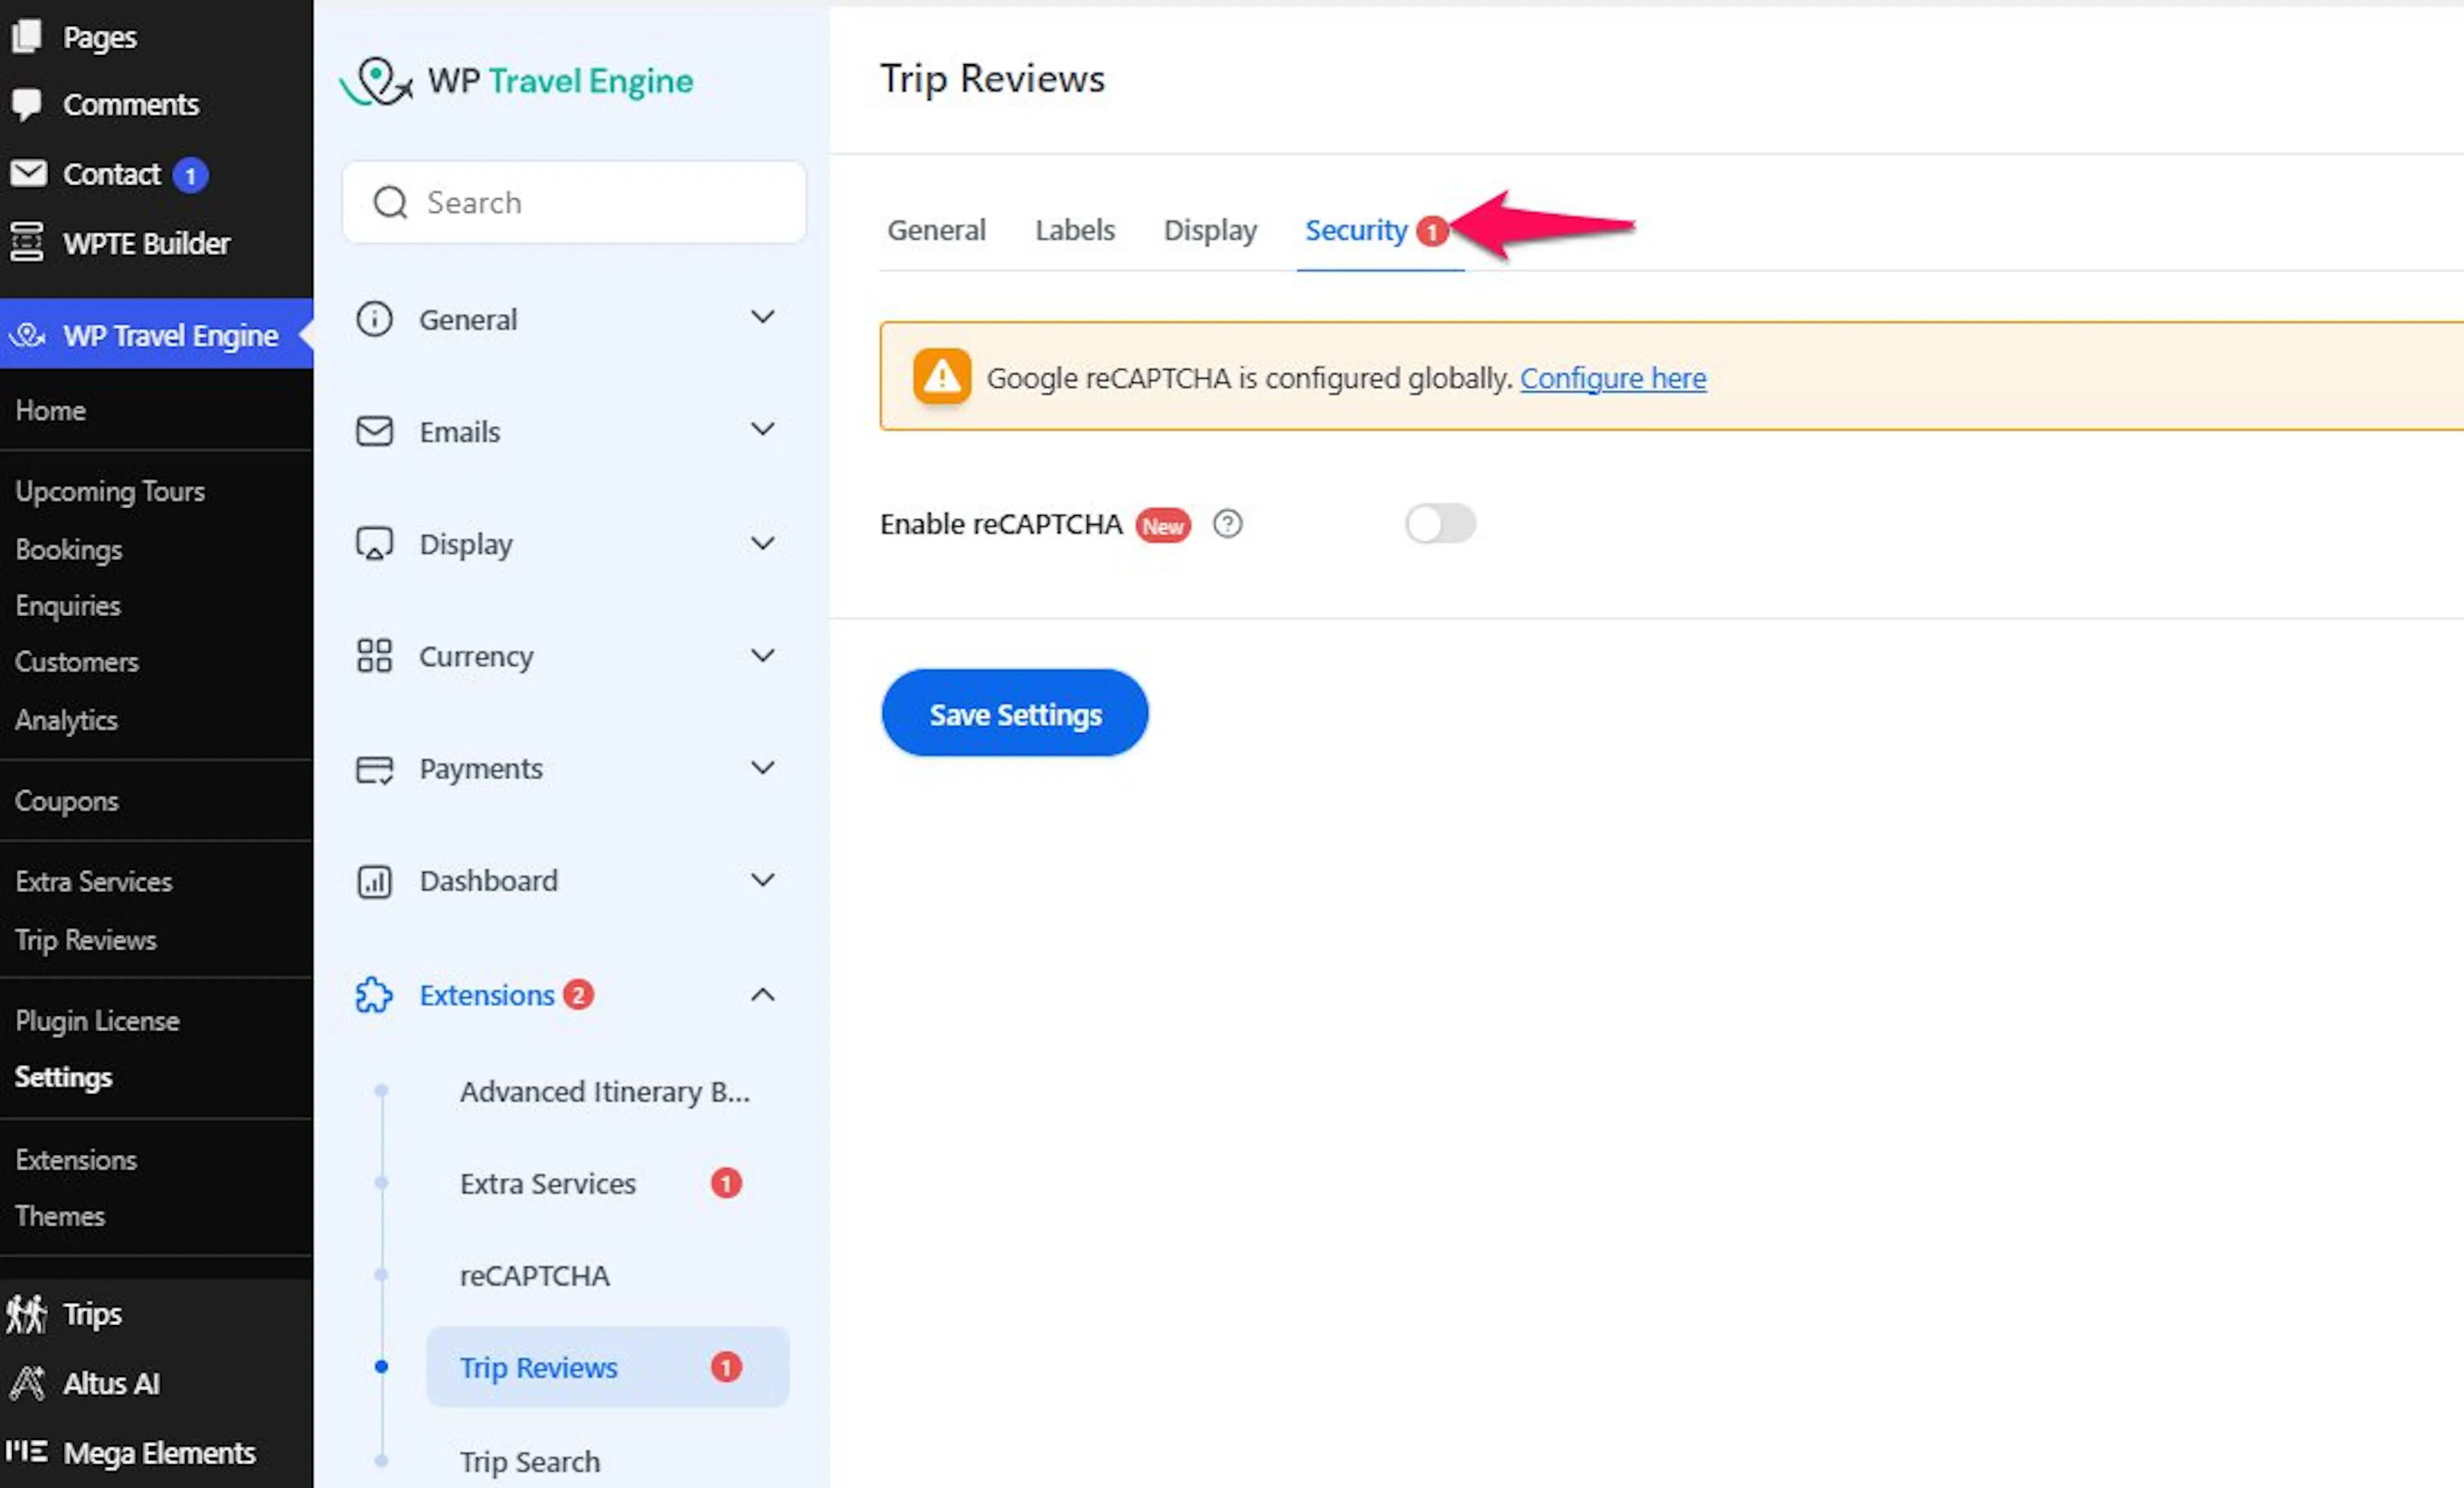
Turn on Enable reCAPTCHA if you want protection on the review form. The keys are not entered on this screen.
Enter the Site Key and Secret Key separately under WP Travel Engine, Settings, Extensions, and reCAPTCHA. Every form that supports reCAPTCHA, including the Trip Reviews form, uses those same keys.
When your settings are ready, click Save Settings at the bottom of the page. Your global review settings are now in place.
Next, you can add reviews that travelers sent to you directly.
Adding reviews yourself
A traveler may email you a review instead of submitting it on your site. You may also have testimonials on a platform such as TripAdvisor. Add those reviews yourself so they can appear on the trip pages where they are most helpful.
Before you start, have the review text and star rating ready. The traveler's name and email address are helpful but optional. You can publish a review without them.
Open the Trip Review Form
Opening the form gives you one place to enter a review and connect it to the correct trip.
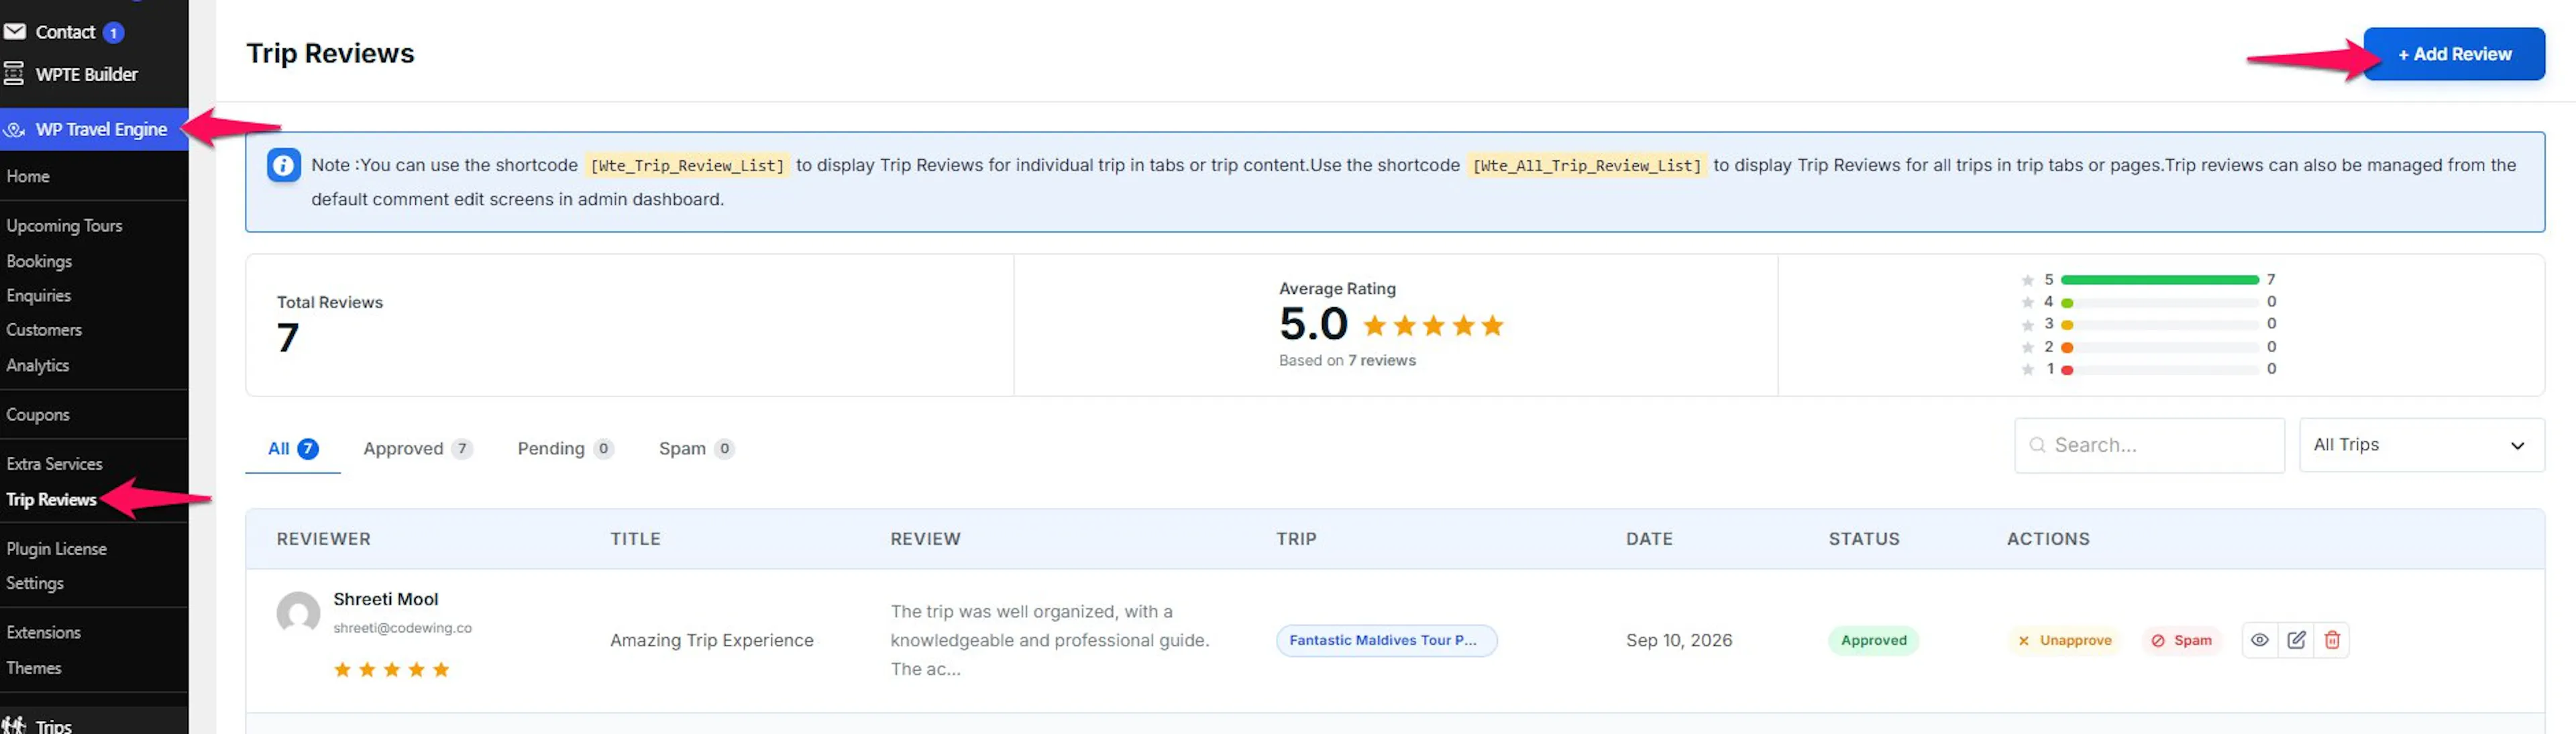
On the left sidebar of your WordPress dashboard, go to WP Travel Engine, then Trip Reviews, then Add Review.
Fill in the review details
Entering all the required details makes sure the review appears with the right trip and rating.
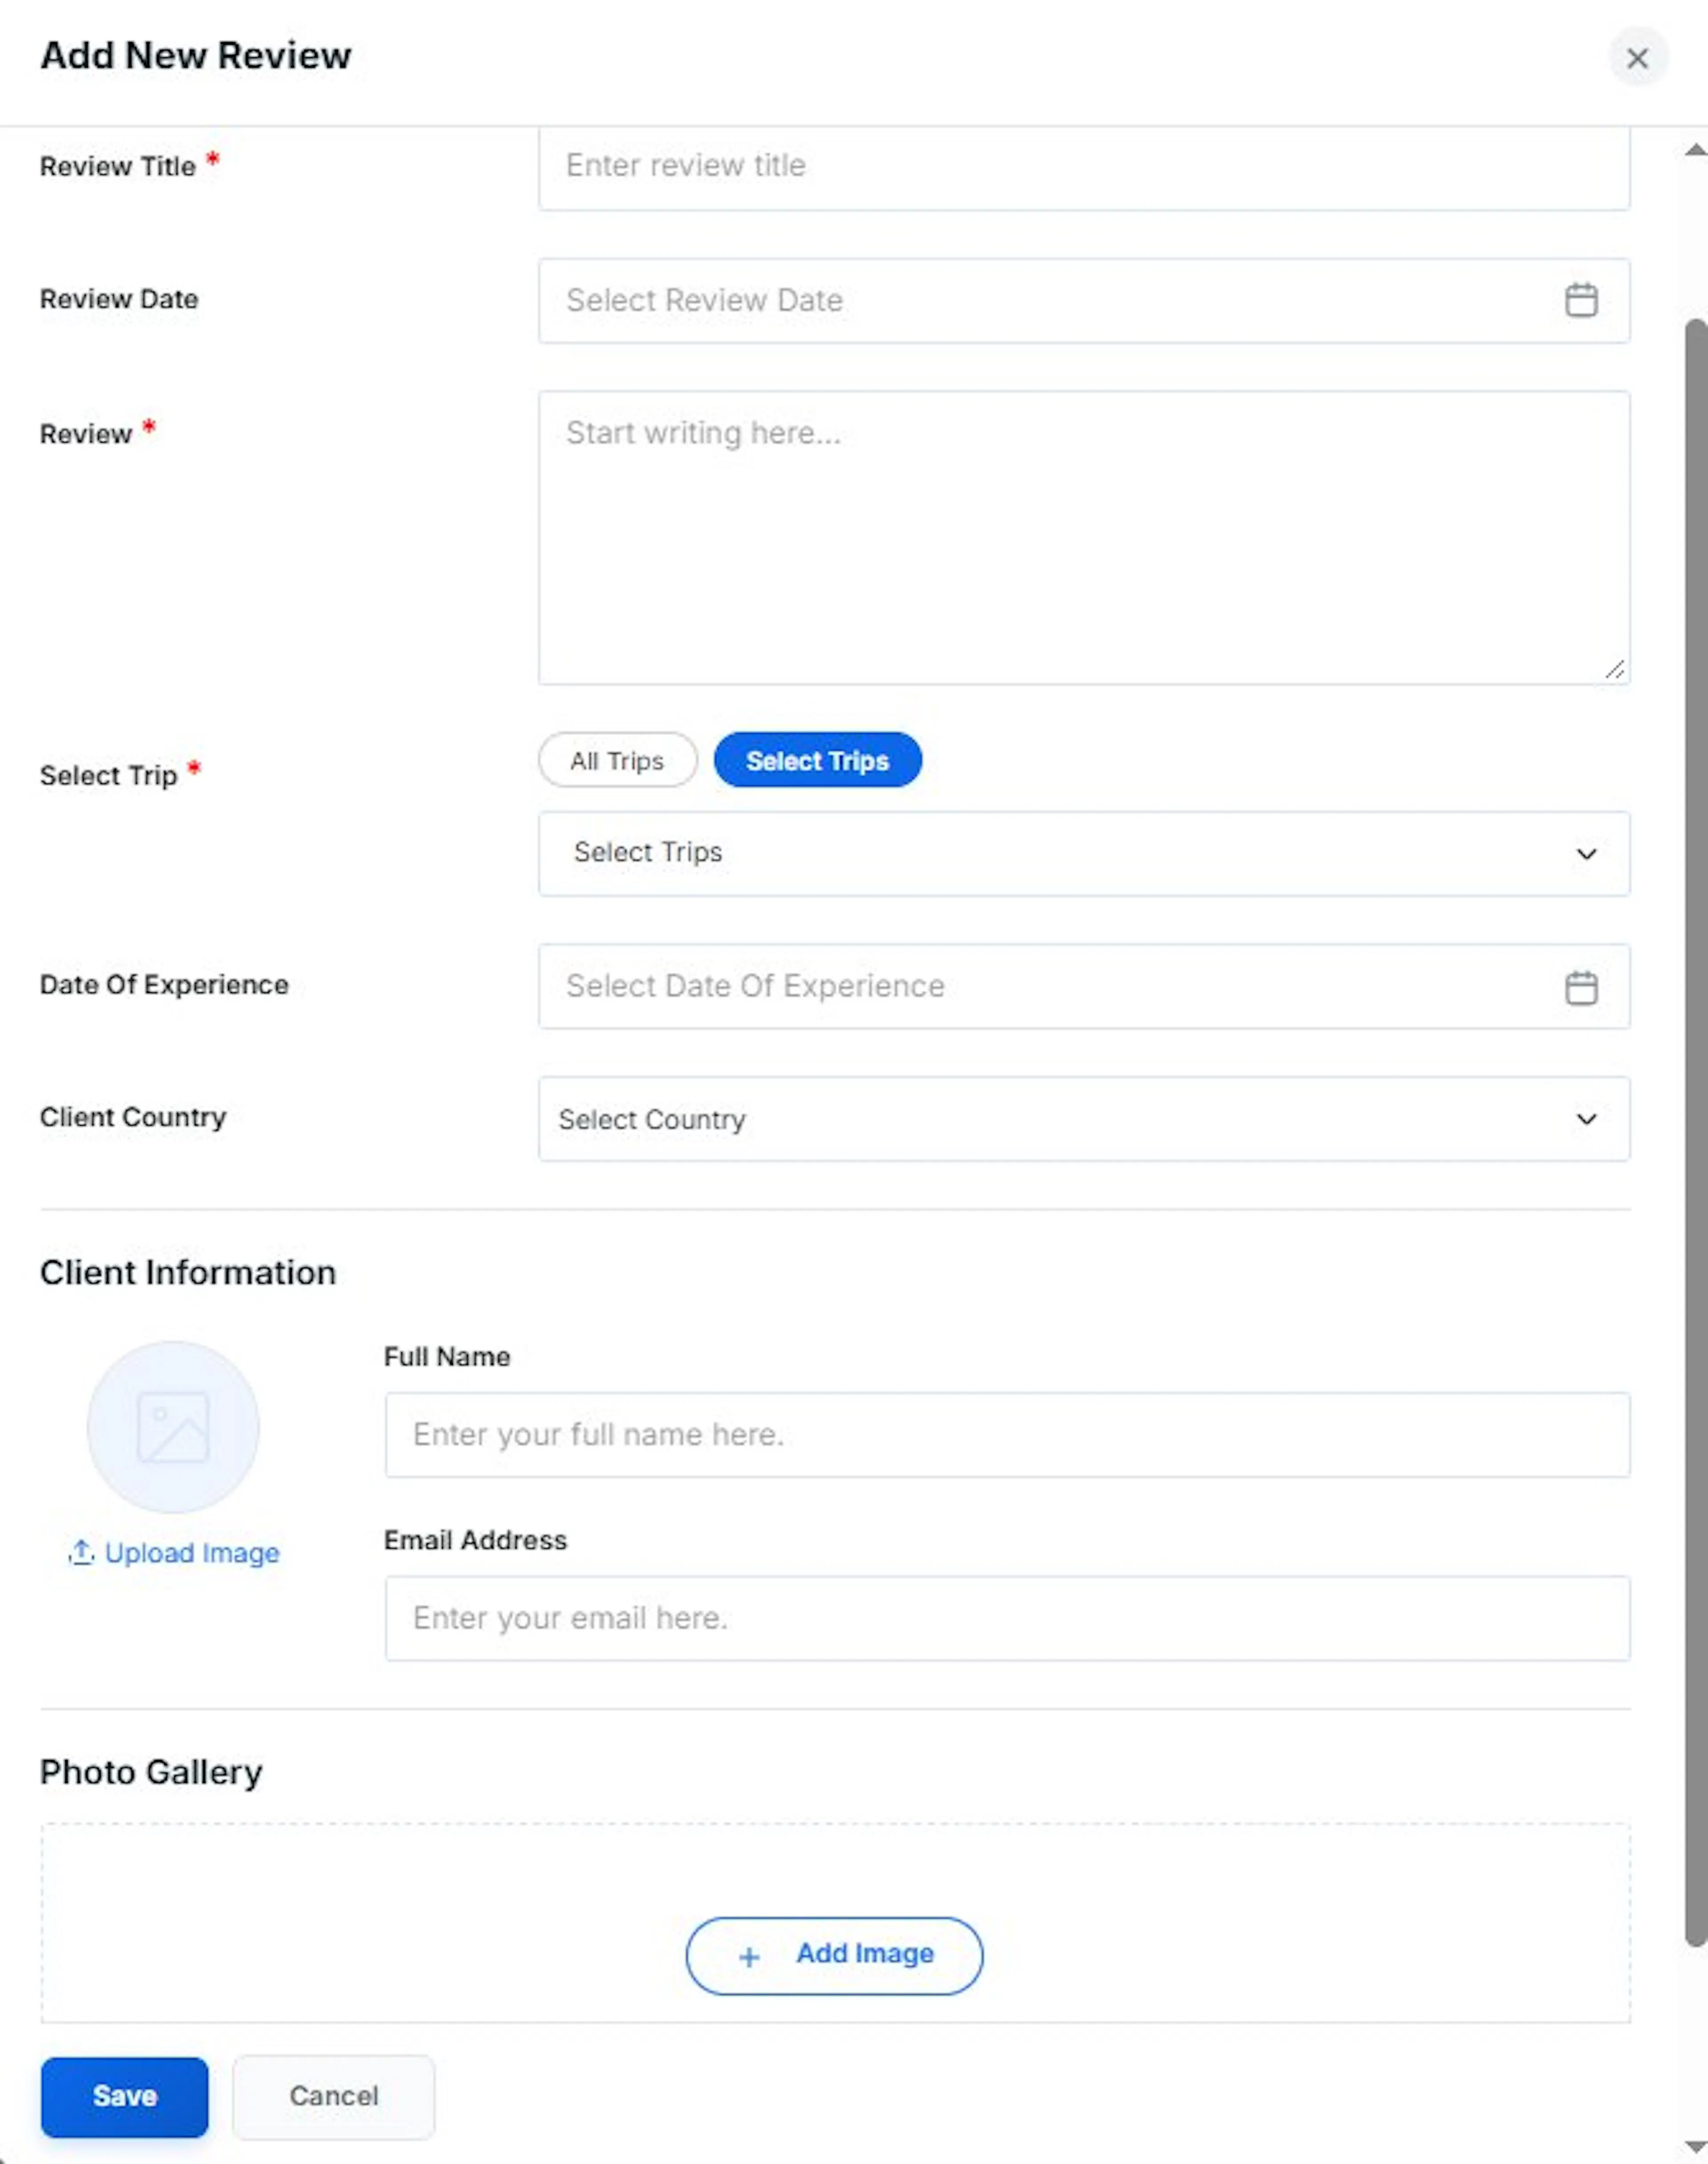
Type the star rating, review title, review date, and review text. Then select the trip the review belongs to. Rating, review title, review, and select trip are required fields.
Add the client's full name, email address, and a photo if you have them. These fields are optional.
Publish the review
Saving the review makes it visible on the trip page you selected.
Click Save to publish it. The review will now appear on the trip page linked to it.
That is all it takes. The review goes live right away.
Approving reviews from travelers
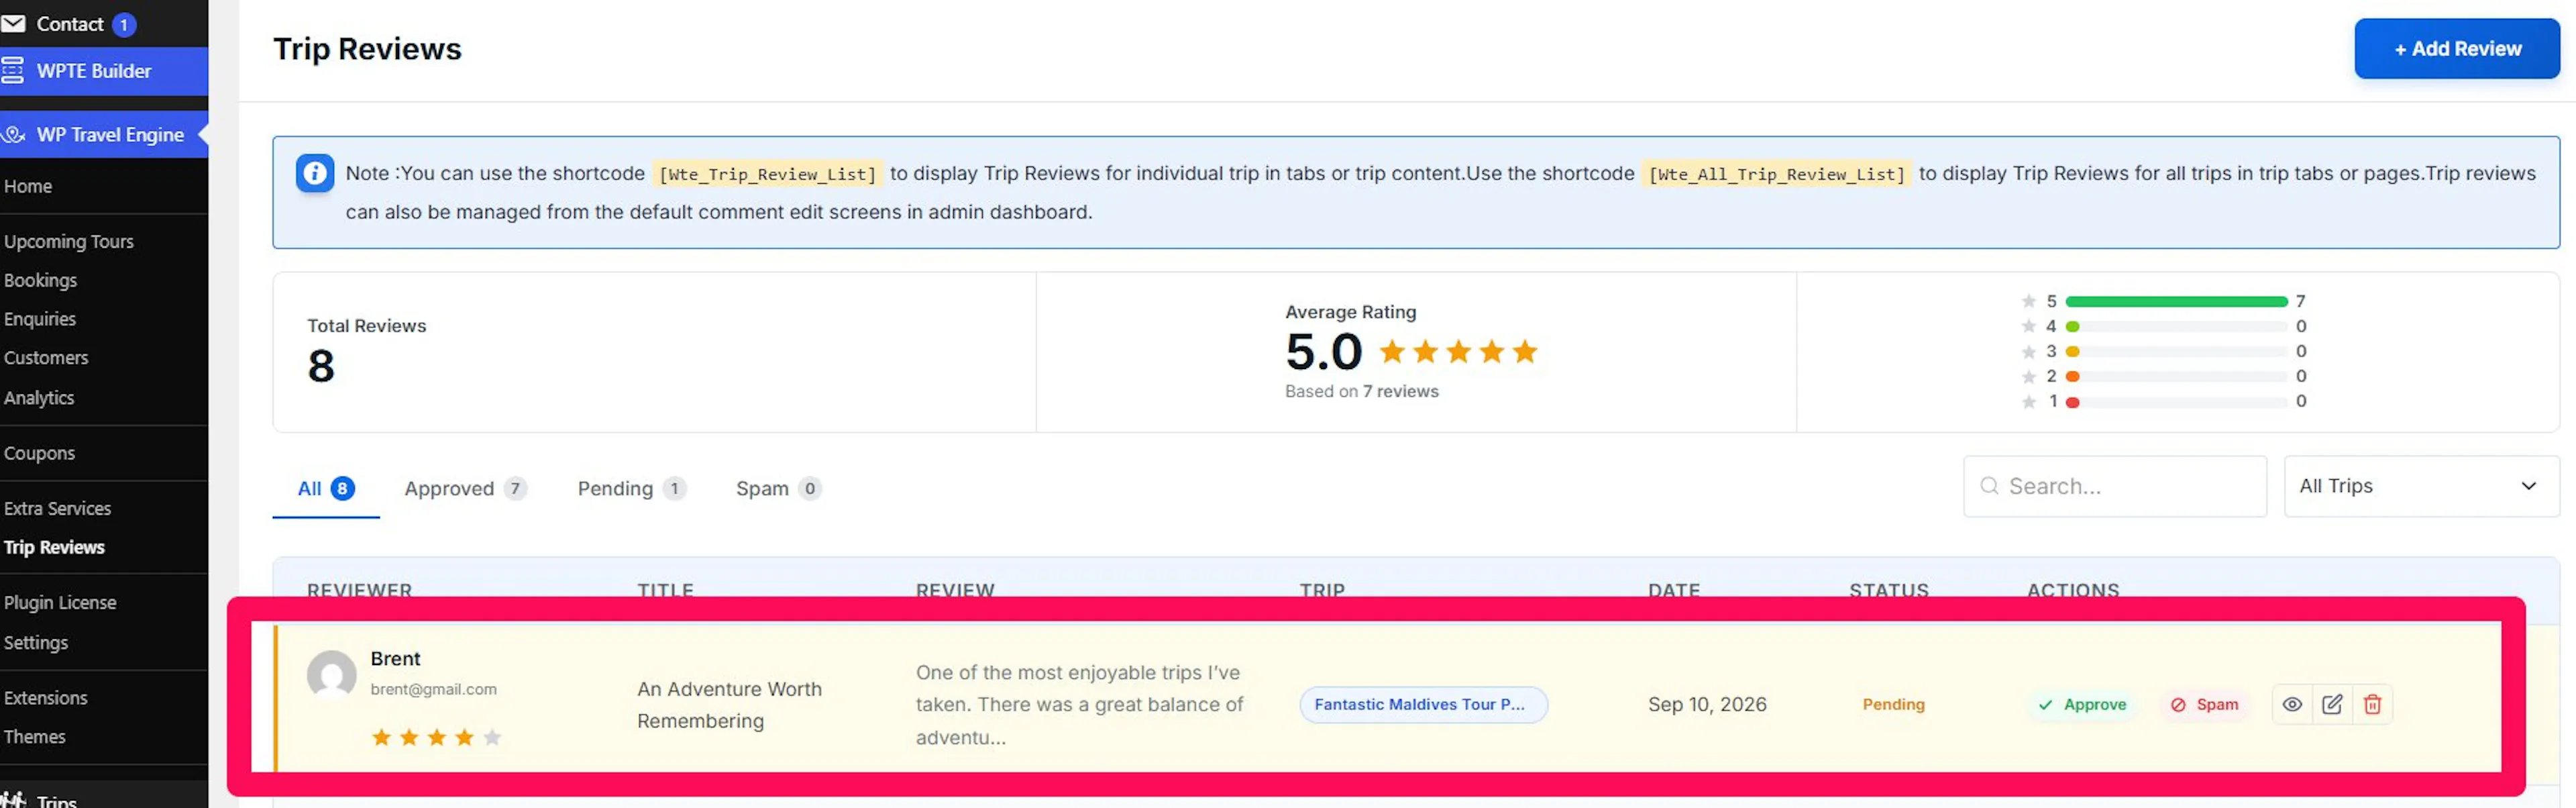
When travelers submit their own reviews on a trip page, those reviews do not appear right away. They wait for your approval first. This gives you a chance to read through them and make sure they are genuine before they go public.
What you'll need before you start: at least one traveler-submitted review waiting for approval.
Open the Trip Reviews list
This is where you can read through every review travelers have submitted and decide which ones to show on your site.
In the left sidebar of your WordPress dashboard, go to WP Travel Engine, then Trip Reviews, then Trip Reviews.
Review and moderate each submission
Hover over a review to see your options:
- Approve: Makes the review visible on your trip page.
- Unapprove: Keeps the review hidden if you need more time or want to ask the traveler for changes.
- Spam: Flags reviews that are fake, irrelevant, or from bots and hides them.
- Not Spam: Appears in place of Spam once a review has been flagged. Use this if you marked a review as spam by mistake. It puts the review back to pending.
- Edit: Lets you fix a typo or adjust the wording before you approve it.
- View Details: Shows you the full information the traveler submitted.
- Delete: Removes the review permanently.
It is a good habit to check for new reviews once a week. Travelers appreciate seeing their review go live quickly, and a fast approval keeps your trip pages fresh.
Once you approve a review, it shows up on the trip page right away.
How reviews appear on your trip page
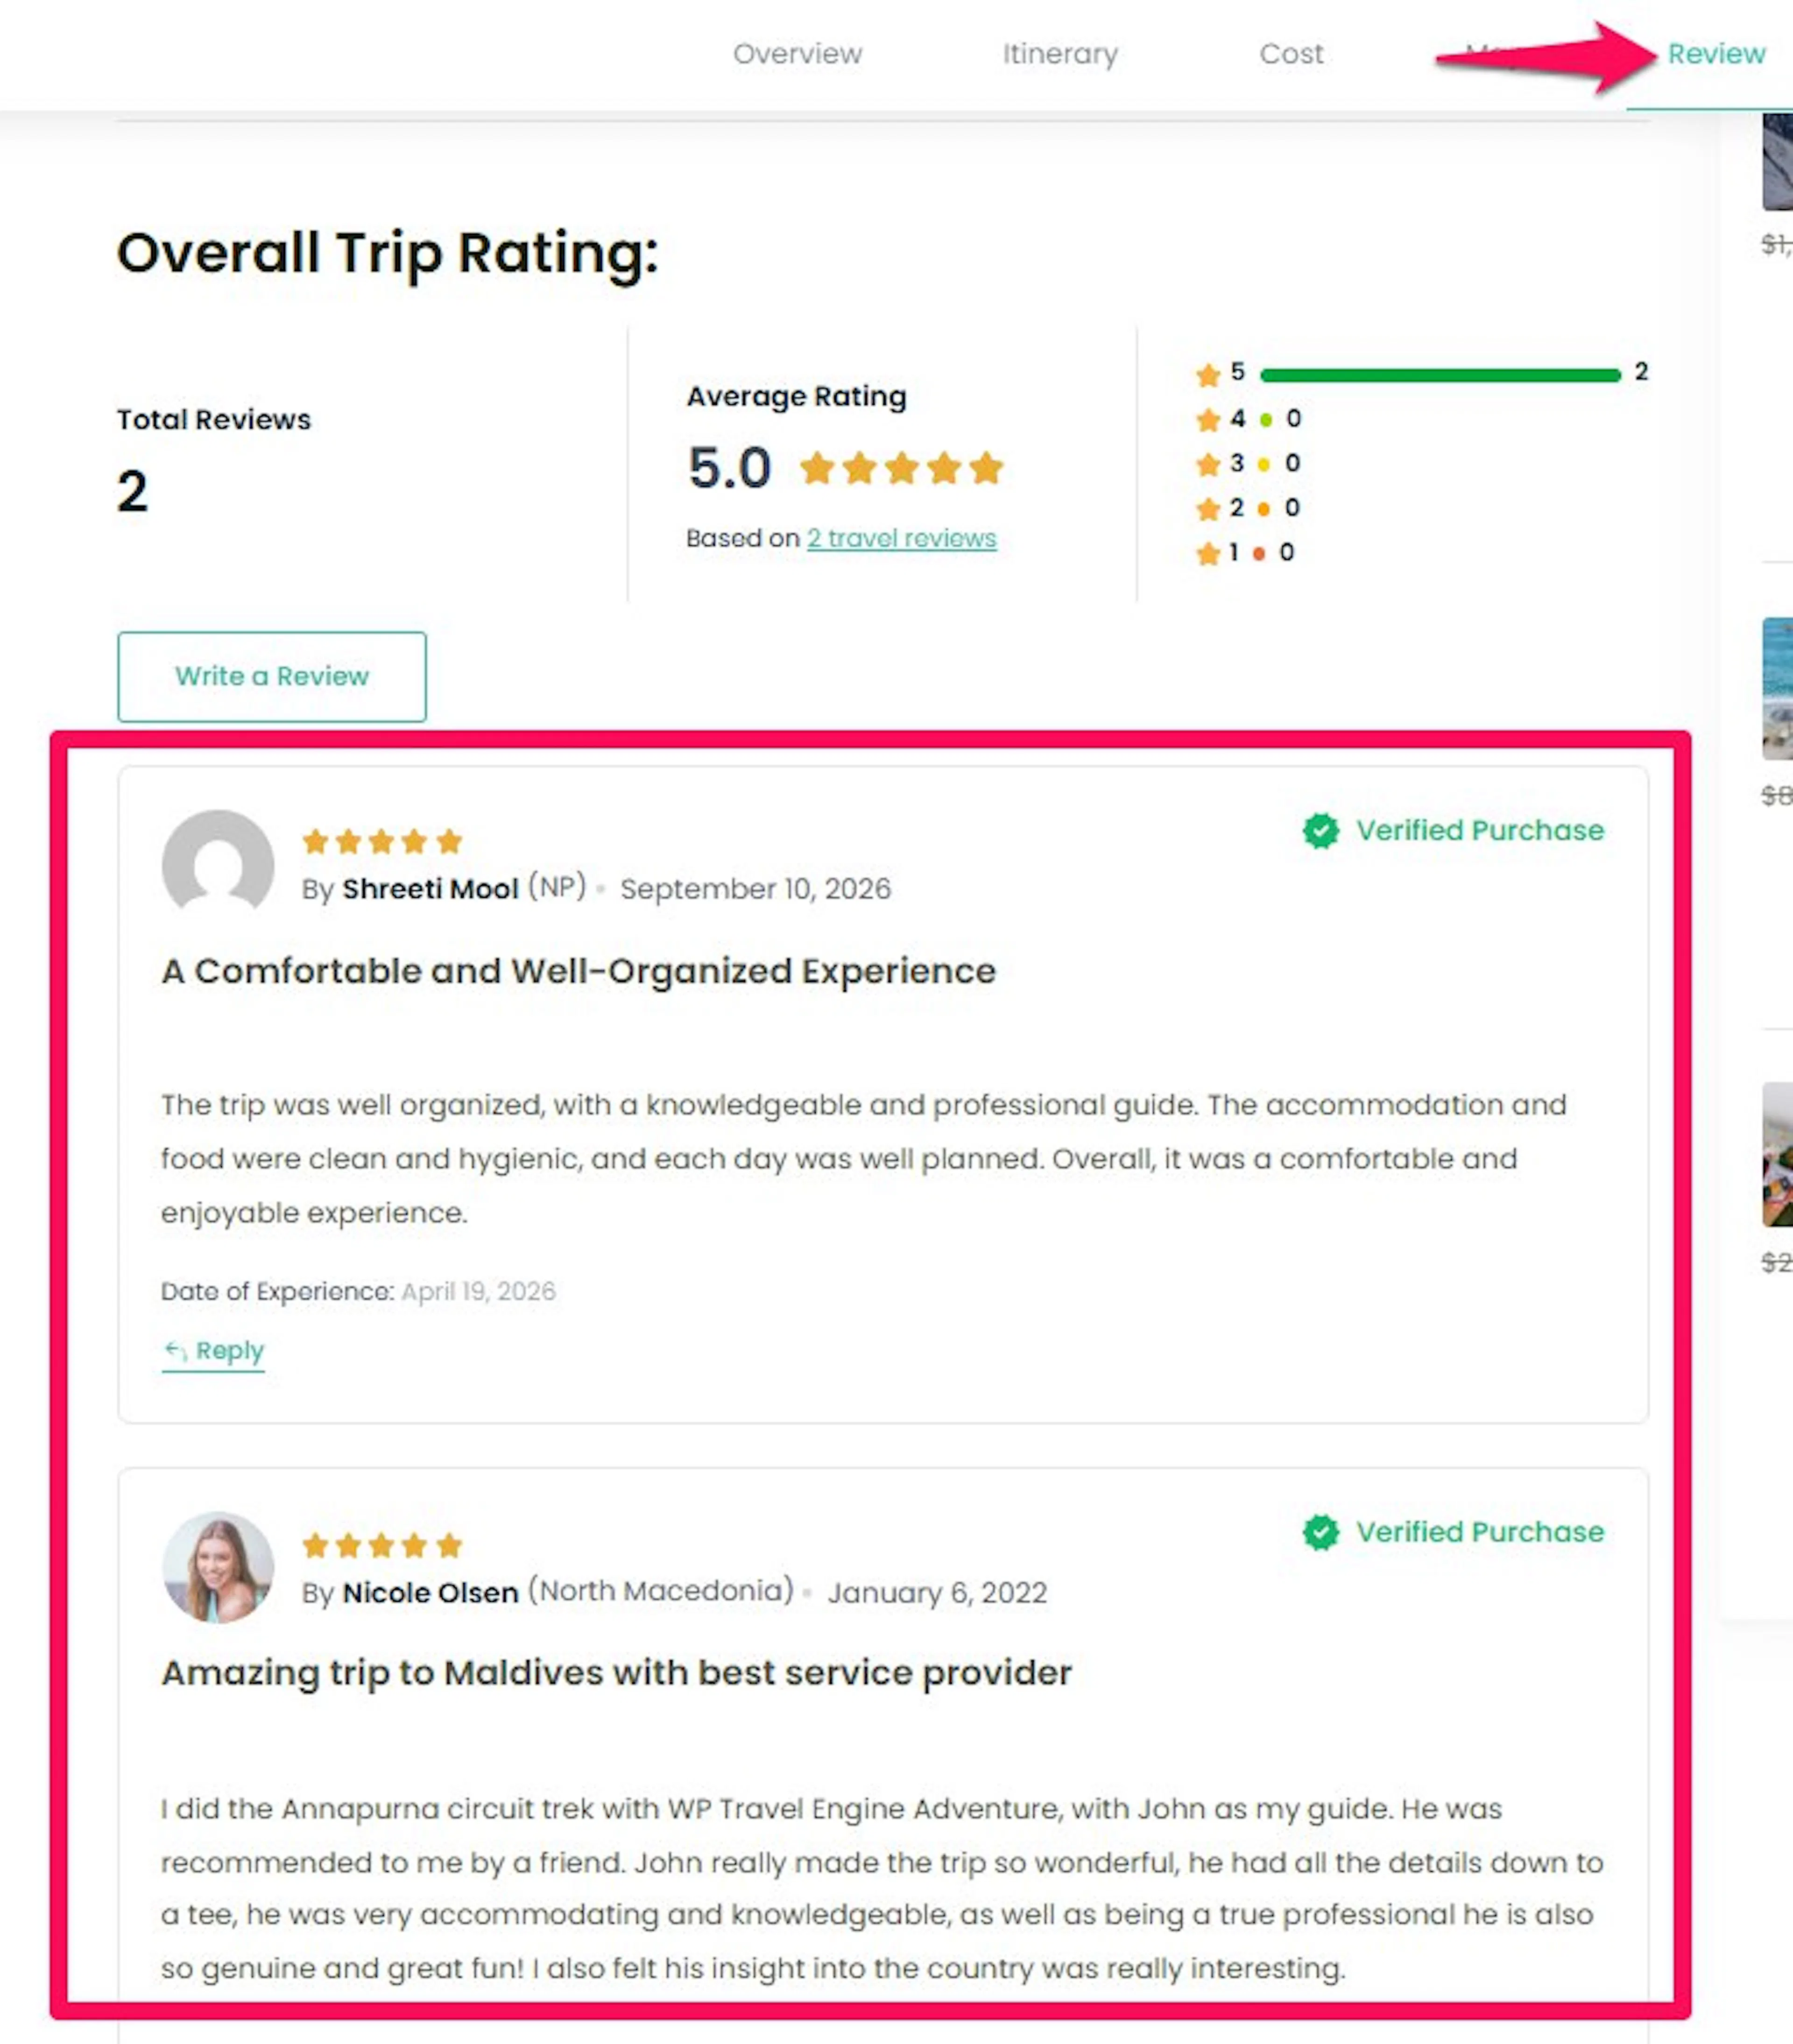
After a review is approved, it appears in the Review tab on the trip page. The plugin also calculates an average star rating based on all the approved reviews for that trip.
Say your 3-day jungle trek has four reviews. Three travelers gave it 5 stars and one gave it 4 stars. The review section will show an average rating of 4.75 stars, along with each individual review. That average gives new visitors a quick sense of how past travelers felt.
That is the full setup. Your trip pages now show real reviews from real travelers.
Troubleshooting
These are the most common things tour operators run into when setting up reviews. If something looks wrong, check here before you start over.
Reviews aren't showing up on my trip page
Check that Show Trip Reviews is turned on in the global settings. You can find it under WP Travel Engine, then Settings, then Extensions, then Trip Reviews. Also check that at least one review has been approved for that trip. Reviews waiting for approval do not appear on the page.
The review form isn't appearing on my trip
The Show Trip Review Form switch needs to be turned on. It only appears after Show Trip Reviews is also on. Check both switches under WP Travel Engine, then Settings, then Extensions, then Trip Reviews.
I added a review but it's not showing on the trip page
Make sure you selected the right trip when filling in the review. Also check that you clicked Save to publish it. A review that was filled in but not saved will not appear.
I can't find the Trip Reviews menu in my dashboard
The add-on may not be activated. Check that the Trip Reviews add-on is installed and activated. Also make sure your license key has been entered. See the license key activation link at the top of this page if you need help with that.
I'm getting spam reviews on my trip pages
Turn on Enable reCAPTCHA in the Security settings. The reCAPTCHA keys are set up separately under WP Travel Engine, then Settings, then Extensions, then reCAPTCHA. Once those keys are in place, the review form will have spam protection.
FAQs
If you are still stuck or have a question we did not cover, our support team is happy to help. Reach out at our support page and we will get you sorted.