

Visibility & Rate Limits
Choose which pages of your tour website show the chat widget, and control how many conversations travelers can start and how much you spend on AI each day, so the widget shows up where it helps and your costs stay predictable.
You can get to both tabs from the left sidebar of your WordPress dashboard. Go to Altus AI > Settings > Modules, find Trip Assistant, and select Configure. Then click the Visibility or Rate Limits tab at the top of the page.
Visibility
This tab decides where the chat widget appears on your website. You can show it on every page, only on your trip pages, or on specific pages you pick yourself.
The rules you set here are checked from top to bottom. The widget only loads on pages that pass every rule. That means it never slows down the pages where it does not belong.
Why does this matter? You want the assistant showing up where travelers have questions, like on a trip page where they are deciding whether to book. You do not want it on pages where it would distract, like a contact form or a blog post.
Say you run a multi-day trek to Annapurna Base Camp. A traveler reading that trip page might wonder what is included in the price or whether they need their own sleeping bag. That is exactly where the chat widget helps. On your "About Us" page, though, they are reading your story. A chat box there might feel like clutter.
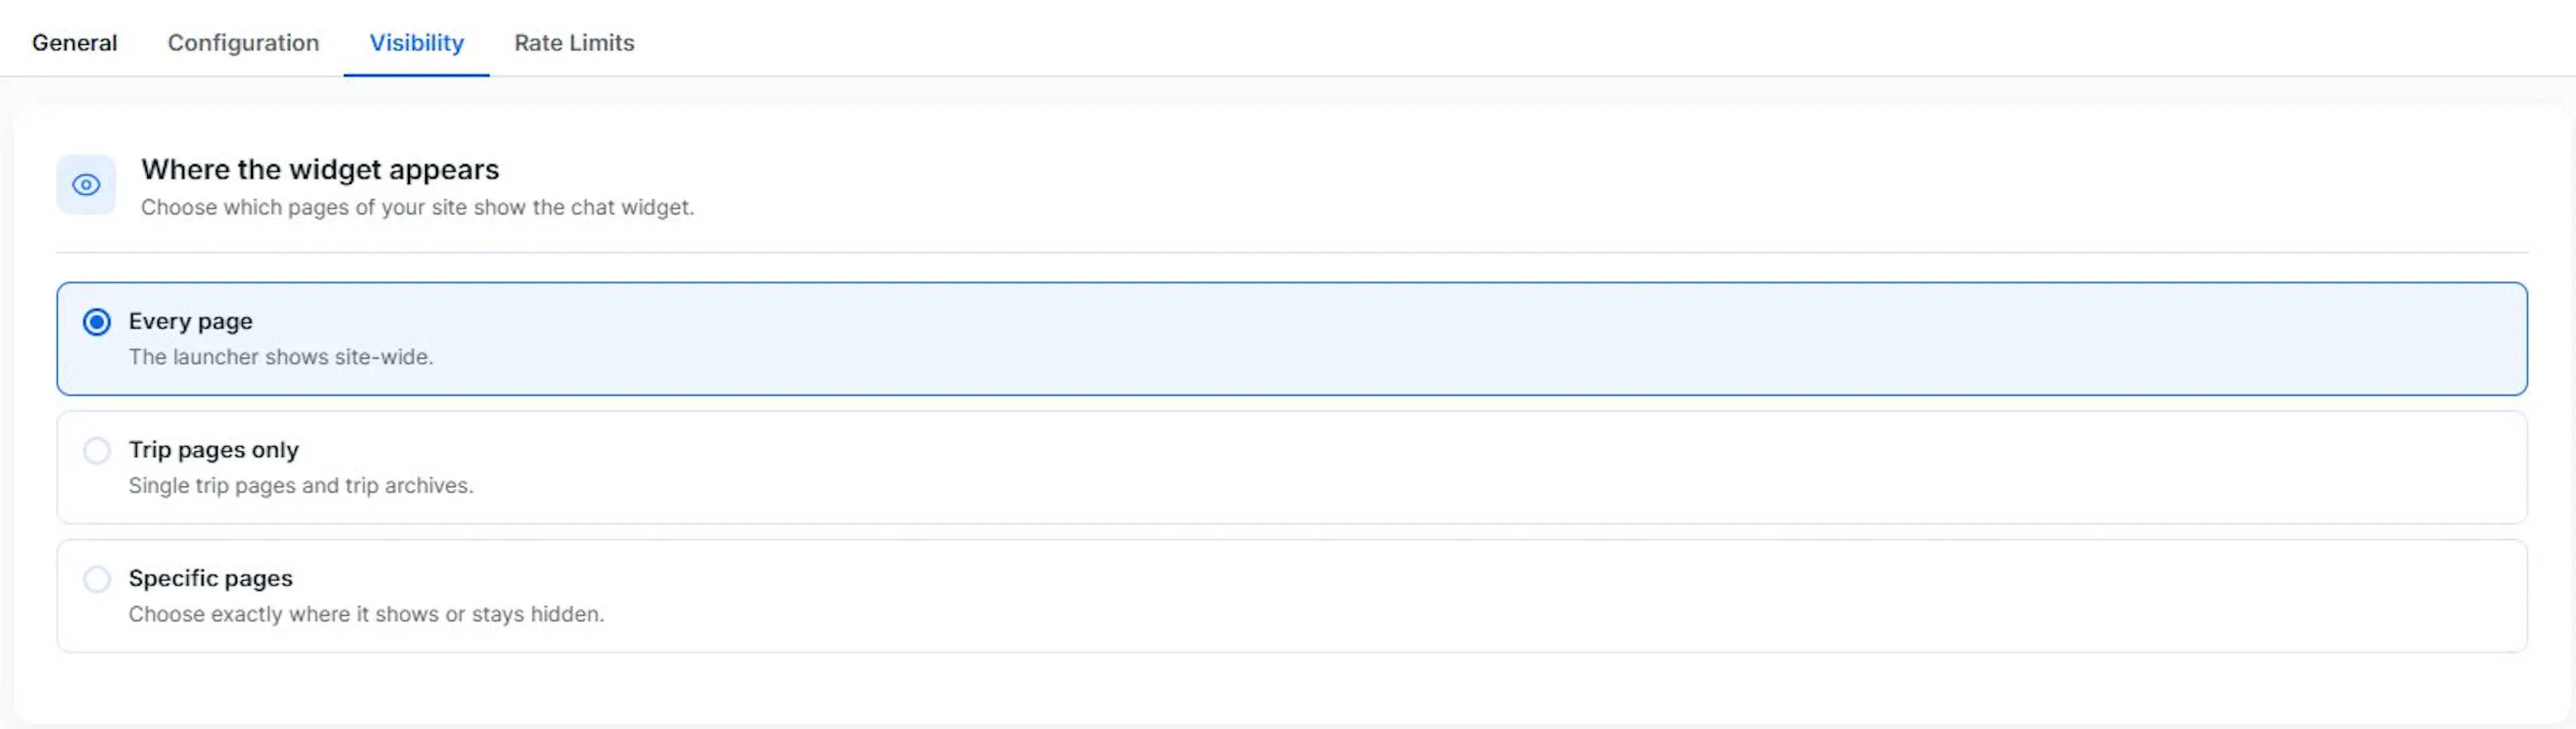
Where the Widget Appears
You have three choices for where the chat widget shows up. Pick the one that fits how you want travelers to find help on your site.
Every page: The widget appears on every page of your website. This works well if you want travelers to be able to ask questions no matter where they are. They might be browsing your homepage or reading about a specific trek.
Trip pages only: The widget shows up on your individual trip pages and your trip listing page. This makes sense for most tour operators. Travelers are most likely to have questions about dates, prices, and what is included when they are looking at a specific trip. This option puts help right where they need it.
Specific pages: You choose exactly which pages show the widget and which ones do not. This gives you the most control. It takes a bit more setup, though. Pick this if the trip-pages-only option does not cover what you need, and you want the widget on some pages but not others.
Once you have made your choice, you are done unless you picked Specific pages. In that case, the next section lets you fine-tune things.
Building an Allow or Block List
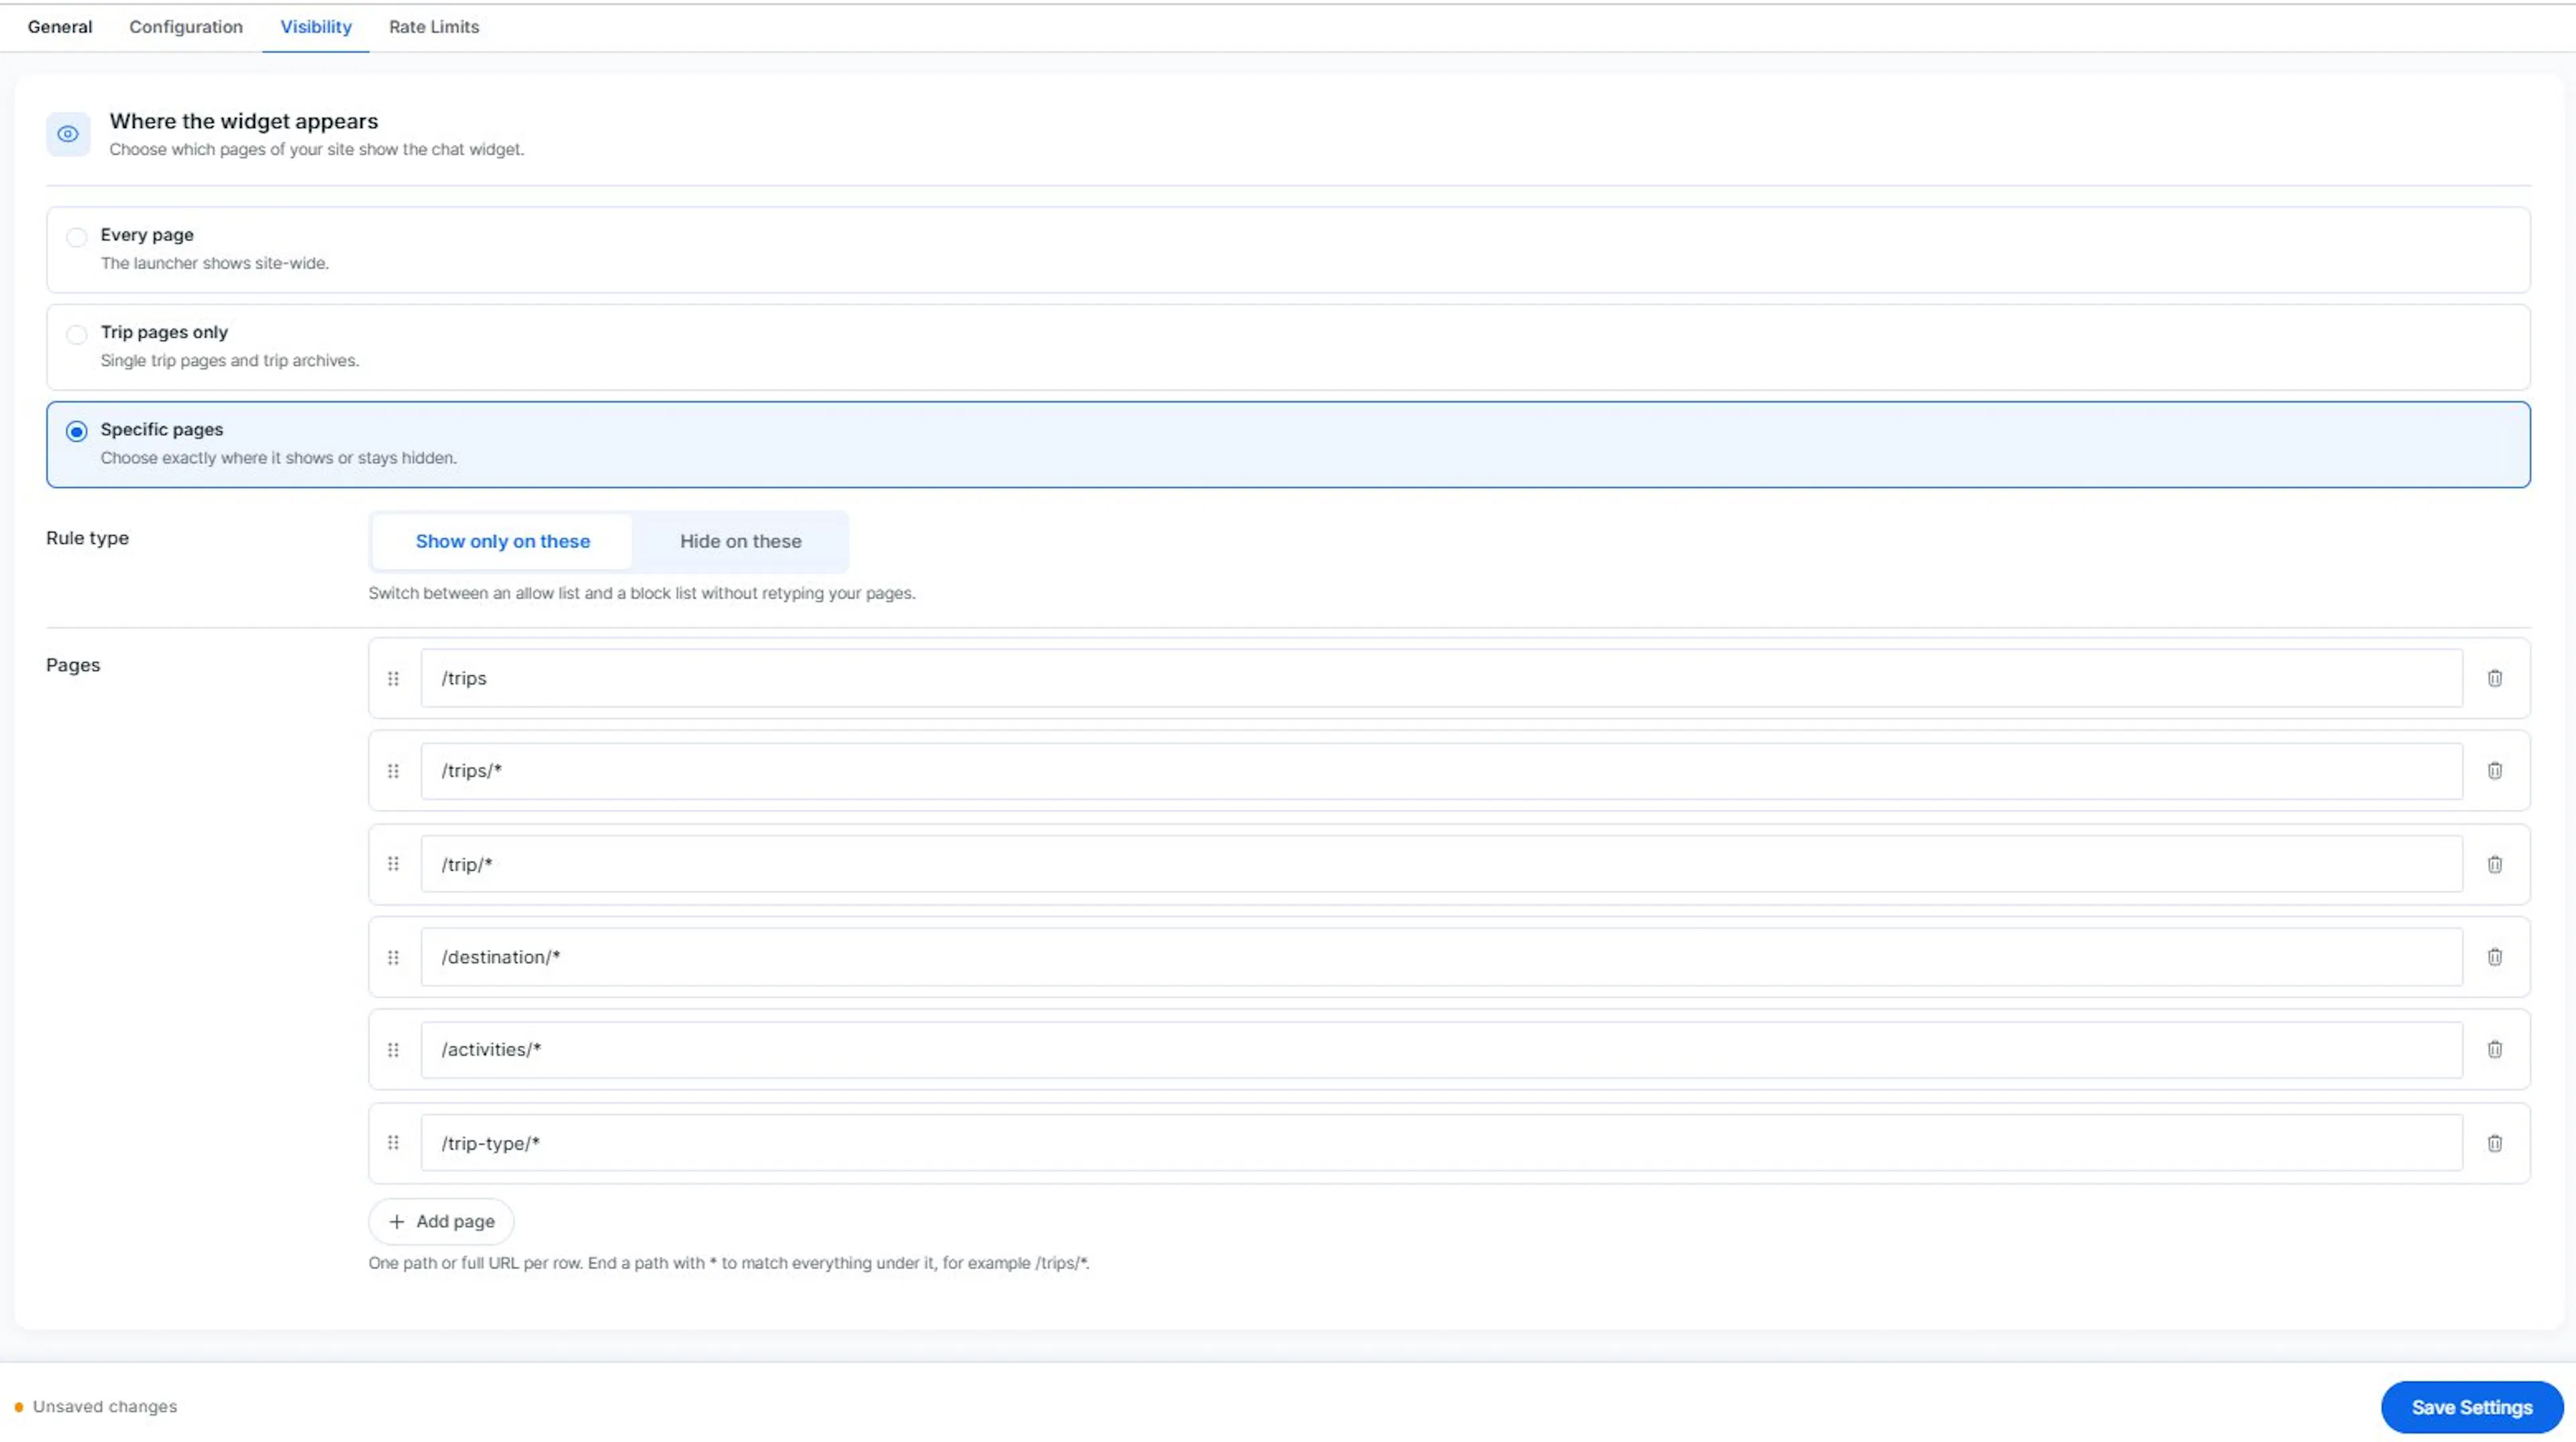
When you choose Specific pages, a new section appears below with a rule builder. This is where you tell the widget exactly which pages to show up on.
Think of it like a guest list for your trip. An allow list is like saying "only these people can come." A block list is like saying "everyone can come except these people." You pick whichever one matches what you are trying to do.
Before you start, make sure you know which pages you want the widget on. You will need the page path for each one. A page path is the part of your web address that comes after your site name. For example, if your trip page is yoursite.com/trips/annapurna-trek, the path is /trips/annapurna-trek.
Pick your rule type
Choose Show only on these if you want the widget on specific pages and nowhere else. This is your allow list. Choose Hide on these if you want the widget everywhere except certain pages. This is your block list. You can switch between the two at any time without losing the pages you have already typed in.
Add your pages
Type one page path per row. You can use either the path (like /trips/annapurna-trek) or the full web address (like yoursite.com/trips/annapurna-trek). Press Enter after each one to add a new row. Take your time here. Getting the paths right means the widget shows up where you expect it to.
Use the star shortcut for groups of pages
If you want the widget on every page under a certain section, end the path with a star symbol (*). For example, /trips/* means "every page that starts with /trips/." This saves you from typing out each trip page one by one. Say you run twenty different treks. Instead of listing all twenty pages, you would type /trips/* once. The widget shows up on all of them.
Not sure where to start? Try Trip pages only first and see if it covers what you need. It is quicker than building a full list under Specific pages. You can always switch to Specific pages later if you find a page where the widget should or should not appear.
Rate Limits
This tab helps you control two things. First, how much each traveler can chat with the assistant in a day. Second, how much you spend on AI responses across your whole site.
The chat widget is great for travelers. But every answer it gives costs a small amount of AI processing. As more people find the widget, those costs can add up. This tab lets you set a ceiling on both daily usage and daily spending.
Say you launch a new trek and suddenly get a spike of visitors. Some might start several chats in a row. Others might ask one question and leave. The settings on this page keep things steady no matter how much traffic you get.
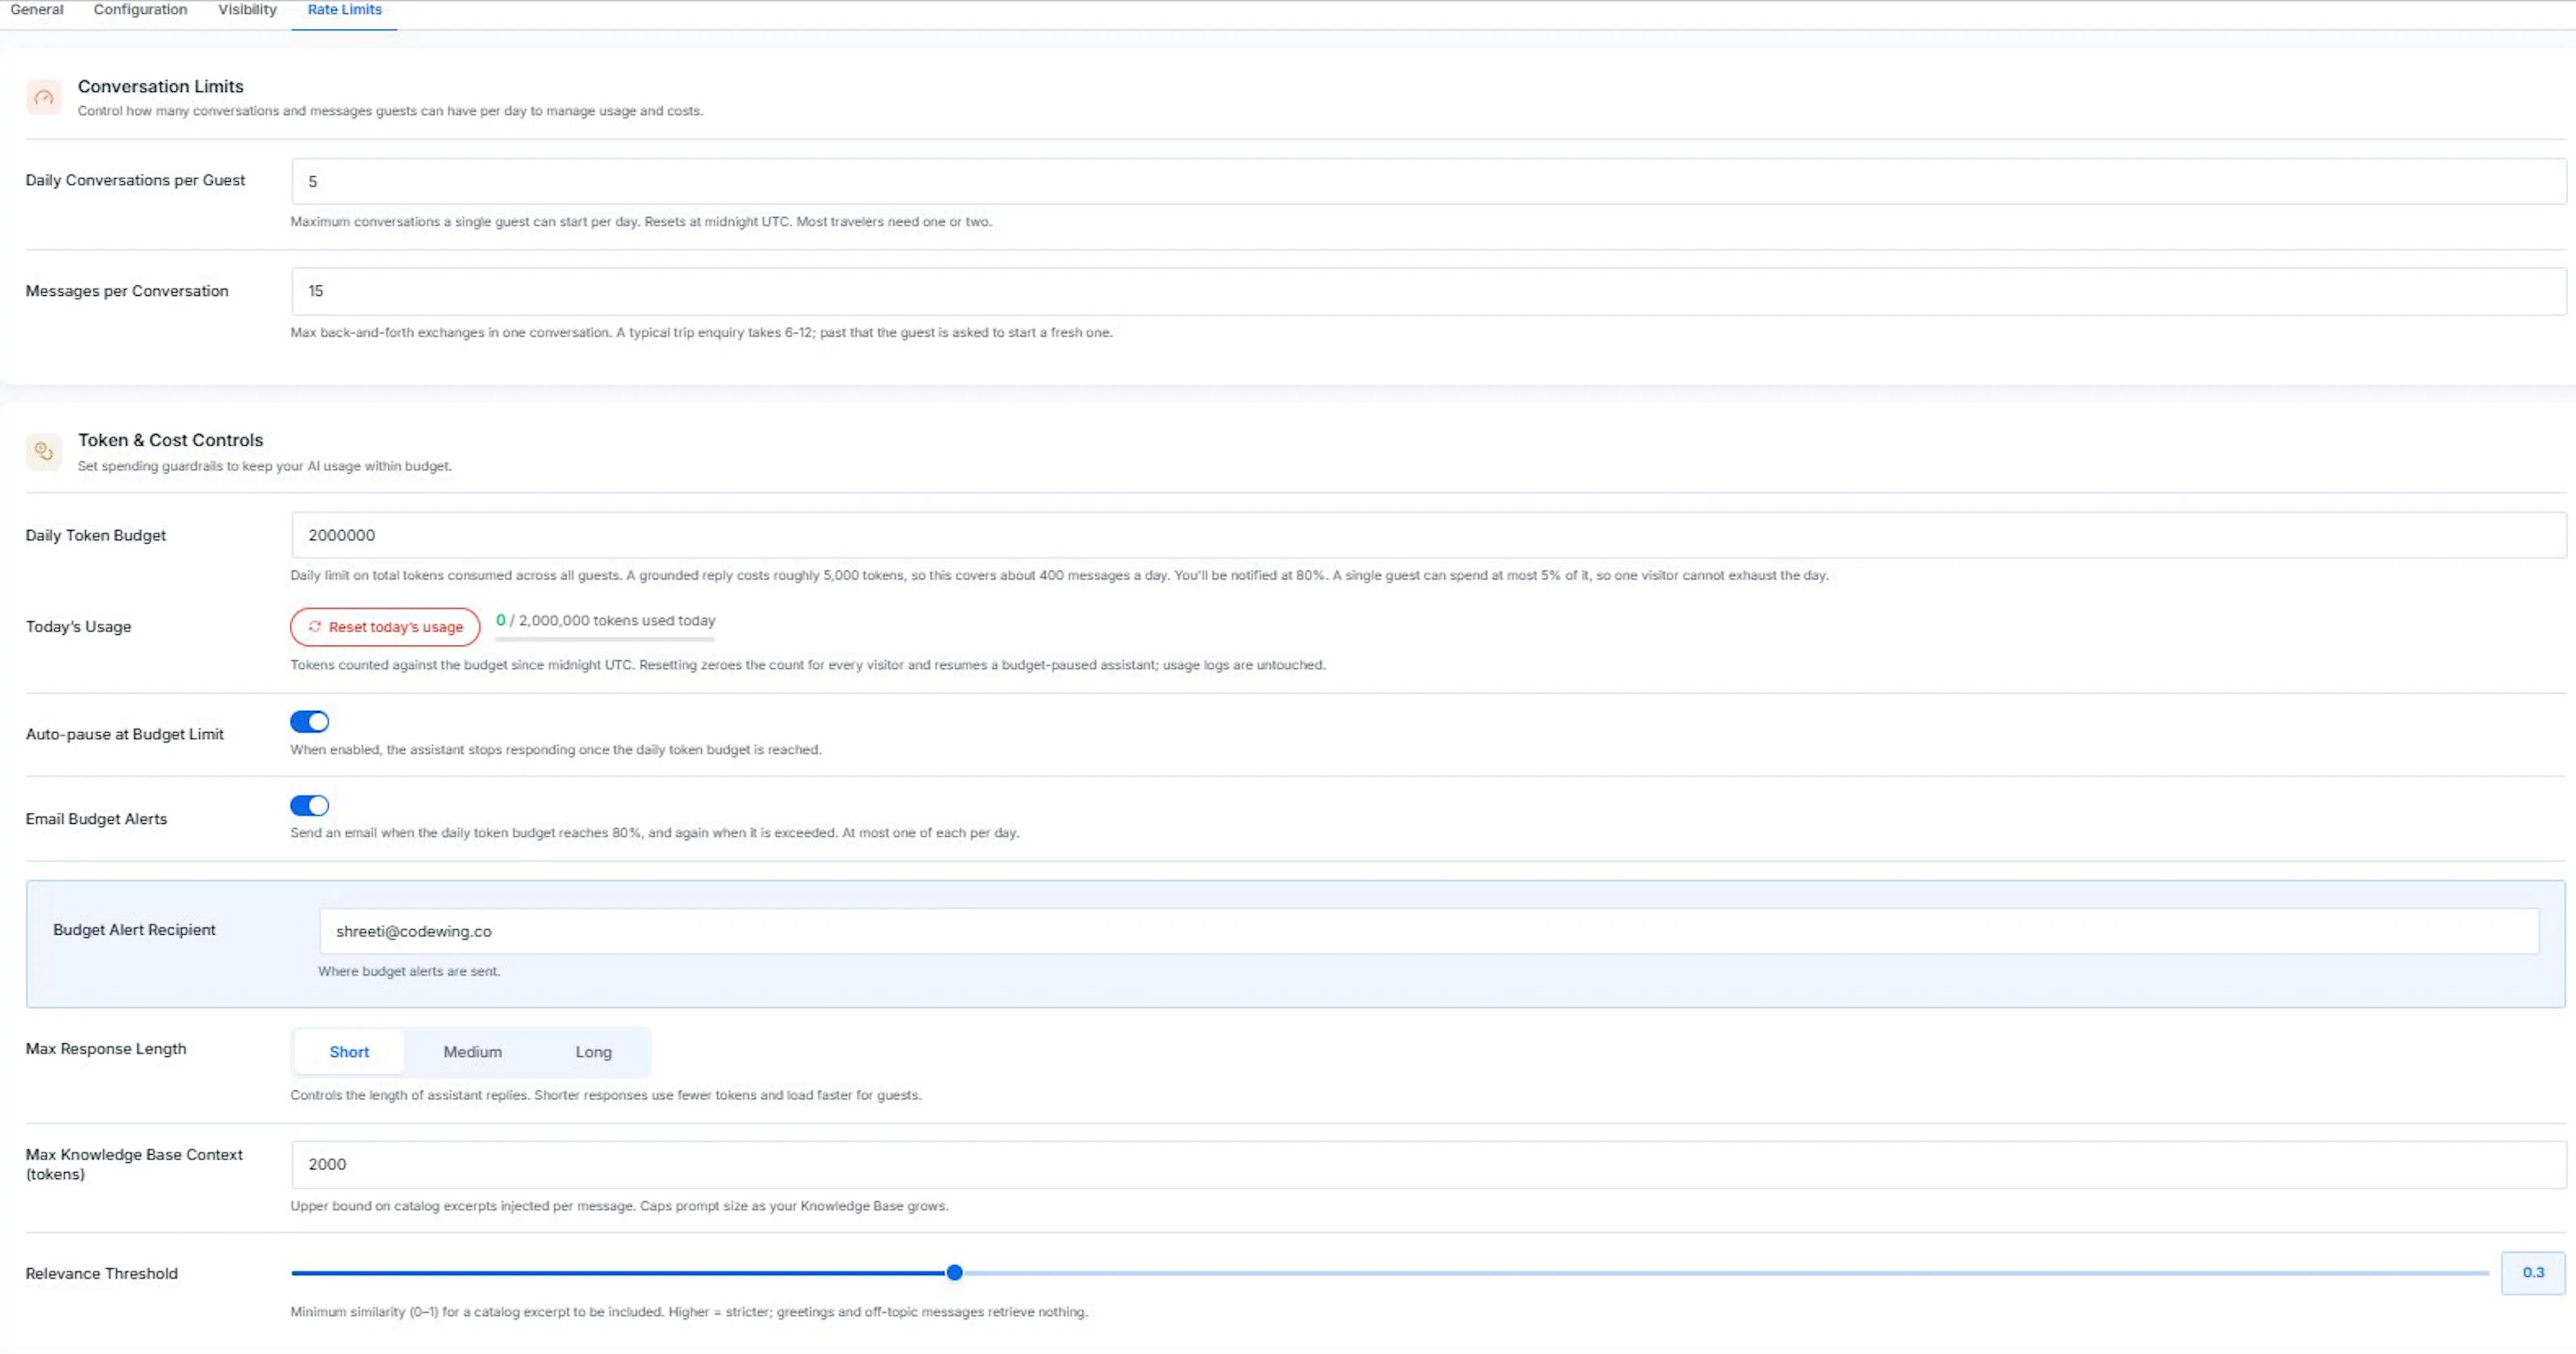
Conversation Limits
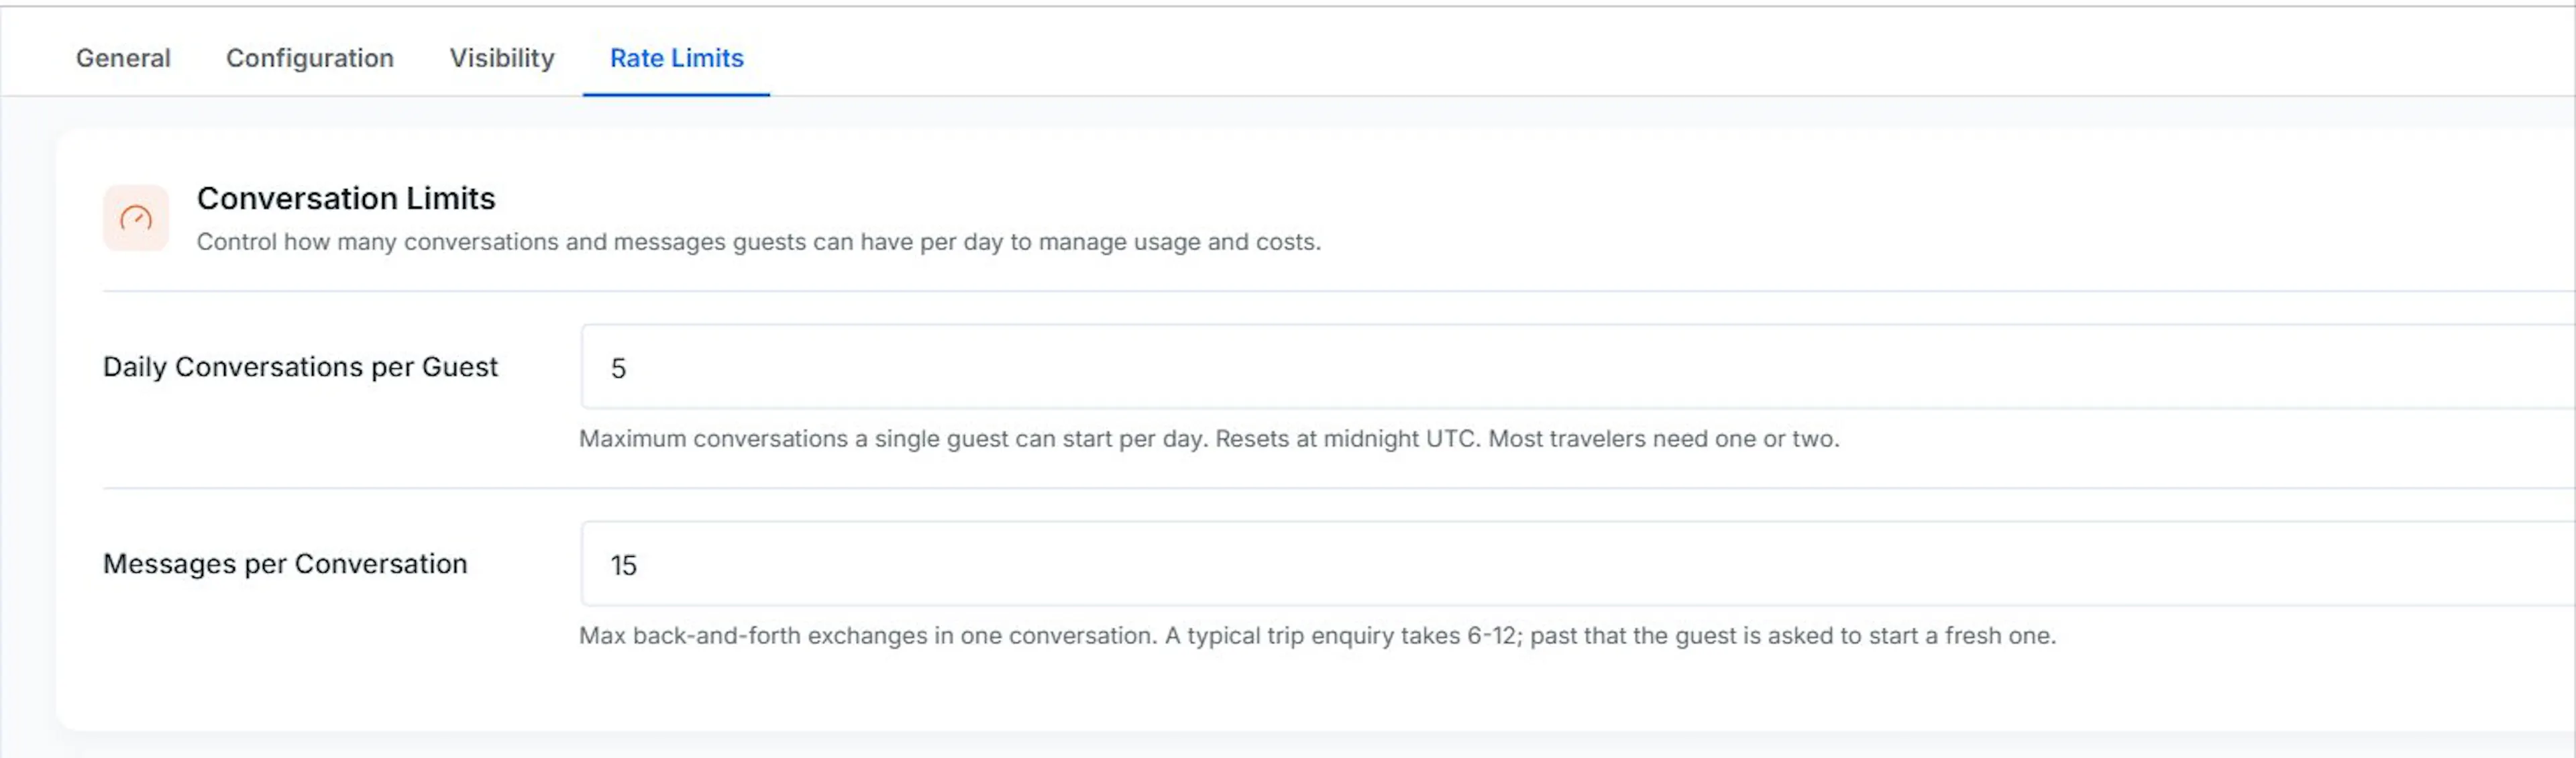
These three settings control how much chatting a single traveler can do in one day. They keep one person from tying up the assistant when other travelers also need help.
Before you start, make sure the Trip Assistant is active on your site. These settings only take effect when the chat widget is running.
Set the daily conversations per guest
This is the maximum number of separate chats one traveler can start in a day. You can set it anywhere from 1 to 100. The count resets at midnight UTC. UTC is a world time standard, similar to Greenwich Mean Time, so the reset happens at the same moment no matter where your travelers are.
Most travelers only need one or two conversations. Say a traveler is comparing three treks on your site. They might start a chat on each trip page. A limit of 3 would cover that without letting someone open dozens of chats.
Set the messages per conversation
This is the maximum number of back-and-forth exchanges in a single chat. You can set it from 1 to 100. A typical trip enquiry takes about 6 to 12 exchanges. The traveler might ask about dates, then price, then what is included, then group discounts. Past the limit, the guest is asked to start a fresh conversation instead.
These settings work quietly in the background once you save them. Next, let's look at the settings that control your daily spending.
Token & Cost Controls
These settings control how much you spend on AI each day. Before you go through them, one word you'll see here needs a quick explanation.
A "token" is how AI models count words. Think of tokens like a meter that ticks as the assistant reads and writes. A short reply might use a few hundred tokens. A longer one that pulls in trip details from your catalog might use a few thousand. You don't need to count them yourself. The system tracks them and stops when the daily limit is reached.
Your "Knowledge Base" is the collection of trips, FAQs, and other content on your site that the assistant uses to answer questions. When a traveler asks something, the assistant searches that collection for relevant sections and includes them in its reply.
Set the daily token budget
This is the most you want to spend on AI processing in a single day. You can set a minimum of 20,000 tokens. A typical reply that pulls in your trip details costs roughly 5,000 tokens, so this setting determines about how many answers your site can handle each day.
Think of it like a daily fuel budget for a vehicle. Once you use it up, the vehicle stops running until the next day. Trip Assistant lets you know when you have used 80% of the budget. It also caps any single traveler at 5% of the total, so one visitor can't use up your whole day's budget on their own.
Check today's usage
Right under the budget field, a running count shows how many tokens have been used since midnight UTC, with a bar that turns amber past 80% and red once the budget is gone.
Select Reset today's usage, then confirm, to zero that count for every traveler and bring a budget-paused assistant back online. This doesn't touch your usage history, only today's live count.
Turn on auto-pause at budget limit
Toggle this on to stop the assistant from responding once the daily token budget is reached. This is the safety net that keeps your costs from climbing past what you set.
Turn on email budget alerts
Toggle this on to get an email when the daily token budget reaches 80%, and another if it's exceeded. You'll get at most one of each per day.
Once it's on, find Budget Alert Recipient and enter the address that should receive them. It starts filled in with your WordPress admin email.
Choose the maximum response length
Pick Short, Medium, or Long. Shorter responses use fewer tokens and load faster for your travelers. If a traveler asks a quick question like "what time does the trek start?", a Short response gets them a fast answer. For something like "tell me everything included in the package," a Long response gives a more complete answer.
Set the maximum knowledge base context
This caps how much of your trip catalog the assistant can pull into a single reply. You can set it from 200 to 8,000 tokens. Say a traveler asks about your Annapurna trek. The assistant searches your catalog for the relevant sections and includes them in its answer. This setting controls how much of that content it can bring in for one message. As your trip catalog grows, this cap keeps each reply from getting too large.
Set the relevance threshold
This controls how closely a traveler's question needs to match your trip content before the assistant pulls it in. You can set it from 0 to 1. A higher number is stricter. Say a traveler only says "hi." There is nothing specific to search your catalog for. A higher threshold means the assistant won't try to pull in trip details for a greeting or an off-topic question. It keeps responses cleaner and saves your daily budget.
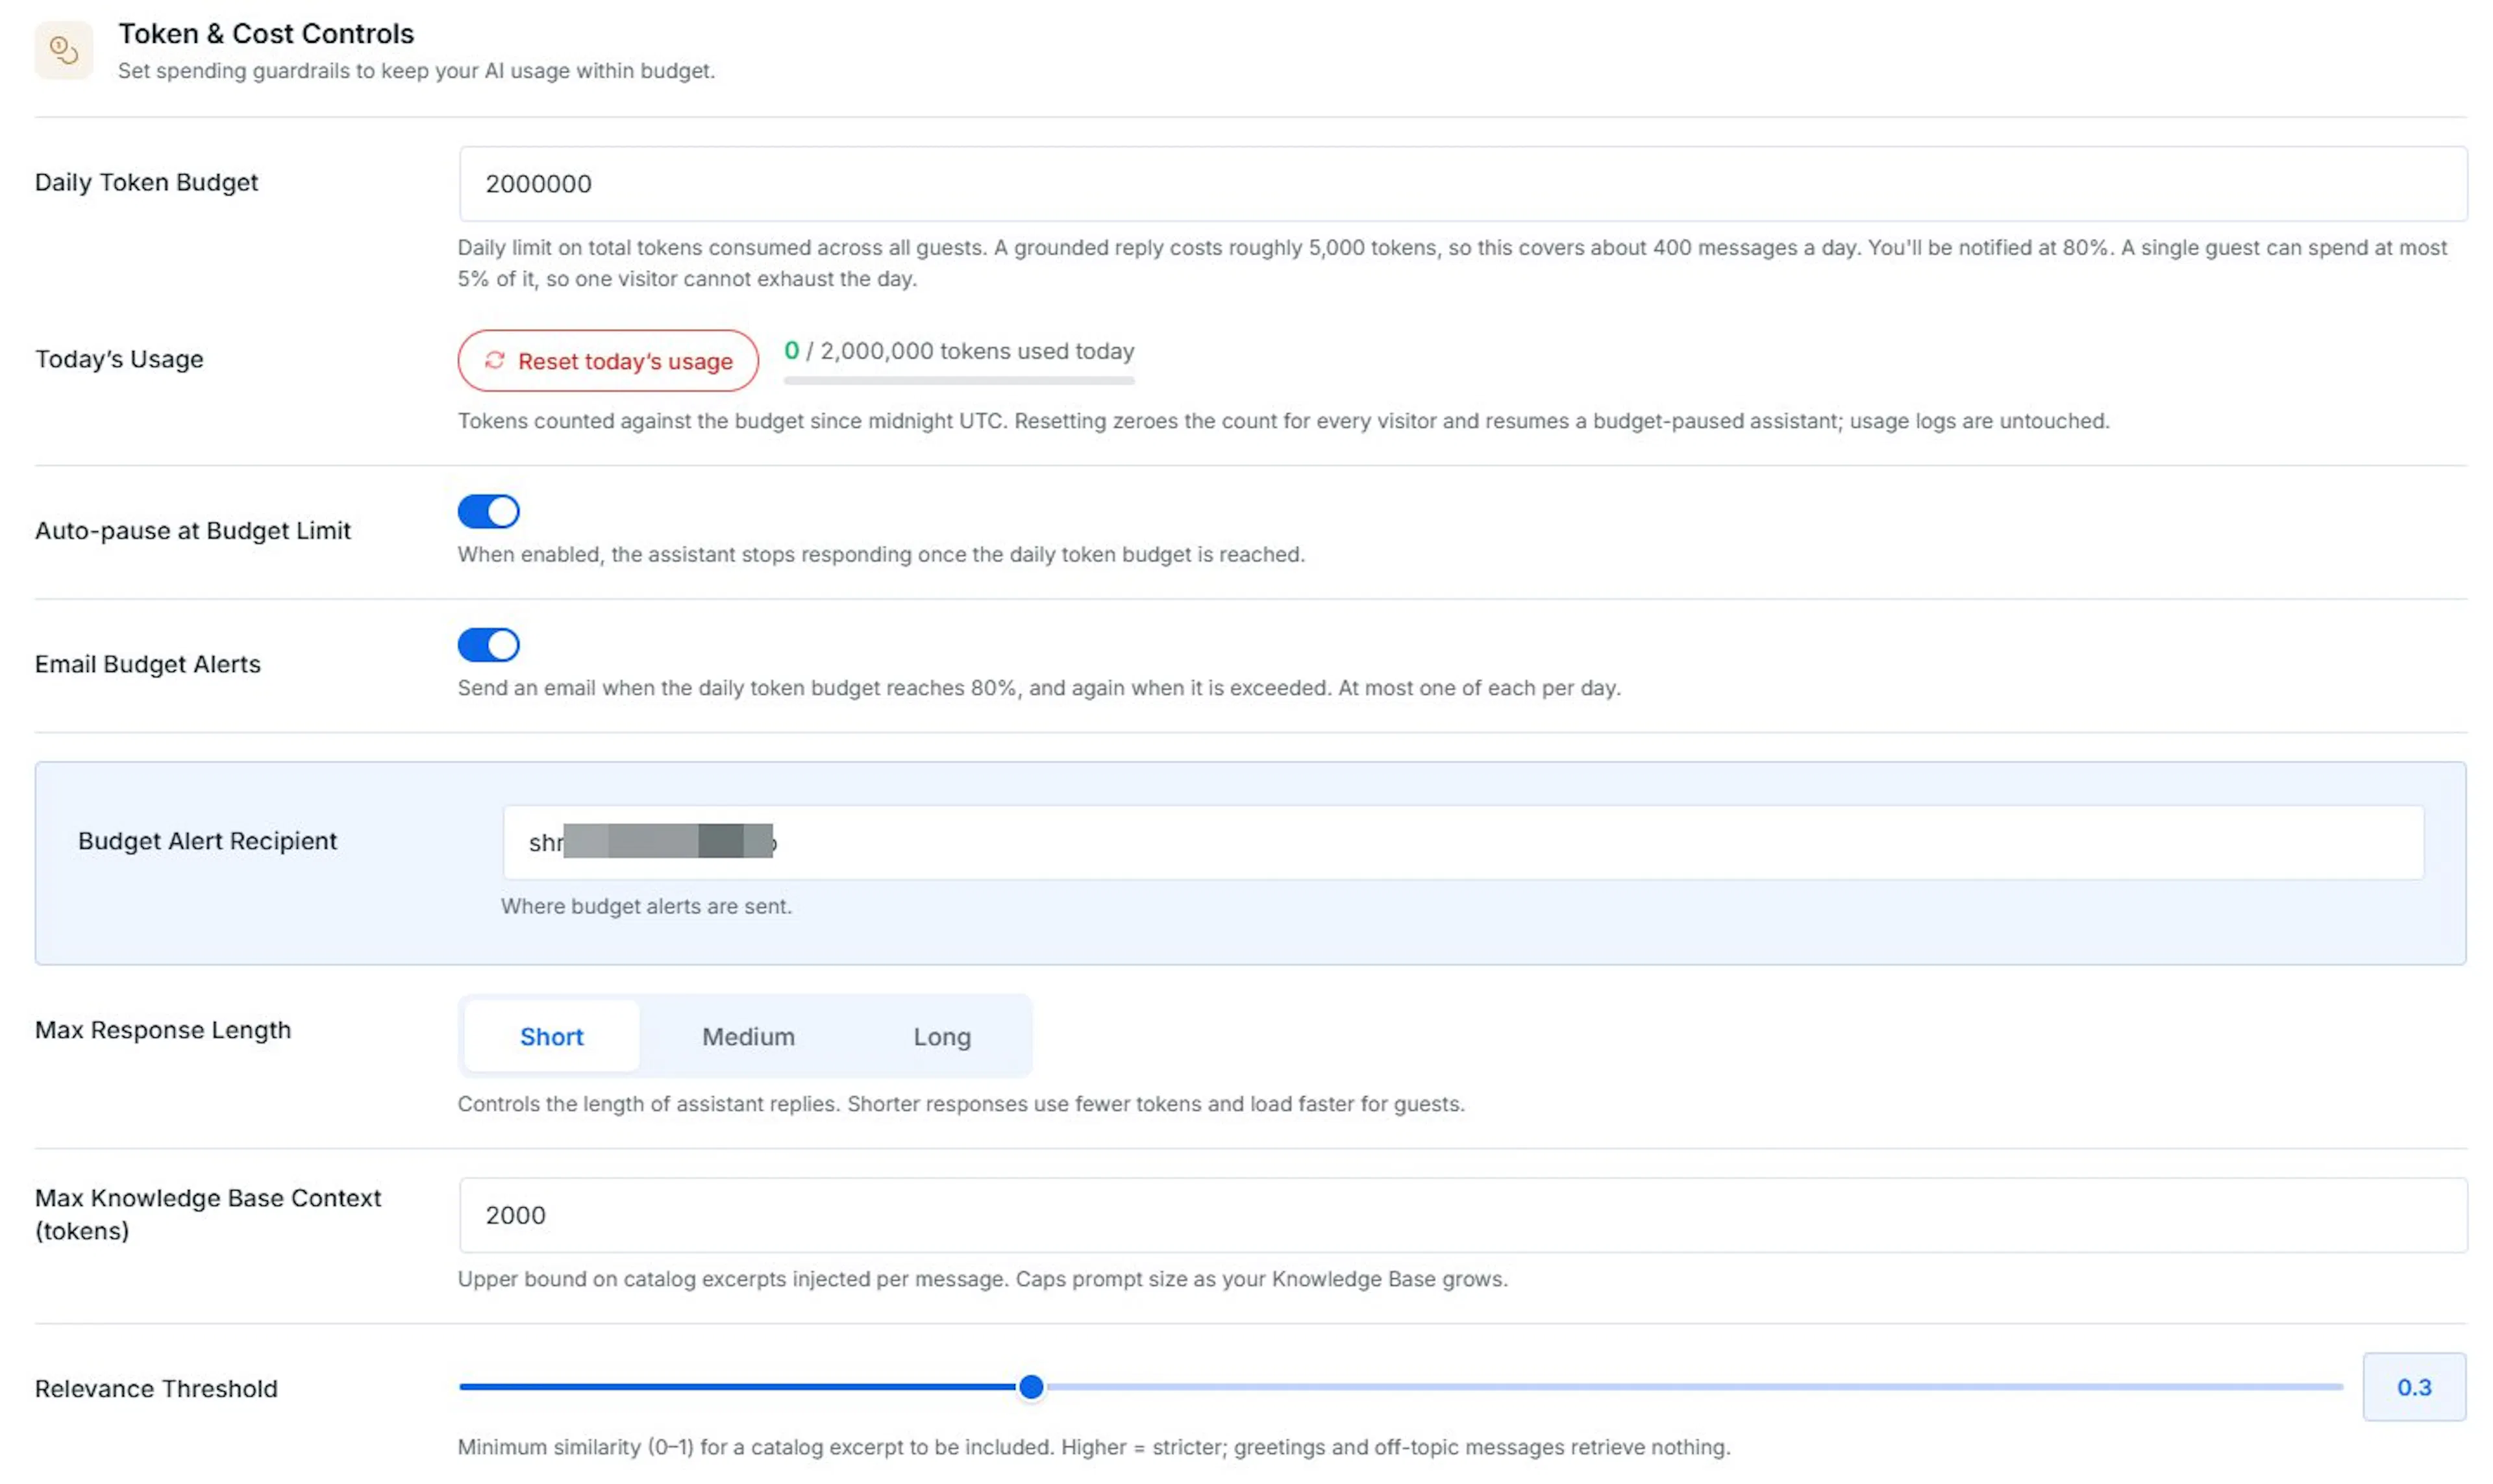
If you leave Auto-pause turned off, the assistant keeps responding even after the daily token budget is reached. That means your costs can keep climbing for the rest of the day. If your site gets a lot of traffic, think about whether that is something you want before switching it off. You can always turn it back on later.
Take your time adjusting these settings. You can always come back and fine-tune them as you see how travelers actually use the chat widget.
If you're still stuck or have a question we didn't cover, our support team is happy to help. Reach out at our support page and we'll get you sorted.