

General & Configuration
Choose the AI provider and model that power your assistant, then configure its identity, tone, appearance, handoff details, and chat tabs so travelers get helpful answers from your tour website.
General
The General tab sets which AI model answers travelers' questions, and which model indexes your trip catalog for search. These are the two model choices behind every reply the assistant gives.
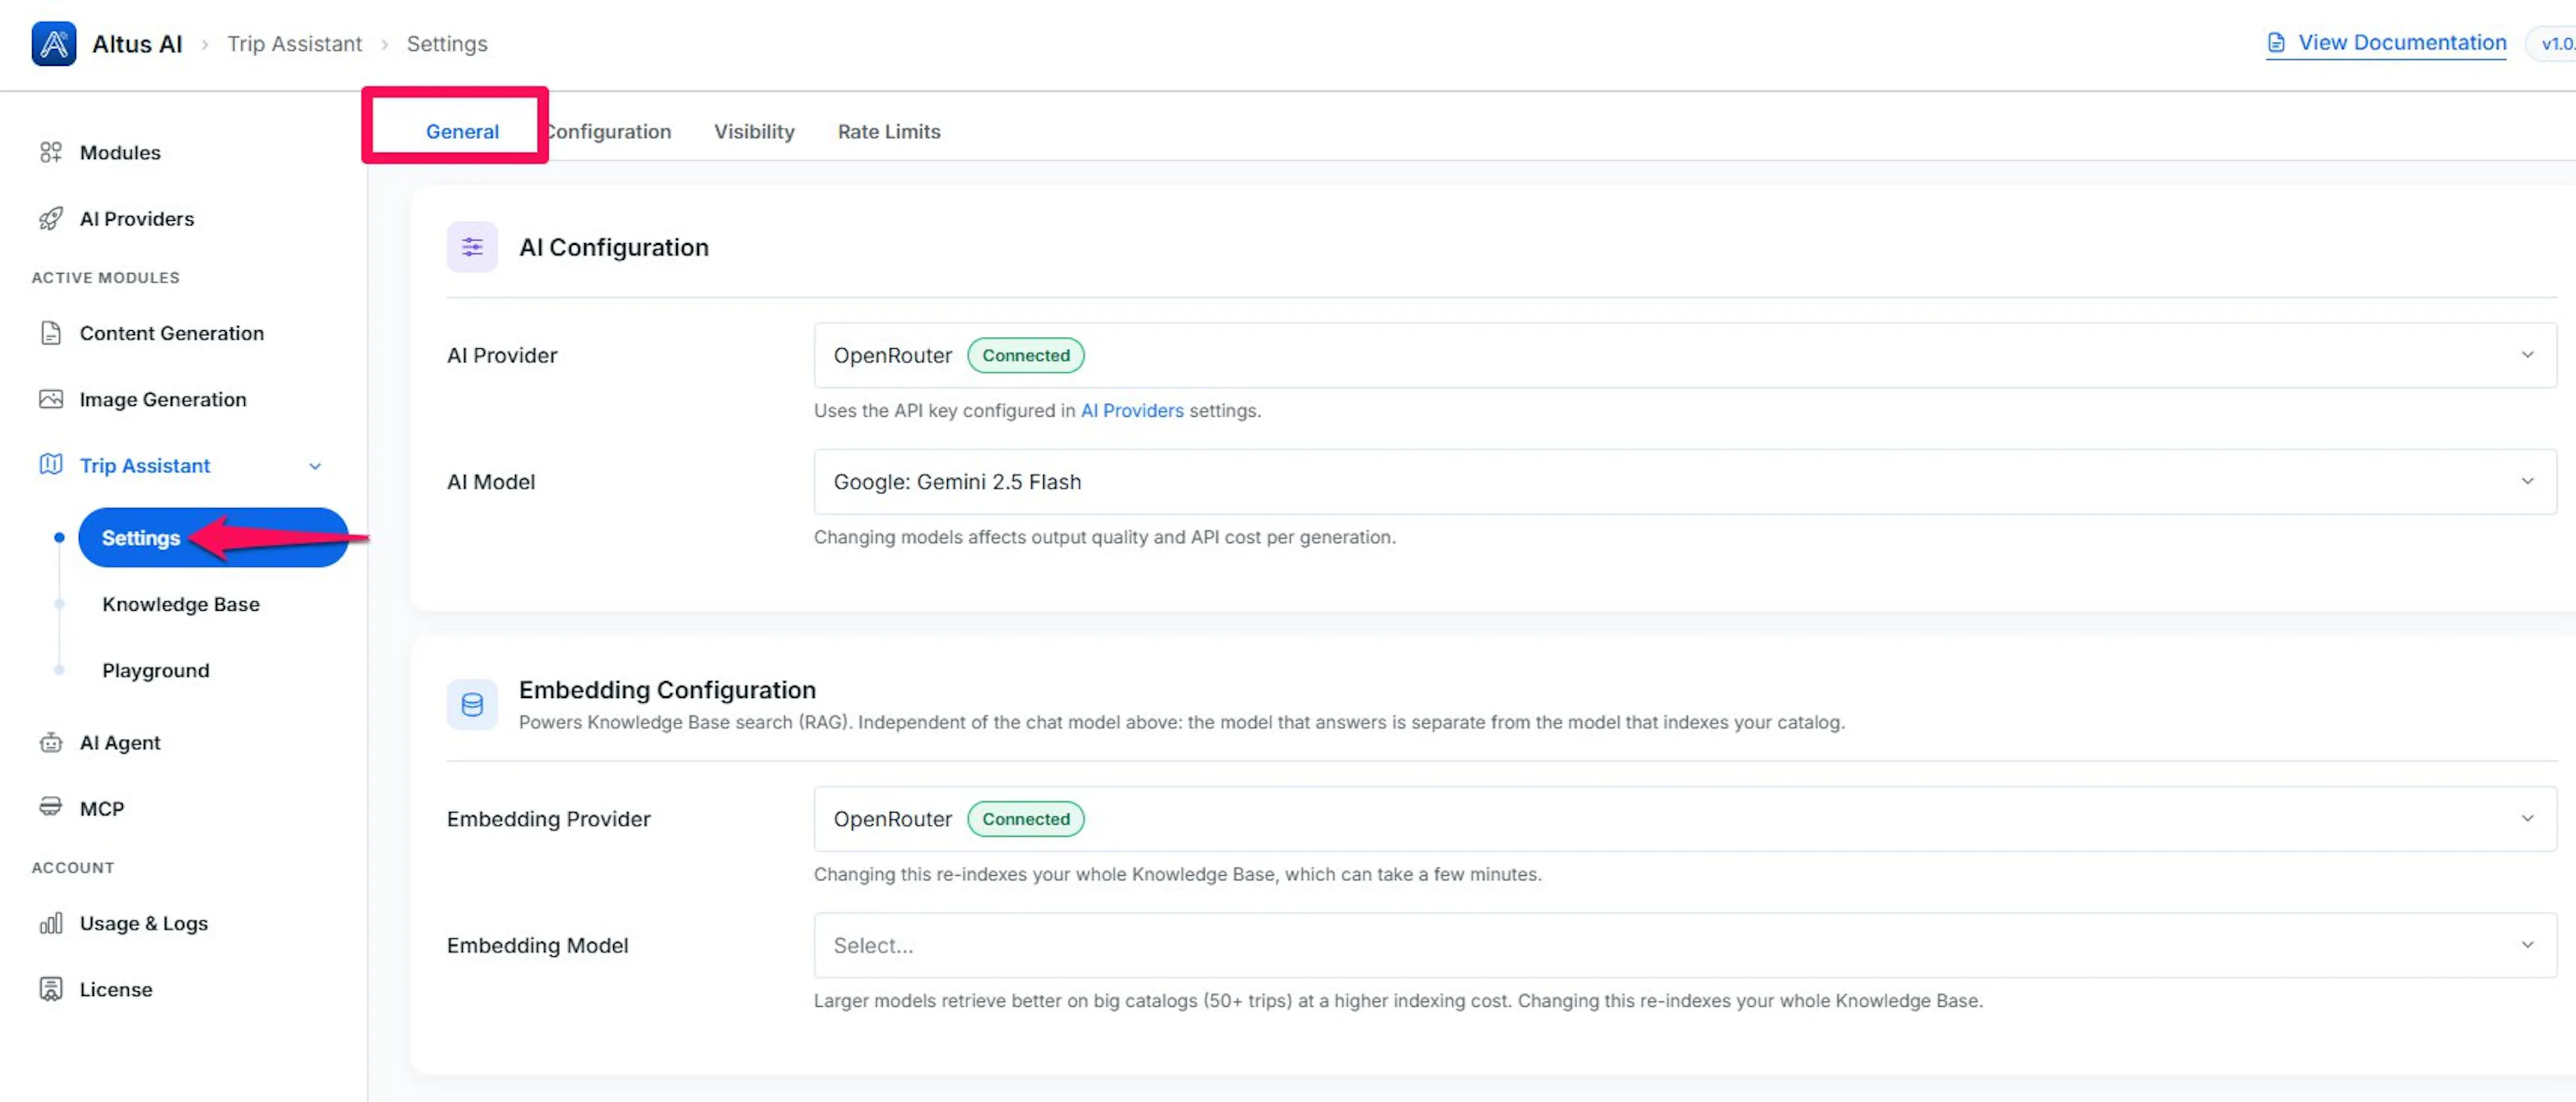
AI Configuration
AI Provider
Select the AI service that powers the chat. This list shows only the providers you've connected under Altus AI > AI Providers: OpenAI, Anthropic, Google, and OpenRouter are supported.
If the selected provider doesn't have an API key yet, Trip Assistant will not be displayed on the frontend until an API key is added.
AI Model
Choose the model from that provider that answers travelers. More capable models tend to give better answers but usually cost more per request.
If no models are loaded for the provider, go to AI Providers and select Test Connection to fetch its model list.
Embedding Configuration
This section powers Knowledge Base search (RAG). It works independently of the chat model above: the model that answers a traveler isn't the model that indexes your catalog.
Embedding Provider
Select the provider that generates embeddings for your Knowledge Base: OpenAIor OpenRouter.
Embedding Model
Choose the embedding model from that provider. A larger model retrieves better on big catalogs (50+ trips), at a higher indexing cost.
- OpenAI: text-embedding-3-small (1536 dimensions, cheapest) or text-embedding-3-large (3072 dimensions, best recall on large catalogs).
- OpenRouter: the same two OpenAI models, plus Qwen3 Embedding 8B, Gemini Embedding 001, Voyage 4 Lite, and BGE-M3, each suited to different catalog sizes and languages.
Changing this re-indexes your whole Knowledge Base, which can take a few minutes.
Configuration
The Configuration tab helps you set up the part of your tour website that travelers see and use. Think of it as decorating the front desk of your tour office.
You can choose the assistant's name and logo. You can set its tone. You can decide what happens when it cannot help. You can control how the chat looks and what travelers find in each tab.
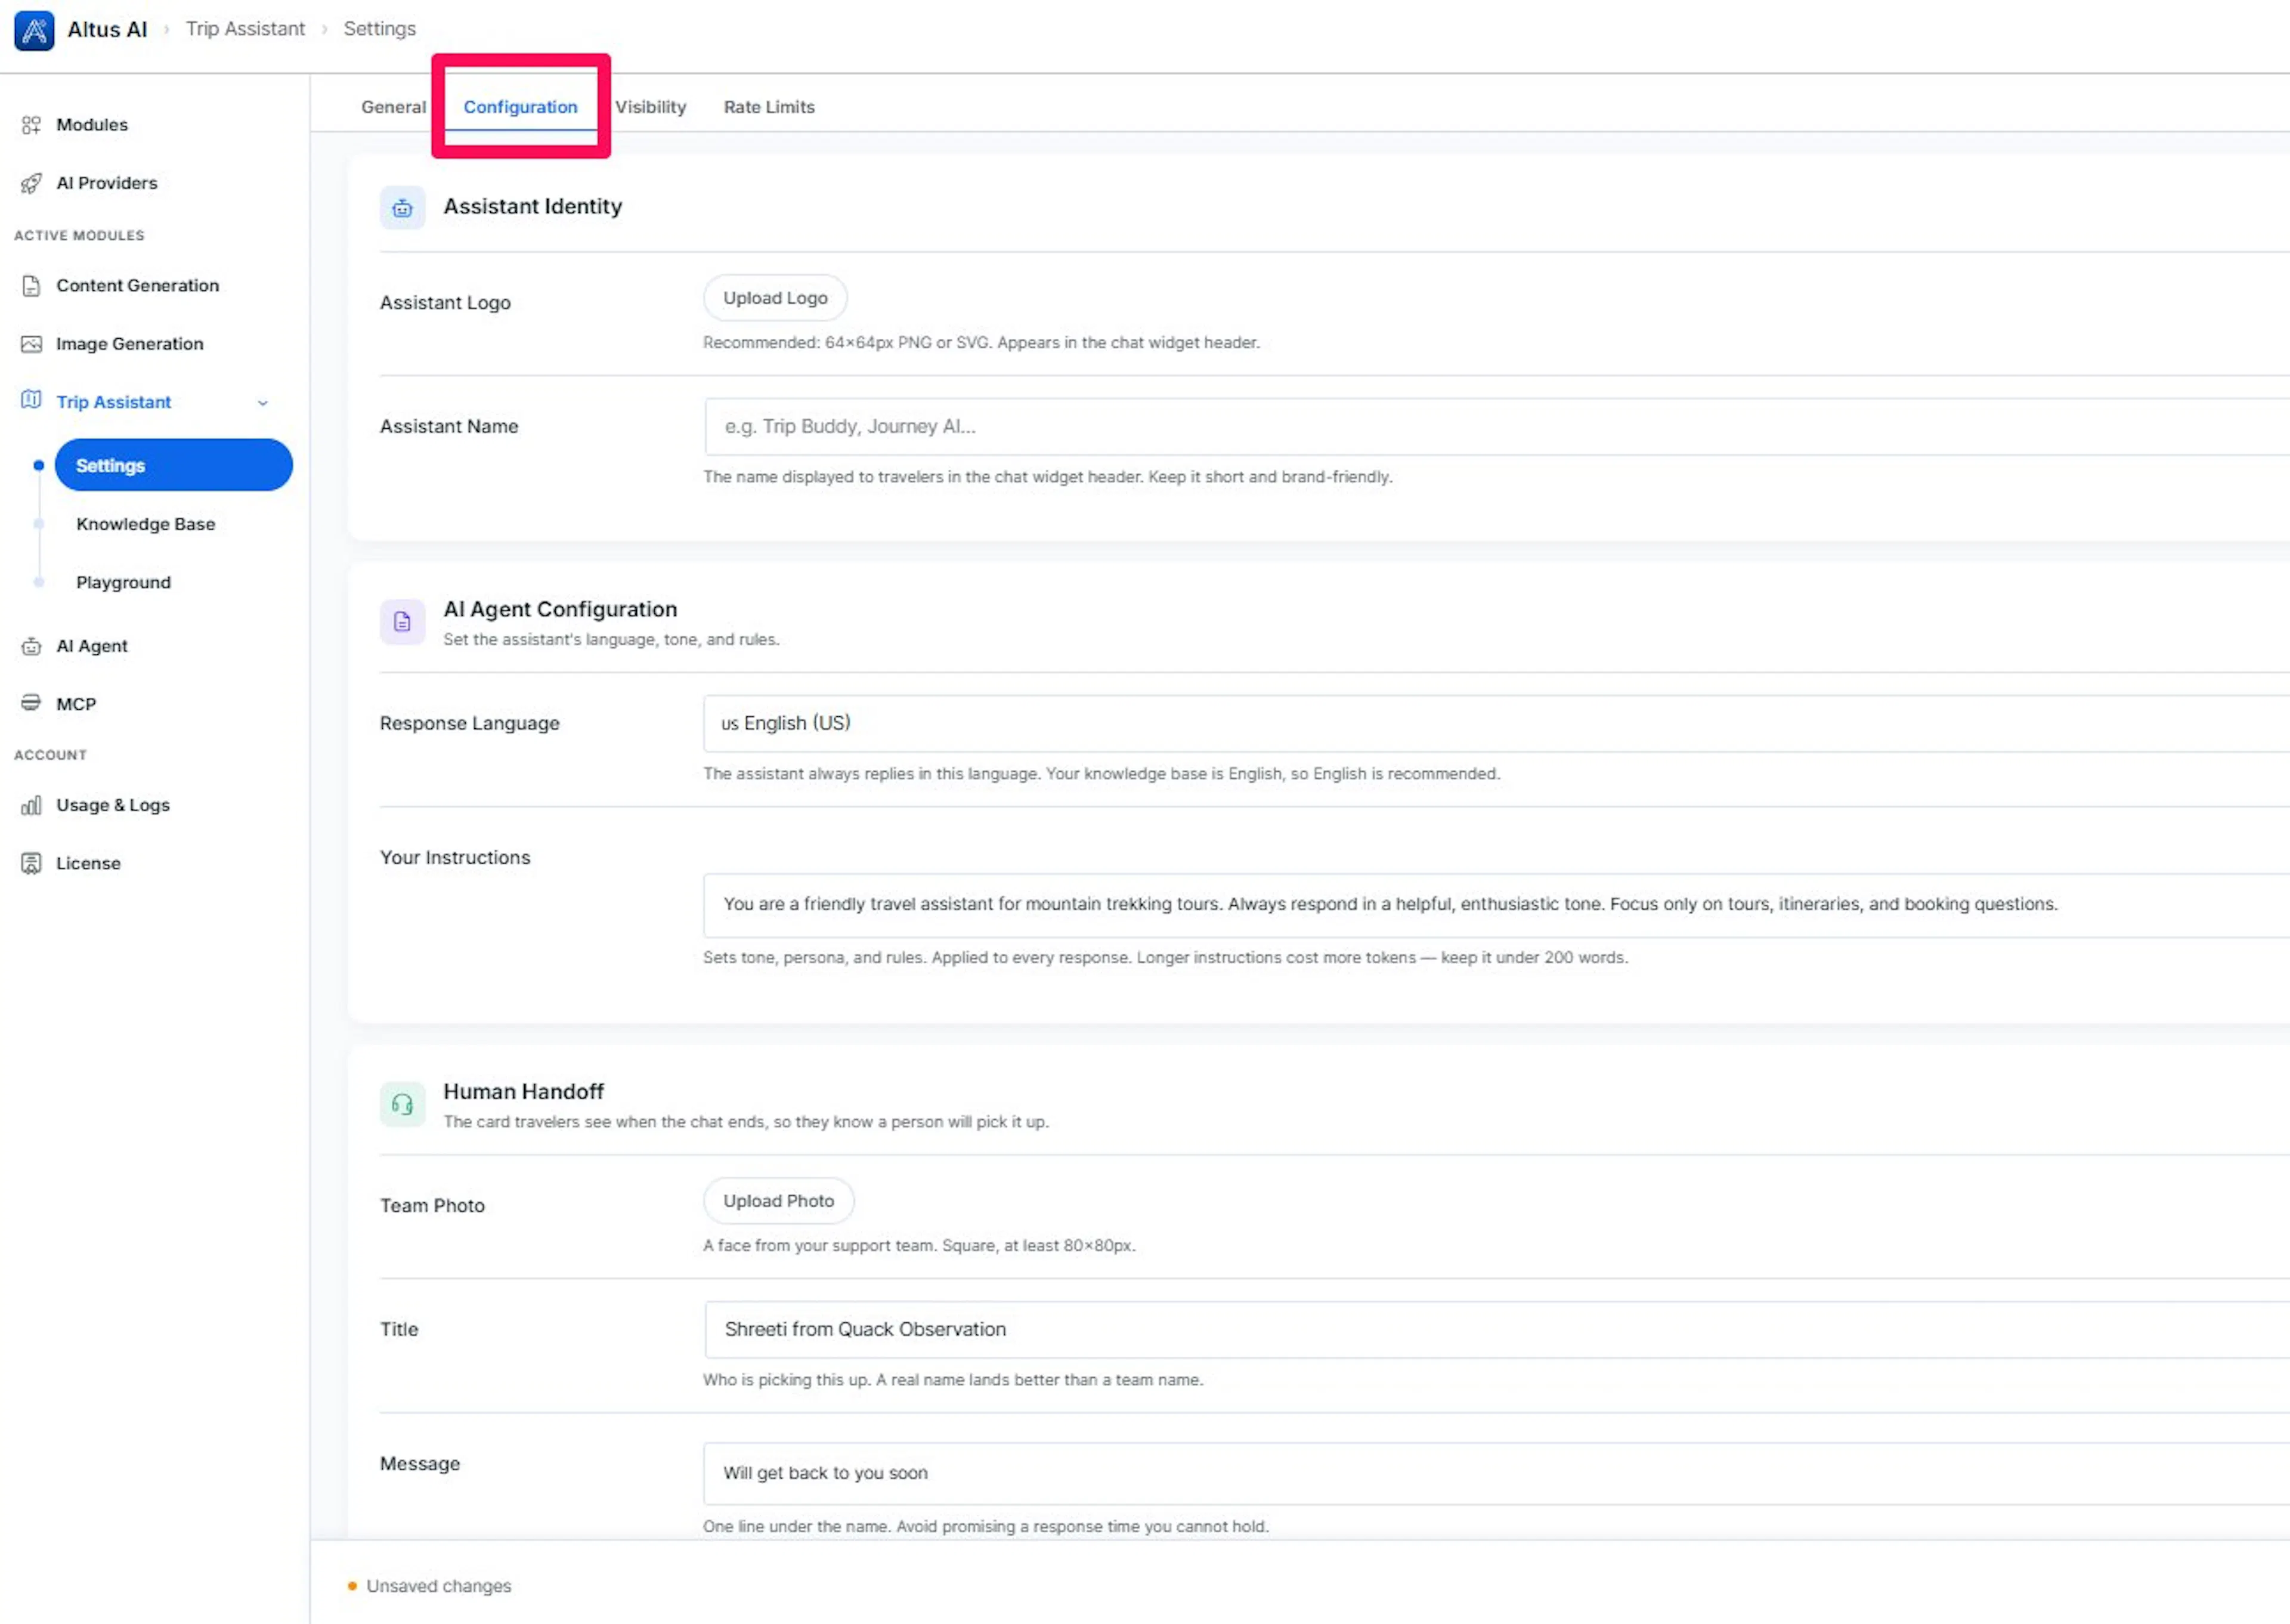
Assistant Identity
Give the assistant a name and image that match your tour business. Travelers should recognize that they are speaking with your company.
Say you run a Himalayan trekking company called Himalayan Treks. You could upload your company logo and name the assistant Himalayan Treks Assistant.
Upload the assistant logo
On the Configuration page in your WordPress dashboard, find Assistant Logo.
Upload a 64×64px PNG or SVG. The image appears in the chat widget header. A widget is the small chat box that sits on your website.
Name the assistant
Find Assistant Name and enter the name travelers should see in the widget header.
Keep the name short and connected to your brand. For example, use Himalayan Treks Assistant instead of a long internal team name.
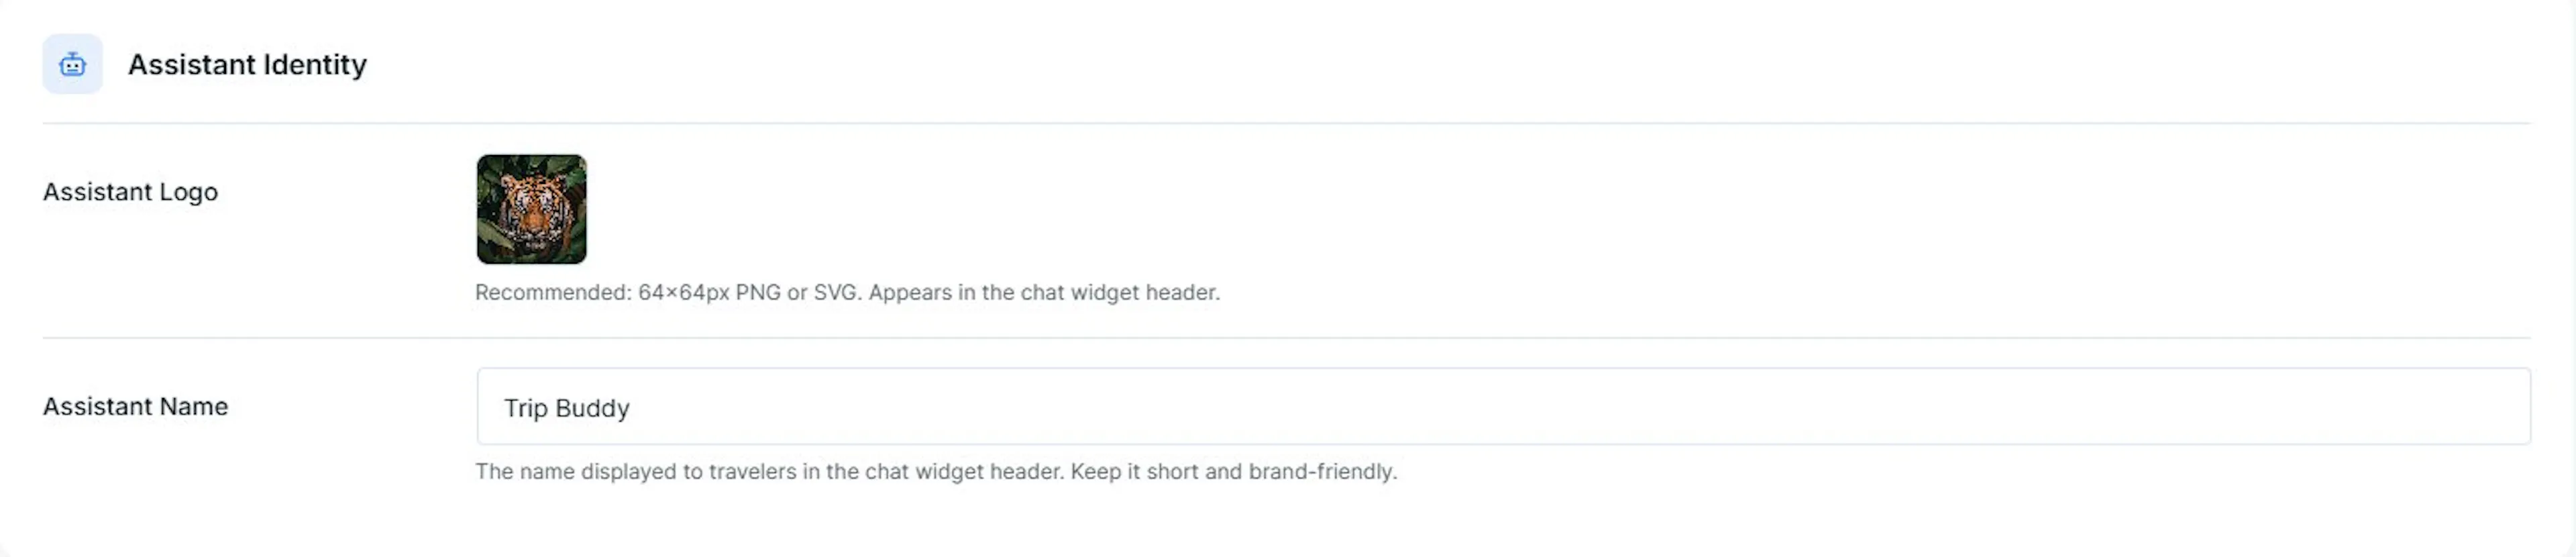
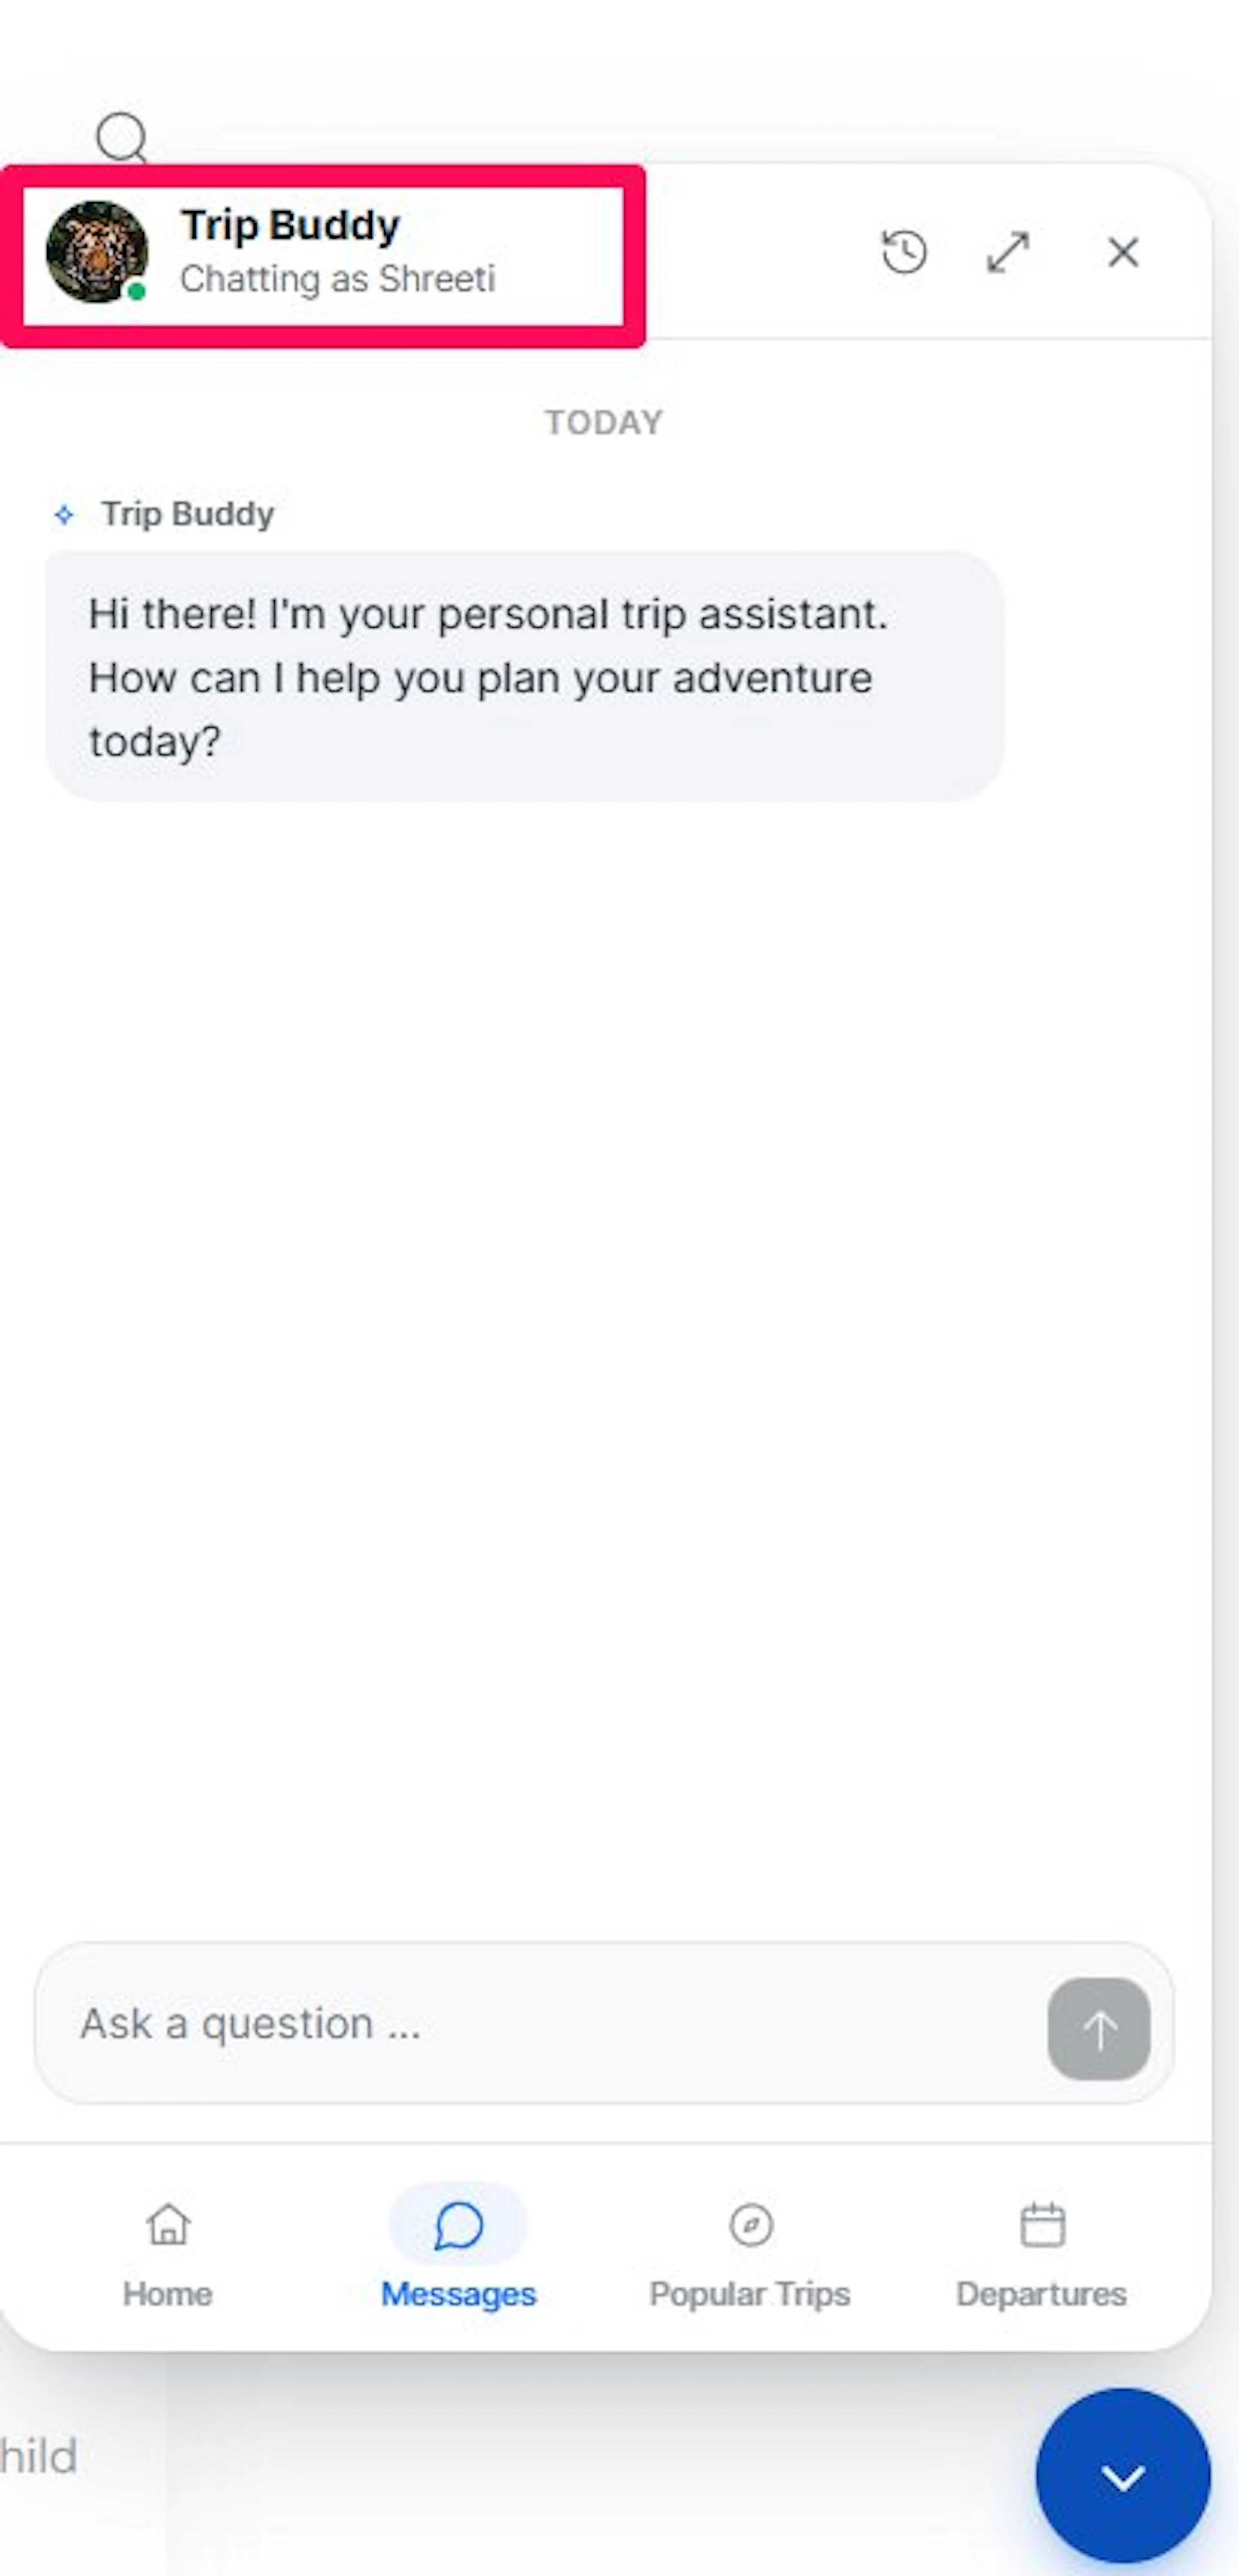
Your assistant now has a recognizable face and name. Next, set the language and instructions it should follow.
AI Agent Configuration
These settings control how the assistant replies to travelers. You can find them in the AI Agent Configuration section of the page.
Choose the response language
Find Response Language and select the language the assistant should always use.
Your Knowledge Base is the collection of trip details and content the assistant uses to answer questions. If your Knowledge Base is in English, choose English unless most of your travelers read another language.
Write your instructions
Find Your Instructions and describe the tone, personality, and rules the assistant should follow in every reply.
Keep the instructions under 200 words. Tokens are the way AI usage is counted and billed. Longer instructions use more tokens in each reply.
Write the instructions as if you were briefing a new member of your team. For a family-friendly day-tour company, you might write: Be warm and casual. Avoid jargon. If a traveler asks about difficulty, compare it to everyday activities like walking in a park. Use the trip details in the Knowledge Base. Do not make up prices or availability. If you are not sure, offer to connect the traveler with our team.
Preview changes to Your Instructions in the Playground before you save them. The Playground is a test page where you can try the assistant's replies before travelers see them.
The instructions give the assistant a clear brief. Test a few common traveler questions before moving on.
Human Handoff
A handoff is what happens when the AI chat ends, and a real person takes over. The handoff card introduces that person to the traveler.
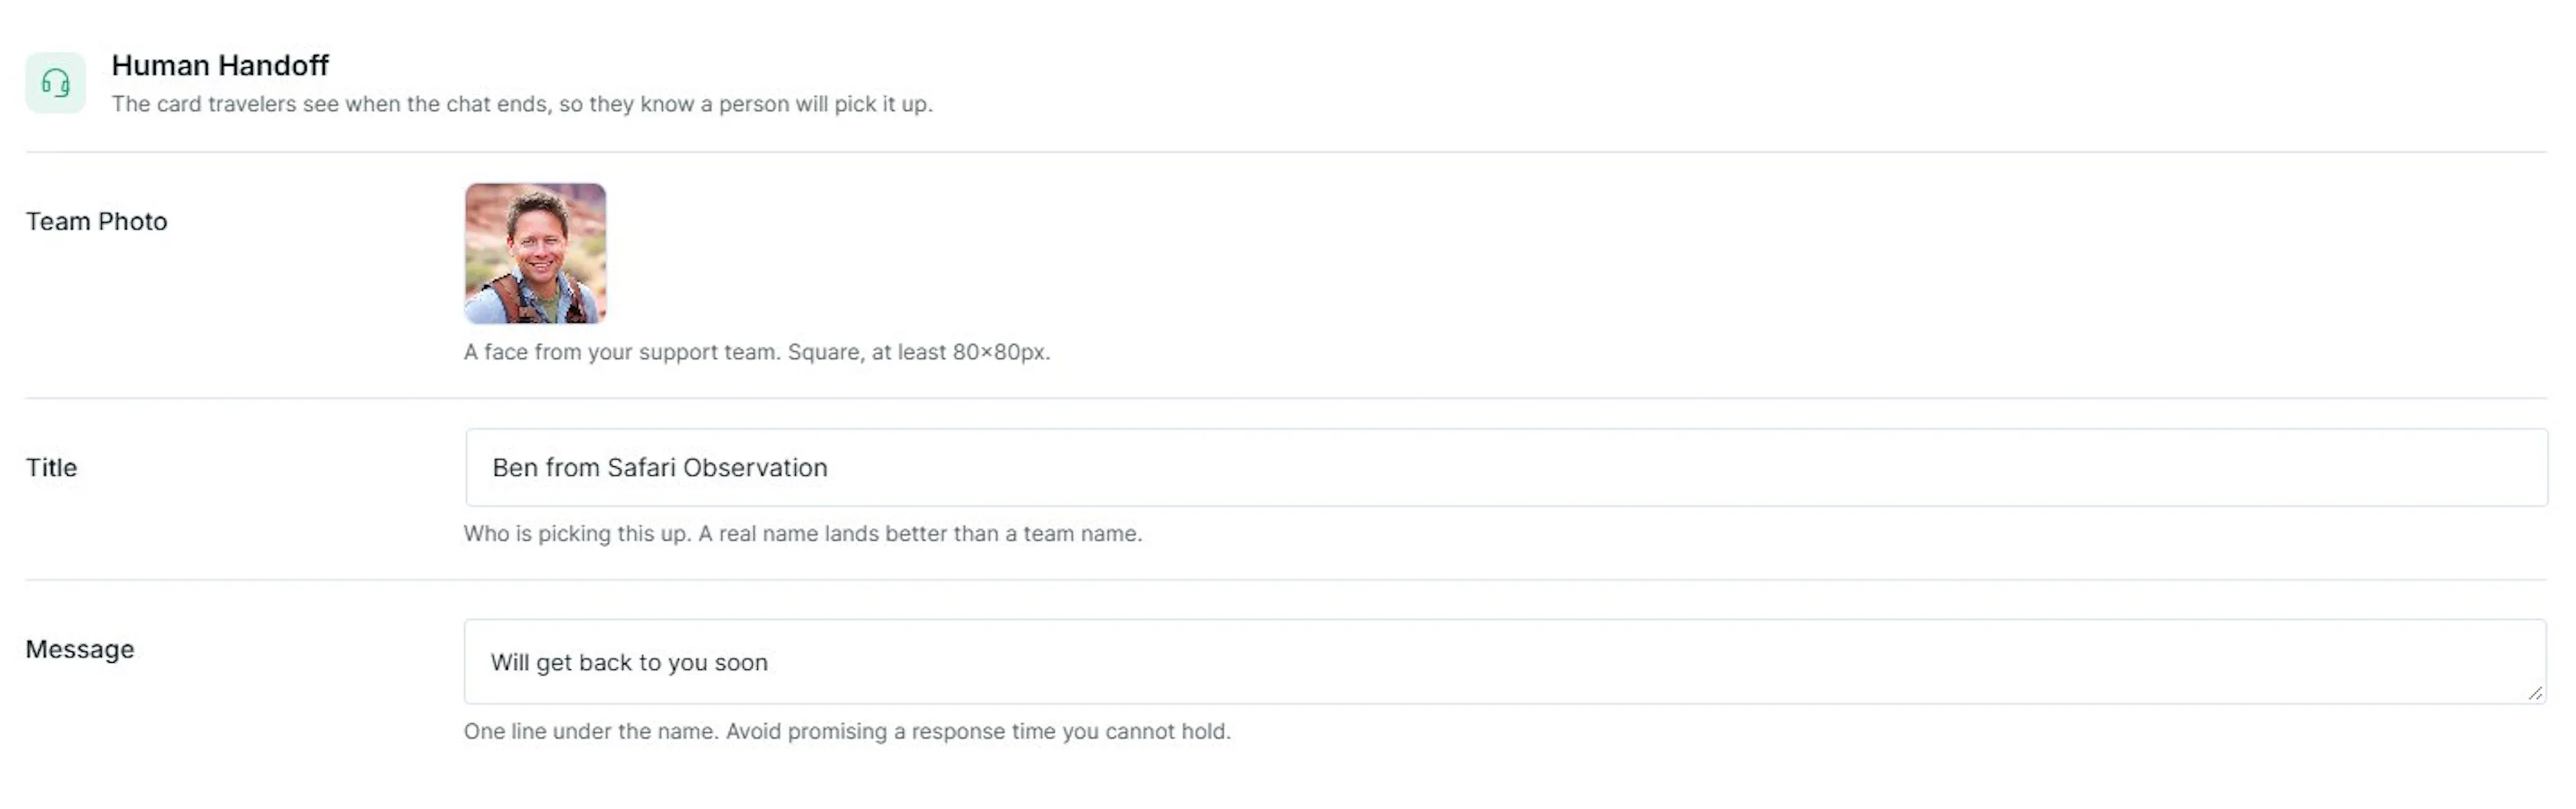
Add the team photo
Find Team Photo and upload a square photo that is at least 80×80px.
If you are a solo operator, upload your own photo. Travelers often trust a real face more than a generic icon.
Add the person's title
Find Title and enter the name or role of the person who picks up the conversation.
A real name usually feels more personal than a team name. For example, use Maria from Alpine Adventures.
Write the handoff message
Find Message and write one line beneath the name.
Tell travelers what happens next. Avoid promising a response time you cannot keep.
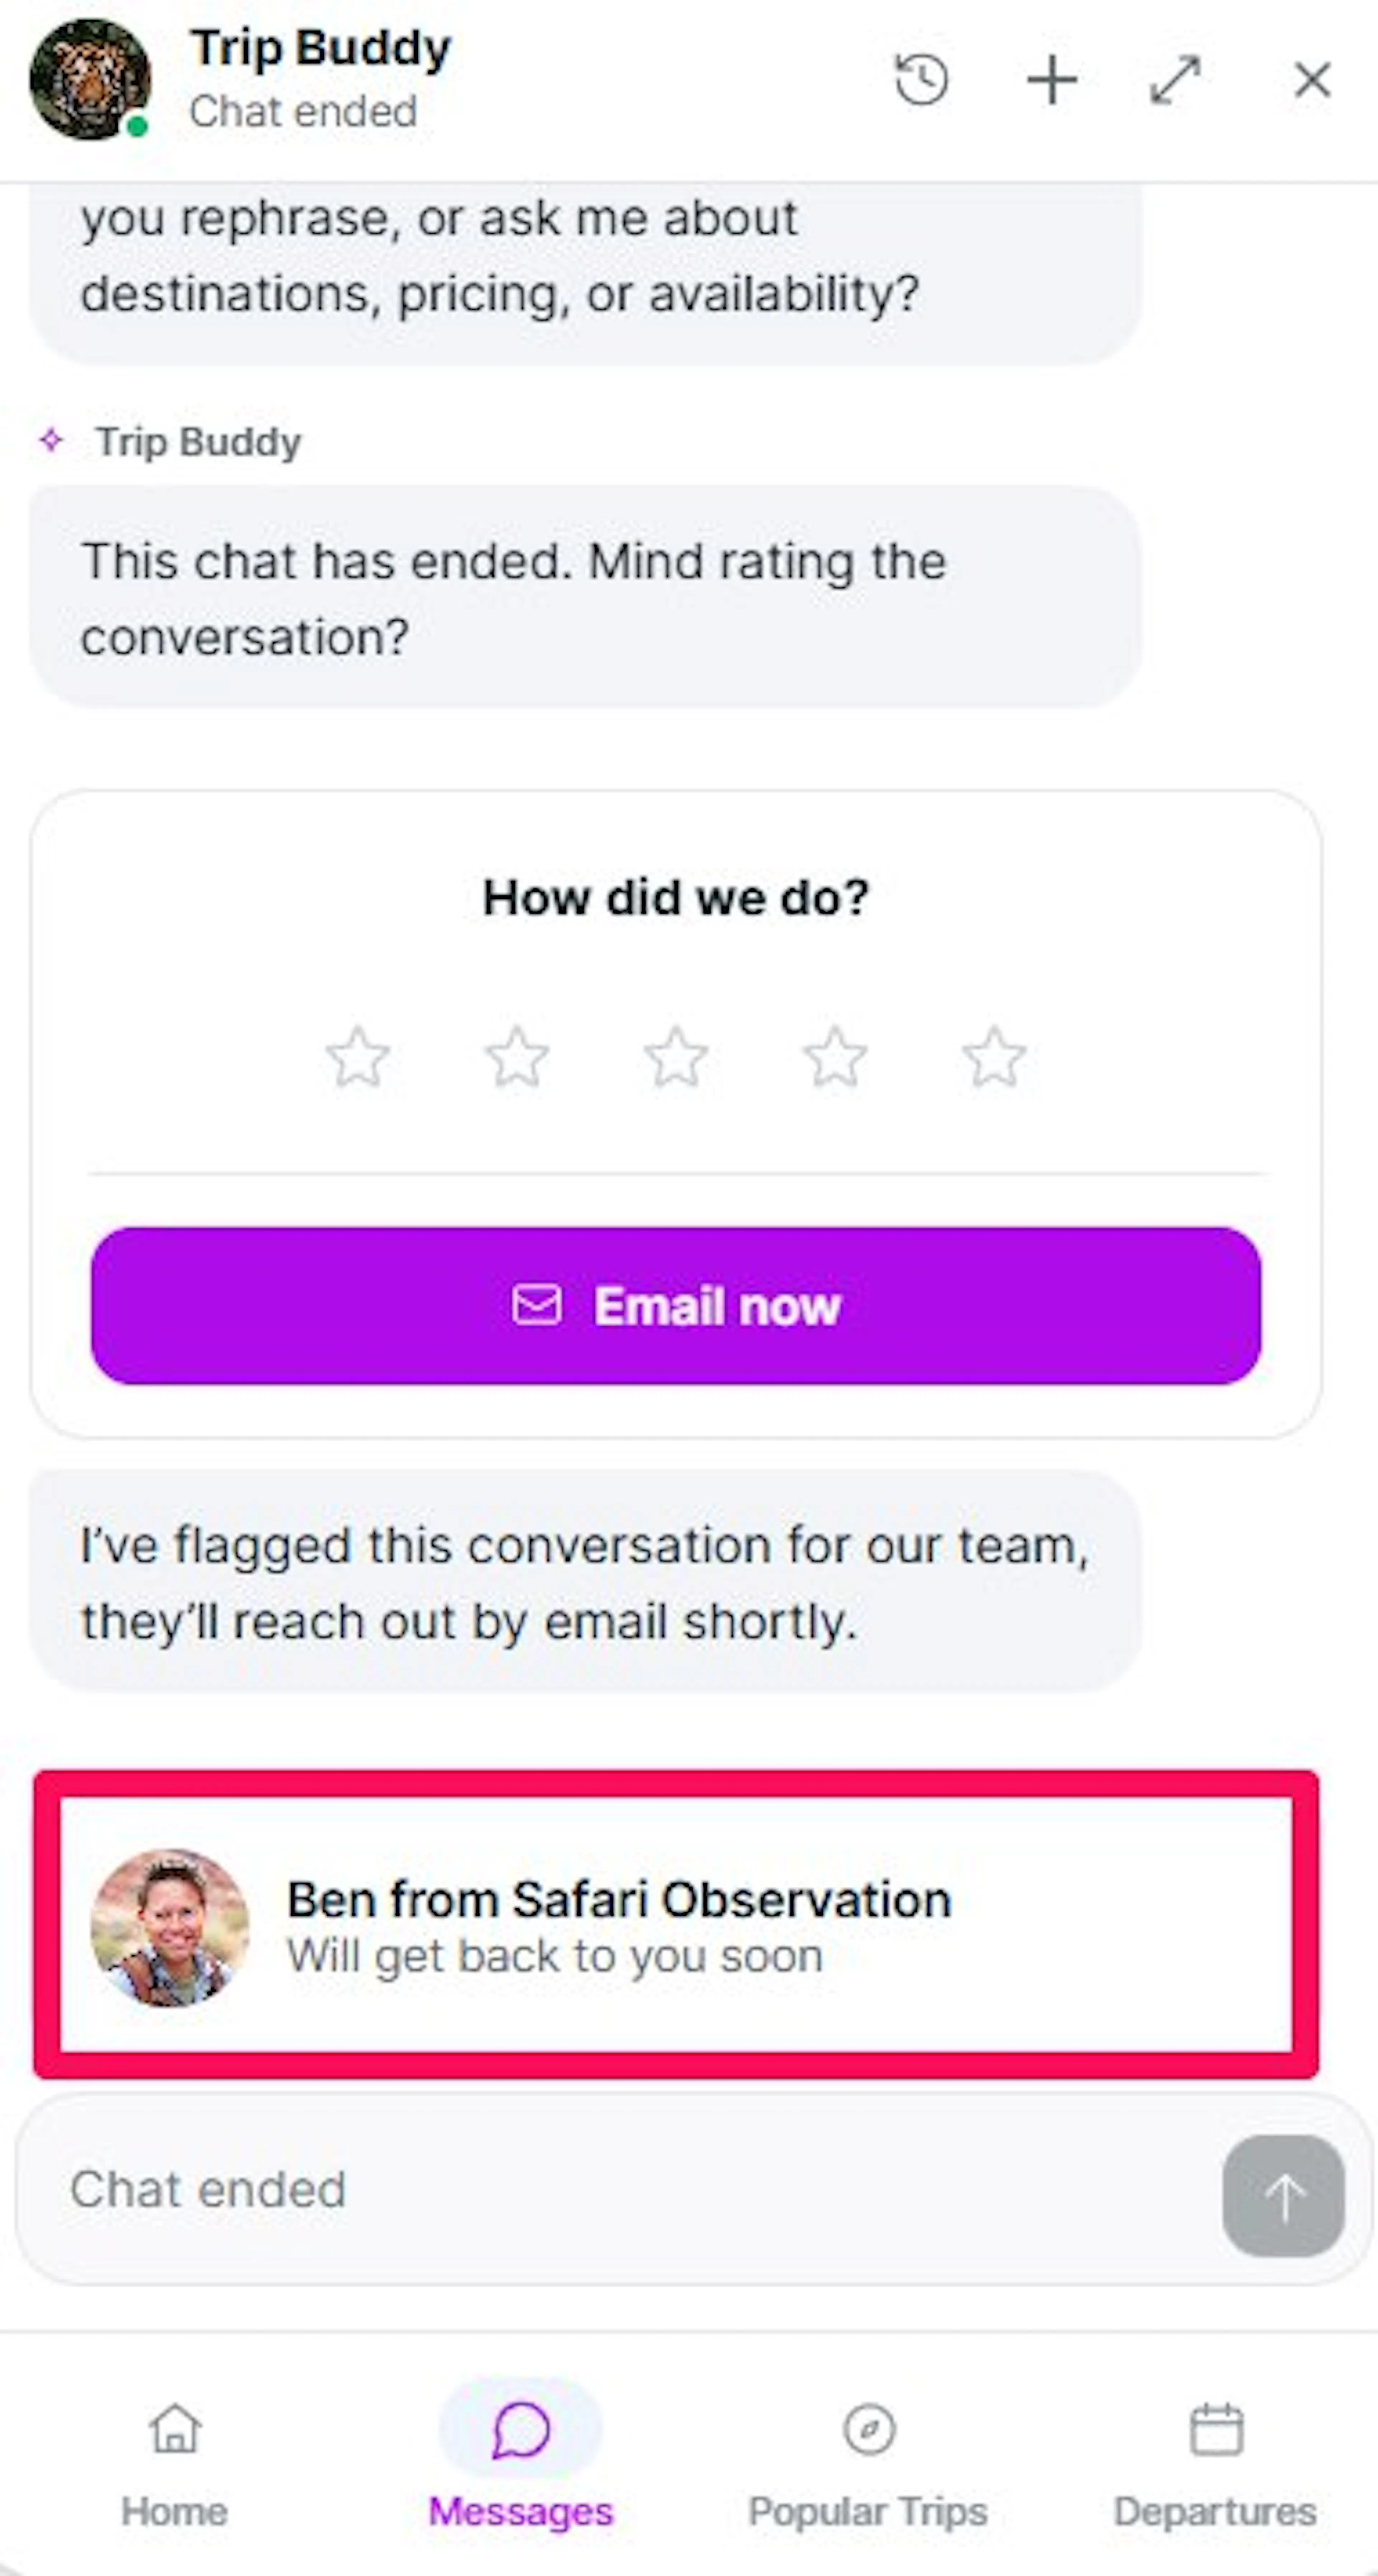
Travelers will know who is ready to help when the assistant cannot take the conversation further. Next, choose how the chat appears on your site.
Style and Appearance
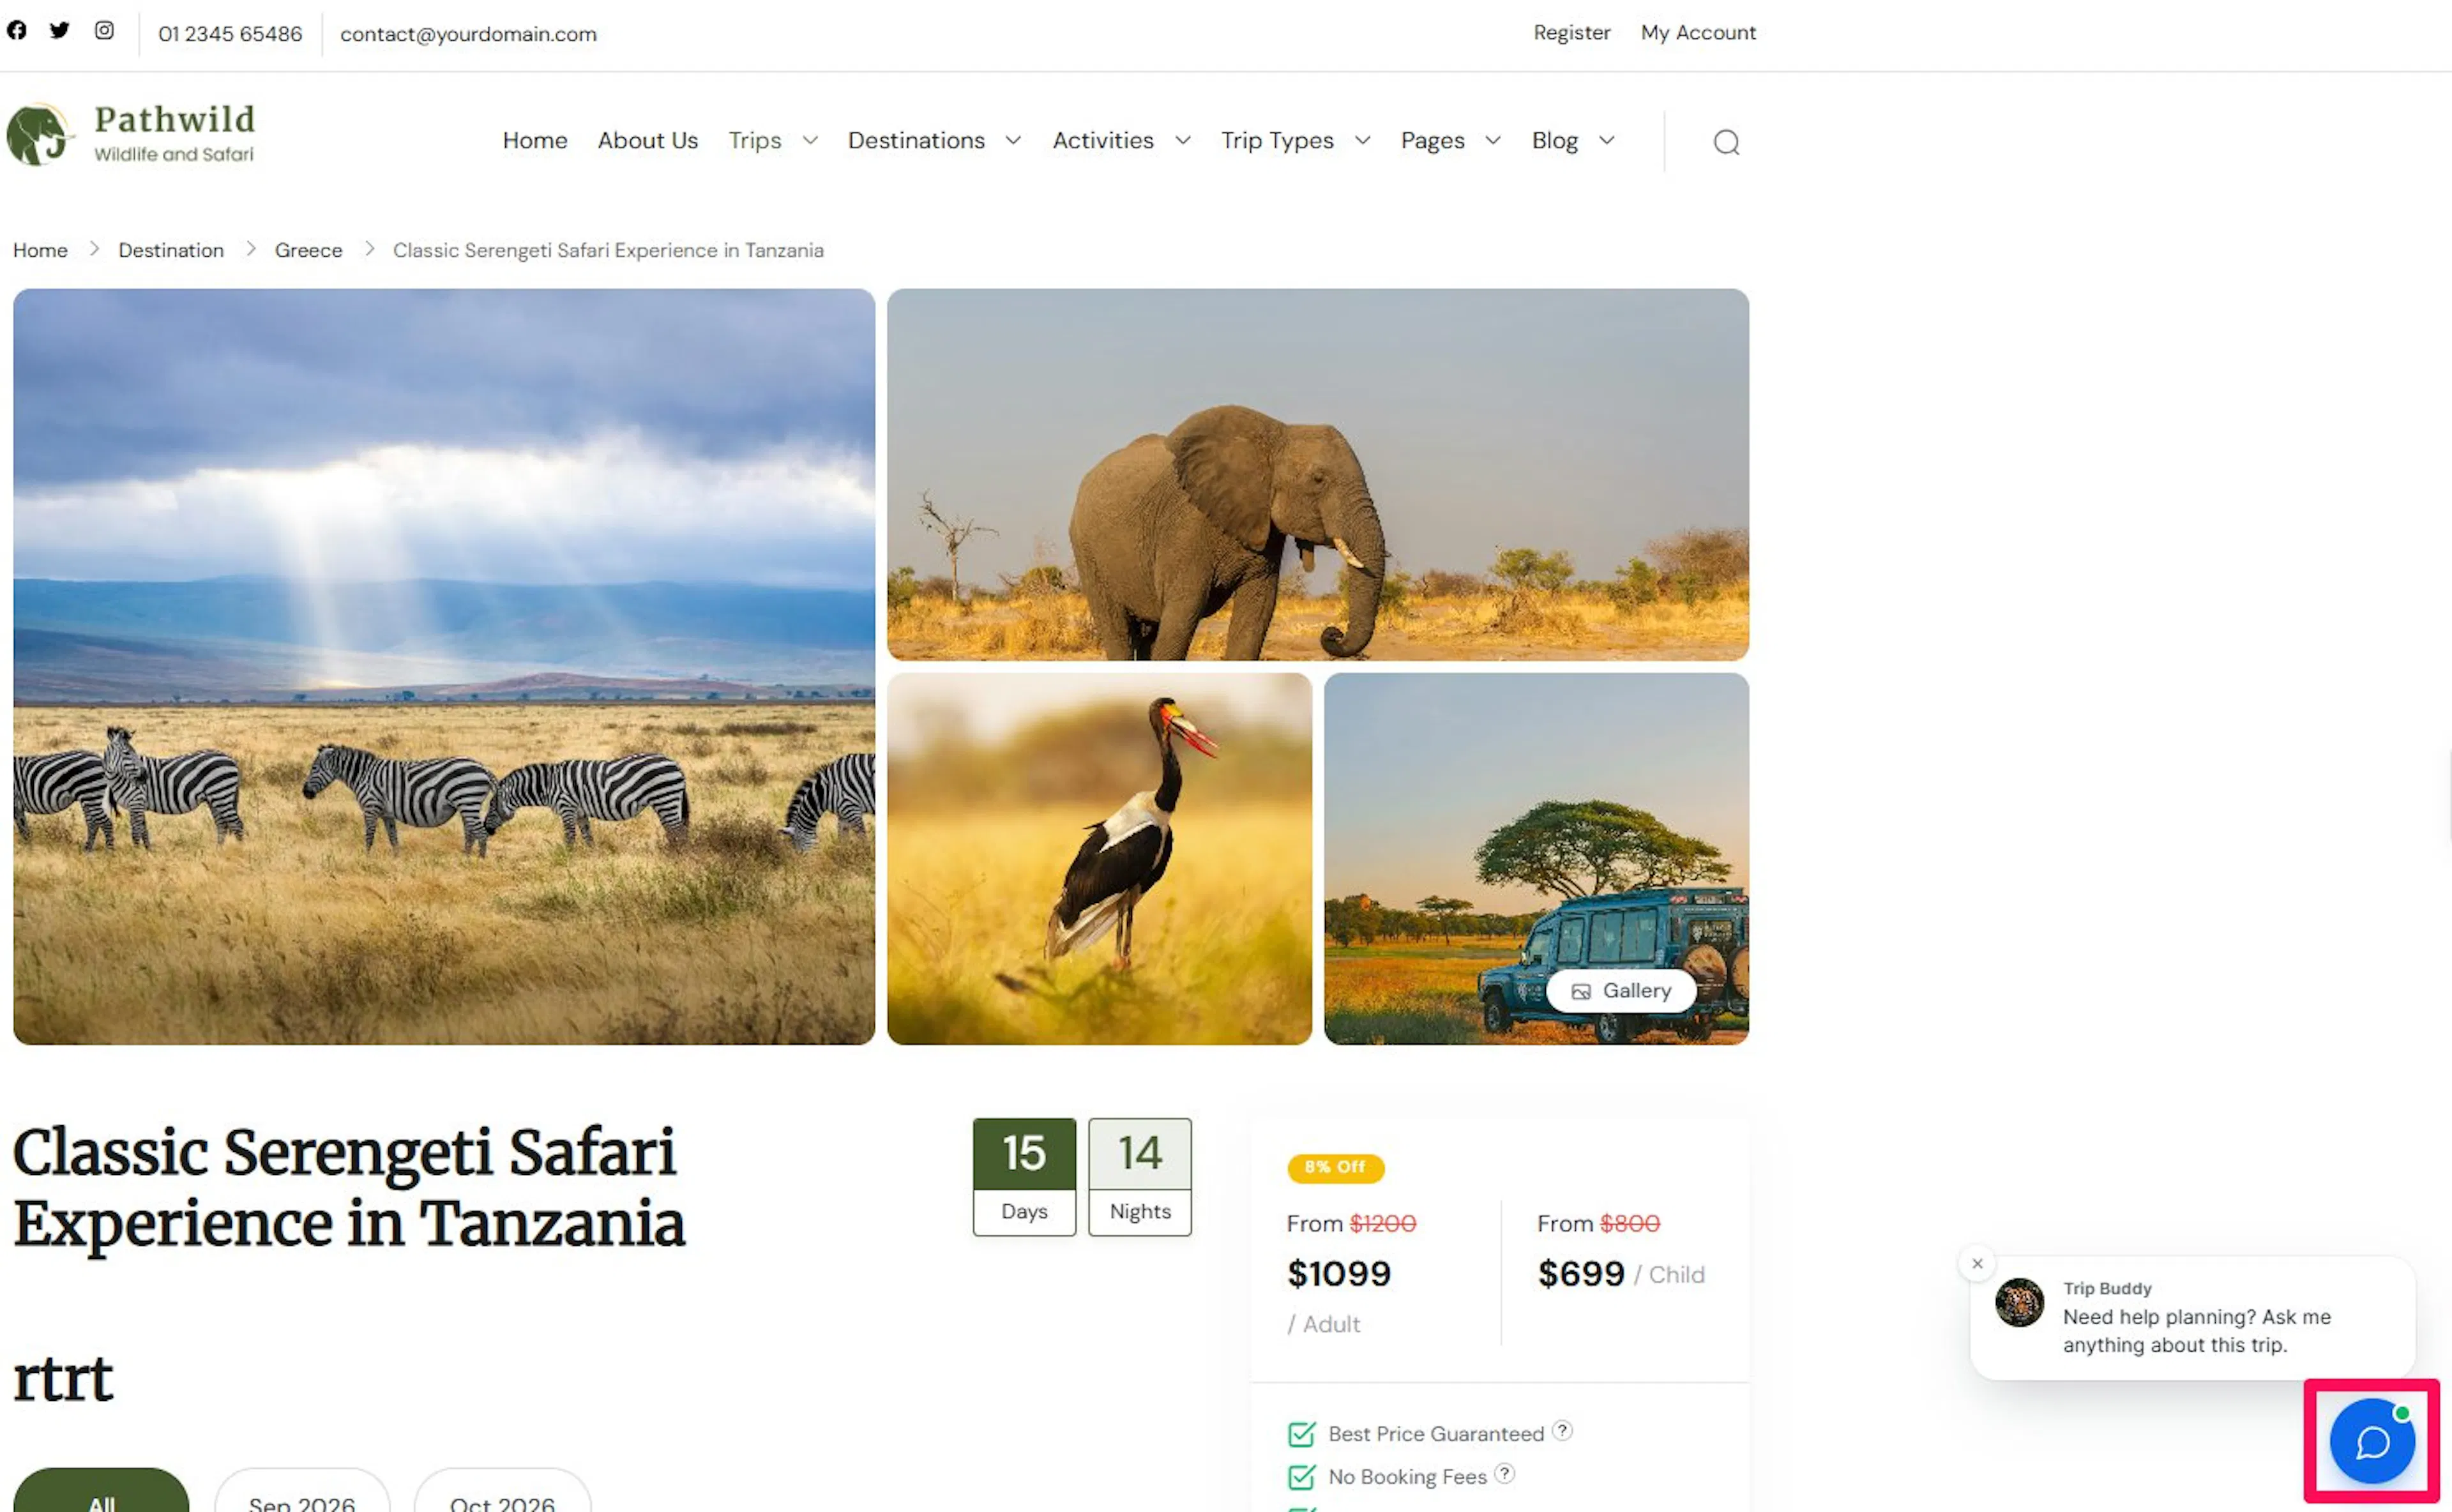
This section controls how the chat looks and where visitors open it. The launcher is the round chat button visitors see on your page. The widget is the small chat box that opens when they select the launcher.
Choose the layout
The layout decides how the chat opens on your site.
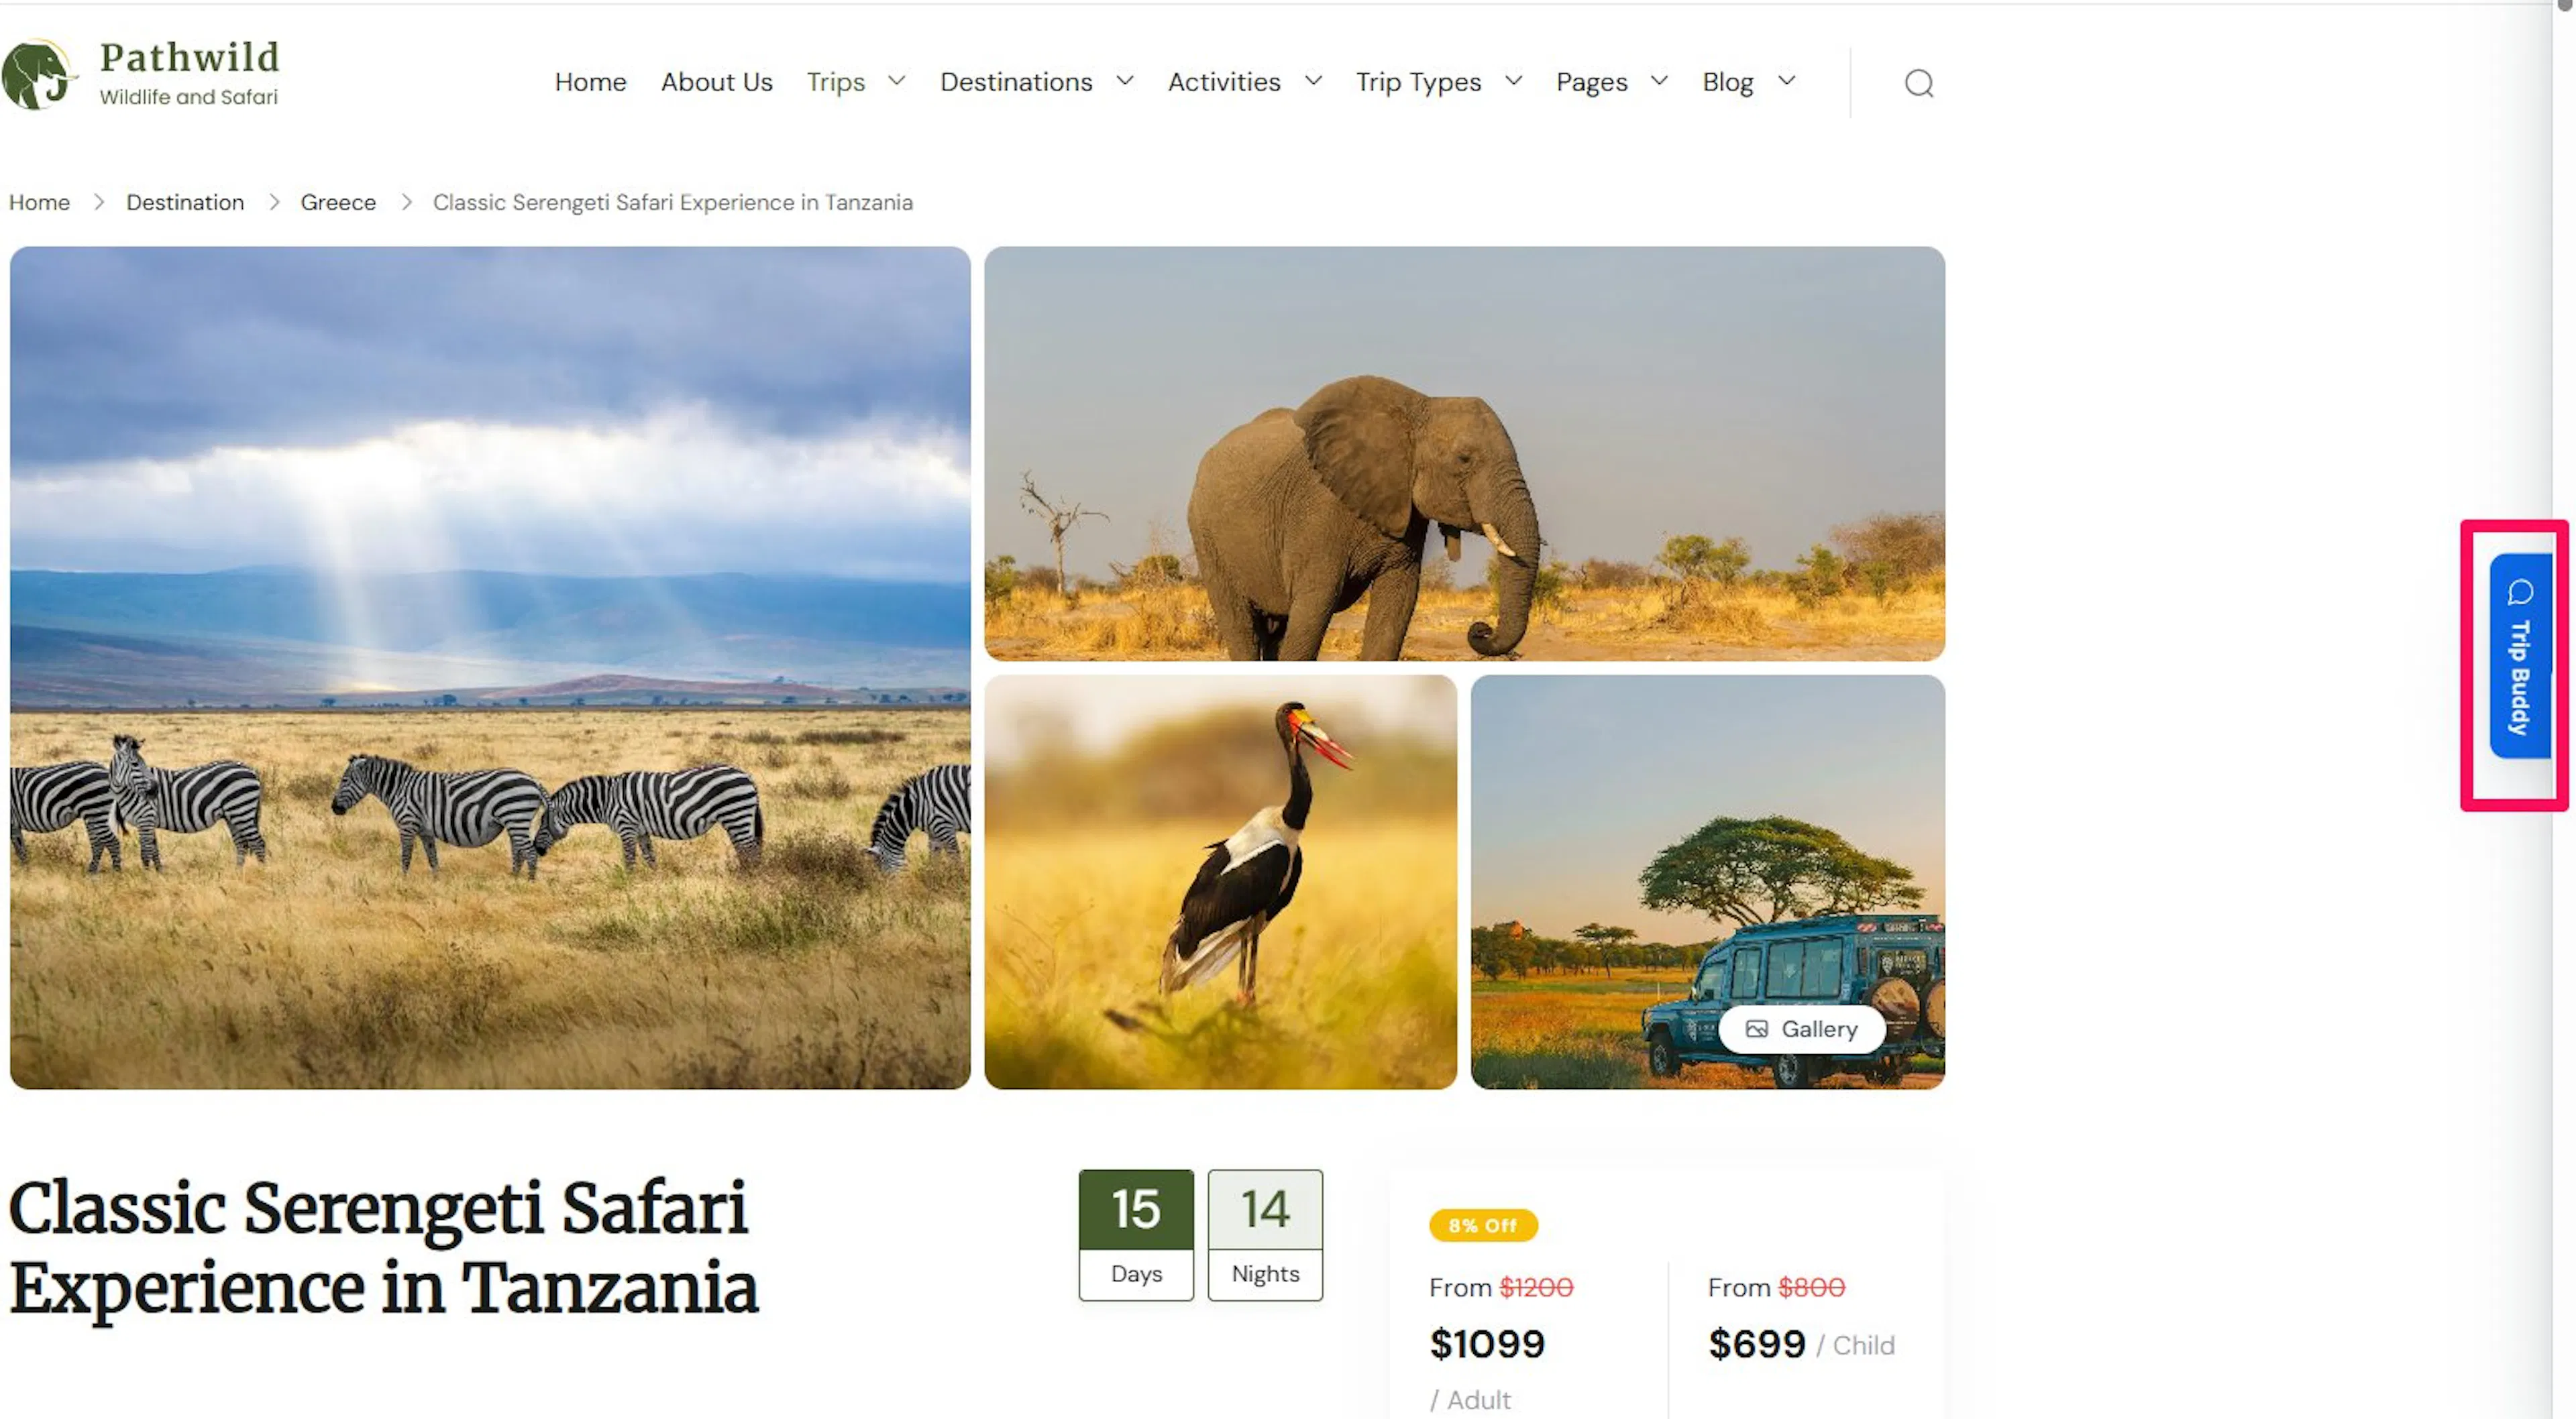
Find Layout and choose one option. Pick Chat Widget for a floating launcher and chat panel. Pick Overlay Drawer for a full-height panel that slides in from the side of the screen.
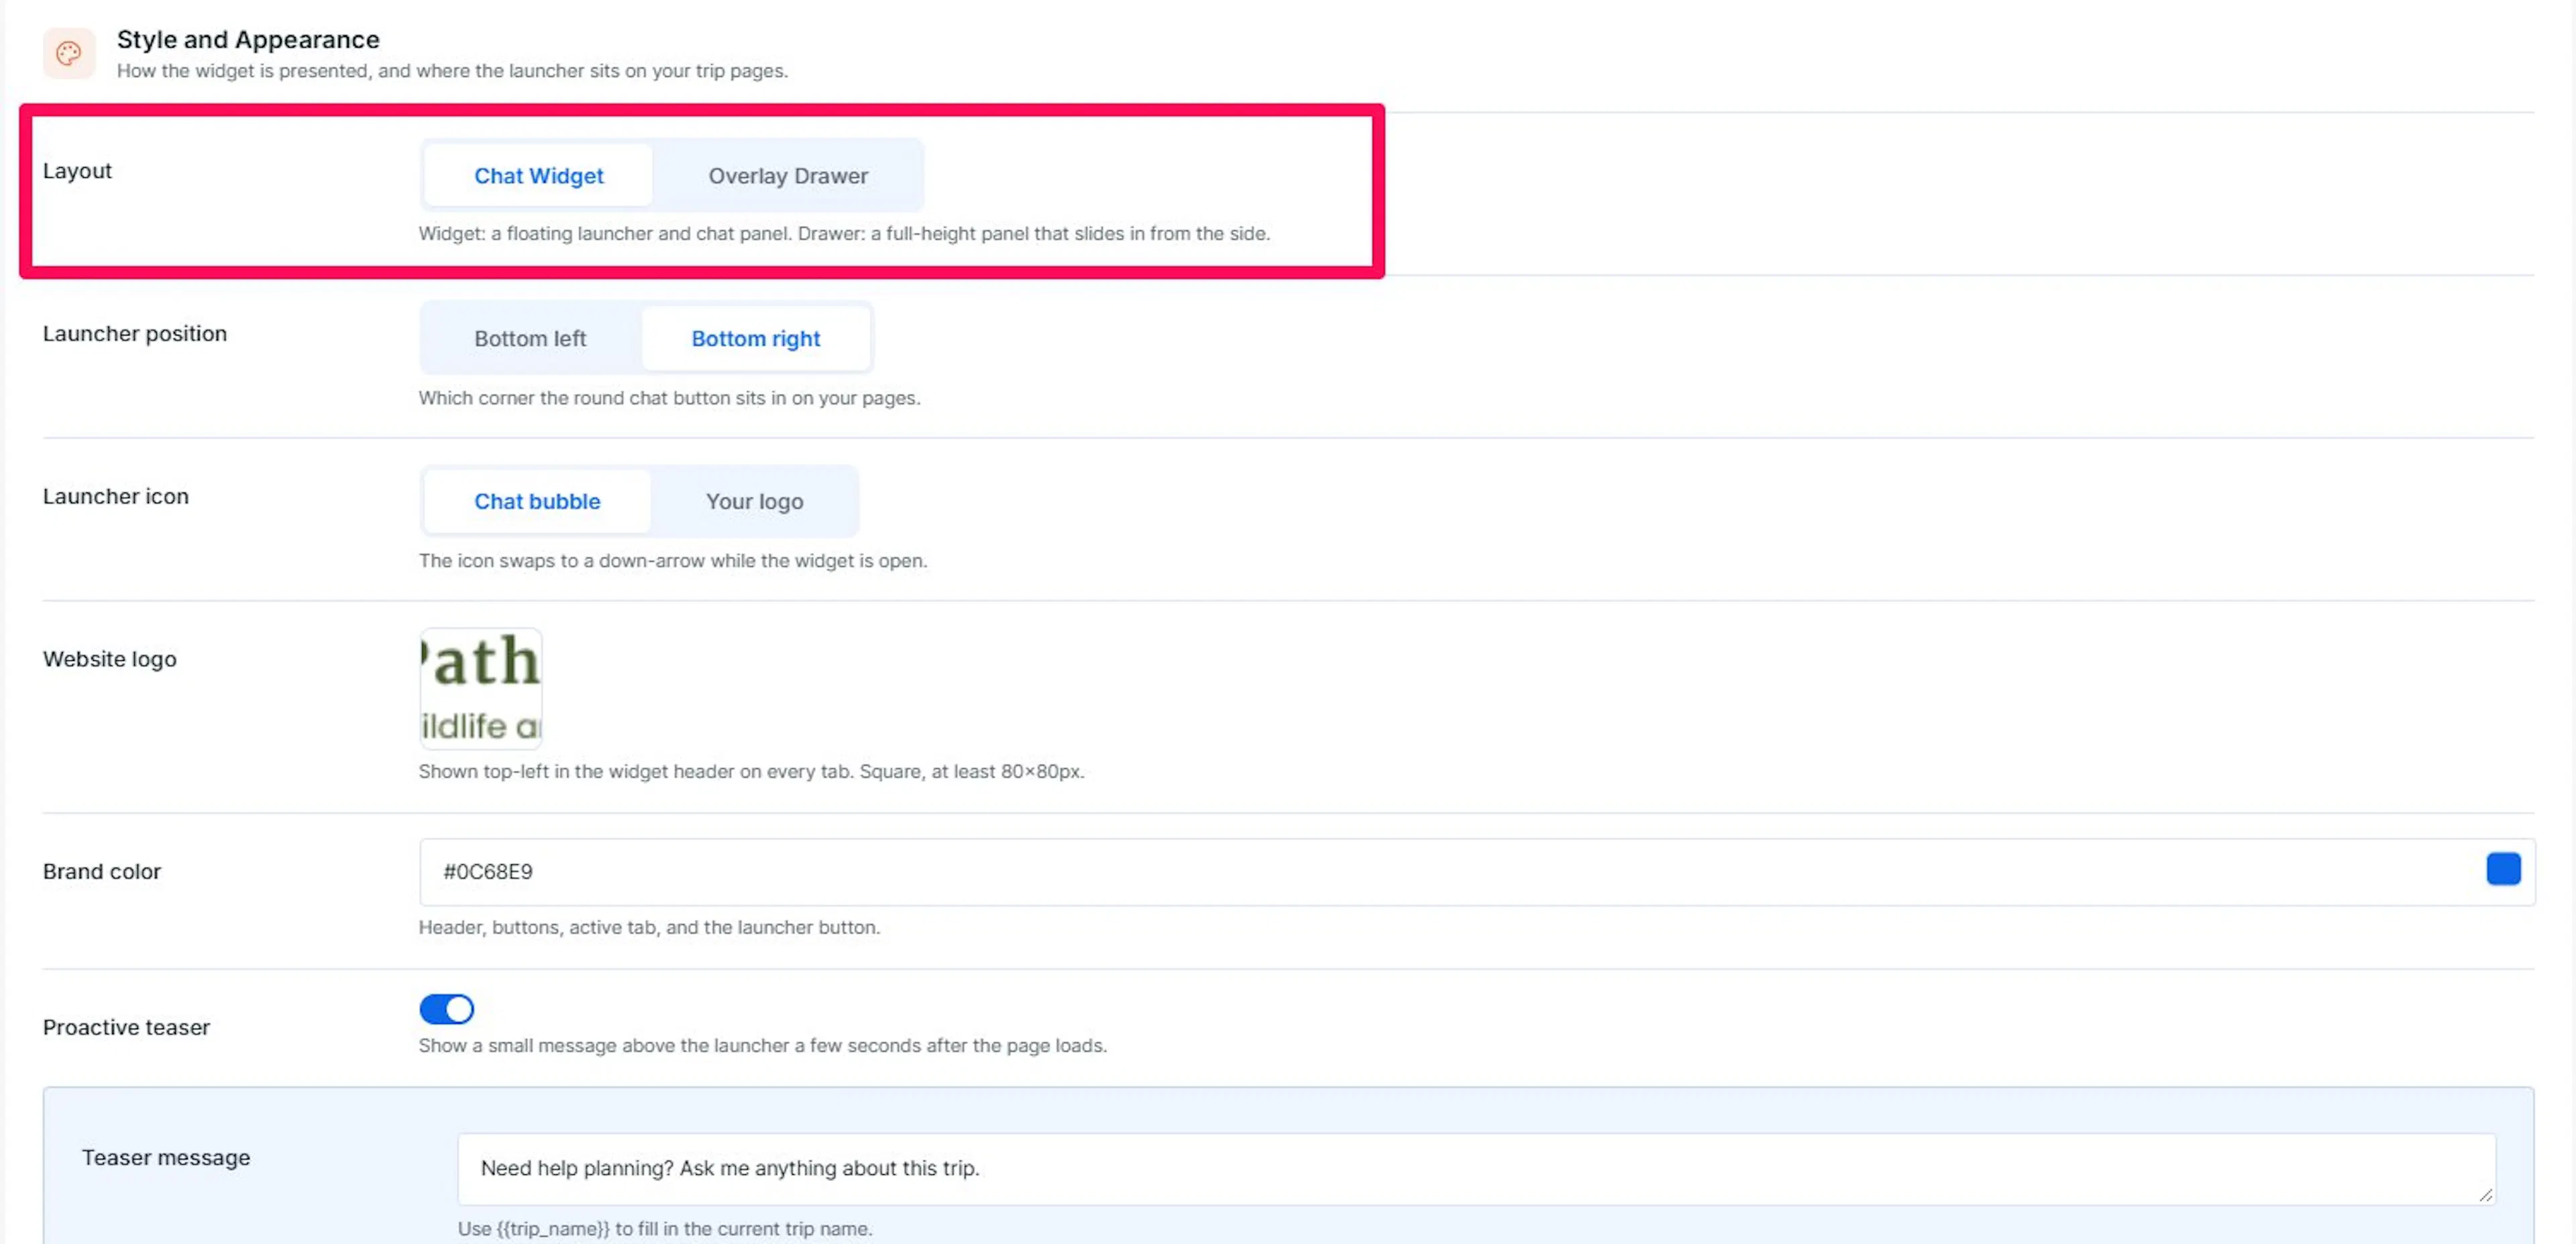
Pick Overlay Drawer for a full-height panel that slides in from the side of the screen.
Pick the launcher position
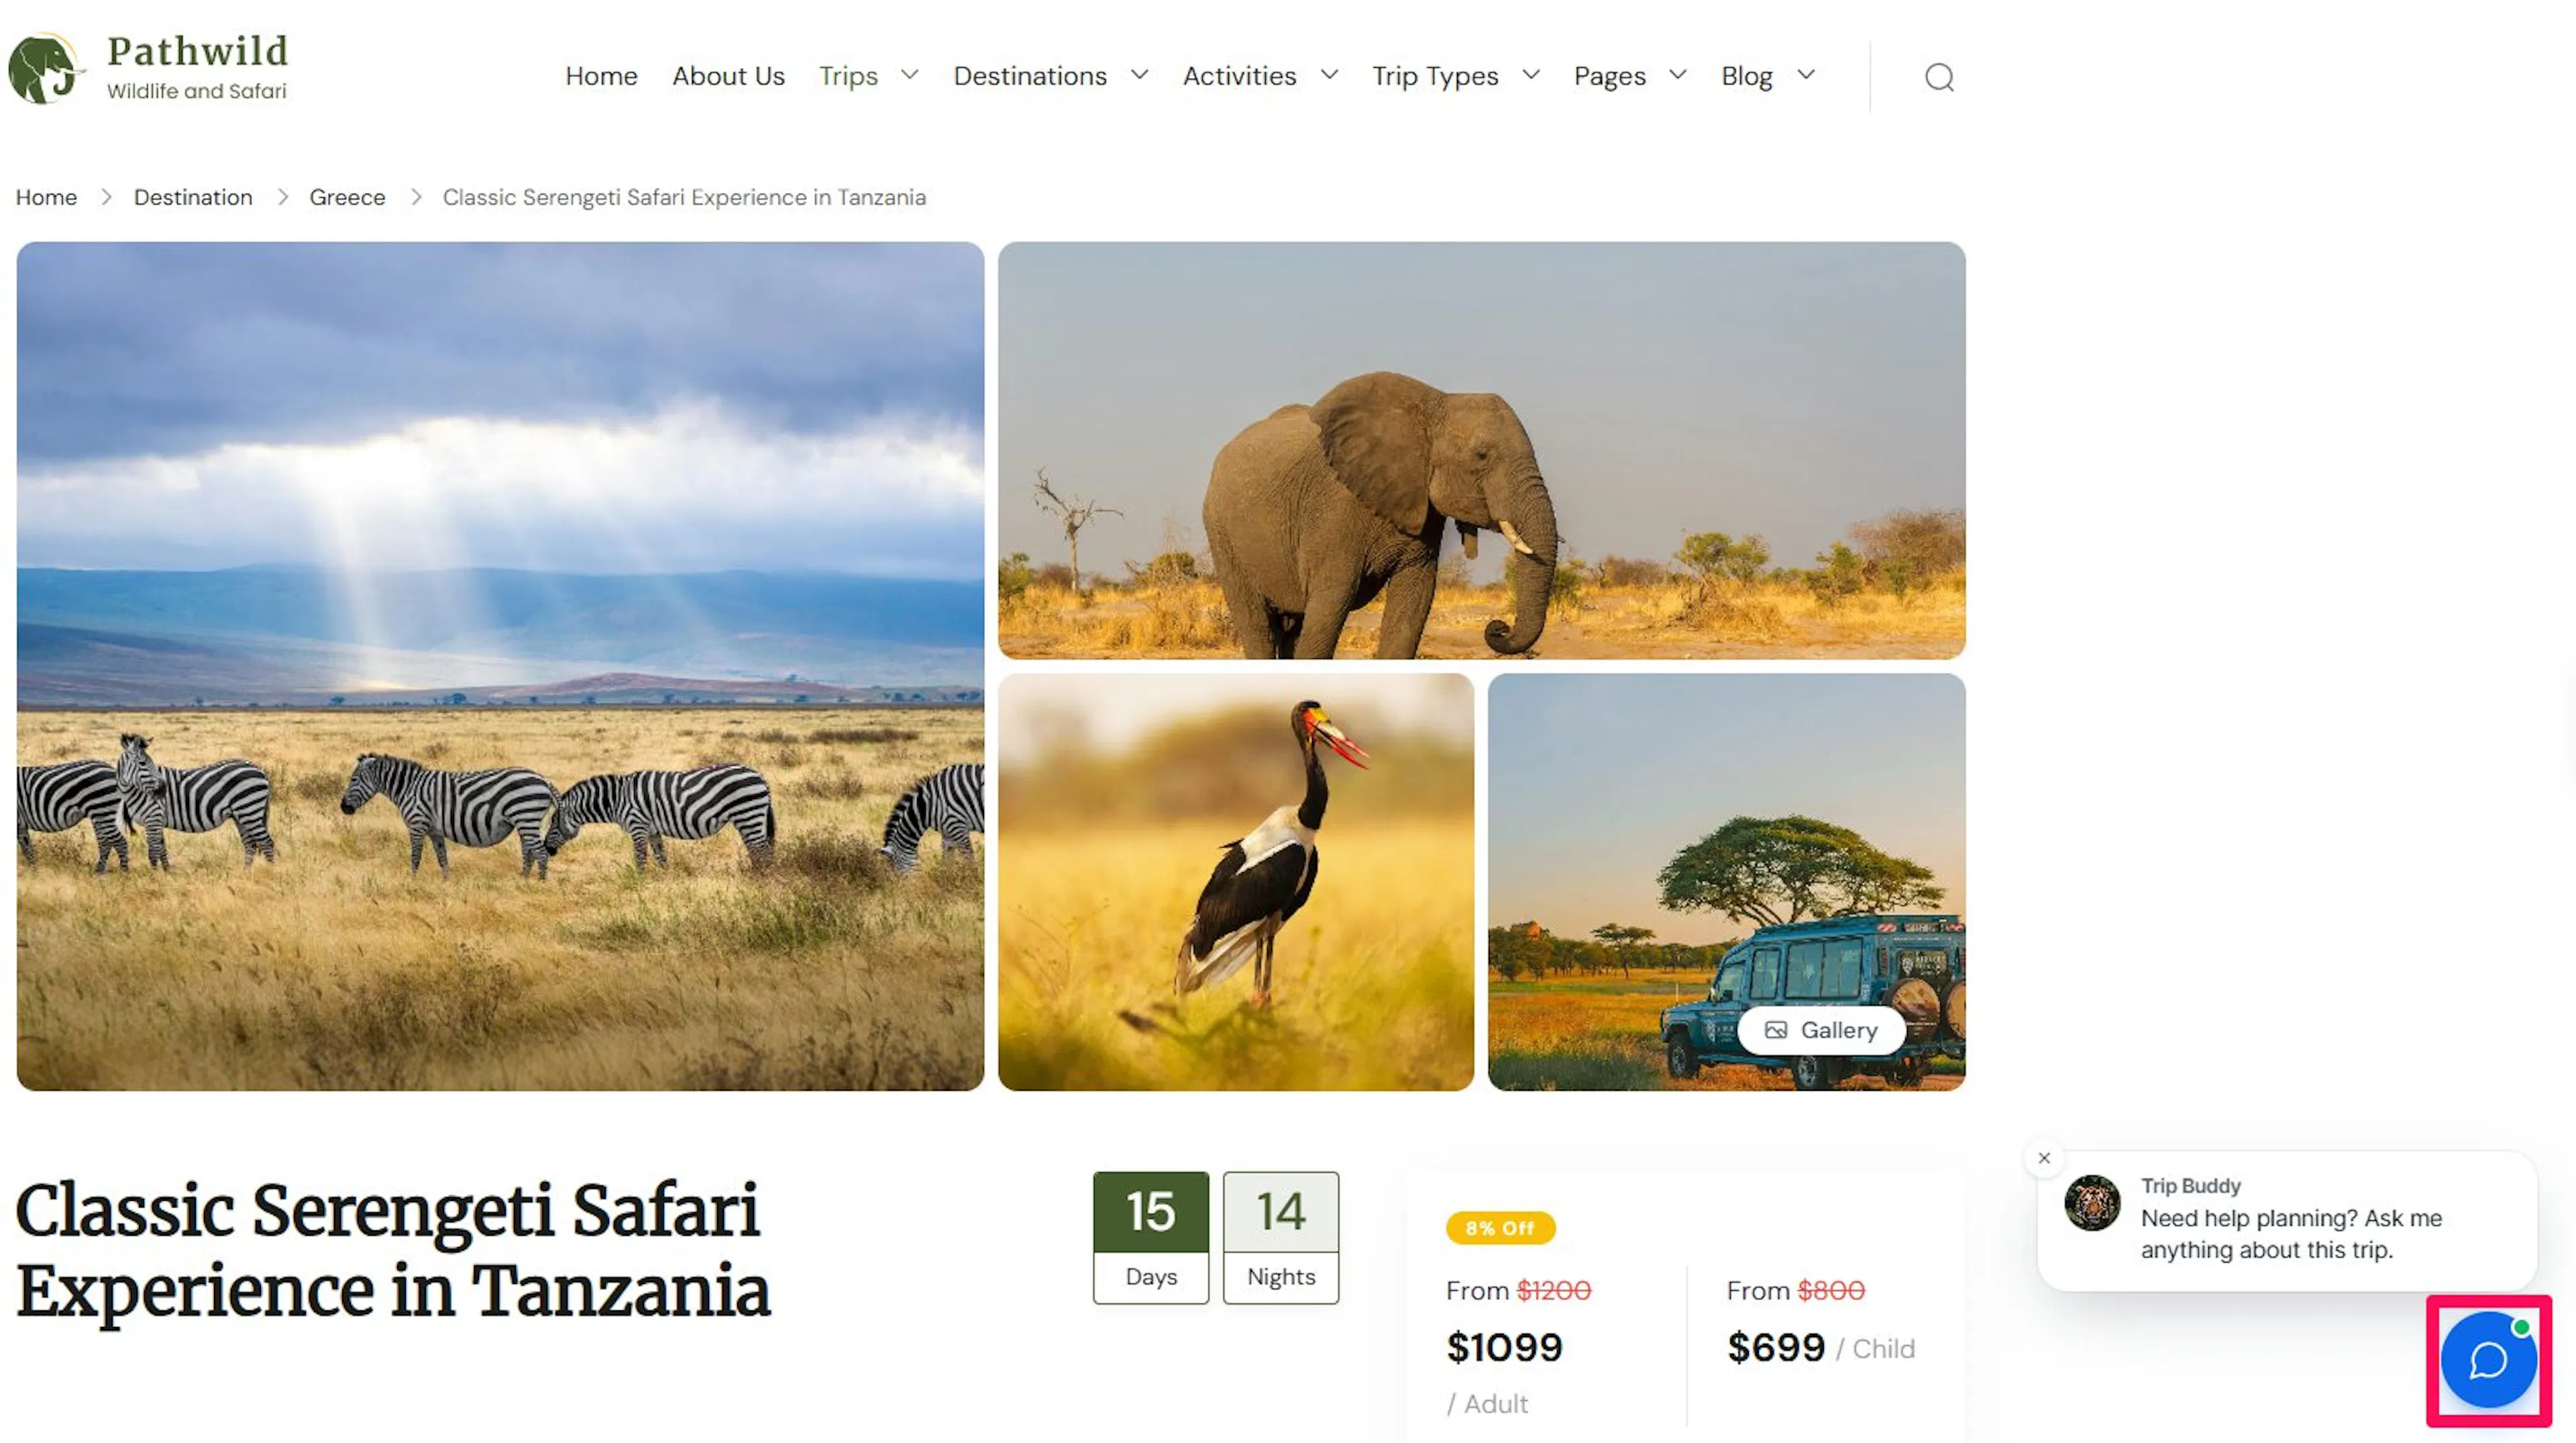
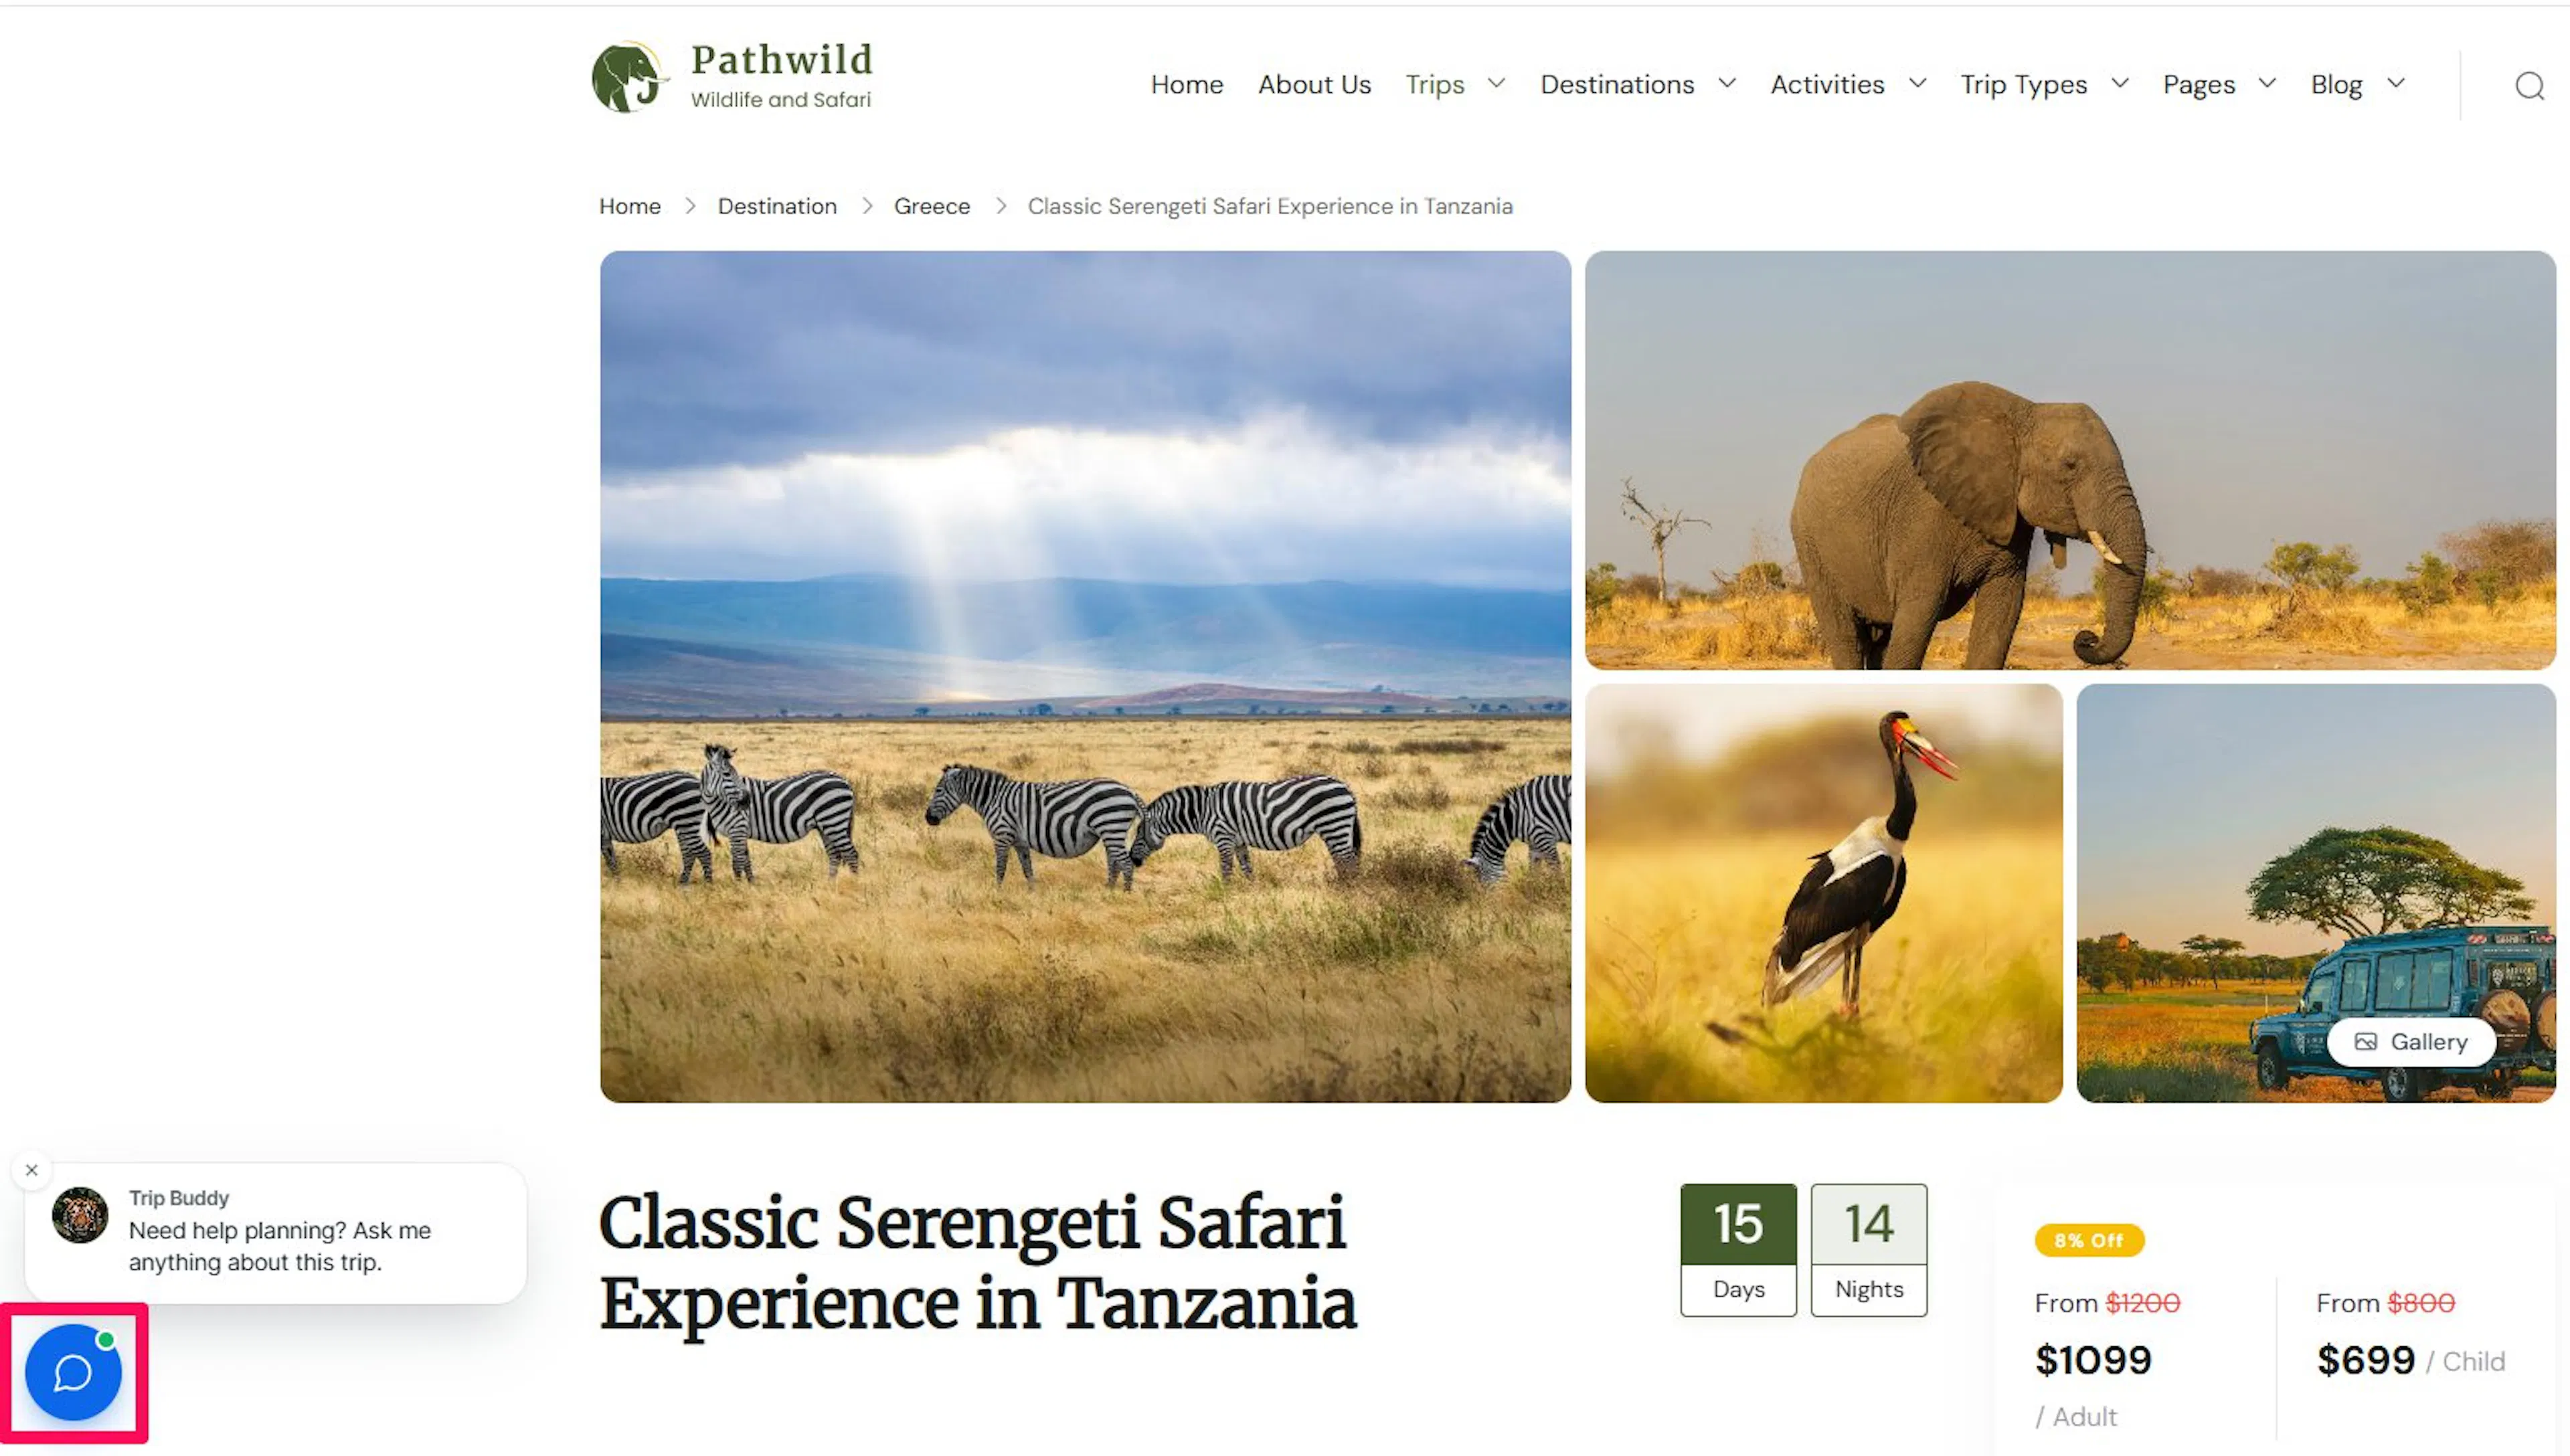
This decides which corner of the page the round chat button sits in.
Find the launcher position and choose bottom left or bottom right. Pick the corner that is not already crowded with other buttons on your site.

Choose the launcher icon
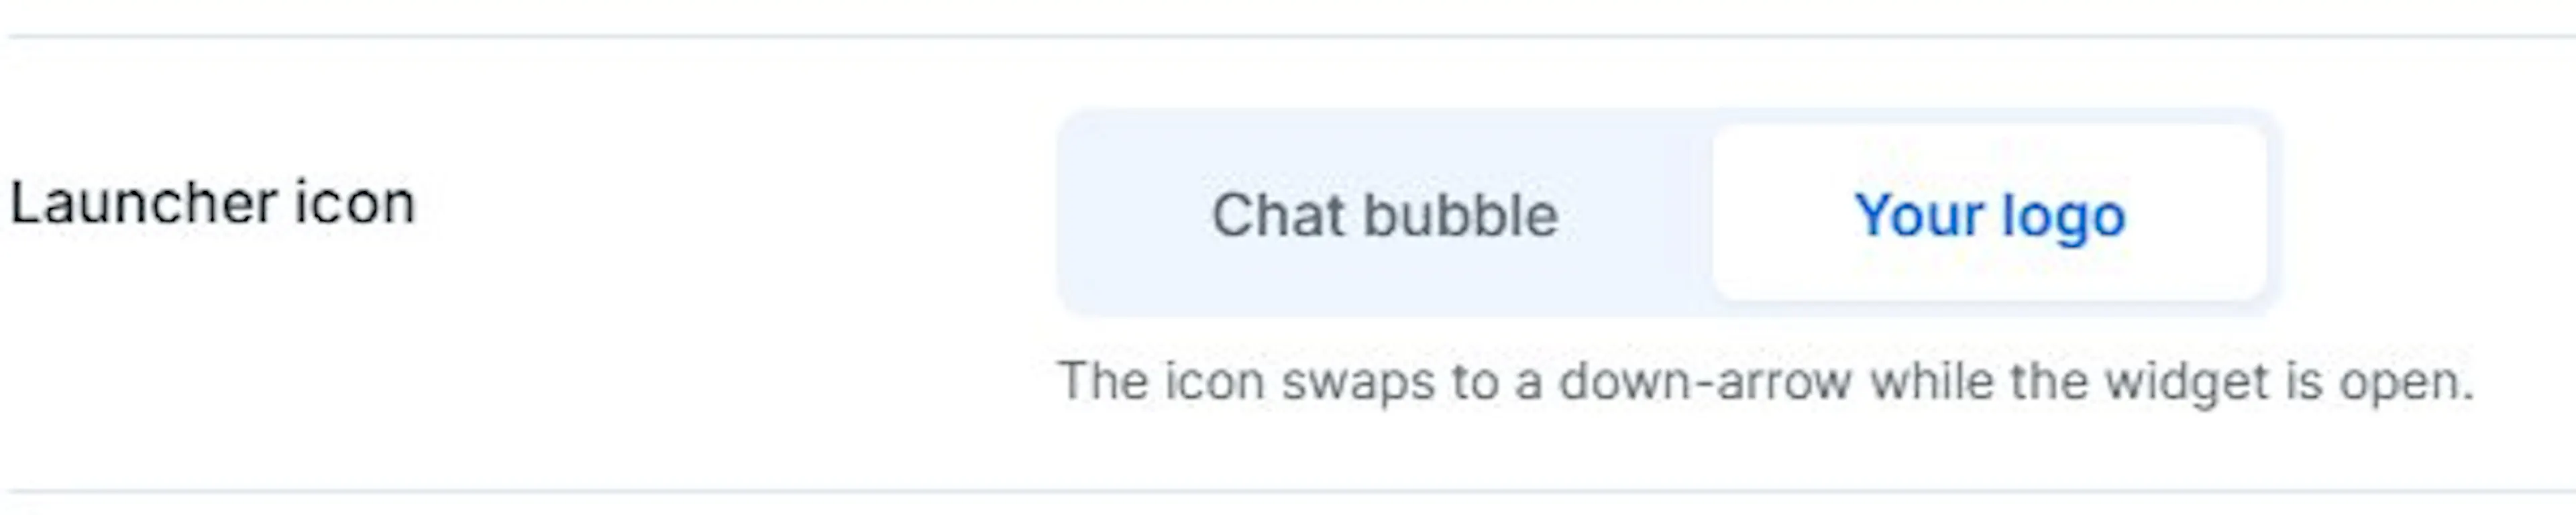
This is the small image travelers tap to open the chat.
Find Launcher icon and choose a chat bubble or upload your own logo. The icon changes to a down arrow while the widget is open.
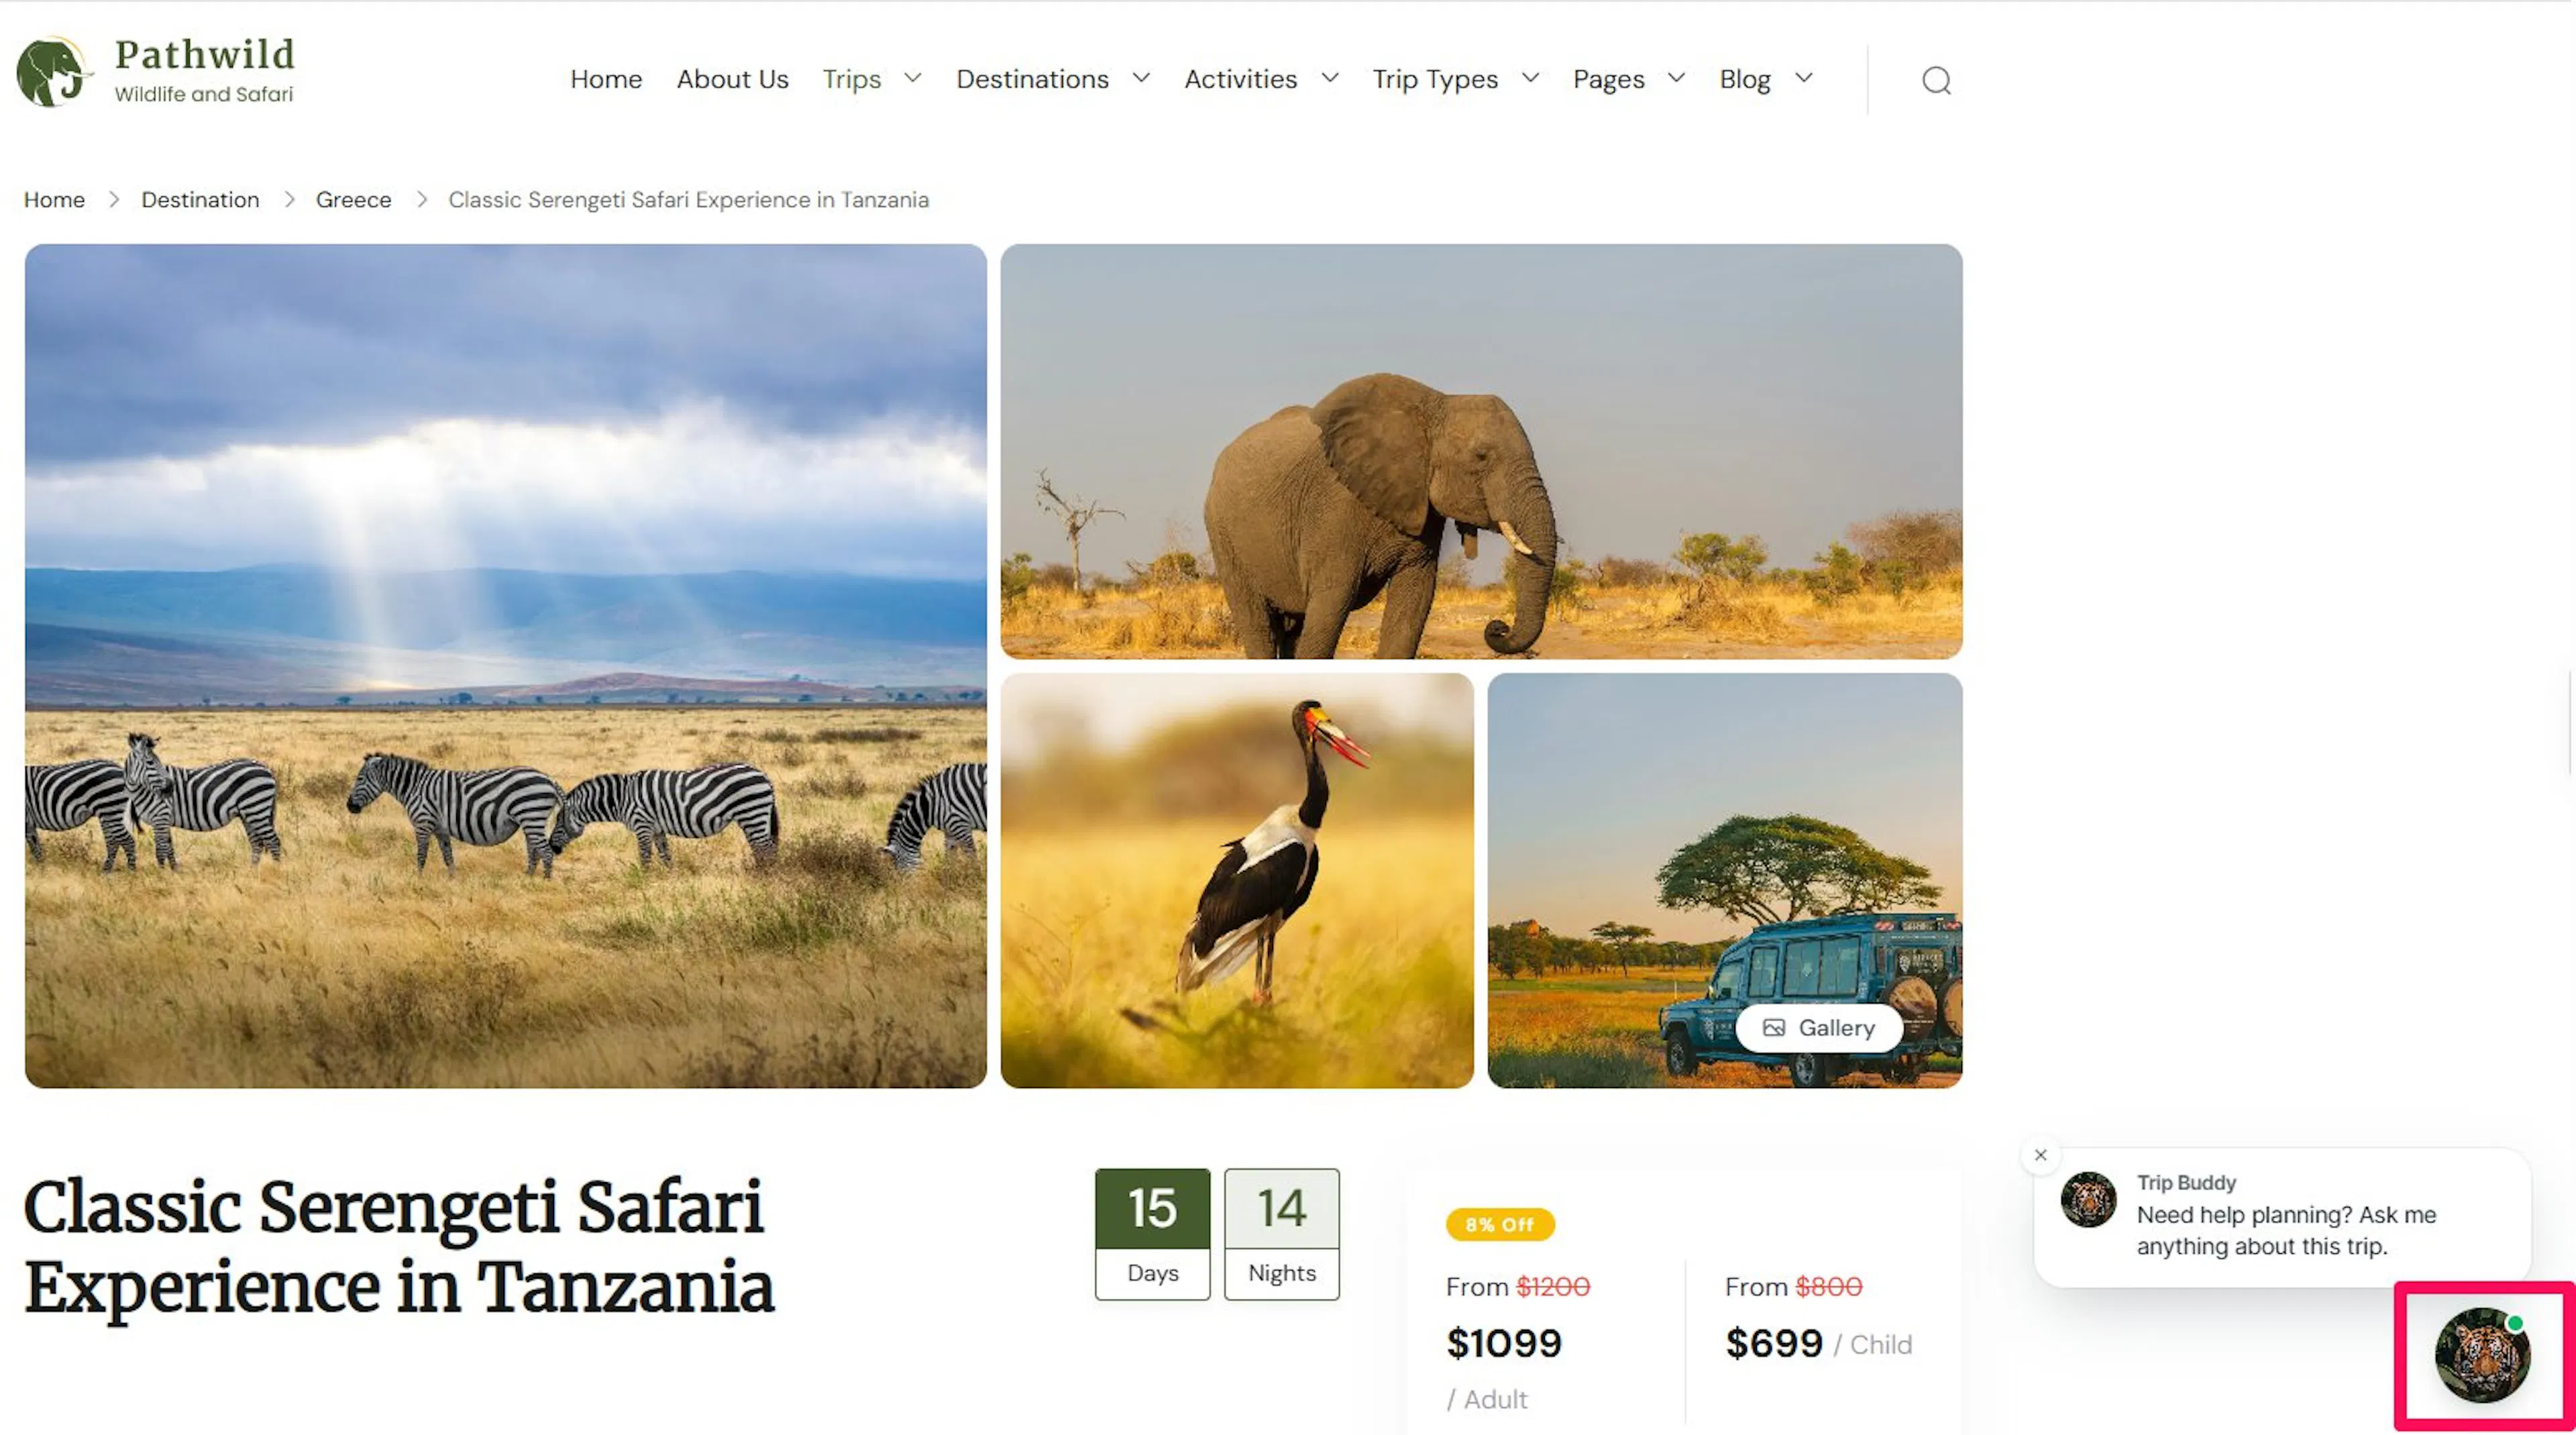
Upload your website logo
This logo appears at the top left of the widget header on every tab so travelers know they are talking to your business.
Find Website logo and upload a square image that is at least 80×80px.

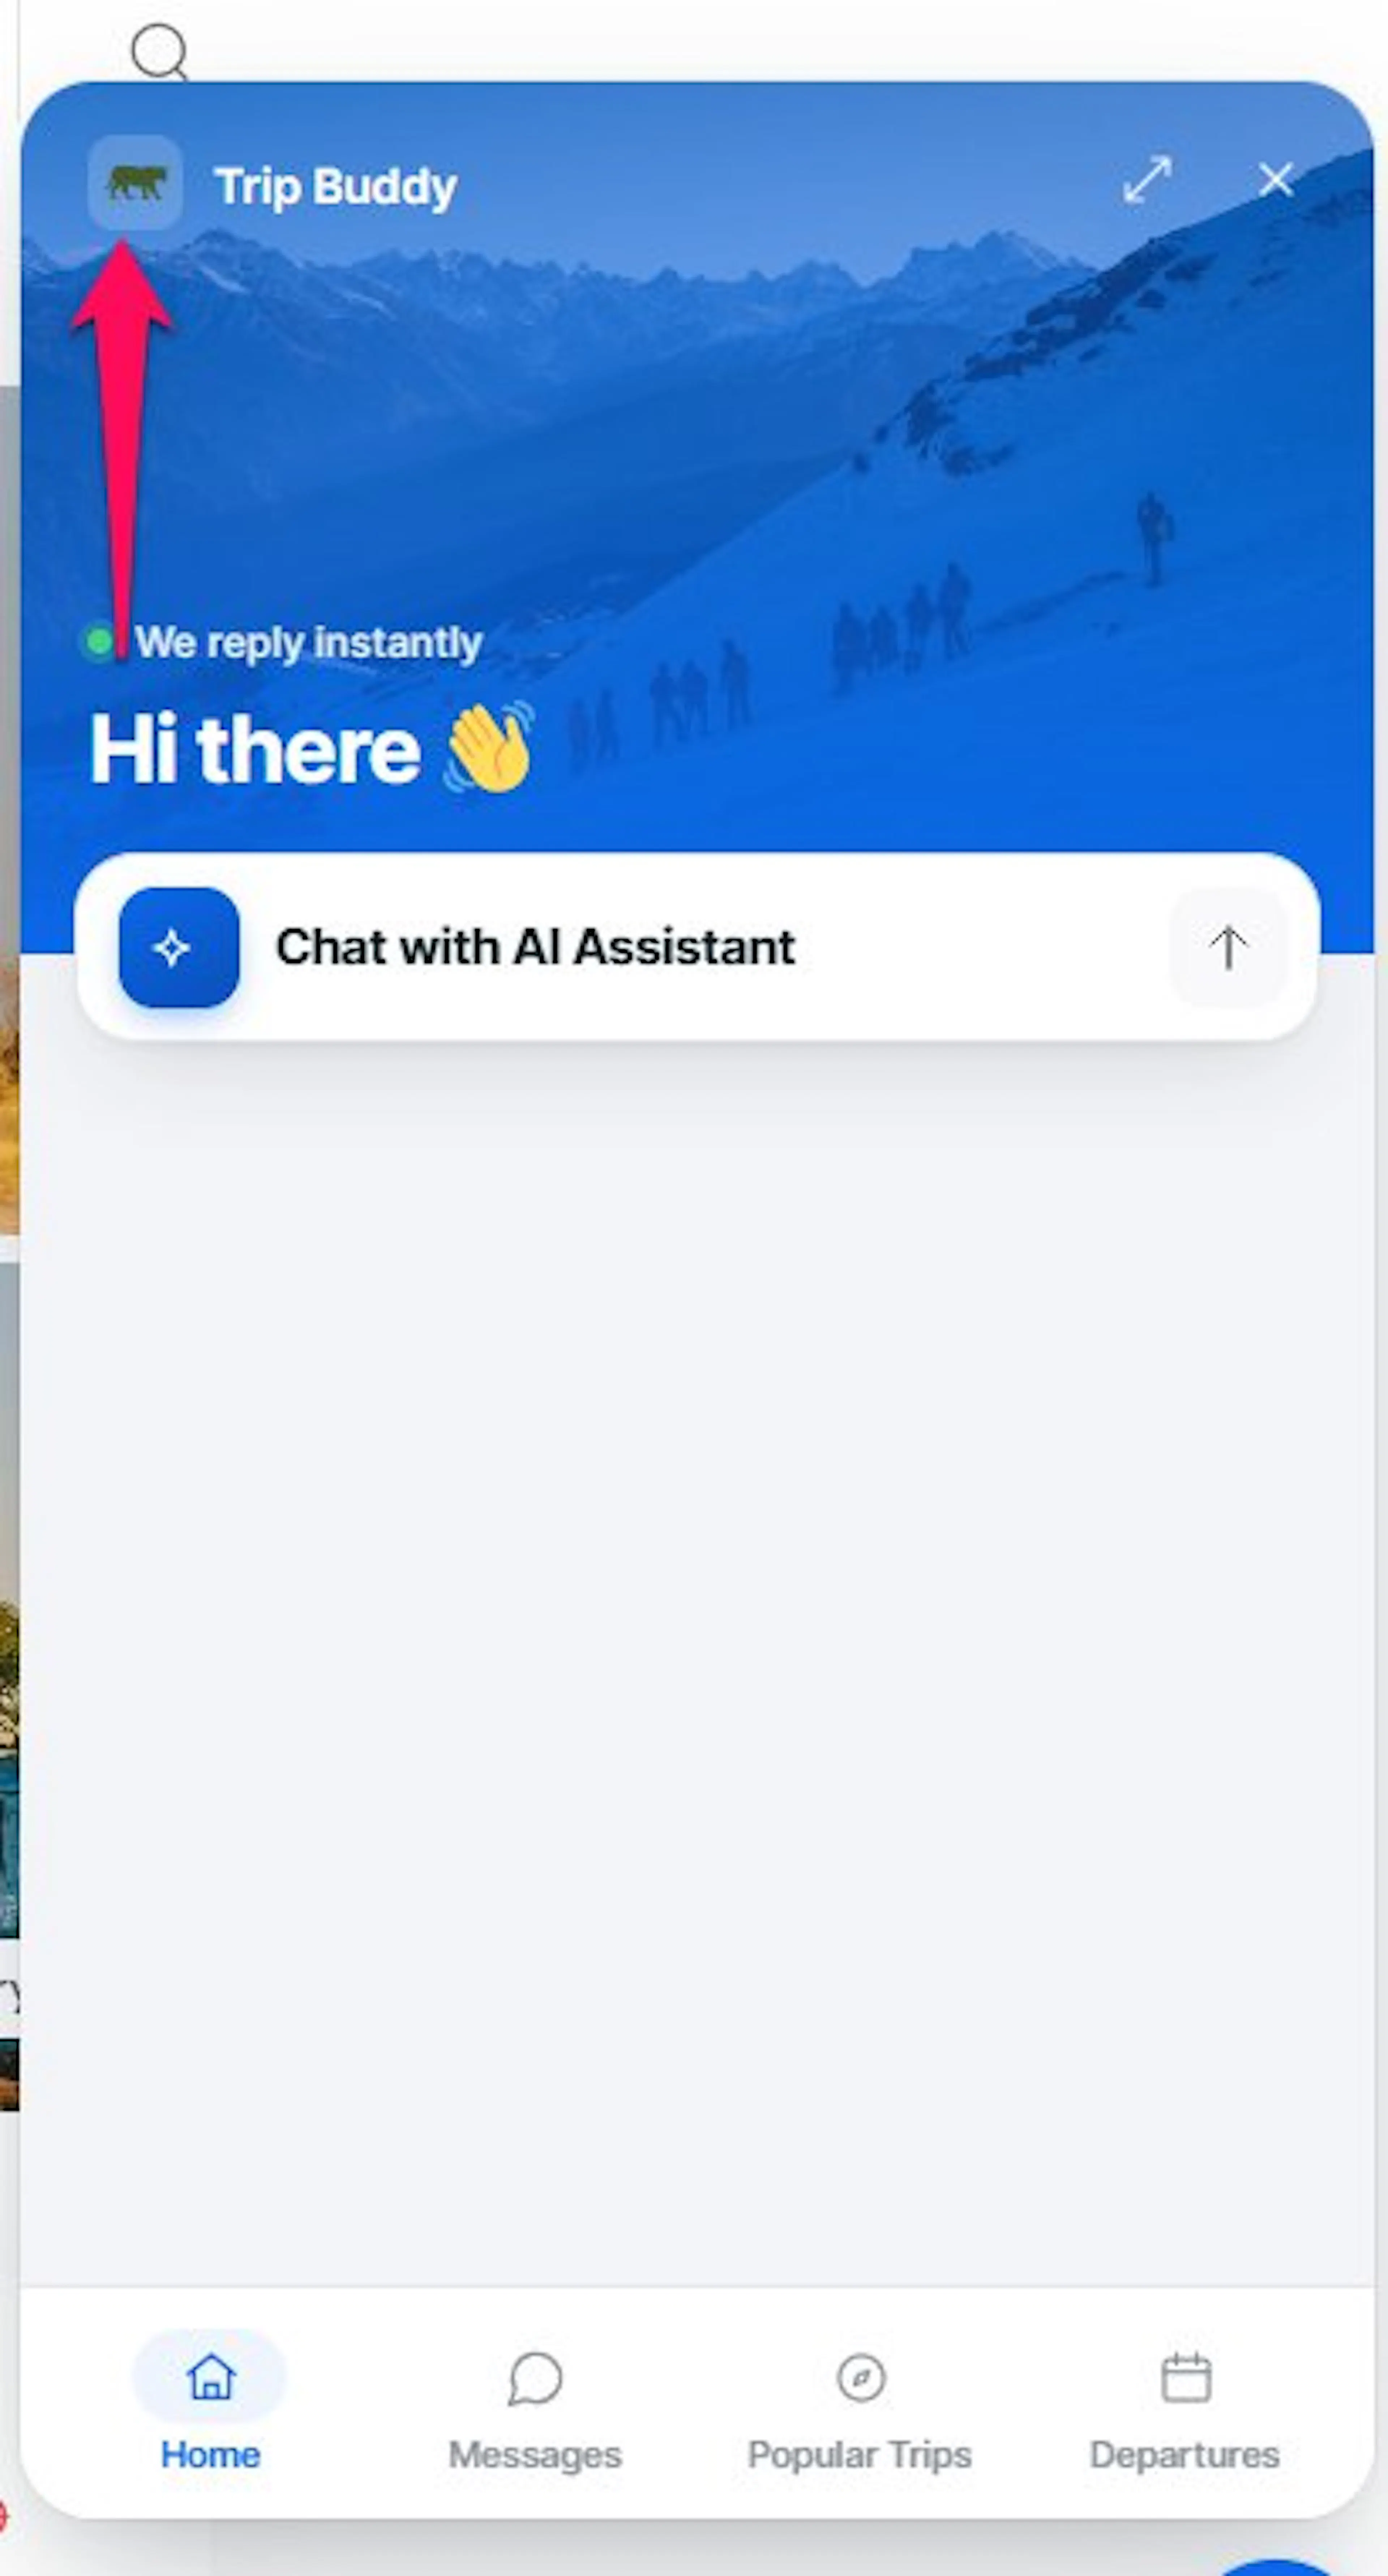
Set your brand color
This color is used for the header, buttons, active tab, and launcher button. Matching it to your logo makes the chat look like it belongs on your site.
Find Brand color and pick a color. If your brand color is the deep green from your logo, choose that color here.

Turn on the proactive teaser
This shows a short message above the launcher a few seconds after the page loads. It gives travelers a reason to start chatting.
Find Proactive teaser and turn it on. Then find Teaser message and enter the message travelers should see. Use {{trip_name}} to automatically fill in the name of the trip page the traveler is viewing.
For example, if you run seasonal monsoon treks, you might write: Questions about our monsoon treks? Ask me!

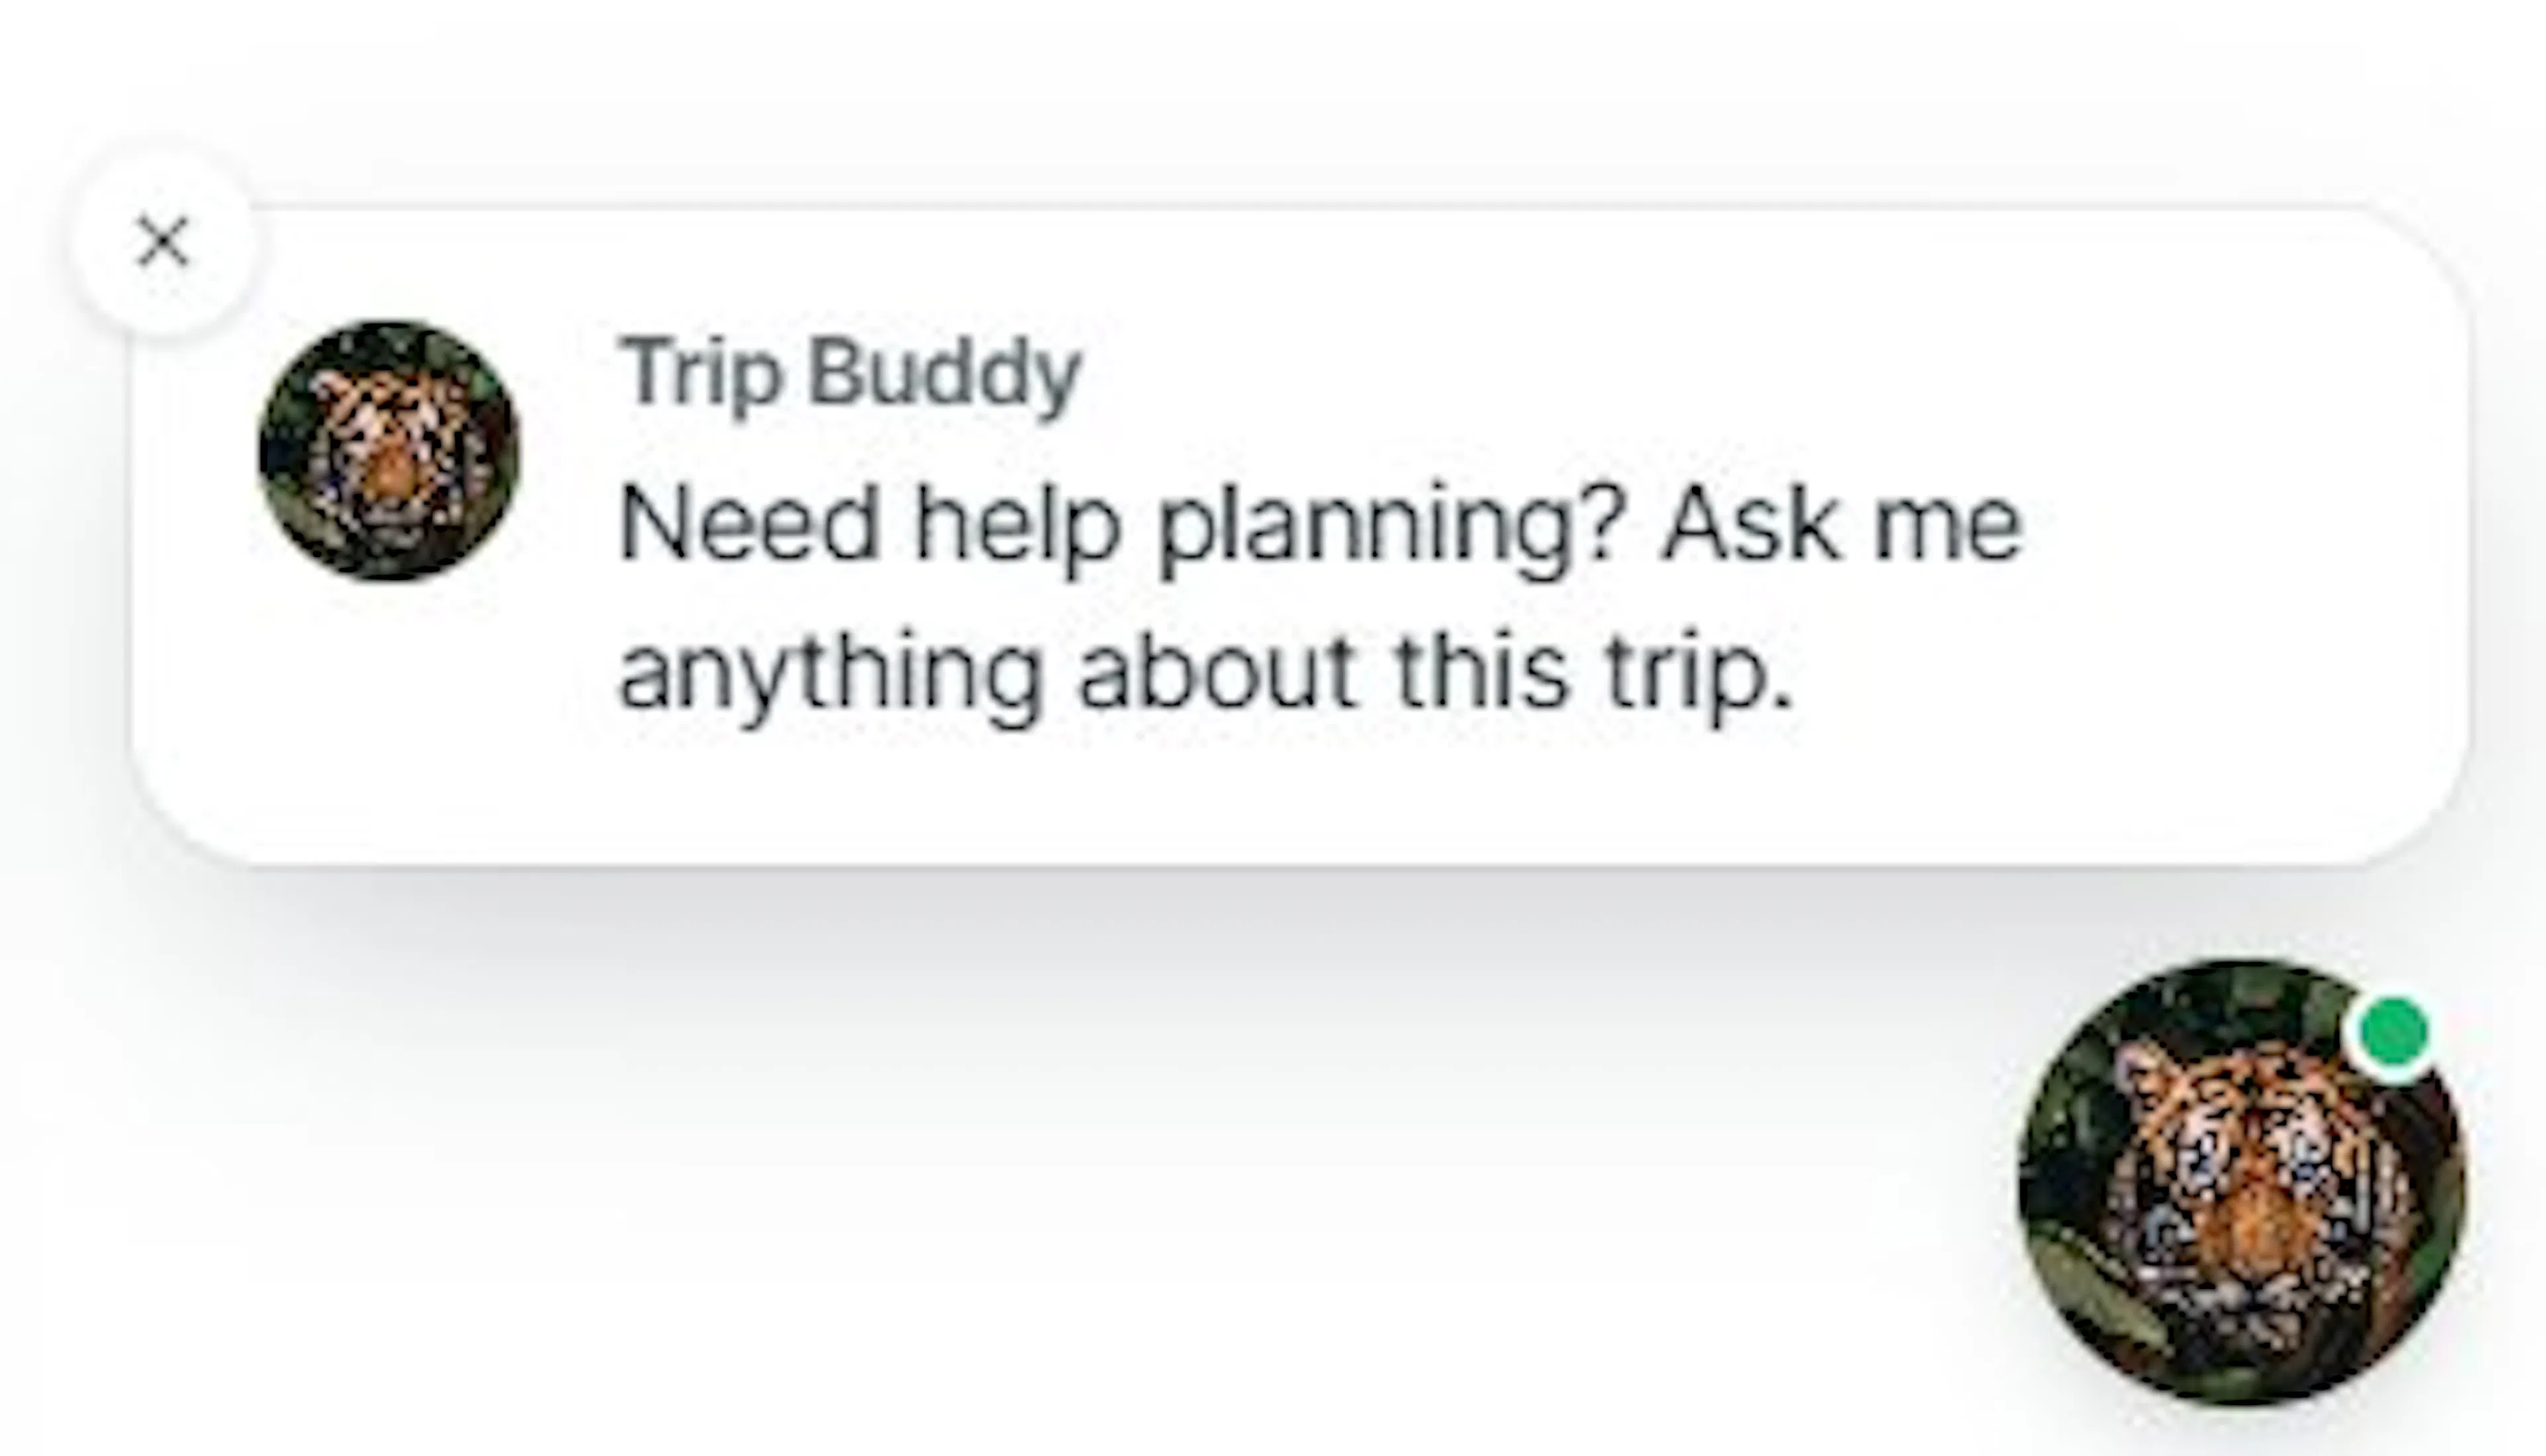
The preview helps you check the position, color, and overall feel before travelers see the chat. Next, choose what travelers find in the widget footer.
Tab Content
The tabs give travelers different ways to explore your trips and contact you. You manage them in the Tab Content section.
Tabs
Drag the rows to change the order in which sections appear from top to bottom.
Turn Popular Trips and Departures on or off. Home and Messages are always on and cannot be turned off.
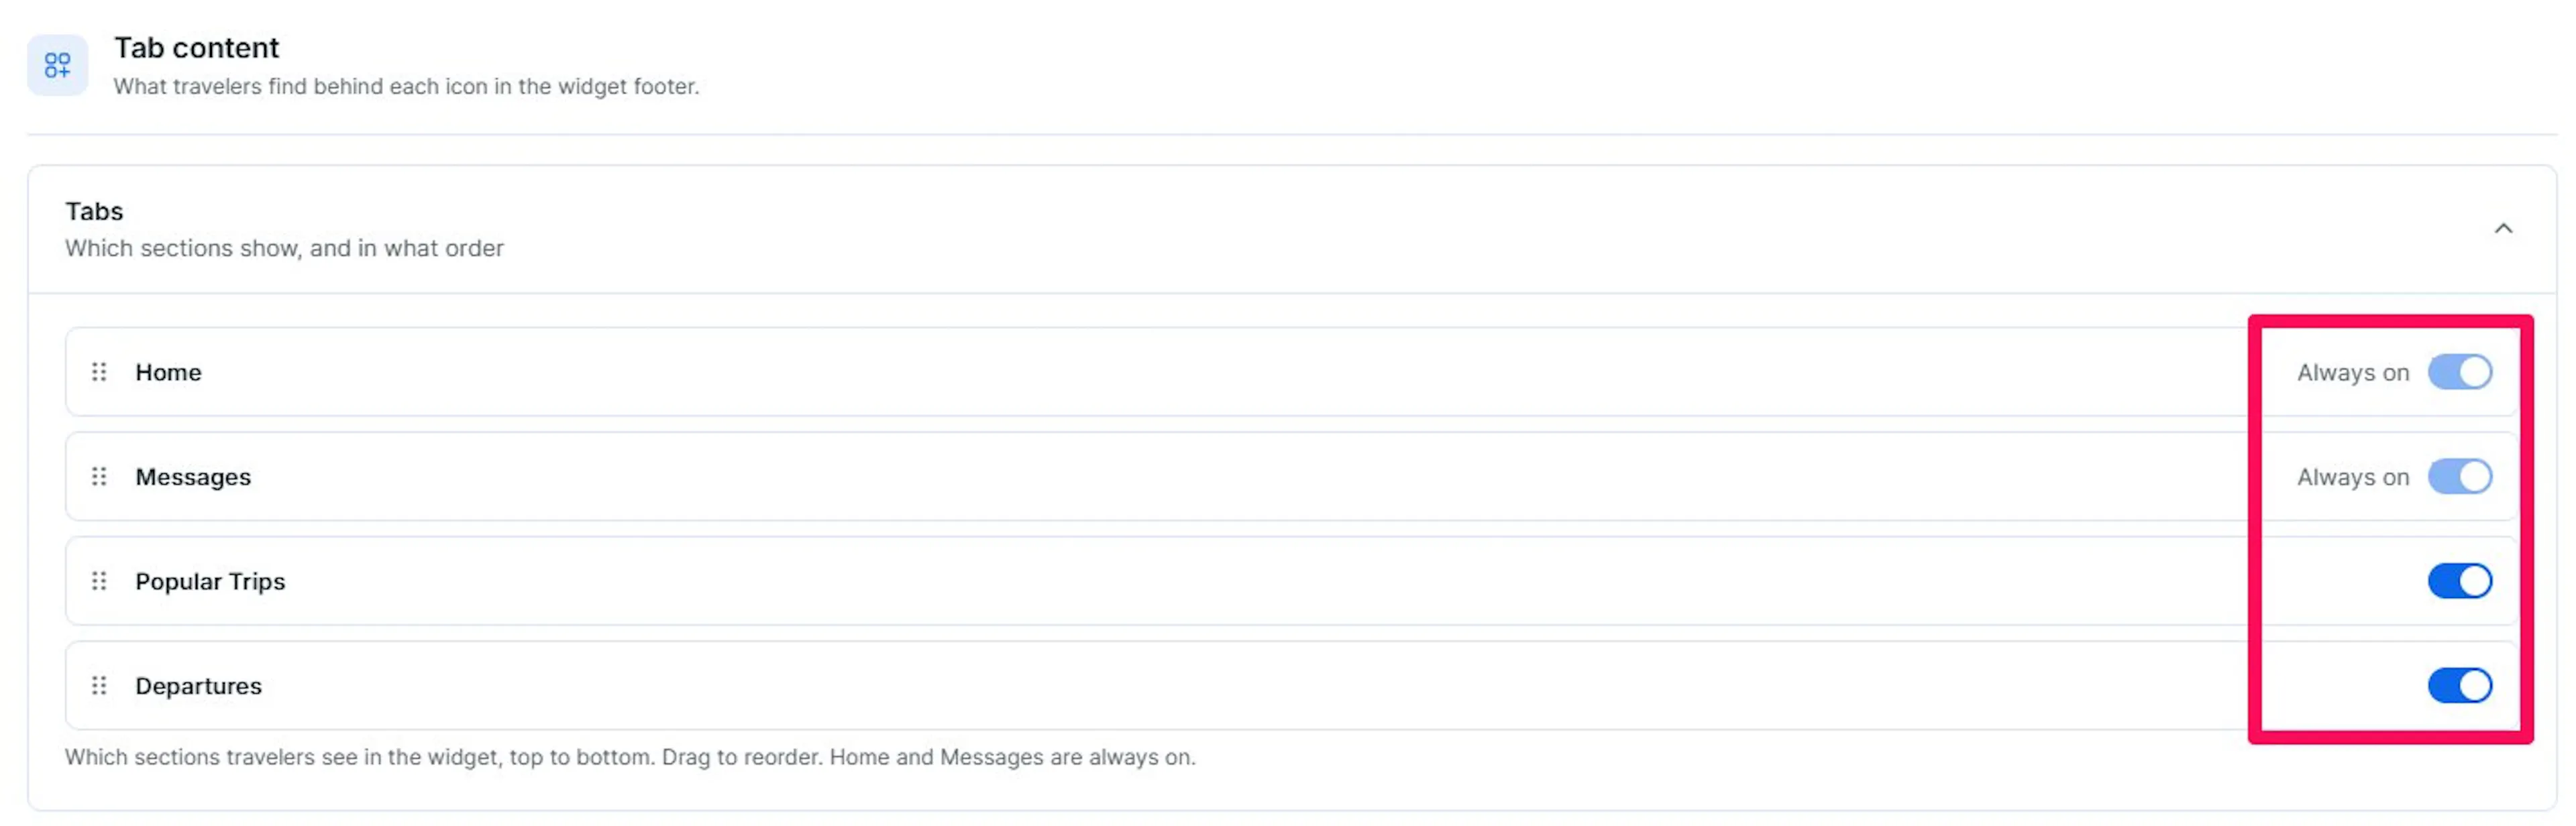
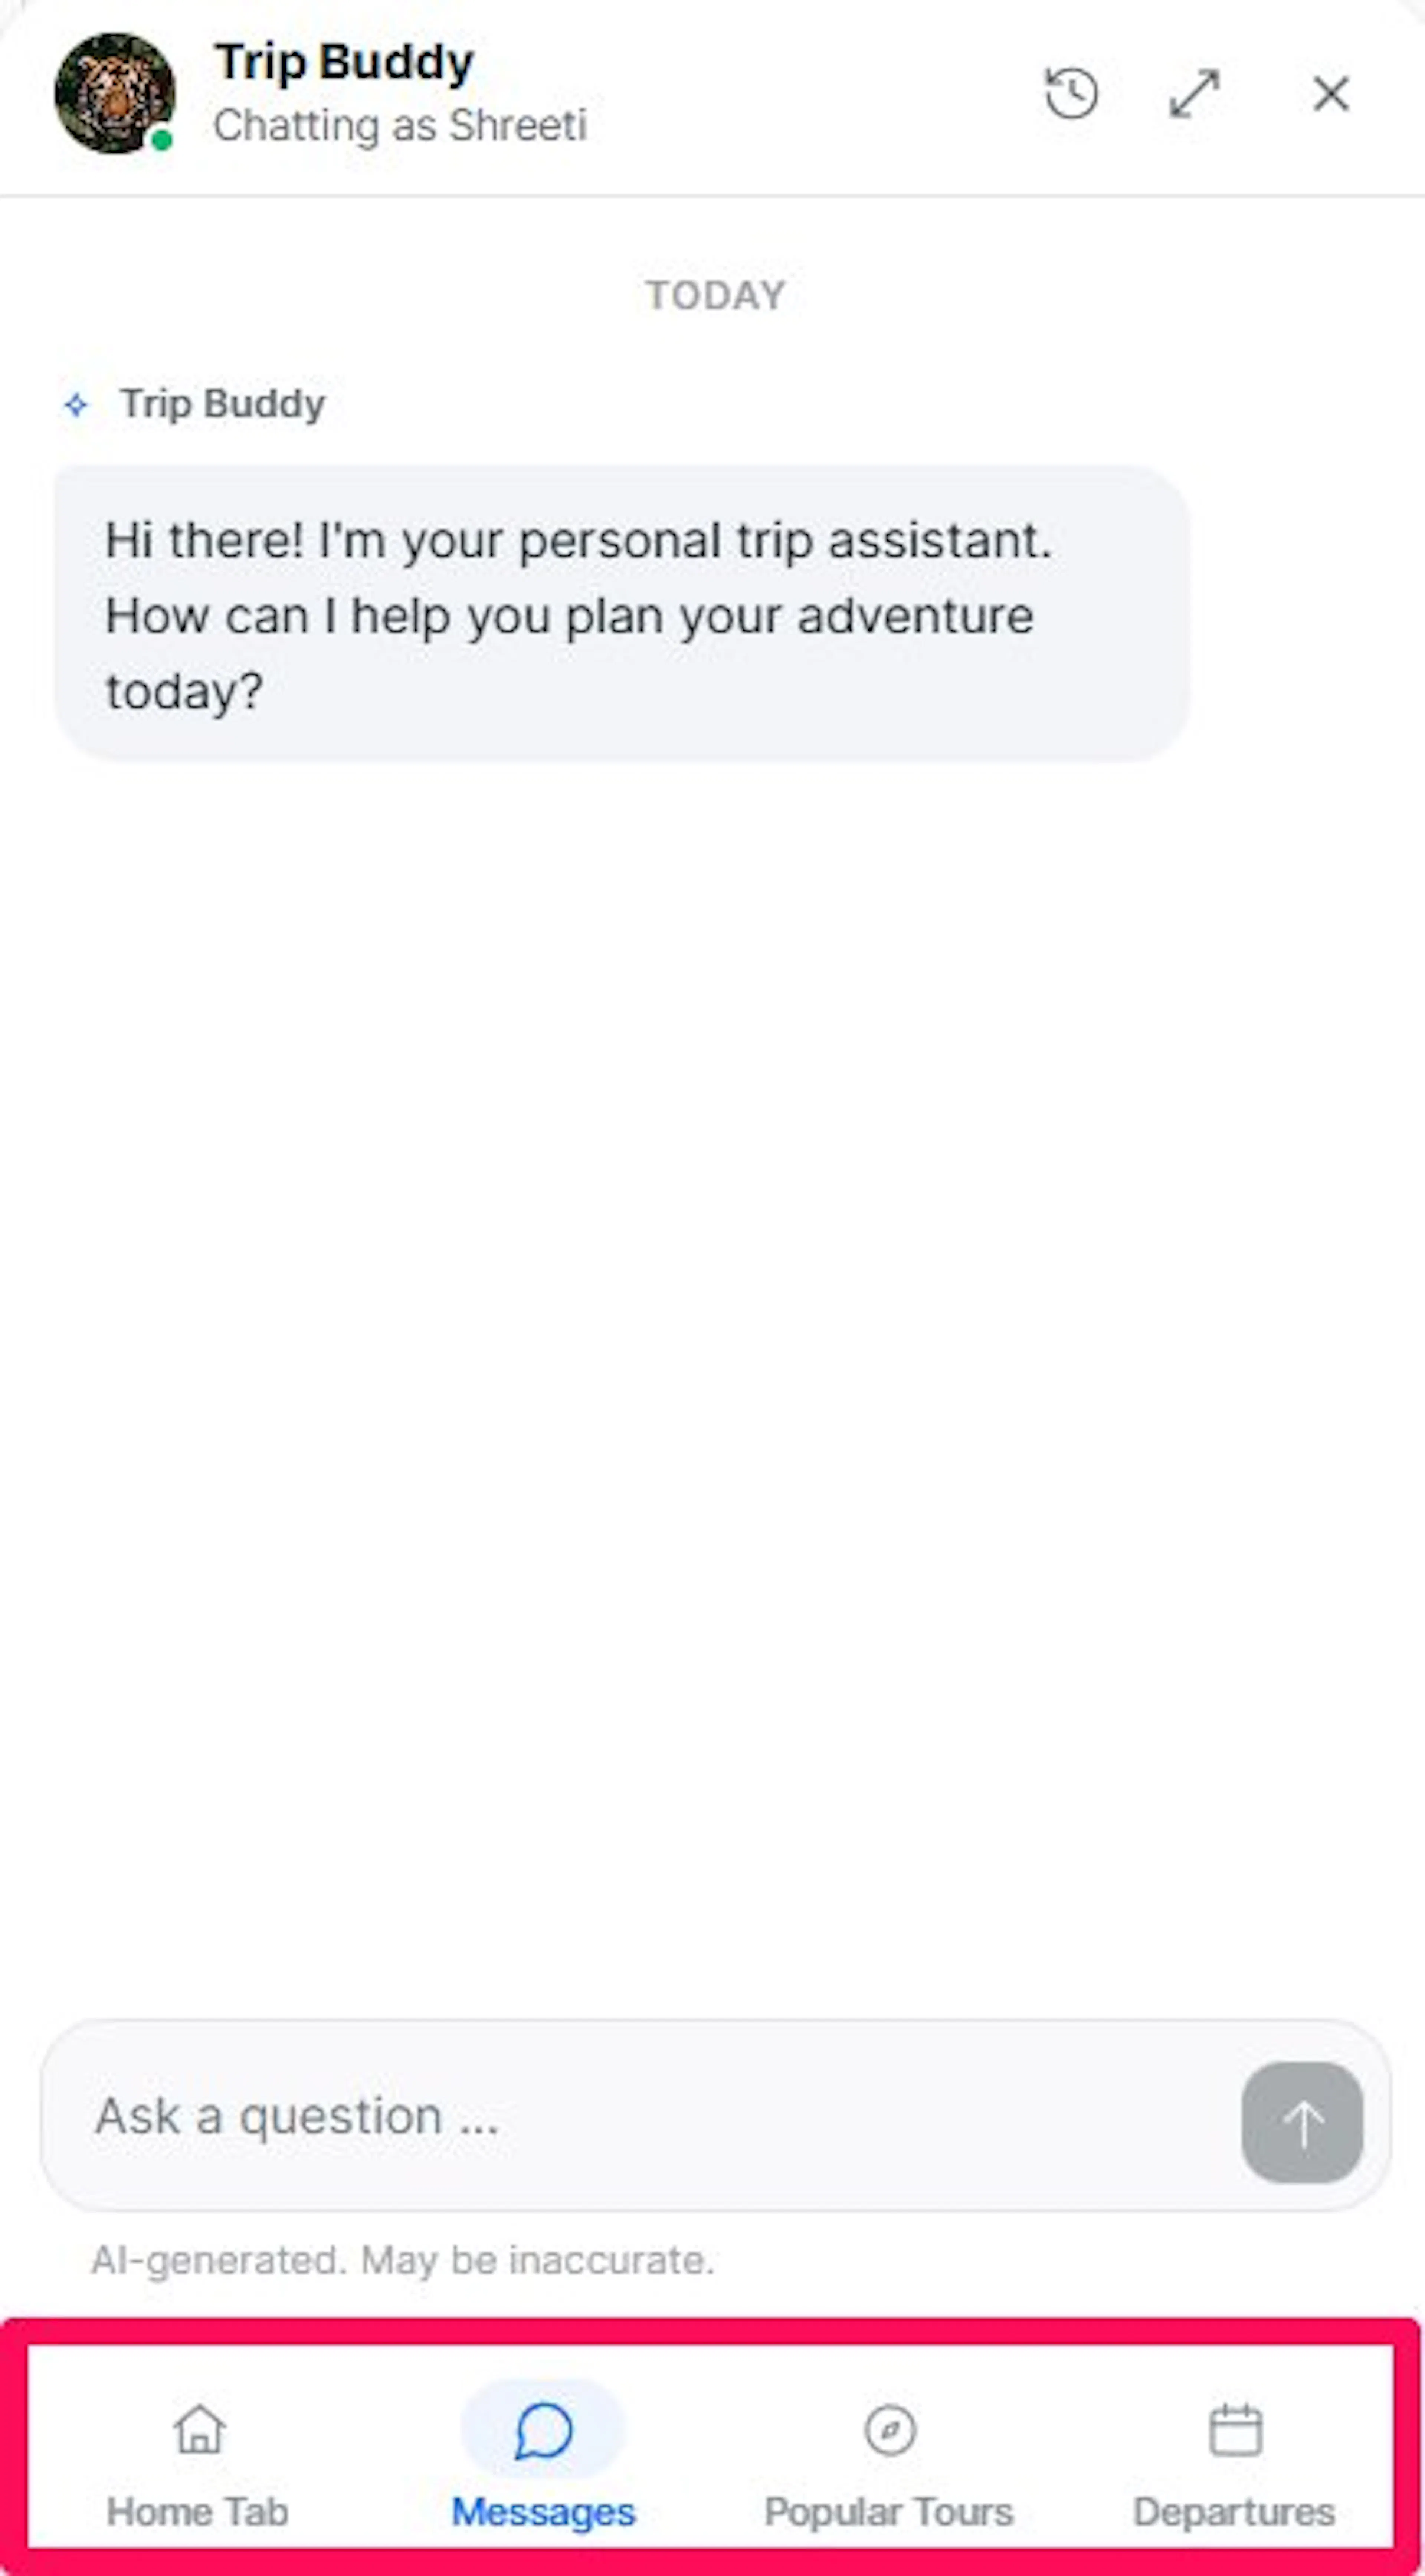
The order you choose controls the order travelers see. Configure each tab below when you are ready.
Home
The Home tab gives travelers a quick starting point before they open a chat.
Set the tab label
This is the small word travelers see under the house icon at the bottom of the chat.
Find Tab label and enter the label shown under the house icon in the widget footer.
Write the greeting
This is the first text travelers see when the chat opens. A warm greeting sets the tone.
Find Greeting and enter the greeting text travelers see first.
Add an introduction line
This line sits under the greeting. Keep it short so the chat button stays visible without scrolling.
Find Introduction and enter one line under the greeting. Keep it short so the chat button stays above the fold, which means travelers can see it without scrolling.
Upload a hero image
This is the large image at the top of the Home tab. It gives travelers a visual feel for your trips before they start chatting.
Find Hero image and upload a landscape image that is at least 640×360px. If you leave this empty, the chat shows the photo from the trip page the traveler is viewing. This works well when you run many trips and do not want to choose a different image for every trip.
Set the chat button text
This is the label on the main button travelers tap to start a conversation.
Find Chat button text and enter the label on the main chat button.
Turn on the next departure card
This shows the closest upcoming departure with its date, spots left, and price. It helps travelers pick a date without leaving the chat.
Find Next departure card and turn it on.
Turn on helpful links
This adds quick links below the chat button so travelers can jump to important pages on your site.
Find Helpful links and turn it on. Then find Section title and enter the small heading above the links.
Under Links, add up to 6 links. Choose an icon for each one. Then enter the label and the destination URL for each link.
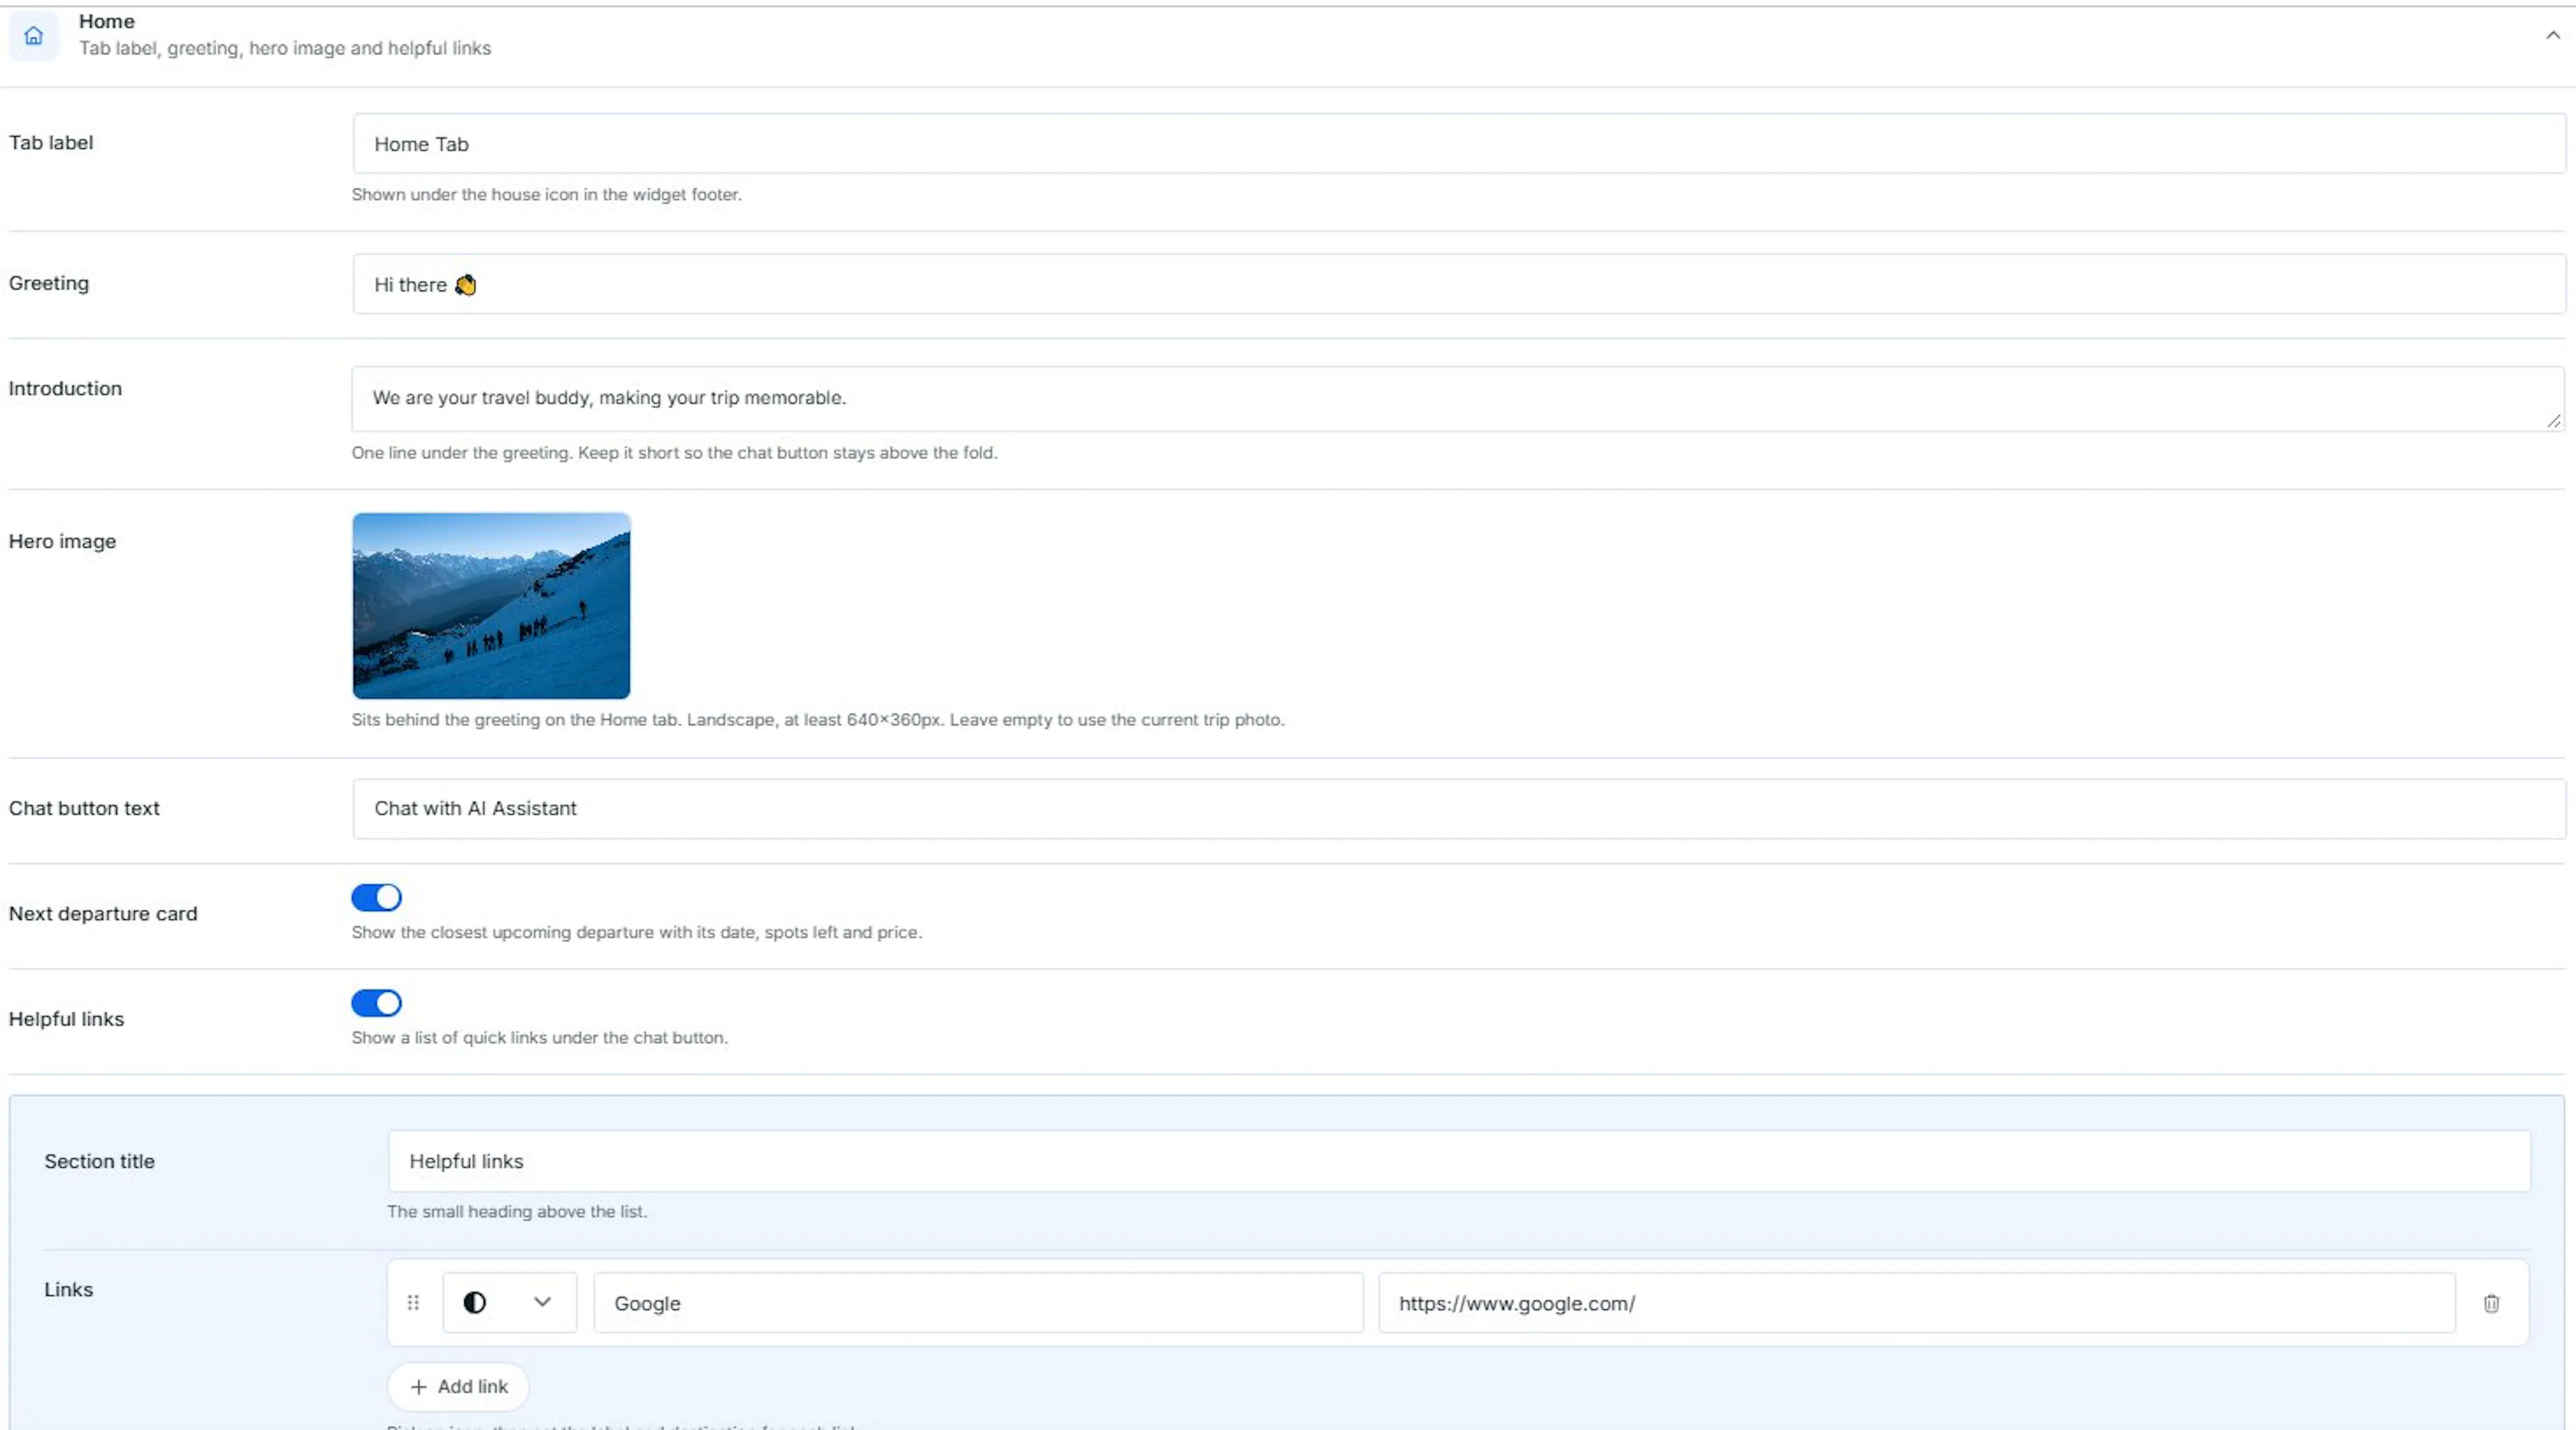
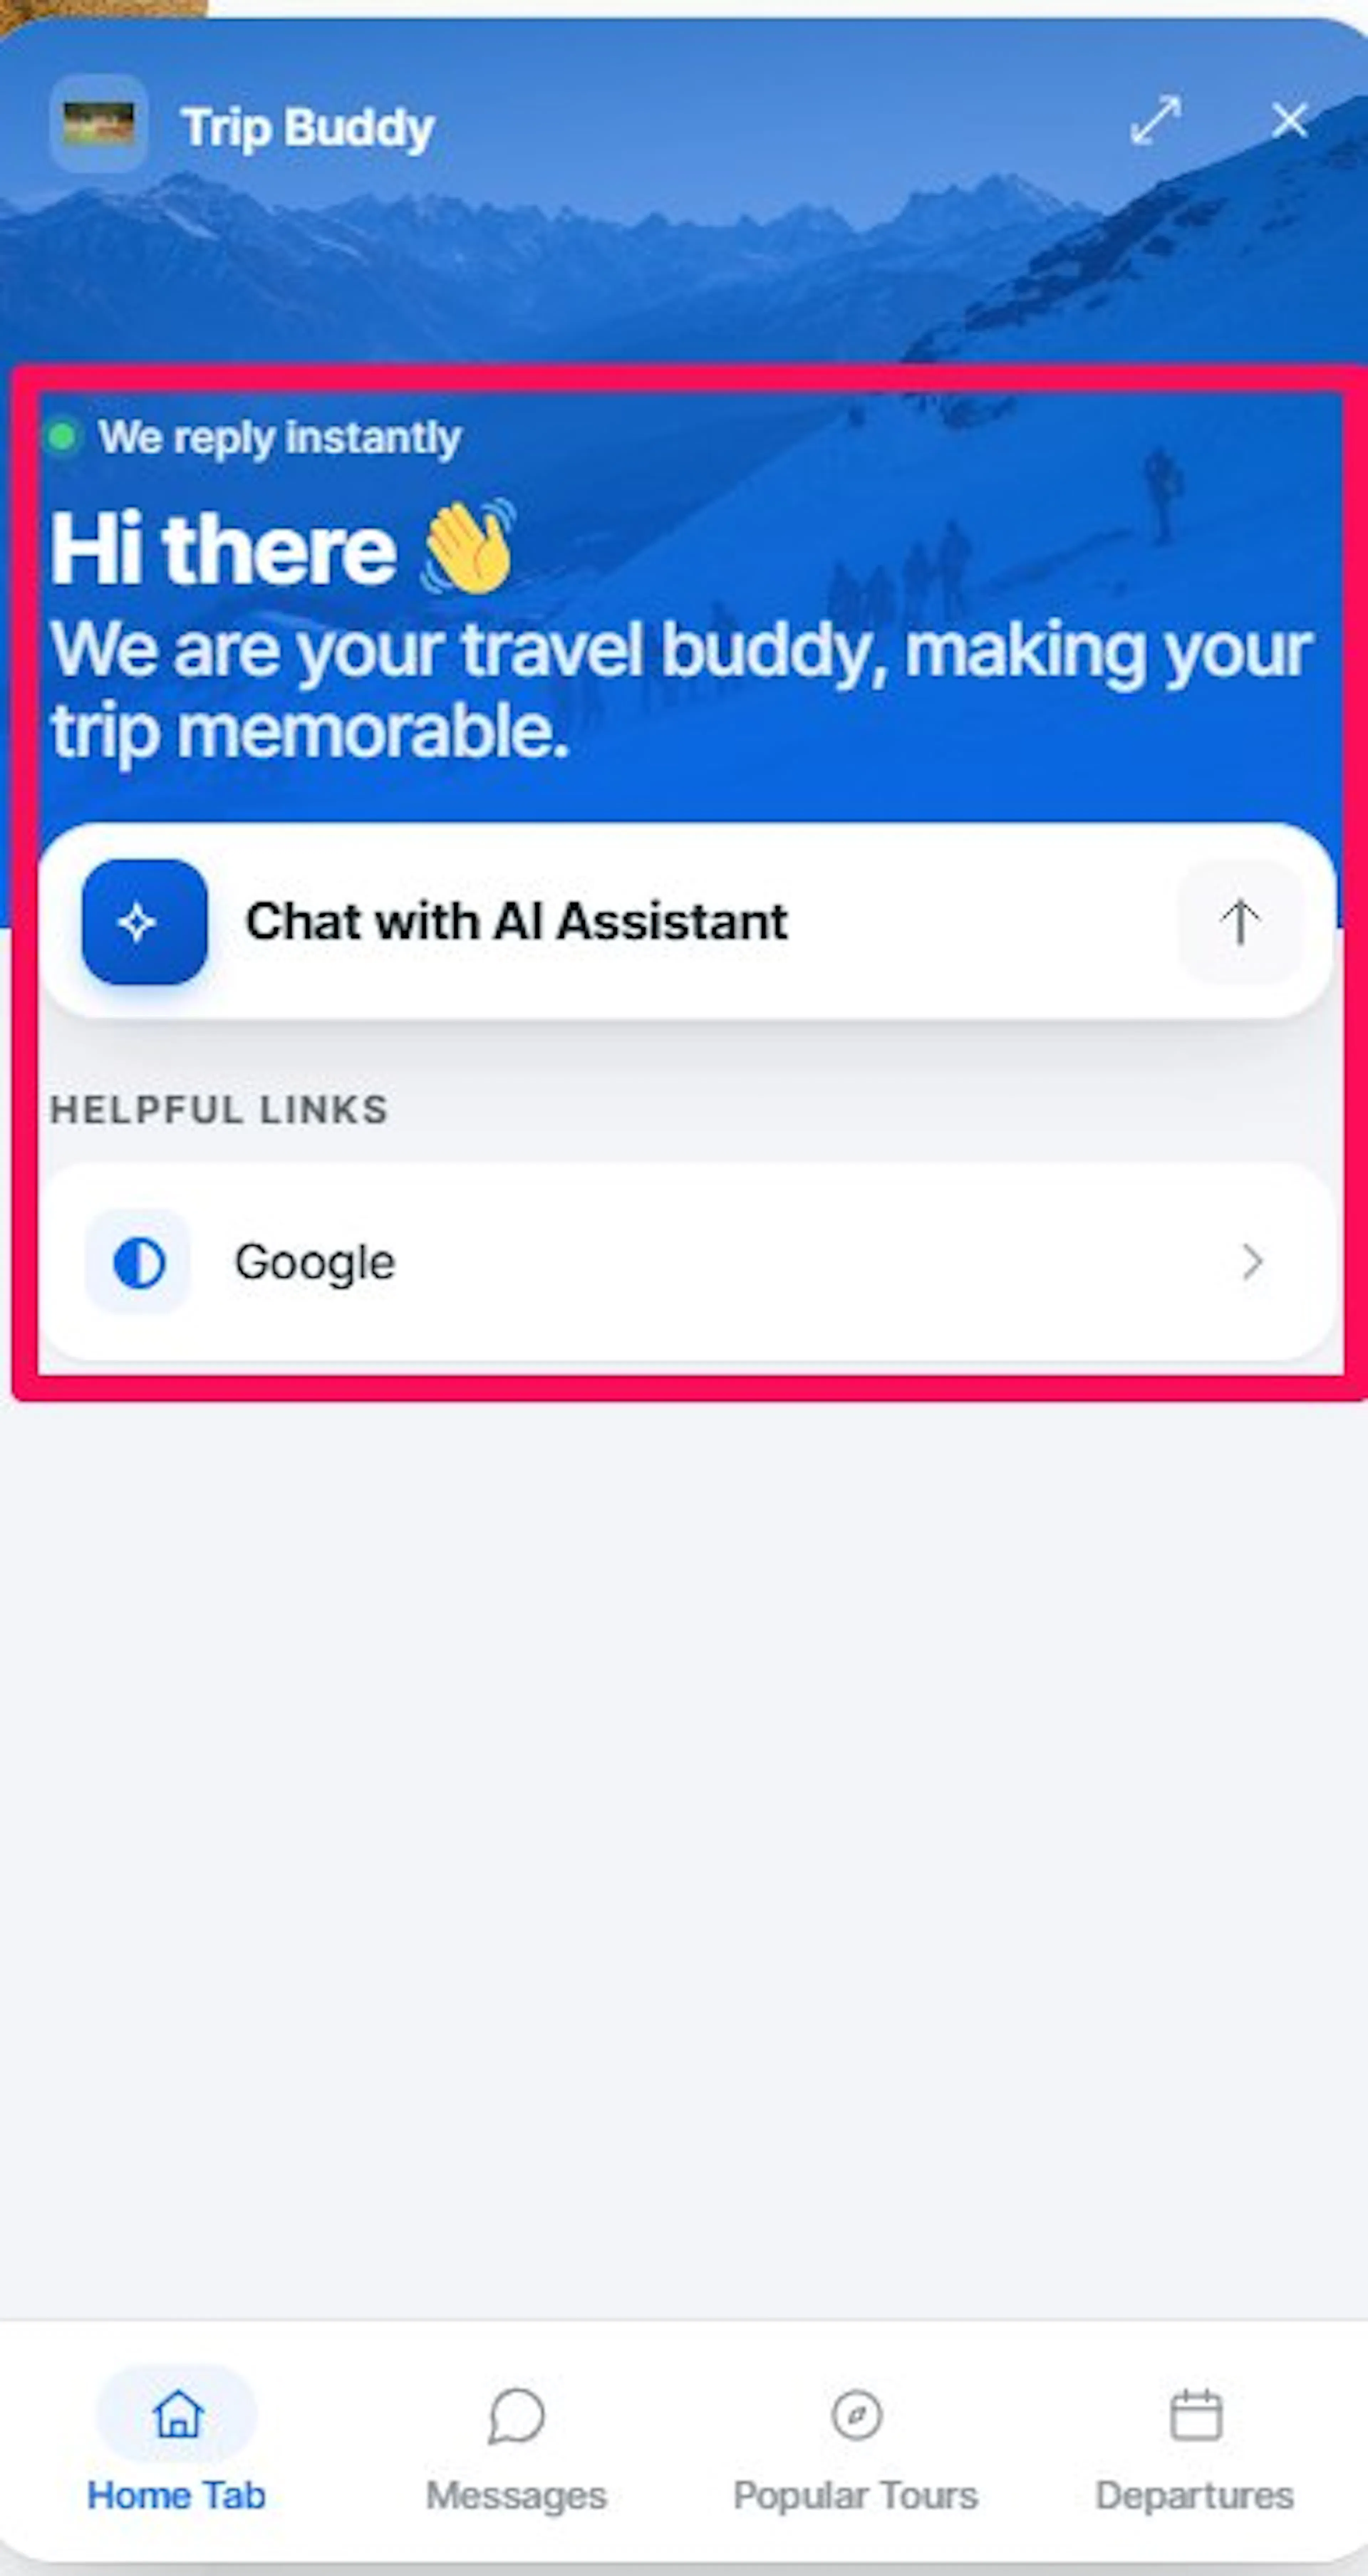
A short greeting and a clear chat button help travelers know where to begin. The next tab controls the conversation itself.
Messages
The Messages tab controls what travelers see before, during, and after a chat.
A placeholder is the light gray text inside a text field before someone types anything. A fallback message is the reply travelers see when the assistant does not know the answer. Starter questions are tappable question chips that appear before the traveler's first message.
Set the tab label
This is the small word travelers see under the chat icon at the bottom of the widget.
Find Tab label and enter the label shown under the chat icon in the widget footer.
Write the welcome message
This is the first message travelers see in every new chat. A good welcome message invites them to ask about your trips.
Find Welcome message and enter the first message in every new chat. Use {{trip_name}} to include the name of the trip the traveler is viewing. If you run a 3-day Annapurna trek, you might write:
Hi! Ask me anything about our Annapurna trek - gear, difficulty, what's included.
Write a fallback message
This is what the assistant says when it cannot answer. It keeps the conversation moving and guides the traveler to your team.
Find Fallback message and enter what the assistant should say when it does not know the answer.
Add starter questions
These are tappable question chips that appear before the traveler's first message. They help travelers who do not know what to ask.
Find Starter questions and add up to 3 tappable questions. After that, the AI generates its own follow-up questions.
Set the identification question
This message asks travelers to identify themselves after the chat has been useful. It helps your team follow up with real contact details.
Find Question and enter the message that asks travelers to identify themselves after the chat has been useful.
Choose which fields to collect
These are the contact details your team receives so you can follow up. Name and email are always collected.
Find Fields. Name and email are always on. Turn Phone on if you also want to ask for a phone number.
Write the message placeholder
This is the light gray text travelers see in the message box before they type. It hints at what they can ask.
Find Message placeholder and enter the light gray text travelers see in the message box before they type.
Turn on suggested follow-ups
These are 2 to 3 tappable follow-up questions that appear under each answer. They keep the conversation going without the traveler having to think of the next question.
Find Suggested follow-ups and turn it on to show 2 to 3 tappable follow-up questions under each answer.
Ask for a rating after the chat ends
This shows a 5-star prompt on the end-of-chat card. It helps you see how travelers feel about the assistant's help.
Find After the chat ends. Turn on Ask for a rating to show a 5-star prompt on the end-of-chat card.
Add an Email now button
This adds a button to the end-of-chat card that opens the traveler's mail app. It gives travelers a direct way to reach your team.
Find Show "Email now" and turn it on to add an Email now button to the card.
Then find Send to and enter the address that receives these messages. This field appears after you turn on Email now.
Find Subject and enter the email subject line. Use {{trip_name}} so you know which trip the email is about.
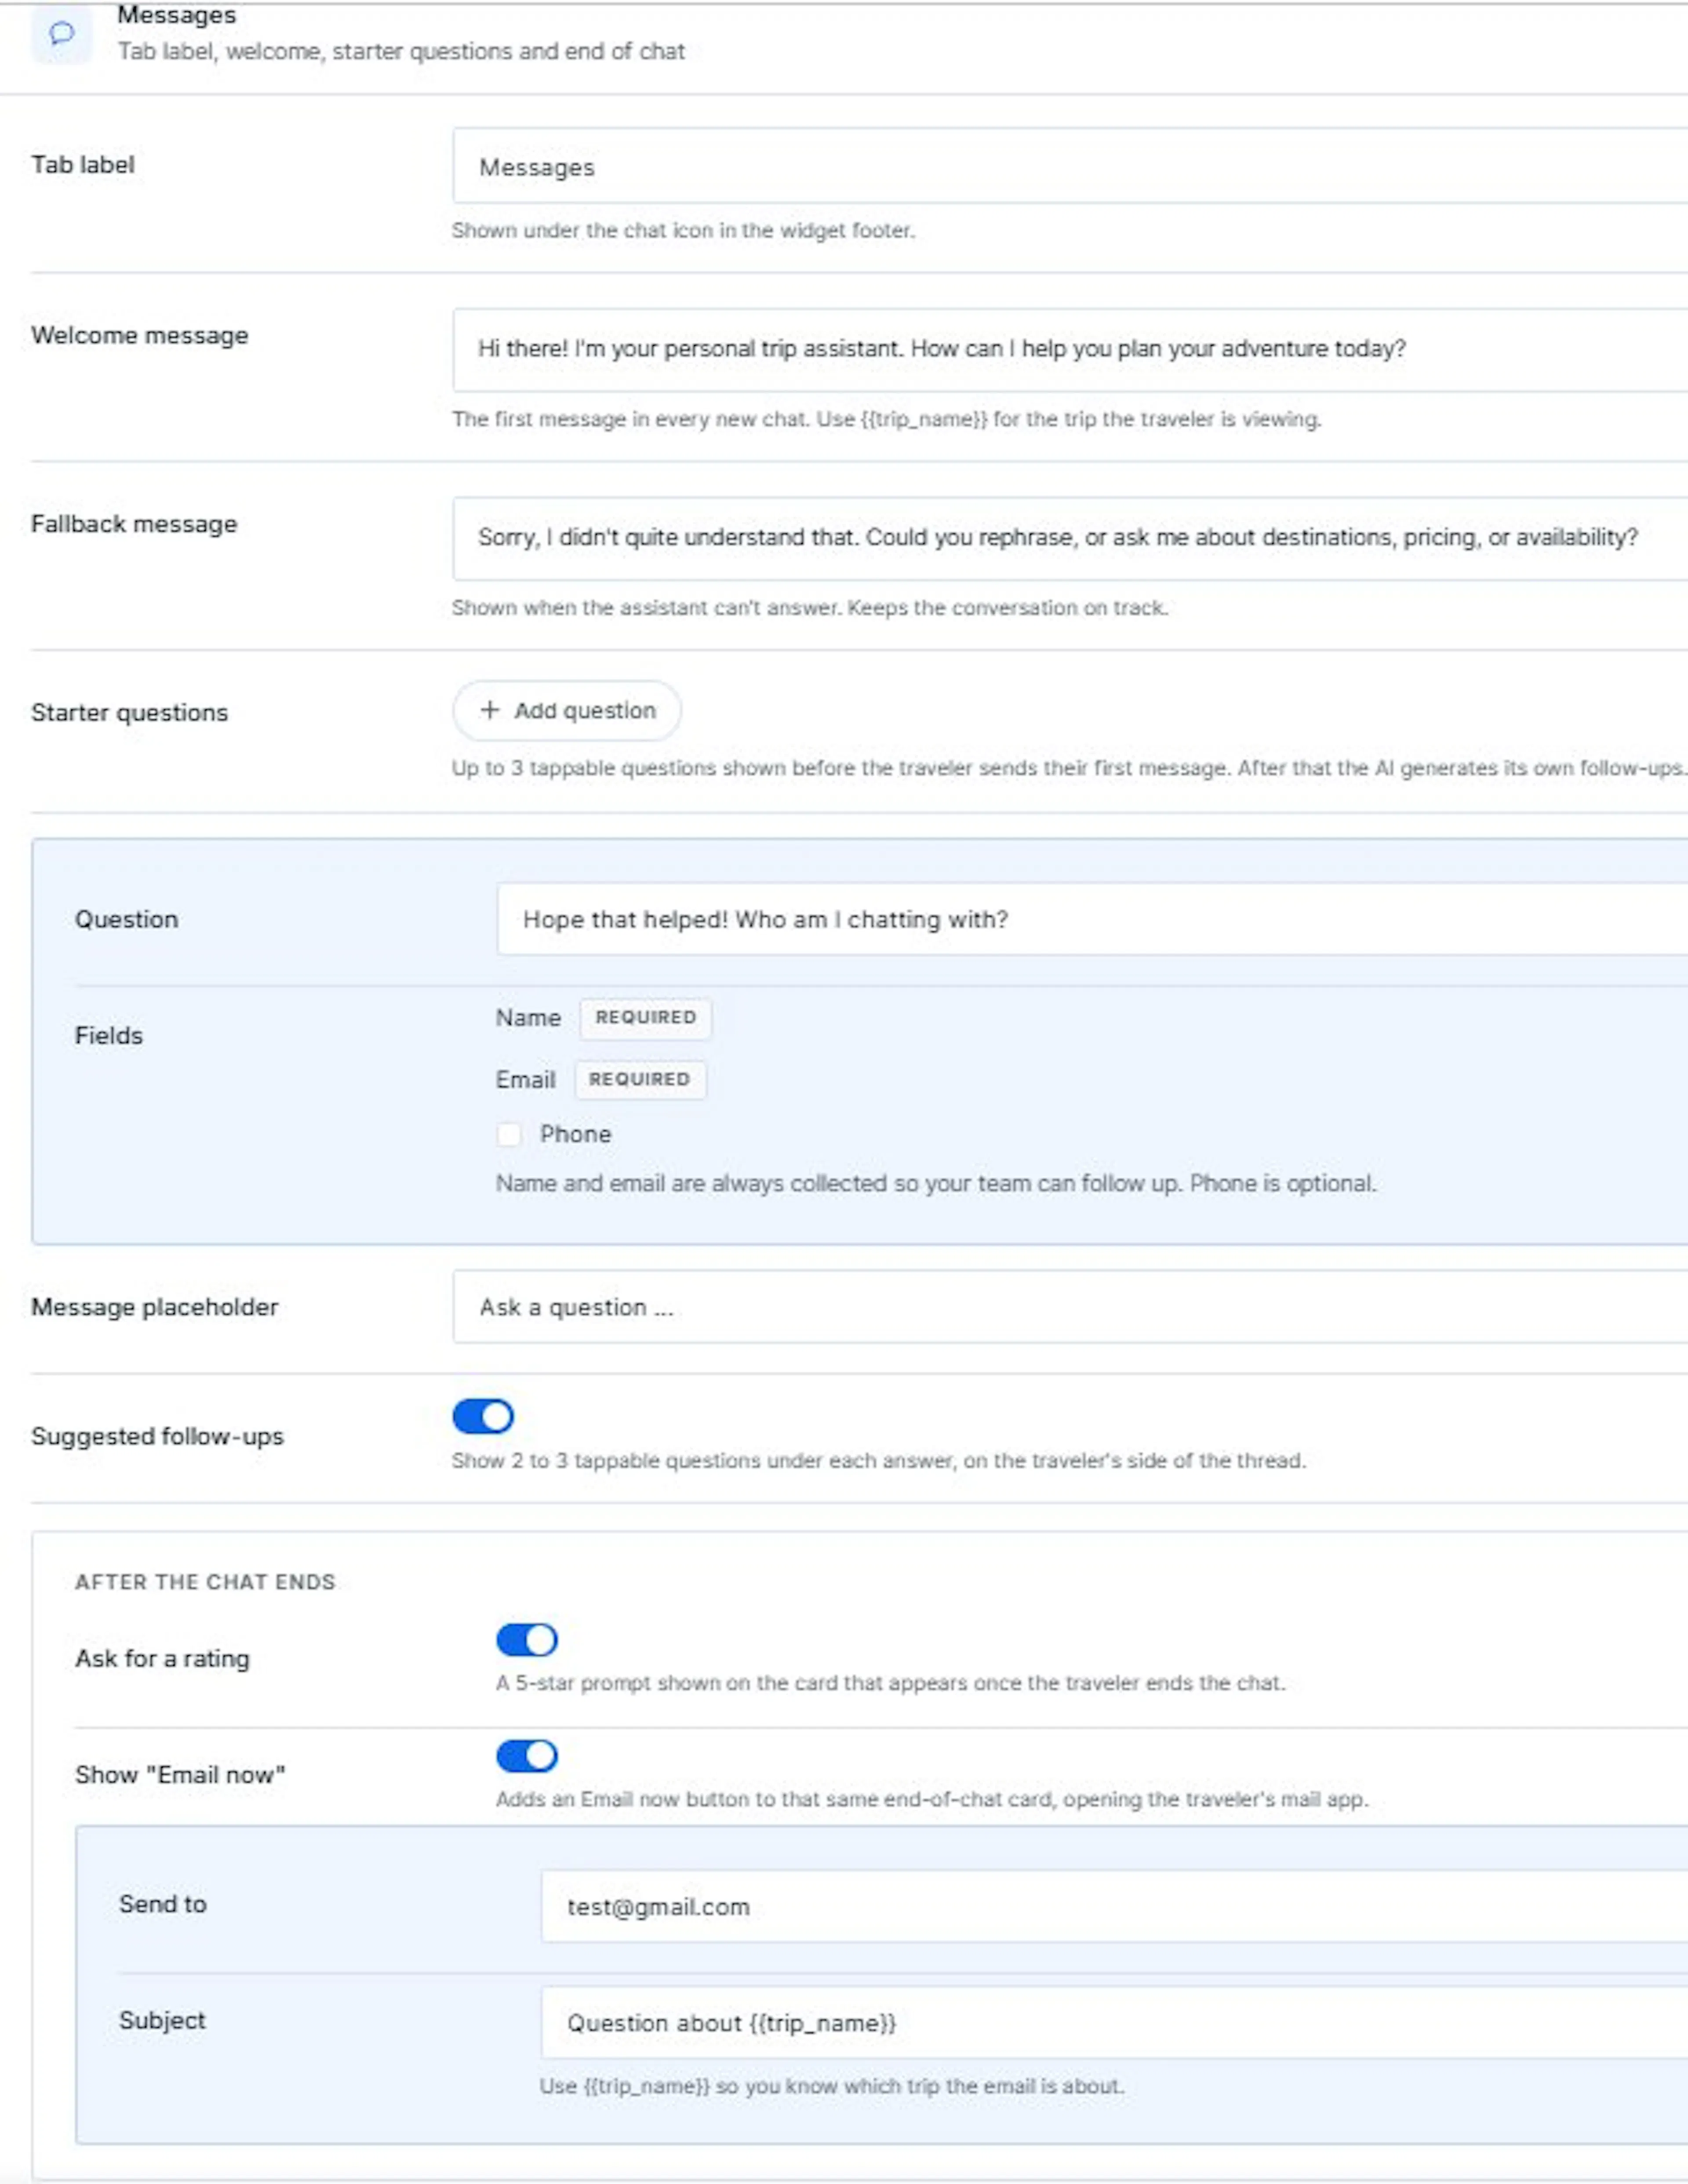
Travelers are asked to identify themselves after the chat has helped them. They are not asked before the conversation starts. The Question and Fields settings apply at that point in the conversation.
These settings help travelers start with questions and give your team enough information to follow up. Next, choose whether to show popular trips.
Popular Trips
The Popular Trips tab helps travelers find the trips people book most often or the trips you want to feature.
Set the tab label
This is the small word travelers see under the compass icon at the bottom of the widget.
Find Tab label and enter the label shown under the compass icon.
Choose which trips to show
This decides whether the list updates on its own or stays fixed to trips you pick.
Find Which trips and choose one option. Pick Most booked if you want the list to update from your booking data. Pick Choose manually if you want to pin a fixed list of trips.
Select your trips
This is where you choose which trips appear, and in what order. This step applies when you pick Choose manually.
Find selected trips and search for and select the trips to show. Trips appear in the order you select them. If your bestseller is a 5-day Everest viewpoint trek, pin it first so every traveler sees it at the top.
Set how many trips appear
This controls how many trip cards show before travelers need to scroll. This step applies when you pick Most booked.
Find Number of trips and set how many cards appear before travelers need to scroll. You can show up to 20 trips.
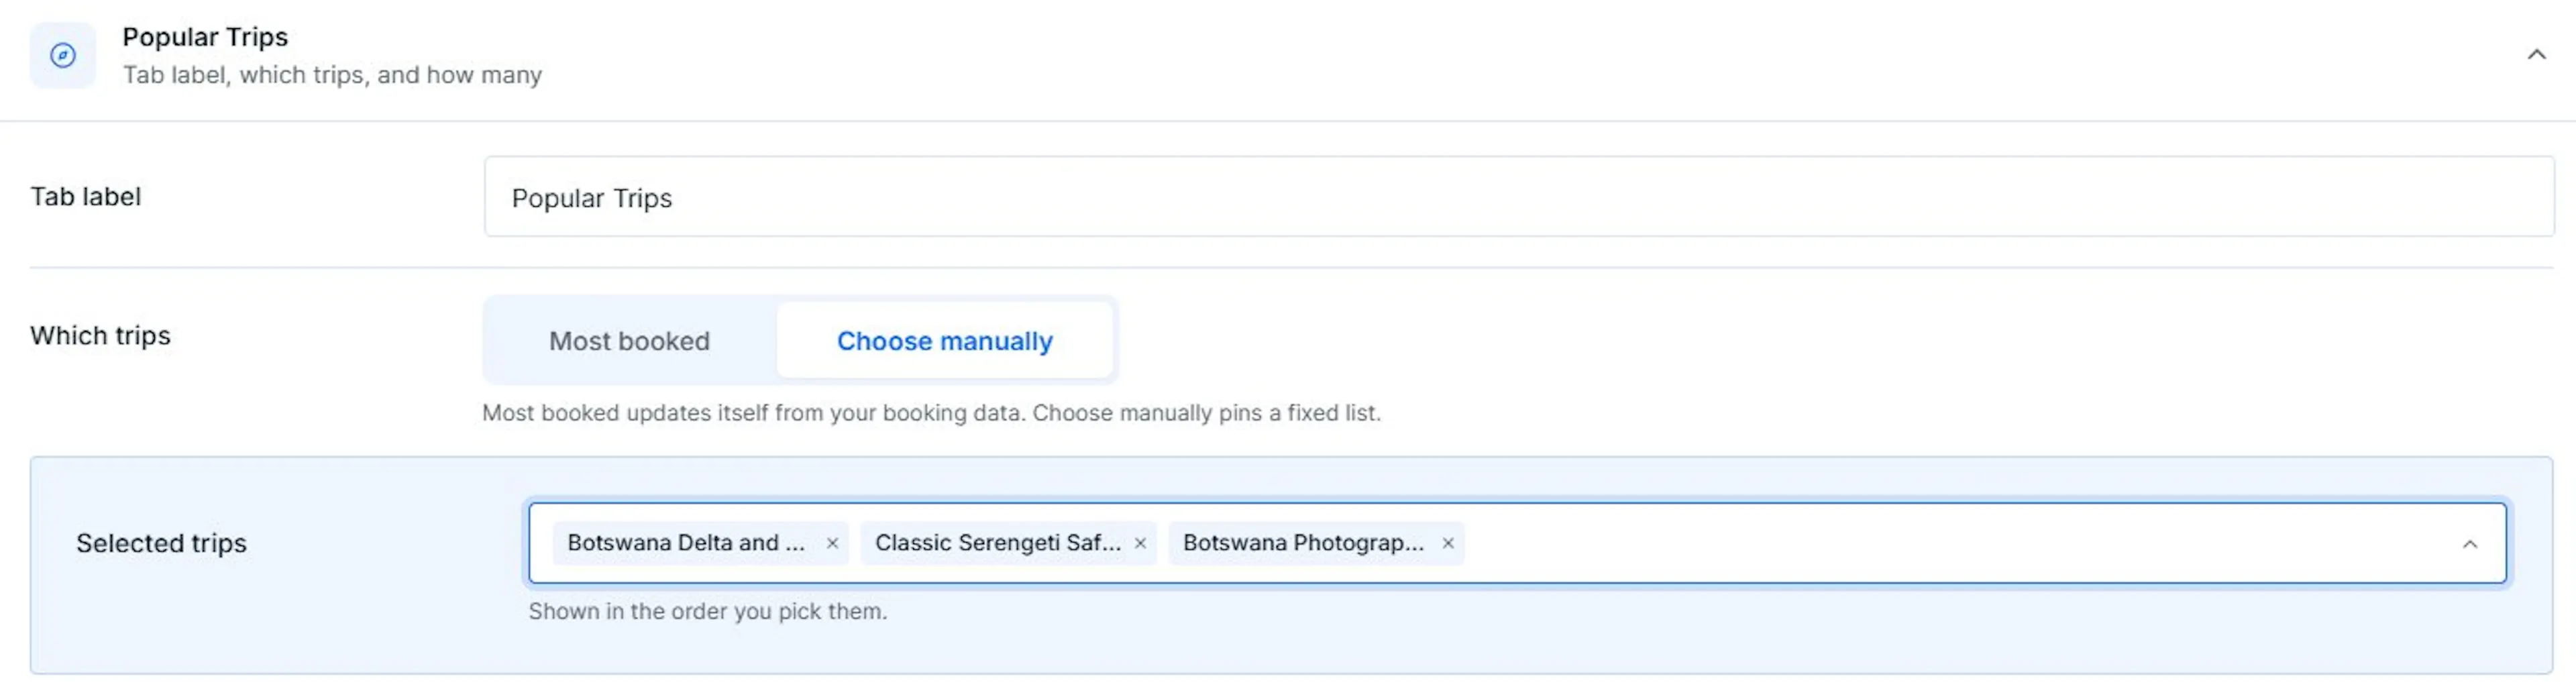
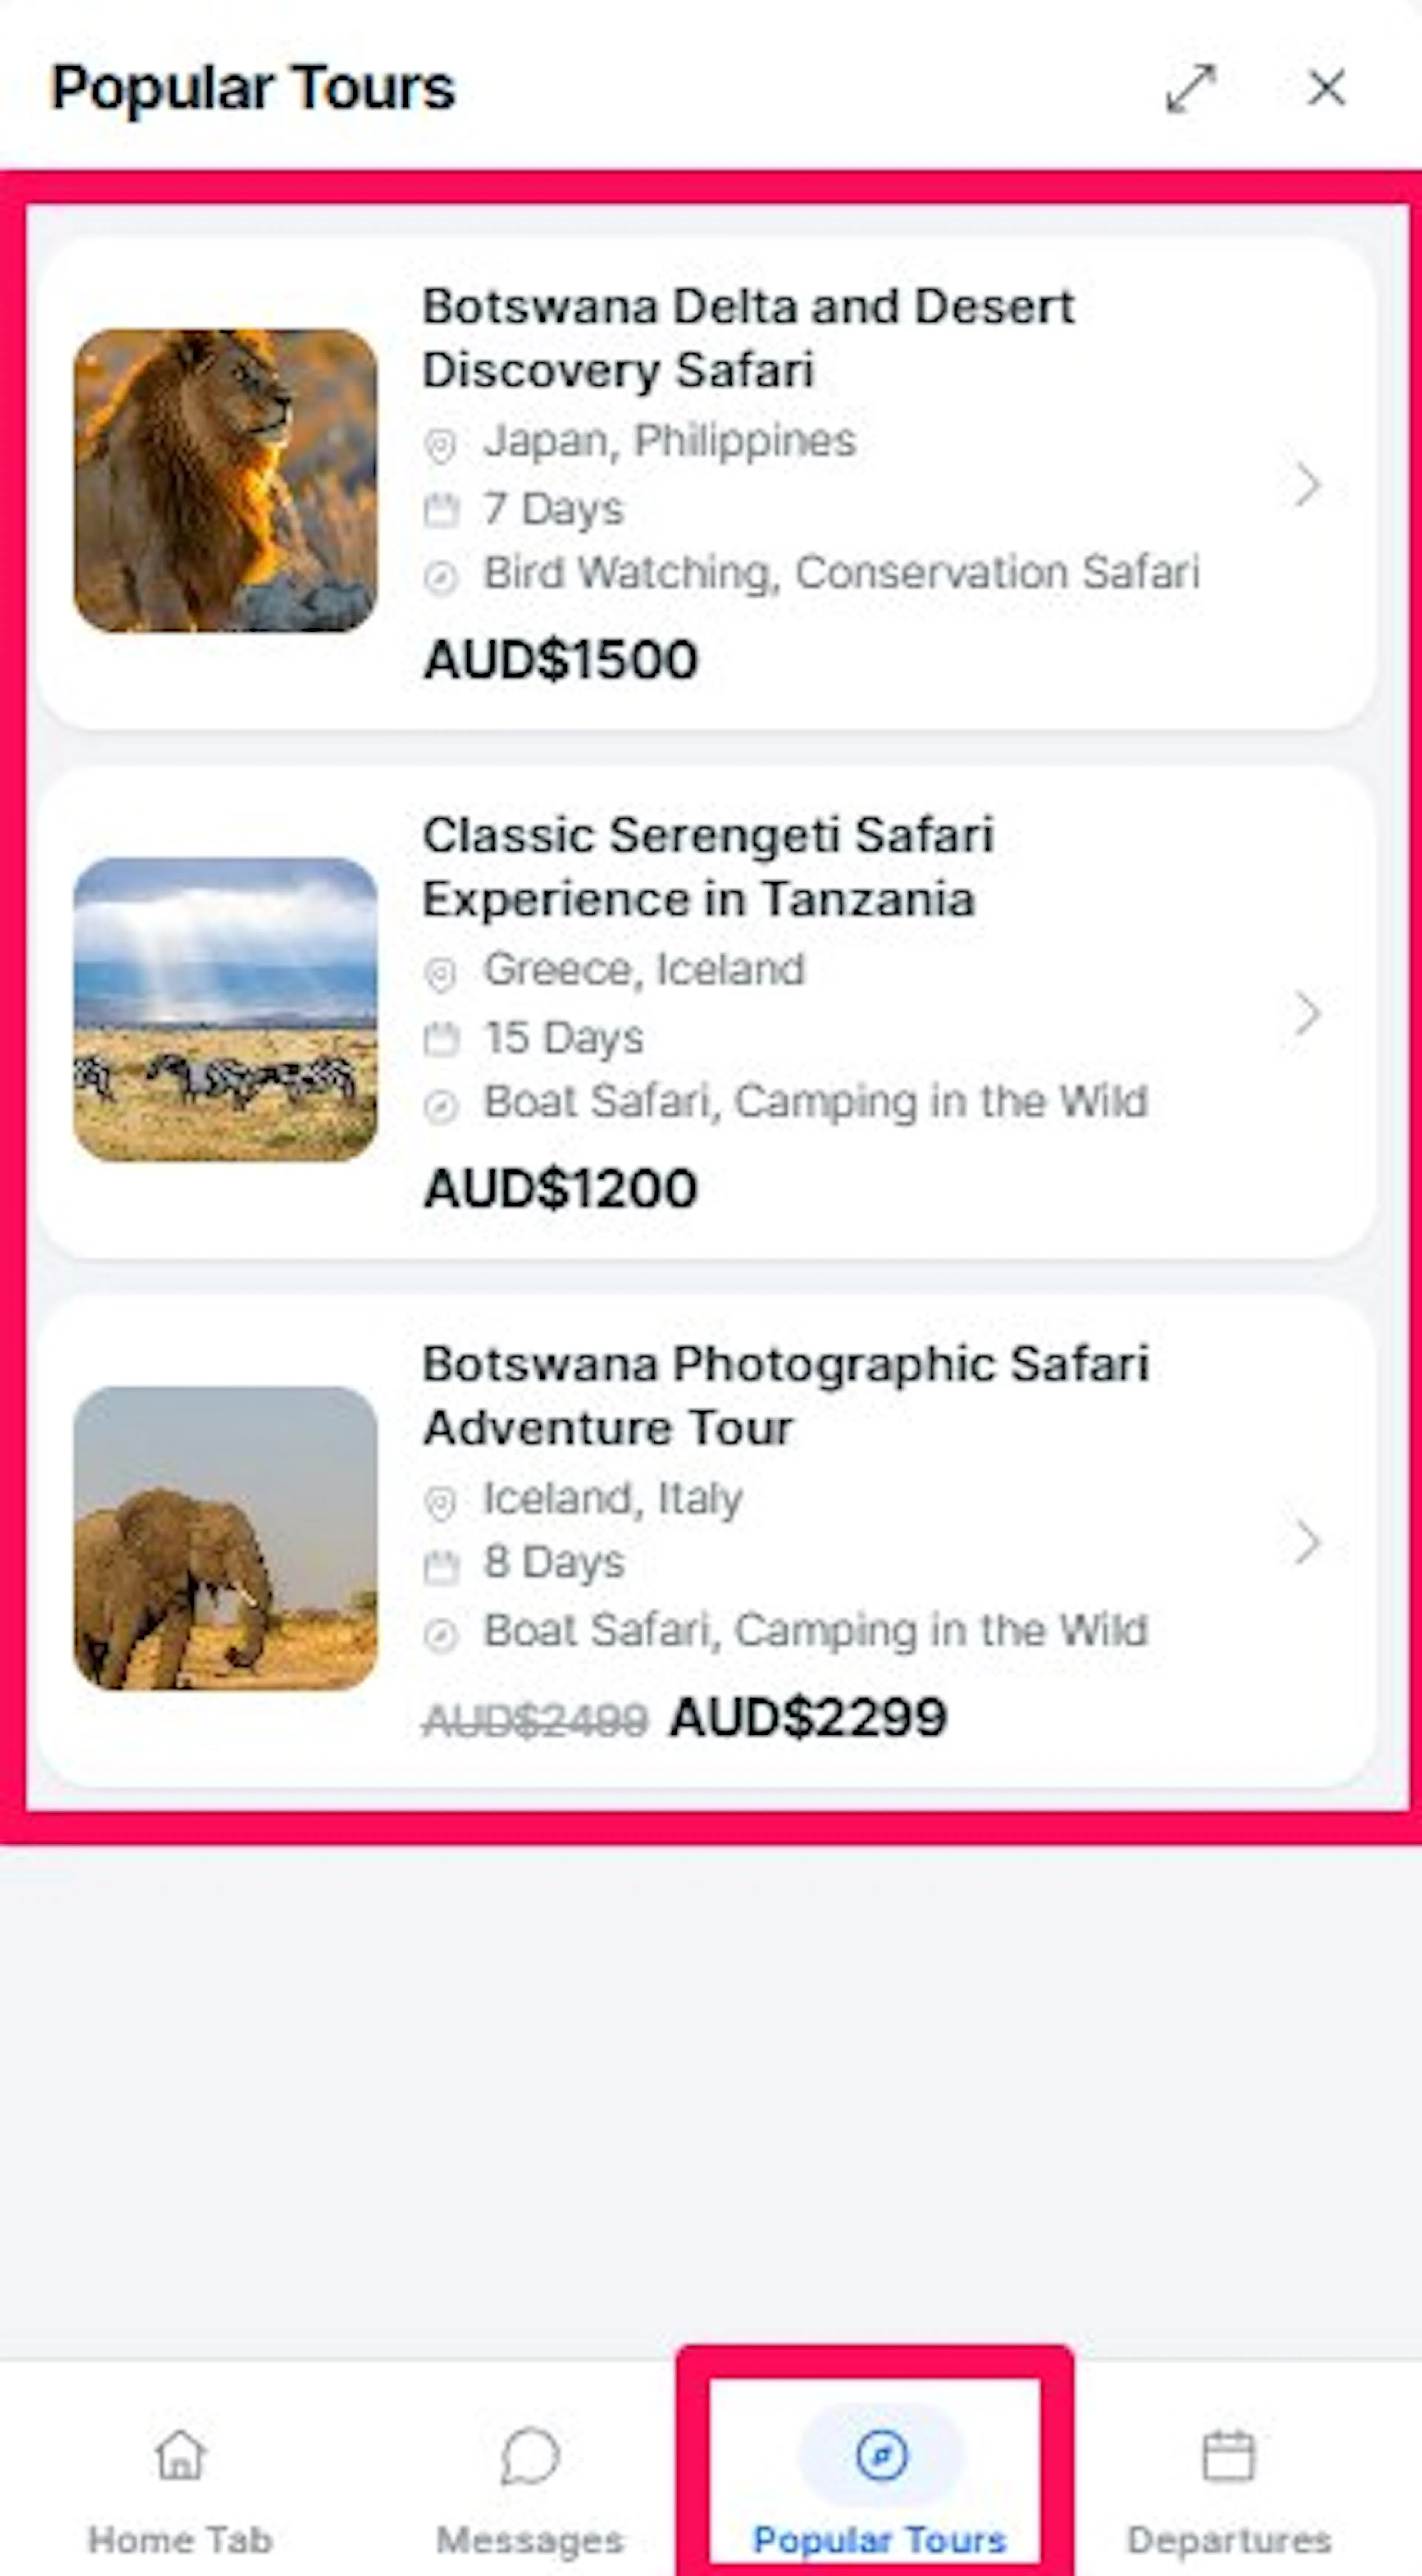
Use Most booked when you want the list to update on its own. Use Choose manually when you want to promote specific trips.
Departures
The Departures tab shows upcoming dates so travelers can choose a departure without searching through your whole site.
Set the tab label
This is the small word travelers see under the calendar icon at the bottom of the widget.
Find Tab label and enter the label shown under the calendar icon.
Set how many departures appear
This controls how many upcoming dates travelers see before they need to scroll. Dates show soonest first.
Find Number of departures and set how many upcoming dates appear. You can show up to 20 departures.
Turn on the See all departures button
This adds a button at the end of the list that takes travelers to a full calendar page. It helps travelers who want to browse all your dates at once.
Find Show "See all departures" button and turn it on.
Set the departures page link
This is the page the button takes travelers to. It should be the URL of your full departures or calendar page. This step applies after you turn on Show "See all departures".
Find Departures page and enter the URL where the button should take travelers.
Say you run fixed-date group departures every Saturday. This tab shows those dates so travelers can choose one without scrolling through your whole site.
The Departures tab needs the WP Travel Engine Fixed Starting Dates add-on. Without it, this tab stays hidden in the widget even if you configure it here. Your settings stay saved for when you activate the add-on.
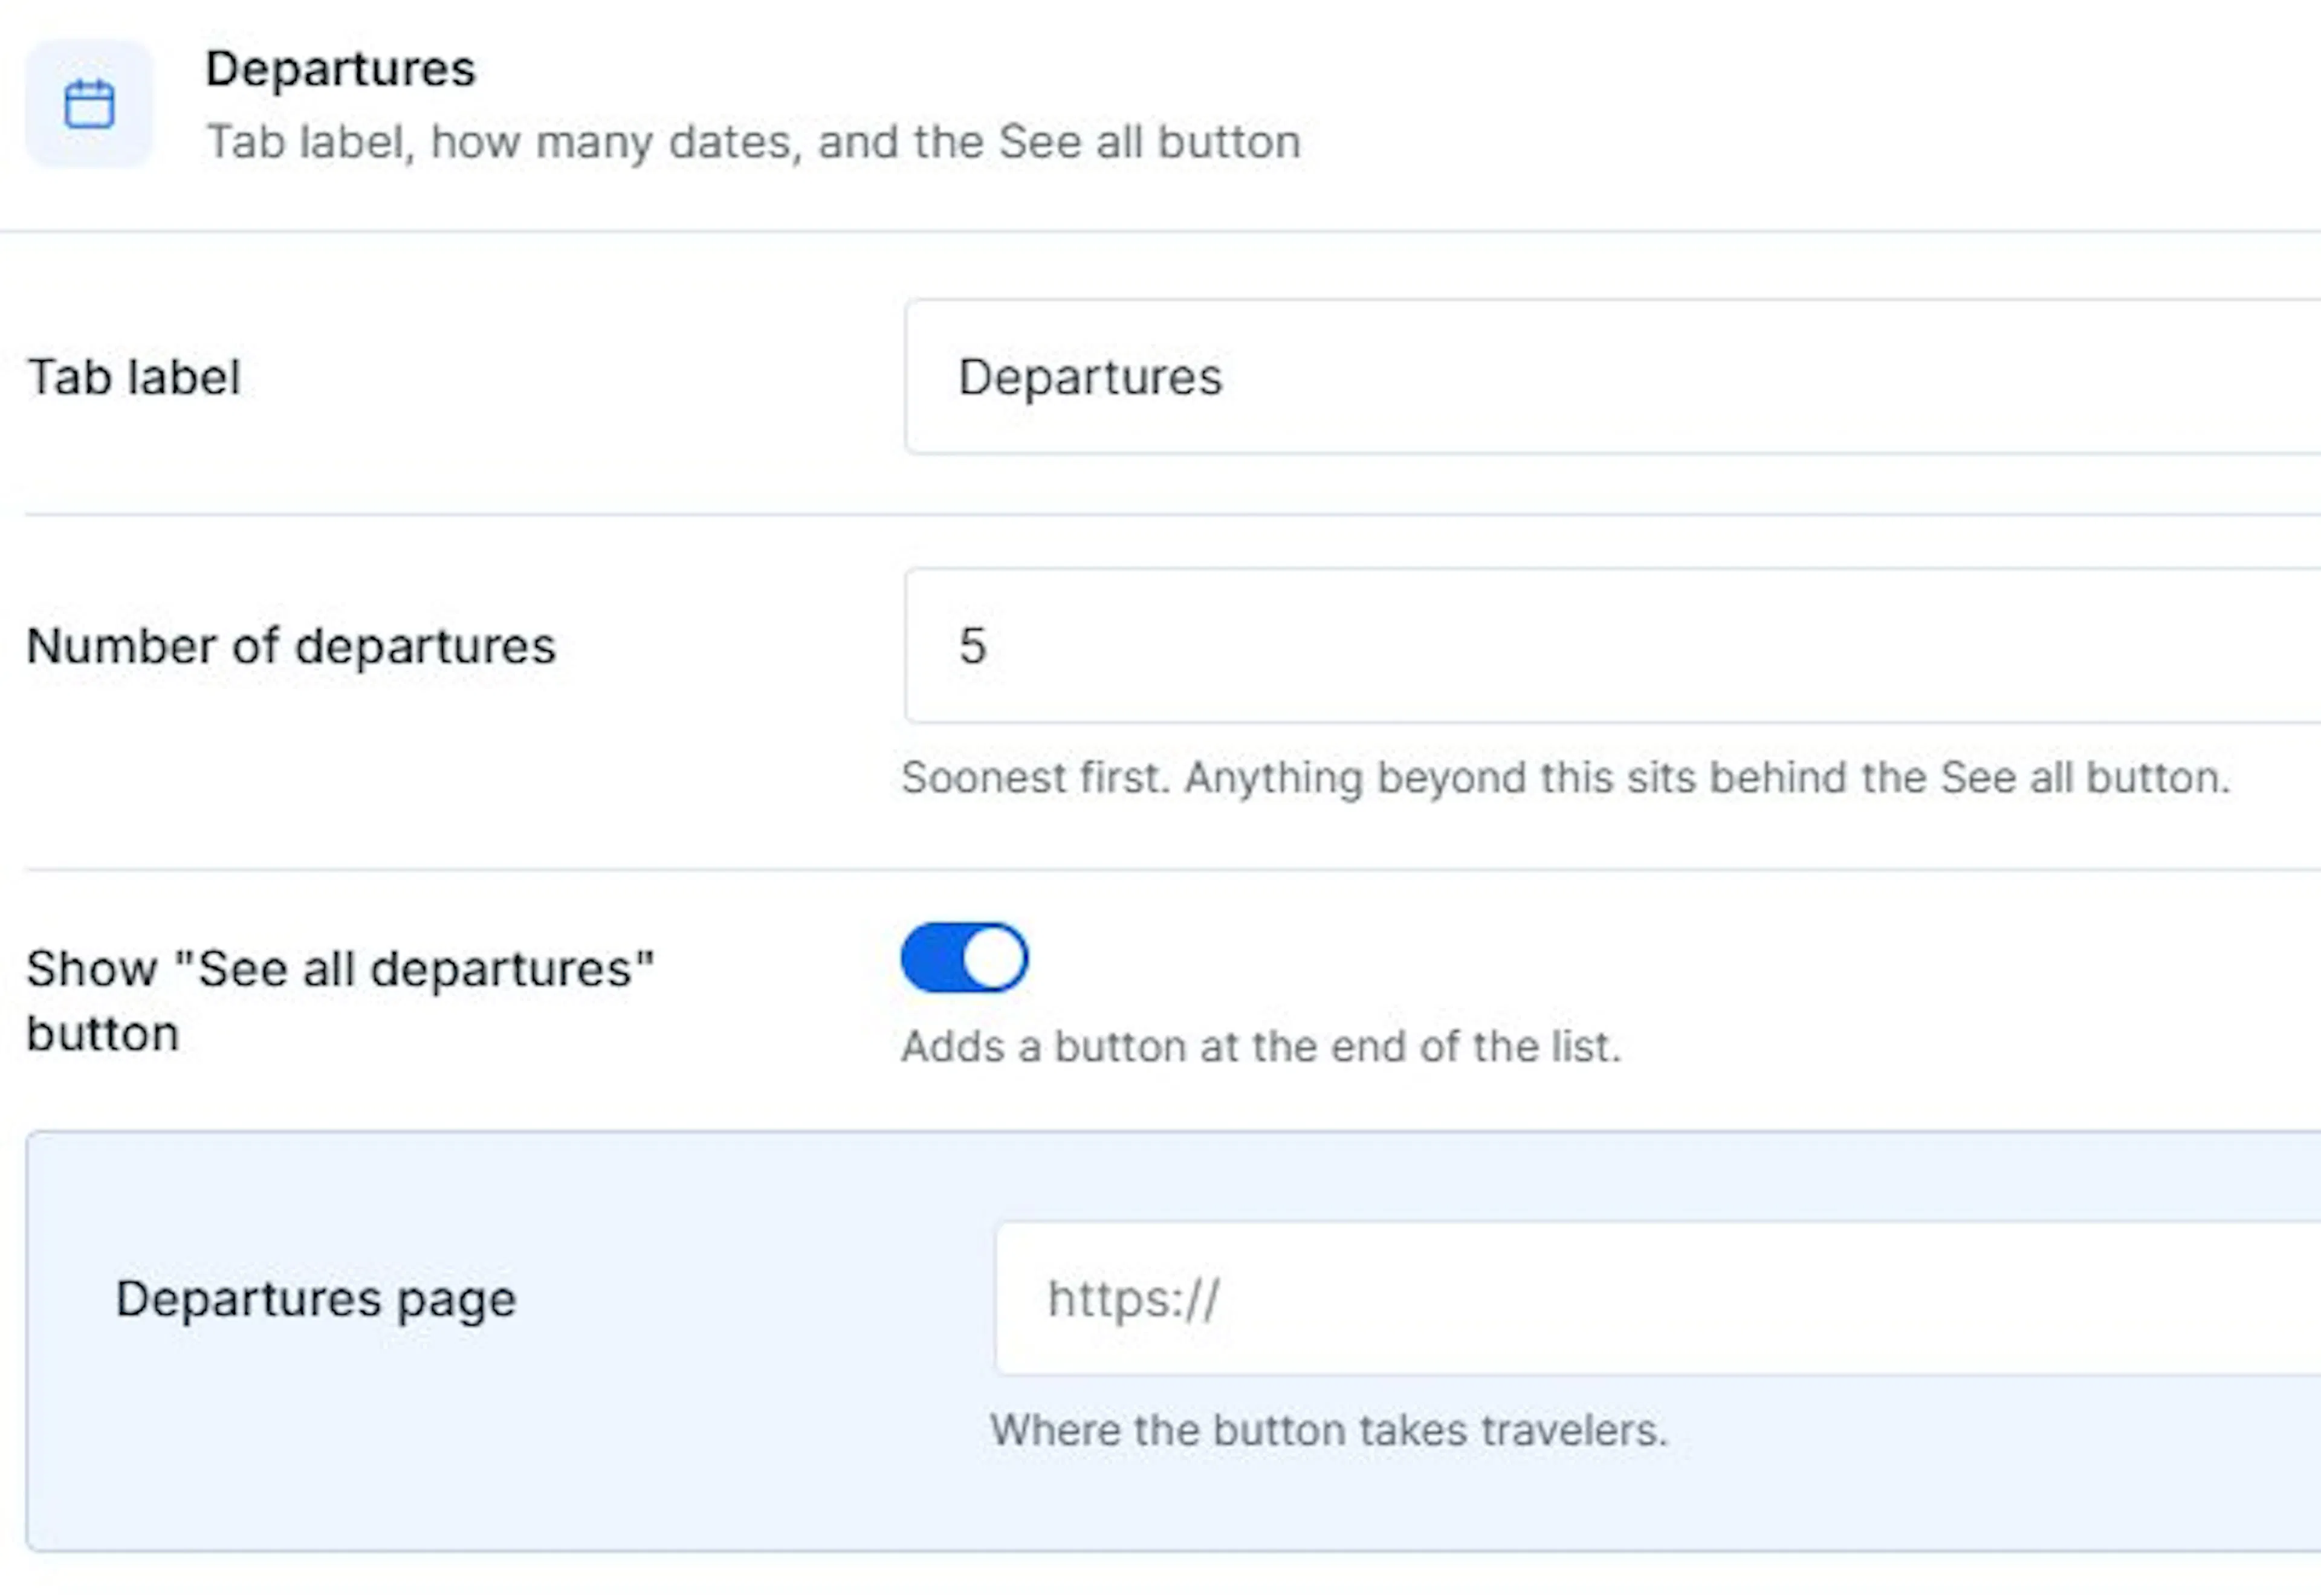
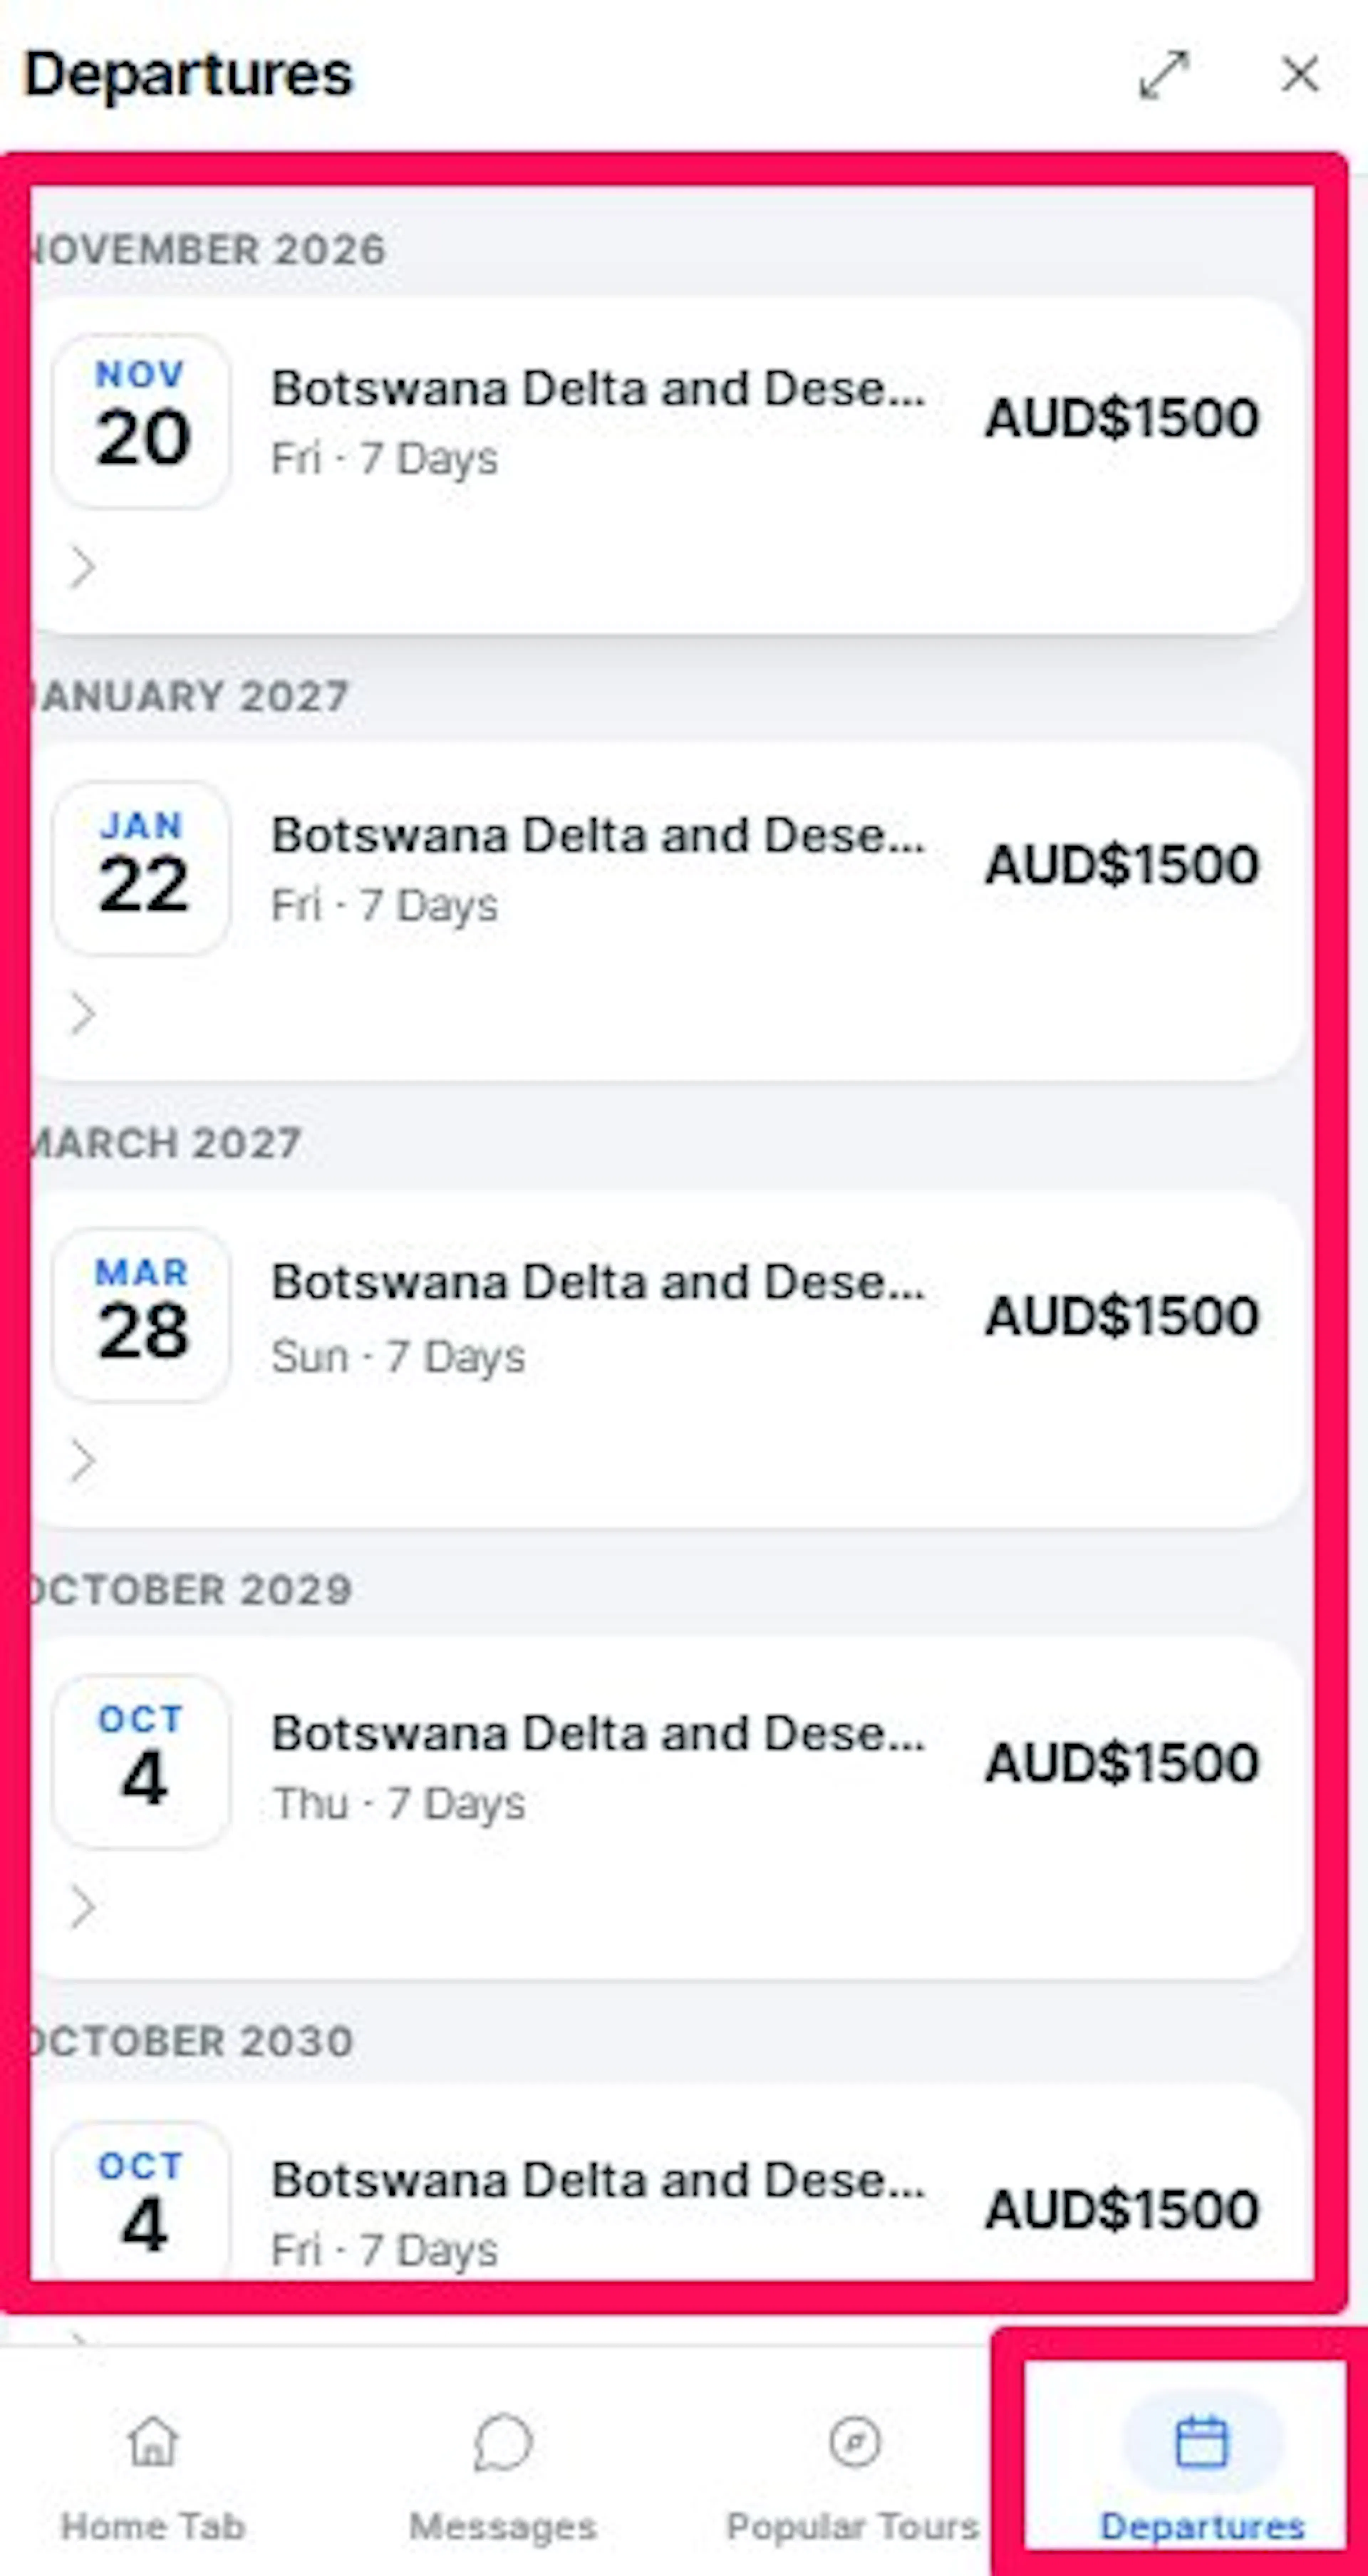
Your tabs are now set up based on how travelers browse and book your tours.
Troubleshooting
My changes aren't showing up on my live site
Your site may be showing a cached copy of the page. A cache, pronounced “cash,” is a stored copy that helps pages load faster.
If you use a caching plugin, clear its cache from your WordPress dashboard. If you are not sure whether your site uses one, wait a few minutes and refresh the page.
The chat button is hiding behind something on my page
Move the launcher to the other corner.
Under Style and Appearance, change Launcher position from bottom right to bottom left. If it is already on the left, change it to the right. This usually fixes overlap with other buttons on your site.
Travelers can't see the Popular Trips or Departures tab
Check that the tab is turned on under Tab Content, then Tabs.
The Departures tab also needs the Fixed Starting Dates add-on active on your site. Without it, the tab stays hidden even when it is turned on.
The proactive teaser message shows the wrong text
Check that you used {{trip_name}} with double curly braces, exactly as written.
If the trip page does not have a name set in WP Travel Engine, the variable appears blank.
I changed the brand color, but the chat still looks the old color
Save your changes first.
Then clear your browser cache or open the page in a private or incognito window. Your browser may still be showing the old color from its stored copy.
Frequently Asked Questions
Do I need to fill in every field on this page?
No. Start with the name, logo, and your instructions.
The other fields have sensible defaults that work well until you are ready to customize them.
What should I write in Your Instructions?
Think of it as a job description for your assistant.
Write how you would brief a new staff member: be friendly, know our trips, do not make up prices, and if you are not sure, offer to connect the traveler with your team.
Can I use my own photo for the team handoff?
Yes. Upload a square photo of yourself or whoever handles customer chats.
A real face builds more trust than a generic icon.
What happens if I leave the hero image empty?
The chat shows the photo from the trip page the traveler is currently viewing.
This works well if you run many trips and want each page to feel relevant.
Will the proactive teaser message annoy my visitors?
It shows once per visit after a short delay.
If it feels like too much, turn it off anytime under Style and Appearance.
Do I need the Fixed Starting Dates add-on?
Only if you want the Departures tab to show in the chat.
Everything else works without it. The Departures tab stays hidden until the add-on is active.
If you're still stuck or have a question we didn't cover, our support team is happy to help. Reach out at our support page and we'll get you sorted.