

Knowledge Base
Teach your assistant about your business with direct Q&A pairs, trained pages already on your site, and uploaded documents, so travelers get accurate, grounded answers.
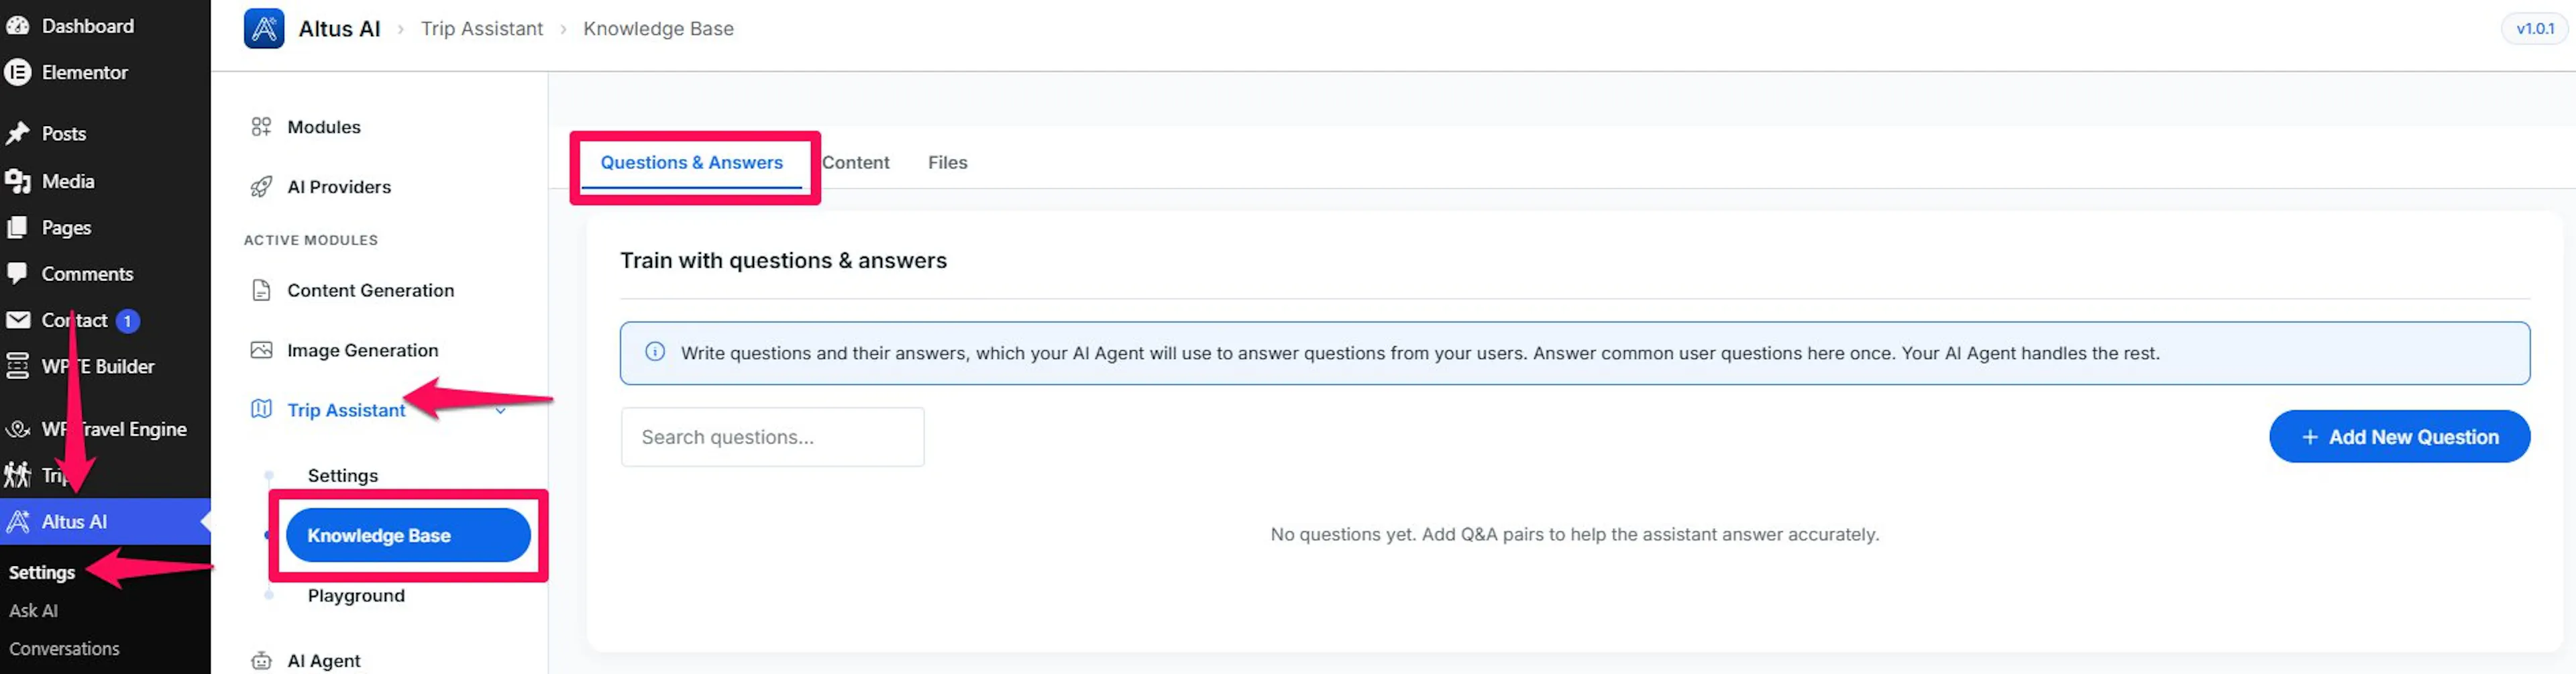
You can get to the Knowledge Base from the left sidebar of your WordPress dashboard. Go to Altus AI > Settings > Modules, find Trip Assistant, and select Configure. Then click Knowledge Base, and choose the Questions & Answers, Content, or Files tab at the top of the page.
Questions & Answers
The Questions & Answers tab is where you write direct Q&A pairs for the assistant, the fastest way to teach it something without waiting on a content crawl. Each pair matches one question to one answer; the assistant compares a traveler's message against your questions and uses the closest answer.
If your embedding provider isn't configured, a warning banner appears above this tab. Without it, Q&A pairs are matched by keyword only, not by meaning, so add an embedding provider under the General tab for accurate matching.
Managing Questions
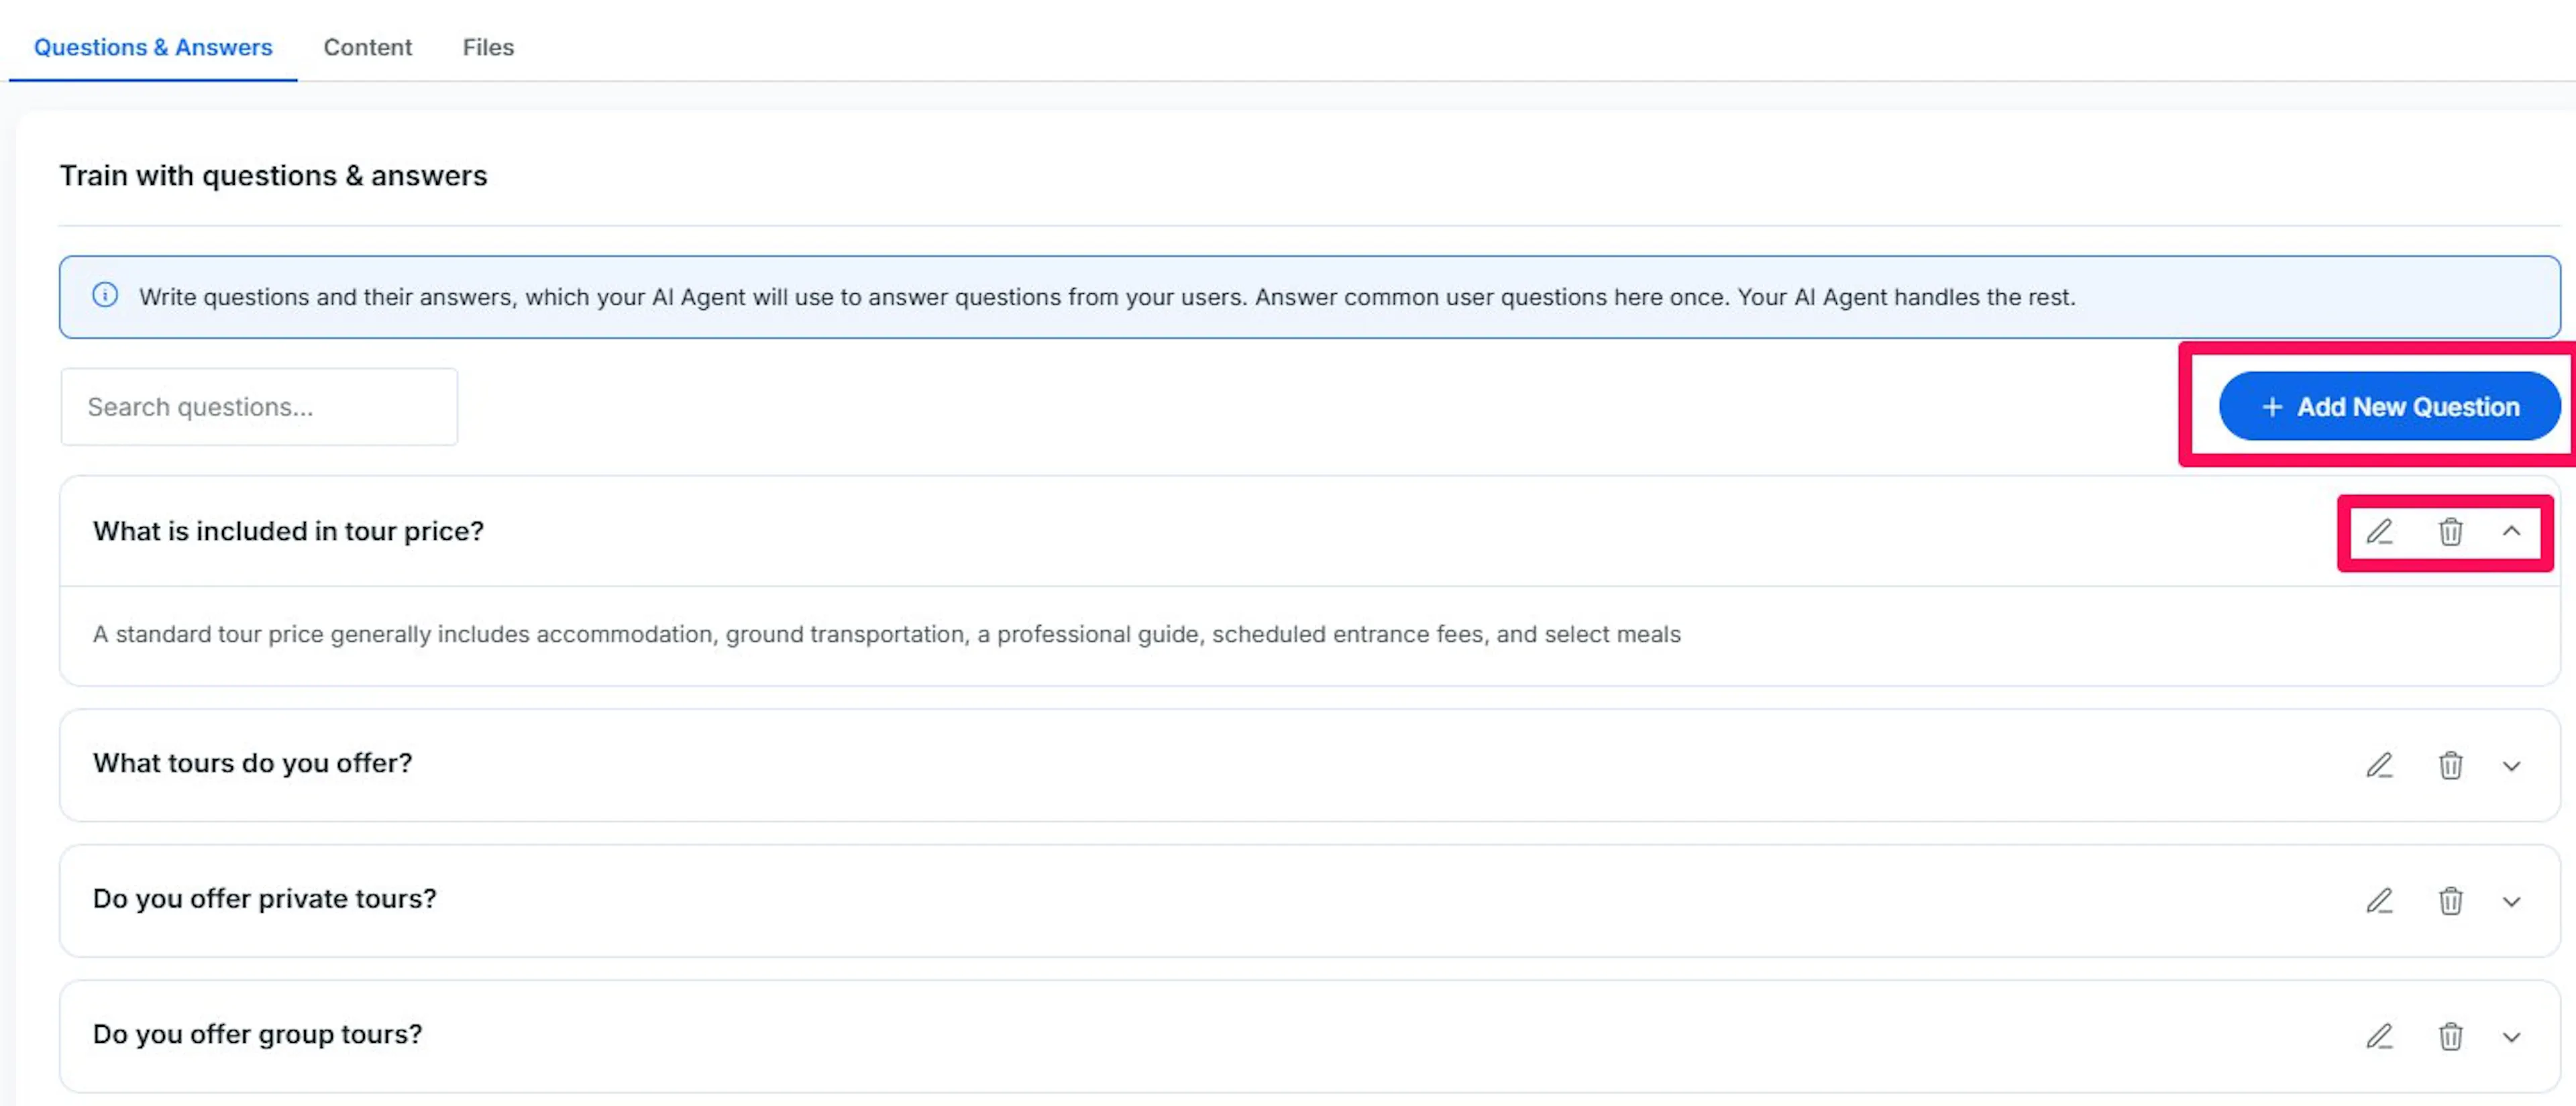
- Search questions: Enter a keyword to filter the list by question text.
- Add New Question: Select to open the Add Question form.
- Select a question row to expand it and read the stored answer underneath.
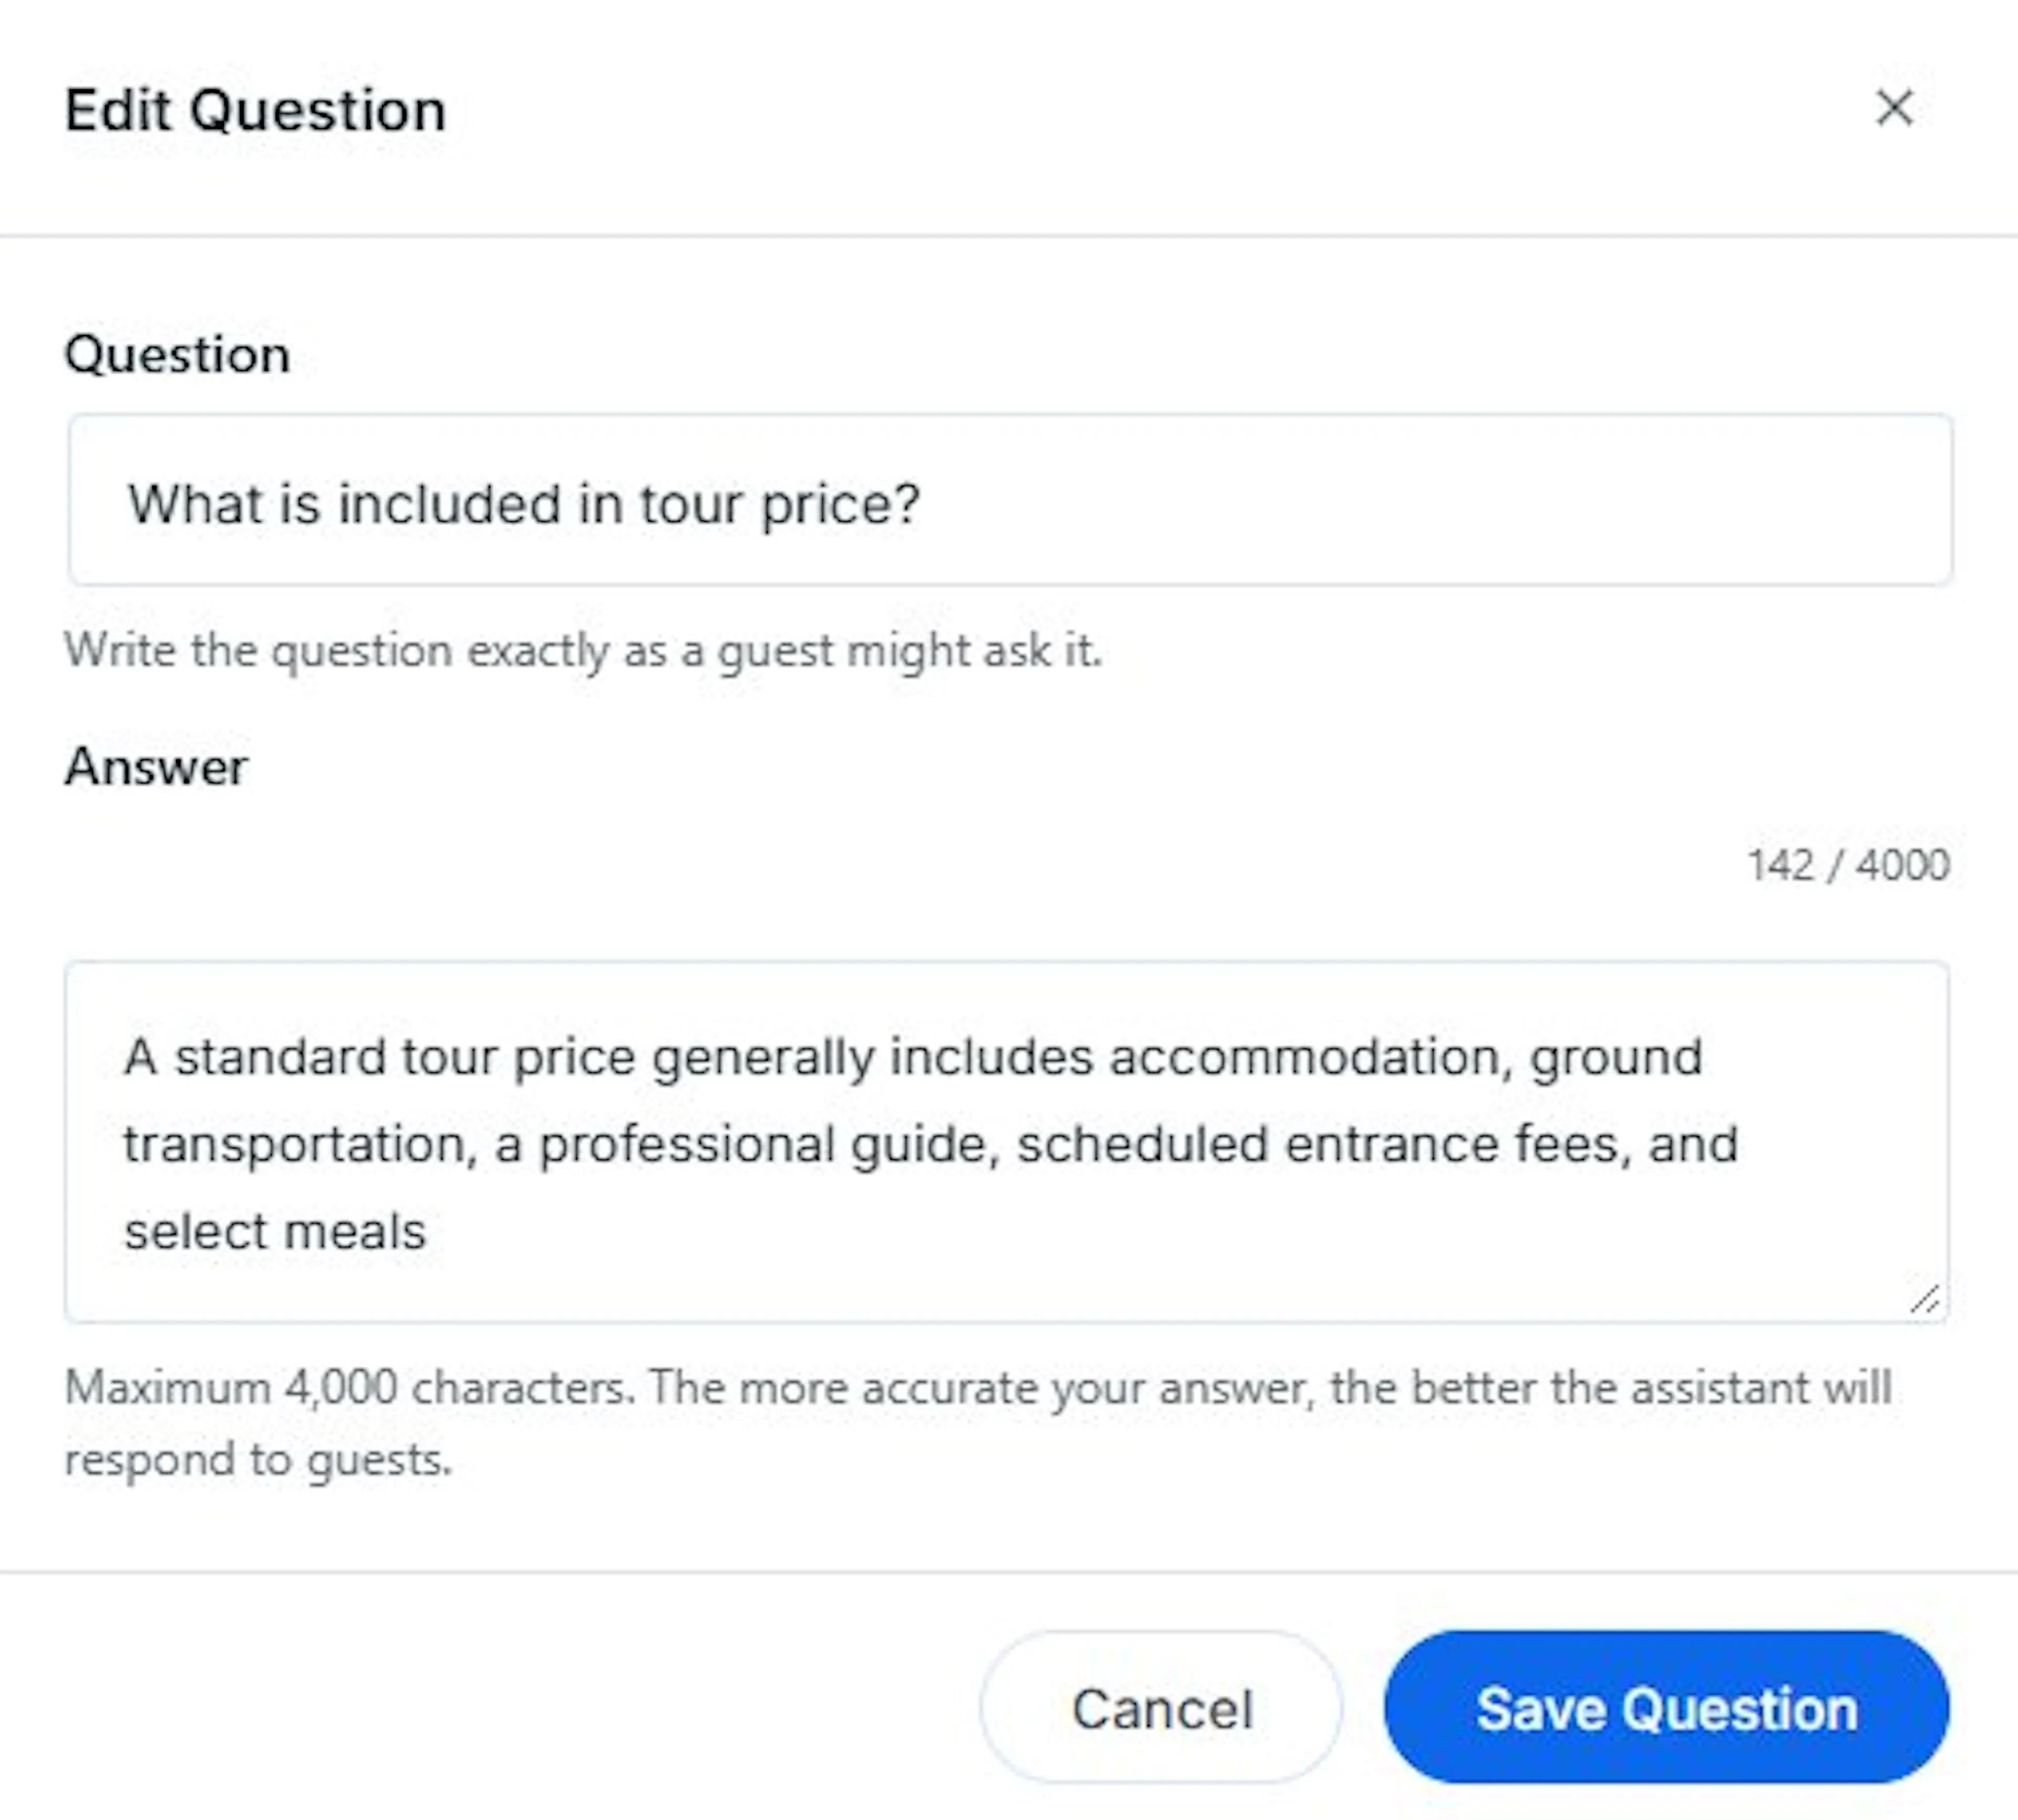
- Edit (pencil icon): Select to reopen a question in the same form, pre-filled.
- Delete (trash icon): Select to remove a question. You're asked to confirm first; this can't be undone.
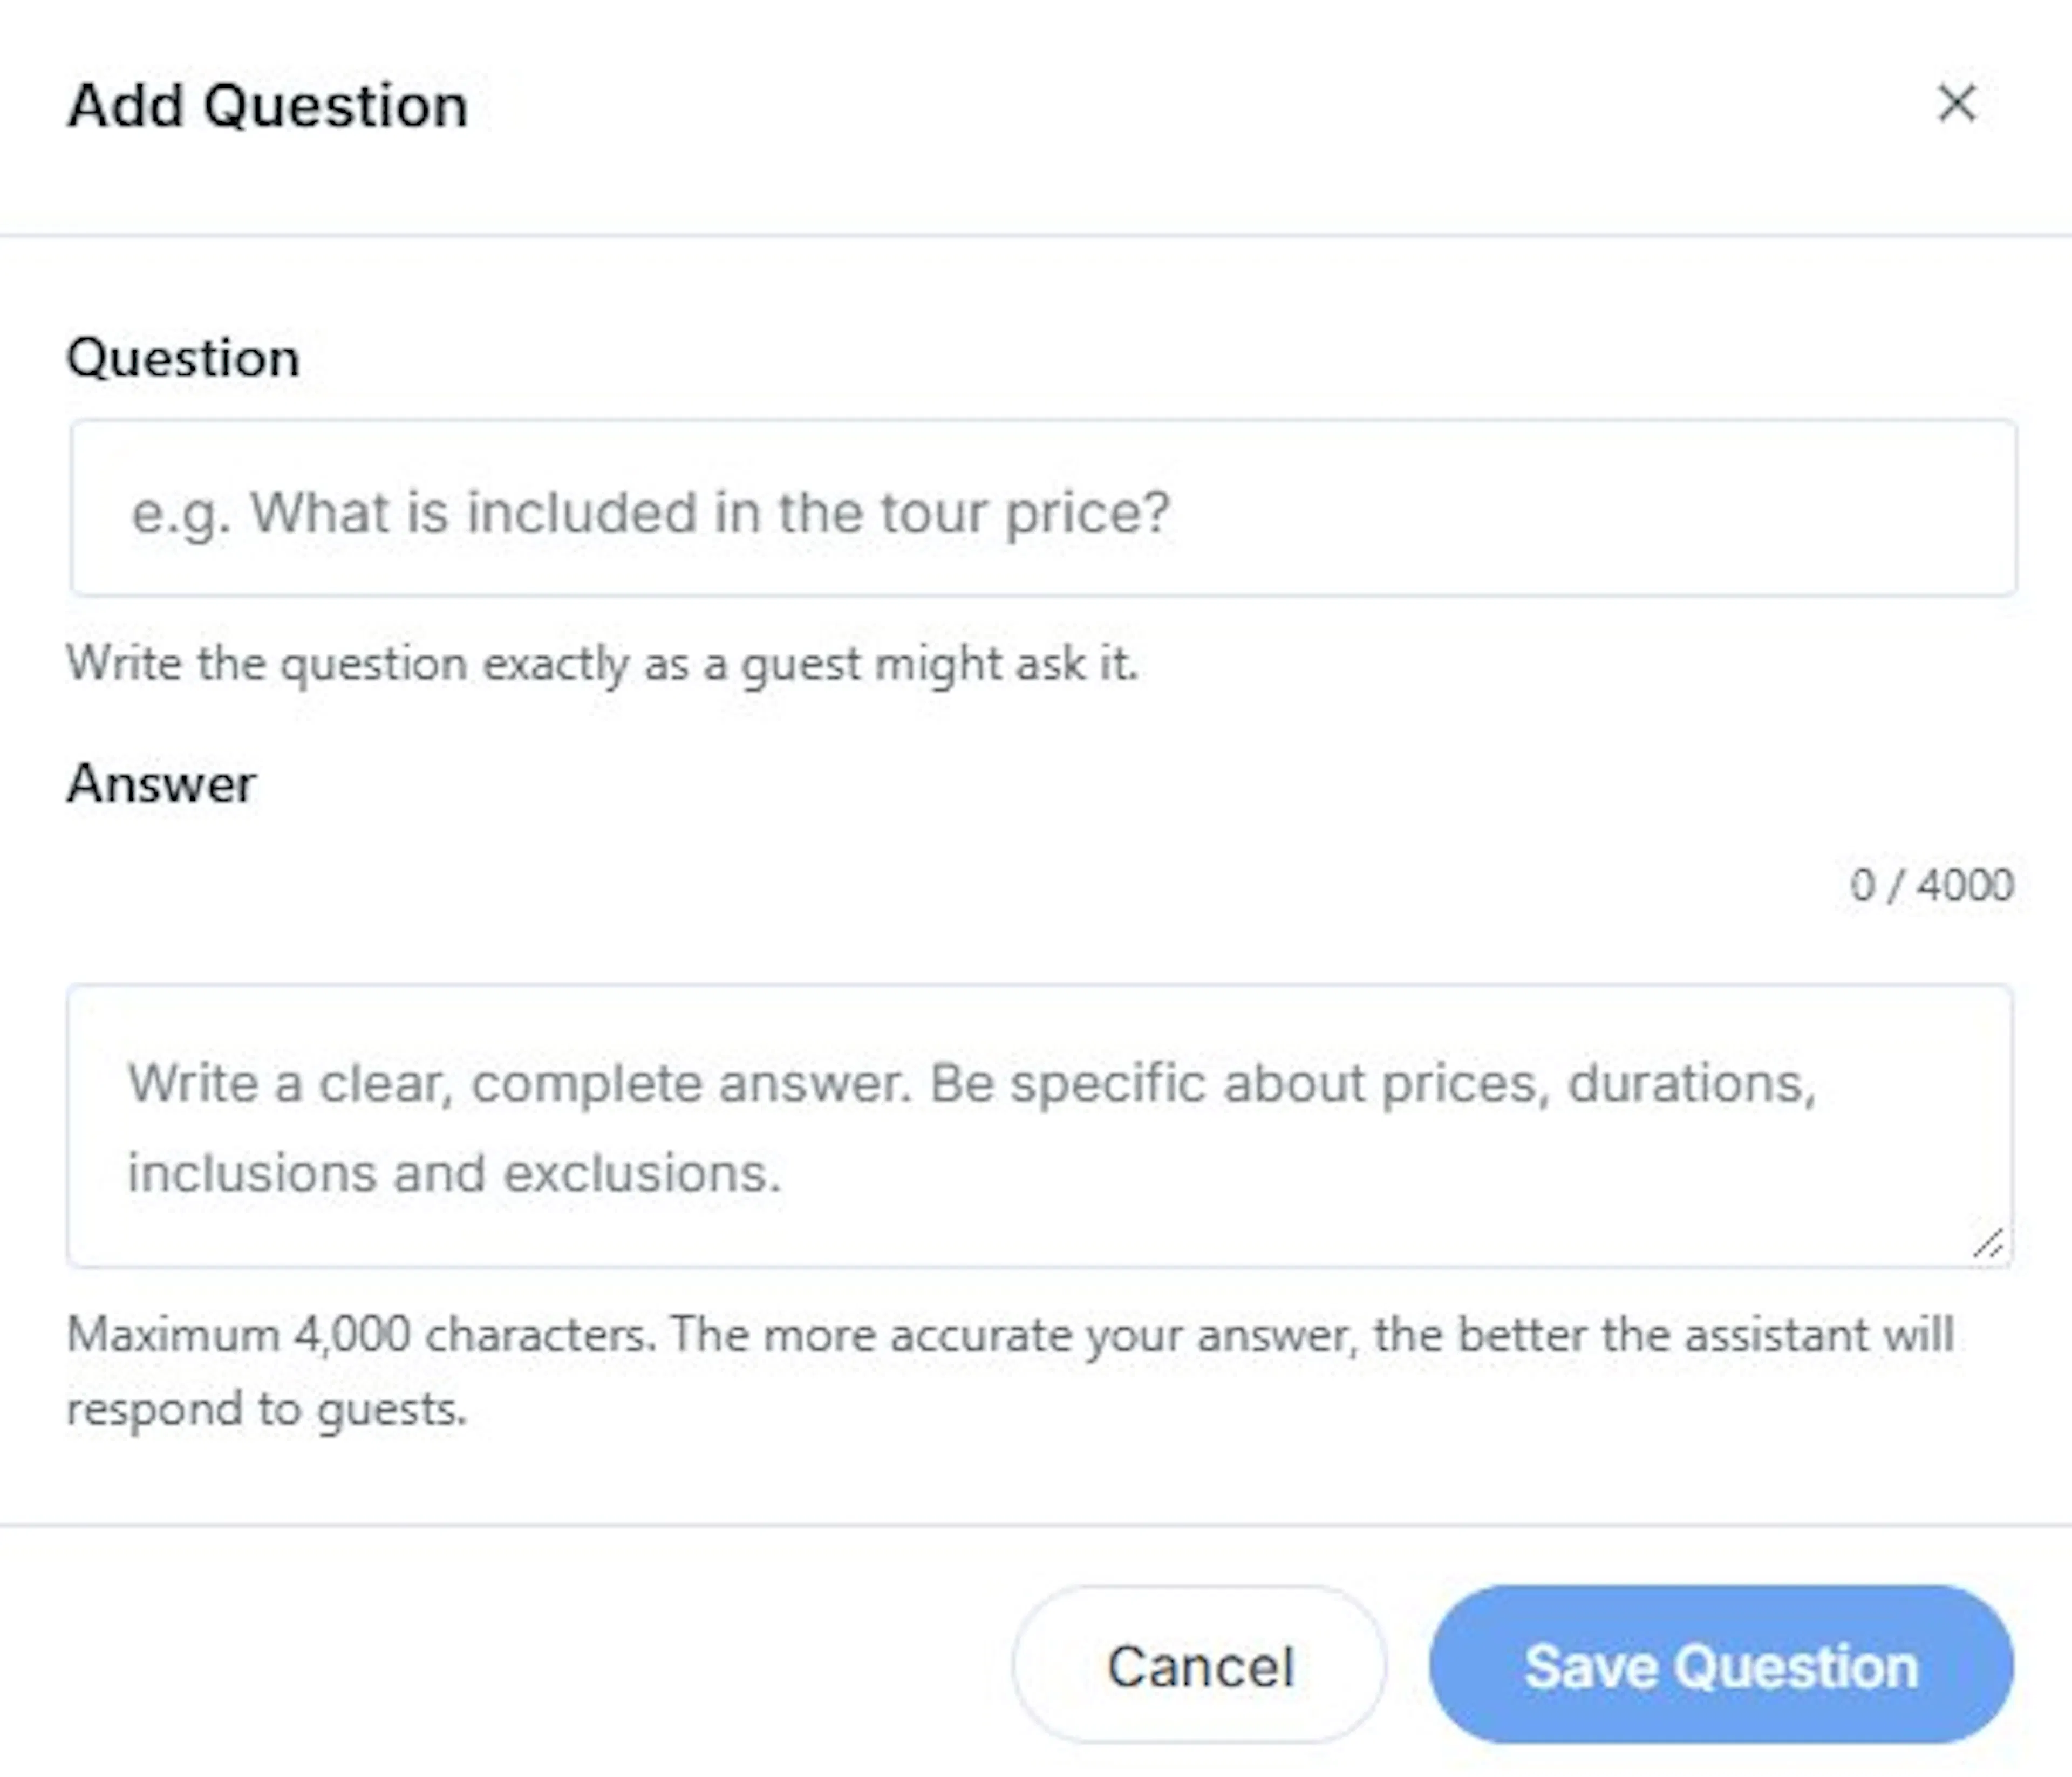
Add or Edit a Question
- Question: Enter the question exactly as a guest might ask it.
- Answer: Enter a clear, complete answer, up to 4,000 characters. Be specific about prices, durations, inclusions, and exclusions; the more accurate the answer, the better the assistant responds to guests.
Save Question stays disabled until both fields have text, so an empty answer can't be published by accident.
Content
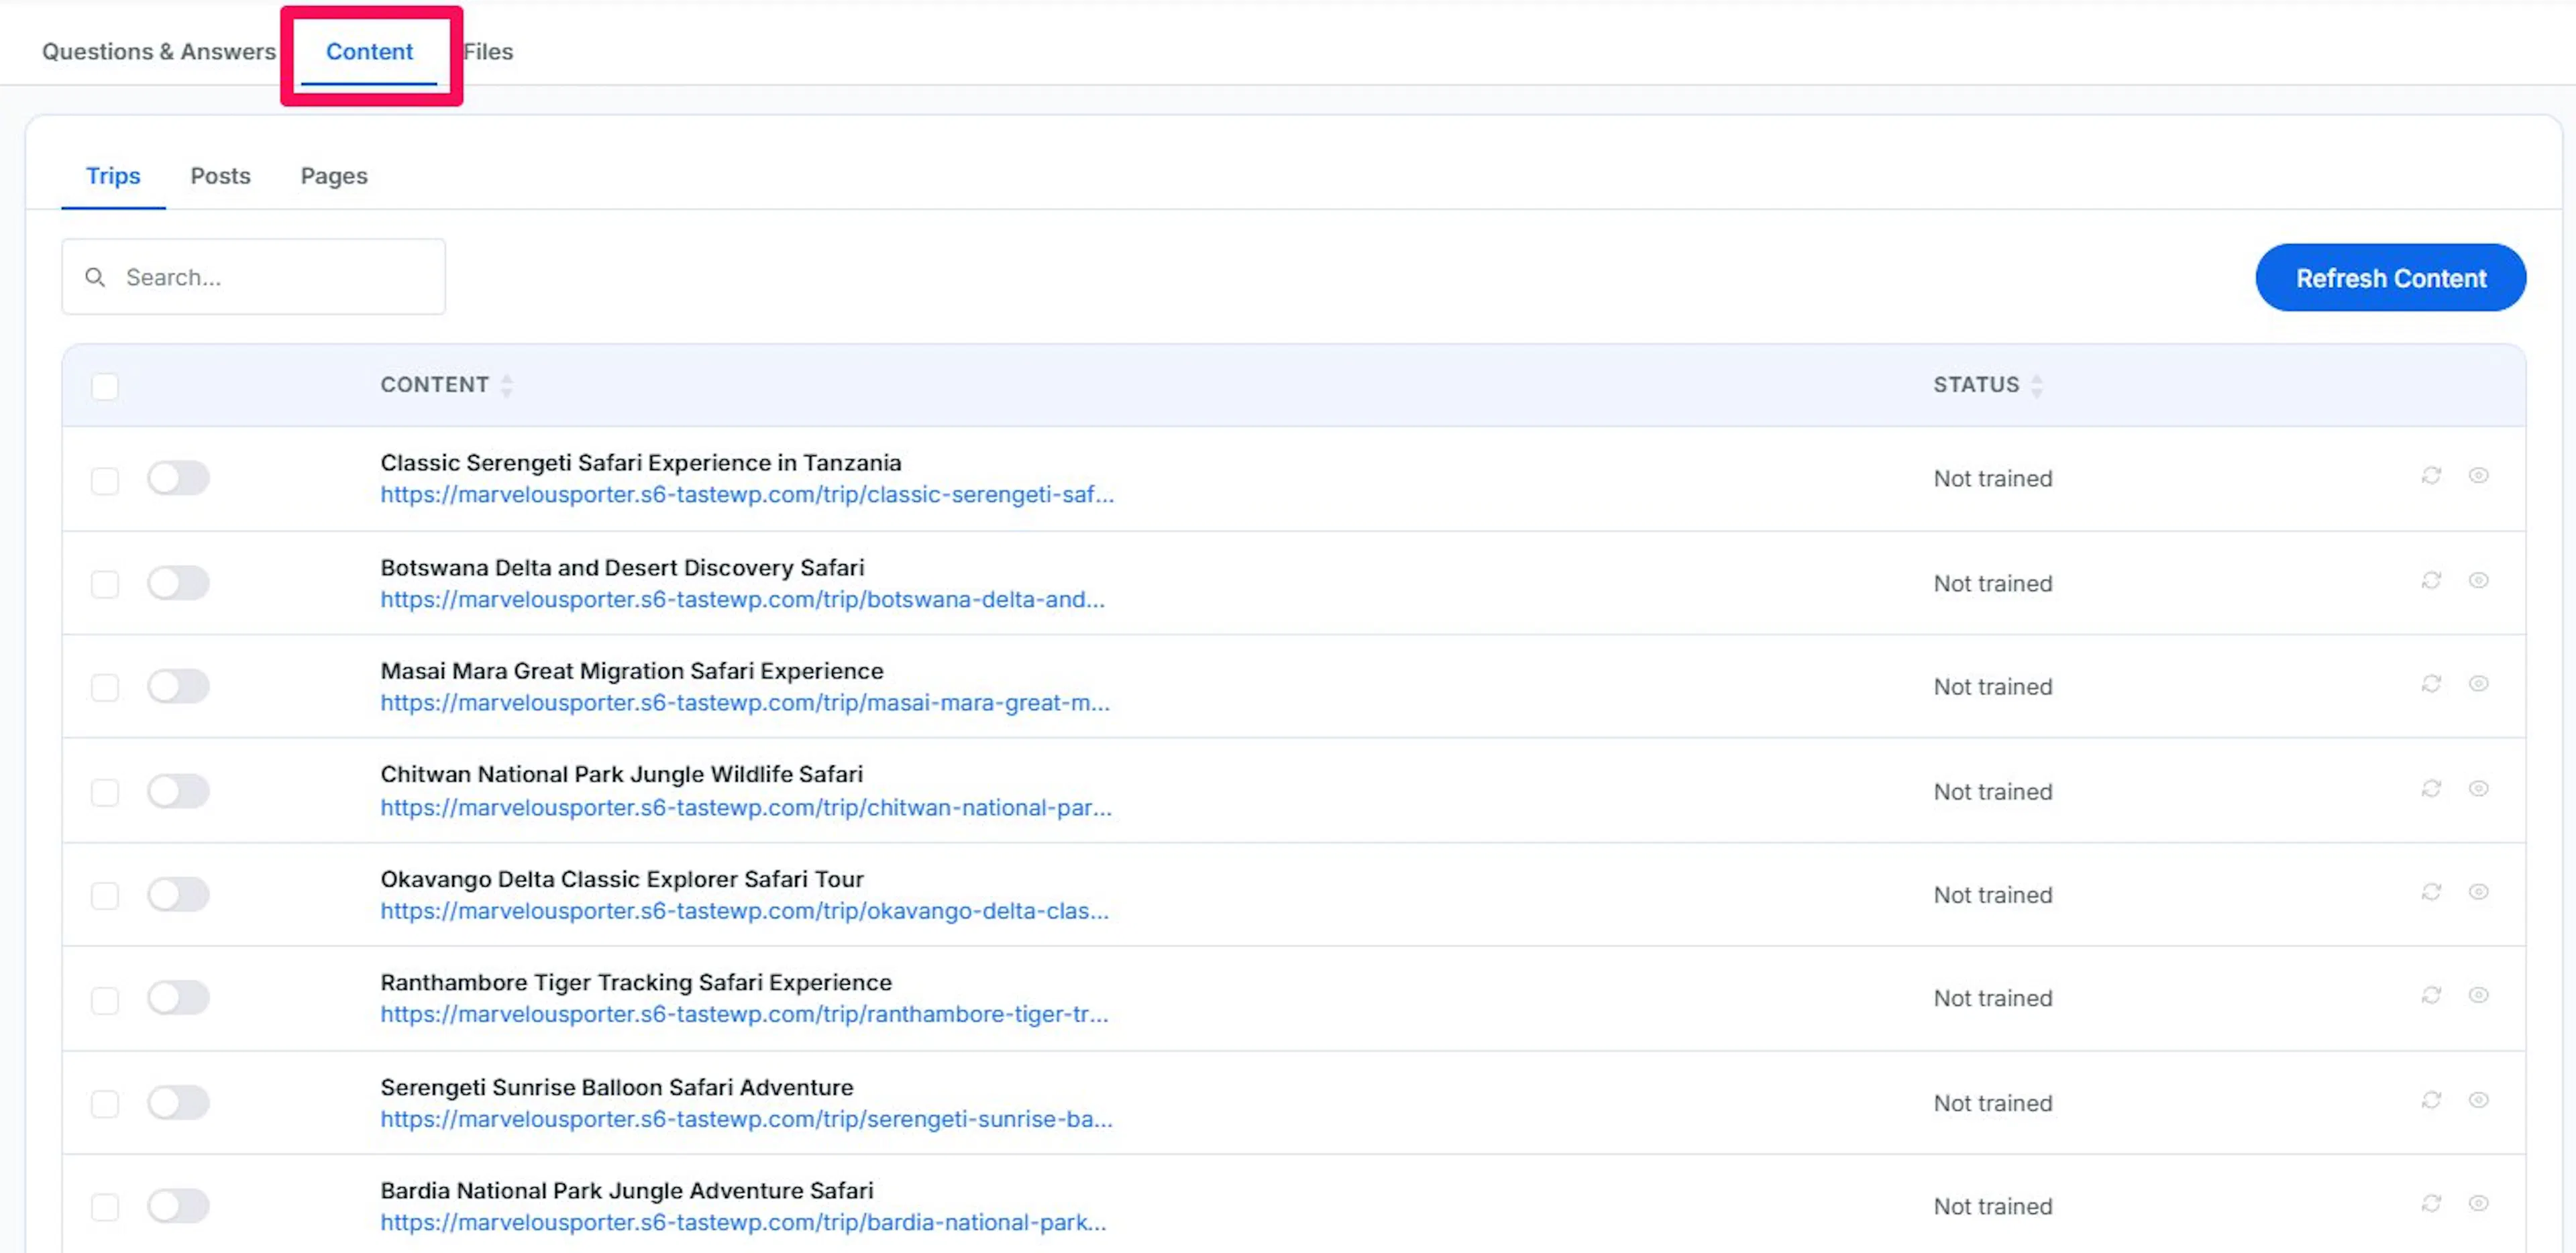
The Content tab trains the assistant on pages already on your site: trips, blog posts, and standard pages. Training a piece of content indexes its text so the assistant can draw on it when a traveler asks a related question.
If your embedding provider isn't configured, a warning banner appears above this tab, and training is not available. Add an embedding provider under the General tab first for accurate answers.
Train your trips before you turn Trip Assistant on. An untrained trip still gets live prices, packages, availability, and departure dates, but the assistant has nothing to draw on for its overview, itinerary, highlights, what's included and excluded, or FAQs, so it replies with your fallback message instead of a detailed answer. Questions about policies, such as cancellations, refunds, and insurance, are answered only from what you've added to the Knowledge Base.
Trips, Posts, and Pages
Each sub-tab lists one content type in its own table, with the same columns and actions in each.
- Trips: every trip in your catalog.
- Posts: your blog posts.
- Pages: your standard WordPress pages.
Training Content
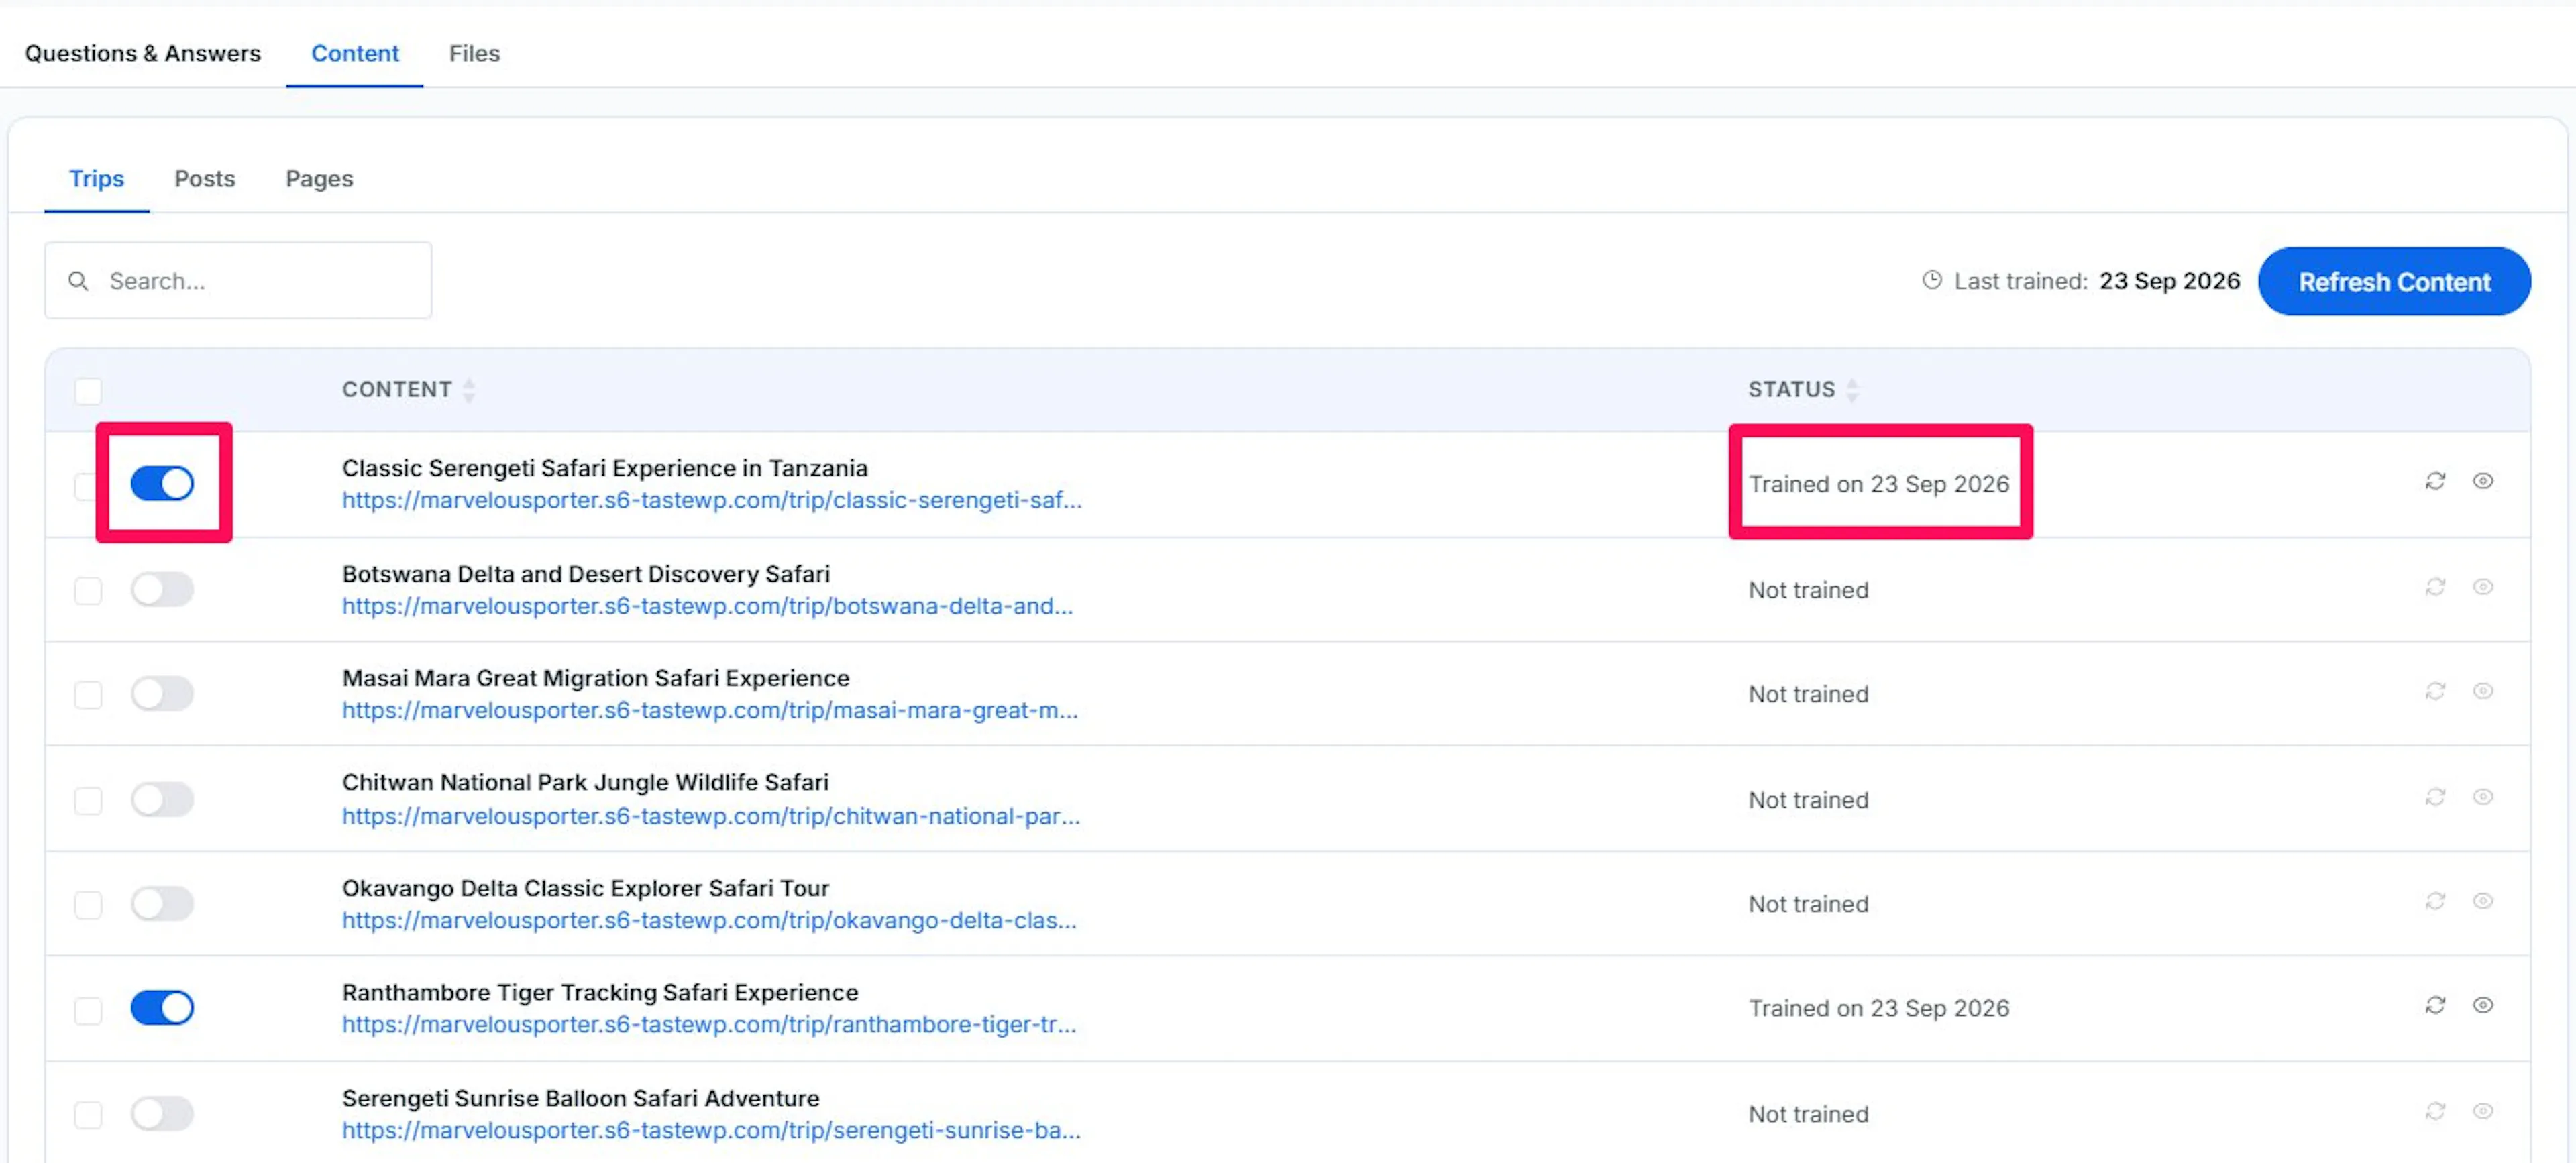
- Toggle (first column): Turn a single item's training on or off. Toggling an untrained item on trains it for the first time. Toggling a trained item off disables it without deleting its indexed content, so it doesn't need to be re-embedded if you turn it back on.
- Content column: Shows the title and a link to the live page.
- Status column: Shows Not trained, Disabled, or the date it was last trained.
- Retrain (refresh icon): Select to re-index an already-trained item, for example, after editing it. Disabled for items that aren't trained yet.
- Preview (eye icon): Select to see the exact text stored for that item. Disabled for items that aren't trained yet.
- Refresh Content: Select to retrain every currently trained item on this sub-tab in one go.
Files
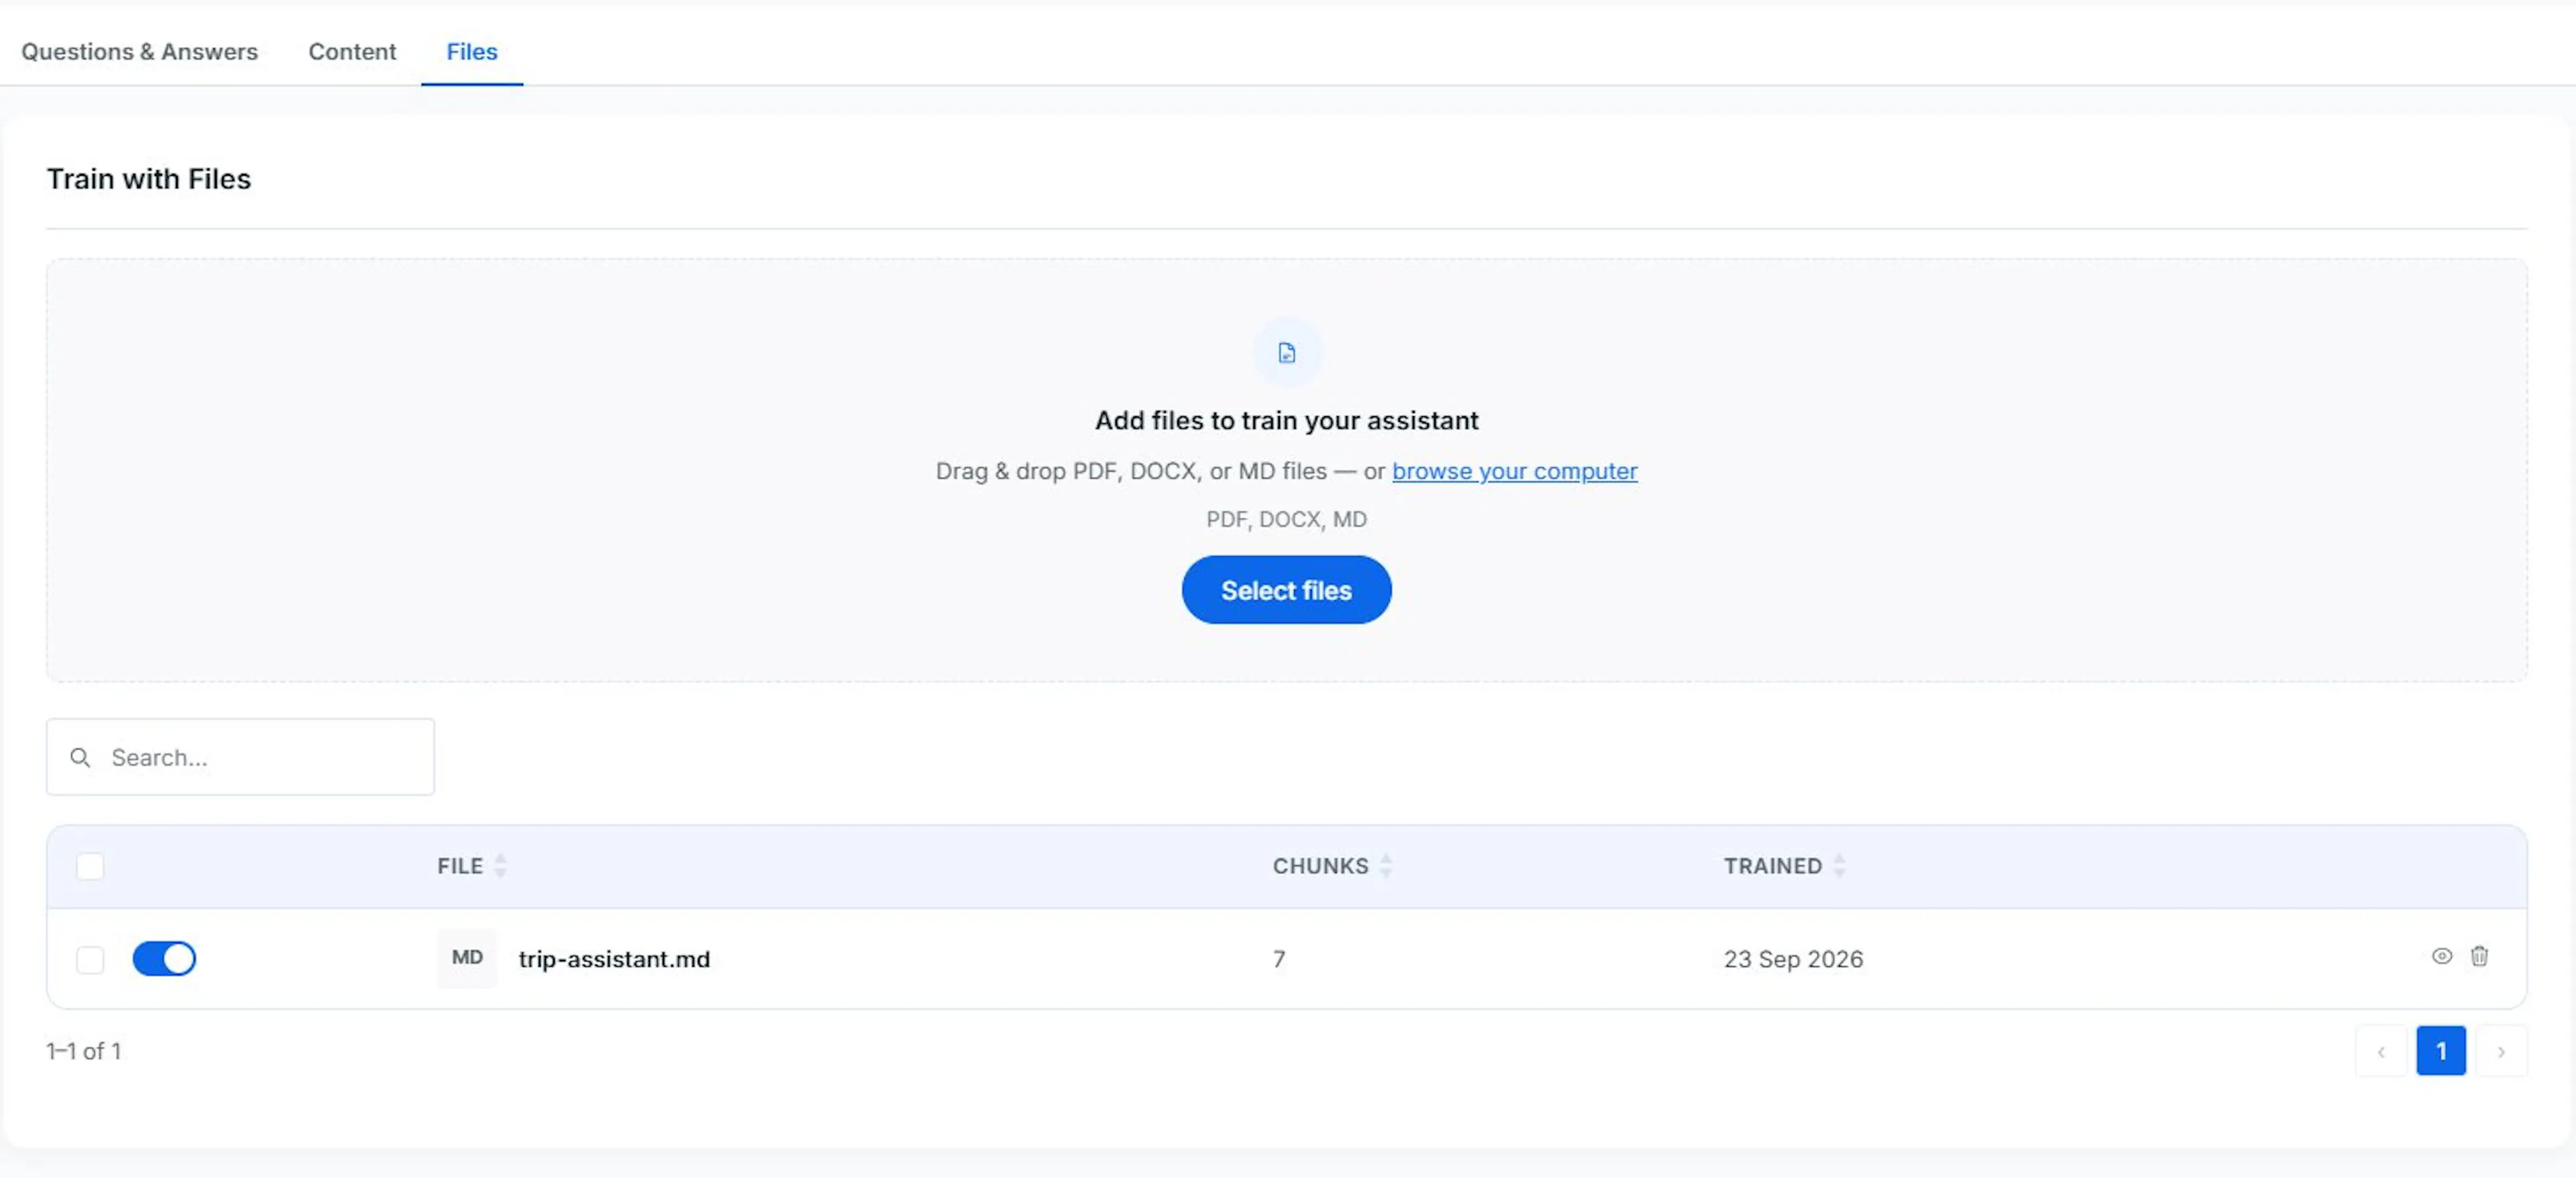
The Files tab trains the assistant on documents you upload directly, for content that doesn't live on a page, such as a PDF brochure, a policy document, or a Word file. Uploading a file doesn't store the original in your media library; the server extracts its text, splits it into chunks, and embeds those chunks in a single step.
Note: If your embedding provider isn't configured, a warning banner appears above this tab, and trained files fall back to keyword matching instead of semantic search. Add an embedding provider under the General tab first for accurate answers.
Uploading Files
- Add files to train your assistant: Drag and drop files onto the dropzone, or select browse your computer. Accepts PDF, DOCX, and MD files.
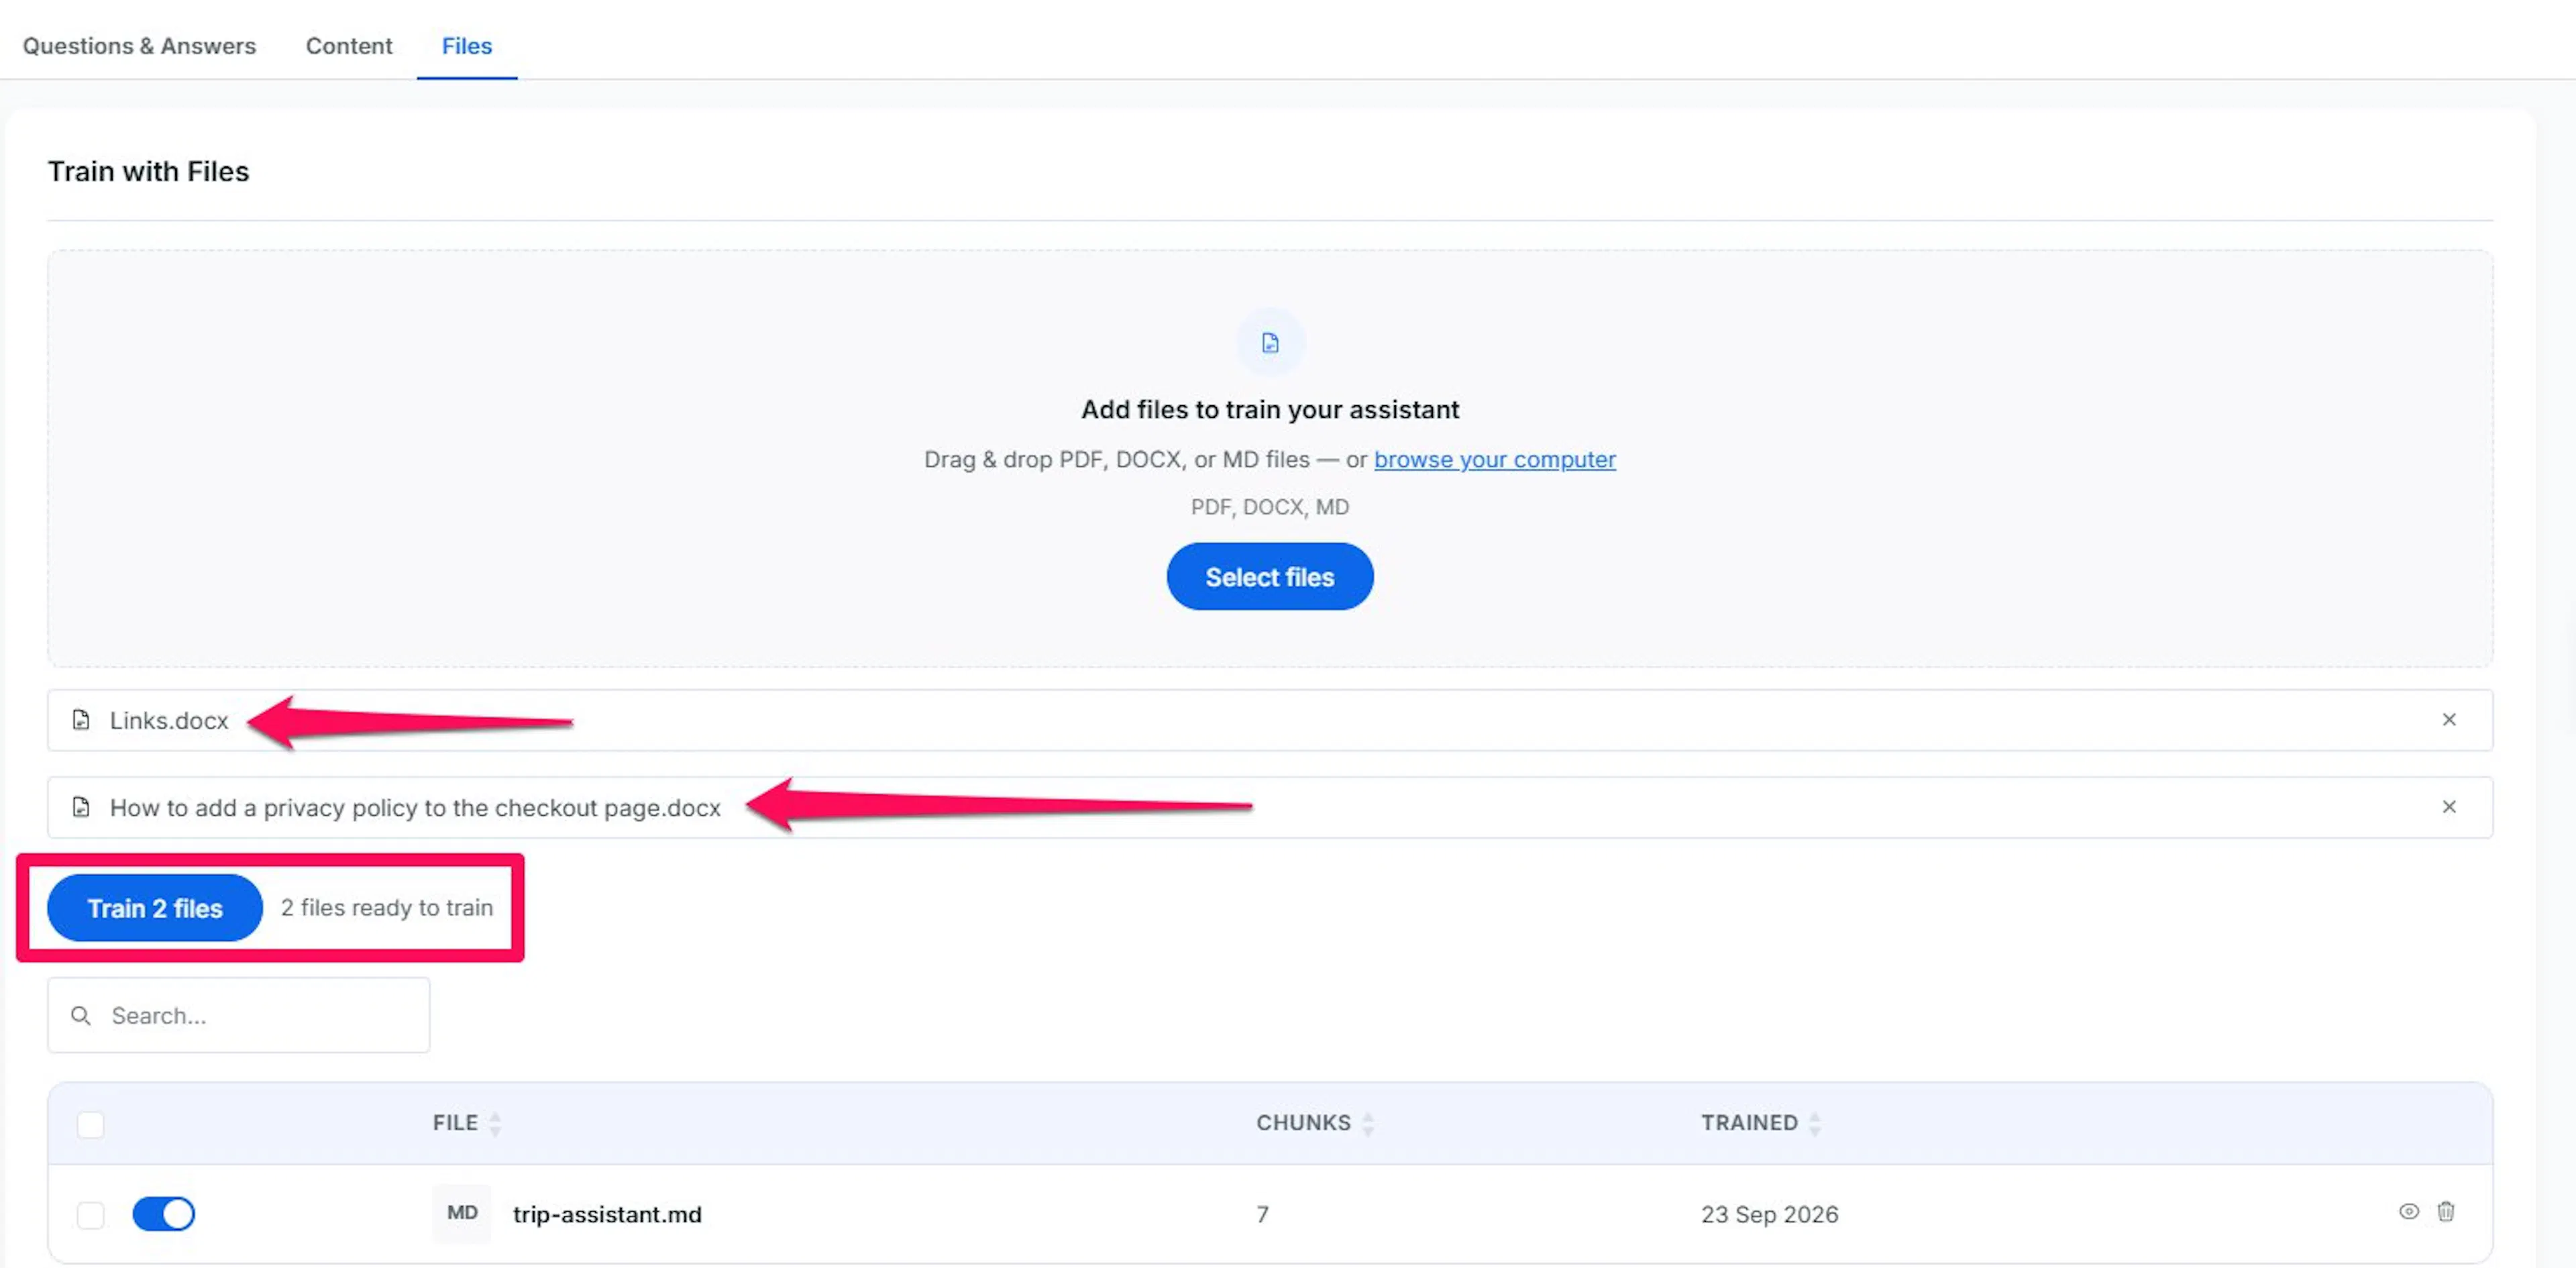
- Each file you add joins a pending list below the dropzone; nothing uploads yet.
- Remove (X icon): Select a pending file to drop it from the list before training.
- Train [n] files: Select once you're ready to upload, extract, and embed every pending file. A file that fails to train is reported separately and doesn't block the rest.
Managing Trained Files
- Toggle (first column): Turn a file's training on or off without deleting it.
- File column: Shows the file name with a badge for its type: PDF, DOC, or MD.
- Chunks column: Shows how many text chunks the file was split into.
- Trained column: Shows the date the file was trained.
- Preview (eye icon): Select to read the extracted text stored for that file.
- Delete (trash icon): Select to remove a file from the knowledge base. You're asked to confirm first; this can't be undone.

If you're still stuck or have a question we didn't cover, our support team is happy to help. Reach out at our support page and we'll get you sorted.