- How to use this Documentation?
- Requirements for Getting Started
- Recommended Image Size (in px)
- Demo Import (Instantly Make Website Like Demo)
- How to Check and Update WordPress Version:
- Theme Installation & Activation
- Installing Recommended Plugins
- Setting up the Front/Landing/Home Page and Blog Page
- Logo and Header Settings
- Appearance Settings
- Layout Settings
- Front Page Settings
- Trip Page Settings
- General Settings
- Footer Settings
Thank you for choosing Travel Muni WordPress theme!
This documentation covers the installation and the usage of the theme.
The main goal of the documentation is to provide guidance and walk-through to set up the theme on your website in an easy-to-follow manner, while also introducing you to some of the features of the theme. We encourage you to go through this document and keep it handy for reference.
If you have any questions about the theme or need assistance with anything related to the theme, please feel free open a support ticket. Our support team will be happy to assist you.
In this documentation, first, we’ll make sure that everything is ready for the installation, then we’ll set up the theme, and cover some initial configuration and customization options.
You can either follow the video or the below documentation to install and setup Travel Muni Theme:
How to use this Documentation? #
We recommend everyone to go through each step of the documentation to have a better understanding of the theme and its features.
However, if you are looking for a specific section, you can easily navigate using our table of contents on the right-hand side of the screen.
If you want to find a specific keyword, hit “Ctrl+F” on your browser to start searching.
Requirements for Getting Started #
Make sure Travel Muni is compatible with your WordPress version.
Travel Muni will work with 4.5 and above versions of WordPress.
However, for the best experience, added features, and updated security patches, we recommend you to update your WordPress to the latest version.
If you haven’t downloaded WordPress already, you can download it from the WordPress repository via https://wordpress.org/download/.
Checklist for Getting Started: #
- Check WordPress Version and Update it
- Install and Activate Travel Muni theme
- Install Necessary Plugins. Some functionality of the theme might not work if you do not install the recommended plugins.
Recommended Image Size (in px) #
The following is the list of recommended image sizes for various elements of the Travel Muni theme.
Header Image: 960 x 650 px
Header Background Image: 1920 x 350 px
Site Logo: 150 x 150 px
Trip Taxonomy Image: 600 x 600 px
Post thumbnail image: 610 x 343 px
Single Trip Page Banner: 1920 x 500 px
Demo Import (Instantly Make Website Like Demo) #
You can easily make your website look like the live preview (demo) of the Travel Muni theme by importing the demo content. Importing demo content is a great way of getting started with your website.
Before you start the process, please download the Travel Muni demo from the given link.
Once you download the file, extract it so that you can upload it to the demo import settings mentioned below.
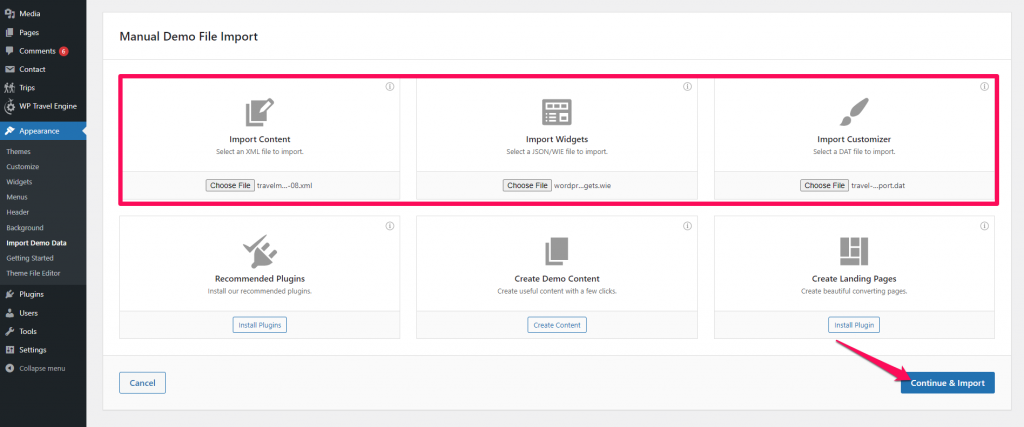
To import the demo with a click, you need to install and activate the One Click Demo Import plugin and then follow the below steps:
- Go to Appearance > Import Demo Data
- Select and upload the XML file, WIE file, and DAT file from the downloaded demo file.
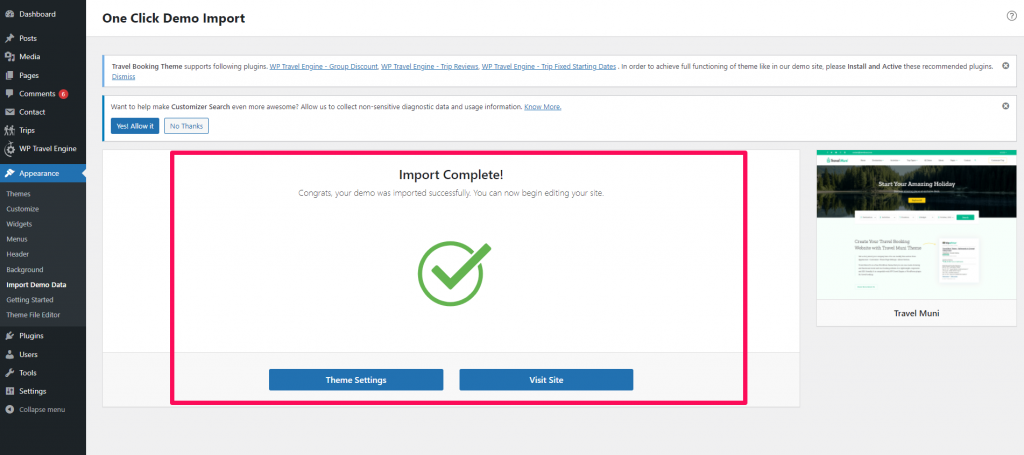
- Click on the Continue & Import button. The importing process might take a few minutes so do not close or refresh the page.
- After the Import is completed and successful, you will receive the following message.
How to Check and Update WordPress Version: #
Go to Dashboard > Updates.

Please update your WordPress version, if there is an update available.
Theme Installation & Activation #
After you have the latest version of WordPress, save the downloaded Travel Muni theme somewhere handy on your computer, as you will be using the included files for the rest of the installation process.
The Travel Muni theme file includes:
A WordPress Theme Files (in .zip format)— This (travel-muni.zip) is a compressed WordPress theme file containing all of the required templates, images, and icons required for the theme to function properly.
Note for Safari users (macOS): If you are using Safari to download the theme file, the file may unzip automatically. So, make sure your theme file is in .zip format. Here’s how to stop Safari from automatically unzipping your .zip file.

To install and activate the theme follow these steps or the above gif:
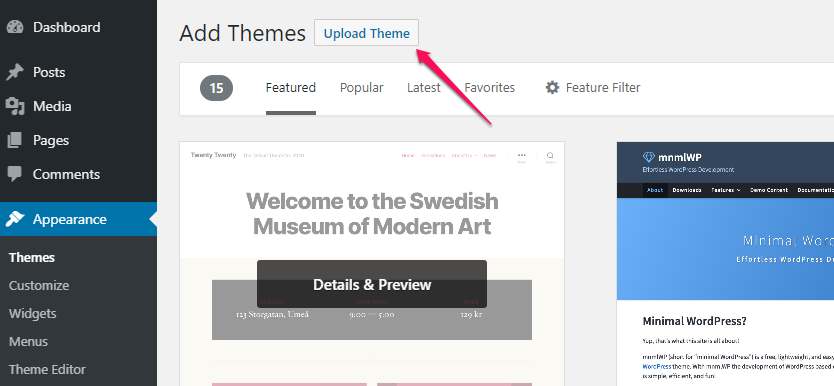
- Go to Appearance > Themes.
- Click on Add New button
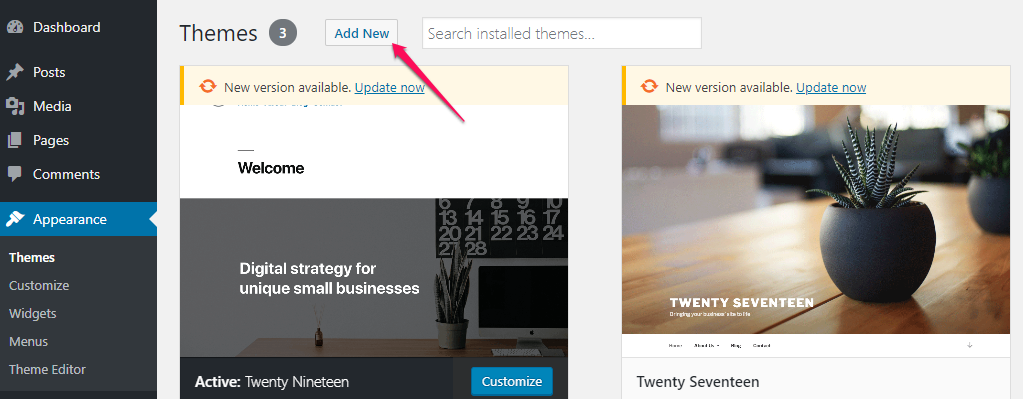
Click on Upload Theme.
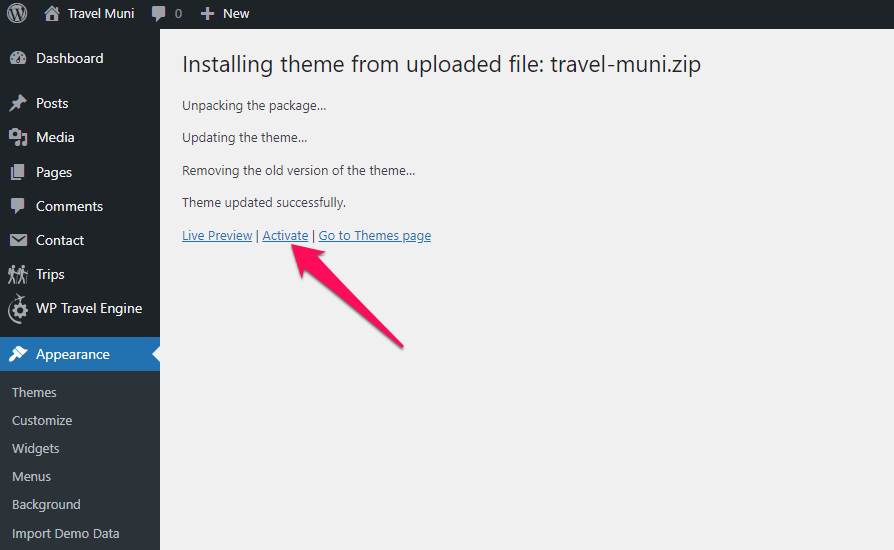
Click on “Choose File…”, select the “travel-muni.zip” file from your computer and click Open.

After the theme is installed, click on “Activate” to use the theme on your website.
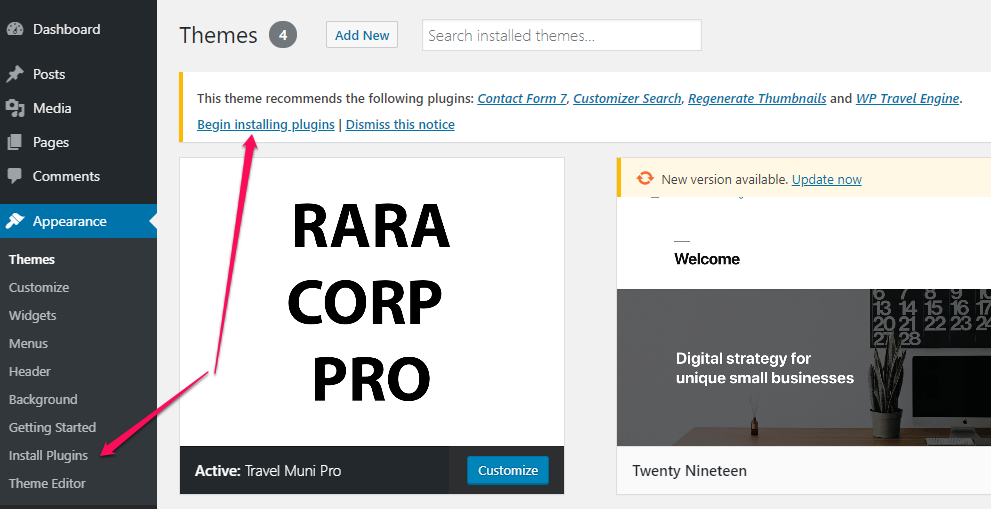
Installing Recommended Plugins #
You must install and activate the following plugins to get the best out of the Travel Muni theme.
WP Travel Engine: This plugin helps you create and add travel trips, destinations, itinerary, and other trips details. This plugin extends the functionality of your travel website.
Travel Booking Toolkit: Travel Booking Toolkit plugin adds extra functionality to the Customizer and Widgets Section of your admin area so that your website can be rich in features.
Contact Form 7: Contact Form 7 helps you add and manage multiple contact forms.
Regenerate Thumbnails: If you have existing content, this will help you update your image thumbnails sizes. To update the thumbnails, you must run this plugin.
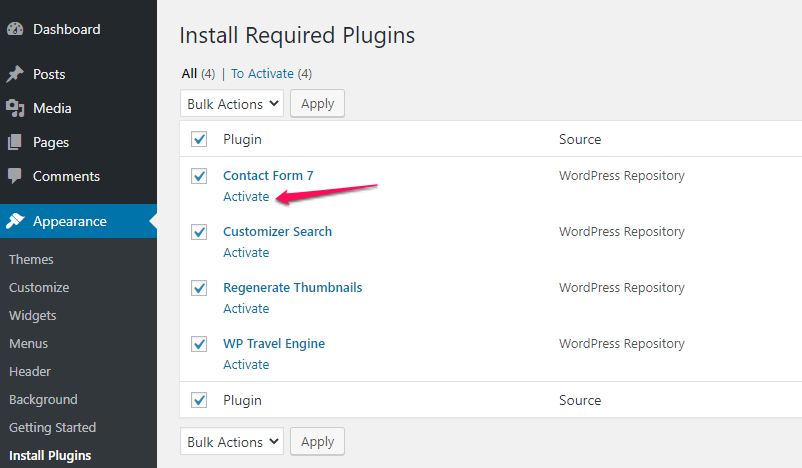
How to Install Recommended Plugin: #
Go to Appearance > Install Plugins
Click “Install” to install the plugins.
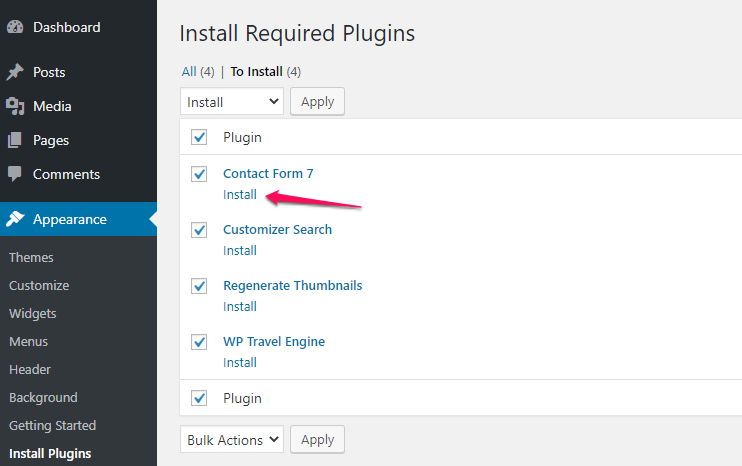
Click “Activate” to activate the plugins
Setting up the Front/Landing/Home Page and Blog Page #
To get started with customizing the theme, you first need to set up a front page. If you want to make your website look like the demo, you should select FrontPage as Static Page.
Configure the Home Page and Blog Page #
- Go to Appearance > Customize > Homepage Settings
- Select A Static page under Your homepage displays.
- Choose the page you want to display as Homepage under the Homepage option and choose the page you want to set as a blog page under the Posts Page option.
- Click on Publish.

Logo and Header Settings #
You can add your logo, tagline, phone number, search form, and social media icons on the top of your website via these settings.
Site Identity (Add Logo/Name and Tagline on your website) #
You can change the name and logo of your website here.
- Go to Appearance > Customize > Site Identity
- Click Select Logo and upload your logo.
- Enter Site Title and Tagline.
- Check Display Site Title and Tagline.
- Click Select Image and upload Image for Site Icon (favicon).
- Click on Publish.

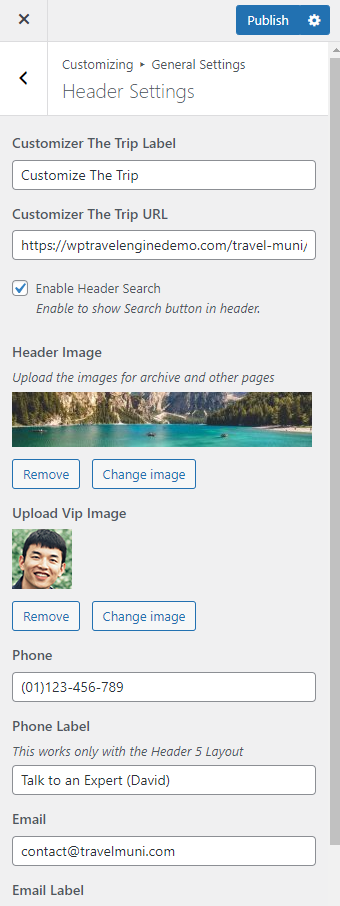
Header Settings #
You can add the contact information and a button on the site header by following the below instructions.
- Go to Appearance > Customize > General Settings > Header Settings
- Enter the Button Label in the Customize The Trip Label.
- Enter the button link in the Customizer The Trip URL.
- Enable Header Search option to show the search button on the site header.
- Upload a Header Image to display on the archive and other site pages.
- Upload the contact person image on the Upload Vip Image field.
- Enter the necessary information in the Phone and Email fields.
- Click on Publish.
Appearance Settings #
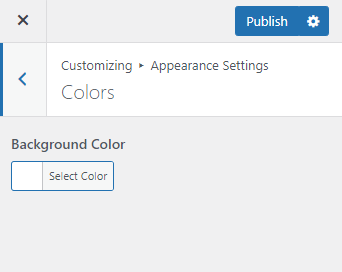
Color Scheme #
Please follow the below steps to select the color scheme of your website.
- Go to Appearance > Customize > Appearance Settings > Colors
- Select the Background Color.
- Click on Publish
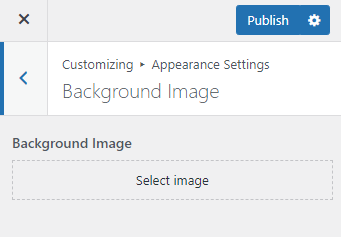
Background Settings #
Please follow the below steps to configure the Background setting of your website.
- Go to Appearance > Customize > Appearance Settings > Background Image
- Click on Select Image & upload the background image of your choice.
- Click on Publish
Layout Settings #
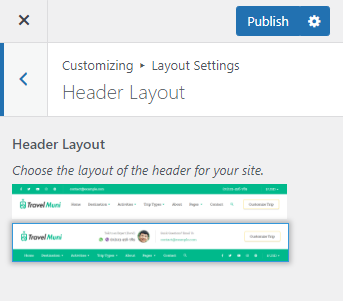
Header Layout #
- Go to Appearance > Customize > Layout Settings > Header Layout
- Select a header layout for your website
- Click Publish.
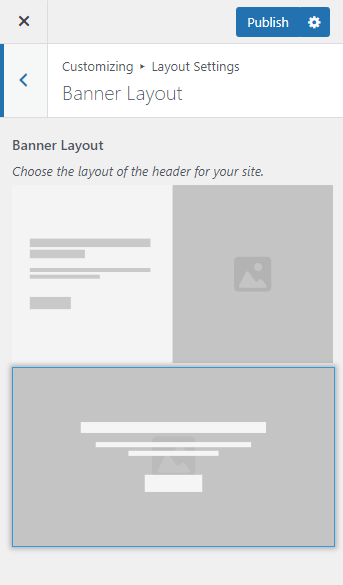
Banner Layout #
- Go to Appearance > Customize > Layout Settings > Banner Layout
- Select a banner layout for your website
- Click Publish.
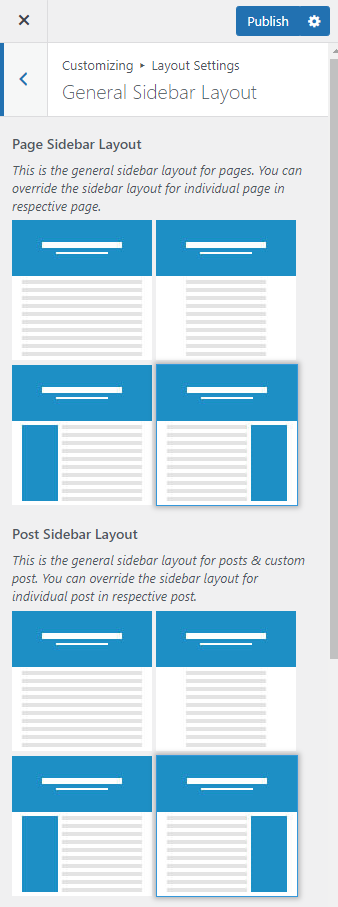
General Sidebar layout #
- Go to Appearance > Customize > Layout Settings > General Sidebar Layout
- Select the default sidebar layout and also the sidebar layout for pages and posts.
- Click Publish.
Front Page Settings #
You can configure the Front page sections provided by the theme via this setting. Make sure to set the homepage as a static page in order to configure the front page sections.
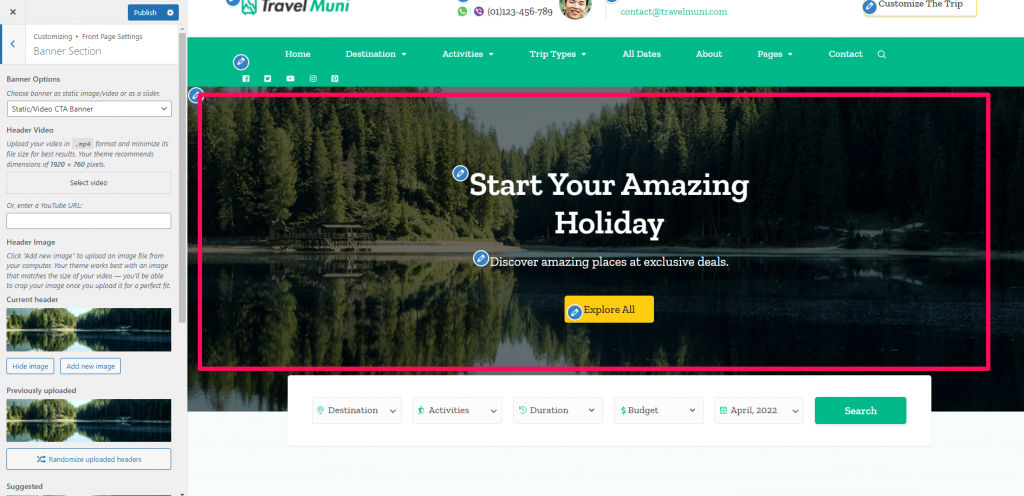
Banner Section #
You can add a Static image or Video CTA in the banner section. The banner will be displayed at the top of your website.
To setup your site banner:
- Go to Appearance > Customize > Front Page Settings > Banner Section
- Choose “Static/Video CTA Banner” under Banner Options or Disable Banner Section (if you do not want a banner).
- Upload and select a video. You can also enter a YouTube link. If you have the video link or the video, the image will not be displayed.
- If you want to put an image in the banner, click on “Add new image” to add images to the banner section
- Select the image you want to display on the banner section. You can also randomize added images. When you click on “Randomize uploaded headers” button, the uploaded banner images will be displayed randomly every time your website is loaded. Make sure you don’t have video select if you want to show an image.
- Enter the Title and Sub Title for the banner.
- Enter the Banner Label and Banner Link.
- Click on Publish
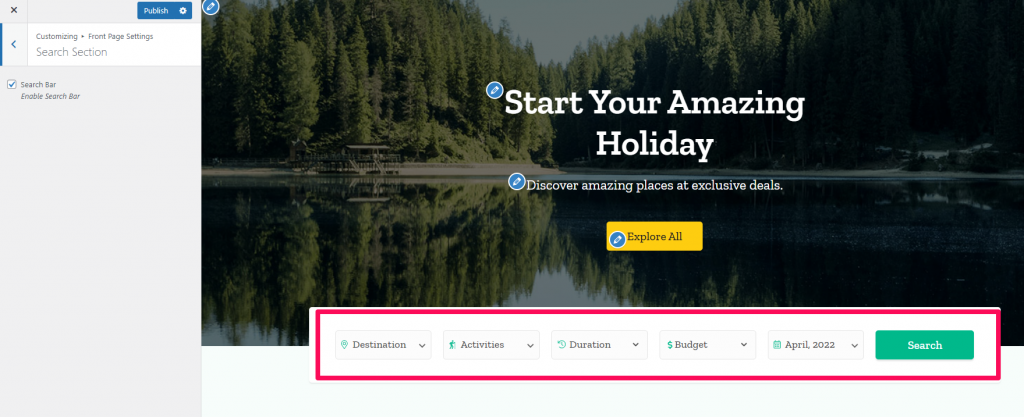
Search Section #
Note: Make sure you have installed and activated the WP Travel Engine plugin for this section to work properly.
- Go to Appearance > Customize > Front Page Settings > Search Section
- Checkmark the Search Bar option to show and allow trip search on the homepage.
- Click Publish.
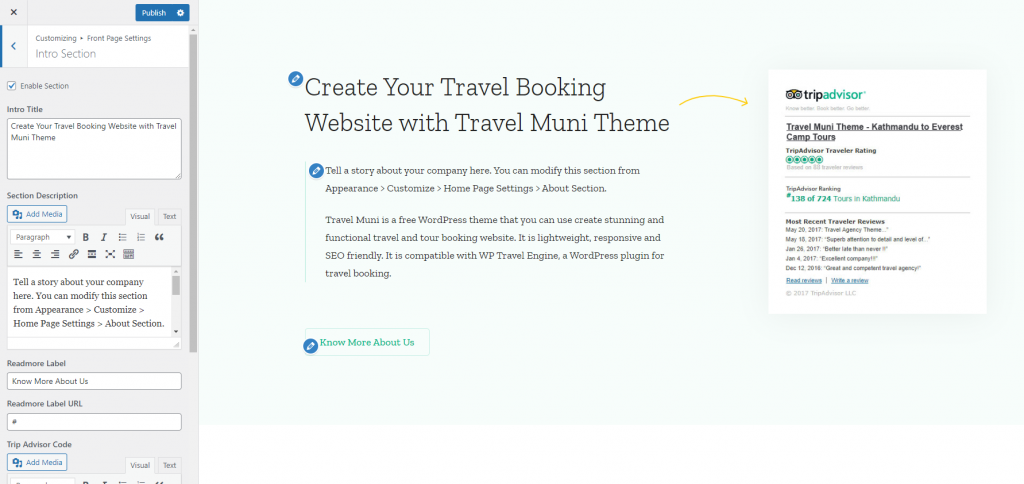
Intro Section #
To configure the Intro section:
- Go to Appearance > Customize > Front Page Settings> Intro Section
- Choose to either Enable/Disable the section.
- Add the Intro Title, Section Description, Readmore Label, Readmore Label URL, and Trip Advisor Code.
- Click on Publish.
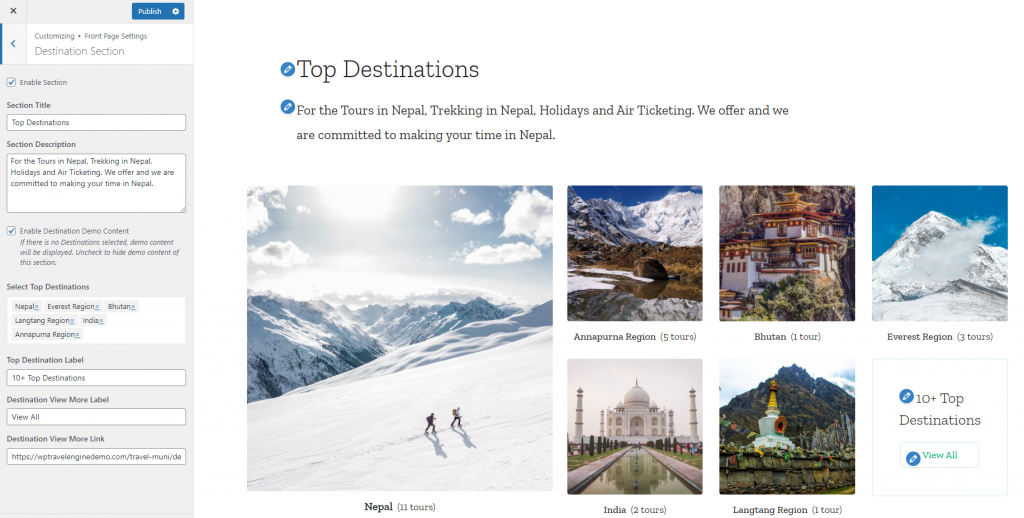
Destination Section #
- Go to Appearance > Customize > Front Page Settings > Destination Section
- Choose to either Enable/Disable the section.
- Enter the Section Title.
- Enter Section Description.
- Checkmark the Enable Destination Demo Content option if you want to display the demo content on this section.
- Select Top Destinations.
- Enter the Top Destination Label.
- Enter the Label in Destination View More Label field.
- Enter the link in the Destination View More Link field.
- Click Publish.
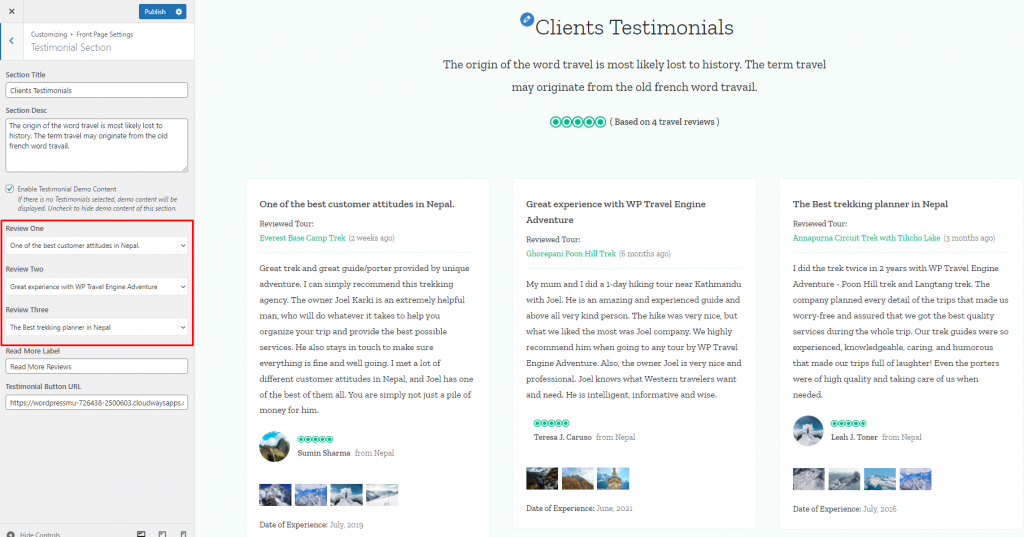
Testimonial Section #
- Go to Appearance > Customize > Front Page Settings > Testimonial Section
- Choose to either Enable/Disable the section.
- Enter the Section Title and Section Description.
- Checkmark the Enable Testimonial Demo Content option if you want to display the demo content on this section.
- Select the reviews from the review drop-down option.
- Enter the Label in Read More Label field.
- Enter the link in the Testimonial Button URL field.
- Click Publish.
Note: This section is made compatible with our WP Travel Engine – Trip Reviews addon. So, you need have that addon to obtain the section as shown below.
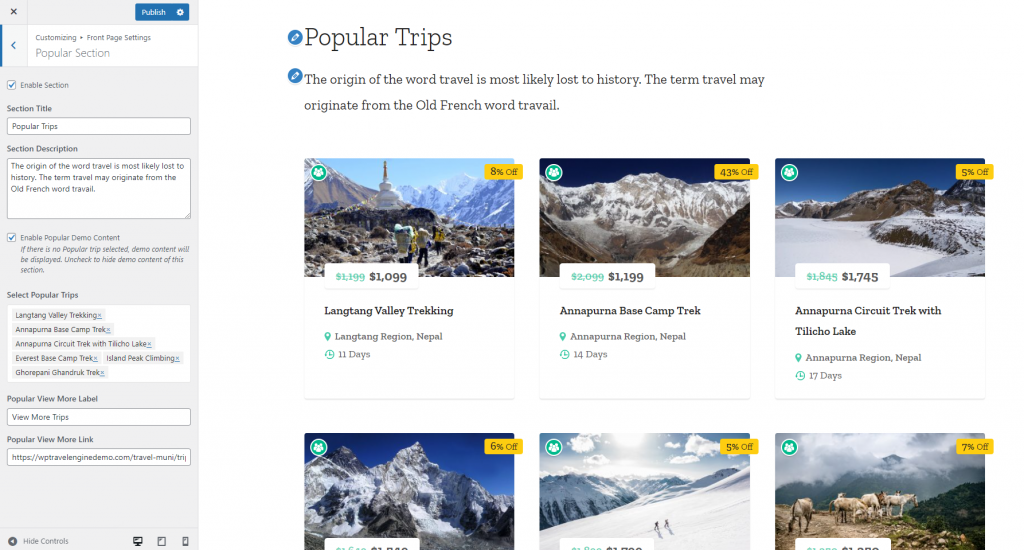
Popular Section #
- Go to Appearance > Customize > Front Page Settings > Popular Section
- Choose to either Enable/Disable the section.
- Enter the Section Title and Section Description.
- Checkmark the Enable Popular Demo Content option if you want to display the demo content on this section.
- Select the Popular Trips for your site.
- Enter the button label in Popular View More Label field.
- Enter the button link in the Popular View More Link field.
- Click Publish.
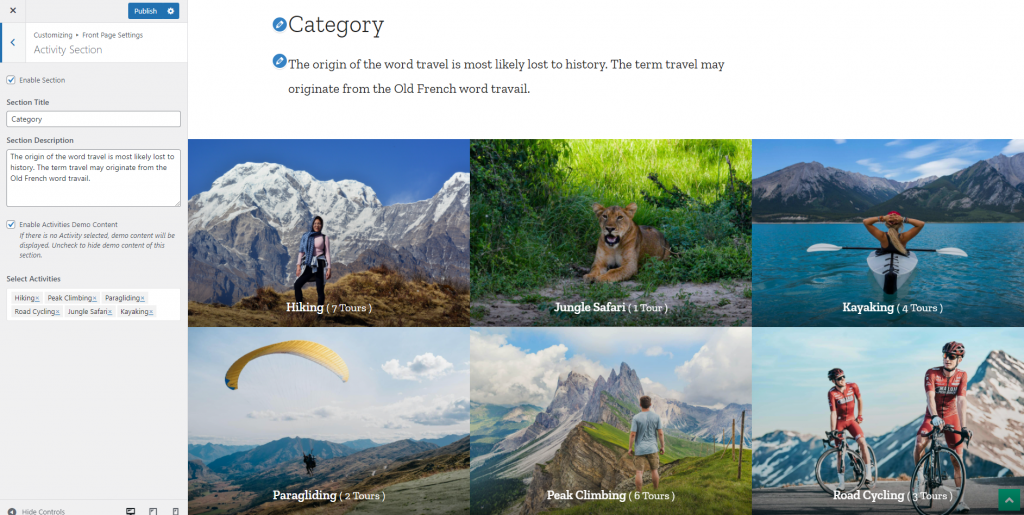
Activity Section #
- Go to Appearance > Customize > Front Page Settings > Activity Section
- Choose to either Enable/Disable the section.
- Enter the Section Title and Section Description.
- Checkmark the Enable Activities Demo Content option if you want to display the demo content on this section.
- Select the activities you wish to display in front page.
- Click Publish.
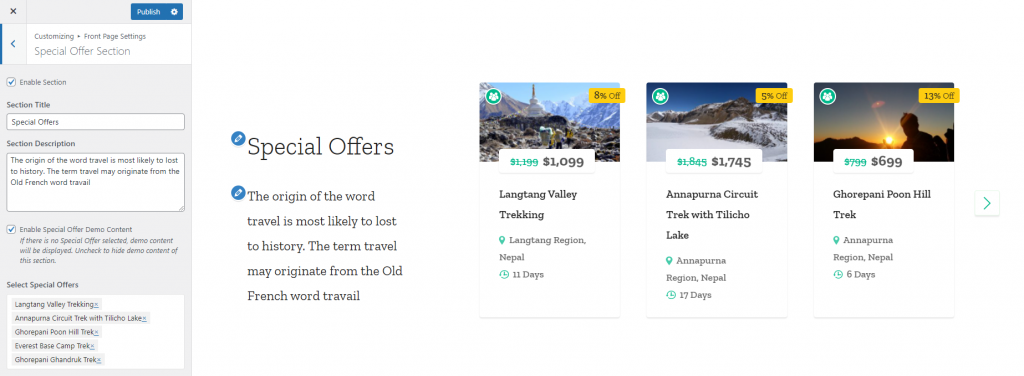
Special Offer Section #
- Go to Appearance > Customize > Front Page Settings > Special Offer Section
- Choose to either Enable/Disable the section.
- Enter the Section Title and Section Description.
- Checkmark the Enable Special Offer Demo Content option if you want to display the demo content on this section.
- Select the trips with Special Offers.
- Click Publish.
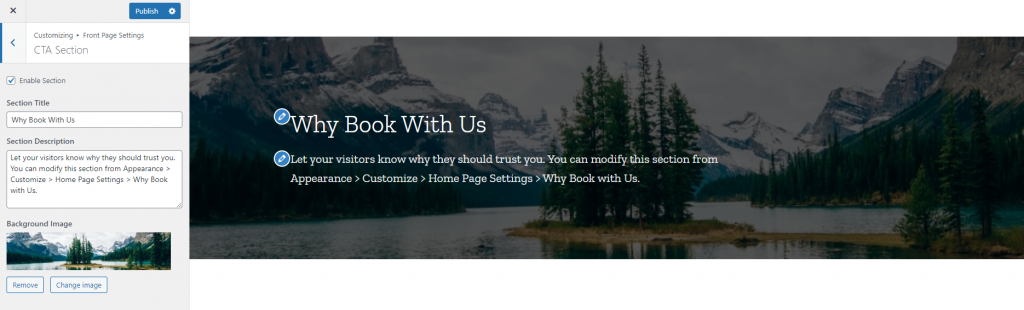
CTA Section #
- Go to Appearance > Customize > Front Page Settings > CTA Section
- Choose to either Enable/Disable the section.
- Enter the Section Title and Section Description.
- Select the Background Image for the CTA section.
- Click Publish.
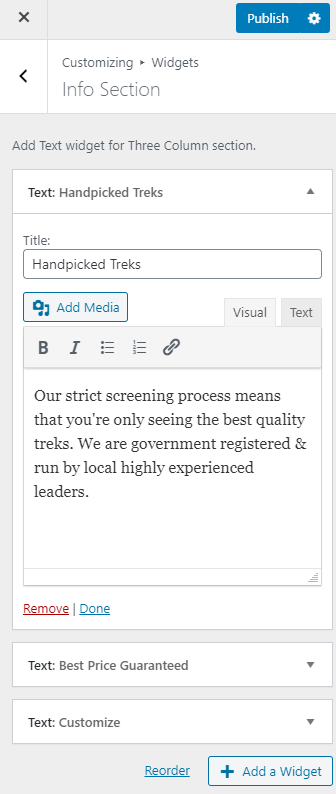
Info Section: #
- Go to Appearance > Customize > Front Page Settings > Info Section
- Click on Add a Widget and add the Text Widget
- Enter the Title and Description.
- Click on Publish.
Blog Section: #
- Go to Appearance > Customize > Front Page Settings > Blog Section
- Choose to either Enable/Disable the section.
- Enter the Blog title and Blog description.
- Click on Publish.

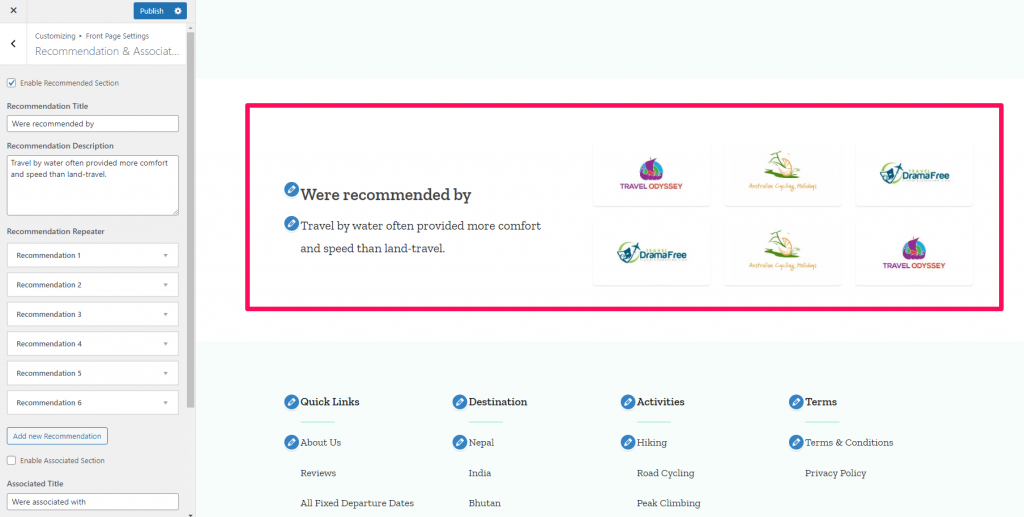
Recommendation & Associated Section: #
- Go to Appearance > Customize > Front Page Settings > Recommendation & Associated Section
- Choose to either Enable/Disable the Recommended Section.
- Enter the Recommendation title and Recommendation Description.
- Click on Add new Recommendation to add the Recommendation information.
- Choose to either Enable/Disable the Associated Section.
- Enter the Associated Title and Associated Description.
- Click on Add new Associated to add the Associate information.
- Click on Publish.
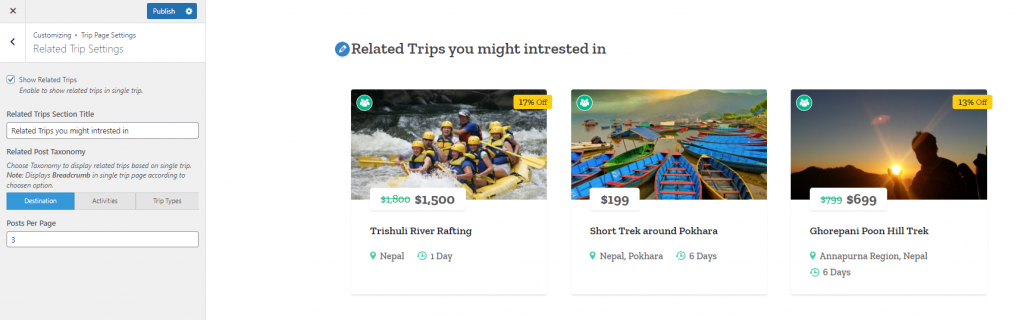
Trip Page Settings #
You can configure the Related Trip Section of the Single trip page here. You must be on Single Trip Page to customize the sections.
Related Trip Settings #
- Go to Appearance > Customize > Trip Page Settings > Related Trip Settings
- Choose to either show/hide Related Trips Section.
- Enter the Related Trips Section Title
- Choose the taxonomy based on which you want the posts on the Related Trips Section to be displayed.
- Enter the number of posts you want to display under the Related Trips Section inside the Posts Per Page field.
- Click on Publish.
General Settings #
You can set up some general settings from this section.
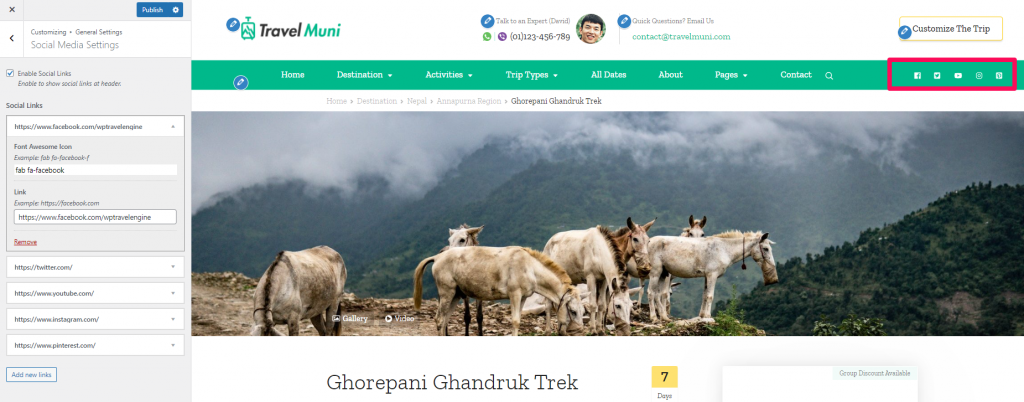
Social Media Settings #
- Go to Appearance > Customize > General Settings > Social Media Settings
- Choose to Enable Social Links at header.
- Click on Add new links to add Social links.
- Select the social icon and enter the social link
- Click on Publish.
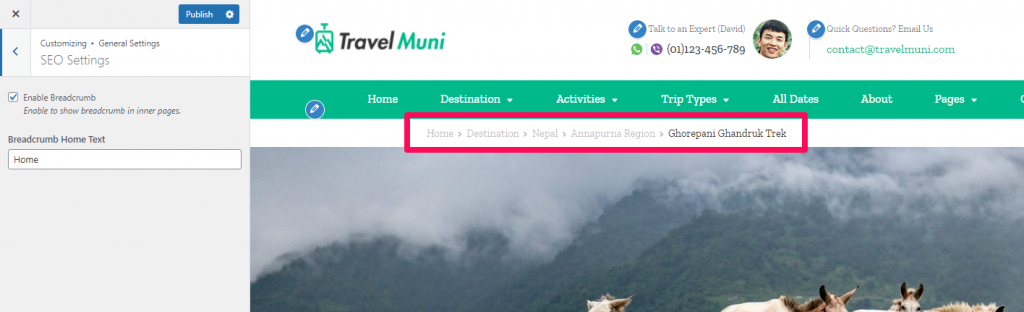
SEO Settings #
- Go to Appearance > Customize > General Settings > SEO Settings
- Checkmark the option to Enable Breadcrumb in inner pages.
- Enable the Breadcrumb Home Text.
- Click on Publish.
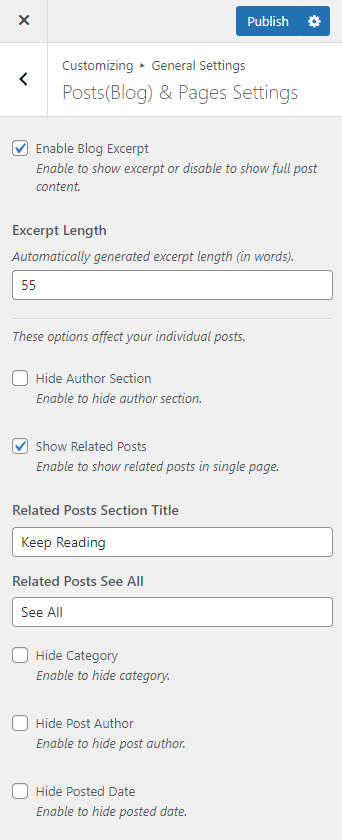
Posts(Blog) & Pages Settings #
- Go to Appearance > Customize > General Settings > Posts(Blog) & Pages Settings
- Checkmark the Enable Blog Excerpt option to show excerpt or uncheck the option to show full post content.
- Set Excerpt Length.
- Choose to Show/Hide Author Section and Related Posts on single page
- Enter the Related Posts Section Title and Related Posts See All button label.
- Enable/Disable the option to Hide Category, Post Author and Posted Date.
- Click on Publish.
Footer Settings #
Footer Bottom Settings #
To configure the footer bottom settings,
- Go to Appearance > Customize > Footer Settings > Footer Bottom Settings
- Enter the description text you want to display inside the footer field.
- Enter the title for the Phones detail section inside Enter Label For the Phones field.
- Enter contact number inside the Enter Phone field.
- Enter your whatsapp number inside the Enter Whatsapp Phone Number field.
- Enter your viber number inside the Enter Viber Phone Number field.
- Enter the title for the Emails detail section inside Enter Label For the Email field.
- Enter your contact email details inside the Enter Email field. You can enter multiple email separating each by comma.

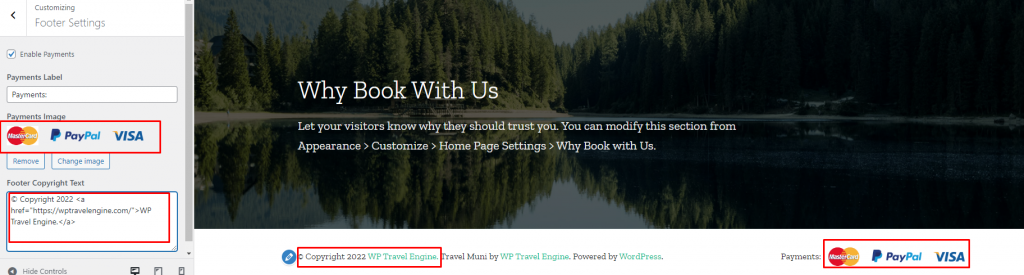
Copyright Settings #
- Go to Appearance > Customize > Footer Settings > Copyright Settings
- Checkmark the Enable Payments option to display the Payment information on the footer copyright field.
- Enter the Payments Label.
- Upload Payments Image.
- Enter the copyright text you want to display inside the Footer Copyright Text field.
- Click on Publish.