- Key Features
- Prerequisites
- How to Install the Trip Fixed Starting Dates Add-on
- Configuring the Global Settings for Trip Fixed Starting Dates
- FSD Settings in the Single Trip
- Date Settings in a Single Trip
- Shortcode
- Troubleshooting
- FAQ
- Can I run a trip at multiple times in one day?
- What happens when all seats are sold out?
- How do repeating schedules stop?
- Can I list all trips with fixed dates on one page?
- What happens if I leave an attribute out of the Departure Calendar shortcode?
- How do I find a trip’s ID for the include/exclude shortcode attributes?
The Trip Fixed Starting Dates (FSD) add-on is built for travel businesses that run trips on specific schedules. Instead of letting customers pick any date from a calendar, you get to define fixed departure dates for each trip.
This is especially useful if your tours happen on certain days only, like a monthly hiking group, a seasonal tour, or a festival-based package. With this add-on, you can display all upcoming departure dates, control how they appear, and even manage seat availability and booking urgency.
Key Features #
- Trip Expiry: Automatically expire trips after a certain date.
- Fixed Departure Dates: Set specific start dates for each trip.
- Seat Management: Define total seats for a trip per day, package, or time slot.
- Recurring Dates: Create daily, weekly, or monthly schedules.
- Time Slots: Run multiple sessions of a trip (e.g., morning, evening, night) with the same seat pool.
- Date Availability Labels: Mark trips as Available, Limited, and Guaranteed.
- Departure Dates: You can assign the Departure Dates Status as well.
Prerequisites #
Before using this add-on, make sure:
- You have WP Travel Engine installed and activated on your WordPress site (Version 6.5.0 or more)
- You have installed and activated the Trip Fixed Starting Dates add-on
- You have added at least one trip.
How to Install the Trip Fixed Starting Dates Add-on #
Configuring the Global Settings for Trip Fixed Starting Dates #
The Global Settings section allows you to configure the features that apply across all trips and bookings on your site. Use these settings to configure how bookings are handled, what trip information is visible, and how travelers experience your site.
You can configure the global settings for Trip Fixed Starting Dates via WP Travel Engine > Settings > Extensions > Fixed Starting Dates > General.
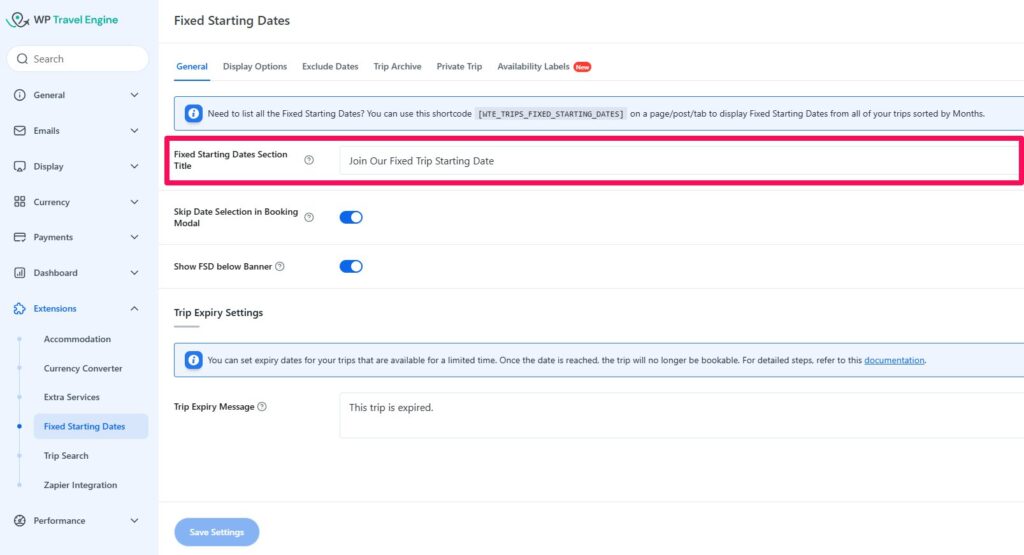
Enable Trip Fixed Starting Dates for Trips #
This setting controls whether the Fixed Starting Dates section appears on trip pages.
- Fixed Starting Dates Section Title: Enter a custom title for the section. For example, you could name it “Available Departures” or “Trip Dates”. This title will show above the date list.

Booking Modal Options #
- Skip Date Selection in Booking Modal: When this option is enabled, travellers will not see the date selection field in the booking pop-up. This works because the traveller has already chosen a date from the list shown in the trip’s date table.
On the single trip page, all available dates are displayed in a list. When a traveller clicks Book Now next to a specific date, the system knows which date they selected. Since the date is already chosen, the booking pop-up skips the extra date selection step.
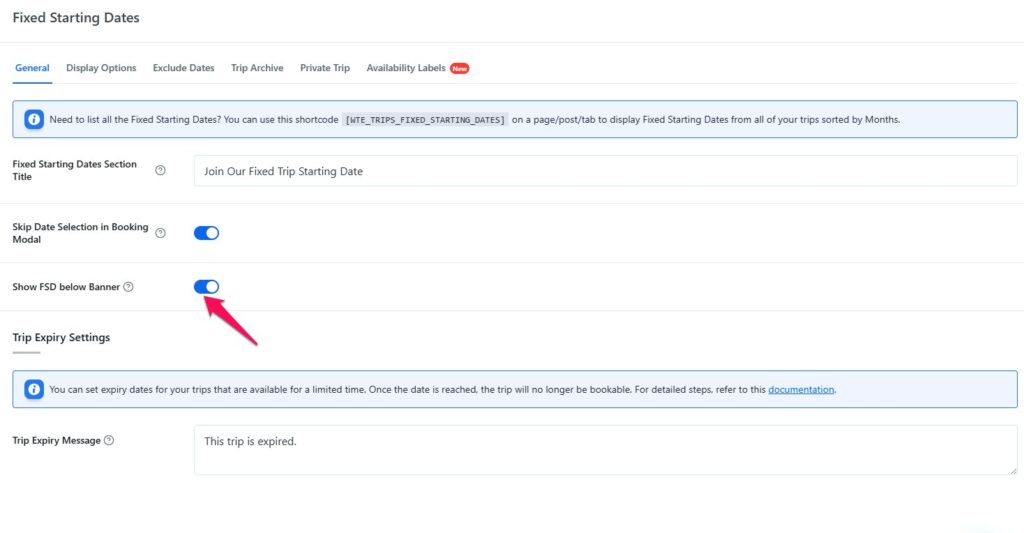
Enable FSD below the Banner #
Show FSD below Banner: This option serves as a global setting that determines where the Fixed Starting Dates (FSD) section appears on your trip pages. When this setting is enabled, the FSD section will be displayed just below the banner area across all trip pages by default. However, if you have specifically chosen to hide the FSD section below the banner for an individual trip within its single-trip settings, that individual preference will override the global setting. In such cases, the FSD section will appear below the main content area instead of directly beneath the banner.
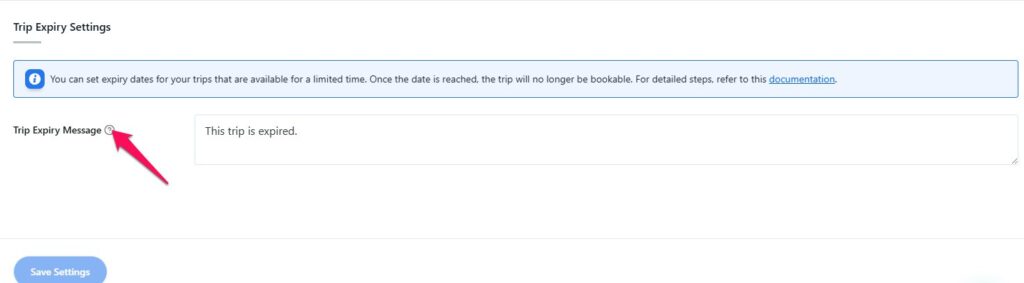
Trip Expiry Message #
Customize the message that appears when a trip has passed its expiry date. Example: This trip is expired.
Display Options #
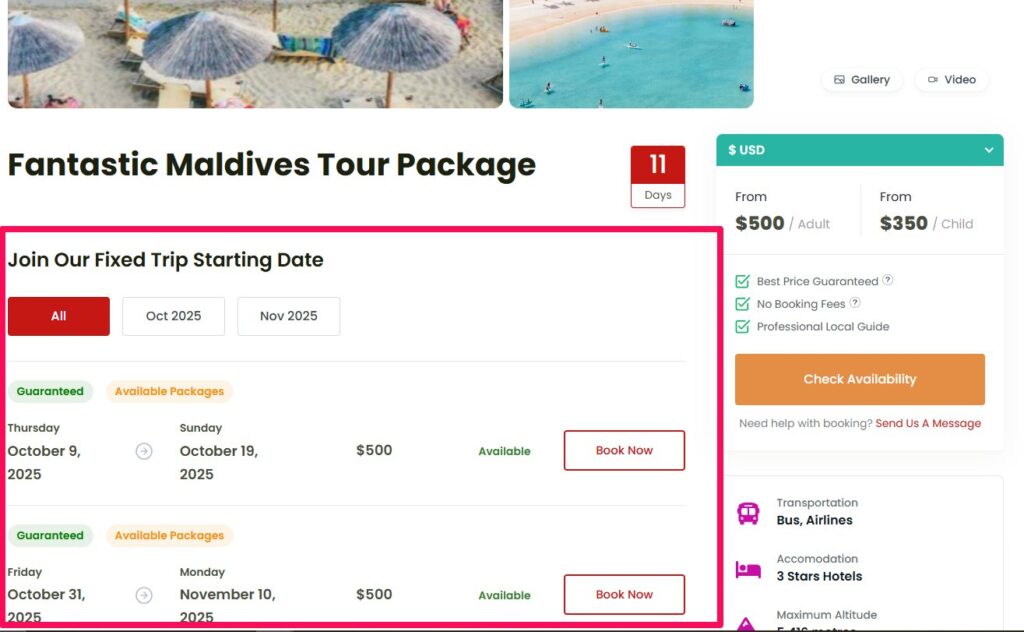
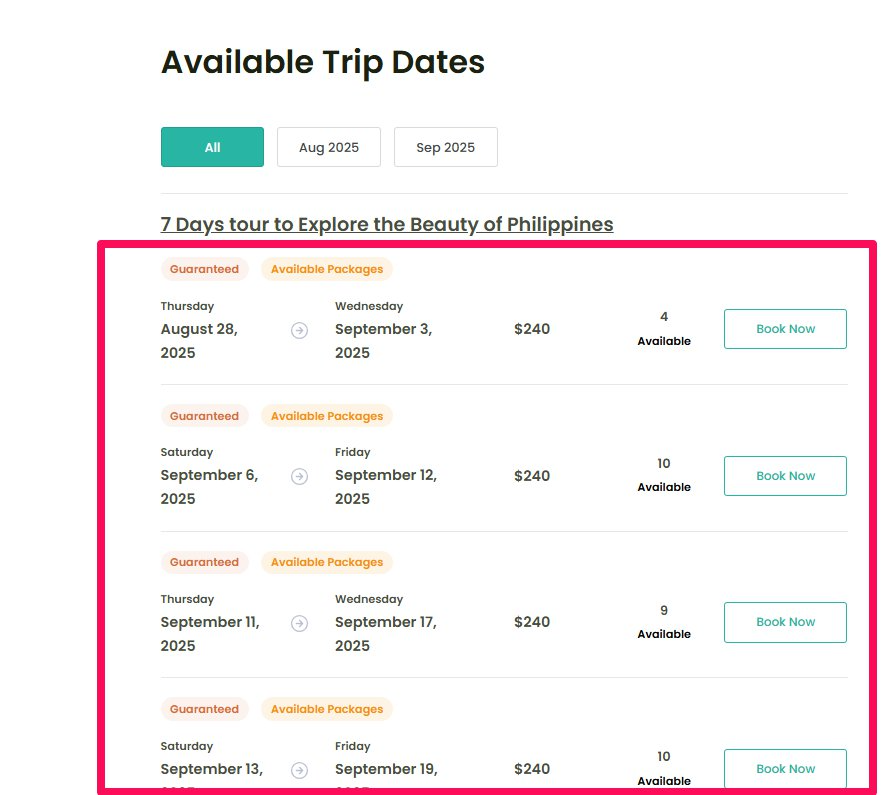
You can customize how the Fixed Starting Dates (FSD) section is displayed on your trip pages. The following settings allow you to choose which details are shown to travelers. On each single trip page, visitors will see a table listing all the available departure dates for that specific trip. From the display options, you can decide which information columns appear in this table,such as available seats, pricing, and remaining spots.
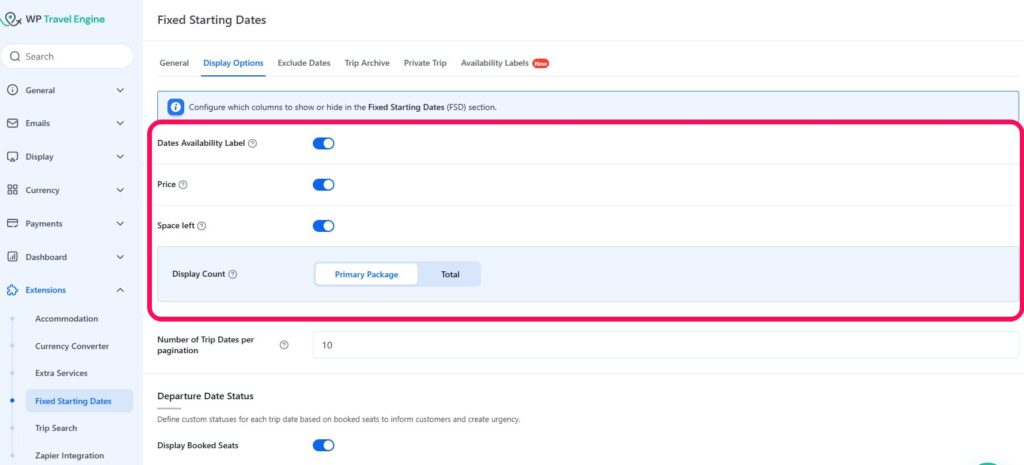
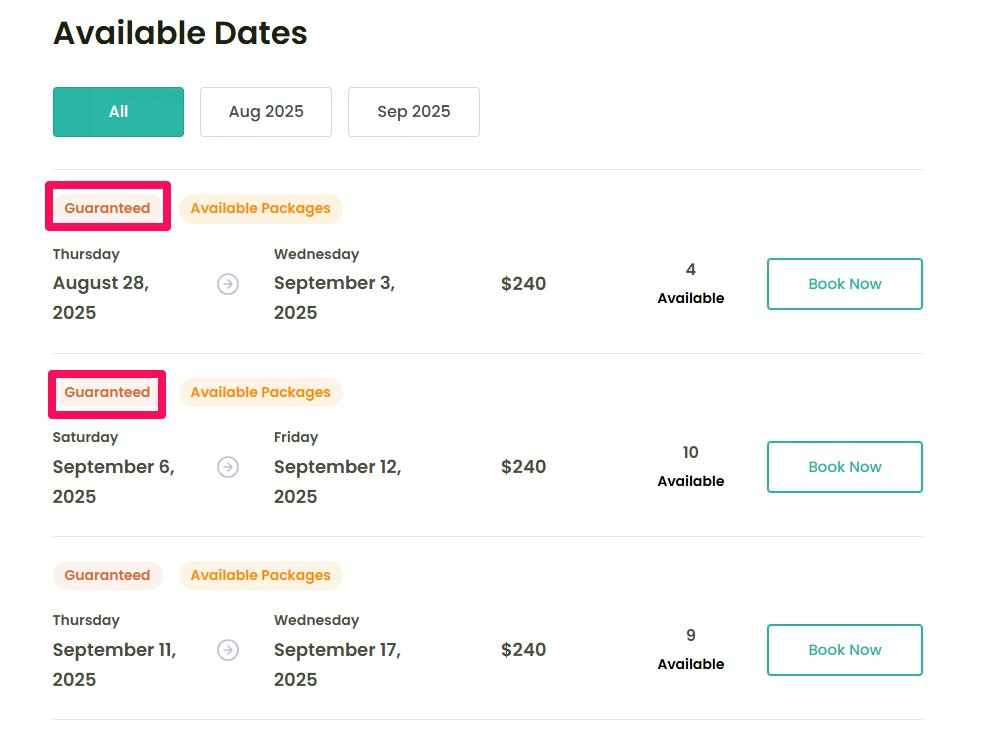
Date Availability Label:
When assigning a date to a trip, you can add an availability label such as Guaranteed, Limited, or Available. These labels help travellers quickly understand the booking status.
If you prefer not to display labels in the dates table, you can disable this option in the settings.
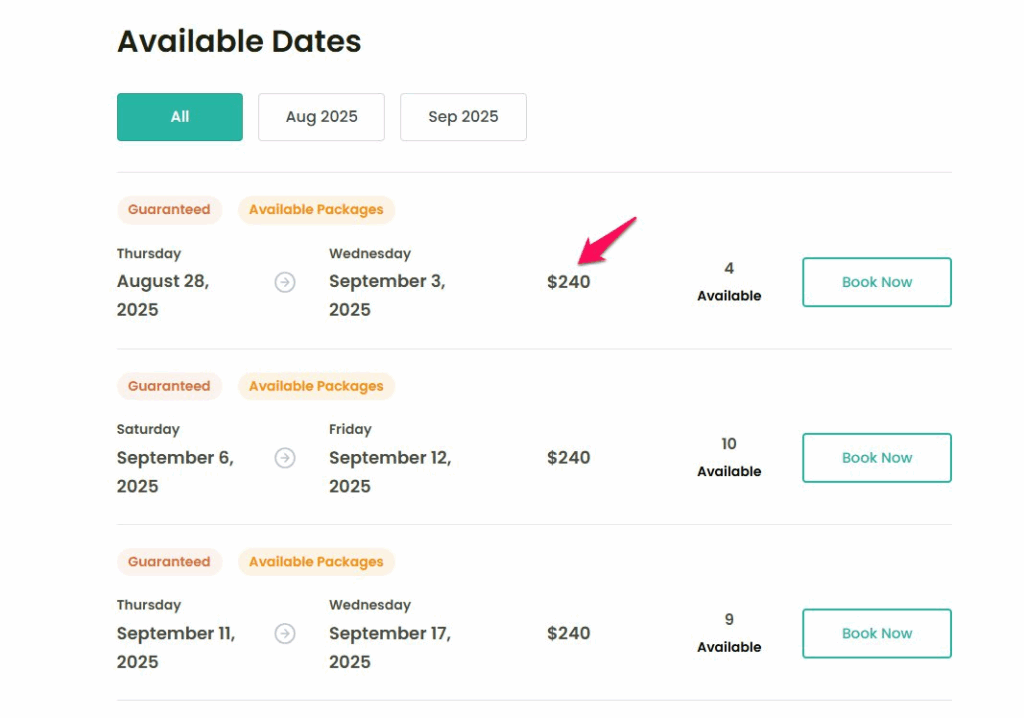
Price
This shows the package price for each departure date. By default, the price of the primary package is displayed. The price column is visible directly in the departure dates table on the single trip page.
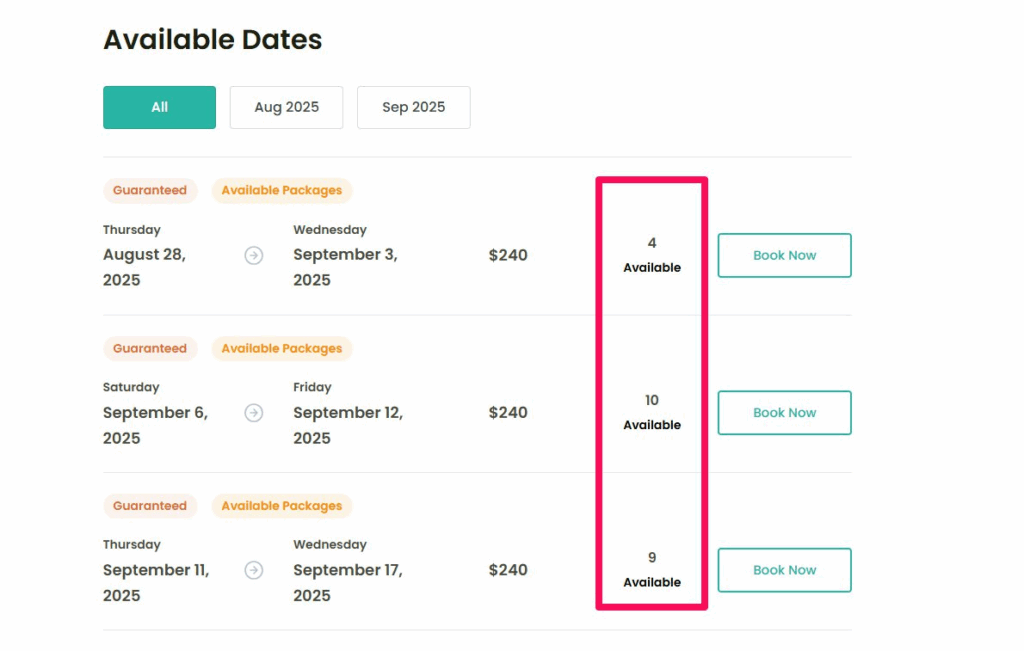
Space left
This shows how many seats are still available for a particular date. Once this option is enabled, you will also be able to choose how the seat count is displayed:
- Primary Package: Shows the number of seats left in the primary package created for the trip.
- Total Seats: Shows the combined number of seats left across all packages for that date.
Example:
If General Settings set 10 seats, and you created Standard (4 seats) and Premium (3 seats), the display can either show the primary package count (for example 4 seats from Standard) or the total seat pool (7 seats from both packages).
Number of Trip Dates per pagination

When using shortcodes ([WTE_TRIPS_FIXED_STARTING_DATES] ) to display trips, this setting controls how many departure dates are shown per page. For instance, if you set this to 10, visitors can browse up to 10 dates per page for a particular trip before moving to the next page.
Configure Departure Date Status #
This lets you define labels and colors for seat availability.
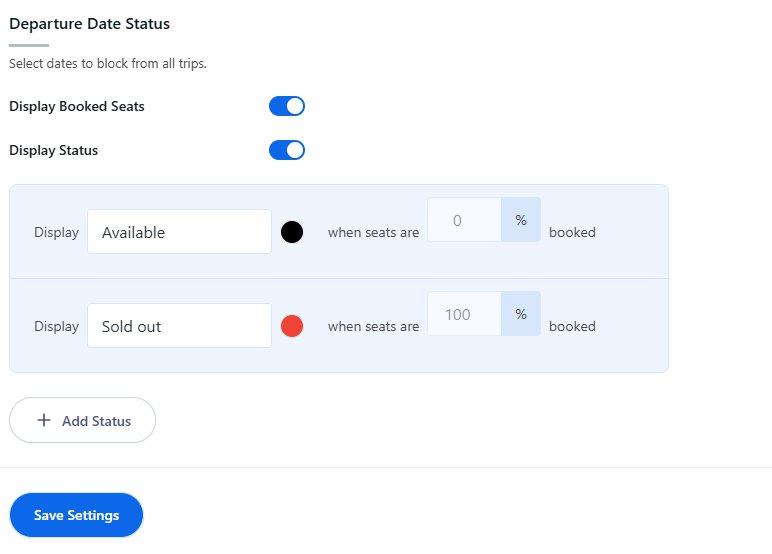
- Display Booked Seats: Shows how many seats are already booked.
- Display Status: Shows availability labels.
- Available: Set the label and color for when seats are available (for example green or black at 0% booked). This is a predefined label, and the percent value cannot be changed.
- Sold Out: Set the label and color for when all seats are filled (100% booked). This is a predefined label, and the percent value cannot be changed.
- Add Status: Add another status like Limited for when 80% seats are filled. You can also set color, label and percent for this status.
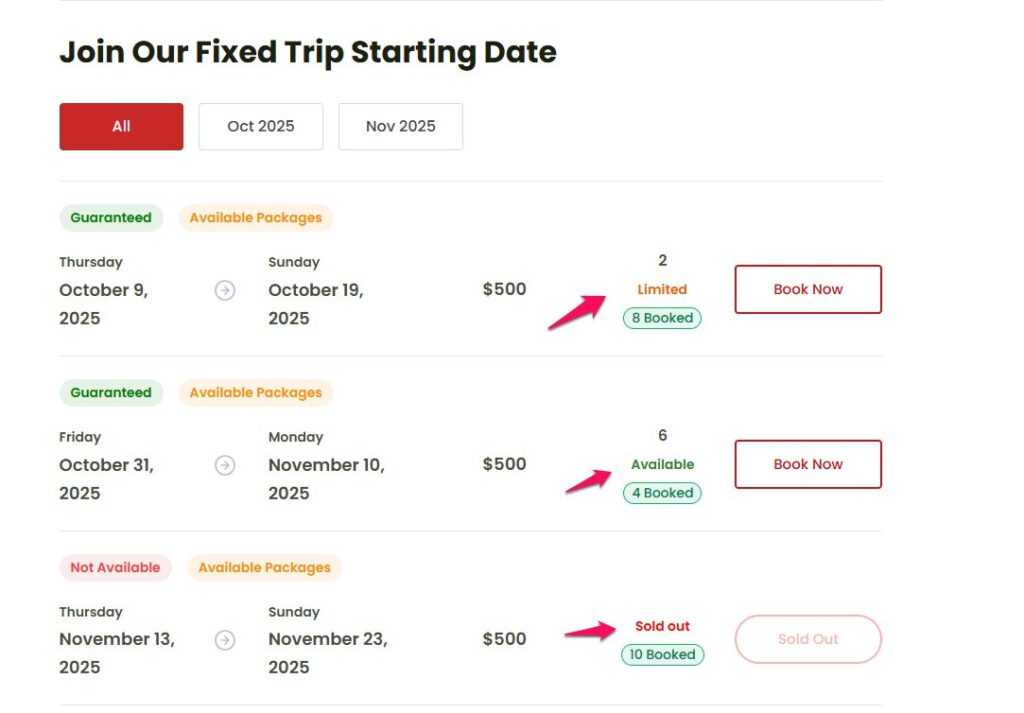
Example:
- 0% booked → Available
- 80% booked → Limited (yellow)
- 100% booked → Sold Out (red)
Add Excluded Dates #
The Excluded Dates feature lets you block specific dates across all trips. This is useful if your business is closed or unavailable on certain days.
How to set Excluded Dates:
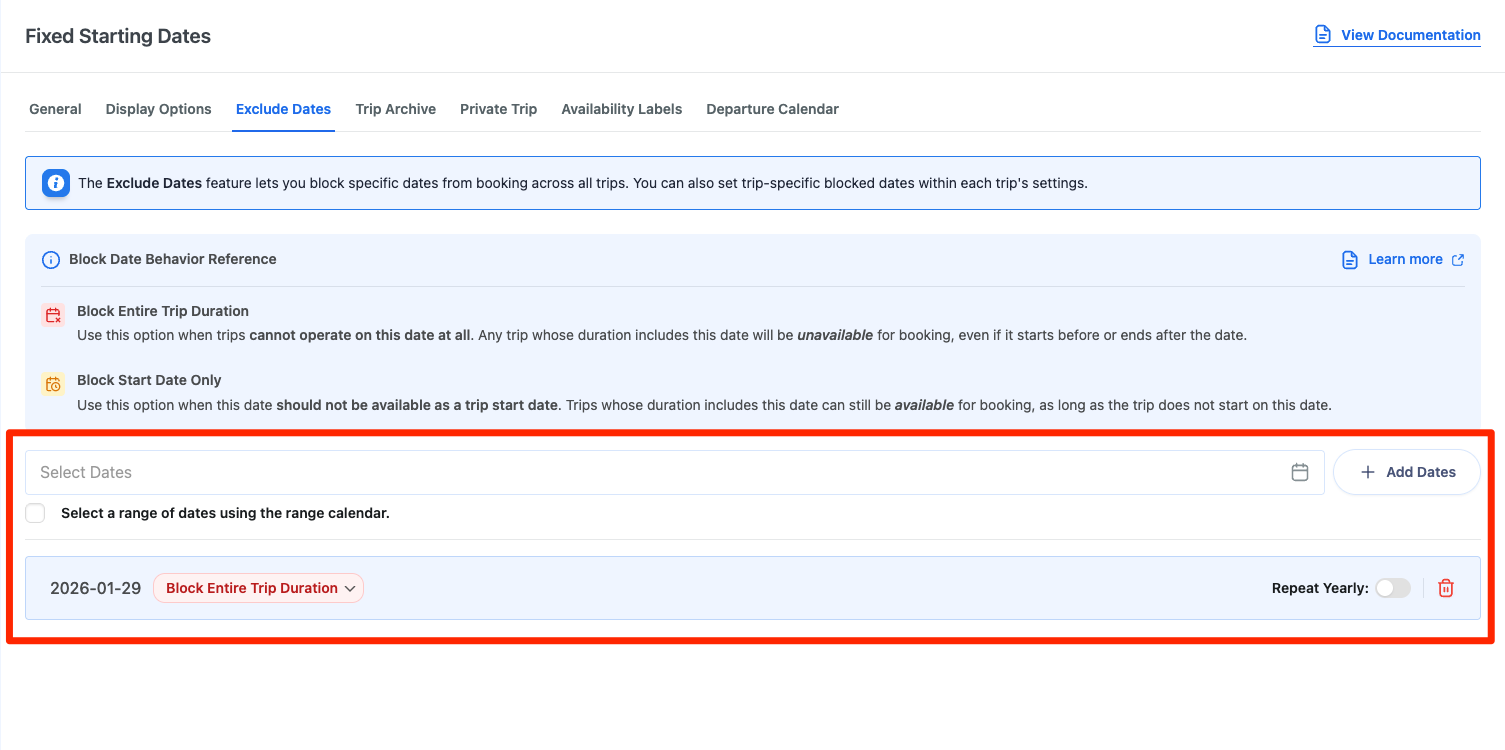
- Open the settings under Fixed Starting Dates.
- Go to the Exclude Dates tab.
- In Select Dates, pick one or more dates, or check Select a range of dates using the range calendar to block a date range at once.
- Click Add Dates.
- Choose a Block Behavior for the date:
- Block Entire Trip Duration – Trips that include this date anywhere in their duration cannot be booked.
- Block Start Date Only – Trips cannot start on this date, but trips already in progress on this date can still be booked.
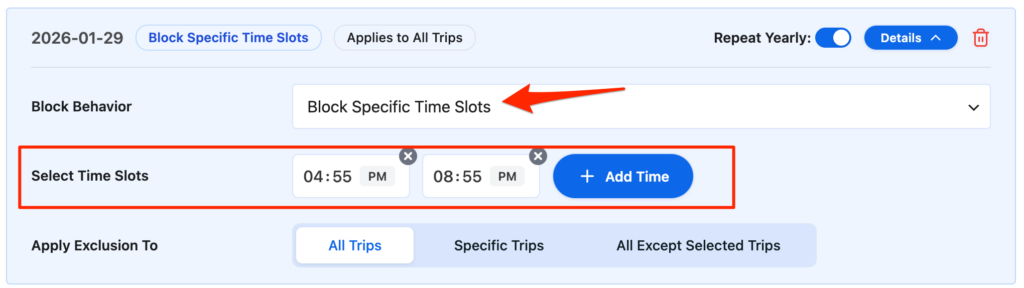
- Block Specific Time Slots – Blocks only the start times you choose on this date. Customers can still book any remaining time slots. This works best for high-frequency tours where you want to stop overbooking on one slot without shutting down the whole day.
- If you picked Block Specific Time Slots, add the start times to block under Select Time Slots. Click Add Time to block more than one slot on the same date.
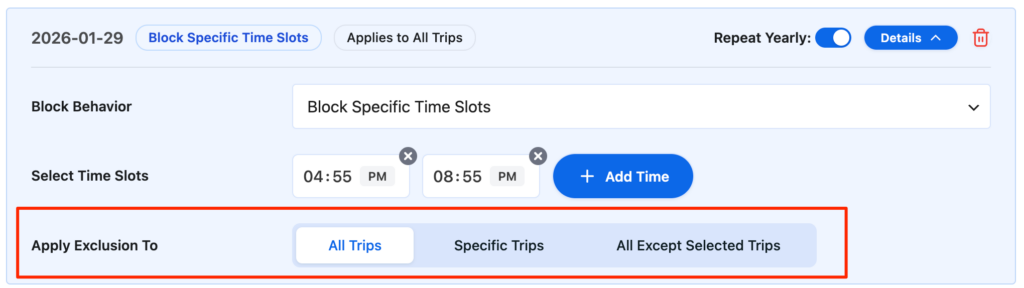
- Under Apply Exclusion To, choose who the exclusion covers:
- All Trips – blocks the date for every trip on your site.
- Specific Trips – blocks the date only for the trips you choose.
- All Except Selected Trips – blocks the date for every trip except the ones you choose.
- If you choose Specific Trips or All Except Selected Trips, search for and select the trips in Trips to Exclude. Start typing a trip name to find it in the dropdown.
Tip: Use All Except Selected Trips when most of your trips should stay closed on a date but a few need to stay bookable, like a private charter that still runs on a public holiday. - Optionally, enable Repeat Yearly to block the same date every year.
- Click Details on any saved entry to review or change its settings later, and use the delete icon to remove an entry.
- Click Save Settings.
Examples of using Excluded Dates:
- Blocking public holidays when your office is closed (Block Entire Trip Duration)
- Preventing trips from starting on certain peak days while allowing ongoing trips (Block Start Date Only)
- Excluding peak days when guides are unavailable
- Blocking a single overbooked departure time while keeping other time slots open on the same day (Block Specific Time Slots)
- Marking company retreat days where no trips should be booked
Trip Archive #
These settings control how departure dates appear on trip cards when travellers browse your archive pages.
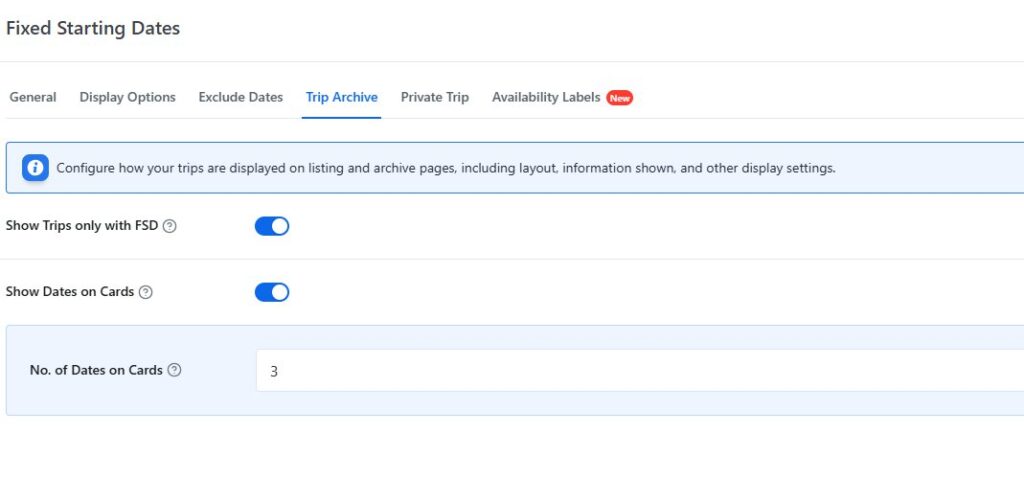
Show trips with fixed starting dates: Enable this so only trips with set dates appear on trip archive pages.
Show Dates on Cards: This option lets you manage whether departure dates are displayed directly on trip cards. If you turn this off, the date section will not appear on the trip cards of the archive page.
No. of Dates on Cards: This setting decides how many upcoming departure dates should be shown on each trip card. For example, if you set this to 3, travellers will see the next three departure dates listed under each trip.
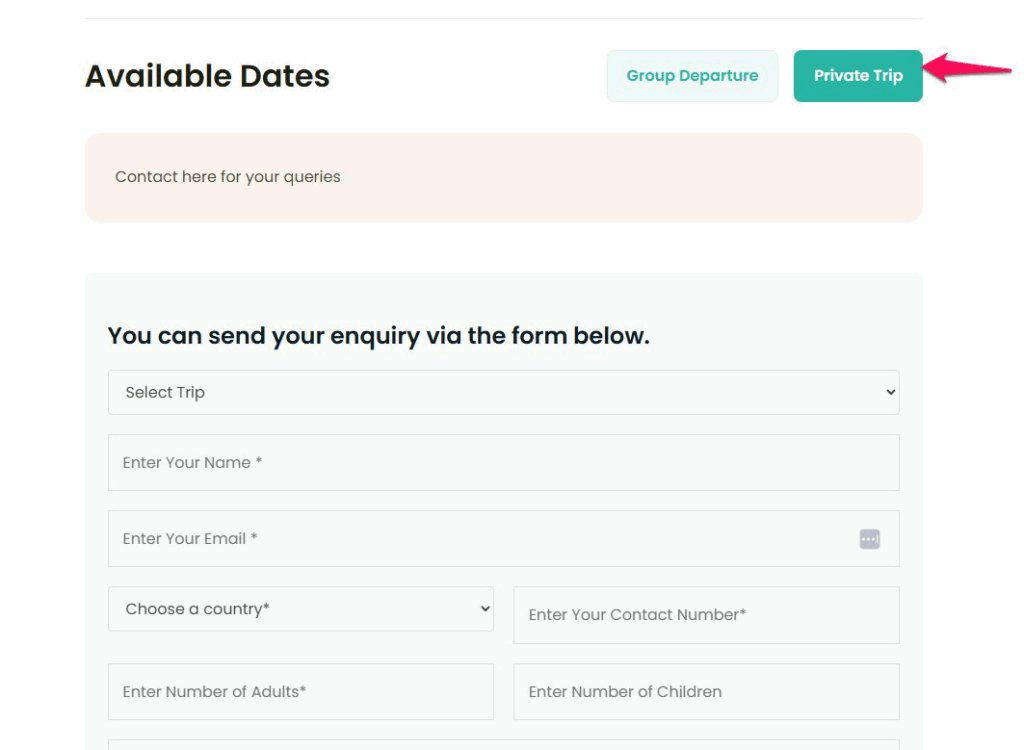
Private Trips #
The Private Trip option is useful when you want travellers to have a way to contact you for available dates, booking status, general enquiries, or to request a private trip on their preferred dates.
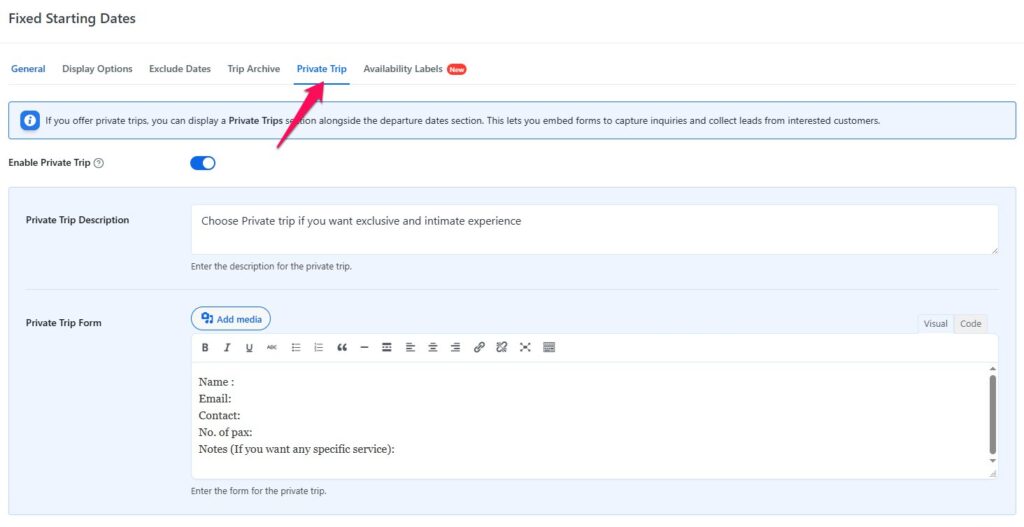
Enable Private Trip: Enable the toggle to display the private trips.
Private Trip Description: Here you can add a short description or instructions for the traveller.
Private Trip Form: This field allows you to add a form shortcode (from plugins like Enquiry Form Shortcode or any other form). The form will appear alongside the departure dates section, allowing travellers to ask questions or request a quote.
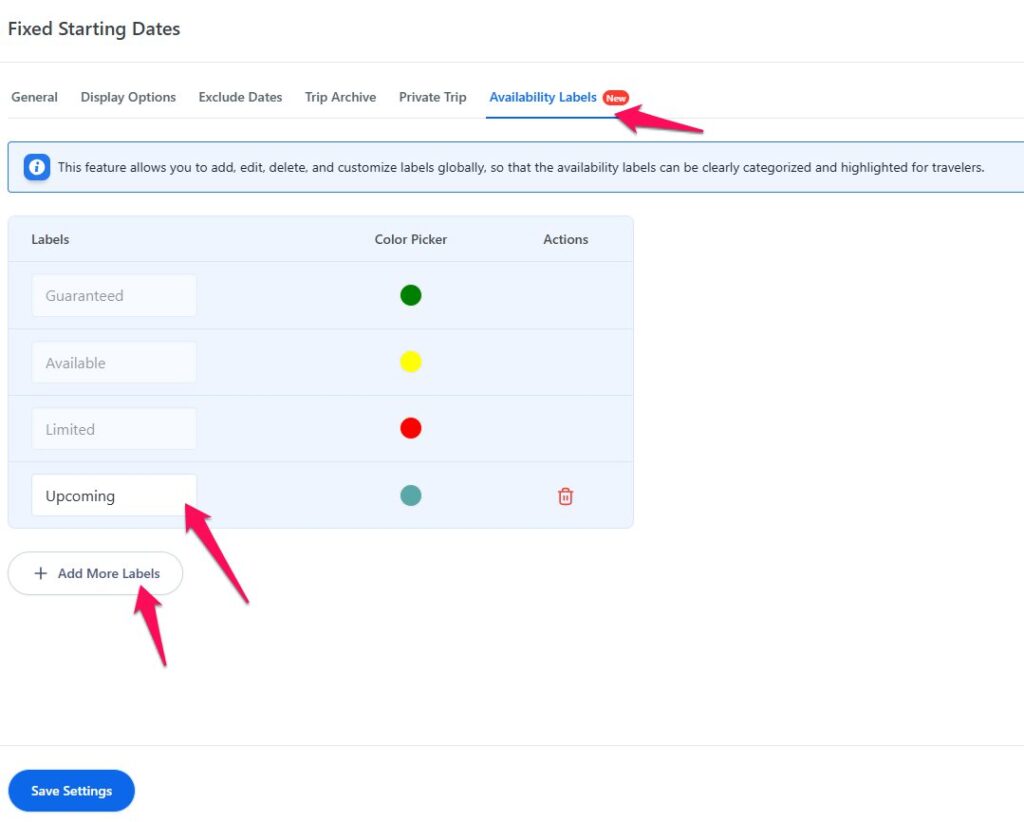
Availability Labels #
Labels: This feature allows you to create and manage custom availability labels that can be assigned to your trips. By default, the plugin provides three predefined labels: Guaranteed, Available, and Limited, which you can use right away. However, if you want to include additional labels to better fit your business needs, you can easily do so by clicking the Add More Labels button.
Color Picker: Each label can be assigned a unique color, making it easier for travelers to identify trip availability at a glance.
Actions: You can also remove any custom labels you no longer need to keep your list organized and relevant. When a label is deleted, it will also be removed from any trips it was assigned to. In the backend, the “Choose Label” option will automatically be selected for those trips.
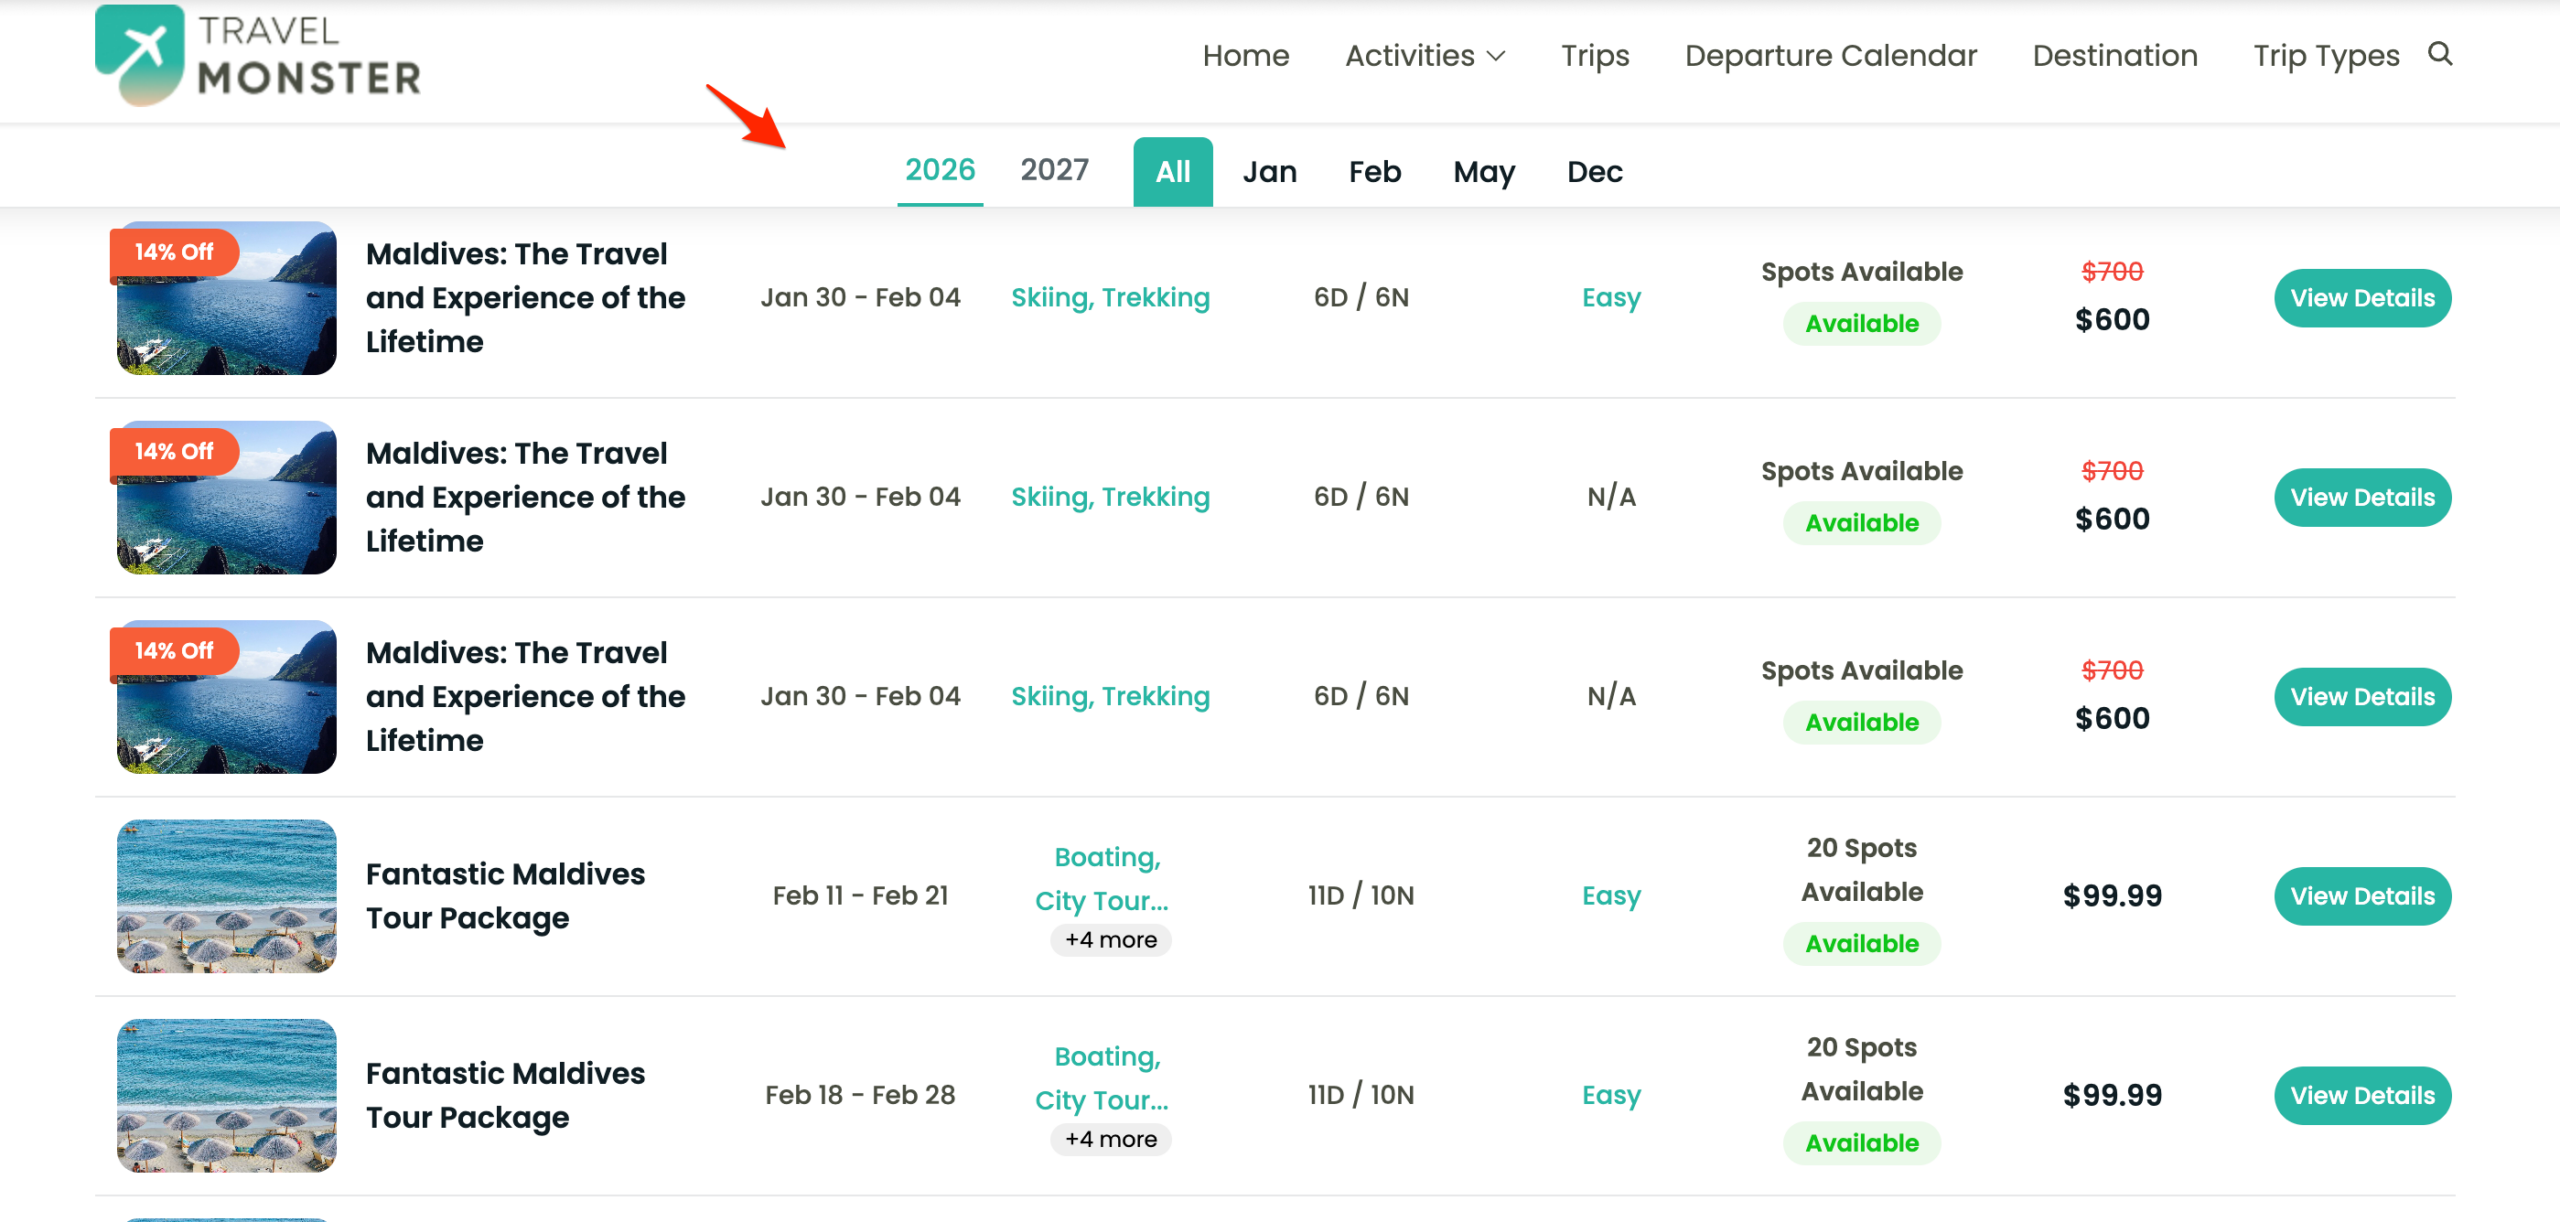
Trip Departure Calendar #
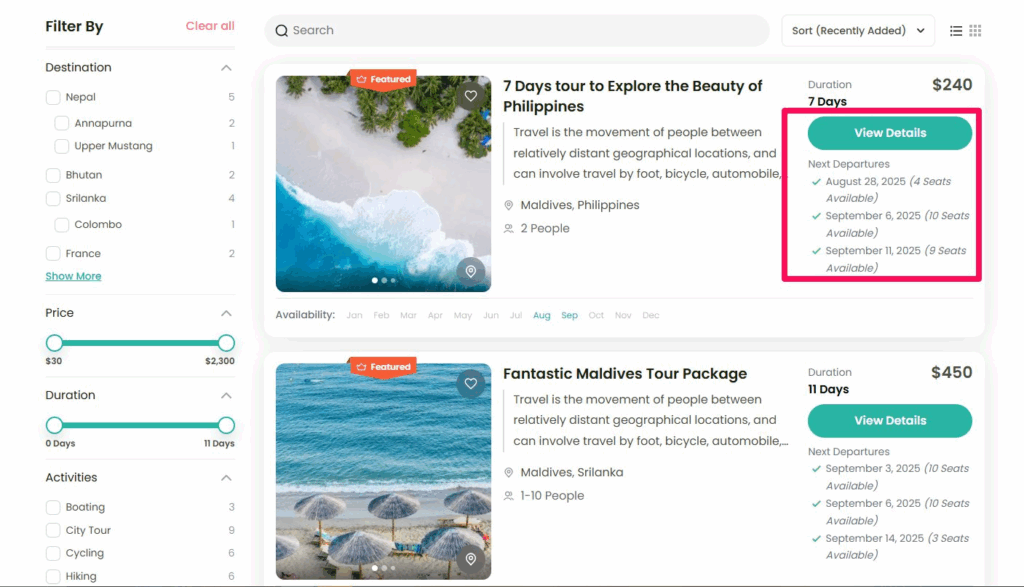
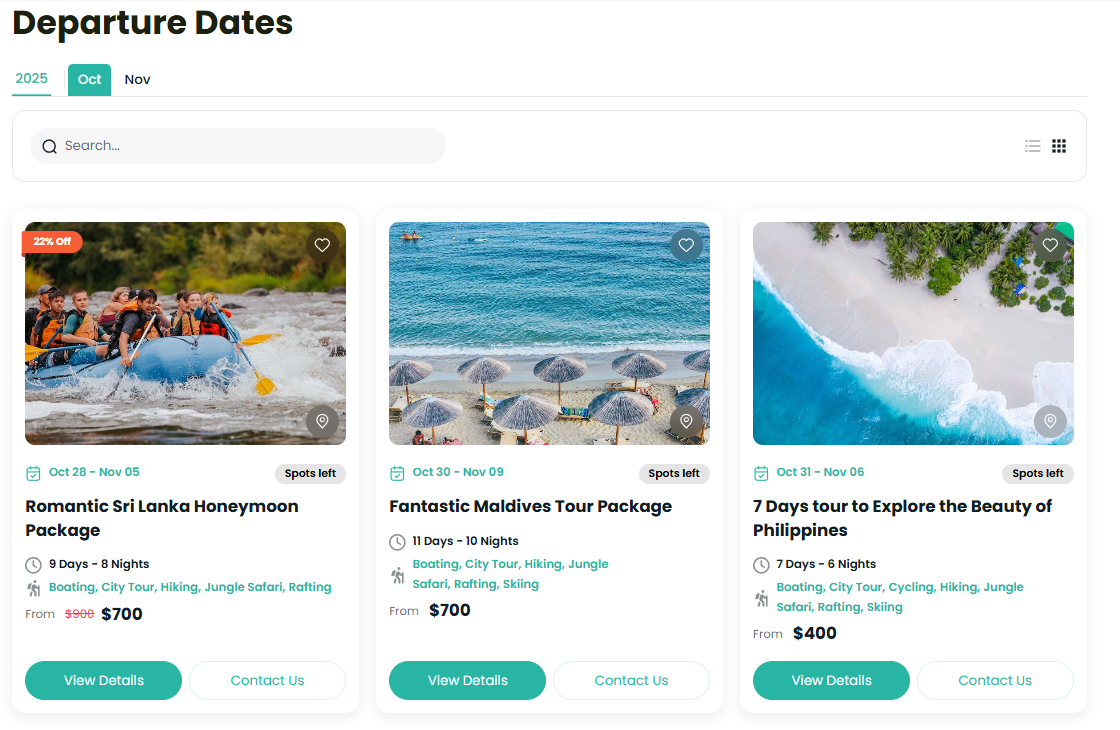
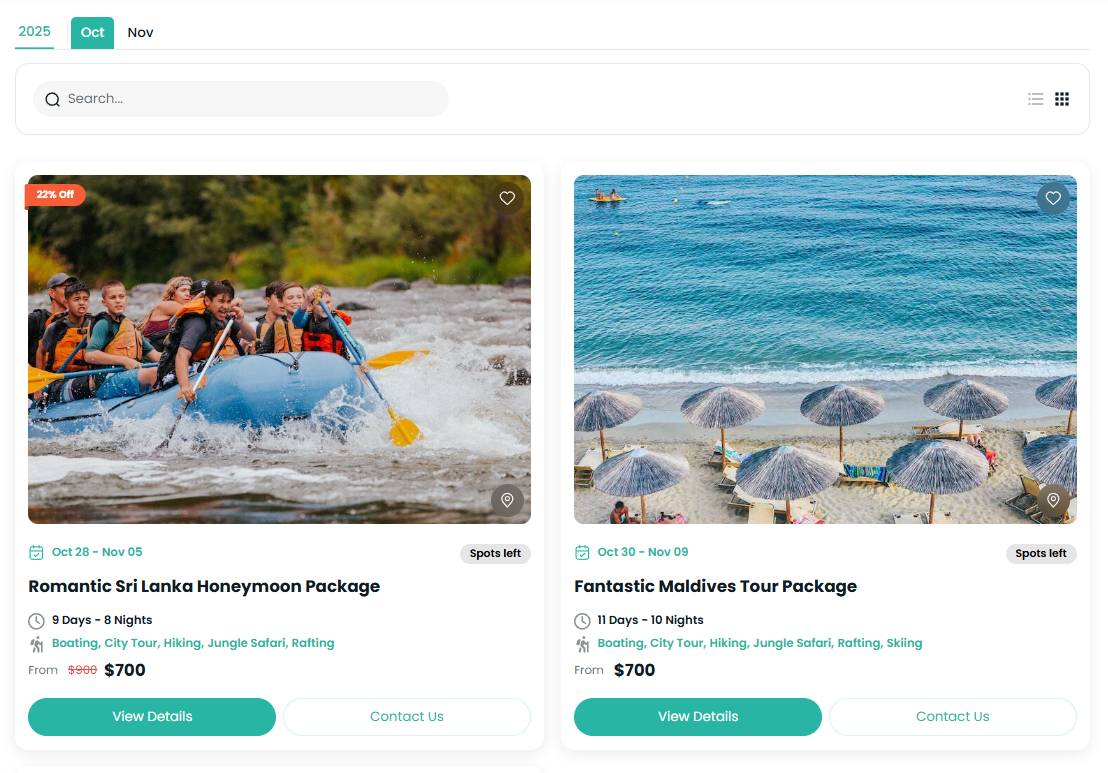
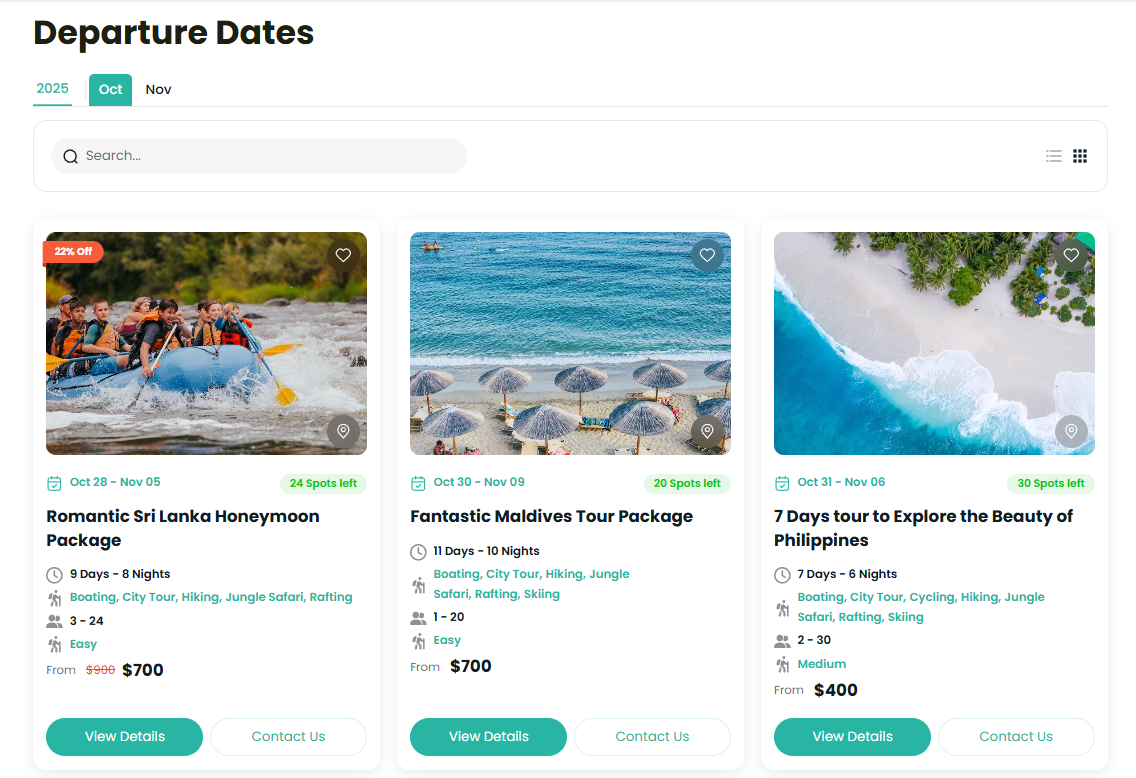
The Trip Departure Calendar displays all upcoming trip departure dates in an organized layout, making it easy for travelers to see available trips at a glance and book faster. Tour operators can highlight and embed departures directly on their website for a better user experience
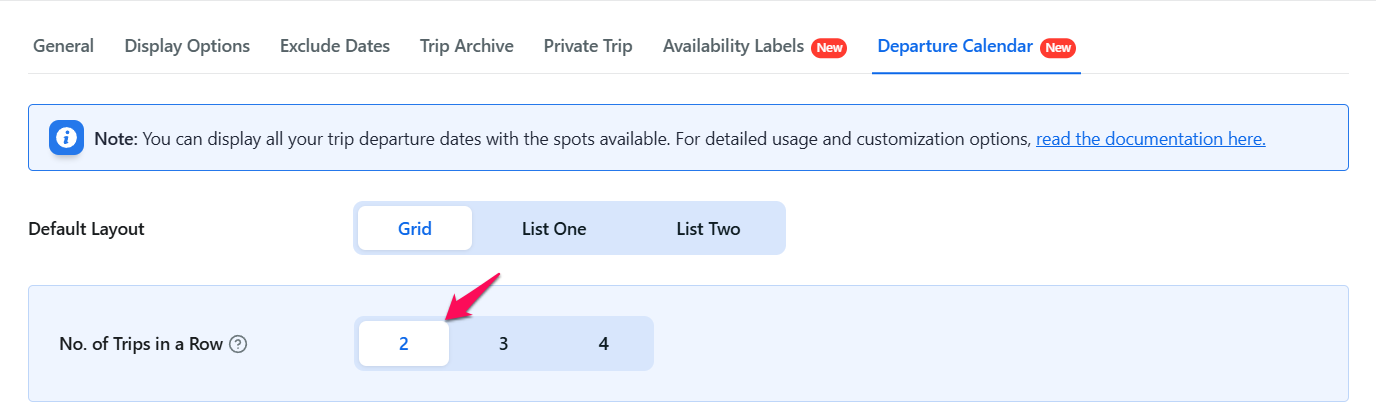
Departure Calendar Settings #
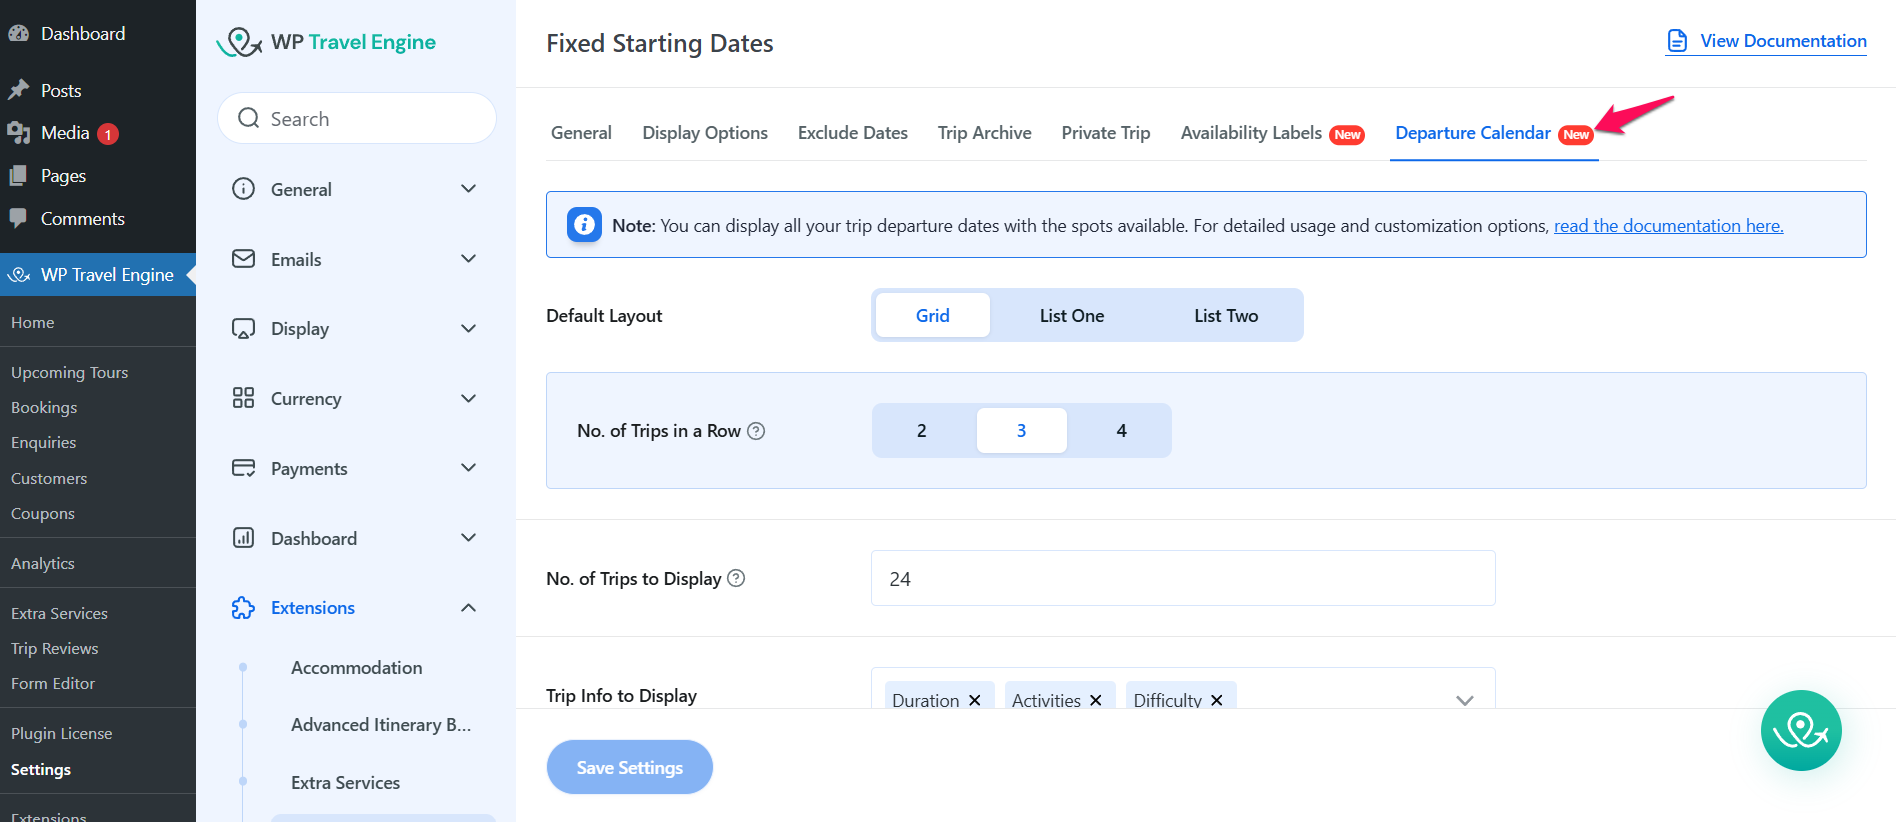
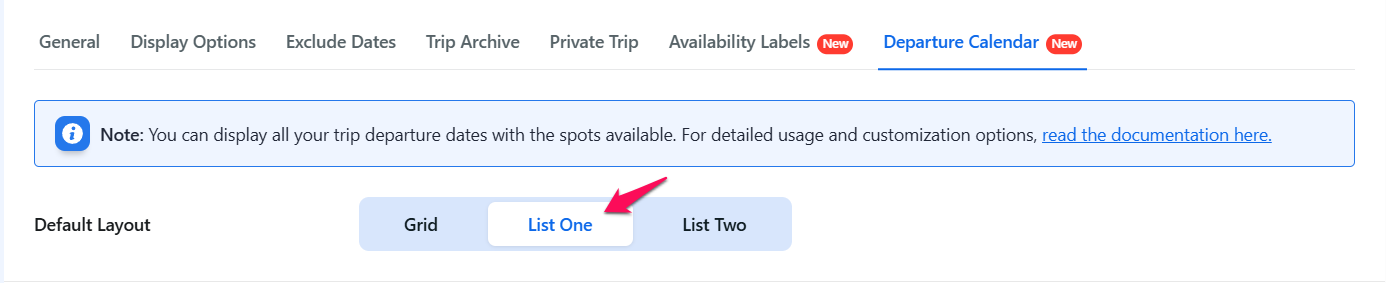
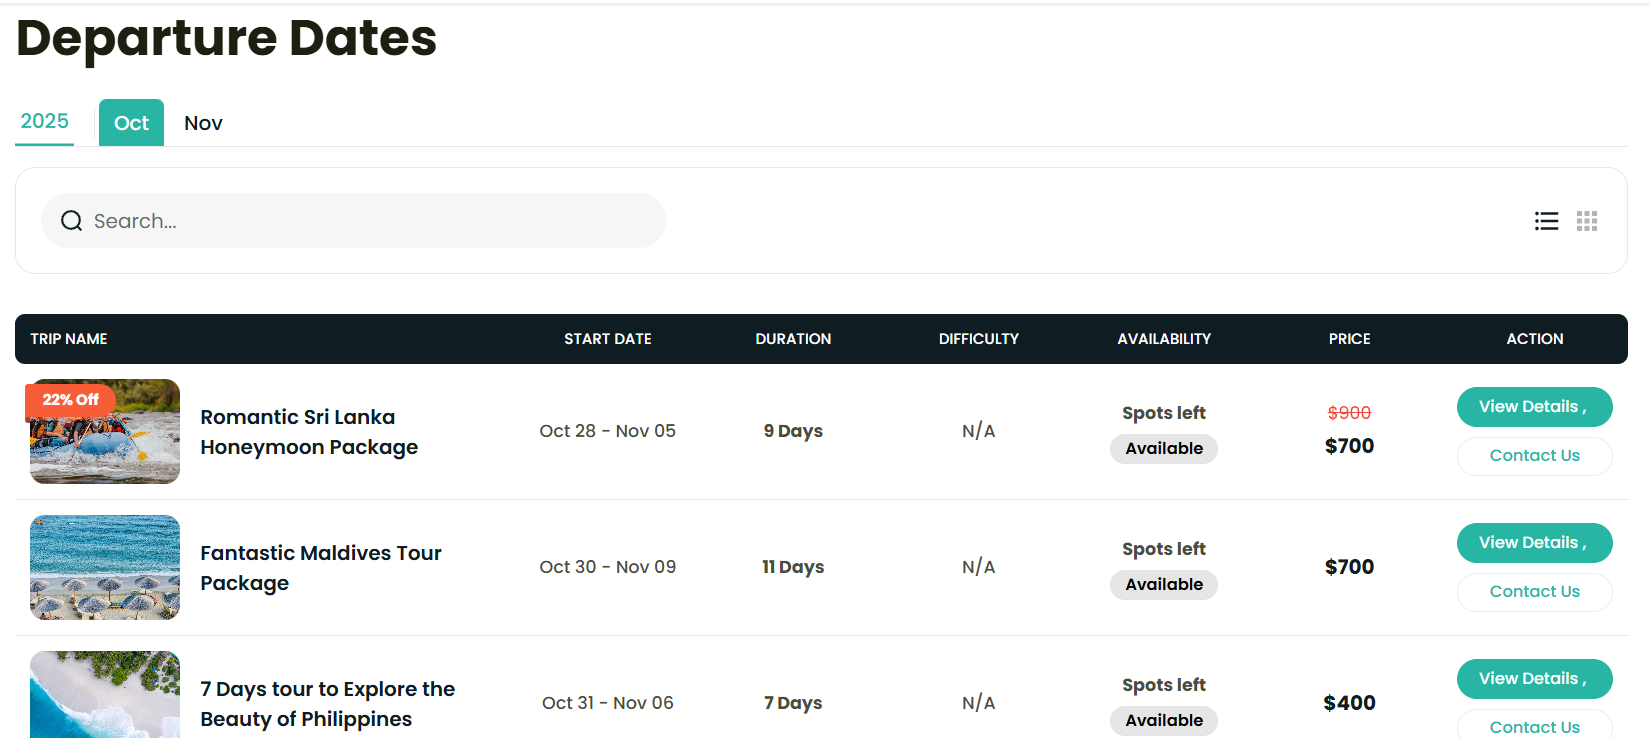
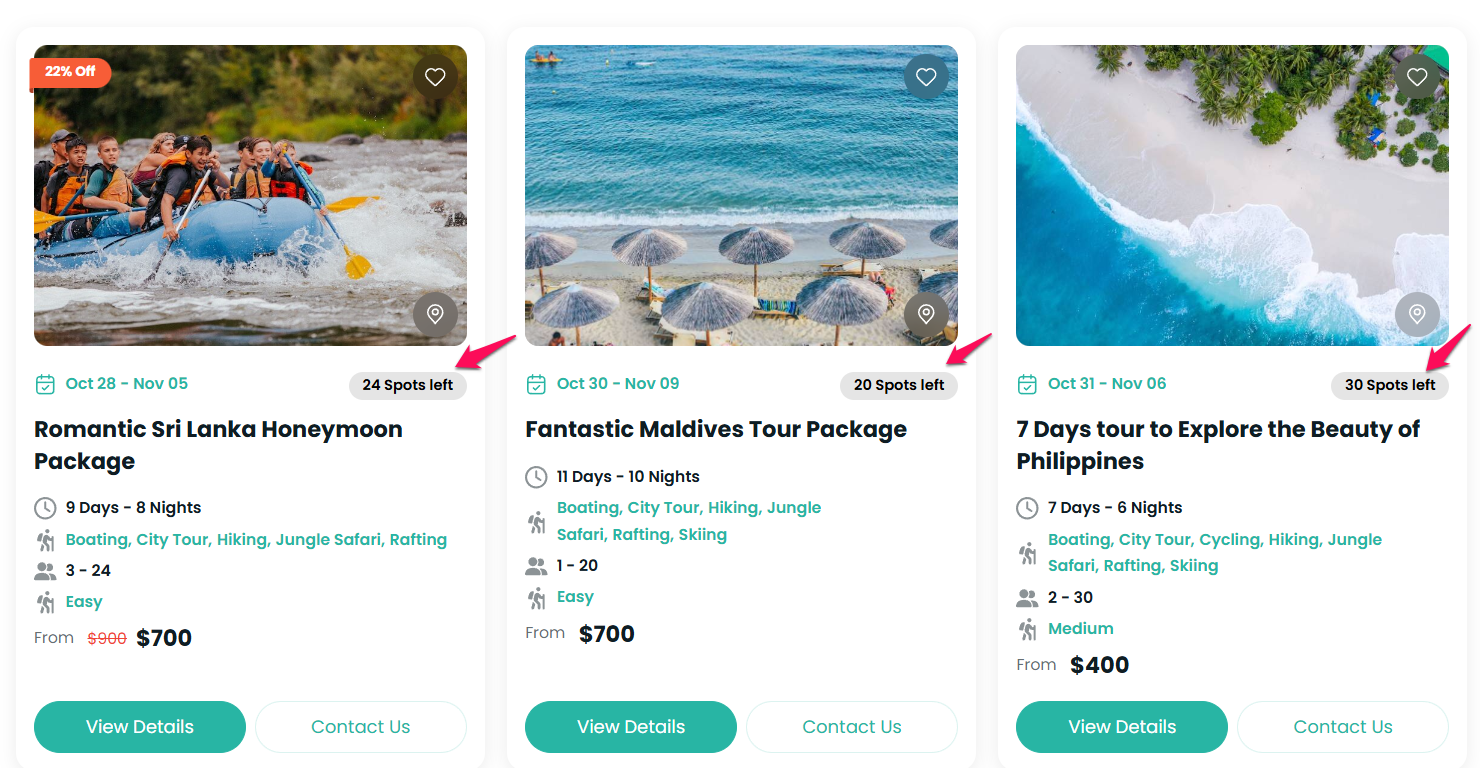
Default Layout: Choose between a Grid layout, which displays trips in compact cards, or a List layout, which shows trips in a single-column stacked format. There are two types of List layouts available to choose from. The Grid layout is ideal for showcasing multiple trips at a glance, while the List layout provides a more detailed vertical view.
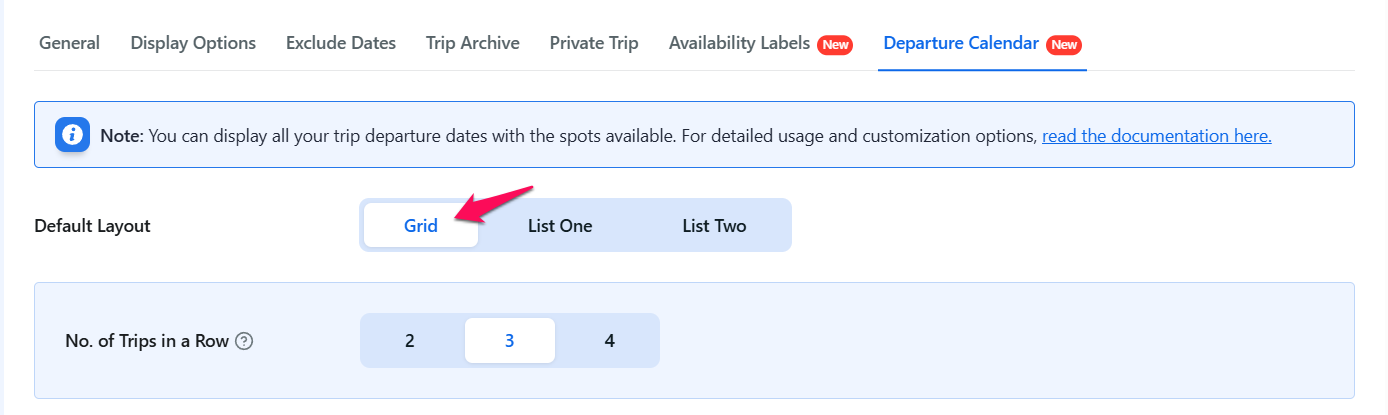

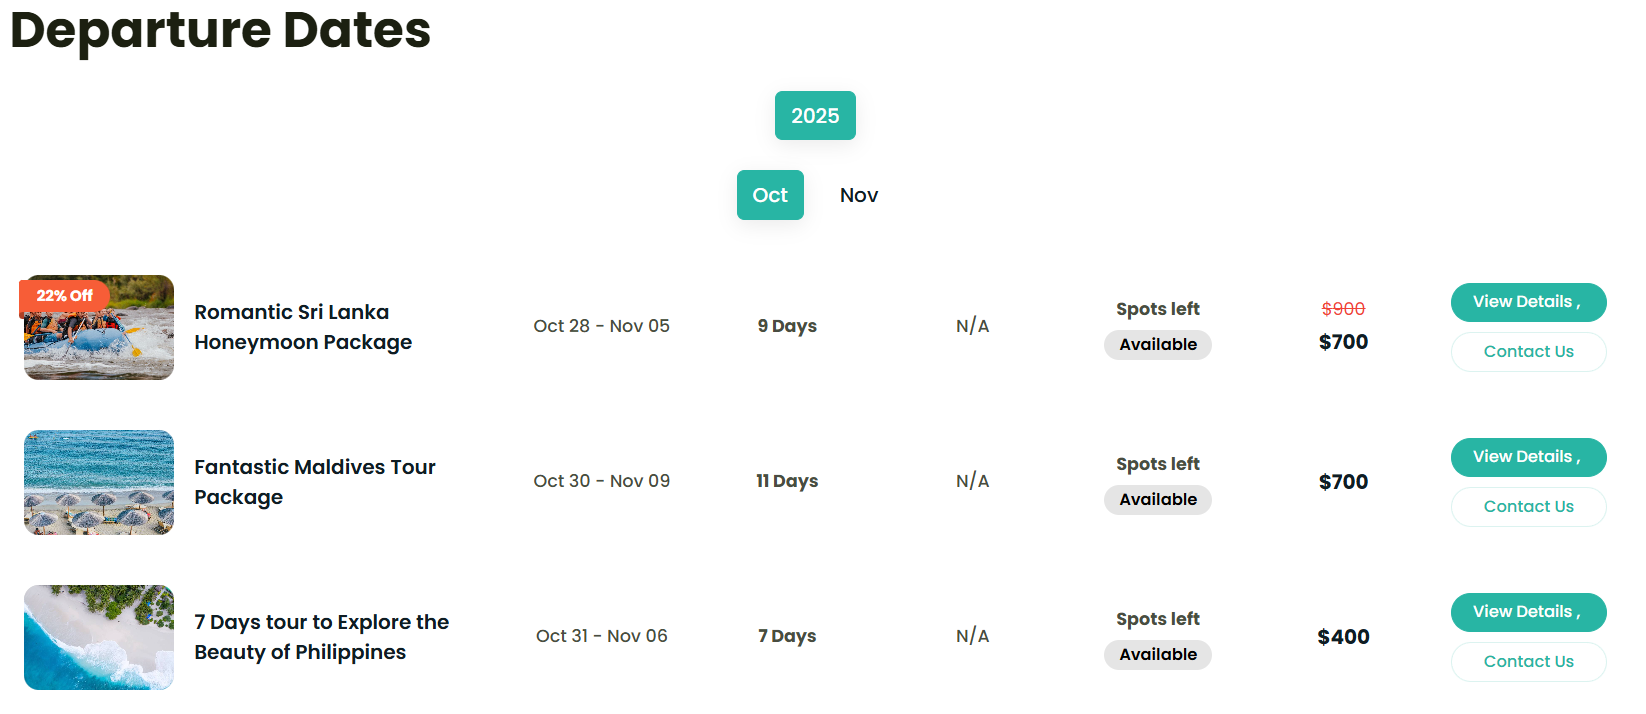
Number of Trips per Row (Grid Only): When using the Grid layout, you can select 2, 3, or 4 trips per row. On tablet devices, the cards automatically adjust to two per row, and on mobile devices, they stack into a single column for optimal viewing.
Number of Trips to Display: Enter any number between 3 and 48 to control how many trips appear initially in the calendar. Additional trips will load as visitors scroll down the page (infinite scroll). For the neatest presentation, it is recommended to choose a number that is a multiple of the trips-per-row setting.

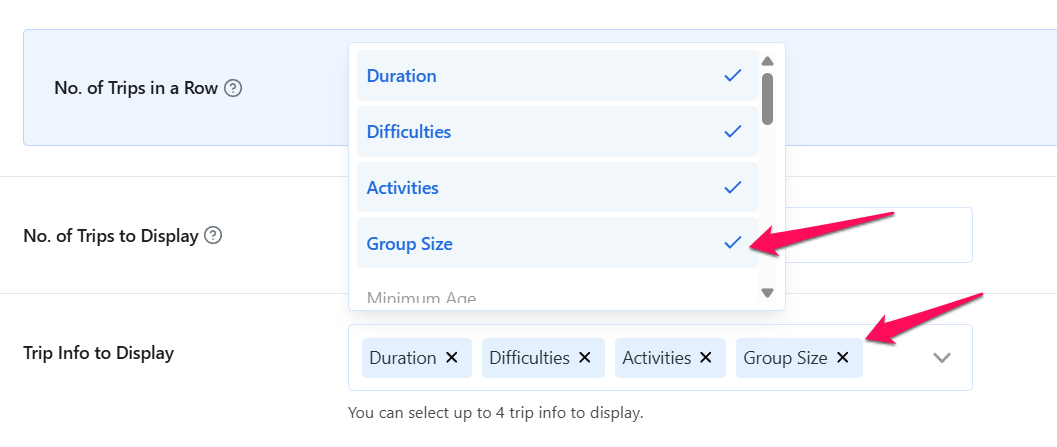
Trip Info to Display: This setting allows you to choose which trip details appear under the trip title, such as Duration, Difficulty, and Activities. A maximum of four trip facts can be displayed to maintain a clean, readable layout.

Show Available Seats: Enabling this option shows badges for seat availability, such as “X Spots left” or “Sold Out.” The badge reflects the total availability across all packages, while the front-end displays the Primary Package as the main reference.

Show Only Booked Trips: Enabling this option will display only trips that have at least one confirmed booking, helping users focus on trips that are currently active and available.

Show Only Available Trips: When enabled, trips that have reached full capacity are hidden from the calendar, providing a cleaner user experience by removing unavailable options.

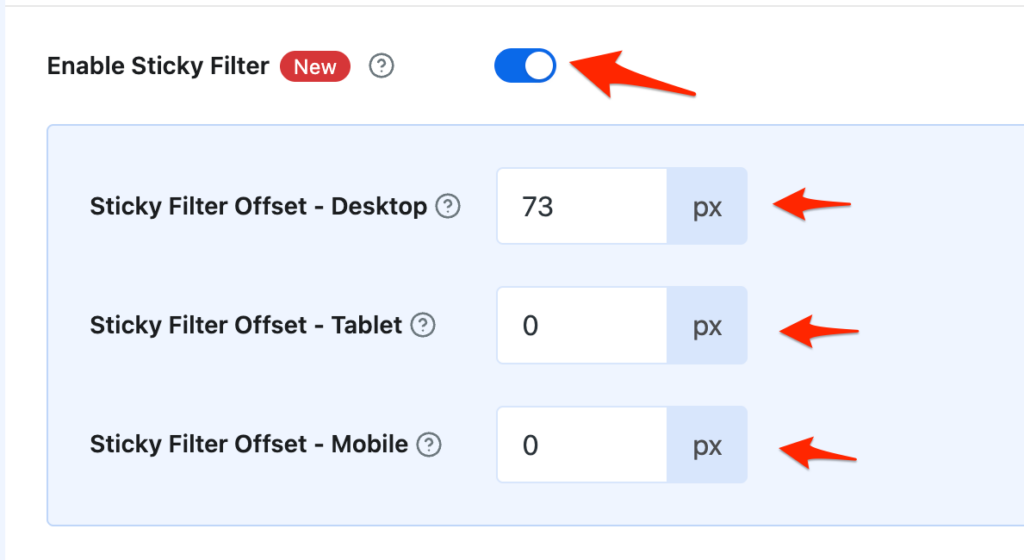
Enable Sticky Filter: When enabled, the departure calendar filter bar stays fixed at the top of the screen while users scroll through the trip list. This makes it easier for visitors to switch between years or months without scrolling back to the top.
You can control the spacing between the sticky filter and the top of the screen using device-specific offsets:
- Sticky Filter Offset – Desktop: Set the top spacing (in pixels) for desktop screens.
- Sticky Filter Offset – Tablet: Set the top spacing (in pixels) for tablet devices.
- Sticky Filter Offset – Mobile: Set the top spacing (in pixels) for mobile devices.
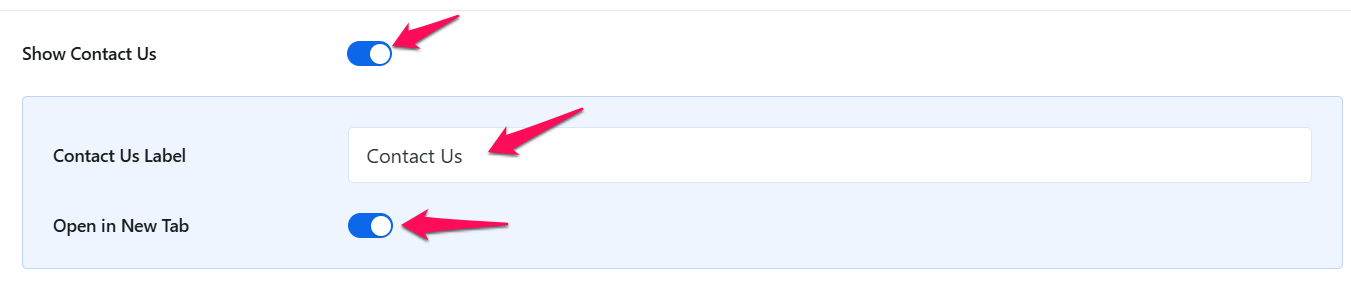
Show Contact Button: Enabling this option adds a “Contact Us” button to each trip card or row. You can customize the button label and use the toggle to choose whether the link opens in the same browser tab or a new one. If the main toggle is turned off, the contact button will not be displayed

How to use Shortcodes – copy-and-paste ready #
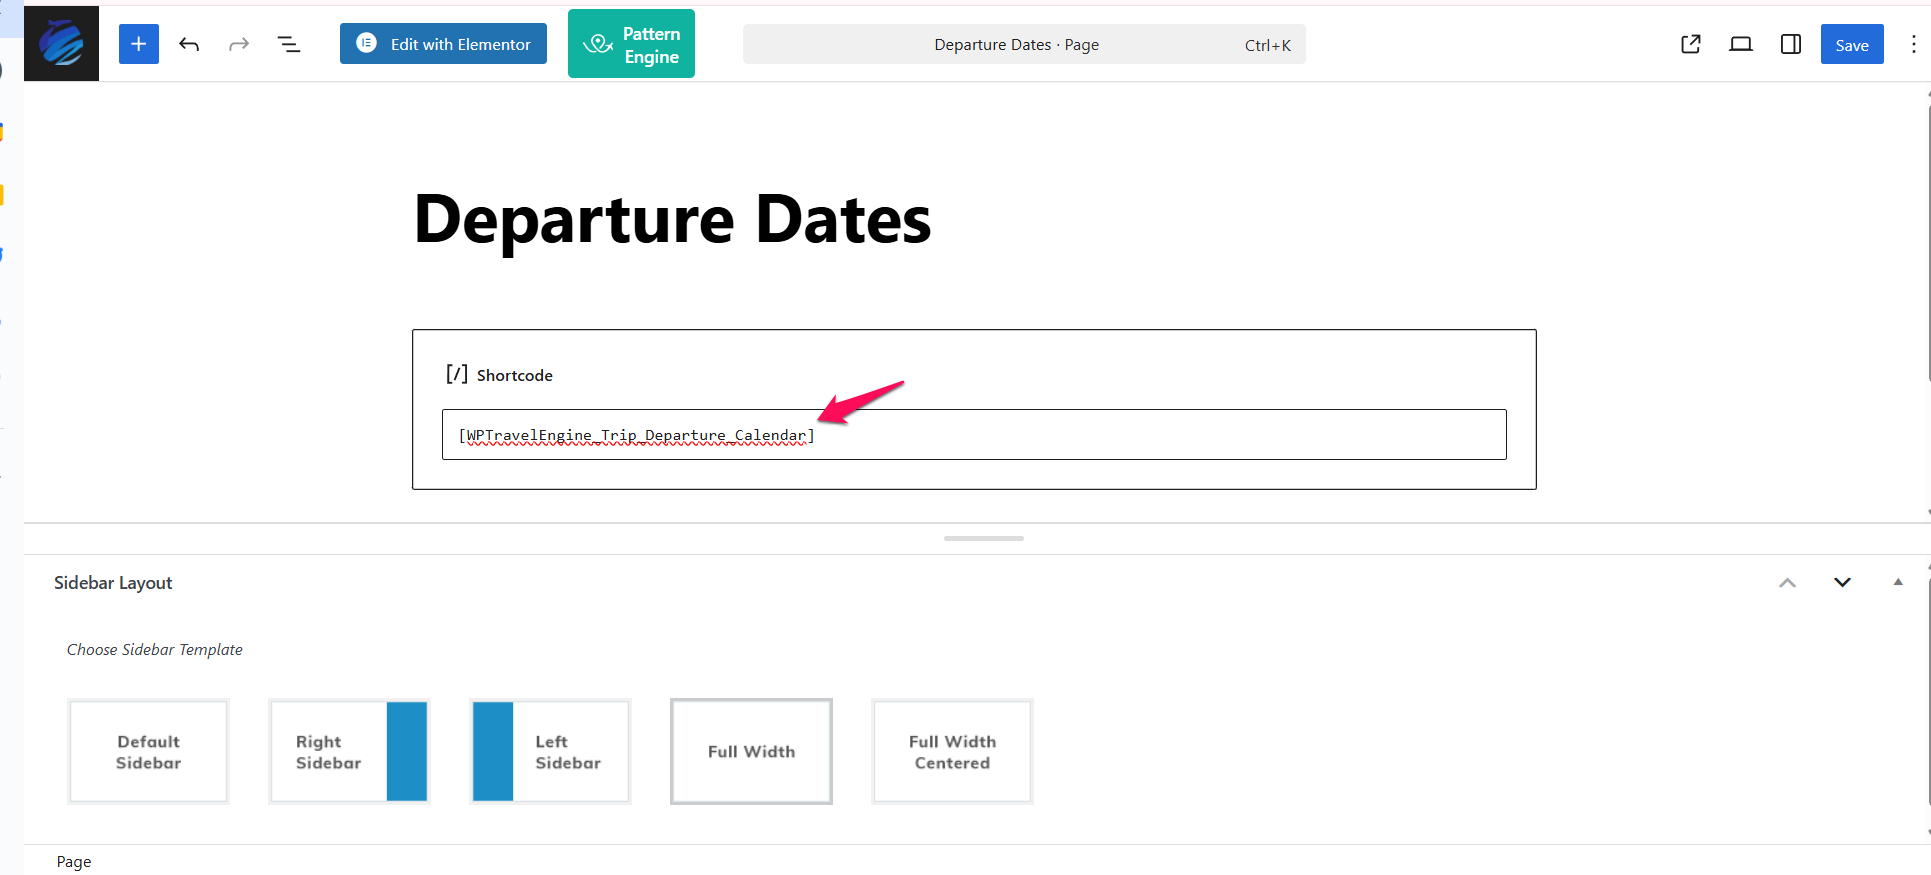
After you save your settings, use the shortcodes to place the departure calendar anywhere on your site.
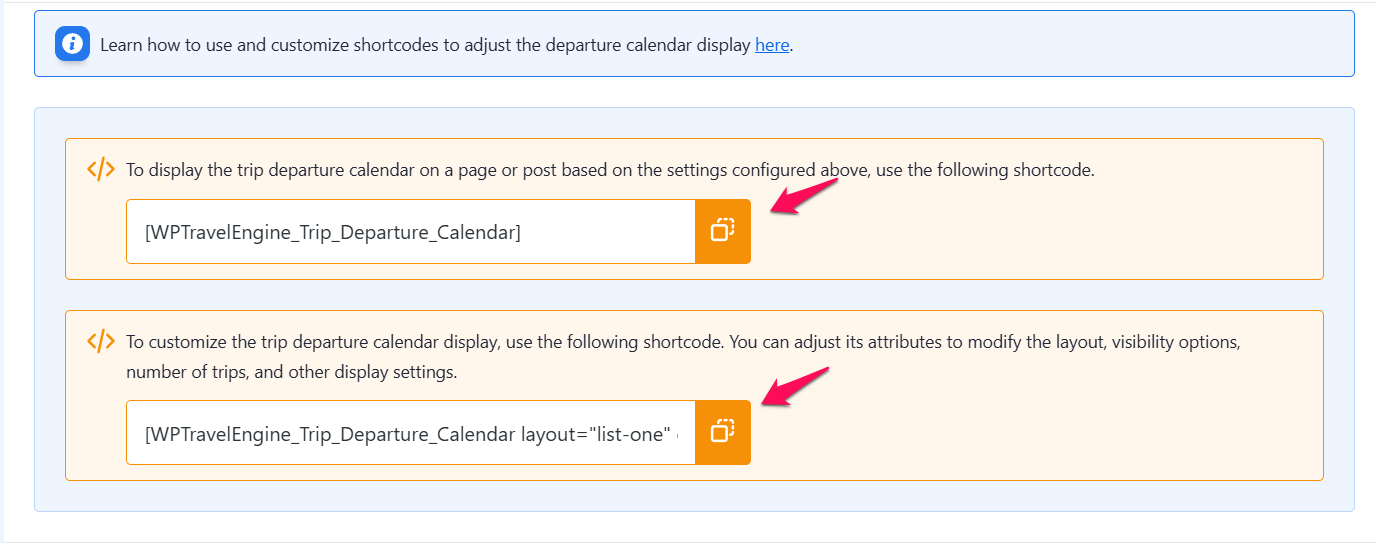
Simple shortcode
The [WPTravelEngine_Trip_Departure_Calendar] shortcode displays the calendar exactly as configured in the global settings. Simply copy and paste it into any page or post, and the calendar will appear with the configured layout and display options.
Advanced shortcode (optional)
You can use an advanced shortcode to override specific settings on a single page. For example:
[WPTravelEngine_Trip_Departure_Calendar layout=”list-one” display_contact_us=”yes” display_available_seats=”yes” display_only_booked_trips=”yes” display_available_trips_only=”yes” no_of_trips=”24″ exclude=”trip_id1,trip_id2” include=”trip_id1,trip_id2” default_year=”20xx” default_month=”all”]
This shortcode allows you to change the layout, show or hide the contact button, display seat availability, limit trips to only those with bookings, hide sold-out trips, set the number of trips, or include/exclude specific trips by ID.
The following attributes can be used to customize the calendar on a single page:
- layout: Write grid, list-one, or list-two to force that look for this page.
- display_contact_us: Accepts “yes” or “no”. Set to “yes” to display the Contact Us button. If set to “no”, the button will not be displayed.
- display_available_seats: Accepts “yes” or “no”. Set to “yes” to show Spots Left or Sold Out badges. If set to “no”, the badge will not be displayed.
- display_only_booked_trips: Accepts “yes” or “no”.Set to “yes” to display only trips that have at least one confirmed booking. If set to “no”, all trips will be displayed regardless of bookings.
- display_available_trips_only: Accepts “yes” or “no”. Set to “yes” to hide fully booked (sold-out) trips. If set to “no”, sold-out trips will also be displayed.
- no_of_trips: Any number between 3 and 48 to control how many trips load initially.
- exclude: Comma-separated trip IDs to leave out, e.g., 6380, 6783.
- include: Comma-separated trip IDs to display exclusively, e.g., 6380, 6783.
- default_year: Set the year that should be selected by default when the calendar loads.
Use20xxto automatically display the current year. You can also enter a specific year, such as2027, to show trips for that year by default. - default_month: Set the month that should be selected by default when the calendar loads.
Useallto display trips from all months, or enter a specific month number (1–12). For example,1for January,6for June, or12for December.
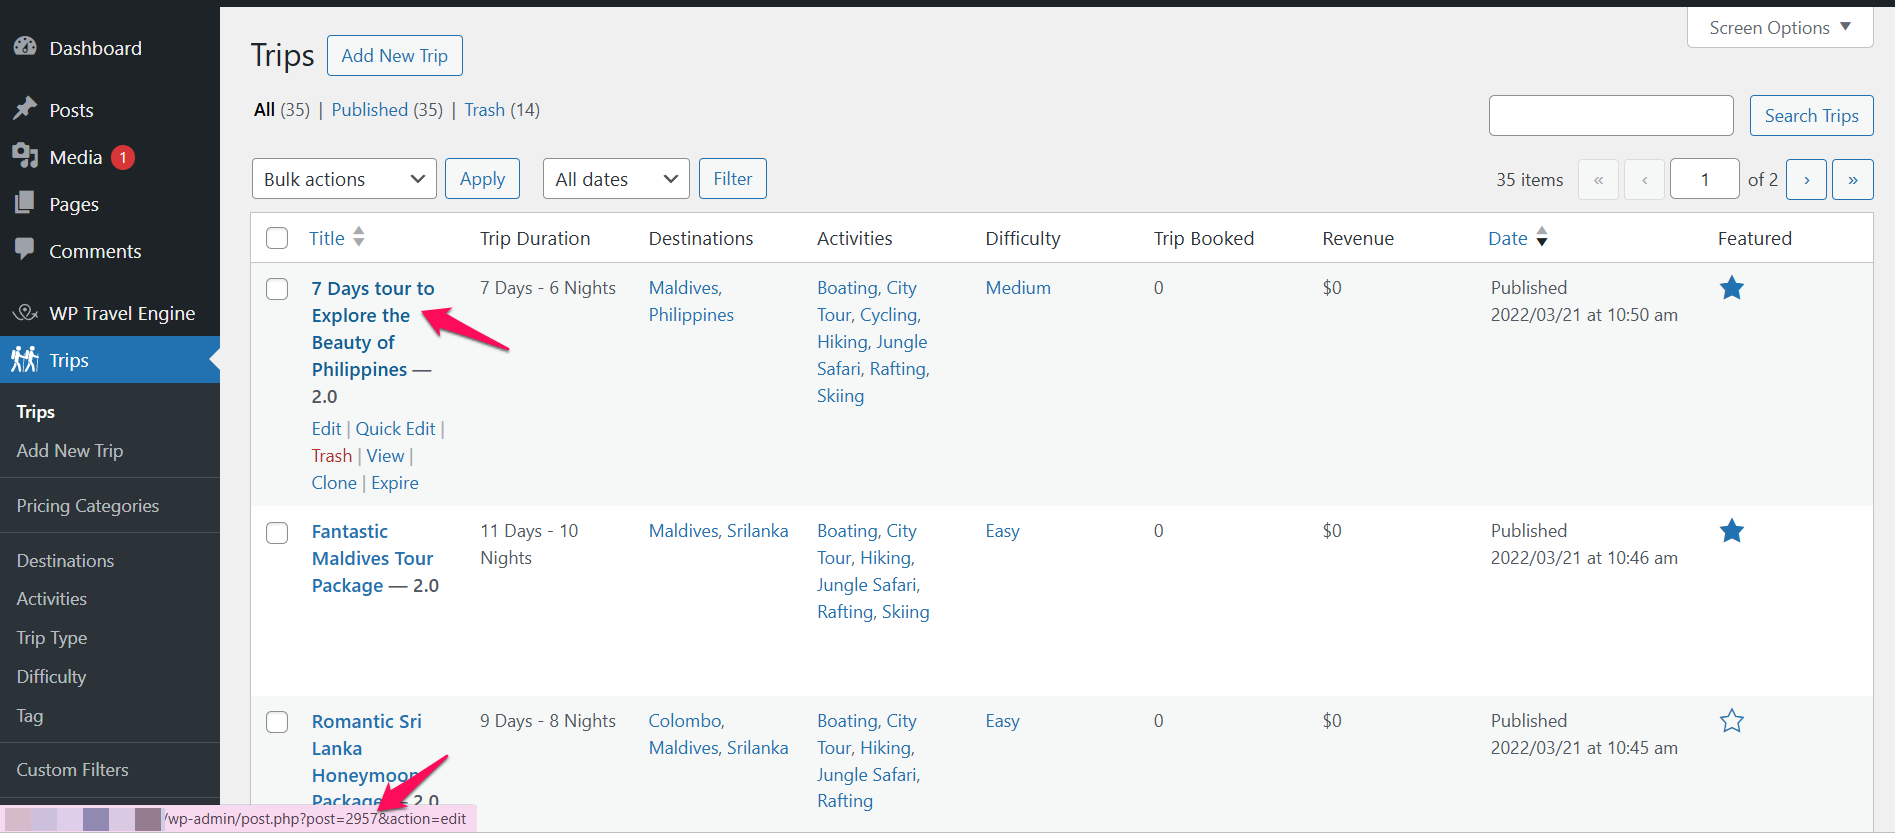
How to find the Trip ID?
- Go to the Trips in your WordPress Dashboard.
- Hover your mouse over the trip you want to target.
- Look at the URL preview in the bottom-left of your browser. The link will contain something like post=1234. 1234 is the trip ID you need.
- Copy and paste or type the trip IDs into the shortcode as a comma-separated list (no spaces).
Handling empty attributes: If you provide an attribute but leave its value empty (for example, no_of_trips=””), the calendar will automatically fall back to the value saved in the global settings. This ensures that you only override the settings you actually want to change.
Saving Settings #
After adjusting all the options, scroll down and click Save Settings. This ensures your changes are applied.
FSD Settings in the Single Trip #
The Trip Fixed Starting Dates (FSD) settings in a single trip allow you to control how dates, expiry rules, and availability are managed for that specific trip. Unlike the global FSD settings, which apply to all trips on your website, these settings are trip-specific.
Assigning Dates to Packages in FSD #
With the Fixed Starting Dates plugin, you can assign specific dates to packages so customers know exactly when a trip is available. Each package (for example, Standard or Premium) can have its own dates, seat capacity, and availability labels.
This feature ensures you can manage trips in detail, whether they run on a single day, across a date range, or on repeating schedules.
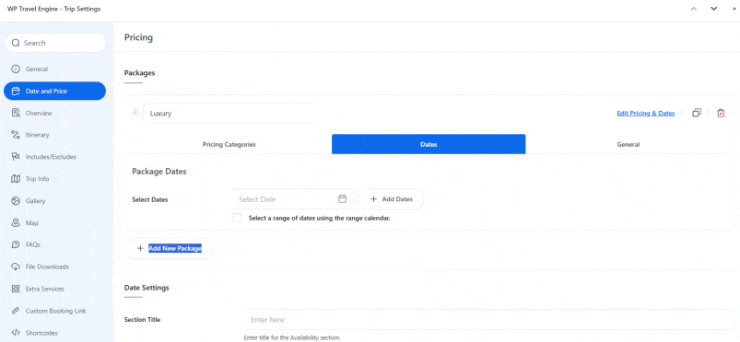
How to Assign Dates to a Package #
- Go to Trips → Edit a Trip → Date and Price → Dates tab.
- Select the package you want to configure.
- Under Package Dates, click Edit Pricing and Dates.
- Click on the Date tab to assign the date.
- Choose a starting date from the calendar.
Selecting a Range of Dates #
- To assign multiple consecutive dates, check the box Select a range of dates using the range calendar.
- Example: If you select 1 August to 7 August, the package will be available on each of those dates.
Adding a conditional Price as per the date. #
You can set different prices for specific dates if needed. For example, you might charge a higher price during peak season and a lower price in the off-season. This gives you flexibility to adjust costs based on demand or seasonal changes. If you don’t set any date-specific prices, the system will automatically use your global pricing. For more details, check the full documentation here.
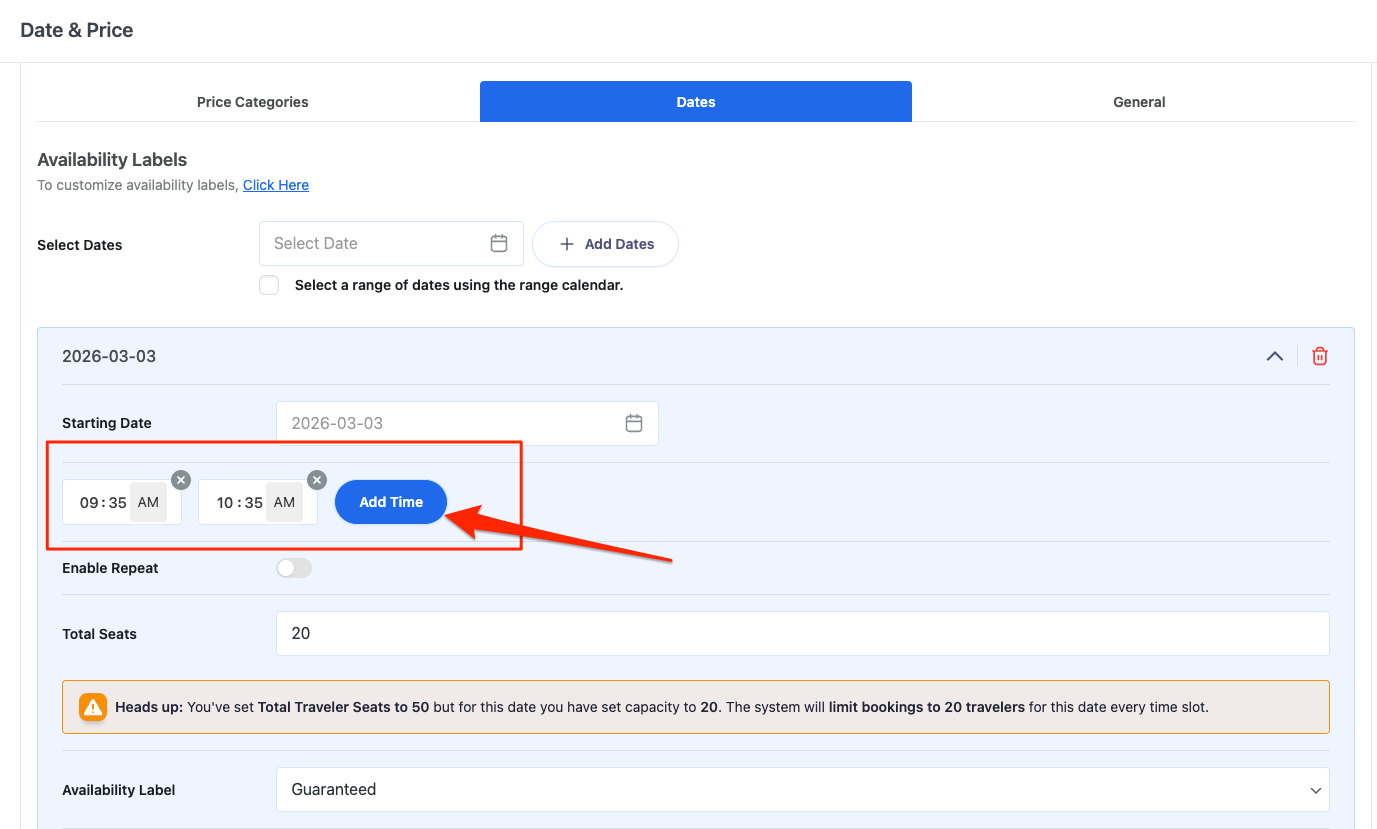
Adding Time Slots for Booking #
- After selecting a date, click Add Time.
- Enter the time slots for when the trip will run.
- Example: You can add 9:00 AM for morning and 3:00 PM for afternoon on the same date.
- Each time slot will share the same seat limit for that date. Please check this documentation on how seat allocation works.
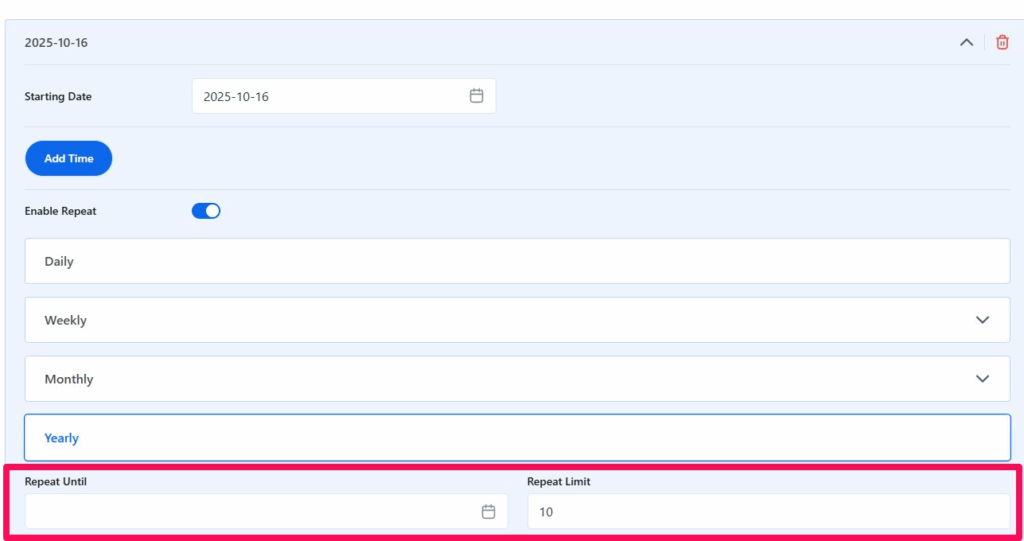
Recurring time #
Instead of adding each date one by one, you can set a trip to repeat automatically. You can choose only one option for a particular date. This saves time when a trip follows a regular schedule.
- Daily: The trip repeats every day starting from the chosen date.
- Weekly: The trip repeats every week on the same weekday. You can also select specific weekdays for the repeat.
- Monthly: The trip repeats once a month, and you can choose which months it should appear in. For example, you might only select January and February.
- Yearly: The trip repeats once a year on the same date.
Example
If you set a trip to repeat weekly starting on 5 August (Monday), it will automatically create departures for every Monday that follows.
Stopping Repeats #
You can stop the repeat schedule in two ways:
- Repeat Until: Select a specific end date. Example: Repeat until 31 December 2025.
- Repeat Limit: Enter the number of times the trip should repeat. Example: 10 times only.
Setting Total Seats #
For each package date or time slot, you can assign a Total Seat.
- Example: If you set 3 seats, only 3 travellers can book that package for that date and time.
- Once the seat limit is reached, no more bookings are allowed.
To understand how seat allocation works across general settings, packages, and time slots, see the Seat Allocation Documentation here.

Availability Label #
You can also set an Availability Label to show the booking status of the package. The predefined labels are listed below:
- Guaranteed: The trip will definitely run.
- Available: Seats are still open.
- Limited: Only a few seats are left.
Date Settings in a Single Trip #
To configure the settings, go to Trips → Edit a Trip → Date and Price → Date Settings.
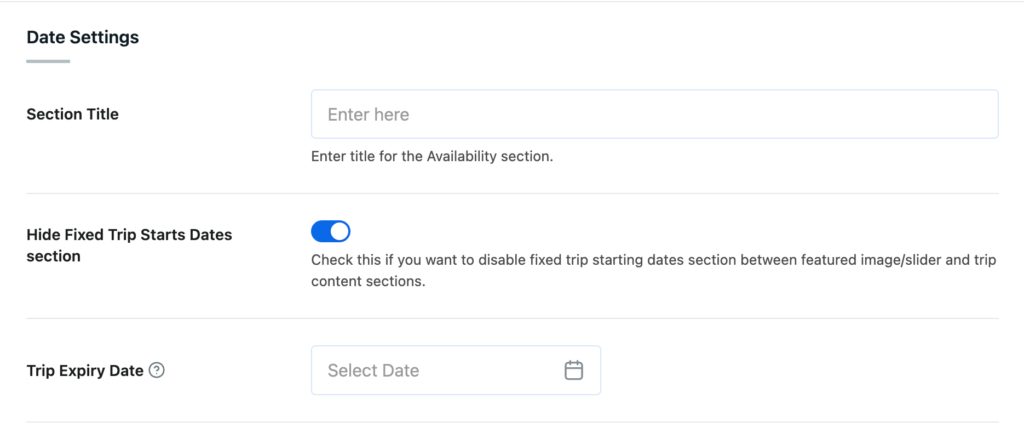
Section Title #
This allows you to enter a custom heading for the availability section on the trip page.
Example:
- If you enter Upcoming Departures, travellers will see this heading above the list of dates.
- If you leave it blank, the default title will be used.
Hide Fixed Trip Starts Dates Section #
Enable this option if you want to hide the fixed departure dates section on a single trip page. Normally, the dates section appears between the featured image or slider and the main trip content. Turning this on will remove that section from view.
Trip Expiry Date #
This setting allows you to choose a date after which the trip cannot be booked. The trip page will still be visible to visitors, but bookings will automatically be disabled once the expiry date is reached.
Example
If you set the expiry date to 31 December 2025, travellers can view the trip details but will not be able to make bookings after that date.
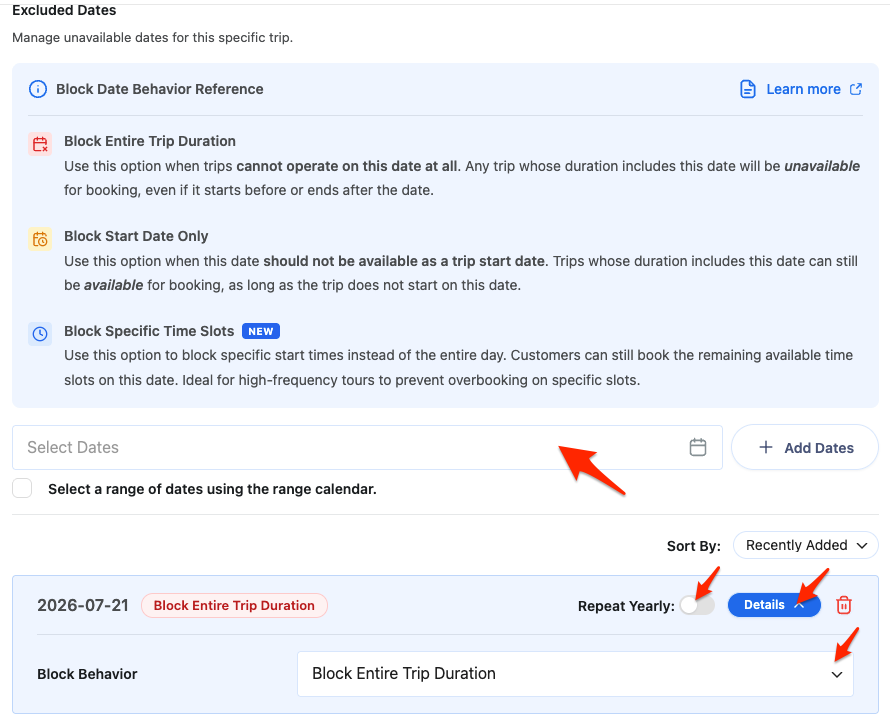
Excluded Dates #
This option lets you block specific dates for this trip only. You can exclude individual dates or select a range of dates from the calendar. You can choose how this date blocks bookings, and you can also set it to repeat every year if needed.
How Excluded Dates work for this trip
When adding an excluded date, choose one of the following block behaviors:
- Block Entire Trip Duration – The trip cannot be booked if its duration includes the excluded date, even if the trip starts before or ends after that date.
- Block Start Date Only – The trip cannot start on the excluded date, but bookings are still allowed if the trip includes the date during its duration.
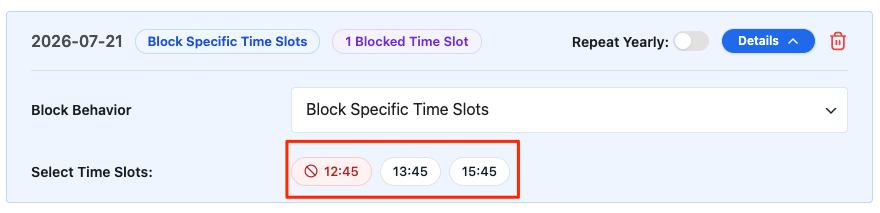
- Block Specific Time Slots – Blocks only the departure times you pick on that date, while the trip’s other time slots stay bookable. Under Select Time Slots, tap the times you want to block; the ones you select show a blocked icon.
Examples
- If a trip runs daily in August but cannot operate on 15 August, exclude that date using Block Entire Trip Duration.
- If a trip should not start on 15 August but can continue through that day, exclude the date using Block Start Date Only.
- If a trip runs three departures a day and one departure on 15 August is fully staffed elsewhere, exclude just that time using Block Specific Time Slots, keeping the other departures open.
Important Note
- There are two types of exclusions:
- Global Exclusions – Set in the global settings and applied to all trips.
- Trip-Specific Exclusions – Set here and applied only to the individual trip you are editing.
- If the same date is excluded in both Global and Trip-Specific settings, the Trip-Specific setting takes priority.
- If the block behavior differs for the same date, the Trip-Specific block behavior overrides the Global one for this trip.
The final unavailable dates for a trip are a combination of both global and trip-specific exclusions.
Shortcode #
The Fixed Starting Dates (FSD) plugin provides shortcodes that let you display departure dates anywhere on your site. You can use these shortcodes in posts, pages or widgets. This gives you flexibility to show upcoming trip dates outside of the main trip pages.
How Shortcodes Work
- You copy and paste the shortcode into a post, page, or widget.
- The shortcode automatically pulls in the trip dates you’ve configured in each trip.
- On the front end, travellers will see:
- The list of available departure dates
- The price for each date
- The number of seats left
As bookings come in, the number of available seats is updated in real time until the trip is sold out.
Shortcode Options
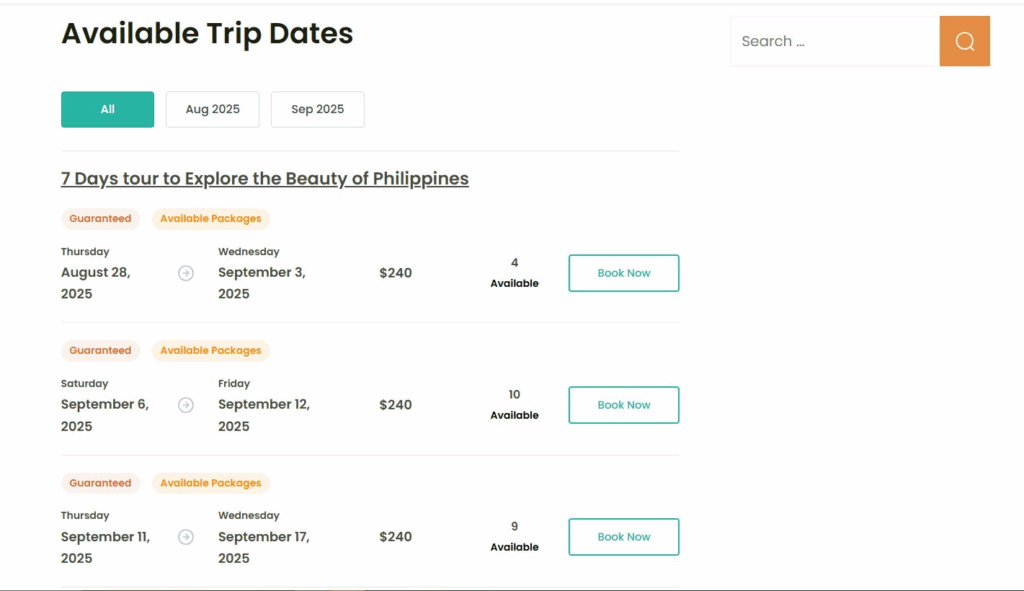
1. All Fixed Starting Dates
To display all fixed starting dates from all trips across your site, use:
[WTE_TRIPS_FIXED_STARTING_DATES]
This shortcode shows a complete calendar of all available trips, organized by months and years. Customers can easily browse trips and find available departure options.
Example use cases:
- Create a dedicated page called Upcoming Departures that lists every trip date.
Troubleshooting #
Problem: Trip shows seats available, but users cannot book.
- Check if the package seats + date seats are less than the General Settings total. The system uses the smaller number.
Problem: Dates not showing on trip page.
- Make sure you turned on the Show Fixed Trip Starts Dates section in global settings.
- Check if the trip has active dates added.
Problem: Overbooking happens.
- Ensure Total Traveller Seats is set in General Settings. This acts as the ceiling.
- Packages and times should not exceed the daily cap.
Problem: Expired trips still visible.
- Set the Trip Expiry Date in the trip editor under Date Settings.
FAQ #
Can I run a trip at multiple times in one day? #
Yes. Add multiple time slots for the same date.
What happens when all seats are sold out? #
The system automatically marks the trip as Sold Out.
How do repeating schedules stop? #
You can stop with an end date or a repeat limit.
Can I list all trips with fixed dates on one page? #
Yes, use [WTE_TRIPS_FIXED_STARTING_DATES].
What happens if I leave an attribute out of the Departure Calendar shortcode? #
Leaving an attribute out or providing an empty value will make the calendar fall back to the global settings for that value.
How do I find a trip’s ID for the include/exclude shortcode attributes? #
Go to your WordPress Dashboard > Trips. Hover over the trip title and look at the URL preview in the bottom-left of your browser. The link will contain something like post=1234; the number after post= is the trip ID you need.