The Form Editor Add-on is a premium feature in WP Travel Engine that gives you full control over the forms your travelers fill out – from the initial trip enquiry through to checkout and emergency contact details. You can add, remove, reorder, and configure fields across all five default forms. If your current forms ask for too much, too little, or the wrong information, this add-on is how you fix that.
Key Features & Benefits #
| Feature | Benefit |
| Five Default Forms (Enquiry, Checkout, Lead Traveler, Additional Traveler, Emergency Contact) | Cover the full booking journey without building forms from scratch |
| Drag-and-Drop Field Reordering | Arrange fields in the order that works for your business |
| Live Preview | See exactly what travelers will see before saving any changes |
| 10+ Field Types (Text, Radio, Checkbox, Date Picker, Attachment, Captcha, and more) | Collect the right information in the right format for every trip |
| Conditional Logic | Show or hide fields based on traveler responses, keeping forms relevant and short |
| Per-Field Settings (Label, Placeholder, Width, Required, CSS Class) | Fine-tune every field to match your brand and data needs |
| Attachment Upload Controls (Multiple Files, Max File Size) | Manage what travelers can upload and how much |
| Reset to Default | Restore any form to its original state if something goes wrong |
Prerequisites #
Before using this add-on, make sure:
- You have WP Travel Engine installed and activated on your WordPress site (Version 6.5.0 or more).
- You have updated WP Travel Engine plugin to its latest version 6.7.12.
- You have installed and activated the Form Editor add-on.
How to Install the Form Editor Add-on #
Verification #
To confirm the add-on is active and working:
- Go to your WordPress Dashboard
- Then, navigate to WP Travel Engine > Form Editor
- You will see all your default forms here.
Configuring the Settings for Form Editor Add-on #
The Form Editor add-on provides an easy-to-use interface for website admins to add, edit, delete, and sort form fields in all WP Travel Engine plugin forms.
To customize any of the five WP Travel Engine forms, navigate to the Form Editor section under the WP Travel Engine menu. This menu provides access to all settings and fields for each form through a dedicated settings page. Here, you will find dedicated tabs for each form in the WP Travel Engine core plugin:
- Enquiry Form – Shown on individual trip pages. Travelers fill this out to send an enquiry about a trip before booking.
- Checkout Form – Appears as the billing details section when a traveler proceeds to purchase a trip.
- Lead Traveler Information – Collected at checkout. Captures details about the primary traveler on the booking.
- Additional Traveler Information – Also collected at checkout. Used when a booking includes more than one traveler.
- Emergency Contact – Collected at checkout. Captures emergency contact details for the booking.
Managing Fields #
Adding a field
- Open the form you want to edit by clicking its tab at the top of the Form Editor page.
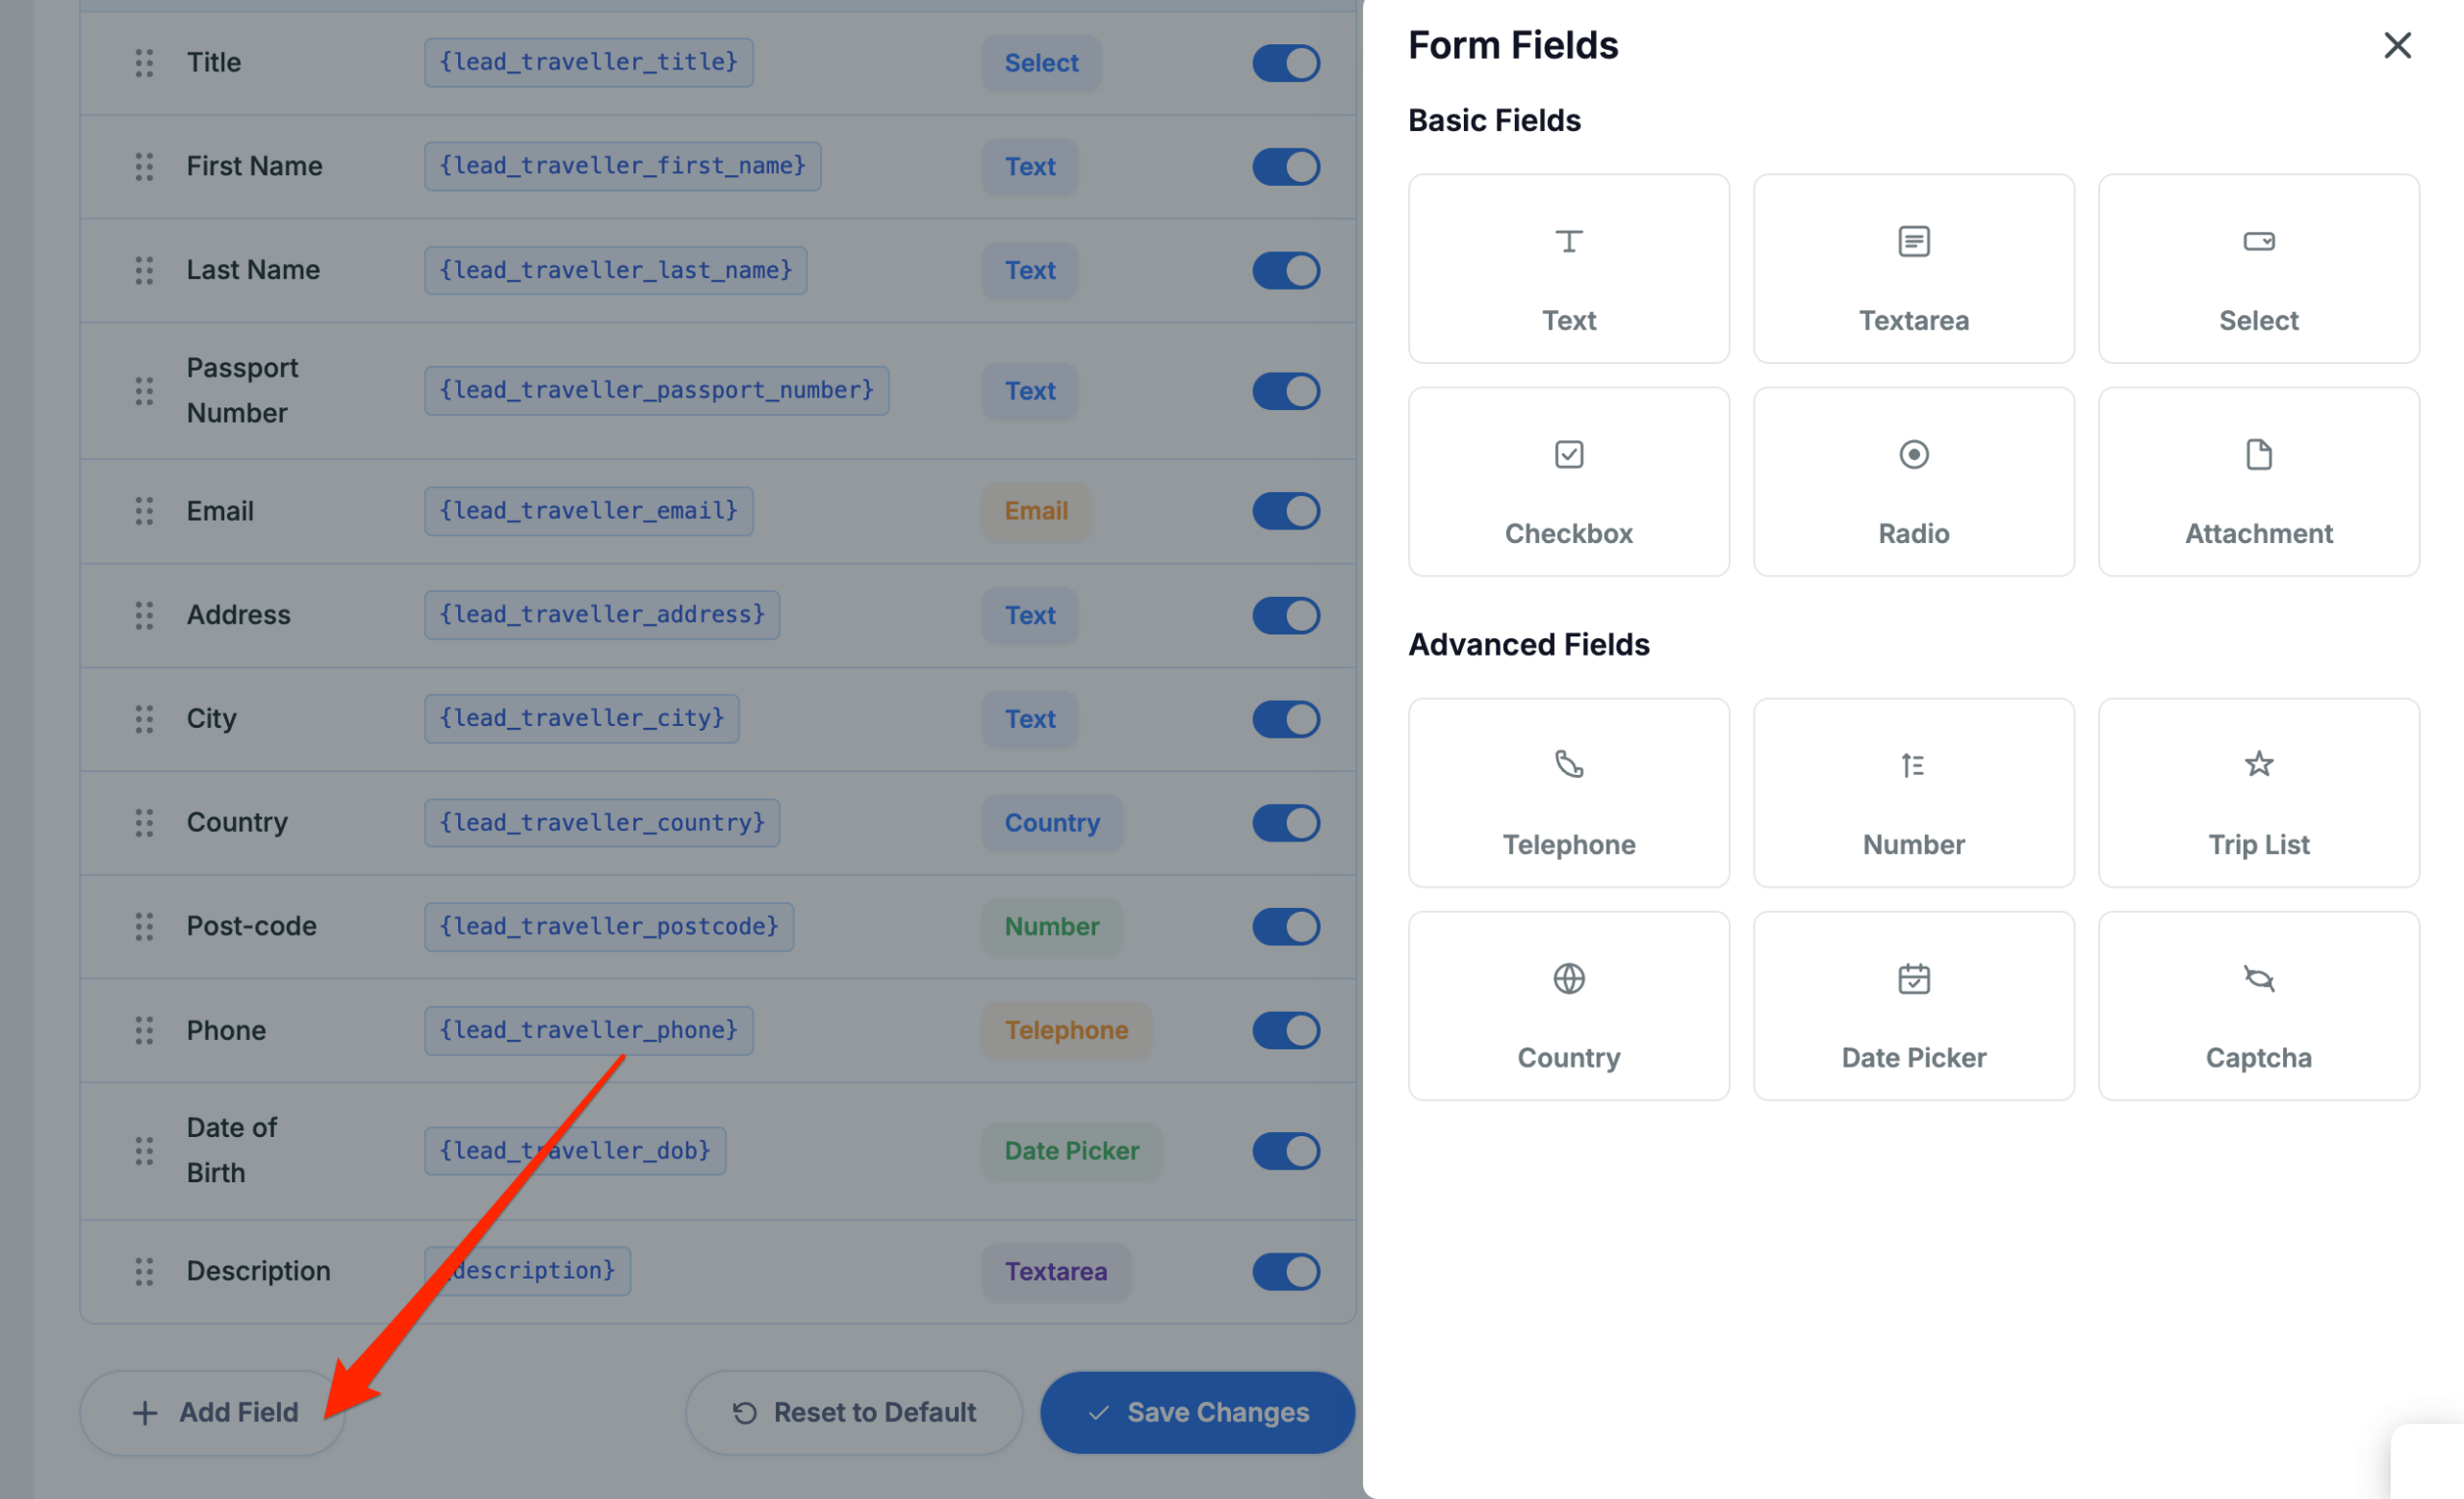
- Click + Add Field at the bottom left of the field table.
- A Form Fields panel opens on the right, showing all available field types under Basic Fields and Advanced Fields.
- Click the field type you want to add.
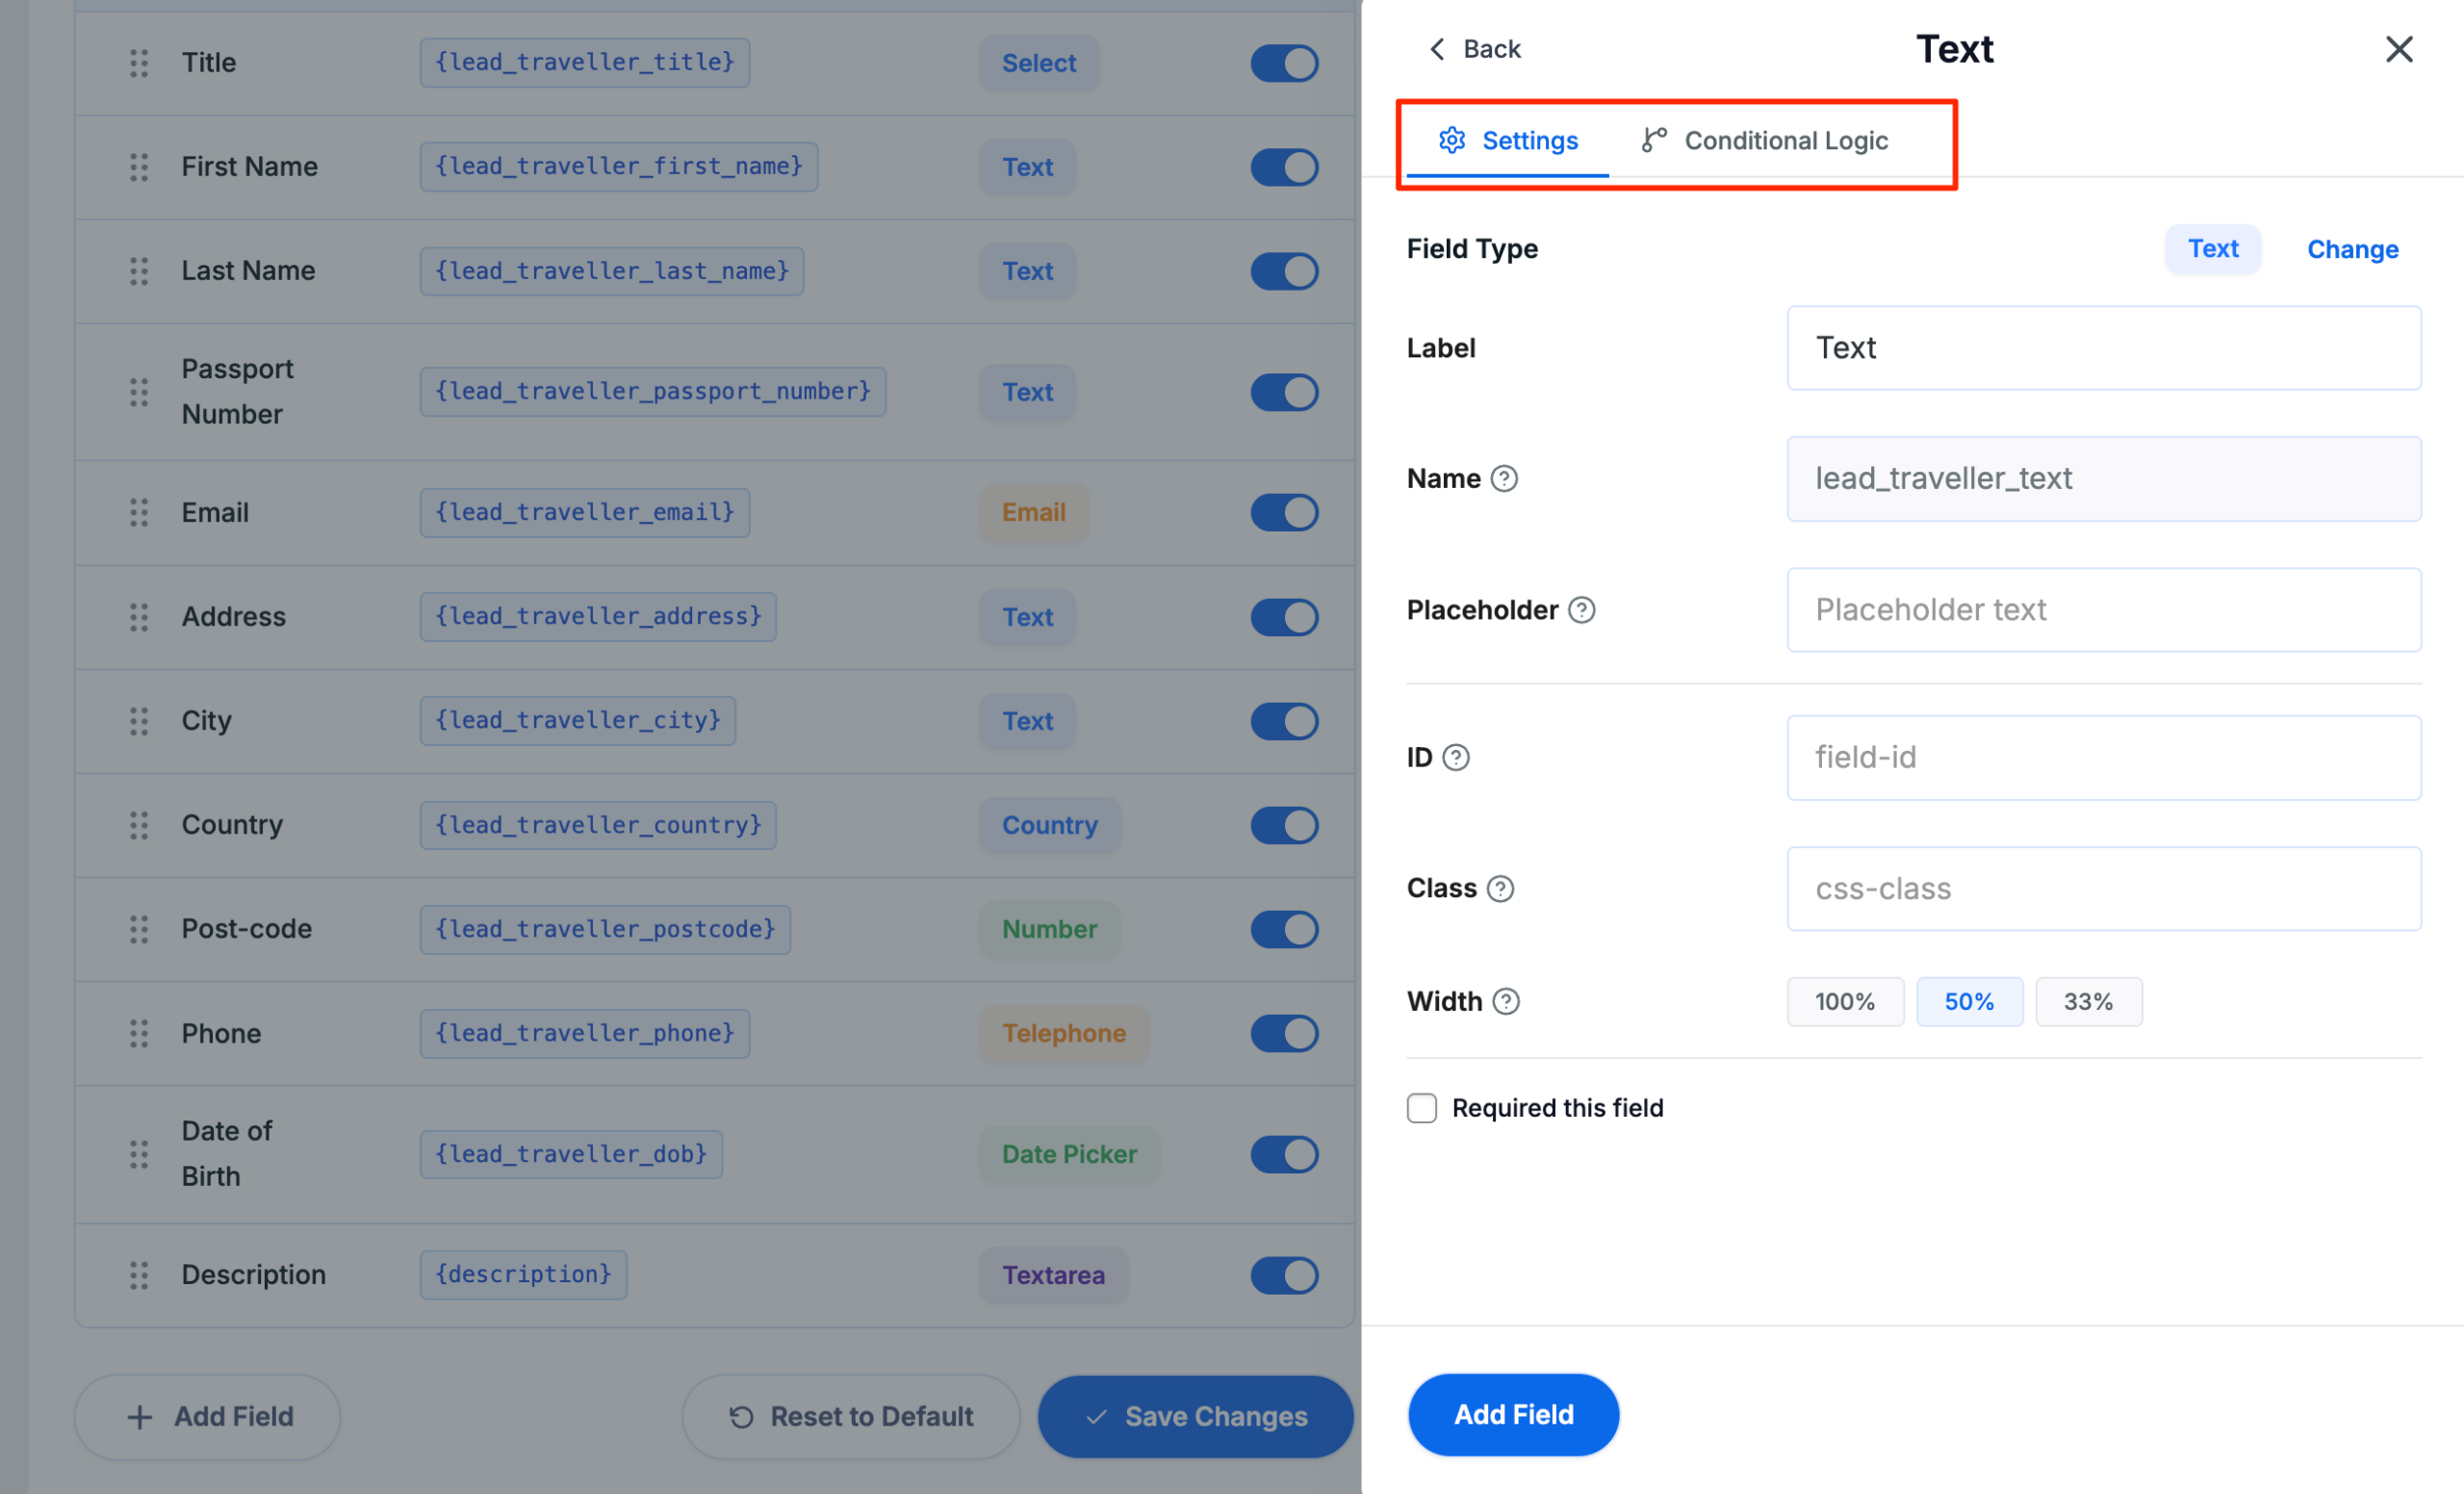
- A settings panel opens for the new field with two tabs: Settings and Conditional Logic.
- Under Settings, fill in the label, name, and any other settings you need.
- Under Conditional logic, you can choose to show or hide a field based on how a traveler answers another field in the same form. You can also choose to show this field in specific trips only.
- Click Add Field at the bottom of the settings panel to add it to the form.
- Click Save Changes to save.
Editing a field
Click the edit icon (pencil) next to any field in the table. The field settings panel opens on the right. Make your changes and click Save Changes. You can also change the field type of your saved field clicking on the Change button.

Reordering fields
Click and drag the drag handle (the six-dot icon) on the left of any row to move it up or down in the form. Click Save Changes when done.
Deleting a field
Click the delete icon next to the field you want to remove. Click Save Changes to confirm.
Toggling a field on or off
Use the toggle in the Active column to show or hide a field without deleting it. A blue toggle means the field is active and visible to travelers. Click Save Changes after making any changes.
Using the Live Preview
Click Show Preview in the top right corner of the Form Editor to open the live preview panel. The panel appears on the right side of the screen and updates in real time as you make changes to the form.
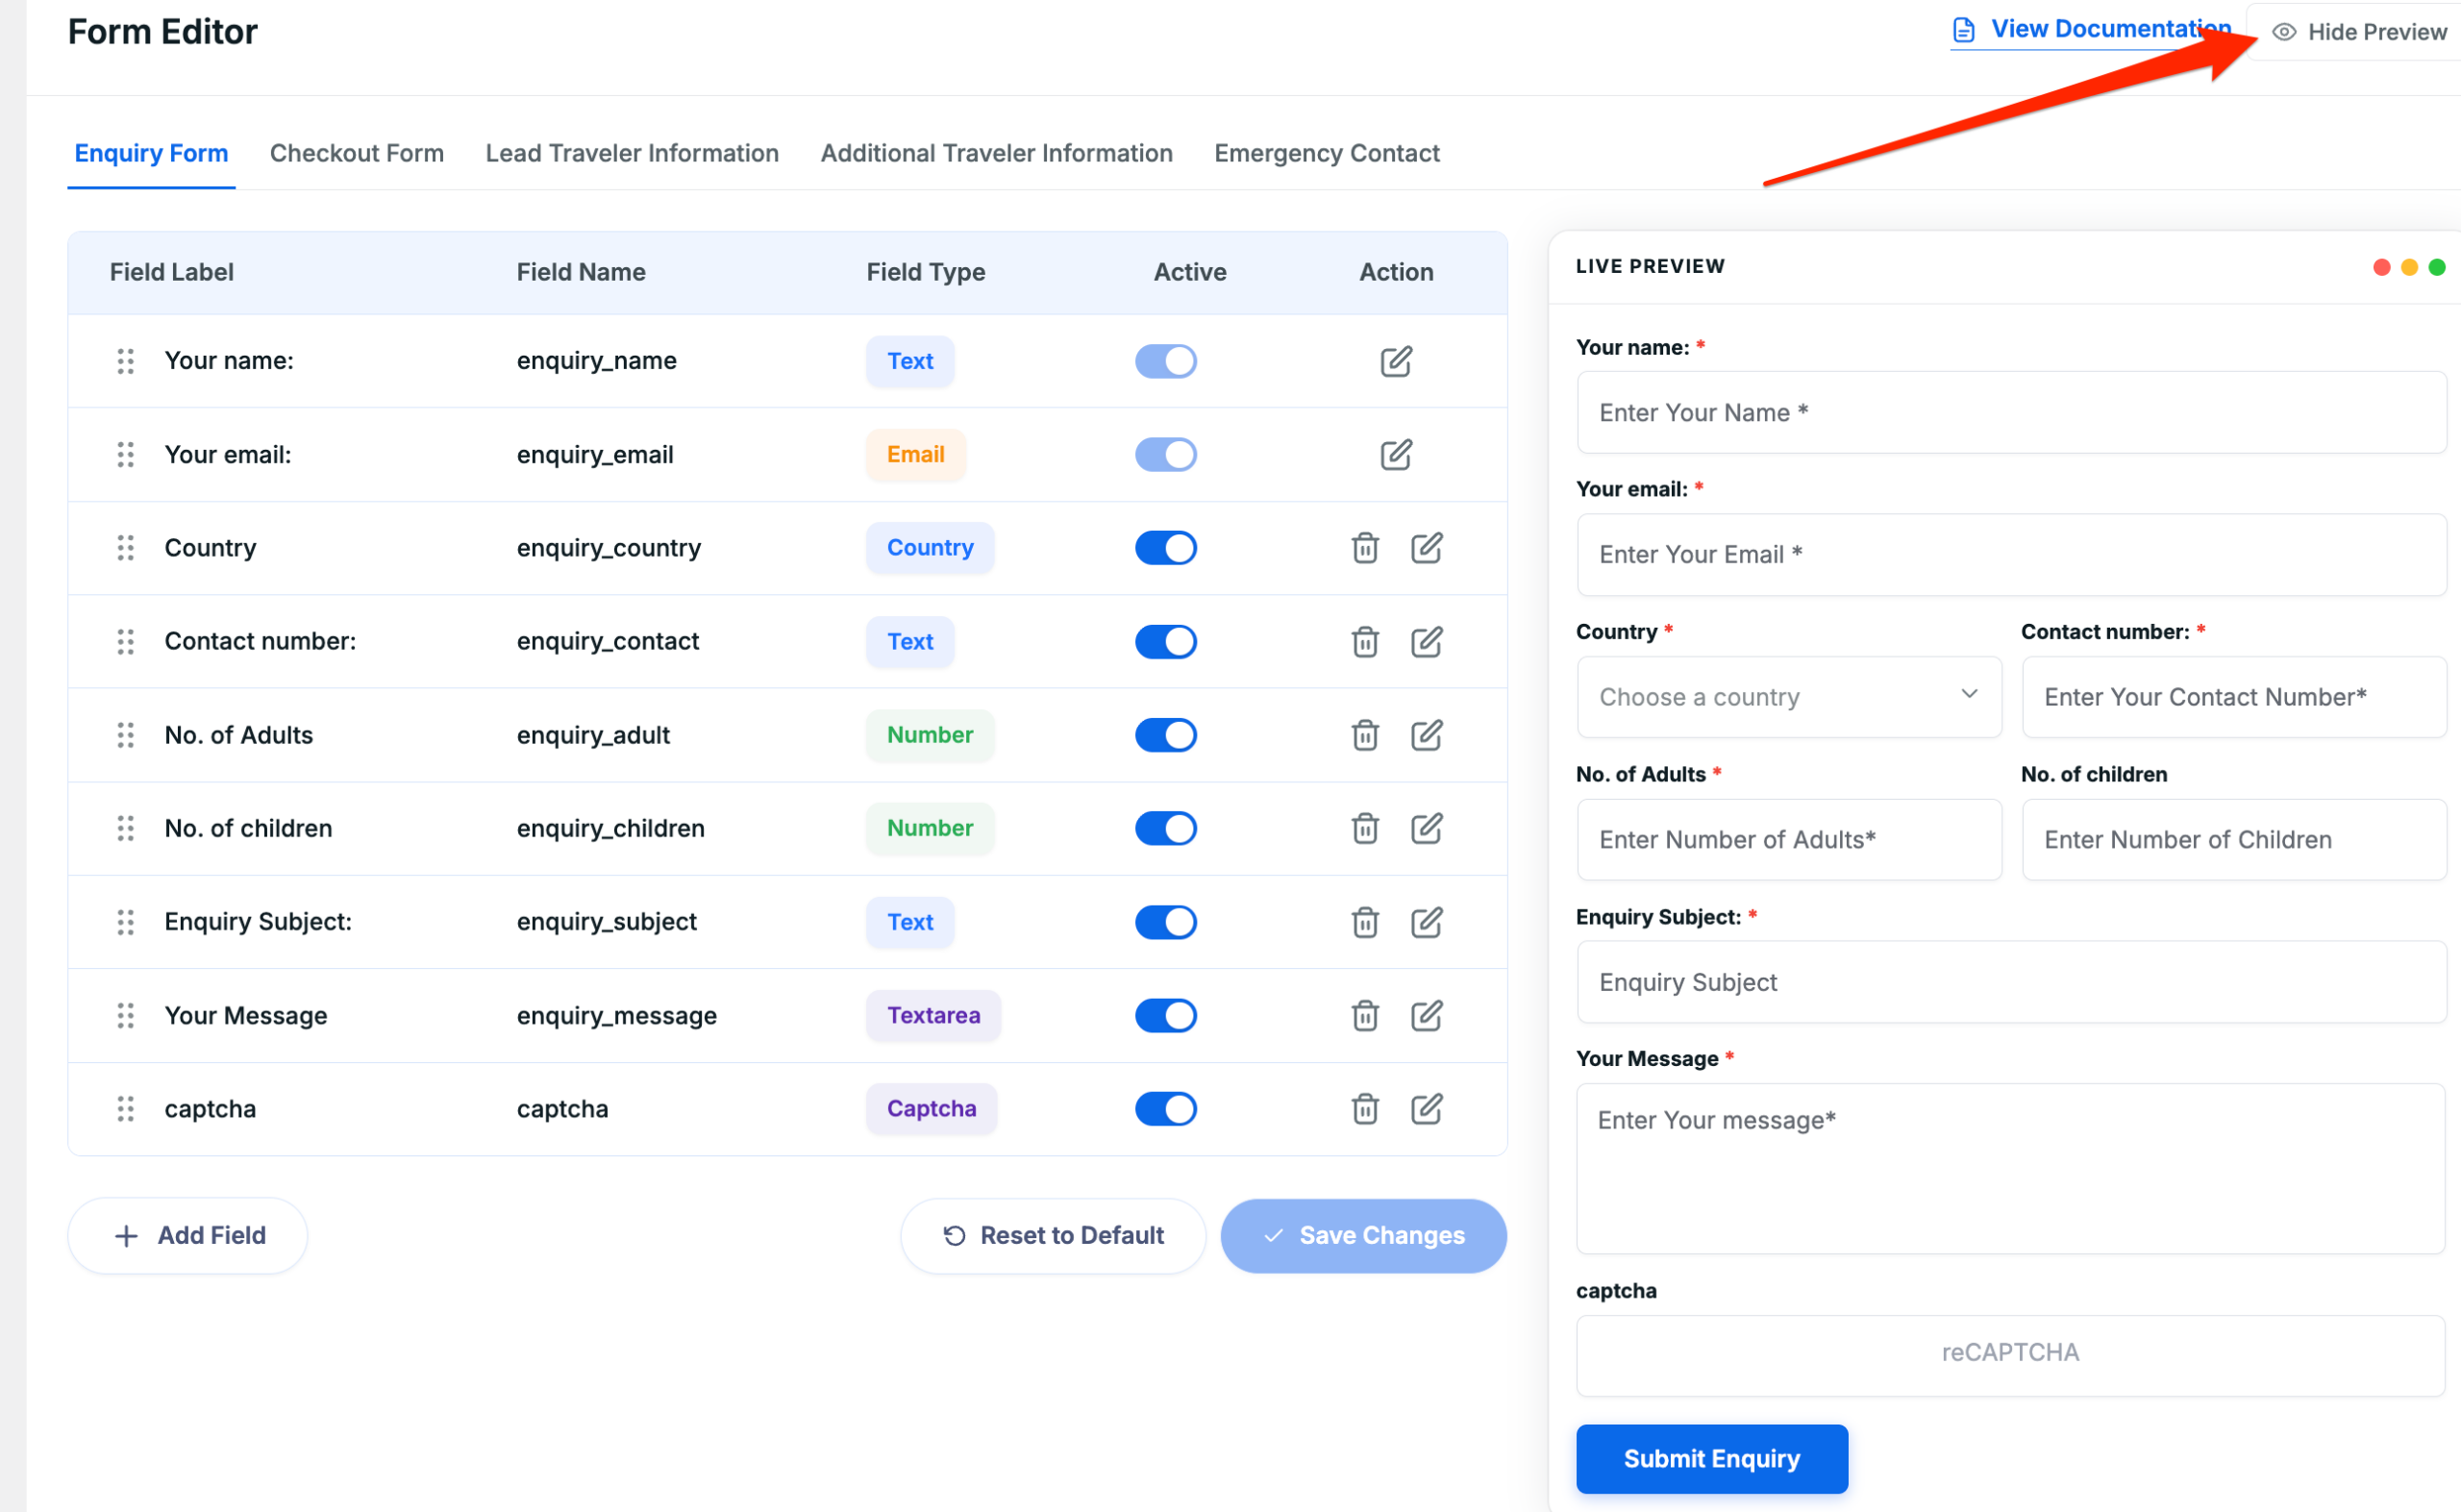
Use the preview to check field order, labels, and layout before saving. The preview reflects the active state of each field – inactive fields do not appear.
To close the preview, click Hide Preview in the top right corner.
Field Types Reference #
Basic Fields
- Text – A single-line text input. Use for names, subjects, or any short free-text response.
- Textarea – A multi-line text input. Use for messages or longer responses.
- Select – A dropdown list. Use when you want travelers to pick one option from a predefined list.
- Checkbox – One or more checkboxes. Use for yes/no questions or multi-select options.
- Radio – A set of radio buttons. Use when travelers must choose exactly one option from a list.
- Attachment – A file upload field. Use to collect documents, passport scans, or other files from travelers.
Advanced Fields
- Telephone – A phone number input with country code support.
- Number – A numeric input. Use for fields like the number of adults or children.
- Trip List – A dropdown pre-populated with your published trips.
- Country – A dropdown pre-populated with country names.
- Date Picker – A calendar-based date selector.
- Captcha – A reCAPTCHA field to prevent spam submissions.
Configuring Field Settings #
When you add or edit a field, a settings panel opens on the right with two tabs: Settings and Conditional Logic.
Under Settings, you’ll find the following options based on the type of field you select:
- Label – Set the field name that will be shown to travelers on the form.
- Name – The internal field identifier used by the system. This is filled in automatically based on the label. You cannot edit this field
- Placeholder – Set the grey hint text shown inside the field before a traveler types anything.
- ID – An optional HTML ID for the field. Leave blank unless you have a specific reason to set one.
- Class – An optional CSS class. Leave blank unless you’re applying custom styling.
- Width – Controls how wide the field appears on the form. Choose from 100%, 50%, or 33%. Setting two related fields to 50% places them side by side.
- Required – Check this box to make the field mandatory. Travelers cannot submit the form without filling in a required field.

New in Attachment field settings
The Attachment field has two additional options:
- Allow Multiple Files – Let travelers upload more than one file in a single submission. Supported file formats are: .jpg, .jpeg, .png, .doc, .docx.
- Maximum File Size – Set the upper limit for uploaded files. Enter the size in MB.
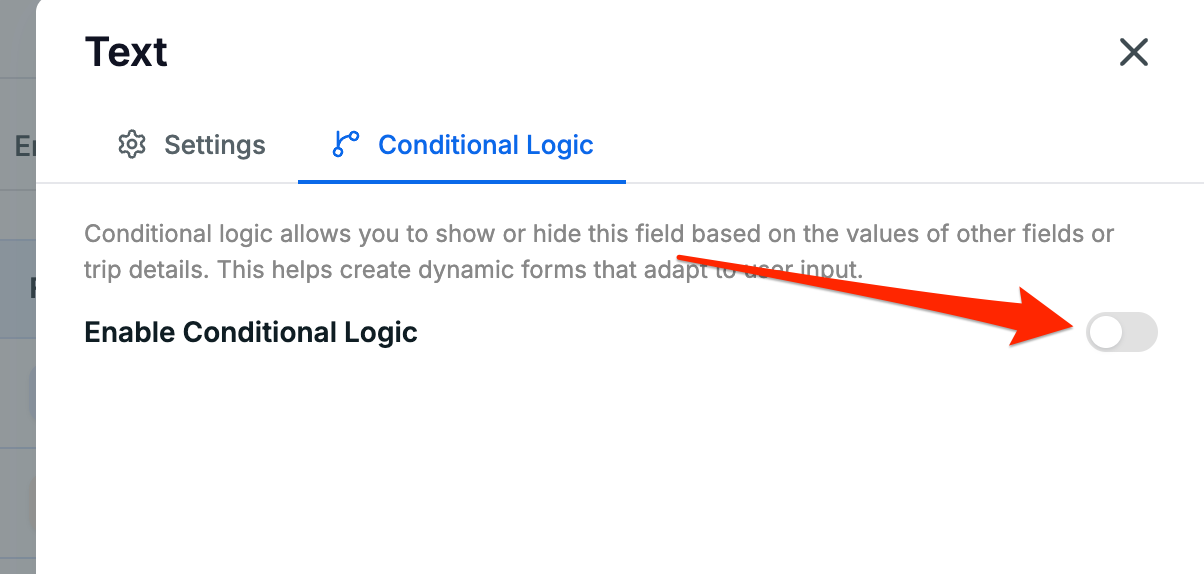
Under Conditional Logic, you can choose to show or hide a field based on how a traveler answers another field in the same form. This keeps forms short by only showing fields that are relevant to each traveler. It also lets you display the field for all trips, or specific trips only.
To set up conditional logic on a field:
- Click the edit icon next to the field you want to show or hide conditionally.
- In the settings panel, click the Conditional Logic tab.
- Toggle Enable Conditional Logic on.
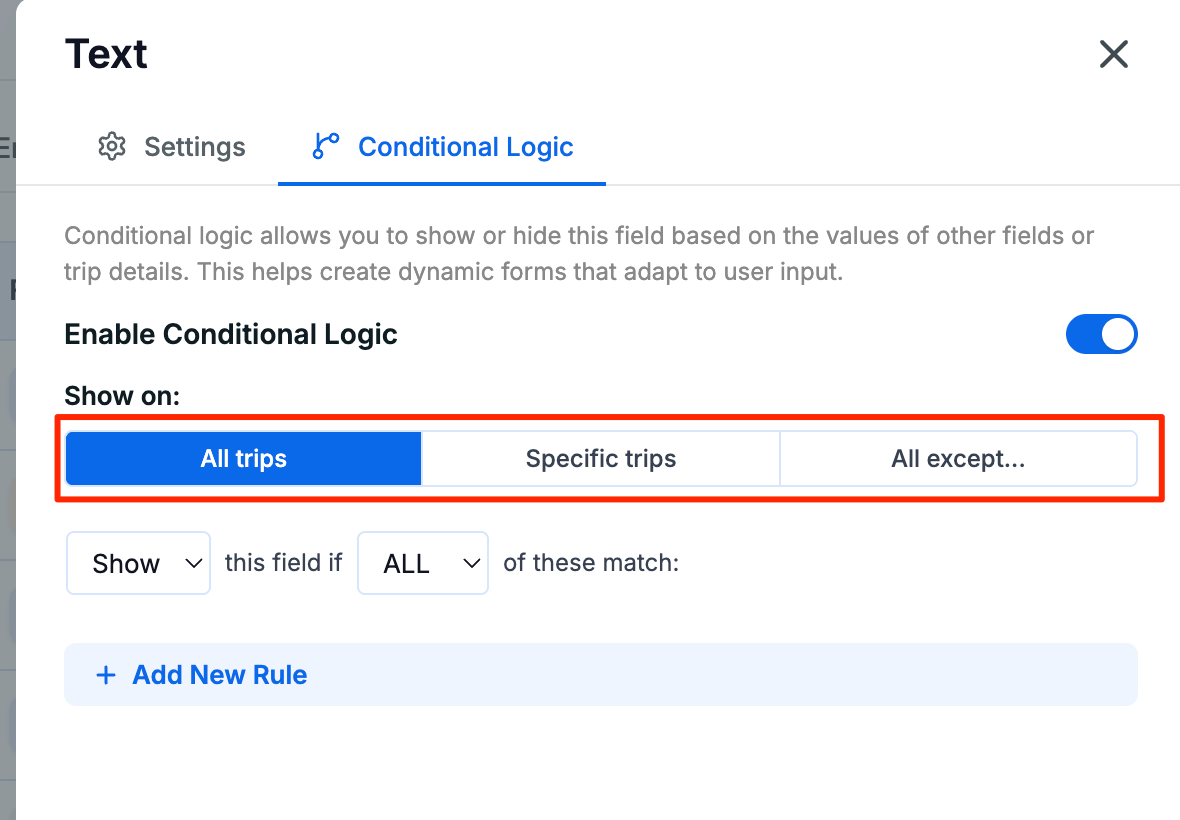
- Under Show on, choose one of the following:
- All trips – The conditional rule applies across all trips.
- Specific trips – The rule applies only to the trips you select. Click the trip selector and choose the trips you want.
- All except – The rule applies to all trips except the ones you select.
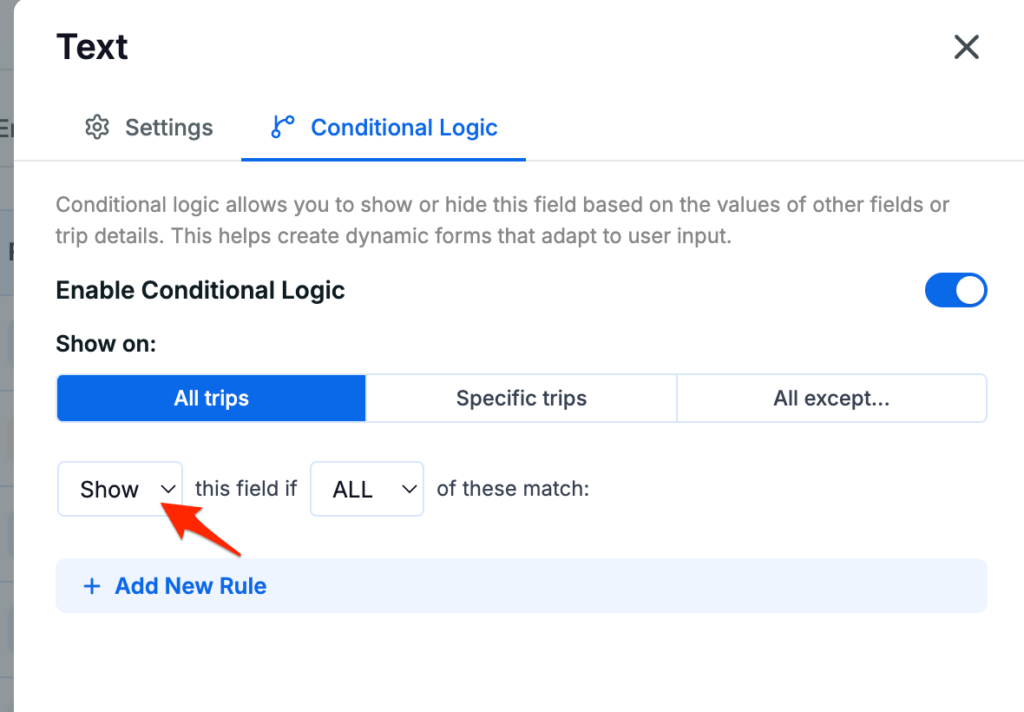
- The default action is Show. Leave this as is if you want the field to appear when the condition is met. Change it to Hide if you want the field to disappear instead.
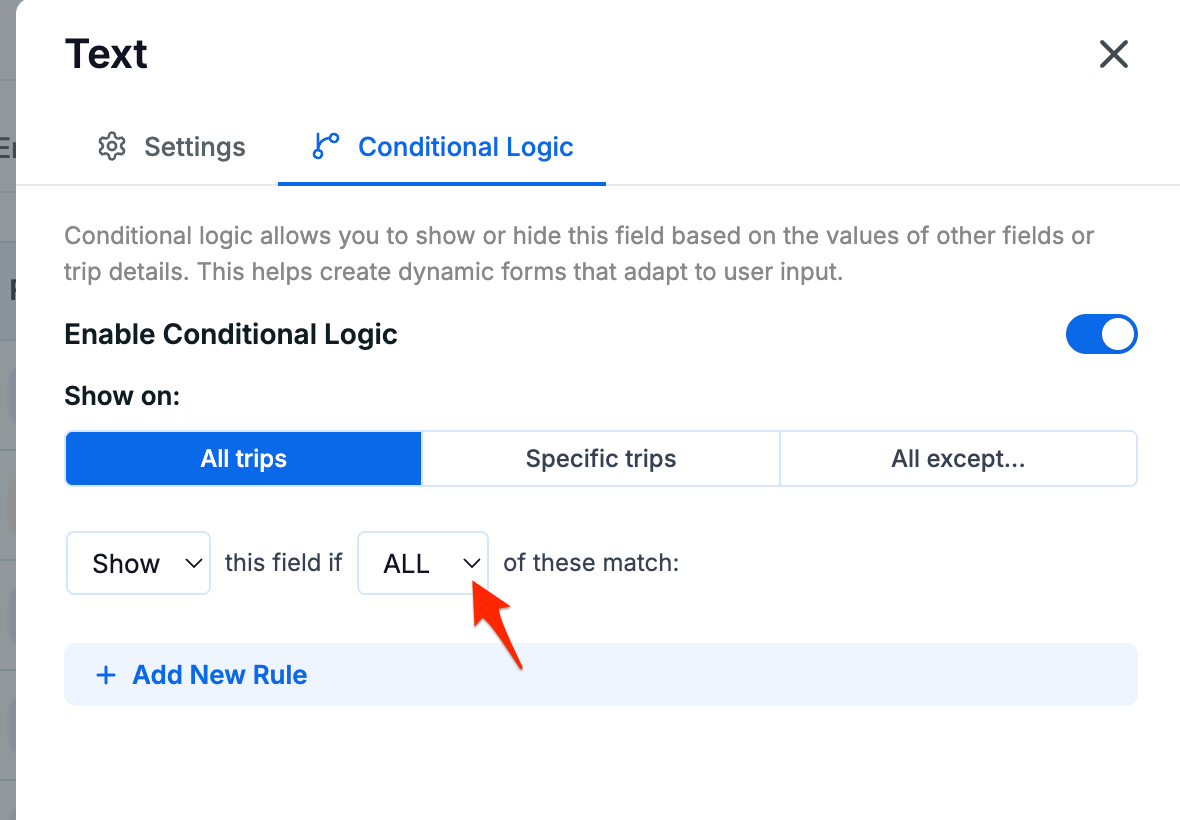
- Set the matching behavior:
- ALL – Every rule in the list must match for the field to show or hide.
- ANY – At least one rule must match.
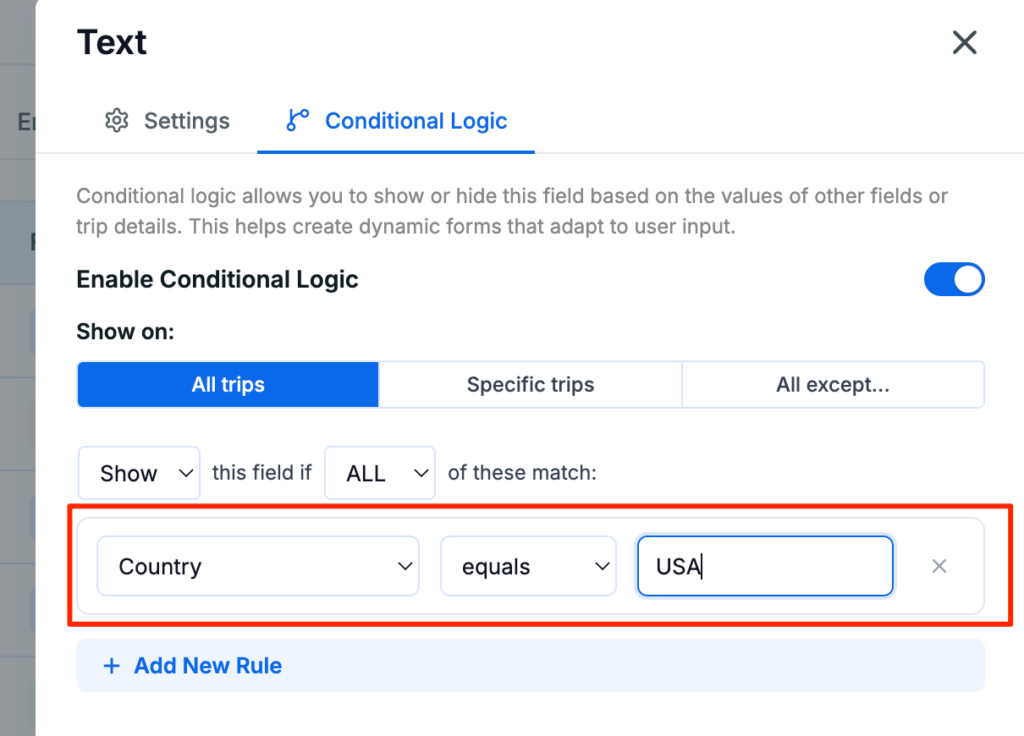
- Click + Add New Rule to define a condition. Each rule has three parts:
- The field whose value you’re checking (e.g., “Country”)
- The operator (e.g., equals, contains, greater than)
- The value to match against (e.g., “USA”)
- Add more rules if needed by clicking + Add New Rule again.
- Click Done to close the panel, then click Save Changes.
Use Cases #
Use Case 1: Requiring Travel Documents for Specific Trips
Situation: Some of your trips, particularly international or high-altitude treks, require travelers to upload a passport scan or medical clearance before you confirm the booking. You don’t want this requirement showing up on every trip.
Implementation:
- Add an Attachment field to the Lead Traveler Information form with the label “Upload Passport / Medical Document”.
- Mark it as required in the field settings so travelers cannot complete checkout without uploading a file.
- Open the Conditional Logic tab for this field and set Show on to Specific trips. Select only the trips that require the document.
- Set a Maximum File Size to avoid oversized uploads.
- Save Changes.
Benefit: Travelers booking trips that require documentation are prompted to upload at checkout. Travelers booking other trips never see the field.
Use Case 2: Showing Transfer Preferences Only for Travelers Who Need a Pickup
Situation: You offer airport transfers as part of some tours, but not every traveler needs one. Some drive themselves, others arrange their own transport. Showing a transfer preference field to everyone clutters the form and causes confusion.
Implementation:
- Add a Radio field to the Enquiry Form with the label “Do you need an airport transfer?” and options “Yes” and “No”.
- Add a Select field with the label “Preferred Pickup Location” and options for each pickup point you offer (e.g., “Kathmandu Airport”, “Pokhara Airport”, “Hotel in Thamel”).
- Edit the Preferred Pickup Location field and open the Conditional Logic tab.
- Enable Conditional Logic and set the rule: Show this field if “Do you need an airport transfer?” equals “Yes”.
- Save Changes.
Benefit: Travelers who don’t need a transfer see a shorter form. Those who do are immediately prompted for their pickup preference, so you have everything you need without a follow-up.
Use Case 3: Collecting Dietary Requirements at Checkout
Situation: You include meals on most of your tours and need to know each traveler’s dietary preferences before departure. Right now, you’re following up by email after every booking, which takes time.
Implementation:
- Add a Select field to the Lead Traveler Information form with the label “Dietary Preference”.
- Add options such as “No restrictions”, “Vegetarian”, “Vegan”, “Halal”, “Gluten-free”, and “Other”.
- Leave conditional logic off so the field appears on all trips where meals are included, or use Specific trips if only some of your tours include meals.
- Save Changes.
Benefit: Dietary information is collected at checkout for every booking. No follow-up emails needed, and your operations team has everything before the trip departs.
FAQs #
Can I create a completely new form from scratch using Form Editor Add-on? #
No. The Form Editor works with the five default forms. You can add, remove, and reconfigure fields within each form, but you cannot create additional custom forms outside of these five.
Does conditional logic work on the Checkout Form? #
Yes. Conditional logic is available on all five forms, including the Checkout Form and the traveler information forms.
Can I set a field to appear only on specific trips in the Enquiry Form? #
Yes. The Show on option in the Conditional Logic panel lets you target specific trips, so a field can be visible on one trip’s enquiry form and hidden on another.
What field types support conditional logic as a trigger? #
Any active field in the same form can be used as a trigger in a conditional logic rule. The value you enter in the rule must match exactly what the traveler would input or select – for example, “yes” not “Yes” if your radio button option is lowercase.