- Banner Layouts
- Show Trip Featured Image:
- Show Featured Image in Image Gallery:
- Image Gallery Autoplay:
- Trip Duration Format:
- Show Discounts In
- Show Trip Info:
- Show Booking Form
- Make Tabs Sticky and Scrollable:
- FSE Template:
- Show warning message in booking modal:
- Pricing Widget Layouts (For smaller devices):
- Compact Layout:
- Make Sticky and Scrollable:
- Show WhatsApp:
- Enquiry Message
- Enquiry Form
- Show Related Trips:
- New Layout for Related Trips:
The WP Travel Engine plugin offers a Single Trip page where each individual trip has its own booking details page. You can configure various settings for the Single Trip page, customizing the user experience for your customers.
To access the Single Trip settings, go to your WordPress Admin Dashboard and navigate to WP Travel Engine > Settings > Display > Singe Trip. Here, you will find various options to configure the Single Trip page.
Here, you will find various options to customize the Single Trip page. Each setting is described below with guidance on how to use them effectively.
Banner Layouts #
The “Banner Layouts” feature in the WP Travel Engine plugin allows users to customize the banner design on the single trip page. This feature introduces 7 unique banner layouts, giving site administrators the flexibility to enhance their site’s visual appeal and better align with their branding needs.
Under the Banner Layouts option, you can select one of the seven available layouts.
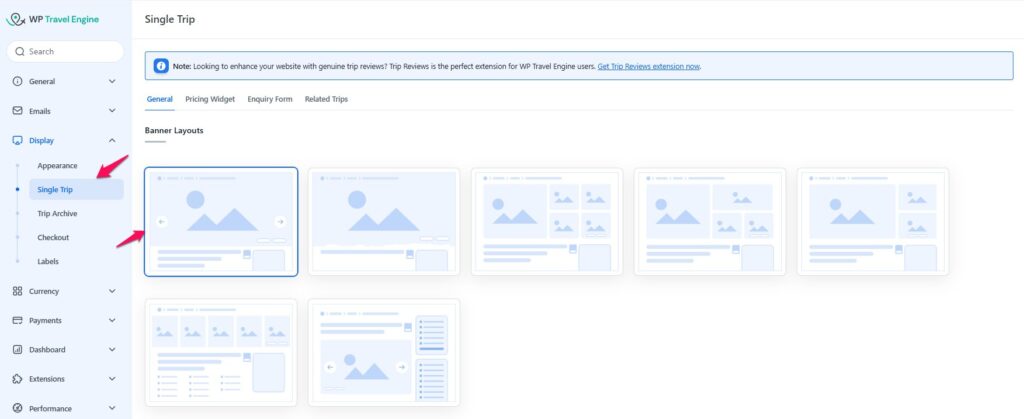
Below are the description and preview of each banner layouts:
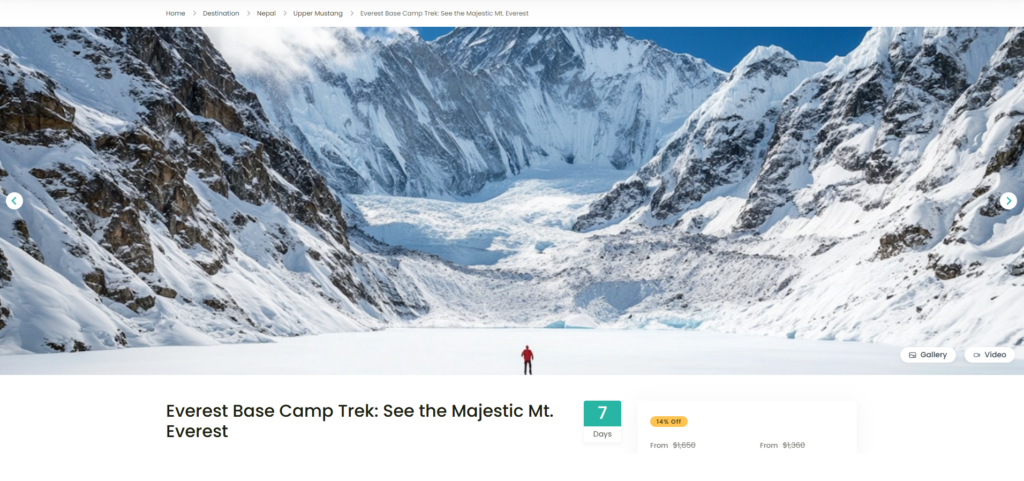
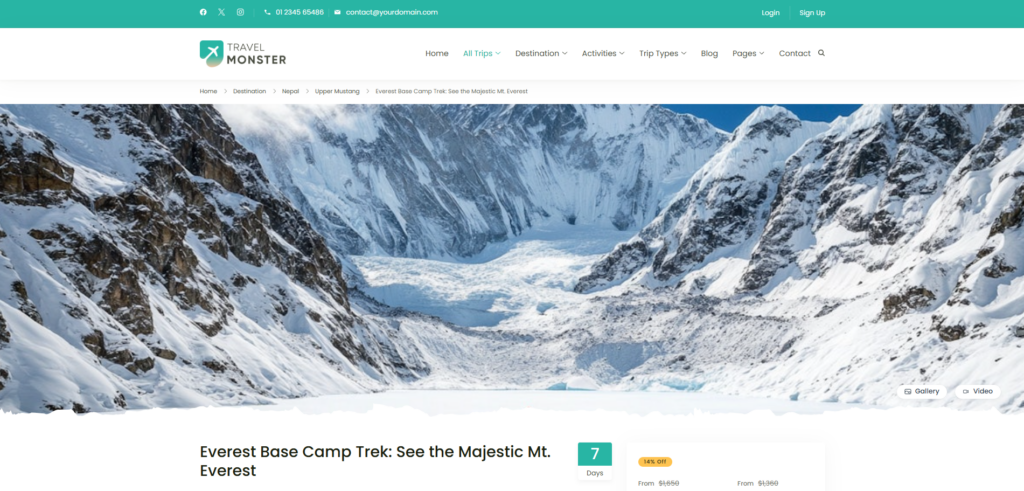
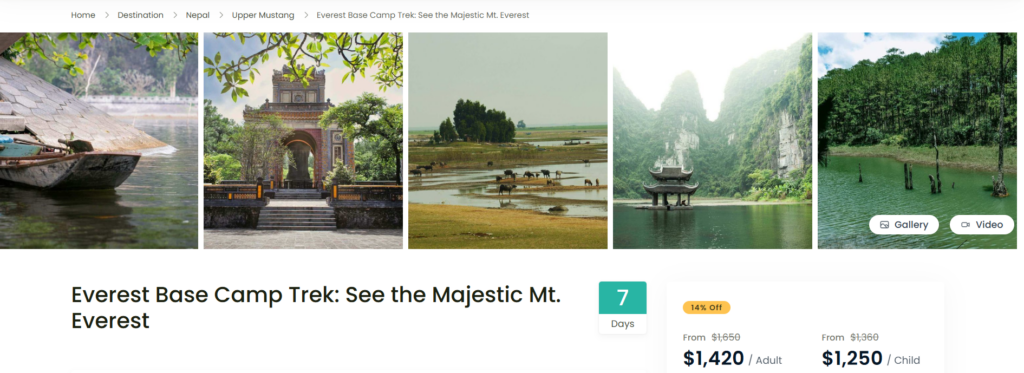
a. Banner Layout 1 #
Layout 1 displays full-width image slider with navigation arrows. This layout allows users to browse through gallery images using the slider or navigation arrows. Additionally, users can view full-sized images by clicking the “Gallery” button located at the bottom-right corner, which opens the images in a Lightbox modal.
Recommended Image Size: 1920 by 800 pixels for optimal display.
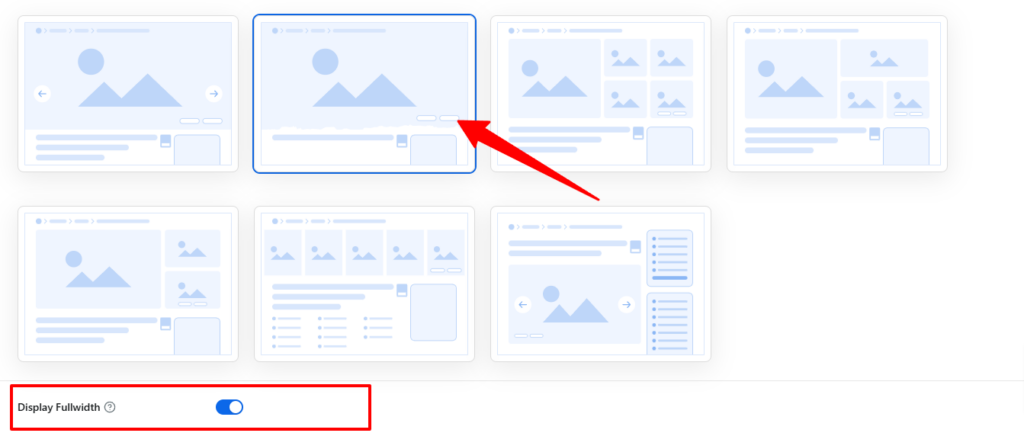
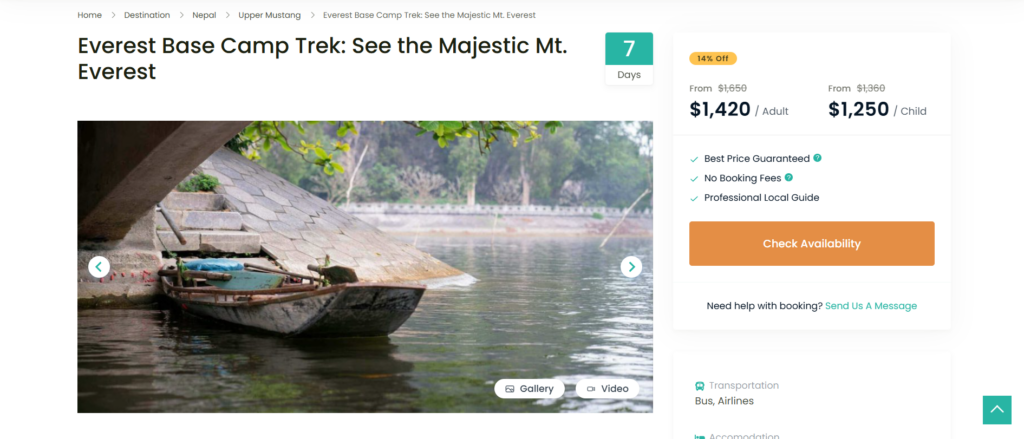
b. Banner Layout 2 #
Layout 2 isplays the original image by default. If a full-width banner is preferred, you can enable the Display Fullwidth option for this layout.
Below is a screenshot showing the banner when Layout 2 is selected:
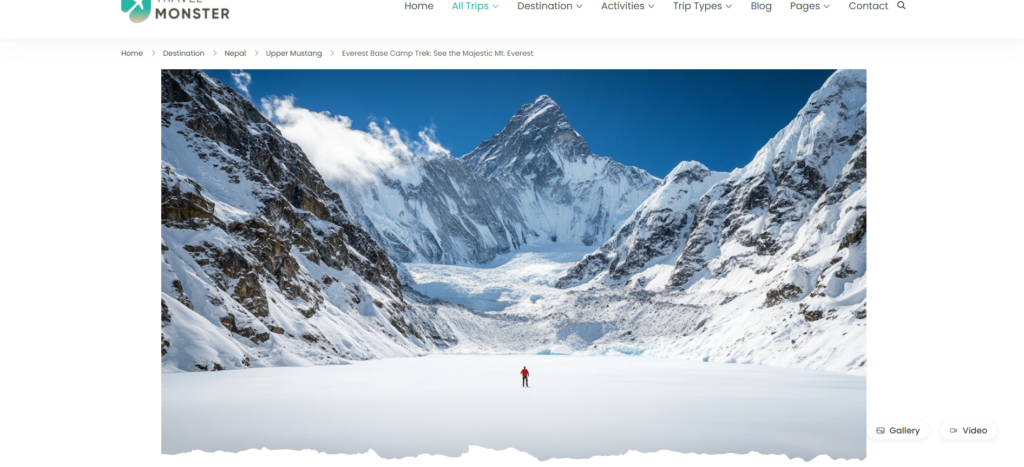
Below is another screenshot showing the banner when Layout 2 is selected with Display Fullwidth option enabled:
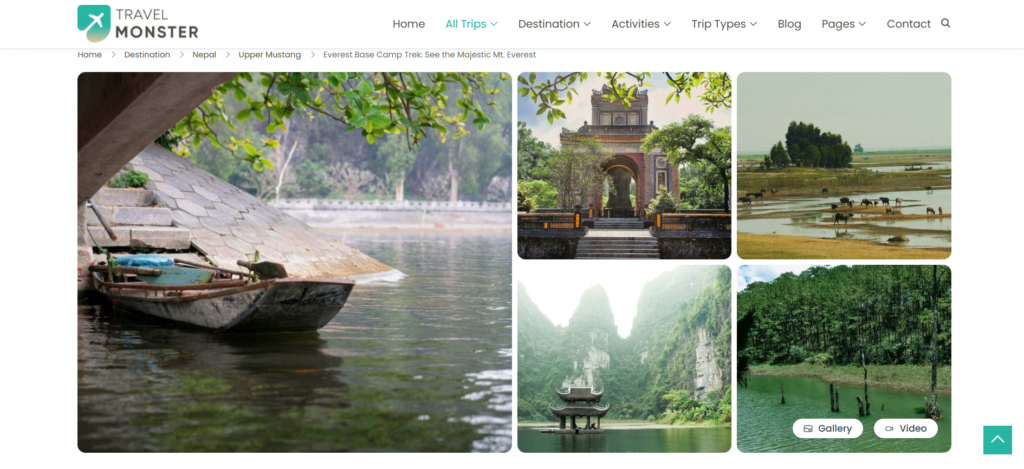
c. Banner Layout 3 #
Layout 3 utilizes a split-screen design that balances visual content and information effectively. The left section displays a large, featured image in its 324/284 aspect ratio, while the right section showcases a grid of smaller supporting images. These smaller images are ideal for highlighting trip details, destinations, or additional visuals.
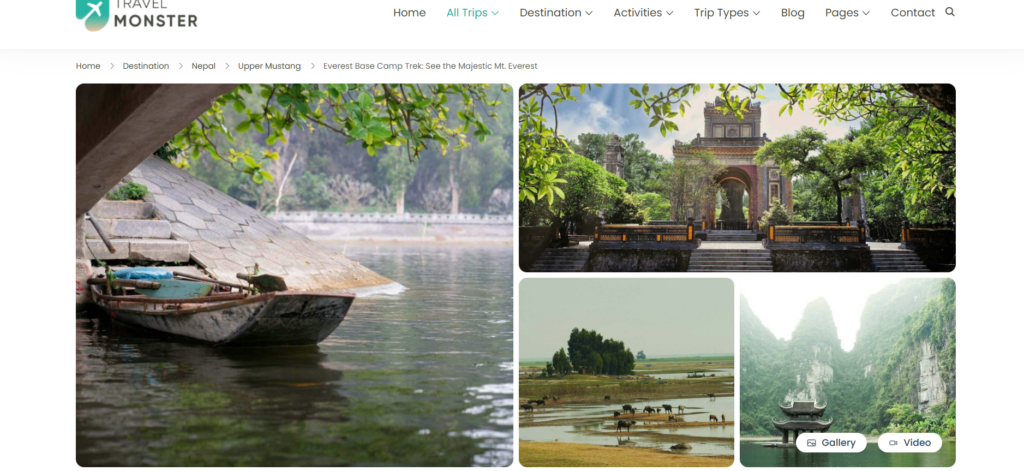
d. Banner Layout 4 #
Layout 4 is same as the Layout 3 but the it incudes a single image in the upper side instead of 2 supporting images on the right section.
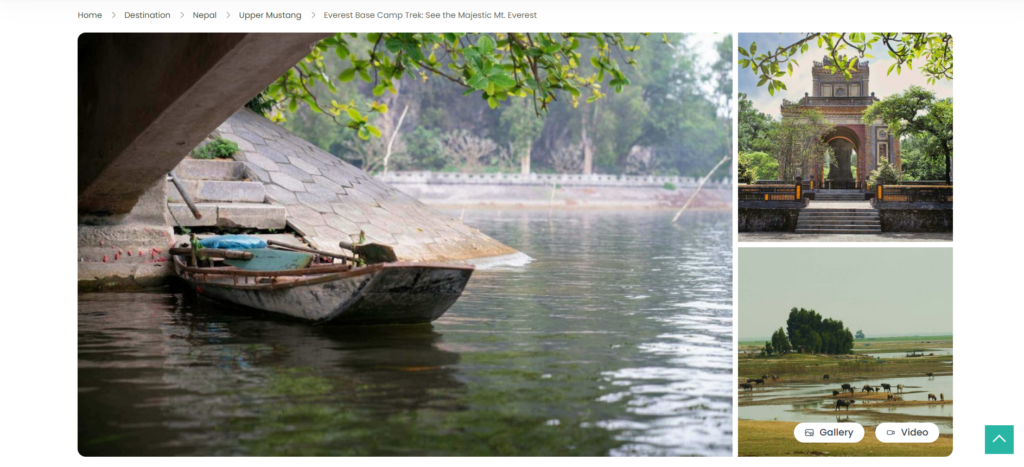
e. Banner Layout 5 #
Layout 5 incudes a large featured image in the left section with 2 other supporting images in right section.
f. Banner Layout 6 #
Layout 6 features features five images displayed side by side in a static grid format. When users hover over an image, it zooms in, creating a subtle and engaging hover effect.
g. Banner Layout 7 #
Layout 7 features a image slider and will be displayed below the trip title within the trip content area unlike other banner layouts which are displayed outside the trip content area.
Additional Notes: #
The banner layouts are specifically designed for desktops and tablets. On mobile devices, a standard image slider will replace all banner layouts to ensure optimal functionality and responsiveness.

Show Trip Featured Image: #
Enable this option to display the featured image on the trip detail page.
Show Featured Image in Image Gallery: #
Enable this option to include the featured image in the trip’s image gallery, both on the single trip page and on the trip card.
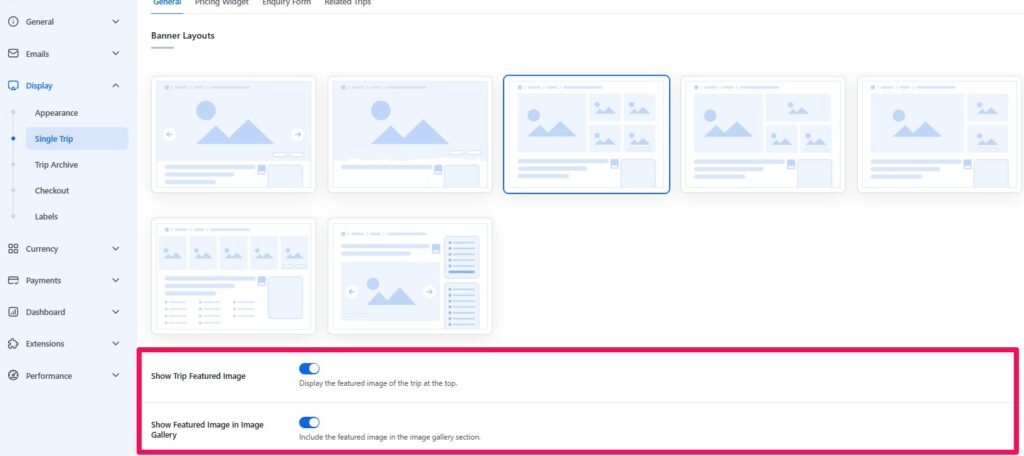
Image Gallery Autoplay: #
Enable this option to automatically cycle through images in the trip’s image gallery. By default, autoplay is disabled.

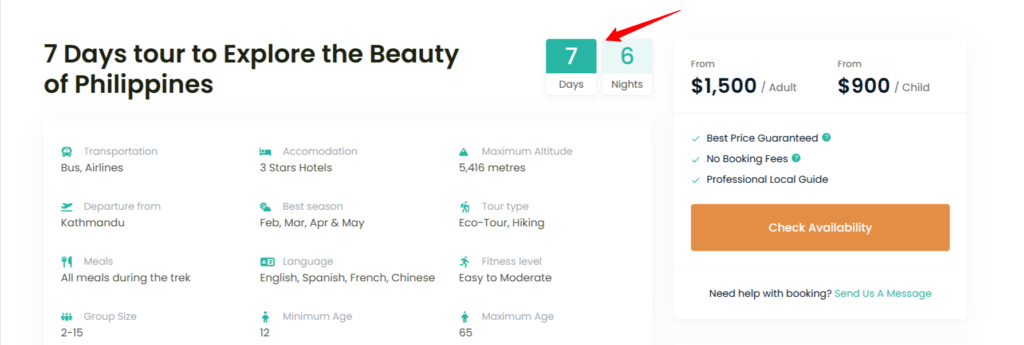
Trip Duration Format: #
Select how the trip duration will be displayed:
- Days: Shows only the number of days on the single trip page.

- Days and Nights: Displays both the number of days and nights on the page.

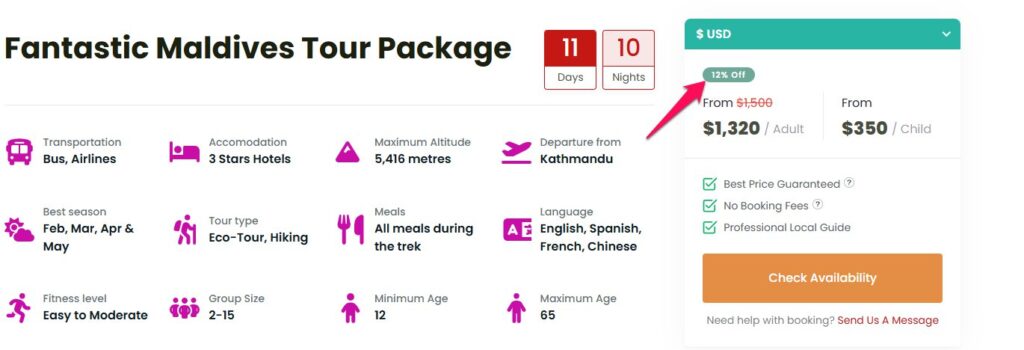
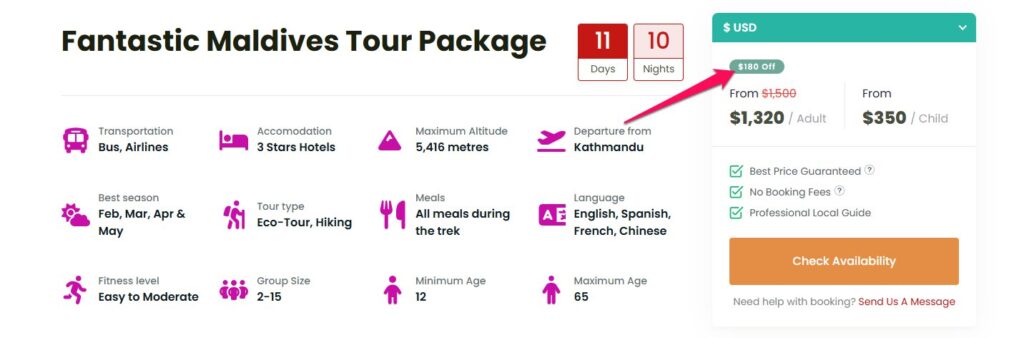
Show Discounts In #
You can choose to display whether to display the discount as a percentage or a fixed amount.

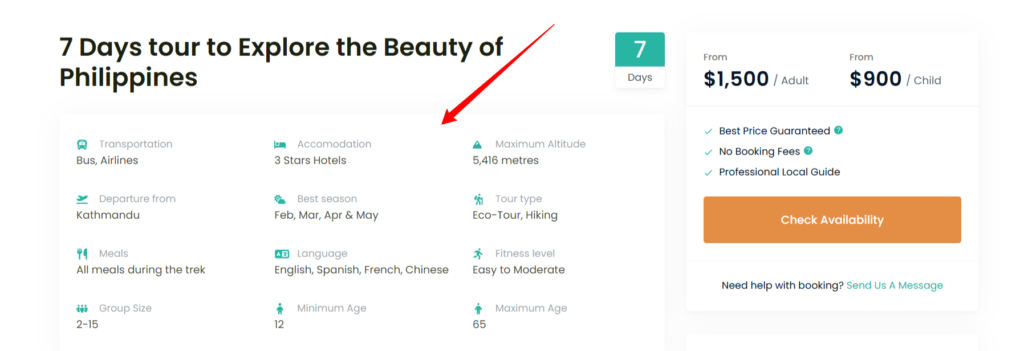
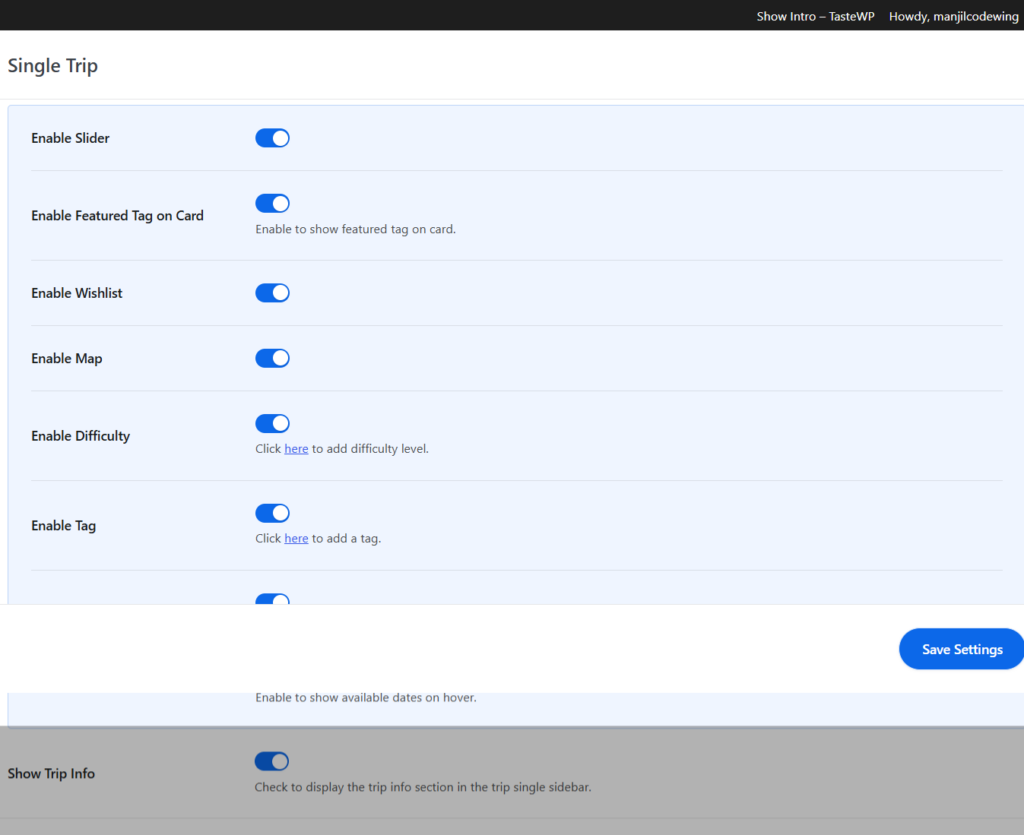
Show Trip Info: #
This option controls the display of the Trip Info section on the single trip page. You can choose to show this information in either the sidebar or the main content area or both.
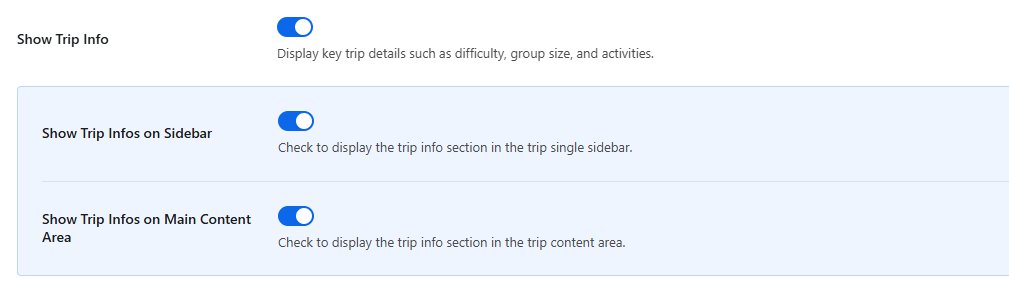
Show Trip Infos on Sidebar: #
Displays the trip info section in the sidebar of the single trip page.
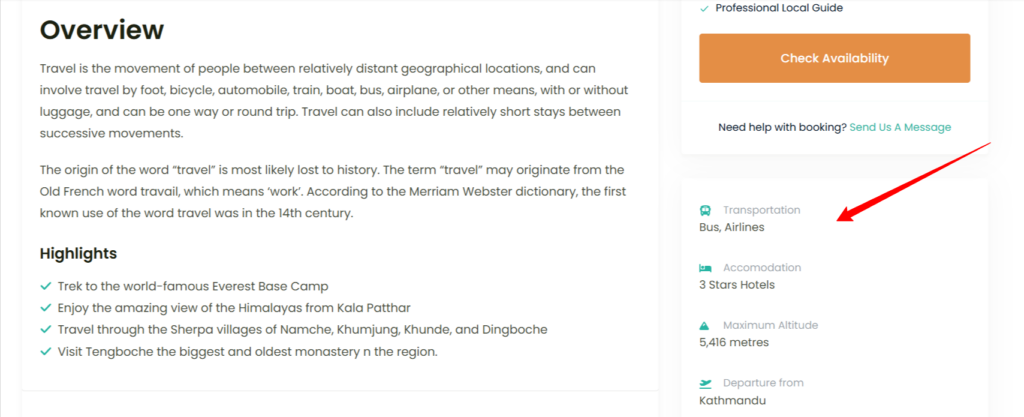
Show Trip Infos on Main Content Area: #
Displays the trip info section within the main content area of the page.
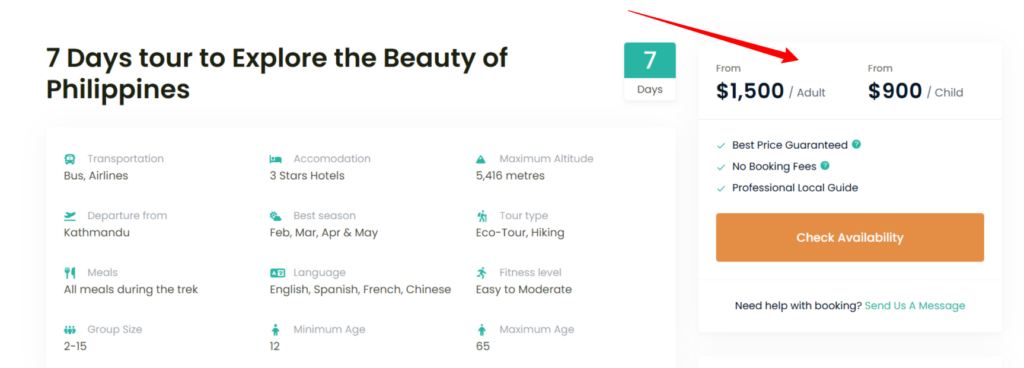
Show Booking Form #
- When this option is selected: The Booking Form will appear on the trip detail page.
- When this option is not selected: The Booking Form will be hidden on the page.

Make Tabs Sticky and Scrollable: #
When enabled, this option allows the trip content tabs to be scrollable, ensuring that all content remains accessible on longer trip detail pages.

FSE Template: #
Enable the use of Full Site Editing (FSE) templates provided by WP Travel Engine. For more information on setting up these templates, refer to the related documentation.

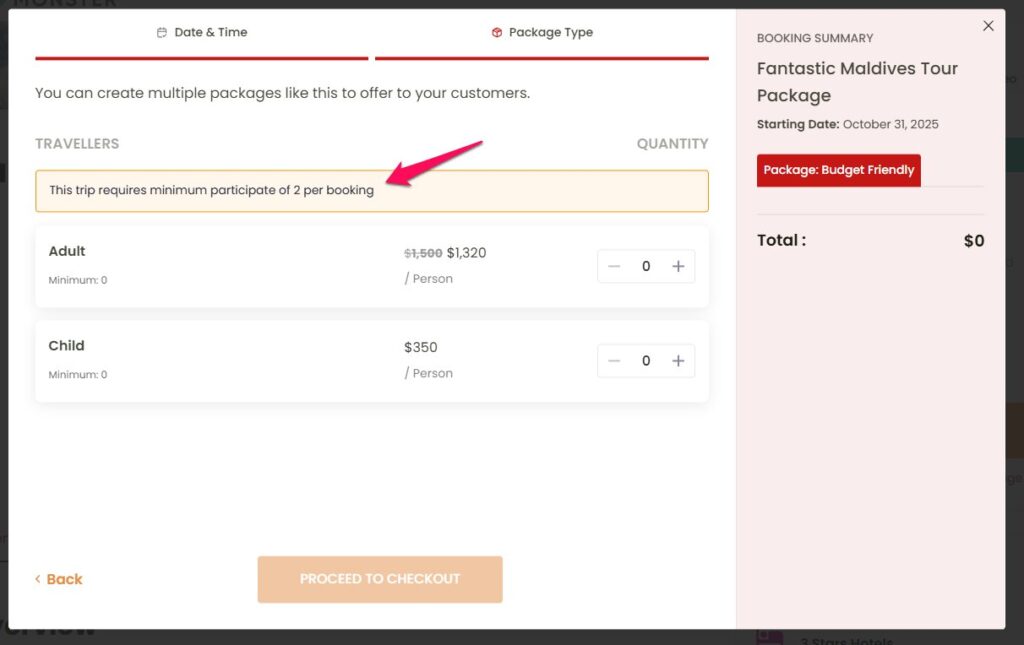
Show warning message in booking modal: #

Add a warning message that will be shown inside the booking modal. This message should inform users about the minimum participant requirement for the trip. You can include the placeholder {min_pax} in the message, which will automatically display the required minimum number of participants.
Pricing Widget Layouts (For smaller devices): #
To enable these layouts, simply navigate to WP Travel Engine > Settings > Display > Single Trip > Pricing Widget Tab. From there, you can choose your preferred layout.
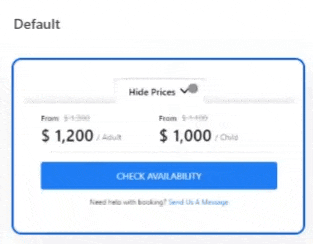
- Default:
The default layout is mobile-friendly and includes a toggle-style button that allows users to show or hide prices easily. This layout is ideal for users who prefer a clean and user-friendly design.
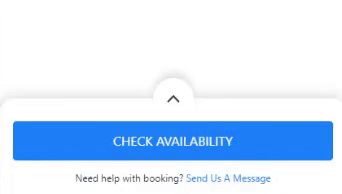
- Compact Layout:
The Compact Layout is similar to the existing layout but replaces the toggle button with a compact button. This provides more space for content and makes it easier to use on smaller screens. See the screenshot below for an example of how it looks on smaller devices.
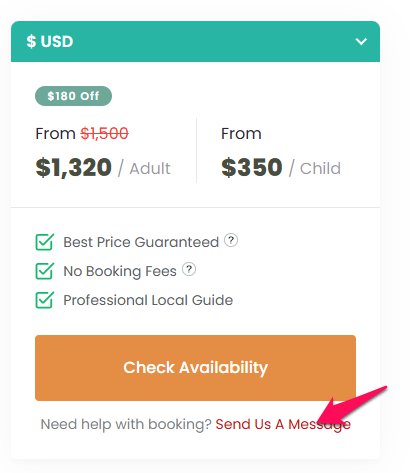
- Breeze Layout:
The Breeze Layout is designed to be even more mobile-friendly. It contains the entire widget in a button, and when clicked/tapped, a popup appears showing all your category pricings. This layout is perfect for users who prefer a clean and minimalistic design.

Compact Layout: #
When you enable this option, it will make the above models compact on mobile devices, taking up less space on the screen.

Make Sticky and Scrollable: #
Enable this option to make the pricing widget sticky and scrollable. This ensures that the booking form remains visible to users even when they scroll down the page.

Show WhatsApp: #
Enable this option to add a link to your WhatsApp number, allowing customers to directly message you for inquiries.

Enquiry Message #
Enter the enquiry message to be displayed in the trip pricing widget. You can include [[Your Link Label]] in the message to show a clickable link that directs users to the enquiry form.

Enquiry Form #
You can configure the enquiry form in a single trip via WP Travel Engine > Settings > Display> Single Trip > Enquiry Form tab.
Show Enquiry Form: #
Enable this toggle to display the enquiry form on a single-trip post.

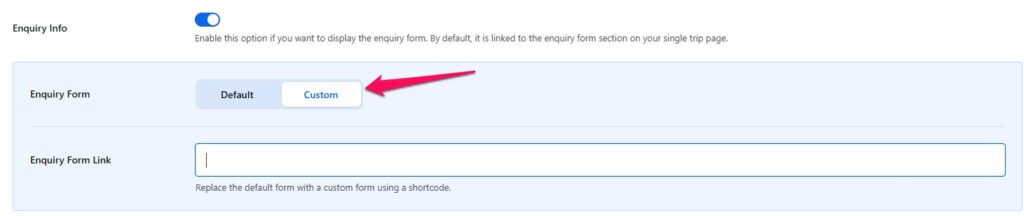
Enquiry Info: #
Enable this option if you’d like to display an enquiry form on the single trip page. By default, this will link to the enquiry section of the page.
However, if you enable this option, additional settings will become available:
Default: #
By default, the inquiry form will link to the enquiry section of the page, where users can submit their questions or requests.

Custom: #
If you choose the Custom option, you’ll be able to add a custom URL in the “enquiry Form Link” field. This allows you to link to a different page or external destination for the inquiry form, offering more flexibility in how you collect inquiries.
Custom Enquiry Form: #
Enable this option to use a custom enquiry form. Make sure that the custom form includes a notification email to receive user submissions. Then, add the shortcode of your custom form. WP Travel Engine is compatible with popular form plugins such as Gravity Forms, Ninja Forms, and WPForms.

GDPR Message: #
Enter the GDPR message for the trip Enquiry form.

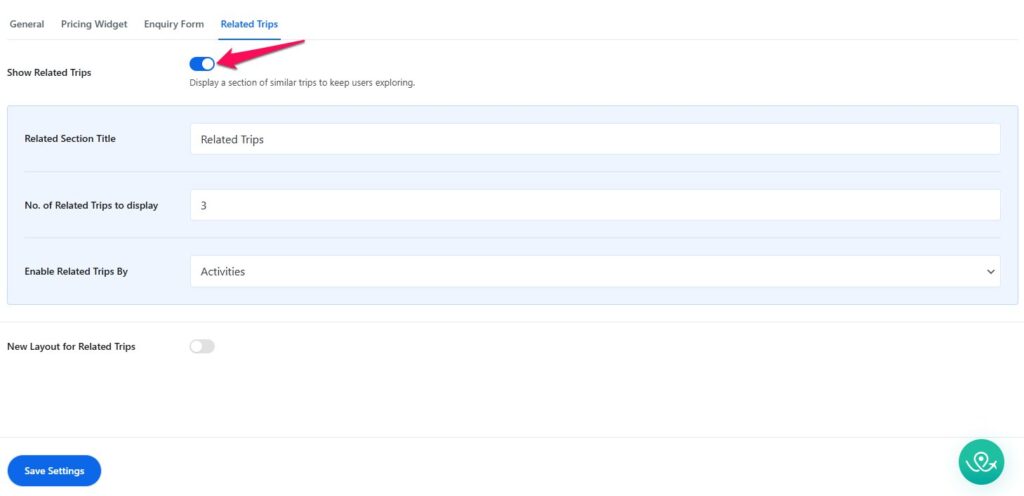
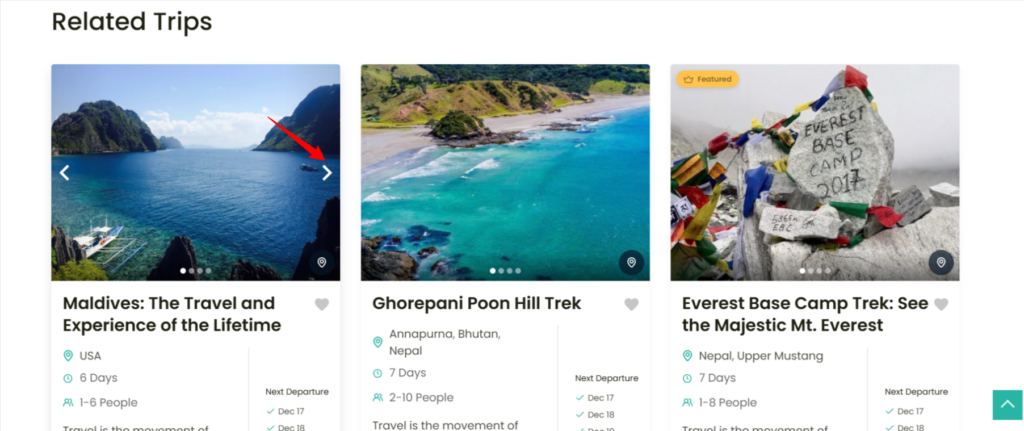
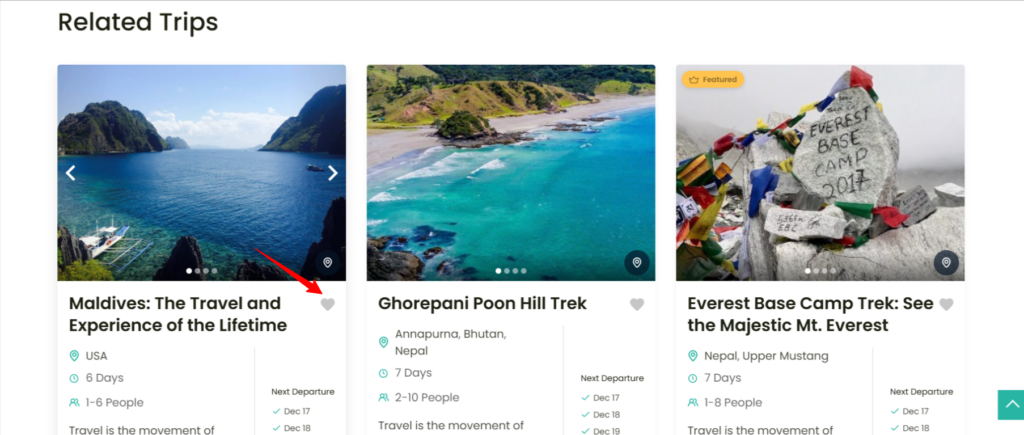
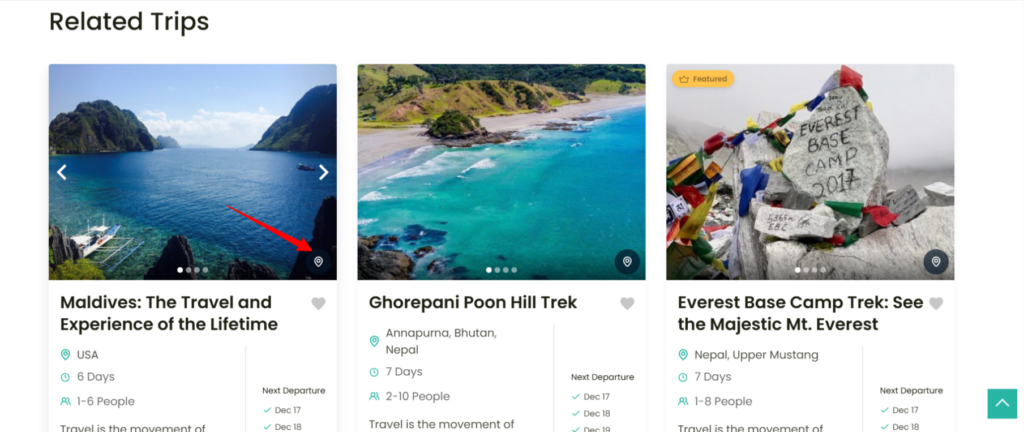
Show Related Trips: #
This option displays related trips on the single trip page. Once enabled, you’ll have the following configuration options:
- Related Section Title: Add a custom title for the related trips section.
- No. of Related Trips to Display: Set the number of related trips to show.
- Enable Related Trips By: Choose which taxonomies (e.g., Destinations, Activities, Trip Types, Difficulty, and Tags) to use for filtering related trips.
New Layout for Related Trips: #
Enable this option to use a new layout for displaying related trips. Once enabled, you’ll have additional settings:
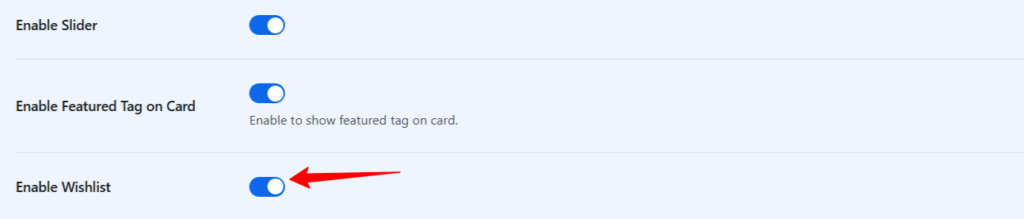
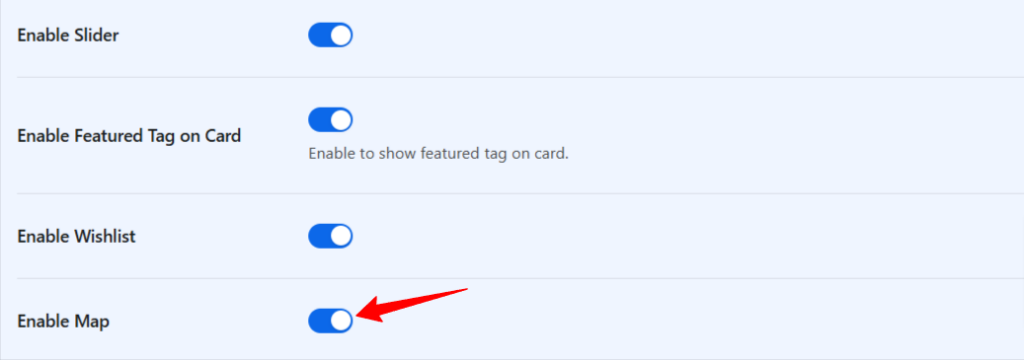
Enable Slider: #
- Enable this option: This will add a slider feature to the trip, allowing you to showcase images from the trip’s gallery.

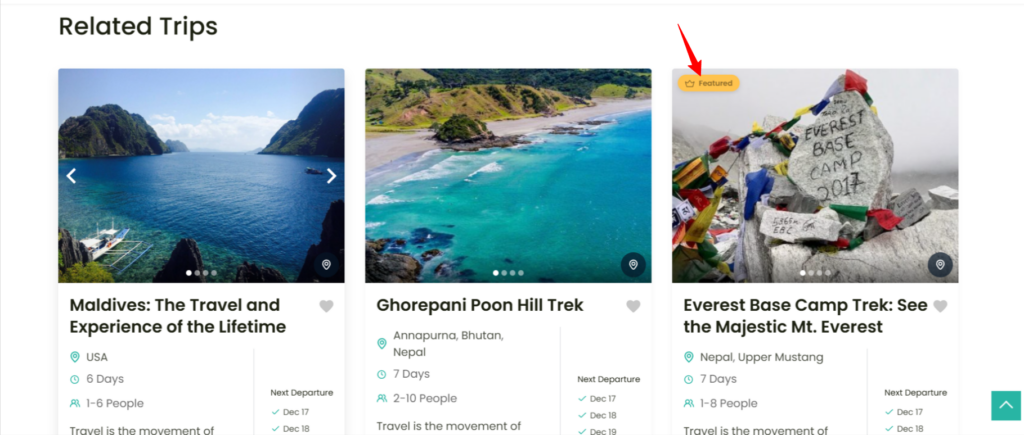
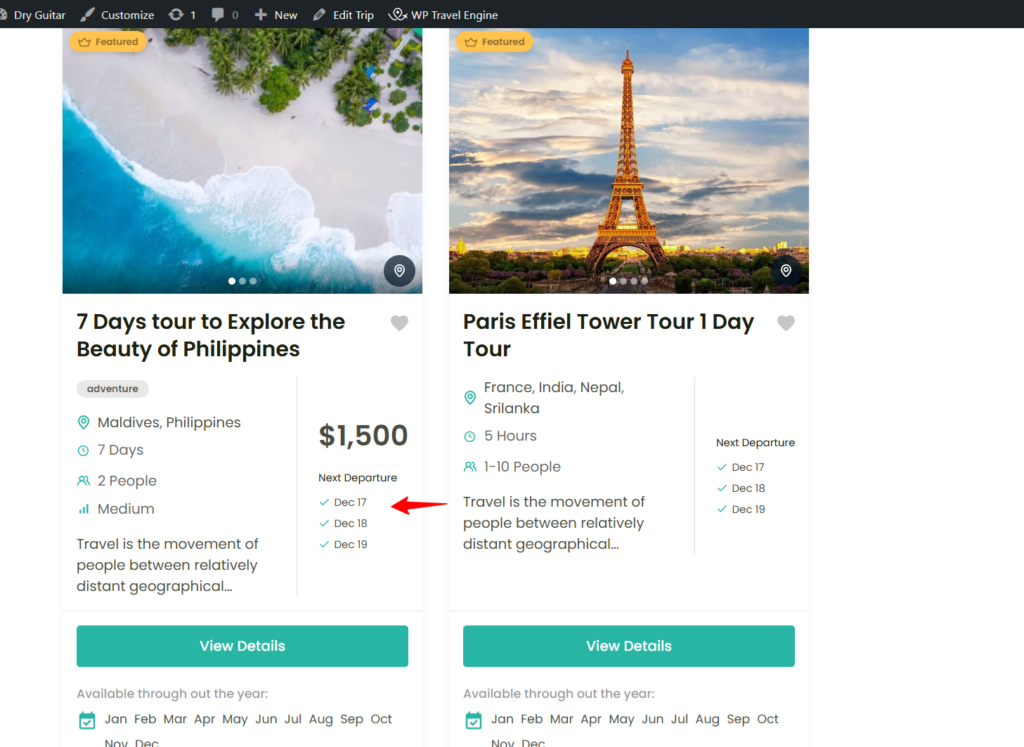
Show Featured Tag on Card: #
- Enable this option: A “Featured” tag will be displayed on trips that are marked as featured.

Show Wishlist: #
- Enable this option: A Wishlist icon will appear on the trip card, allowing users to save trips they are interested in.
Enable Map: #
A map icon will appear on the trip card. When clicked, a map of the trip’s location will be displayed on the individual trip page.
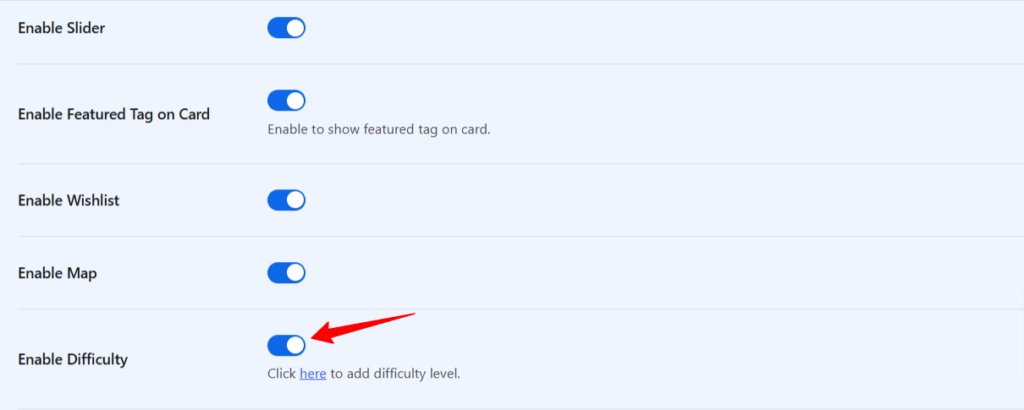
Enable Difficulty: #
- Enable this option: The difficulty level of the trip will be displayed on the trip card (e.g., Easy, Extreme, Hard).

Show Tag: #
- Enable this option: Tags associated with the trip will be shown on the trip card (e.g., Adventure, Family-friendly, etc.).


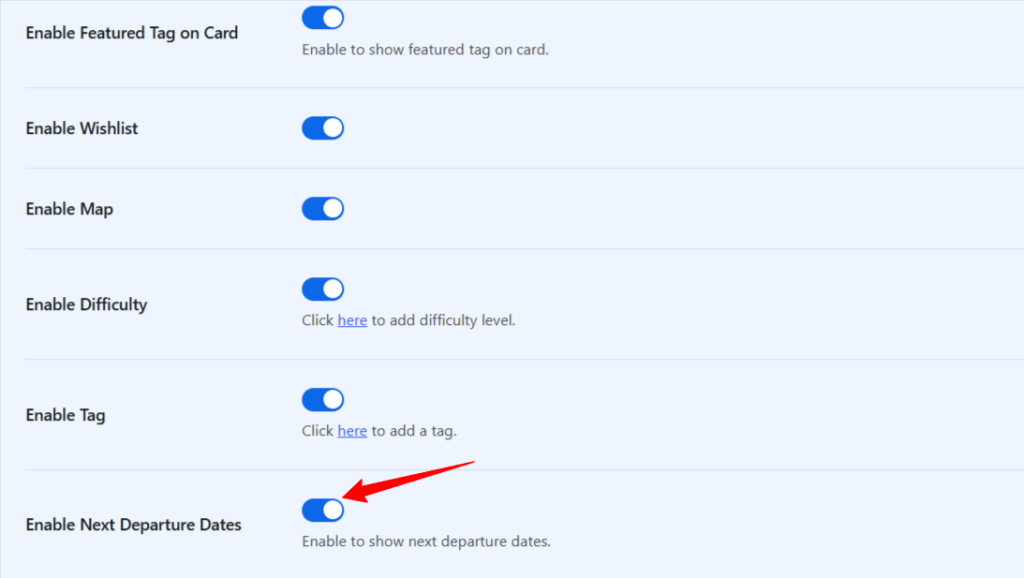
Show Next Departure Dates: #
- Enable this option: The next available departure dates will be shown on the trip card.This feature is only available after activating the FSD Plugin.
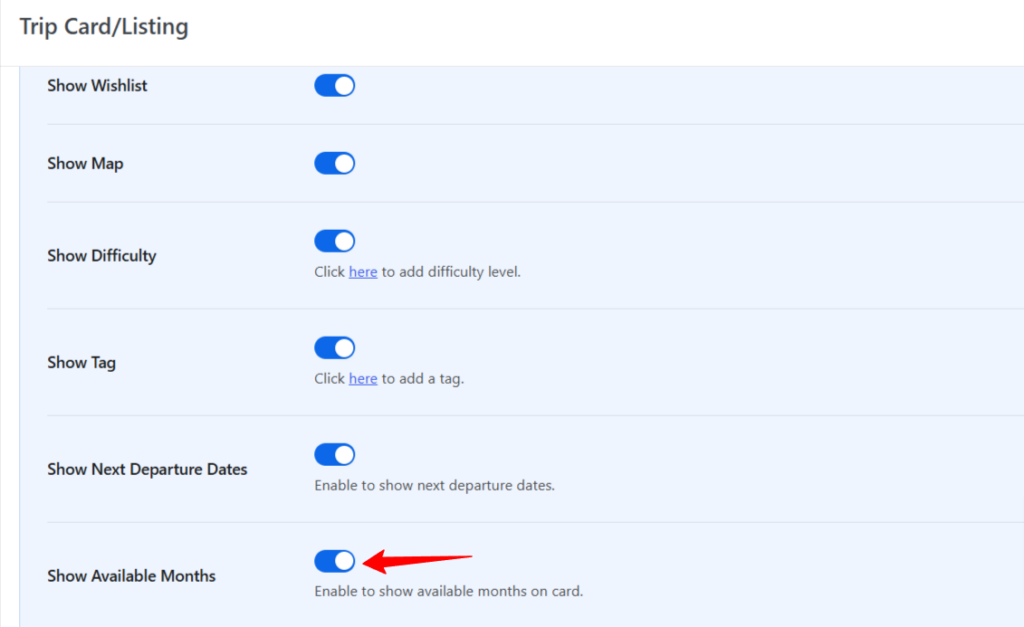
Show Available Months: #
- Enable this option: Available months for booking will be displayed on the trip card.
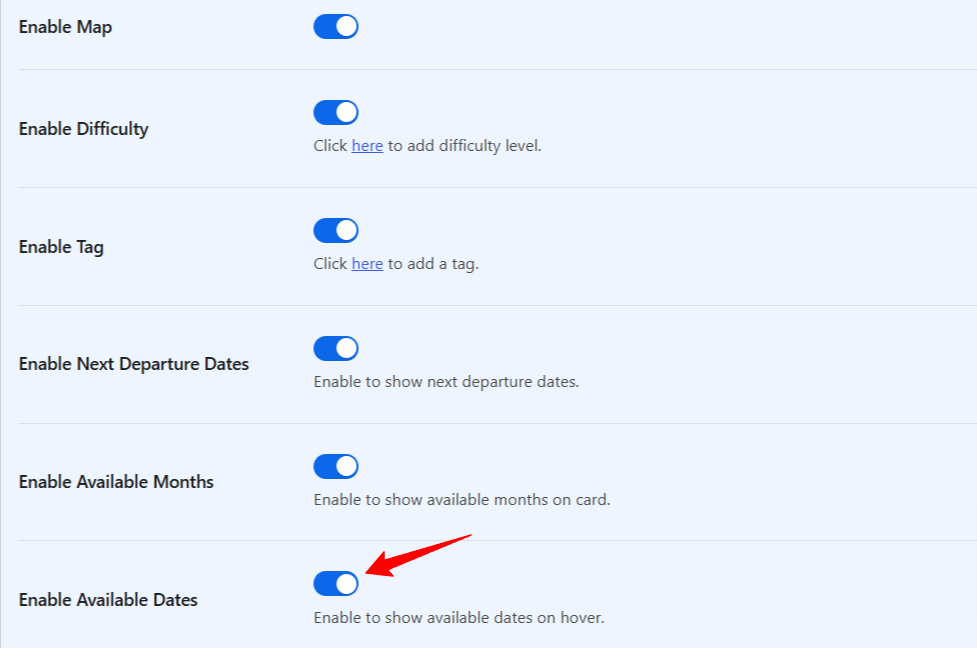
Show Available Dates: #
- Enable this option: Specific available dates for the trip will be shown on the card.This feature is only available after activating the FSD Plugin.
Feel free to contact our support team for any other assistance.