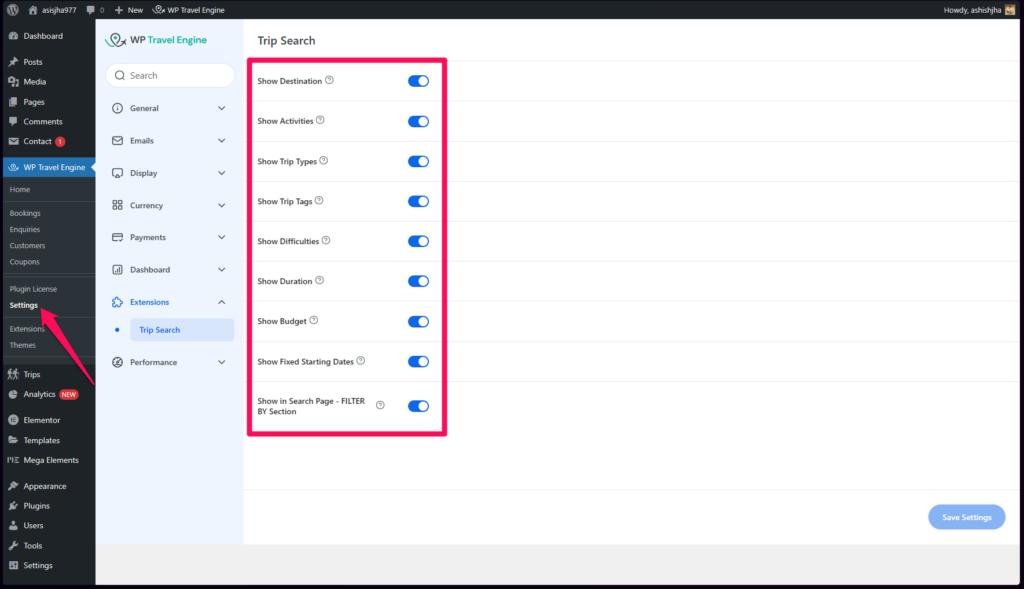
WP Travel Engine allows you to extend the functionality of your site through various premium extensions. All the premium extensions will be accessible via Dashboard > WP Travel Engine > Settings > Extensions. After installing the respective addon.
In the Extensions settings, you can configure the Trip Search extension to display various filters on the Trip Search Form. This helps users find trips that best match their preferences quickly and easily.
Accessing the Extensions Settings #
To configure the Trip Search extension, follow these steps:
- Log in to your WordPress admin dashboard.
- Navigate to Dashboard > WP Travel Engine > Settings.
- Click on the Extensions tab.
- Under the Trip Search section, you will find the settings that allow you to enable or disable different filters for the Trip Search Form.
Available Settings for Trip Search #
The Trip Search extension includes the following options to customize the fields visible in the Trip Search Form. You can enable or disable these fields by checking or unchecking the relevant checkboxes:
1. Show Destination #
- Description: This option controls whether the Destination field appears in the Trip Search Form.
- How it works: When enabled, users will be able to filter trips based on their desired destination.
- Setting: Enable the toggle to show the Destination field in the search form.
2. Show Activities #
- Description: This option enables the Activities field in the Trip Search Form.
- How it works: When enabled, users can filter trips by specific activities they are interested in (e.g., hiking, diving, cultural experiences).
- Setting: Enable the toggle to show the Activities field.
3. Show Trip Types #
- Description: This option allows you to display the Trip Types field in the Trip Search Form.
- How it works: Enabling this field lets users filter trips based on the type of trip, such as group tours, private tours, adventure trips, etc.
- Setting: Enable the toggle to show the Trip Types field.
4. Show Trip Tags #
- Description: This option displays the Trip Tags field in the Trip Search Form.
- How it works: Trip tags can be used to categorize trips further (e.g., family-friendly, off-the-beaten-path). This setting allows users to filter trips by these tags.
- Setting: Enable the toggle to show the Trip Tags field.
5. Show Difficulties #
- Description: The Difficulties field allows users to filter trips based on the level of difficulty (e.g., easy, moderate, hard).
- How it works: Enabling this option helps users narrow down trips that match their fitness or adventure preferences.
- Setting: Enable the toggle to show the Difficulties field.
6. Show Duration #
- Description: This setting enables the Duration field, allowing users to filter trips based on trip length (e.g., 1-3 days, 4-7 days, etc.).
- How it works: Users can choose the trip duration that fits their schedule when searching for trips.
- Setting: Enable the toggle to show the Duration field.
7. Show Budget #
- Description: This option enables the Budget field in the Trip Search Form.
- How it works: Users can filter trips based on their budget range, helping them find trips that match their financial constraints.
- Setting: Enable the toggle to show the Budget field.
8. Show Fixed Starting Dates #
- Description: This setting controls whether the Dates field is displayed in the Trip Search Form. It allows users to filter trips by specific starting dates.
- How it works: If enabled, users can search for trips with fixed starting dates, making it easier to find trips that align with their schedule.
- Setting: Enable the toggle to show the Dates field.
9. Show in Search Page – FILTER BY Section #
- Description: This setting enables the selected fields to also appear in the FILTER BY section on the search results page.
- How it works: When enabled, the same filters you configured above will be displayed in the FILTER BY section on the search results page, allowing users to narrow down their results without returning to the search form.
- Setting: Enable the toggle to apply the selected fields to the FILTER BY section on the search results page.

How to Enable and Configure These Options #
- Navigate to Dashboard > WP Travel Engine > Settings > Extensions.
- In the Trip Search section, you will see a list of options with a toggle button next to each one.
- To enable a field, simply click on the toggle button next to the field name (e.g., Show Destination, Show Activities, etc.).
- After making your changes, click the Save Changes button to apply your new settings.
Best Practices for Using Trip Search Filters #
- User Experience: Only enable the fields that are relevant to your trips and target audience. Too many options can overwhelm users and clutter the search form.
- Categories & Tags: Make sure your trips are properly categorized and tagged in your content management system so the filters work effectively.
Conclusion #
The Trip Search extension in WP Travel Engine provides a powerful way to customize your trip search form with various filtering options. By enabling or disabling filters such as Destination, Activities, Trip Types, and more, you can make it easier for users to find trips that match their preferences, ultimately enhancing their experience on your site.