Introduction #
The Itinerary Downloader is a WordPress plugin extension that generates downloadable PDF brochures for your trip. Visitors can download trip details directly from your site, save them for later, or share them with others.
This add-on not only improves the user experience but also helps you capture leads with email forms and Mailchimp integration.
Benefits #
- Easy access for travellers: Visitors can download itineraries instantly in a PDF format.
- Professional branding: Include your company logo, description, and custom colors in each brochure.
- Lead generation: Collect emails before allowing downloads and automatically add them to your Mailchimp list.
- Offline planning: Users can save itineraries to view later, even without internet access.
Prerequisites #
Before using the add-on, make sure:
- You have WP Travel Engine Core Plugin installed and activated.
- You have purchased and installed the Itinerary Downloader Add-on.
- Your WP Travel Engine plugin is updated to version 6.5.0 or later.
How to Install the Trip Fixed Starting Dates Add-on
General Settings #
You can configure the add-on by going to: Dashboard → WP Travel Engine → Settings → Extensions → Itinerary Downloader
- Enable Itinerary Downloader
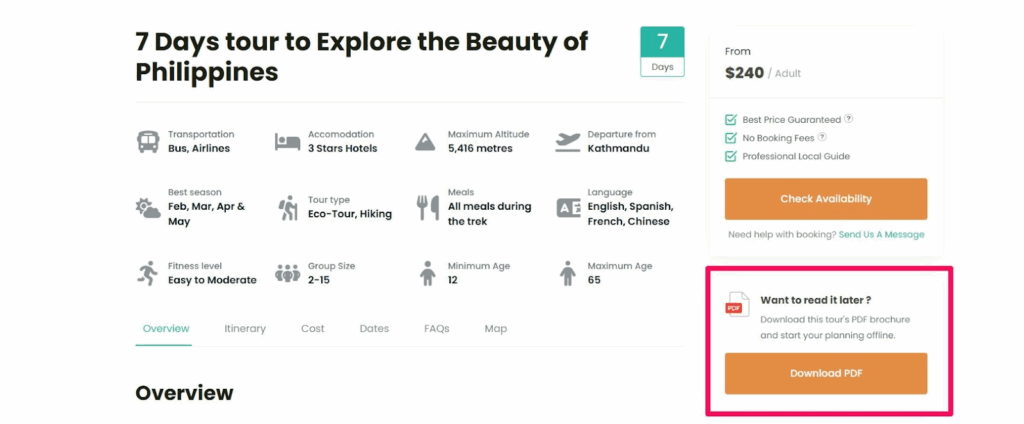
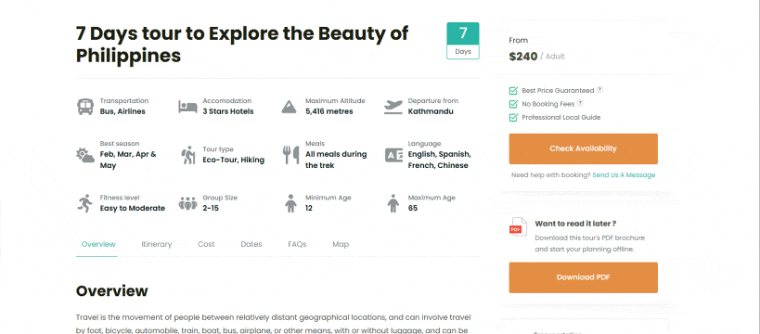
Activate the PDF download feature on your site by turning this option on. Once enabled, visitors will be able to download a PDF version of the tour’s details directly from the trip page. This feature allows users to save the tour brochure for offline use, improving their overall experience on your site.
2. Button Label
This setting lets you customize the text that appears on the download button. By default, the button is labeled “Download PDF.” You can change this label to anything you want, such as “Get Your Itinerary,” “Download Tour Info,” or any other wording that fits the style of your website. This helps you customize the call to action based on your branding or user preference.
3. Section Title
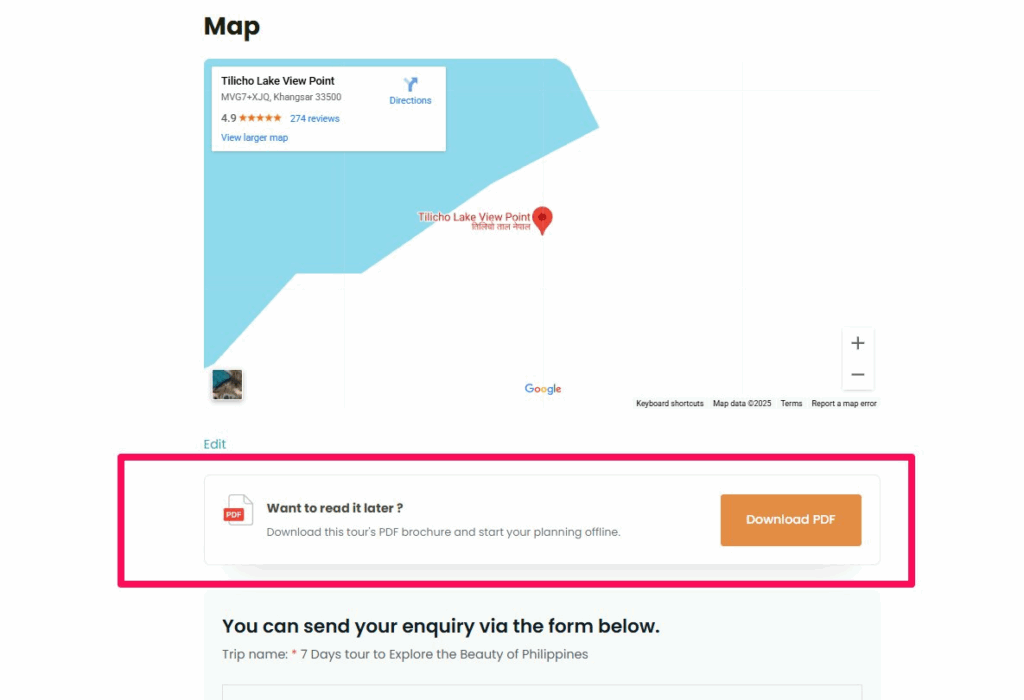
Here, you can add a title or heading that appears above the PDF download button. The default title is “Want to read it later?” You can change this to something more relevant to your audience, such as “Download Your Tour Details” or “Save This Tour for Later.” This title helps provide context and draws attention to the PDF download button, encouraging users to take action.
4. Description
In this field, you can provide a brief description that explains the purpose of the download button. The default description is: “Download this tour’s PDF brochure and start your planning offline.” This text can be customized to better reflect your brand’s voice or provide more specific instructions, such as “Save this PDF for future reference or share it with friends!” A clear, concise description helps visitors understand the value of the feature and can improve conversion rates.
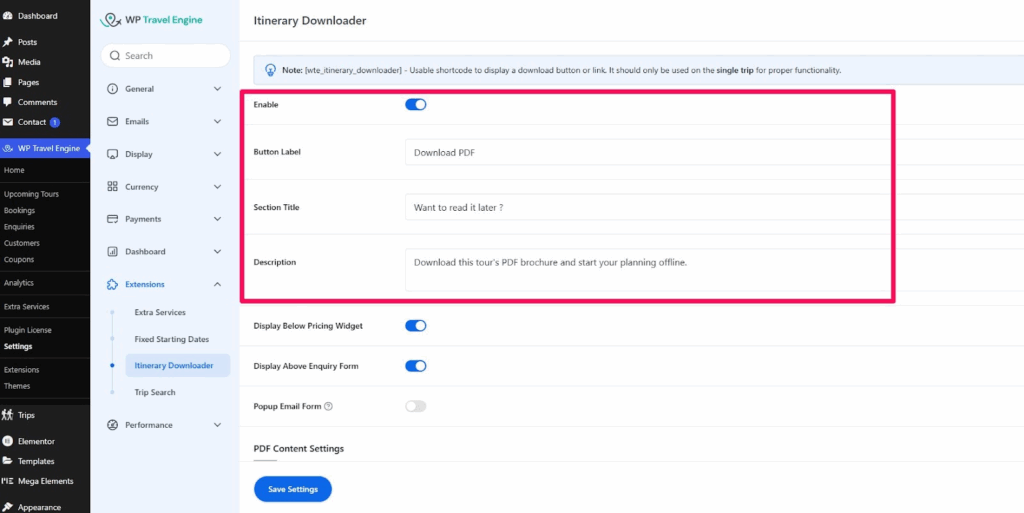
5. Display Below Pricing Widget
This option allows you to display the PDF download button below the pricing section in the sidebar of the single trip page. By enabling this setting, the download button will be placed right beneath the trip’s pricing details, making it easily accessible to users who have reviewed the pricing and are ready to download the itinerary.
6. Display Above Enquiry Form:
If you prefer to have the download button placed above the enquiry form in the sidebar of the single trip page, this option allows you to do so. By enabling this, the “Download PDF” button will be shown right above the trip’s enquiry form, providing easy access for users who are interested in downloading the itinerary before they make an inquiry or request more details.
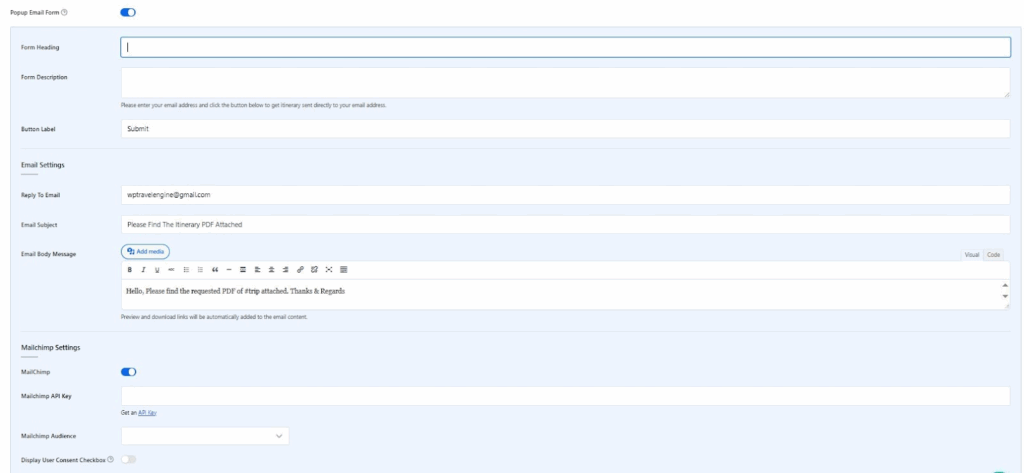
7. Display Popup Email Form:
Enable this option if you wish to collect emails before allowing users to download the itinerary. This feature is particularly useful for building your mailing list and engaging users who are interested in receiving the trip details directly in their inbox.
When you enable the Popup Email Form, travelers will be required to enter their email address before they can download the itinerary PDF.
Settings for the Popup Email Form: #
- Form Heading: This is the title of the email form. For example: “Get this itinerary in your inbox.”
- Form Description: Provide a brief explanation to users, such as: “Please enter your email to get the itinerary sent to you directly.”
- Button Label: Customize the button text, such as “Submit” or “Get PDF.”
- Reply To Email: Specify the email address that will be used to send the PDF. For example, use a business email like
[email protected]. - Email Subject: Customize the subject line for the email, such as: “Your Requested Itinerary PDF.”
- Email Body Message: Craft a message that will be sent with the PDF. For example: “Hello, Please find the requested PDF of #trip attached. Thanks & Regards.”
Mailchimp Settings (optional): #
- Mailchimp API Key: If you want to automatically add users to your Mailchimp audience, enter your Mailchimp API key here.
- Mailchimp Audience: Select the audience (list) where new email entries will be added.
- User Consent Checkbox: Optionally, you can enable a checkbox to ask users for consent before adding them to your mailing list. Example: “I agree to receive emails and updates from [Your Company].”
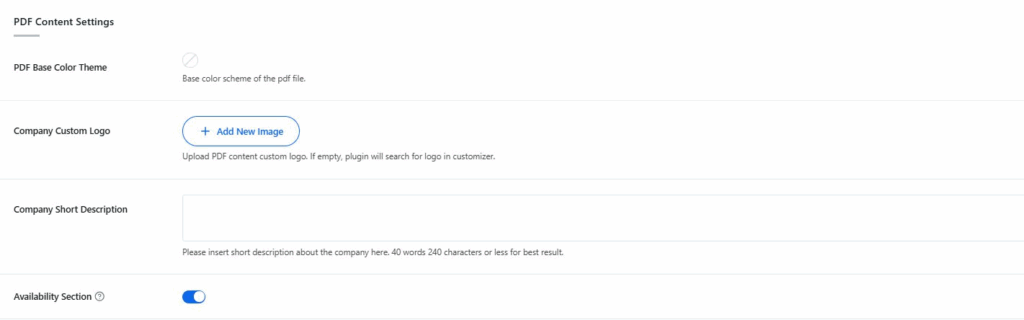
8. PDF Content Settings #
Here you can control how the PDF looks and what information is included.
- PDF Base Color Theme: Choose the primary color scheme for the PDF file. This makes your brochure visually consistent with your brand.
- Company Custom Logo: Upload your company logo to be displayed in the PDF. If left empty, the system will use the logo set in the theme customizer.
- Company Short Description: Add a short description of your company. This will appear inside the PDF as an introduction.
- Availability Section: Enable this to include available trip dates inside the PDF. By default, all the trip content will display in PDF.
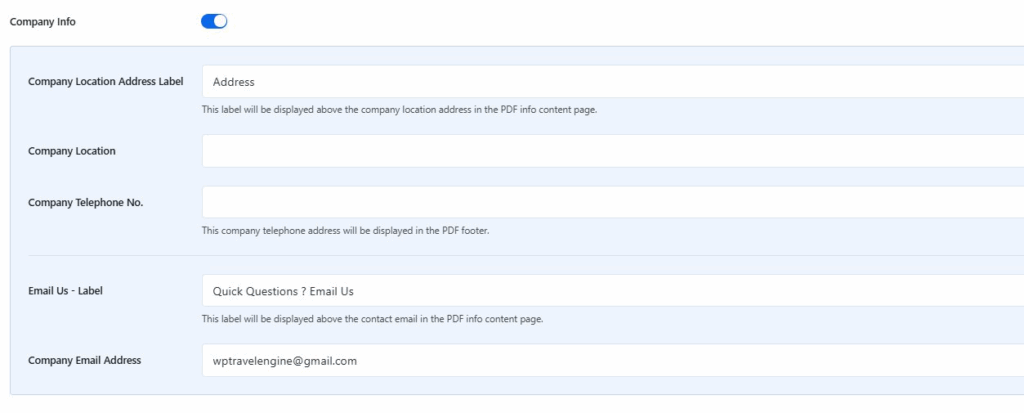
9. Company Info Settings
Once you enable the Company Info toggle, you will find the settings below. These settings allow you to display your company contact details inside the PDF brochure.
- Company Location Address Label: Example label “Address.”
- Company Location: Add your office or business location.
- Company Telephone Number: Add your phone number.
- Email Us – Label: Example label “Quick Questions? Email Us.”
- Company Email Address: Add your business email to display in the PDF.
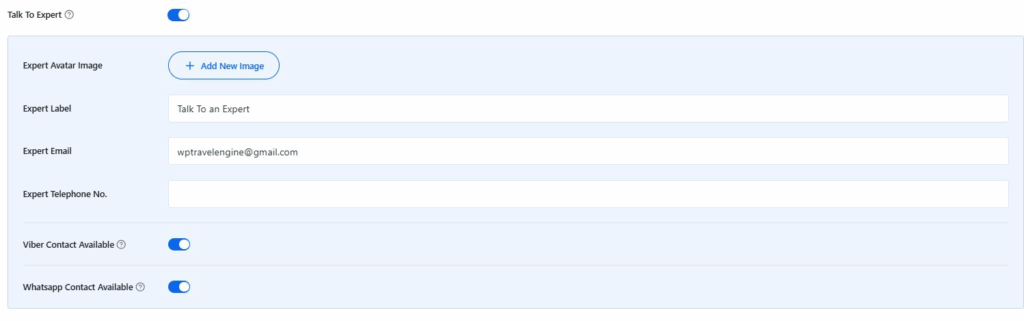
10. Talk to Expert Section
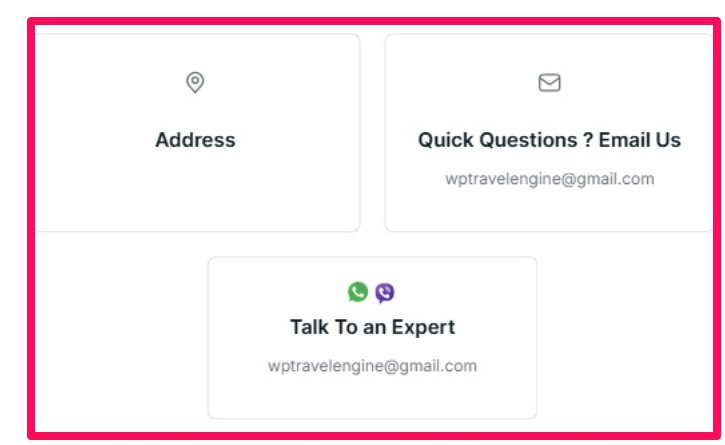
Once you enable the Talk to Expert toggle, you will find the settings below. This section adds a “Talk to an Expert” block inside the PDF to build trust and encourage direct contact.
- Expert Avatar Image: Upload an image of your representative.
- Expert Label: Add a label for Expert. Example: “Talk to an Expert.”
- Expert Email: Add the expert’s email.
- Expert Telephone: Add the expert’s direct contact number.
- Viber / WhatsApp Contact Available: Turn on if you want to provide Viber or WhatsApp details for quick chat support.
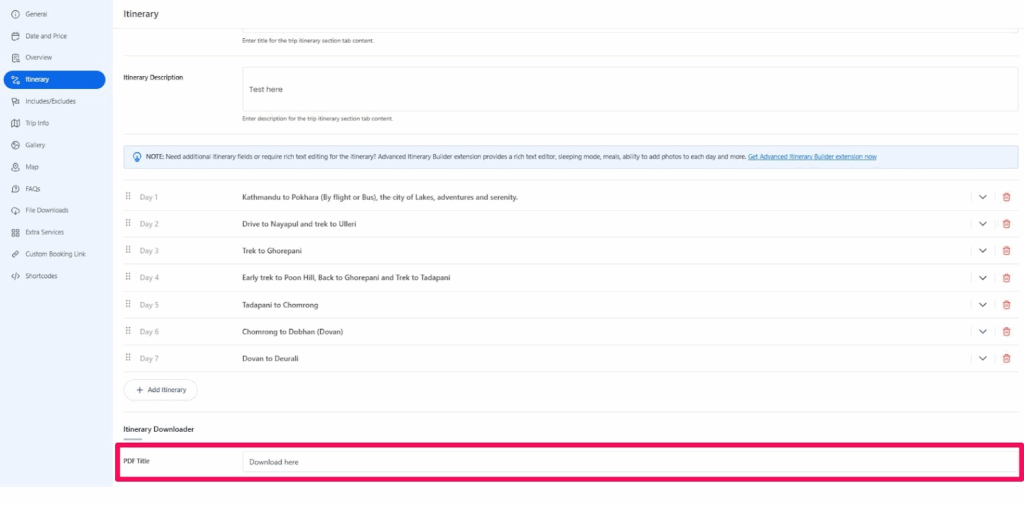
Single Trip Setting of the Itinerary Downloader Addon #
- Go to Trips → Edit a Trip.
- Scroll to the Itinerary Downloader section in the Itinerary tab.
- Add a PDF Title for that trip.
- Example: Trip Itinerary PDF.
- Save changes.
Now, on the frontend, visitors will see the Download PDF button on the trip page.
Shotcode #
You can also display the button anywhere with this shortcode:
[wte_itinerary_downloader]
Troubleshooting #
- PDF not generating: Ensure the add-on is enabled and your trip has an itinerary set.
- Wrong logo: Upload a custom logo under settings or check your theme’s customizer logo.
- Emails not sending: Verify the Reply To Email address and check if emails are landing in spam.
- Shortcode not working: Make sure you are using it on a single trip page.
FAQ #
Can I use the shortcode on the homepage? #
No, it only works on single trip pages.
Can I force users to enter an email before downloading? #
Yes, enable the Popup Email Form.
Will the PDF include company details? #
Yes, if you configure the Company Info and Talk to Expert sections.
Can I customize the look of the PDF? #
Yes, you can change the theme color, upload your logo, and add background images..
Feel free to contact our support team for any other assistance.