The User Dashboard in WP Travel Engine offers flexible options to manage user accounts and registrations, enhancing the booking experience for your customers. These settings allow you to automate account creation, enforce registration for bookings, and streamline the signup process.
This guide explains each available setting and provides instructions on configuring the User Dashboard in WP Travel Engine.
Accessing the User Dashboard Settings #
To configure the User Dashboard:
- Log in to your WordPress Admin Dashboard.
- Navigate to WP Travel Engine > Settings > Dashboard > User Dashboard.
- Here, you will find the options to configure account management and registration preferences.
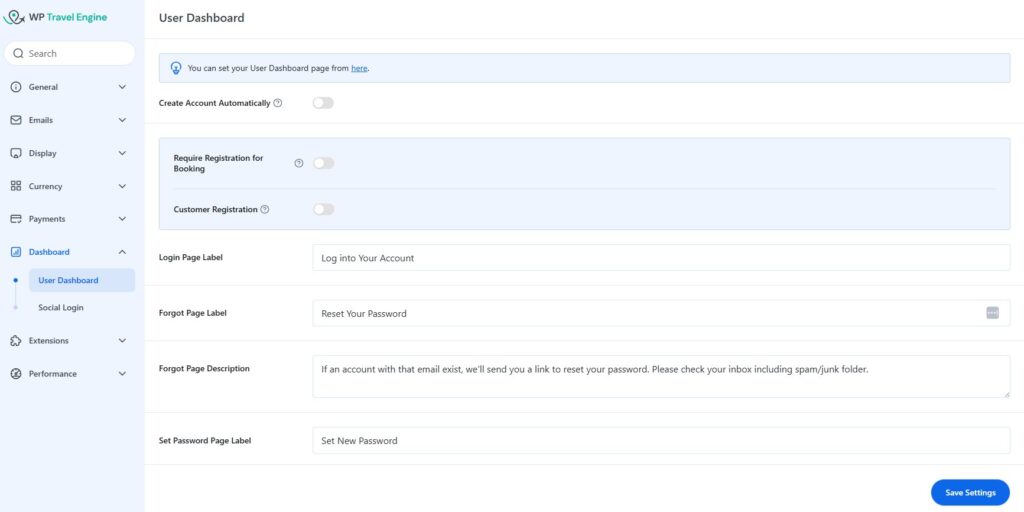
Settings in the User Dashboard #
- Create Account Automatically: Enabling this toggle will automatically create a user account (username and password) when a customer books a trip. The account details will be sent to the customer via email.

- If manual signup or registration is required on your website, ensure this option is Disabled.
- Require Registration for Booking: Enabling this toggle requires customers to sign in or create an account to complete trip bookings. Without an account, they cannot proceed to the checkout page.
- Customer Registration: This toggle allows or restricts customers from creating new accounts on the My Account page.

- Login Page Label: Enter a label for the Login page.
- Forgot Page Label: Enter a label for the Forgot Password page.
- Forgot Page Description: Add a description for the Forgot Password page.
- Set Password Page Label: Enter a label for the Set Password page.
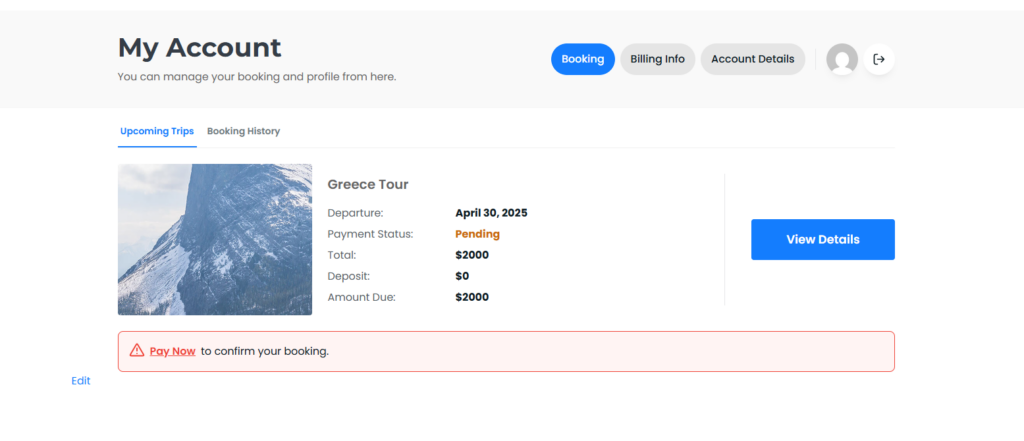
User Dashboard Overview #
The User Dashboard allows customers to manage their trip bookings and personal profile with ease. Below is a breakdown of the different sections and features included in the dashboard:
1. Navigation Tabs #
- Booking: View and manage upcoming and past bookings.
- Billing Info: Access and update billing details.
- Account Details: Update user profile information.
2. Upcoming Trips #
Displays a list of active or future bookings. Each trip card includes the following information:
- Trip Name (e.g., Greece Tour)
- Departure Date: When the trip is scheduled to start (e.g., April 30, 2025).
- Payment Status: Indicates whether the payment is complete or pending.
- Total Cost: The full price of the trip.
- Deposit: Amount already paid as a deposit.
- Amount Due: Remaining balance that needs to be paid.
3. Trip Management #
- View Details: Button to access full booking information and itinerary.
- Edit: Allows users to modify booking details (if permitted).
- Pay Now Prompt: Displays if the payment is still pending. Users are reminded to complete the payment to confirm their booking. This is emphasized with a red warning box and a payment button for quick access.
4. Booking History #
A separate tab (not selected in the image) that likely shows past or completed trips for the user’s reference.
For further assistance, refer to the WP Travel Engine documentation or contact support.