
- Introduction
- Key Features & Benefits
- What You'll Need Before You Start
- Installing the Members Plugin
- Verification
- Understanding WP Travel Engine's Permissions
- Setting Up Permissions for a Role
- Creating a User and Assigning the Role
- What the Booking Agent Sees on Their Dashboard
- Good to Know
- Troubleshooting
- Frequently Asked Questions
- Do I really need the Members plugin?
- Will any of this affect my own access as the site administrator?
- Can I give someone access to bookings but not trips?
- What happens if I give someone View access but not Manage access?
- Can I use a role that already exists in WordPress, like Editor or Author?
- If I change someone's permissions later, do they need to do anything?
Introduction #
If more than one person works on your travel site, you do not want everyone to have the same access.
For example, you might run a multi-day trekking company and hire someone to handle bookings. You want that person to see and manage bookings. You do not want them changing your trip prices or payment settings.
Roles and Capabilities lets you decide exactly what each person can view or manage inside WP Travel Engine, area by area. Once you know where to look, setting this up is straightforward.
Key Features & Benefits #
Here is what this feature helps you do on a day-to-day tour business site.\Set Up User Roles and Permissions in WP Travel Engine
| Feature | Benefit |
|---|---|
| Role-based access control | Give each team member exactly the access they need, from a quick look at bookings to full control, without ever sharing your admin login |
| Separate view and manage permissions | Let someone check on enquiries or bookings without giving them the power to change or delete anything |
| Protected settings and reports | Keep pricing rules, payment setup, and your Analytics Dashboard visible only to the people you choose |
| Works with roles you already use | Apply these permissions to your existing WordPress roles, or create a new one just for your booking staff |
| No impact on your own access | Administrators and Editors keep full access automatically, so nothing changes for you when you turn this on |
Once you know the main benefits, the next step is making sure you have what you need before you begin.
What You’ll Need Before You Start #
- WP Travel Engine is installed, activated, and updated to the latest version.
- The free Members plugin is installed and activated.
Installing the Members Plugin #
WP Travel Engine does not have its own permissions screen. Instead, it adds its permissions into Members, a free WordPress plugin built for managing user roles. A role is a way to group people who should have the same permissions.
Before you start clicking around, it helps to know where you are working. Your WordPress dashboard is the admin area of your WordPress site, where you manage everything. The sidebar is the left-hand menu in your WordPress dashboard.
This step matters because WP Travel Engine only shows its permission settings inside the Members plugin. Once Members is installed, you will have a place to control who can access bookings, trips, enquiries, and more.
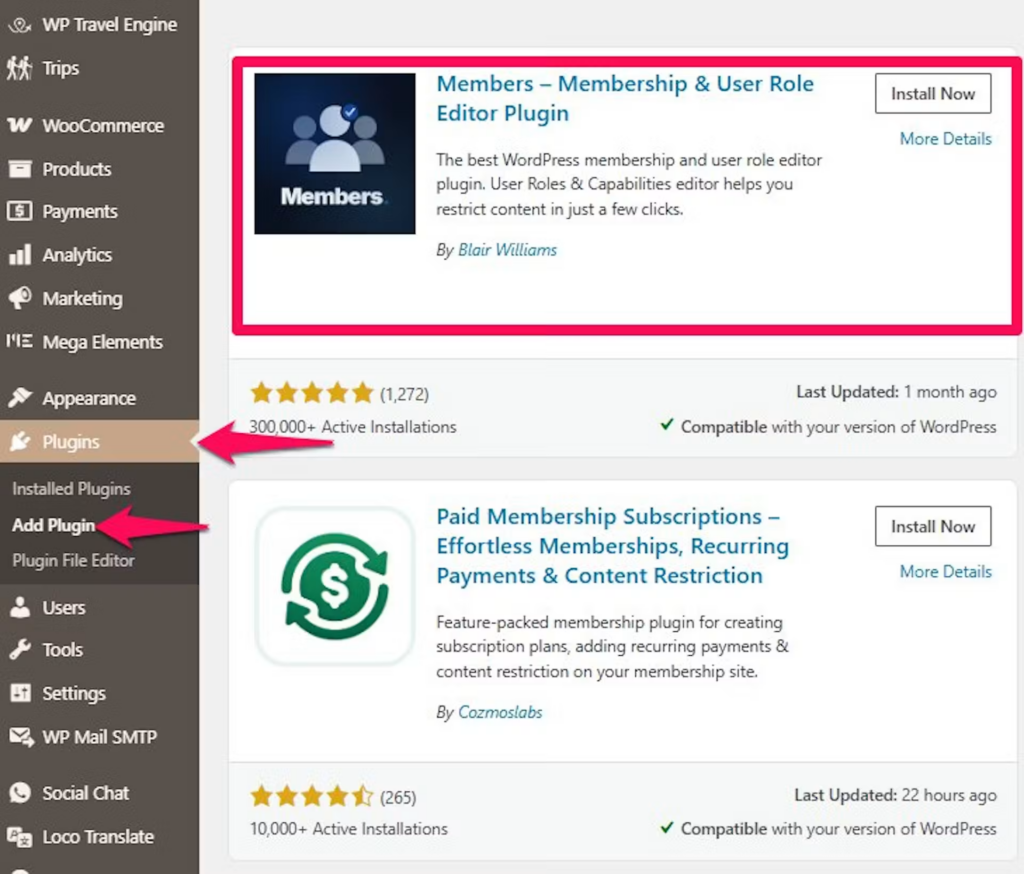
- Open the plugin installer. Go to your WordPress Dashboard. In the left-hand menu, click Plugins, then Add New Plugin.
- Search for Members. Use the search box to look for Members by MemberPress.
- Install and activate the plugin. Click Install Now. When the installation finishes, click Activate.
Now that Members is active, it is worth checking that WP Travel Engine is connected to it properly.
Verification #
This check confirms everything is connected the way it should. It only takes a minute.
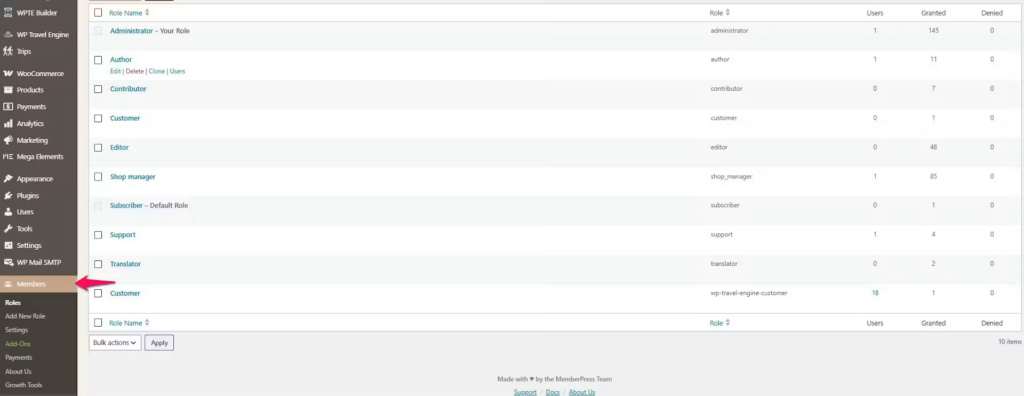
- Check for the Members menu: Go to your WordPress Dashboard and look at the left-hand menu. You should now see a new Members menu as its own item, separate from Users.
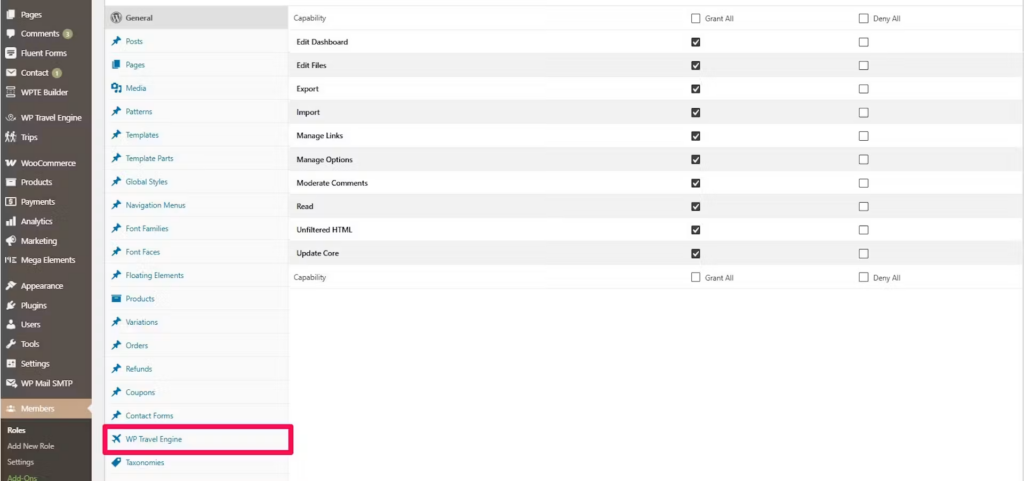
- Open a role and look for the WP Travel Engine tab: Click Members > Roles. Open any role. Then check for a WP Travel Engine tab alongside the other capability groups. It is marked with a small airplane icon.
If you can see both the Members menu and the WP Travel Engine tab, you are ready to set permissions.
Understanding WP Travel Engine’s Permissions #
Once Members is active, WP Travel Engine groups permissions by the part of your travel business they control.
| Area | What “View” allows | What “Manage” allows |
|---|---|---|
| Trips | See the trip list and open individual trips | Create, edit, and delete trips |
| Bookings | See the bookings list and open booking details | Create, edit, and delete bookings |
| Enquiries | See customer enquiries | Respond to and manage enquiries |
| Customers | See customer records | Edit and manage customer records |
| Coupons | See existing discount coupons | Create, edit, and delete coupons |
Three more permissions stand on their own, without a separate View and Manage split:
- Settings: Manage access to WP Travel Engine’s settings pages.
- Analytics: View access to the Analytics Dashboard.
- Logs: View access to the activity logs.
If you hire someone to check the bookings list every morning and flag anything that needs attention, give them View access to Bookings. If you also want them to confirm or cancel bookings, give them Manage access instead.
Now that you know what each permission controls, you can choose what a role should be allowed to do.
Setting Up Permissions for a Role #
This is the part where you decide exactly what each role can do. You can edit a role you already use or create a new one for a staff member such as a booking agent.
- Open the Roles screen. Go to your WordPress Dashboard and click Members > Roles in the left-hand menu
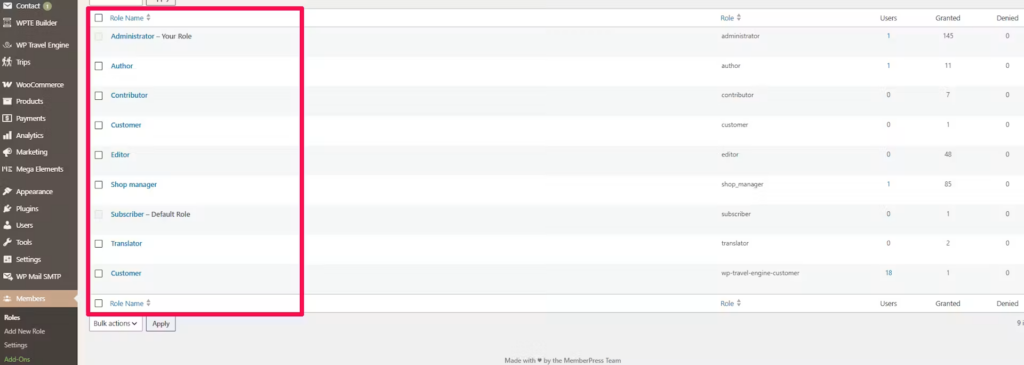
2. Choose an existing role or create a new one. To edit an existing role, click its name in the list. To create a new role, click Add New Role above the list.
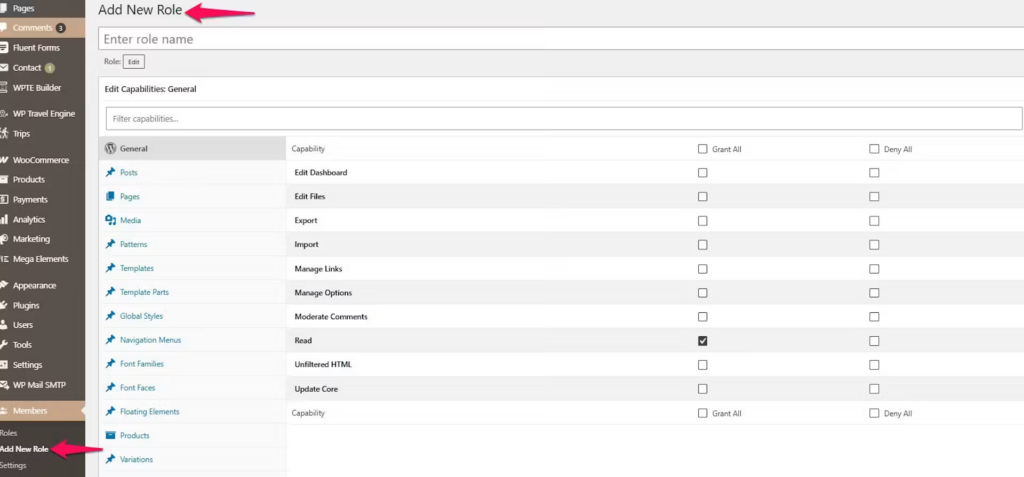
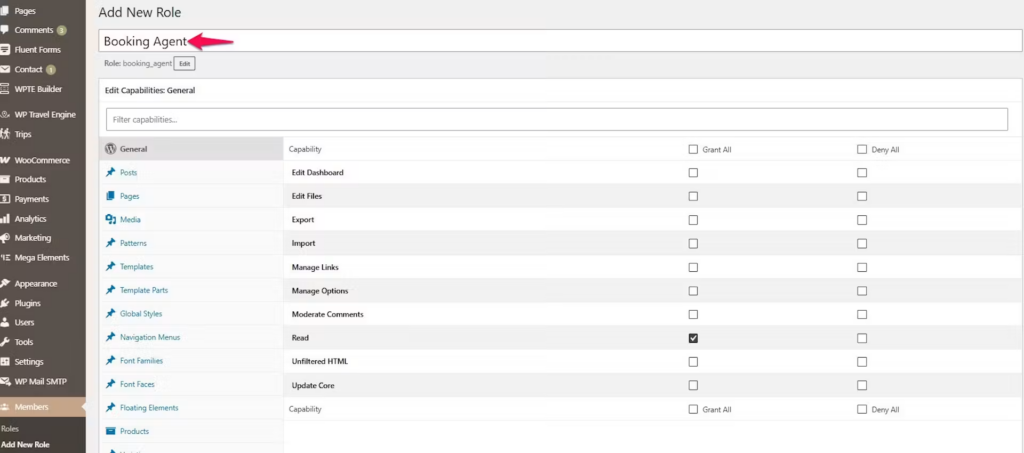
3. Name the new role if you are creating one: If you are adding a new role, type a name into the Role Name field at the top of the screen. For example, you might use Booking Agent.
4. Open the WP Travel Engine permissions: The screen opens on the General tab by default. Scroll down the list of capability group tabs until you reach WP Travel Engine, then click it.
5. Choose what this role can access: Tick the boxes for the areas this role should access. Choose View for read-only access. Choose Manage for full control of that area.
6. Save the role: Scroll back up and confirm the role name is correct. Then scroll to the bottom of the screen and click Add Role. If you are editing an existing role, click Update Role.
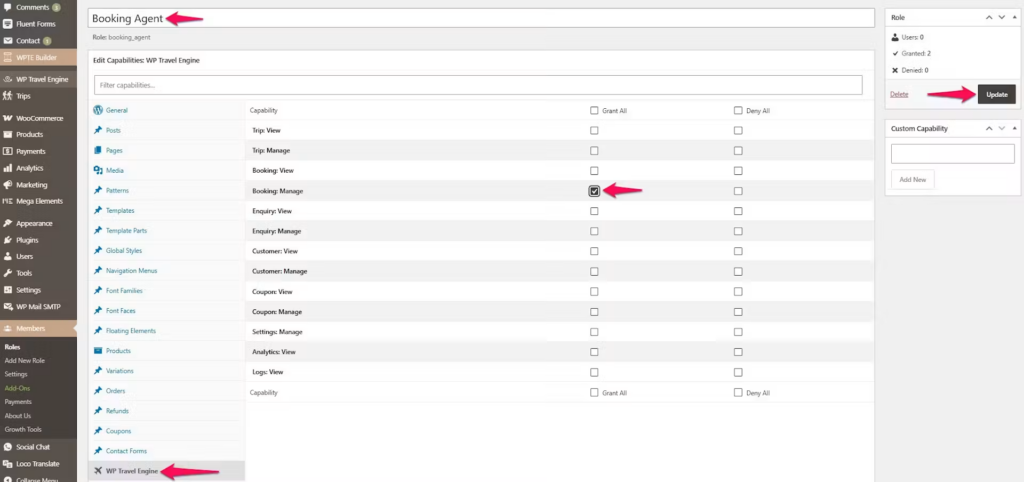
If you are setting up a Booking Agent role, a common setup is:
- Tick Manage next to Bookings and Enquiries so they can handle customer questions and booking changes.
- Tick View next to Customers so they can look up customer details but not edit them.
- Leave Trips, Coupons, Settings, Analytics, and Logs unchecked.
This works well for a trekking company, day tour operator, or group tour business where one staff member handles incoming bookings but should not change trip setup or pricing.
Once the role is ready, the next step is to create a login for the person who will use it.
Creating a User and Assigning the Role #
Now that the role is ready, you can create a login for your staff member and assign that role to them.
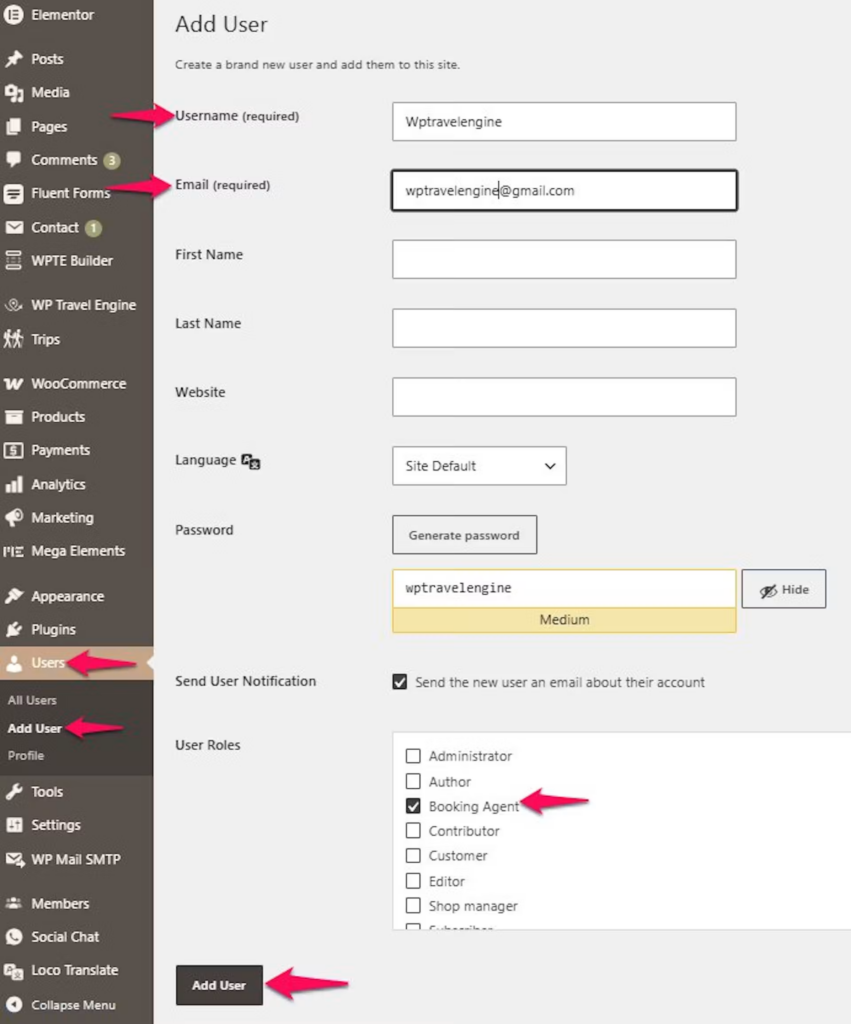
- Open the Add User screen. Go to your WordPress Dashboard and click Users > Add User.
- Enter the staff member’s details. Fill in their Username, Email, and the rest of their details as you normally would.
- Choose the correct role. Scroll down to the Role dropdown and select the role you created earlier, such as Booking Agent.
- Create the user account. Click Add User at the bottom of the screen.
Once the account is created, it helps to know what that staff member will see when they log in.
What the Booking Agent Sees on Their Dashboard #
When this account logs in, the dashboard looks much simpler than yours.
In the left-hand menu, they will only see the WP Travel Engine menu with Bookings and its Enquiries and Customers submenus. They will not see Trips, Coupons, Settings, Analytics, or Logs.
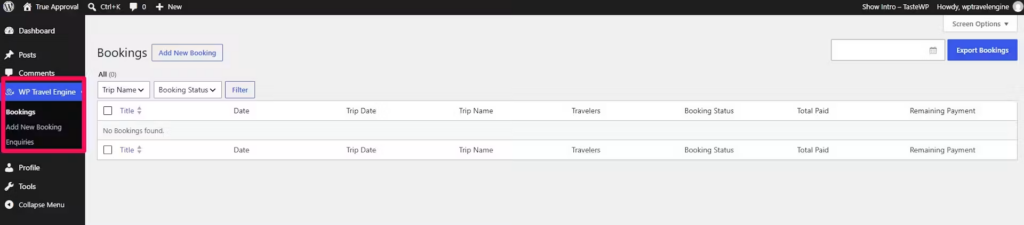
Inside Bookings, they can open the bookings list and manage individual bookings and enquiries because they have Manage access there. Because their Customers access is View only, they can look up customer details but they will not see options to edit or delete a customer record.
That smaller menu is exactly what you want. It keeps your staff focused on their work and away from areas they do not need.
Good to Know #
If something does not look right, the fixes are usually quick.
Troubleshooting #
The Members menu isn’t showing up in my sidebar #
Deactivate and reactivate the Members plugin from the Plugins screen. Then check your sidebar again. If it still does not appear, make sure WP Travel Engine is active as well.
I can’t find the WP Travel Engine tab when editing a role #
This tab only appears if both WP Travel Engine and the Members plugin are active. Check that both are turned on in your Plugins screen. If both are active and the tab is still missing, deactivate and reactivate Members to refresh the connection.
My staff member says their permissions haven’t changed #
Ask them to log out of WordPress and log back in. Changes take effect right away, but sometimes the browser needs a fresh login to catch up.
My staff member can see things they shouldn’t be able to #
Go back to Members > Roles and open the role. Double-check that the boxes for areas they should not access are unchecked. Remember that if a box is unchecked, that is a denial, and denials always win over any other setting.
My staff member can’t see the Add New button for trips or bookings #
This happens when someone has View access only. View access lets them see the list and open records, but not create new ones. If they need to create trips or bookings, change their role to Manage access for that area.
Frequently Asked Questions #
Do I really need the Members plugin? #
Yes. WP Travel Engine adds its permission settings into the Members plugin rather than building a separate screen. Members is free and works well, so it is the recommended way to manage who can access what.
Will any of this affect my own access as the site administrator? #
No. Administrators and Editors automatically get full access to everything in WP Travel Engine. Setting up roles for your staff does not change what you can see or do.
Can I give someone access to bookings but not trips? #
Yes. This is one of the most common setups. Tick the boxes for Bookings and leave Trips unchecked. They will be able to manage bookings without ever seeing your trip setup.
What happens if I give someone View access but not Manage access? #
They can see the list and open individual records, but they will not see the Add New, Edit, or Delete buttons. This works well for someone who only needs to check on things, such as a team member reviewing new enquiries for your day tours each morning.
Can I use a role that already exists in WordPress, like Editor or Author? #
Yes. You can edit any existing WordPress role and add WP Travel Engine permissions to it. You do not have to create a new one from scratch.
If I change someone’s permissions later, do they need to do anything? #
No. Changes take effect immediately. But if they are logged in at the time, ask them to refresh their browser or log out and back in so they see the updated menu.
ℹ️ If you’re still stuck or have a question we didn’t cover, our support team is happy to help. Reach out at our support page and we’ll get you sorted.