
- Key Features & Benefits
- Prerequisites
- How to Install the Resource Management Add-on
- Creating a Capacity Rule
- What Travelers See on the Trip Page
- View Available/Booked Resources in Occupancy Calendar
- Releasing Room Capacity from Upcoming Tours Dashboard
- Use Cases
- FAQs
- Does Resource Management replace the trip seat limits WP Travel Engine already has?
- What happens if I don't set a capacity for a room or service?
- Can one rule cover rooms and services from different trips?
- Does releasing capacity for a waitlisted traveler show on the Occupancy Calendar right away?
- What happens if I deactivate a rule?
- Does this work with Activity Tour Booking's time slots?
Resource Management is an add-on that lets you set a maximum bookable quantity for rooms and extra services on your trips, and enforces that limit automatically once it’s set.
Use it for a room type with only a handful of physical units, or an extra service like a private transfer or gear rental that can only be fulfilled a limited number of times per day.
Works across trips or per trip, your choice. Everything else on your site stays untouched.
Key Features & Benefits #
| Feature | Benefit |
| Room and service capacity limits | No more selling more rooms or extra services than you physically have. |
| One rule, many trips | Apply the same capacity to every departure that shares a room type. |
| Flexible capacity resets | Decide whether a limit applies per departure or is shared across overlapping stays, depending on how you actually manage inventory |
| Occupancy Calendar | See rooms occupied and services booked for any date. |
| Built-in Waitlist integration | Release freed-up capacity to a specific waitlisted traveler and notify them directly. |
Prerequisites #
Before using this add-on, make sure:
- You have WordPress 6.5 or higher installed on your site.
- You have WP Travel Engine installed and activated on your WordPress site.
- You have updated WP Travel Engine to its latest version (Version 6.8.5 or above).
- You have installed and activated the Resource Management add-on, with a valid license key.
- You have installed and activated at least one of the following:
- Accommodation (Version 1.0.9 or more)
- Extra Services (Version 2.2.2 or more)
How to Install the Resource Management Add-on #
Verification #
To confirm the add-on is active and working:
- Go to your WordPress Dashboard.
- Navigate to the WP Travel Engine.
- Confirm that Resource Management appears in the submenu.
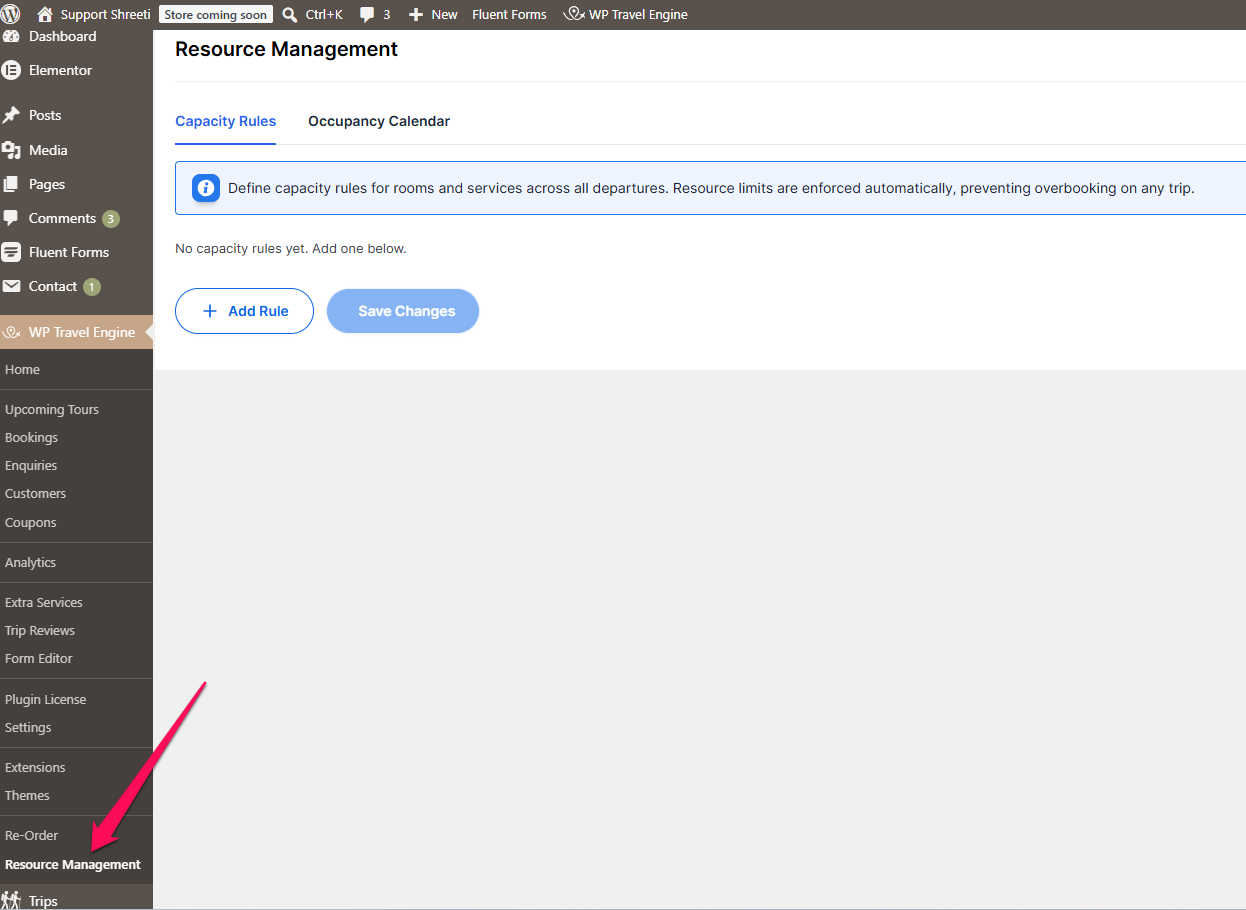
If the menu item doesn’t appear, deactivate and reactivate the add-on from the Plugins screen.
Creating a Capacity Rule #
From your WordPress dashboard, go to WP Travel Engine > Resource Management.
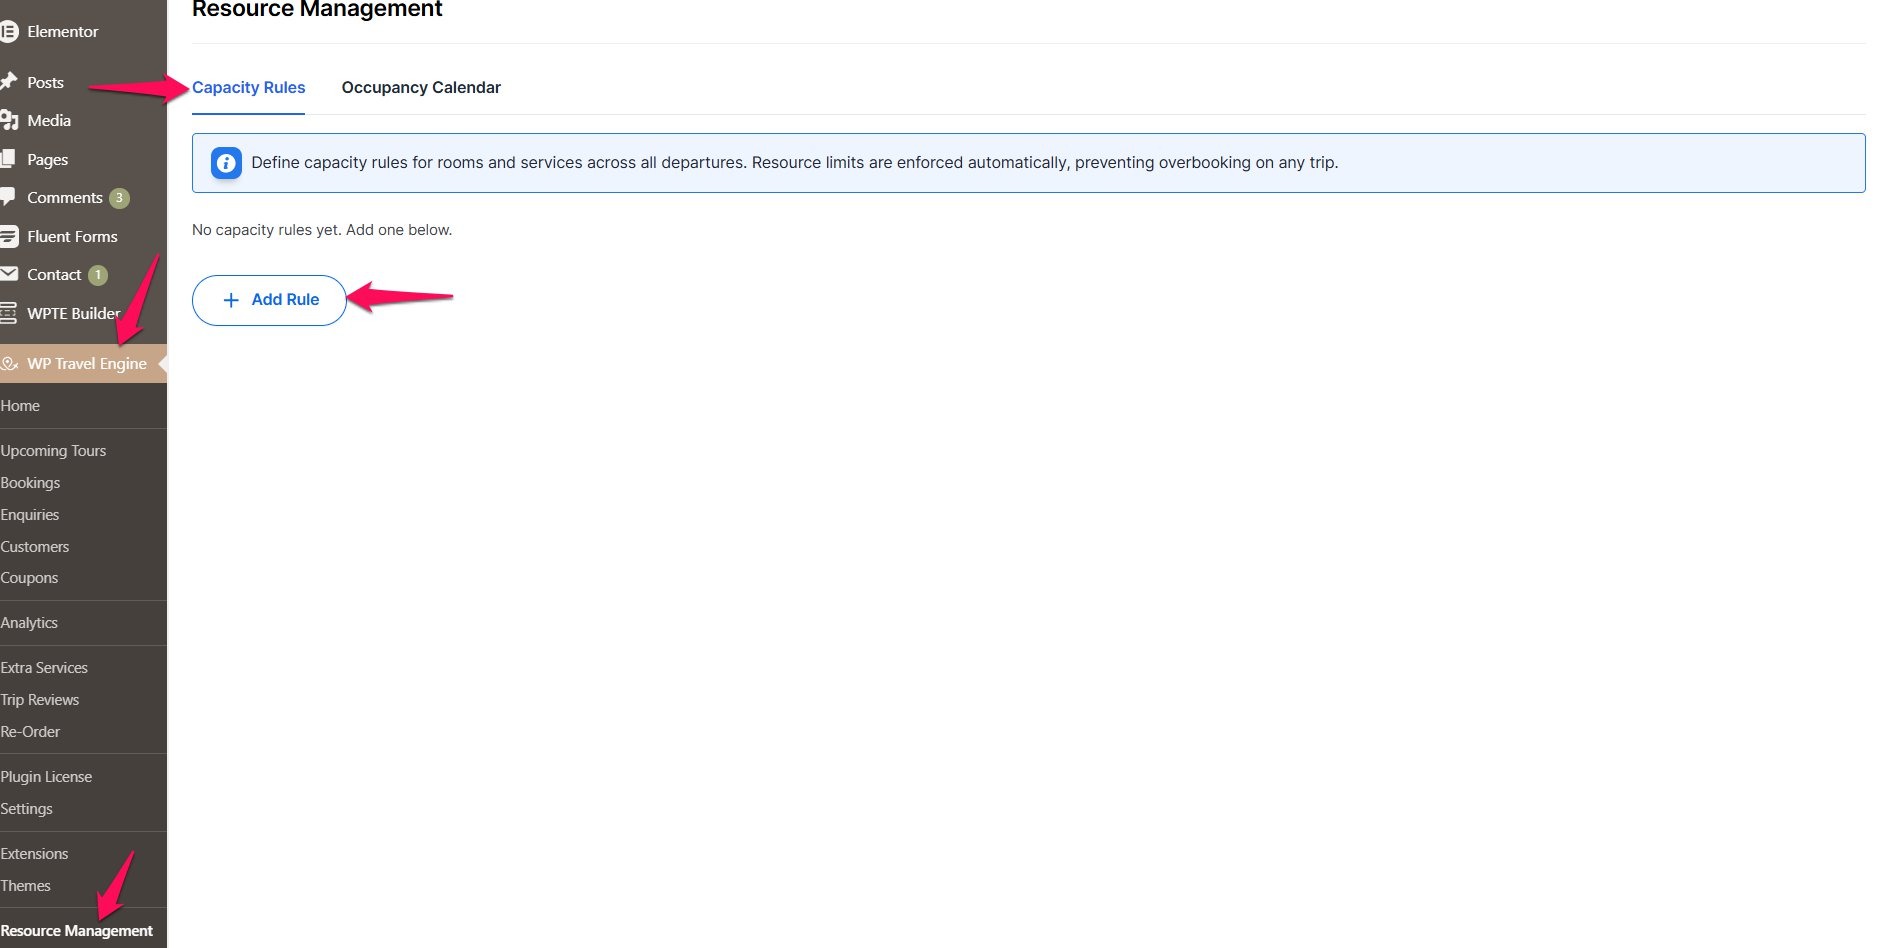
Click Add Rule to open the Configure New Capacity Rule panel.
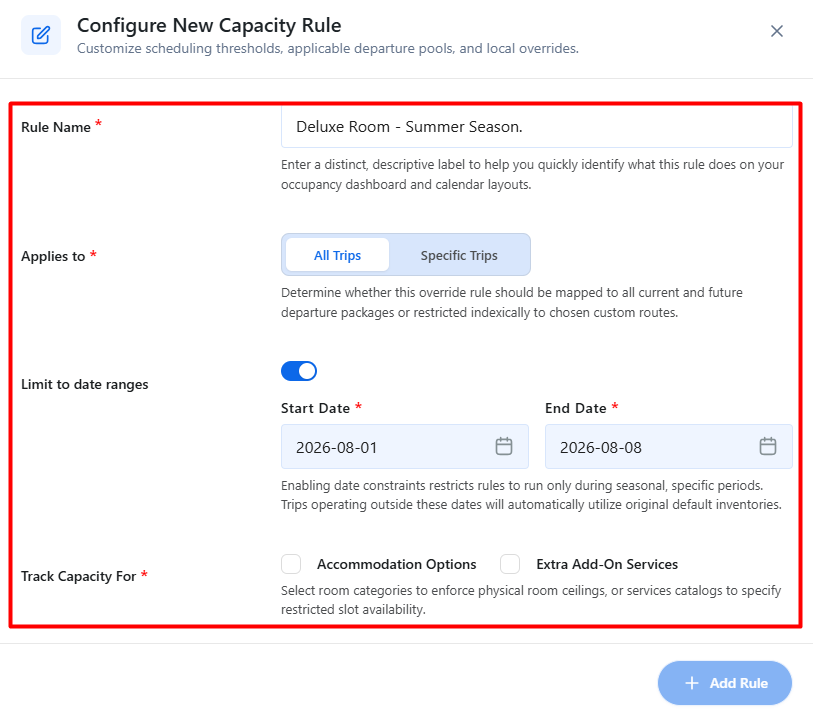
Rule Name: Enter a descriptive label, such as “Deluxe Room, Summer Season.” This is for your own reference on the rules list. Travelers never see it.
Applies To: Choose All Trips to apply the rule everywhere, or Specific Trips to restrict it to certain trips. Selecting Specific Trips reveals a drop-down field to search and individual trips.
Limit to Date Ranges: Toggle on to restrict the rule to a specific departure date. Set the Start Date and End Date, and trips falling between those dates will only be eligible for this rule. This is useful for seasonal limits. Trips outside the range use their normal, unrestricted inventory.
Track Capacity For: Select Accommodation, Extra Services, or both. Each choice reveals its own restriction section below, so one rule can control rooms and services together.
Accommodation Restriction
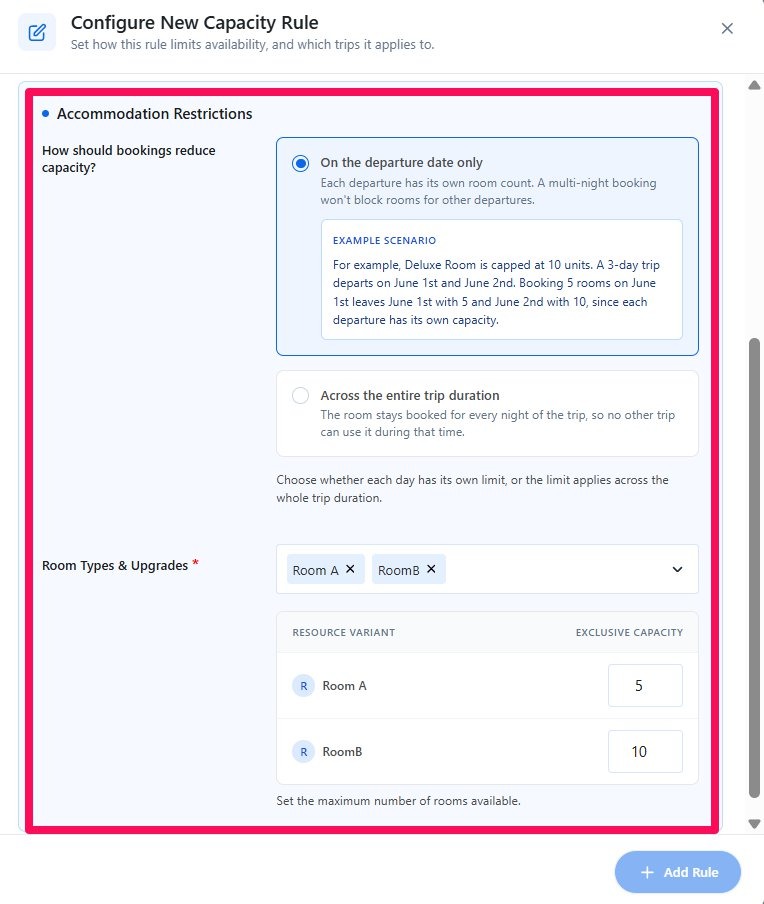
How should bookings reduce capacity?: This tells the system how to count your room limit across different departure dates. Choose between:
- On the departure date only: each departure has its own room count. A multi-night booking won’t block rooms for other departures.
Example: Room A is capped at 10 units. A 3-day trip departs on June 1st and June 2nd. Booking 5 units of Room A on June 1st leaves June 1st with 5 units left, but June 2nd still has all 10, since each departure has its own capacity. - Across the entire trip duration: the room stays booked for every night of that stay, so no other trip can use it during that time.
Example: Room A is capped at 10 units. A trip departs on June 1st for a 5-night stay, and another trip departs on June 3rd for a 4-night stay. If the June 1st trip books 6 units of Room A, those rooms stay held for its whole stay, through June 6th. Since the June 3rd trip’s dates fall inside that same window, only 4 units of Room A are left for it to book.
Room Types & Upgrades: Select which rooms and upgrades this rule applies to. Each one appears in a table below with an Exclusive Capacity box. Enter how many of that room can be booked. In this screenshot, Room A is set to 5 and Room B is set to 10.
Extra Services Restrictions
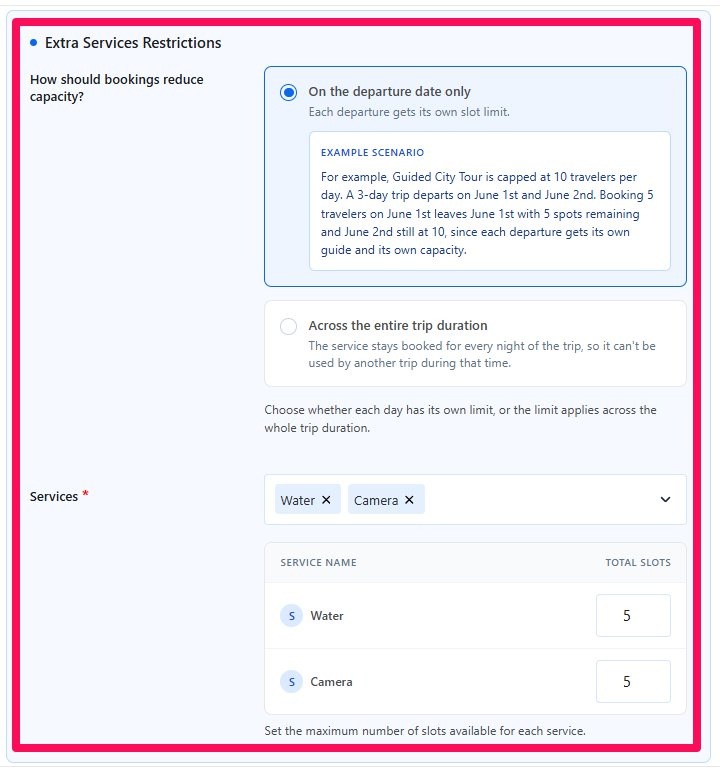
How should bookings reduce capacity?: This works the same way as it does for rooms in Accommodation Restrictions: On the departure date only gives each departure its own separate slots, and across the entire trip duration shares slots between departures whose dates overlap.
Services: Click this field and select which extra services this rule should apply to, for example, Water or Camera. You can select more than one.
Once you’ve selected a service, it appears in the table below with a Total Slots box next to it. Enter the maximum number of bookings that service can receive. Here, Water is set to 5 and Camera to 4, meaning only 5 travelers can book Water and only 4 can book Camera before they show as full.
Once everything is set, click Add Rule and click Save Changes.
Capacity Management Settings in Accommodation & Extra Services Settings #
Resource Management stores the rules and capacity numbers. What travelers actually see on the trip page is controlled separately, in Accommodation’s and Extra Services’ own settings.
Capacity Management in Accommodation #
From your WP dashboard, go to WP Travel Engine > Settings > Extensions > Accommodation. Here, select the tab Capacity Management.
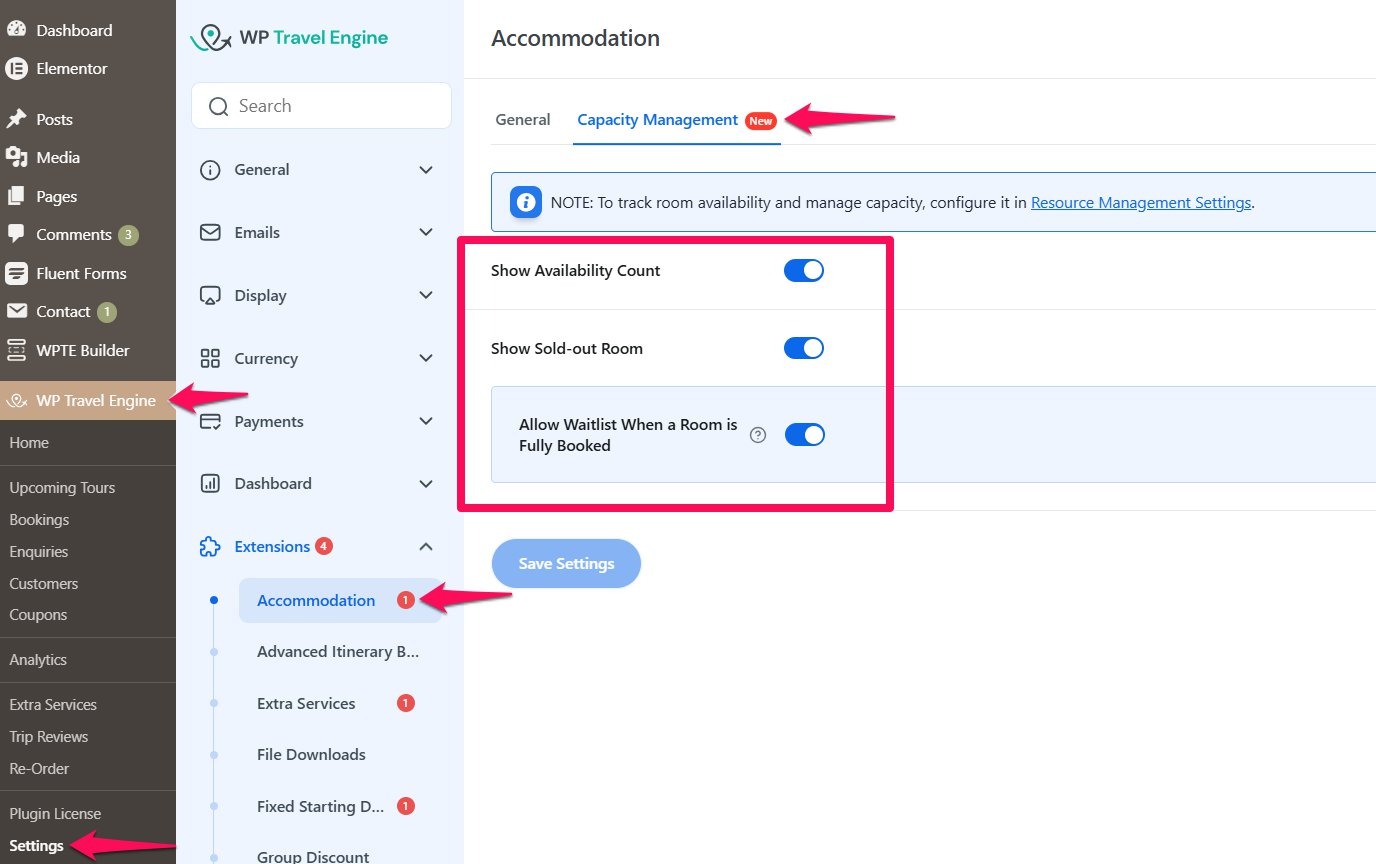
Show Availability Count: Toggle ON to show an “X Left” badge next to a room once it’s close to selling out.
Show Sold-out Room: Toggle ON to keep a fully booked room visible on the trip page, tagged “Sold out,” instead of hiding it
Allow Waitlist When a Room is Fully Booked : Toggle on to allow travelers to join the waitlist for the room, when the room is sold out.
You can release rooms to your waitlisters later from the Upcoming Dashboard. It lists all waitlisters for a specific departure, alongside your Trip waitlisters.
Click Save Settings to apply.
Capacity Management in Extra Services #
It works in the same way as Accommodation.
Go to WP Dashboard > WP Travel Engine > Settings > Extensions > Extra Services.
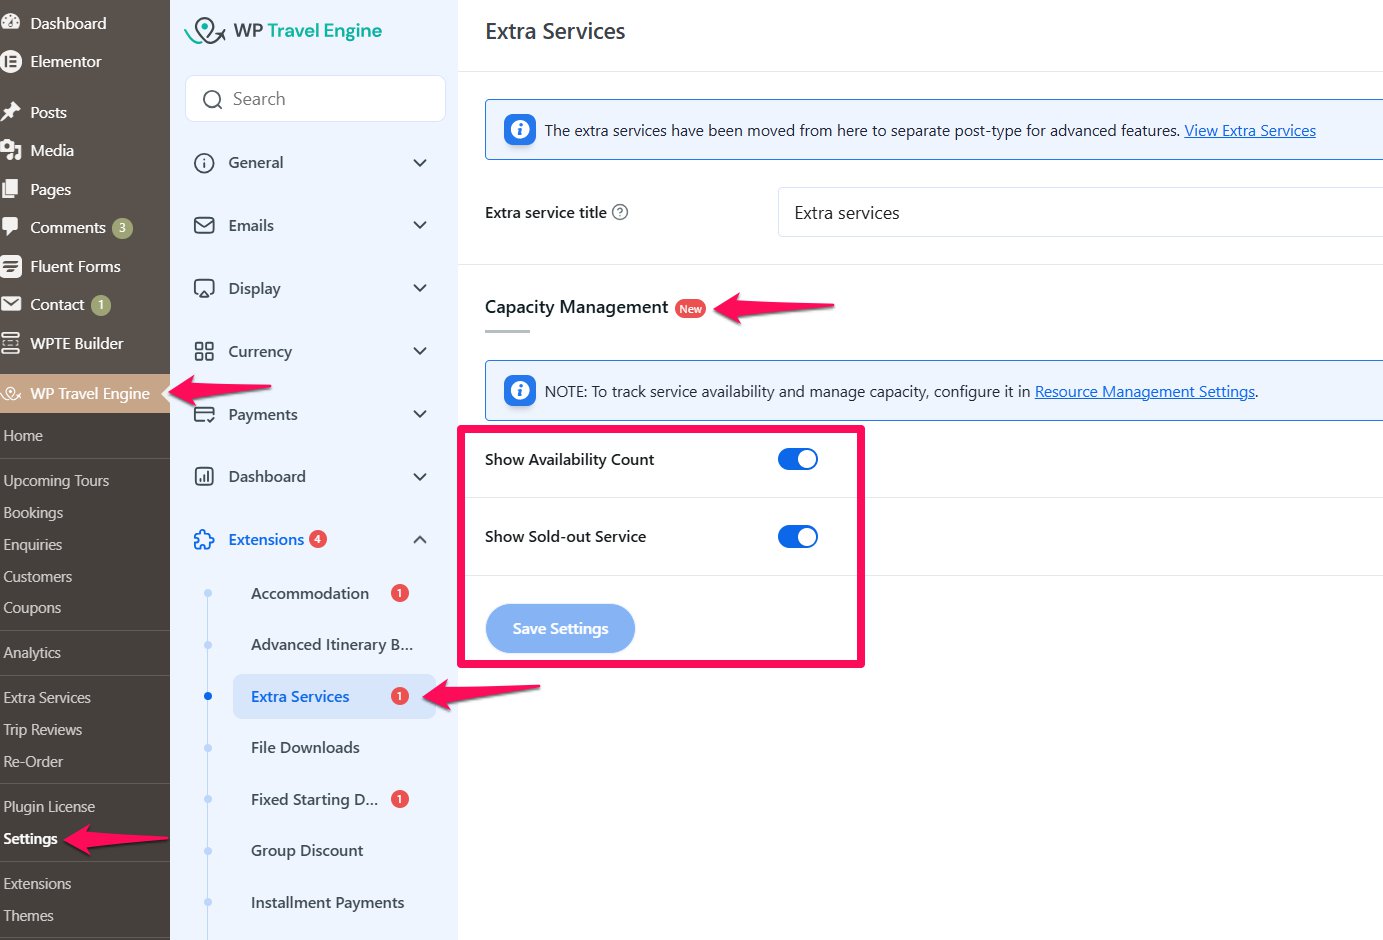
Under your existing settings, you’ll find the same Show Availability Count and Show Sold-out Service toggles, doing the same job for extra services instead of rooms.
What Travelers See on the Trip Page #
Accommodation Step in Booking Modal #
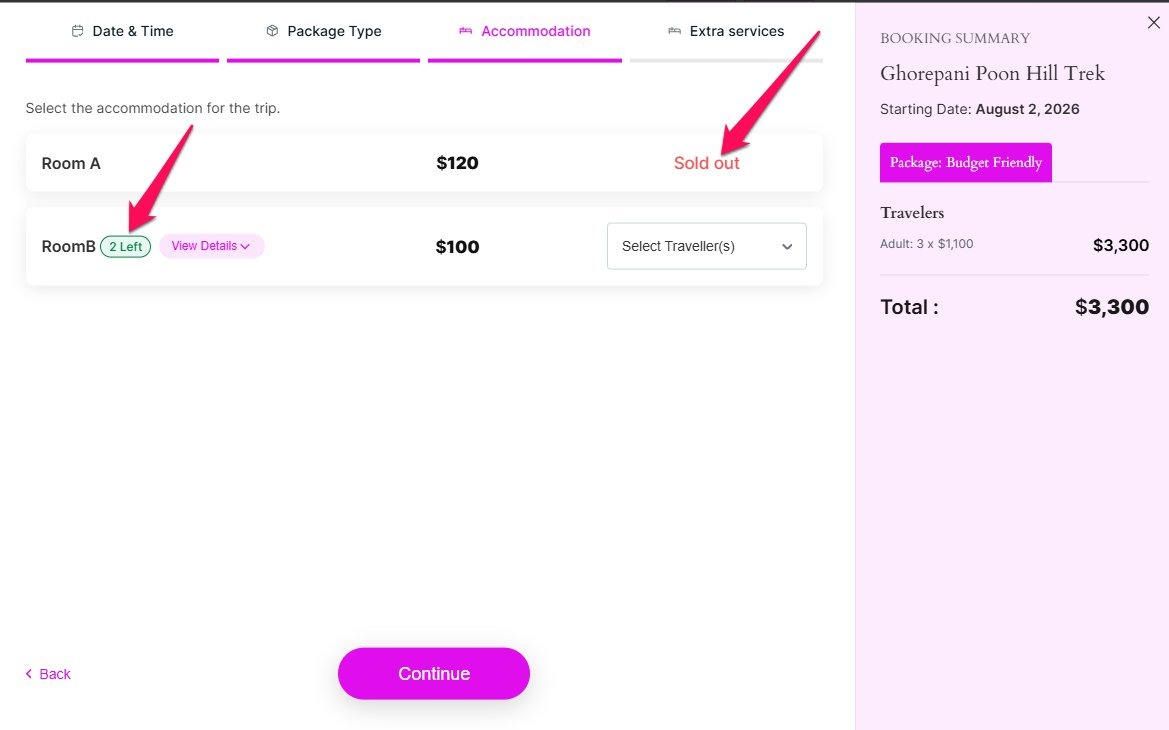
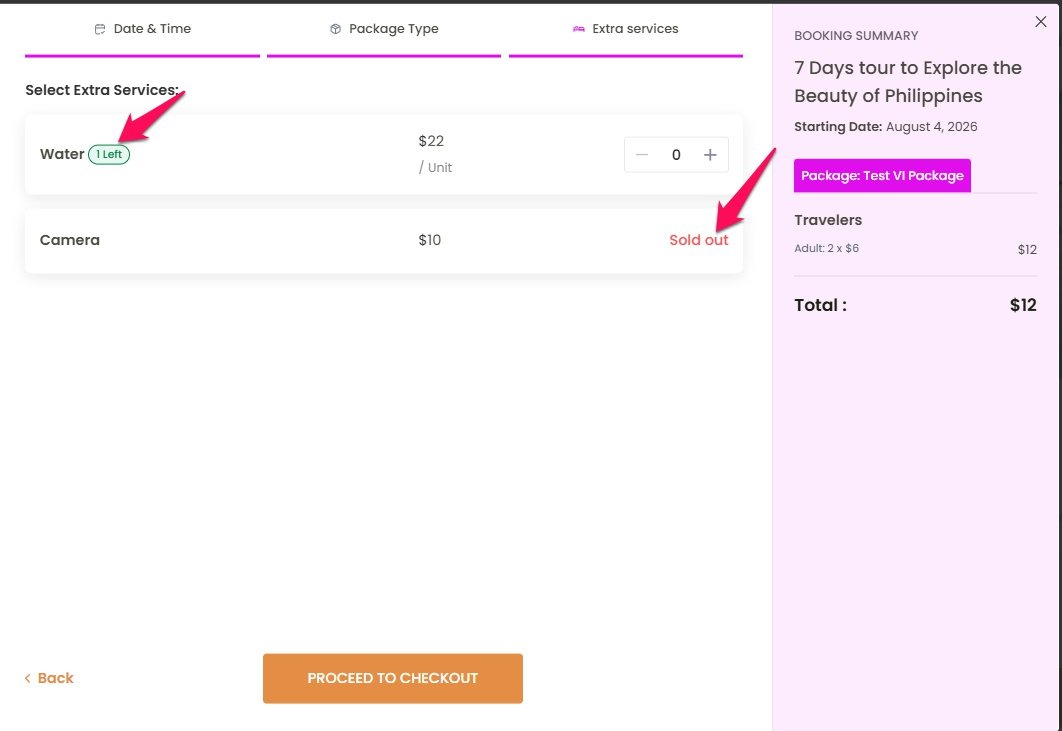
With Show Availability Count on, travelers see a live count next to each room or service as it fills up. With Show Sold-out Room or Show Sold-out Service on, a fully booked item stays on the page, tagged as sold out, instead of disappearing entirely.
Extra Service Step in Booking Modal #
Extra Services behave the same way on the front end: a live count badge while slots remain, and a “Sold out” tag once a service is full.
View Available/Booked Resources in Occupancy Calendar #
Go to WP Dashboard > WP Travel Engine > Resource Management > Occupancy Calendar.
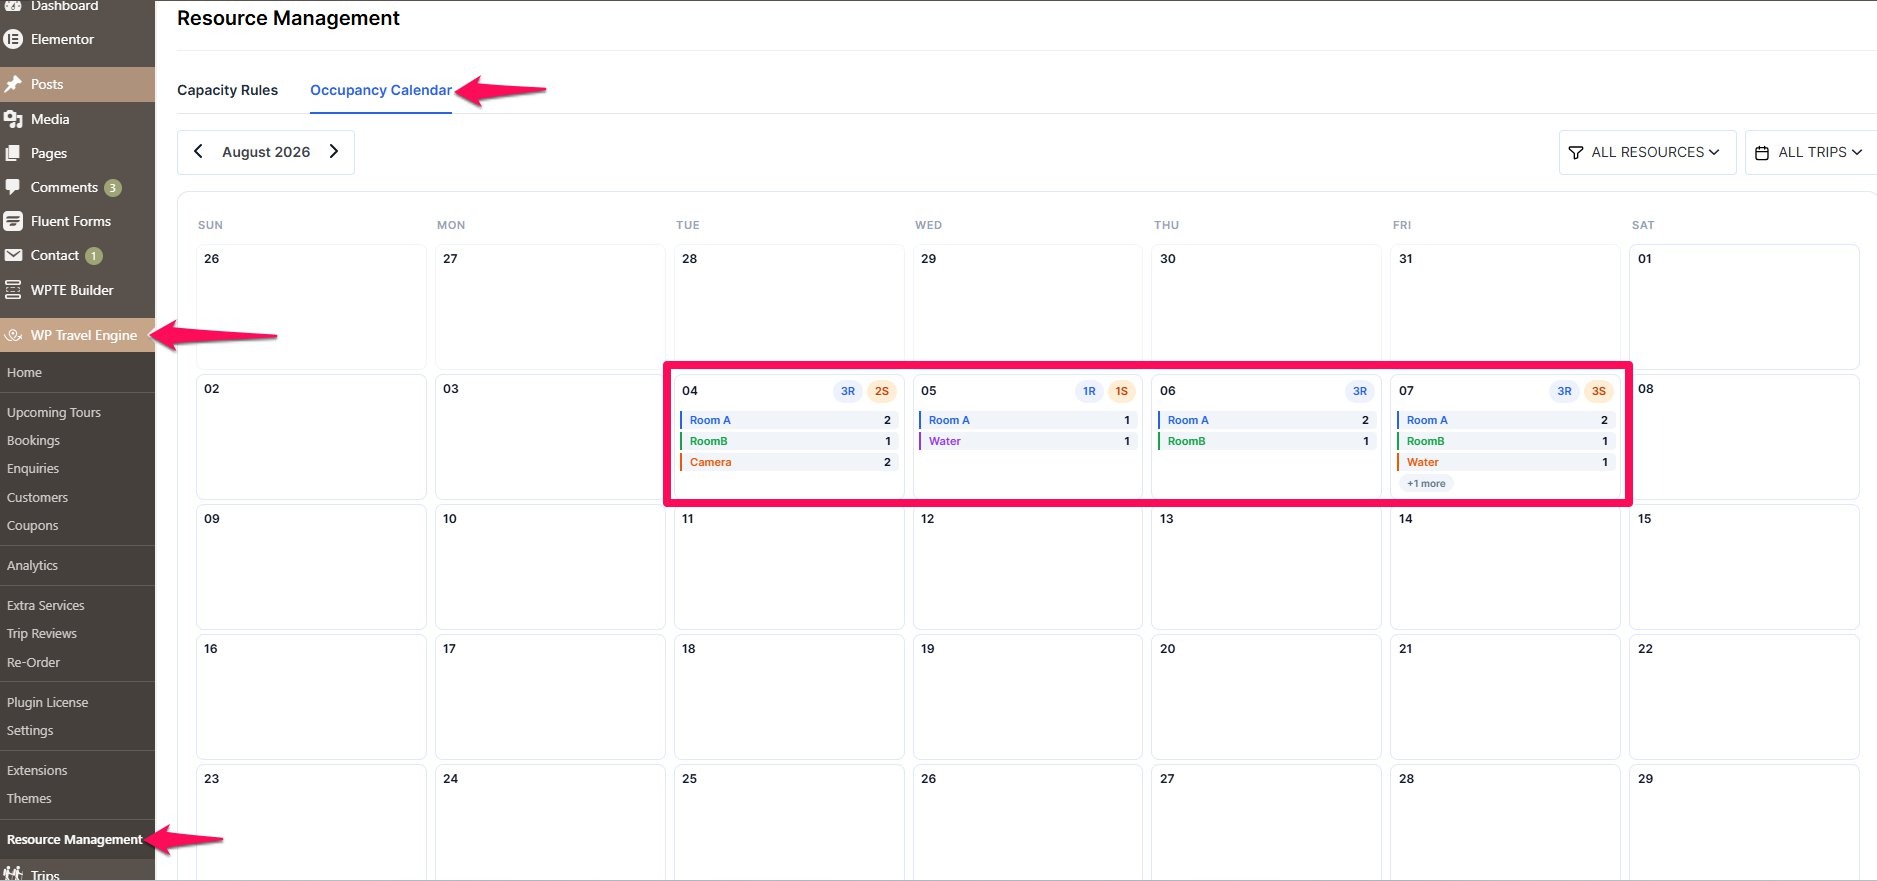
Each day shows how many rooms are occupied and how many services are booked, based on every active rule. Click a day to open its breakdown.
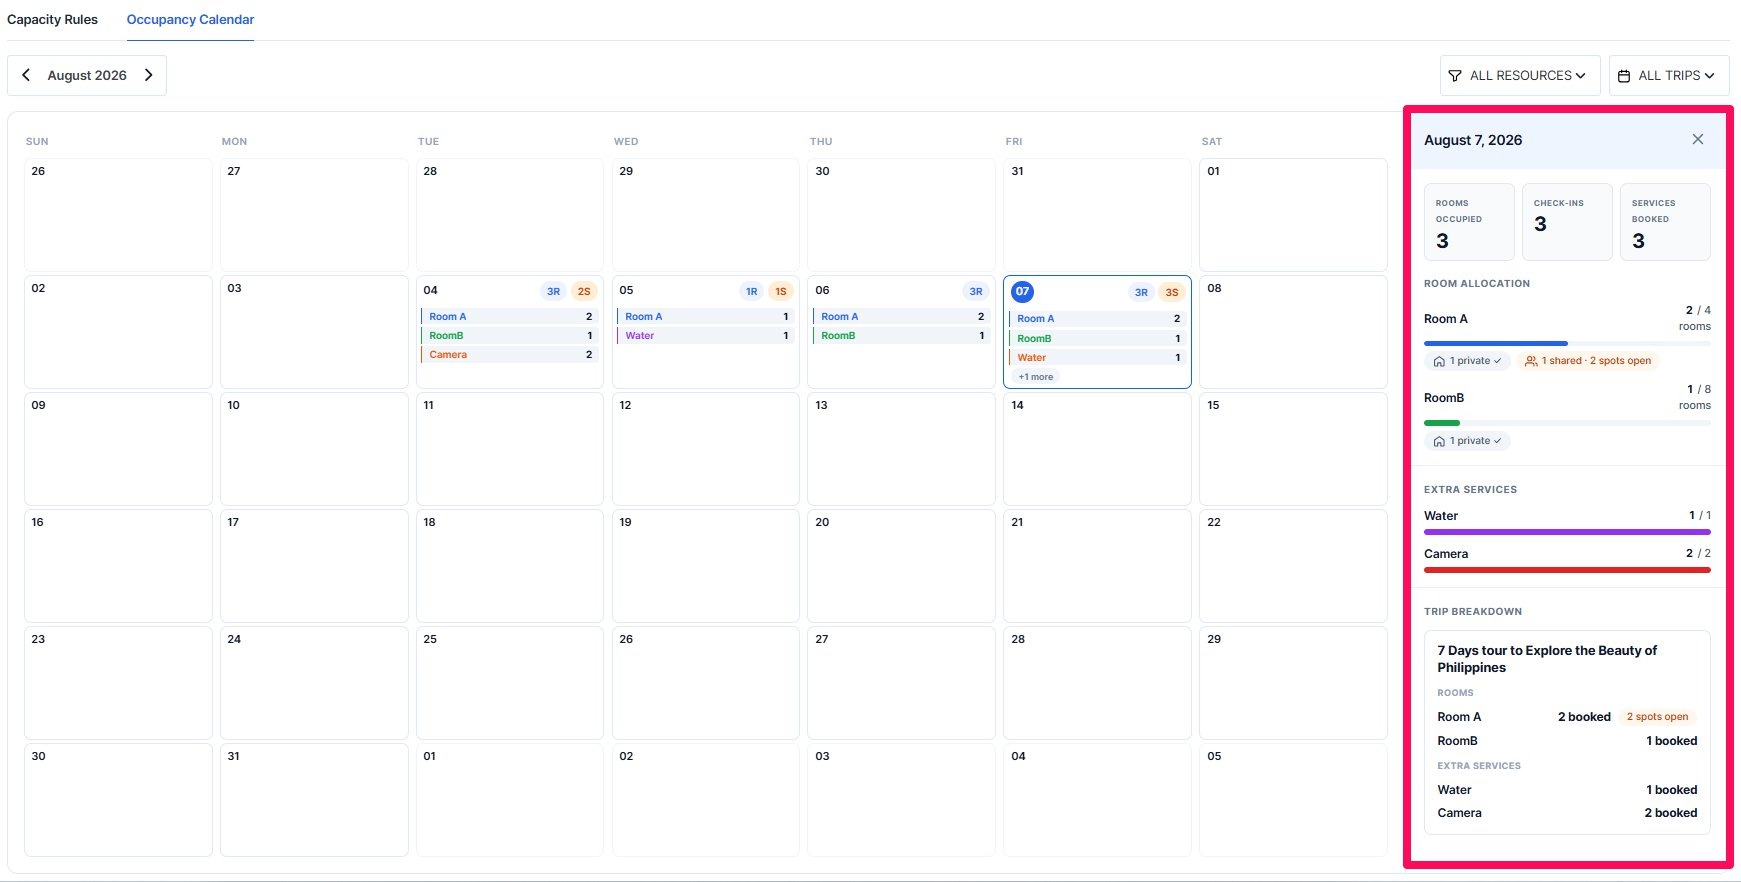
The detail panel shows all the rooms and extra services booked that day. You can also see how many rooms/services are booked per trip.
Releasing Room Capacity from Upcoming Tours Dashboard #
Go to WP Dashboard > WP Travel Engine > Upcoming Tours. Click Waitlist Details on the departure row.
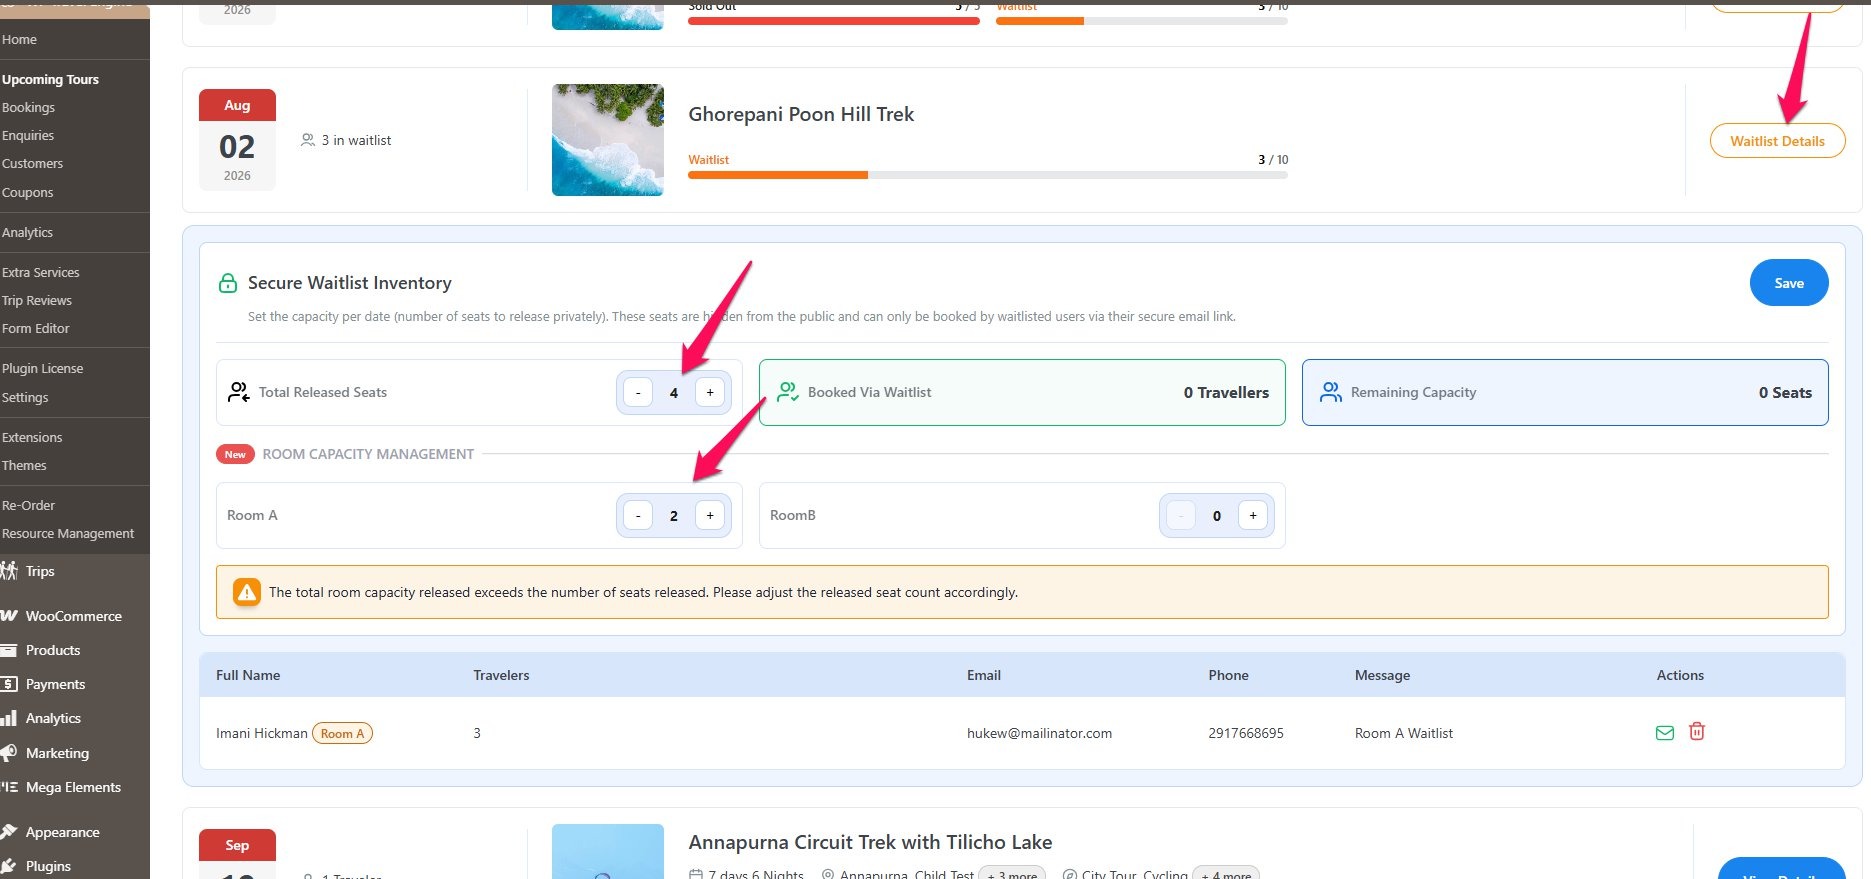
Under Room Capacity Management, set how many extra seats to release for each room.
These released seats are not shown on the trip page for new visitors to book. They’re only reserved for travelers already on the waitlist for this trip. Once you release seats, you can choose which waitlisted traveler gets access to them.
If a trip uses Activity Tour Booking, travelers choose a specific time, like 9:00 AM or 2:00 PM, instead of just a date. When you release extra capacity for a waitlisted traveler on this kind of trip, that release only applies to the time they were waitlisted for. For example, releasing a seat for the 9:00 AM tour won’t open up any extra seats on the 2:00 PM tour of the same day.
Use Cases #
Use Case 1: Capping a Popular Room Type Across the Season #
Situation: An operator sells a Deluxe Room with only 10 physical units, but several trip departures list it as bookable. Without a shared limit, overlapping departures could sell more rooms than exist.
Implementation:
- Go to WP Travel Engine Dashboard > Resource Management and click Add Rule.
- Name it “Deluxe Room, Season Cap” and set Applies To to All Trips.
- Under Track Capacity For, tick Accommodation.
- Select the Deluxe Room and set its capacity to 10.
- Choose the entire trip duration so overlapping stays share the same pool.
- Click Save Changes.
Benefit: Every departure checks against the same 10-room limit. No trip can oversell the room, no matter how many departures list it.
Use Case 2: Reserving a Freed-Up Seat for a Specific Waitlisted Traveler #
Situation: A trip’s Ocean View room sold out, but a returning customer on the waitlist wants first access if a cancellation opens up.
Implementation:
- Go to WP Travel Engine Dashboard > Upcoming Tours and open the trip’s View Details.
- Under Room Capacity Management, release 1 seat for Ocean View.
- Find the customer’s waitlist entry and click Send Email.
- Send the private booking link.
Benefit: Only that traveler can book the newly opened room. Their status updates are notified once the email goes out, so it’s clear they’ve been contacted.
FAQs
#
Does Resource Management replace the trip seat limits WP Travel Engine already has? #
No. It adds a separate limit on rooms and extra services. Trip-level seat limits keep working the same way.
What happens if I don’t set a capacity for a room or service? #
It’s tracked on the Occupancy Calendar without an enforced limit, useful for visibility without restricting bookings yet.
Can one rule cover rooms and services from different trips? #
Yes, as long as Applies To is set to All Trips, or the specific trips are added under Specific Trips.
Does releasing capacity for a waitlisted traveler show on the Occupancy Calendar right away? #
No. Releasing capacity only sends the waitlisted traveler a booking link, the Occupancy Calendar won’t update immediately. It reflects the change only once that traveler actually completes their booking using the link you sent them.
What happens if I deactivate a rule? #
Its capacity stops being enforced. Any rooms or services it covered return to their normal, unrestricted availability.
Does this work with Activity Tour Booking’s time slots? #
Yes, rules apply the same way. Only capacity released for a waitlisted traveler is scoped to a single time slot instead of the whole day.