- How Pabbly Integration Benefits WP Travel Engine Sites
- Prerequisites
- How to Integrate Pabbly Connect with WP Travel Engine
- Step 1: Log into Pabbly Connect
- Step 2: Create a New Workflow
- Step 3: Understand Workflow Structure
- Step 4: Set the Trigger Event
- Step 5: Choose the Action Event (WP Travel Engine)
- Step 6: Connect Your WordPress Site
- Step 7: Send Booking Data to Google Sheets (or Another App)
- Step 9: Confirm Test Booking Data
- Popular Automation Ideas for Travel Sites
- Troubleshooting
- FAQ
Pabbly Connect is a powerful automation tool that lets you connect your WordPress website with thousands of apps and services without any coding. By integrating WP Travel Engine with Pabbly, you can automate tasks such as syncing trip bookings, customer details, and inquiries with your CRM, email marketing tools, spreadsheets, and more.
Pabbly offers robust workflow automation, so when a traveler books a trip, the data is instantly sent to your preferred apps. This reduces manual work, prevents errors, and improves your marketing and customer follow-up processes.
How Pabbly Integration Benefits WP Travel Engine Sites #
- Integrating Pabbly Connect with WP Travel Engine allows you to:
- Automatically send trip booking data to Google Sheets, CRMs, or email platforms.
- Save time by eliminating manual data entry.
- Trigger follow-up emails, messages, or workflows when a booking is made.
- Centralize customer data for better reporting and segmentation.
- Connect with over 1000+ apps effortlessly.
Prerequisites #
Before you start the integration, ensure the following:
- You have an active Pabbly Connect account.
- Your WordPress site is using WP Travel Engine.
- You have admin access to the WordPress dashboard.
- You’ve installed and activated the WP REST API Authentication (Basic Auth)
How to Integrate Pabbly Connect with WP Travel Engine #
This guide will help you integrate WP Travel Engine with Pabbly Connect to automate your workflows, such as sending trip booking data to Google Sheets or your CRM. Please check below indepth tutorial.
Step 1: Log into Pabbly Connect #
- Go to https://www.pabbly.com/connect.
- Click Sign In and log in using your Pabbly credentials.
- On the dashboard, click Pabbly Connect > Access Now.

Step 2: Create a New Workflow #
- Click Create Workflow.
- Choose Classic Workflow (you can also use Meta Workflow, but we’ll use Classic for this example).
- Name your workflow something descriptive like: “WP Travel Engine – Booking Flow”
- Click Create to proceed.

Step 3: Understand Workflow Structure #
Each workflow consists of two main components:
- Trigger Event: Starts the automation.
- Action Event: Defines what should happen next.
Step 4: Set the Trigger Event #
- In the Trigger section, search and select the app that you want to connect to. In this case, we are using Pabbly Connect Manager.
- Pabbly supports 1000+ apps. You can browse the full list here.
- Choose the Trigger Event, for example, New Booking Received.
- Click on the Capture Webhook Response button.
- Copy the generated Webhook URL.

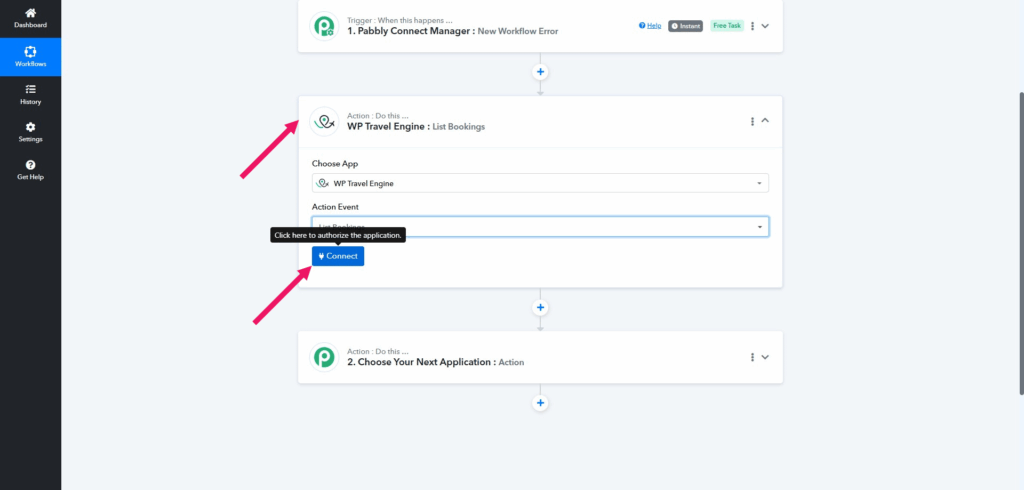
Step 5: Choose the Action Event (WP Travel Engine) #
- Back in your workflow, click on + Action Step.
- Search and select WP Travel Engine.
- For Action Event, choose:
- List Booking (or any other action you want to automate).
- Click Connect.
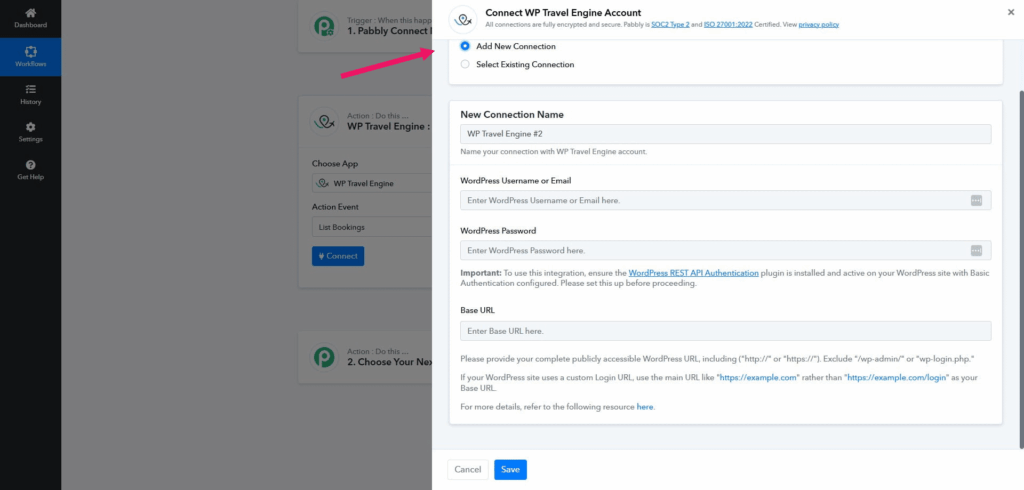
Step 6: Connect Your WordPress Site #
In the connection window:
- Choose Add New Connection (or select an existing one).
- Enter:
- Connection Name
- Username
- Password
- Base URL (Dashboard URL)
- Click Save & Send Test Request.
- Pabbly will now display all the fields and values retrieved from your site.
Step 7: Send Booking Data to Google Sheets (or Another App) #
- Click + Action Step again.
- Search and select Google Sheets (or any app you want to send data to).
- Choose action: Add New Row.
- Click Connect and authorize your Google account.
- Select the target Spreadsheet and Worksheet.
- Map booking data fields to your spreadsheet columns by selecting the appropriate attributes retrieved from WP Travel Engine. Simply match each attribute to the correct column in your Google Sheet, for example, map
trip_nameto the “Trip Name” column,customer_emailto “Email”, and so on. Few examples are listed below:- Customer Name
- Trip Name
- Total Cost
- Booking Date
- Click Save & Send Test Request.

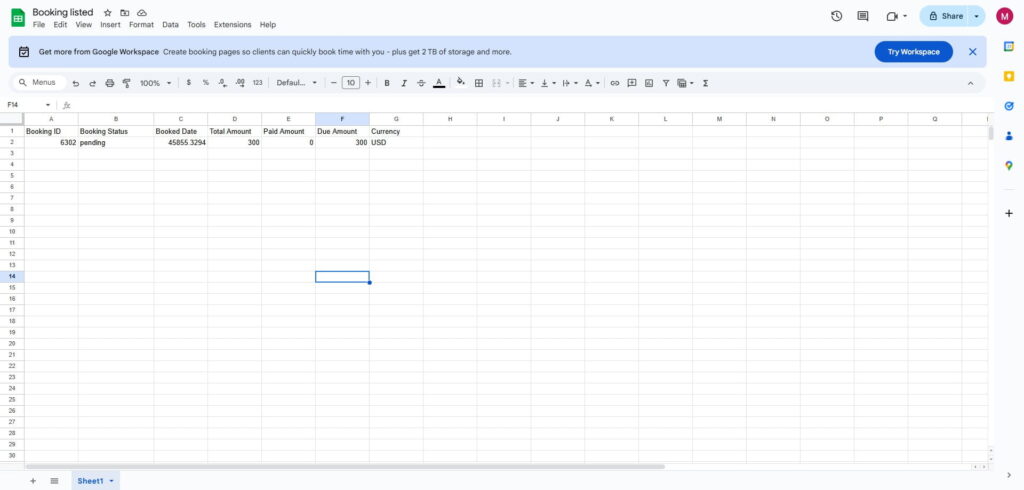
Step 9: Confirm Test Booking Data #
- Go to your travel site and make a test trip booking.
- After booking, open the Google Sheet or other app that you are using.
- Confirm that the test booking row appears correctly with all mapped data.
Popular Automation Ideas for Travel Sites #
| If you want to… | Use this automation |
| Add new bookings to CRM | WP Travel Engine → HubSpot/Zoho CRM |
| Send itinerary via email | WP Travel Engine → Gmail |
| Notify booking team | WP Travel Engine → Slack |
| Save all booking data | WP Travel Engine → Google Sheets |
| Send SMS to customer | WP Travel Engine → Mailchimp |
Troubleshooting #
- Webhook not triggering: Double-check that the webhook is saved in WP Travel Engine and connected to the correct event.
- Google Sheets not updating: Make sure the mapped column headers match exactly in your Google Sheet.
- Authentication error: Ensure the WP REST API Authentication plugin is installed and your credentials are correct.
- No data received in test: Perform a new test booking and use “Save & Send Test Request” again.
FAQ #
Can I use this with other apps besides Google Sheets? #
Yes! You can integrate with 1000+ apps like Mailchimp, Slack, Brevo, Zoho, and more.
Do I need a paid Pabbly Connect account? #
For multi-step workflows and webhook functionality, a paid plan is recommended.
Can I send different trip bookings to different apps or sheets? #
Absolutely. Use filters or create multiple workflows to handle different booking types.
What is a “Connection” in Pabbly? #
A connection is the secure link between Pabbly and your app (e.g., WordPress or Google Sheets). You can create multiple connections for different sites or accounts.
Feel free to contact our support team for any other assistance.