
- Benefits at a Glance
- Prerequisites
- How to Install
- Verification
- Before You Connect: Understanding Read vs. Write Access
- Choosing a Connection Method
- Method A: OAuth (Claude and ChatGPT)
- Method B: Application Password (Claude Code, Cursor, VS Code, and other local clients)
- Available Tools
- Revoking Access
- Use Cases
- Troubleshooting
MCP (Model Context Protocol) lets an AI assistant, Claude, ChatGPT, Cursor, VS Code, or another MCP-capable client, connect directly to your site and act on it: reading trips, bookings, and customers, and creating or updating them where you allow it. Once connected, you ask the assistant a question or hand it a task in plain language instead of copying data back and forth.
Benefits at a Glance #
| Feature | User Benefit |
| Live Data Access | Your assistant reads real trip, booking, and customer data instead of you pasting it in manually |
| Two Connection Methods | Application Password for local tools like Claude Code and Cursor, OAuth for browser tools like Claude.ai and ChatGPT |
| One-Click Client Setup | Claude Code, Cursor, and VS Code get a ready-to-run command or deep link, nothing to configure by hand |
| Granular Tool Access | Every read and write action is a separate tool, so you can see exactly what an assistant is able to do |
| Write Actions Gated | Creating or updating trips, bookings, coupons, or settings always requires an admin-level WordPress user |
| Revocable Anytime | Shut off any connection instantly without affecting your regular WordPress login |
Prerequisites #
- You have WP Travel Engine installed and activated on your WordPress site.
- You have installed and activated the Altus AI plugin.
- You have a WordPress admin login ready, since some connection steps redirect you to sign in and approve access.
How to Install #
Verification #
To confirm MCP is active and working:
- Go to your WordPress Dashboard.
- Navigate to Altus AI > Modules.
- Confirm the MCP card shows Active, with its toggle switched on.
- Click Configure on the MCP card, or go to Altus AI > MCP, to open the configuration screen.
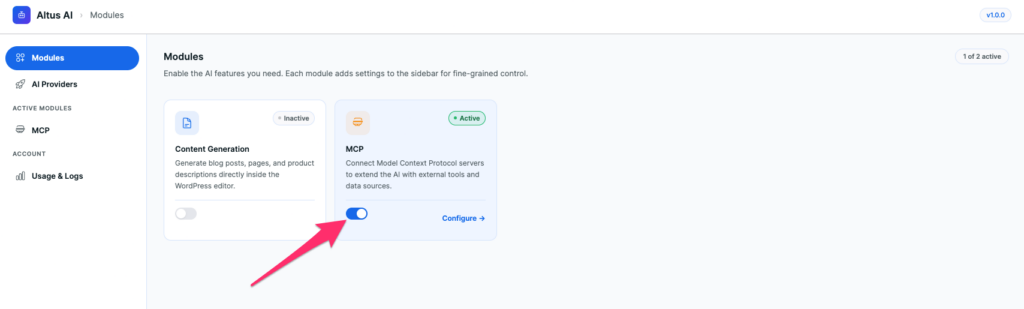
If MCP doesn’t show as active after toggling it on, click Save Settings at the bottom of the Modules screen.
Before You Connect: Understanding Read vs. Write Access #
Every connected assistant can freely use Altus’s read tools: viewing trips, bookings, customers, coupons, payments, and analytics. Write tools, creating or updating a trip, booking, coupon, customer, or your global settings, are gated to an admin-level WordPress user no matter which client connects.
Choosing a Connection Method #
On Altus AI > MCP, the Add Altus to your client screen has two tabs, and which one you use depends entirely on the AI tool you’re connecting. They are not interchangeable.
| Method | Use it for | Where it lives |
| OAuth | Browser-based tools that log in through your site rather than storing a static credential – Claude (Desktop, Mobile & Web) and ChatGPT | OAuth tab |
| Application Password | Local clients that run on your own machine and store their own connection config – Claude Code, Cursor, VS Code, Continue, or any other SSE-capable client | Editors & CLI tab |
Pick the section below that matches the tool you’re connecting.
Method A: OAuth (Claude and ChatGPT) #
OAuth authorizes the connection interactively: the AI tool redirects you to your WordPress site to log in and approve access, then redirects you back. No credential to copy.
Connecting Claude (Desktop, Mobile & Web) #
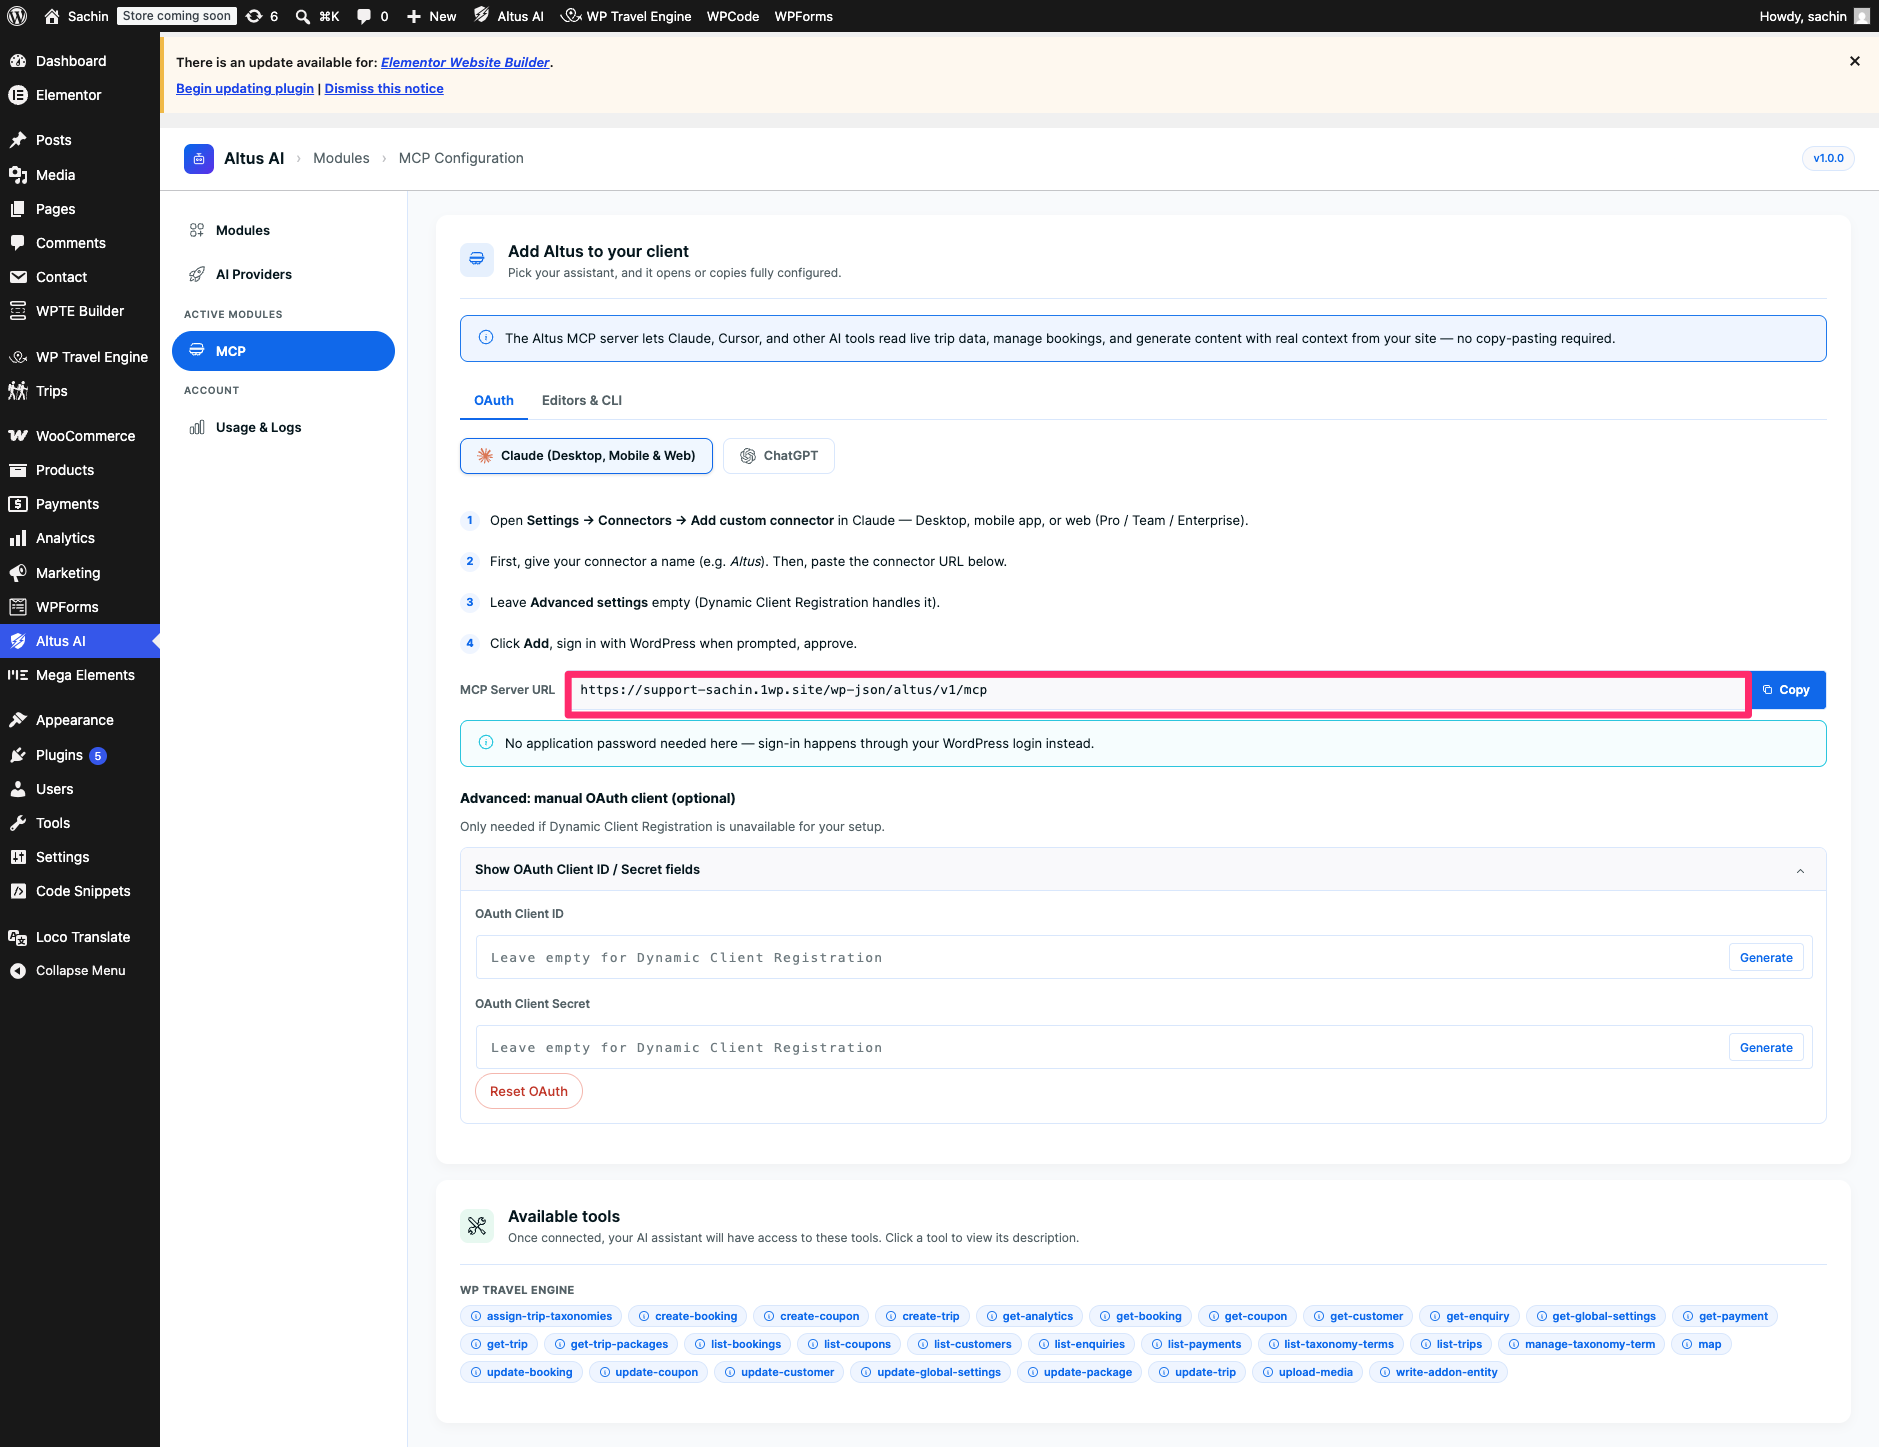
- On Altus AI > MCP, under the OAuth tab, select Claude (Desktop, Mobile & Web).
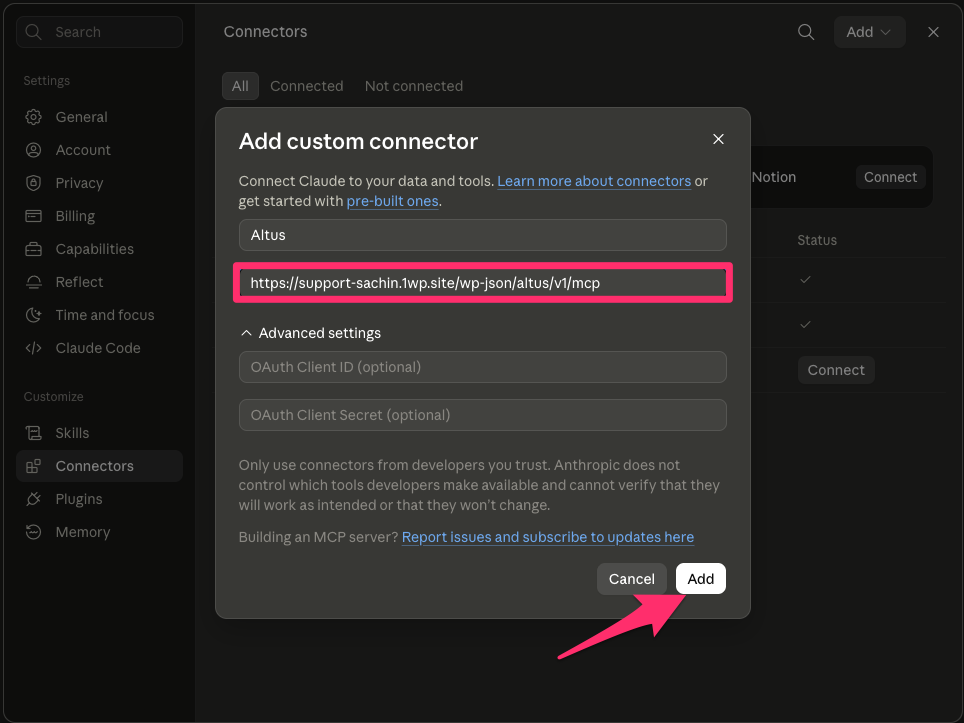
- In Claude, open Settings > Connectors > Add custom connector (available on Desktop, mobile app, or web on a Pro, Team, or Enterprise plan).
- Give your connector a name, for example “Altus,” then paste in the MCP Server URL shown on the Altus screen using the Copy button.
- Leave Advanced settings empty. Dynamic Client Registration handles it automatically.
- Click Add in Claude. When prompted, sign in with your WordPress account and approve the connection.
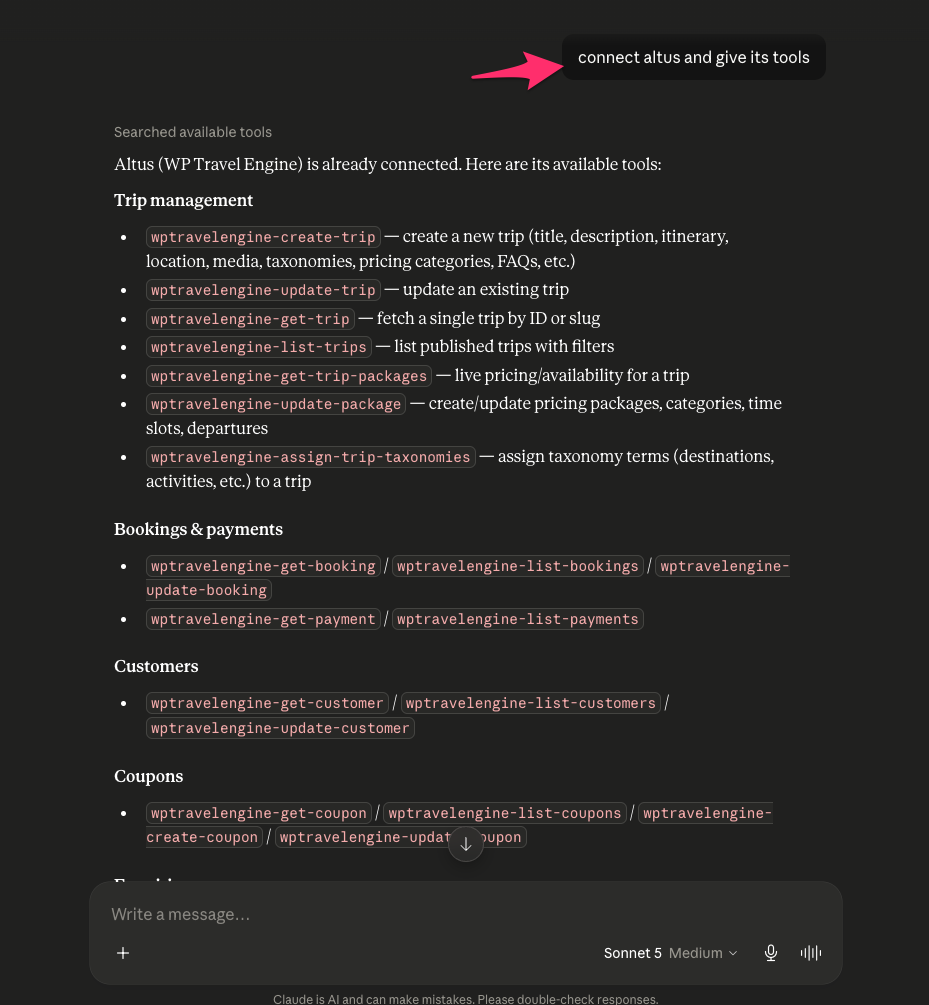
- Start a new conversation in Claude, enable the connector, and test it with a read-only question, for example “How many bookings do I have this month?”
If your setup can’t use Dynamic Client Registration, expand Advanced: manual OAuth client (optional) and click Show OAuth Client ID / Secret fields. Click Generate next to each field to create them manually, or leave both blank to let Dynamic Client Registration handle it. Most setups won’t need this.
Connecting ChatGPT #
ChatGPT’s OAuth connectors sit behind a feature called Developer Mode, and are only available on paid plans (Plus, Pro, Team, Business, Enterprise, or Edu). The free plan cannot add custom connectors at all.
1. Turn on Developer Mode
- Sign in to chatgpt.com on a paid plan.
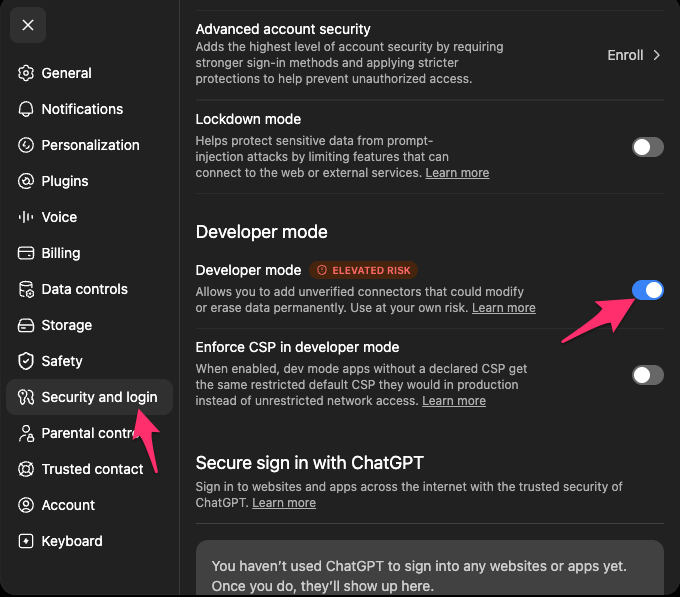
- Click your profile icon in the bottom-left corner, then go to Settings > Security and Login, and scroll down to the Developer Mode toggle.
- Toggle Developer Mode on, and acknowledge the warning about connecting unverified connectors.
2. Add Altus as a custom app
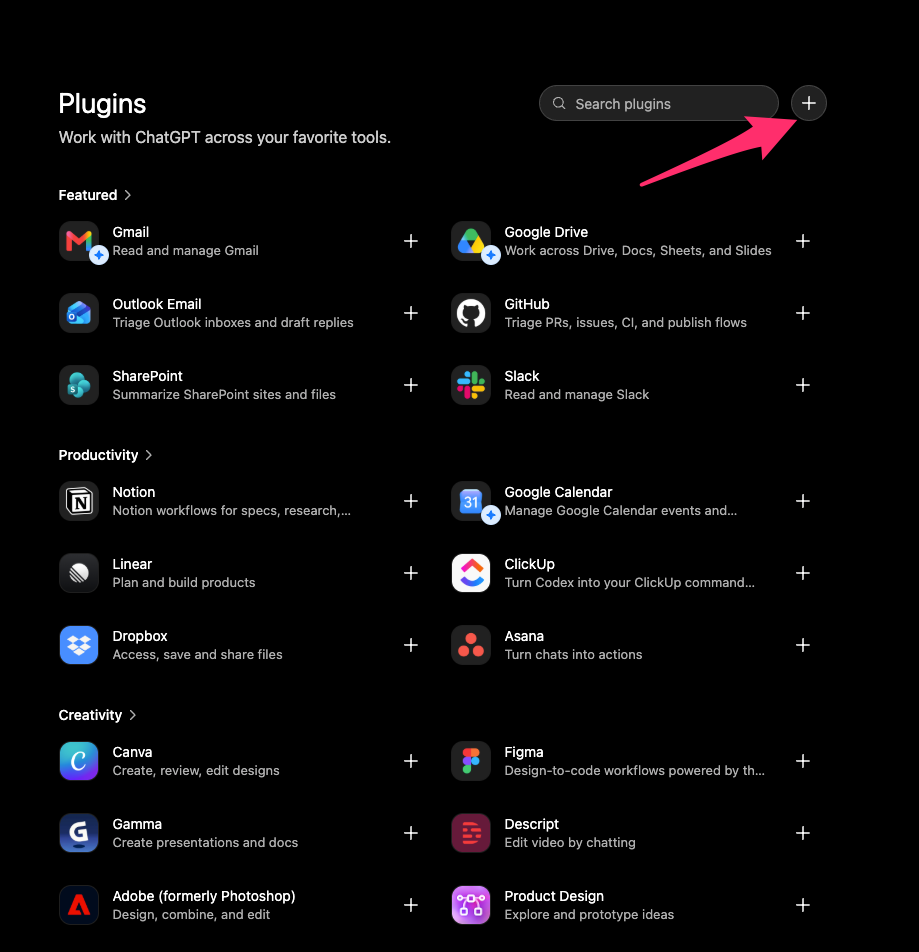
- Still under Settings > Plugins, click the + icon in the top-right corner.
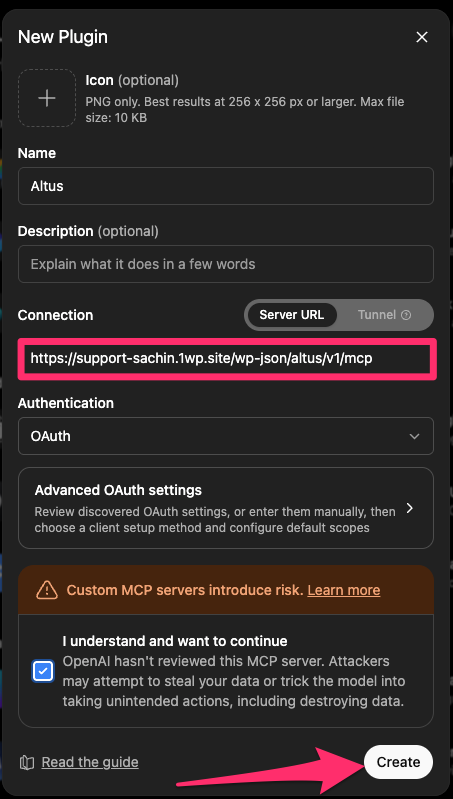
- Fill in a Name (your site or business name), a specific Description (ChatGPT uses this to decide when to bring the connector into a conversation, be specific, not generic), and the Server URL from Altus’s OAuth tab.
- Set Authentication to OAuth, check the risk-acknowledgment box, and click Create.
3. Authorize the connection
- ChatGPT redirects you to your WordPress site’s OAuth consent screen.
- Review the permissions and click Authorize.
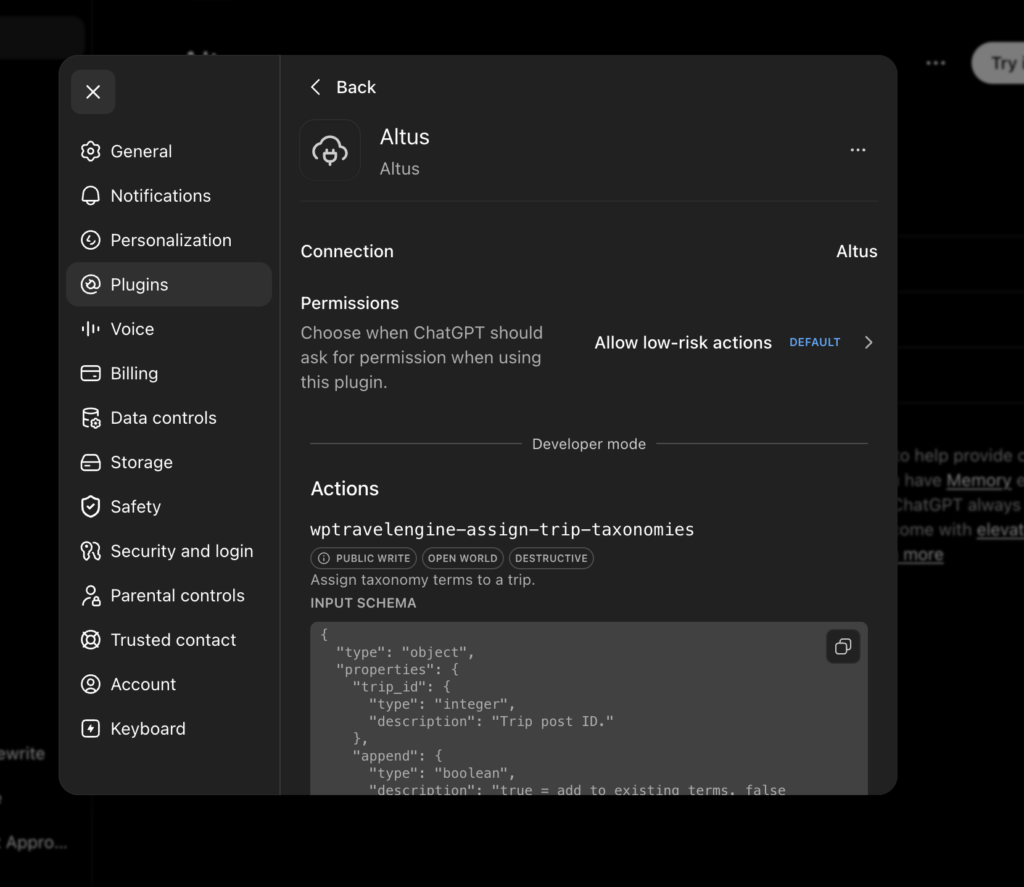
- You’re redirected back, and your connector appears under installed plugins.
4. Using it in a conversation
- Open a new ChatGPT conversation.
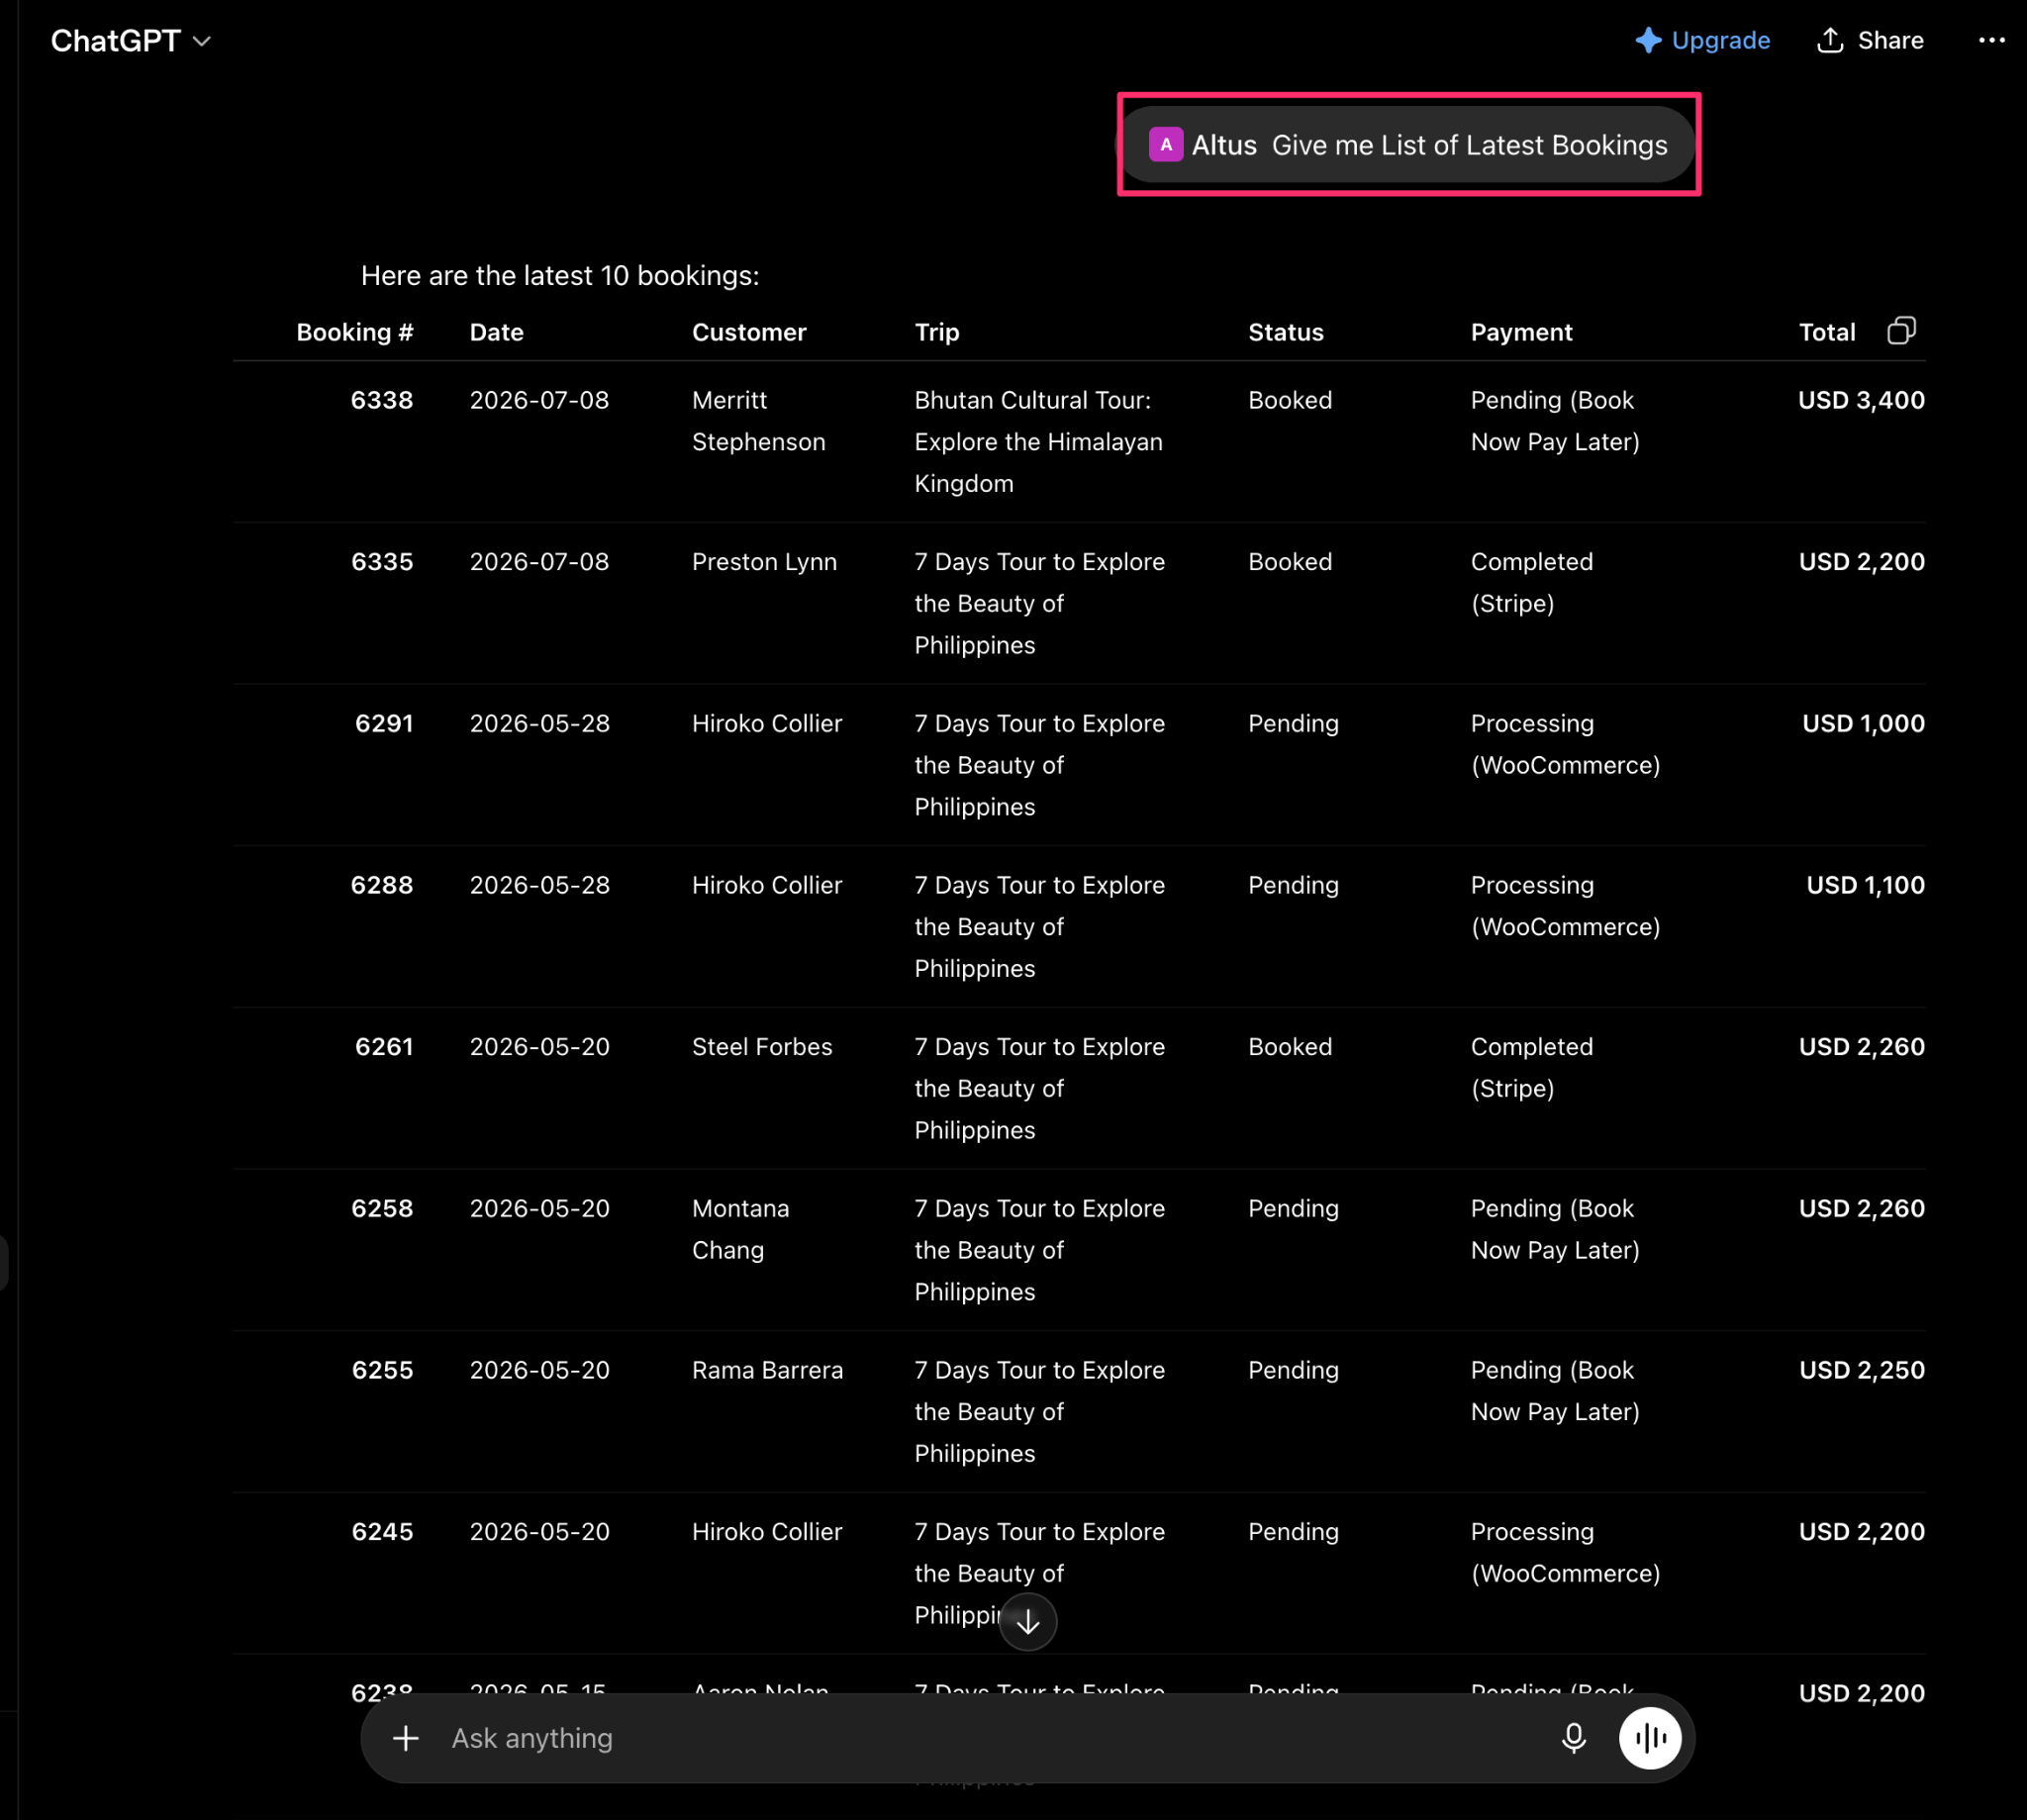
- Click + > More and select your Altus connector. This is enabled per conversation, so repeat this each time you start a new chat.
- Test with a read-only prompt first, for example “Give me the latest booking?”
Method B: Application Password (Claude Code, Cursor, VS Code, and other local clients) #
An Application Password is a revocable, WordPress-native credential made for exactly this purpose, it’s not your login password, doesn’t expire on its own, and can be revoked at any time without affecting your regular account. Every client using it sends the password as an HTTP Authorization: Basic header on each request. There’s no separate process or local server to run.
1. Create an application password #
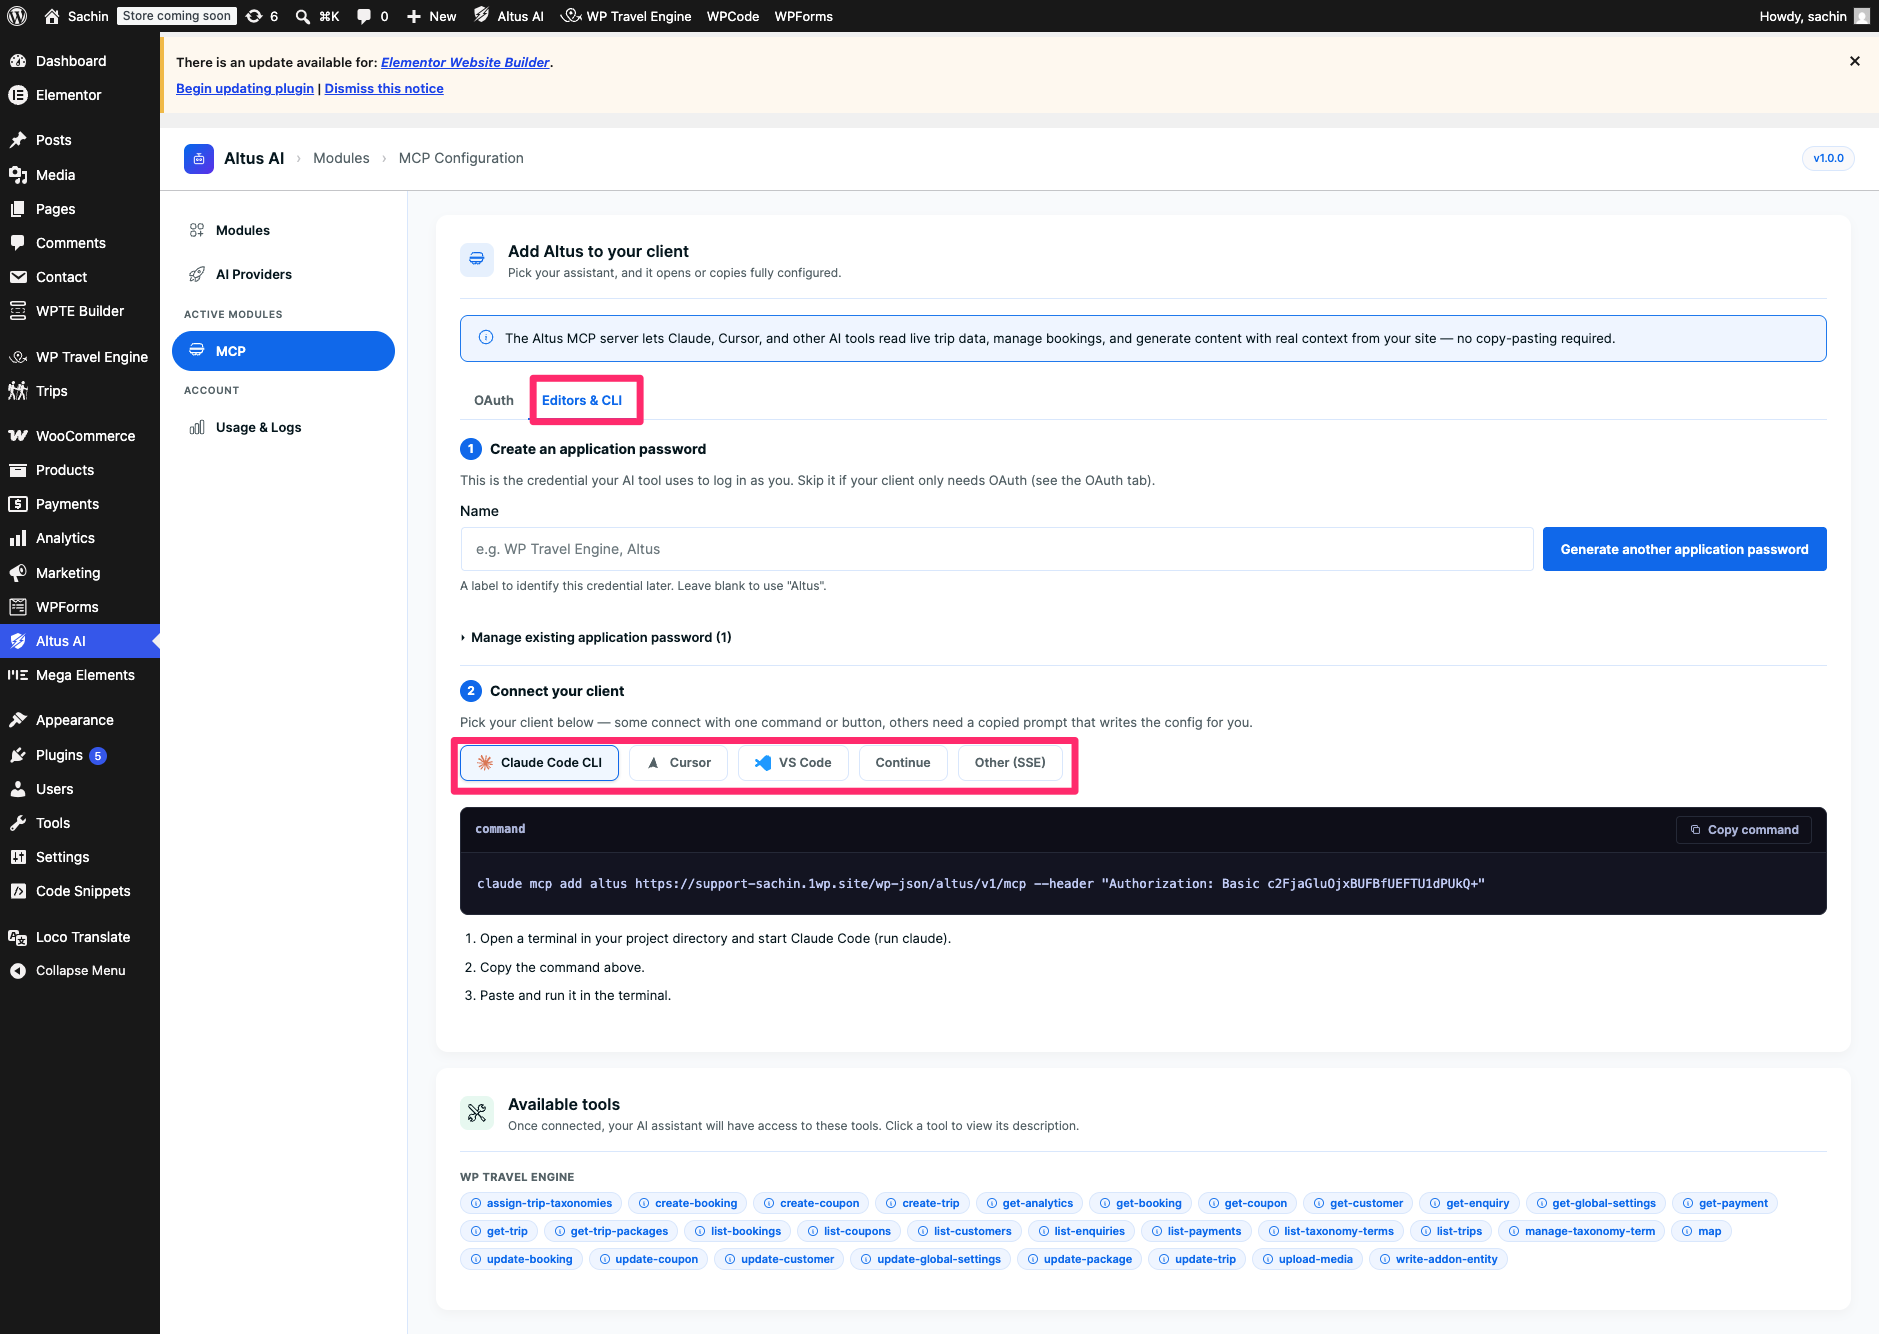
- On Altus AI > MCP, switch to the Editors & CLI tab.
- Under Create an application password, optionally enter a Name to label the credential (defaults to “Altus” if left blank).
- Click Generate another application password.
2. Connect your client #
Pick the tab matching your client, each one provides a ready command or deep link with the credential already filled in.
Claude Code
- Open a terminal in your project directory and start Claude Code (claude).
- Copy the command shown under the Claude Code CLI tab, a claude mcp add command with the endpoint URL. The Authorization header is included only if you copy the command right after generating the password, since the password itself can’t be retrieved afterward. If you copy it later, add the header yourself using the password you saved.
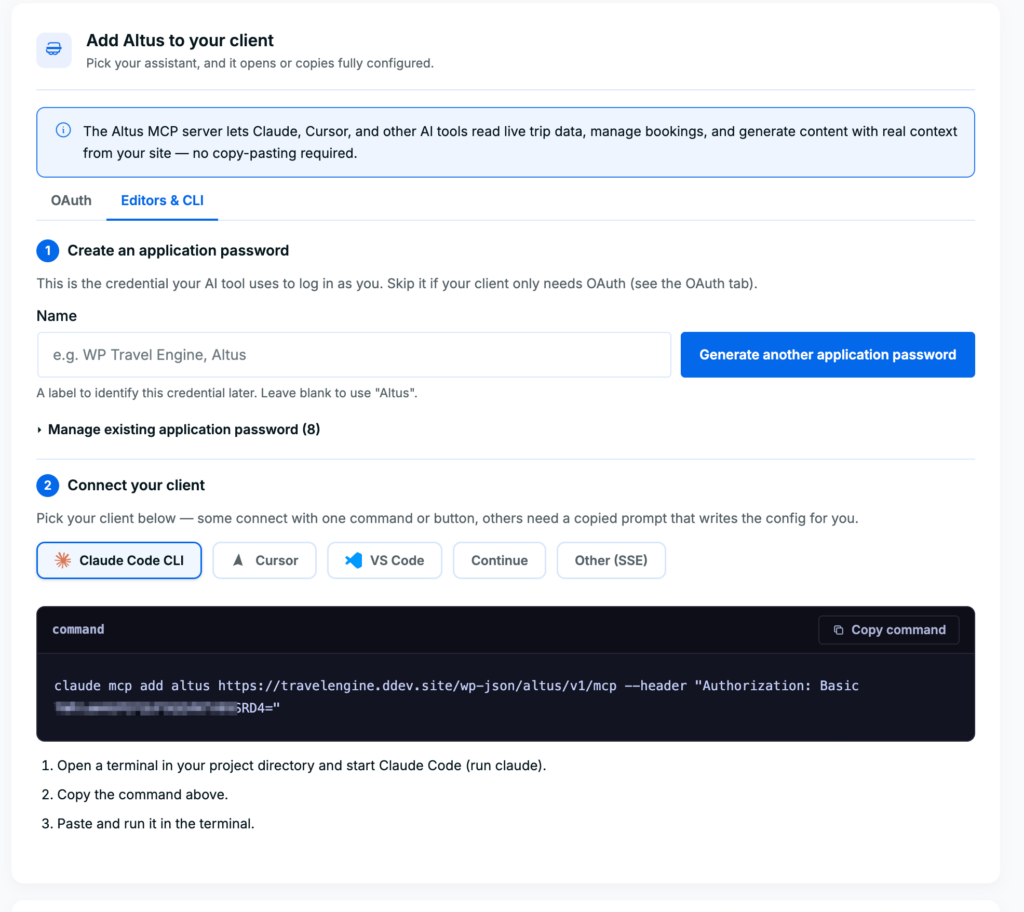
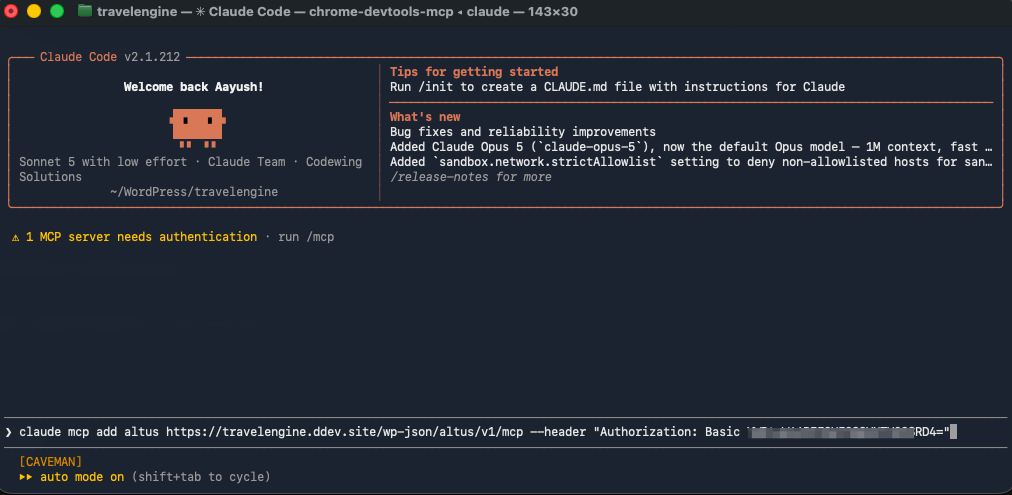
- Paste and run it in your terminal.
- In a new session, confirm the server shows as connected (Claude Code lists connected MCP servers at startup or via a status command).
Cursor
- Click Add to Cursor under the Cursor tab. This opens a cursor:// deep link with the endpoint URL and Basic-auth header pre-filled.
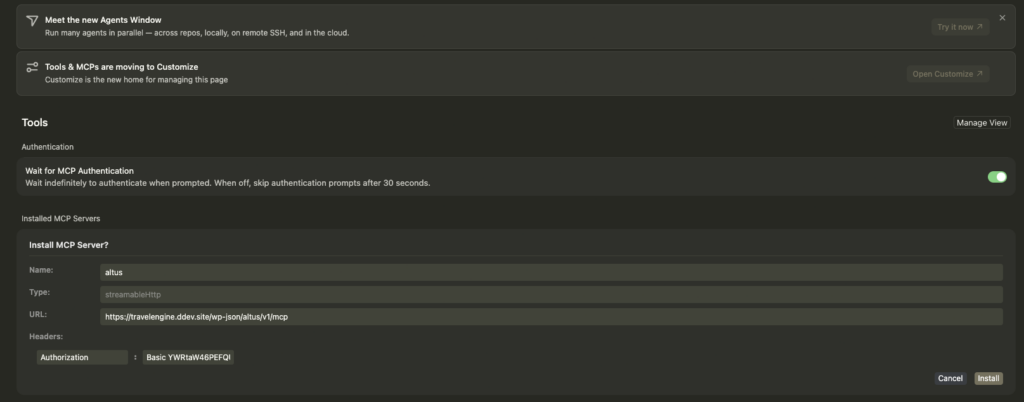
- If Cursor doesn’t open or isn’t installed, expand Cursor not installed, or the button didn’t open it? Copy the prompt instead, and paste that prompt into Cursor’s chat.
- Cursor shows the server as connected once it can reach it, with its tools available in chat and composer.

VS Code
- Click Add to VS Code under the VS Code tab. This opens a vscode: deep link that installs the server as an HTTP MCP server, with the endpoint URL and Basic-auth header pre-filled.
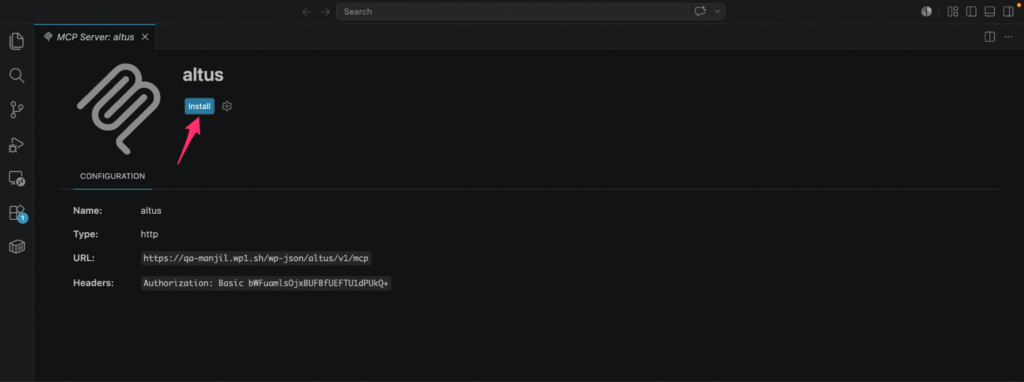
- If VS Code doesn’t open or isn’t installed, expand the fallback prompt option and paste it into VS Code’s chat.
- VS Code lists the server as connected once it can reach it, with tools available in Copilot Chat.
Continue or other SSE-capable clients
- Select the Continue tab, or Other (SSE) if your client isn’t listed.
- Copy the prompt shown, it contains the endpoint URL, your Application Password, and the setup instructions the client needs to configure itself.
- Paste it into your client.
3. Confirm it’s connected #
Regardless of which client you used, start a new conversation and ask a read-only question, for example “What trips do I have listed?” If you get a real answer from your site’s data, the connection is working.
If it fails, regenerate the Application Password on the Editors & CLI tab, re-copy the command or link, and confirm the MCP module is still active under Altus AI > Modules.
Available Tools #
Once connected, an assistant can call any of these WP Travel Engine tools, subject to the read/write access described above:
Read – get-analytics, get-booking, get-coupon, get-customer, get-enquiry, get-global-settings, get-payment, get-trip, get-trip-packages, list-bookings, list-coupons, list-customers, list-enquiries, list-payments, list-taxonomy-terms, list-trips, map
Write – assign-trip-taxonomies, create-booking, create-coupon, create-trip, manage-taxonomy-term, update-booking, update-coupon, update-customer, update-global-settings, update-package, update-trip, upload-media, write-addon-entity
Click any tool on the Available tools list to see exactly what it does before granting access.
Revoking Access #
- Go to Altus AI > MCP.
- Application Password connections (Claude Code, Cursor, VS Code, and similar) – under the Editors & CLI tab, expand Manage existing application password, and revoke the credential. This immediately breaks the connection for every client using it.
- OAuth connections (Claude, ChatGPT) — under the OAuth tab, expand Advanced: manual OAuth client and click Reset OAuth to invalidate the client, disconnecting every assistant authorized through it.
Use Cases #
Use Case 1: Managing Bookings from Claude Desktop While Traveling #
Situation: You’re away from your laptop’s admin dashboard but need to check and update a booking.
Implementation:
- Connect Claude (Desktop, Mobile & Web) via OAuth, following Method A.
- Ask Claude directly, for example “Show me today’s new bookings” or “Update booking #16668’s payment status.”
Benefit: You manage live bookings from a phone or any device with Claude installed, without opening wp-admin.
Use Case 2: A Developer Debugging Trip Data from the Terminal #
Situation: A developer needs to inspect live trip and booking data while working in Claude Code.
Implementation:
- Generate an Application Password under the Editors & CLI tab.
- Run the provided claude mcp add command in the project terminal.
- Ask Claude Code to pull specific trip or booking records while debugging.
Benefit: The developer gets real site data directly in their coding environment, without switching to wp-admin or exporting data manually.
Troubleshooting #
- Connector doesn’t appear after adding it – confirm the MCP module is still active under Altus AI > Modules.
- Claude or ChatGPT can’t authorize – double-check the MCP Server URL was copied exactly from the OAuth tab, and that you’re signed in to WordPress with an account that has access.
- Write actions fail on ChatGPT – check your plan tier, Plus and Pro accounts are read-only regardless of the tools Altus exposes.
- Local editor can’t connect – regenerate the Application Password under Editors & CLI and re-copy the full command or link, a partial copy will fail authentication.
- Cursor or VS Code deep link doesn’t open the app – use the fallback “copy the prompt instead” option under that client’s tab.
FAQs #
Does revoking one Application Password affect others? #
Yes. OAuth and Application Password connections are independent, and you can generate multiple Application Passwords for different clients.
Does revoking one Application Password affect others? #
No. Each Application Password is a separate credential. Revoking one only disconnects the clients using that specific password.
Which method should I use if I’m not a developer? #
Use OAuth. It’s built for Claude and ChatGPT and requires no command line or credential copying, just signing in through your WordPress account.