- Getting Started
- WP Travel Engine Onboard
- Creating/Adding a New Trip
- Destinations (Add/View/Modify)
- Activities (Add/View/Modify)
- Trip Type (Add/View/Modify)
- All Bookings
- All Customers
- All Enquiries
- Coupon Code
- Trip Search
- Plugin License
- Trip Global Settings (Configuring Trips)
- Available Shortcodes
WP Travel Engine Plugin helps you convert your WordPress website into a complete travel booking website.
Using this plugin, you can add trips with a detailed itinerary and allow customers to enquire and book the trips on your website. You can arrange and manage trips you offer based on destinations, activities, and trip types.
This plugin also helps you manage all your customers– new and old. You can view the number of bookings made by a particular customer. You can manage all the bookings, enquires, and customers right from your WordPress dashboard.
You can also define your own payment method.
Fully Compatible Themes with WP Travel Engine:
- Travel Booking WordPress Theme by WP Travel Engine
- Travel Booking Pro by WP Travel Engine
- Travel Muni WordPress Theme by WP Travel Engine
- Travel Muni Pro by WP Travel Engine
- Travel Agency WordPress Theme by RaraTheme
- Travel Agency Pro by RaraTheme
- Tour Package WordPress Theme by RaraTheme
- Tour Operator WordPress Theme by RaraTheme
- Travel Tour WordPress Theme by The Bootstrap Themes
- Travel Tour Pro by The Bootstrap Themes
- Travel Company WordPress Theme by Scorpion Themes
- Travel Company Pro by Scorpion Themes
If you have developed a theme compatible with WP Travel Engine and want to include above, please contact us here.
Getting Started #
Make sure you have the latest version of WP Travel Engine Plugin installed and activated. You can find the plugin here.
You can either follow the video or the below steps to install WP Travel Engine Plugin:
Installing the Plugin #
Using Site Admin
- Download the plugin from wordpress.org
- Install it from the Site Admin
- Activate the plugin through the ‘Plugins’ menu in WordPress.
Using FTP
- Download the plugin from wordpress.org
- Unzip wptravelengine.zip.
- Upload all the files to the /wp-content/plugins/wp-travel-engine.
- Activate the plugin through the ‘Plugins’ menu in WordPress.
Once activated, you will be redirected to “WP Travel Engine Onboard”.
WP Travel Engine Onboard #
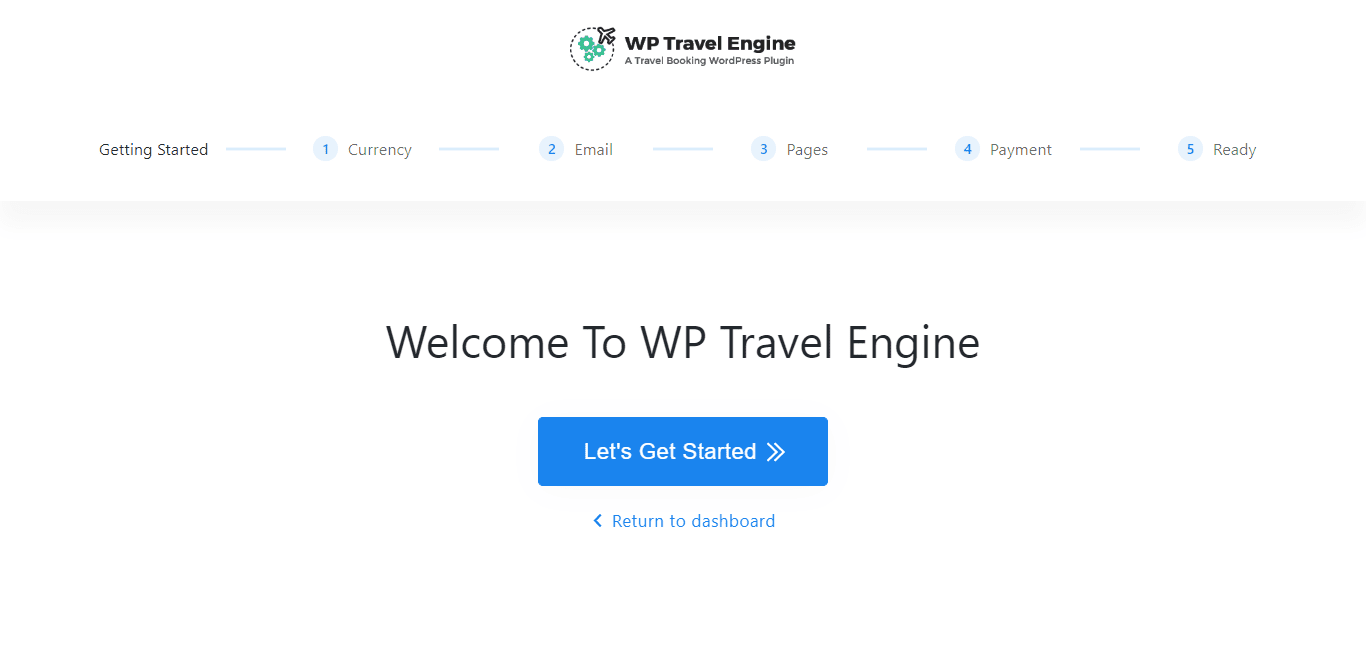
Once the plugin is activated from the plugin list page, you will be redirected to this current page “WP Travel Engine Onboard” if you are a first-time user which will guide you through various basic configurations to make your site “WP Travel Engine” ready. This is to help you guide through the basics to configure the plugin to make your site ready as required.
Configurable Tabs & Settings #
There are 5 different tabs configurable in the “WP Travel Engine Dashboard” page as listed below:
- Currency – You can configure various options such as types of currency your business support, currency symbol to display, thousand separator for currency.

- Email – You can configure if you want to send the sales notification email to admin or send an inquiry notification email to use and custom emails.

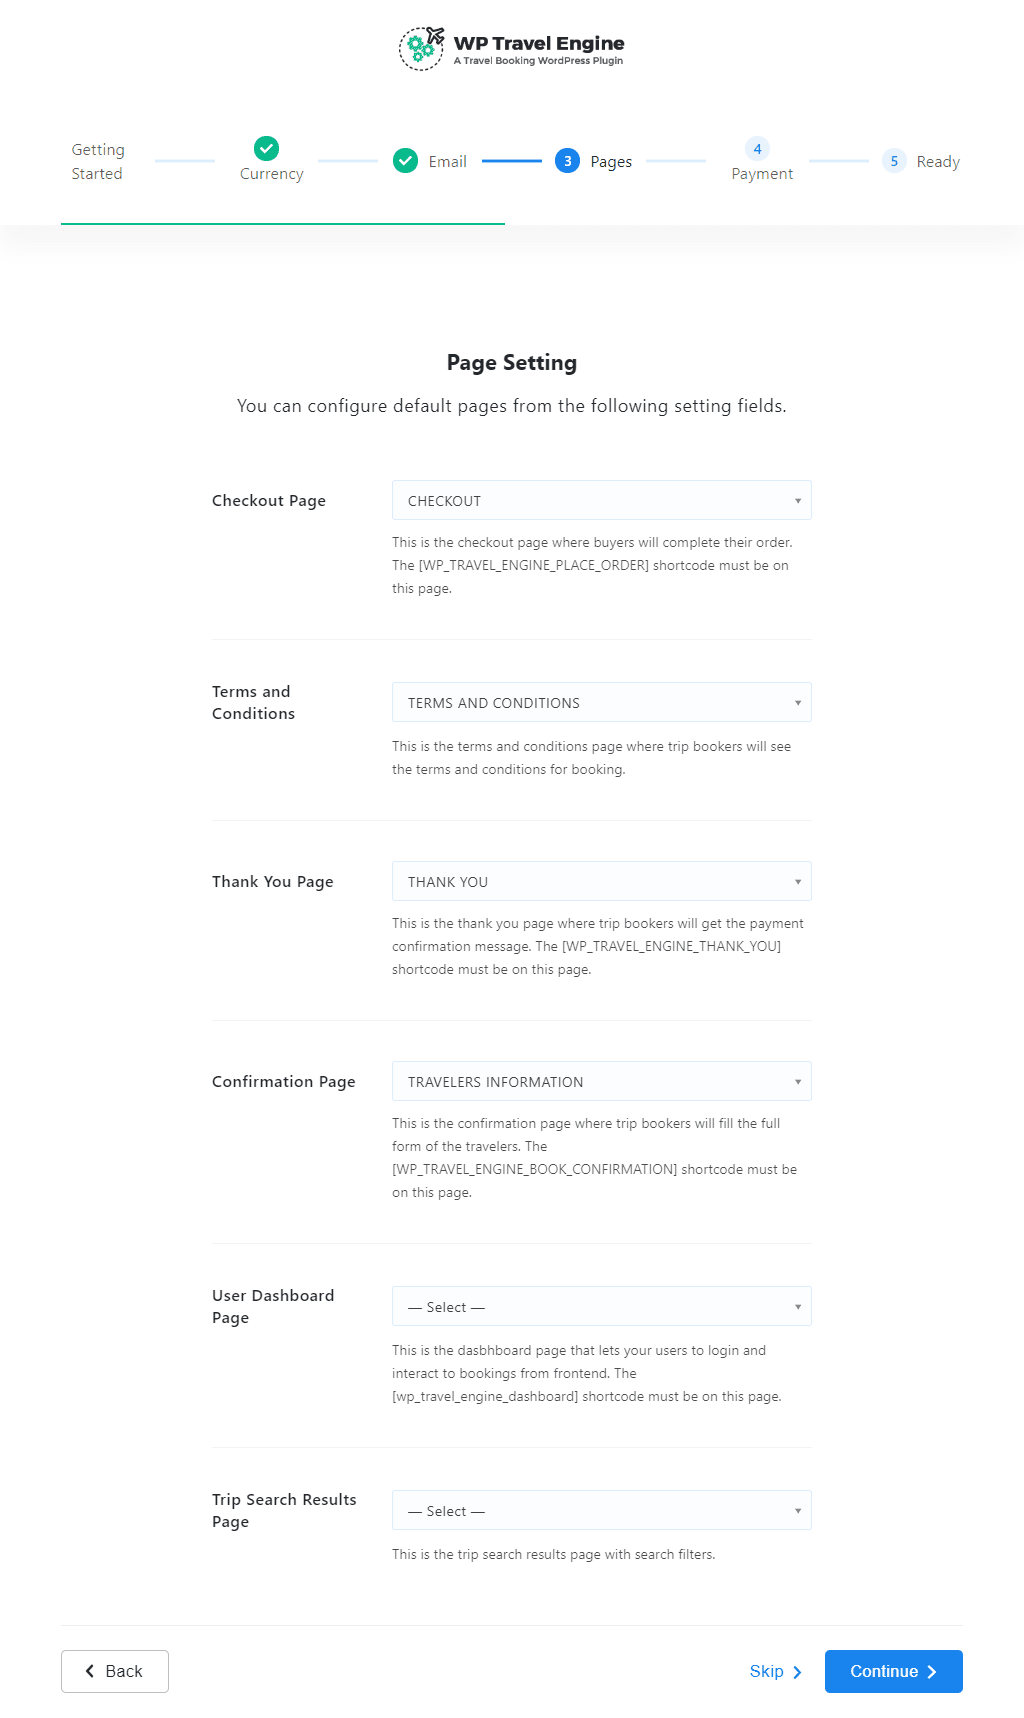
- Pages – You can set the various pages for checkout page, terms and conditions, thank you page, purchase confirmation pages, etc.
- Payment – You can configure payment gateway options from here. Paypal is enabled by default and after you insert the PayPal email/id, you are ready to go.

- Ready
After you complete the configuration, you will land on this tab, where you can find various links to different pages for documentation, and support. You can also share or tweet about the plugin from here. Or you can start creating a new trip from here or return to the dashboard instead as well.
Creating/Adding a New Trip #
You can add trip details and assign them to destinations, activities, and trip type while creating a trip.
You can either follow the video or the below steps to configure this section:
- Go to Trips > Add New
- Enter the trip name in the title section.
- Enter the trip description in the description section

Configurable Trip Tabs #
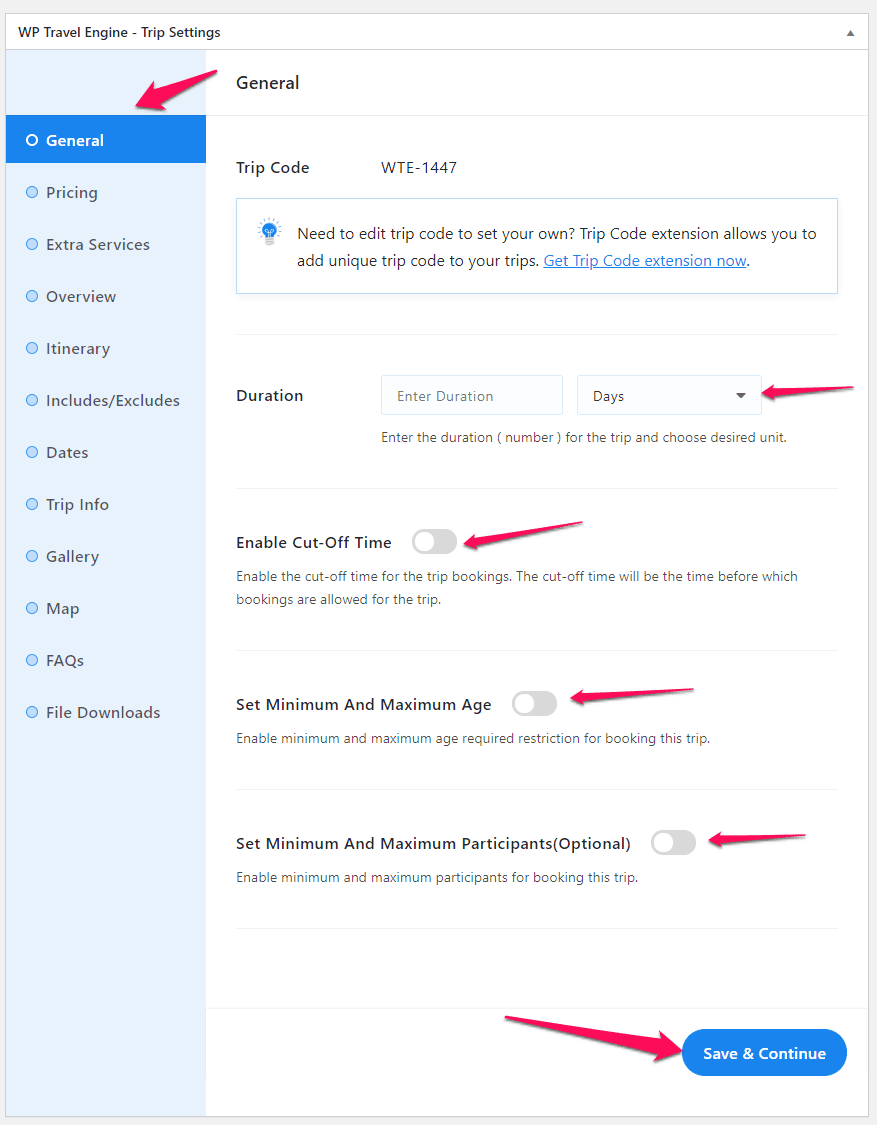
Enter the Trip duration, Cut-off Time, Minimum and Maximum Age, and Minimum and Maximum Participants of the trip in the General Section.
Enter the Regular Price, Sale Price, Child Price, Infant Price of the trip in the Pricing Section.
Enter additional services such as supplementary room, hotel upgrade, airport pick, and drop off, etc.
Enter Trip Descriptions and Trip Highlights.
Enter Day to Day Itinerary for the trip.
Enter things included or excluded on the trip. You can define what services you provide for the trip and what you don’t provide while creating a trip.
Enter your trips with fixed departure dates and let user book only on specific days.
You can enter extra trip information like group-size, transportation, etc in the “Trip Info” tab. Select the Trip Fact and Click on “Add Fact” button to add trip info. You can add more trip info fields from WP Travel Engine > Settings > General > Trip Info.
Enter to display either the image gallery or Video Gallery.
Enter a map image or a map iframe code.
Enter frequently asked questions content from here.
Enter content here to list the downloadable files to visitors like brochures, guidebooks, offline maps, etc.
You can also add extra tabs or sort the order of the tabs by going to WP Travel Engine > Settings > General > Trip Tab Settings. Refer to Trip Tab setting section of this documentation to configure/add trip tabs.
Destinations (Add/View/Modify) #
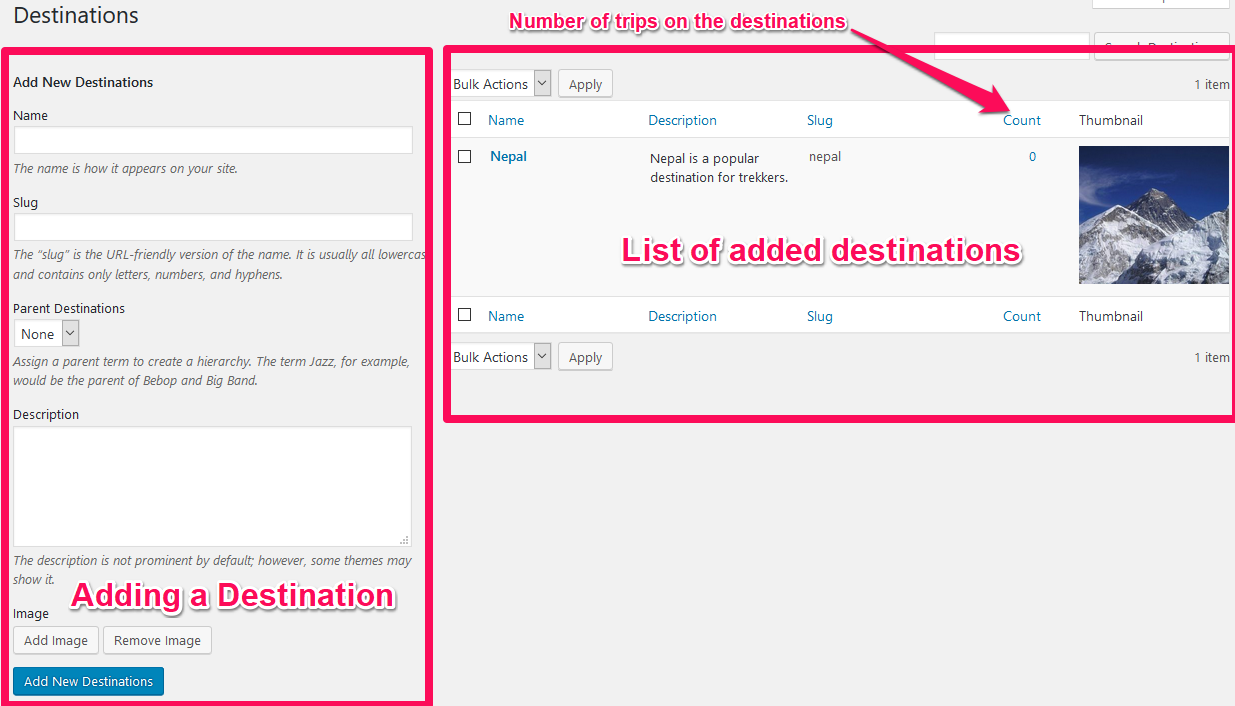
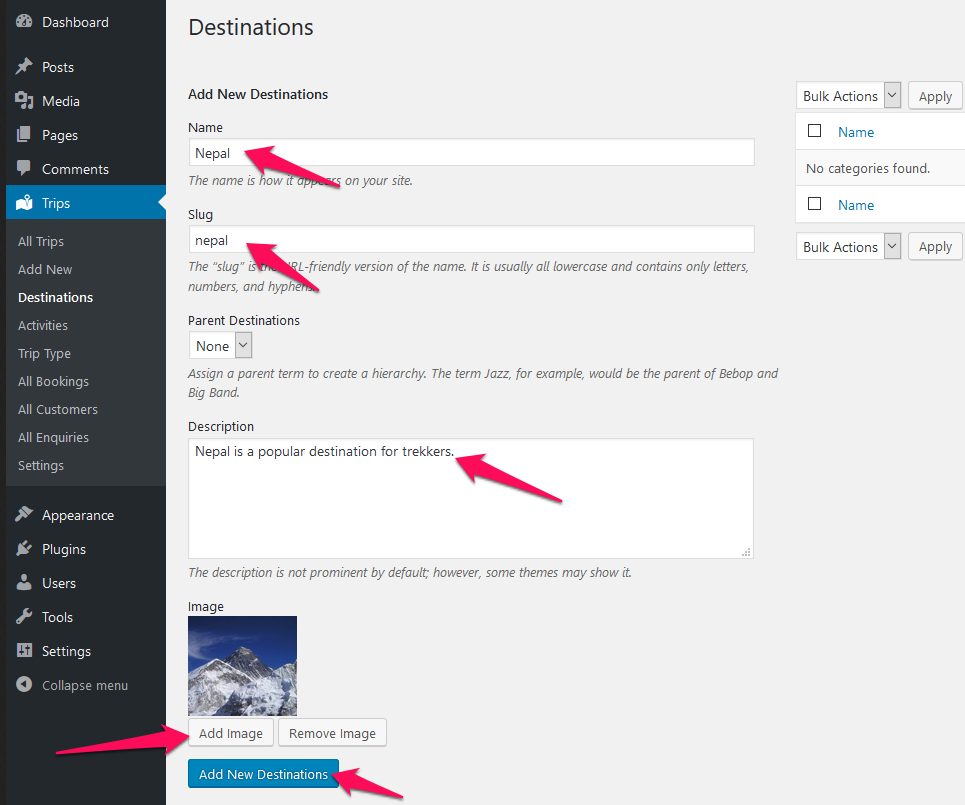
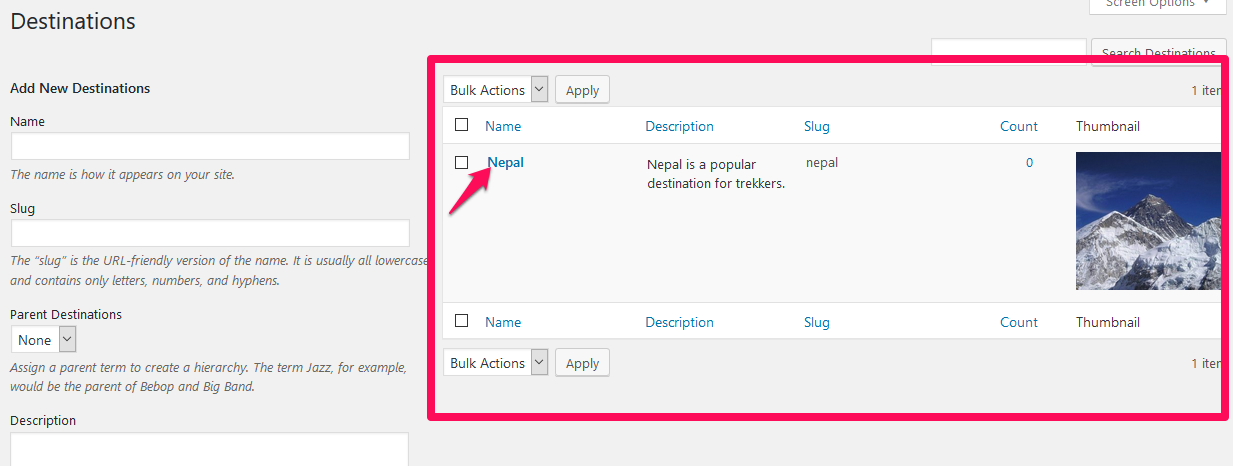
You can add trip destinations along with an image. Destinations can be countries or cities. The “Count” shows the number of trips on a particular destination.
Adding Destinations #
Recommended Image Size for Destinations: 300 x 275 px
- Go to Trips > Destinations.
- Enter the name, slug, and description of the destination. The description of the destination is displayed on the single destination page. The single destination page displays all the trips associated with the destination.
- Upload an image for the destination. The image will be displayed as a thumbnail in the destinations archive page.
- Click on Add New Destinations button.
Editing Destinations #
- Go to Trips > Destinations.
- Click on the destination you want to edit. A new page will be loaded.
- Click on Update after making the necessary changes.
Activities (Add/View/Modify) #
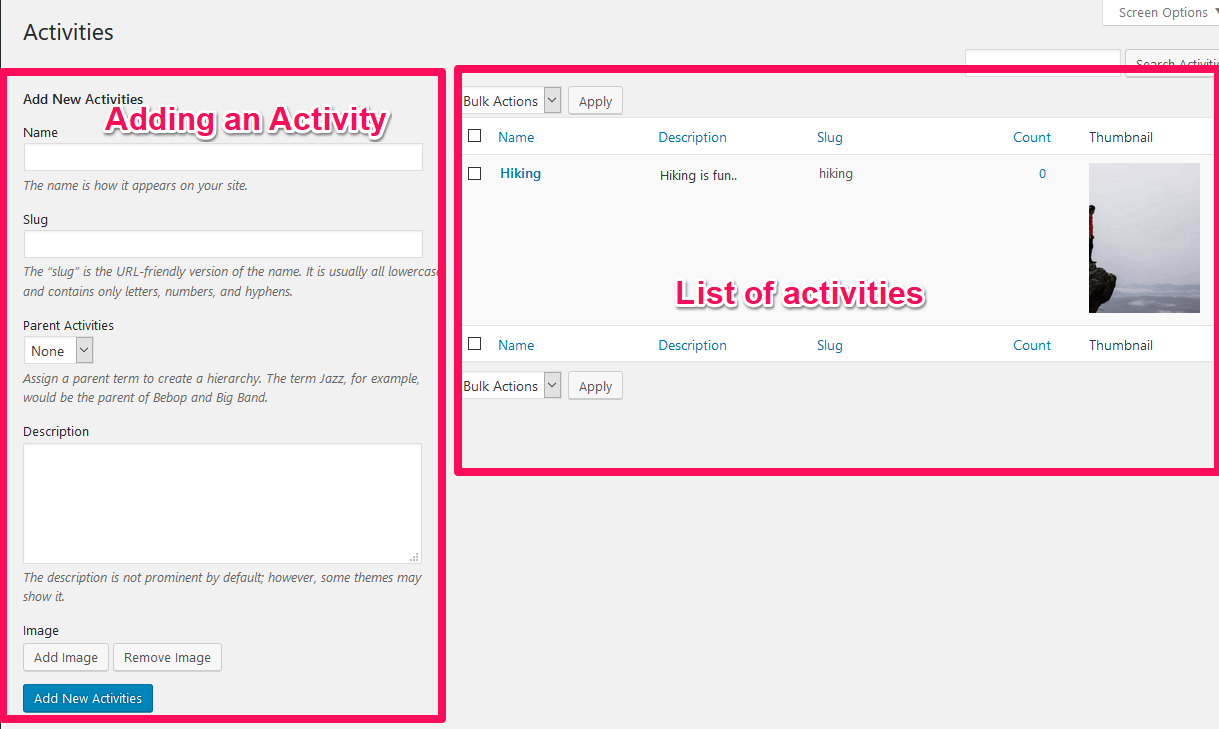
You can add trip activities along with an image in the theme. Activities can be hiking, skydiving, surfing, etc. The “Count” shows the number of trips on a particular activity.
Adding Activities #
Recommended Image Size for Activities: 300 x 405 px
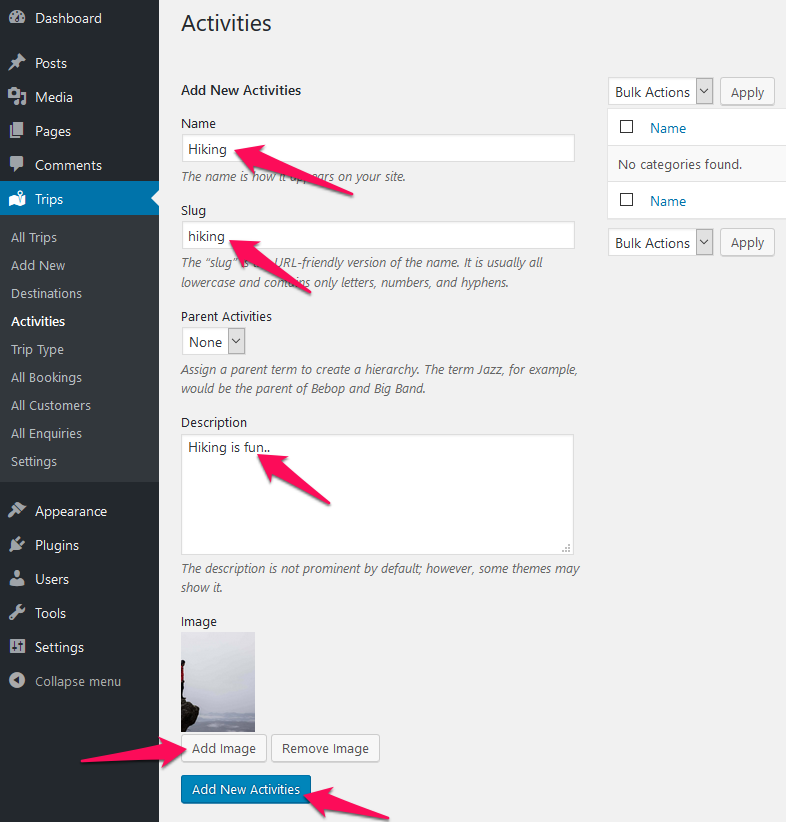
- Go to Trips > Activities.
- Enter the name, slug, and description of the activity. The description of the activity is displayed in the single activity page. The single activity page displays all the trips associated with the activity.
- Upload an image for the activity. The image will be displayed as a thumbnail in the activity archive page.
- Click on Add New Activities button.
Editing Activities #
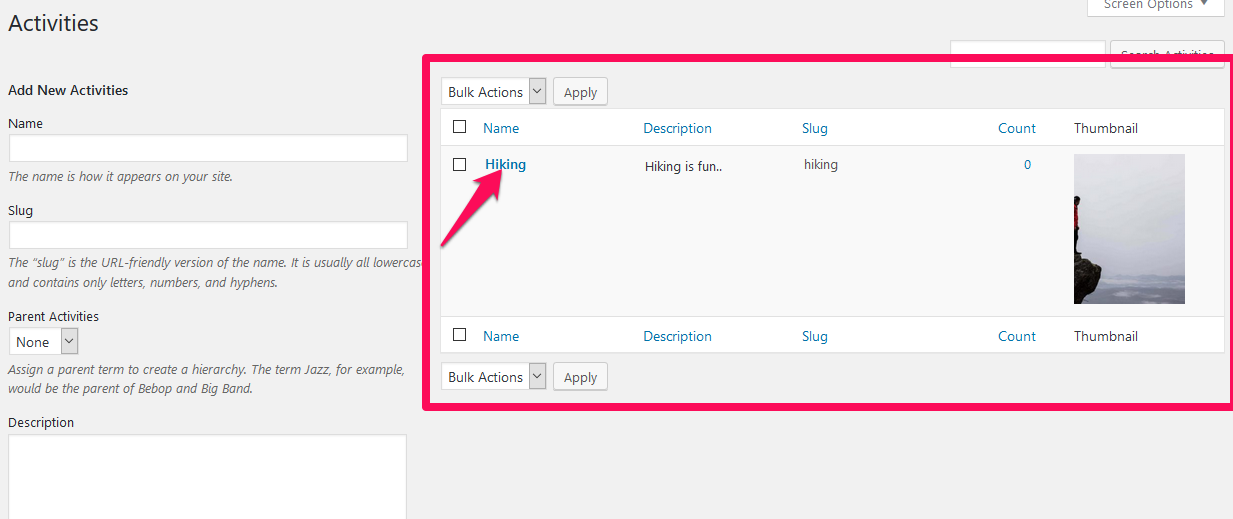
- Go to Trips > Activities.
- Click on the activity you want to edit. A new page will be loaded.
- Click on Update after making the necessary changes.
Trip Type (Add/View/Modify) #
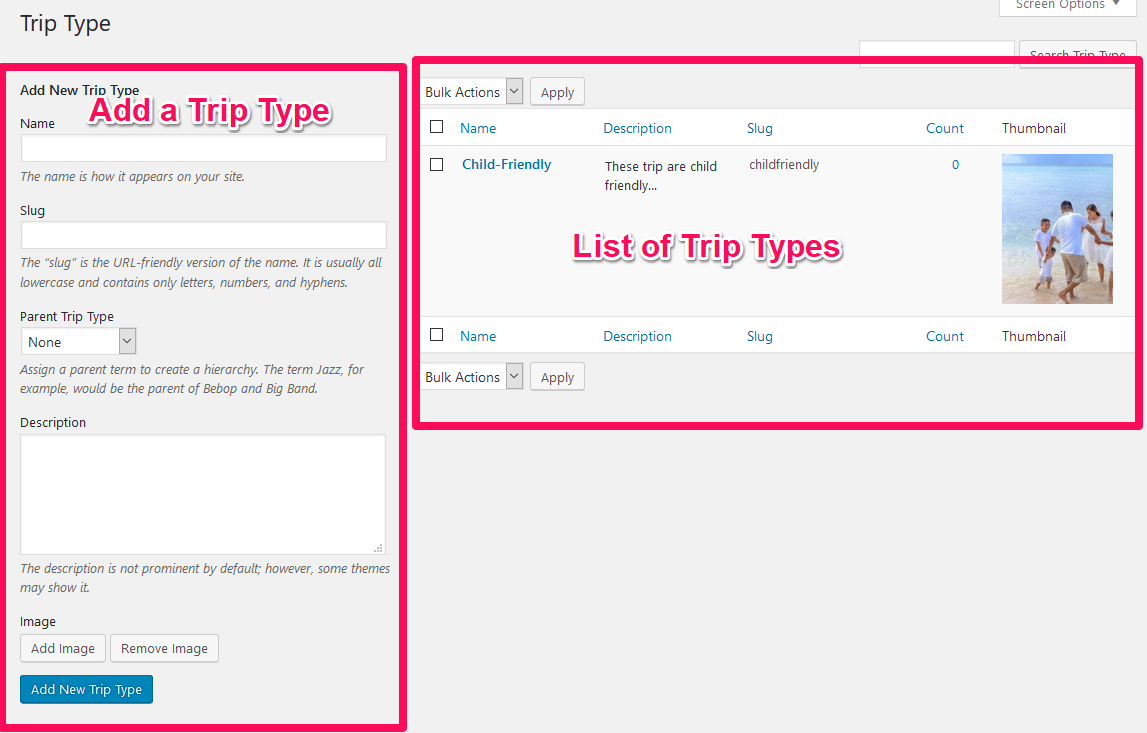
You can add trip types along with an image in the theme. Trip types can be Budget Friendly, Child-Friendly, Dog-Friendly, Easy, Difficult, etc. The “Count” shows the number of trips on a particular trip type.
Adding Trip Type #
Recommended Image Size for Trip Type: 300 x 405 px
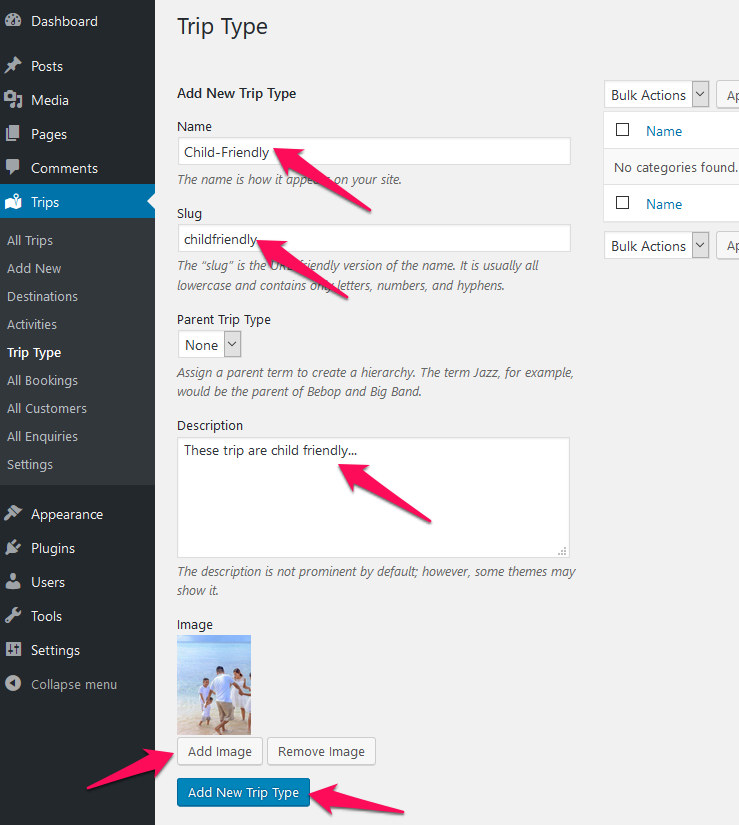
- Go to Trips > Trip Type.
- Enter the name, slug, and description of the trip type. The description of the trip type is displayed in the single trip type page. The single trip type page displays all the trips associated with the trip type.
- Upload an image for the trip type. The image will be displayed as a thumbnail in the trip type archive page.
- Click on Add New Trip Type button.
Editing Trip Type #
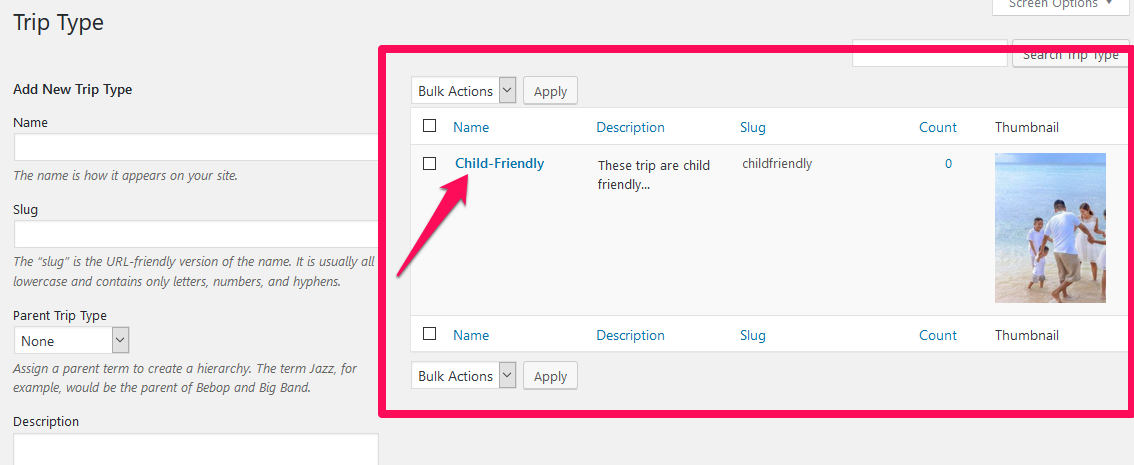
- Go to Trips > Trip Type.
- Click on the Trip Type you want to edit. A new page will be loaded.
- Click on Update after making the necessary changes.
All Bookings #
Manage Bookings #
You can view/edit bookings from Trips > All Bookings

You can see the Booking ID, booking date, trip ID of the booking, Trip Name, Number of Travelers booked, and Total Cost of the booking. To see the details of the booking, click on the booking title.
Add/View Bookings #
You can add your own booking from the back using button Add New. Or you can view the booking details clicking the booking title in the list section.

Booking Status #
Booking Status is a new feature in WP Travel Engine v.4.0.8 that lets you assign and change the booking status for the bookings made on your website.

By default, when a booking is made the booking status for the booking will be set as booked in the Admin Dashboard. You can change the status to refunded, canceled if required and it will be represented visually on the Bookings list and edit booking page.

Compatibility with Fixed Departure Dates addon
If you are using the WP Travel Engine Fixed Departure Dates addon, the booking status feature can be used to free up the seats in specific dates by setting the booking status to refunded or canceled as per your requirements.
If any of the bookings are canceled or refunded, you can set the booking status accordingly and the seats for the booking date will be freed for the trip automatically so that you can accept new bookings.
Note: Setting a booking status to refunded or canceled is a one-way process. Bookings once set to refunded or canceled status cannot be reverted back to booked status.
All Customers #
View/Manage Customers #
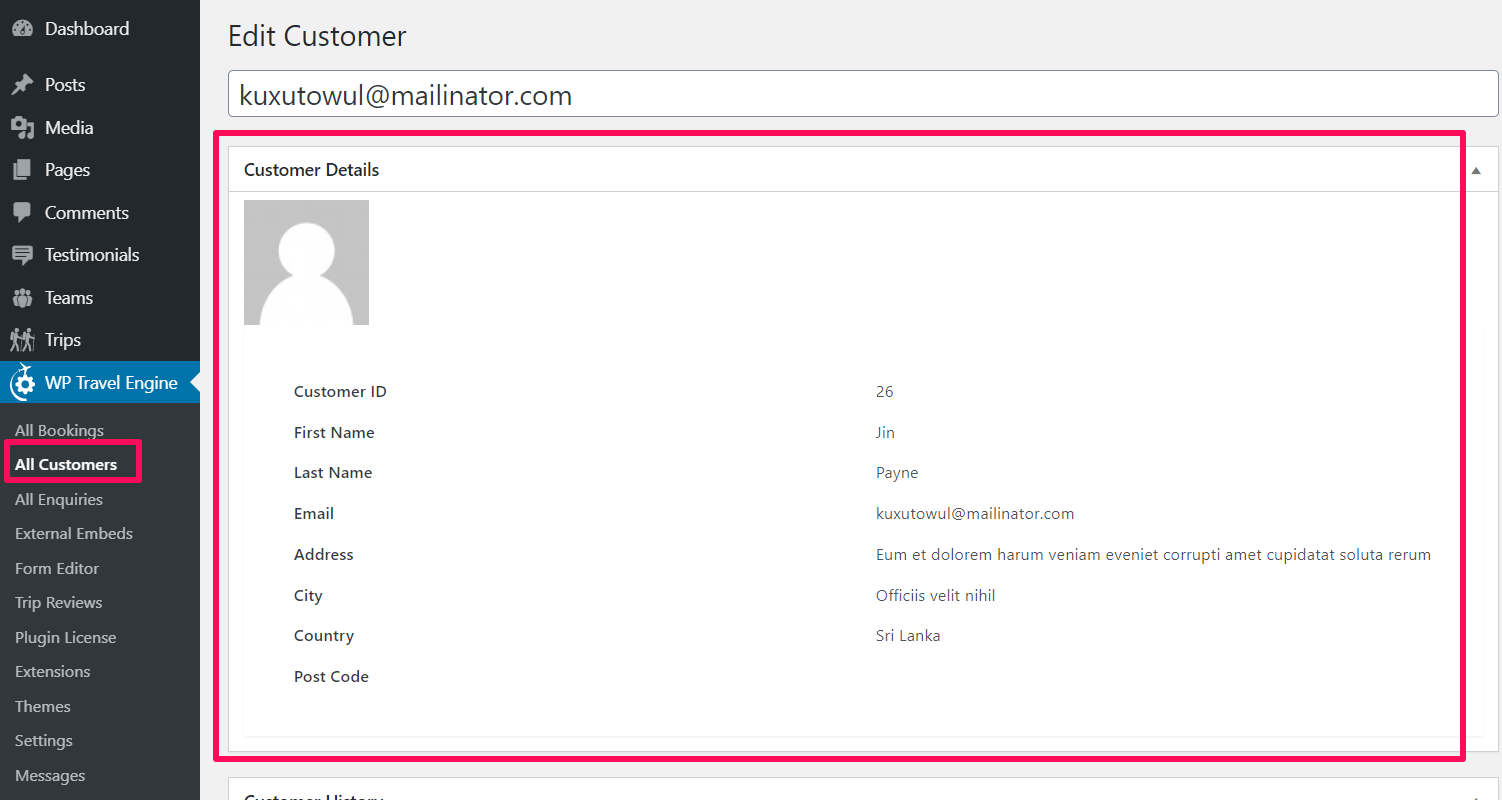
You can view/edit new and old customers from Trips > All Customers
You can see the email of the customer, customer ID, customer’s country, number of booking made by that customer, and total money spent by the customers. To see the details of a customer, click on the email address.
An email address is used to track customers.
All Enquiries #
View/Manage Enquiries #
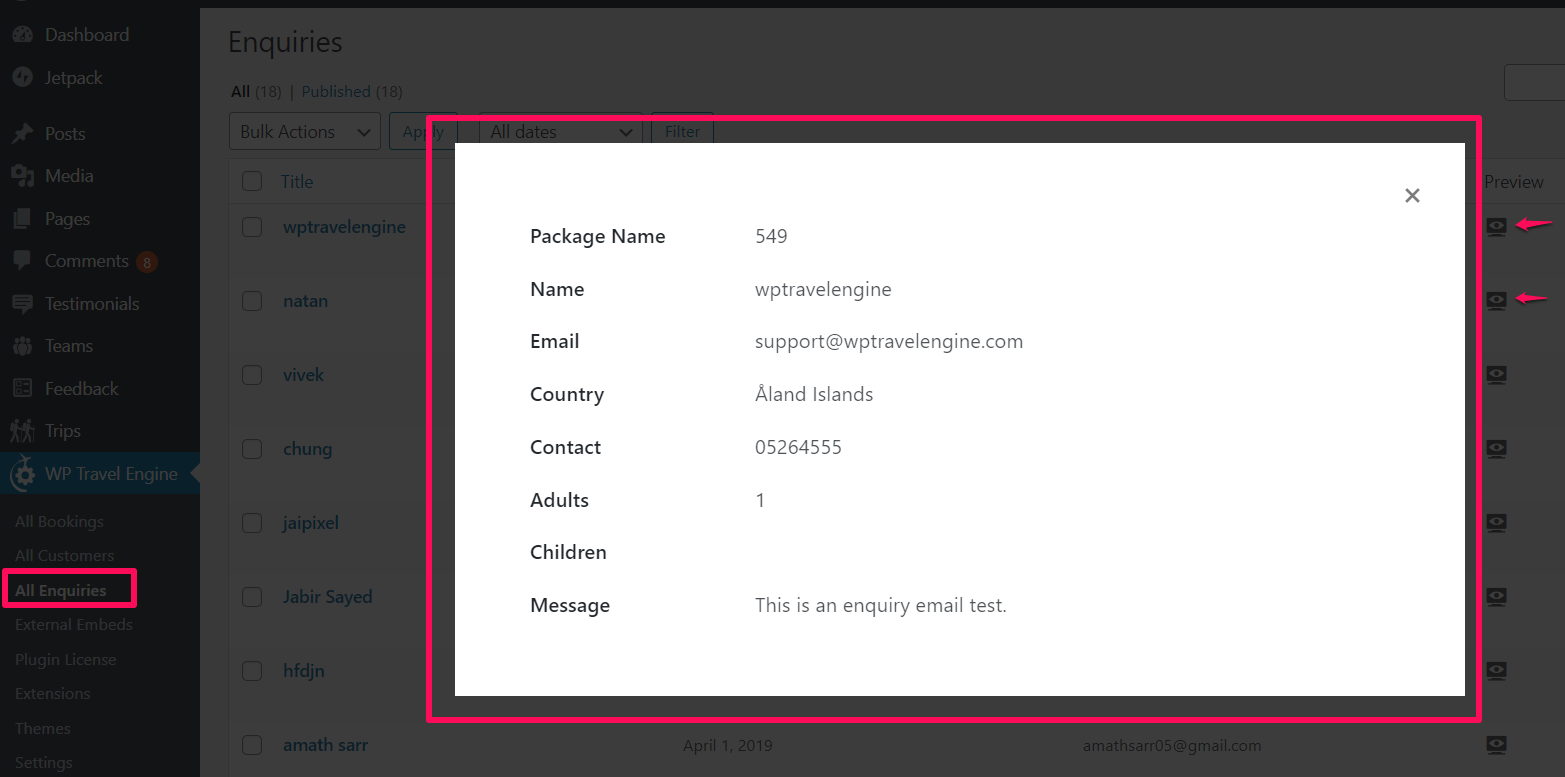
You can view/edit enquiries from this page. Site visitors can send the email with enquiries to know about the trek package in the enquiry form at end of every trip single page like queries, special requests & extras.
Coupon Code #
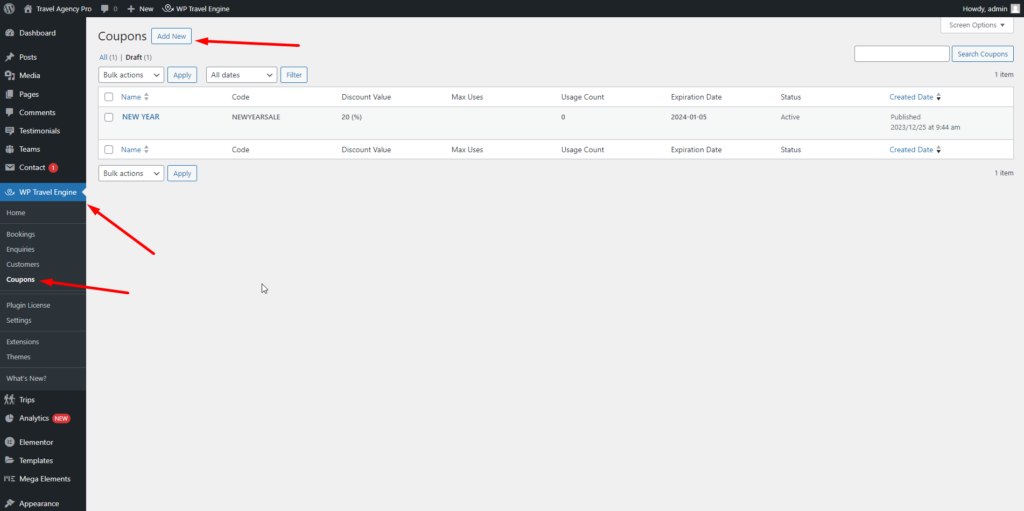
Now, with WP Travel Engine, you have the option to provide discounts to your customers through the creation of Coupon Codes. This feature enables you to generate a coupon code that visitors can apply at checkout to receive the specified discount on their trips.
For creating a Coupon Code, please visit Dashboard > WP Travel Engine > Coupons.
Trip Search #
Trip Search is an extension for WP Travel Engine that provides a one-step trip search engine to search trips by Destination, Activities, Duration, and Budget on your travel website.
How it Works? #
Trip Search indexes all the trip posts and adds destination, activity, duration, budget, and trip starting dates as search filters in a dropdown.
- Search by Destination – Users can search for trips by Destination such as Pokhara, Mustang, etc.
- Search by Activities – Users can search for trips by Activities such as Paragliding, Rafting, etc.
- Search by Duration – Users can search for trips by Duration such as 5 days, 10 days.
- Search by Budget – Users can search for trips by the Budget range.
- Search by Trip Starting Dates – Users can search for trips by Trip Starting Dates.

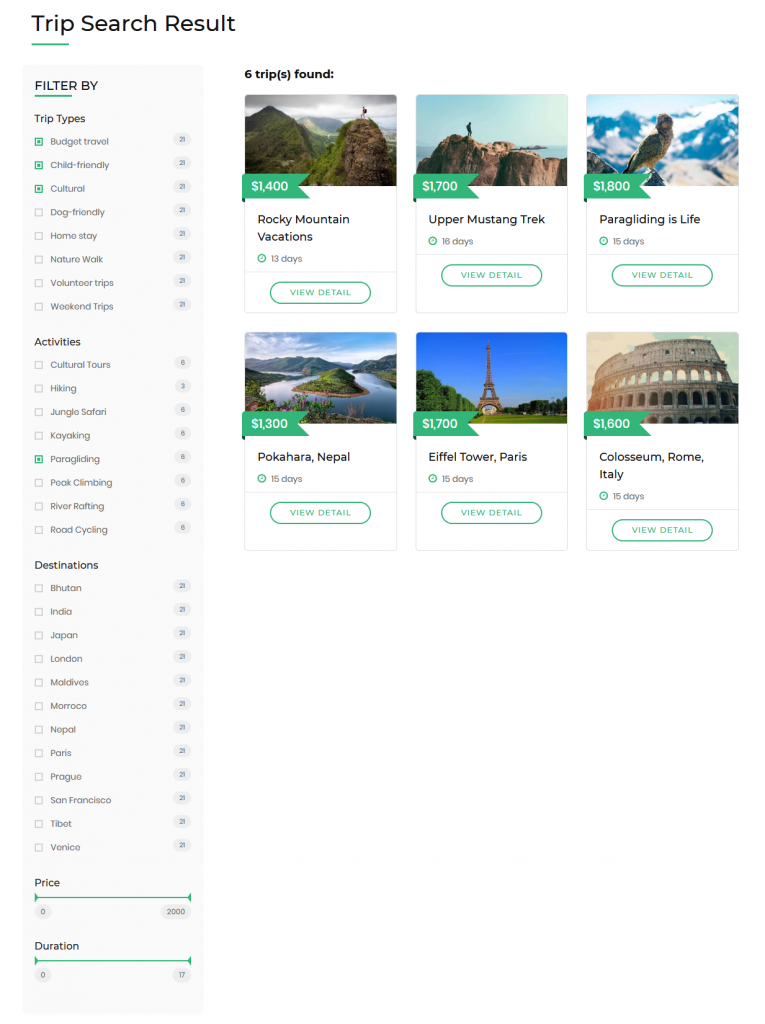
Users can select filters on the Trip Search Result page as well to filter trips.
Configure the Extension #
To configure Trip Search Extension, go to WP Travel Engine > Settings > Extensions > Trip Search.
You can choose which filters (destination, activity, duration, budget) to exclude from the search.
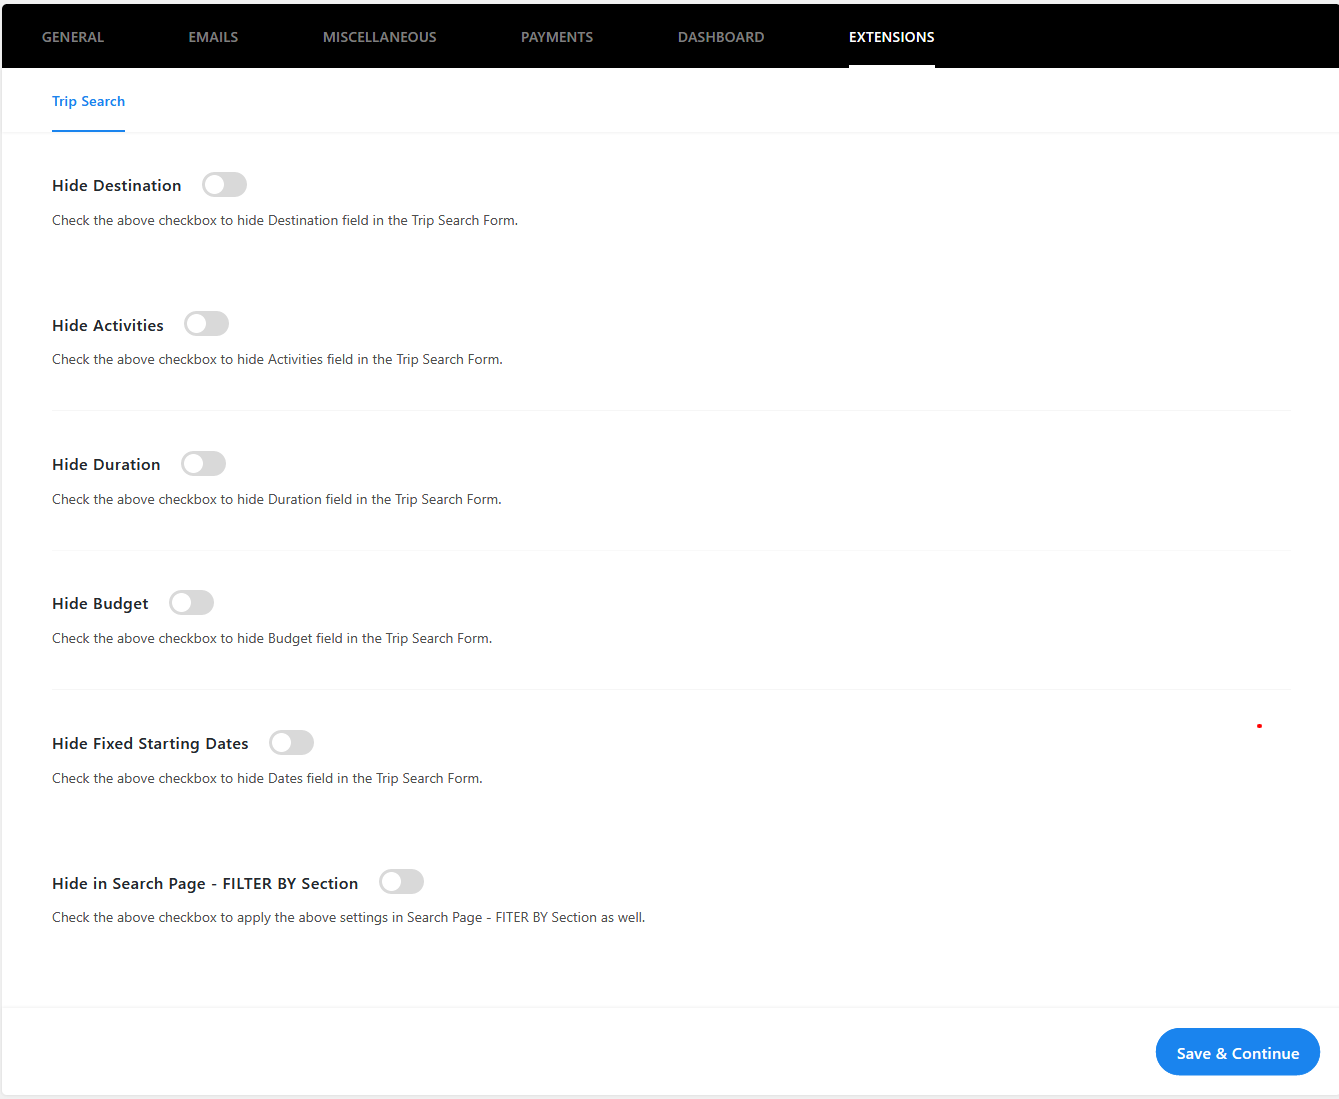
If the Fixed Trip Starting Dates add-on is added, you can also choose Fixed Starting Dates filter to exclude form the search.
To disable these filters in the search page filter by section as well, configure the Hide in Search Page – FILTER BY Section option.
Plugin License #
You can activate the license of add-ons that you are using with the wptravelengine plugin.
Please follow the below steps to activate the add-ons license.
- Go to Trips > Plugins License
- Enter the add-ons license
- Click Save Changes
- Then, click Activate License.
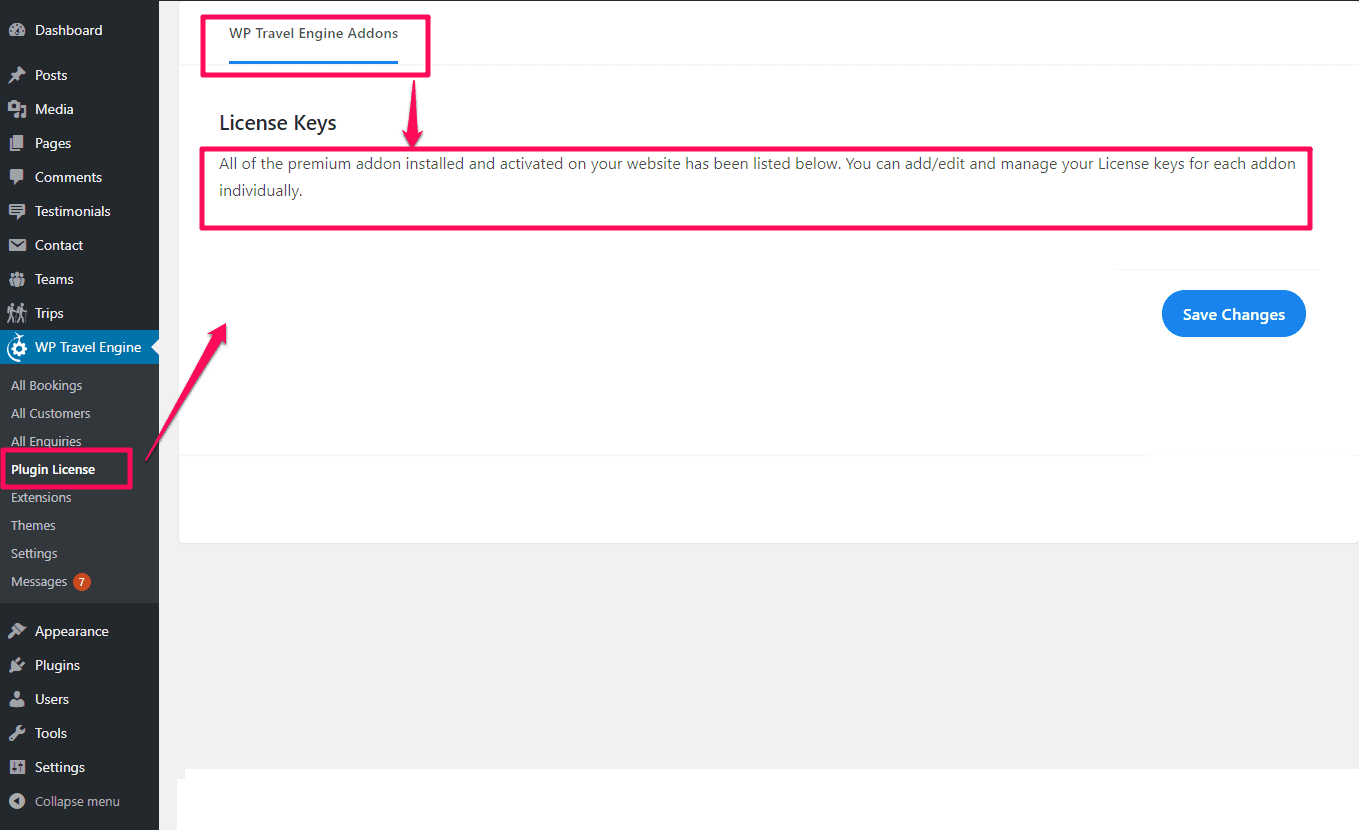
Once you have any one of the addon installed in your site, license field for addon will be automatically be generated. Then you can simply enter the license key and save the setting. If the license key is valid or invalid, a related message will be displayed in the section to notify you that license for addon has successfully been activated or deactivated.

Trip Global Settings (Configuring Trips) #
You can either follow the video or the below steps to configure this section:
You can configure your trips like creating Checkout, Terms and Conditions, Thanks, and Confirmation Pages, creating email templates, managing payment methods, and adding extensions from WP Travel Engine > Settings.

General Settings #
You can assign pages, add/configure trip tabs, and add trip info in this setting.
Page Settings #
- Go to WP Travel Engine > Settings > General > Page Settings
- Select the pages for checkout, terms, and conditions, thank you, and booking confirmation. If you don’t have pages, you can create one from Page > Add New in WordPress dashboard. Once you create pages, you may need to add the below-mentioned shortcodes in the description of the page.
- Click “Save Changes”.

Shortcodes For Pages:
For Checkout page: [WP_TRAVEL_ENGINE_PLACE_ORDER]
For Thank You Page: [WP_TRAVEL_ENGINE_THANK_YOU]
For Confirmation Page: [WP_TRAVEL_ENGINE_BOOK_CONFIRMATION]
Trip Tab Settings #
- Go to WP Travel Engine > Settings > General > Trip Tabs Settings
- Click on “Add Tab” to add a new tab.

- Enter Name for the Tab (eg. Faq) and Add an Icon for the tab.
- Click “Add Tab” to add more tabs. Click on Cross icon to delete a tab. Click and drag on the Move icon to rearrange the tabs.
- Click Save Changes to save your changes.
Trip Info #
You can add your own trip info fields on the trip page. WIth Trip Info fields, you can add extra information like transportation, group-size, etc. with icons on the trip page.
- Go to WP Travel Engine > Settings > General > Trip Info.
- Click on Add Field to add a trip info field.

- Enter the Field Name, Icon, Type, and other required fields.
- Click “Add Field” to add more trip info fields. Click on Cross icon to delete a field.
- Click Save Changes to save your changes.
Email Settings #
You can modify the content of Purchase Receipt and Booking Notification that is received by the customers.
- Go to WP Travel Engine > Settings > Emails
- Go to Purchase Receipt Tab
- Enter From Name & Email
- Enter Email Subject & Email Message
- Click on Save Changes

- Go to Booking Notification
- Enter Sale Notification Subject & Message
- Enter the Sale notification email address
- Disable Admin Notification
- Enable Customer Enquiry Notification
- Click on Save Changes
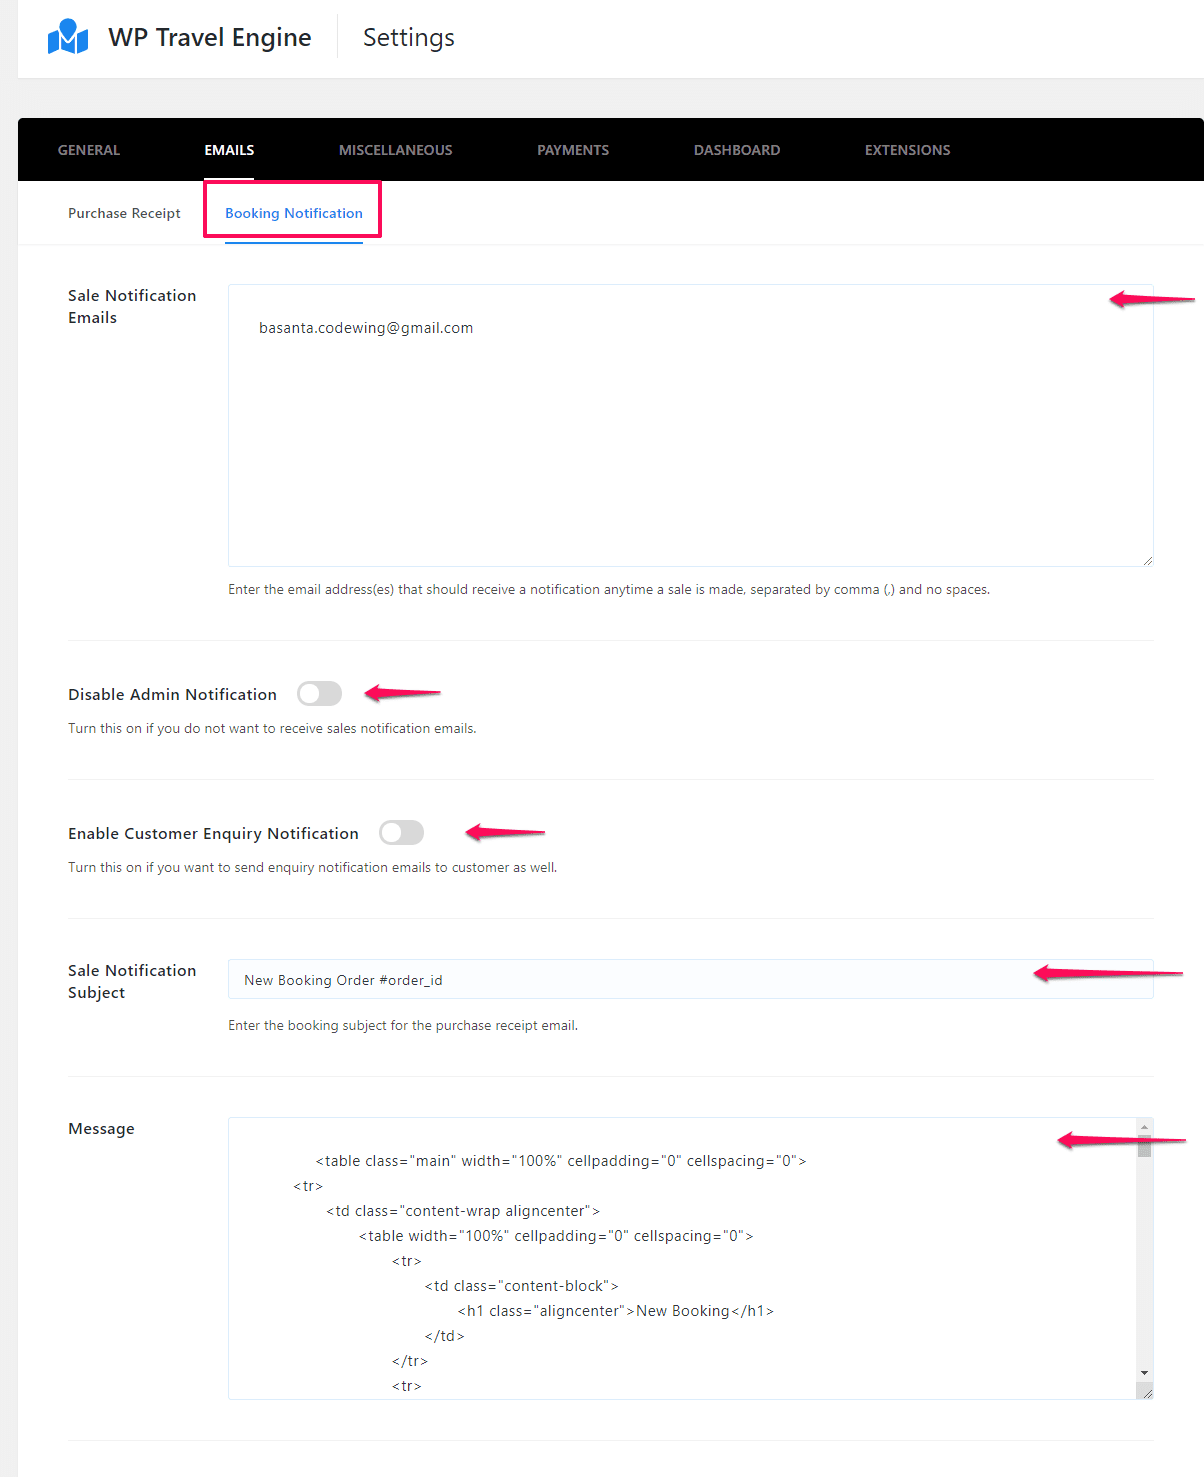
Email Template Tags: Enter the following tags as required in your email template.

Display Settings #
Single Trip #
Pricing Widget Layouts (For smaller devices) Settings #
To enable these layouts, simply navigate to WP Travel Engine > Settings > Display > Single Trip Tab. From there, you can choose your preferred layout.
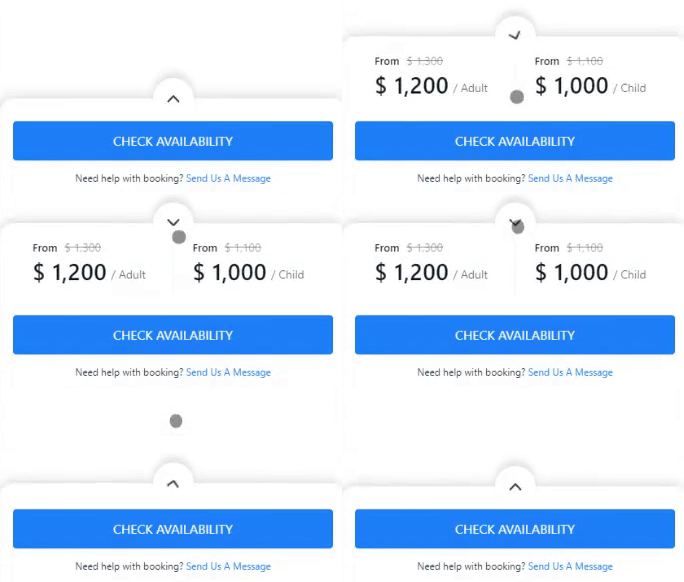
- Compact Layout:
The Compact Layout is similar to the existing layout but replaces the toggle button with a compact button. This provides more space for content and makes it easier to use on smaller screens. See the screenshot below for an example of how it looks on smaller devices.
- Breeze Layout
The Breeze Layout is designed to be even more mobile-friendly. It contains the entire widget in a button, and when clicked/tapped, a popup appears showing all your category pricings. This layout is perfect for users who prefer a clean and minimalistic design.

Miscellaneous Settings #
You can change currency settings, display settings, and other miscellaneous settings.
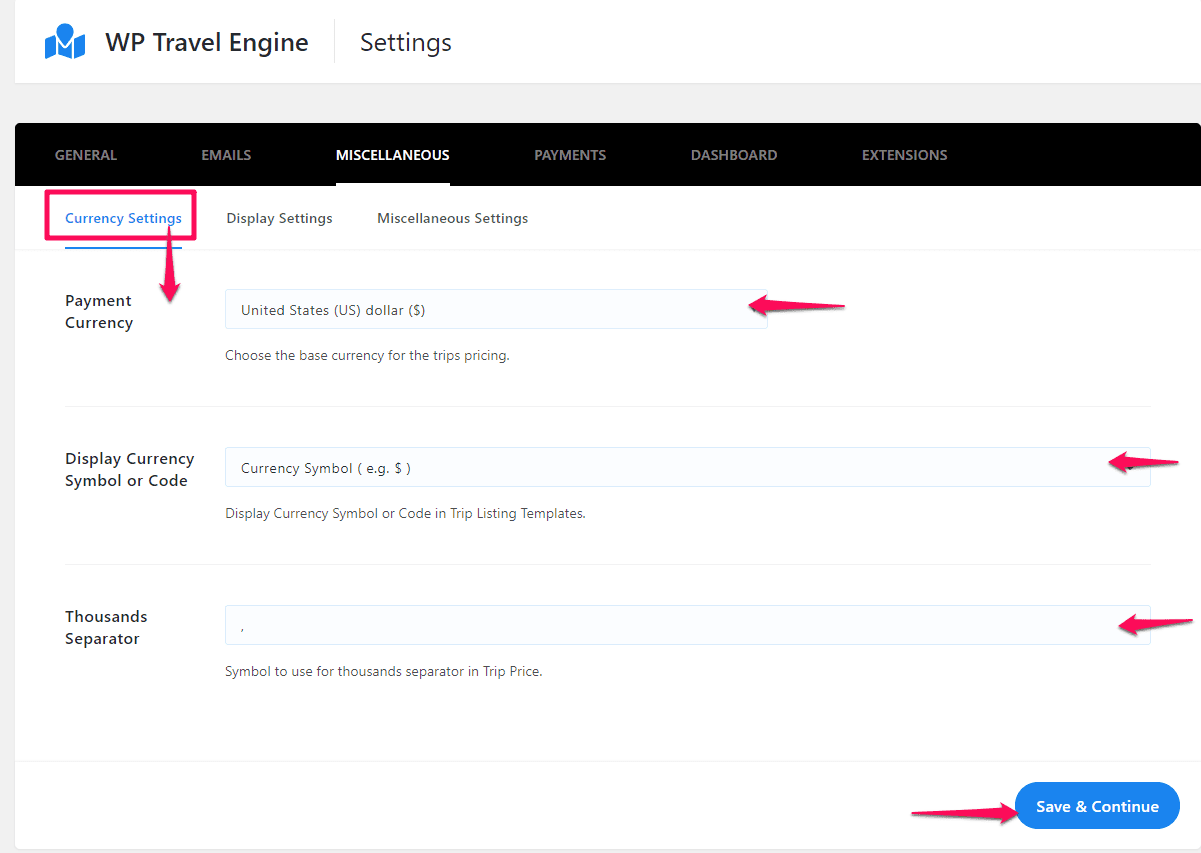
Currency Settings #
- Go to WP Travel Engine > Settings > Miscellaneous > Currency Settings
- Select the currency & currency symbol
- Enter Thousands separator
- Click on Save Changes
Display Settings #
- Go to WP Travel Engine > Settings > Miscellaneous > Display Settings
- Configure the various display settings
- Click on Save Changes

Miscellaneous Settings #
- Go to WP Travel Engine > Settings > Miscellaneous > Miscellaneous Settings
- Configure the various miscellaneous settings
- Click on Save Changes

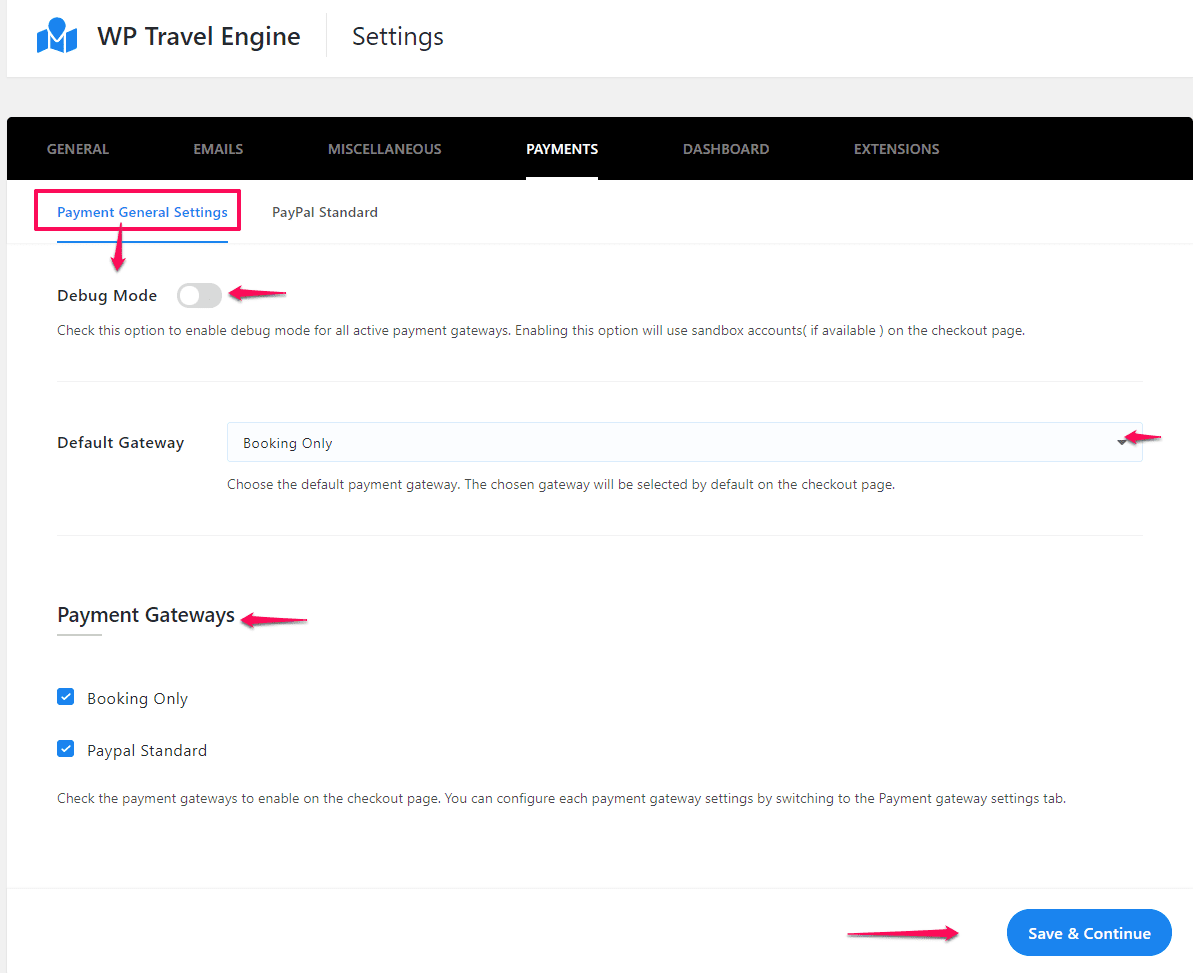
Payment Settings #
You can define advance payment and payment method (Pro version only) in this setting. To change the currency of the payment, please go to Miscellaneous > Currency Settings.
- Go to WP Travel Engine > Settings > Payments
- Enable the Debug Mode to test payment gateways on your website.
- Select the Default Gateway from the list of available gateways.
- Select and configure the Payment Gateways.
- Click Save Changes
Paypal Standard #
You can configure the standard PayPal account by adding PayPal ID in the field. If all the details are correct, the PayPal standard will be activated.

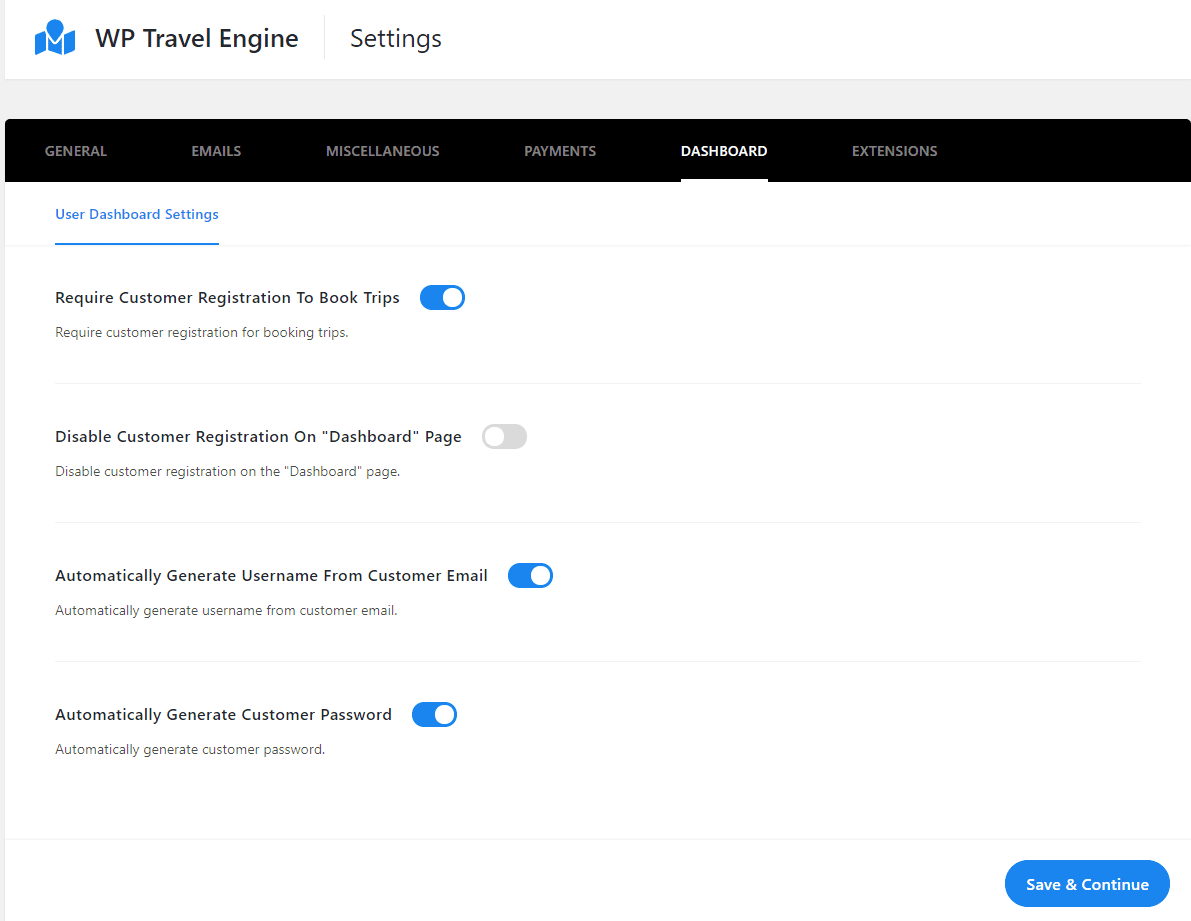
Dashboard Settings #
If you like to add the user and control user in the front-end itself rather than sending the user to the admin, all can be configured from the global setting tab User Dashboard Setting tab.
Extensions Settings #
If you have any of the additional helper addon added and activated in the site, and if that addon creates the global setting, then those settings will be listed in this tab.
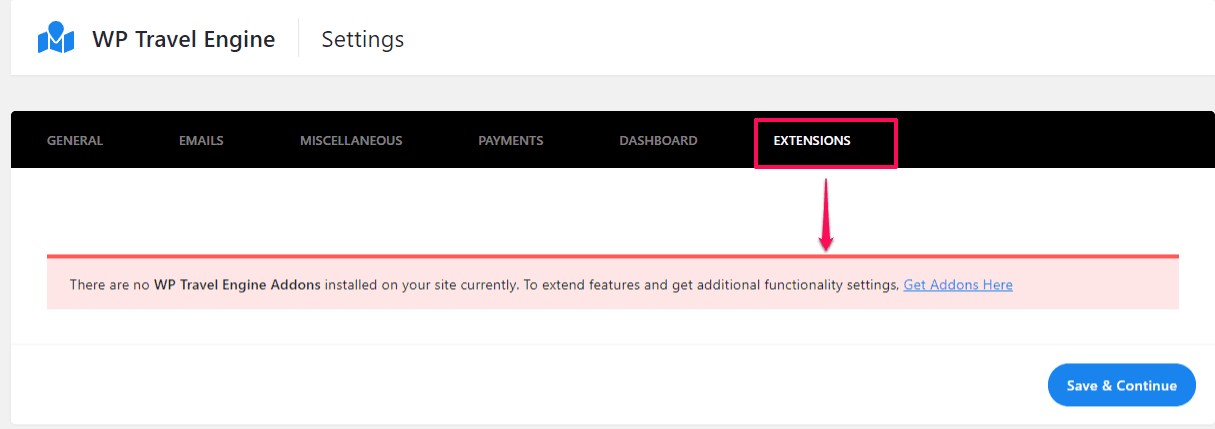
Extensions Tab with example #

Available Shortcodes #
You can add these shortcodes in the content editor to display a list of your selected trips.
- Display Selected Trips:
, where trip_id is replaced by the trip ID. Go to Trips > All Trips > Trip ID column to get the desired trip ID.
- Display trips by Trip Activities:
, where term_id is replaced by the activities term ID.
- Display trips by Trip Destination:
, where term_id is replaced by the destination term ID.
- Display trips by Trip Types:
, where term_id is replaced by the trip types term ID.
Note: How to get the term ID?
- For Destination, go to Trips > Destinations > Term ID column to get its term ID.
- For Trip Types, go to Trips > Trip Types > Term ID column to get its term ID.
- For Activities, go to Trips > Activities > Term ID column to get its term ID.
