Travel Monster comes with a powerful Header and Footer Builder that lets you create fully customized header and footer layouts using Elementor.
This feature is perfect for users who want more design flexibility than the default pre-built options.
Prerequisities #
Prerequisites for Using the Header and Builder in Travel Monster
- The latest version of the Travel Monster theme must be installed and activated.
- The Elementor plugin must be installed and activated.
- The WTE Elementor plugin must be installed and activated.
Header Builder #
Step 1: Access the Header Builder #
To create a custom header or footer:
- Go to your WordPress Admin Dashboard
- Navigate to WPTE Builder > Header Builder
- Click on “Add New”
- Give your header a name
- Click Publish

Step 2: Edit with Elementor #
After publishing:
- Click Edit with Elementor
- This will launch the Elementor editor, where you can start designing your header using drag-and-drop widgets.
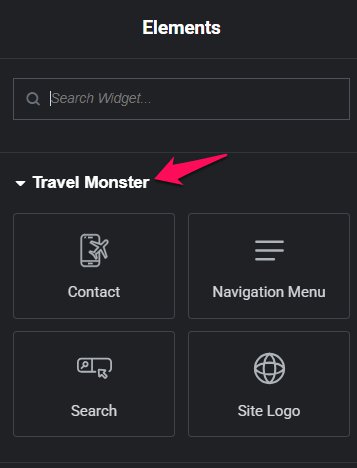
Travel Monster provides 4 custom Elementor widgets for building headers:
- Navigation Menu – Add your primary or custom menus
- Contact – Add contact info such as phone, email, or address
- Search – Insert a site-wide search bar
- Site Logo – Display your logo with optional links
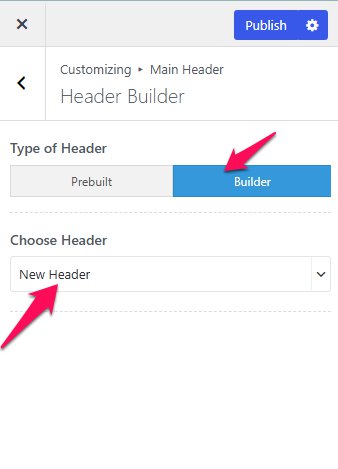
Step 3: Apply the Custom Header #
Once you’re done designing, the custom header will automatically apply if you’ve selected “Builder” as the layout option in the Customizer Settings:
- Navigate to Appearance > Customize > Main Header > Header Builder
- Under Type of Header, select Builder
- You can select the header that you have created
Footer Builder #
Similar to the Header builder, you can create a Footer using Elementro widget. You can use any widget as per your requirement and can custom-build your footer.
Step 1: Access the Footer Builder #
To create a custom header or footer:
- Go to your WordPress Admin Dashboard
- Navigate to WPTE Builder > Footer Builder
- Click on “Add New”
- Give your footer a name
- Click Publish
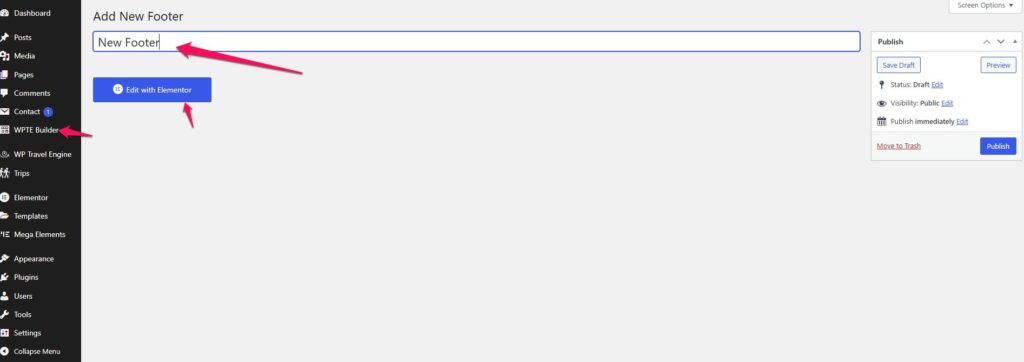
Step 2: Edit with Elementor #
After publishing:
- Click Edit with Elementor
- This will launch the Elementor editor, where you can start designing your footer using drag-and-drop widgets. You can use any one of the available widgets as per your requirements.
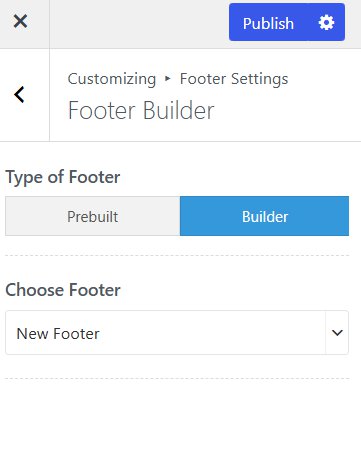
Step 3: Apply the Custom Footer #
Once you’re done designing, the custom footer will automatically apply if you’ve selected “Builder” as the layout option in the Customizer Settings:
- Navigate to Appearance > Customize > Footer Settings > Footer Builder
- Under Type of Footer, select Builder
- You can select the Footer that you have created.
Feel free to contact our support team for any other assistance.