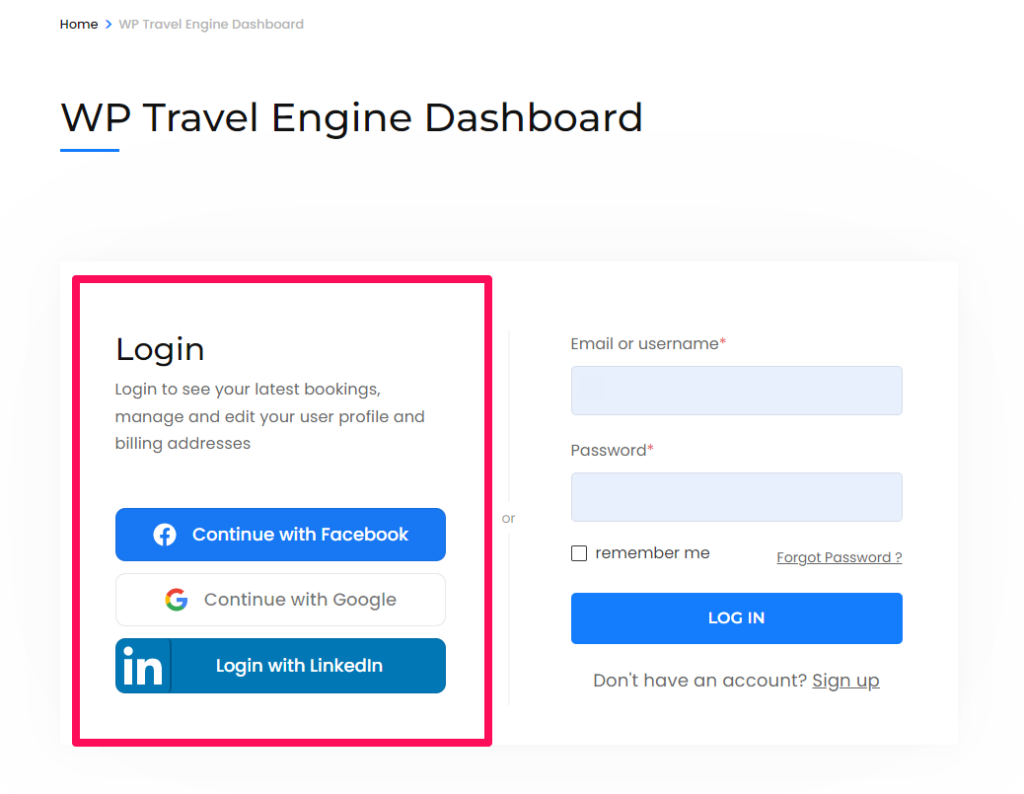
You can now log in to your WP Travel Engine account directly via your social media account without having to go through the signup step for creating a new account. The WP Travel Engine plugin supports social login for Facebook, Google, and LinkedIn.
To enable social login on your website, you will first need to create a social media project for obtaining your App/Client ID and App/Client Secret key. Then finally, you will need to configure the Social Login Settings provided by the WP Travel Engine plugin.
Creating a social media project #
Steps for creating Google App #
Below listed are the steps to create a Google Project. You will need to follow them to make google login work on your website.
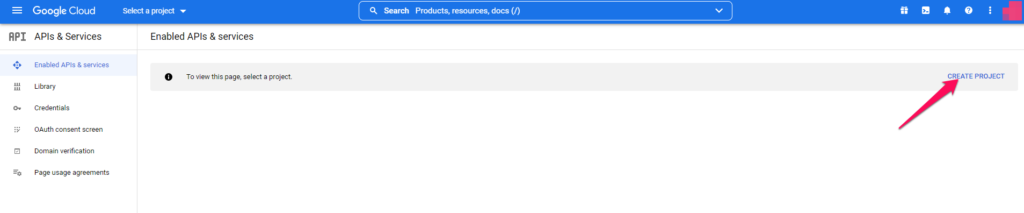
- Navigate to https://console.developers.google.com/apis/
- Log in with your Google credentials if you are not logged in.
- If you don’t have a project yet, you’ll need to create one. You can do this by clicking on the blue “Create Project” text on the right side.
But if you already have a project, then in the top bar click on the name of your project, which will bring up a modal, and click on “New Project”.

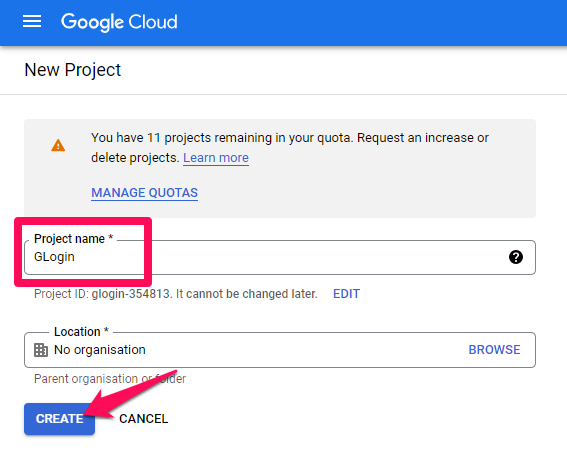
- Name your project and then click on the “Create” button.
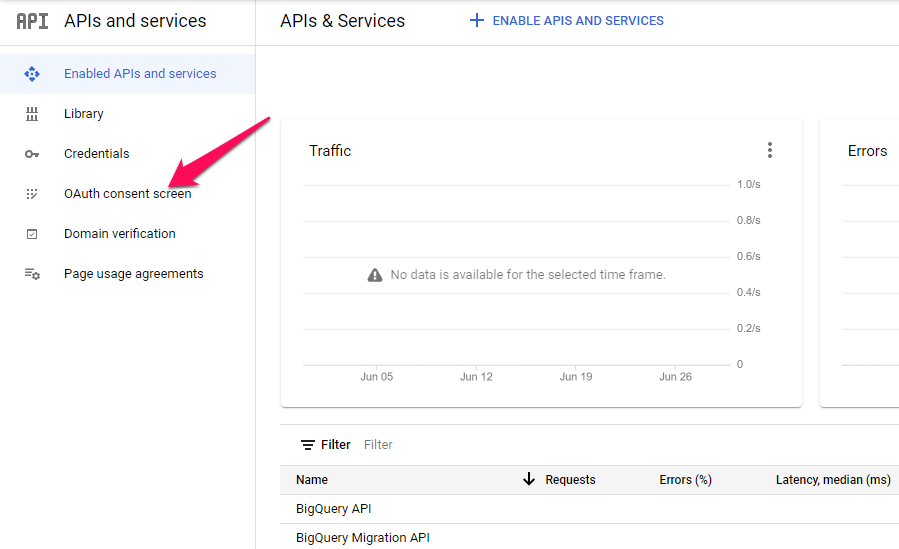
- Once you have a project, you’ll end up in the dashboard. (If earlier you have already had a Project, then make sure you select the created project in the top bar)
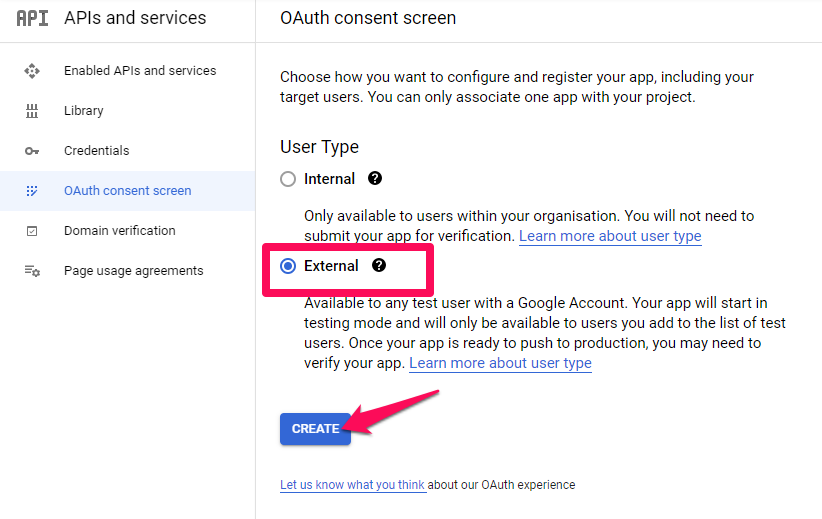
- Click the “OAuth consent screen” menu on the left-hand side.
- Choose a User Type according to your need and click on ‘Create’. If you want to enable the social login with Google for any users with a Google account, then select the ‘External’ option.
- Enter a name for your App on the “App name” field, which will appear as the name of the app asking for consent.
- For the “User support email” field, select an email address that users can use to contact you with questions about their consent.
- Under the “Authorised domains” section click on the “Add Domain” button and enter your domain name. For example yoursite.com
- In the “Developer contact information” section, enter an email address that Google can use to notify you about any changes made to your project.
- Click on “Save and continue” to save all the changes made.

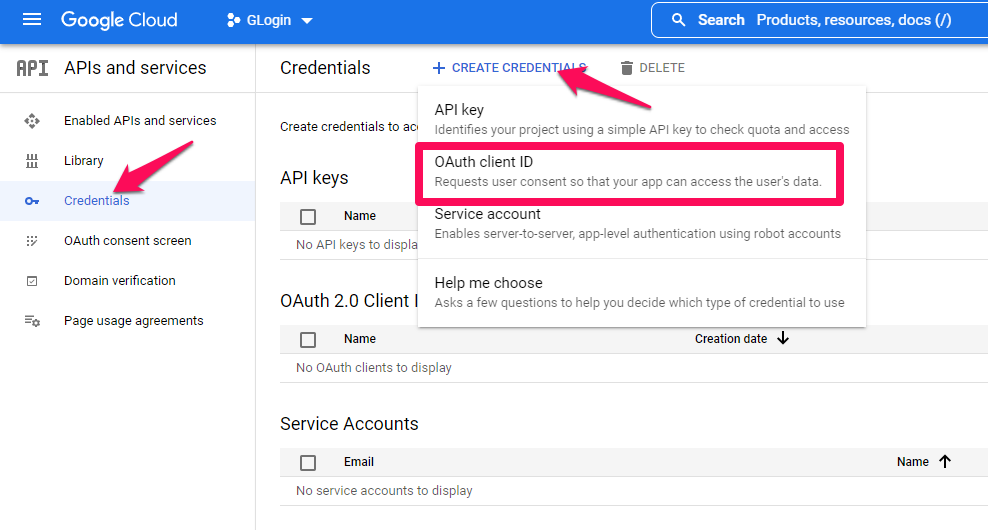
- On the left side, click on the “Credentials” menu point, then click on the “Create Credentials” button on the top bar and choose the OAuth client ID option.
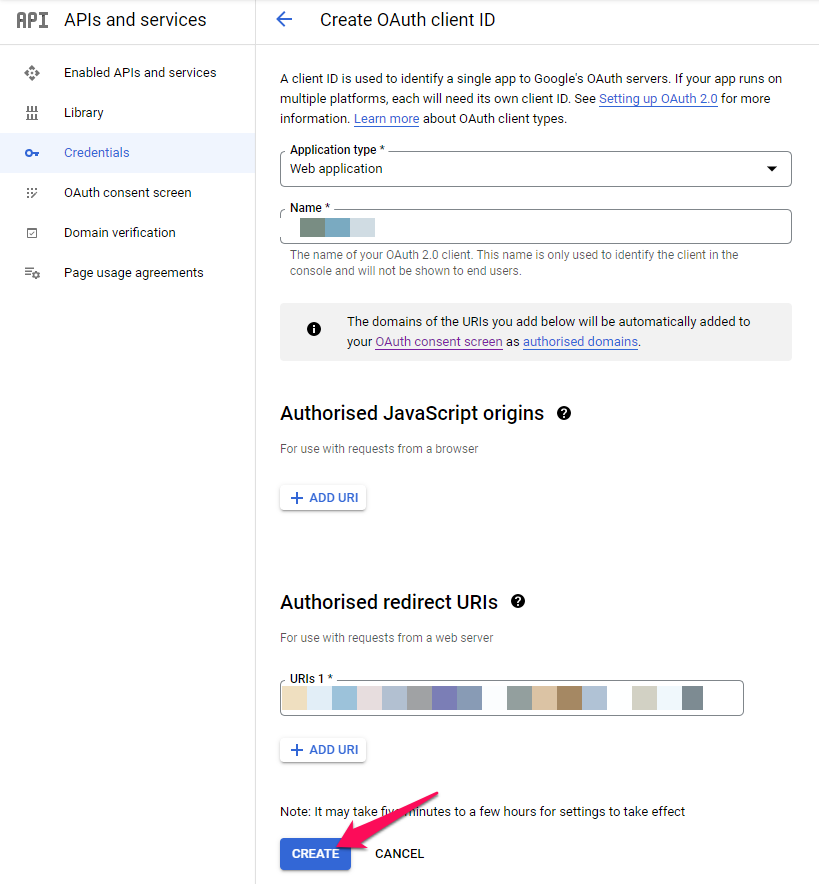
- Select the “Web application” option as the Application type and enter a “Name” for your OAuth client ID.
- Under the “Authorised redirect URIs” section click “Add URI” and add the following URL: https://yoursite.com/wp-login.php?wte_login=google
Here, you need to replace https://yoursite.com/ with your website URL and then click on the ‘Create’ button.
- Now a modal should pop up with your credentials. If that doesn’t happen, go to the Credentials in the left-hand menu and select your app by clicking on its name and you’ll be able to copy-paste the “Client ID” and “Client Secret” from there. You will require these credentials for configuring the Social Login Settings in the WP Travel Engine plugin.
Note: Currently, your App is in Testing mode, so only a limited number of people can use it. To allow this App to be used by any user with a Google Account, click on the “OAuth consent screen” option on the left side. Then click the “Publish App” button under the “Publishing status” section, and finally click on the “Confirm” button.
Steps for creating Facebook App #
The following are some steps for creating a Facebook App. You will need to follow them to make Facebook login work on your website.
- While logged into your Facebook account, navigate to https://developers.facebook.com/async/registration so that you can register as a Facebook developer. You can follow the steps here to complete the registration.
- If you are already a registered Facebook developer then you can skip step 1 and while logged into your Facebook account navigate to https://developers.facebook.com/apps/
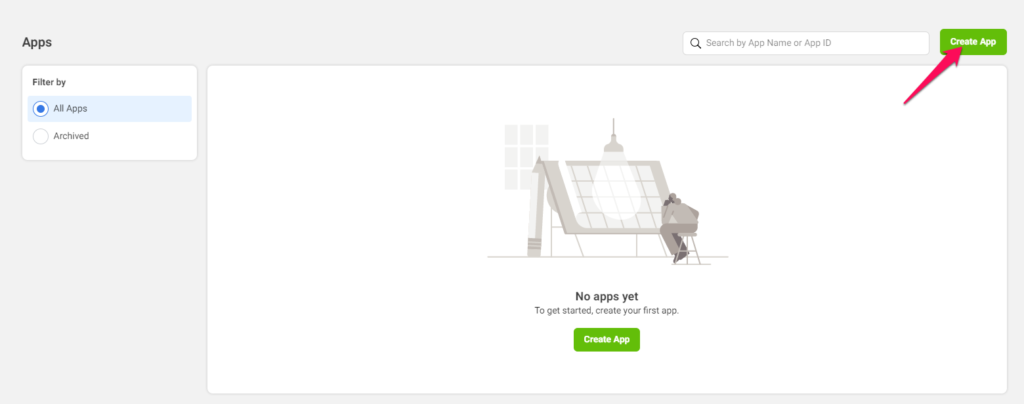
- Inside the Apps panel, click on the “Create App” button.
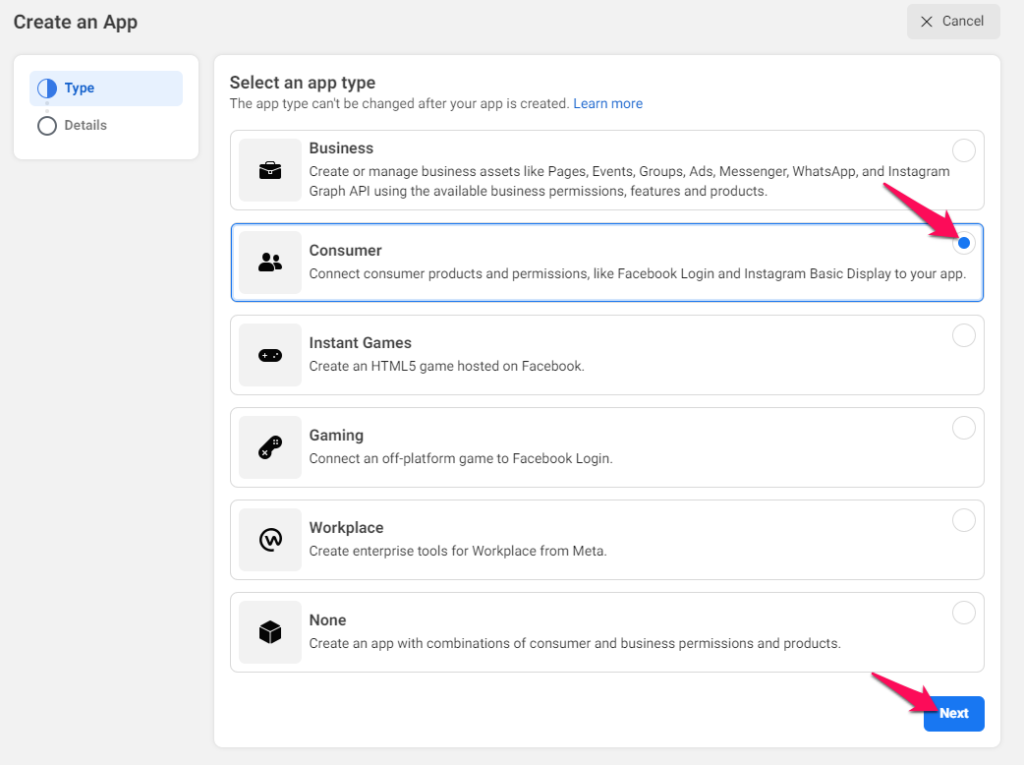
- Inside the Popup, choose the “Consumer” App type option and click Next.
- Fill in “App Display Name”, “App contact email” and “Business Manager Account(optional)”. The specified App Display Name will appear on your Consent Screen.
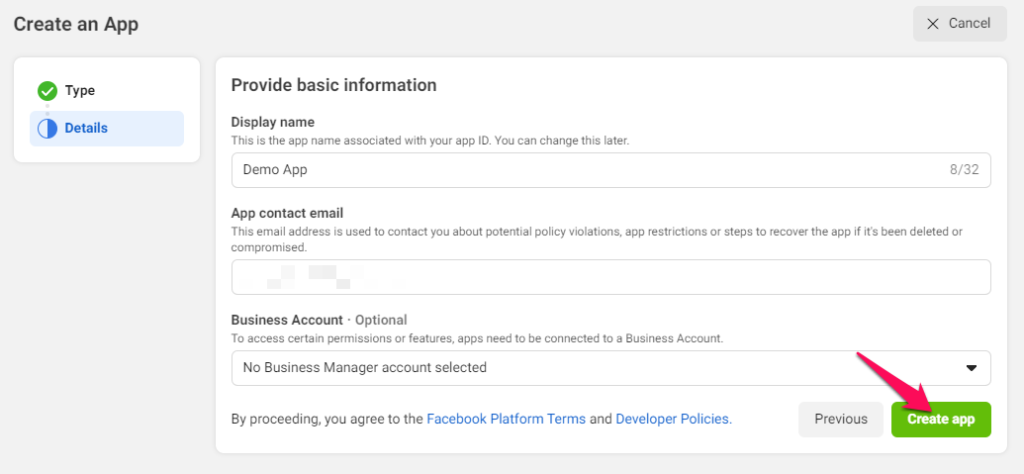
- Click the “Create app” button and complete the Security Check.
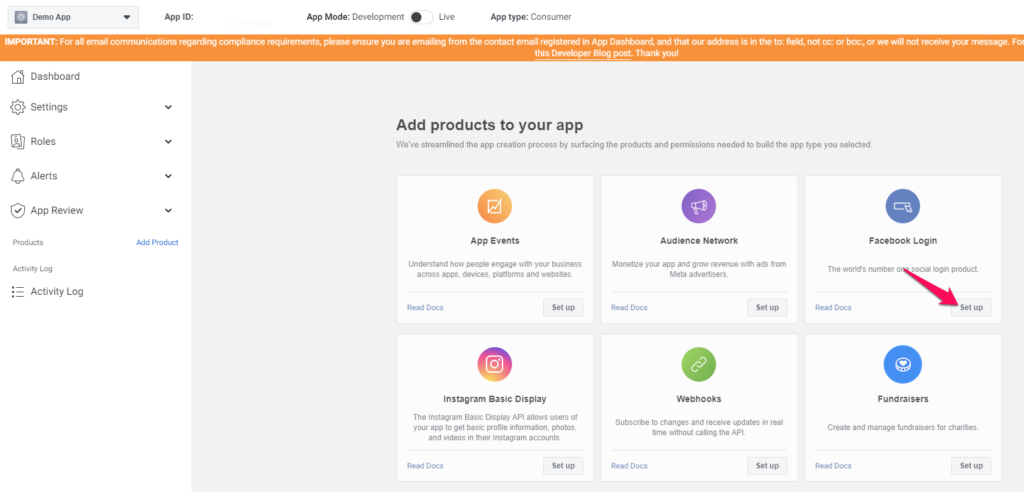
- Find “Facebook Login” and click “Set Up”.
- Select the “Web” platform and enter your site URL inside the “Site URL” field.
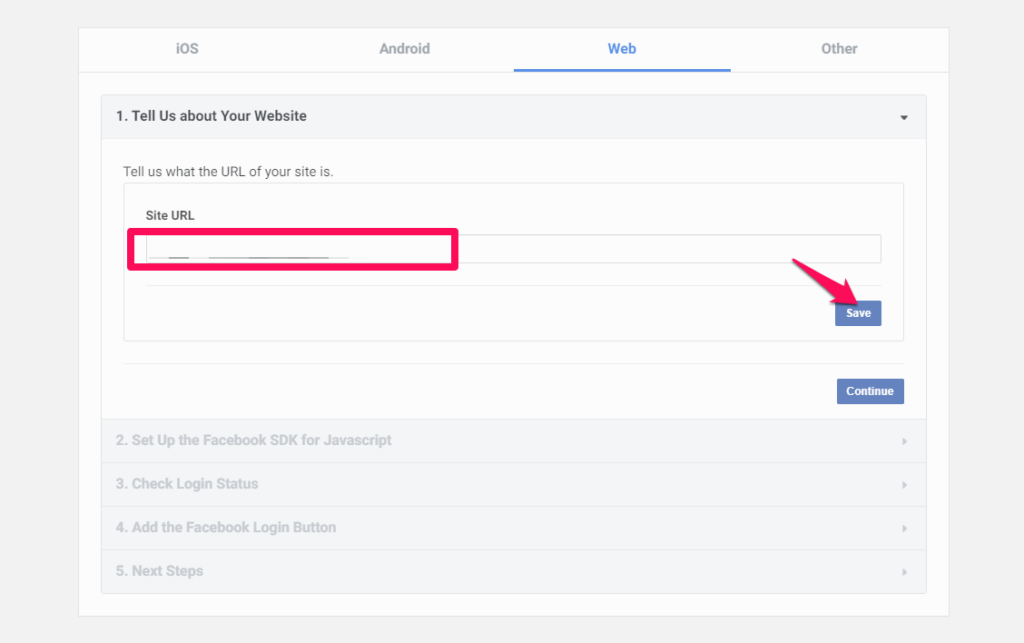
- Click on the “Save” button to save the changes made.
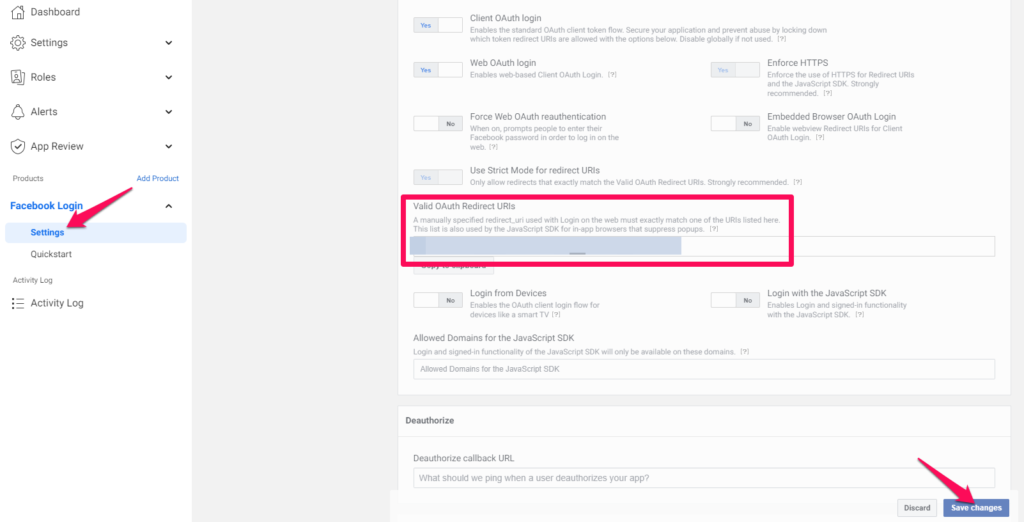
- Click on the “Settings” option on the left side, under the “Products – Facebook Login” menu.
- Then add the following URL to the “Valid OAuth Redirect URIs” field: https://yoursite.com/wp-login.php?wte_login=facebook
Here, you need to replace https://yoursite.com/ with your website URL and then click on the “Save Changes” button.
- Now navigate to Settings > Basic and then enter your site domain name into the “App Domains” field. For example: yoursite.com
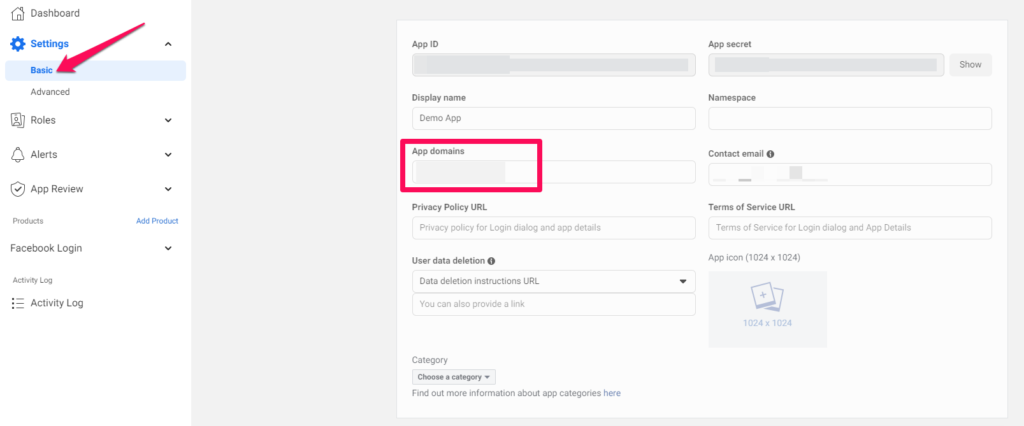
- Fill up the “Privacy Policy URL” field. Provide a publicly available and easily accessible privacy policy that explains what data you are collecting and how you will use that data.
- Under the “User data deletion” option, choose the “Data deletion instructions URL” option, and enter the URL of your page that contains the instructions on how users can delete their accounts on your website.
- Next, select a “Category”, and “App Icon” for your App. Then click on “Save Changes”.
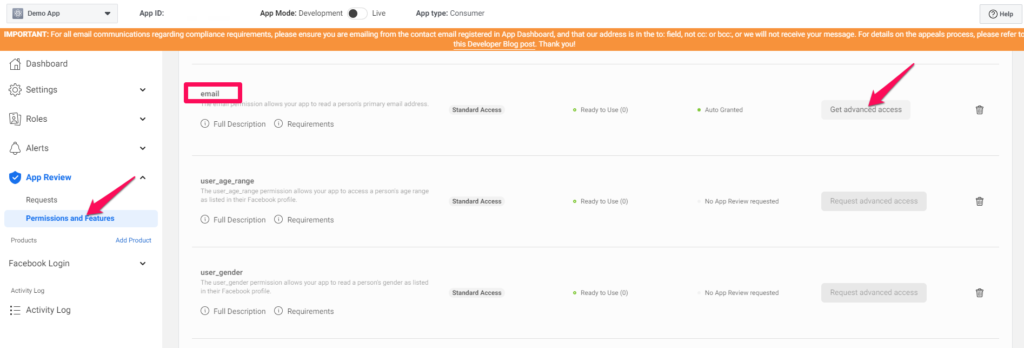
- Your application is currently private, which means that only you can log in with it. In the top bar switch the “App Mode” from “Development” to “Live”.

- By default, your application only has Standard access for the permissions, which is not enough for Facebook Login. Now navigate to App Review > Permissions and Features. Inside the Permissions and Features table, you will find the “public_profile” and “email” permissions and you should click on the “Get advanced access” buttons next to them.
- Finally, go to Settings > Basic. At the top of the page, you can find your “App ID” and you can see your “App secret” if you click on the “Show” button. You will require these credentials for configuring the Social Login Settings in the WP Travel Engine plugin.
Note: One might face issues when converting an app from development mode to live mode because of not having a valid Privacy Policy and Data deletion URL. So in such a case, make sure these pages have valid content.
Steps for creating LinkedIn App #
Below listed are some steps to create a Linkedin App. You will need to follow them to make LinkedIn login work on your website.
- Navigate to https://developer.linkedin.com/ and click on the “Create app” button.
- Log in with your LinkedIn credentials if you are not logged in.
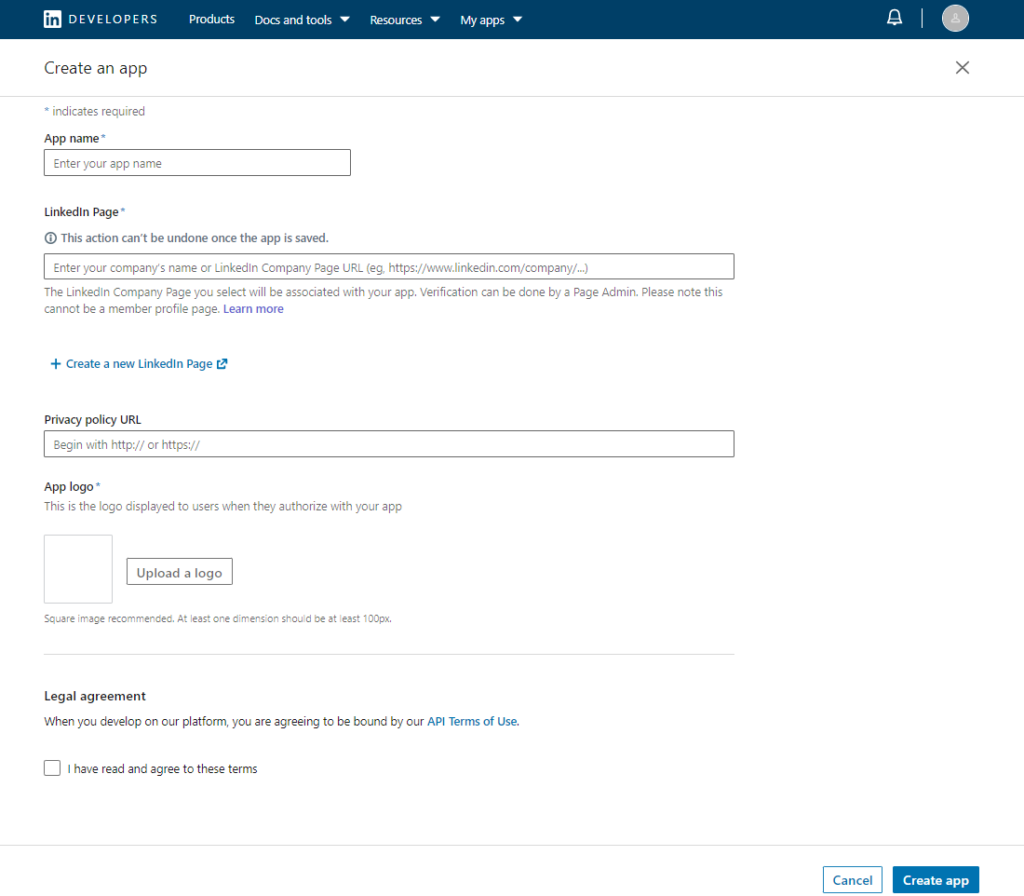
- Enter a name for your application inside the “App name” field.
- Enter your LinkedIn Company Page URL inside the “LinkedIn Page” field or create a new LinkedIn Company Page.
- Enter your website’s Privacy Policy Page URL inside the “Privacy policy URL” field.
- Upload an App logo.
- Read the terms of service and check the box to confirm that you have read and agreed to the terms.
- Finally, click on the “Create app” button.
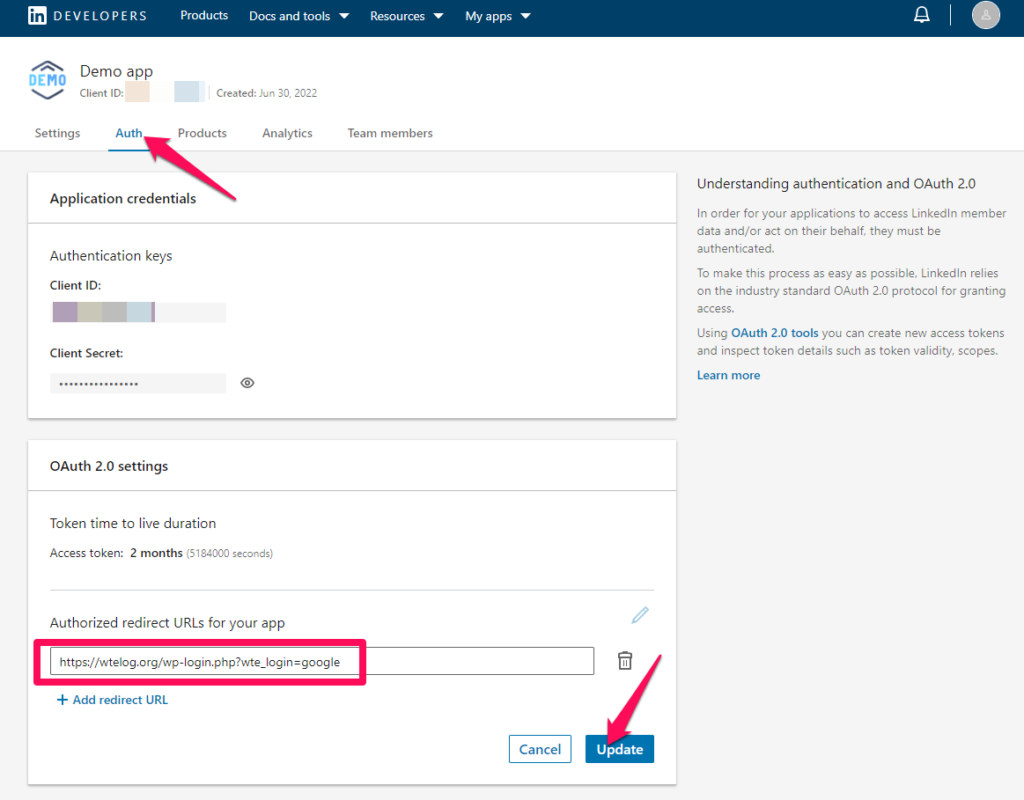
- Now click on the Auth tab and add Authorized redirect URLs for your app. For example: https://yoursite.com/wp-login.php?wte_login=linkedin
Here, you need to replace https://yoursite.com/ with your website URL and then click on the ‘Update’ button.
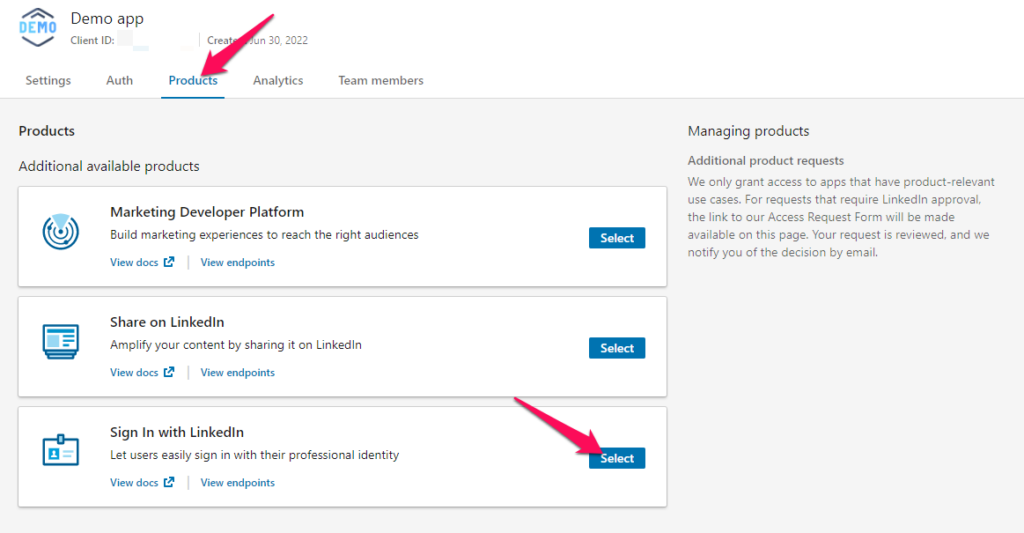
- Now go to the Products tab and click on the “Select” button for the “Sign In with LinkedIn” option.
- Visit the Settings tab and “Verify” the company LinkedIn account you have selected. (This step doesn’t need to be followed if you created your company LinkedIn page in step 4.)
- Return to Auth tab and wait for a few seconds for r_liteprofile and r_emailaddress to appear in “OAuth 2.0 scopes” section.
- If the app is successfully created, you will get a “Client ID” and “Client Secret key” under the “Application credentials” section. You will require these credentials for configuring the Social Login Settings in the WP Travel Engine plugin.
Configuring Social Login Settings #
You can access the Social Login Settings via Admin Dashboard > WP Travel Engine > Settings > Dashboard > Social Login.
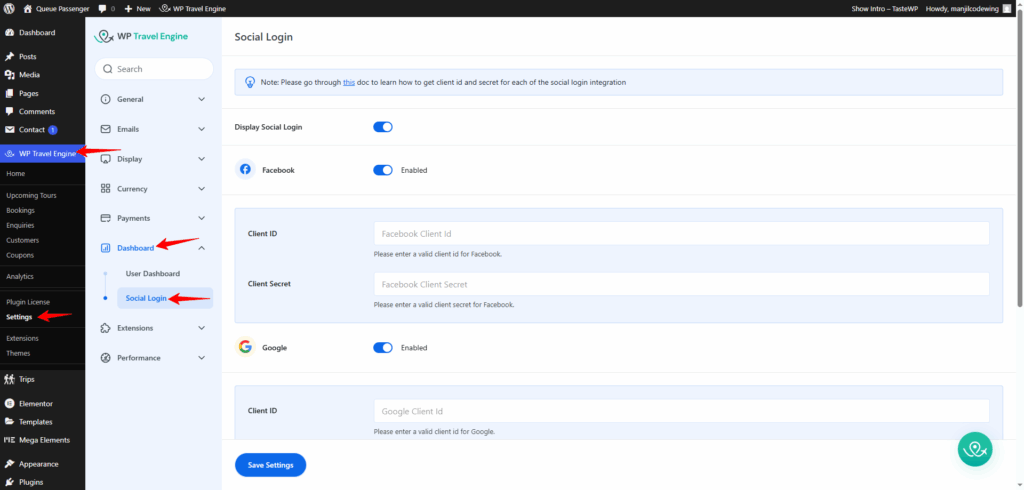
The following are the different options available under the Social Login Settings:
Display Social Login: You will need to enable this option to display the social login feature on the login page provided by the WP Travel Engine plugin.
Facebook: Enable this option to allow Facebook login on the WP Travel Engine login page.
- Client ID: Enter the Client ID of the Facebook App you created.
- Client Secret: Enter the Client Secret of the Facebook App you created.
Google: Enable this option to allow Google login on the WP Travel Engine login page.
- Client ID: Enter the Client ID of the Google App you created.
- Client Secret: Enter the Client Secret of the Google App you created.
LinkedIn: Enable this option to allow LinkedIn login on the WP Travel Engine login page.
- Client ID: Enter the Client ID of the LinkedIn App you created.
- Client secret: Enter the Client Secret of the LinkedIn App you created.
Frontend view of Social Login #