- How to use this Documentation?
- Requirements for Getting Started
- Recommended Image Size (in px)
- Demo Import (Instantly Make Website Like Demo)
- How to Check and Update WordPress Version:
- Theme Installation & Activation
- Installing Recommended Plugins
- Setting up the Front/Landing/Home Page and Blog Page
- Logo and Header Settings
- Front Page Settings
- Archive Page Settings
- Post Page Settings
- SEO Settings
- Color Settings:
- Menus (Create and Edit Menu)
- Widgets
- Additional CSS
- Footer Section
- Footer Credit Settings
- Helpful Tips
Thank you for choosing the Travel Booking WordPress theme!
This documentation covers the installation and the usage of the theme.
The main goal of the documentation is to provide guidance and a walk-through to set up the theme on your website in an easy-to-follow manner, while also introducing you to some of the features of the theme. We encourage you to go through this document and keep it handy for reference.
If you have any questions about the theme or need assistance with anything related to the theme, please feel free open a support ticket. Our support team will be happy to assist you.
In this documentation, first, we’ll make sure that everything is ready for the installation, then we’ll set up the theme, and cover some initial configuration and customization options.
You can either follow the video or the below documentation to install and setup the Travel booking Theme:
How to use this Documentation? #
We recommend everyone go through each step of the documentation to have a better understanding of the theme and its features.
However, if you are looking for a specific section, you can easily navigate using our table of contents on the right-hand side of the screen.
If you want to find a specific keyword, hit “Ctrl+F” on your browser to start searching.
Requirements for Getting Started #
Make sure Travel Booking is compatible with your WordPress version.
Travel Booking will work with 4.5 and above versions of WordPress.
However, for the best experience, added features, and updated security patches, we recommend you to update your WordPress to the latest version.
If you haven’t downloaded WordPress already, you can download it from the WordPress repository via https://wordpress.org/download/.
Checklist for Getting Started: #
- Check WordPress Version and Update it
- Install and Activate the Travel Booking theme
- Install Necessary Plugins. Some functionality of the theme might not work if you do not install the recommended plugins.
Recommended Image Size (in px) #
Banner: 1920 x 800 px
Banner: 1920 x 680
Single blog Page featured image = 1290 X 737 Pixels
Trip Page image = 990 X 490 Pixels
Testimonial Image size :150 X 150 Pixels
Team member Image: 770 X 450
Demo Import (Instantly Make Website Like Demo) #
You can easily make your website exactly like the live preview (demo) of the Travel Booking theme by importing the demo content. Importing demo content is a great way of getting started with your website.
Before you start the process, please download the Travel Booking Demo File from the given link.
Click here to Download the Travel Booking Demo File.
Once you download the zip file, you will need to extract it so that you can access the three different demo files that you need for importing the demo content.
Further, you need to install the One Click Demo Import plugin and follow the below steps:
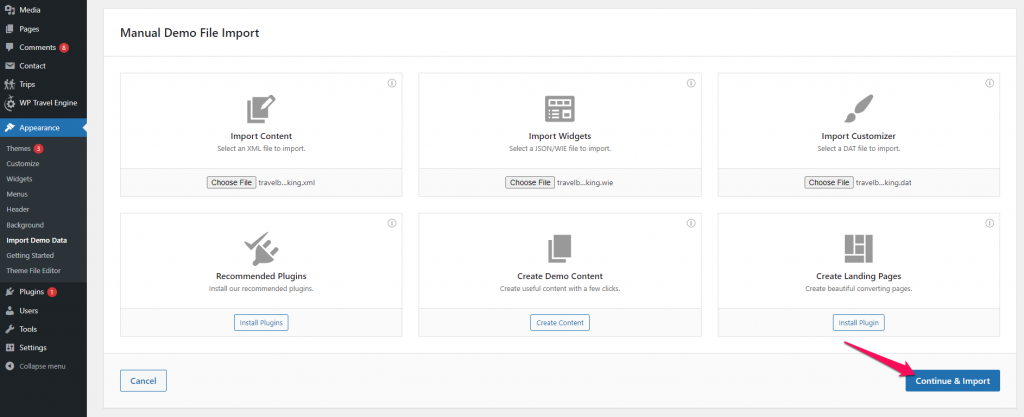
- Go to Appearance > Import Demo Data
- Under the Manual Demo File Import field, select and upload the XML, WIE, and DAT files to import.
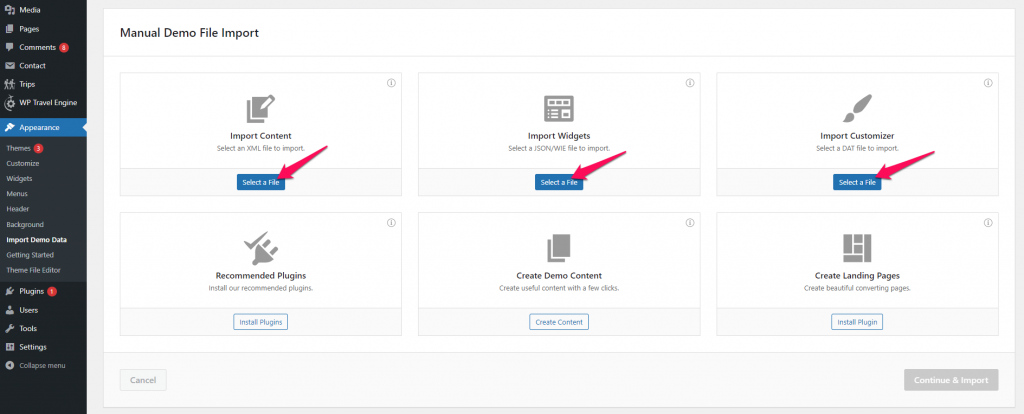
- Click on the Continue & Import button to begin the import process.
How to Check and Update WordPress Version: #
- Log in to the WordPress admin panel
- Go to Dashboard >Updates.

Theme Installation & Activation #
After you have the latest version of WordPress, save the downloaded Travel Booking theme somewhere handy on your computer, as you will be using the included files for the rest of the installation process.
The Travel Booking theme file includes:
A WordPress Theme Files (in .zip format)— This (travel-booking.zip) is a compressed WordPress theme file containing all of the required templates, images, and icons required for the theme to function properly.
Note for Safari users (macOS): If you are using Safari to download the theme file, the file may unzip automatically. So, make sure your theme file is in .zip format. Here’s how to stop Safari from automatically unzipping your .zip file.

To install and activate the theme follow these steps or the above gif:
- Log in to WordPress Dashboard.
- Go to Appearance > Themes.
- Click on Add New button
- Click on Upload Theme.
- Click on “Browse…”, select the “travel-booking.zip” file from your computer and click Open.
- Click Install Now.
- After the theme is installed, click on “Activate” to use the theme on your website.
Installing Recommended Plugins #
You must install and activate the following plugins to get the best out of Travel Booking theme.
WP Travel Engine by WP Travel Engine: This plugin helps you create and add travel trips, destinations, itinerary, and other trips details. This plugin extends the functionality of your travel website.
Travel Booking Toolkit by WP Travel Engine: This plugin adds extra homepage sections and some useful widgets on the Travel Booking theme.
Regenerate Thumbnails by Alex Mills (Viper007Bond): If you have existing content, this will help you update your images thumbnail sizes. To update the thumbnails, you must run this plugin.
How to Install Recommended Plugin: #
- Go to Appearance> Install Plugins

- Click “Install” to install the plugins.

- Click “Activate” to activate the plugins

Setting up the Front/Landing/Home Page and Blog Page #
To get started with customizing the theme, you first need to set up a front page. If you want to make your website look like the demo, you should select Front Page as Static Page.
Configure the Home Page and Blog Page #
- Log in to the WordPress Admin Panel.
- Go to Appearance>Customize > Homepage Settings
- Select A static page under Your homepage displays.
- If you are using this theme in a fresh WordPress installation, go to the next point. If you are using this theme in an old WordPress, choose the page you want to set homepage as Frontpage and choose the page you want to set as blog page as Posts Page.
- Click Save & Publish.

Logo and Header Settings #
You can add your logo, tagline, phone number, search form, and social media icons on the top of your website here.
Site Identity (Add Logo/Name and Tagline on your website) #
You can change the name and logo of your website here.
- Log in to the WordPress Admin Panel.
- Go to Appearance > Customize > Logo & Header Settings> Site Identity
- Click Select Logo and upload your logo.
- Enter Site Title and Tagline.
- Check Display Site Title and Tagline.
- Click Select Image and upload Image for Site Icon (favicon).
- Click Save & Publish.

Search Form: #
- Log in to the WordPress Admin Panel.
- Go to Appearance > Customize > Logo & Header Settings> Misc Settings
- Check Search Form to enable and show it in the header.
- Click Save & Publish.

Front Page Settings #
You can manage and edit homepage sections here. You must be on Home Page to customize the sections.
Also, make sure you have set the home page as static front page– if not please refer to Setting Up the Front Page section of this documentation. Also, you must install and activate the Travel Booking Toolkit plugin to see all the home page section.
Banner Section #
You can attract your visitors using the banner section.
Recommended Image Size: 1920 x 800 px
- Log in to the WordPress Admin Panel.
- Go to Appearance> Customize> Front Page Settings> Banner Section
- Select Enable Banner Section to show the banner.
- Select a video for a video banner or enter a YouTube URL.
- Click on “Add new image” to add images to the banner section
- Select the image you want to display on the banner section. You can also randomize added images. When you click on “Randomize uploaded headers” button, the uploaded banner images will be displayed randomly every time your website is loaded.
- Enter the title for the banner.
- Enter Button Label and Button URL.
- Click Save & Publish.

About Section: #
- Log in to the WordPress Admin Panel.
- Go to Appearance> Customize> Front Page Settings> About Section
- Add “Text” widget for the title and description of the section. Add “WP Travel Engine: Icon Text Widget” for the about section.

- Enter a title and content. Upload an Image or choose an Icon. Add more widgets to add more of icon text section.
- Enter Read more text and Read more URL
- Click Save & Publish.
Call to Action One: #
- Log in to the WordPress Admin Panel.
- Go to Appearance> Customize> Front Page Settings> Call To Action One
- Add “WP Travel Engine: Call To Action Widget” for the Call to Action one.

- Enter title and content for the section. Choose the button Alignment. Choose the number of Call to action buttons. Enter Button text and Button Link, Choose a background color or an image.

- Click Publish.
Popular Packages Section #
Note: Please add trips before you start with the section. Go to Trips > Add New trips. Then you will be able to select a trip from the dropdown below.
- Go to Appearance> Customize> Front Page Settings> Popular Packages
- Check Enable Popular Packages Section.
- Enter Section Title and description.
- Uncheck
- Choose Popular Packages One, Popular Packages Two and Popular Packages Three.
- Enter Read More Label, View All Label and View All URL
- Click Publish.

Featured Section: #
Note: Make sure you have created packages before you start with the section.
- Go to Appearance> Customize> Front Page Settings> Featured Section
- Check Enable Featured Trip Section to show this section on your homepage.
- Enter Section Title and description.
- Uncheck
- Choose a featured trip category or latest trips to display under the section.
- Choose the number of trips to display
- Enter Read More Label and View All Label
- Click Publish.

Call to Action Two: #
- Log in to WordPress Admin Panel.
- Go to Appearance> Customize> Front Page Settings> Call To Action Two
- Add “WP Travel Engine: Call To Action Widget” for the Call to Action one.

- Enter title and content for the section. Choose the button Alignment. Choose the number of Call to action buttons. Enter Button text and Button Link, Choose a background color or an image.
- Click Publish.
Deals Section : #
Note: Please add trips before you start with the section. Go to Trips > Add New trips. Then you will be able to select a trip from the dropdown below.
- Go to Appearance> Customize> Front Page Settings> Deals Packages
- Check Enable Deal and Discount Section to display it on your homepage
- Enter Section Title and description.
- Uncheck
- Choose Deal Post One, Deal Post Two, Deal Post Three, and Deal Post Four.
- Enter Read More Label, View All Label and View All URL
- Click Publish.

Destination Section : #
Note: Note Please add destinations before you start with this section. Go to Trips > Add New trips > Add destination. Then you will be able to select a destination from the dropdown below.
- Go to Appearance> Customize> Front Page Settings> Destination Section
- Check Enable Destination Section to display it on your homepage
- Enter Section Title and description.
- Uncheck
- Choose Destination One, Destination Two, Destination Three, and Destination Four.
- Click Publish.

Activities Section #
Note: Add Activities before you start with this section. Go to Trips > Add New trips > Add activities. Then you will be able to select an activity from the dropdown below.
- Go to Appearance> Customize> Front Page Settings> Activities Section
- Check Enable Activities Section to display it on your homepage
- Enter Section Title and description.
- Uncheck
- Choose Activities One, Activities Two, ActivitiesThree, Activities Four, Activities Five, Activities six, Activities Seven and Activities Eight.
- Click Publish.

Blog Section: #
- Go to Appearance> Customize> Front Page Settings> Blog Section
- Check Enable Blog Section to display it on your homepage
- Enter Section Title and Subtitle
- Enter Readmore text and View all Label
- Click Publish.

Archive Page Settings #
- Go to Appearance> Customize>General Settings> Blog Section
- Enter Excerpt Length.
- Enter Readmore Label
- Click Publish.

Post Page Settings #
- Go to Appearance> Customize>General Settings> Post Page Settings
- Check Related Posts to show related posts in a single post page below the content.
- Enter Related Posts Title
- Click Publish.

404 Page Settings #
- Go to Appearance> Customize>General Settings> 404 Page Settings
- Enable Popular Trips in 404 Page to show Popular trips in 404 Error Page.
- Choose Popular Trips
- Click Publish.

SEO Settings #
- Go to Appearance> Customize>General Settings> SEO Settings
- Enable Breadcrumb.
- Enter Breadcrumb Home Text.
- Click Publish.

Color Settings: #
You can change the background color of the theme here.
- Log in to the WordPress Admin Panel.
- Go to Appearance> Customize> General Settings> Colors
- Select the color
- Click Save & Publish.
Change Background Image #
You can change/add the background image of the theme here.
- Log in to the WordPress Admin Panel.
- Go to Appearance> Customize> General Settings> Background Image
- Select an image
- Click Save & Publish.
Menus (Create and Edit Menu) #
By default, all your primary pages will be displayed in the menu. If you want to create a Custom Menu, you can do it from Customizer or from Dashboard. This theme supports two menus: Primary and Secondary. If you need more than two menus, you can add them in the sidebar using “Custom Menu” widget.
Create Menu from Customizer #
- Login to your WordPress Dashboard.
- Go to Appearance > Customize> Menus in the WordPress Dashboard
- Click on Add a menu button

- Give a name to your menu name and click Create Menu button

- Click “Add Items” to add items (pages, posts, categories, events, services, custom links…) to the Menu
- Click “+” icon on the items list to add the item to the menu
- Drag and Drop the added items to rearrange them.
- Check the Menu location to Primary or Footer
- Click Save & Publish

Create Menu from Dashboard #
- Login to your WordPress Dashboard.
- Go to Appearance > Menus in the WordPress Dashboard
- Click on create a new menu.

- Give a name to your menu in Menu Name and click Create Menu button.

- Select the items from Pages, Posts, Custom Links, or Categories and click “Add to Menu”.

- Drag and Drop the added items to rearrange them.
- Check the Menu location to Primary or Footer
- Click Save Menu
Widgets #
You can add the widgets to the sidebar in two ways, either via Dashboard or Customizer.
Adding Widgets via Customizer #
- Login to your WordPress Dashboard.
- Go to Appearance> Customize>Widgets
- Make sure you are on the page you want to add widgets to.
- Click on the desired Sidebar or location (the one you want to add widgets to). You can add widgets on Footer as well.
- Click on Add a Widget to add widgets
- Select desired Widgets and give the title to the widget.

- Click Add a Widget to add more widgets in the sidebar
- Drag and reorder the widget as desired
- Click Save & Publish
Adding Widgets via Dashboard #
- Login to your WordPress Dashboard
- Go to Appearance> Widgets
- Available widgets are listed on the left-hand side while Sidebars are listed on the right side (including the sidebars you create)
- Drag and drop the widgets to the desired sidebars.

Additional CSS #
You can add extra CSS codes here. If you want to modify the color, fonts, or any other CSS effects, you can enter the code here.
- Login to your WordPress Dashboard
- Go to Appearance> Additional CSS
- Enter your code
- Click Save & Publish when you are done.
Footer Section #
The theme has 4 widgets area in the footer. You can add various widgets to the area. To add widgets in the footer, go to Appearance> Customize>Widgets and select the Footer Location (footer one, two, three, four) and add the widgets.
Footer Credit Settings #
You can edit the footer credit using this setting.
- Login to your WordPress Dashboard
- Go to Appearance> Footer Settings
- Enter your desired footer credit text
- Click Save & Publish when you are done.
Helpful Tips #
- We highly recommend using Child Theme if you need to change the code of the theme. Do not change the codes in the files of the parent theme as all such changes will be lost when the theme is updated.
- Always keep a BackUp of your theme before making any changes to the theme.
- If you get any problem in using the theme, you can do the following things:
- Deactivate the plugins, sometimes plugin conflict may cause issues with the theme. Please deactivate the unused plugins.
- Replace the latest modified code with the original code.
- If the issue pertains, feel free to contact us using our Support Ticket