

How to Add reCAPTCHA to the Enquiry Form, Checkout, and Other Forms
Stop spam enquiries and fake bookings from cluttering your forms. Set up Google reCAPTCHA on your enquiry, checkout, and waitlist forms with step-by-step guidance.
Stop spam from reaching your forms
Spam enquiries and fake bookings waste your time and clutter your Bookings list. Google reCAPTCHA adds a check so bots cannot submit your forms.
You add your Google keys once. Then you place a Captcha field on each form you want to protect. This includes the Enquiry Form, Checkout Form, Lead Traveler Information, Additional Traveler Information, Emergency Contact, and Waitlist Form.
What you'll need before you start
You need these items before you begin:
- WP Travel Engine installed and activated, Version 6.9.0 or more. A plugin is an add-on that gives your WordPress site extra features. You manage plugins from Plugins on the left sidebar of your WordPress dashboard.
- The Form Editor add-on installed and activated, Version 2.3.0 or more. An add-on is an optional plugin that adds a specific feature to WP Travel Engine. This version adds reCAPTCHA v3 support and Checkout Form support.
- A Google account. You need it to create your reCAPTCHA keys.
Once these items are ready, choose the type of reCAPTCHA that suits your customers.
Choosing between reCAPTCHA v2 and v3
Your choice determines whether travelers see a checkbox when they submit a form.
| Version | What visitors see | Good for |
|---|---|---|
| v2 ("I'm not a robot" checkbox) | A checkbox they must tick before submitting | Forms where you want a visible check |
| v3 | Nothing. It runs in the background | Forms where you do not want to add a step for the visitor |
Say you run day tours and your enquiry form receives fake submissions every night. v2 puts a visible checkbox on the form so real travelers can prove they are human before sending their question.
Keys are version-specific. A v2 key does not work in the v3 section. A v3 key does not work in the v2 section.
You can switch versions later. You will need keys for the new version.
Creating your Google reCAPTCHA keys
Google gives you two keys. The Site Key connects your forms to reCAPTCHA in the visitor's browser. The Secret Key lets your website confirm the result with Google.
Open Google reCAPTCHA Admin
This takes you to the place where Google creates the keys for your website.
Go to the Google reCAPTCHA Admin page and sign in.
Register your website
Registering your website tells Google which site will use these keys.
Register a new site. Choose the reCAPTCHA type that matches the version you selected.
For v2, choose "I'm not a robot" Checkbox.
Add your website domain
Adding your domain prevents the keys from being used on an unrelated website.
Enter your website's domain in the domain list. Use the domain where your WP Travel Engine forms appear.
Copy both keys
You need both keys to connect reCAPTCHA to WP Travel Engine.
Submit the form. Google shows a Site Key and a Secret Key. Keep this page open so you can copy both keys in the next section.
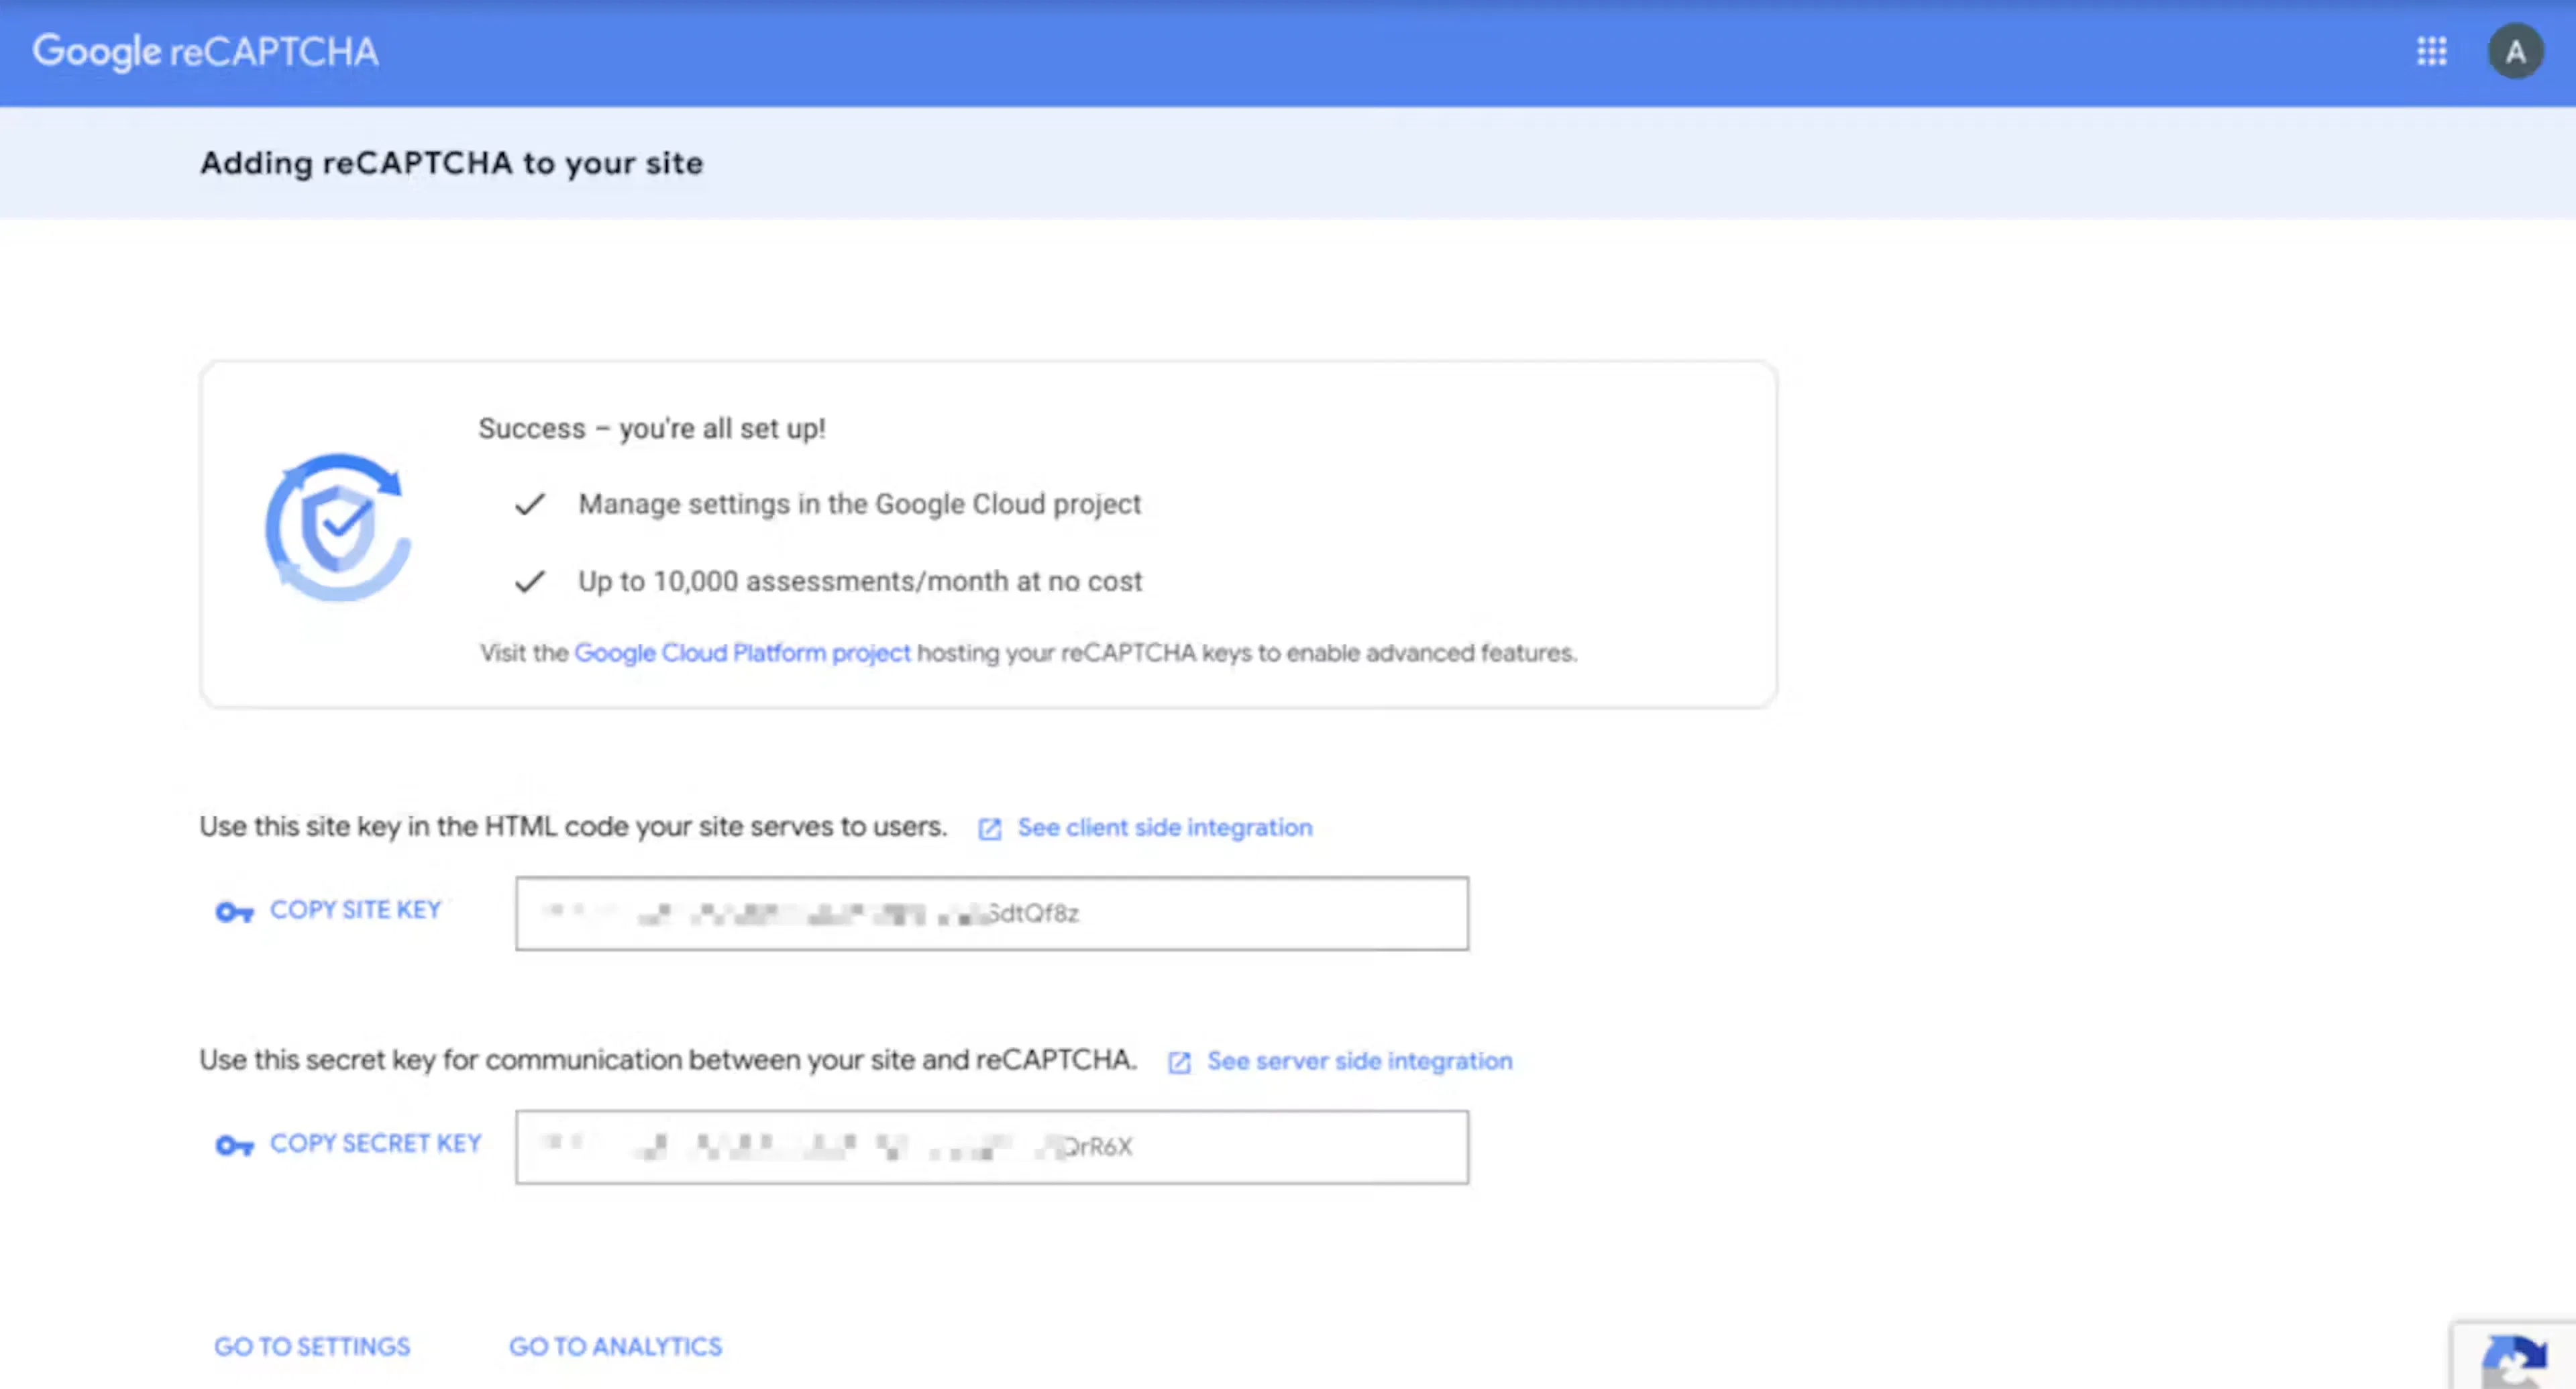
Once you have both keys, you are ready to connect them to WP Travel Engine.
Adding your keys to WP Travel Engine
This connects the Google keys to your website. You only need to do this once for each reCAPTCHA version you use.
Open the reCAPTCHA settings
The settings tell WP Travel Engine which Google keys to use.
From the left sidebar of your WordPress dashboard, open WP Travel Engine. Then open Settings, followed by Extensions.
Open the reCAPTCHA tab
The reCAPTCHA tab contains the fields for your Google keys.
Click the reCAPTCHA tab.
Choose your reCAPTCHA version
The selected version must match the keys you created with Google.
Under reCAPTCHA Version, choose v2 or v3.
Enter the Site Key
The Site Key identifies your website to Google.
Paste your Site Key into the Site Key field.
Enter the Secret Key
The Secret Key lets WP Travel Engine verify each check with Google.
Paste your Secret Key into the Secret Key field.
Save the settings
Saving stores the connection between your website and Google.
Click Save Changes. Your keys are now connected to WP Travel Engine.
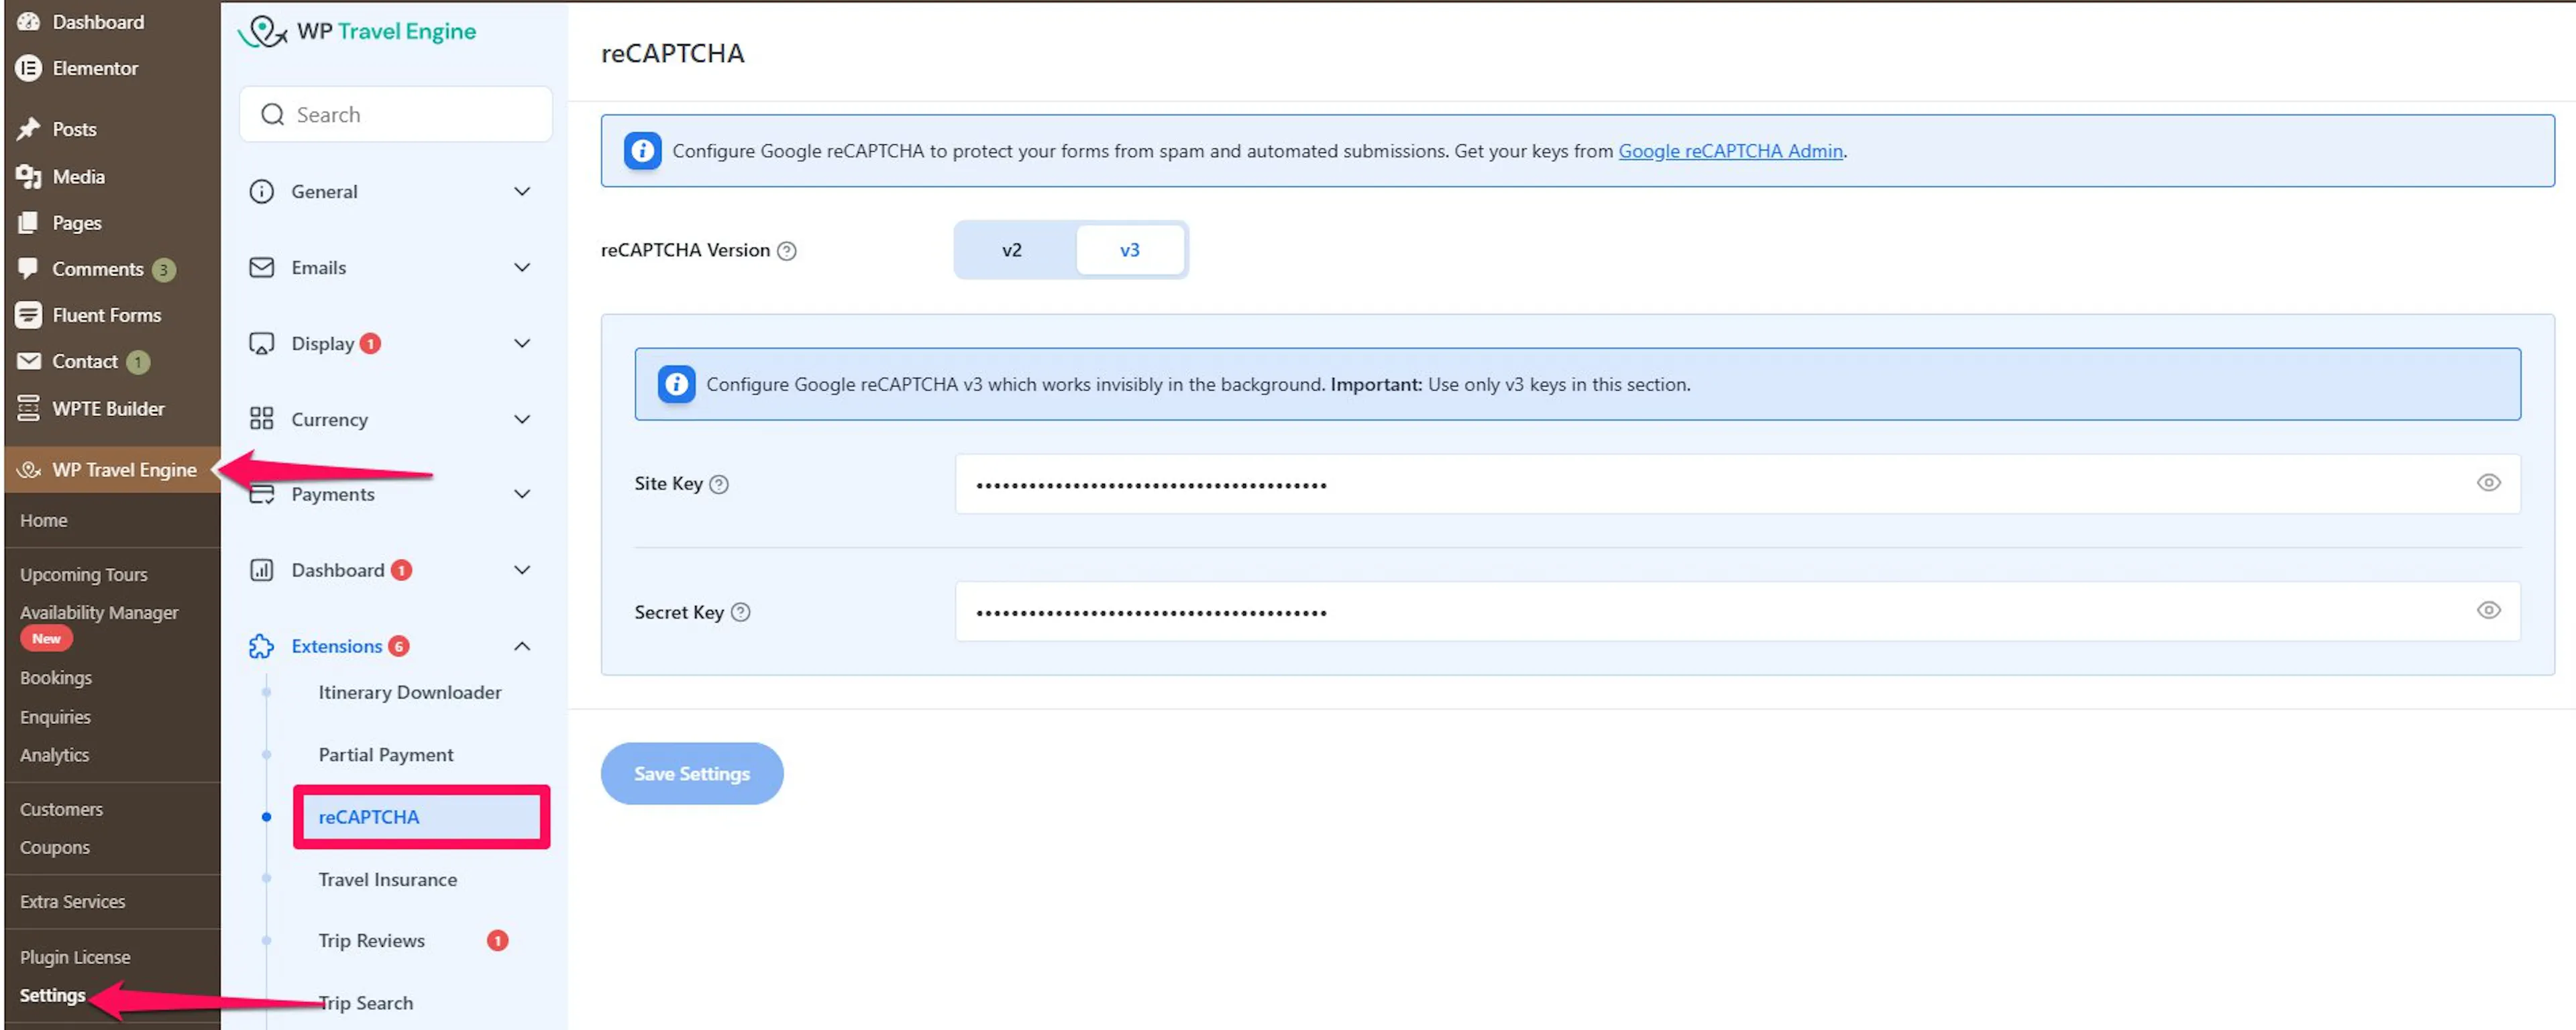
The Site Key and Secret Key fields hide what you type, like a password field. Paste carefully. Check that you copied the full key.
The v2 and v3 sections each store their own keys. If you switch the version later, the keys for the other version stay saved. Enter keys for the new version if you have not done so already.
If you used reCAPTCHA before
Older versions of the Form Editor add-on stored a v2 Site Key and Secret Key under the Form Editor tab. WP Travel Engine copies those v2 keys into the reCAPTCHA tab for you. Once you save the reCAPTCHA tab, the older keys are cleared. WP Travel Engine then uses the keys saved in the new location.
Your keys are connected. Next, add the check to the forms that receive visitors' information.
Adding the CAPTCHA field to a form
Adding your keys does not put reCAPTCHA on a form yet. You add the Captcha field in the Form Editor, one form at a time.
Open the Form Editor
The Form Editor is where you arrange the fields visitors complete.
Open WP Travel Engine from the left sidebar of your WordPress dashboard. Then click Form Editor.
Choose a form
Choosing a form tells WP Travel Engine where to place the spam check.
Click the tab for the form you want to protect:
- Enquiry Form
- Checkout Form
- Lead Traveler Information
- Additional Traveler Information
- Emergency Contact
- Waitlist Form
Add a field
The new field will appear in the form you selected.
Click Add Field.
Choose Captcha
The Captcha field adds the Google check to the form.
Under Advanced Fields, select Captcha.
Add a label if needed
A label helps you recognize the field in the form editor and can appear on the form.
Enter a Label if you want to give the field a name.
Add the field to the form
This confirms the field settings before you save the whole form.
Click Add Field at the bottom of the panel.
Save the form
Saving makes the Captcha field active on the selected form.
Click Save Changes at the top of the page.
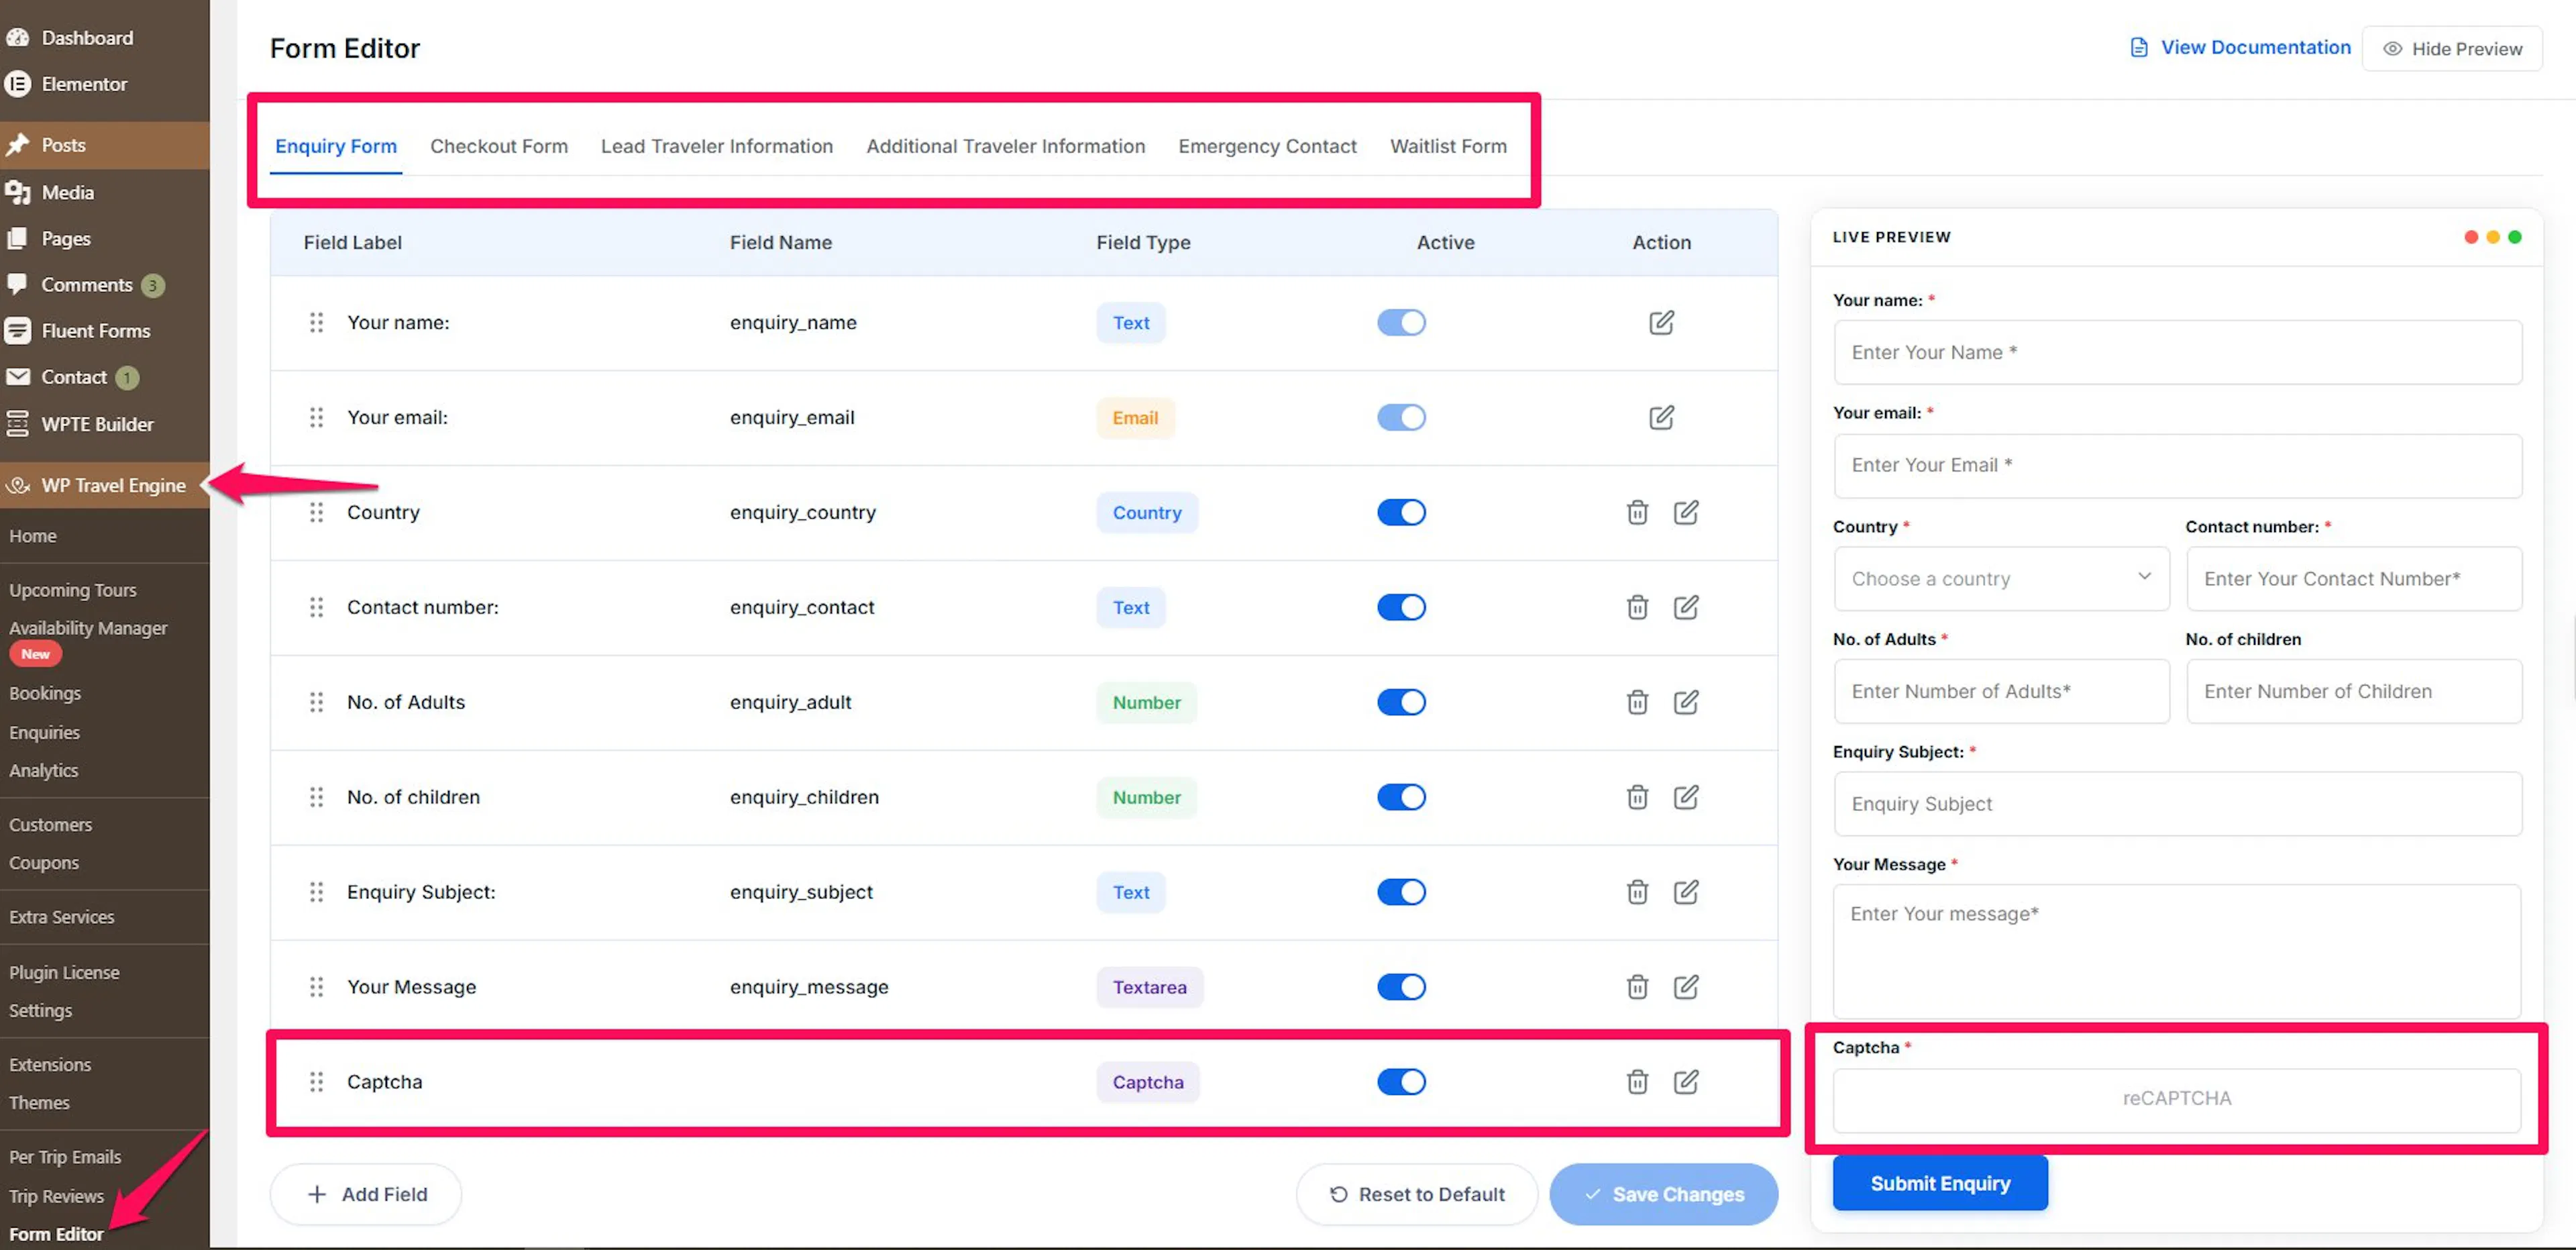
Use Show Preview at the top of the Form Editor to see where the Captcha field sits before you save. Drag the row by its handle to move it. Placing it just above the submit button usually works well.
How the CAPTCHA field behaves
- It is always required. The panel has no Require this field checkbox for Captcha. A visitor must pass the check before submitting the form.
- It has no width or conditional logic settings. The Width option and the Conditional Logic tab do not appear for this field. The field always spans the full width of the form and always shows when it is active.
- It has no mail tag. The Field Name or Mail Tag column does not contain a
{tag}for this field. The captcha response has no value that you can use in an email. - The response is not saved with submissions. The captcha response does not appear in enquiry emails, enquiry details in your dashboard, or booking emails.
- The keys are shared across your forms. The Configure here link takes you to WP Travel Engine, then Settings, then Extensions, and finally reCAPTCHA. You do not set keys separately for each form.
- You can turn it off for one form. Use the Active toggle on the Captcha row. You can also delete the field. Click Save Changes after either change.
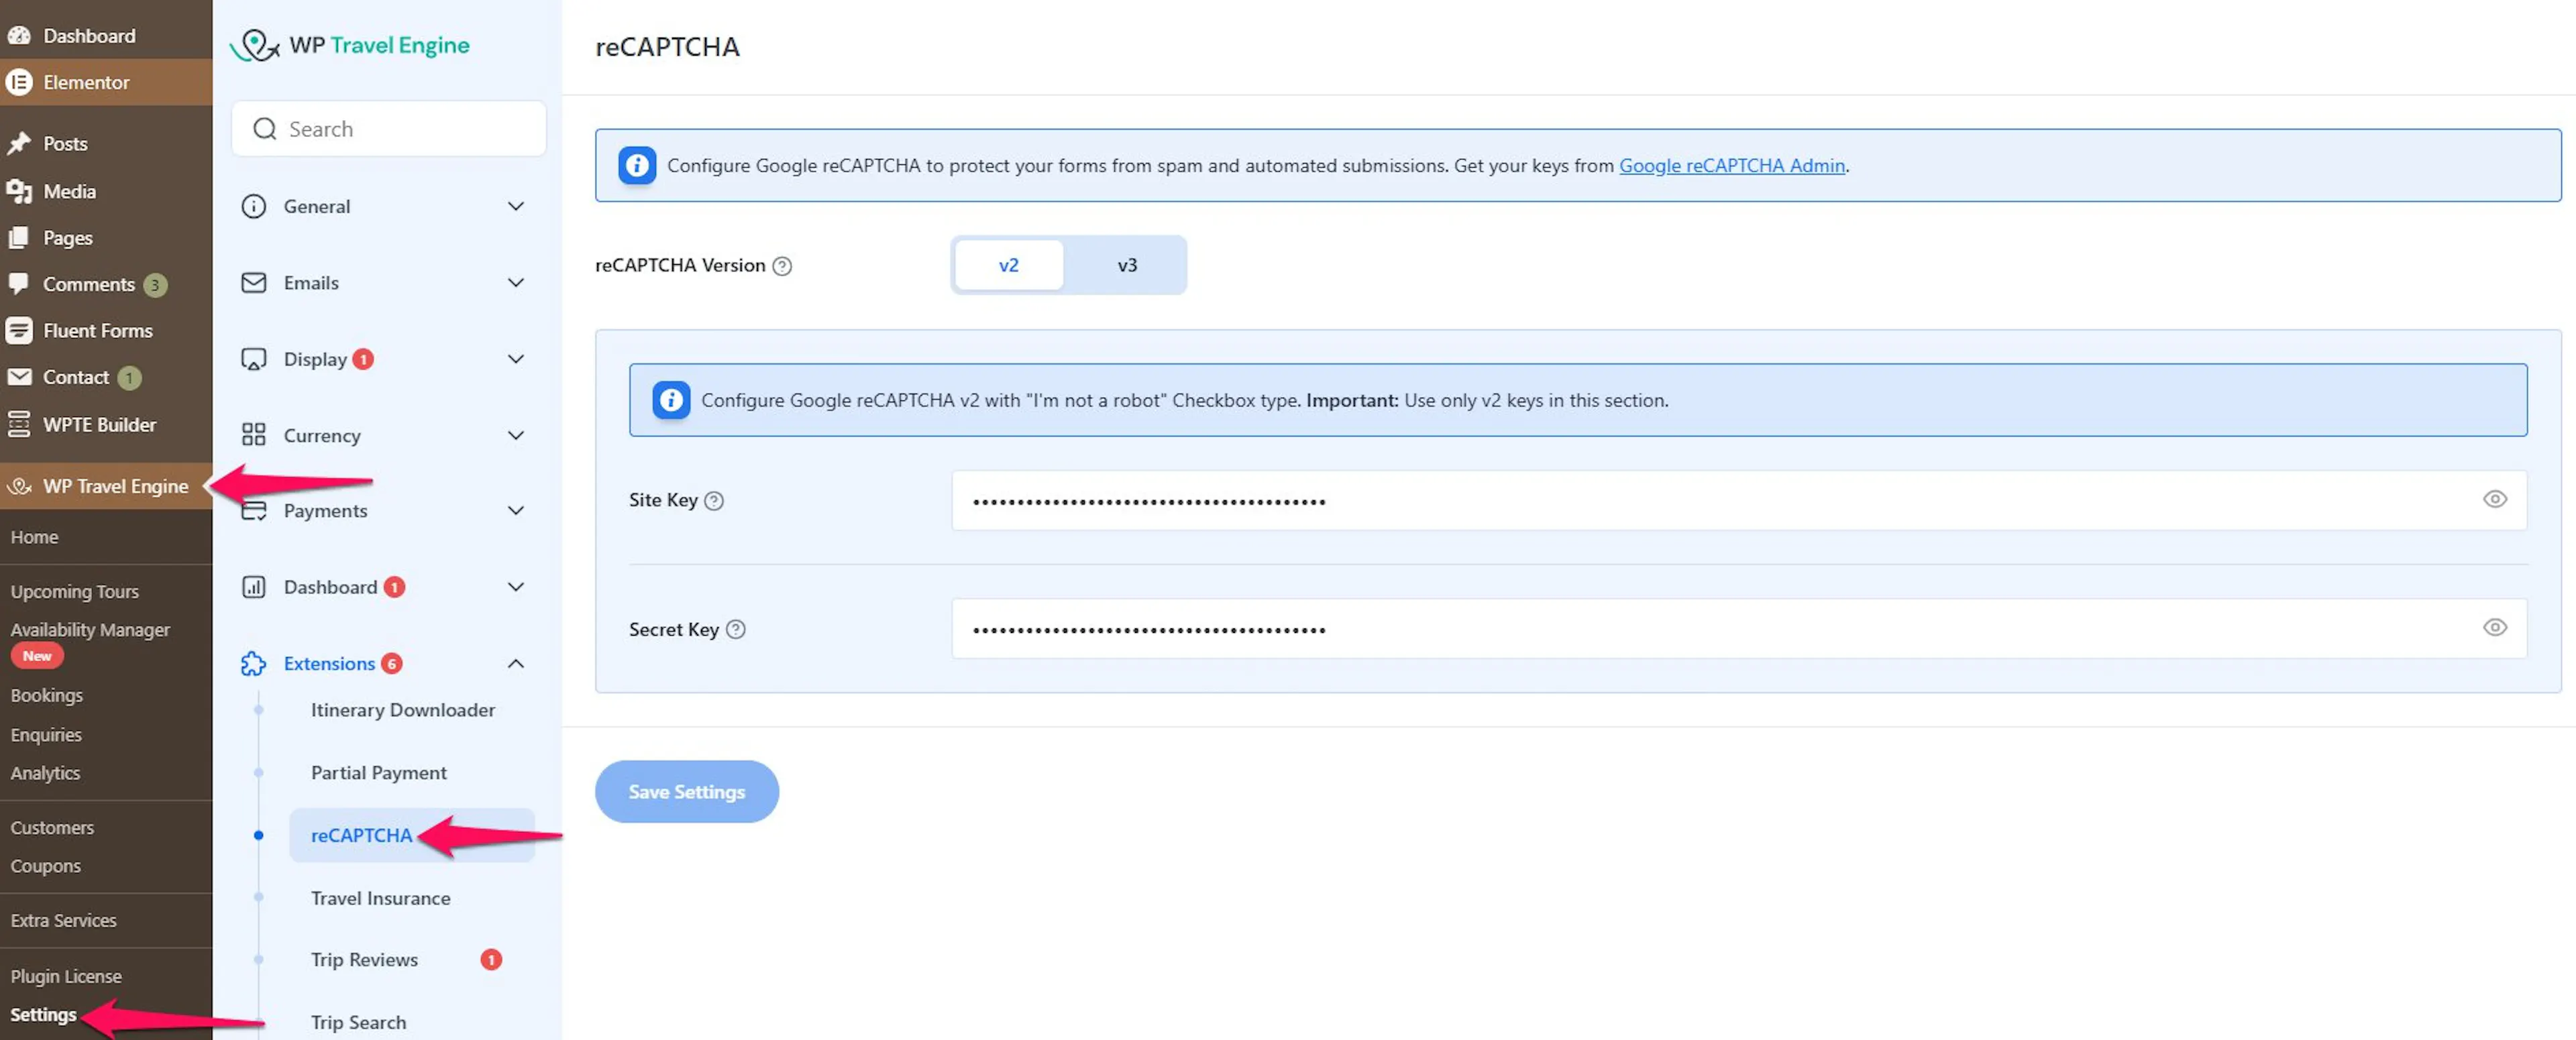
You can protect one form or several forms. Choose the forms where spam causes the most work for you.
Where to add it
| Form | Form Editor tab | Where visitors see it |
|---|---|---|
| Enquiry form | Enquiry Form | The enquiry form on your trip pages and on any page where you have added the enquiry form |
| Checkout | Checkout Form | The checkout page, in the billing details form |
| Lead traveler details | Lead Traveler Information | The lead traveler section at checkout |
| Additional traveler details | Additional Traveler Information | The additional traveler section at checkout |
| Emergency contact | Emergency Contact | The emergency contact section at checkout |
| Waitlist | Waitlist Form | The waitlist form, as described in the next section |
Add the Captcha field to as many of these tabs as you need. Most tour operators protect the Enquiry Form and Checkout Form first because those forms usually receive the most spam.
For example, a trekking company might add it to the Enquiry Form to reduce fake questions about a Himalayan trek. The company might also add it to the Checkout Form to protect bookings for the same trek.
The captcha appears only on pages that contain a form. You will not see it on the thank you page, in the traveler dashboard, or in email previews. This is expected.
Adding reCAPTCHA to the Waitlist Form
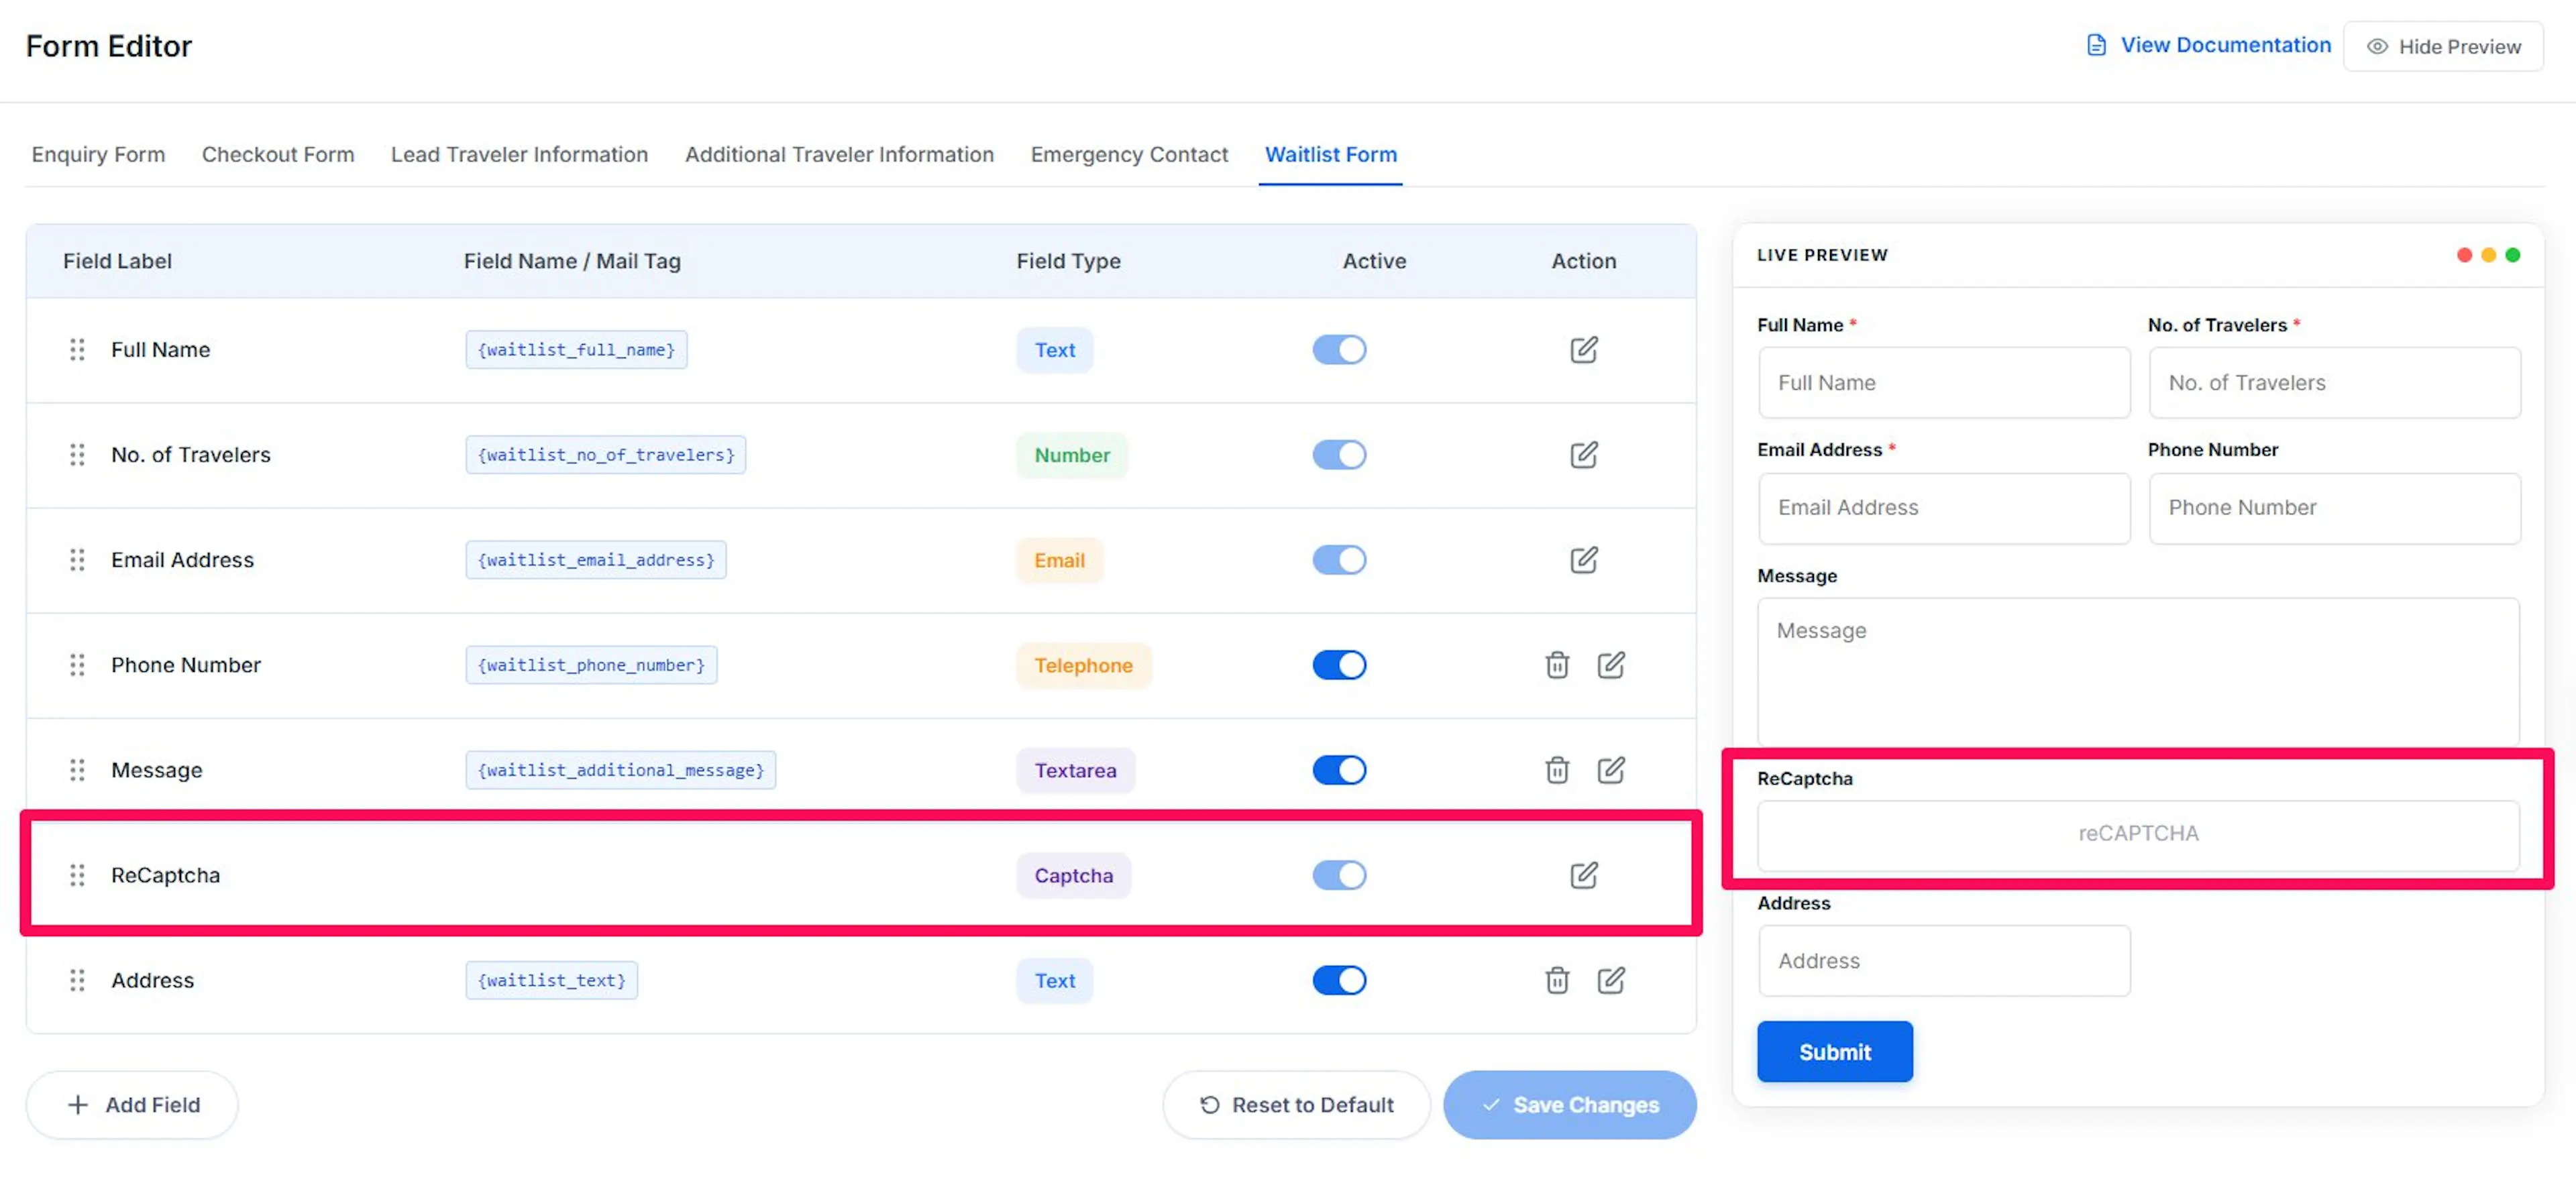
The Waitlist Form tab already has a Captcha field. Its default label is ReCaptcha. This field works differently from the fields on the other forms.
- The Active toggle is locked. Hover over it to see “Configure from Waitlist global settings.”
- You cannot change its field type or delete it.
- Turn reCAPTCHA on or off in the Waitlist add-on's own settings. Use its reCAPTCHA option.
- The Waitlist Form uses the same Site Key and Secret Key that you saved under WP Travel Engine, then Settings, then Extensions, and finally reCAPTCHA. You do not enter the keys again.
You can still edit the label of this field in the Form Editor.
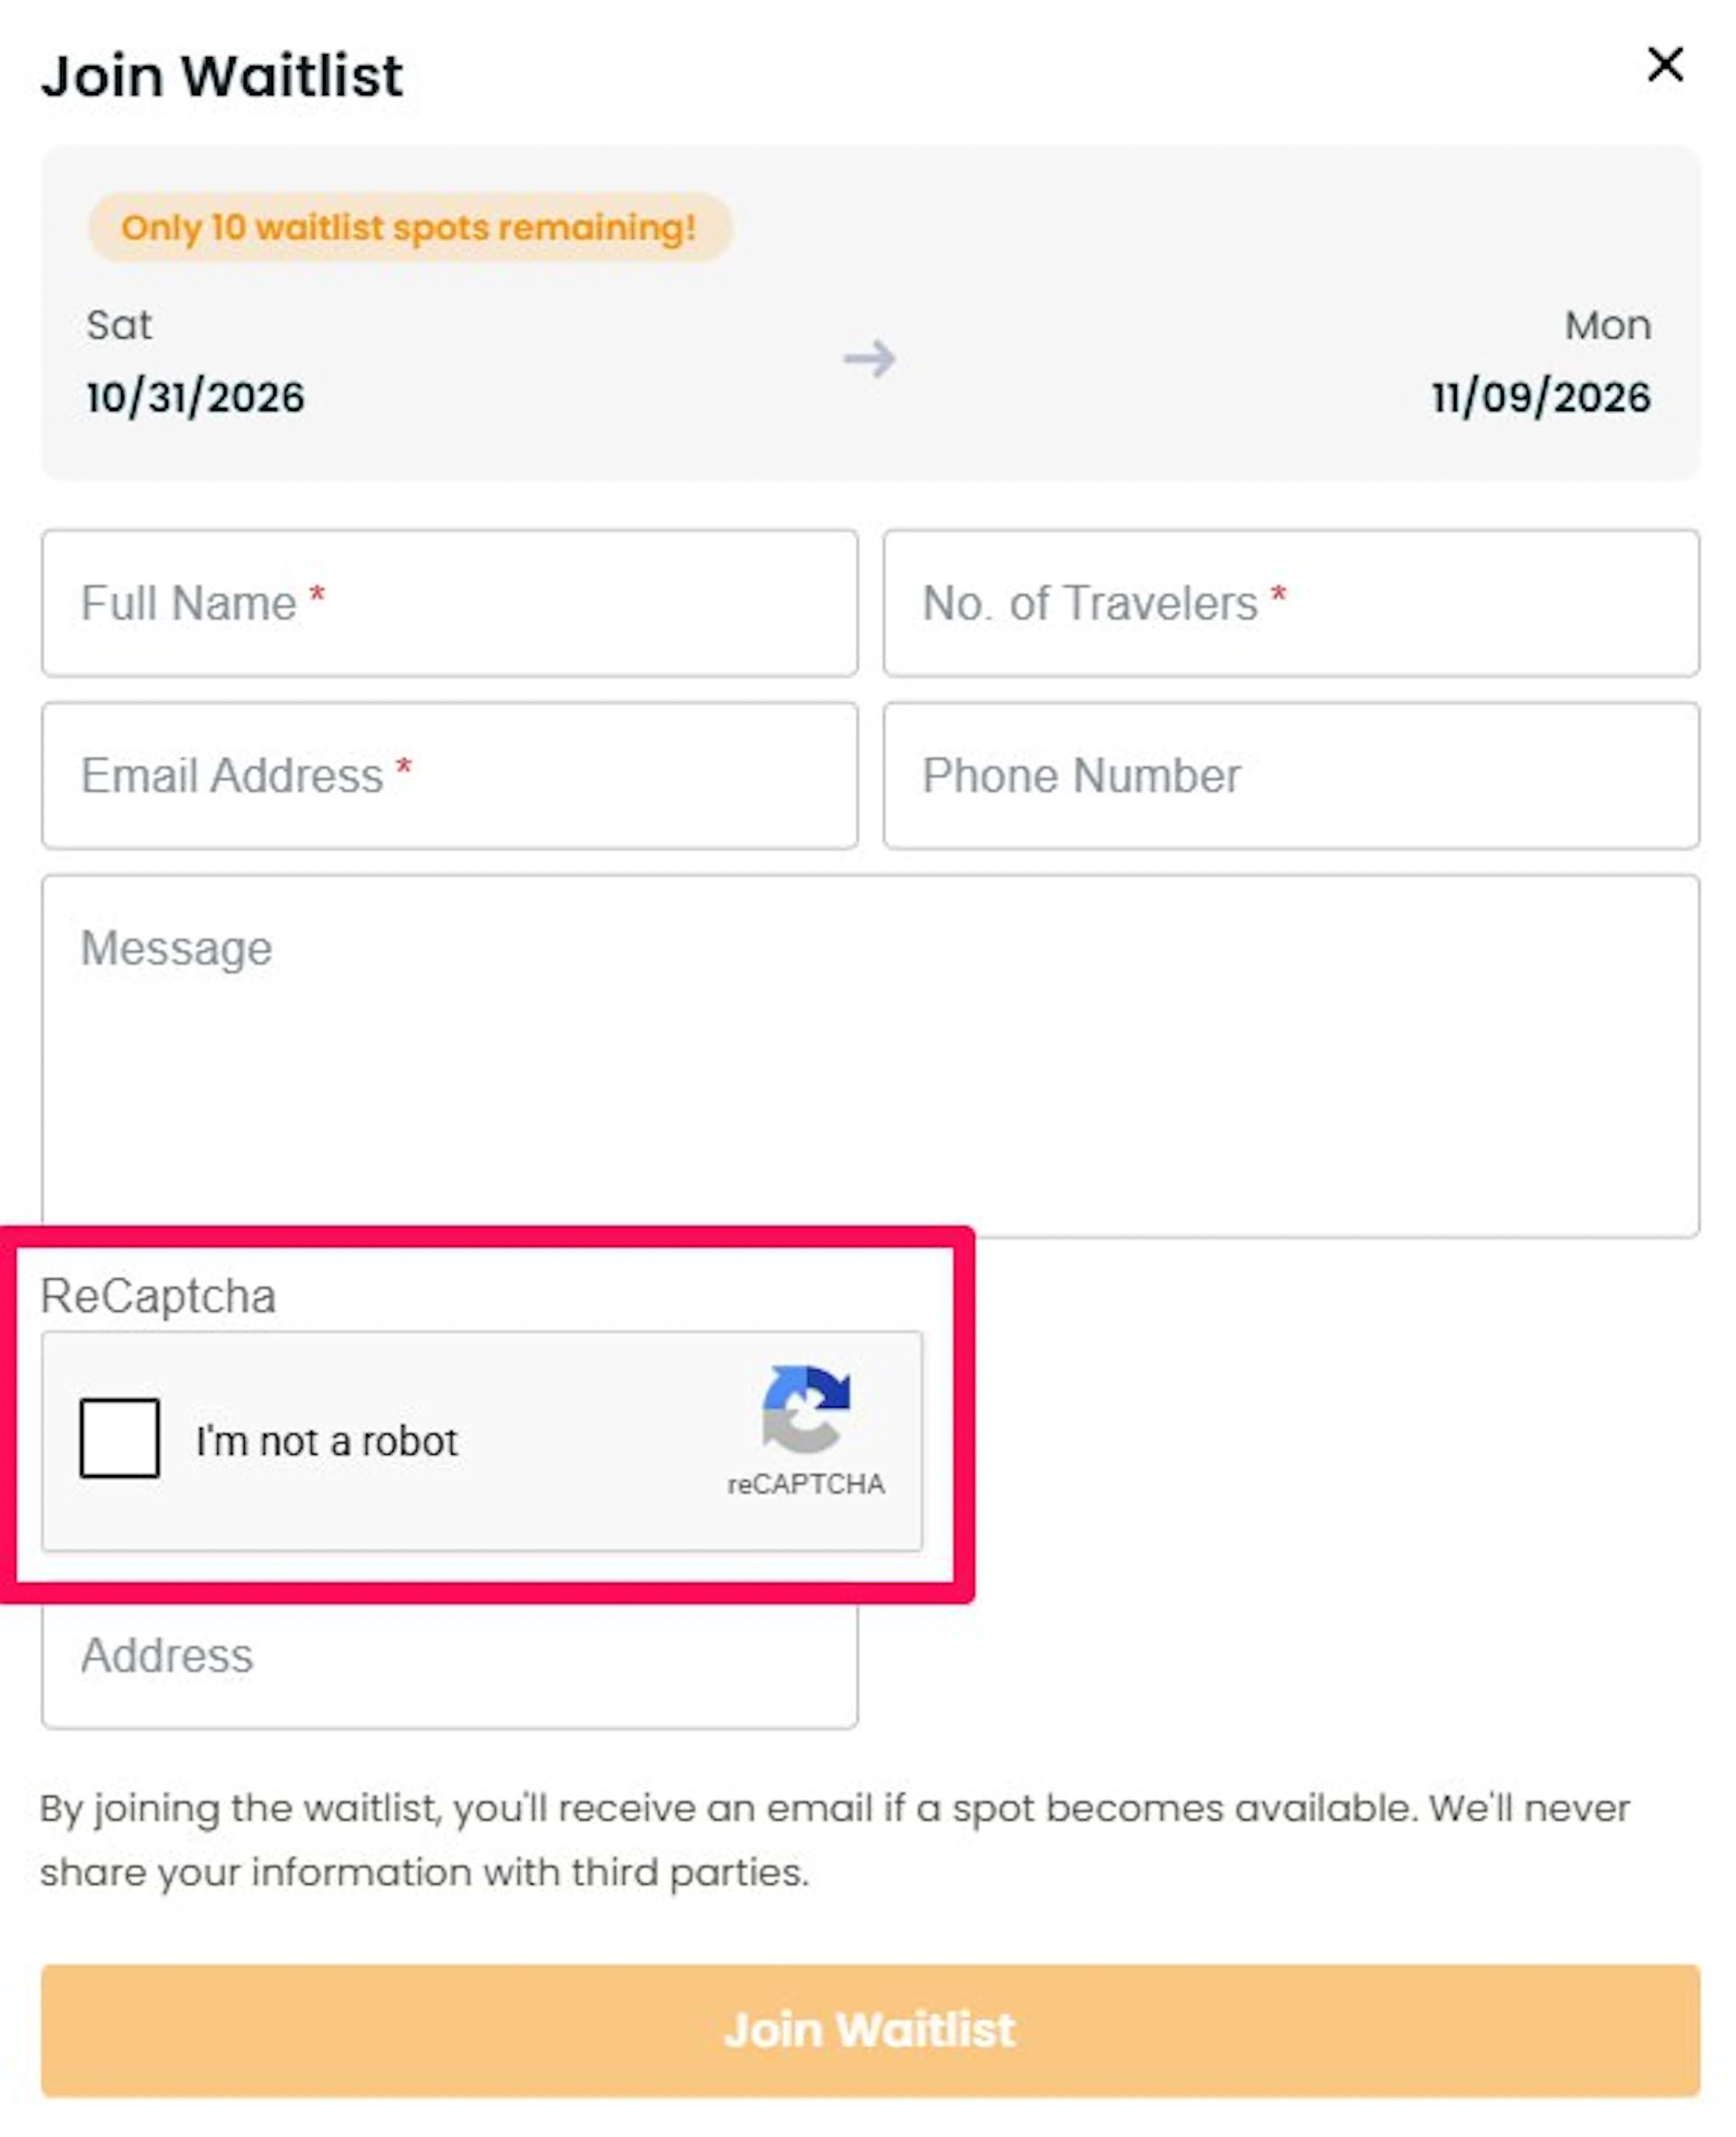
The Waitlist Form tab is available only if the Waitlist add-on is installed and activated.
Your waitlist uses the same Google connection as your other forms. You only manage whether the waitlist check is active in the Waitlist settings.
What your visitors see
With reCAPTCHA v2
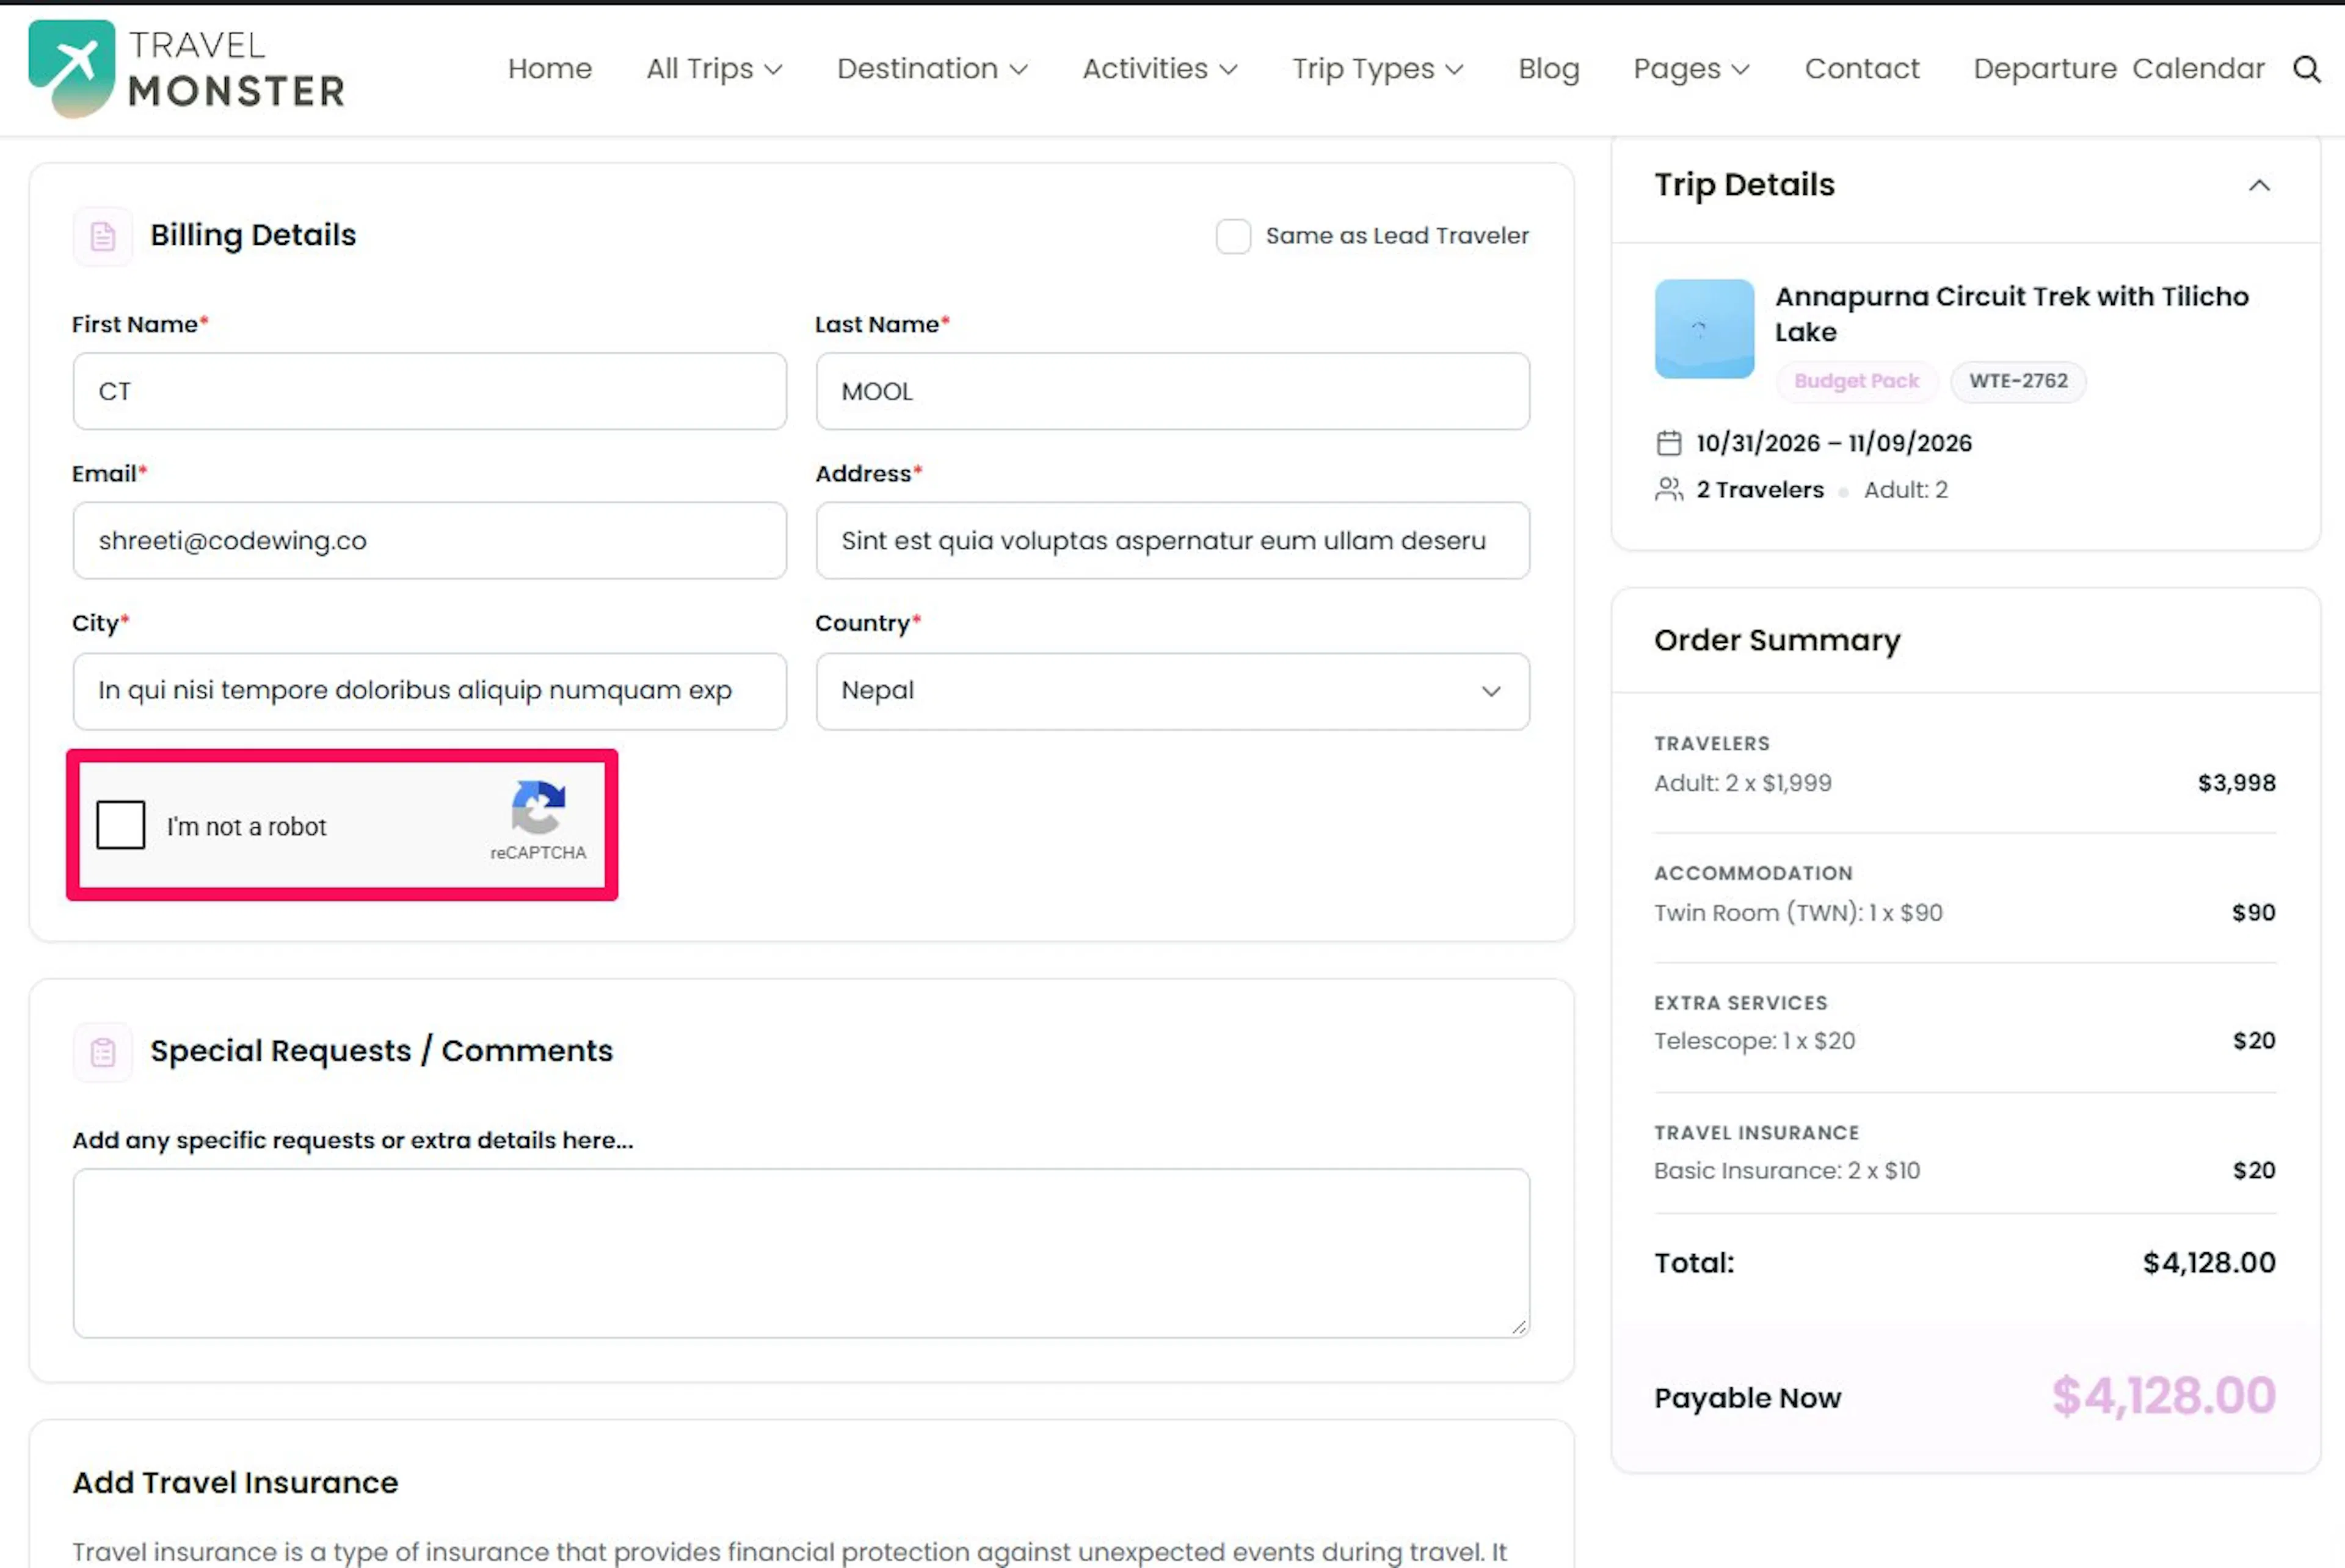
Visitors see the “I'm not a robot” checkbox on the form. They must tick it before submitting.
On the Checkout Form, the field's label is hidden. Visitors see only the checkbox.
For example, a traveler booking a multi-day package sees the checkbox before sending their payment and traveler details. They can confirm they are human without answering any extra questions.
With reCAPTCHA v3
Visitors see no checkbox and no label. WP Travel Engine hides the field's whole area on the form. The check runs in the background.
The token refreshes in the background about every 90 seconds. A traveler who keeps a page open while comparing seasonal prices can still submit the form later.
v3 adds no extra step for the traveler. The check happens while they complete the form.
Troubleshooting
I can't find the reCAPTCHA tab under Extensions
The tab appears only while the Form Editor add-on is active.
Open Plugins from the left sidebar of your WordPress dashboard. Check that the Form Editor add-on is installed and activated. If it is active and the tab is still missing, deactivate the add-on and activate it again.
The captcha isn't showing up on my form
Check these items in order:
- Confirm that the Captcha field is on the correct Form Editor tab. Click Save Changes after adding it.
- Confirm that the Active toggle on the Captcha row is on.
- Open a page that contains the form. The captcha does not show on the thank you page, in the traveler dashboard, or in email previews.
- Confirm that the Site Key is saved for the version you selected. If you selected v3, you need v3 keys. v3 does not show a checkbox by design.
- Confirm that your domain is in the domain list for those keys in the Google reCAPTCHA Admin.
- Clear your site cache and your browser cache. A cache is a stored copy that helps pages load faster, but it can show an older version of a page. Reload the form after clearing both caches.
I switched from v2 to v3 and the checkbox disappeared
This is expected. v3 runs in the background and does not show a checkbox.
Make sure you saved v3 keys in the v3 section. The same form can look different after you change the selected version.
I'm still getting spam after setting up reCAPTCHA
Check that you entered the correct Site Key and Secret Key. Confirm that your website domain is listed in Google reCAPTCHA Admin. Confirm that the selected WP Travel Engine version matches the keys you created.
v3 gives Google a score instead of showing a checkbox. Some spam may still get through. Review your form settings as well. For example, make sure your enquiry form asks for the travel date, group size, and the trip the visitor wants to book.
The reCAPTCHA box looks cut off or overlaps other fields
Move the Captcha field to a different position in the Form Editor. The field always spans the full width of the form, so placing it near the bottom often gives it more room.
Use Show Preview at the top of the Form Editor to check the placement before saving. Drag the Captcha row by its handle if you need to move it.
My keys don't seem to work
Check that you pasted the Site Key into the Site Key field and the Secret Key into the Secret Key field. These are two different keys.
Check that you copied the full key without extra spaces. Re-copy each key from the Google reCAPTCHA Admin page and save the settings again.
FAQs
Can I use different keys for different forms?
No. WP Travel Engine uses one set of keys for each version across all forms.
Choose which forms to protect by adding the Captcha field to those forms. You can protect an enquiry form without adding the field to your traveler information forms.
Can I show reCAPTCHA v2 on one form and v3 on another?
No. The reCAPTCHA Version setting applies to every form on your site.
All forms that use the Captcha field follow the version selected in the reCAPTCHA settings.
Do I need to add the Captcha field again after resetting the Form Editor?
Yes. Reset to Default removes all custom fields, including Captcha fields you added. Add the fields again and click Save Changes.
The Waitlist Form keeps its default CAPTCHA field.
Will reCAPTCHA slow down my customers?
v2 adds a checkbox that takes a traveler about a second to click. v3 runs in the background and gives the traveler no extra step.
Neither version adds a noticeable delay to form loading. A traveler booking a gear rental add-on or a group discount can complete the form without waiting for a separate page to load.
Do I need a separate reCAPTCHA setup for my Trip Reviews form?
No. The Trip Reviews add-on uses the same keys you save here.
Turn on Enable reCAPTCHA in the Trip Reviews settings. The add-on connects to the keys automatically.
If you're still stuck or have a question we didn't cover, our support team is happy to help. Reach out at our support page and we'll get you sorted.